VELUX America 836406 RF Interface and Beacon User Manual
VELUX America Inc. RF Interface and Beacon Users Manual
Users Manual
VAS 452421-2010-03
Directions for use
KLF 100
ENGLISH: User manual
ESPAÑOL: Manual de usario
FRANÇAIS : Notice d'utilisation
JAPANESE:

2 VELUX VELUX 3
English
User manual x-x
Español
Manual del usuario x-x
Français
Notice d'utilisation x-x
Japanese
User manual x-x

4 VELUX ENGLISH VELUX 5
ENGLISH
Important information 6-8
Getting started
Fitting 10
Initial set-up 11
Guide to quick standard set-up 12
Example of typical use of the interface/repeater unit 13
Interface/repeater unit function and connection 14-15
Settings
Channels 16-19
- Set channel 16
- Block channel 17
- Permanent blocking 18-19
Setting of position 20-21
- Position UP 21
- Position DOWN 21
System settings
Register products 22-25
- From a remote control 23
- From a new product 24-25
Select products 26-27
Security key 28-29
Copy system 30-31
Signal mode 32-33
Function as repeater unit 34-35
Intelligent building installations 36
Contents

ENGLISH ENGLISH 7
6 VELUX VELUX 7
products connected to it (including battery backup KLB, if installed) and
ensure that it cannot be reconnected unintentionally during this time.
• The product requires a minimal amount of maintenance. The surface may
be cleaned with a soft, damp cloth using a small amout of household cleaner
diluted in water.
• If main power supply cable is damaged, it must be replaced by qualified
electrical installer in accordance with all local codes, ordinances, rules and
regulations.
• If you have any technical questions, please contact VELUX.
Installation
• The interface/repeater unit is for indoor use only.
• Installation in rooms with a high level of humidity and with hidden wiring
must comply with relevant regulations (contact a qualified electrician if
necessary).
Function
• Check that the interface/repeater unit can operate the relevant products
from the chosen position before final fixing.
• If a skylight has been opened manually, it cannot be activated via the inter-
face/repeater unit .
• In case of snow and/or ice, the automatic operation of certain products may
be blocked.
• The entries in the interface/repeater unit draw 5-10 mA at approx 10 V d.c.
and must be connected to potential free contacts.
• Avoid frequent activation of the motors in the system from automatic sys-
tems (eg IBI systems) as this will reduce the service life of the motors.
• The interface/repeater unit can be used as a repeater that extends the
operation range of remote controls in the system.
Product
• The interface/repeater unit is used when products are to be controlled with
external control devices that are not compatible.
IMPORTANT INFORMATION
AND WARNINGS
WARNING - TO REDUCE THE
RISK OF SEVERE INJURY OR
DEATH:
Safety
• Read instructions carefully before installing and operating.
• Please keep instructions for future reference and hand them over to any
new user.
• Never let children operate or play with the system. The remote control
should be kept out of reach of children at a minimum height of 5 feet.
• The product must not be put into operation until it has been fitted accor-
ding to these in-structions.
• Before operating ensure that the product can be and is operated without
risk of damage to property or injury to people or animals.
• If repair and adjustment work is needed, disconnect from the main power
supply and ensure that it cannot be reconnected unintentionally.
• The interface/repeater unit must not be covered (maximum casing tempe-
rature: 104°F/40°C).
• This product has been designed for use with genuine VELUX products.
Connection to or use with other products may cause damage, malfunction
or injury.
• The interface/repeater unit has a Class 2 Low Voltage output (19-24 V d.c.).
• The power supply cable is equipped with a polarized plug. Do not change
the plug.
• Disconnect from the main power supply before carrying out any mainte-
nance, repair, adjustment or service work to the interface/repeater unit or
Important information

8 VELUX ENGLISH VELUX 9
ENGLISH
• The interface/repeater unit has a built-in RF (radio frequency) unit and will
not be operative if placed in a metal cabinet.
• Electrical products must be disposed of in conformity with all local codes,
ordinances, rules and regulations for electronic waste and not with house-
hold waste.
• Used remote control batteries have to be disposed of in conformity with the
relevant environmental regulations and ordinances.
• The packaging can be disposed of with usual household waste.
• Radio frequency band: 2.4 GHz.
• Radio frequency range: 110 yeards (100 m) free field. Depending on building
construction, the indoor range is approx 30 ft (10 m). However, construc-
tions with reinforced concrete, metal ceilings and plaster walls with steel
members may reduce the range.
Maintenance and service
• Spare parts are available through VELUX. Please provide information from
the data plate.
Important information
10 VELUX ENGLISH VELUX 11
ENGLISH
Back
Back
Enter Back
Dansk
English
Deutsch
Enter Back
Dansk
English
Deutsch
Enter Back
Interface
Interface/repeater unit
Reset system
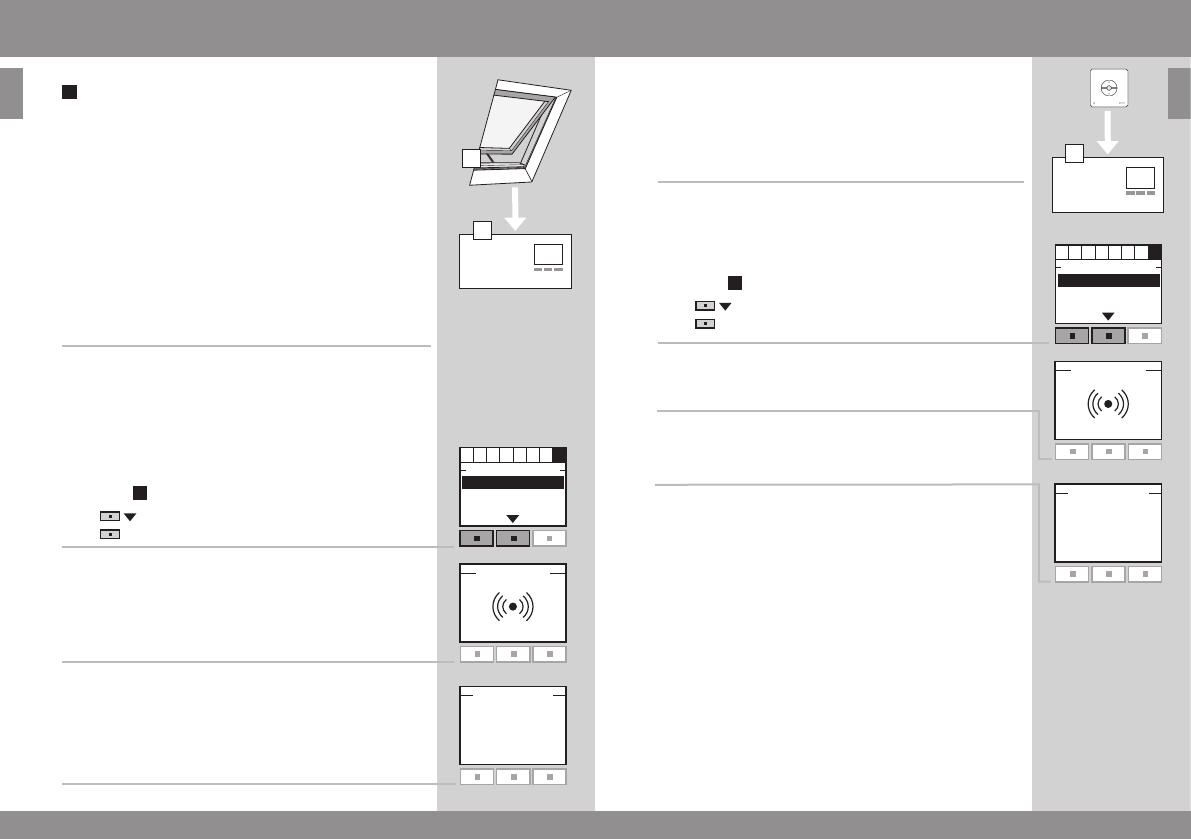
Fitting
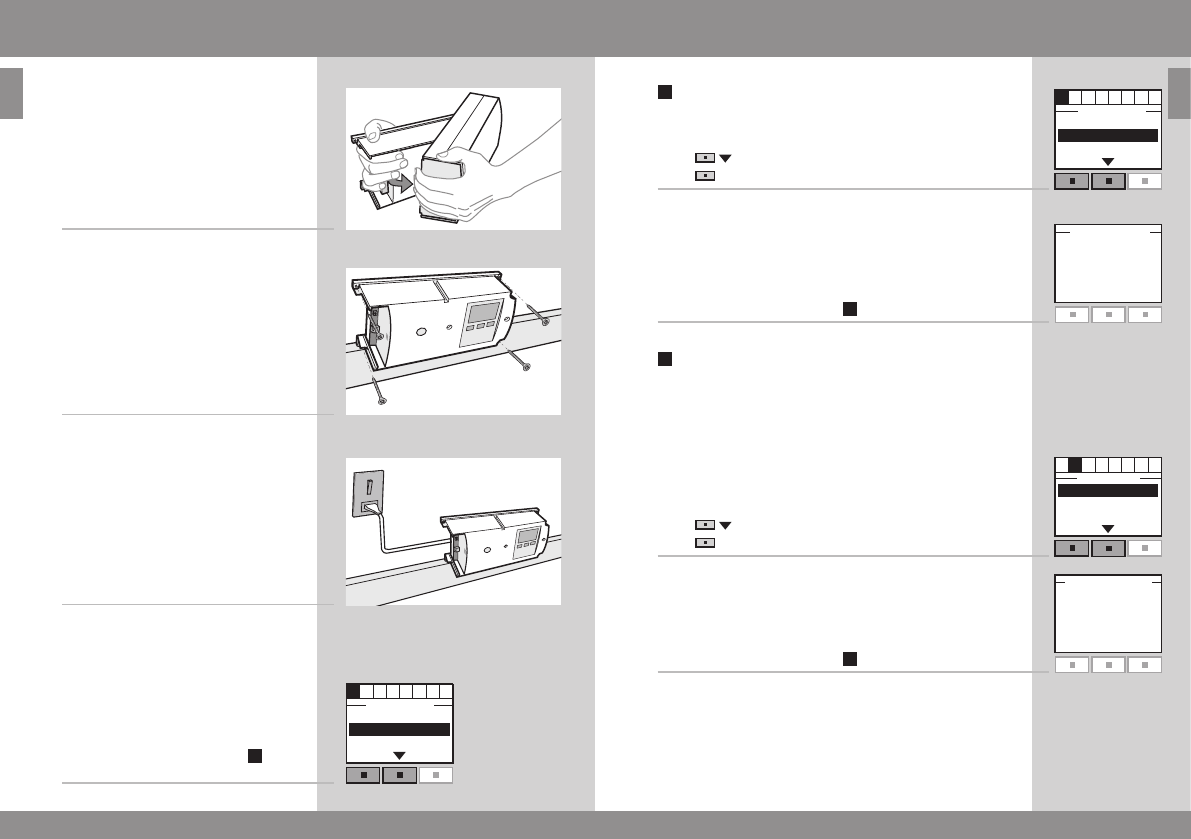
1 Remove cover.
2 Decide position of interface/repeater.
Note: Check that the interface/re-
peater unit can operate the relevant
products from the chosen position
before final fixing.
3 Connect interface/repeater unit to
power supply. Do not replace cover
until the entire installation process is
completed.
The display appears automatically
when the mains power is switched on.
After a short time menu item is
displayed.
Language
1 Press to highlight your language.
Press "Enter" to confirm your choice.
2 The display shows that the language has been saved.
After a short time menu item is displayed.
Function
The interface/repeater unit is used when products are to
be controlled with external control devices that are not
compatible, eg intelligent building installations, sensors
and standard wall switches.
1 Press to highlight "Interface/repeater unit".
Press "Enter" to confirm your choice.
2 The display shows that the function has been saved.
After a short time menu item is displayed.
Note: "Repeater" is used for extending the operation
range of remote controls in the system, see section
Function as repeater.
"Reset system" is used for deleting all settings and reset-
ting the interface to its factory setting.
Initial set-up
12 VELUX ENGLISH VELUX 13
ENGLISH
C
˚F
~74 °F
72 °F
~70 °F
Enter Back
XXXXXXX
XXXXXXX
Guide to quick standard set-up
Menu items to
These instructions refer to the menu items to .
These menu items are shown automatically and in
alphabetical order in the display, as the interface is
installed.
In many cases the interface/repeater unit factory set-
tings are sucient and the interface/repeater unit can
be used without further settings being programmed.
When using the factory settings, first confirm the
settings in menu items , , , and (described on
pages 16-21).
Then continue in menu item , submenu "Register pro-
ducts" (described on pages 22-25) and submenu "Select
products" (described on pages 26-27). It is not necessary
to go through the other submenus in menu item .
The interface is now ready for use.
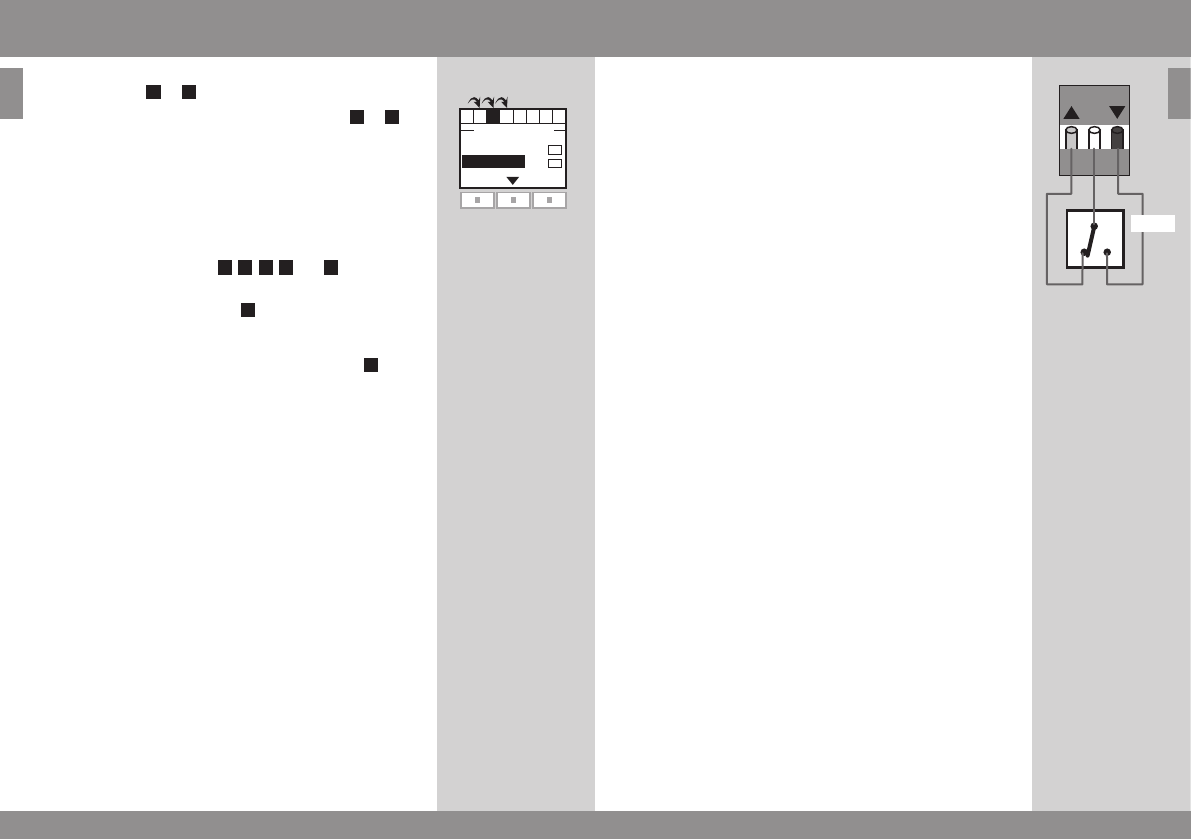
Thermostatic control of a VELUX skylight by a compa-
tible thermostat
A thermostat can be used to control automatic opening
and closing of skylight(s) depending on the temperature.
A typical thermostat works by means of a potential free
change-over contact that switches between two positions
depending on the ambient temperature.
The illustration shows how to connect the potential free
change-over contact to the inter-face/repeater unit.
A thermostat set to 72 °F will typically change position (ie
open the skylight(s)) when the tem-perature rises above
74°F, and switch back (ie close the skylight(s)) when the
temperature again has fallen below 70 °F.
The skylight(s) can be operated with the remote control
at any time.
Example of typical use of the interface/repeater unit
14 VELUX ENGLISH VELUX 15
ENGLISH
C
C
C
C
C
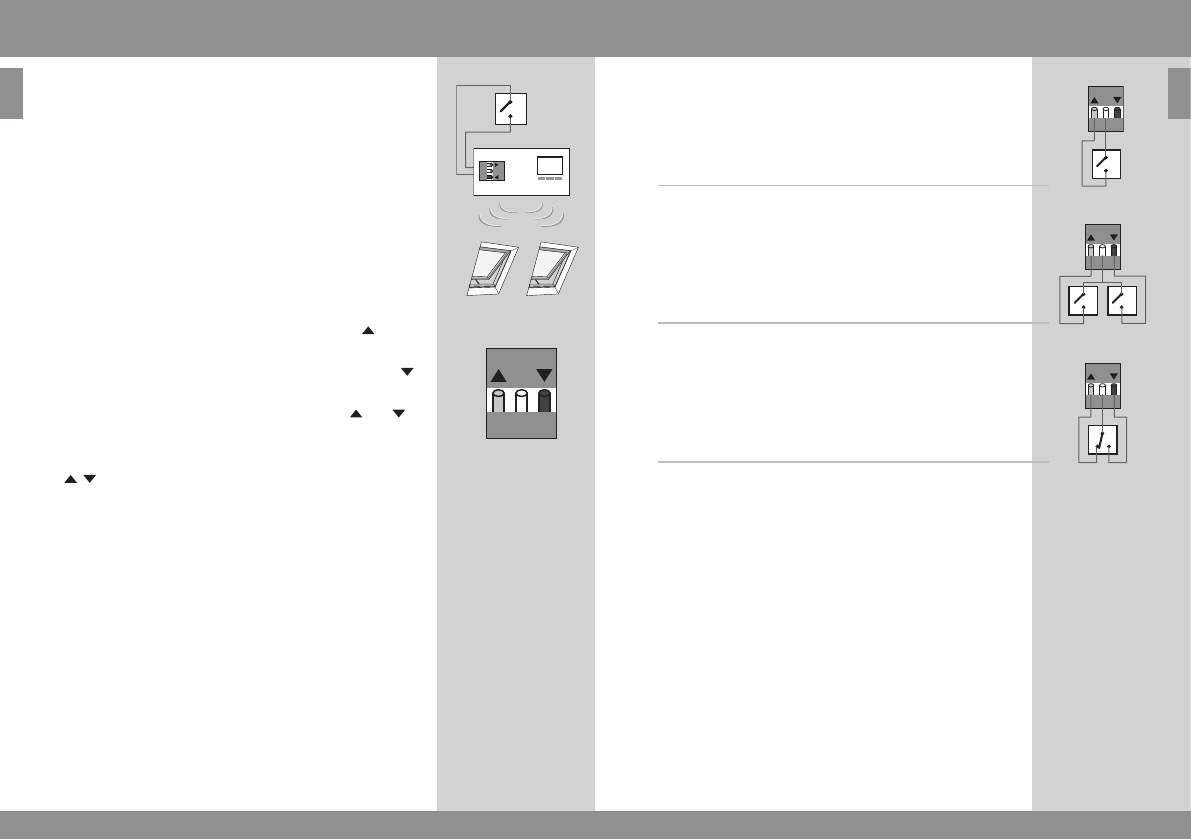
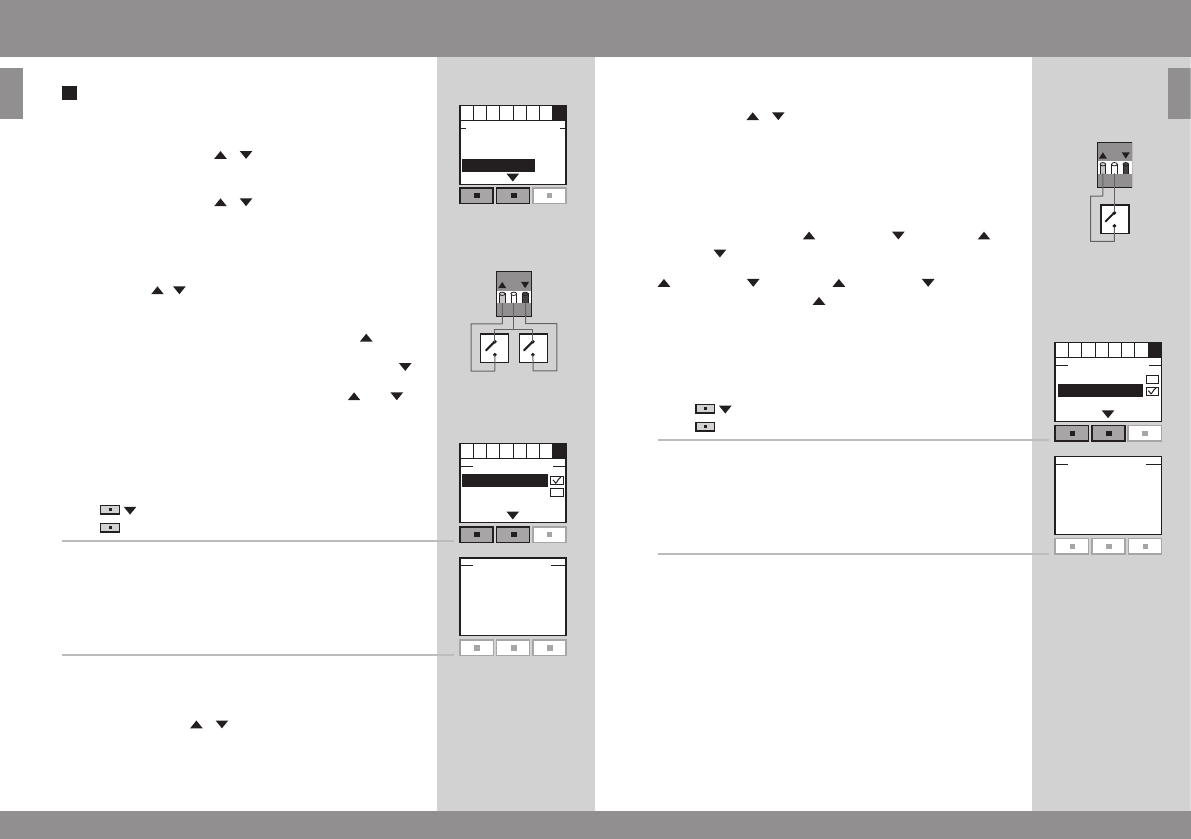
Interface/repeater unit function and connection
The interface/repeater unit is used when products are to
be controlled by external control devices.
Individual control of a product or a product group requires
one interface/repeater unit per product or product group.
The entries in the interface/repeater unit must be connec-
ted to control devices with potential free contacts. When
the potential free contact is activated, the interface/
repeater unit sends an RF command to the products to
be operated. It is possible to operate a single product or a
group of products.
Function of entries
OPEN/UP/ON is controlled by connecting C and
(2 core wire required).
CLOSE/DOWN/OFF is controlled by connecting C and
(2 core wire required).
STOP is controlled by connecting C with both and
(3 core wire required).
Note: Alternatively, a single contact can control both
, and STOP, see section Signal mode.
Connection to entries
A single contact can be used for running products either
up or down.
A set of two contacts can be used for running products
both up and down with variable stops.
A change-over contact can also be used for running pro-
ducts both up and down but stops are not possible.
Contact requirements
Potential free contacts with a maximum resistance of
100 Ω can be used. A current of 5-10 mA at approx 10 V
d.c. runs through the contact.
Contacts with a pulse signal can also be used if the dura-
tion of the pulse is longer than 100 ms.
Note: The operation of the interface/repeater unit can
only be stopped by switching o the mains power.
16 VELUX ENGLISH VELUX 17
ENGLISH
Back
Back
Enter Back
Channel 6
Channel 7
Edit Back
Channel 5
Channel 6
Enter Back
Select
Save
Edit Back
Channel 5
Channel 6
Enter Back
Deselect
Save
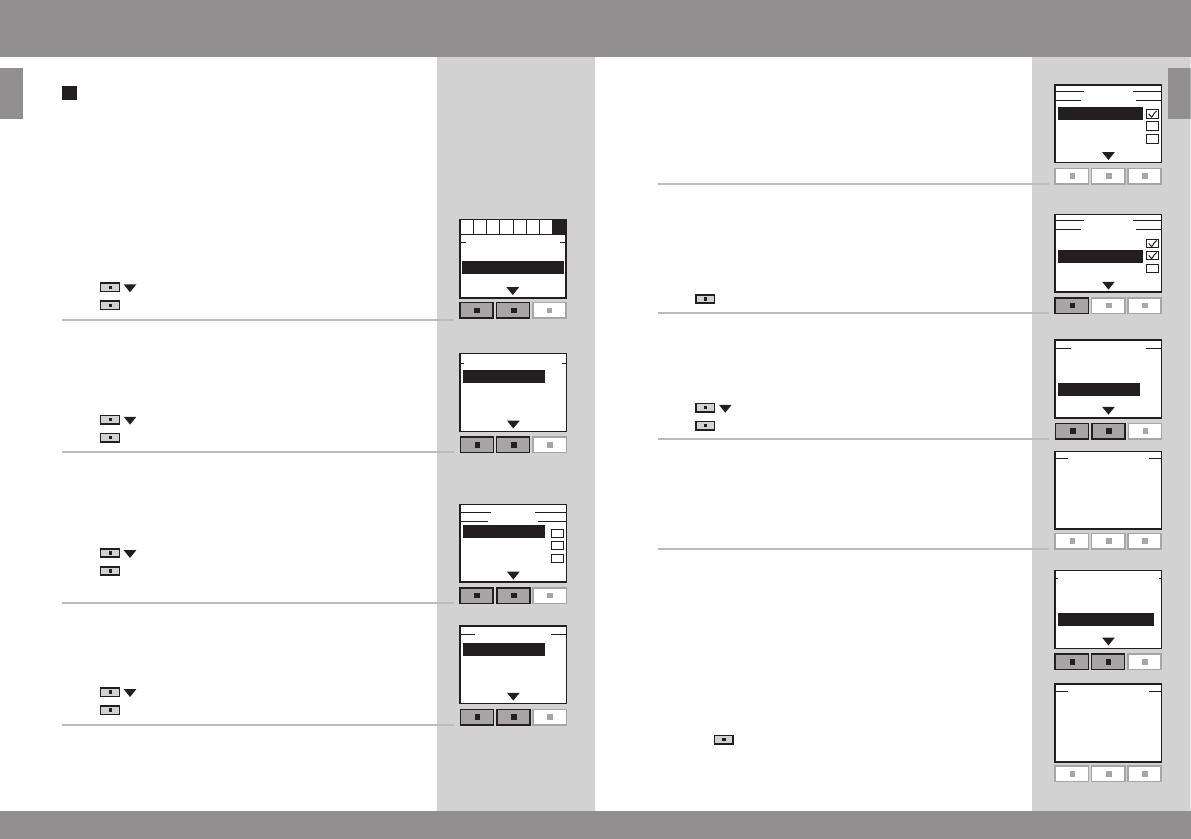
Channels
Set channel
The system can send and receive commands on eight
channels.
0 Personal safety
1 Product safety
2 Operation - high
3 Operation - normal
4 Automatic - 1
5 Automatic - 2
6 Automatic - 3
7 Automatic - 4
A VELUX remote control sends on channel 3. Channels 4
to 7 are intended for automatic functions.
The interface/repeater unit can send on one channel only
and it is recommended to choose channel 7.
1 Press to choose channel.
Press "Enter" to confirm your choice.
2 The display shows that the chosen channel has been
saved.
After a short time menu item is displayed.
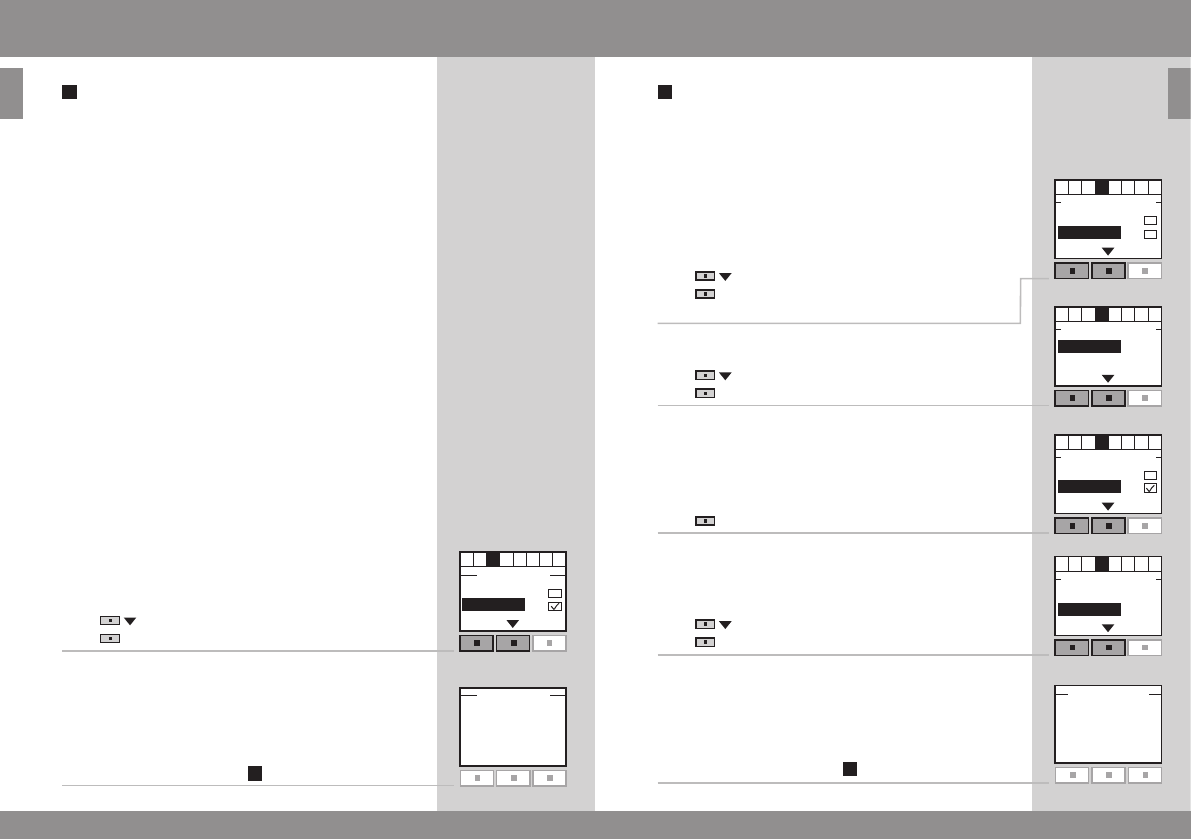
Block channel
You can block commands from other interfaces/repea-
ters or remote controls for 30 minutes from the time of
sending the command from them. Each channel (3-7) must
be blocked individually. In this way you can give some
commands priority to others. See the example on page 17.
1 Press to highlight the channel to be blocked.
Press "Edit" to confirm that the channel in question is
to be edited.
2 Press to highlight "Select".
Press "Enter" to confirm your choice.
3 The blocked channel has been ticked. Repeat items 1-2 to
block additional channels if required.
Press "Edit" to undo or save the settings.
4 Press to highlight "Save".
Press "Enter" to confirm your choice.
5 The display shows that the channel(s) has/have been
blocked.
After a short time menu item is displayed.
18 VELUX ENGLISH VELUX 19
ENGLISH
Back
Enter Back
Off
On
Back
Channels
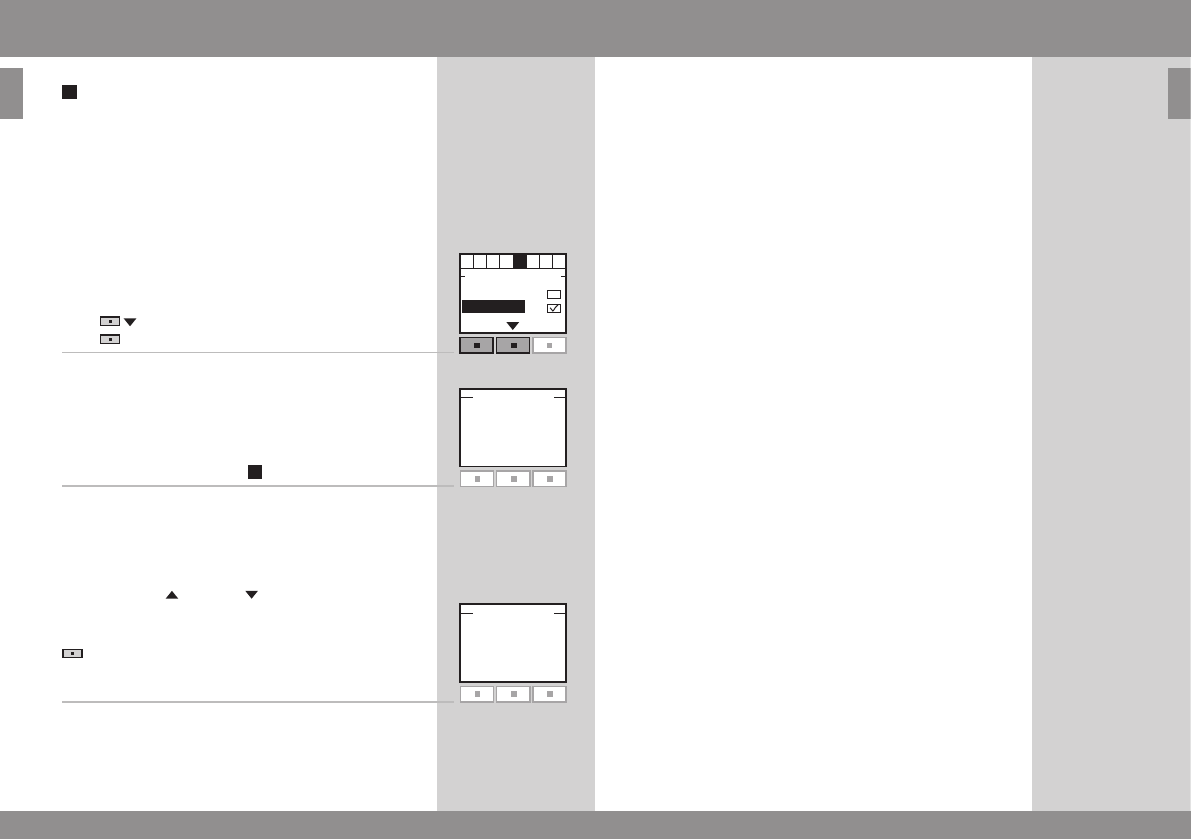
Permanent blocking
The interface/repeater unit can keep blocking the chosen
channels for longer than 30 minutes. In this way, both
external control devices with a pulse signal and ordinary
control devices such as a standard wall switch can be
used for blocking other commands.
1 Press to highlight "On".
Press "Enter" to confirm your choice.
2 The display shows that the function has been saved.
After a short time menu item is displayed.
Note: The blocking can be cancelled by simultaneously
activating entry and entry from the external control
device.
The blocking can also be cancelled temporarily by pressing
"Menu" on the display of the interface. The next time
the entries are activated, the chosen channels are blocked
again.
Example of blocking channels
Blocking is used for blocking the commands of other
control devices. For instance you may want to close the
skylights when leaving the house. In this case, you can
use a key switch that transmits a signal when you turn
the key.
If you set the interface/repeater unit to send on channel
7 and permanently block all other channels (4-6), the
skylights will be closed when you lock the door.
Note: Many alarm systems with integrated locking signal
in the keypad can be used for activating the entries in the
interface/repeater unit and therefore for blocking the
operation of products in the system.

20 VELUX ENGLISH VELUX 21
ENGLISH
C
Enter Back
90 %
100 %
Manual
Enter Back
Back
Enter Back
100 %
90 %
80 %
Back
Setting of position
Positions UP and DOWN
Setting of position is used to run products to a position
between 0% and 100% at intervals of 10%. As default
(factory setting) the products will travel to maximum top
or bottom position.
Position table
Entry
Default 0% 100%
Blinds and shades Up Down
Skylight Open Closed
The position indication for VELUX products corresponds
to the display information on a VELUX remote control.
This applies to all product types except Skylight. You are
therefore recommended to use the position table when
setting the position. Always check the position settings
when the installation of the interface/repeater unit has
been completed.
Note: You can also choose manual operation. In this case,
the products will only be activated as long as the external
control device is active.
Position UP
1 Press to choose the required position.
Press "Enter" to confirm your choice.
2 The display shows that the position has been saved.
After a short time menu item is displayed.
Position DOWN
1 Press to choose the required position.
Press "Enter" to confirm your choice.
2 The display shows that the position has been saved.
After a short time menu item is displayed.
22 VELUX ENGLISH VELUX 23
ENGLISH
B
A
Enter Back
P1 P2
Menu
Locate
P1 P2
Enter Back
Register products
Select products
Security key
Back
Back
Register product
Copy system
Security key
Congure
System settings
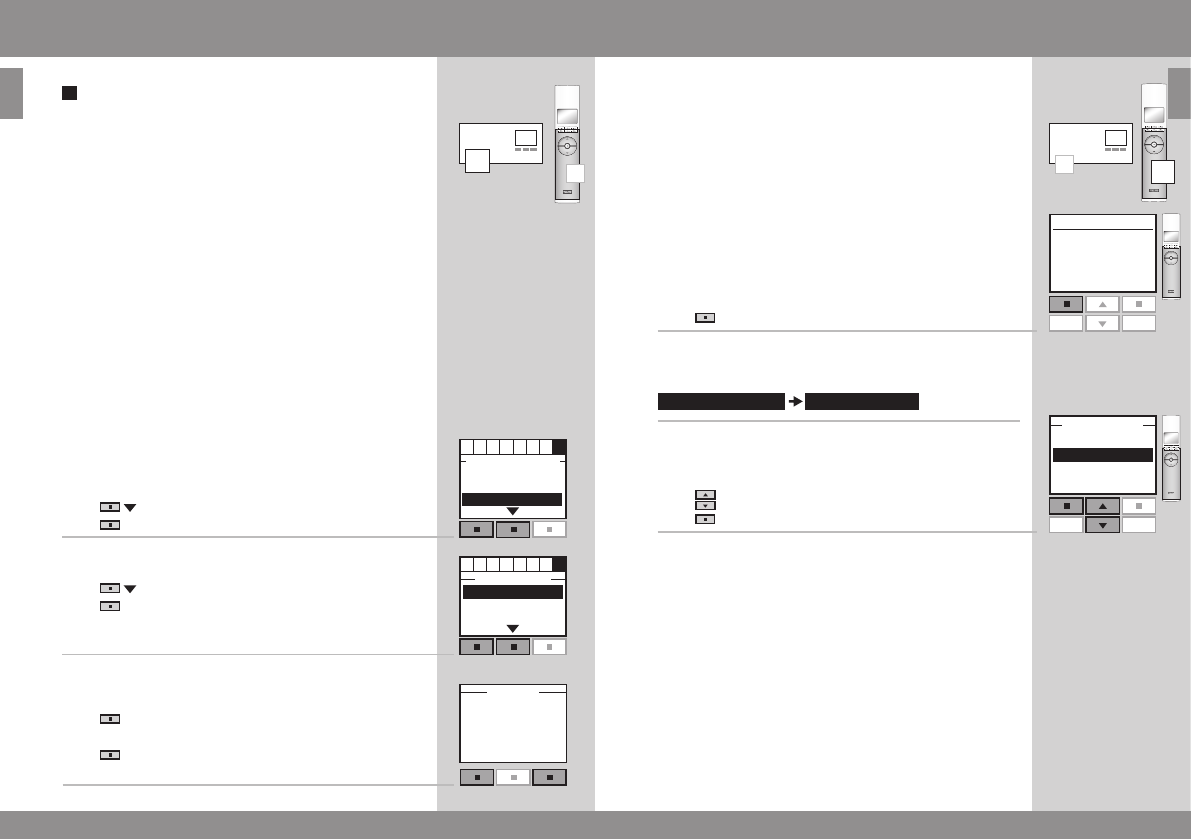
Register products
The products must be registered in the interface/repeater
unit to be operational.
The interface/repeater unit can register:
- VELUX remote control KLR 100 (page ??)
- Control keypad KLI 110 (page ??)
- Directly from a new product (page ??)
The registration takes place in 2 steps.
Step 2 must be completed within two minutes after
implementing step 1, so please read steps 1-2 before
proceeding.
Registration from a remote control
If you have a VELUX remote control, you can copy the
registered products from the remote control to the inter-
face/repeater unit.
Note: All products can be copied to the interface/repea-
ter unit, but Groups, Zones and program functions cannot.
The products to be operated through the interface/repea-
ter unit are to be chosen in submenu "Select products".
The example shows how to copy from a VELUX remote
control B to interface/repeater unit A.
Step 1: Remote control B
1 Press "Menu".
2 Select the submenu:
3 Press to highlight "Copy system".
Press "Enter" to confirm your choice.
Step 2: Interface/repeater unit A
4 Menu item is highlighted.
Press to highlight "Register products".
Press "Enter" to confirm your choice.
5 Automatic registration is running. Please wait. The regis-
tration can take up to one minute.
6 The display shows that the new product(s) has/have been
registered.
24 VELUX ENGLISH VELUX 25
ENGLISH
System settings
A
Enter Back
Register products
Select products
Security key
Back
Back
BA
Enter Back
Register products
Select products
Security key
Back
Back
Registration from a new product
New products can be registered directly in the interface/
repeater unit .
The example shows how to prepare VELUX products for
registration.
Step 1: Product B
1 Switch o mains power to the product for at least one
minute and subsequently switch on again.
Note: For other types of products, please refer to the ins-
tructions provided with the product in question to execute
step 1.
Step 2: Interface/repeater unit A
2 Menu item is highlighted.
Press to highlight "Register products".
Press "Enter" to confirm your choice.
3 Automatic registration is running. Please wait. The regis-
tration can take up to two minutes.
4 The display shows that the new product(s) has/have been
registered.
Step 1:KLI 110
Transmit system from KLI by pressing the "PRG" button
for 3-4 seconds. LED flashes green slowly.
Step 2: Interface/repeater unit A
1 Menu item is highlighted.
Press to highlight "Register products".
Press "Enter" to confirm your choice.
2 Automatic registration is running. Please wait. The regis-
tration can take up to two minutes.
3 The display shows that the new product(s) has/have been
registered.
Connection to entries
A single contact can be used for running products either
up or down. A set of two contacts can be used for running
products both up and down with variable stops.
A change-over contact can also be used for running pro-
ducts both up and down but stops are not possible.
Contact requirements
Dry contacts with a maximum resistance of 100 Ù can
be used. A current of 5-10 mA at approx 10 V d.c. runs
through the contact.
Contacts with a pulse signal can also be used if the dura-
tion of the pulse is longer than 100 ms.
Note: The operation of the interface/repeater unit can
only be stopped by switching o the mains power.
26 VELUX ENGLISH VELUX 27
ENGLISH
Select product
Identify product
Save list
Enter Back
Create list
Undo list
Identify products
Enter Back
No. 1
No. 2
No. 3
Edit Back
No. 1
No. 2
No. 3
Edit Back
Enter Back
Create list
Undo list
Identify products
Enter Back
Register products
Select products
Security key
No. 1
No. 2
No. 3
Edit Back
Select product
Identify product
Save list
Enter Back
System settings
Select products
The products to be controlled via the interface must now
be selected.
The example shows how to select products from a VELUX
remote control in which Rooms have been created.
1 Press to highlight "Select products".
Press "Enter" to confirm your choice.
2 Press to highlight "Create list".
Press "Enter" to confirm your choice.
The display shows a list of all registered products.
3 Press to highlight the product to be edited.
Press "Edit" to confirm that the product in question is
to be edited.
4 Press to highlight "Select product".
Press "Enter" to confirm your choice.
Note: The individual product can be identified by
highlighting "Identify product".
5 The display shows the list of all registered products once
again. The chosen product has been ticked.
6 Repeat items 3-6 to edit additional products if required.
When the products to be edited have been ticked, the list
must be saved.
Press "Edit".
7 Press to highlight "Save list".
Press "Enter" to confirm your choice.
8 The display shows that the list has been saved.
Note: The individual products can be identified by
highlighting "Identify products". Highlight "Undo list" to
undo your choice.
When items 1-8 have been executed and the list with
products has been saved, the inter-face/repeater unit is
ready for use. The interface/repeater unit is activated by
pressing "Back" for more than 3 seconds or by waiting
2 minutes. After this the display shows that the interface/
repeater unit is active.
28 VELUX ENGLISH VELUX 29
ENGLISH
Enter Back
Change
Receive
Menu
Locate
Yes
No
Security key
Each product has a security key ensuring that external
control devices cannot communicate with your system.
A common security key is created automatically during
the registration process ensuring that all products in the
system share the same security key.
The example shows how to change the security key in
interface/repeater unit A and in the products registered in
interface/repeater unit A (step 1). If you have remote con-
trols or additional inter-faces/repeaters, the new security
key must also be transferred to these (step 2).
The example in step 2 shows how to transfer the security
key to a VELUX remote control.
Step 1: Interface/repeater unit A
1 Press to highlight "Security key".
Press "Enter" to confirm your choice.
2 Press to highlight "Change".
Press "Enter" to confirm your choice.
The display now indicates that the security key has been
changed.
3 The display asks whether the security key of other pro-
ducts is to be changed.
Press "No" to finish if this is the only interface/re-
peater unit.
Press "Yes" if there are other products. Execute step
2 for these.
Step 2: Remote control B (and other products)
4 Press "Menu".
5 Scroll through the menus:
6 Press to highlight "Receive".
Press "Enter" to confirm your choice.
The display indicates that the security key is being trans-
ferred from interface/repeater unit A to remote control B.
Note: An interface/repeater unit can also receive a new
security key from eg a remote control or another interfa-
ce/repeater unit by highlighting "Receive" in item 2 above.
Note: For other types of activation controls, please refer
to the instructions provided with the product in question
to execute step 2.
AB
System settings
B
A
Enter Back
Register products
Select products
Security key
Enter Back
Change
Receive
30 VELUX ENGLISH VELUX 31
ENGLISH
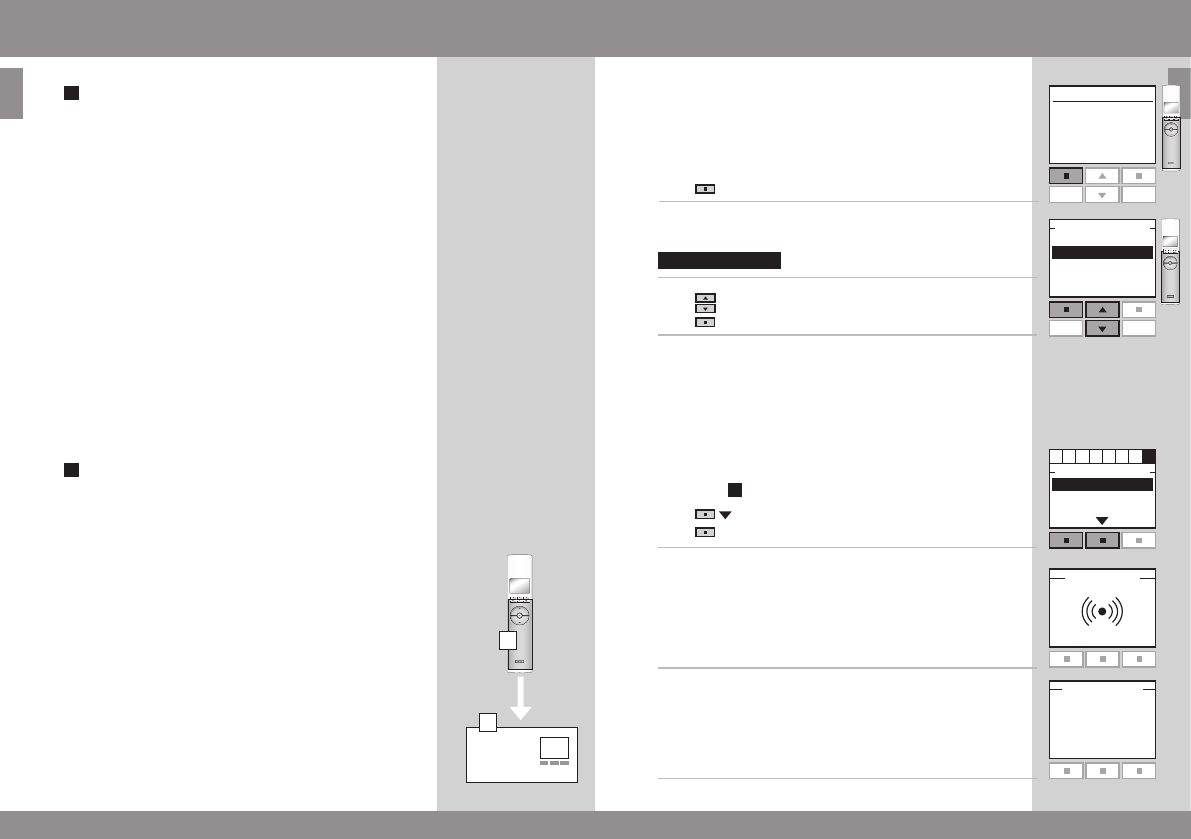
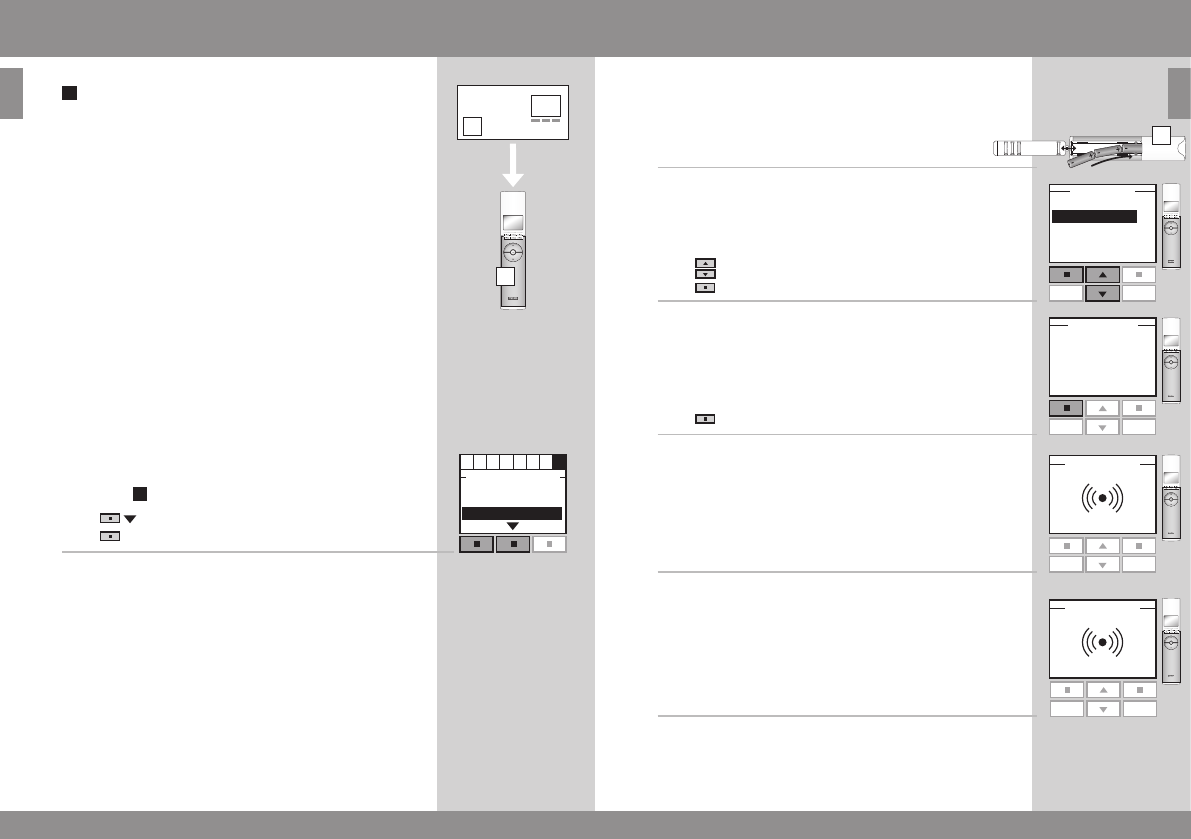
Step 2: Remote control B
2 Insert the three batteries supplied (type AA, 1.5 volt)
into the remote control as shown.
3 Choose language:
Press to highlight your language.
Press "Enter" to confirm your choice.
4 Press "Register" to start registration.
5 Registration is running. This can take up to two minutes.
6 The display shows "Completed" when all products have
been registered.
Note: For other types of activation controls, please refer
to the instructions provided with the product in question
to execute step 2.
System settings
Copy system
If the products have been registered directly in the
interface/repeater unit as shown on page 23, they can be
copied to other interface/repeater unit or remote controls.
The copying takes place in 2 steps.
Step 2 must be completed within two minutes after
implementing step 1, so please read steps 1-2 before
proceeding.
The example shows how to copy the registered products
from the interface/repeater unit to a VELUX remote
control not yet in operation.
Step 1: Interface/repeater unit A
1 Menu item is highlighted.
Press to highlight "Copy system".
Press "Enter" to confirm your choice.
A
B
B
Enter Back
Select products
Security key
Copy system
Enter
Dansk
English
Français
Deutsch
Register Info
32 VELUX ENGLISH VELUX 33
ENGLISH
C
C
Signal mode
The entries can be used in two ways:
Control of the functions / through signals on their
respective entries.
Control of the functions / through signals on one and
the same entry.
Use of more than one entry
The functions / are controlled by their respective
entries.
OPEN/UP/ON is controlled by connecting C and .
CLOSE/DOWN/OFF is controlled by connecting C and .
STOP is controlled by connecting C with both and .
1 Press to highlight "Separate signals".
Press "Enter" to confirm your choice.
2 The display shows that the signal mode has been saved.
Note: This mode can also be used when you want to use
one of the functions / only, eg a rain sensor that only
closes the skylight.
System settings
Use of one entry
The functions / / STOP are controlled by one and the
same entry. Each time the entry is activated, the function
will change.
For instance, ordinary electric light in buildings is contro-
lled from a wall switch that turns the light both on and o.
By choosing "Toggle signal", the interface/repeater unit is
set to change between -> STOP -> -> STOP -> ->
STOP -> etc each time the entry is activated.
-> STOP -> -> STOP -> -> STOP -> etc is contro-
lled by connecting C and :
1 Press to highlight "Toggle signal".
Press "Enter" to confirm your choice.
2 The display shows that the signal mode has been saved.
Note: The products will travel in the reverse direction to
the latest activation no matter the control device. The
products will always travel to maximum top or bottom
position.
Back
Back
Enter Back
Separate signals
Toggle signal
Enter Back
Separate signals
Toggle signal
Enter Back
Security key
Copy system
Signal mode
34 VELUX ENGLISH VELUX 35
ENGLISH
Menu
Locate
Enter Back
Register product
Copy system
Security key
Congure
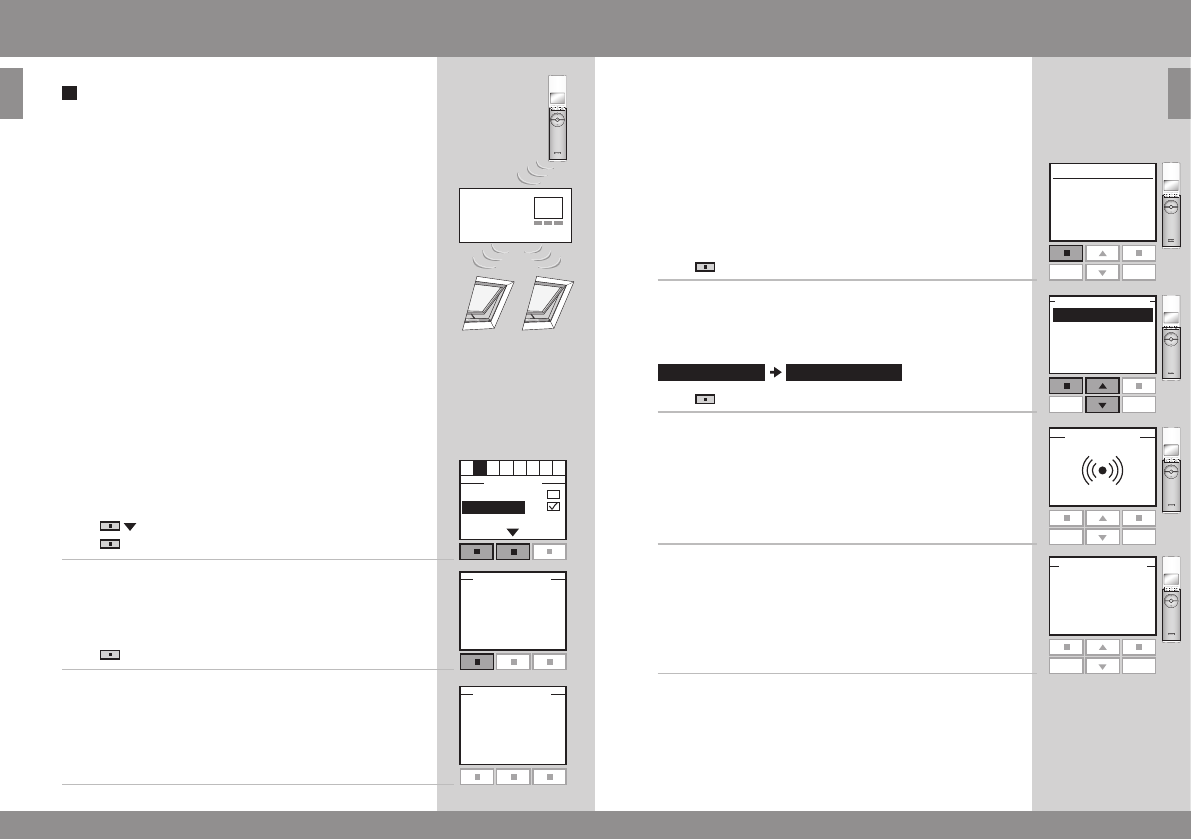
Function as repeater unit
Back
Repeater unit
The repeater function extends the operation range of
remote controls in the system by transmitting received
RF commands. When used as a repeater, the interface/
repeater unit should therefore be placed approximately
halfway between the remote controls and the products to
be operated.
The repeater function must be registered in remote
controls as if it were a product in the same way as other
products, see section Register products.
Steps 1 and 2 must be completed within ten minutes,
so please read items 1-7 before proceeding.
The example shows how to activate the repeater function
in the interface/repeater unit and register the function in
a VELUX remote control.
Step 1:
1 Press to highlight "Repeater".
Press "Enter" to confirm your choice.
2 The display shows that the repeater function has been
activated.
Press "Continue" to open for registration.
3 The display shows that the repeater function is ready to
be registered in the remote control.
Note: Up to three interfaces/repeater units in a system
can be set to repeater function.
The operation range of remote controls cannot be
extended further in the same direction by placing more
repeaters after each other as commands can only be sent
via one repeater.
Step 2:
4 Press "Menu".
5 Scroll through the menus:
Press "Enter" to confirm your choice.
6 Registration is running. This can take up to two minutes.
7 The display shows that the repeater function has been
registered. The repeater function is only displayed in the
remote control during the registration process. When
registration has been completed, the function is "invisible"
to the user.
Repeat step 1 and step 2 for all remote controls for which
the operation range is to be extended.
Note: For other types of activation controls, please refer to
the instructions provided with the product in question to
execute step 2.
Back
Continue
Enter Back
Interface
Repeater
Reset system

36 VELUX ENGLISH VELUX 37
ENGLISH
The products can be combined with most intelligent building installations
(IBI). The IBI system must include an output module with one or more pro-
grammable outputs. When the outputs have been connected to the entries
in the interface/repeater unit, the relevant products can be controlled via the
interface/repeater unit. With two outputs, it is possible to control both of the
functions and in an product or a group of products.
You can control up to 200 products or groups of products individually. Howe-
ver, individual control of a product or a product group requires one interface/
repeater unit per product or product group. If eg a group of skylights facing
south and another group of skylights facing north are to be con-trolled
individually by thermostats, the two groups must have an interface/repeater
unit each.
Intelligent building installations