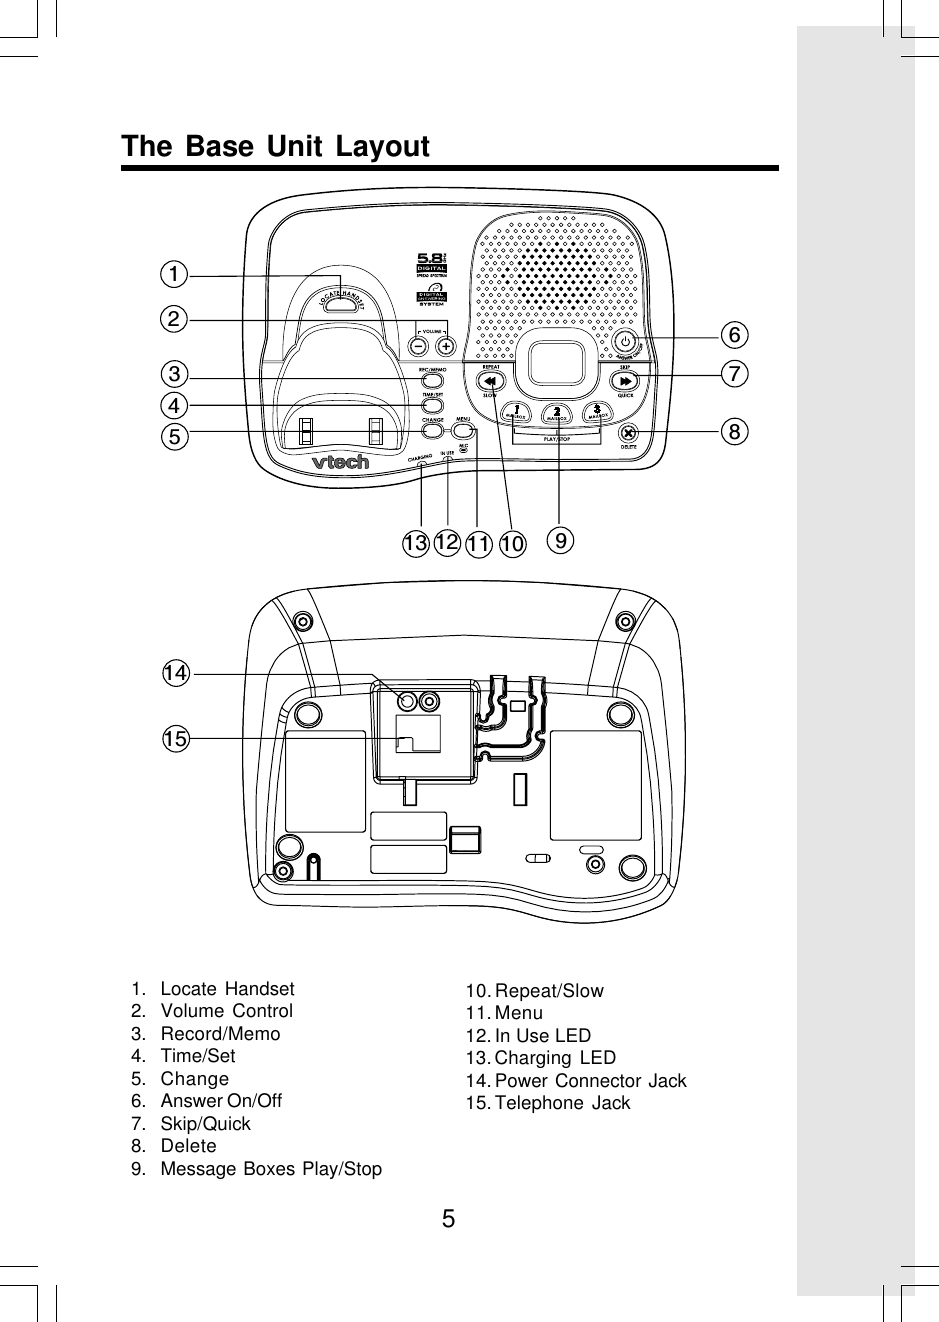
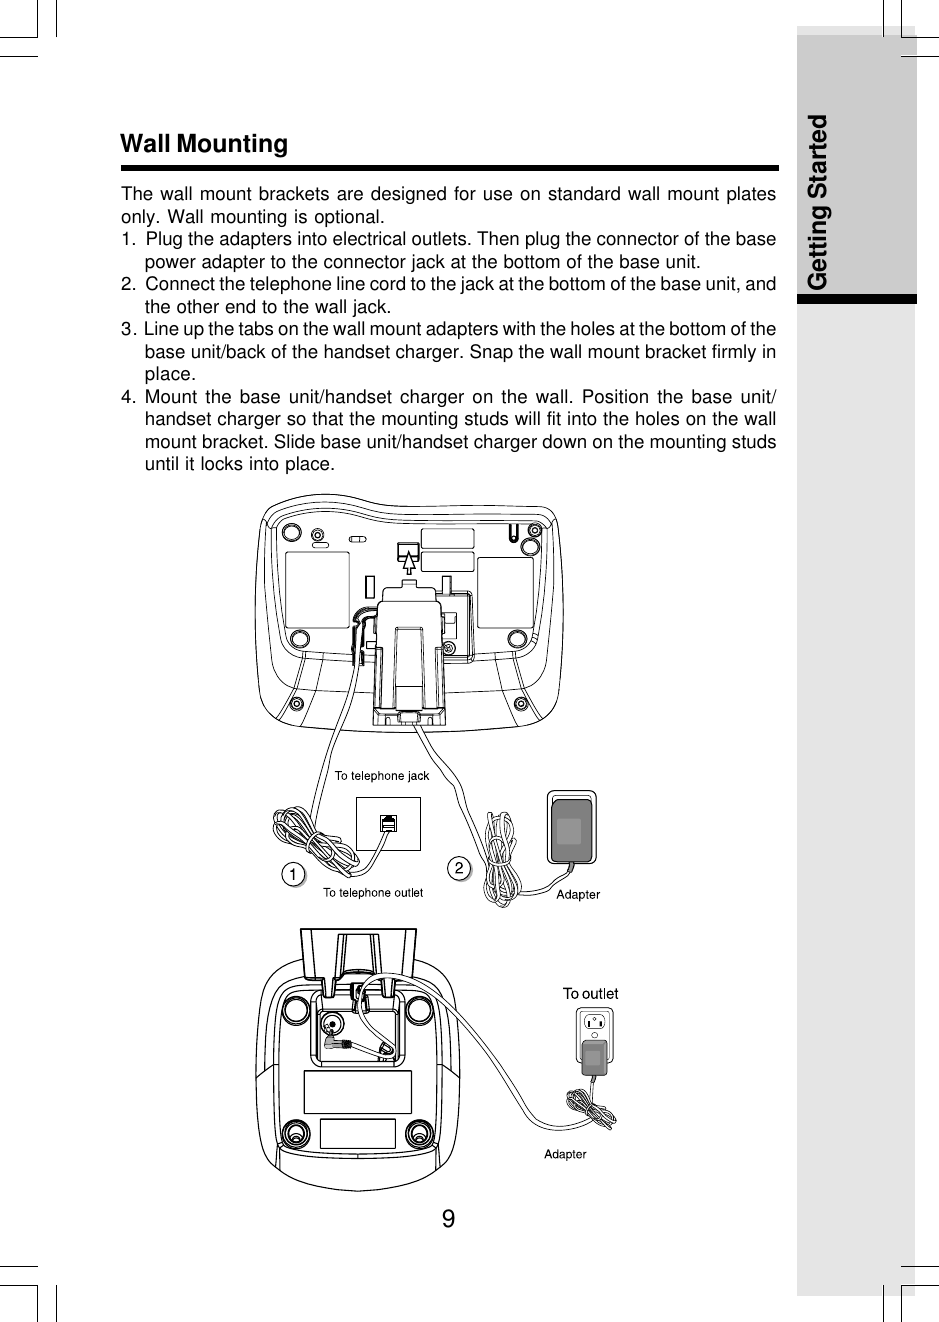
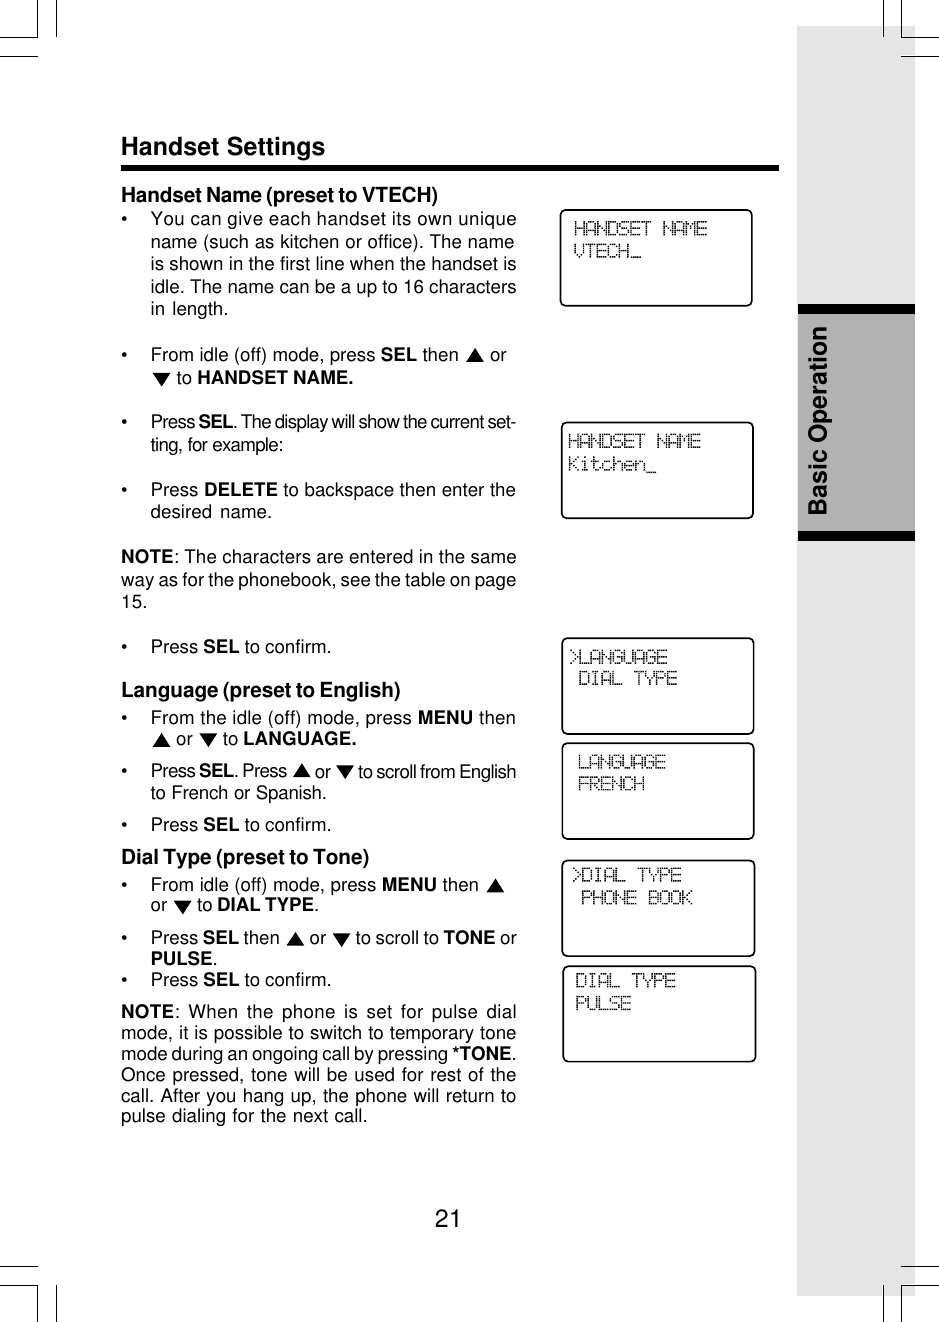
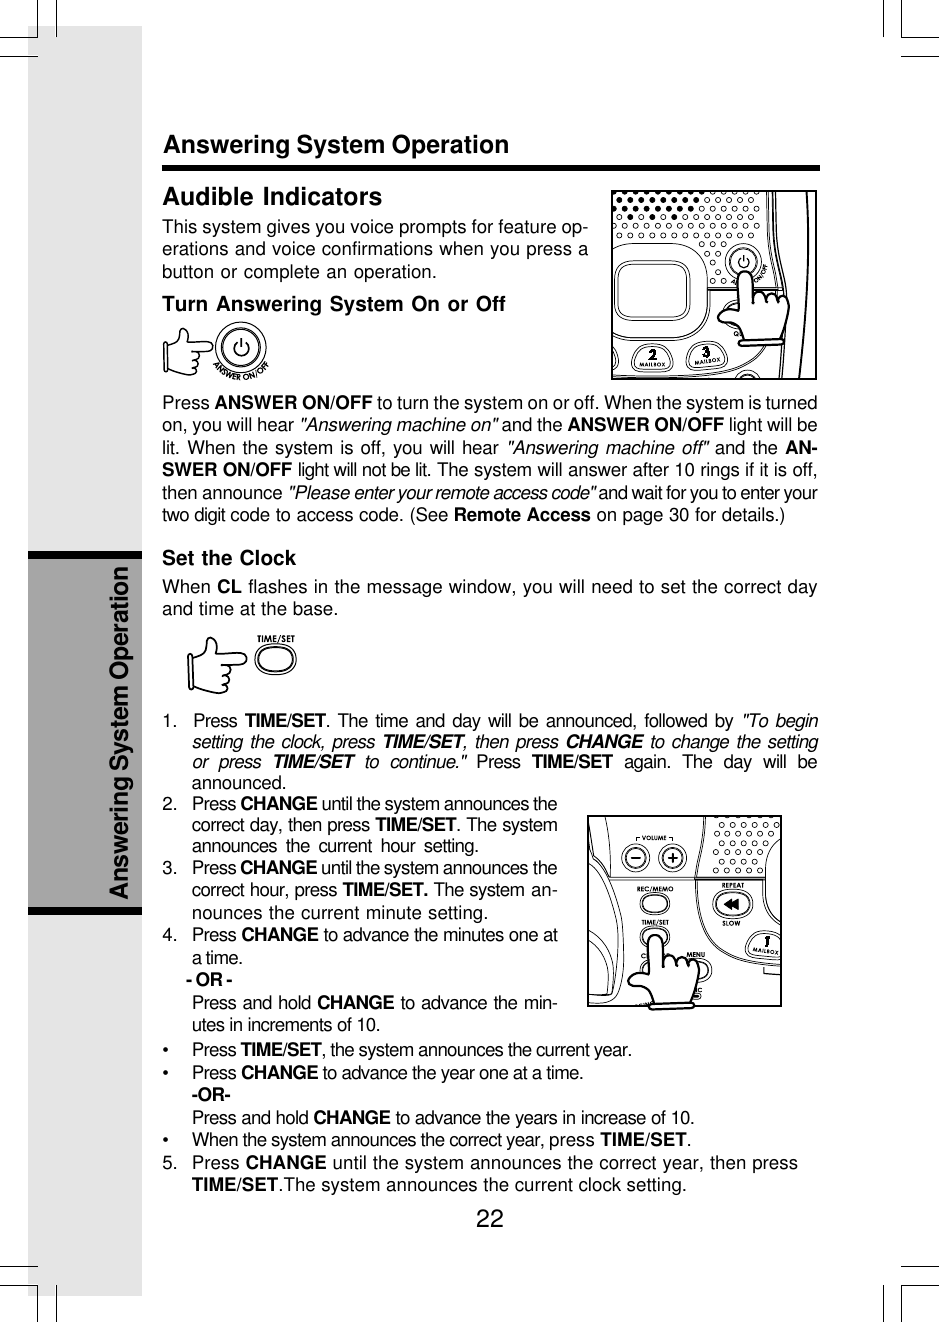
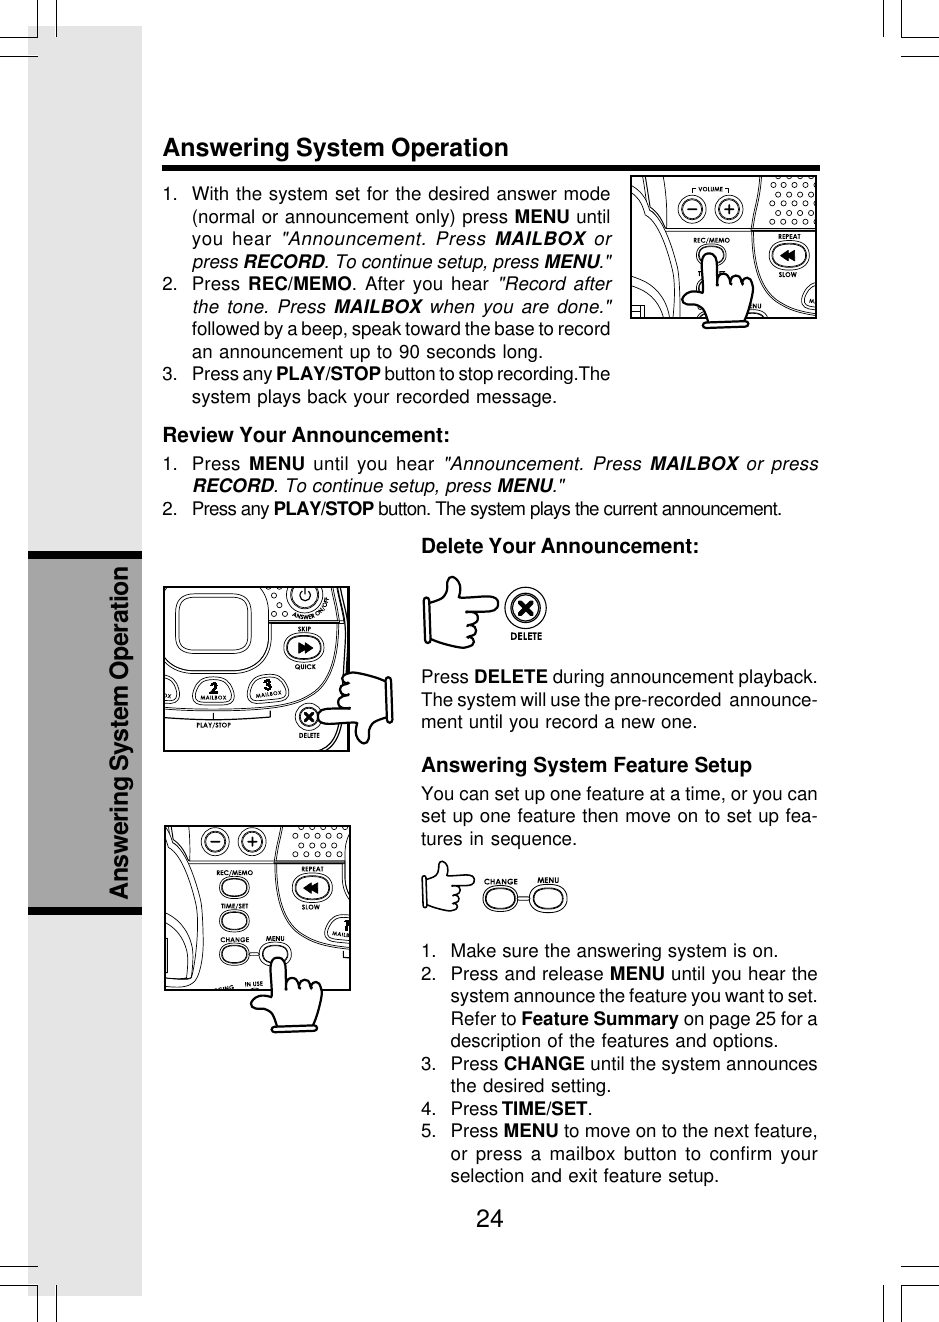
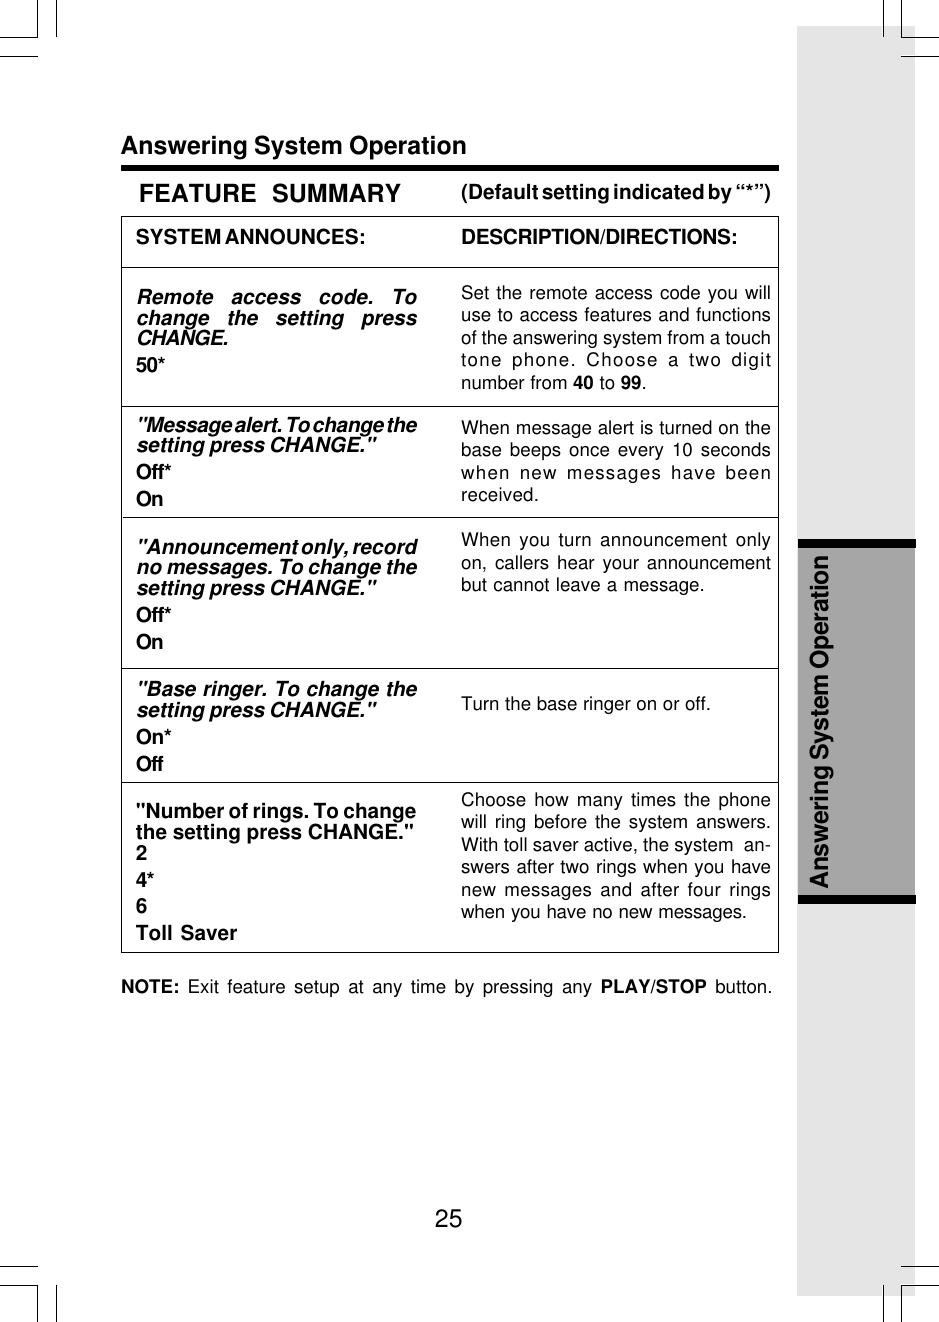
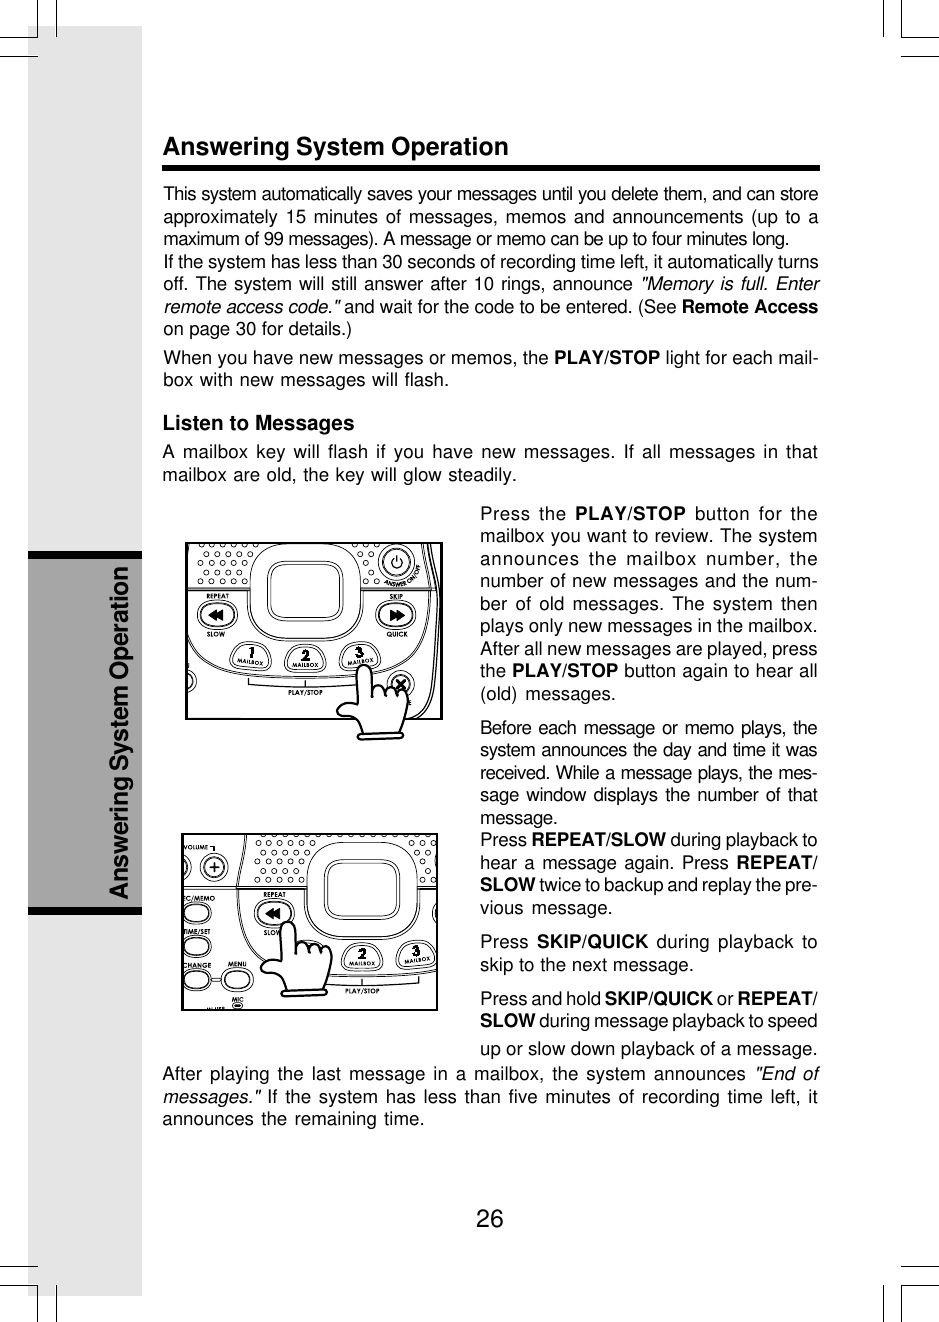
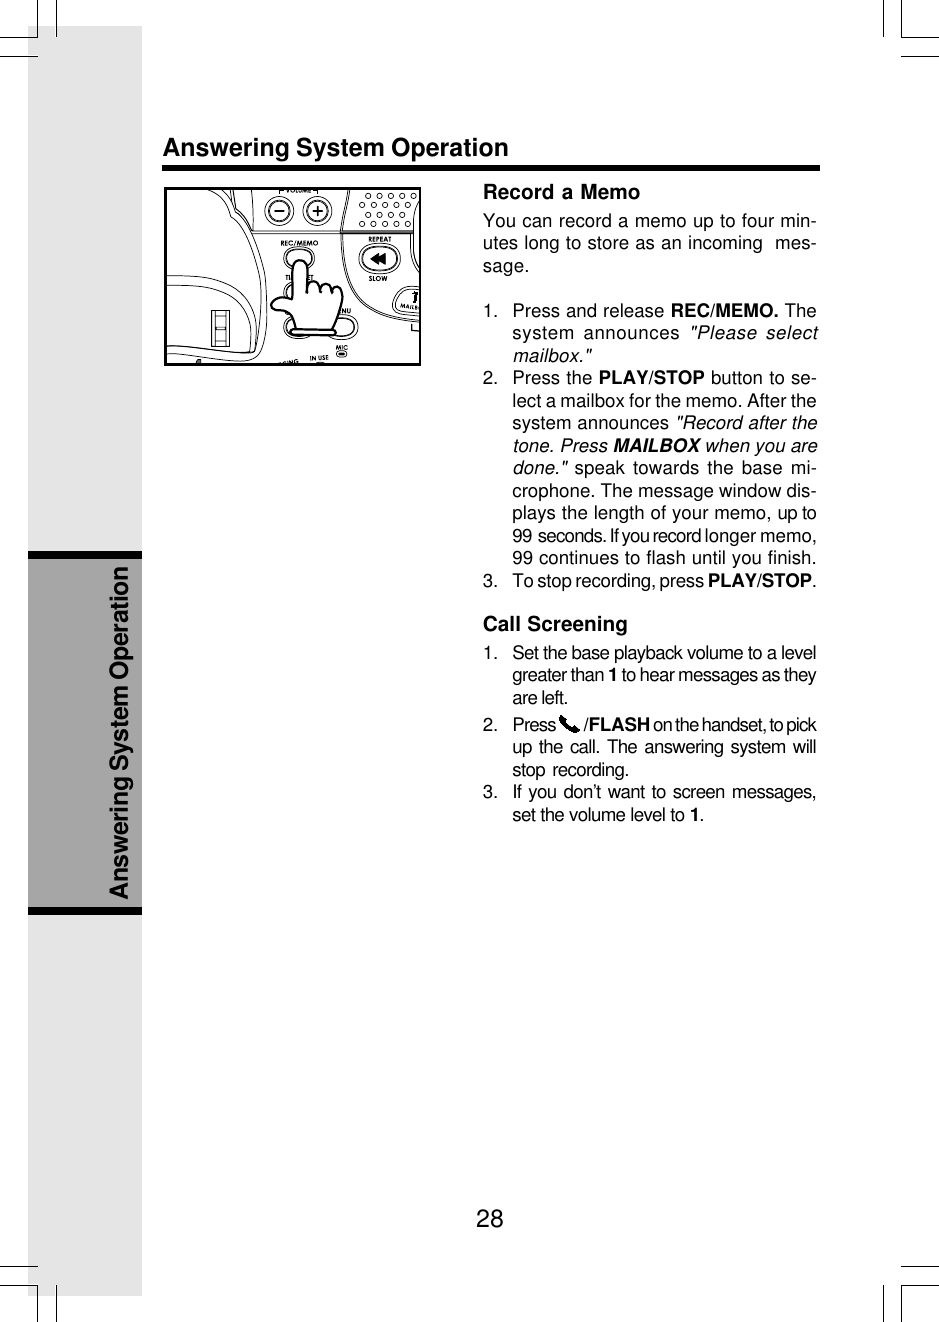
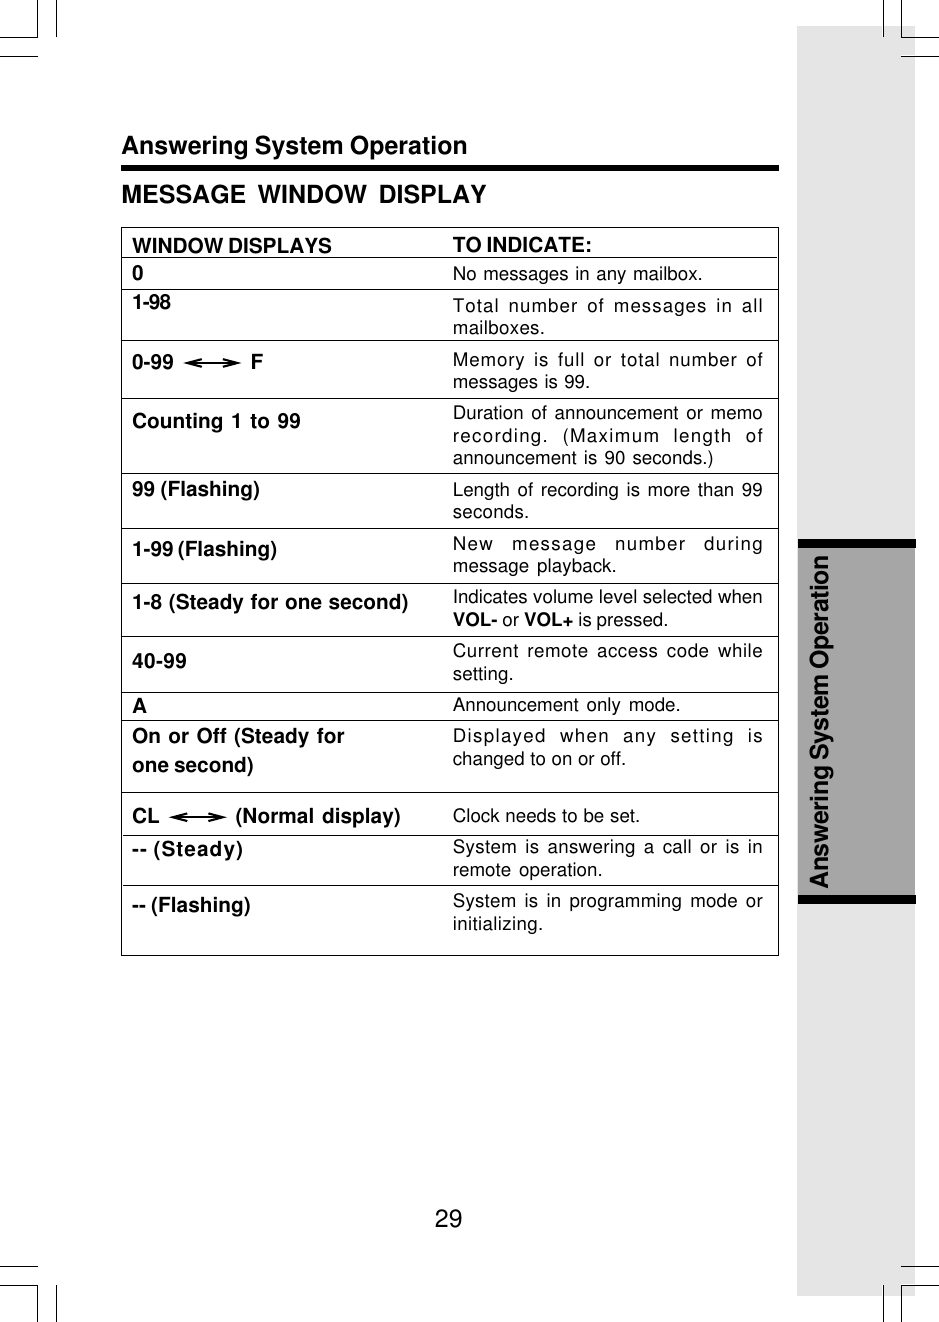
VTech Telecommunications 80-5348-01 VTECH 5825 & 5850 Handsets User Manual i6764 English manual pmd

VTech Telecommunications Ltd VTECH 5825 & 5850 Handsets i6764 English manual pmd

Manual

1Important Safety InstructionsWhen using your telephone equipment, basic safety precautions should always befollowed to reduce the risk of fire, electric shock and injury, including the following:1. Read and understand all instructions.2. Follow all warnings and instructions marked on the product.3. Unplug this product from the wall outlet before cleaning. Do not use liquid or aerosolcleaners. Use a damp cloth for cleaning.4. Do not use this product near water (for example, near a bath tub, kitchen sink orswimming pool).5. Do not place this product on an unstable surface, such as a table, shelf or stand.The product may fall, causing serious damage.6. Slots and openings in the back or bottom of the base unit and handset are providedfor ventilation. To protect them from overheating, these openings must not beblocked by placing the product on a soft surface such as a bed, sofa or rug. Thisproduct should never be placed near or over a radiator or heat register. This productshould not be placed in any area where proper ventilation is not provided.7. This product should be operated only from the type of power source indicated onthe marking label. If you are not sure of the type of power supply in your home, consultyour dealer or local power company.8. Do not allow anything to rest on the power cord. Do not install this product wherethe cord may have anyone walking on it.9. Never push objects of any kind into this product through slots in the base or handsetas they may touch dangerous voltage points or short out parts that could result ina risk of fire or electric shock. Never spill liquid of any kind on the product.10. To reduce the risk of electric shock, do not disassemble this product, but take it toan authorized service facility. Opening or removing parts of the base or handsetother than specified access doors may expose you to dangerous voltages or otherrisks. Incorrect reassembling can cause electric shock when the product issubsequently used.11. Do not overload wall outlets and extension cords as this can result in the risk of fireor electric shock.12. Unplug this product from the wall outlet and refer servicing to an authorized servicefacility under the following conditions:A. When the power supply cord or plug is damaged or frayed.B. If liquid has been spilled onto the product.C. If the product has been exposed to rain or water.D. If the product does not operate normally by following the operating instructions.Adjust only those controls that are covered by the operating instructions, asimproper adjustment of other controls may result in damage and often requiresextensive work by an authorized technician to restore the product to normaloperation.E. If the product has been dropped and the base and/or handset has beendamaged.
2Important Safety InstructionsF. If the product exhibits a distinct change in performance.13. Avoid using a telephone (other than cordless) during an electrical storm. Thereis a remote risk of electric shock from lightning.14. Do not use the telephone to report a gas leak in the vicinity of the leak.15. Only put the handset of your telephone next to your ear when it is in normal talkmode.VTECH COMMUNICATIONS INC.Customer Service: www.vtechphones.com or 1-800-595-9511. In Canada; VTech Telecom-munications Canada Ltd. at 1-800-267-7377.BEFORE USING YOUR i 6764 SYSTEM, CAREFULLY PEEL OFF THE PROTECTIVEFILM COVERING THE DISPLAYS.Your i 6764 is an advanced cordless telephone set, capable of supporting two handsets.This manual is designed to familiarize you with this cordless telephone. We stronglyrecommend you read the manual before using your phone.SAVE THESE INSTRUCTIONS
3Parts Check List1. Base Unit2. Handsets (2)3. Handset Charger4. Base Power Adapter5. Telephone Line Cord6. Belt Clips (2)7. Base Wall Mounting Bracket8. Charger Wall Mounting Bracket9. User’s Manual10. Batteries (2)To purchase replacement batteries, visit us on the web at www.vtechphones.comor call VTech Communications, Inc. at 1-800-595-9511. In Canada, call VTechTelecommunications Canada Ltd. at 1-800-267-7377.NOTE: Use only VTech batteries (part number 89-1323-00-00).
4The Handset Layout1. Antenna2. Earpiece3. LCD Display4. CID (Scroll Down)5. On (Flash)6. Headset Jack (2.5mm)7. Dialing Keys (0-9, *, #)8. Redial (Pause)9. Speaker10. Volume Control11. DIR (Scroll Up)12. Select (Menu)13. Off (Clear)14. Intercom15. Mute (Delete)457119126141031512813
5The Base Unit Layout1. Locate Handset2. Volume Control3. Record/Memo4. Time/Set5. Change6. Answer On/Off7. Skip/Quick8. Delete9. Message Boxes Play/Stop10.Repeat/Slow11.Menu12. In Use LED13.Charging LED14. Power Connector Jack15. Telephone Jack1234689111214155713 10
6Getting StartedConnecting Power to Base Unit/Handset Charger1. Plug the power adapter into an electrical outlet not controlled by a wallswitch, and the connector into the bottom of the base unit.2. Choose the location for your handset charger, and plug its power supplyinto an electrical outlet.SetupTo outletTo telephone outlet
7Getting StartedSetupInstallation of Handset Battery1. Place the new battery in the hand-set with the positive and negativepoles aligned in the battery com-partment.2. Replace the battery compartmentcover by sliding it upward.3. If the new battery is not alreadycharged, place the handset in itscharger or base unit, and allow it tocharge for 10-12 hours. After the initialcharge, a maintenance charge of eighthours should be sufficient. Be sure toplace the handset in its base when notin use for maximum performance.Charging of the Handset BatteryThe handset of your cordless telephone is powered by rechargeable battery. It chargesautomatically whenever the handset is in its charger or base unit. Average talk timeon a fully charged battery is about nine hours depending on environmentalconditions, standby time is approximately four days.You should charge the batteries for 10-12 hourswhen you first receive your phone. You will knowthe battery need charging when:• The low battery message is displayed:• The handset seems completely dead, the LCDis completely clear and does not activate whenyou press the keys.NOTE: When in LOW BATTERY mode, the keypad sounds, backlighting andspeakerphone features will not work. When your battery has been charged,your features will return to their normal function.IMPORTANT:1. Do not dispose of battery in a fire, it might explode.2. Do not open or mutilate the battery. Toxic substances may be released,causing harm to eyes or skin.3. Exercise care in handling the battery in order to prevent an accidentalshort of the charge contacts, potentially causing the battery to overheat.4. Do not dispose of the battery into household garbage. Properly recycle thebattery.5. For maximum performance, use only the power supply packaged with yourVTech phone.
8Getting StartedConnecting to Phone LinePlug one end of the telephone line cord into the jack at the bottom of the baseunit. Then plug the other end of the cord into the wall jack.SetupChecking for Dial ToneAfter the battery are charged, press   /FLASH on the handset. You should heara dial tone. If not, see In Case of Difficulty.CAUTION: Use only the VTech power supply provided with your telephone.IMPORTANT! FOR MAXIMUM PER-FORMANCE OF YOUR CORDLESS TELE-PHONE SYSTEM:1. Choose a central location for yourbase unit.2. Install your base unit and extension hand-sets away from electronic equipment,such as personal computers, televisionsets and microwave ovens.3. In locations where there are multiplecordless telephones, separate baseunits as far away as possible.4. Install your telephone equipment awayfrom heat sources and sunlight.5. Avoid excessive moisture, dust orextreme cold.Check Battery IndicatorIf you receive a check battery warning, it indicatesone of the following:1. There are no batteries in your handset. You’llneed to install battery into your handset (seeInstallation and Charge of Handset Batterysection on the previous page.)2. The battery needs to be replaced with a new battery.3. The battery has been installed incorrectly. Please reinstall (see Installationof Handset Battery) and/or the diagram in the battery compartment on thehandset.
9Getting StartedWall MountingThe wall mount brackets are designed for use on standard wall mount platesonly. Wall mounting is optional.1.  Plug the adapters into electrical outlets. Then plug the connector of the basepower adapter to the connector jack at the bottom of the base unit.2.  Connect the telephone line cord to the jack at the bottom of the base unit, andthe other end to the wall jack.3. Line up the tabs on the wall mount adapters with the holes at the bottom of thebase unit/back of the handset charger. Snap the wall mount bracket firmly inplace.4. Mount the base unit/handset charger on the wall. Position the base unit/handset charger so that the mounting studs will fit into the holes on the wallmount bracket. Slide base unit/handset charger down on the mounting studsuntil it locks into place.
10Basic OperationHandset and Base Indicators•     Turns on when the microphone is muted.•     Turns on when there are new call log entries.•     Turns on when the ringer is muted.•     Low battery indicator or charging indicator.Handset LEDs         LED                     Description.Base LEDs         LED                     DescriptionIN USECHARGINGPLAY/STOP1, 2, 3• On when the phone is off the hook.• Flashes when an extension phone is off the hook.• On when the handset is charging in the base.• Flashes when new messages are in the correspondingmailbox.• On when only old messages are in the correspondingmailbox.• On when the answering system is on.•    LED is on when in handsfree mode.Handset Icons         Icon                     DescriptionMUTENEWAnswer ON/OFF
11Basic OperationHandset OperationMaking Calls• Press   /FLASH (or SPEAKER to use thehandset speakerphone feature). Dial thephone number.-OR-Dial the phone number first, then press /FLASH (or SPEAKER).• Press OFF to end your call or place thehandset in its base.Answering Calls• Press   /FLASH, SPEAKER or any dialingkeys.• Press OFF to end your call or place thehandset in its base.Adjust Handset VolumeThe volume control is on the right edge of thehandset. During a call, press the VOLUME + and- keys to adjust the listening volume to a comfort-able level. When you reach the maximum or mini-mum setting, a double beep will sound.NOTE: The procedure is  the same for the handsetearpiece, speakerphone and headset.Flash FunctionYou can use your i 6764 with services such as callwaiting (fee required). When you receive a call wait-ing signal, press   /FLASH to switch to the newcall. Press   /FLASH again to switch back tothe original call.NOTE: Use   /FLASH to access other phonecompany subscriber services, as described byyour provider.Redial Function• Press REDIAL/PAUSE to display the lasttelephone number dialed from the handset(up to 32 digits). Use   or   to scrollthrough the last five numbers dialed.When the beginning or the end of the redial list is reached, a double beepwill sound.• Press OFF to exit the redial review list.• When the desired number is reached, press   /FLASH or SPEAKER to dial.• When the desired entry displays, press DELETE to delete it. You’ll hear aconfirmation beep.NOTE: If the redial memory is empty, and REDIAL is pressed, a double beep willsound.
12Basic OperationHandset OperationMute Function• During a call, press the MUTE/DELETEkey to disable the microphone. Thescreen will display MICROPHONEMUTED briefly:• Press MUTE/DELETE again to return tonormal two-way conversation. MICRO-PHONE ON will display briefly.Intercom Call• From idle (off) mode, press INTERCOM.The handset will display:• The other handset will ring and the screenwill display:• Press INTERCOM, SPEAKER or any dialingkey to answer the intercom call. Thescreens will display:• Press INTERCOM or OFF on either hand-set to end the call, or simply place thehandsets back in their charger.NOTE: If the other handset is out of range, oron an external call, when you intercom it, thedisplay of the first handset will show:Call Forward and Call TransferAn external call can be forwarded or trans-ferred from one handset (HS1) to the otherhandset (HS2). The difference between forwardand transfer depends on if HS1 wishes tospeak with HS2 before the call is transferred.
13Basic OperationHandset OperationCall Forward•  A handset (HS1) on an external call can for-ward the call to the other handset (HS2) bypressing and holding the INTERCOM key.HS1 will initially show:•   HS2 can press   /FLASH to answer the call.NOTE: If HS2 does not answer the call in about30 seconds, the external call will be returned toHS1 and the display will show:If the returned call is not answered within another 30seconds, the external call will end automatically.Call Transfer• HS1 can transfer an external call to HS2 by pressing the INTERCOM key.The external call is put on hold automatically.• HS2 will ring, showing an intercom call.• HS2 can answer the intercom call by pressing   /FLASH.• Intercom is established while the external call is still on hold. HS1 maydiscuss the external call with HS2.• When HS1 presses OFF, the external call is  then transferred to HS2. CALLTRANSFERRED will briefly display on HS1.NOTE: If there is no answer on HS2, HS1 can reconnect to the held call bypressing   /FLASH.Conference CallIt is possible to establish a conference betweentwo handsets and the external line.If HS1 already has a connection to the externalline, HS2 can join the call by pressing   /FLASH, aconference will be immediately established. Bothhandsets will show:Base OperationFrom the base unit, press the LOCATE HANDSETkey to locate the handsets.• With the handset in idle, press LOCATEHANDSET. The handsets will display:• To end the page at  the base, press LOCATEHANDSET again.• To end the page at the handset, press   /FLASH, SPEAKER or any dial pad key (0-9, *,#) on handset, or press LOCATE HANDSETbase.
14Basic OperationPhonebook OperationYour i 6764 can store up to 50 numbers with names in memory. Each memorylocation can hold up to 32 digits for the number and 16 characters for the name.NOTE: The handsets share a common phonebook, which is stored in the base.  Thismeans that entries inserted by one handset are available for both handsets, and if onedeletes a phonebook entry, it will disappear from both handsets.When one handset is accessing the phonebook, the other handset cannot ac-cess it at the same time. If this is attempted, NOT AVAILABLE AT THIS TIME willdisplay on the second handset.Storing a New Entry• Press MENU.• With PHONEBOOK selected, pressSEL.• Press   to select STORE. Press SEL.• You will be prompted to ENTER NUMBER.Use the dialing keys to enter the numberyou wish to store in the phonebook. Pressthe MUTE/DELETE key to backspaceand make corrections. Press SEL.• You will then be prompted to ENTERNAME. Use the dialing keys to spell thename. Press SEL.• You’ll hear a confirmation tone, and thenew phonebook entry will briefly be dis-played.NOTES:• If the phonebook is full, the handset willdisplay PHONEBOOK IS FULL.• You can press REDIAL/PAUSE, then or   to scroll to the previously dialednumber from the redial list  to store it intothe phonebook. Press SEL.• While entering numbers, press andhold REDIAL/PAUSE to add pausesif necessary.• If the number is already in the phonebook,the display will show:_
15Basic OperationPhonebook OperationEach press of a particular key causes characters to be displayed in the follow-ing order:Characters by number of key pressesKey 123456789 space 1ABC2abcDEF3de fGH I 4 g h iJKL5 j k lMNO6 mn oPQRS7pqr sTUV8 t uvWXY Z 9w x y z0?!/()#',-.&1234567890#Reviewing/Dialing from the Phonebook• Press MENU. With PHONEBOOK in the firstline, press SEL. With the REVIEW in the firstline, press SEL.- OR -With the handset in idle, press   to enterphonebook review mode. The first phonebookentry will be displayed.• Scroll through phonebook entries using and    or enter first character of the name tobe searched (using the digit keys). Continuenavigating using the   or    scroll keys, untilyou reach the entry to be dialed.NOTE: When reviewing the phonebook, the sec-ond line of the display will show the number, upto 16 digits. For numbers longer than 16 digits,only the first 13 digits will be shown. Press   or #to scroll the phone number to see the additionaldigits.
16Basic OperationPhonebook Operation• Press   /FLASH or SPEAKER to dial thenumber.NOTE: If there are no entries in the phonebook,when it is accessed, PHONEBOOK ISEMPTY will display.Editing a Phonebook Entry• Follow the steps in Reviewing/Dialingfrom the Phonebook (page 15) to reachthe entry to be edited.• Press SEL to enter number edit mode.• Press MUTE/DELETE to backspace thenpress the digit keys to correct the number.Press and hold REDIAL/PAUSE to addpauses if necessary.If you wish to store a number from redialmemory into the phonebook, press RE-DIAL/PAUSE then  or   to scroll to de-sired redial number from memory. PressSEL.• Press SEL.• Press MUTE/DELETE to backspace and usethe digit keys to enter the correct name.• Press SEL. You’ll hear a confirmation tone.Delete a Phonebook Entry• Follow the steps in Reviewing/Dialingfrom the Phonebook (page 15) to reachthe entry to be deleted.• Press MUTE/DELETE to delete the entry.You’ll hear a confirmation tone.• The handset will then move to the next entry,if any._
17Basic OperationCall Log (Caller ID - Call Waiting)Caller ID - Call Waiting IDYour i 6764 is capable of displaying the number of the calling party before youanswer the phone (caller ID or  CID). If the number is contained in the phonebook,the name of the caller will also be displayed. It is also capable of displaying CIDinformation in conjunction with a call waiting alert signal (call waiting caller ID).With call waiting caller ID, the CID data is displayed so you can decide whether toanswer the incoming call, or continue with your current conversation. Your i 6764can hold up to 50 CID entries.NOTES ABOUT CALLER ID & CALL WAITING CALLER ID These are sub-scription services, provided by most regional telephone service providers.You must subscribe to these services to get the benefits of these features. Ifyou do not subscribe to CID services, you can still use your i 6764 and theother features it offers.Due to regional incompatibilities, CID information may not be available forevery call you receive. In addition, the calling party may intentionally blocktheir name and/or phone number from being sent.• As new CID/call waiting ID records are re-ceived, your handset displays will alert  youto the new CID records, for example:• After you review all new CID records, theNEW call indicator will be turned off andthe screen will show:•  If the call log is full, the oldest entry isdeleted to make room for the new call. Ifthe call log is empty when you try to enterto call log review, the following messageis displayed:Reviewing Caller IDYou can review the CID records via the menuas described below, or by pressing   while inidle, and the handset jumps directly to CID re-view.•   In idle mode, press MENU.•   Press   to scroll to the  CALL LOG option.
18Basic OperationCall Log (Caller ID - Call Waiting)• Press SEL. Use   and   to scroll throughthe call log entries. When the beginning orthe end of the call log is reached, a doublebeep will sound.NOTE: The NEW icon in the lower left cornerindicates the call has not yet been reviewed.Storing Caller ID• Follow the steps in Reviewing Caller ID to scrollto the record to be stored.• To view alternate dialing sequences, pressthe # key repeatedly. The screen will cyclethrough the various dialing options (1 + areacode + number, area code + number, 1 +number, number only.) Press SEL to storethe displayed number.• If the CID record contains both name and number,the CID will be stored after pressing SEL.• If the CID record does not contain a name,you will be prompted to EDIT NAME and thescreen will show:• If the CID record does not contain a number,you will be prompted to EDIT NUMBER, andthe screen will show:• You’ll hear a confirmation beep and thescreen will display:• If both name and number are missing, forexample as in a private listing, the requestwill be rejected with the message:• If the number already exists in the phonebook,the entry will not be stored, and the screenwill show:•   If the phonebook is full, the screen will show:Dialing from Caller ID• Follow the steps in Reviewing Caller ID toEDIT NUMBER800-595-9511_
19Basic OperationCall Log (Caller ID - Call Waiting)Deleting Caller ID• Follow the steps in Reviewing Caller ID toscroll to the record to be deleted.• Press the DELETE key to delete the desiredrecord. You’ll hear a confirmation beep andthe previous CID record will be displayedon the screen.• To delete all the CID records, press andhold the DELETE key. The screen will askyou DELETE ALL CALLS? Press SEL toconfirm. Press OFF to return to the CIDrecord previously displayed.scroll to the entry to be dialed.• To change how the number will be dialed,(1 + area code + number, area code + num-ber, 1 + number, number only.) press #repeatedly. The screen will cycle throughthe dialing options. Press   /FLASH orSPEAKER key to dial the number.
20Basic OperationRinger Volume• From the idle (off) mode, press SEL then   or to RINGER VOLUME.• Press SEL. The current ringer volume will beshown:• Press   and   or enter a digit (0 through 6)to the desired ringer volume. The current ringtone will play and the volume bar is increasedor decreased each time the setting is adjusted.At the lowest setting the display will show:• Press SEL.NOTE: The handset will not ring when a call comesin if ringer volume is set to the lowest setting.Ringer Tone• From idle (off) mode, press SEL then   or to RINGER TONE.• Press SEL. You are prompted to select  IN-TERCOM CALL or OUTSIDE CALL. Press or   to select the desired option.• Press SEL. You can then use   or   or entera digit (0 through 9) to sample the ring tone.• Press SEL to confirm.Key Tone (preset to ON)• From the idle (off) mode, press SEL then or   to KEY TONE.• Press SEL. The current setting will be shown.Press   or   to scroll to ON or OFF. Whenset to ON, the handset will emit a beep when-ever a key is pressed.• When the desired option is shown, press SEL.Handset Settings
21Basic OperationHandset SettingsHandset Name (preset to VTECH)• You can give each handset its own uniquename (such as kitchen or office). The nameis shown in the first line when the handset isidle. The name can be a up to 16 charactersin length.• From idle (off) mode, press SEL then   or to HANDSET NAME.• Press SEL. The display will show the current set-ting, for example:• Press DELETE to backspace then enter thedesired name.NOTE: The characters are entered in the sameway as for the phonebook, see the table on page15.• Press SEL to confirm.Language (preset to English)• From the idle (off) mode, press MENU then or   to LANGUAGE.• Press SEL. Press   or   to scroll from Englishto French or Spanish.• Press SEL to confirm.Dial Type (preset to Tone)• From idle (off) mode, press MENU then or   to DIAL TYPE.• Press SEL then   or   to scroll to TONE orPULSE.• Press SEL to confirm.NOTE: When the phone is set for pulse dialmode, it is possible to switch to temporary tonemode during an ongoing call by pressing *TONE.Once pressed, tone will be used for rest of thecall. After you hang up, the phone will return topulse dialing for the next call.
22Answering System OperationAudible IndicatorsThis system gives you voice prompts for feature op-erations and voice confirmations when you press abutton or complete an operation.Turn Answering System On or OffPress ANSWER ON/OFF to turn the system on or off. When the system is turnedon, you will hear "Answering machine on" and the ANSWER ON/OFF light will belit. When the system is off, you will hear "Answering machine off" and the AN-SWER ON/OFF light will not be lit. The system will answer after 10 rings if it is off,then announce "Please enter your remote access code" and wait for you to enter yourtwo digit code to access code. (See Remote Access on page 30 for details.)Set the ClockWhen CL flashes in the message window, you will need to set the correct dayand time at the base.1.  Press TIME/SET. The time and day will be announced, followed by "To beginsetting the clock, press TIME/SET, then press CHANGE to change the settingor press TIME/SET to continue." Press TIME/SET again. The day will beannounced.Answering System Operation2. Press CHANGE until the system announces thecorrect day, then press TIME/SET. The systemannounces the current hour setting.3. Press CHANGE until the system announces thecorrect hour, press TIME/SET. The system an-nounces the current minute setting.4. Press CHANGE to advance the minutes one ata time.      - OR -Press and hold CHANGE to advance the min-utes in increments of 10.• Press TIME/SET, the system announces the current year.• Press CHANGE to advance the year one at a time.-OR-Press and hold CHANGE to advance the years in increase of 10.• When the system announces the correct year, press TIME/SET.5. Press CHANGE until the system announces the correct year, then pressTIME/SET.The system announces the current clock setting.
23Answering System OperationAnswering System OperationNOTES:1. You can set the time manually, or allow it to be set automatically with incom-ing caller ID information. (If you subscribe to CID service, fee required.)2. Press any PLAY/STOP button to exit programming at any time. The PLAY/STOP buttons are located on the base unit and are labeled numbers 1, 2, and 3.These buttons also playback messages left in their respective mailbox.About MailboxesThis answering system has three voice mailboxes. Callers using a touch tonephone can select the mailbox in which their messages will be recorded bypressing 1, 2, or 3 while the system plays the outgoing announcement. Otherwise,messages will be recorded in mailbox 1.About Announcements• You can record two different announcements - one for normal answering and onefor when the system is set to play the announcement only.• Use normal answering when you want the system to record callers' messages.Use announcement only when you want to give information to callers withoutaccepting messages.• If you choose not to record an announcement, the system answers with apre-recorded announcement.• The normal answering pre-recorded announcement says: "Hello, please leave amessage after the tone." The announcement only pre-recorded announcementsays: " We're sorry messages to this number cannot be accepted."• By setting announcement only to on or off, you decide which announcementyour callers will hear when the system answers a call (the system comes setfor normal answering, with announcement only turned off). See Set An-nouncement Only on page 25 to change your announcement selection.Record Your AnnouncementNOTE: If you have assigned different mailboxes to different people, be sure totell callers in your announcement to press 1, 2 or 3 to leave a message in theappropriate mailbox. Remember to leave a few seconds at the end of yourrecorded announcement to allow callers enough time to select a mailbox.An example of an announcement:"Thank you for calling. To leave a message for Bob, press 1 now; to leave amessage for Sue, press 2 now; to leave a message for Elmo, press 3 now;or, wait for the beep and leave your message."The system will record your announcement for the currently selected answermode (normal or announcement only). To confirm or change the answer mode,follow the directions under Answering System Feature Setup and Feature Sum-mary on pages 24 and 25.
24Answering System OperationAnswering System Operation1. With the system set for the desired answer mode(normal or announcement only) press MENU untilyou hear "Announcement. Press MAILBOX orpress RECORD. To continue setup, press MENU."2. Press REC/MEMO. After you hear "Record afterthe tone. Press MAILBOX when you are done."followed by a beep, speak toward the base to recordan announcement up to 90 seconds long.3. Press any PLAY/STOP button to stop recording.Thesystem plays back your recorded message.Review Your Announcement:1. Press  MENU until you hear "Announcement. Press MAILBOX or pressRECORD. To continue setup, press MENU."2. Press any PLAY/STOP button. The system plays the current announcement.Delete Your Announcement:Press DELETE during announcement playback.The system will use the pre-recorded  announce-ment until you record a new one.Answering System Feature SetupYou can set up one feature at a time, or you canset up one feature then move on to set up fea-tures in sequence.1. Make sure the answering system is on.2. Press and release MENU until you hear thesystem announce the feature you want to set.Refer to Feature Summary on page 25 for adescription of the features and options.3. Press CHANGE until the system announcesthe desired setting.4. Press TIME/SET.5. Press MENU to move on to the next feature,or press a mailbox button to confirm yourselection and exit feature setup.
25Answering System OperationAnswering System OperationNOTE: Exit feature setup at any time by pressing any PLAY/STOP button.SYSTEM ANNOUNCES:Remote access code. Tochange the setting pressCHANGE.50*"Message alert. To change thesetting press CHANGE."Off*On"Announcement only, recordno messages. To change thesetting press CHANGE."Off*On"Base ringer. To change thesetting press CHANGE."On*Off"Number of rings. To changethe setting press CHANGE."24*6Toll Saver(Default setting indicated by “*”)DESCRIPTION/DIRECTIONS:Set the remote access code you willuse to access features and functionsof the answering system from a touchtone phone. Choose a two digitnumber from 40 to 99.When message alert is turned on thebase beeps once every 10 secondswhen new messages have beenreceived.When you turn announcement onlyon, callers hear your announcementbut cannot leave a message.Turn the base ringer on or off.Choose how many times the phonewill ring before the system answers.With toll saver active, the system  an-swers after two rings when you havenew messages and after four ringswhen you have no new messages.FEATURE SUMMARY
26Answering System OperationAnswering System OperationThis system automatically saves your messages until you delete them, and can storeapproximately 15 minutes of messages, memos and announcements (up to amaximum of 99 messages). A message or memo can be up to four minutes long.If the system has less than 30 seconds of recording time left, it automatically turnsoff. The system will still answer after 10 rings, announce "Memory is full. Enterremote access code." and wait for the code to be entered. (See Remote Accesson page 30 for details.)When you have new messages or memos, the PLAY/STOP light for each mail-box with new messages will flash.Listen to MessagesA mailbox key will flash if you have new messages. If all messages in thatmailbox are old, the key will glow steadily.Press the PLAY/STOP button for themailbox you want to review. The systemannounces the mailbox number, thenumber of new messages and the num-ber of old messages. The system thenplays only new messages in the mailbox.After all new messages are played, pressthe PLAY/STOP button again to hear all(old) messages.Before each message or memo plays, thesystem announces the day and time it wasreceived. While a message plays, the mes-sage window displays the number of thatmessage.Press REPEAT/SLOW during playback tohear a message again. Press REPEAT/SLOW twice to backup and replay the pre-vious message.Press SKIP/QUICK during playback toskip to the next message.Press and hold SKIP/QUICK or REPEAT/SLOW during message playback to speedup or slow down playback of a message.After playing the last message in a mailbox, the system announces "End ofmessages." If the system has less than five minutes of recording time left, itannounces the remaining time.
27Answering System OperationAnswering System OperationPress the PLAY/STOP button at any timeduring playback to exit message playback.You’ll hear a confirmation beep.Adjust Playback VolumePress VOL + or VOL - to adjust playbackvolume to a comfortable level. If volume isset to level one, you will not hear incom-ing messages as they are received.The system beeps three times when youreach the highest or lowest volumesetting.Delete MessagesNOTE: Deleted messages cannot berecovered.Delete a Specific Message:Press  DELETE while a message isplaying to delete only that message.Delete All Messages in a Mailbox:Press DELETE. The system announces,"Please select mailbox." Press thedesired PLAY/STOP button. The systemerases all old (previously reviewed)messages and memos in that mailbox.
28Answering System OperationAnswering System OperationRecord a MemoYou can record a memo up to four min-utes long to store as an incoming  mes-sage.1. Press and release REC/MEMO. Thesystem announces "Please selectmailbox."2. Press the PLAY/STOP button to se-lect a mailbox for the memo. After thesystem announces "Record after thetone. Press MAILBOX when you aredone." speak towards the base mi-crophone. The message window dis-plays the length of your memo, up to99  seconds. If you record longer memo,99 continues to flash until you finish.3. To stop recording, press PLAY/STOP.Call Screening1. Set the base playback volume to a levelgreater than 1 to hear messages as theyare left.2. Press   /FLASH on the handset, to pickup the call. The answering system willstop recording.3. If you don’t want to screen messages,set the volume level to 1.
29Answering System OperationAnswering System OperationTO INDICATE:No messages in any mailbox.Total number of messages in allmailboxes.Memory is full or total number ofmessages is 99.Duration of announcement or memorecording. (Maximum length ofannouncement is 90 seconds.)Length of recording is more than 99seconds.New message number duringmessage playback.Indicates volume level selected whenVOL- or VOL+ is pressed.Current remote access code whilesetting.Announcement only mode.Displayed when any setting ischanged to on or off.Clock needs to be set.System is answering a call or is inremote operation.System is in programming mode orinitializing.MESSAGE WINDOW DISPLAYWINDOW DISPLAYS01-980-99   FCounting 1 to 9999 (Flashing)1-99 (Flashing)1-8 (Steady for one second)40-99AOn or Off (Steady forone second)CL   (Normal display)-- (Steady)-- (Flashing)
30Answering System OperationAnswering System OperationFUNCTION:Play messages in a mailboxRepeat a messageSkip a messageStopSave messagesDelete messageReview announcementRecord announcementRecord memoEnd remote access callTurn system offTurn system onRemote AccessYou can access many features of this system remotely from a touch tone phone.1. Dial your telephone number.2. When the system answers, enter your remote access code (preset to 50). Thesystem beeps once and announces the number of new messages on the system.3. Enter a remote command (see Remote Access Commands below).4. Press * 0 to exit remote operation.Voice MenuThe system has voice prompts to help you with remote operation.Press * 5 to hear the menu while remotely connected to the answering system.REMOTE ACCESS COMMANDSCOMMAND:Press #, then the desired mailbox number(1, 2 or 3). The system plays newmessages. If there are no new messagesthe system plays old messages.Press #4 while message is playing; press#4 twice to back up previous message.Press #6 while message is playing; eachpress advances next message.Press  #5.Hang up.Press  #9 while message is playing.Press  #7; system plays announcement,then beeps.Press  7; after beep, record announcement,press  #5 to stop. System plays backannouncement.Press   8, then the mailbox number whereyou want memo recorded; speak after thesystem announces "Record after the tone.Press  MAILBOX when you are done."Press  #5 to stop.Press  0.Press  #0; the system announces, "Answeringmachine off." Press #0 again to turn thesystem back on.When system is off, it answers after 10rings and announces, "Please enter yourremote access code." Enter your remoteaccess code.NOTE: If no key is pressed within 10 seconds of entering remote access, the voicemenu will be announced. After the voice menu announcement, if no key is pressedwithin 20 seconds, the remote access call will automatically end.***(If accessing from a touchtone telephone, press #5 tostop recording.)
31Headset OperationAdvanced  OperationYour i 6764 handset is equipped with a 2.5mm headset jack for use with anoptional accessory headset for handsfree operation. If you choose to use theheadset option, you must obtain an optional accessory headset that iscompatible with the i 6764.To purchase a headset, visit us on the web at www.vtechphones.com orcall VTech Customer Service at 1-800-595-9511.Once you have a compatible 2.5mm headset, locate the headset jack on thei 6764 handset. Connect the plug on the headset cord to the jack (under asmall rubber flap) on the handset. The plug should fit securely. Do not forcethe connection.NOTE:Whenever a compatible headset isconnected to the cordless handset, themicrophone on the handset will be muted.This is done to limit the effect of backgroundnoise.Belt ClipYour  i 6764 is also equipped with adetachable belt clip. Align the pins on theinside edge of the clip with the notches onthe sides of the handset. The belt clipshould snap securely into place. Do notforce the connection.
32Additional InformationIn Case Of DifficultyIf you have difficulty operating your phone, the suggestions below should solve theproblem. If you still have difficulty after trying these suggestions, call VTech Communica-tions at 1-800-595-9511. In Canada, call VTech Telecommunications Canada Ltd. at1-800-267-7377.The phone doesn't work at all• Make sure the power cord is plugged in.• Make sure the telephone line cord is plugged firmly into the base unit and thetelephone wall jack.• Make sure the batteries are properly charged. If you get a LOW BATTERY messageor indication, the batteries need charging.No dial tone• First try all the suggestions above.• If you still don't hear a dial tone, disconnect the base unit from the telephone jackand connect a different phone. If there is no dial tone on that phone either, theproblem is in your wiring or local service. Contact your local telephone company.You get noise, static, or a weak signal even when you're near the baseunit• Household appliances plugged into the same circuit as the base unit can sometimescause interference. Try moving the appliance or the base unit to another outlet.You get noise, static, or a weak signal when you're away from the baseunit• You may be out of range. Either move closer to the base, or relocate the baseunit.• The layout of your home may be limiting the range. Try moving the base unit toanother position.The handset does not ring when you receive a call• Make sure you have the ringer activated. Refer to the section(s) on ringerselection  in this user’s manual.• Make sure the telephone line cord is plugged firmly into the base unit and thetelephone jack. Make sure the power cord is plugged in.• You may be too far from the base unit.• You may have too many extension phones on your telephone line to allow all ofthem to ring. Try unplugging some of the other phones.
33Additional InformationIn Case Of DifficultyYou hear other calls while using your phone• Disconnect your base unit from the telephone jack, and plug in a regular telephone.If you still hear other calls, the problem is probably in your wiring or local service.Call your local telephone company.You hear noise in the handset, and none of the keys or buttons work• Make sure the power cord is plugged in.Common cure for electronic equipmentIf the unit does not seem to be responding normally, then try putting the Handset in itsbase. If it does not seem to respond, do the following (in the order listed):1. Disconnect the power to the base.2. Disconnect the handset battery, and spare battery, if applicable.3. Wait a few minutes.4. Connect power to the base.5. Re-install the battery.6. Wait for the handset to re-establish its link with the base. To be safe, allow up toone minute for this to take place.Your answering system is not recording messages• Make sure system is turned ON (the ANSWER ON/OFF light is illuminated).• Make sure the Announce Only feature is set to OFF.You cannot hear recorded messages• Using the base volume control, raise the volume to a comfortable listening level.CL is flashing in the Base Message Window Display:• You need to set the day and time. Refer to the section(s) on Set the Clock in thisuser's manual.
34Additional InformationMaintenanceTaking care of your telephoneYour cordless telephone contains sophisticated electronic parts, so it must betreated with care.Avoid rough treatmentPlace the handset down gently. Save the original packing materials to protectyour telephone if you ever need to ship it.Avoid waterYour telephone can be damaged if it gets wet. Do not use the handset outdoorsin the rain, or handle it with wet hands. Do not install your base unit near a sink,bathtub or shower.Electrical stormsElectrical storms can sometimes cause power surges harmful to electronicequipment. For your own safety, use caution when using electric appliancesduring storms.Cleaning your telephoneYour telephone has a durable plastic casing that should retain its luster formany years. Clean it only with a soft cloth slightly dampened with water or a mildsoap. Do not use excess water or cleaning solvents of any kind.Remember that electrical appliances can cause serious injury if usedwhen you are wet or standing in water. If your base unit should fall intowater, DO NOT RETRIEVE IT UNTIL YOU UNPLUG THE POWER CORDAND TELEPHONE LINE CORDS FROM  THE WALL. Then pull the unitout by the unplugged cords.
35Additional InformationWhat does this limited warranty cover?•    The manufacturer of this VTech product, VTech Communications, warrants tothe holder of a valid proof of purchase (“Consumer” or “you”) that the productand all accessories provided by VTech in the sales package (“Product”) are freefrom material defects in material and workmanship, pursuant to the following termsand conditions, when installed and used normally and in accordance withoperation instructions, This limited warranty extends only to the Consumerfor Products purchased and used in the United States of America.What will VTech Communications do if the Product is not free frommaterial defects in materials and workmanship during the limitedwarranty period (“Materially Defective Product”)?•   During the limited warranty period, VTech’s authorized service representativewill repair or replace at VTech’s option, without charge, a Materially DefectiveProduct. If we repair this product, we may use new or refurbished replacementparts. If we choose to replace this product, we may replace it with a new orrefurbished product of the same or similar design. VTech will return repaired orreplacement products to you in working condition. VTech will retain defectiveparts, modules, or equipment. Repair or replacement of Product, at VTech’soption, is your exclusive remedy. You should expect the repair or replacementto take approximately 30 days.How long is the limited warranty period?•   The limited warranty period for the product extends for ONE(1) YEAR from thedate of purchase if we repair or replace a Materially Defective Product underthe terms of this limited warranty. This limited warranty also applies to repairedor replacement Products for a period of either (a) 90 days from the date therepaired or replacement Product is shipped to you or (b) the time remainingon the original one-year warranty; whichever is longer.What is not covered by this limited warranty?This limited warranty does not cover1.  Product that has been subjected to misuse, accident, shipping or other physicaldamage, improper installation, abnormal operation or handling,negligent, inundation, fire, water or other liquid intrusion; or2. Product that has been damaged due to repair, alteration or modification byanyone other than an authorized service representative of VTech; or3. Product to the extent that the problem experienced is caused by signalconditions, network reliability or cable or antenna systems; or4. Product to the extent that the problem is caused by use with non-VTechelectrical accessories; or5. Product whose warranty/quality stickers, Product serial numbers plates orelectronic serial numbers have been removed, altered or rendered illegible; orWarranty Statement
36Additional Information6. Product purchased, used, serviced, or shipped for repair from outside theUnited States, or used for commercial or institutional purposes (including butnot limited to Products used for rental purposes); or7. Product returned without valid proof of purchase (see 2 below); or8. Charges for installation or set up, adjustment of customer controls, andinstallation or repair of systems outside the unit.How do you get warranty service?•   To obtain warranty service in the United States of America, call 1-800-595-9511 for instructions regarding where to return the Product. Before calling forservice, please check the user’s manual. A check of the Product controls andfeatures may save you a service call.•    Except as provided by applicable law, you assume the risk of loss or damageduring transit and transportation and are responsible for delivery or handlingcharges incurred in the transport of Product(s) to the service location. VTechwill return repaired or replaced product under this limited warranty to you,transportation, delivery or handling charges prepaid. VTech assumes no riskfor damage or loss of the Product in transit.•    If the Product failure is not covered by this limited warranty, or proof of purchasedoes not meet the terms of this limited warranty, VTech will notify you and willrequest that you authorize the cost of repair and return shipping costs for therepair of Products that are not covered by this limited warranty.What must you return with the Product to get warranty service?1. Return the entire original package and contents including the Product to theVTech service location along with a description of the malfunction or difficulty;2. Include “valid proof of purchase” (sales receipt) identifying the Productpurchased (Product model) and the date of purchase or receipt; and3. Provide your name, complete and correct mailing address, and telephonenumber.Other Limitations•  This warranty is the complete and exclusive agreement between you andVTech. It supersedes all other written or oral communications related to thisProduct. VTech provides no other warranties for this product. The warrantyexclusively describes all of VTech’s responsibilities regarding the product.There are no other express warranties. No one is authorized to makemodifications to this limited warranty and you should not rely on any suchmodification.State Law Rights: This warranty gives you specific legal rights, and you mayalso have other rights, which vary from state to state.Warranty Statement
37Additional InformationLimitations: Implied warranties, including those of fitness for a particularpurpose and merchantability (an unwritten warranty that the product is fit forordinary use) are limited to one year from date of purchase. Some states do notallow limitations on how long an implied warranty lasts, so the above limitationmay not apply to you.•    In no event shall VTech be liable for any indirect, special, incidental, consequential,or similar damages (including, but not limited to lost profits or revenue,inability to use the product, or other associated equipment, the cost ofsubstitute equipment, and claims by third parties) resulting from the use of thisproduct, some states do not allow the exclusion or limitation of incidental orconsequential damages, so the above limitation or exclusion may not apply to you.Warranty Statement
38Additional InformationFCC, ACTA and IC RegulationsFCC Part 15This equipment has been tested and found to comply with the requirements for a ClassB digital device under Part 15 of the Federal Communications Commission (FCC) rules.These requirements are intended to provide reasonable protection against harmfulinterference in a residential installation. This equipment generates, uses and can radiateradio frequency energy and, if not installed and used in accordance with the instructions,may cause harmful interference to radio communications. However, there is no guaranteethat interference will not occur in a particular installation. If this equipment does causeharmful interference to radio or television reception, which can be determined by turningthe equipment off and on, the user is encouraged to try to correct the interference byone or more of the following measures:* Reorient or relocate the receiving antenna.* Increase the separation between the equipment and receiver.* Connect the equipment into an outlet on a circuit different from that to which thereceiver is connected.* Consult the dealer or an experienced radio/TV technician for help.Changes or modifications to this equipment not expressly approved by the partyresponsible for compliance could void the user’s authority to operate the equipment.To ensure safety of users, the FCC has established criteria for the amount of radiofrequency energy that can be safely absorbed by a user or bystander according to theintended usage of the product. This product has been tested and found to comply withthe FCC criteria. The handset may be safely held against the ear of the user. The baseunit shall be installed and used such that parts of the user’s body other than the handsare maintained at a distance of approximately 20 cm (8 inches) or more. If you chooseto use a clipping device, please make sure to only use the supplied VTech belt clip.FCC Part 68 and ACTAThis equipment complies with Part 68 of the FCC rules and with technical requirementsadopted by the Administrative Council for Terminal Attachments (ACTA). The label onthe back or bottom of this equipment contains, among other things, a product identifierin the format US:AAAEQ##TXXXX. This identifier must be provided to your local telephonecompany upon request.The plug and jack used to connect this equipment to premises wiring and the telephonenetwork must comply with applicable Part 68 rules and technical requirements adoptedby ACTA. A compliant telephone cord and modular plug is provided with this product. Itis designed to be connected to a compatible modular jack that is also compliant. AnRJ11 jack should normally be used for connecting to a single line and an RJ14 jack fortwo lines. See Installation Instructions in the user’s manual.The Ringer Equivalence Number (REN) is used to determine how many devices youmay connect to your telephone line and still have them ring when you are called. TheREN for this product is encoded as the 6th and 7th characters following the US: in theproduct identifier (e.g., if ## is 03, the REN is 0.3). In most, but not all areas, the sum ofall RENs should be five (5.0) or less. For more information, please contact your localtelephone company.This equipment may not be used with Party Lines. If you have specially wired alarm
39Additional InformationFCC, ACTA and IC Regulationsdialing equipment connected to your telephone line, ensure the connection of thisequipment does not disable your alarm equipment. If you have questions about what willdisable alarm equipment, consult your telephone company or a qualified installer.If this equipment is malfunctioning, it must be unplugged from the modular jack until theproblem has been corrected. Repairs to this telephone equipment can only be made bythe manufacturer or its authorized agents. For repair procedures, follow the instructionsoutlined under the Limited Warranty.If this equipment is causing harm to the telephone network, the telephone companymay temporarily discontinue your telephone service. The telephone company is requiredto notify you before interrupting service. If advance notice is not practical, you will benotified as soon as possible. You will be given the opportunity to correct the problemand the telephone company is required to inform you of your right to file a complaint withthe FCC. Your telephone company may make changes in its facilities, equipment,operation, or procedures that could affect the proper functioning of this product.Thetelephone company is required to notify you if such changes are planned.If this product is equipped with a corded or cordless handset, it is hearing aid compatible.If this product has memory dialing locations, you may choose to store emergencytelephone numbers (e.g., police, fire, medical) in these locations. If you do store or testemergency numbers, please:* Remain on the line and briefly explain the reason for the call before hanging up.* Perform such activities in off-peak hours, such as early morning or late evening.Industry CanadaThis equipment complies with regulations RSS210 and CS-03 of Industry Canada.Operation is subject to the following two conditions: (1) this device may not causeinterference, and (2) this device must accept any interference, including interferencethat may cause undesired operation of the device.The term ‘’IC: ‘’ before the certification/registration number only signifies that the IndustryCanada technical specifications were met.The Ringer Equivalence Number (REN) for this terminal equipment is 0.1. The REN isan indication of the maximum number of devices allowed to be connected to a telephoneinterface. The termination on an interface may consist of any combination of devicessubject only to the requirement that the sum of the RENs of all the devices does notexceed five.
40Additional InformationFREQUENCY CONTROLCrystal controlledPLL synthesizerTRANSMIT FREQUENCYBase: 5725 - 5850 MHzHandset: 2400 - 2483.5 MHzRECEIVE FREQUENCYBase: 2400 - 2483.5 MHzHandset: 5725 - 5850 MHzCHANNELS95 ChannelsNOMINAL EFFECTIVE RANGEMaximum power allowed by FCC andIC. Actual operating range may varyaccording to environmental conditionsat the time of use.SIZEHandset: 182mm x 54.3mm x 46mm (including  antenna)Base: 75mm x 166.6mm x 122.4mmCharger: 62mm x 76mm x 88mmWEIGHTHandset: 170 grams (including batteries)Base: 342 gramsCharger: 60.6 gramsPOWER REQUIREMENTSHandset: 3.6V 600mAh NiMHBase: 8V DC @ 650mACharger: 9 VDC @ 150mAMEMORYPhonebook: 50 Memory locations;up to 16 digits per locationCID: 50 Memory locationsSPECIFICATIONS ARE TYPICALAND MAY CHANGE WITHOUTNOTICE.Technical Specifications
41Additional InformationAnswering Calls................................11Adjust Handset Volume...................11Adjust Playback Volume..................27Answering System Operation.........22Audible Indicators......................22About Mailboxes.........................23About Announcements..............23Answering System FeatureSetup............................................24Base LEDs..........................................10Base Operation..................................13Belt Clip................................................31Calls Log (Caller ID-Call Waiting)...17Caller ID - Call Waiting ID.................17Call Forward and Call Transfer.......12Call Screening...................................28Charging of the Handset Battery ......7Check Battery Indicator.......................8Checking for Dial Tone........................8Connecting Power to Base Unit/Handset Charger...................................6Connecting to Phone Line..................8Conference Call.................................13Delete a Phonebook Entry...............16Deleting Caller ID..............................19Delete Your Announcement............24Delete Messages...............................27Dialing from Caller ID........................18Dial Type..............................................21Editing a Phonebook Entry...............16FCC, ACTA and IC Regulations......38Feature Summary..............................25Flash Function....................................11Handset and Base Indicators..........10Handset Icons.....................................10Handset LEDs....................................10Handset Operation.............................11Handset Settings................................20Handset Name....................................21Headset Operation.............................31Important Safety Instructions..............1Installation of Handset Battery............7Intercom Call.........................................12In Case Of Difficulty...............................32Key Tone.............................................20Language.............................................21Listen to Messages...........................26Maintenance........................................34Making Calls........................................11Message Window Display................29Mute Function.....................................12Parts Check List.....................................3Phonebook Operation........................14Redial Function....................................11Reviewing/Dialing from thePhonebook...........................................15Reviewing Caller ID...........................17Record Your Announcement..........23Review Your Announcement...........24Record a Memo.................................28Remote Access Commands..............30Remote Access..................................30Remote Access Commands............30Ringer  Volume..................................20Ringer  Tone........................................20Setup......................................................6Set the Clock.......................................22Storing a New Entry...........................14Storing a Caller ID...............................18Technical Specifications...................40The Handset Layout.............................4The Base Unit Layout............................5Turn Answering System On or Off...22Voice Menu.........................................30Wall Mounting.......................................9Warranty Statement............................35Index
91-000xxx-010-000issued 0VTECH TELECOMMUNICATIONS LTD.                               A member of THE VTECH GROUP OF COMPANIES.Distributed in the U.S.A. by VTech Communications, Inc. Beaverton, Oregon, 97008.Distributed in Canada by VTech Telecommunications Canada Ltd., Richmond, B.C.V6X 1Z9.Copyright 2005 for VTECH TELECOMMUNICATIONS LTD.Printed in China
43IMPORTANT SAFETY INSTRUCTIONS.............................................1Parts Check List.......................................................................................................3The Handset Layout................................................................................................4The Base Unit Layout..............................................................................................5GETTING STARTED............................................................................6Setup.........................................................................................................................6Connecting Power to Base Unit/Handset Charger..............................................6Installation of Handset Battery.........................................................................7Charging of the Handset Battery.....................................................................7Check Battery Indicator......................................................................................8Connecting to Phone Line......................................................................................8Checking for Dial Tone........................................................................................8Wall Mounting..........................................................................................................9BASIC OPERATION............................................................................10Handset and Base Indicators.............................................................................10Handset Icons.......................................................................................................10Handset LEDs.....................................................................................................10Base LEDs...............................................................................................................10Handset Operation................................................................................................11Making Calls.........................................................................................................11Answering Calls..................................................................................................11Adjust Handset Volume...................................................................................11Flash Function.................................................................................................... 11Redial Function ................................................................................................ 11Mute Function ................................................................................................... 12Intercom Call.....................................................................................................12Call Forward and Call Transfer .....................................................................12Conference Call ...............................................................................................13Base Operation ................................................................................................13Phonebook Operation..........................................................................................14Storing a New Entry...............................................................................................14Reviewing/Dialing from the Phonebook...........................................................15Editing a Phonebook Entry..................................................................................16Delete a Phonebook Entry................................................................................16    Calls Log (Caller ID-Call Waiting).....................................................................17Caller ID - Call Waiting ID ..................................................................................17Reviewing Caller ID ............................................................................................17Storing a Caller ID............................................................................................ 18Dialing from Caller ID.........................................................................................18Deleting Caller ID................................................................................................19Handset Settings.................................................................................................... 20Ringer  Volume.......................................................................................................20Ringer  Tone........................................................................................................20Table Of Contents
44Table Of ContentsKey Tone ............................................................................................................20Handset Name ..................................................................................................21Language ..........................................................................................................21Dial Type .................................................................................................................21ANSWERING SYSTEM OPERATION..................................................22     Audible Indicators................................................................................................22Turn Answering System On or Off........................................................................22Set the Clock......................................................................................................22About Mailboxes...............................................................................................23About Announcements........................................................................................23Record Your Announcement...........................................................................23Review Your Announcement.............................................................................24Delete Your Announcement.............................................................................24Answering System Feature Setup.................................................................24Feature Summary..............................................................................................25Listen to Messages............................................................................................26Adjust Playback Volume..................................................................................27Delete Messages..............................................................................................27Record a Memo................................................................................................28Call Screening...................................................................................................28Message Window Display...............................................................................29Remote Access.................................................................................................30Voice Menu..........................................................................................................30Remote Access Commands............................................................................30ADVANCED OPERATION................................................................31Headset Operation................................................................................................31Belt Clip ............................................................................................................. 31ADDITIONAL INFORMATION...........................................................32In Case Of Difficulty...............................................................................................32Maintenance..........................................................................................................34Warranty Statement..............................................................................................35FCC, ACTA and IC Regulations..........................................................................38Technical Specifications ....................................................................................40
Congratulations on your purchaseof this VTech productNEED HELP?Our representatives are hereto help you with any questionsconcerning the operation of thisproduct, available accessories,or any other related issues.Call Toll Free:1-800-595-9511In Canada, Call:1-800-267-7377or visit our website atwww. vtechphones. com

Navigation menu