VTech Telecommunications 80-6292-00 Cordless Phone with Instant Messaging User Manual I
VTech Telecommunications Ltd Cordless Phone with Instant Messaging Users Manual I
Contents
- 1. Users Manual I
- 2. Users Manual II
Users Manual I
This manual has all the feature operations and troubleshooting necessary to install
and operate your new VTech telephone. Please review this manual thoroughly to
ensure proper installation and operation of this innovative and feature rich VTech
product. For support, shopping, and everything new at VTech, visit our website at
www.vtechphones.com. In Canada, go to www.vtechcanada.com.
Congratulations
on purchasing your new VTech product.
Before using this telephone, please read the
Important safety instructions
on page 92 of this manual.
www.vtechphones.com
I
T ab le of contents
B efore you b egin . . . . . . . . . . . . . . . . . . . . 1
Minimum req uirements . . . . . . . . . . . . . . . . 1
Parts checklist . . . . . . . . . . . . . . . . . . . . . 2
Installation . . . . . . . . . . . . . . . . . . . . . . . . 3
H andset charger installation . . . . . . . . . . . . . . 3
Install handset battery . . . . . . . . . . . . . . . . . 4
Charge handset battery . . . . . . . . . . . . . . . . 5
Telephone base installation . . . . . . . . . . . . . . 7
Install MS N Messenger/A IM software . . . . . . . . . 8
Install IS 6110 phone software . . . . . . . . . . . . 11
R unning the IS 6110 phone software. . . . . . . . . 19
S ettings of the IS 6110 phone software . . . . . . . 20
To setup/change the messenger account:. . . . . . 21
S ettings for running the IS 6110 software: . . . . . . 21
A bout tab of the IS 6110 phone software. . . . . . . 22
L og into the IS 6110 phone software . . . . . . . . . 23
To login on the computer: . . . . . . . . . . . . . . 23
To login on using the handset: . . . . . . . . . . . . 25
R unning the IS 6110 phone software. . . . . . . . . 26
Belt clip & headset (optional) . . . . . . . . . . . . 28
H eadset . . . . . . . . . . . . . . . . . . . . . . . 28
Belt clip. . . . . . . . . . . . . . . . . . . . . . . . 28
G etting to k now the IS 6 110. . . . . . . . . . . . . . 29
Telephone base layout . . . . . . . . . . . . . . . . 29
S tatus lights on the telephone base . . . . . . . . . 30
H andset layout . . . . . . . . . . . . . . . . . . . . 31
H andset status icons. . . . . . . . . . . . . . . . . 32
U sing the handset . . . . . . . . . . . . . . . . . . 33
S oftkeys . . . . . . . . . . . . . . . . . . . . . . . 33
Basic navigation . . . . . . . . . . . . . . . . . . . 33
E ntering characters . . . . . . . . . . . . . . . . . 33
Tex t entry tips . . . . . . . . . . . . . . . . . . . . 34
Chart of characters . . . . . . . . . . . . . . . . . 35
S ymbol table . . . . . . . . . . . . . . . . . . . . . 37
T elephone settings . . . . . . . . . . . . . . . . . . 38
R inger . . . . . . . . . . . . . . . . . . . . . . . . 38
Play or delete sound clips . . . . . . . . . . . . . . 38
R ecord sound clips . . . . . . . . . . . . . . . . . 39
To record sound clip using microphone: . . . . . . . 39
To record a sound clip using an audio cable: . . . . 39
R inger melody . . . . . . . . . . . . . . . . . . . . 41
R inger volume . . . . . . . . . . . . . . . . . . . . 42
Display . . . . . . . . . . . . . . . . . . . . . . . . 43
W allpapers . . . . . . . . . . . . . . . . . . . . . . 43
Color S cheme . . . . . . . . . . . . . . . . . . . . 44
L CD Brightness . . . . . . . . . . . . . . . . . . . 45
S ettings . . . . . . . . . . . . . . . . . . . . . . . 46
Clock setting . . . . . . . . . . . . . . . . . . . . . 46
To synchroniz e the telephone clock with
the computer/caller ID: . . . . . . . . . . . . . . 46
To set the clock manually: . . . . . . . . . . . . . . 47
K ey tone . . . . . . . . . . . . . . . . . . . . . . . 48
IM alert tone . . . . . . . . . . . . . . . . . . . . . 49
Clear voice mail . . . . . . . . . . . . . . . . . . . 50
Default setting . . . . . . . . . . . . . . . . . . . . 51
Default setting table . . . . . . . . . . . . . . . . . 52

www.vtechphones.com II
Table of contents
M essenger . . . . . . . . . . . . . . . . . . . . . . . 53
Buddy status window . . . . . . . . . . . . . . . . 53
Active chat window. . . . . . . . . . . . . . . . . . 53
O nline . . . . . . . . . . . . . . . . . . . . . . . . 54
1HƀKPG ........................54
Active status . . . . . . . . . . . . . . . . . . . . . 55
To accept the Internet voice connection (VoIP)
request: . . . . . . . . . . . . . . . . . . . . . 55
Reviewing unread instant messages: . . . . . . . . 55
Send out instant messages . . . . . . . . . . . . . 56
Send a VoIP request . . . . . . . . . . . . . . . . . 57
Accept an incoming instant voice request . . . . . . 58
VoIP/IM request from buddy outside the current
buddy chat window. . . . . . . . . . . . . . . . 59
Incoming standard call while using IM in
messenger . . . . . . . . . . . . . . . . . . . . 60
Incoming standard call while using VoIP in
messenger . . . . . . . . . . . . . . . . . . . . 61
Incoming Internet voice call (VoIP) while idle . . . . 62
Incoming Internet voice call (VoIP) while on a
standard call . . . . . . . . . . . . . . . . . . . 62
Simultaneous incoming standard call and VoIP
call while on a standard call . . . . . . . . . . . 63
8Q+2ECNNTGSWGUVEQOGUſTUV . . . . . . . . . . . . 63
5VCPFCTFECNNEQOGUſTUV . . . . . . . . . . . . . . 63
Multiple incoming Internet voice calls (VoIP) while
on a standard call . . . . . . . . . . . . . . . . 64
View buddy history. . . . . . . . . . . . . . . . . . 64
Delete buddy history . . . . . . . . . . . . . . . . . 65
View buddy information . . . . . . . . . . . . . . . 65
Choose your IM status . . . . . . . . . . . . . . . . 65
Sign out instant messenger . . . . . . . . . . . . . 65
Telephone operation . . . . . . . . . . . . . . . . . 66
Making calls on the Home line. . . . . . . . . . . . 66
Receiving calls on the Home line . . . . . . . . . . 66
Ending calls on the Home line . . . . . . . . . . . . 67
Speakerphone operation. . . . . . . . . . . . . . . 67
Mute . . . . . . . . . . . . . . . . . . . . . . . . . 67
Volume . . . . . . . . . . . . . . . . . . . . . . . . 67
Find handset . . . . . . . . . . . . . . . . . . . . . 68
Redial . . . . . . . . . . . . . . . . . . . . . . . . 68
Directory . . . . . . . . . . . . . . . . . . . . . . . 69
Search and review a directory entry . . . . . . . . . 69
Edit a directory entry . . . . . . . . . . . . . . . . . 70
Delete a directory entry . . . . . . . . . . . . . . . 70
Delete all directory entries . . . . . . . . . . . . . . 70
Add a new entry in the directory . . . . . . . . . . . 71
Caller ID operation . . . . . . . . . . . . . . . . . . 72
Caller ID with call waiting . . . . . . . . . . . . . . 72
Call log . . . . . . . . . . . . . . . . . . . . . . . . 73
Save call log entry to the directory . . . . . . . . . 74
Make call log entries ready to dial or store . . . . . 74
Delete call log entry . . . . . . . . . . . . . . . . . 75
Delete all call log entries . . . . . . . . . . . . . . . 75
H andset screen display message . . . . . . . . . . 76
R egistration and de-registration . . . . . . . . . . 78

www.vtechphones.com III
Registration of handset . . . . . . . . . . . . . . . 78
De-registration of handset . . . . . . . . . . . . . . 80
Troubleshooting. . . . . . . . . . . . . . . . . . . . 81
O perating range . . . . . . . . . . . . . . . . . . . . 89
Maintenance . . . . . . . . . . . . . . . . . . . . . . 89
About cordless telephones . . . . . . . . . . . . . 90
W arranty . . . . . . . . . . . . . . . . . . . . . . . . 90
Important safety instructions . . . . . . . . . . . . 92
F CC, ACTA and IC regulations . . . . . . . . . . . . 93
The RBRC® Seal . . . . . . . . . . . . . . . . . . . 94
6GEJPKECNURGEKſECVKQP U ...............95

www.vtechphones.com
1
Before you begin
Minimum req uirements
%QPſTO[QWTU[UVGOOGGVUVJGHQNNQYKPIOKPKOWOTGSWKTGOGPVU
MSN Messenger or AIM account.
PC with an available USB port.
PC with an operating system of Windows Vista/X P/2000 (does not support Window 98/ME).
Broadband Internet access (cable/DSL).
IMP ORTAN T:
In order to access instant messaging with the IS6110, you must either have an account with MSN
Messenger or AIM service. If you don’t already have a MSN Messenger or AIM account, you may
sign up for a free MSN Messenger account at http://www.hotmail.com or for a free AIM account
at http://www.aim.com.
Y ou must either install the MSN Messenger or AIM software before installing the IS6110 phone
software.
•
•
•
•
•
•
www.vtechphones.com 2
Before you begin
Before you begin
• To purchase a new• To purchase a newTo purchase a new
battery, visit our
website at www.
vtechphones.
com or call VTech
Communications,
Inc. at 1 (800) 595-
9511 in the United
States. In Canada,
go to www.
vtechcanada.com.
or dial 1 (800) 267-
7377.
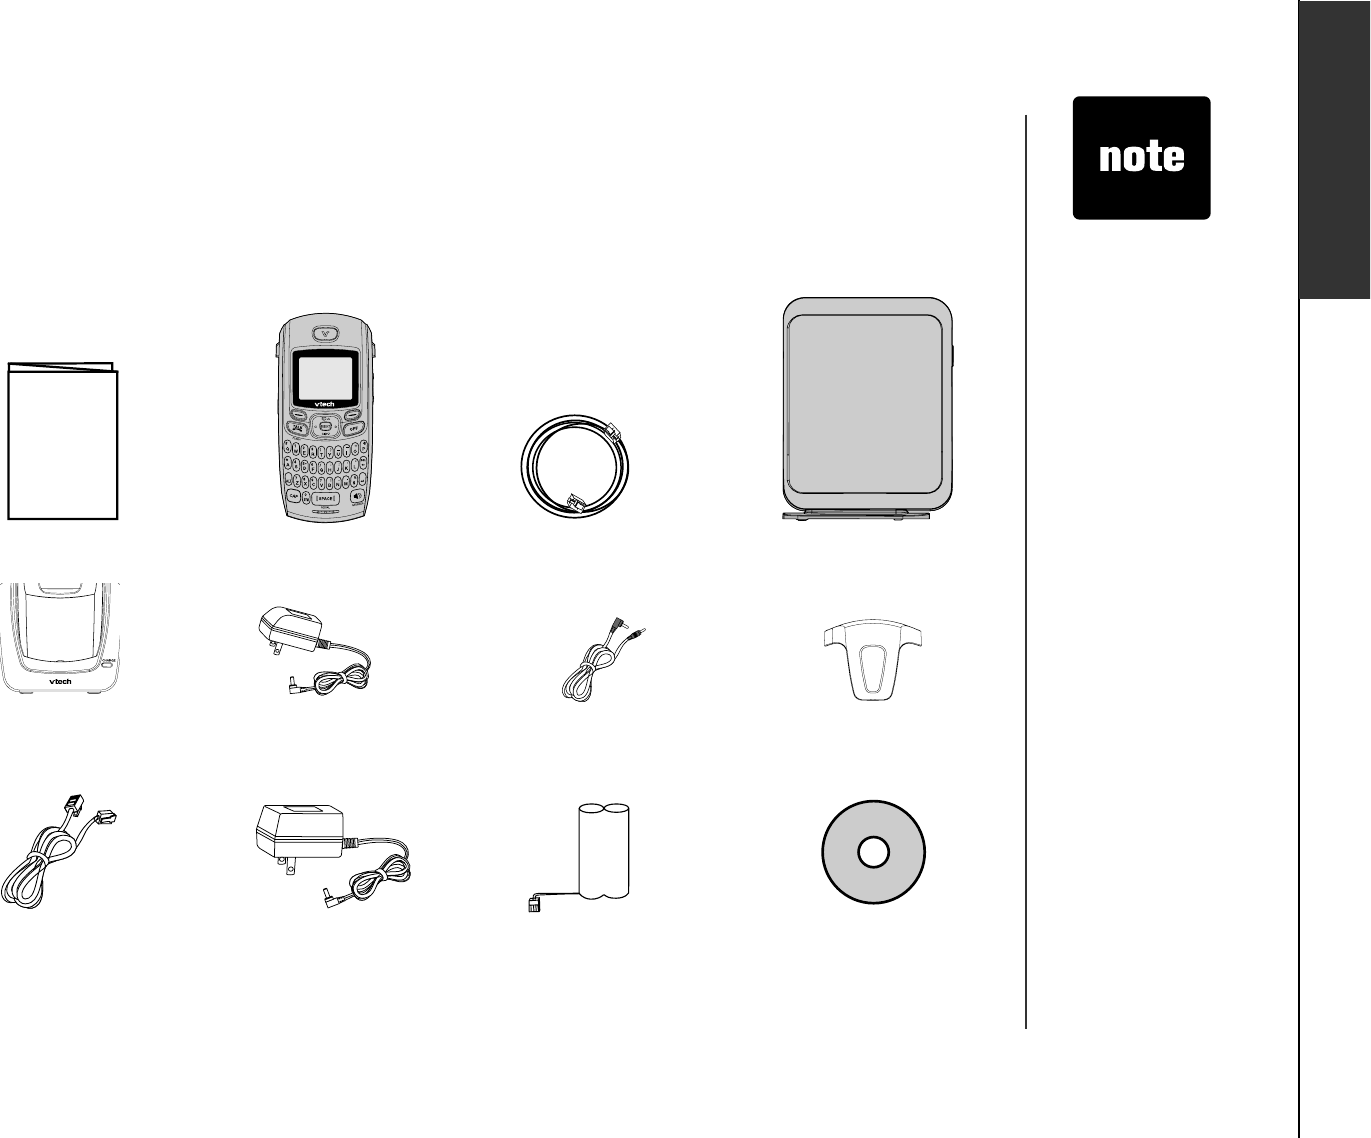
Parts checklist
You telephone contains the followings items. Save your sales receipt and original packaging in case
you need warranty service.
4. Telephone base2. Handset
1. Q uick start guide 3. USB cable
5. Handset
charger
9. Telephone
line cord
11. Battery
6. Handset charger
power adapter
10. Telephone base
power adapter
8. Belt clip
12. CD-ROM(VTech
IS6110 software for
MSN Messenger/
AIM software)
7. Audio cable
www.vtechphones.com
3
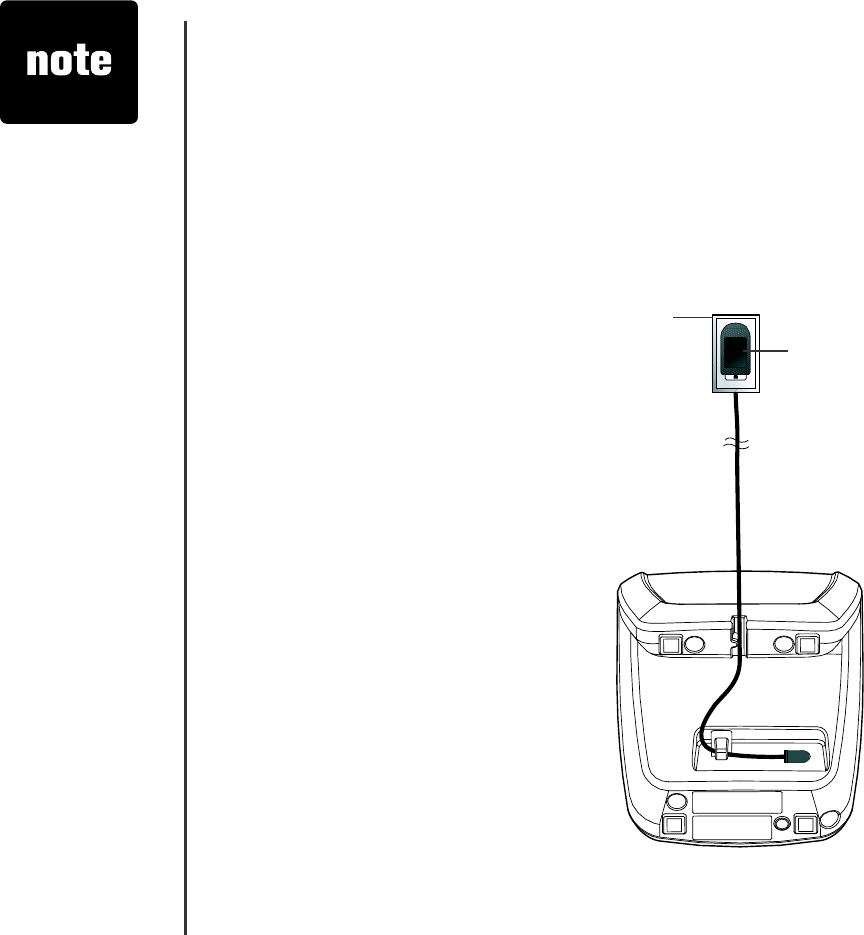
Handset charger installation
Plug the smaller power adapter into the power port on the bottom of the handset charger. Route
the cord through the slots and plug the other end into the electrical outlet as shown below. Make
sure the electrical outlet is not controlled by a wall switch.
The power adapters for the handset charger and the telephone base are different. The power
adapter for the handset charger is the smaller adapter.
•
•
Installation
Use only the AC
power adapter
supplied with this
telephone.
This power
adapter is
intended to be
correctly oriented
in a vertical
QTƀQQTOQWPV
position.
•
•
Handset charger
power adapter
Electrical outlet
Bottom view of
handset charger
www.vtechphones.com 4
Installation
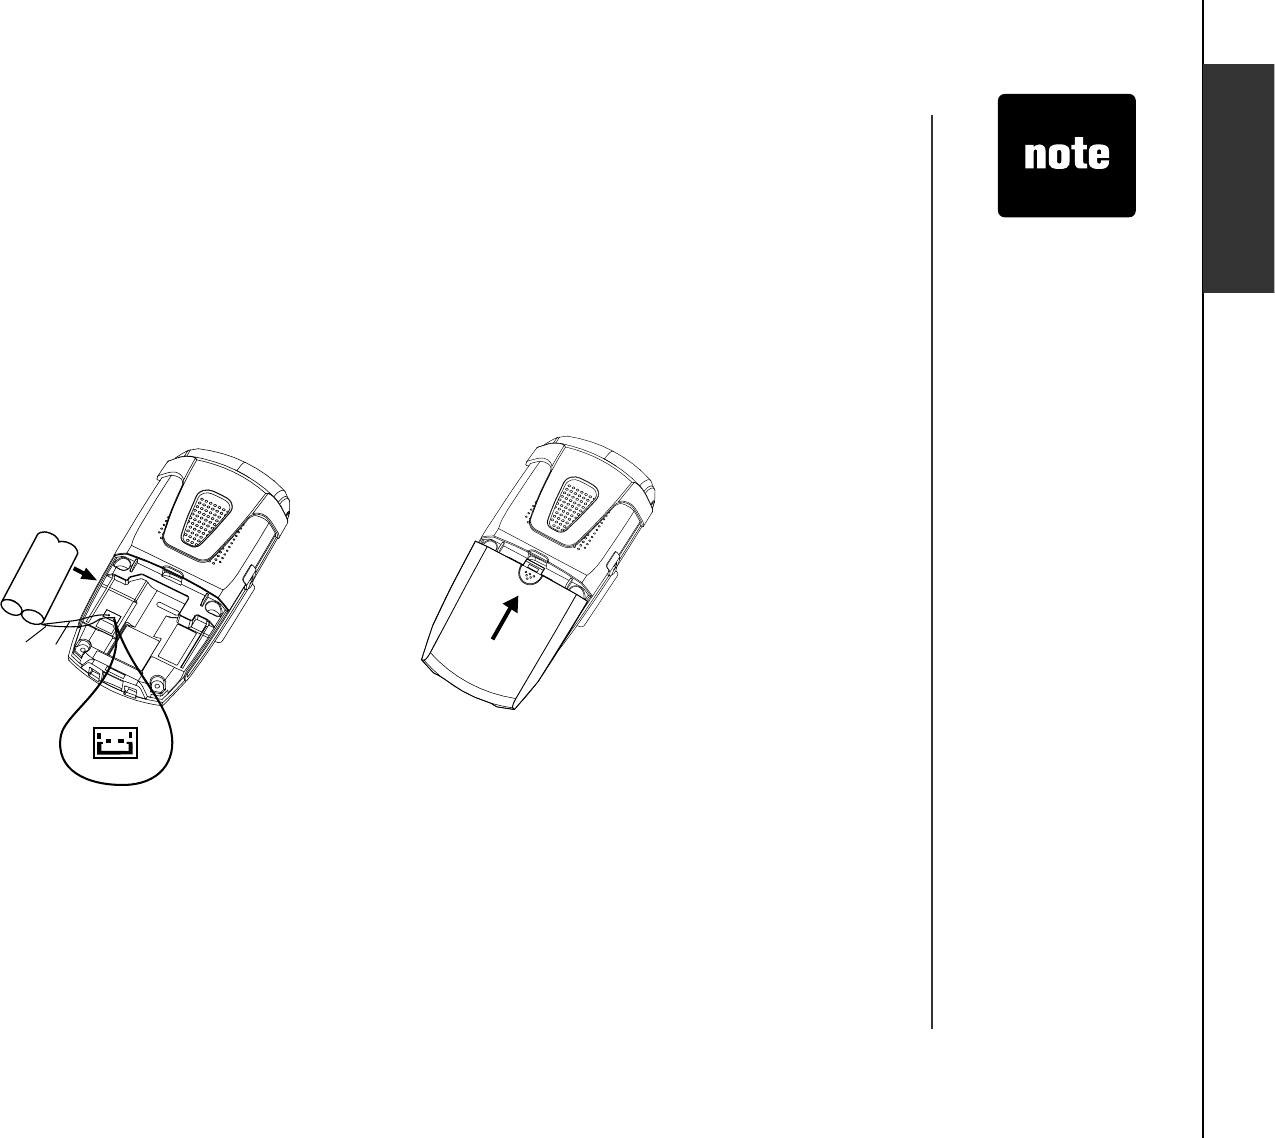
Install handset battery
Step 1: Align the two holes of the battery plug with the socket pins in the handset battery
compartment, matching the red and black wires of the color-coded label.
Step 2: Place the battery in the compartment with the wires in the bottom left corner.
Step 3: Position the battery compartment cover and slide it up until it clicks into place.
• To purchase
replacement
batteries,
visit us on the
web at www.
vtechphones.
com or call VTech
Communications,
Inc. at 1 (800)
595-9511.
In Canada,
go to www.
vtechcanada.com
or dial 1 (800)
267-7377.
Installation
Red
wire
Black
wire
Red
wire
Black
wire
www.vtechphones.com
5
Charge handset battery
After battery installation, there may be enough power for short calls. For optimal performance, we
recommend that you place the handset in the handset charger and allow the battery to charge for 16
hours before use. The CHARGE light on the handset charger will be lit to indicate that the handset
is charging. You can keep the battery charged by returning the handset to the handset charger after
each use. When the battery power is completely depleted, a full recharge takes about 16 hours. If the
handset will not be used for a long period, remove the battery to prevent possible leakage.
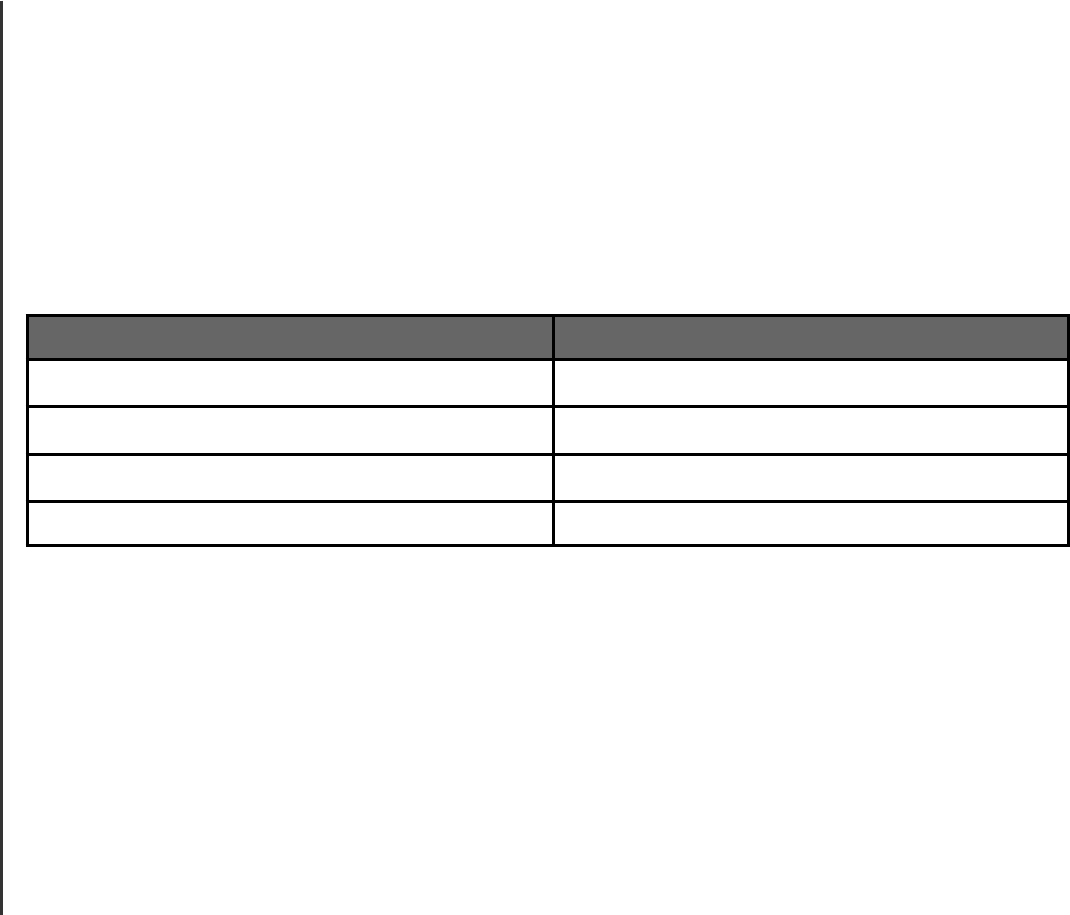
After the battery is fully charged, you can expect the following performance:
Operation Operating time
While in use (handset/headset) 7 hours
While in use (speakerphone) 2 hours
While in use (IM mode) 2 hours
While not in use (standby*) 96 hours
*Handset is off the charger but not in use.
The battery needs charging when:
• A new battery is installed in the handset.
Ŗ 6JGDCVVGT[KPFKECVQTQPVJGJCPFUGVFKURNC[KUƀCUJKPICPFGORV[
Installation

www.vtechphones.com 6
Installation
Charge handset battery
CAU TION:
6QTGFWEGVJGTKUMQHſTGQTKPLWT[TGCFCPFHQNNQYVJGUGKPUVTWEVKQPU
1. Use only the battery(ies) provided or their equivalent.
&QPQ VFKURQU GQ HVJ GDCVVGT[KGU KPCſTG %JGE MNQEC NYCUV GOCPCIGOGP VEQFG UHQ TURGEKC N
disposal instructions.
3. Do not open or mutilate the battery(ies). Released electrolyte is corrosive and may cause burns
QTKPLWT[VQVJGG[GUQTUMKP6JGGNGEVTQN[V GOC[DGVQZKEKHUYCNNQYGF
4. Exercise care in handling battery(ies) in order not to create a short circuit with conductive materials
such as rings, bracelets, and keys. The battery and/or conductor may overheat and cause
burns.
%JCTIGVJGDCVVGT[KGURTQXKFGFYKVJQTKFGPVKſGFHQTWUGYKVJVJKURTQFWEVQPN[KPCEEQTFCPEGYKVJ
VJGKPUVTWEVKQP UCPFNKOKVCVKQPUURGEKſGFKPVJKUOCPWCN
WARNING: TO PREVENT FIRE OR SHOCK HAZ ARD, DO NOT EXPOSE THIS PRODUCT TO
WATER OR ANY TYPE OF MOISTURE.
Installation
www.vtechphones.com
7
• The power
adapter is
intended to be
correctly oriented
in a vertical
QTƀQQTOQWPV
position.
• Use only the
power adapter
provided in this
package; using
any other power
adapter not
manufactured
by VTech could
damage the
telephone.
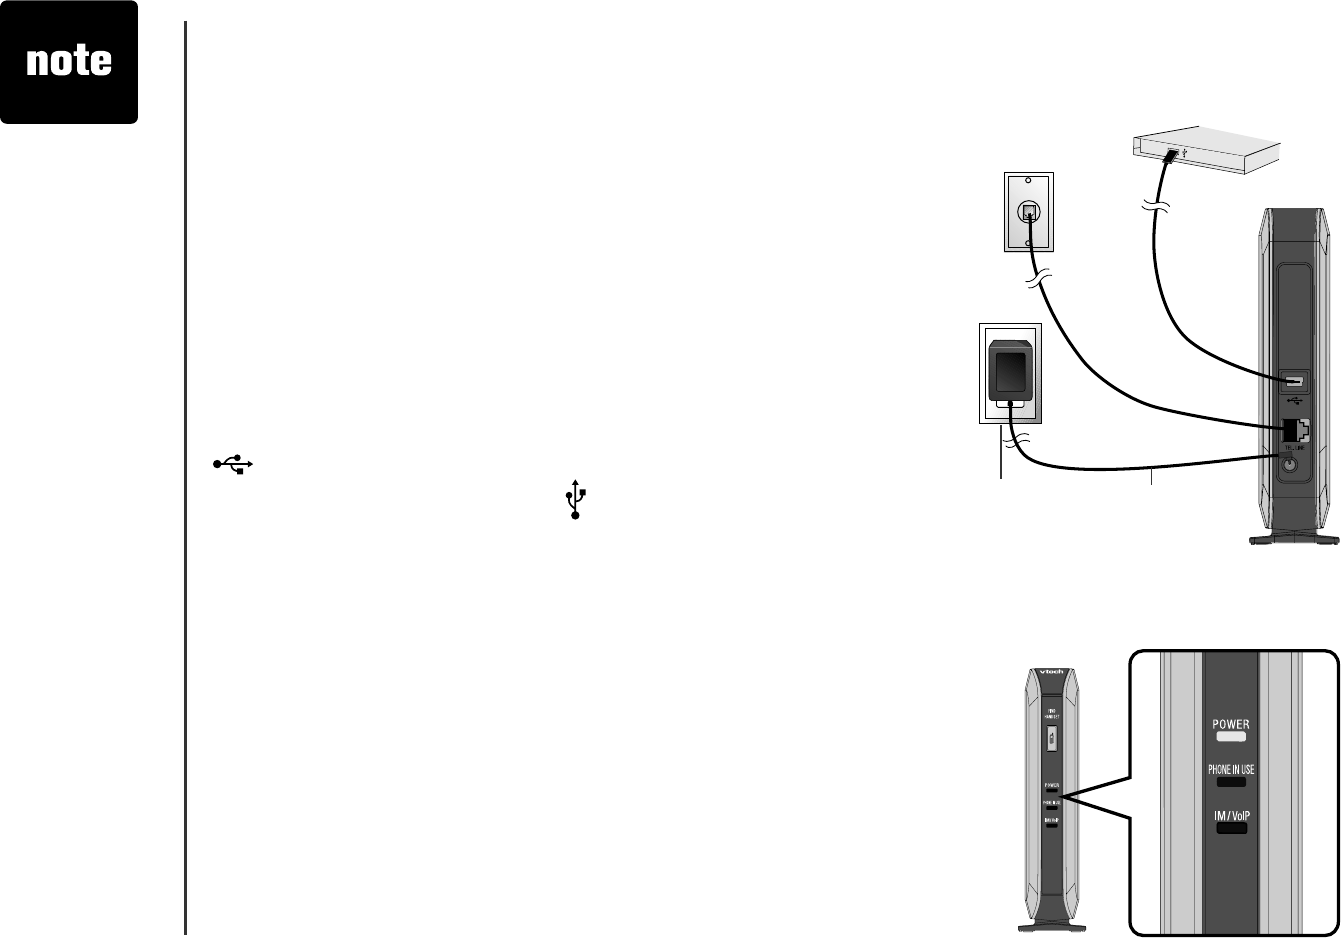
Telephone base installation
To install the telephone base:
Step 1: Install telephone line
2NWIQPGGPFQHVJGVGNGRJQPGNKPGEQTFKPVQVJGVGNGRJQPGNKPGLCEM
on the back of the telephone base. Then plug the other end of the
cord into a telephone outlet. If you have DSL, you may need to install
C&5.ſNVGTDGVYGGPVJG+5VGNGRJQP GDCUGCPFVJGYCNNLCEM
%QPVCEV[QWT&5.RTQXKFGTHQTOQTGKPHQTOCVKQPQP&5.ſNVGTUCPF
telephone line interference.
Step 2: Install USB cable
Using the USB cable provided, connect one end into the port labelled
, located on the back of the telephone base. Connect the other
end into an available USB port on your computer.
Step 3: Turn power on
Plug the telephone base power adapter into the power port located
on the back of the IS6110 telephone base and the other end into
an electrical outlet not controlled by a wall switch. This turns the
telephone on. Do NOT interrupt the telephone installation process
by unplugging the power adapter or by using the handsets until
the POWER indicator light on the front of telephone base is lit
steadily.
Step 4: Check diagnostic lights
The POWER light should be on indicating the power is on.
TEL.LINE
Installation
Computer
Telephone
outlet
Electrical
outlet
Telephone
base
USB cable
Telephone
line cord
Telephone base
power adapter
www.vtechphones.com 8
Installation
Installation
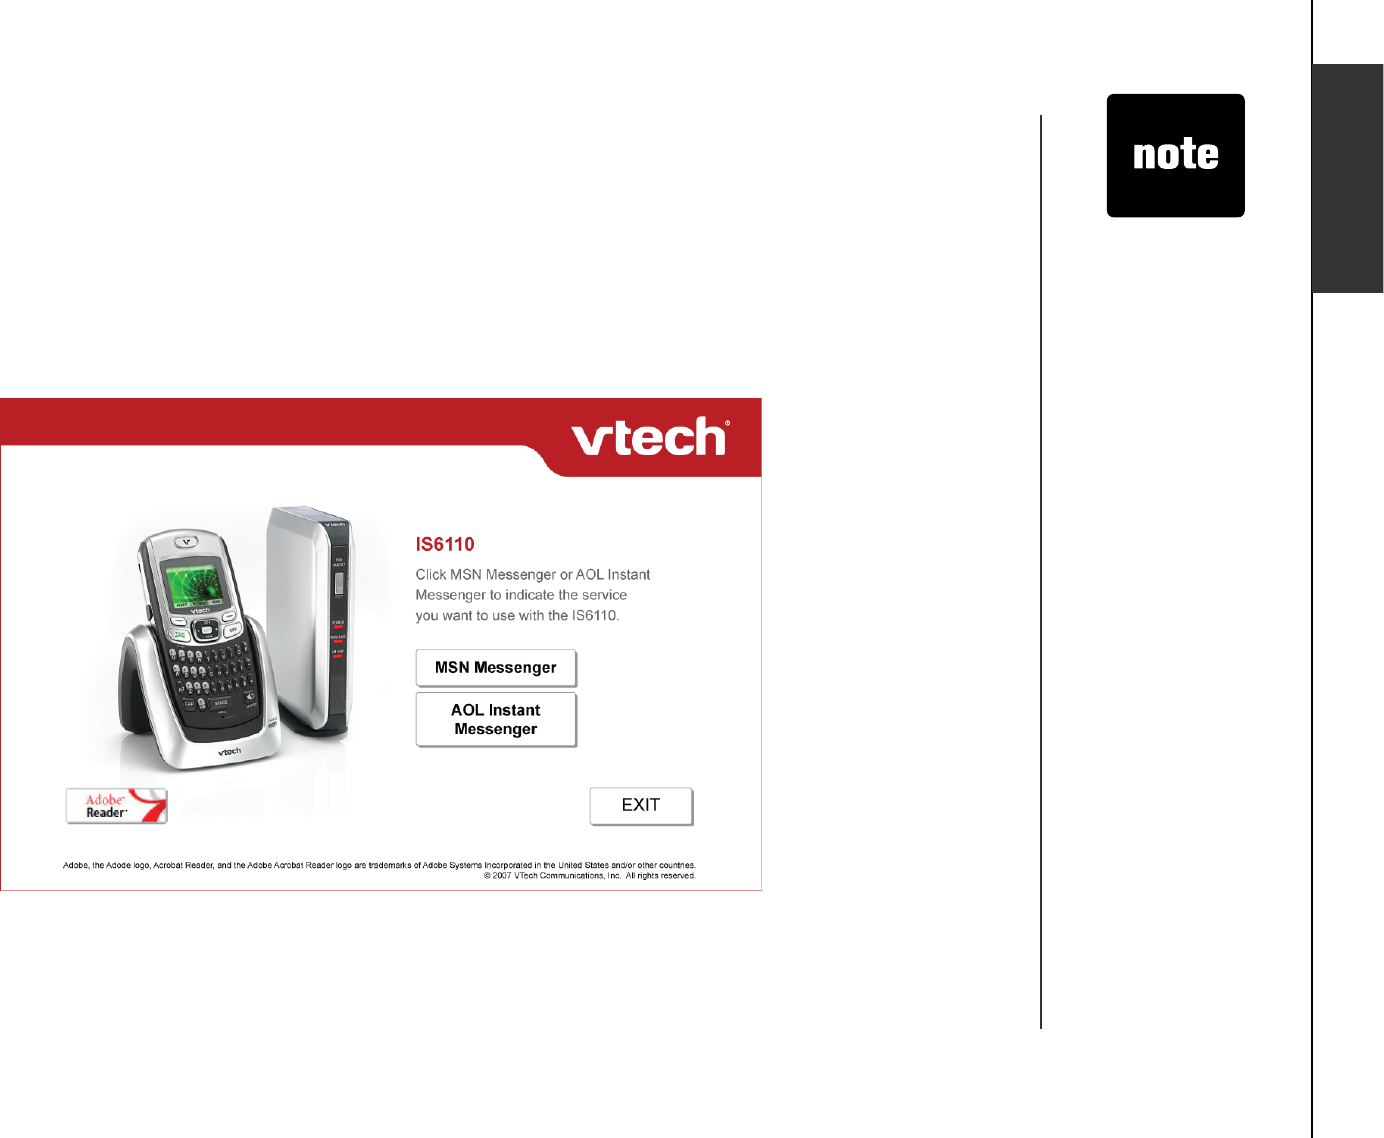
Install MSN Messenger/AIM software
Before installing IS6110 phone software and using MSN Messenger/AIM on the handset, MSN
/GUUGPIGT#+/UQHVYCTGOWUVDGKPUVCNNGFKP[QWTEQORWVGTſTUV
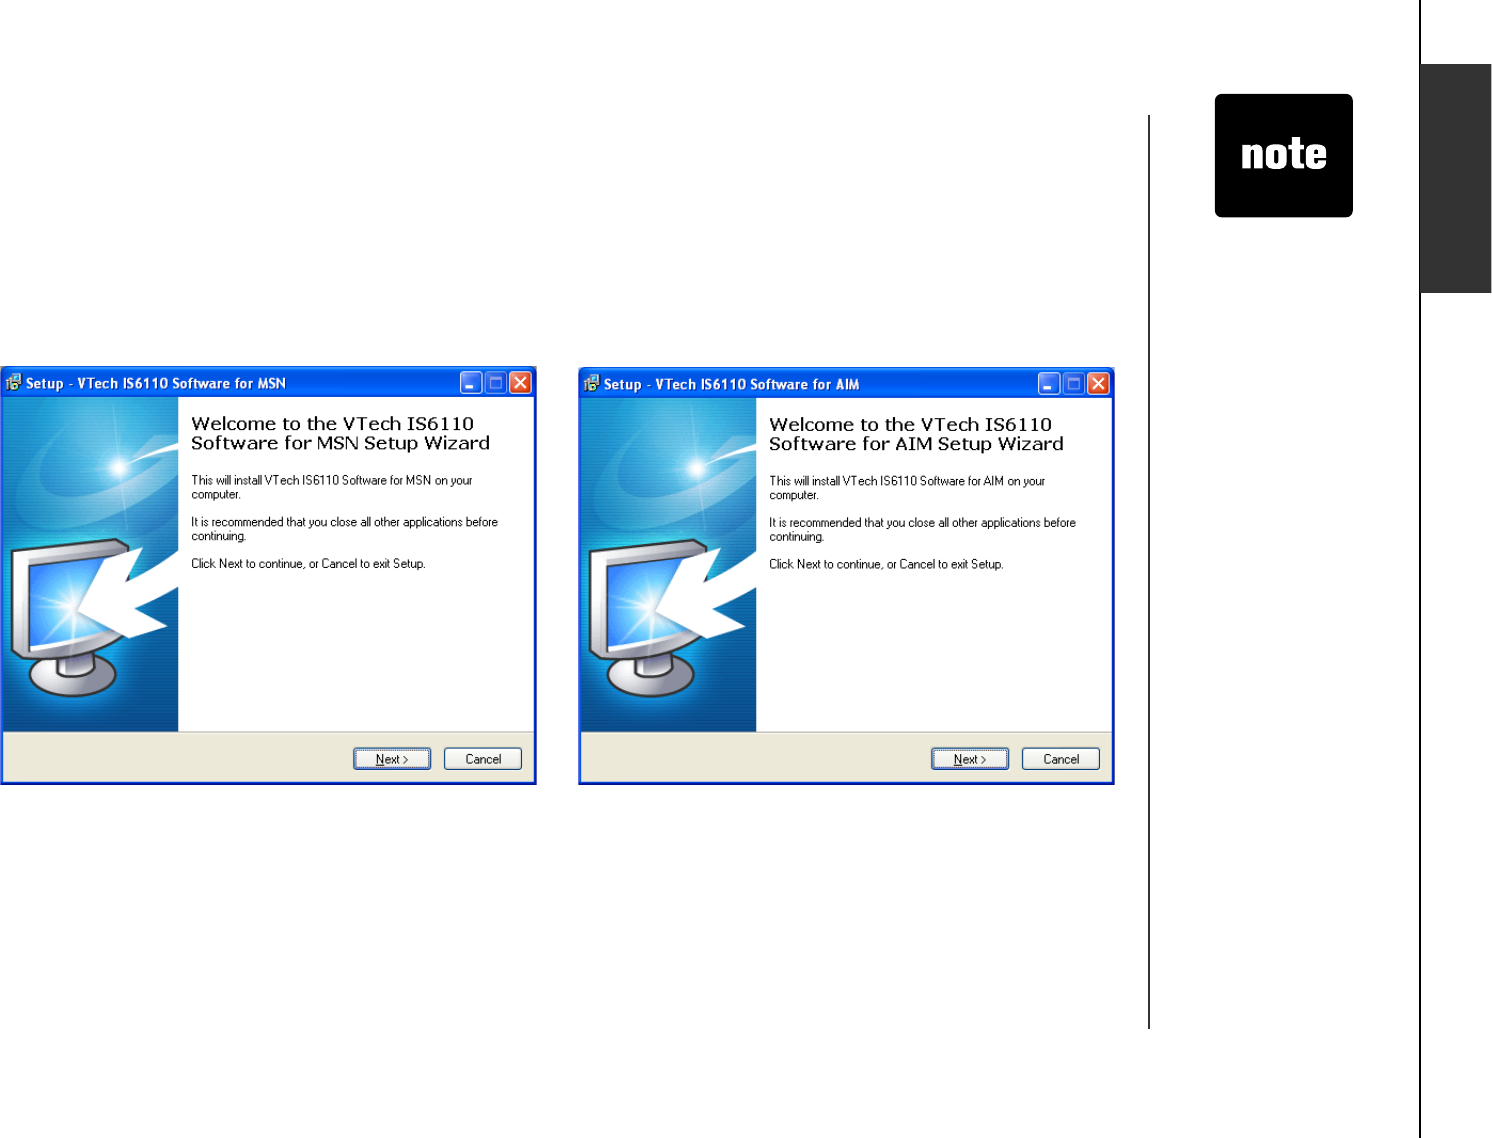
To install the MSN Messenger/AIM software:
Step 1: Insert the enclosed VTech IS6110 software CD-ROM into your computer. The CD-ROM will
run automatically and the following screen will be shown.
Press the EX IT
button to exit the
installation.
•

www.vtechphones.com
9
Installation
Install MSN Messenger/AIM software
If you want to install MSN Messenger, click MSN Messenger button. The software
will check your computer to see what operating system you are using. If you are using
Windows 2000, the screen 2a below will be displayed. If you are using Windows XP or
Vista, the screen 2b below will be displayed.
If you want to install AIM, click AOL Instant Messenger button and go to Step 3.
2a - MSN Messenger for Windows 2000 2b - Windows Live Messenger for Windows
XP/Vista
Click the D ownload MSN Messenger button or D ownload Windows L ive Messenger
button to start the installation on the screen 2a or 2b respectively. Follow the instructions
for downloading. After the installation is complete, click the NEXT button. G o to Step 4
for the installation of the IS6110 phone software.
•
•
•
Step 2:
Click the BACK
button anytime
to return to the
previous screen.
•
www.vtechphones.com 10
Installation
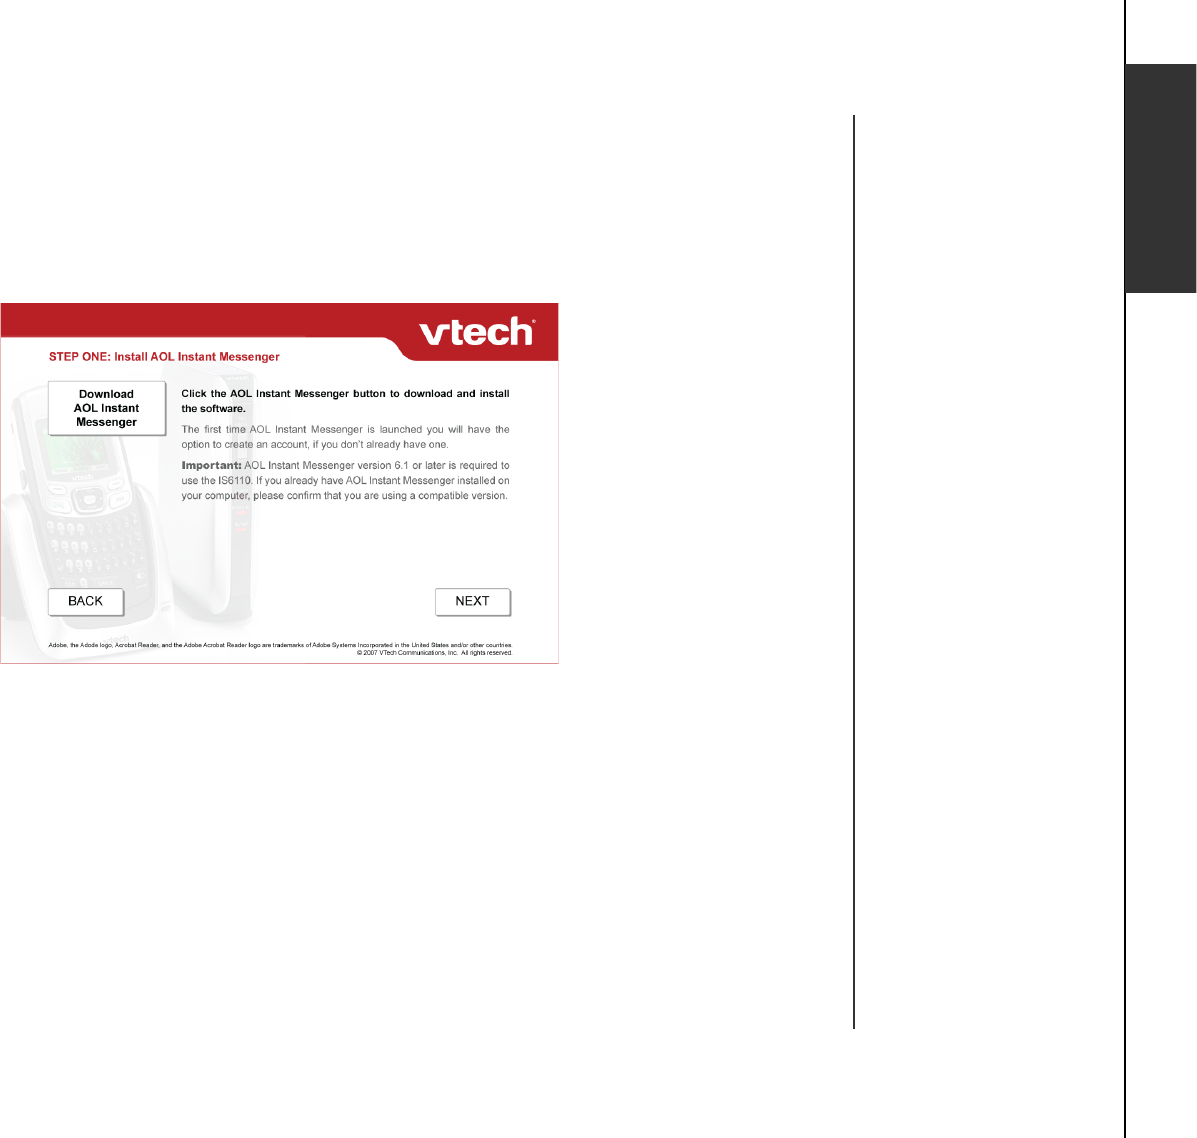
Install MSN Messenger/AIM software
The following screen will be displayed after you click the AOL Instant Messenger
button to install the AIM software.
Click the Download AOL Instant Messenger button to start the installation. Follow the
instructions for downloading. After the installation is complete, click the NEXT button.
Go to Step 4 for installation of the IS6110 phone software.
•
•
Step 3:
Installation
www.vtechphones.com
11
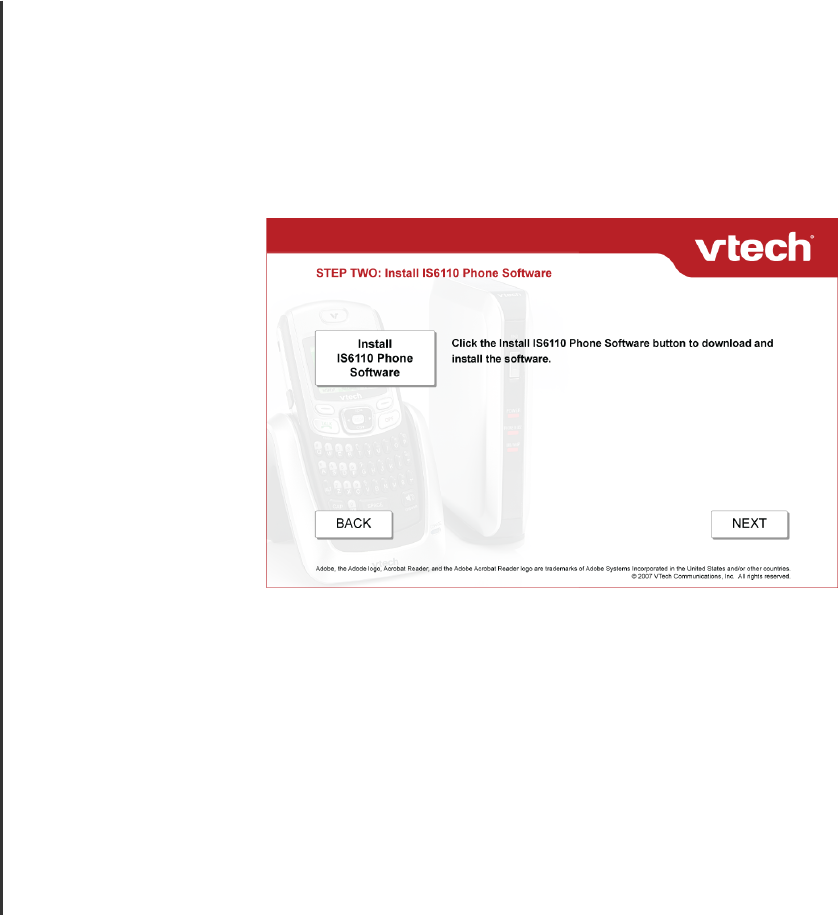
Installation
Install IS6110 phone software
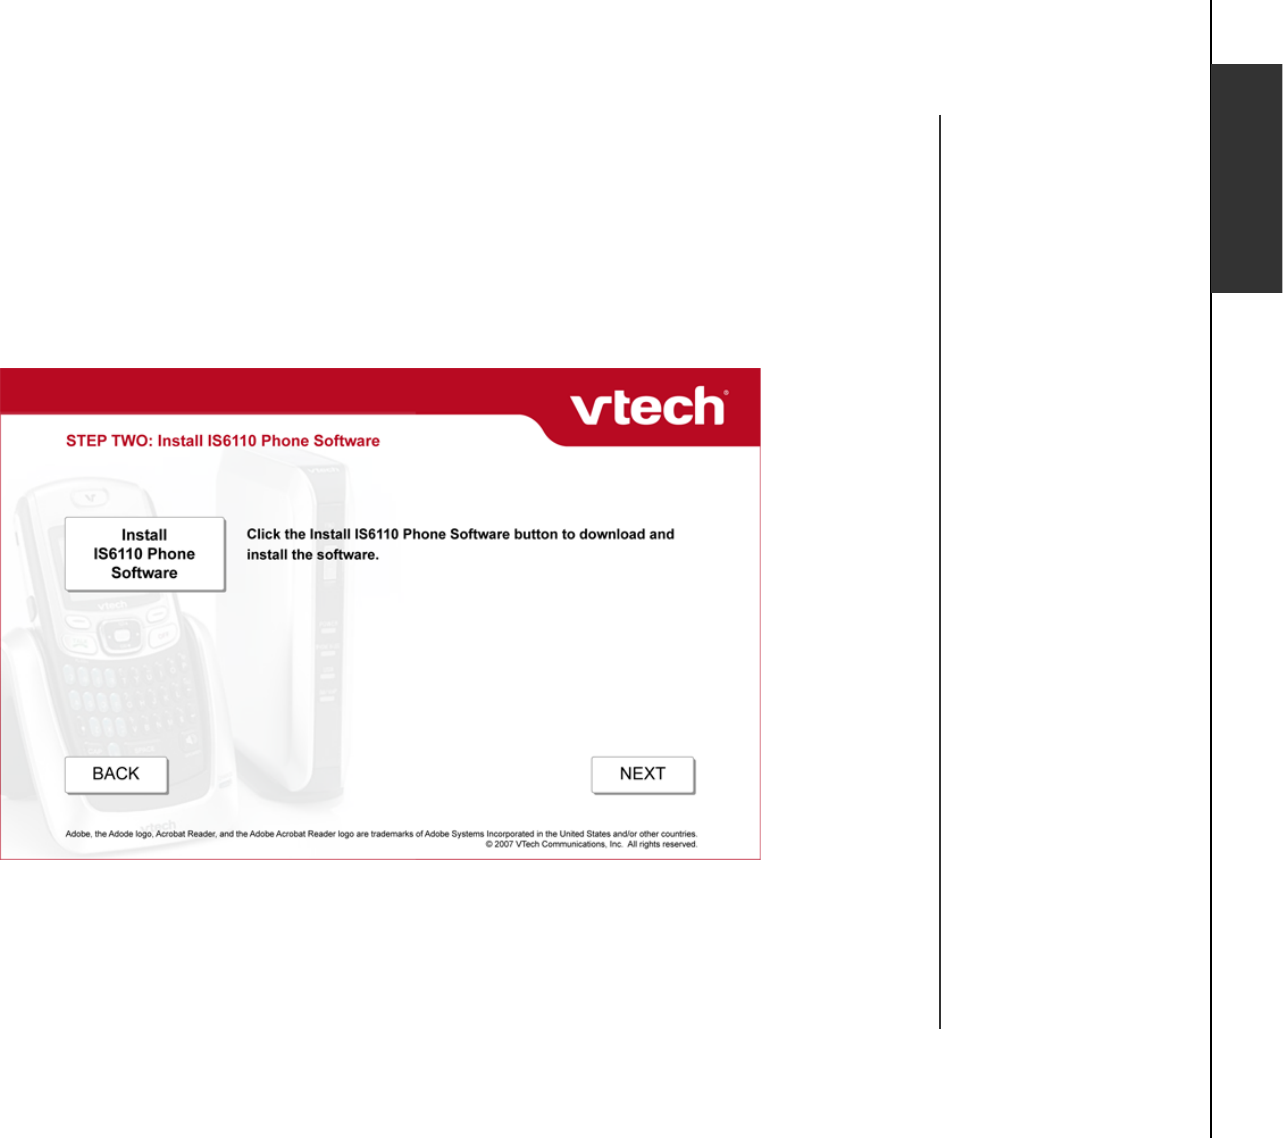
After the installation of MSN Messenger or AIM software is complete, you will be prompted
to install the IS6110 phone software. The following screen will be displayed. Click the
Install IS6110 Phone Software button to start the installation.
•
Step 4:
www.vtechphones.com 12
Installation
Installation
Install IS6110 phone software
Step 5: A VTech IS6110 setup window will be displayed. If you are installing MSN Messenger, the
screen 2a below will be displayed. If you are installing AIM, the screen 2b below will be
displayed. Click the Nex t button to proceed.
2a : 2b:
Click the Cancel
button to cancel
installation.
•
www.vtechphones.com
13
Installation
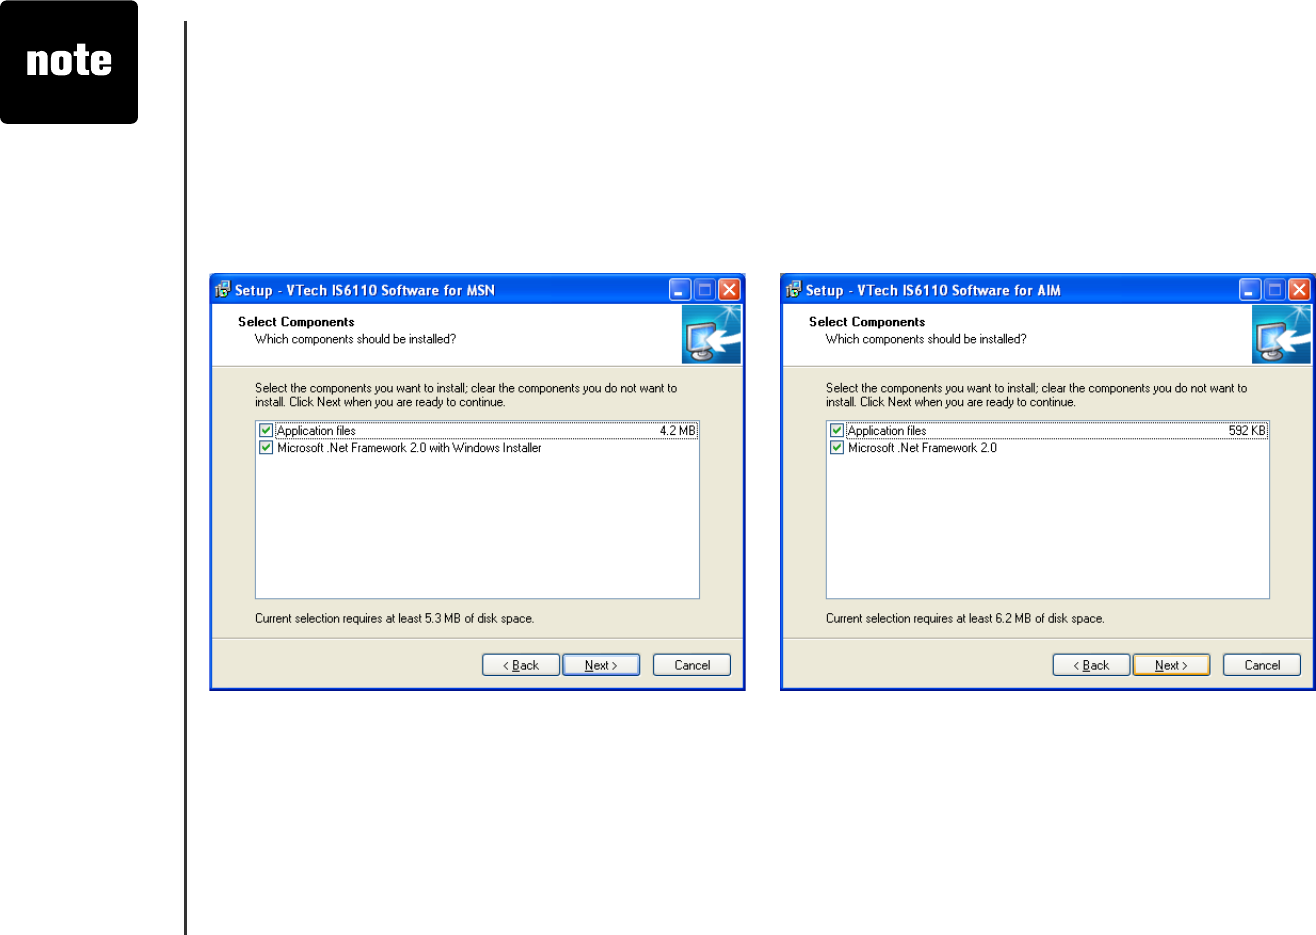
Install IS6110 phone software
Step 6: Make sure the boxes beside #RRNKECVKQPſNG U and Microsoft .Net Framework 2.0 are
checked. If you are installing MSN Messenger, the screen 2a below will be displayed. If you are
installing AIM, the screen 2b below will be displayed. Click the Next button to proceed.
2a: 2b:
Click the Cancel
button to cancel
installation. Click
the Back button
to go back to the
previous step.
•
www.vtechphones.com 14
Installation
Installation
Install IS6110 phone software
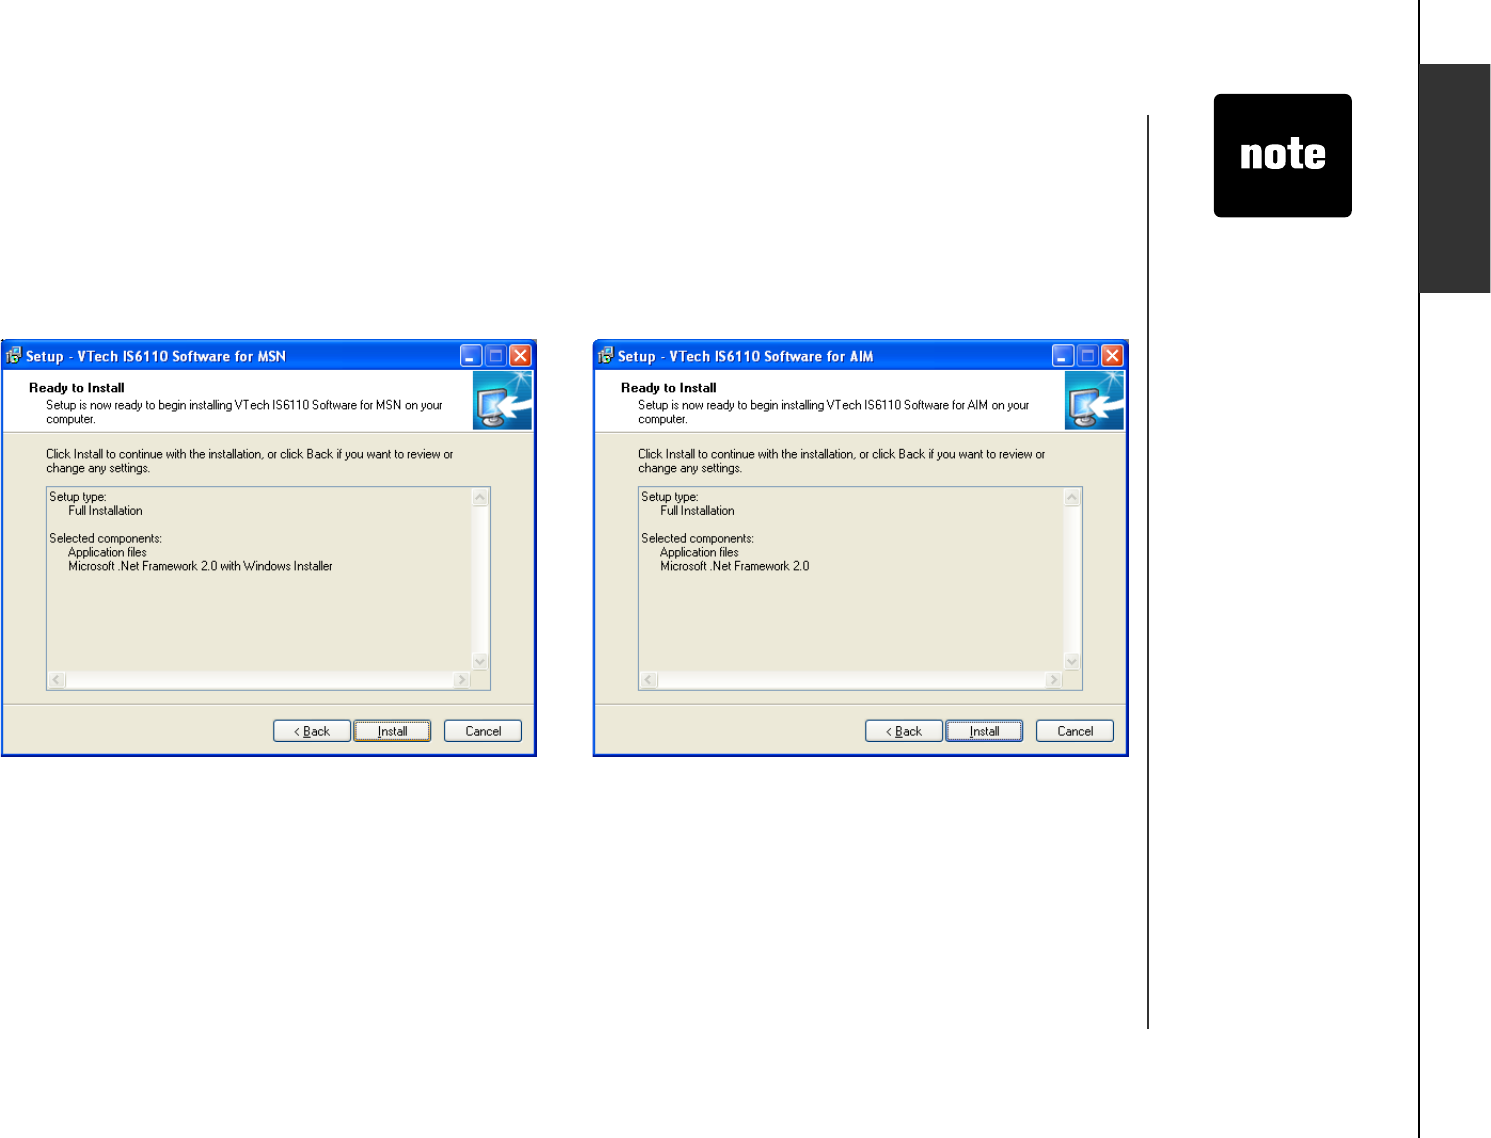
Step 7: If you are installing MSN Messenger, the screen 2a below will be displayed. If you are installing
AIM, the screen 2b below will be displayed. Click the Install button to proceed.
2a: 2b:
Click the Cancel
button to cancel
installation. Click
the Back button
to go back to the
previous step.
•
www.vtechphones.com
15
Installation
Install IS6110 phone software
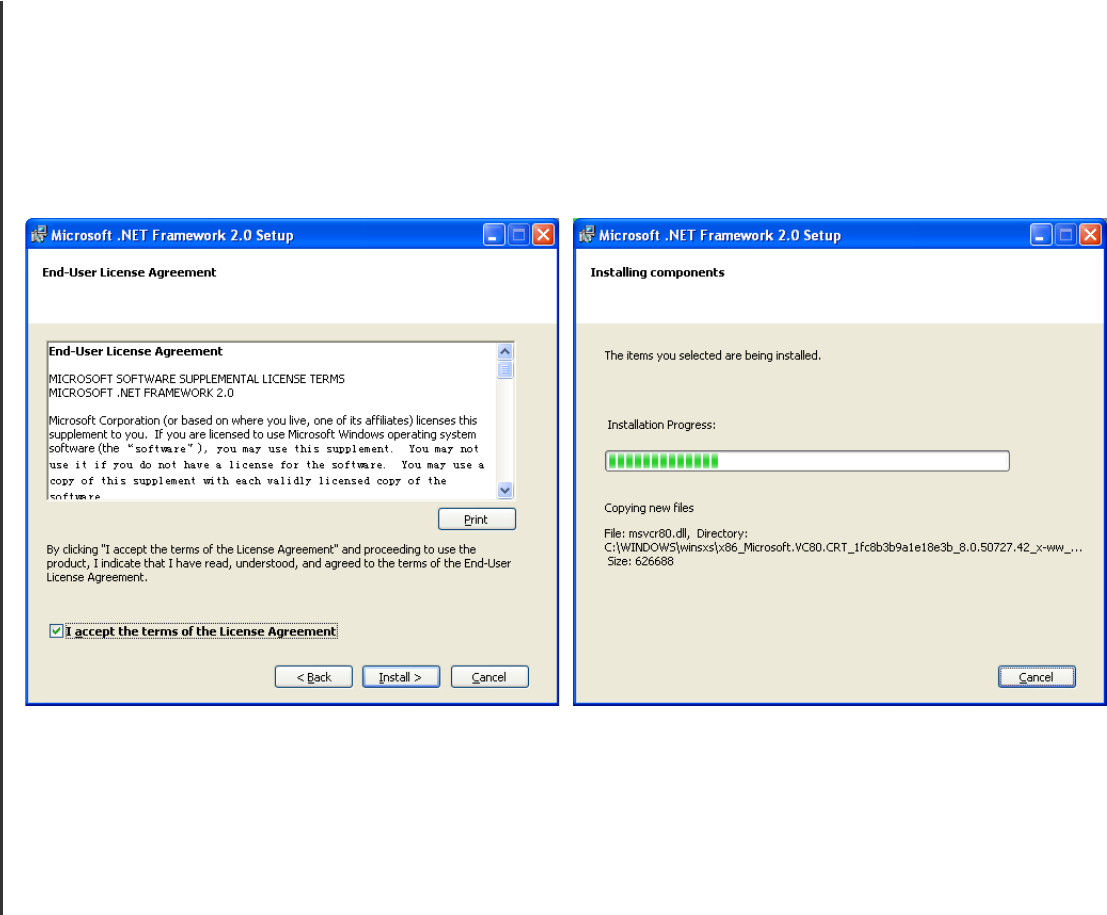
Step 8: The Microsoft .NET Framework 2.0 Setup window will be display. Make sure the box beside
I accept the terms of the License Agreement is checked. Click the Install button and the
installation will begin.
www.vtechphones.com 16
Installation
Installation
Install IS6110 phone software
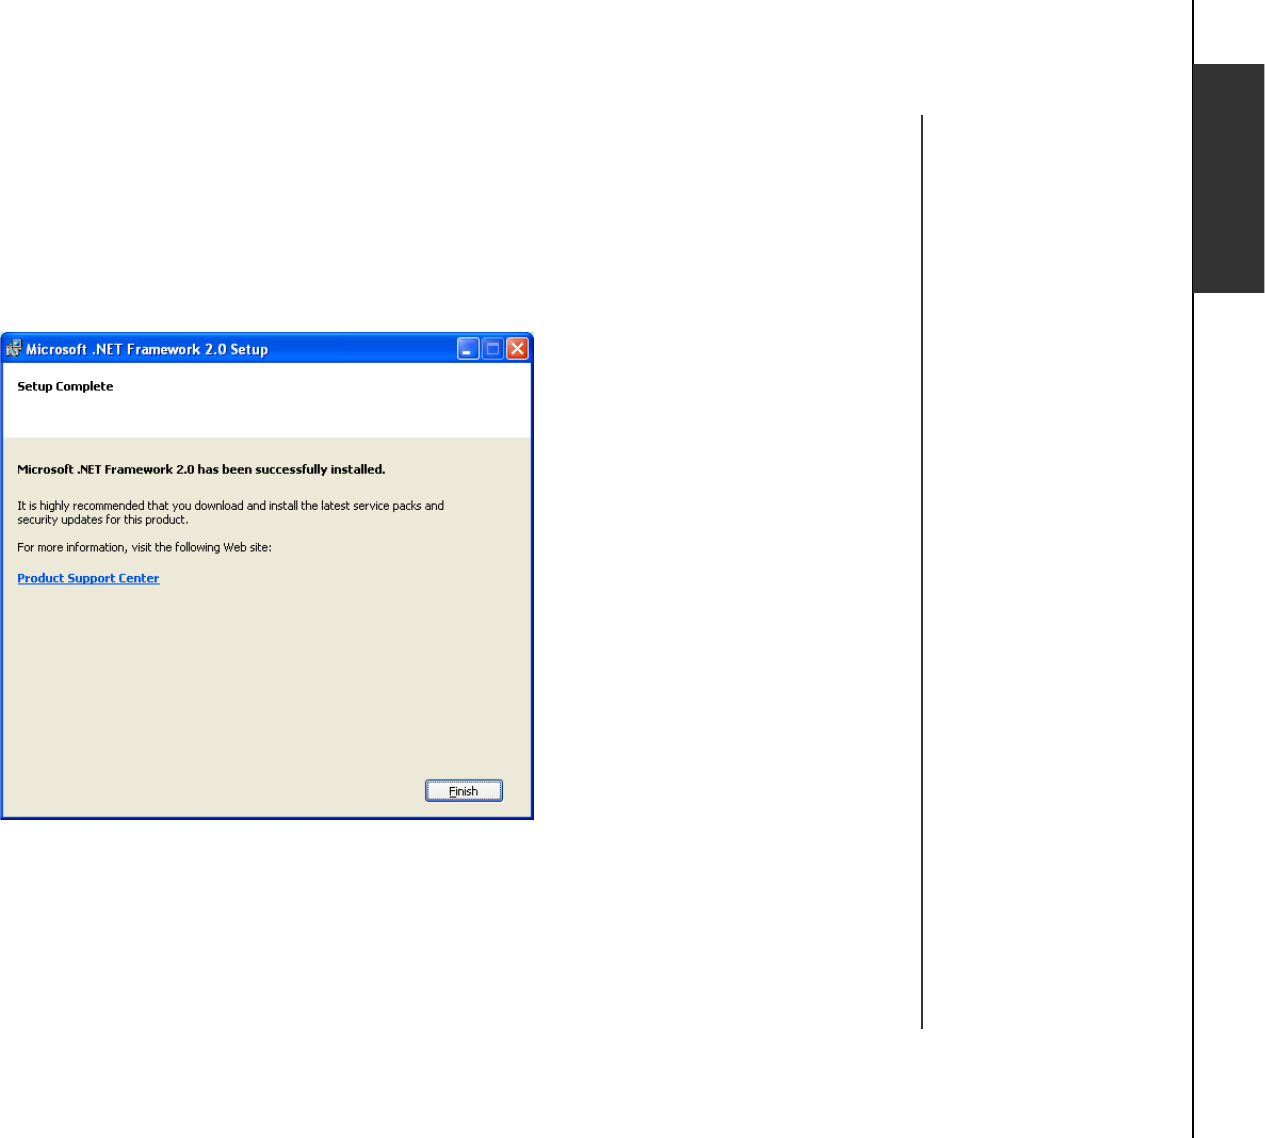
Step 9: After the installation of Microsoft .NET Framework 2.0 is complete, the following window
will be displayed. Click the Finish button and it will return to the installation of VTech IS6110
software.
www.vtechphones.com
17
Installation
Install IS6110 phone software
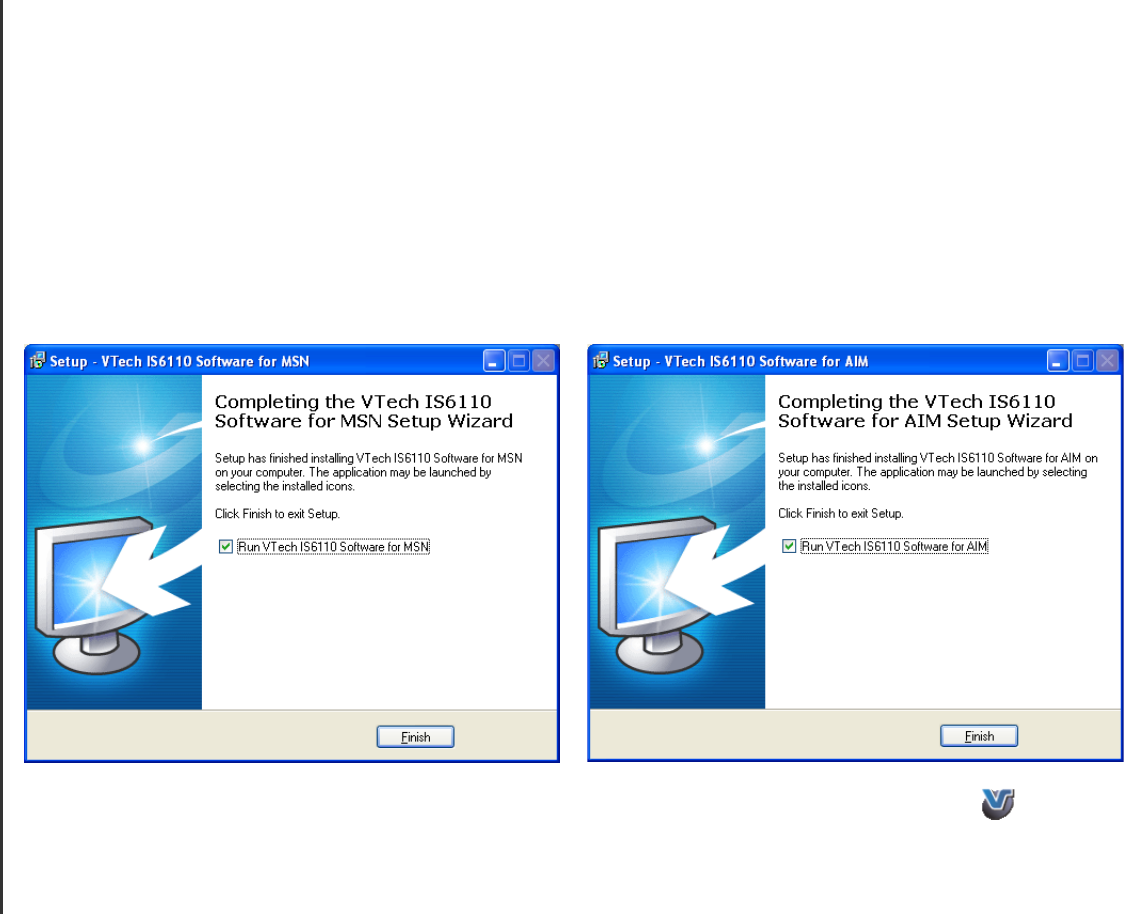
Step 10:
After the installation of IS6110 phone software is complete, the below screen will be displayed.
If you are installing MSN Messenger, the screen 2a below will be displayed. If you are
installing AIM, the screen 2b below will be displayed.
If you want to start the IS6110 phone software immediately, make sure the box beside
Run
V Tech IS6110 for MSN
(2a) or
AIM
(2b)
is checked and click the
Finish
button. If you prefer
to start the IS6110 phone software later, un-check the box by clicking inside it and click
Finish
button.
2a:
2b:
#HVGTVJGKPUVCNNCVKQ PKUEQORNGVG[QWYKNNſPFC+5RJQPGUQHVYCT GUJQTVEW VKEQP
on your PC
desktop. You can start the IS6110 phone software anytime by clicking on the icon and the software
will be started automatically.
www.vtechphones.com 18
Installation
Installation
Install IS6110 phone software
Step 11: After the installation of the IS6110 phone software, the following screen is still displayed.
Click the Next button to proceed and click the EXIT button to exit the installation.
www.vtechphones.com
19
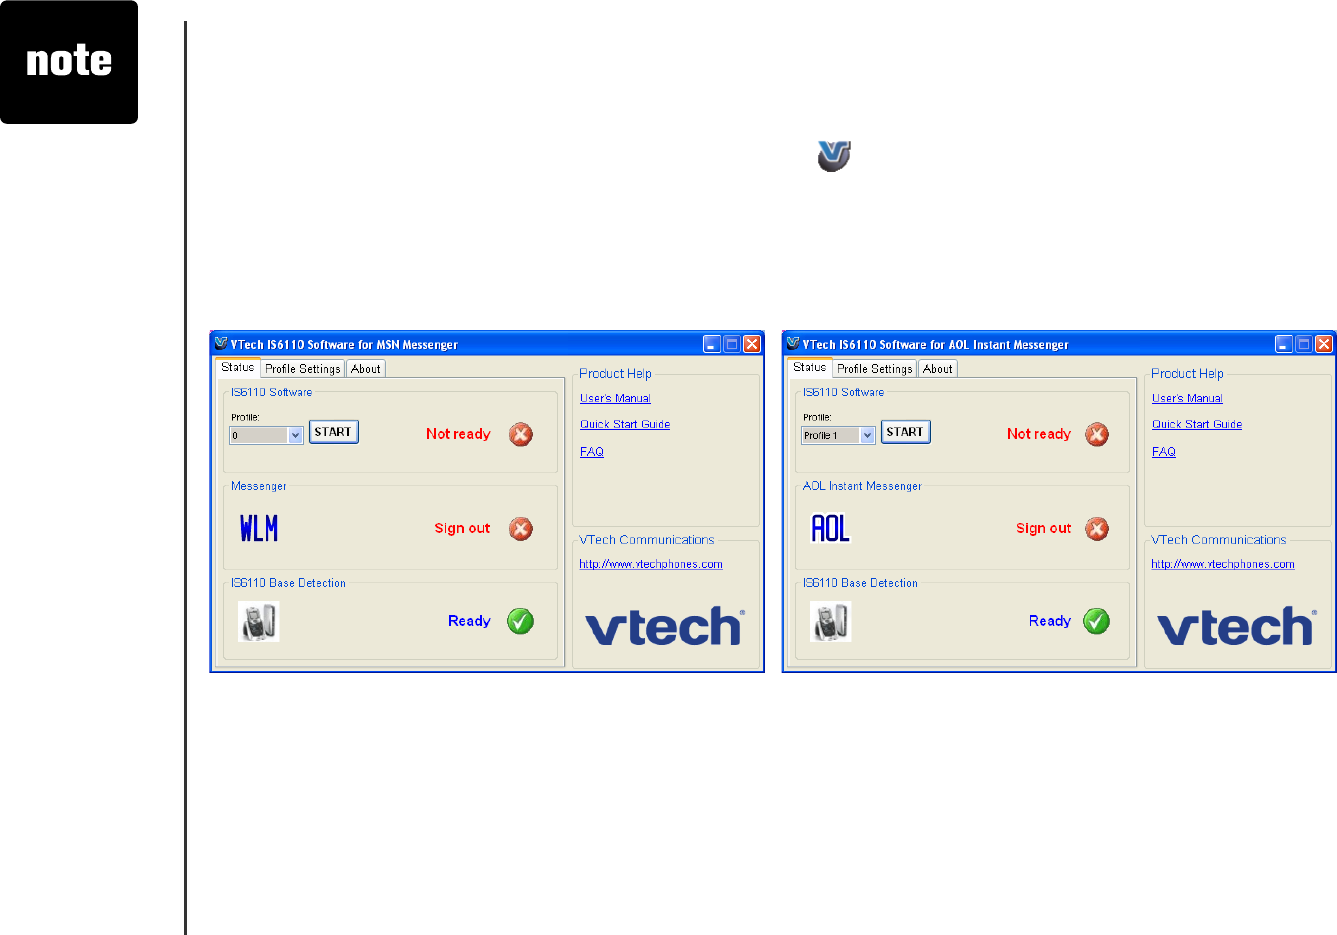
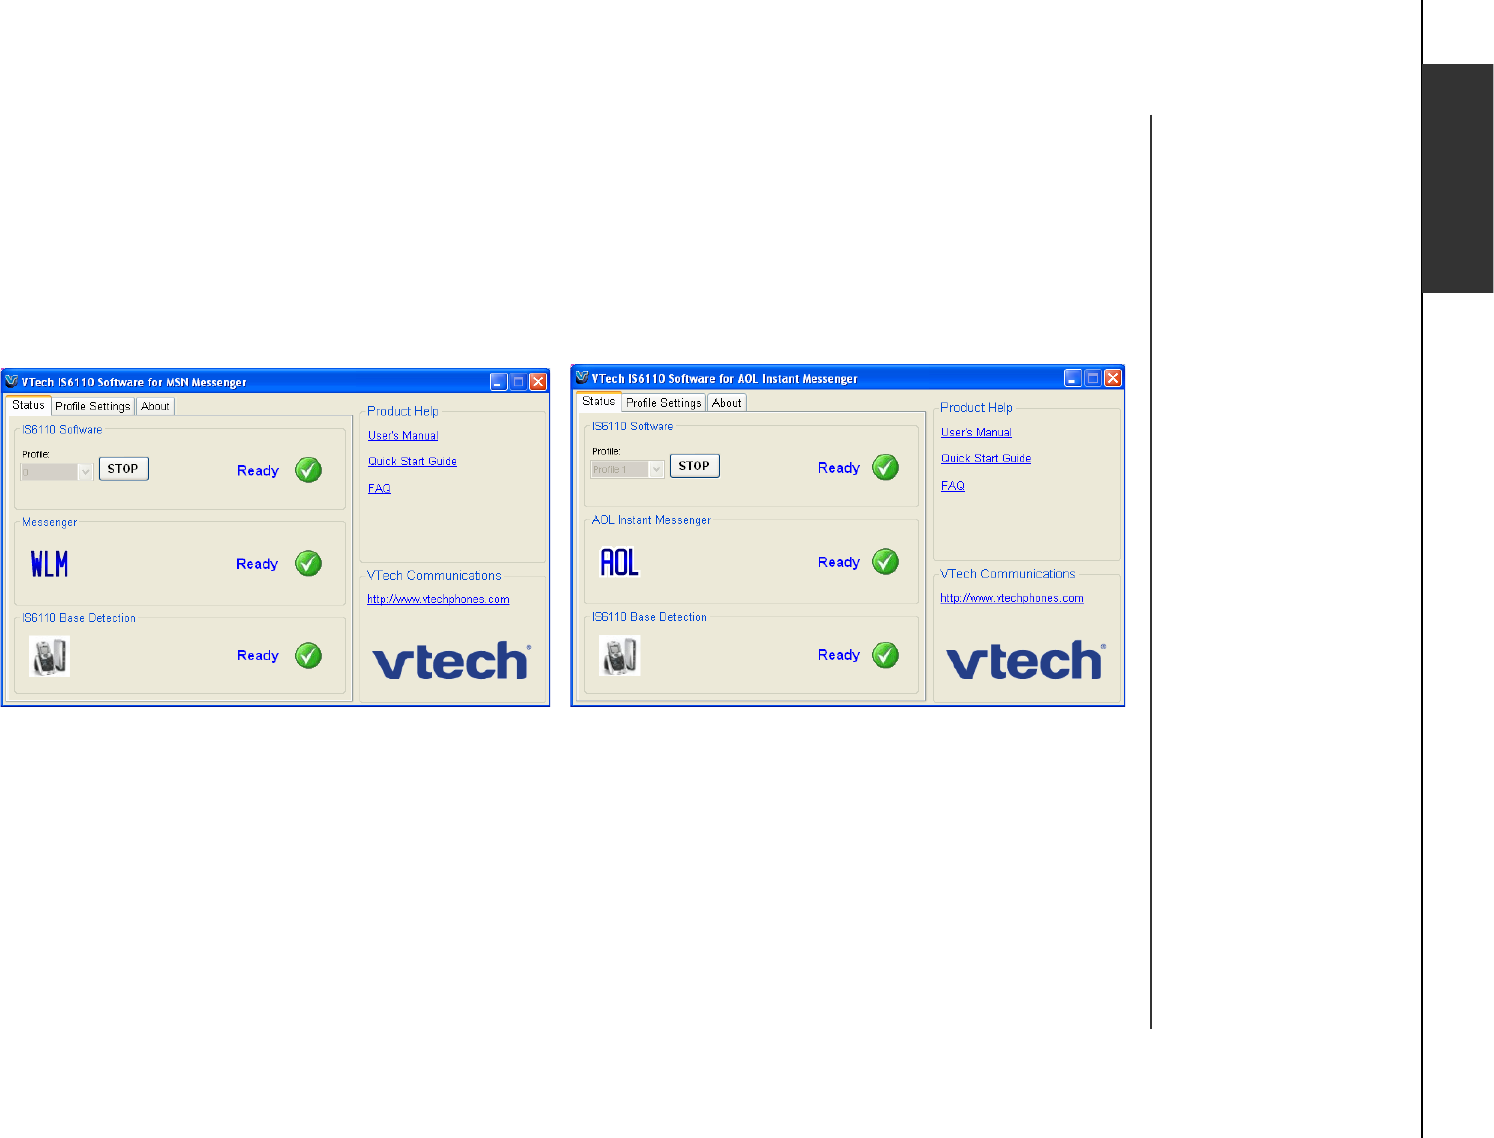
Running the IS6110 phone software
The IS6110 phone software must be started before using the messenger service on your handset.
Click on the IS6110 phone software application icon
on your PC desktop, the software will run
automatically and the following screen will be displayed. If you are using MSN Messenger, the screen
2a below will be displayed. If you are using AIM, the screen 2b below will be displayed. There are three
tabs including
Status
,
2TQſNG5GVVKPIU
and
About
.
2a:
2b:
After the IS6110
phone software
has been started
at the computer,
the
USB
light
on the front of
the telephone
base will be
on if there is a
good connection
between the
telephone base
and the computer.
•
Installation
www.vtechphones.com 20
Installation
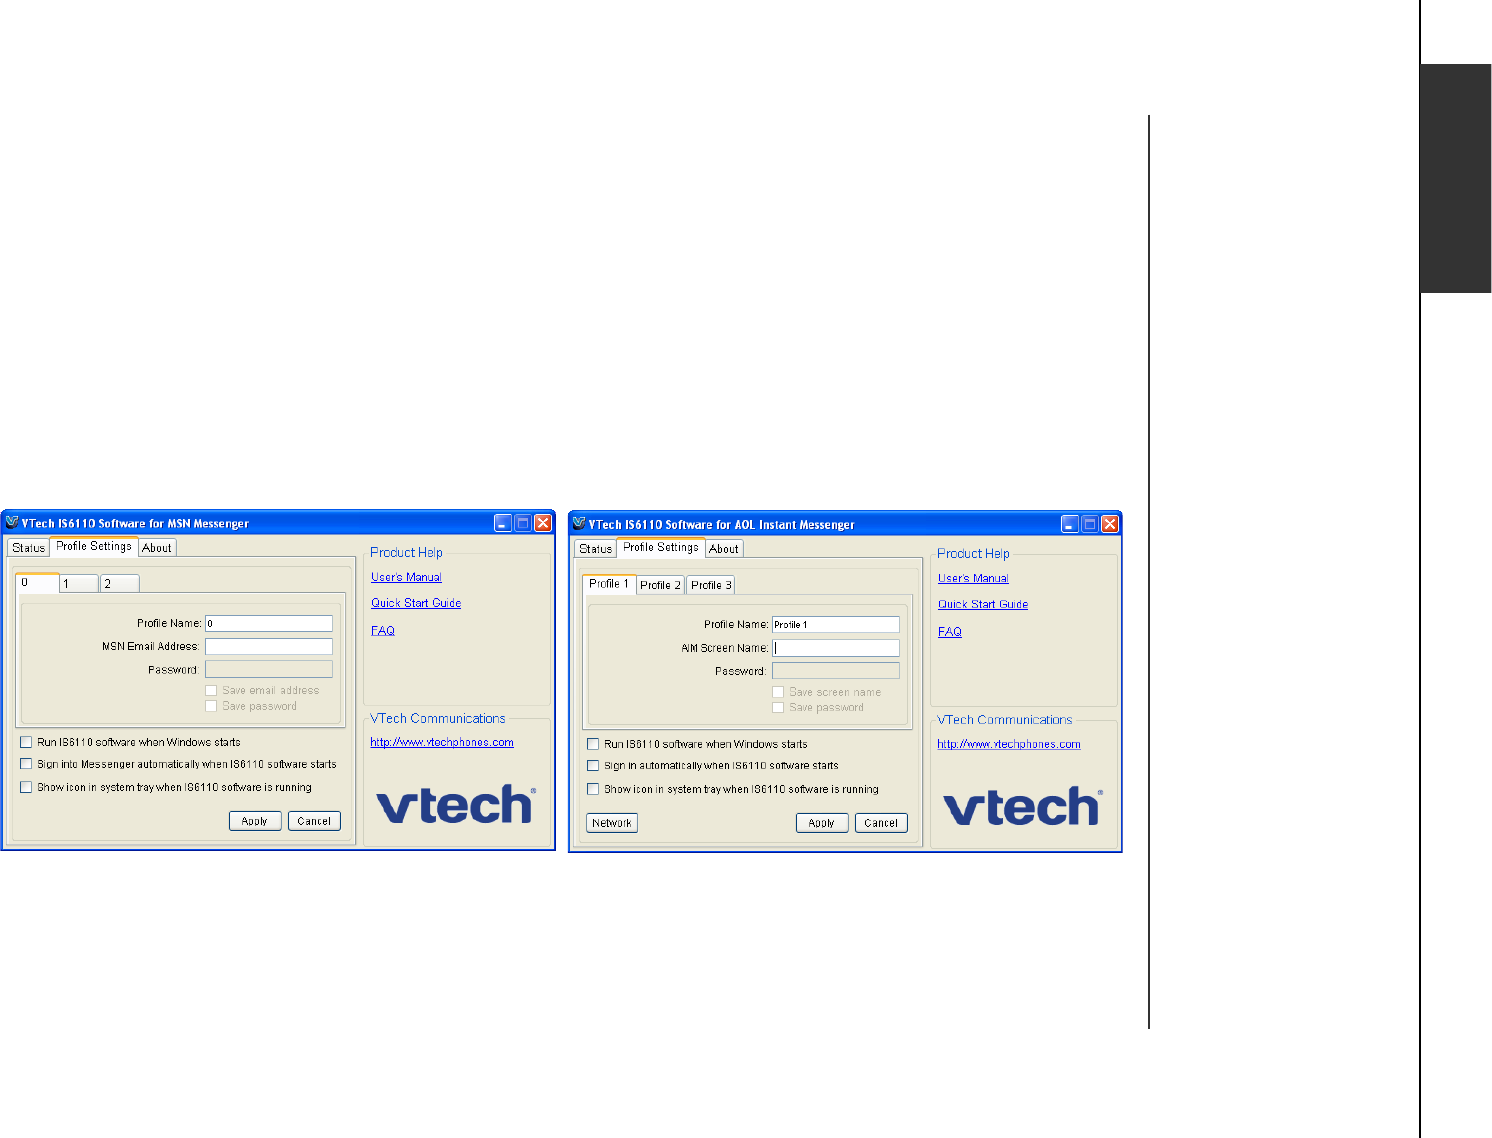
Settings of the IS6110 phone software
Changes to the 2TQſNG5GVVKPIU tab can only be made when the IS6110 software is not running (i.e.
On the StatusVCDVJGſTUVDQZOWUVUC[STOP).
+PQTFGTVQWUGVJGKPUVCPVOGUUCIKPICPFKPVGTPGVXQKEGHGCVWTGUYKVJ[QWTRJQPG[QWOWUVſTUVETGCVG
CRTQſNGD[GPVGTKPI[QWT/50QT#+/GOCKNCFFTGUUCPFRCUUYQTFQPVJG2TQſNG5GVVKPI U tab.
;QWECPETGCVGWRVQRTQſNGUHQTFKHHGTGPV+/CEEQWPVU+H[QWCTGWUKPI/50/GUUGPIGTVJGUETGGP
2a below will be displayed. If you are using AIM, the screen 2b below will be displayed.
2a: 2b:
Installation

www.vtechphones.com
21
Settings of the IS6110 phone software
To setup/change the messenger account:
5VGR %JQQUGCURGEKſERTQſNGD[ENKEMKPIQPVJGVCD
Step 2: Enter your email address for your messenger account in the box next to MSN Email Address
(2a) or AIM Screen Name (2b).
Step 3: Enter your password in the box next to Password.
Step 4: If you do not want to re-enter you email address and password every time you start the IS6110
phone software, make sure the boxes next to Save email address (2a) / Save screen name
(2b) and Save password are checked.
Step 5: Click the Apply button to save, or click the Cancel button to cancel the change.
Settings for running the IS6110 software:
5VGR %JQQUGCURGEKſERTQſNGD[ENKEMKPIQPVJGVCD
Step 2: In the box next to 2TQſNG0COGV[RGVJGPCOGHQTVJGRTQſNGCPFENKEMVJGApply button to
save, or click the Cancel button to cancel the change.
If you want to log into your messenger account automatically every time the IS6110 software starts,
make sure the box next to Log into messenger automatically when IS6110 software starts is
checked.
If you want to run the IS6110 phone software automatically every time Windows starts, make sure the
ſGNFRun IS6110 software when Windows starts is checked.
If you want to show an icon the system tray for easy access and the status of the IS6110 software, make
sure the box next to Show icon in system tray when IS6110 software is running is checked.
While your AIM Screen Name and Password (2b) are correct but you have problem to login to your
#+/CEEQWPVEQPſIWTG[QWTKPVGTPGVUGVVKPIUD[ENKEMKPIQPVJGNetwork button (2b).
After all the changes are made, click the Apply button to save the new settings.
The messenger
RTQſNGPCOGCPF
password cannot
be changed in the
handset.
•
Installation
www.vtechphones.com 22
Installation
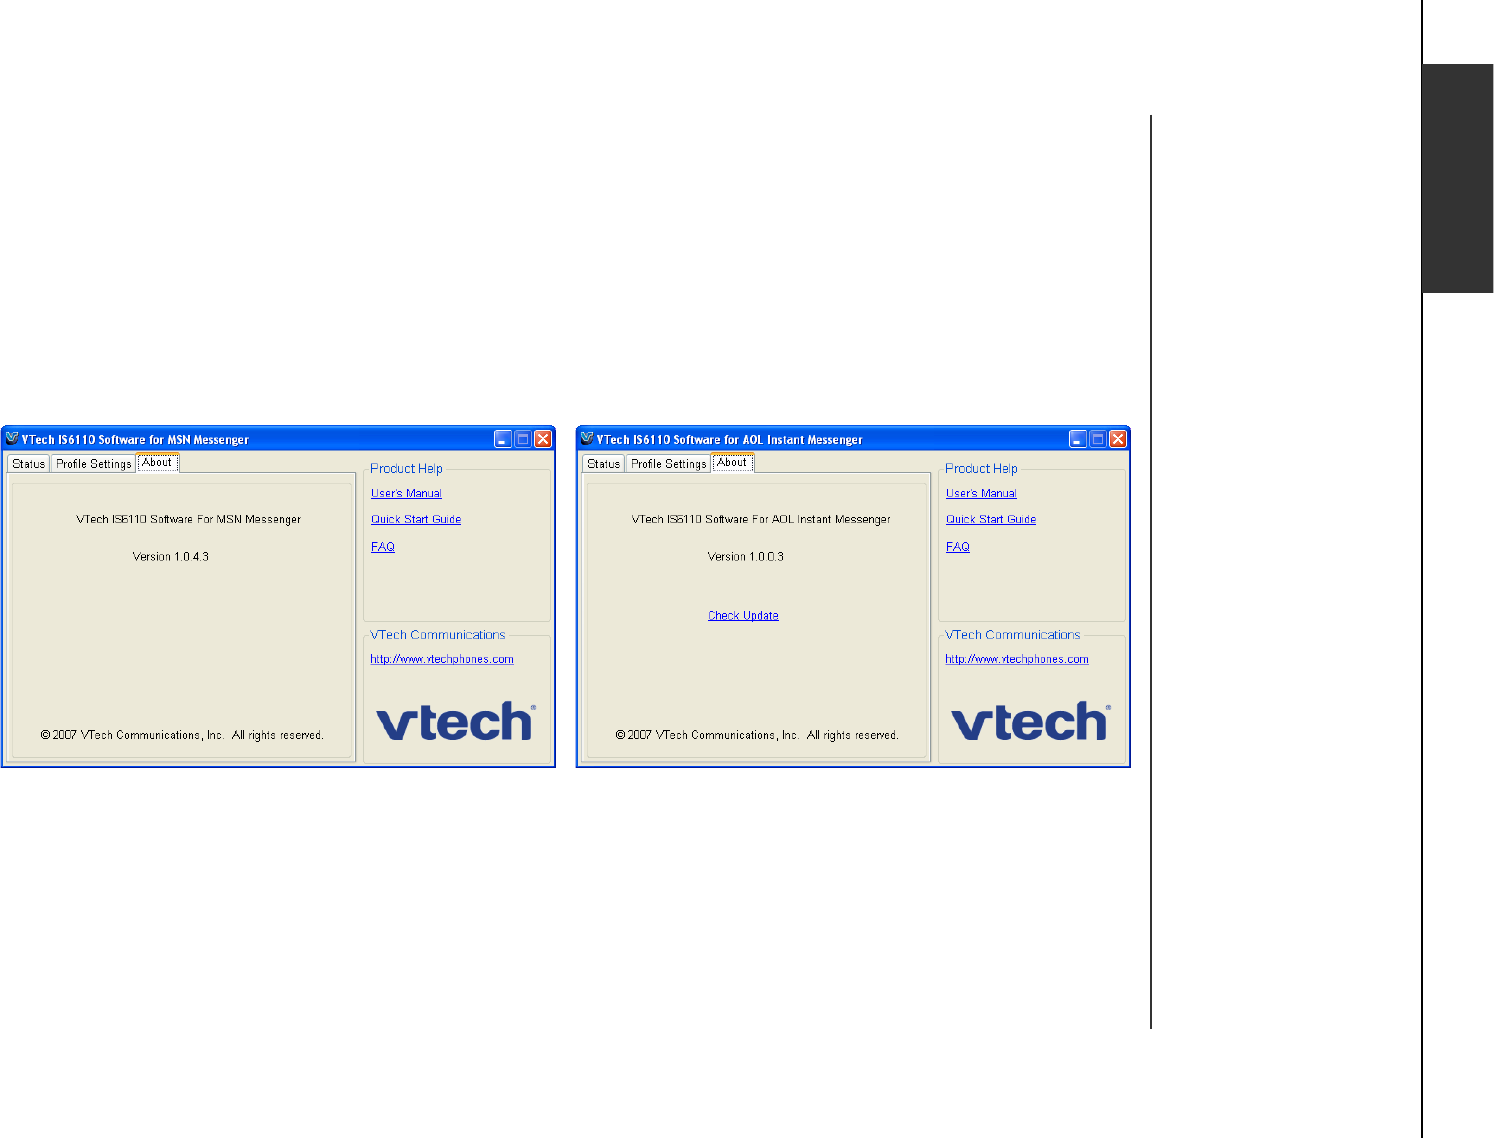
About tab of the IS6110 phone software
On the About tab of the IS6110 phone software, the version of the software will be displayed. In the
Product HelpUGEVKQP [QWECPſPFVJGNKPMVQVJG7UGTŏU/CPWCN 3WKEM5VCT V)WKF GCPF(#3;QW
ECPCNU QſPFVJ G86GEJYGDUKV GCFFTGU UKPVJGVTech Communications section. If you are using
MSN Messenger, the screen 2a below will be displayed. If you are using AIM, the screen 2b below
will be displayed.
2a: 2b:
Installation
www.vtechphones.com
23
Log into the IS6110 phone software
You can log into the IS6110 phone software from your handset or computer.
To login on the computer:
Step 1: On the StatusVCDQHVJG+5RJQPGUQHVYCTGEJQQUGVJGRTQſNG[QWYKUJVQNQIKPVQD[
ENKEMKPIQPVJGCTTQYQHVJG2TQſNGſGNF6JKUYKNNQRGPCFTQRFQYPDQZ%NKEMQPVJGRTQſNG
you wish to use and click the START button. If you are using MSN Messenger, the screen
2a below will be displayed. If you are using AIM, the screen 2b below will be displayed.
2a: 2b:
Installation

www.vtechphones.com 24
Installation
Log into the IS6110 phone software
To login on the computer:
If login is not successful because the login id and/or password is incorrect, the following
screen will be displayed. If you are using MSN Messenger, the screen 2a below will be
displayed. If you are using AIM, the screen 2b below will be displayed.
2a: 2b:
If either the login name or password is missing, the following error box will be displayed.
Check with the 2TQſNG5GVVKPIU tab for the missing item.
•
•
Step 2:
Installation
www.vtechphones.com
25
Log into the IS6110 phone software
If you try to log in to the messenger through the handset before the IS6110 phone software is started,
the screen of the handset will display Fail to connect messenger.
To login on using the handset:
9JGPNQIIKPIKPHTQOVJGJCPFUGV[QWYKNNCWVQOCVKECNN [DGNQIIGFKPVQVJGRTQſNGVJCVKUEJQUGPKP
VJG+5RJQPGUQHVYCTGQPVJGEQORWVGT+H[QWYKUJVQEJCPIGVJGRTQſNG[QWOWUVEJCPIGKVQP
the computer.
Step 1: Press the MSNGR softkey from the idle screen.
-OR-
Press the MENU softkey. Press the , , and/or NavKeys to choose Messenger,
then press the SELECT softkey or the center NavKey/SELECT/.
Step 2: The screen will display Login in progress. Please wait.
Step 3: If login is successful, the buddy status window will be displayed.
Step 4: If login is not successful, an error message will be displayed on the screen. Check with the
2TQſNG5GVVKPIU tab of the IS6110 phone software for the incorrect or missing item(s).
Error messages Explanation
Sign in error It indicates the login name is incorrect.
Password error It indicates the login password is wrong.
Missing password or
sign in name
If there is a missing name or password.
The IM/VoIP
light on the
telephone base
will be on when
there is a good
connection to the
computer and you
are logged into
messenger.
•
Installation
www.vtechphones.com 26
Installation
Running the IS6110 phone software
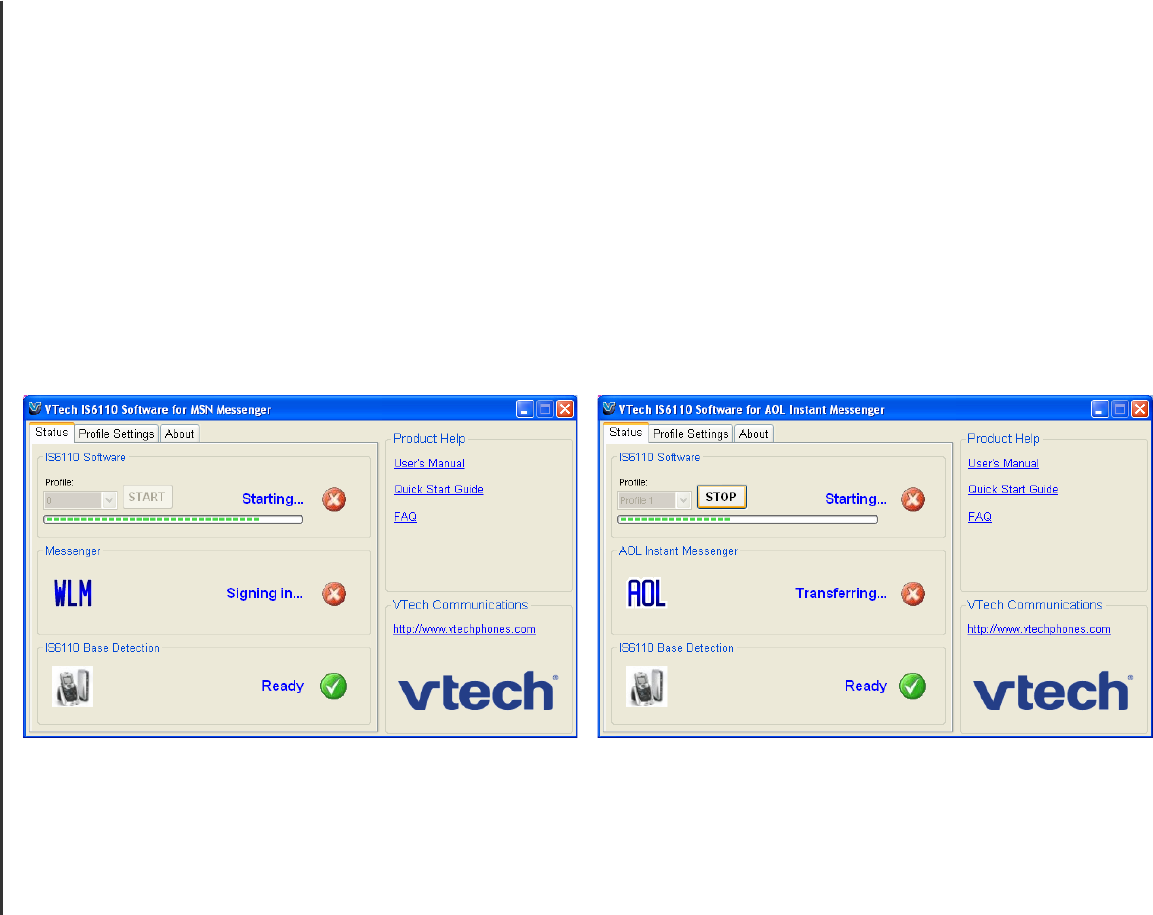
In order to use the MSN Messenger on the handset, all the status must be Ready as shown in the
screen below. If you are using MSN Messenger, the screen 2a below will be displayed. If you are
using AIM, the screen 2b below will be displayed.
2a: 2b:
Installation
www.vtechphones.com
27
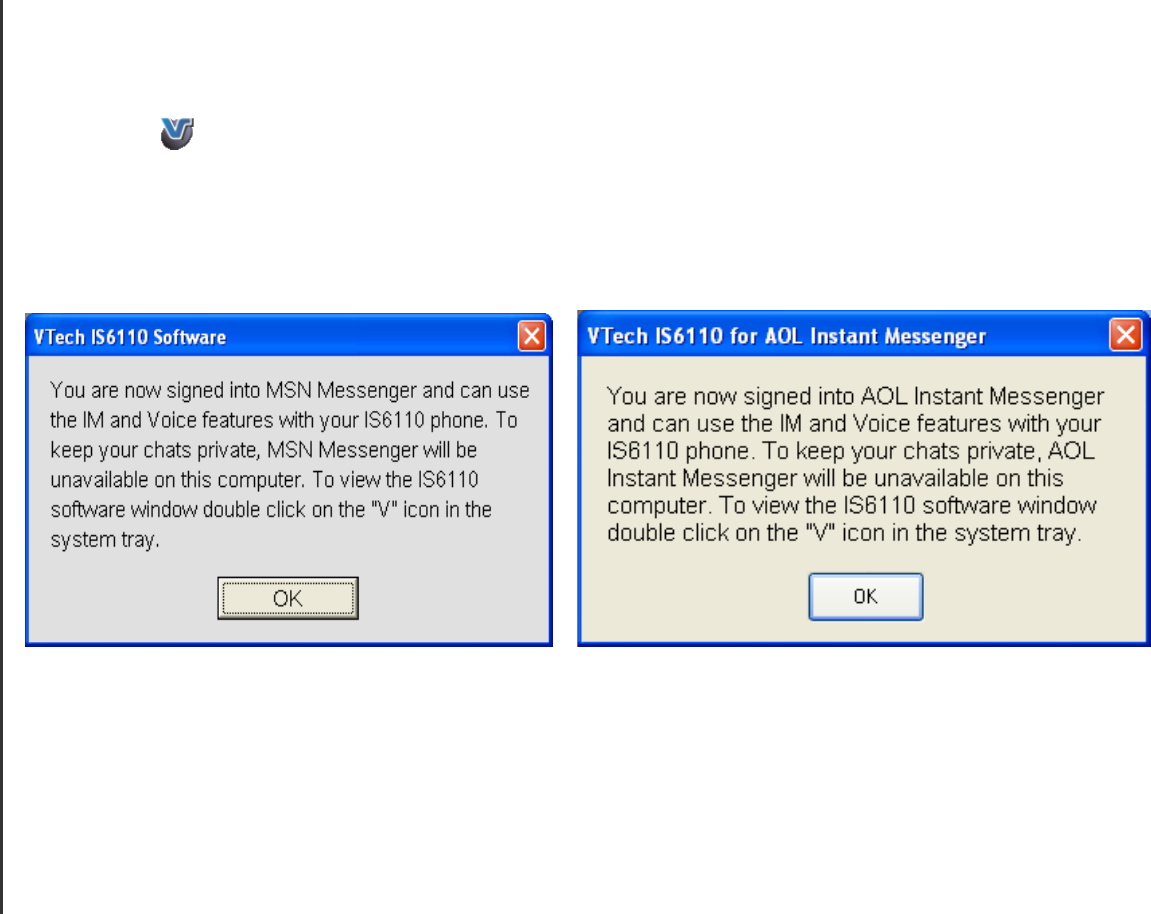
Running the IS6110 phone software
If login is successful, the IS6110 phone software interface will be hidden in the system tray. Double
click on the
icon in the system tray to view the VTech IS6110 software. If you had already started
the messenger on your computer before logging in through the IS6110 phone software, the following
message will be displayed. If you are using MSN Messenger, the screen 2a below will be displayed.
If you are using AIM, the screen 2b below will be displayed.
2a:
2b:
Installation
www.vtechphones.com 28
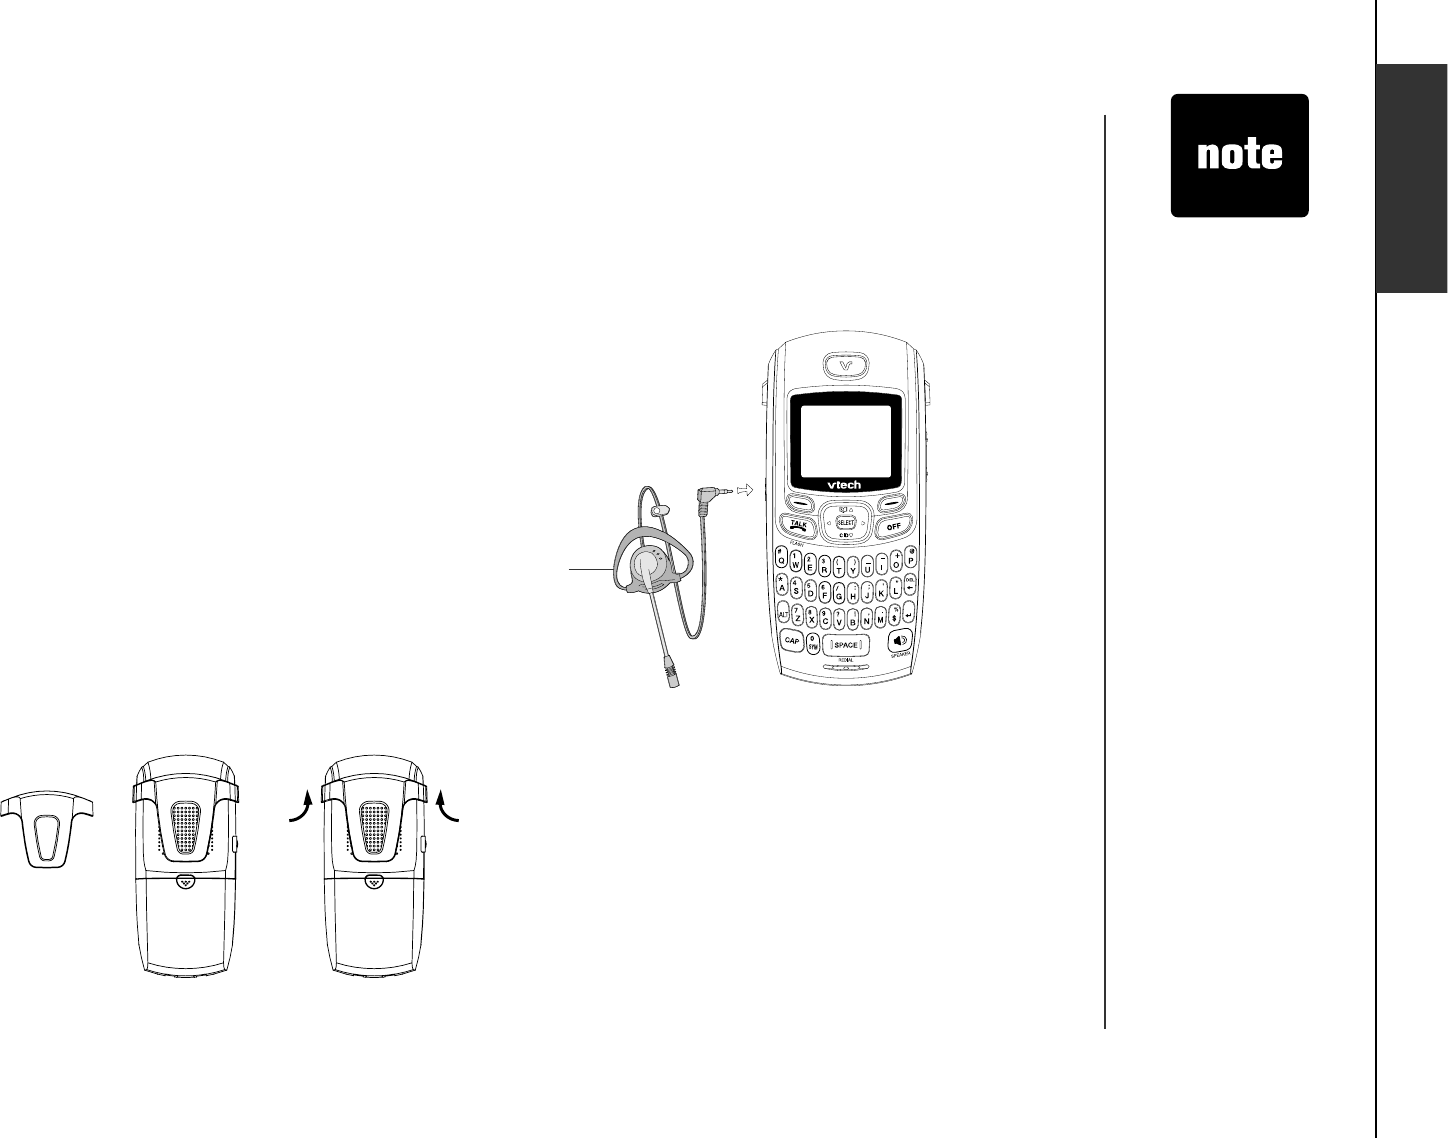
Installation
Installation
For hands-free telephone conversations, use any industry-standard
2.5mm headset (purchased separately). For best results, use a
VTech 2.5mm headset.
Belt clip & headset (optional)
• To purchase
a headset,
visit us on the
web at www.
vtechphones.com
or call VTech
Communications,
Inc. at 1 (800)
595-9511.
In Canada,
go to www.
vtechcanada.com
or dial 1 (800)
267-7377.
• Whenever a
compatible
headset is
connected to the
cordless handset,
the microphone
on the handset
will be muted.
This reduces
background noise
and improves the
sound quality.
Belt clip
Align and snap the belt clip into the notches
on each side of the handset. To remove, go
to either side of the handset and gently pry
the clip from the notch.
Headset
2NWIVJGOOJGCFUGVKPVQVJGLCEMQPVJGUKFG
QHVJGJCPFUGVDGPGCVJVJGUOCNNTWDDGTƀCR
Industry standard
2.5mm headset
www.vtechphones.com
29
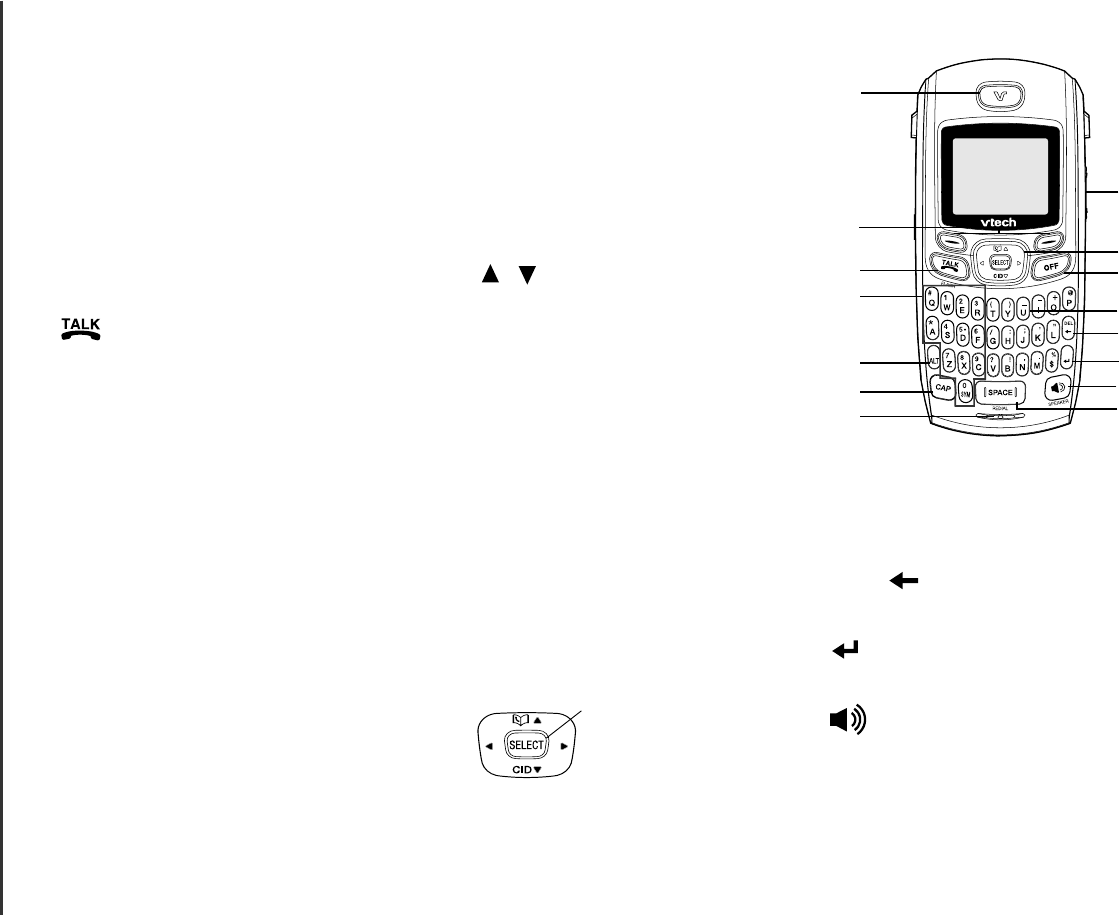
1. FIND HANDSET
If you misplace the handset, press
this button to make the handset
ring. To stop the ringing, press
OFF on the handset, or press FIND
HANDSET on the telephone base
again.
2. POWER
A steady red light indicates the
telephone base is powered on.
3. PHONE IN USE
A blinking red light indicates that
there is an incoming call. A steady
red light indicates that the telephone
line is in use. If the light is off, the
telephone line is not in use.
4. IM/VoIP
A steady red light indicates that the
messenger has been logged in and
it is ready to start IM or VoIP. If the
light is off, the IS6110 software has
not been started at the PC.
5. (USB port)
Connects to the USB port at the
computer to establish a connection
between the telephone base and the
computer.
6. TEL LINE J ACK
Connects to your home telephone
line for making and receiving calls.
7. POWER PORT
Connects to the power adapter
which plugs into an electrical outlet
to provide power to the telephone
base.
Getting to know the IS6110
1
2
45
6
7
Telephone base layout
3
www.vtechphones.com 30
Getting to know the IS6110
Status lights on the telephone base
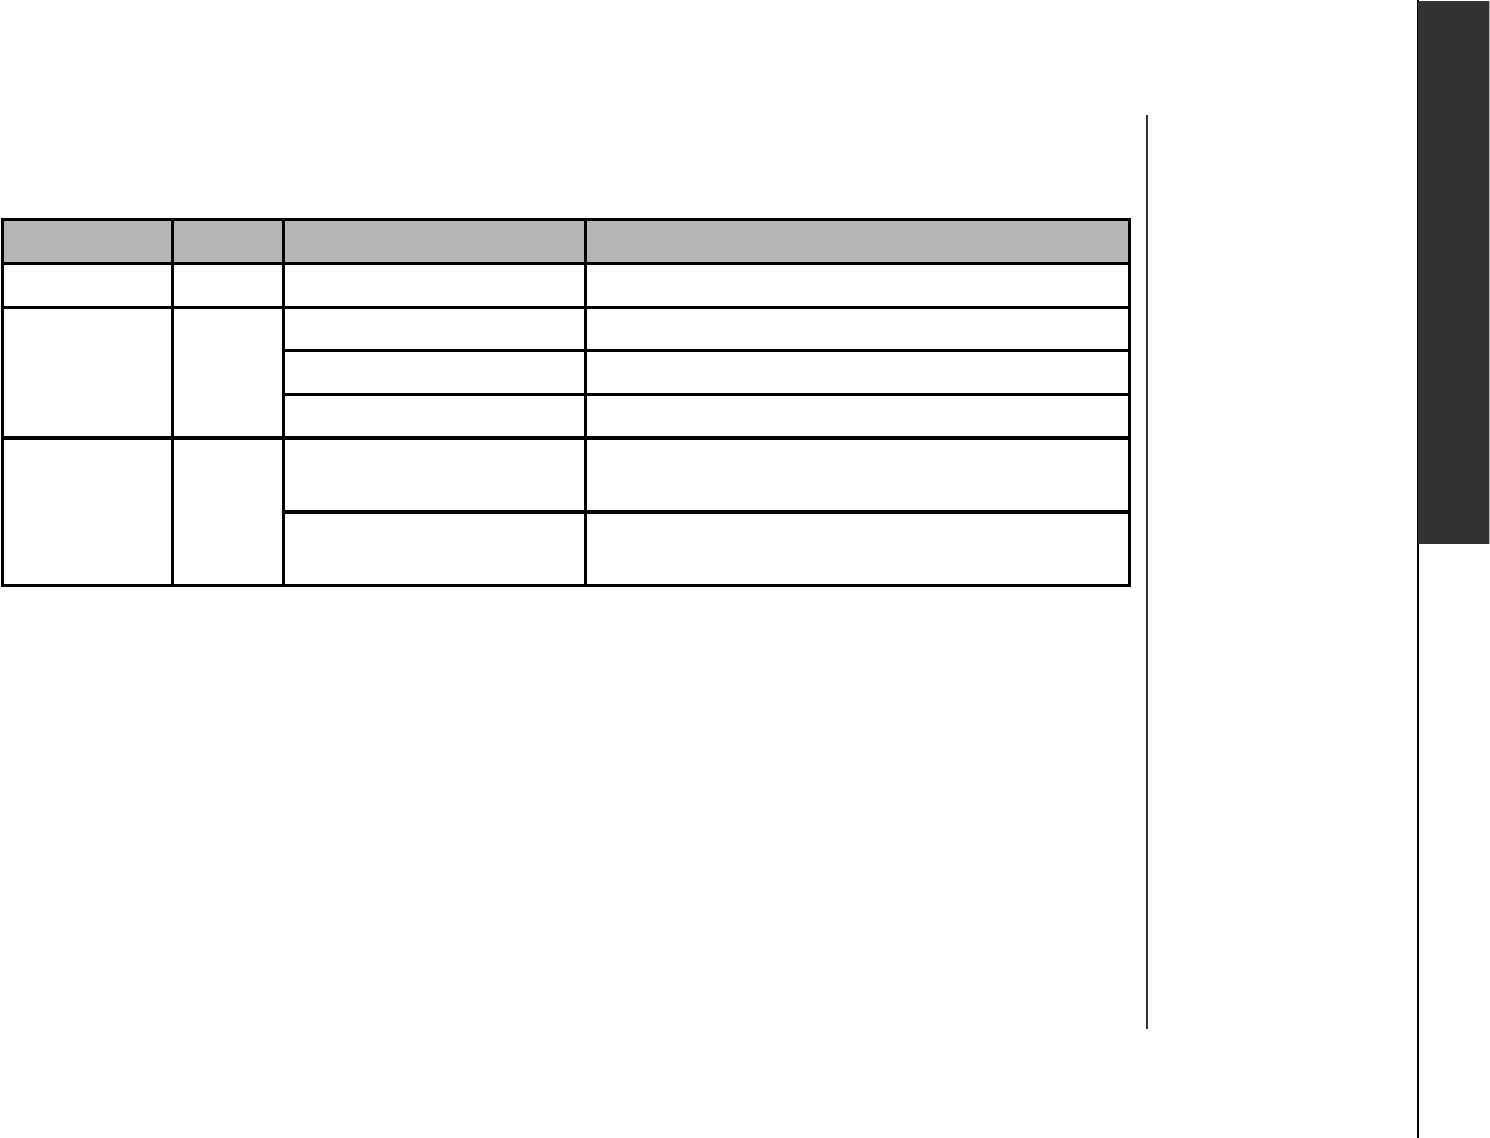
Name Color Indication light status Description
POWER Red On The telephone base is powered on.
PHONE IN
USE Red
Off The telephone line is not in use.
Blinking The telephone is ringing.
On The telephone line is in use.
IM/VoIP Red
Off The IS6110 phone software has not been
started at the computer.
On steady The IS6110 phone software has been started at
the computer and it is ready to start IM/IV.
Getting to know the IS6110
www.vtechphones.com
31
Getting to know the IS6110
Handset layout
1. Earpiece
Audio output for telephone
calls.
2. Softkey
Press to select the action
shown on the bottom of the
screen.
3. /FLASH
Press to get a dial tone.
After pre-dialing a number,
press to make a call.
Press to answer call waiting.
4. Numeric keys
These keys are shown in
grey on the keypads. While in
numeric mode, they are used
for dialing phone numbers, or
entering numbers.
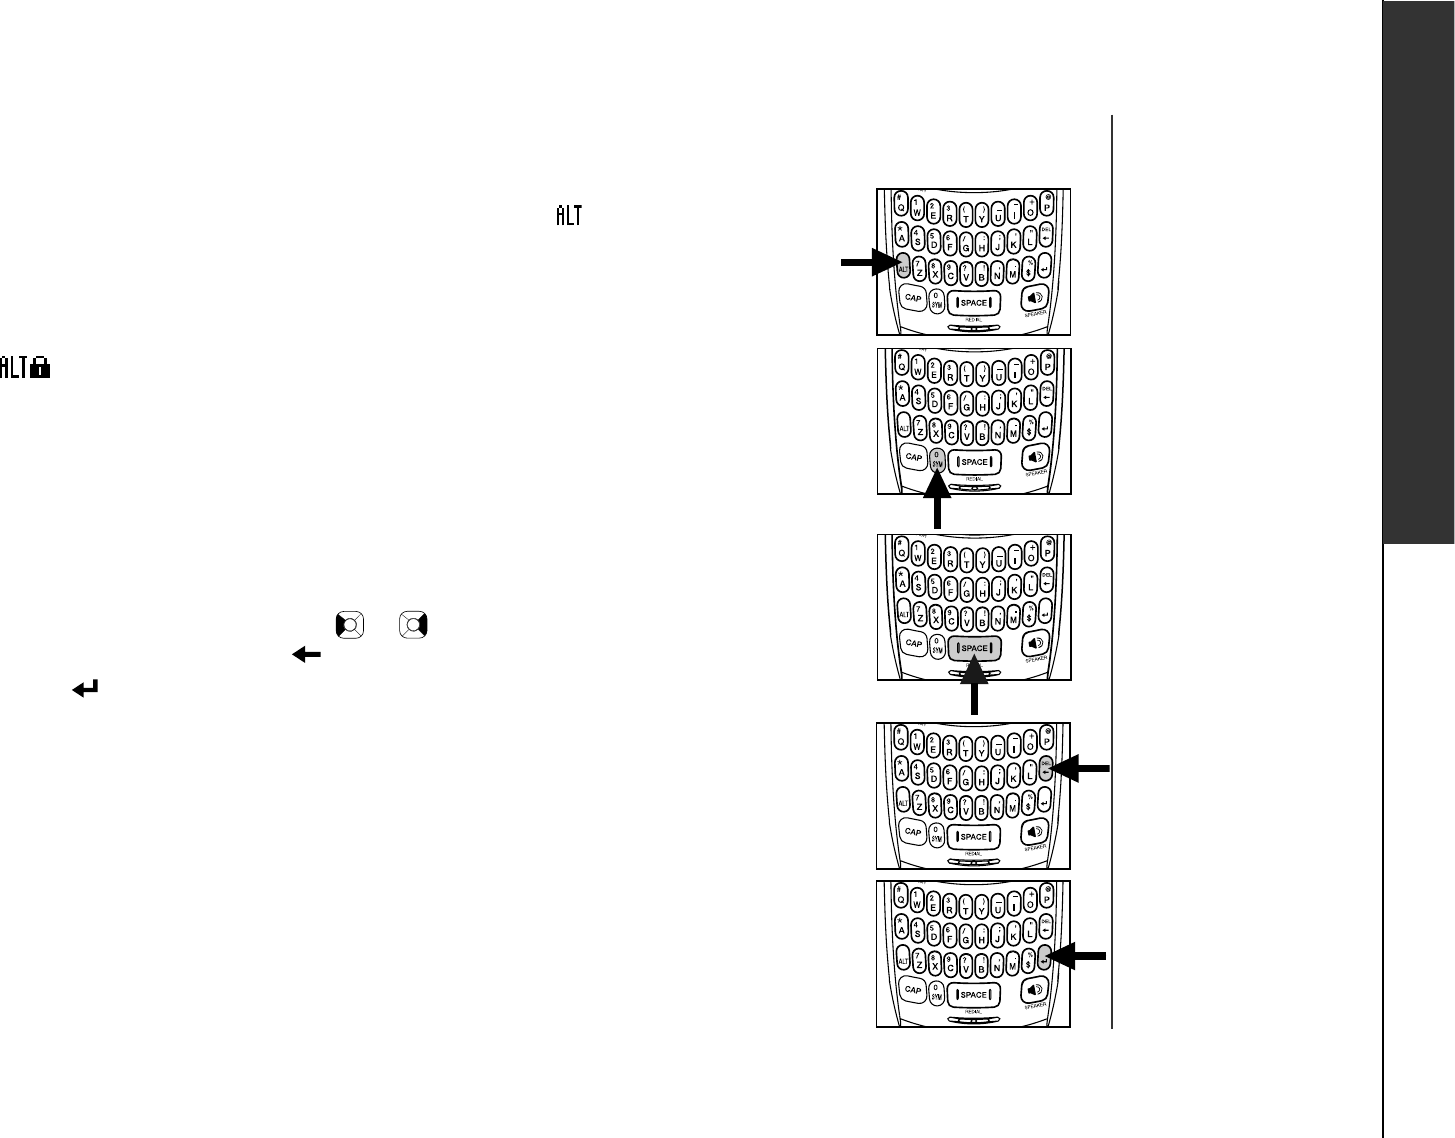
5. ALT (alt)
Press to change to numeric
mode.
While in text mode, press and
then any key on the keypad to
perform the alt function of the
selected key.
1
2
3
4
8
9
10
11
6. CAP
Press this key to switch between
uppercase and lowercase mode.
7. Microphone
Audio input for telephone calls.
8. VOL /
2TGUUVJKUMG[VQCFLWUVVJG
listening volume while on a call.
9. NavKey (navigation key)
Use this key for navigating menu
screens and for positioning the
cursor when editing text.
Press the up NavKey to access
the directory.
Press the down Navkey to
access the call log.
Press the center NavKey/
SELECT to select the
highlighted item.
10.OFF
Press to end a call.
6
5
CENTER
D OW N
U P
L EF T RIG HT
12
13
14
11. Keypads
These keys are used for dialing
phone numbers, or entering
text.
12. DEL (delete)
Press to delete the character.
13. (enter)
Press to send out message.
14. (speaker)
Press to turn the speakerphone
on or off.
15. SPACE/REDIAL
Press to insert a space while in
text mode. Press to review the
redial list.
715
www.vtechphones.com 32
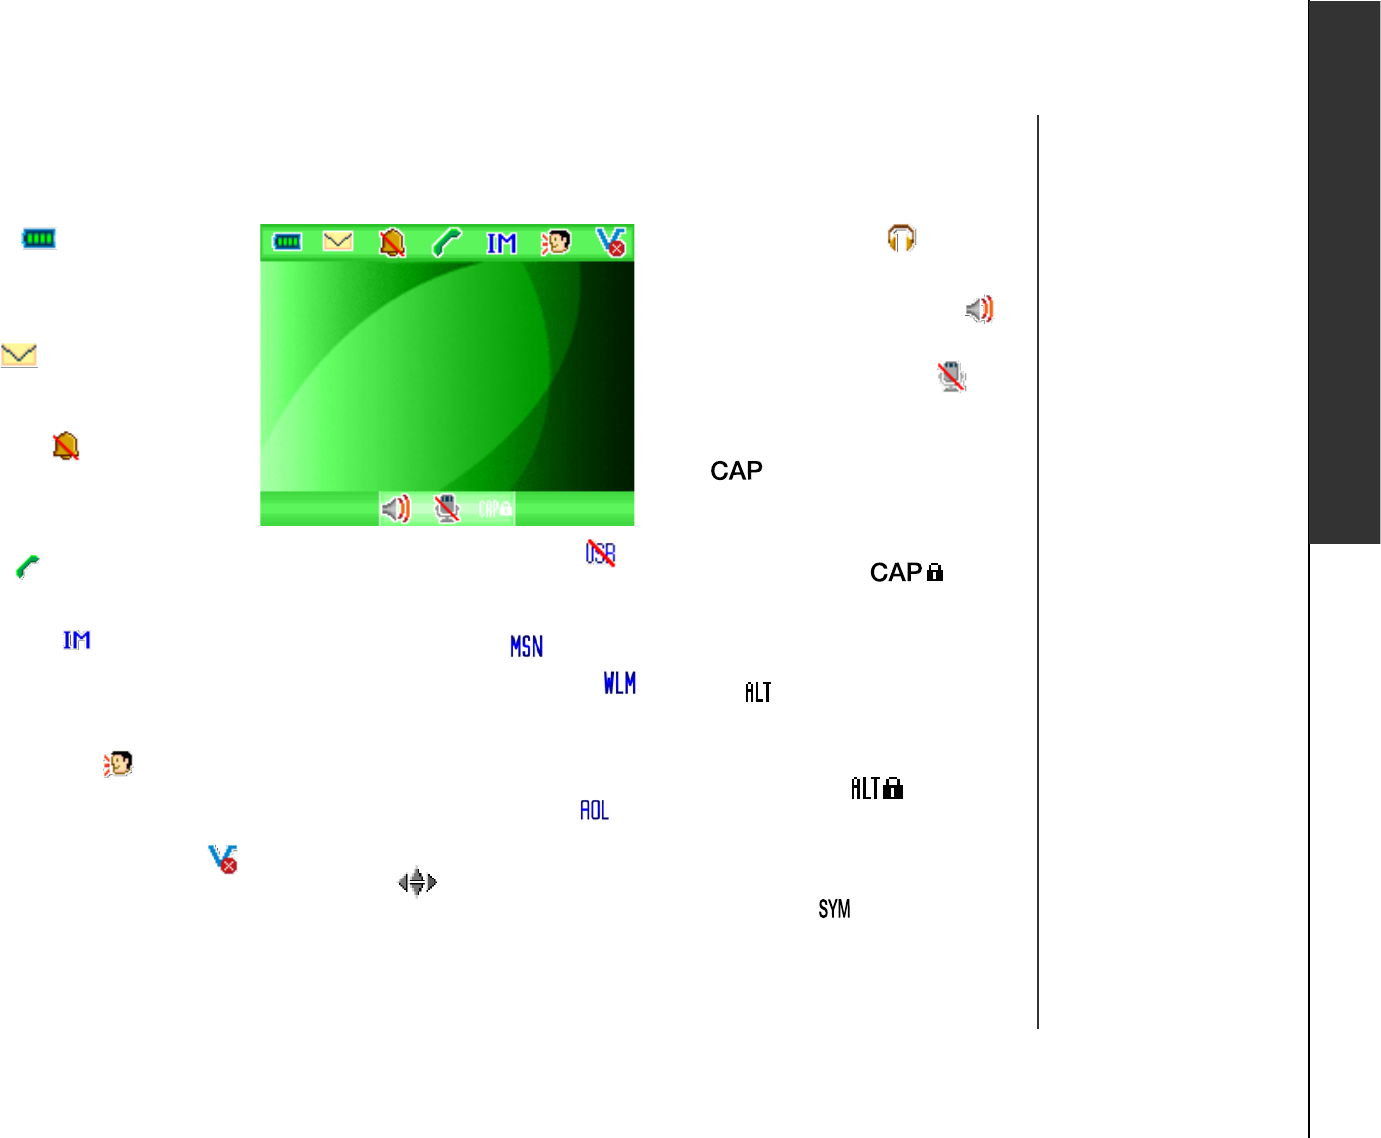
Getting to know the IS6110
8. Headset mode
Headset is in use.
8. Speakerphone mode
Speakerphone is in use.
9. Microphone muted
The microphone is disabled
during a call.
10.
Uppercase input mode is used
to input the next character.
10.CAP (locked)
Uppercase input mode is
used to input all subsequent
character(s).
10.Alt
Numeric input mode is used to
input the next character.
10.Alt (locked)
Numeric input mode is used
to input all subsequent
character(s).
10.SY MBOL
Symbol will be input in the next
character.
Getting to know the IS6110
Handset status icons
1. Battery
An animated battery icon is
displayed when the battery is
charging.
2. VMWI
There are new voicemail
messages.
3. Ringer off
Ringer volume is set to off. The
handset will not ring when there
is an incoming call.
4. On line
Handset is in use.
5. IM indicator
There is unread instant
message(s) from a user on the
buddy list.
6. VoIP indicator
There is a VoIP request from a
user on the buddy list.
7. USB connection status
The telephone base is connected
to the computer, but the IS6110
phone software has not started
at the computer.
7. USB connection status
The telephone base is not
connected to the computer.
7. MSN Messenger /
Window Live Messenger
connection status
The messenger has been logged
in.
7. AIM connection status
The AIM has been logged in.
7. Arrows
There is a function when pressing
the corresponding NavKey(s).
1 2 3
9 10
4 5 6 7
8
www.vtechphones.com
33
Using the handset
Softkeys
The handset has two softkeys serving multiple functions. The text shown
above the softkey indicates the current function of the key. If no text is shown,
then the key has no function at this time.
Basic navigation
Use the NavKey (navigation key) to move around the menu screens.
Press the center NavKey/
SELECT
/
SELECT
SELECT
to select a given option.
Return to the idle screen at anytime by pressing
OFF
.
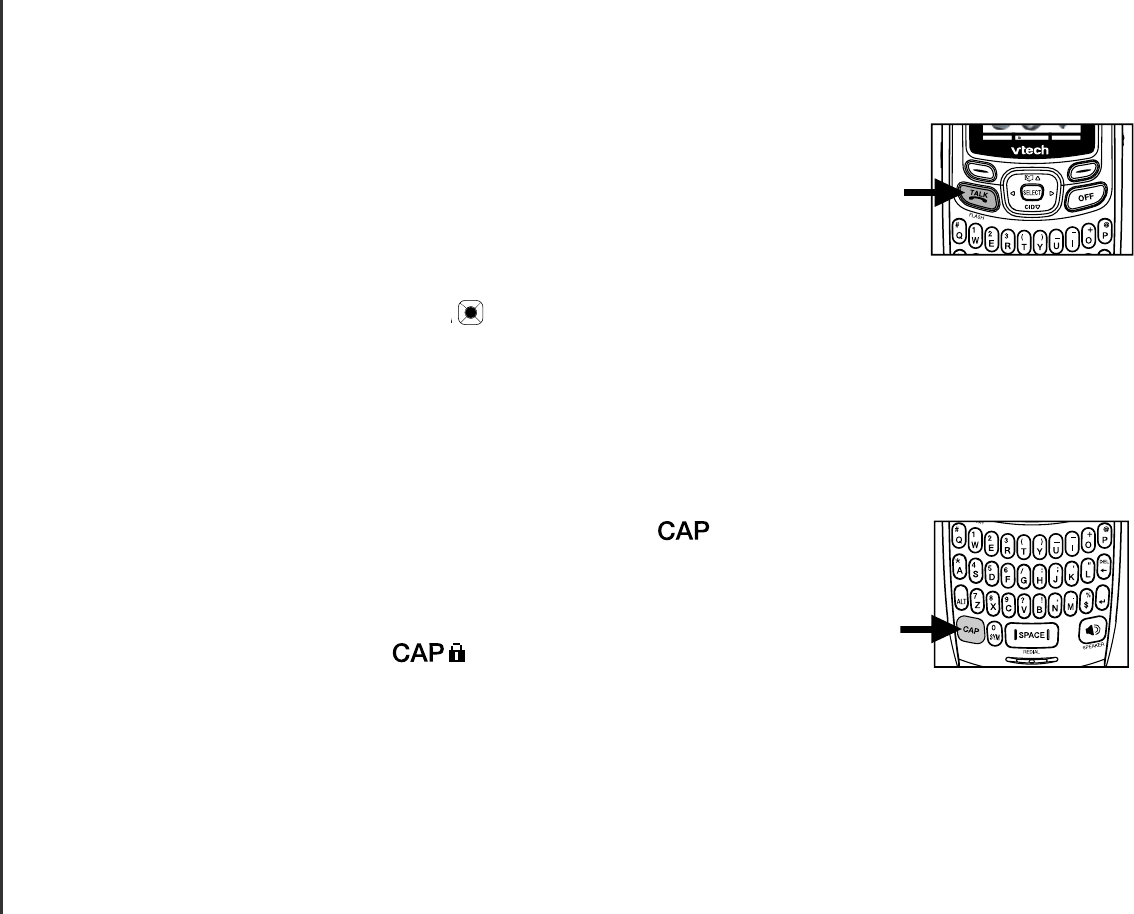
Entering characters
7UGVJGFKCNRCFVQGPVGTEJCTCEVGTUYJKNGKPVJGVGZVGPVT[ſGNF.QYGTECUG
input mode will be used by default (see
Chart of characters
on page 35)
and no status icon will be shown in the center of the softkey bar.
To change to uppercase input mode, press
CAP
and
will be shown
in the center of the softkey bar, indicating the next character will be
capitalized or press the
CAP
and the character at the same time (see
Chart of characters
on page 35). It will then return to the previous input
mode. Double click
CAP
until
is shown in the center of the softkey
bar to input subsequent characters in uppercase. Double click it again
to return to lowercase mode (release once there is no status icon shown
in the sub-display bar).
•
•
•
•
•
Getting to know the IS6110
Messeng e MenuShift-L
www.vtechphones.com 34
Getting to know the IS6110
Entering characters
To change to numeric input mode, press ALT and will be shown in the
center of the softkey bar indicating the next character will be a numeric
character, or press ALT and the character at the same time (See Chart of
characters on page 35). It will only type the next character in this mode,
after that it will return to the previous input mode. Double click ALT until
is shown in the center of the softkey bar to input all the subsequent
characters in numeral(s). Double click it again to return to lowercase.
Text entry tips
Pressing SYM while in text entry mode will generate a chart of symbols.
Use the navigation key to scroll though the options and press the SELECT
softkey to insert the highlighted symbol (see Chart of characters on page
35) or press SYM again to exit.
Press SPACE/REDIAL to enter a space.
Press the left or right NavKey or to move the cursor to the desired
character and press DEL to delete the text.
Press to send out the instant message.
•
•
•
•
•
Getting to know the IS6110
www.vtechphones.com
35
Getting to know the IS6110
Chart of characters
Use the dial pad and the chart below to enter a name (up to 16 characters). Each press of a particular
key causes characters to be displayed in the following order:
Lowercase:
Left softkey
LEFT
UP
RIGHT
Right softkey
SELECT
TALK/FLASH DOWN OFF
q w e r t y u i o p
a s d f g h Lk l DEL
ALT z x c v b n m $ ENTER
CAP SYM SPACE SPEAKER
Left softkey
LEFT
UP
RIGHT
Right softkey
SELECT
TALK/FLASH DOWN OFF
Q W E R T Y U I O P
A S D F G H J K L DEL
ALT Z X C V B N M $ ENTER
CAP SYM SPACE SPEAKER
Uppercase:
www.vtechphones.com 36
Getting to know the IS6110
Left softkey
LEFT
UP
RIGHT
Right softkey
SELECT
TALK/FLASH DOWN OFF
# 1 2 3 ( ) _ - + @
* 4 5 6 / : ; ‘ “ DEL
ALT 7 8 9 ? ! , . % ENTER
CAP SYM SPACE SPEAKER
Left softkey
LEFT
UP
RIGHT
Right softkey
SELECT
TALK/FLASH DOWN OFF
~ ` ^ & ¥ ¦ |
\ [ ] { } £ eDEL
ALT ¢ « » < = > ŝENTER
CAP SYM SPACE SPEAKER
Numeric mode:
Symbol mode:
Getting to know the IS6110
Chart of characters

www.vtechphones.com
37
Symbol table
Pressing SYM while in text entry mode will generate a chart of different symbols as shown in the
following table.
Getting to know the IS6110
~ ` ^ & ¥ ¦ |
\ [ ] { } £ e
¢ « » < = > ŝ
www.vtechphones.com 38
Telephone settings
Telephone settings
Ringer
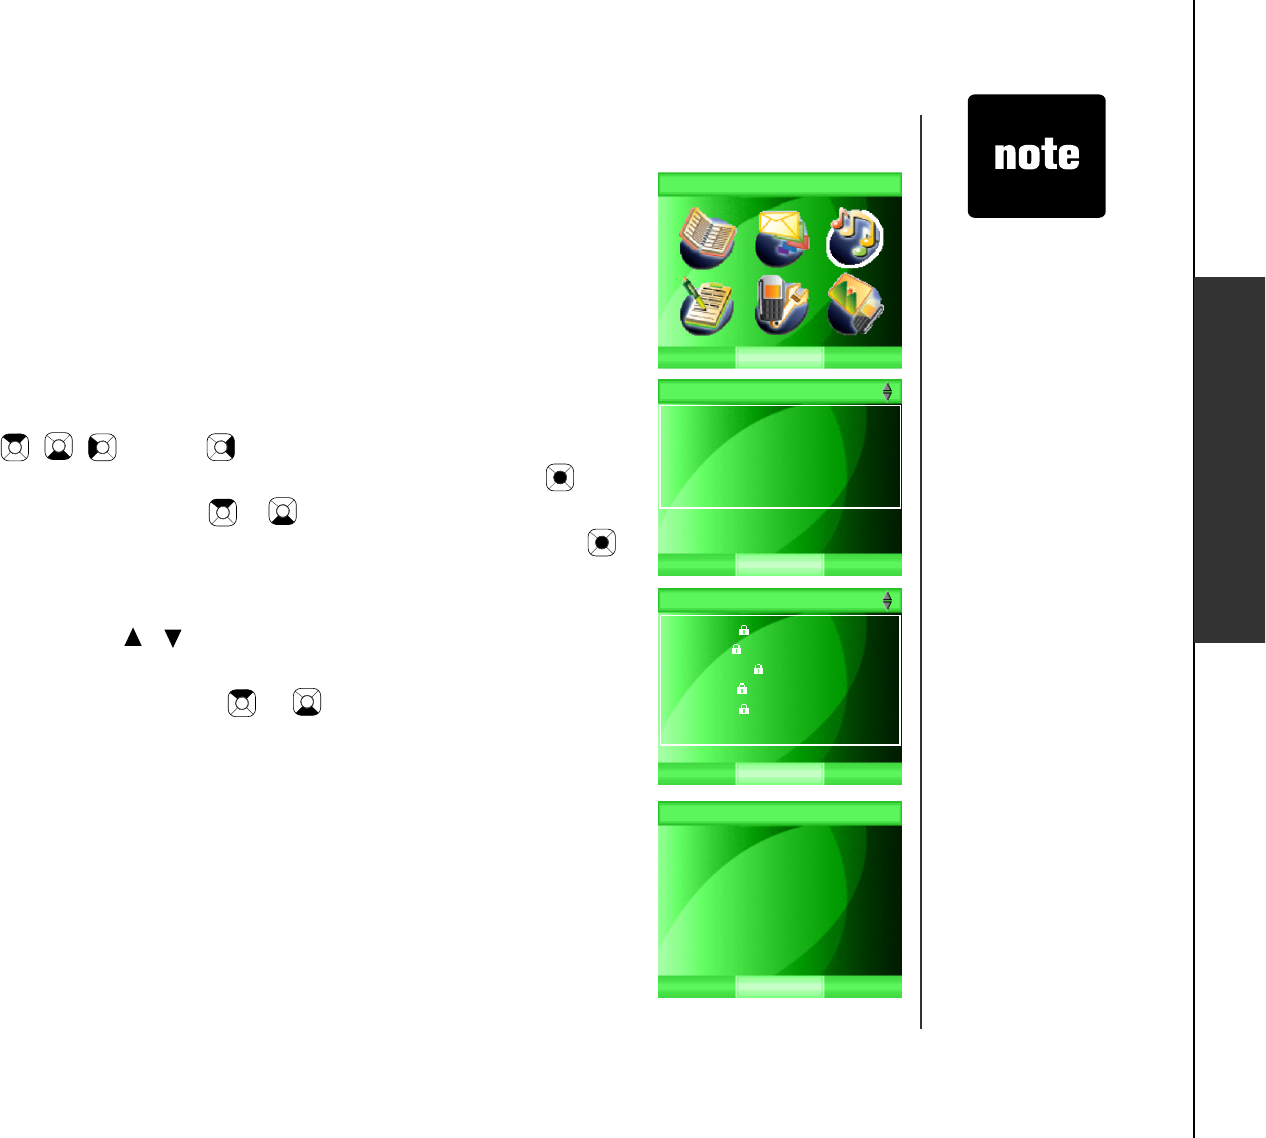
From this menu you can change the ringer melody and ringer volume. You
can also record and play your own sound clips.
Play or delete sound clips
In this menu, you can play the sound clip(s) on the list including the sound
clips recorded using the microphone or audio cable.
Step 1: Press the MENU softkey from the idle screen.
Step 2: Press the , , and/or NavKeys to choose Ringer, then
press the SELECT softkey or the center NavKey/SELECT/.
Step 3: Press the up or down NavKey or to choose Play Sound Clips,
then press the SELECT softkey or the center NavKey/SELECT/.
A list of sound clip(s) will be shown on the screen.
5VGR 6JGUGNGEVGFUQWPFENKRYKNNDGRNC[GF6JGXQNWOGECPDGCFLWUVGF
by pressing the VOL / on the side of the telephone when the
sound clip is played.
Step 5: Press the up or down NavKey or to scroll through the list of
sound clip(s).
Step 6: To delete a sound clip, press the DELETE softkey while the desired
sound clip is highlighted. The screen will display Are you sure you
want to delete the sound clip?. Press the YesUQHVMG[VQEQPſTO
or the No softkey to return to previous screen.
If the sound
clip has a lock
symbol beside
it, this sound
clip is protected
and cannot be
deleted.
•
SELECT
R inger
B ACK
BACK SELECT
Ringer
Play Sound Clips
Ringer Melody
Ringer Volume
Record Sound Clip
BACK DELETE
Play Sound Clips
Riff Rock
Change Up!
R&B
Deep Beat
Catwalkin
Morning
Are you sure you
want to delete the
sound clip?
YES N O
Play Sound Clips