VTech Telecommunications 80-6563-00 1.9GHz CORDLESS PHONE User Manual
VTech Telecommunications Ltd 1.9GHz CORDLESS PHONE
Contents
- 1. Users Manual 1
- 2. Users Manual 2
Users Manual 2
User’s Guide
SB67030 Deskset

SB67030 Deskset User’s Guide - Content 3
Voice Make Call Answer
Install Overview PC UI Setup Mail Directory CallLog Call Manage Call Handset Trouble
C
ONTENT
Content
Preface
Introduction........................................................................................................................................................................................................................................................10
Navigation............................................................................................................................................................................................................................................................11
In This Manual...................................................................................................................................................................................................................................................12
Procedures . . . . . . . . . . . . . . . . . . . . . . . . . . . . . . . . . . . . . . . . . . . . . . . . . . . . . . . . . . . . . . . . . . . . . . . . . . . . . . . . . . . . . . . . . . . 13
Additional Documentation.......................................................................................................................................................................................................................14
Installation
Introduction........................................................................................................................................................................................................................................................15
Initial Precautions...........................................................................................................................................................................................................................................16
SB67030 Desk Set Components..........................................................................................................................................................................................................17
Attaching Deskset Stand...........................................................................................................................................................................................................................18
Cable Connection...........................................................................................................................................................................................................................................19
Wall Mounting...................................................................................................................................................................................................................................................21
Technical Specification...............................................................................................................................................................................................................................23
Typical Network Configurations............................................................................................................................................................................................................24
Overview
Introduction........................................................................................................................................................................................................................................................25
Display and Key Functions........................................................................................................................................................................................................................27
Liquid Crystal Display (LCD) Screen...................................................................................................................................................................................................28
Programmed Operations Keys...............................................................................................................................................................................................................29
Call Appearance (CA)...................................................................................................................................................................................................................................30
Call Appearance (CA) Icons. . . . . . . . . . . . . . . . . . . . . . . . . . . . . . . . . . . . . . . . . . . . . . . . . . . . . . . . . . . . . . . . . . . . . . . . . . . . . 31
Call Appearance (CA) Operation . . . . . . . . . . . . . . . . . . . . . . . . . . . . . . . . . . . . . . . . . . . . . . . . . . . . . . . . . . . . . . . . . . . . . . . . 32

SB67030 Deskset User’s Guide - Content 4
Voice Make Call Answer
Install Overview PC UI Setup Mail Directory CallLog Call Manage Call Handset Trouble
Call Appearance (CA) Timer . . . . . . . . . . . . . . . . . . . . . . . . . . . . . . . . . . . . . . . . . . . . . . . . . . . . . . . . . . . . . . . . . . . . . . . . . . . . 34
Function Keys....................................................................................................................................................................................................................................................35
Programmed Keys..........................................................................................................................................................................................................................................36
The Idle Screen.................................................................................................................................................................................................................................................41
Status Indication . . . . . . . . . . . . . . . . . . . . . . . . . . . . . . . . . . . . . . . . . . . . . . . . . . . . . . . . . . . . . . . . . . . . . . . . . . . . . . . . . . . . . . 42
Extension . . . . . . . . . . . . . . . . . . . . . . . . . . . . . . . . . . . . . . . . . . . . . . . . . . . . . . . . . . . . . . . . . . . . . . . . . . . . . . . . . . . . . . . . . . . . . 42
Keypad Data Entry..........................................................................................................................................................................................................................................43
Search Rules . . . . . . . . . . . . . . . . . . . . . . . . . . . . . . . . . . . . . . . . . . . . . . . . . . . . . . . . . . . . . . . . . . . . . . . . . 44
Browser Interface
Introduction........................................................................................................................................................................................................................................................45
Accessing the User Interface (UI)........................................................................................................................................................................................................46
Call Forward-No Answer Settings . . . . . . . . . . . . . . . . . . . . . . . . . . . . . . . . . . . . . . . . . . . . . . . . . . . . . . . . . . . . . . . . . . . . . . . 48
Editing Quick Dial Entries..........................................................................................................................................................................................................................49
Setup Menus
Introduction........................................................................................................................................................................................................................................................51
Setup Menus.......................................................................................................................................................................................................................................................52
Deskset Settings..............................................................................................................................................................................................................................................54
Display . . . . . . . . . . . . . . . . . . . . . . . . . . . . . . . . . . . . . . . . . . . . . . . . . . . . . . . . . . . . . . . . . . . . . . . . . . . . . . . . . . . . . . . . . . . . . . . 55
Sounds . . . . . . . . . . . . . . . . . . . . . . . . . . . . . . . . . . . . . . . . . . . . . . . . . . . . . . . . . . . . . . . . . . . . . . . . . . . . . . . . . . . . . . . . . . . . . . . 56
Language. . . . . . . . . . . . . . . . . . . . . . . . . . . . . . . . . . . . . . . . . . . . . . . . . . . . . . . . . . . . . . . . . . . . . . . . . . . . . . . . . . . . . . . . . . . . . 57
Preferred Audio . . . . . . . . . . . . . . . . . . . . . . . . . . . . . . . . . . . . . . . . . . . . . . . . . . . . . . . . . . . . . . . . . . . . . . . . . . . . . . . . . . . . . . . 58
User Settings......................................................................................................................................................................................................................................................59
Greetings. . . . . . . . . . . . . . . . . . . . . . . . . . . . . . . . . . . . . . . . . . . . . . . . . . . . . . . . . . . . . . . . . . . . . . . . . . . . . . . . . . . . . . . . . . . . . 61
Recording A Greeting. . . . . . . . . . . . . . . . . . . . . . . . . . . . . . . . . . . . . . . . . . . . . . . . . . . . . . . . . . . . . . . . . . 62
Call Forwarding All . . . . . . . . . . . . . . . . . . . . . . . . . . . . . . . . . . . . . . . . . . . . . . . . . . . . . . . . . . . . . . . . . . . . . . . . . . . . . . . . . . . . 63
Call Fwd All Voicemail (VM). . . . . . . . . . . . . . . . . . . . . . . . . . . . . . . . . . . . . . . . . . . . . . . . . . . . . . . . . . . . . . . . . . . . . . . . . 64
Call Fwd All - Extension . . . . . . . . . . . . . . . . . . . . . . . . . . . . . . . . . . . . . . . . . . . . . . . . . . . . . . . . . . . . . . . 65
Call Fwd All - Outside Line . . . . . . . . . . . . . . . . . . . . . . . . . . . . . . . . . . . . . . . . . . . . . . . . . . . . . . . . . . . . . 66
Call Forward Notification . . . . . . . . . . . . . . . . . . . . . . . . . . . . . . . . . . . . . . . . . . . . . . . . . . . . . . . . . . . . . . . . 67

SB67030 Deskset User’s Guide - Content 5
Voice Make Call Answer
Install Overview PC UI Setup Mail Directory CallLog Call Manage Call Handset Trouble
Voicemail Memory. . . . . . . . . . . . . . . . . . . . . . . . . . . . . . . . . . . . . . . . . . . . . . . . . . . . . . . . . . . . . . . . . . . . . . . . . . . . . . . . . . . . . 68
Name Recording . . . . . . . . . . . . . . . . . . . . . . . . . . . . . . . . . . . . . . . . . . . . . . . . . . . . . . . . . . . . . . . . . . . . . . . . . . . . . . . . . . . . . . 69
Personal Name Recording . . . . . . . . . . . . . . . . . . . . . . . . . . . . . . . . . . . . . . . . . . . . . . . . . . . . . . . . . . . . . . 70
Pre-Set Name . . . . . . . . . . . . . . . . . . . . . . . . . . . . . . . . . . . . . . . . . . . . . . . . . . . . . . . . . . . . . . . . . . . . . . . . 71
Cordless Registration . . . . . . . . . . . . . . . . . . . . . . . . . . . . . . . . . . . . . . . . . . . . . . . . . . . . . . . . . . . . . . . . . . . . . . . . . . . . . . . . . . 72
Register a Cordless Device. . . . . . . . . . . . . . . . . . . . . . . . . . . . . . . . . . . . . . . . . . . . . . . . . . . . . . . . . . . . . . 73
Deregister a Cordless Device. . . . . . . . . . . . . . . . . . . . . . . . . . . . . . . . . . . . . . . . . . . . . . . . . . . . . . . . . . . . 74
Password . . . . . . . . . . . . . . . . . . . . . . . . . . . . . . . . . . . . . . . . . . . . . . . . . . . . . . . . . . . . . . . . . . . . . . . . . . . . . . . . . . . . . . . . . . . . . 75
Change User Password. . . . . . . . . . . . . . . . . . . . . . . . . . . . . . . . . . . . . . . . . . . . . . . . . . . . . . . . . . . . . . . . . 76
Admin Settings.................................................................................................................................................................................................................................................77
Call Fwd - NA . . . . . . . . . . . . . . . . . . . . . . . . . . . . . . . . . . . . . . . . . . . . . . . . . . . . . . . . . . . . . . . . . . . . . . . . . . . . . . . . . . . . . . . . . 78
Call Forward - No Answer to Voicemail . . . . . . . . . . . . . . . . . . . . . . . . . . . . . . . . . . . . . . . . . . . . . . . . . . . 79
Call Forward - No Answer to an Extension. . . . . . . . . . . . . . . . . . . . . . . . . . . . . . . . . . . . . . . . . . . . . . . . . 80
Call Forward - No Answer to an Outside Line . . . . . . . . . . . . . . . . . . . . . . . . . . . . . . . . . . . . . . . . . . . . . . 81
Fwd/Trans to line. . . . . . . . . . . . . . . . . . . . . . . . . . . . . . . . . . . . . . . . . . . . . . . . . . . . . . . . . . . . . . . . . . . . . . . . . . . . . . . . . . . . . . 82
Restore Default Settings . . . . . . . . . . . . . . . . . . . . . . . . . . . . . . . . . . . . . . . . . . . . . . . . . . . . . . . . . . . . . . . . . . . . . . . . . . . . . . . 83
Event Log. . . . . . . . . . . . . . . . . . . . . . . . . . . . . . . . . . . . . . . . . . . . . . . . . . . . . . . . . . . . . . . . . . . . . . . . . . . . . . . . . . . . . . . . . . . . . 84
IP Settings . . . . . . . . . . . . . . . . . . . . . . . . . . . . . . . . . . . . . . . . . . . . . . . . . . . . . . . . . . . . . . . . . . . . . . . . . . . . . . . . . . . . . . . . . . . . 85
IP Configuration . . . . . . . . . . . . . . . . . . . . . . . . . . . . . . . . . . . . . . . . . . . . . . . . . . . . . . . . . . . . . . . . . . . . . . 86
Set/Edit Static IP. . . . . . . . . . . . . . . . . . . . . . . . . . . . . . . . . . . . . . . . . . . . . . . . . . . . . . . . . . . . . . . . . . . . . . 87
IP Status . . . . . . . . . . . . . . . . . . . . . . . . . . . . . . . . . . . . . . . . . . . . . . . . . . . . . . . . . . . . . . . . . . . . . . . . . . . . 88
Reset User Password . . . . . . . . . . . . . . . . . . . . . . . . . . . . . . . . . . . . . . . . . . . . . . . . . . . . . . . . . . . . . . . . . . . . . . . . . . . . . . . . . . 89
Software Upgrade . . . . . . . . . . . . . . . . . . . . . . . . . . . . . . . . . . . . . . . . . . . . . . . . . . . . . . . . . . . . . . . . . . . . . . . . . . . . . . . . . . . . . 90
Deskset Information......................................................................................................................................................................................................................................91
Setting up Do Not Disturb........................................................................................................................................................................................................................92
Voice Mail
Access Voicemail............................................................................................................................................................................................................................................94
Messages Feature...........................................................................................................................................................................................................................................95
Message Playback..........................................................................................................................................................................................................................................97
Forwarding a Message................................................................................................................................................................................................................................99

SB67030 Deskset User’s Guide - Content 6
Voice Make Call Answer
Install Overview PC UI Setup Mail Directory CallLog Call Manage Call Handset Trouble
Forward to Additional Extensions . . . . . . . . . . . . . . . . . . . . . . . . . . . . . . . . . . . . . . . . . . . . . . . . . . . . . . . . . . . . . . . . . . . . . .101
Recording an Audio Annotation. . . . . . . . . . . . . . . . . . . . . . . . . . . . . . . . . . . . . . . . . . . . . . . . . . . . . . . . . 102
Status Notifications. . . . . . . . . . . . . . . . . . . . . . . . . . . . . . . . . . . . . . . . . . . . . . . . . . . . . . . . . . . . . . . . . . . . . . . . . . . . . . . . . . . 103
Deleting Messages......................................................................................................................................................................................................................................104
Clear Message Flags..................................................................................................................................................................................................................................106
Voicemail Remote Operations............................................................................................................................................................................................................107
Directory
Introduction.....................................................................................................................................................................................................................................................110
Using the Directory.....................................................................................................................................................................................................................................111
List Scrolling Rules . . . . . . . . . . . . . . . . . . . . . . . . . . . . . . . . . . . . . . . . . . . . . . . . . . . . . . . . . . . . . . . . . . . . . . . . . . . . . . . . . . .112
Creating a New Directory Entry.........................................................................................................................................................................................................113
Editing a Directory Entry.........................................................................................................................................................................................................................114
Deleting a Directory Entry.....................................................................................................................................................................................................................115
Directory Sort.................................................................................................................................................................................................................................................116
Directory List...................................................................................................................................................................................................................................................117
Non-alphabetical character sort rules. . . . . . . . . . . . . . . . . . . . . . . . . . . . . . . . . . . . . . . . . . . . . . . . . . . . 118
Call Log
Introduction.....................................................................................................................................................................................................................................................119
Using the Call Log.......................................................................................................................................................................................................................................120
List Scrolling Rules . . . . . . . . . . . . . . . . . . . . . . . . . . . . . . . . . . . . . . . . . . . . . . . . . . . . . . . . . . . . . . . . . . . 121
Missed Call Notification...........................................................................................................................................................................................................................122
Reviewing the Call Log list:...................................................................................................................................................................................................................123
Voicemail messages in Call Logs. . . . . . . . . . . . . . . . . . . . . . . . . . . . . . . . . . . . . . . . . . . . . . . . . . . . . . . . . . . . . . . . . . . . . . .124
Storing Call Log Entries...........................................................................................................................................................................................................................125
Deleting Call Log Entries........................................................................................................................................................................................................................126
Making a Call
Dialing Rules...................................................................................................................................................................................................................................................129
The Idle Screen..............................................................................................................................................................................................................................................130

SB67030 Deskset User’s Guide - Content 7
Voice Make Call Answer
Install Overview PC UI Setup Mail Directory CallLog Call Manage Call Handset Trouble
Pre-Dialing........................................................................................................................................................................................................................................................131
Active Call Screen.......................................................................................................................................................................................................................................132
Live Dialing.......................................................................................................................................................................................................................................................133
Using the Extension List..........................................................................................................................................................................................................................134
Calling an Extension in Idle Mode . . . . . . . . . . . . . . . . . . . . . . . . . . . . . . . . . . . . . . . . . . . . . . . . . . . . . . . . . . . . . . . . . . . . . .135
Calling an Extension from Dial . . . . . . . . . . . . . . . . . . . . . . . . . . . . . . . . . . . . . . . . . . . . . . . . . . . . . . . . . . . . . . . . . . . . . . . . . 136
Calling from the Directory.....................................................................................................................................................................................................................137
Calling from the Call Log ......................................................................................................................................................................................................................138
Calling from Call Log Details...............................................................................................................................................................................................................139
Calling from Voicemail.............................................................................................................................................................................................................................140
Using Quick Dial...........................................................................................................................................................................................................................................141
Calling from Quick Dial. . . . . . . . . . . . . . . . . . . . . . . . . . . . . . . . . . . . . . . . . . . . . . . . . . . . . . . . . . . . . . . . . . . . . . . . . . . . . . . .142
Using the Redial List..................................................................................................................................................................................................................................143
Calling from Redial . . . . . . . . . . . . . . . . . . . . . . . . . . . . . . . . . . . . . . . . . . . . . . . . . . . . . . . . . . . . . . . . . . . . . . . . . . . . . . . . . . .145
Calling from Redial Details . . . . . . . . . . . . . . . . . . . . . . . . . . . . . . . . . . . . . . . . . . . . . . . . . . . . . . . . . . . . . . . . . . . . . . . . . . . . 146
Storing Redial Entries . . . . . . . . . . . . . . . . . . . . . . . . . . . . . . . . . . . . . . . . . . . . . . . . . . . . . . . . . . . . . . . . . . . . . . . . . . . . . . . . .147
Deleting Redial Entries. . . . . . . . . . . . . . . . . . . . . . . . . . . . . . . . . . . . . . . . . . . . . . . . . . . . . . . . . . . . . . . . . . . . . . . . . . . . . . . . 148
Call Management
Introduction.....................................................................................................................................................................................................................................................149
Call Management.........................................................................................................................................................................................................................................150
Transferring a Call.......................................................................................................................................................................................................................................151
Transfer to an Internal Extension. . . . . . . . . . . . . . . . . . . . . . . . . . . . . . . . . . . . . . . . . . . . . . . . . . . . . . . . . . . . . . . . . . . . . . . 153
Transfer to an External Number. . . . . . . . . . . . . . . . . . . . . . . . . . . . . . . . . . . . . . . . . . . . . . . . . . . . . . . . . . . . . . . . . . . . . . . .154
Transferring to Call Log . . . . . . . . . . . . . . . . . . . . . . . . . . . . . . . . . . . . . . . . . . . . . . . . . . . . . . . . . . . . . . . . . . . . . . . . . . . . . . . 155
Transferring to Directory . . . . . . . . . . . . . . . . . . . . . . . . . . . . . . . . . . . . . . . . . . . . . . . . . . . . . . . . . . . . . . . . . . . . . . . . . . . . . .156
Transferring to Redial List . . . . . . . . . . . . . . . . . . . . . . . . . . . . . . . . . . . . . . . . . . . . . . . . . . . . . . . . . . . . . . . . . . . . . . . . . . . . .157
Transferring to Held Calls . . . . . . . . . . . . . . . . . . . . . . . . . . . . . . . . . . . . . . . . . . . . . . . . . . . . . . . . . . . . . . . . . . . . . . . . . . . . .158
Transferring to Quick Dial . . . . . . . . . . . . . . . . . . . . . . . . . . . . . . . . . . . . . . . . . . . . . . . . . . . . . . . . . . . . . . . . . . . . . . . . . . . . . 159
Conference a Call........................................................................................................................................................................................................................................160
Conference with Extension List . . . . . . . . . . . . . . . . . . . . . . . . . . . . . . . . . . . . . . . . . . . . . . . . . . . . . . . . . . . . . . . . . . . . . . . . 162
Conference with Call Log . . . . . . . . . . . . . . . . . . . . . . . . . . . . . . . . . . . . . . . . . . . . . . . . . . . . . . . . . . . . . . . . . . . . . . . . . . . . . 163

SB67030 Deskset User’s Guide - Content 8
Voice Make Call Answer
Install Overview PC UI Setup Mail Directory CallLog Call Manage Call Handset Trouble
Conference with Redial List . . . . . . . . . . . . . . . . . . . . . . . . . . . . . . . . . . . . . . . . . . . . . . . . . . . . . . . . . . . . 164
Conference with Park List . . . . . . . . . . . . . . . . . . . . . . . . . . . . . . . . . . . . . . . . . . . . . . . . . . . . . . . . . . . . . . . . . . . . . . . . . . . . . 165
Conference with Directory. . . . . . . . . . . . . . . . . . . . . . . . . . . . . . . . . . . . . . . . . . . . . . . . . . . . . . . . . . . . . . . . . . . . . . . . . . . . .166
Conference with Quick Dial. . . . . . . . . . . . . . . . . . . . . . . . . . . . . . . . . . . . . . . . . . . . . . . . . . . . . . . . . . . . . . . . . . . . . . . . . . . . 167
Conference with a Held Call. . . . . . . . . . . . . . . . . . . . . . . . . . . . . . . . . . . . . . . . . . . . . . . . . . . . . . . . . . . . . . . . . . . . . . . . . . .168
Conference Two Held Calls. . . . . . . . . . . . . . . . . . . . . . . . . . . . . . . . . . . . . . . . . . . . . . . . . . . . . . . . . . . . . . . . . . . . . . . . . . . .169
Canceling a Conference. . . . . . . . . . . . . . . . . . . . . . . . . . . . . . . . . . . . . . . . . . . . . . . . . . . . . . . . . . . . . . . . . . . . . . . . . . . . . . . 170
Call on Hold.....................................................................................................................................................................................................................................................171
Parking a Call.................................................................................................................................................................................................................................................173
Retrieving A Parked Call.........................................................................................................................................................................................................................174
Paging..................................................................................................................................................................................................................................................................175
Answer a Call
Answer Screens.............................................................................................................................................................................................................................................177
Answering a Call in Idle...........................................................................................................................................................................................................................179
Answer From Predial.................................................................................................................................................................................................................................180
Answer While on a Call...........................................................................................................................................................................................................................182
Answer With a Call on Hold.................................................................................................................................................................................................................183
Answer a Call from Within a Menu..................................................................................................................................................................................................184
Answer With Multiple Incoming Calls............................................................................................................................................................................................185
Answer a Call From Voicemail............................................................................................................................................................................................................186
Ignoring a Call................................................................................................................................................................................................................................................187
Handset Interaction
Introduction.....................................................................................................................................................................................................................................................188
Idle Screen........................................................................................................................................................................................................................................................189
Locating the Handset................................................................................................................................................................................................................................191
Ignoring a Call................................................................................................................................................................................................................................................192
Incoming Ring: Deskset Answers......................................................................................................................................................................................................193
Incoming Ring Event: Handset Answers.......................................................................................................................................................................................194
Held Calls on Both Devices...................................................................................................................................................................................................................195

SB67030 Deskset User’s Guide - Content 9
Voice Make Call Answer
Install Overview PC UI Setup Mail Directory CallLog Call Manage Call Handset Trouble
Troubleshooting
Important Safety Instructions . . . . . . . . . . . . . . . . . . . . . . . . . . . . . . . . . . . . . . . . . . . . . . . . . . . . . . . . . . . . . . . . . . . . . . . . . .198
Maintenance....................................................................................................................................................................................................................................................199
Avoid rough treatment. . . . . . . . . . . . . . . . . . . . . . . . . . . . . . . . . . . . . . . . . . . . . . . . . . . . . . . . . . . . . . . . 199
Avoid water. . . . . . . . . . . . . . . . . . . . . . . . . . . . . . . . . . . . . . . . . . . . . . . . . . . . . . . . . . . . . . . . . . . . . . . . . 200
Electrical storms . . . . . . . . . . . . . . . . . . . . . . . . . . . . . . . . . . . . . . . . . . . . . . . . . . . . . . . . . . . . . . . . . . . . . 200
Cleaning your unit . . . . . . . . . . . . . . . . . . . . . . . . . . . . . . . . . . . . . . . . . . . . . . . . . . . . . . . . . . . . . . . . . . . 200
Warranty............................................................................................................................................................................................................................................................200
Technical Specifications..........................................................................................................................................................................................................................200
Glossary
ACTIVE CALL . . . . . . . . . . . . . . . . . . . . . . . . . . . . . . . . . . . . . . . . . . . . . . . . . . . . . . . . . . . . . . . . . . . . . . . . 202
DIAL. . . . . . . . . . . . . . . . . . . . . . . . . . . . . . . . . . . . . . . . . . . . . . . . . . . . . . . . . . . . . . . . . . . . . . . . . . . . . . . 203
Held Calls . . . . . . . . . . . . . . . . . . . . . . . . . . . . . . . . . . . . . . . . . . . . . . . . . . . . . . . . . . . . . . . . . . . . . . . . . . 203
IDLE . . . . . . . . . . . . . . . . . . . . . . . . . . . . . . . . . . . . . . . . . . . . . . . . . . . . . . . . . . . . . . . . . . . . . . . . . . . . . . . 203
SB67030 Deskset User’s Guide - Preface 10
Voice Make Call Answer
Install Overview PC UI Setup Mail Directory CallLog Call Manage Call Handset Trouble
P
REFACE
Introduction
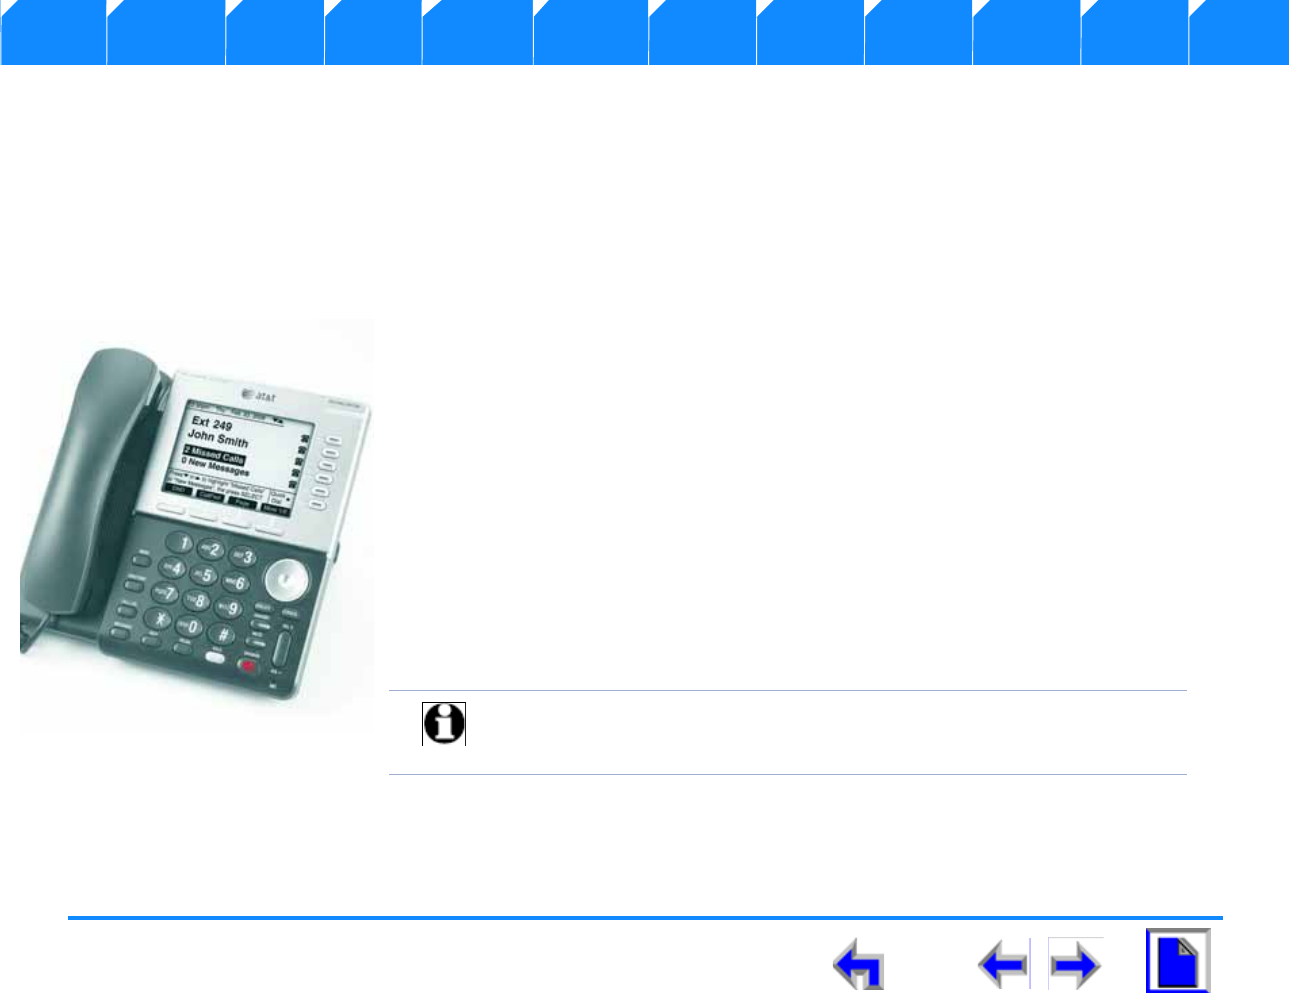
This User’s Guide provides a complete set of instructions to guide you through operation of your
SB67030 Deskset. Operating these devices does not require the technical expertise of a
traditional system administrator or IT professional, However, we recommend that you make one
person responsible for controlling the system-wide features described in this guide.
Before using this AT&T product, please read “Important Safety Instructions” on page 198 of this
manual. Please thoroughly read this user’s manual for all the feature operations and
troubleshooting information necessary to install and operate your new AT&T product.
1. “Navigation” on page 11
2. “In This Manual” on page 12
3. “Procedures” on page 13
Note For customer service or product information, visit our website at
www.telephones.att.com or call 1 (800) 222-3111. In Canada,
dial 1 (866) 288-4268.
SB67030 Deskset User’s Guide - Preface 11
Voice Make Call Answer
Install Overview PC UI Setup Mail Directory CallLog Call Manage Call Handset Trouble
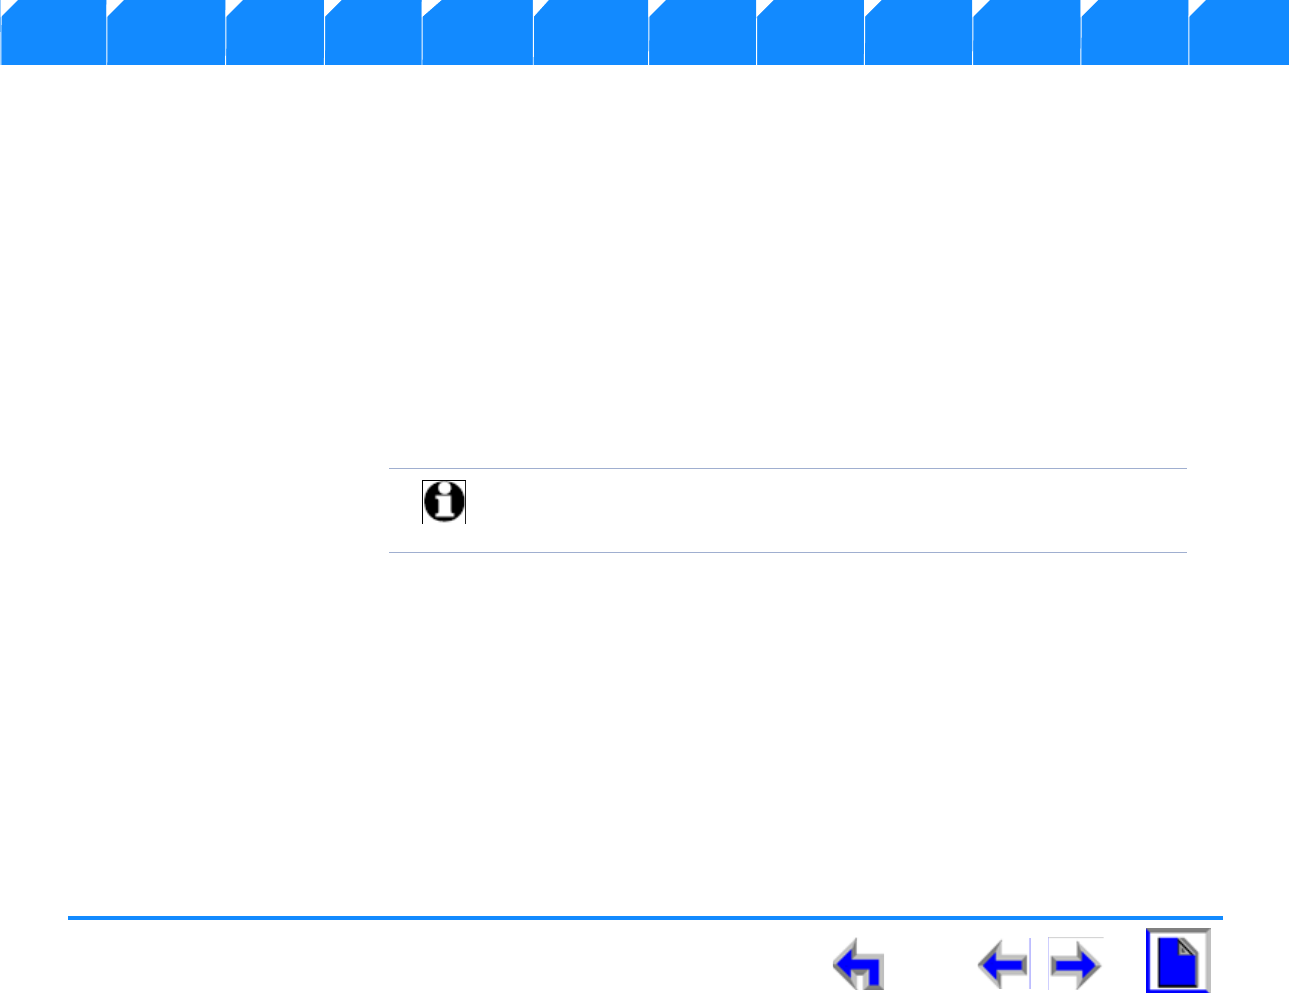
Navigation
Your SB67030 Deskset User Guide provides the ability to move from topic to topic easily, and to return to your original or previous
topic.Figure 1 illustrates the navigation conventions for this user guide.
Figure. 1 User Guide Navigation
Chapter Tabs
Click on these tabs to open
the chapter covered by that
topic.
Primary Topic
Click on this link to move to
the first page covering that
topic.
Previous Topic
Previous Page
Next Page
First Page in Chapter
SB67030 Deskset User’s Guide - Preface 12
Voice Make Call Answer
Install Overview PC UI Setup Mail Directory CallLog Call Manage Call Handset Trouble
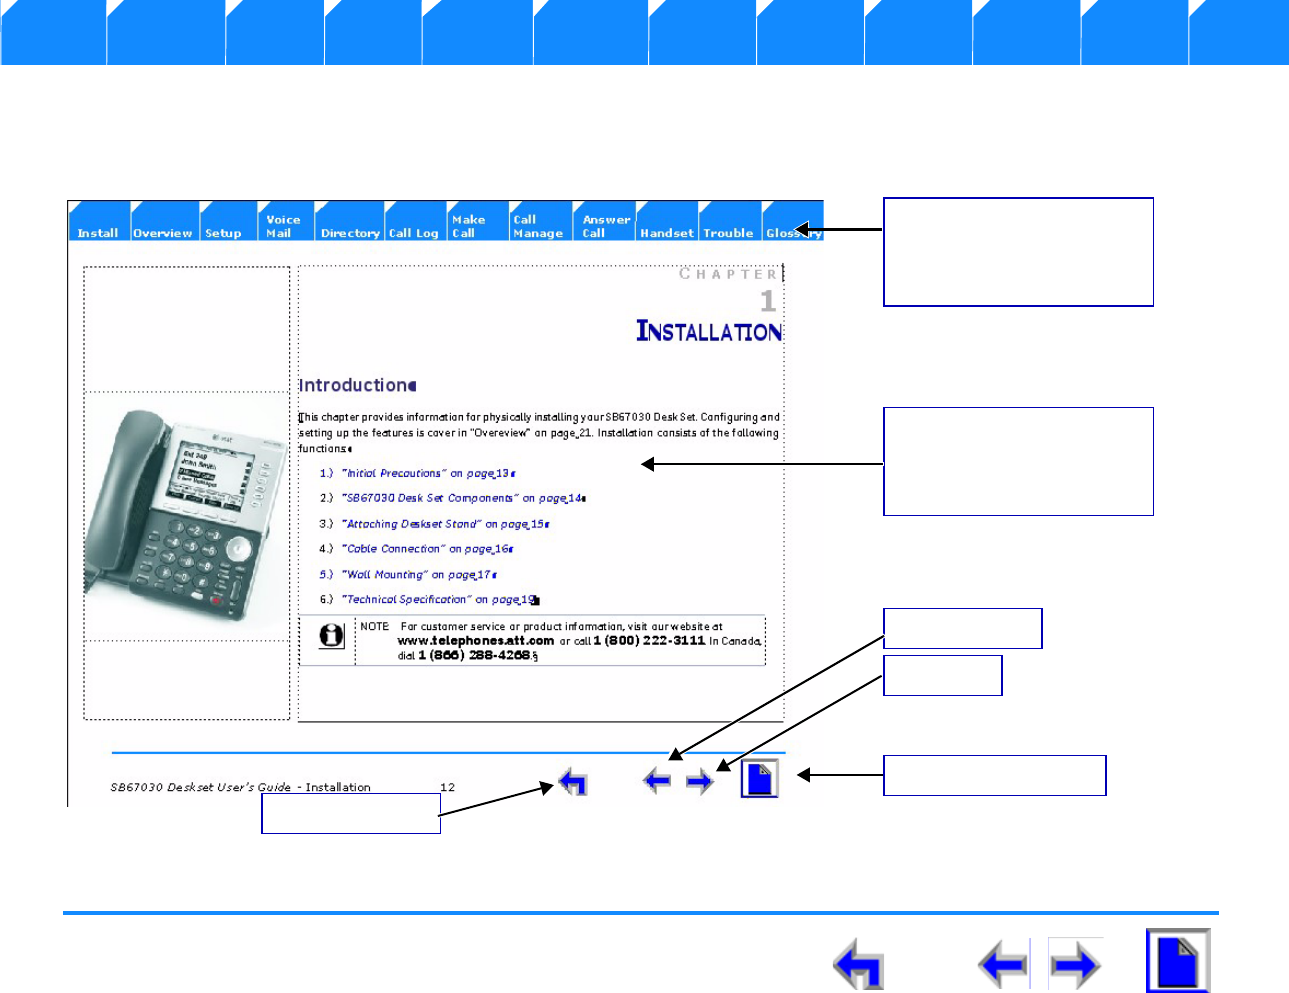
In This Manual
Table 1 lists text formats used in this manual to assist you in identifying items referenced within procedures.
Table 1 Description of Text Formats
Text Format Description
Screen This identifies text that appears on the screen in a menu or prompt.
FUNCTION KEY This identifies a Function key. See “The Idle Screen” on page 41 for a
complete description of the Function keys.
This identifies a Programmed key. See “Programmed Operations Keys” on
page 29 for a complete description of the Function keys.
Figure 1, Table 1, or “Navigation” on page 11 This identifies a reference to a figure, procedure, table, or section
within this manual.
“Introduction” This identifies a hyperlink to a primary topic.
Notes are added to give more information, usually in a procedure.
A caution means that damage to equipment is possible.
A tip provides information that can assist you in performing a
procedure.
Note Notes are added to give more information,
usually in a procedure.
CAUTION A caution means that damage to
equipment is possible.
Tip A tip provides information that can assist
you in performing a procedure.
SB67030 Deskset User’s Guide - Preface 13
Voice Make Call Answer
Install Overview PC UI Setup Mail Directory CallLog Call Manage Call Handset Trouble
Procedures
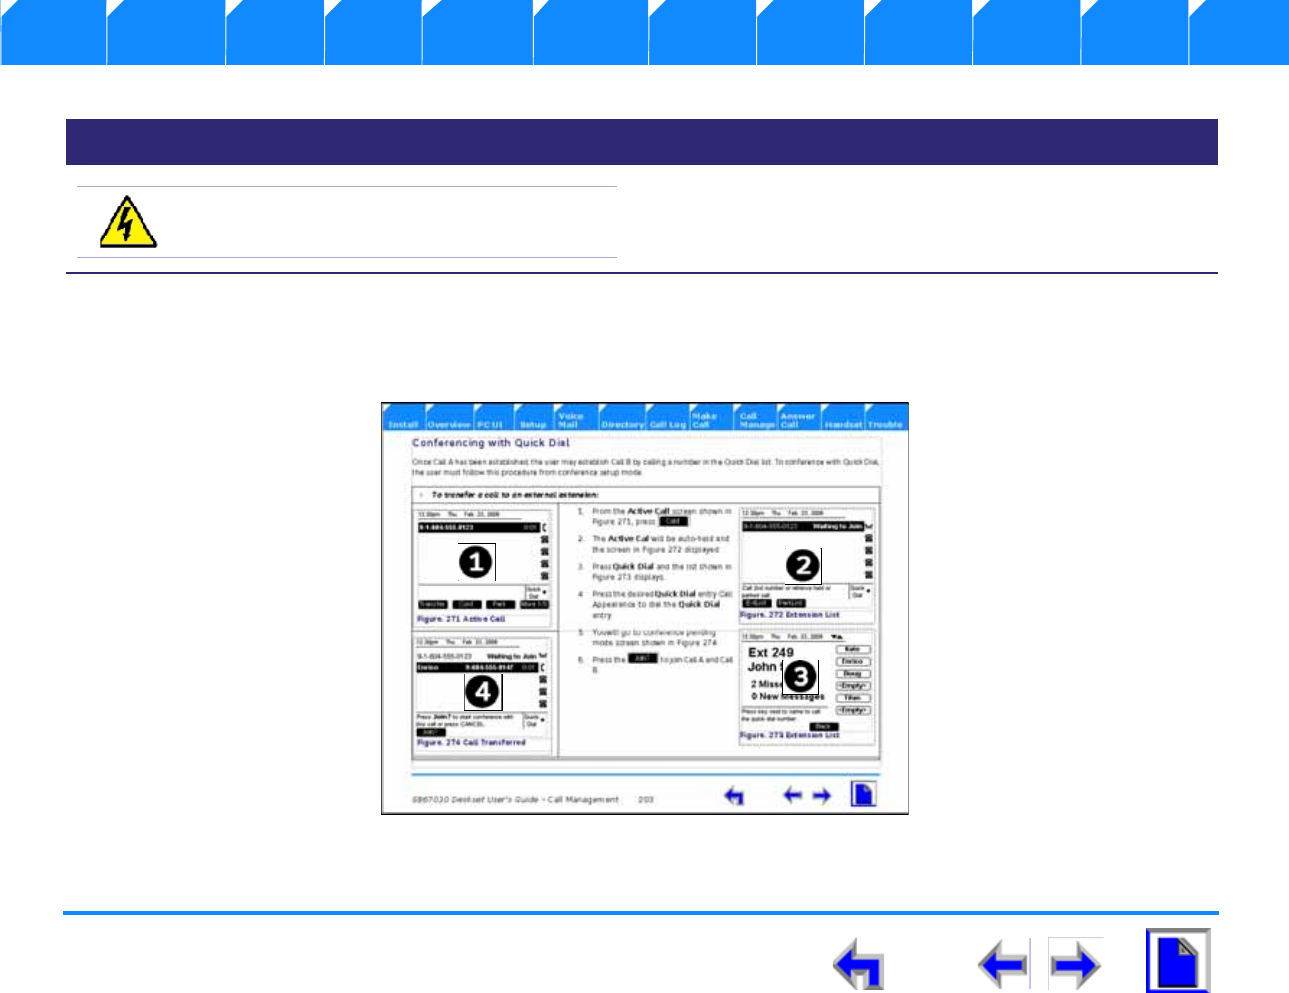
The procedures in this manual are contained on a single page, unless otherwise noted. Each page contains the topic heading and a
procedure table as shown in Figure 2. The screen images appear in clockwise order as indicated by the numbers in Figure 2.
Figure. 2 Sample Procedure
A warning means that injury or death is possible if the instructions
are not obeyed.
Table 1 Description of Text Formats
Text Format Description
WARNING A warning means that injury or death
is possible if the instructions are not obeyed.

SB67030 Deskset User’s Guide - Preface 14
Voice Make Call Answer
Install Overview PC UI Setup Mail Directory CallLog Call Manage Call Handset Trouble
Additional Documentation
This CD contains a complete documentation set for the SB67030 Deskset, SB67040 Remote Handset (Optional), 67020 Gateway, and
the 7610 Cordless Headset (Optional). The documentation set includes;
n67020 Gateway System Administrators Guide
n7610 Cordless Headset User’s Guide
nSB67040 Remote Handset User’s Guide
SB67030 Deskset User’s Guide - Installation 15
Voice Make Call Answer
Install Overview PC UI Setup Mail Directory CallLog Call Manage Call Handset Trouble
CHAPTER
1
I
NSTALLATION
Introduction
This chapter provides information for physically installing your SB67030 Desk Set. Configuring and
setting up the features is cover in “Overview” on page 25. Installation consists of the following
functions:
1. “Initial Precautions” on page 16
2. “SB67030 Desk Set Components” on page 17
3. “Attaching Deskset Stand” on page 18
4. “” on page 19
5. “Wall Mounting” on page 21
6. “Technical Specification” on page 23
Note For customer service or product information, visit our website at
www.telephones.att.com or call 1 (800) 222-3111. In Canada,
dial 1 (866) 288-4268.

SB67030 Deskset User’s Guide - Installation 16
Voice Make Call Answer
Install Overview PC UI Setup Mail Directory CallLog Call Manage Call Handset Trouble
The AT&T Small Business System (SBS) consists of a set of devices that work together to create a small-office telephone network. The
AT&T SBS differs from conventional telephone systems in that calls are not coordinated by a central controller. Instead, The SBS
connects to your office computer network to intelligently route traffic and handle calls..
This (internet Protocol (IP)-based system integrates itself seamlessly into an existing Local Area Network (LAN). Once the Deskset
phones are connected they find each other and automatically self-configure. Once configuration is complete, calls can be made
between extensions within the private network. Additional telephony and network configuration is administered through a Browser-
based User Interface (UI).
To make external calls, a Public Switched Telephone Network (PSTN) Gateway must also be connected to the network. Each Gateway
can connect up to four outside phone lines to the private Synapse network. Up to four Gateways can be connected to the system,
providing up to 16 PSTN lines. In addition, each Deskset can be registered with a Cordless Handset or Headset, which extends
functionality of the system to a portable device.
Initial Precautions
Avoid placing the telephone base too close to:
nCommunication devices such as: television sets, VCRs, or other cordless telephones.
nExcessive heat sources.
nNoise sources such as a window with traffic outside, motors, microwave ovens, refrigerators, or fluorescent lighting.
nExcessive dust sources such as a workshop or garage.
nExcessive moisture.
nExtremely low temperature.
nMechanical vibration or shock such as on top of the washing machine or workbench.
SB67030 Deskset User’s Guide - Installation 17
Voice Make Call Answer
Install Overview PC UI Setup Mail Directory CallLog Call Manage Call Handset Trouble
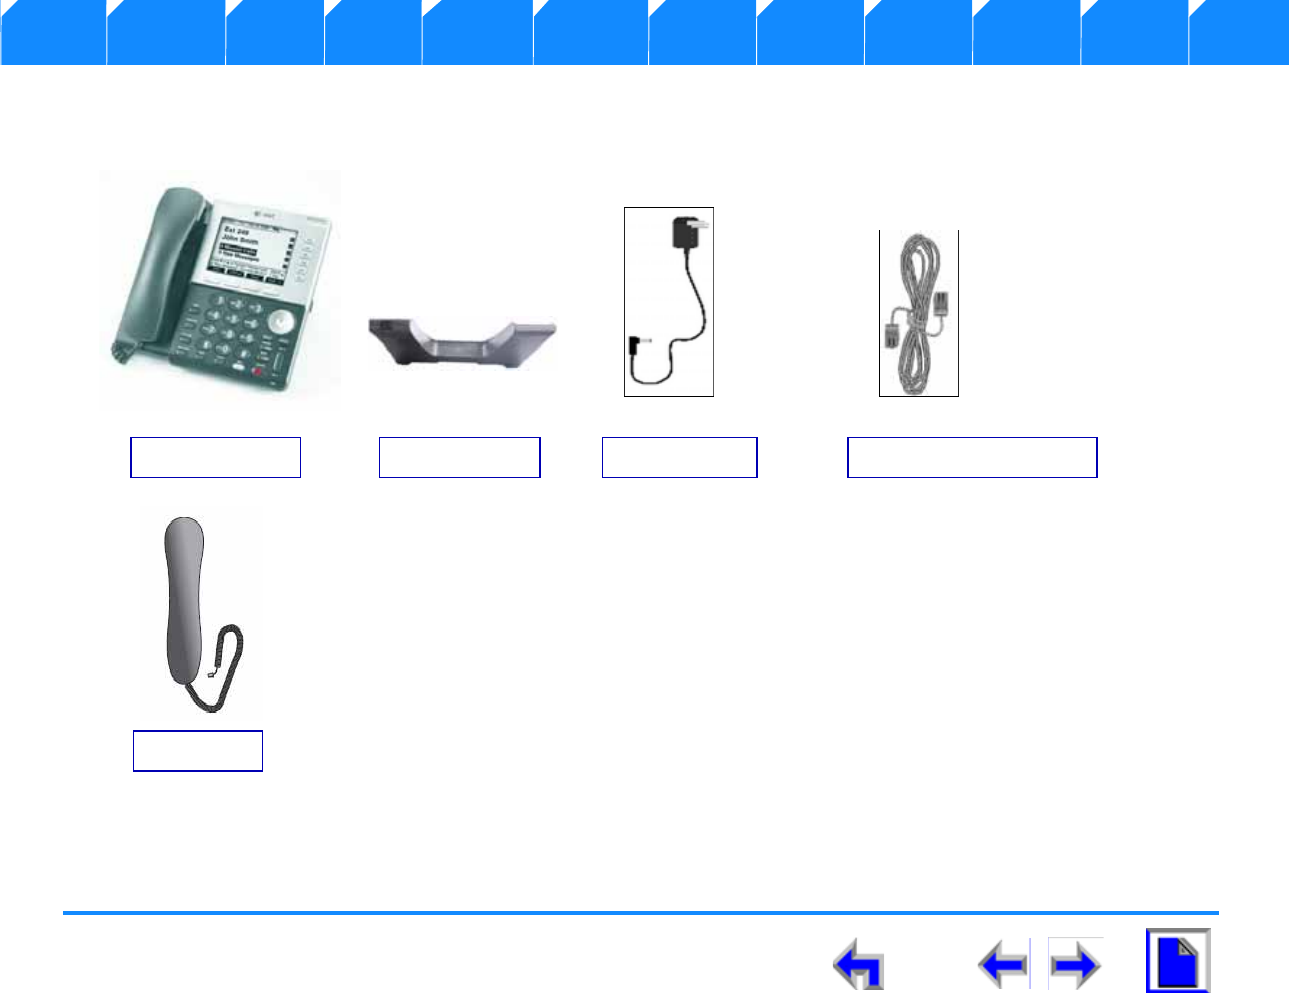
SB67030 Desk Set Components
Figure 3 illustrates the components shipped with the SB67030 Desk Set
Figure. 3 SB67030 Desk Set Components
Deskset Base Deskset Base Power Cable Ethernet Network Cable
Handset
SB67030 Deskset User’s Guide - Installation 18
Voice Make Call Answer
Install Overview PC UI Setup Mail Directory CallLog Call Manage Call Handset Trouble
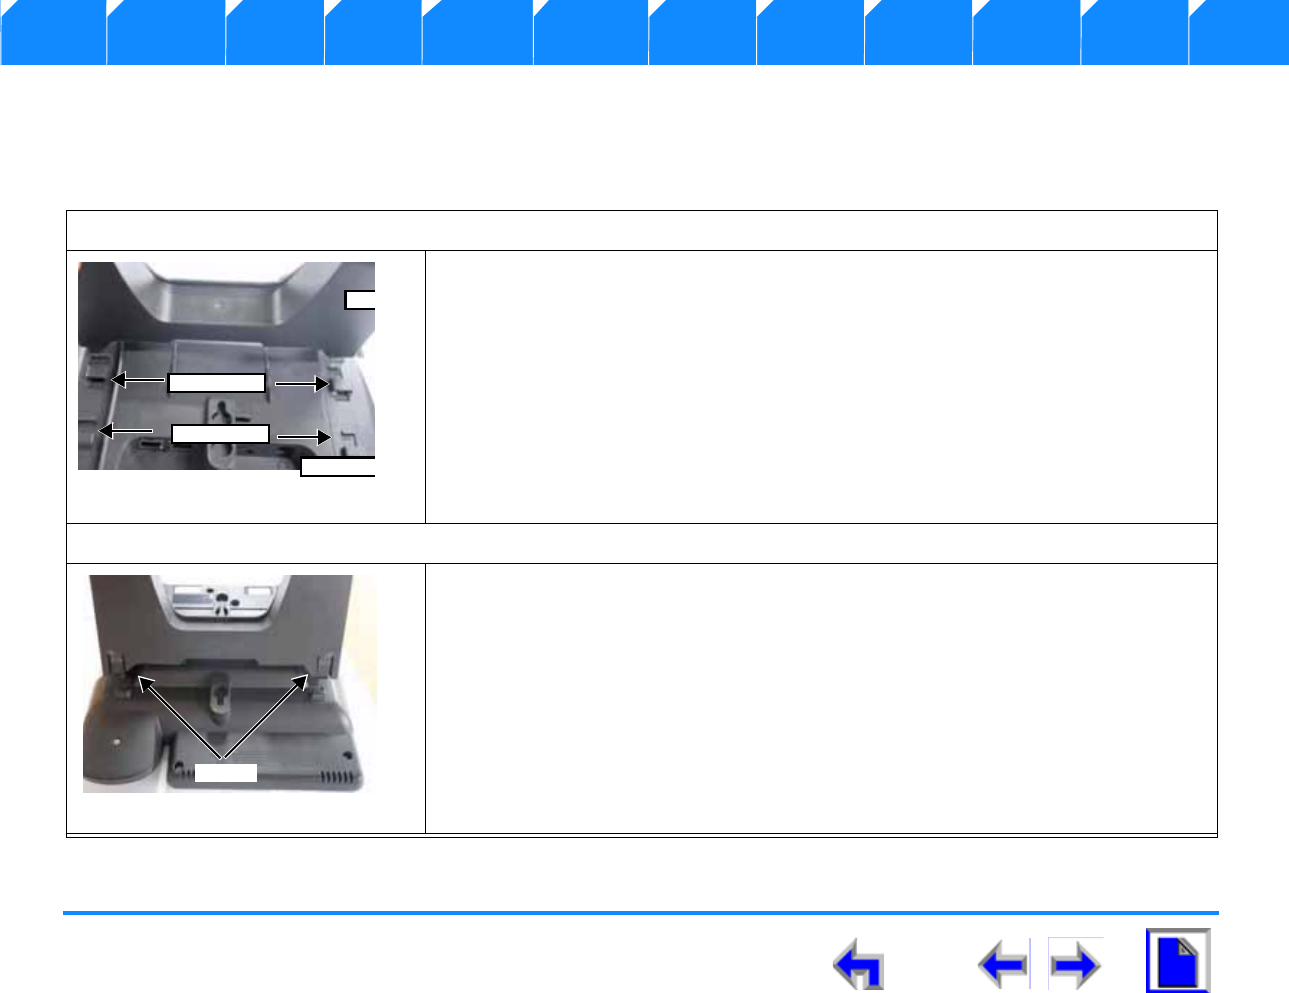
Attaching Deskset Stand
The SB67030 Desk Set operates either on the desktop or mounted on the wall. The desktop setup provides for two positions, Option 1
at 45° and Option 2 at 60°.
To attach the deskset stand:
1. Place the deskset base on a flat surface with the connector side towards you
as illustrated in Figure 4
2. Place the stand on the base with the flexible tab side illustrated in Figure 4
away from you.
3. Insert the solid tabs into the slots on the base for the desired option in the
direction of the arrows as shown in Figure 4
4. Rotate the stand away from you until it rests against the base.and you hear a
click as it locks into place.
To remove the deskset stand:
1. Place the deskset on a flat surface with the connector side towards you as
illustrated in Figure 4
2. Press both flexible tabs at the same time.
3. Rotate the stand towards from you until it disengages from the base.
Figure. 4 Deskset Stand Insta
Sta
Deskset
Option 1
Option 2
Figure. 5 Deskset Stand Tabs
Tabs
SB67030 Deskset User’s Guide - Installation 19
Voice Make Call Answer
Install Overview PC UI Setup Mail Directory CallLog Call Manage Call Handset Trouble
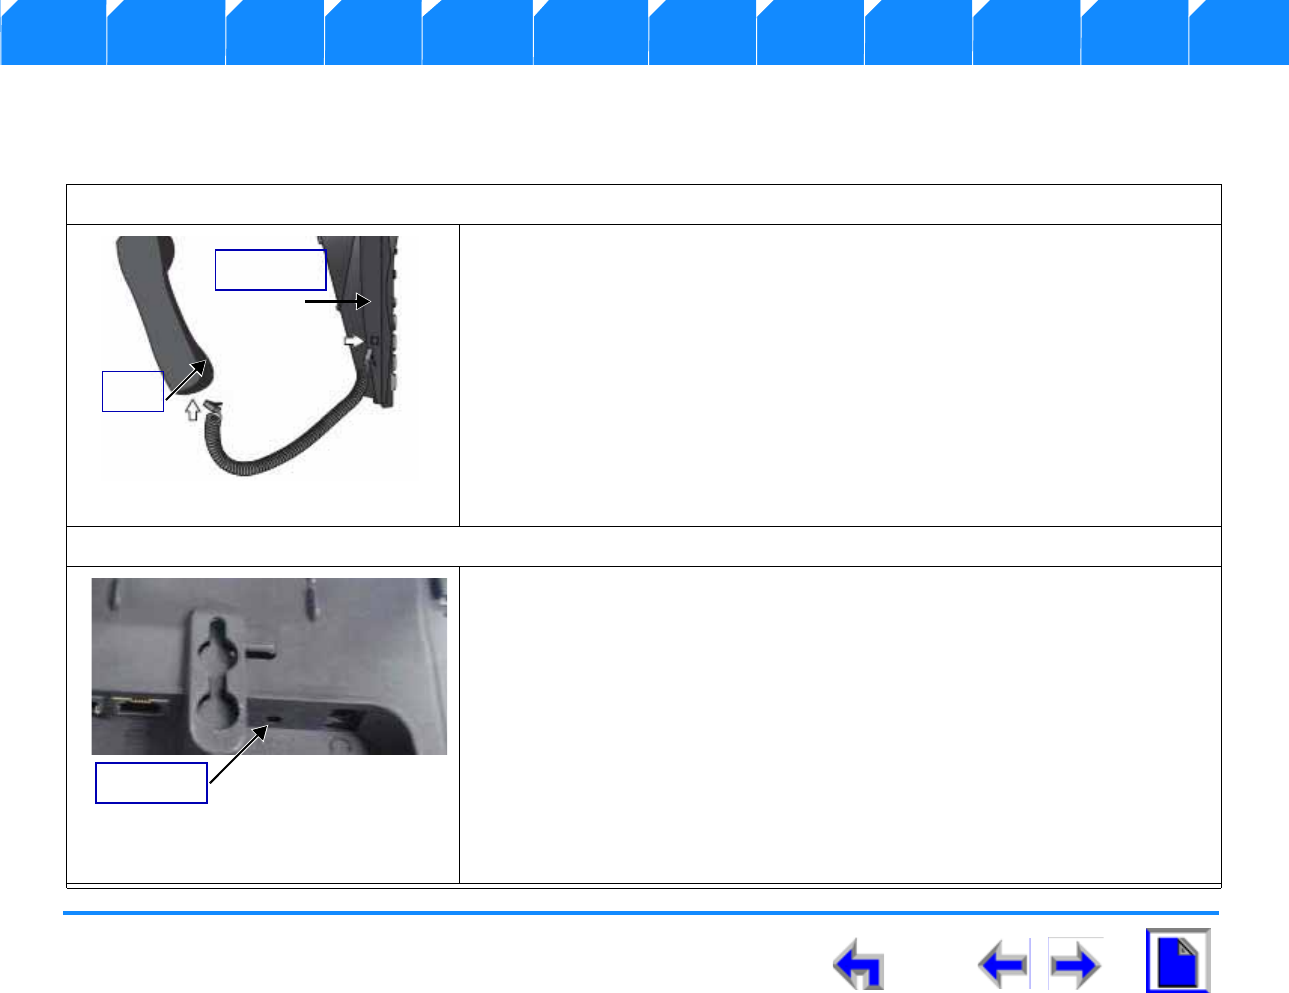
Cable Connection
Connect the handset:
1. Plug the coiled handset cord into the handset jack on the left side of the
telephone identified in Figure 6.
1. Plug the other end of the coiled handset cord into the handset, then hang
up.
To Connecting Power:
1. Plug the power adapter into the connector on the back of the deskset
identified in Figure 7.
2. Plug the power adapter into a power outlet not controlled by a wall switch.
3. Observe that the keys flash and the LCD display illuminates.
Figure. 6 Handset Plug
Connector
Plug
Figure. 7 Power Connector
DC Power
SB67030 Deskset User’s Guide - Installation 20
Voice Make Call Answer
Install Overview PC UI Setup Mail Directory CallLog Call Manage Call Handset Trouble
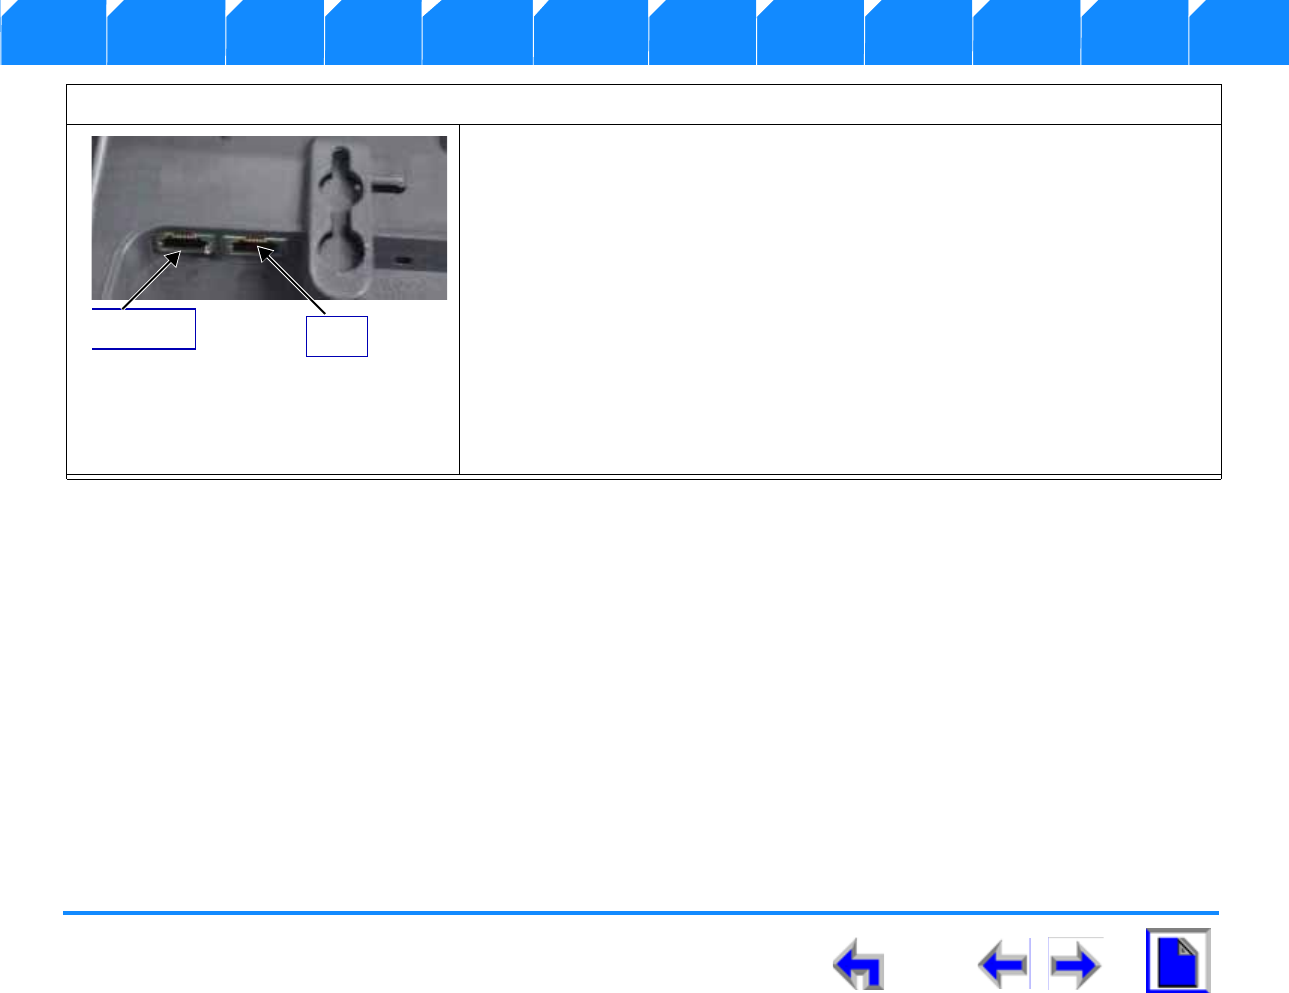
To connect the Ethernet Cable
If you currently have a PC connected to the network:
1. Unplug the RJ-45 ethernet network cable from your PC.
2. Plug the RJ-45 ethernet network cable into the jack on the back of the
deskset identified in Figure 8.
3. Plug an ethernet cable into the PC jack on the deskset.
4. Plug the other end of the ethernet cable into the PC.
If you do not have PC connected to the network:
1. Plug the network cable into the jack on the back of the deskset identified
in Figure 8.
Figure. 8 Network Connections
Network PC
SB67030 Deskset User’s Guide - Installation 21
Voice Make Call Answer
Install Overview PC UI Setup Mail Directory CallLog Call Manage Call Handset Trouble
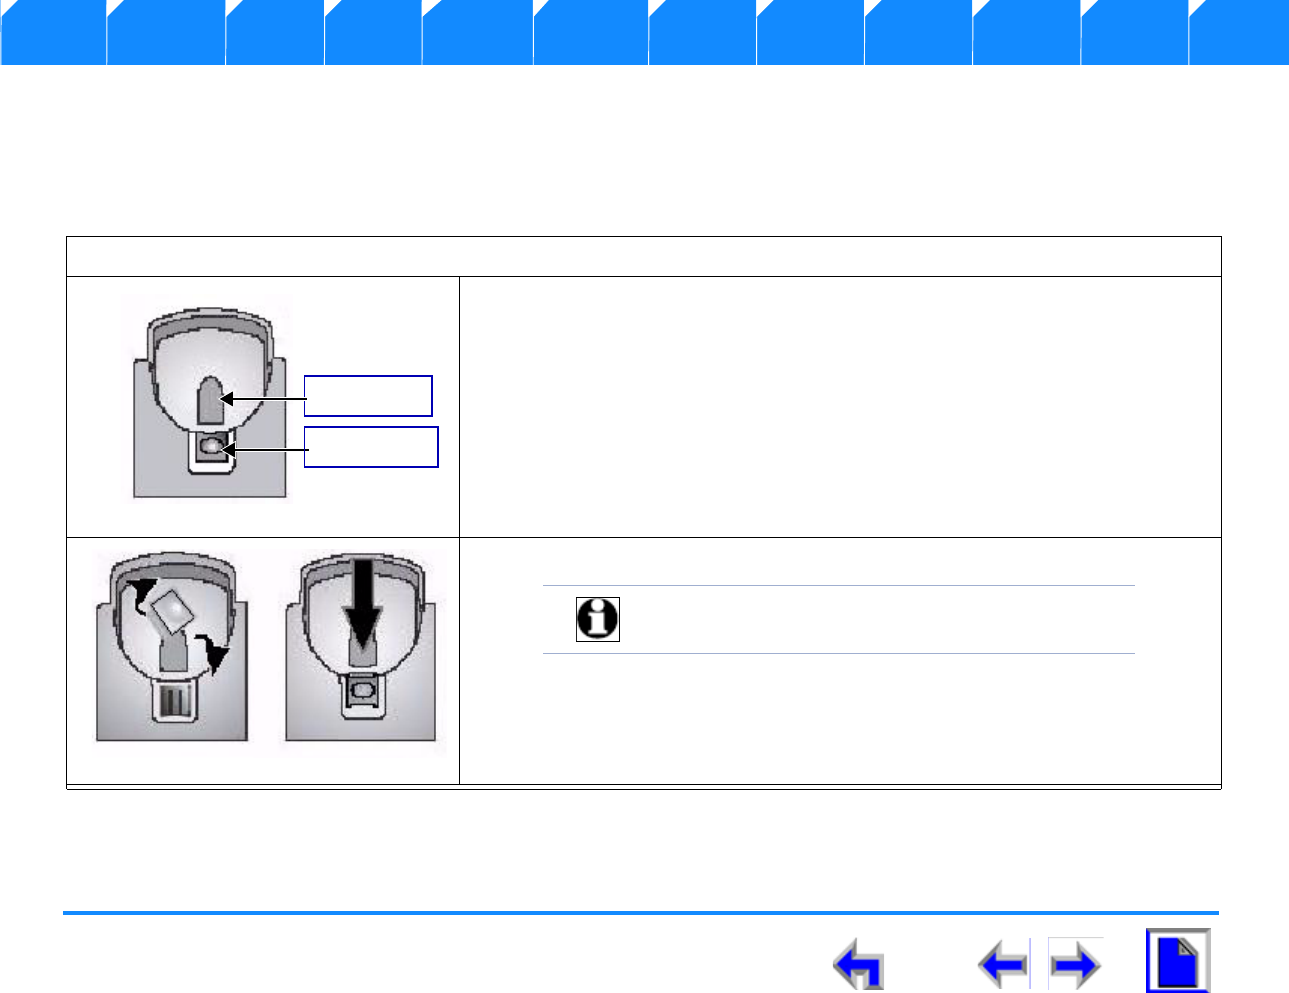
Wall Mounting
The telephone base comes with the bracket for desktop use (See “SB67030 Desk Set Components” on page 17). Wall mounting
requires a telephone outlet wall mounting plate with mounting studs that you must purchase from a hardware or consumer electronics
retailer.
To attach the deskset stand:
1. .Press the switchhook tab and slide it towards the top of the base as shown in
Figure 9.
2. Rotate the tab 180° as shown in Figure 10.
3. Insert the tab back into the base.
Figure. 9 Wall Mount Deskset
Swithchook
Handset Tab
Figure. 10 Wall Mount Deskset
Note You will not need the bracket for wall mounting.
SB67030 Deskset User’s Guide - Installation 22
Voice Make Call Answer
Install Overview PC UI Setup Mail Directory CallLog Call Manage Call Handset Trouble
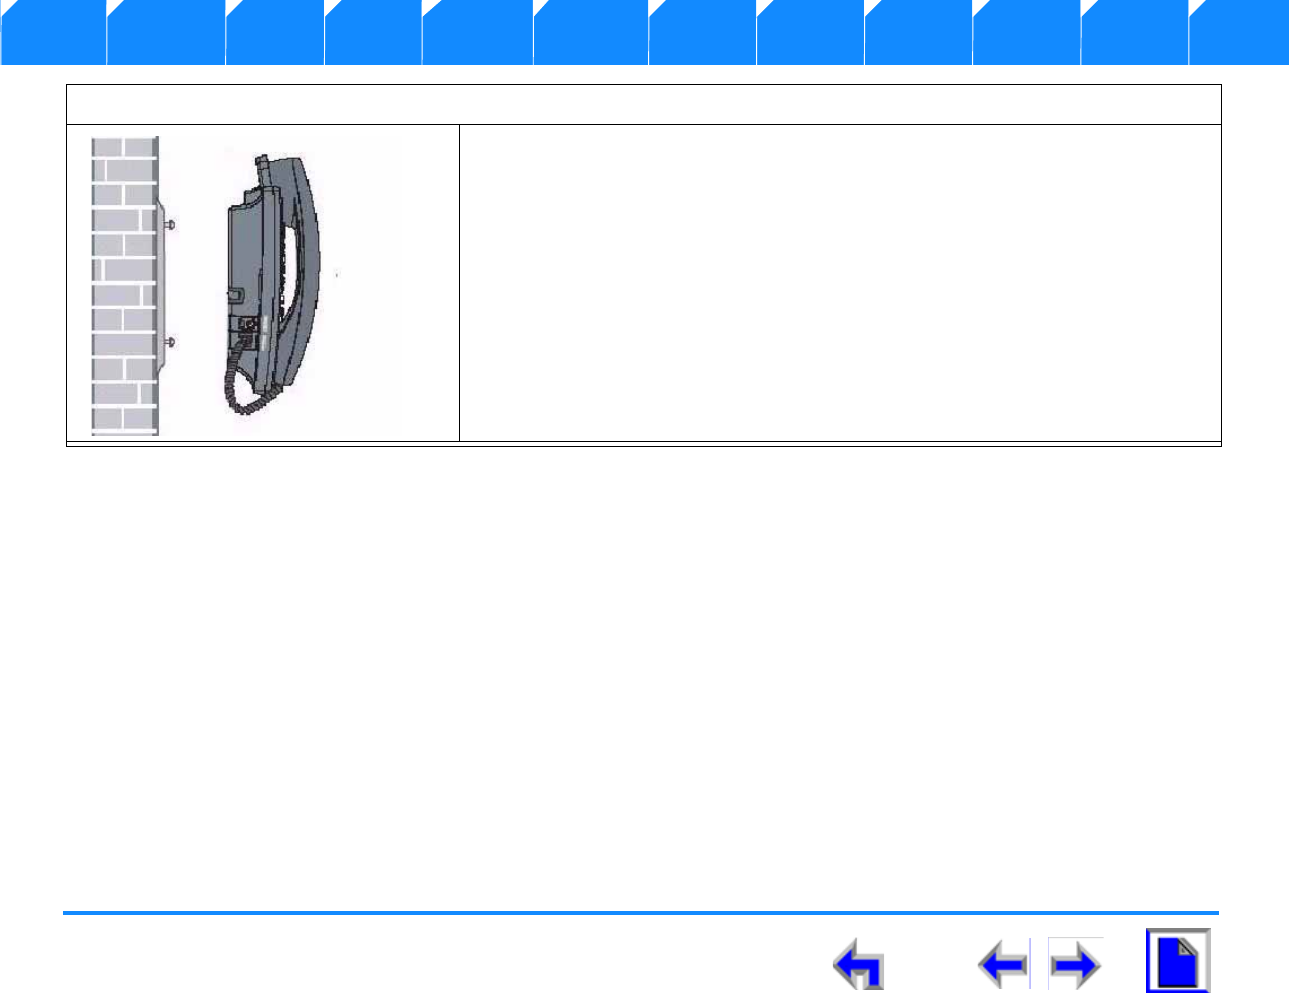
To mount the SB67030 Desk set:
1. Plug the ethernet cable into the jack on the back of the deskset.
2. Plug the power adapter into the connector on the back of the deskset.
3. Place the telephone base mounting plate above the mounting studs as
shown in Figure 11.
4. Slide the telephone base down until secure.
5. Plug the ethernet cable into the wall jack.
6. Plug the power adapter into a power outlet not controlled by a wall switch.
Figure. 11 Mounting Brackets

SB67030 Deskset User’s Guide - Installation 23
Voice Make Call Answer
Install Overview PC UI Setup Mail Directory CallLog Call Manage Call Handset Trouble
Technical Specification
Table 2 identifies the SB67030 Desk Set features and associated technical specifications.
Table 2 Technical Specifications
Feature Specification
Frequency control Crystal controlled PLL synthesizer
Transmit Frequency Cordless Handset: 1921.536-1928.448 MHZ
Base: 1921.536-1928.448 MHZ
Channel 5
Nominal Effective Range Maximum power allowed by FCC and IC. Actual operating range
might vary according to environmental conditions at the time of use
Size Cordless Handset: 1.77 X 1.30 X 6.97 in (45 X 33 X 177 mm)
Charger: 3.15 X 4.13 X 2.36 in (80 X105 X 60 mm)
Base: 8.86 X 6.89 X 7.87 in (225 X 175 X 47 mm)
Gateway: 13.4 X 8.07 X 1.85 in (340 X 205 X 47 mm)
Weight Cordless Handset: 7.05 ounce (200g) (including battery)
Charger: 7.05 ounce (200g) (including adapter)
Base:59.96 ounce (1700g) (including adapter)
Gateway:88.18 ounce (2500g) (including adapter)
Power Requirements Handset:2.4V 550mAh Ni-MH battery
Charger:6V DC @ 200mA


SB67030 Deskset User’s Guide - Overview 25
Voice Make Call Answer
Install Overview PC UI Setup Mail Directory CallLog Call Manage Call Handset Trouble
CHAPTER
2
O
VERVIEW
Introduction
This s section provides a description of the functions and features of the SB67030 Deskset. The
Deskset provides a user interface for the Business Telephone System. The complete
telecommunications system includes:
SB67020 System Gateway - The System Gateway provides control for system
components and access to external communications networks. Use the Gateway to
add and remove users. (See The System Gateway Administrators Guide).
SB67030 Deskset - The Deskset provides up to 50 desk set user interface for the
system..
SB67040 Remote Handset (Optional)- The remote handset duplicates many of the
Deskset features and provides a high degree of mobility.
7610 Headset (Optional) - The headset replaces the deskset local handset to provide
hands-free operation.
Voice Make Call Answer
Install Overview PC UI Setup Mail Directory Call Log Call Manage Call Handset Trouble
SB67030 Deskset User’s Guide - Overview 26
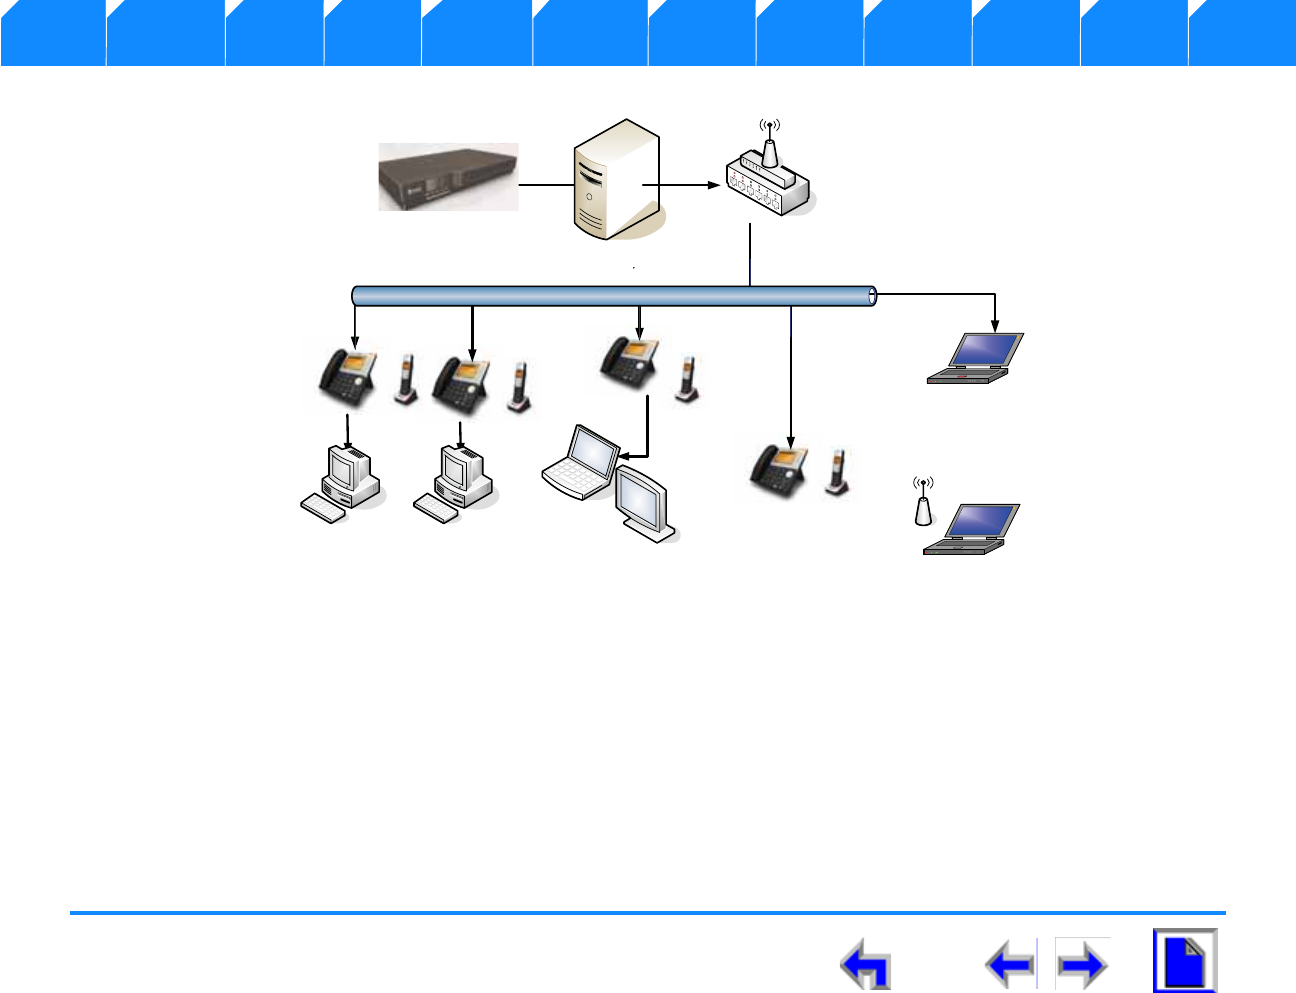
Figure 12 illustrates the AT&T Business System network diagram.
Figure. 12 AT&T Business System Network
This chapter covers the following:
1. “Display and Key Functions” on page 27
2. “Programmed Operations Keys” on page 29
3. “Call Appearance (CA)” on page 30
4. “Function Keys” on page 35
5. “Liquid Crystal Display (LCD) Screen” on page 28
6. “The Idle Screen” on page 41
Laptop
`
Laptop
`

Voice Make Call Answer
Install Overview PC UI Setup Mail Directory Call Log Call Manage Call Handset Trouble
SB67030 Deskset User’s Guide - Overview 27
Display and Key Functions
Figure 13 identifies and describes the main display and key functional areas for the SB67030 Deskset
Figure. 13 SB67030 Deskset Layout
Liquid Crystal Display (LCD)
Provides the Graphical User
Interface (GUI) for the business
system
Voicemail Indicator
Illuminates when a message
or messages has been
received
Function Keys
a complete set of standard
deskset keys with a series of
fixed-function keys for
operation. The Predefined
key’s function depends on
the task being performed
and are disabled for certain
tasks.
Quick Dial
used to access quick dials. The 6
quick dial locations take their
name/number from the
directory entry
Call Appearance and
Programmed Keys
A set of 9 programmed
operation keys provides user
interaction based on the LCD
display activity
Corded Handset
Voice Make Call Answer
Install Overview PC UI Setup Mail Directory Call Log Call Manage Call Handset Trouble
SB67030 Deskset User’s Guide - Overview 28
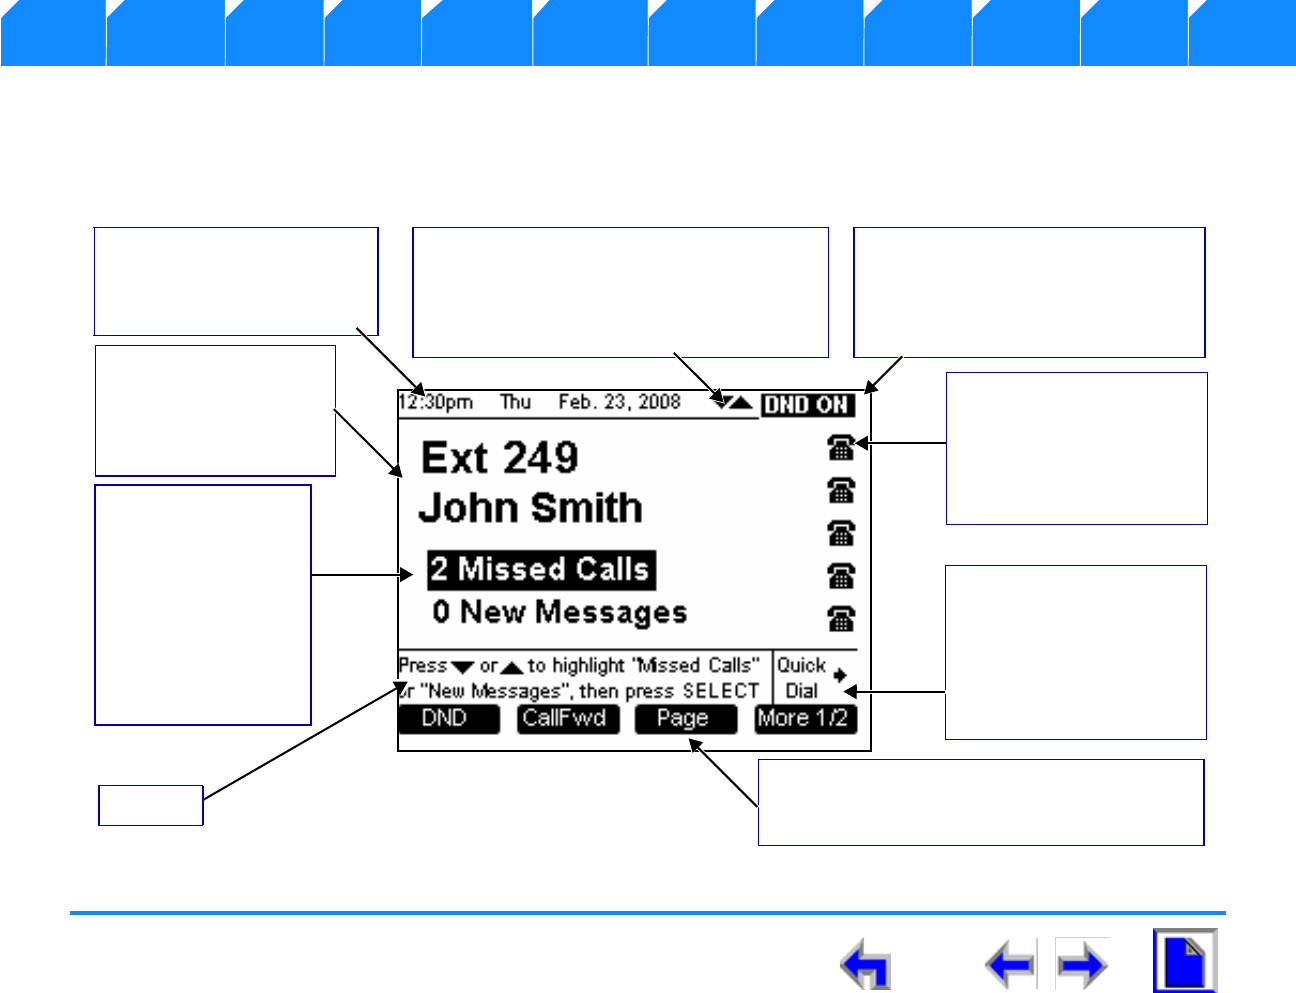
Liquid Crystal Display (LCD) Screen
Figure 14 identifies the basic elements and describes the call functions. of the Liquid Crystal Display. This display provides the user
interface for the SB67030. Desk Set, and changes based on the task being performed. The initial screen (See “The Idle Screen” on
page 41) displays when the system is first turned on or when there is no call activity.
Figure. 14 LCD Screen Description
Date
Visible at all times, in every
screen in the format:
12:00AM Day MMM, DD, YYYY.
Navigation Arrows
The two navigation arrows display solid until
animated. The arrows will change to an open
arrow for 1 second and return to solid when
you press the NAVIGATION key.
DND or Call Forward
The Do Not Disturb (DND) or Call
forward indicator illuminates when
one of these functions has been
activated.
Call Appearance Icons
Call Appearance icons show
call status, that compliment
LED status indications.
There will always be 5
displayed.
Quick Dial
This programmed key
provides a two-touch quick
dial feature. When pressed,
it changes call appearance
icons to directory or feature
shortcuts.
Programmed Keys
A set of context-sensitive keys that provide user
interaction based on the LCD display activity.
Extension Number
Name
The extension number
and name display when in
the Idle screen.
New Calls
New Messages
Displays the name,
number, and time of
recently received calls
that have not been
acted upon.Identifies
the existence of new
messages and how
many.
Help
Voice Make Call Answer
Install Overview PC UI Setup Mail Directory Call Log Call Manage Call Handset Trouble
SB67030 Deskset User’s Guide - Overview 29
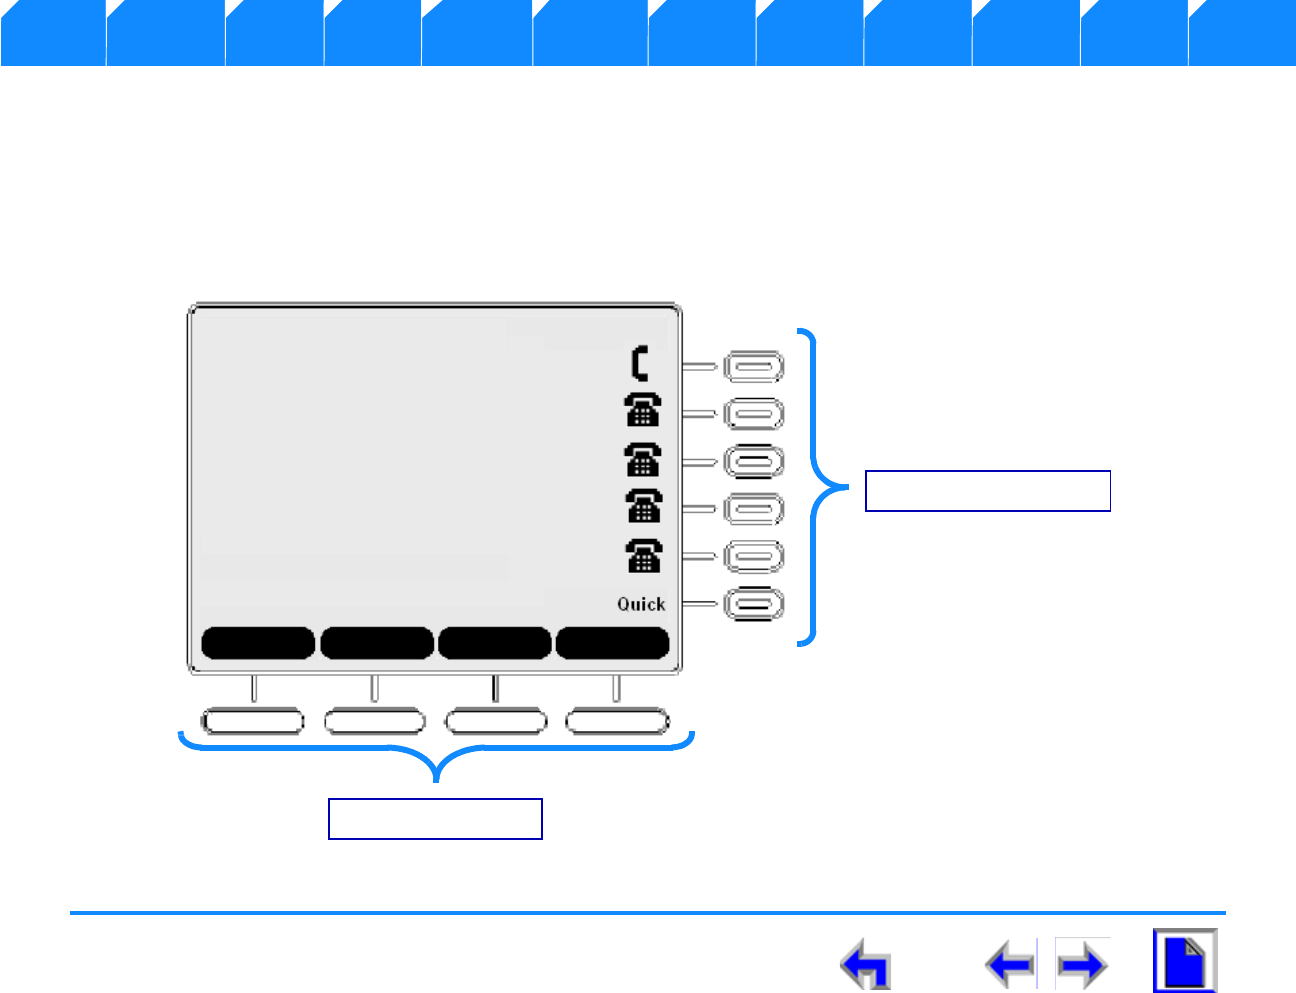
Programmed Operations Keys
The SB67030 Desk Set provides two sets of programmed operation keys, Call Appearance and Programmed, as illustrated in Figure 15.
The keys function changes according to the current operation being performed. The five Call Appearance keys on the right side allow
you to handle multiple calls. The system uses icons displayed on the LCD screen to identify operations for Call Appearance keys. The
four programmed keys on the bottom handle operations based on the current function or task The current function of the Programmed
keys is identified by a screen label.
Figure. 15 Sample Call Appearance
Call Appearance Keys
Programmed Keys
Voice Make Call Answer
Install Overview PC UI Setup Mail Directory Call Log Call Manage Call Handset Trouble
SB67030 Deskset User’s Guide - Overview 30
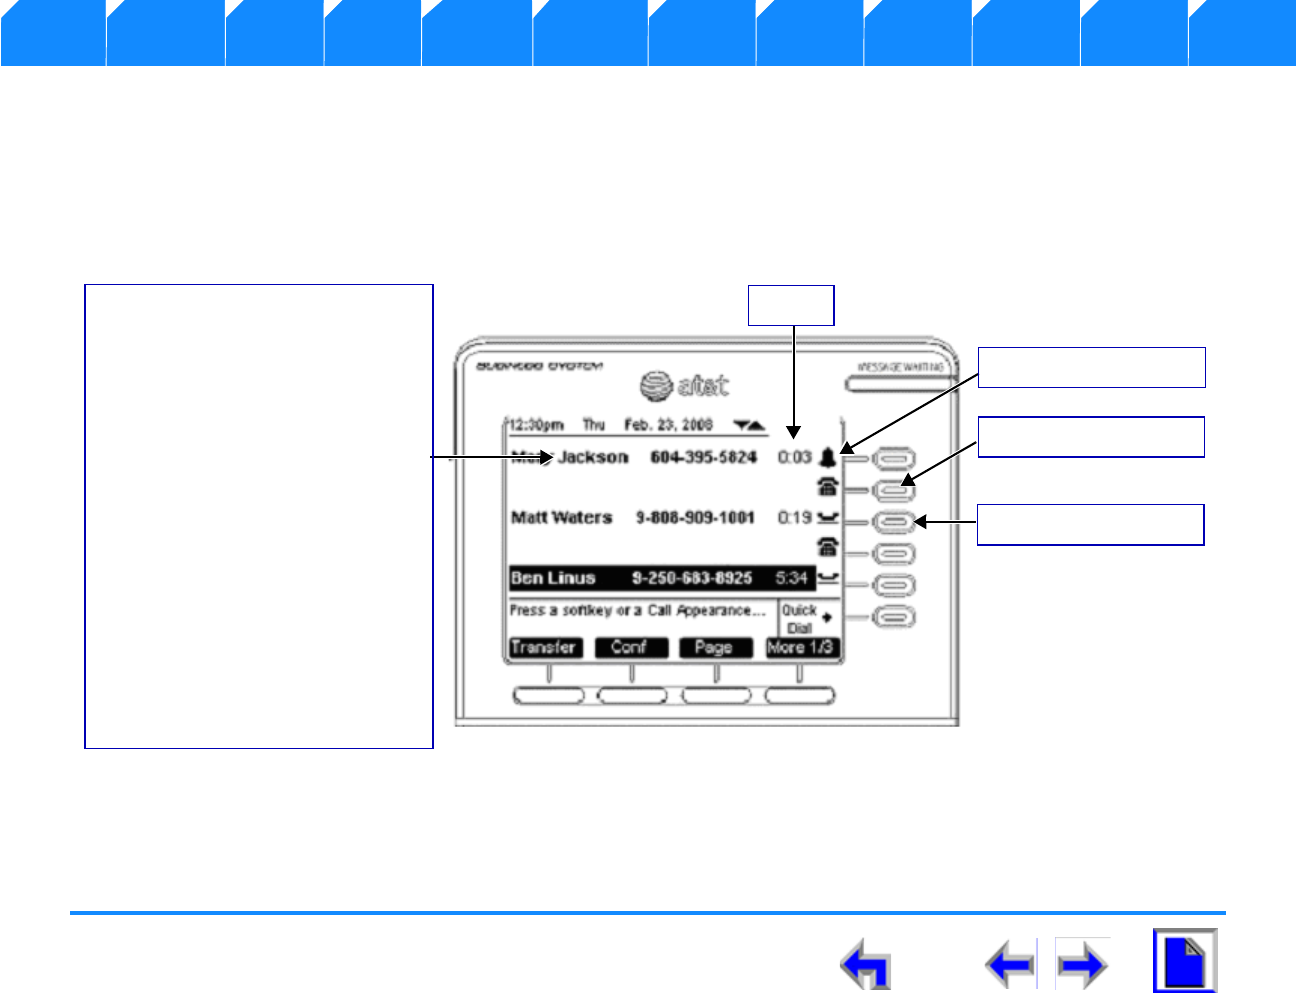
Call Appearance (CA)
Call Appearance feature illustrated in Figure 16, identifies the call information state of the call represented by five backlit CA keys and
an associated icon. See “Call Appearance (CA) Icons” on page 31 for a complete description of the available icons. The deskset presents
call information in-line with the call appearance programmed key at the side of the display. When there is an incoming call, the CA LED
on the key flashes with the incoming ring.
Figure. 16 Sample Call Appearance Screen
Timer
Call Information
Call information consists of name and
number fields for both incoming and
outgoing calls. The following are cases
in which the name field may not be
displayed:
nYou dial the outgoing call by
entering digits
nYou dial the outgoing call from
Call Log, Redial, and Directory
where there is no name
information in the record
nThere is no name information
in the CID with an external
incoming call
Call Appearance Icon
Call Appearance LED
Call Appearance Keys
Voice Make Call Answer
Install Overview PC UI Setup Mail Directory Call Log Call Manage Call Handset Trouble
SB67030 Deskset User’s Guide - Overview 31
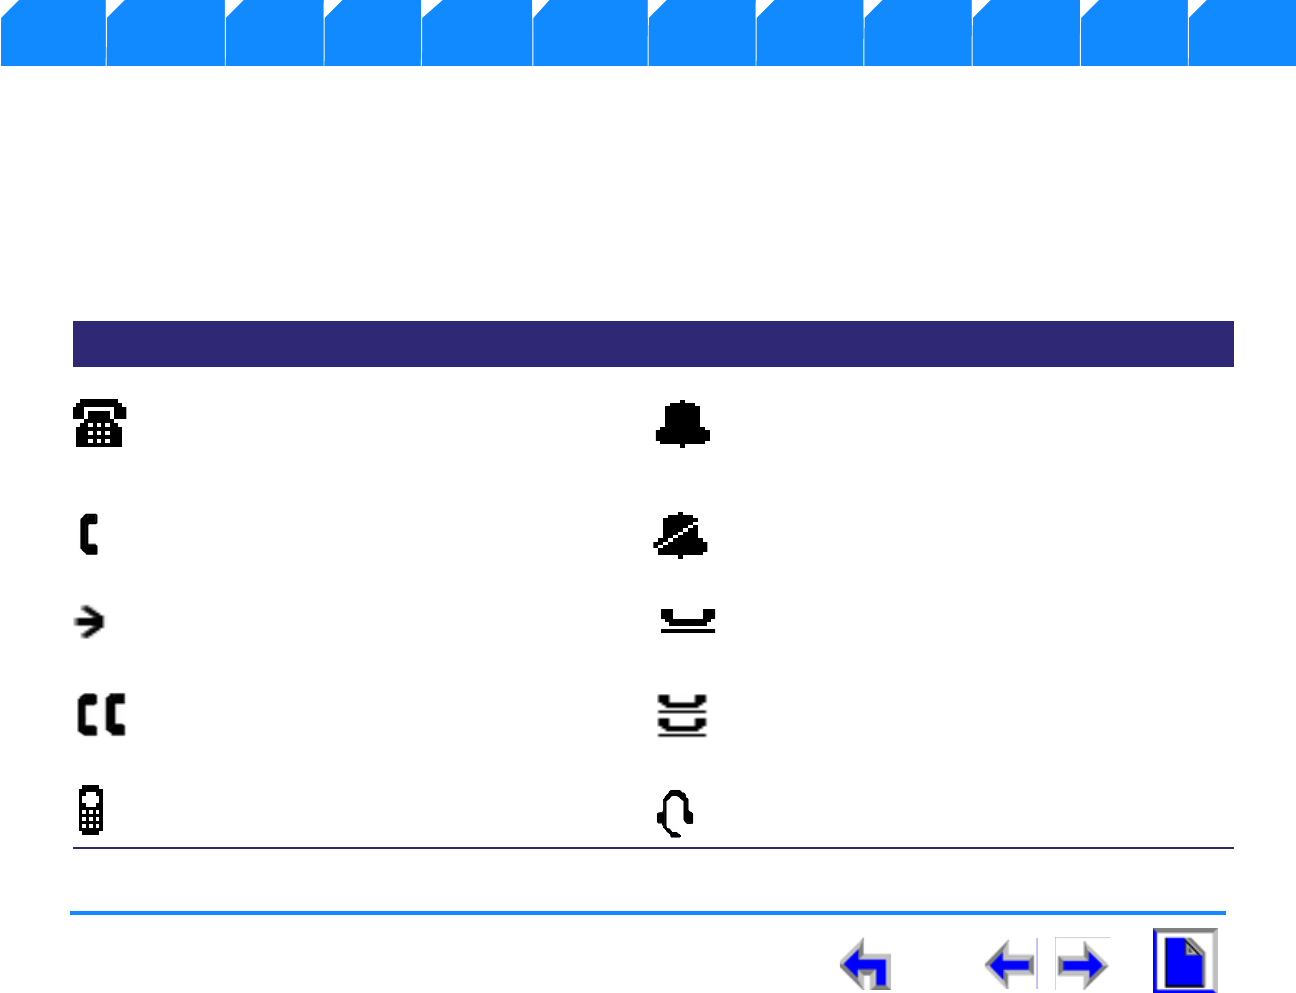
Call Appearance (CA) Icons
The SB67030 Desk Set displays call appearance icons at any given time for the five programmed operation keys, allowing you to
handle multiple calls. Call Appearance icons show call status, and compliment the LED status indications in the programmed operation
keys. There will always be five displayed to reflect the five call limit. If a sixth call comes in, that call will be forwarded to the CallFwd no
answer setting, for example Voicemail. If the Corded Handset, Corded or Cordless headset, Speakerphone or Cordless handset goes off-
hook, the next available call appearance icon will change. Table 3 on page 31 describes the available Call Appearance icons.
Table 3 Call Appearance Icons
Icon Function Description Icon Function Description
Available
CA This icon displays for a free CA. Lifting the
corded handset from the cradle changes
the call appearance icon from Available CA
to Active Call-Off-Hook.
Ringing This Animation Behavior Icon flashes on 1
second, off 1 second, and on. Match ringing
cadence during ring ON – flash at 100ms
intervals.
Active
Call Off-
Hook
This icon indicates that the corded handset
has been lifted from the cradle. Silenced
Ring If the ringer is silenced, this icon appears
during an incoming call instead of the
incoming ring icon.
Pre-dial This CA icon identifies user pre-dial digits
prior to an off hook request. On Hold This Animation Behavior icon displays for
call or conference on Hold. The animation
sequence is the same as the Ringing icon.
Conferen
ce This icon shows for all calls on conference Conferen
ce On
Hold
This Animation Behavior icon displays for
conference on Hold.
Cordless
Handset This icon indicates that the Cordless
Handset is currently in control of
operations.
Headset This icon indicates that the Cordless
Headset is currently in control of operation.

Voice Make Call Answer
Install Overview PC UI Setup Mail Directory Call Log Call Manage Call Handset Trouble
SB67030 Deskset User’s Guide - Overview 32
Call Appearance (CA) Operation
When there is an incoming call, the Call Appearance LED flashes and a ring will be heard. A one-time two-second splash screen appears
to notify you who is calling. The highlight will move automatically to an incoming call to bring attention to the event treating it as the
highest priority. Press CANCEL to get out of the Feature List menu to view the CID info in the call appearance screen. Use one of the
following methods to answer the call:
1. Press the flashing CA key.
2. Press the Answer key.
3. Lift the receiver.
4. Press SPEAKER to route audio to the speaker.
5. Press HEADSET to route audio to headset output.
The highlight will move automatically to another occupied CA when the current CA ends. The status of the call determines the available
programmed operation keys. The following defines the Highlight auto-navigation priority based on the mode of the CA with (1) being
the highest priority.
1. Incoming ring
2. Active Call
3. Pre-dial & Dial state
4. Held Calls
The system fills Call Appearance slots from the top down for both incoming calls as well as outgoing calls. The system forces the
incoming call to a free CA slot closest to the top. When you press a CA key in an unoccupied slot, the system will go off-hook in that
CA slot. When all the Call Appearances are in use, you will not be able to gain a Call Appearance by lifting the receiver, or by pressing
SPEAKER, or HEADSET. You will be notified of this condition and prompted to free up a Call Appearance.

Voice Make Call Answer
Install Overview PC UI Setup Mail Directory Call Log Call Manage Call Handset Trouble
SB67030 Deskset User’s Guide - Overview 33
You can park a held call, or unhold a call and then terminate it. If an incoming call event occurs when all the Call Appearance is full, the
system applies the Call Forward No Answer setting to the incoming call. The default setting for Call Forward No Answer is to
send the call to voicemail.
Conferencing or transferring a call requires two CA slots (for Call A and Call B). If you do not want to transfer or conference one of the
calls that are already held, there will not be enough slots available to make a new call. If an attempt to go off-hook is made by lifting
the receiver, or by pressing SPEAKER, or HEADSET; the user will be prompted to free up a Call Appearance.
When you are in a feature such as the Directory, Call Log, Redial, or Voicemail, pressing a Call Appearance key will not dial out a
highlighted list entry. For example, if a number is highlighted in the Call Log, pressing the CA next to that entry will not call the listed
number. Pressing a Call Appearance will reserve an available Call Appearance and the Call Appearance screen displays.

Voice Make Call Answer
Install Overview PC UI Setup Mail Directory Call Log Call Manage Call Handset Trouble
SB67030 Deskset User’s Guide - Overview 34
Call Appearance (CA) Timer
The Call Appearance Timer displays the length of the state of the call, such as how long the call has been held. The CA timer will always
increase in one-second increments. If there are multiple calls displayed, all CA timers will increment in sync with each other. Table 4
lists and describes the CA operations.
Table 4 Call Appearance Timer
Mode Description
Dial and Pre-dial The call timer will be active as long as the call is off-hook.
From Dial: The CA timer starts as soon as the MMI Dialing rules have been met.
From Pre-Dial: The CA timer starts as soon as an off-hook method is activated.
From Held: The CA timer starts as soon as a call is unheld.
From Park: Same timer rules as Held.
From Incoming ring: The CA timer starts as soon as the call is in Active state (Audio active). The timer
will start at zero.
Active Call There is no Call timer during Dial or Pre-dial states.
Held Call The CA timer will reset to zero. The Active time will be stored and added to the Active call timer once
the call is unheld.
Incoming Ring The call timer will start as soon as the Caller ID information is displayed on the screen.
Voice Make Call Answer
Install Overview PC UI Setup Mail Directory Call Log Call Manage Call Handset Trouble
SB67030 Deskset User’s Guide - Overview 35
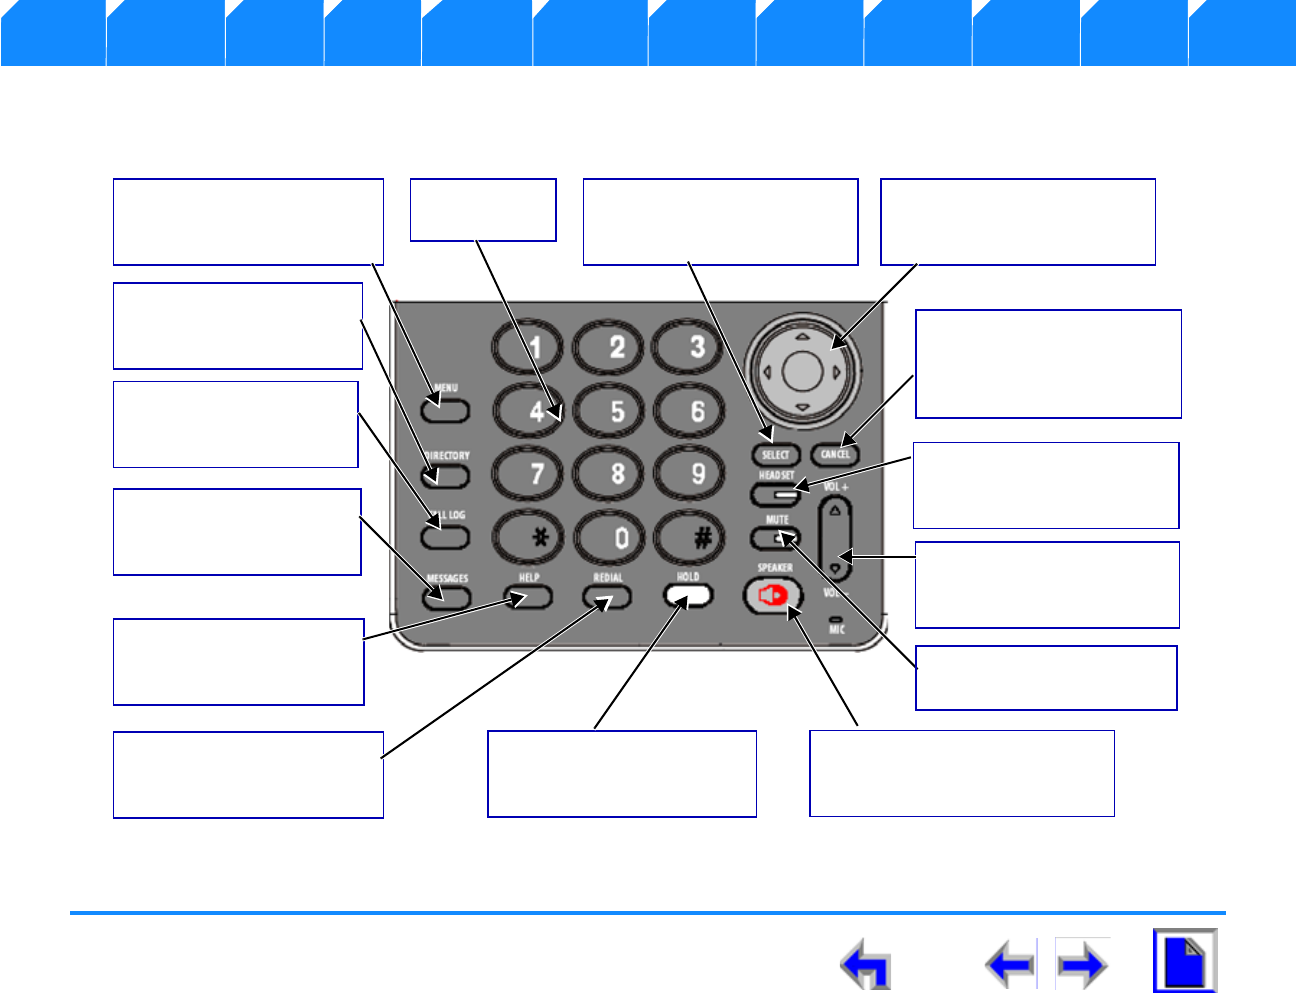
Function Keys
The Function keys include the standard telephone numeric keys and a set of function keys defined in Figure 17 and
Figure. 17 SB67030 Desk Set Function Keys
Menu
Accesses the configuration
menu. Available in Idle only.
Redial
Accesses the outgoing call
log.
Directory
Accesses the local
directory.
Call Log
Accesses the incoming
calls log.
Message
Accesses the voicemail
feature.
Help
Accesses context-sensitive
help.
Hold
Places current active call on
hold.
Speaker
Routes audio to speakerphone.
Can be used to go off-hook.
Mute
Toggles mute on active call.
Volume
Increases/Decreases the
ringer, audio, or call volume.
Headset
Routes audio to headset.
Can be used to go off-hook.
Cancel
Cancels the most recent
operation and returns to
previous function.
Navigation
Moves the cursor up/down/
left/.right on the display.
Select
Selects a highlighted option in
most cases.
Numeric
keypad
Voice Make Call Answer
Install Overview PC UI Setup Mail Directory Call Log Call Manage Call Handset Trouble
SB67030 Deskset User’s Guide - Overview 36
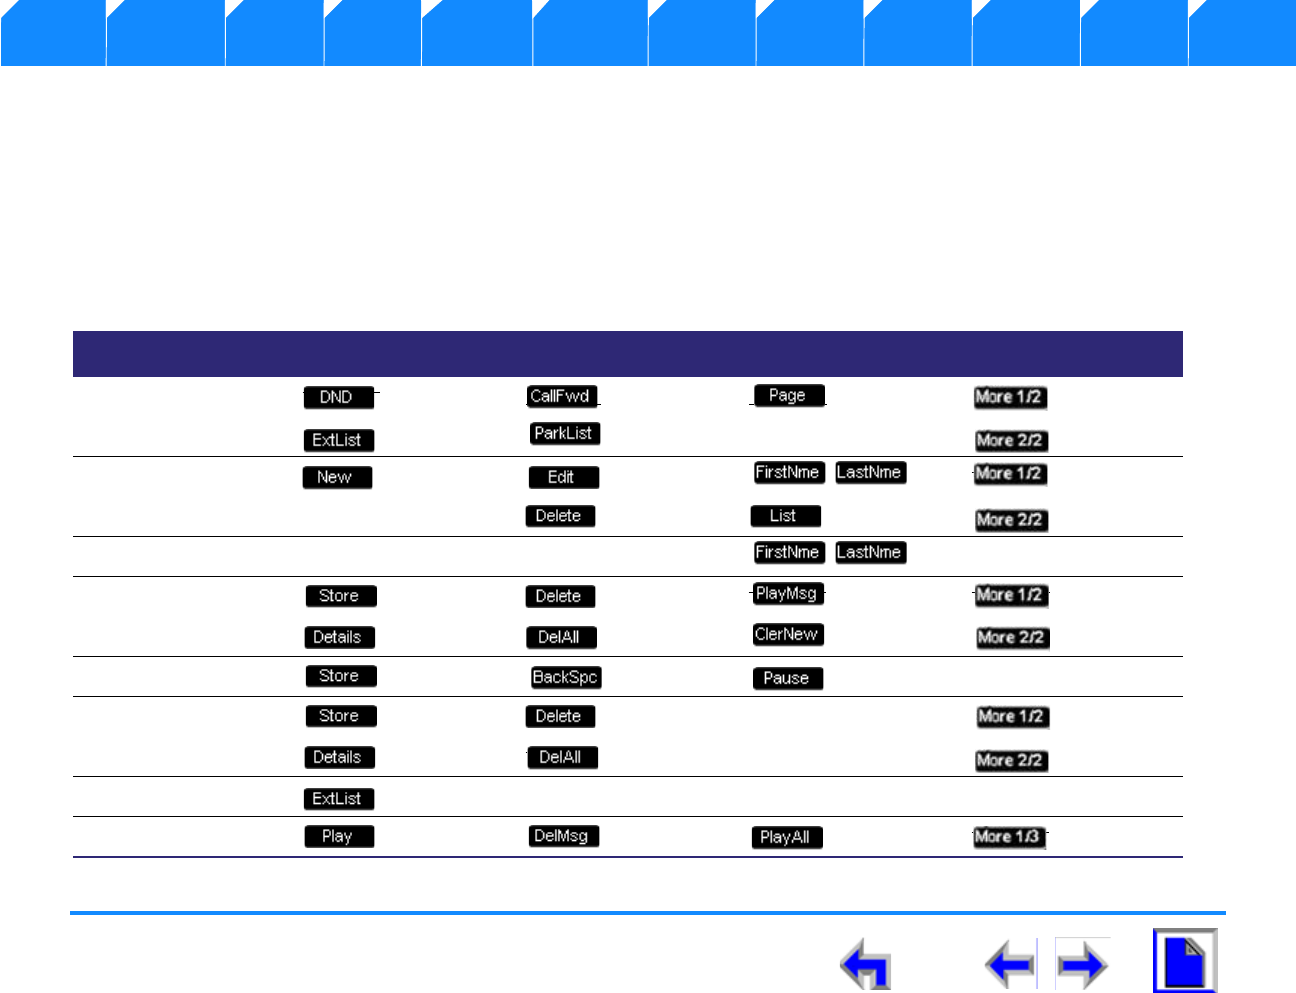
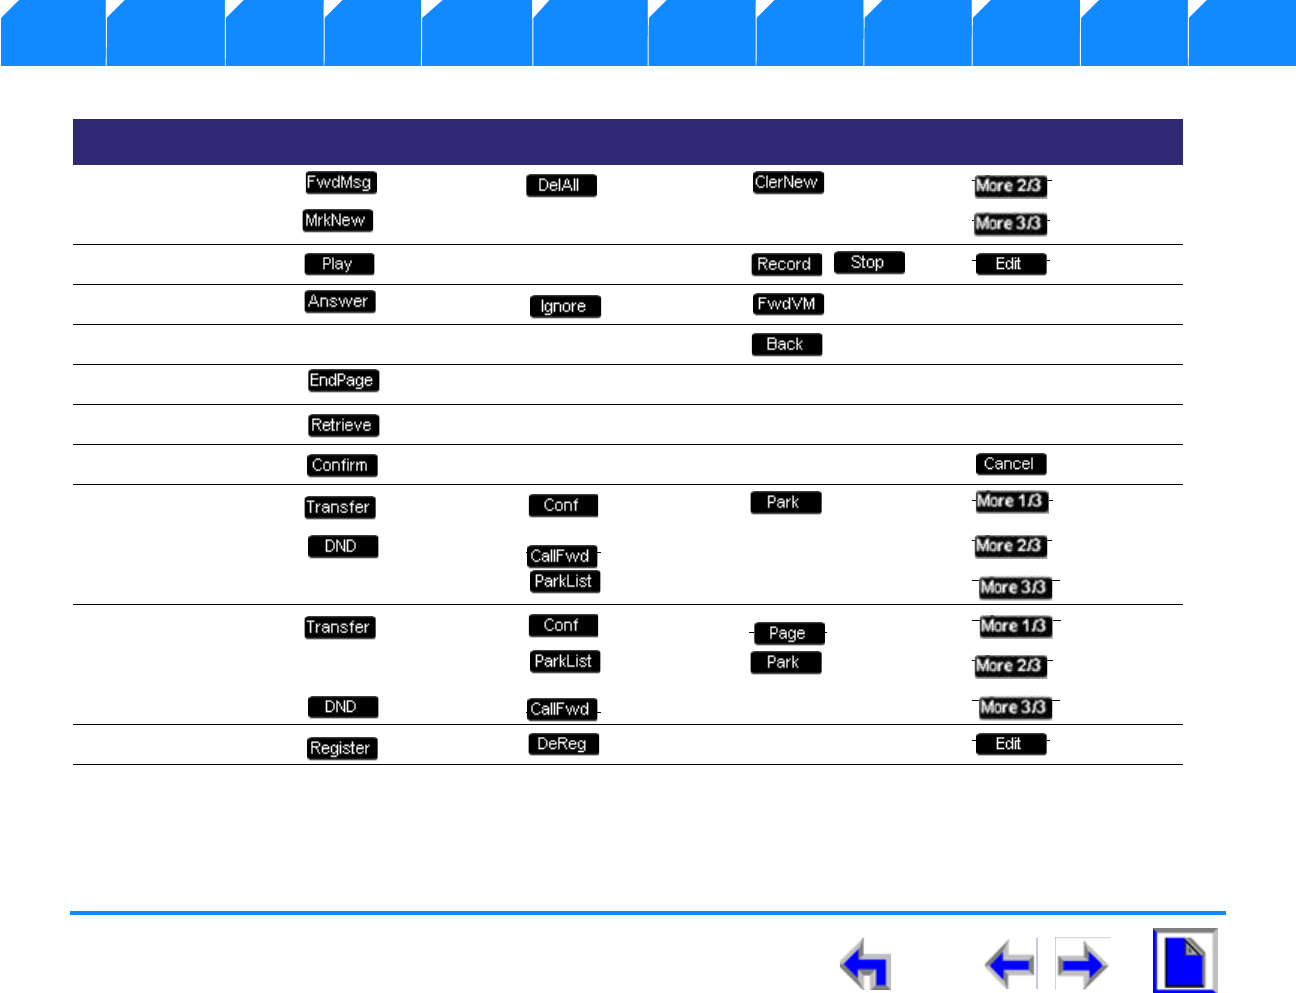
Programmed Keys
The Programmed keys provide a variety of functions determined by the current user task. If you are working in call forwarding. the call
function keys displayed will be different from those displayed if you are making a call.
Programmed keys are located in the same position for consistency. This means that some key positions will remain blank. Some modes
have more than four soft keys available. To view the additional keys, press the More 1/2 or More 1/3 keys. Table 5 shows soft key
positions for most major modes.
Table 5 Programmed Key By Position
Mode Key 1 Key 2 Key 3 Key 4
Idle
Directory
Extension List
Call Log
Pre-Dial
Redial
Dial
Voicemail
Voice Make Call Answer
Install Overview PC UI Setup Mail Directory Call Log Call Manage Call Handset Trouble
SB67030 Deskset User’s Guide - Overview 37
Play/Record Greeting
Incoming Ring
Quick Dial
Page
Park List
DND Settings
Active Call
Held Call
Register/De Register
Table 5 Programmed Key By Position
Mode Key 1 Key 2 Key 3 Key 4
Voice Make Call Answer
Install Overview PC UI Setup Mail Directory Call Log Call Manage Call Handset Trouble
SB67030 Deskset User’s Guide - Overview 38
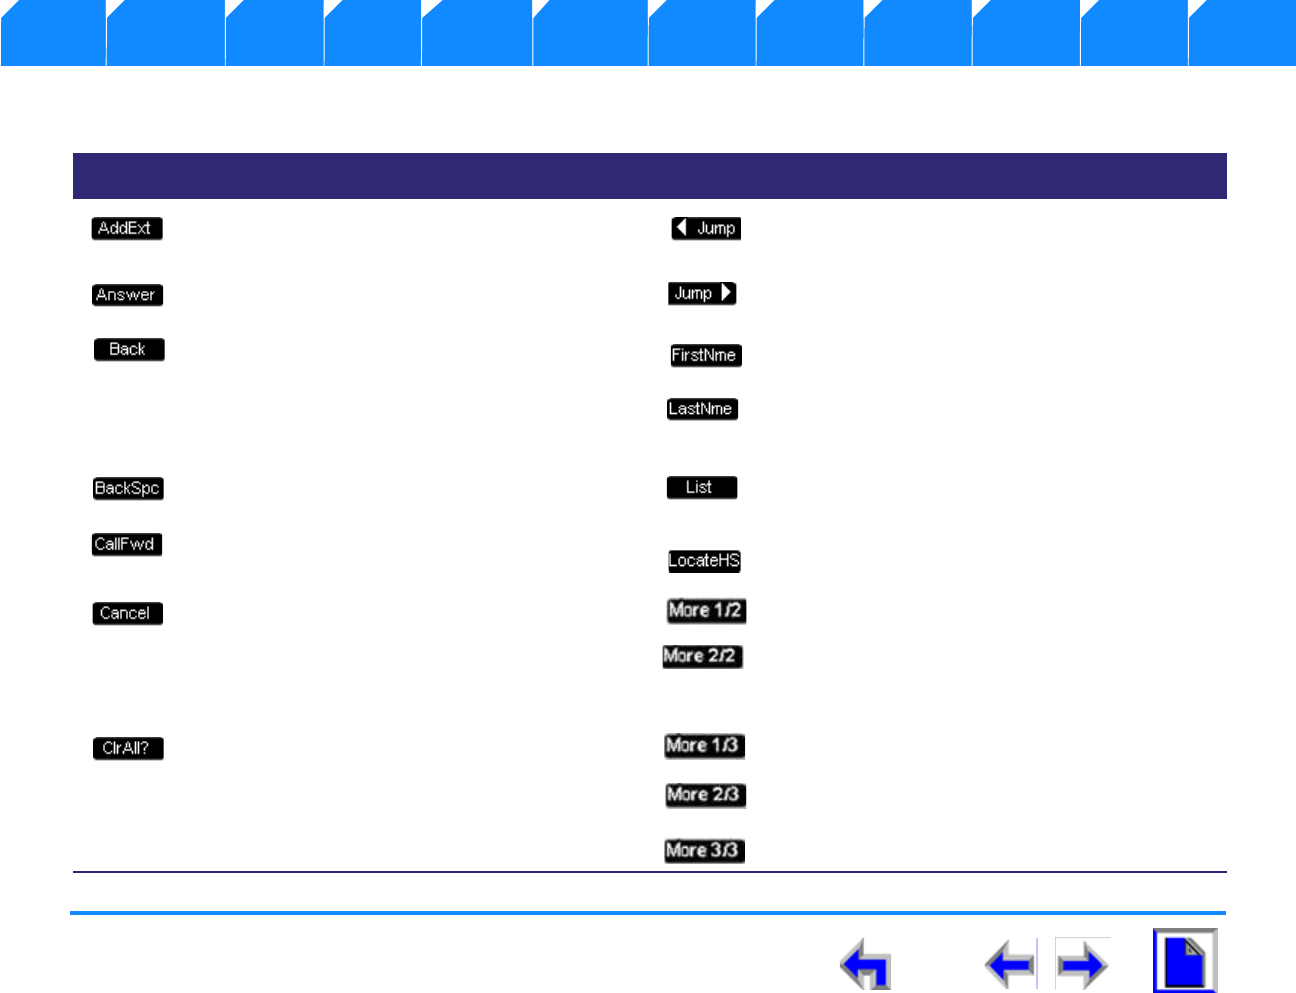
Table 6 provides an alphabetical list of the labels that appear above the Programmed keys.
Table 6 Programmed Key Screen Labels
Function Description Function Description
Adds an extension destination when forwarding a
voicemail message. Rewinds message in playback mode.
Answers incoming call. Forwards message in playback mode.
Goes back to Idle. Toggles First and Last name sort in Directory and
Extension list.
Performs the backspace function. Opens the sort options menu in Directory.
Initiates Call Forward. If the Cordless Handset is registered, locates
handset.
Cancels action and returns user to previous mode. Moves to next set of programmed operation keys. If
this button is present, there are more than four
programmed operation keys available. Numeric
designation indicates current page. For example,
More 1/2 indicates that user is on page one of two.
Clears all entries. Moves to next set of programmed operation keys. If
this button is present, there are more than four
programmed operation keys available. Numeric
designation indicates current page. More 1/3
indicates that user is on page one of three
Voice Make Call Answer
Install Overview PC UI Setup Mail Directory Call Log Call Manage Call Handset Trouble
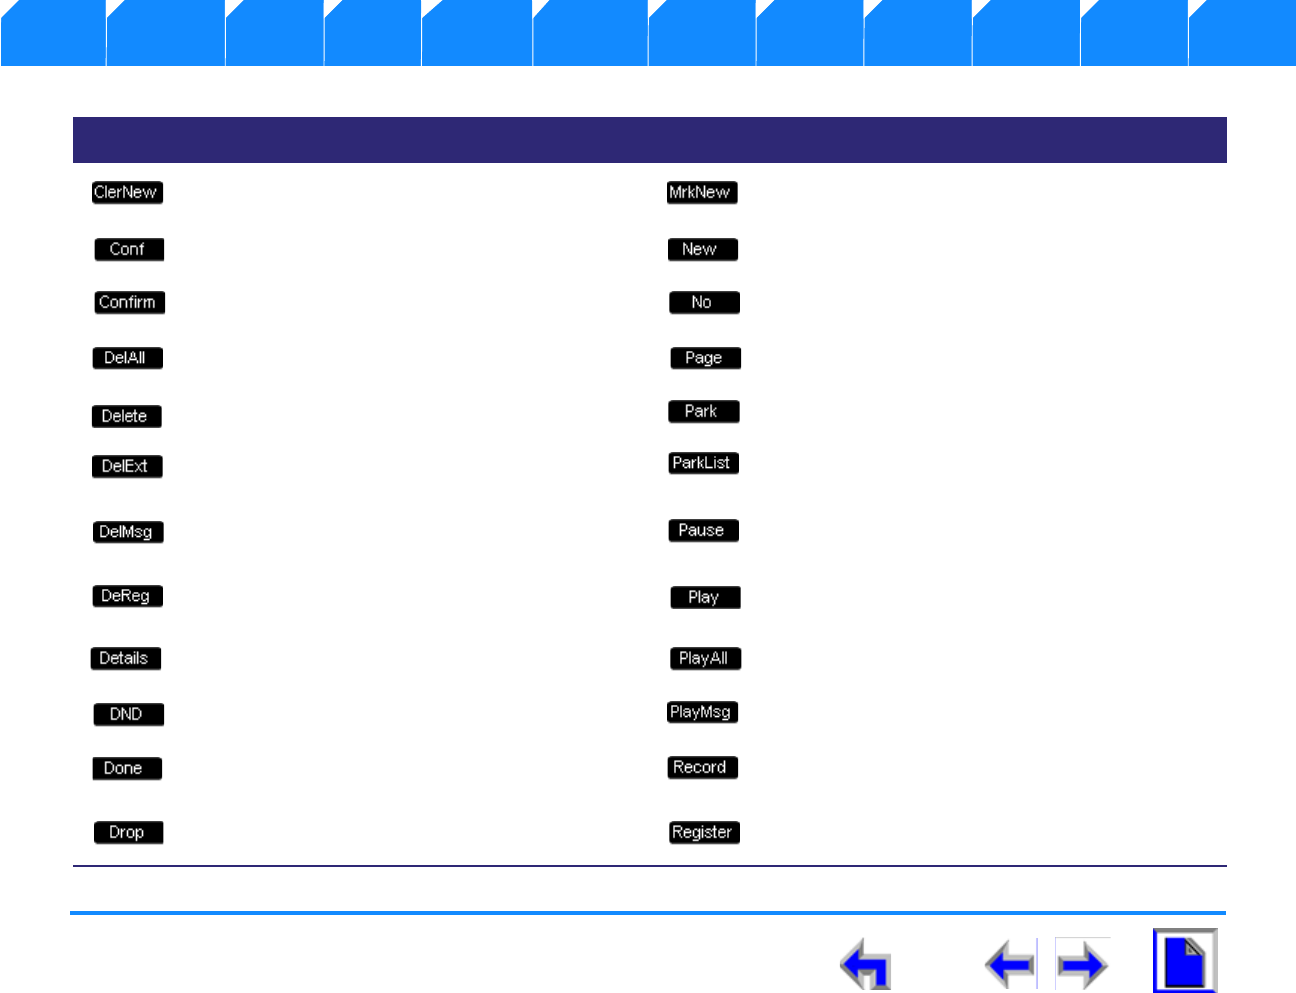
SB67030 Deskset User’s Guide - Overview 39
Clears all new messages. Marks all new messages.
Initiates a conference call. Creates a new entry.
Confirms DND setting ON or OFF. Declines choice.
Performs deletion of multiple records. Pages internal extensions.
Performs a permanent deletion. Parks call.
Removes an extension destination when forwarding
a voicemail message. Goes to Park List.
Deletes highlighted voicemail message in message
list. Inserts a two-second pause in digit string or pauses
message playback.
De-registers Cordless Handset or Headset in
registration menu. Plays recorded audio clip.
Shows you more details for a particular entry. Plays all messages in Voicemail feature.
Initiates Do Not Disturb. Plays message.
Saves message annotation and goes to next step in
message forward function. Records an audio clip.
Drops selected call in conference. Registers Cordless Handset or Headset in
registration menu.
Table 6 Programmed Key Screen Labels
Function Description Function Description
Voice Make Call Answer
Install Overview PC UI Setup Mail Directory Call Log Call Manage Call Handset Trouble
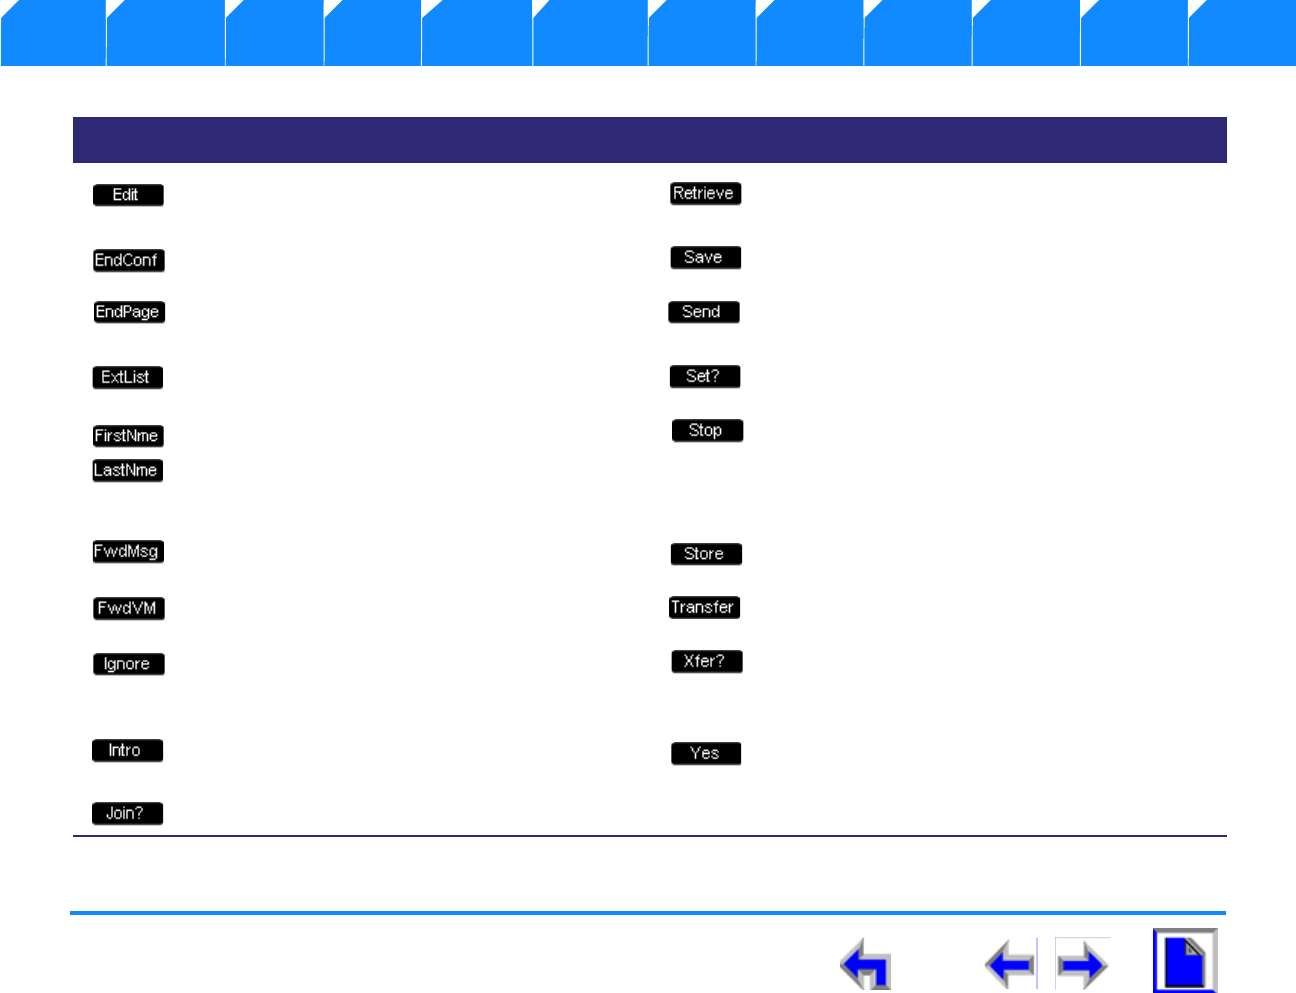
SB67030 Deskset User’s Guide - Overview 40
Allows you to change previously entered
information. Retrieves a parked call.
Ends conference, but keeps calls on hold. Saves information entered.
Ends paging of extensions. Forwards voicemail message to selected
extensions.
Goes to Extension List. Sets the selected option as the default choice.
Toggles First and Last name sort in Directory and
Extension list. Stops recording of audio clip.
Initiates Message Forward function. Stores number in local directory.
Forwards incoming call to voicemail. Initiates transfer of a call.
Silences ringer during incoming call event and
either goes back to previous mode or goes to next
incoming call.
Transfer confirmation.
Initiates recording of annotation when forwarding a
voicemail message. Positive confirmation of choice.
Conference confirmation.
Table 6 Programmed Key Screen Labels
Function Description Function Description
Voice Make Call Answer
Install Overview PC UI Setup Mail Directory Call Log Call Manage Call Handset Trouble
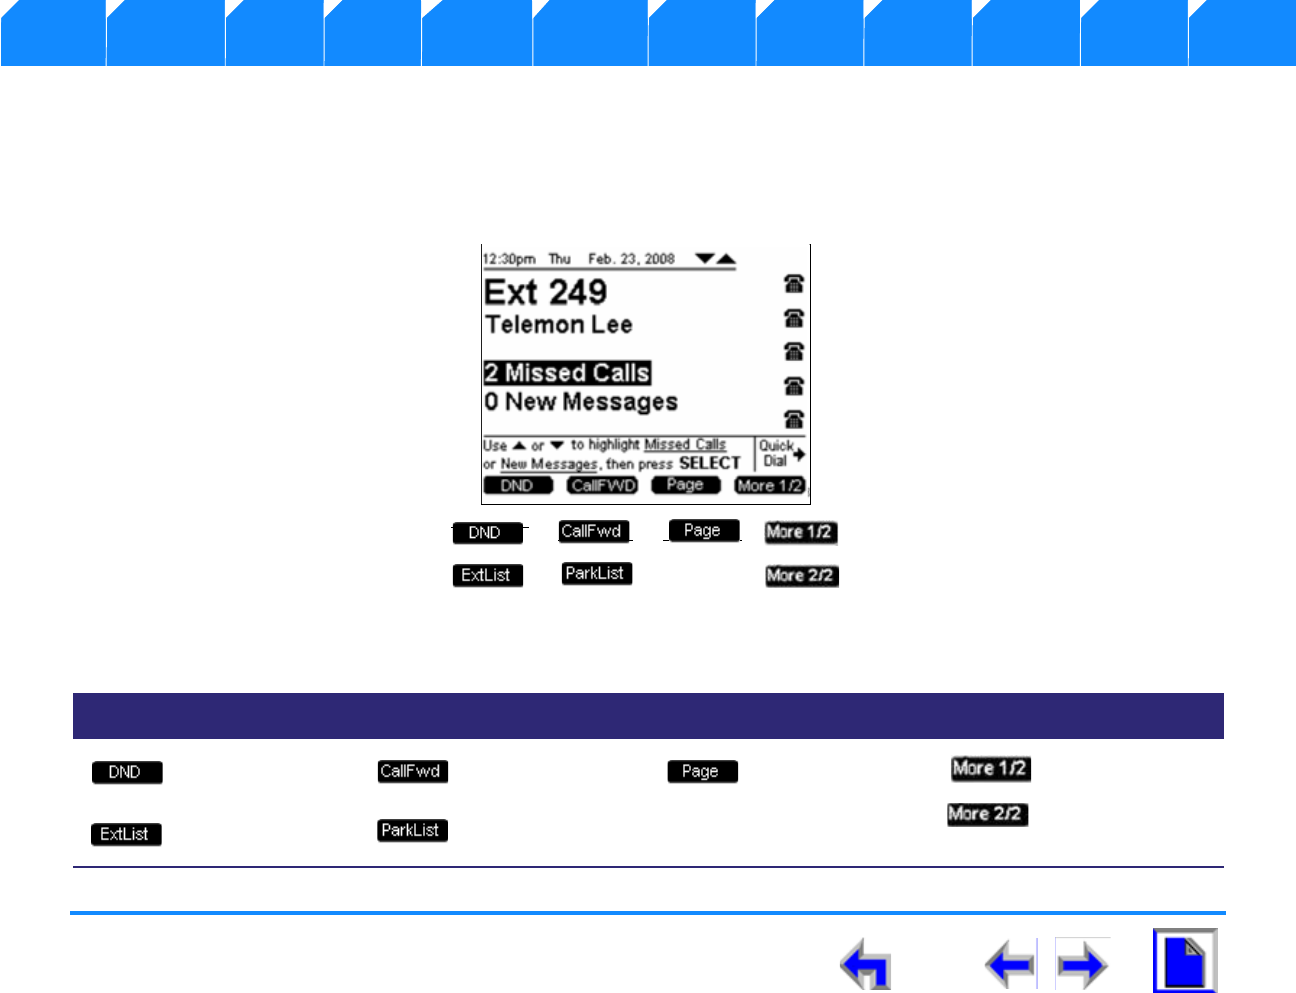
SB67030 Deskset User’s Guide - Overview 41
The Idle Screen
All SB67030 Desk Set operation begin from the Idle screen shown in Figure 18. This screen is displayed when the Desk Set is first
turned on or at the end of any operation such as completion of a call, or when the extension does not have any Active or Held Calls.
“Liquid Crystal Display (LCD) Screen” on page 28 provides a complete description of the Idle screen operation. Customization functions
can only be accessed from the Idle screen
Figure. 18 The SB67030 Desk Set Idle Screen
Table 7 Idle Screen Programmed Keys
Key Description Key Description Key Description Key Description
Initiates Do Not
Disturb. Initiates Call
Forward. Pages internal
extensions.
Moves to next set
of programmed
operation keys.
Goes to Extension
List. Goes to Park List.

Voice Make Call Answer
Install Overview PC UI Setup Mail Directory Call Log Call Manage Call Handset Trouble
SB67030 Deskset User’s Guide - Overview 42
Status Indication
The upper right-hand corner area is reserved for displaying Major status messages, as shown inFigure 19and Figure 20. Status indicators
appear in Idle and Call Appearance modes only. Voicemail, has it’s own set of status indicators.
Figure. 19 Example of DND On
Figure. 20 Example of Call Forward On
Status messages include:
If more than one status indicator is active, the display will switch between each indicator. The status indicator will alternate every two
seconds.
Extension
The extension name and number will be shown when on the Idle screen. The extension and name can only be modified in the Web GUI
application with the ADMIN login, not the USER login.
nDND ON Appears if Do Not Disturb is on.
nFWD ON Appears if Call Forward is on.
nVMFull Appears if voicemail is full.
n< 5 minimum Appears only in Voicemail feature to indicate less than five minutes recording time available
Voice Make Call Answer
Install Overview PC UI Setup Mail Directory Call Log Call Manage Call Handset Trouble
SB67030 Deskset User’s Guide - Overview 43
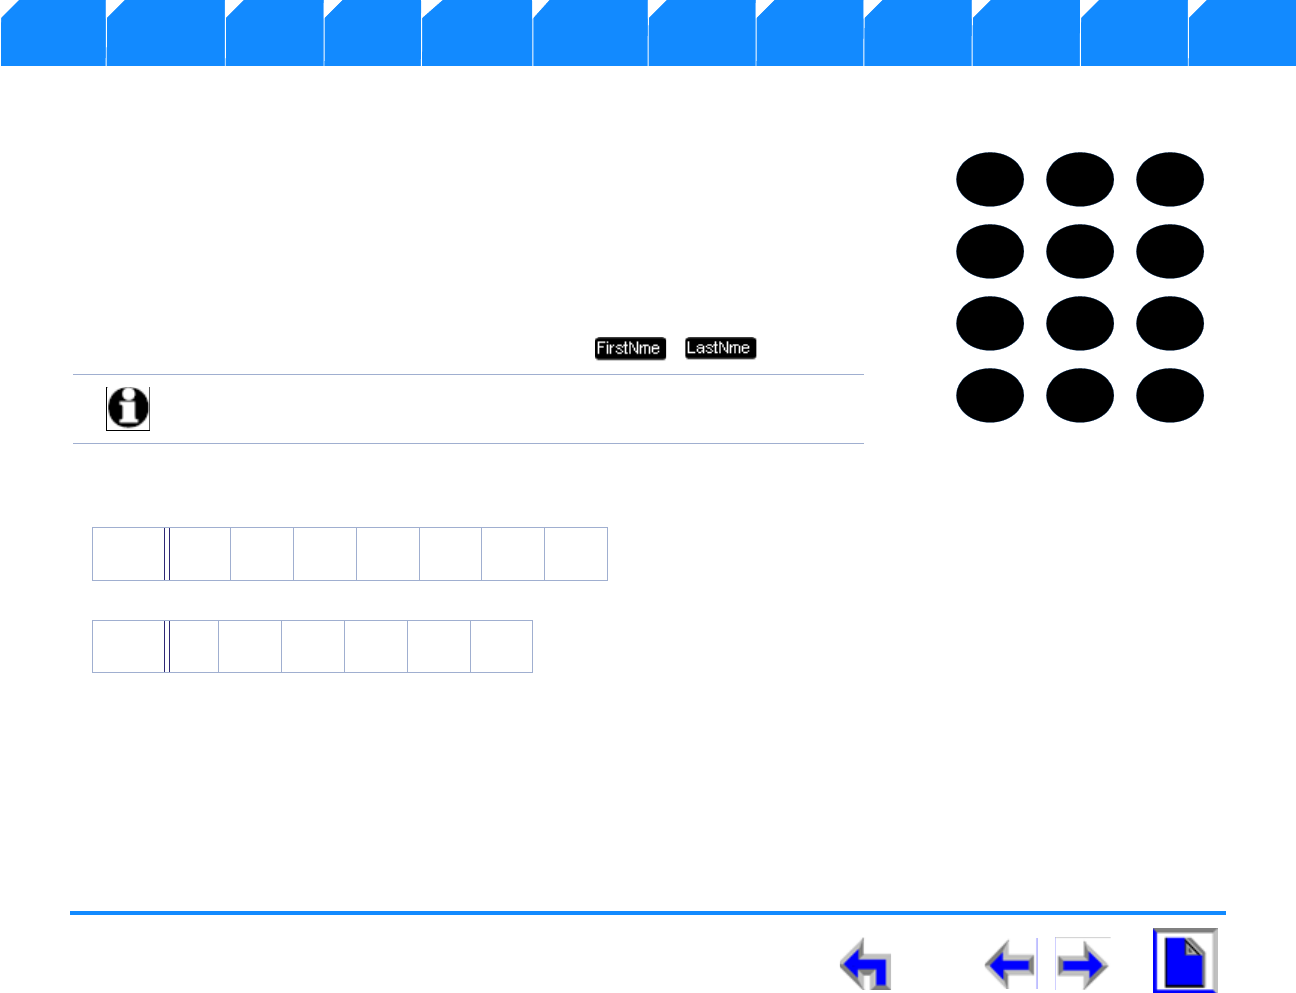
Keypad Data Entry
Keypad Data Entry allows you use the dialing keys to enter alphabetical characters into a text field
or search the Directory or Extension list based on the first character of the entry. Digits 2, 3, 4, 5,
6, and 8 have three assigned letters, while digits 7 and 9 have four assigned letters as shown in
Figure 21. Pressing the dialing key once will enter the first letter, twice will enter the second letter,
three times will enter the third letter. Pressing the key further will cycle through the letters again.
If the list is sorted by First Name, the Deskset will search for the first letter of the First Name. If the
list is sorted by last name, the Deskset will search for the first letter of the Last Name. The user may
toggle between First Name and Last Name sort by pressing ./
The “1” dialing key searches for a space. The “#” and “*” keys have been assigned special characters
as shown in Figure 22. Pressing these keys will cycle through each special character in the order shown.
Figure. 22 Special Character Assignment
Note Keypad Data Entry is available in the Directory and Extension list only
12 3
45 6
789
0
ABC DEF
GHI JKL MNO
PQRS TUV WXYZ
OPER
#
*
Figure. 21 Keypad Data Entry
##&‘,-.@
* !()*+?
Voice Make Call Answer
Install Overview PC UI Setup Mail Directory Call Log Call Manage Call Handset Trouble
SB67030 Deskset User’s Guide - Overview 44
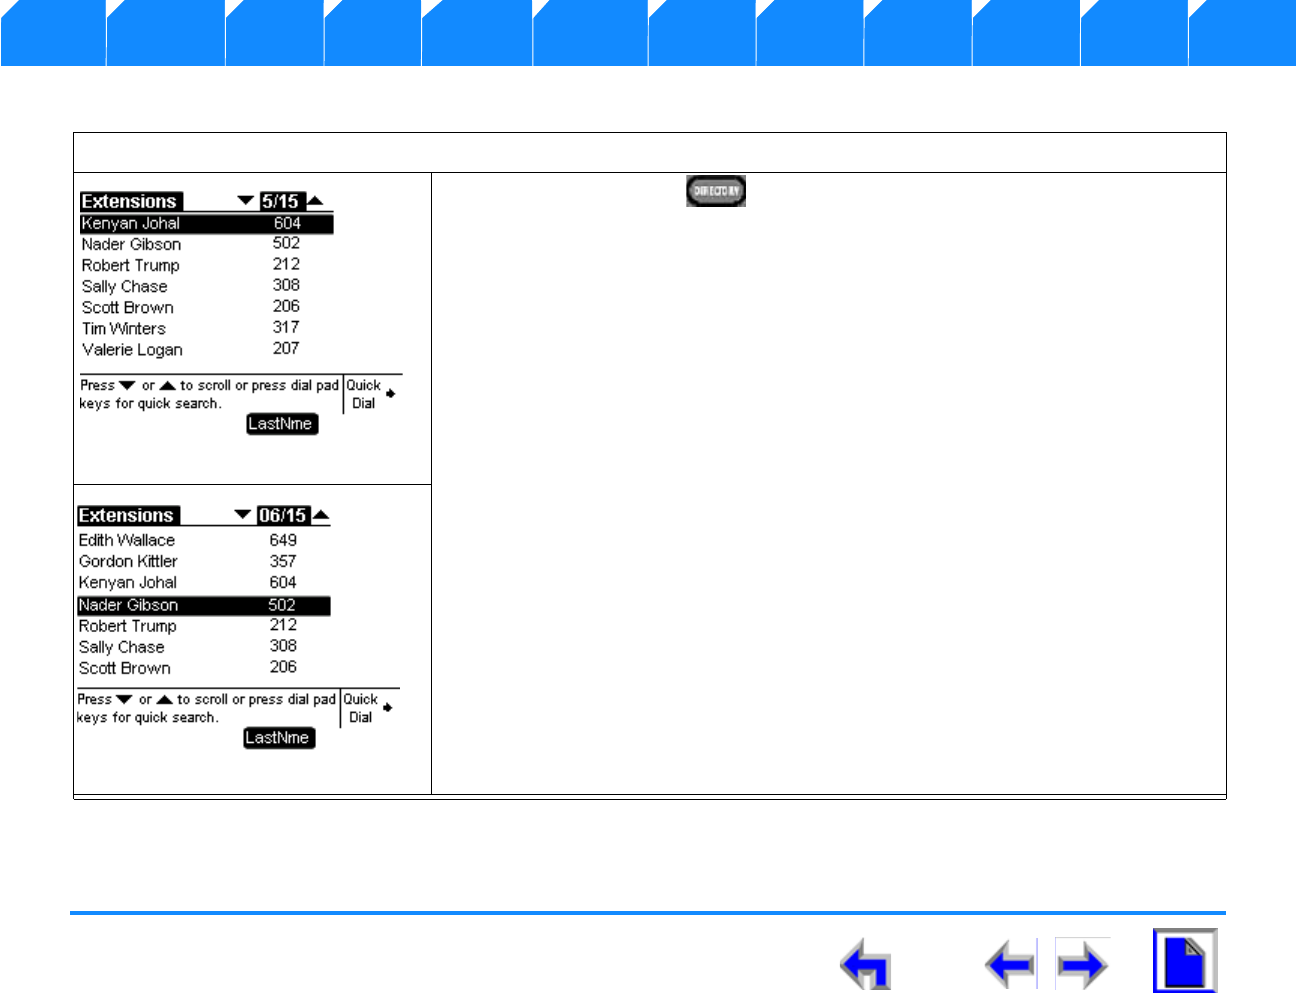
Search Rules
To search for a list entry:
1. Press DIRECTORY to display the directory list.
2. Press a dialling key in the Directory list cause the SB67030 Desk Set to
search for either an exact match or the closest match as follows:
lIf you press K [Press 5 twice] and an exact match is found, the highlight bar
moves to that entry as shown in Figure 23. The highlighted entry appears at
the top of the display regardless of its relative position within the list unless it
falls in the bottom six entries of the list. If the entry falls in the bottom six, the
highlighted entry will appear in its correct relative position.
lIf you press L [Press 5 three times] and the SB67030 Deskset cannot find an
exact match, the highlight bar will move to the entry with the closest
alphabetical match as shown in Figure 24. The highlighted entry will appear in
the middle of the display regardless of its relative position within the list unless
it falls in the top or bottom three of the list. If the entry falls in the top or
bottom three, the highlighted entry will appear in its correct relative position.
Figure. 23 Exact Match
Figure. 24 Closest Match
SB67030 Deskset User’s Guide - Browser Interface 45
Voice Make Call Answer
Install Overview PC UI Setup Mail Directory CallLog Call Manage Call Handset Trouble
CHAPTER
3
B
ROWSER
I
NTERFACE
Introduction
:You can configure certain functions of the AT&T Small Business System through the Browser
Interface that is embedded in every SB67030 Desk Set and SB67020 Gateway. All global settings,
as well as the System Directory, are distributed across the network. The Browser Interface consists
of web pages with editable settings.
Changes made on the WebUI are transmitted to all Desksets when applied. If changes are being
made on the Deskset and WebUI simultaneously, a first-come-first-serve policy on resource
allocation will apply. As system configuration is session based, changes will only be transmitted
globally when the session ends (either by pressing “Save” on the Deskset, or clicking “Apply” on
the WebUI).
If the user types an invalid value into one of the fields on the web page, clicking “Apply” will not
save the page. An error message will be generated and displayed at the top of the page. The field
with the incorrect value will be highlighted, as shown below.
CAUTION In most cases there are multiple settings on one page. Changing a
setting does not instantly apply the new value. Pressing the “Apply” button will save
all changes on that page.
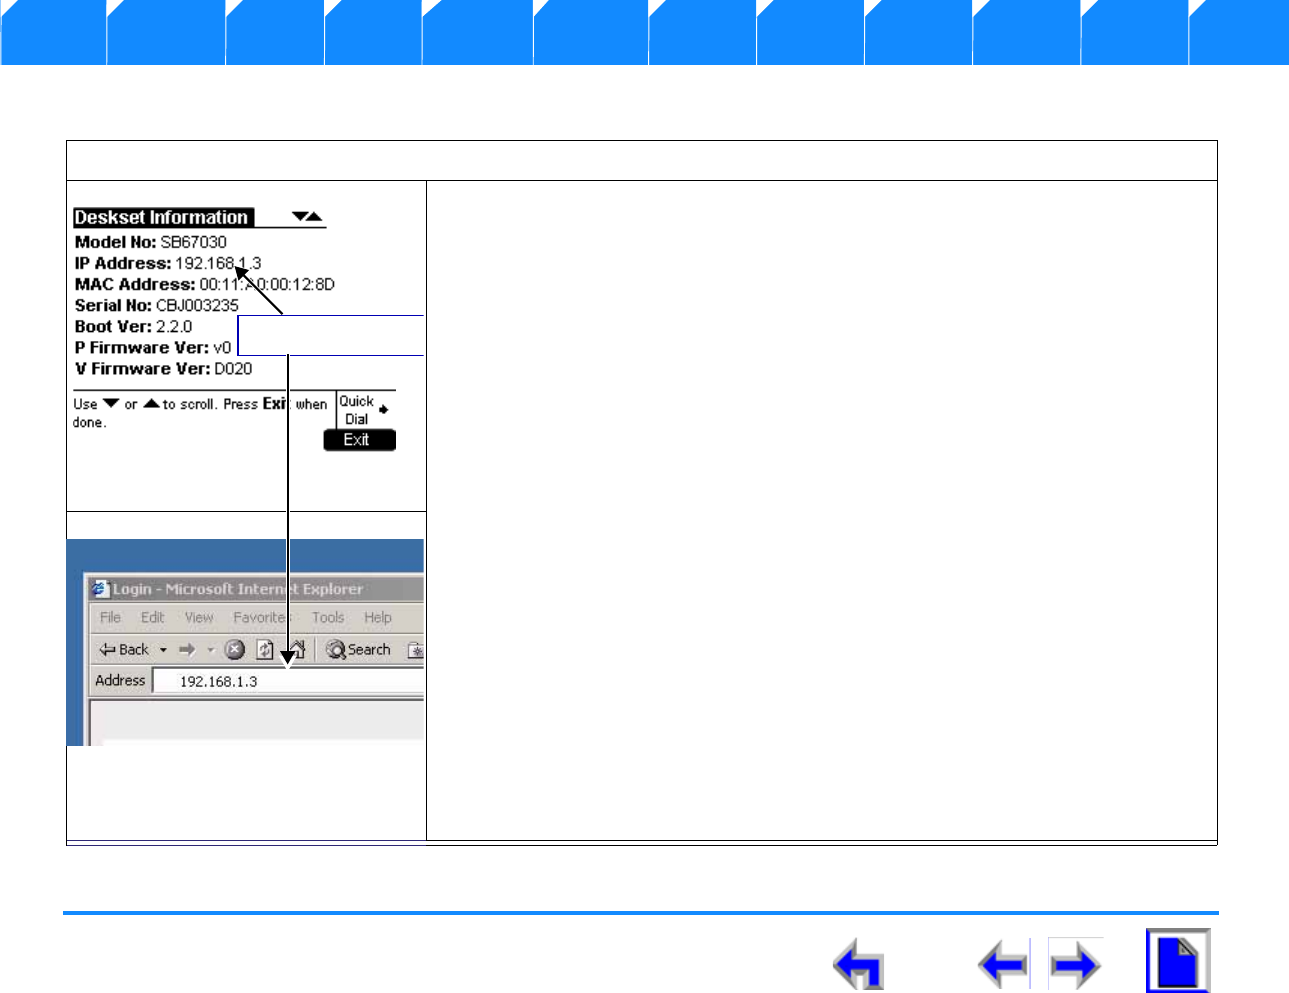
SB67030 Deskset User’s Guide - Browser Interface 46
Voice Make Call Answer
Install Overview PC UI Setup Mail Directory CallLog Call Manage Call Handset Trouble
Accessing the User Interface (UI)
To access the Browser Interface:
1. Press MENU.
2. Press the down NAVIGATION button to highlight Deskset Information and
press SELECT, or press 4.
3. Find your IP Address, as shown in Figure 25 the Deskset Information screen.
4. On your computer, open your preferred Internet Browser such as Internet
Explorer, Firefox, Safari, or Chrome.
5. Type in the Deskset IP address in the address bar and press Enter. Note that the
IP address of any Deskset or Gateway on the Synapse network can be used for
access.
6. You will go to a Login screen, as shown below.
7. Enter in your administrator User ID and password, then click Login.
8. If this is the first time using the WebUI, type “admin” in the User ID field and
“12345” in the password field, then click Login. You may change your User ID and
password once you are logged in.
Note: Logging in as administrator allows you to configure global settings. Logging in as a
user will allow you to access local phone settings only. .
Figure. 25 Menu - Deskset Settings
IP Address
Figure. 26 Menu - Deskset Settings
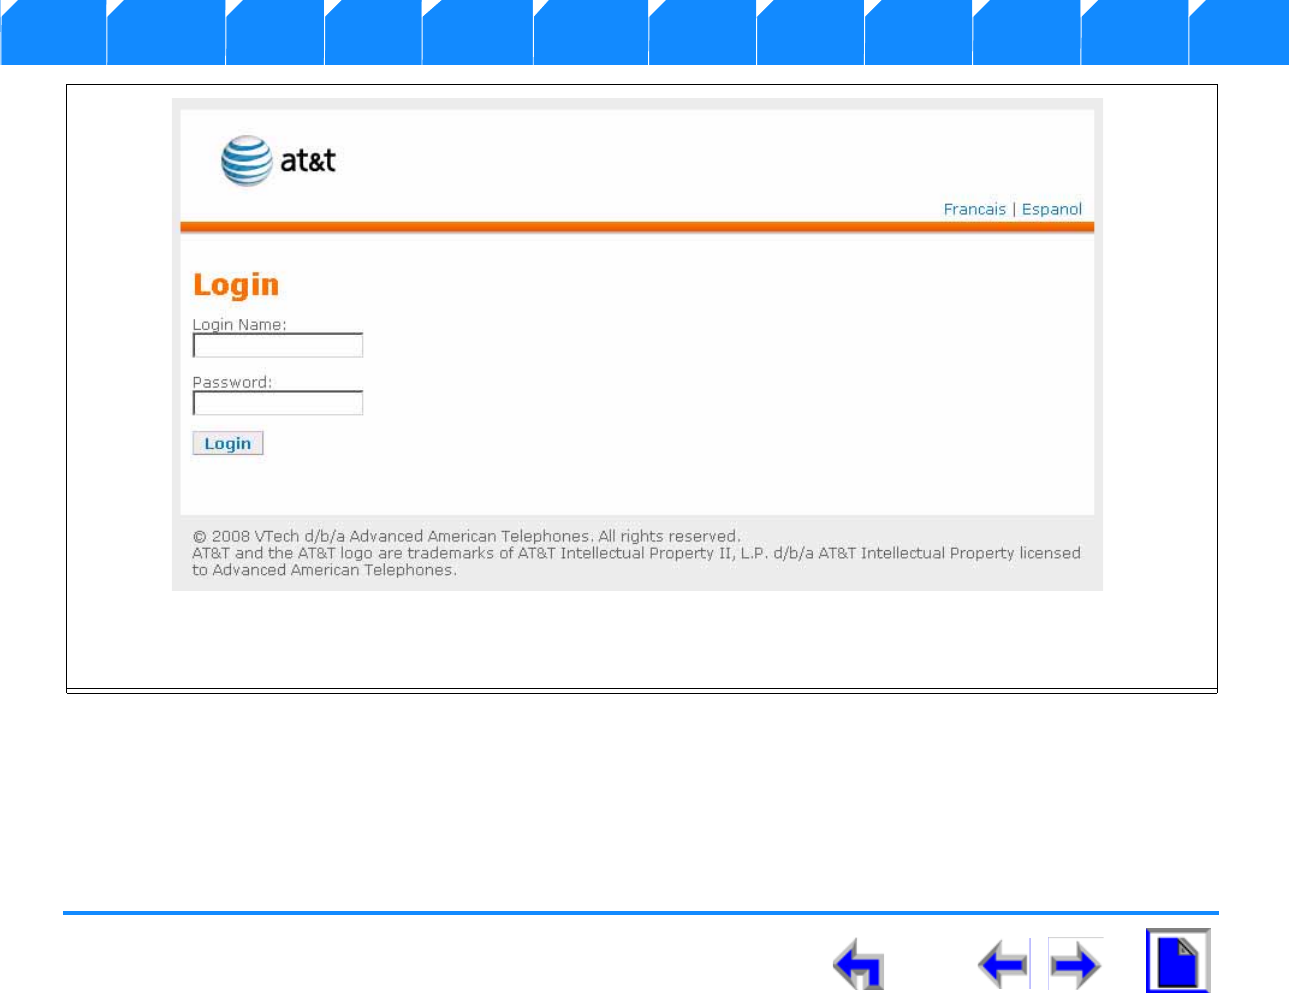
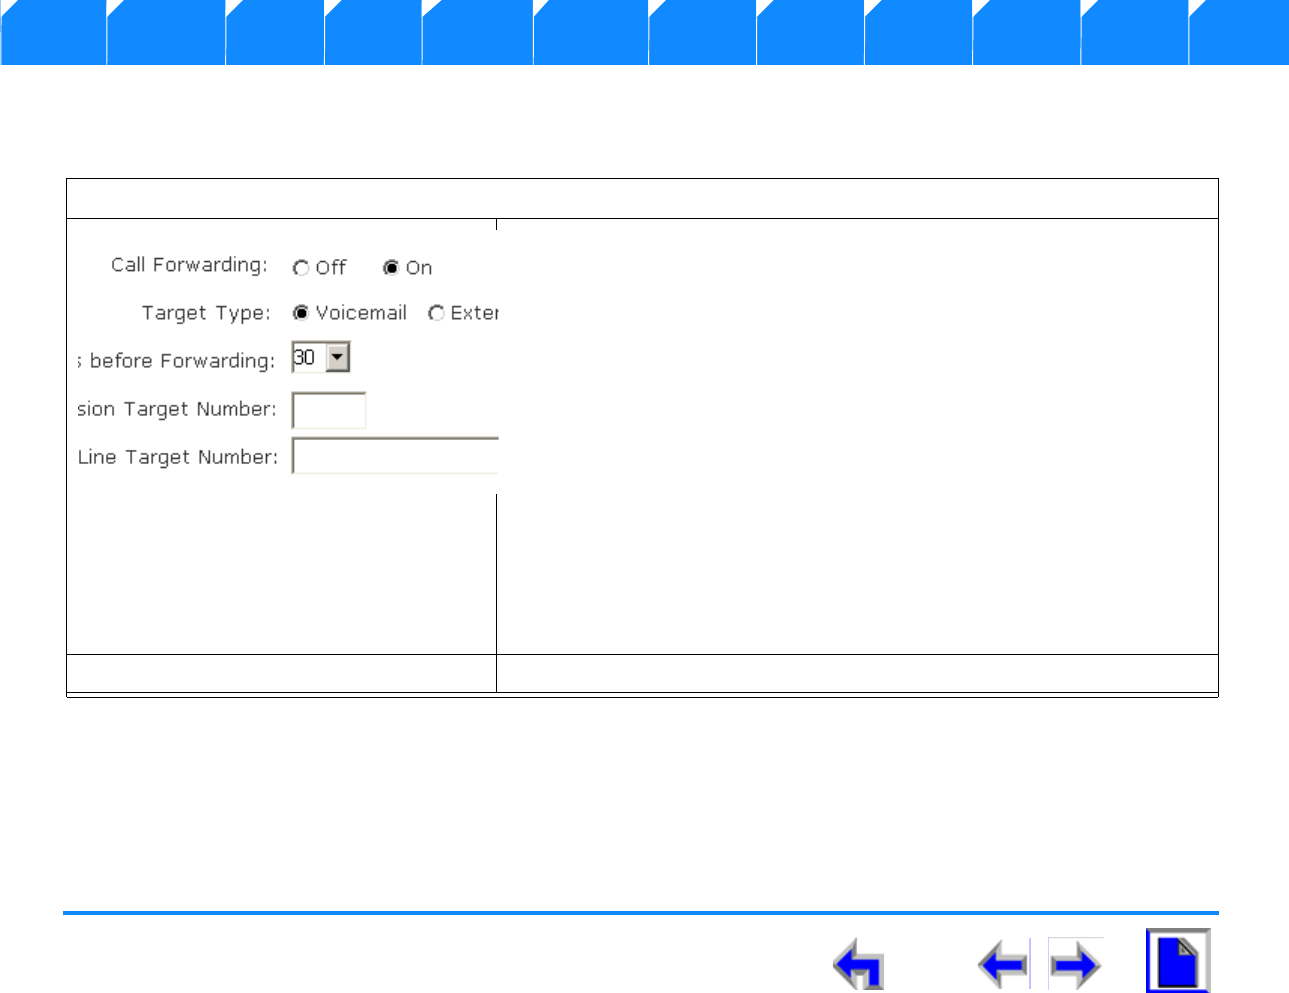
SB67030 Deskset User’s Guide - Browser Interface 48
Voice Make Call Answer
Install Overview PC UI Setup Mail Directory CallLog Call Manage Call Handset Trouble
Call Forward-No Answer Settings
Only a system administrator may alter Call Forward-No Answer (CFNA) settings. CFNA may also be configured on the Deskset.
Log in as administrator.
Click Phone Settings in the left navigation menu.
Click Basic Settings.
Locate “Call Forward No Answer Settings:” and make your selections from the
following options:
Call Forwarding On / Off: Turns CFNA on or off. Caution: Turning CFNA off will
cause the Deskset to ring continuously until the far-end caller hangs up.
Target Type: Voicemail / Extension / Line.
Seconds before forwarding. The user may select a range from 5 to 45 seconds (in
five-second increments).
Extension / External Line Target Number. Enter target extension and external line
numbers here
Figure. 28 Menu - Deskset Settings

SB67030 Deskset User’s Guide - Browser Interface 50
Voice Make Call Answer
Install Overview PC UI Setup Mail Directory CallLog Call Manage Call Handset Trouble
To add or edit Quick Dial entries,
Log in as user or administrator.
Click Phone Settings in the left navigation menu.
Click QuickDial Keys.
Note: If logged in as administrator, you may select which individual exten
edit
Fill out name and number fields.
The associated Call Appearance icons indicate which Call Appearance key
s
used. Due to limited space on the Deskset display, names will be truncat
e
ellipses if they do not fit on the Deskset display. If both name and numb
e
are left blank, then the Deskset display will show <Empty> next to the C
a
Appearance.
Click Apply.
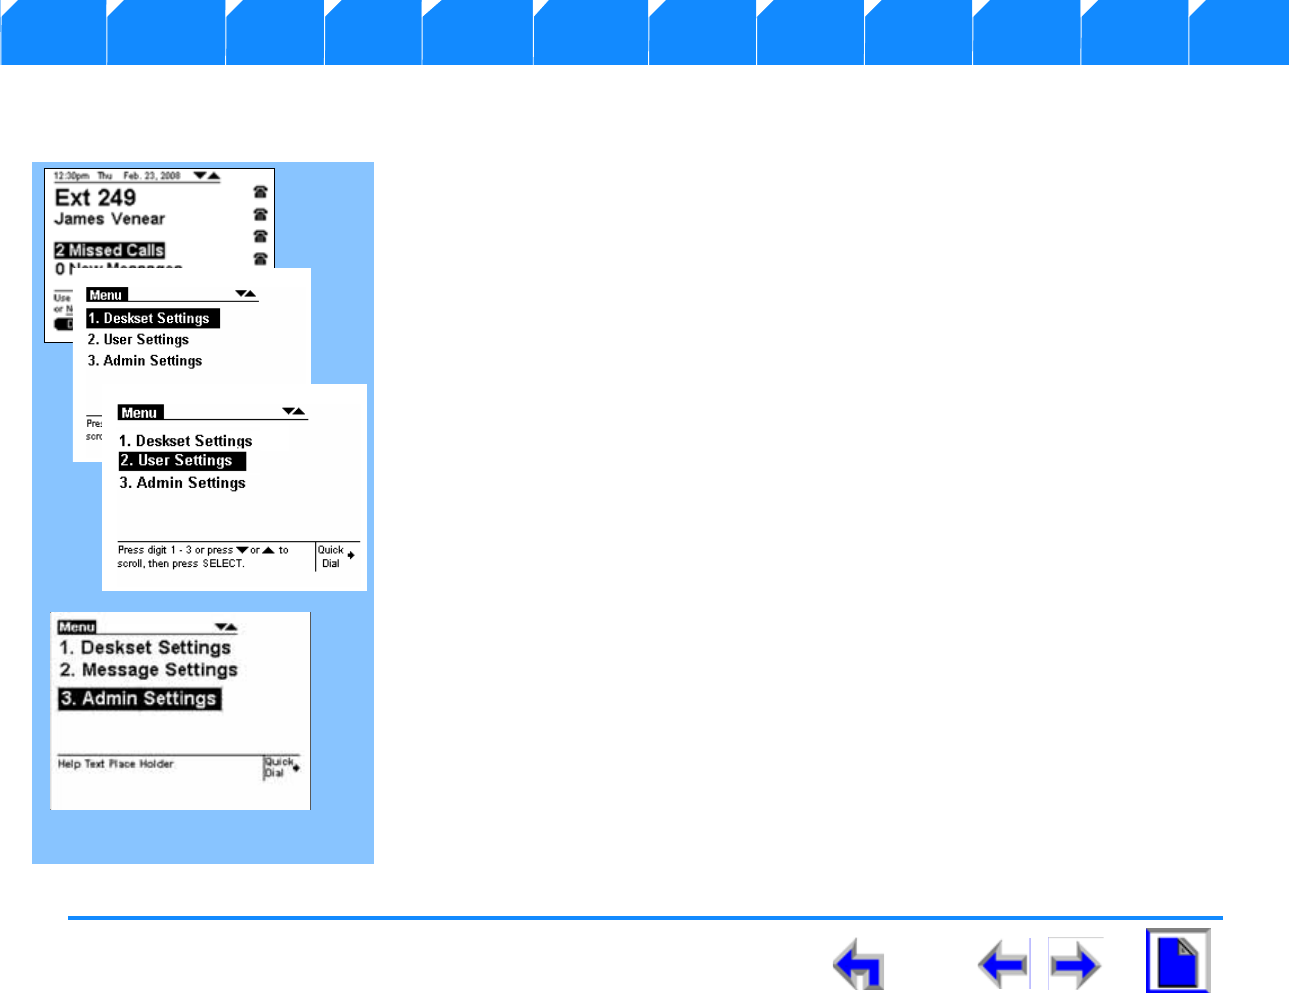
SB67030 Deskset User’s Guide - Setup Menus 51
Voice Make Call Answer
Install Overview PC UI Setup Mail Directory CallLog Call Manage Call Handset Trouble
CHAPTER
4
S
ETUP
M
ENUS
Introduction
Your SB67030 Desk Set ships with a factory or default settings for a variety of settings in the
following categories:
1. “Setup Menus” on page 52
2. “Deskset Settings” on page 54
3. “User Settings” on page 59
4. “Admin Settings” on page 77
5. “Deskset Information” on page 91
6. “Setting up Do Not Disturb” on page 92
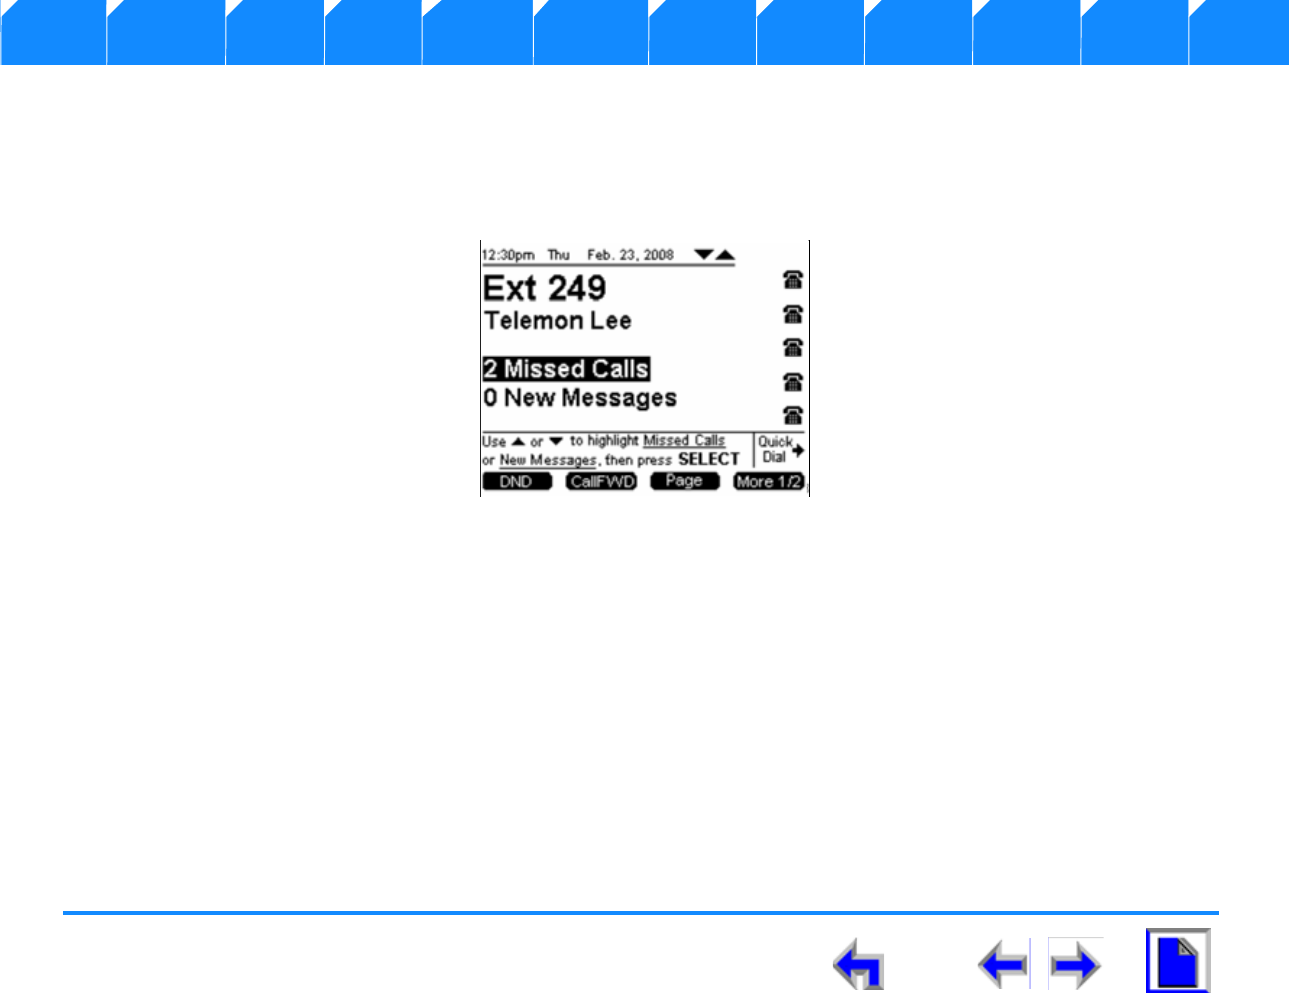
SB67030 Deskset User’s Guide - Setup Menus 52
Voice Make Call Answer
Install Overview PC UI Setup Mail Directory CallLog Call Manage Call Handset Trouble
Setup Menus
All SB67030 Desk Set operation begin from the Idle screen shown in Figure 29. This screen displays when the Desk Set is first turned
on or at the end of any operation such as completion of a call, or when the extension does not have any Active or Held calls.See “Liquid
Crystal Display (LCD) Screen” on page 28 for a complete description of the Idle screen operation. Customization functions can only be
accesses from the Idle screen.
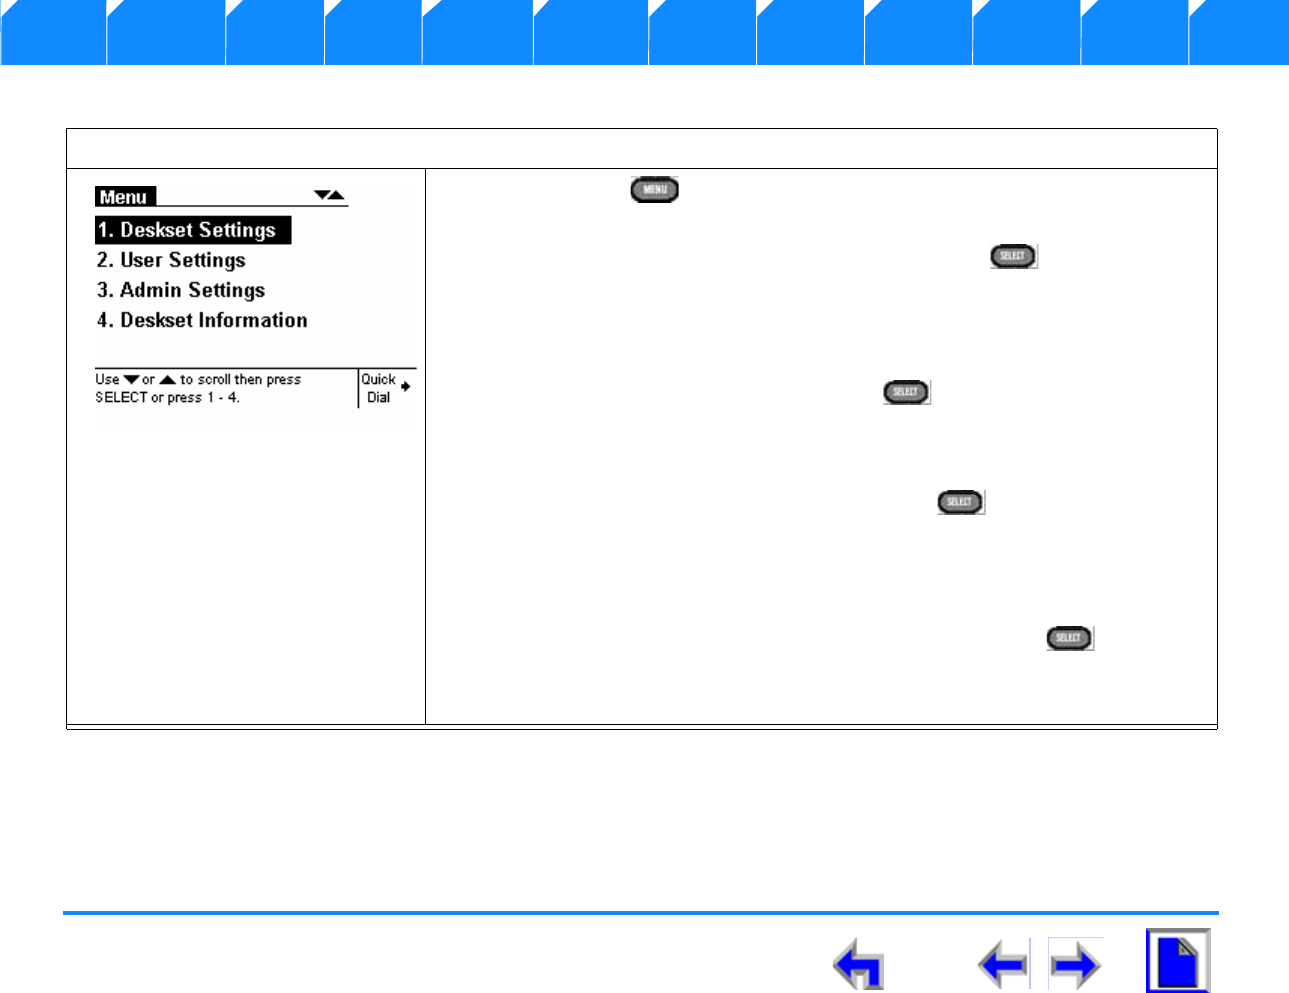
SB67030 Deskset User’s Guide - Setup Menus 53
Voice Make Call Answer
Install Overview PC UI Setup Mail Directory CallLog Call Manage Call Handset Trouble
Figure. 29 The SB67030 Desk Set Idle Screen
To access the SB67030 Deskset setup menus:
1. Press MENU and observe that the Menu screen shown in Figure 30
displays.
2. To display the Deskset Settings menu press SELECT . or press 1 on the
keypad.
3. Go to “Deskset Settings” on page 54 for further instructions.
4. To display the User Settings menu press the down NAVIGATION arrow once
to move the highlight and press SELECT , or press 2 on the keypad.
5. Go to “User Settings” on page 59 for further instructions.
6. To display the Admin Settings menu press the down NAVIGATION arrow
twice to move the highlight and press SELECT , or press 3 on the
keypad.
7. Go to “Admin Settings” on page 77 for further instructions.
8. To display the Deskset Information menu press the down NAVIGATION
arrow three times to move the highlight and press SELECT , or press 4
on the keypad.
9. Go to “Deskset Information” on page 91 for further instructions\++.
Figure. 30 Menu Screen
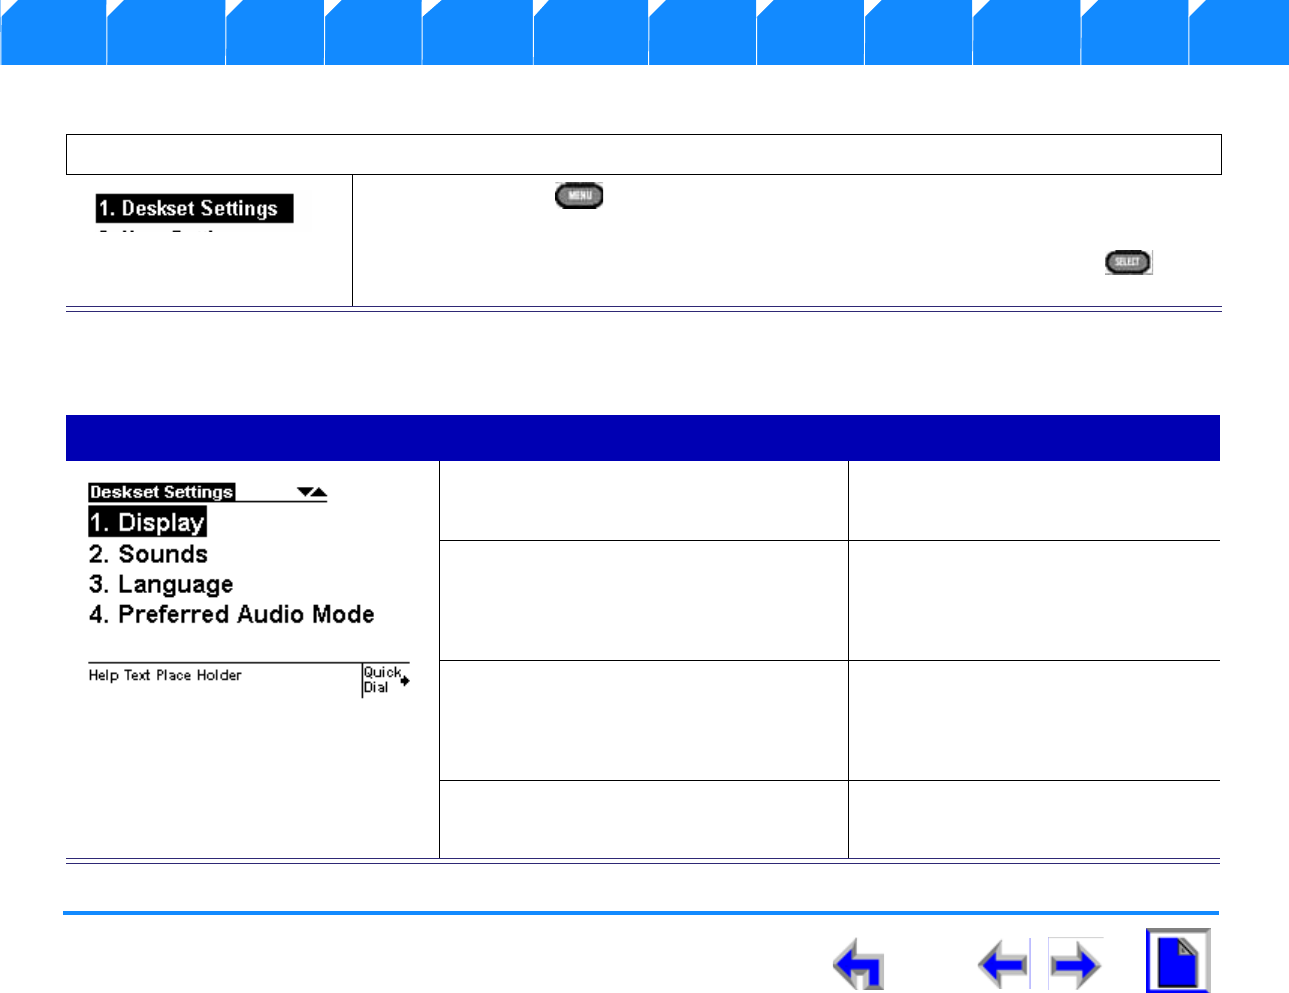
SB67030 Deskset User’s Guide - Setup Menus 54
Voice Make Call Answer
Install Overview PC UI Setup Mail Directory CallLog Call Manage Call Handset Trouble
Deskset Settings
The Deskset Settings menu provides access to the four functions and the related submenus listed in Table 8.
To display the Deskset Settings men:
1. Press MENU and observe that the Menu screen shown in Figure 30 on page 53
displays.
2. To display the Deskset Settings menu shown in Figure 32 press SELECT . or
press 1 on the keypad.
Table 8 Deskset Settings Menu Structure
Function Submenu
1. “Display” on page 55 1. Contrast [1-9]
2. Backlight Hi/Lo/Off]
2. “Sounds” on page 56 1. Ring Volume [0-8]
2. Ringtones [1-9]
3. Key Beeps [On-Off]
3. “Language” on page 57 1. English (Preset)
2. Francais
3. Espanol
4. “Preferred Audio” on page 58 1. Speakerphone (Set)
2. Headset
Figure. 32 Menu - Deskset Settings
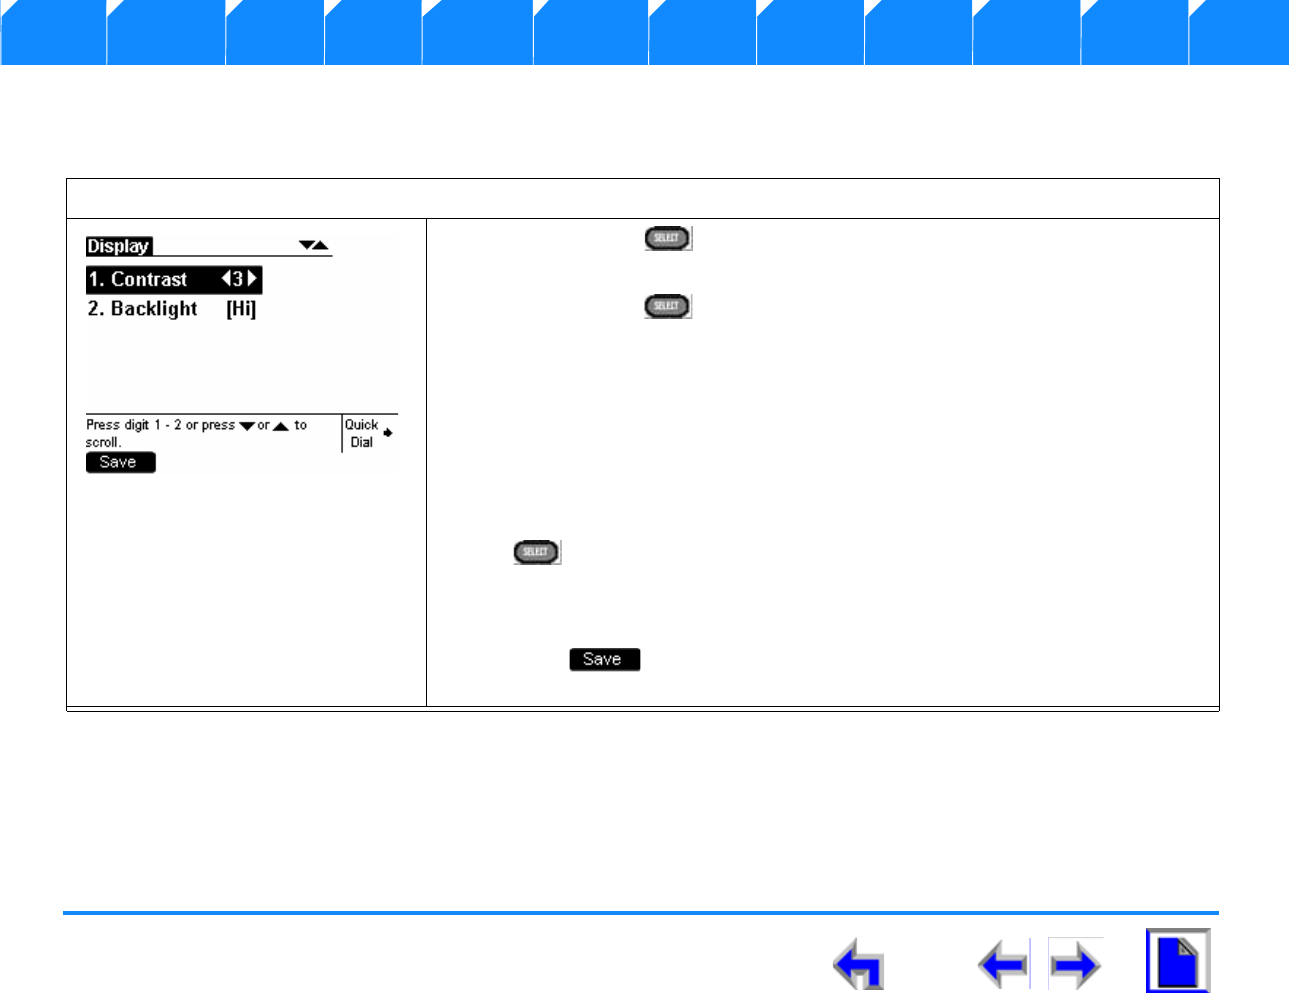
SB67030 Deskset User’s Guide - Setup Menus 55
Voice Make Call Answer
Install Overview PC UI Setup Mail Directory CallLog Call Manage Call Handset Trouble
Display
The Display menu provides the ability to adjust your SB67030 Desk Set LCD contrast and backlight.
To access the Display menu:
1. Press SELECT to display the Deskset Settings menu shown in
Figure 32 on page 54.
2. Press SELECT . or press 1 on the keypad to access the Display menu
shown in Figure 33.
3. To set the desired Contrast level from 1 to 9 press the left or right
NAVIGATION arrow. The default is 3.
4. To set the desired Backlight level press 2 on the keypad.
OR
5. Press the down NAVIGATION arrow to move the highlight and press SELECT
.
6. Press the left or right NAVIGATION arrow to cycle through Hi, Lo, or Off. The
default is Hi.
7. Press to accept the adjustments and return to the Deskset
Settings menu shown in Figure 32 on page 54.
Figure. 33 Display Menu

SB67030 Deskset User’s Guide - Setup Menus 56
Voice Make Call Answer
Install Overview PC UI Setup Mail Directory CallLog Call Manage Call Handset Trouble
Sounds
The Sounds menu provides the ability to set the ring volume, pick one of nine Ringtones, or turn key beeps on and off.
To access the Sounds customization function submenus:
1. Press MENU to display the Menu screen shown in Figure 30 on page 53
displays.
2. Press SELECT to display the Deskset Settings menu shown in Figure 34.
3. Press 2 on the keypad or press the down NAVIGATION arrow to move the
highlight to Sounds.
4. Press SELECT and observe that the Sounds menu shown in Figure 35
appears.
5. To adjust the Ring Volume from 0 to 9, press the left or right NAVIGATION
arrow. The default is 1. Decreasing the volume to zero turns off the ringer. The
ringer will sound as adjusted.
6. To choose Ringtones, press 2 on the keypad or press the down NAVIGATION
once and press SELECT .
7. To select the desired one of nine ringtones press the left or right NAVIGATION
arrow.The default is 4. The ringtone will play when selected.
8. To turn the Key Beeps On or Off, press 3 on the keypad or press the down
NAVIGATION arrow twice to highlight Key Beeps.
9. Press the left or right NAVIGATION arrow to select On or Off. The default is On.
10. Press to accept the adjustments and return to the Deskset Settings
menu shown in Figure 32 on page 54.
Figure. 34 Sounds
Figure. 35 Sounds Menu
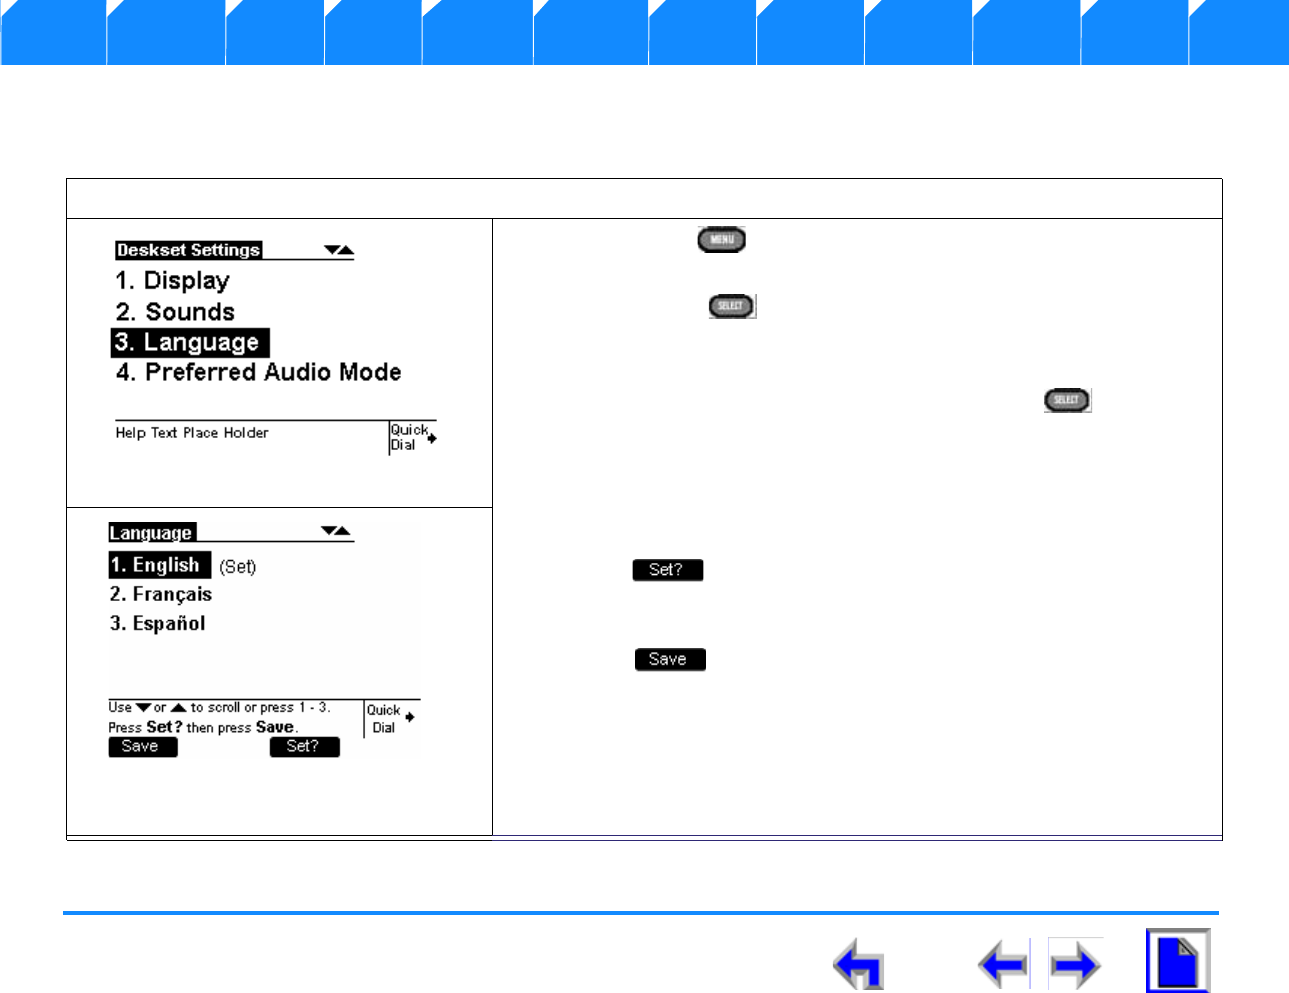
SB67030 Deskset User’s Guide - Setup Menus 57
Voice Make Call Answer
Install Overview PC UI Setup Mail Directory CallLog Call Manage Call Handset Trouble
Language
The Language menu enables your SB67030 Desk Set to display information in English, French, or Spanish.
To access the Language customization function submenus:
1. Press MENU and observe that the Menu screen shown in
Figure 30 on page 53 displays.
2. Press SELECT to display the Deskset Settings menu shown in
Figure 32 on page 54.
3. Press 3 on the keypad or press the down NAVIGATION arrow twice to
move the highlight to Language and press SELECT as shown in
Figure 36.
4. Observe that the Language menu shown in Figure 37 appears.
5. Press 1, 2, or 3 on the keypad or press the down NAVIGATION arrow
to select the desired language.
6. Press to set the desired language as the default preference.
7. Observe that all on-screen text displays in the chosen language.
8. Press to accept the changes and return to the Deskset
Settings menu shown in Figure 32 on page 54.
igure. 36 Deskset Settings - Language
Figure. 37 Language Menu Function
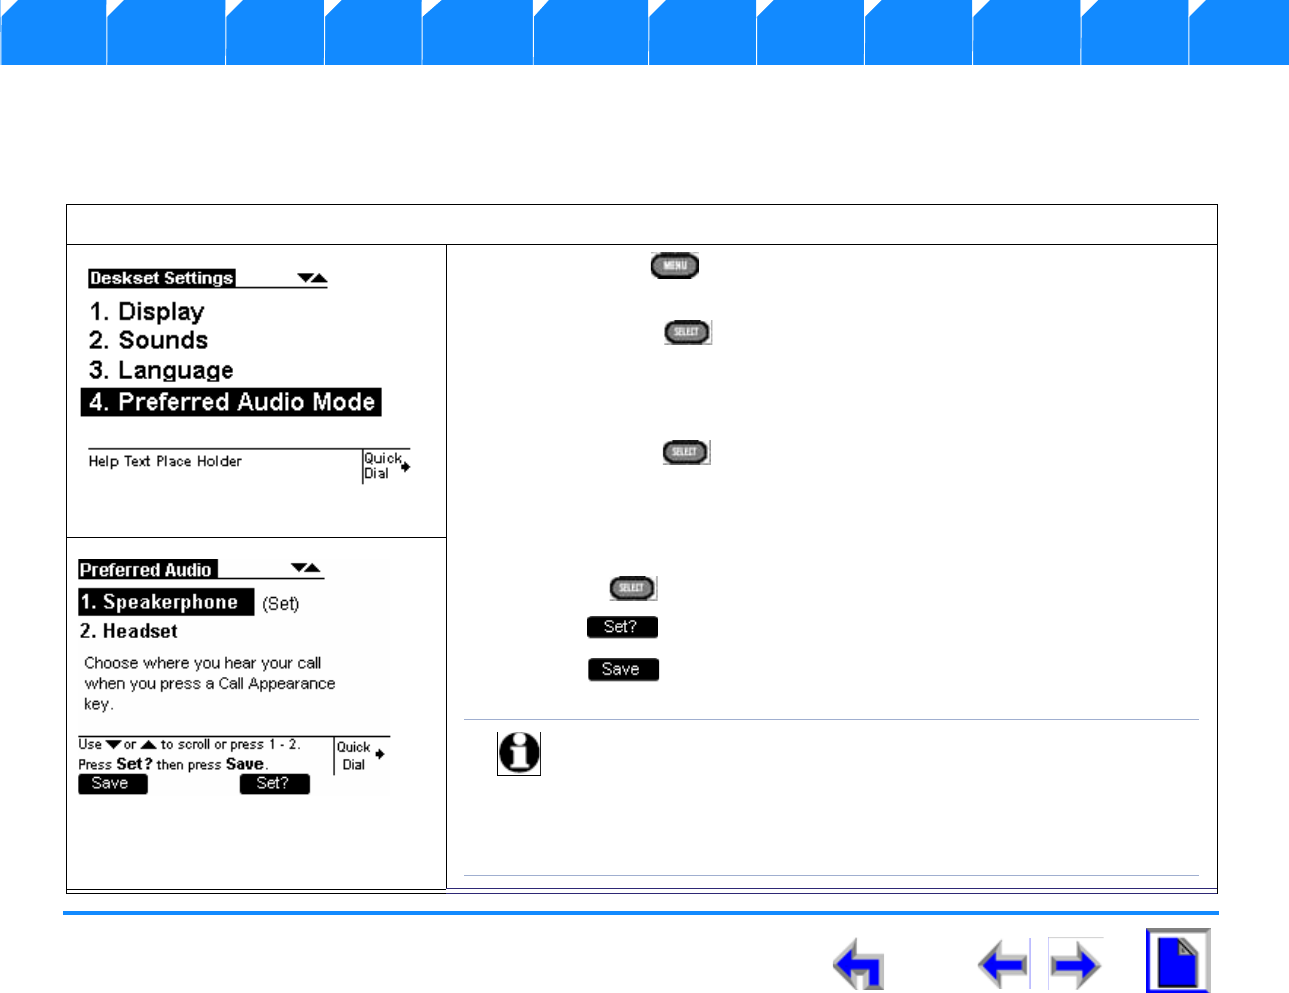
SB67030 Deskset User’s Guide - Setup Menus 58
Voice Make Call Answer
Install Overview PC UI Setup Mail Directory CallLog Call Manage Call Handset Trouble
Preferred Audio
The Preferred Audio menu allows you to set the audio preference to headset or speakerphone. Lifting the handset takes first priority
in all instances.
To access the Language customization function submenus:
1. Press MENU and observe that the Menu screen shown in Figure 30
on page 53 displays.
2. Press SELECT to display the Deskset Settings menu shown in
Figure 32 on page 54
3. Press 4 on the keypad or press the down NAVIGATION arrow three times
to move the highlight to Preferred Audio Mode as shown in Figure 38, and
press SELECT .
4. Observe that the Preferred Audio Mode menu shown in Figure 39
appears.
5. Press 1 or 2 on the keypad or press the down NAVIGATION arrow and press
SELECT to select the desired setting.
6. Press to set your audio preference.
7. Press to accept the selection and return to the Deskset Settings
menu shown in Figure 32 on page 54.
Figure. 38 Deskset Settings - Audio
Note Once the preference is set pressing a Call Appearance key will take
the system Off Hook via the preferred method. If the headset is not
available, the Deskset will go Off Hook via speakerphone. If you are
on a call, pressing the Call Appearance will route the audio to the
preferred audio setting. Lifting the handset while on a call via
speakerphone or headset will re-route audio to the handset.
Figure. 39 Preferred Audio Menu

SB67030 Deskset User’s Guide - Setup Menus 59
Voice Make Call Answer
Install Overview PC UI Setup Mail Directory CallLog Call Manage Call Handset Trouble
User Settings
The User Settings menu provides the ability to modify the functions listed in Table 9 on page 60.
To display the User Settings menus:
1. Press MENU and observe that the Menu screen shown in Figure 40
displays.
2. To display the User Settings menu press the down NAVIGATION arrow once
to move the highlight and press SELECT , or press 2 on the keypad.
3. Observe that the Enter User Password screen shown in Figure 41 displays.
4. Enter the user password and press SELECT .
5. Use the key to correct errors.
6. Press at any time to cancel all entries.
7. Observe that the User Settings menu shown in Figure 42 on page 60
displays.
Figure. 40 Menu
Figure. 41 User Password
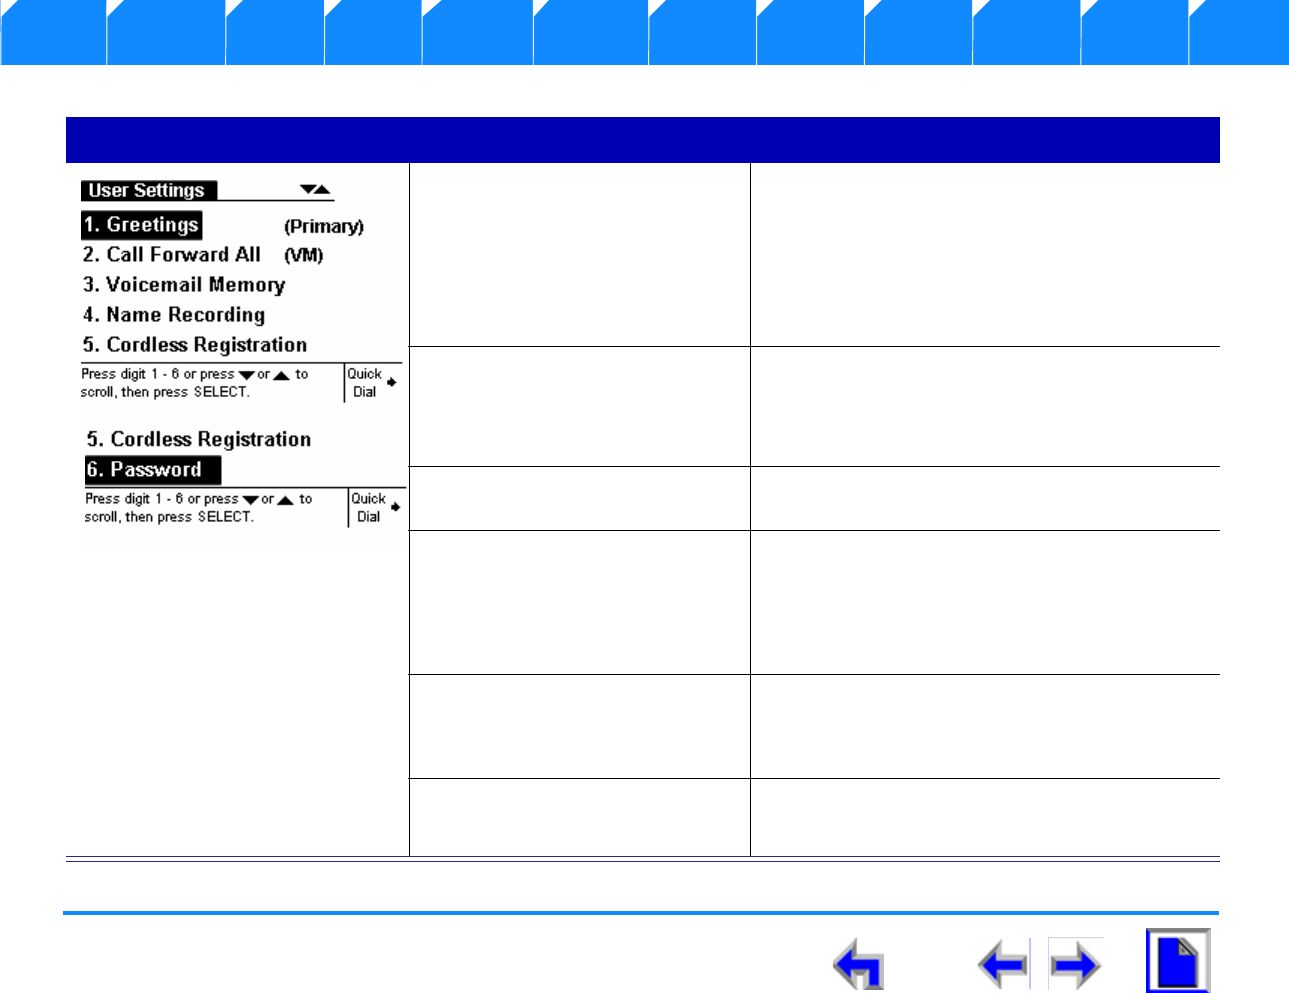
SB67030 Deskset User’s Guide - Setup Menus 60
Voice Make Call Answer
Install Overview PC UI Setup Mail Directory CallLog Call Manage Call Handset Trouble
Table 9 Deskset Menu - User Settings
Function Submenu
1.“Greetings” on page 61 1.Current Greeting (Primary/Alternate/Pre-
Set)
2. Play or record Primary Greeting
3. Play or record Secondary Greeting
4. Play Pre-Set Greeting
2.“Call Forwarding All” on
page 63 1. Call Forward All Target (Ext/VM/Lime)
2. to Ext: xxx
3. to Line: xxx-xxx-xxxx
3.“Voicemail Memory” on
page 68 Shows remaining minutes left in Voicemail
4. “Name Recording” on
page 69 Current Name (Personal/Pre-Set)
Play/Rec Personal Name
Play/Rec Personal Name
5.“Cordless Registration” on
page 72 Handset (Not registered)
Headset (Not registered)
6.“Password” on page 75 1. Set/Change Password
2. Clear Password
Figure. 42 Menu - User Settings
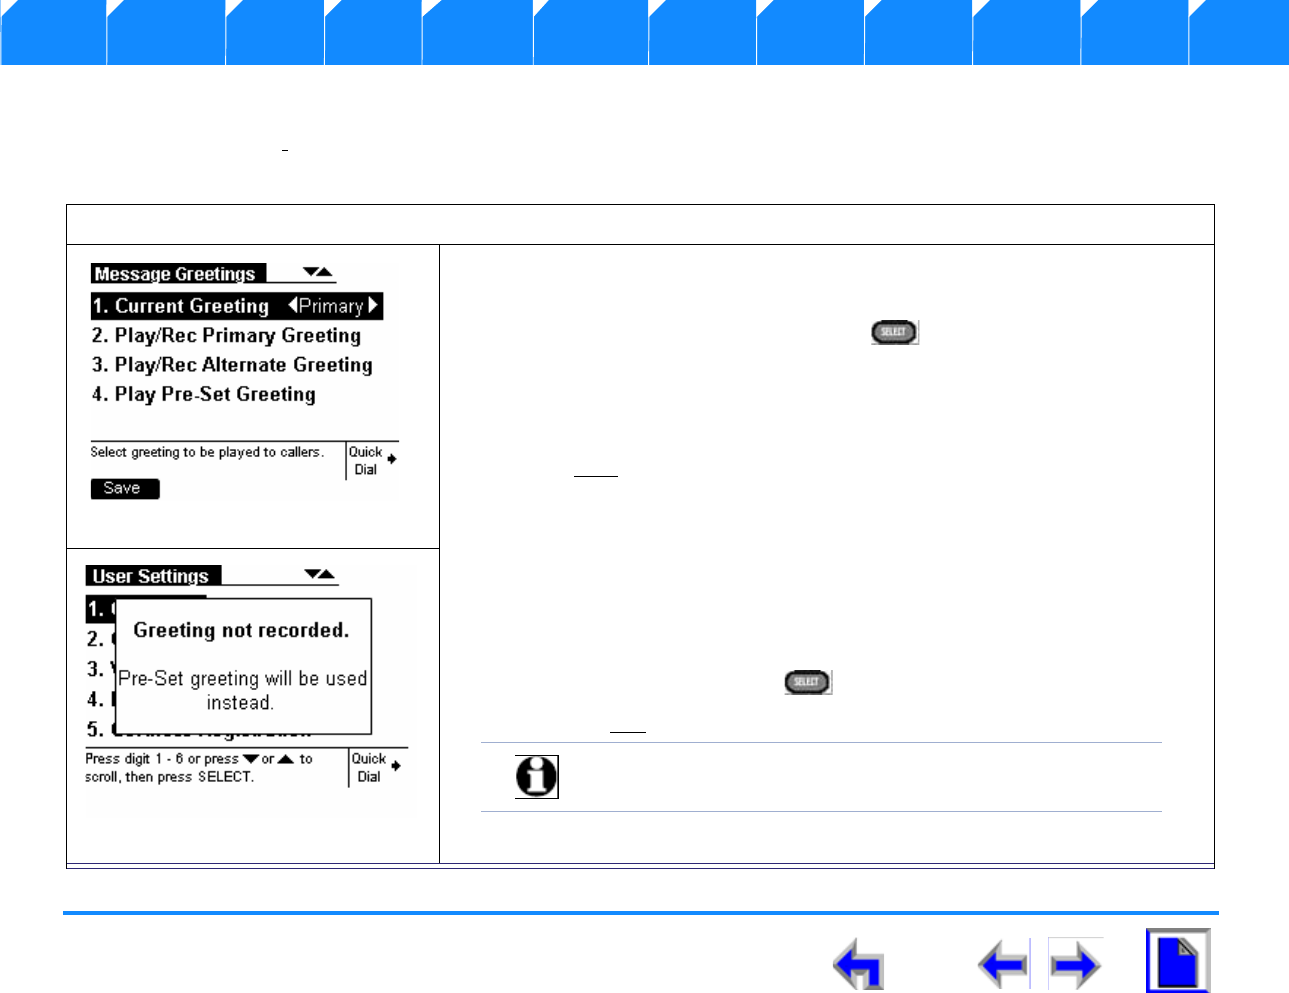
SB67030 Deskset User’s Guide - Setup Menus 61
Voice Make Call Answer
Install Overview PC UI Setup Mail Directory CallLog Call Manage Call Handset Trouble
Greetings
The Message Greeting menu provides the ability to play or record a primary and alternate greeting, play the Pre-set Greeting, and
determine which of three greetings will be used.
To access the Message Greeting menus:
1. Perform the procedure in “User Settings” on page 59 to display the User
Settings menu.
2. Press 1 on the keypad or press SELECT and observe that the Message
Greetings menu shown in Figure 43 appears.
3. Press the left or right NAVIGATION arrow to select the Primary or Alternate
greeting.
4. Press Save to select the greeting and the system will check to see if the selected
greeting has been recorded. If the greeting has been recorded, you will return
to the User Settings menu shown in Figure 42.
5. If a greeting has not been recorded the splash screen shown in Figure 44
appears and the Pre-Set greeting will be used.
6. To play the pre-set greeting press 4 on the keypad or press the down
NAVIGATION arrow three times to move the highlight to Play Pre-Set
Greeting and press SELECT .
7. Press the Play to play the greeting.
8. To record a new greeting see “Recording A Greeting” on page 62.
Figure. 43 Message Greetings
Note You cannot delete or record over the Pre-Set Greeting. See
“Recording A Greeting” on page 62.
Figure. 44 Greeting Not Recorded
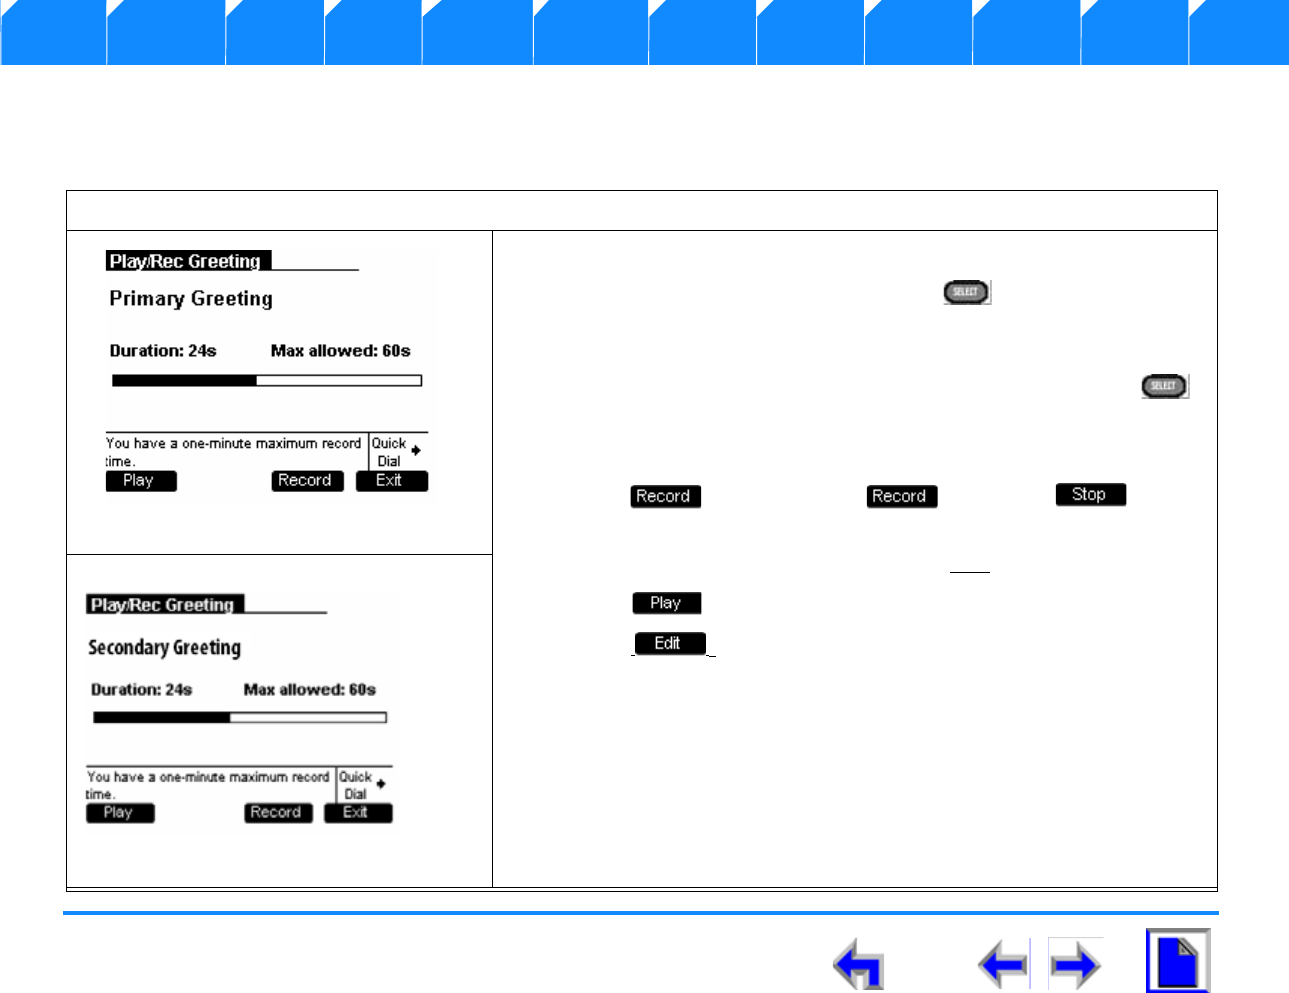
SB67030 Deskset User’s Guide - Setup Menus 62
Voice Make Call Answer
Install Overview PC UI Setup Mail Directory CallLog Call Manage Call Handset Trouble
Recording A Greeting
Your SB67030 Desk Set provides the ability to record a greeting up to 60-seconds long. The procedure for recording a Primary
and Secondary greeting are the same.
To record either a Primary or Alternate greeting:
1. Perform the procedure in “User Settings” on page 59.
2. Press 1 on the keypad or press SELECT and observe that the
Message Greetings menu shown in Figure 43 on page 61 appears.
3. Press 2 (Primary) or 3 (Alternate) on the keypad or press the down
NAVIGATION arrow to move the highlight, and press SELECT .
4. Observe that the Play/Rec Greeting display shown in Figure 45 or
Figure 46 appears.
5. Press and observe that changes to and the
word RECORDING displays.
6. Begin recording your message and press Stop when you are finished.
7. Press to review the message.
8. Press to return to the Message Greetings menu shown in
Figure 43 on page 61.
Figure. 45 Record a Primary Greeting
Figure. 46 Record a Secondary Greeting
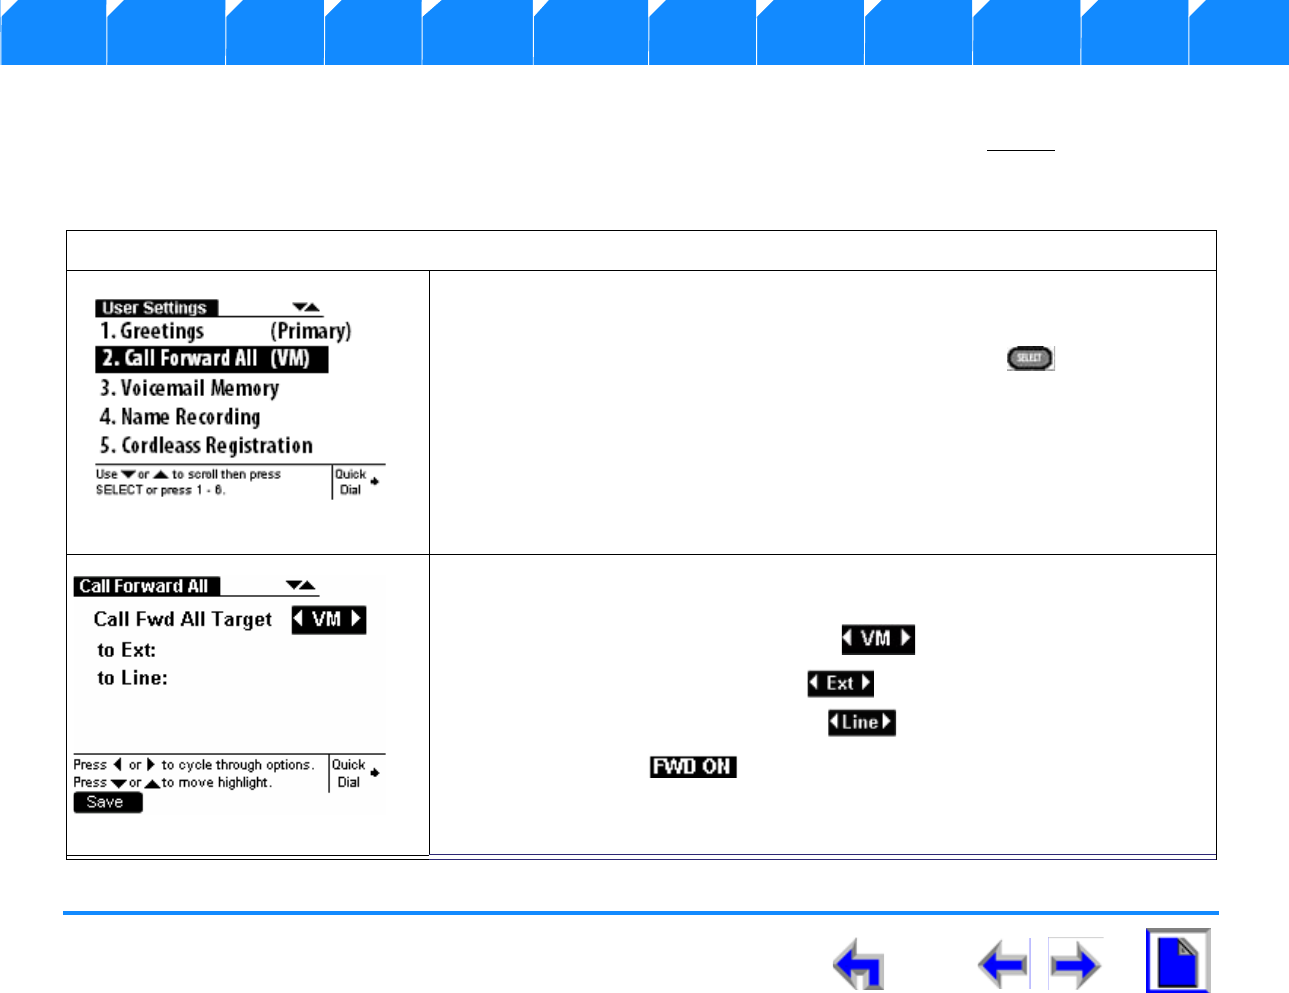
SB67030 Deskset User’s Guide - Setup Menus 63
Voice Make Call Answer
Install Overview PC UI Setup Mail Directory CallLog Call Manage Call Handset Trouble
Call Forwarding All
This setting controls the destination of unconditional Call Forward. To turn Call Forward All on or off, press CallFwd when in Idle, held
calls, or Active mode. When activated, Call Forward All over-rides the Call Forward-No Answer setting. If Call Forward All is off, then the
Call Forward-No Answer setting applies. Set the Call Forward-No Answer in “Admin Settings” on page 77s
To determine the Call Forward settings:
1. Perform the procedure in “User Settings” on page 59.
2. Press the down NAVIGATION arrow once to move the highlight to Call
Forward All as shown in Figure 47 and press SELECT ,
OR
3. Press 2 on the keypad.
4. Observe that the Call Forward All menu shown in Figure 48 displays.
5. Press the left or right NAVIGATION key to toggle the setting to one of the
following targets:
a. “Call Fwd All Voicemail (VM)” . as shown in Figure 48.
b. “Call Fwd All - Extension”
c. “Call Fwd All - Outside Line”
6. Verify that the indicator illuminates on the Idle screen and a call
forward splash screen appear as shown in “Call Forward Notification” on
page 67.
Figure. 47 User Settings - Call FWD
Figure. 48 Call Forward All
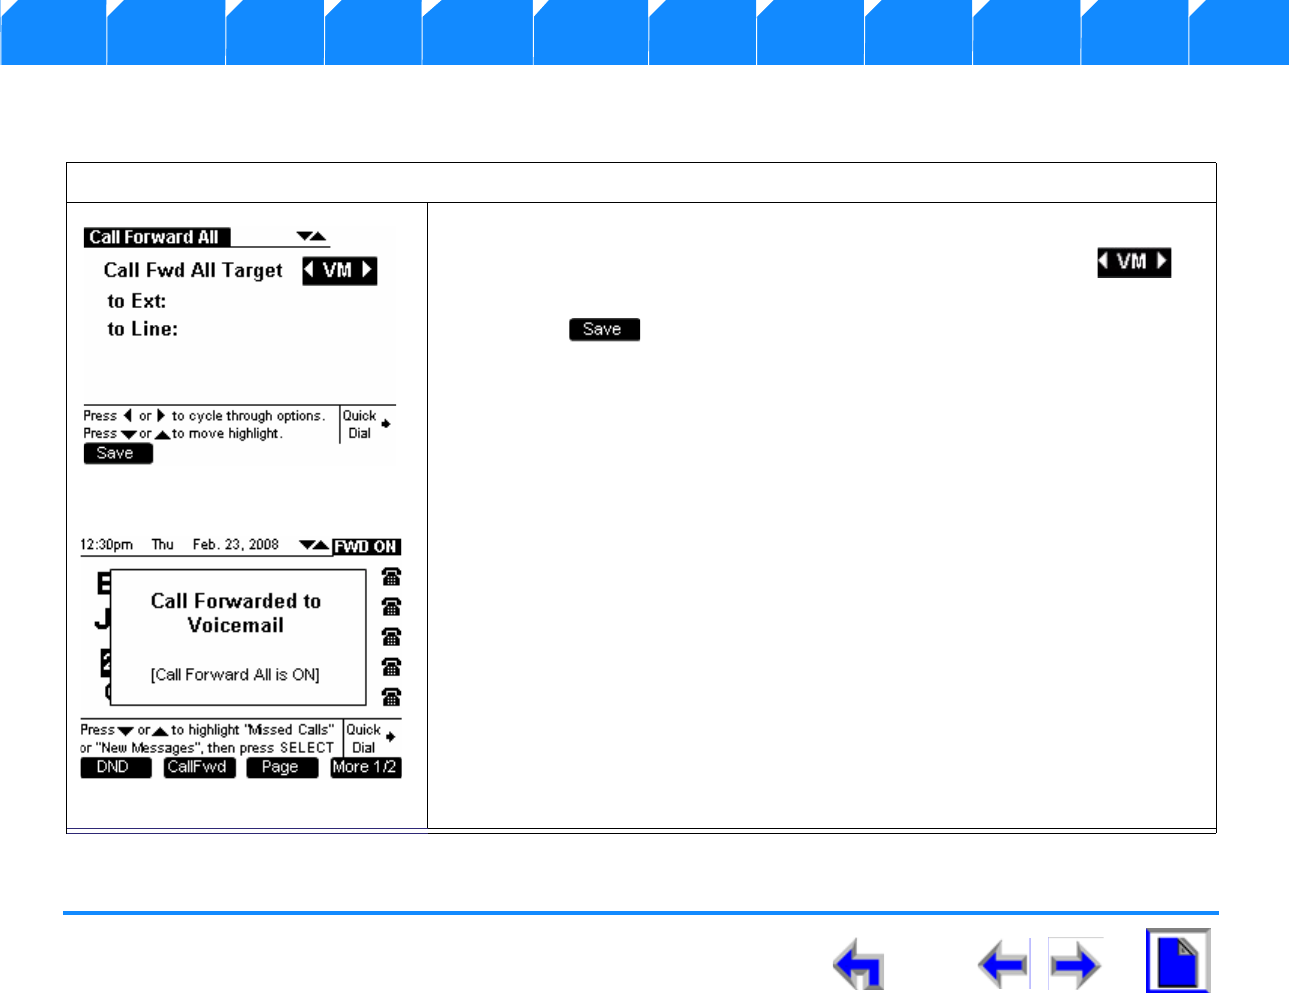
SB67030 Deskset User’s Guide - Setup Menus 64
Voice Make Call Answer
Install Overview PC UI Setup Mail Directory CallLog Call Manage Call Handset Trouble
Call Fwd All Voicemail (VM)
Forwarding all calls to voicemail is the default option.
To set Call Forward All to go to Voicemail:
1. Perform the procedure in “Call Forwarding All” on page 63.
2. Press the left or right NAVIGATION key to toggle the setting to as
shown in Figure 49.
3. Press to confirm the change and return to the User Settings menu
shown in Figure 47 on page 63.
lActivating the Call Forward All setting causes all incoming calls to be re-
directed to Voicemail. The Deskset will not ring but displays the splash screen
shown in Figure 50 to notify you that the call was forwarded.
lThe Deskset will not record the call in the Call Log unless the caller leaves a
message. A call with an associated message will be recorded in the Call Log,
but will not be tagged as NEW.
lIf Call Forward All is activated, the FWD ON status notification appears in Idle
mode.
lSetting Call Forward All sets the Call Forward-No Answer settings to OFF.
Figure. 49 Call Forward - VM
Figure. 50 Call Forward - VM Splash
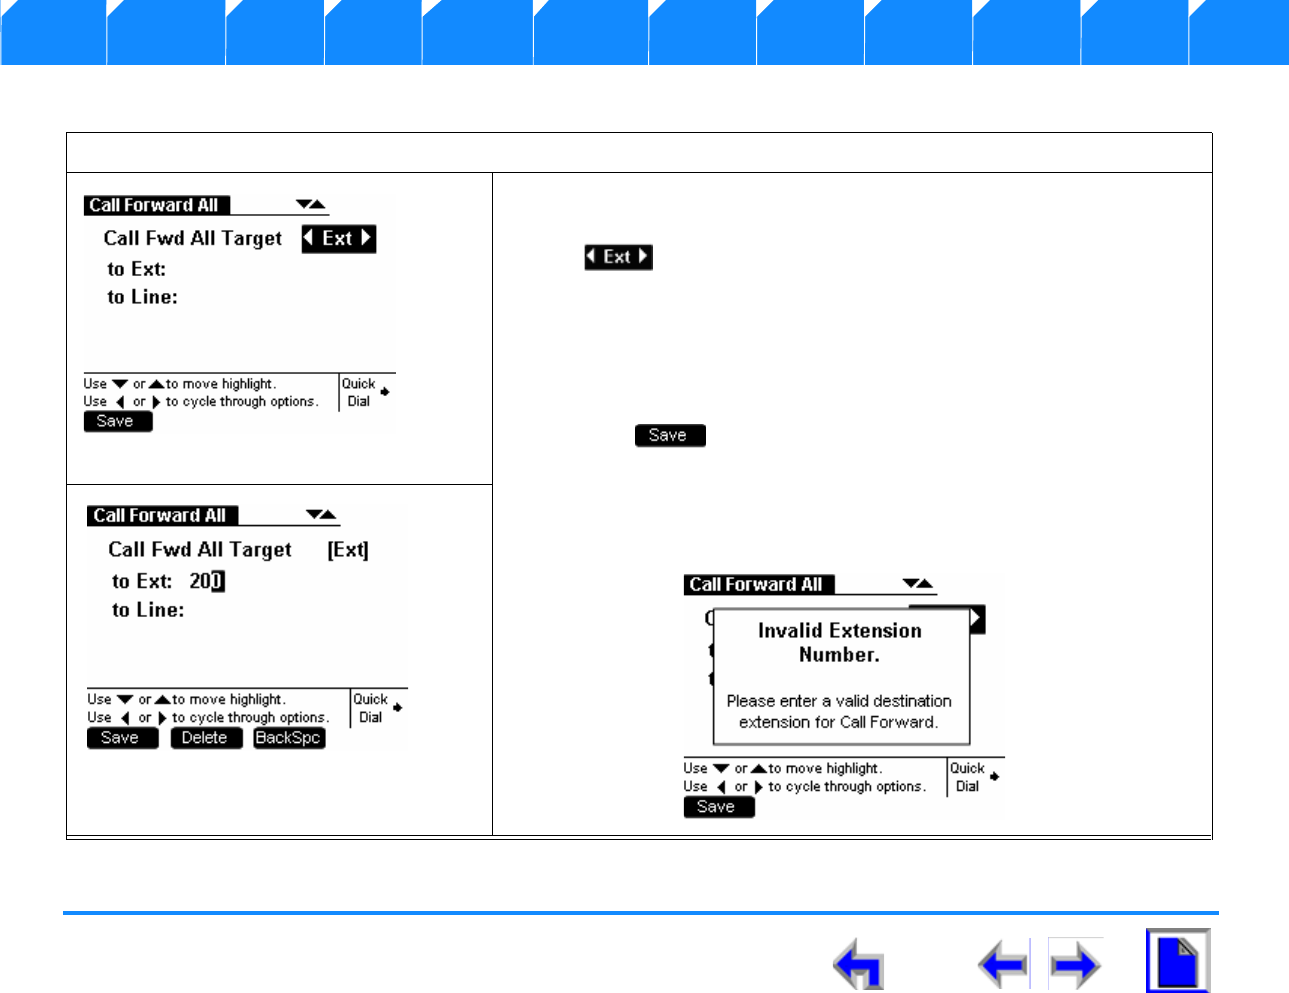
SB67030 Deskset User’s Guide - Setup Menus 65
Voice Make Call Answer
Install Overview PC UI Setup Mail Directory CallLog Call Manage Call Handset Trouble
Call Fwd All - Extension
To set Call Forward All to go to a desired extension:
1. Perform the procedure in “Call Forwarding All” on page 63.
2. Press the left or right NAVIGATION key to toggle the setting to
as shown in Figure 51
3. Press the down NAVIGATION key to move to the to Ext: editable
field. A blinking cursor appears in the number field as shown in
Figure 52.
4. Enter in a valid extension using the dialing keys.
5. Press to confirm the change and return to the User
Settings menu shown in Figure 47 on page 63.
lIf an invalid, or no extension has been entered, an Invalid
Extension Number splash appears as shown and you will remain in
the Call Forward All screen.
Figure. 51 Call Forward All - Extension
Figure. 52 Enter Extension
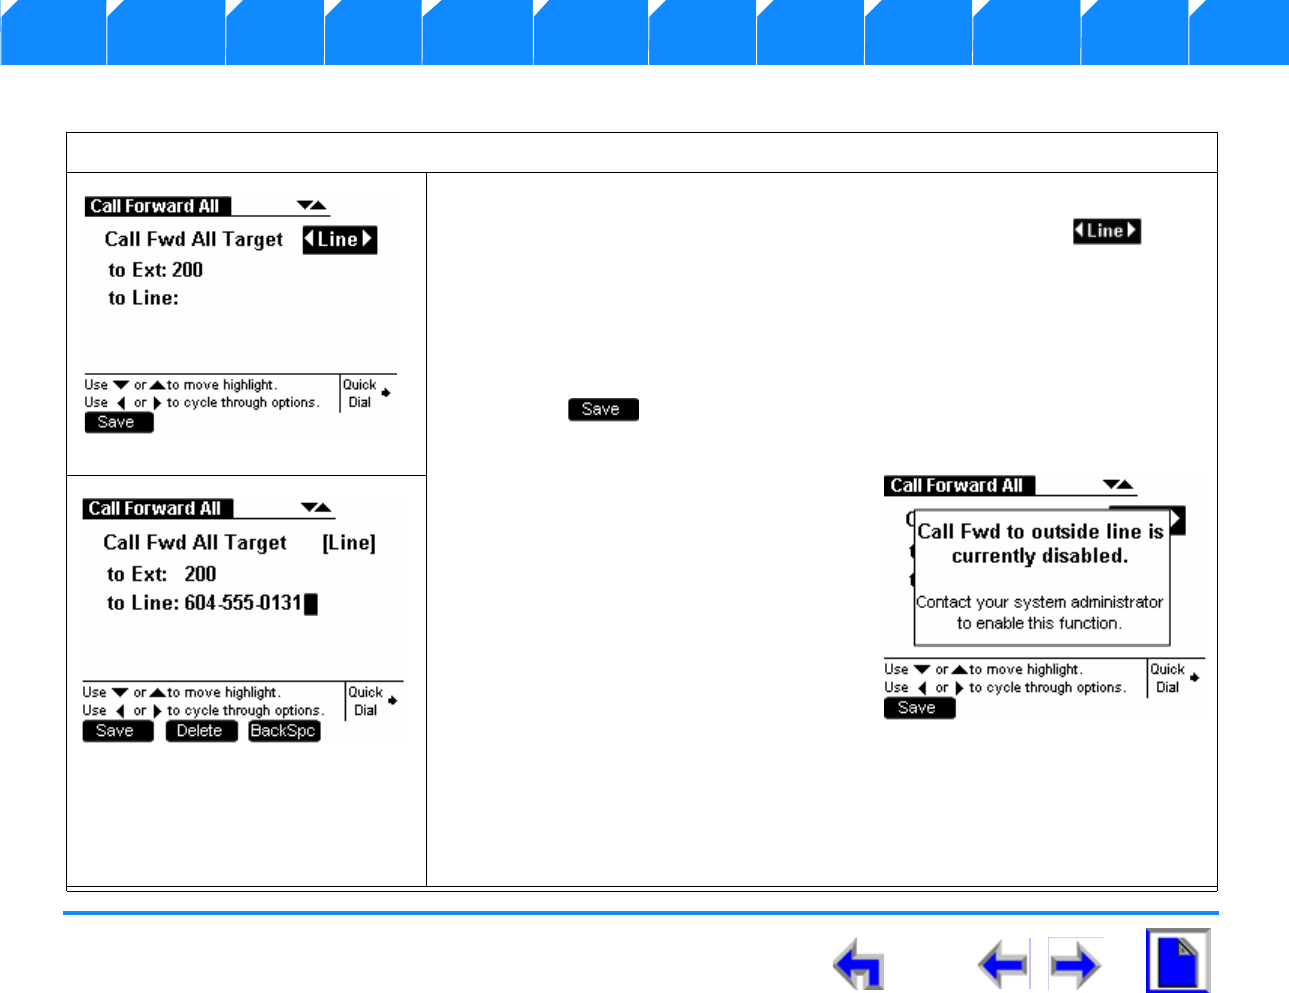
SB67030 Deskset User’s Guide - Setup Menus 66
Voice Make Call Answer
Install Overview PC UI Setup Mail Directory CallLog Call Manage Call Handset Trouble
Call Fwd All - Outside Line
To set Call Forward All to go to an outside line:
1. Perform the procedure in “Call Forwarding All” on page 63.
2. Press the left or right navigation key to toggle the setting to as
shown in Figure 53
3. Press down navigation key to move to the to Line: editable field. A blinking
cursor will appear in the number field as shown in Figure 54.
4. Enter in a valid outside phone number using the dialing keys.
5. Press to confirm the change and return to the User Settings menu
shown in Figure 47 on page 63.
lCalls may be forwarded to an
outside line only if this function is
enabled in the Admin Settings. If Call
Fwd/Transfer to outside line has
been disabled, then an error splash
appears.
lActivating Call Forward All re-directs
the call to the assigned phone
number. The Deskset will not ring but
a splash appears notifying the user
that the call was forwarded. The
Deskset will not record the call in the Call Log. The target extension will
receive the incoming call with the CID of the original caller with no indication
that it is a forwarded call
lIf Call Forward All is activated, the FWD ON status notification appears in Idle
mode.
Figure. 53 Call Forward All - Line
Figure. 54 Call Forward Line
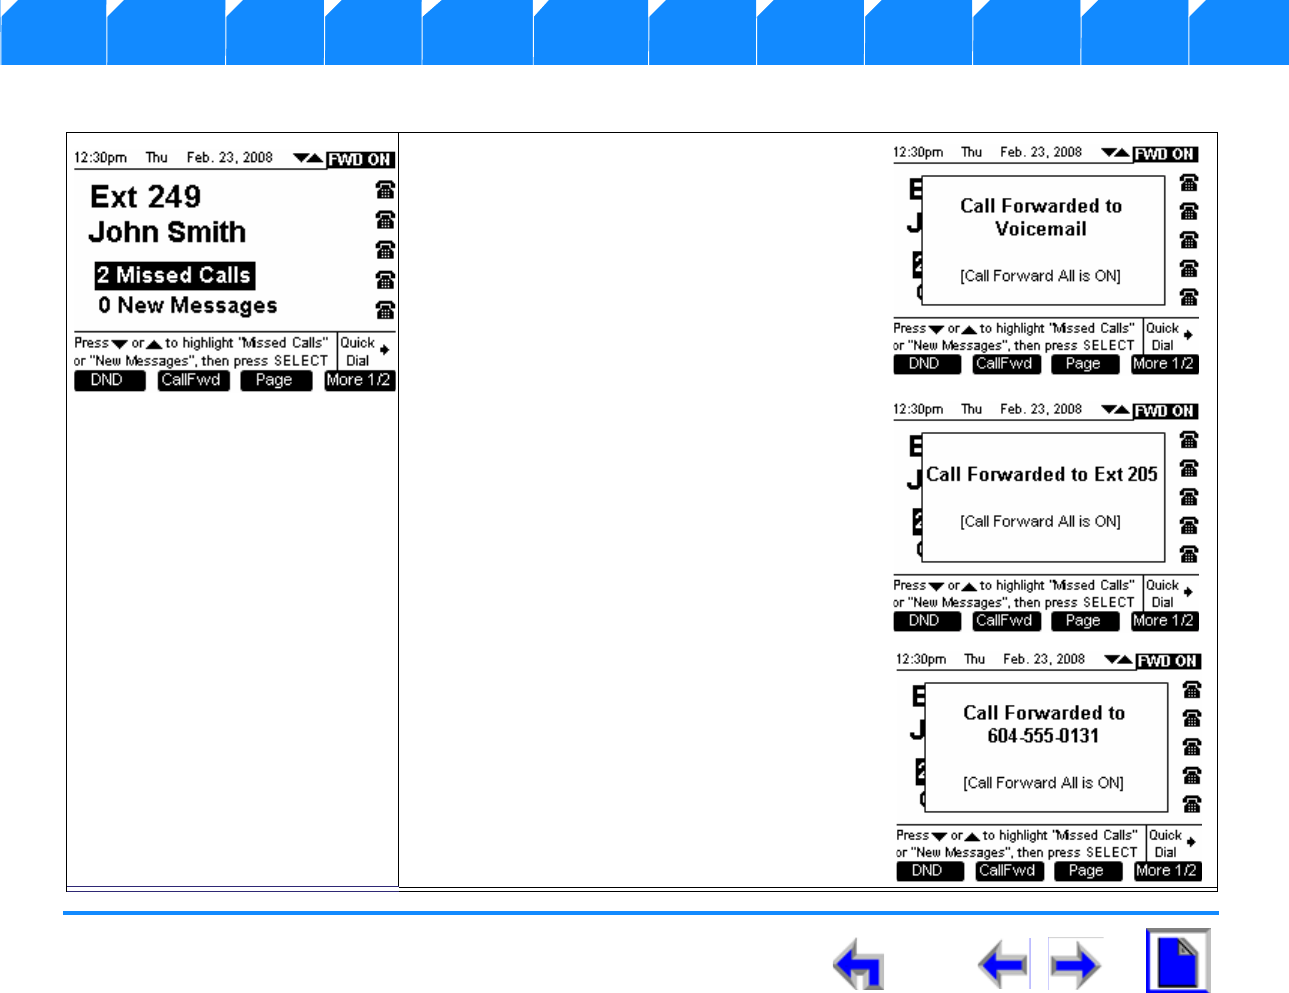
SB67030 Deskset User’s Guide - Setup Menus 67
Voice Make Call Answer
Install Overview PC UI Setup Mail Directory CallLog Call Manage Call Handset Trouble
Call Forward Notification
1. Call Fwd All Voicemail (VM) notification
2. Call Fwd All - Extension indication
3. Call Fwd All - Outside Line Notification
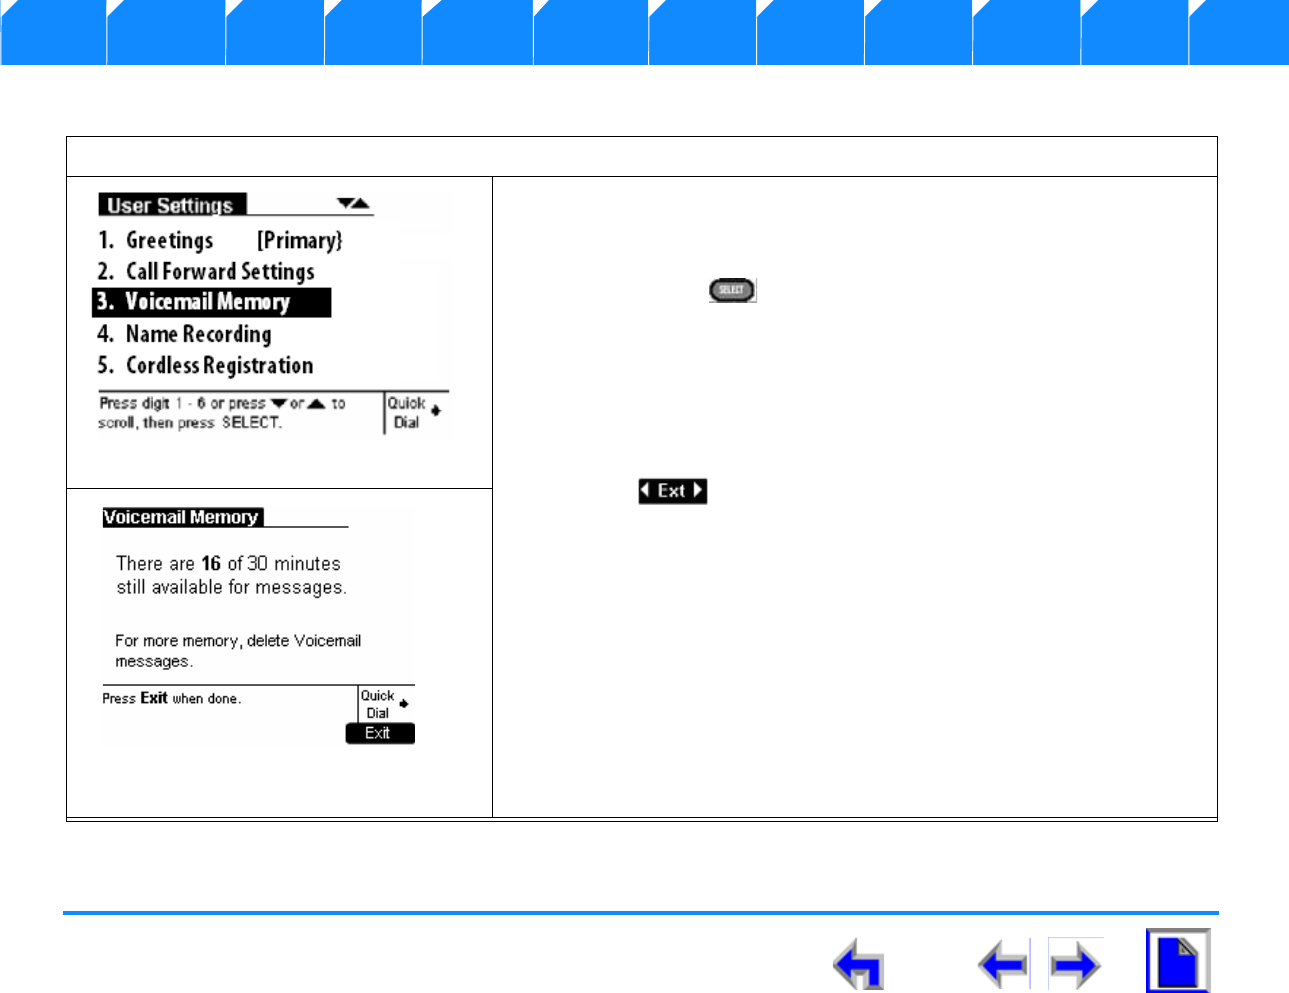
SB67030 Deskset User’s Guide - Setup Menus 68
Voice Make Call Answer
Install Overview PC UI Setup Mail Directory CallLog Call Manage Call Handset Trouble
Voicemail Memory
To access the Voicemail Memory screen:
1. Perform the procedure in “User Settings” on page 59.
2. Press 3 on the keypad or press the down NAVIGATION arrow twice to
move the highlight to Voicemail Memory as shown in Figure 55 and
press SELECT .
3. Observe that the Voicemail Memory menu shown in Figure 56
appears.
4. The Voicemail Memory screen displays the remaining minutes left for
recording a message in Voicemail. This screen is for informational
purposes only.
5. Press to return to the User Settings menu shown in
Figure 40.
Figure. 55 User Settings - Voicemail
Figure. 56 Voicemail Status
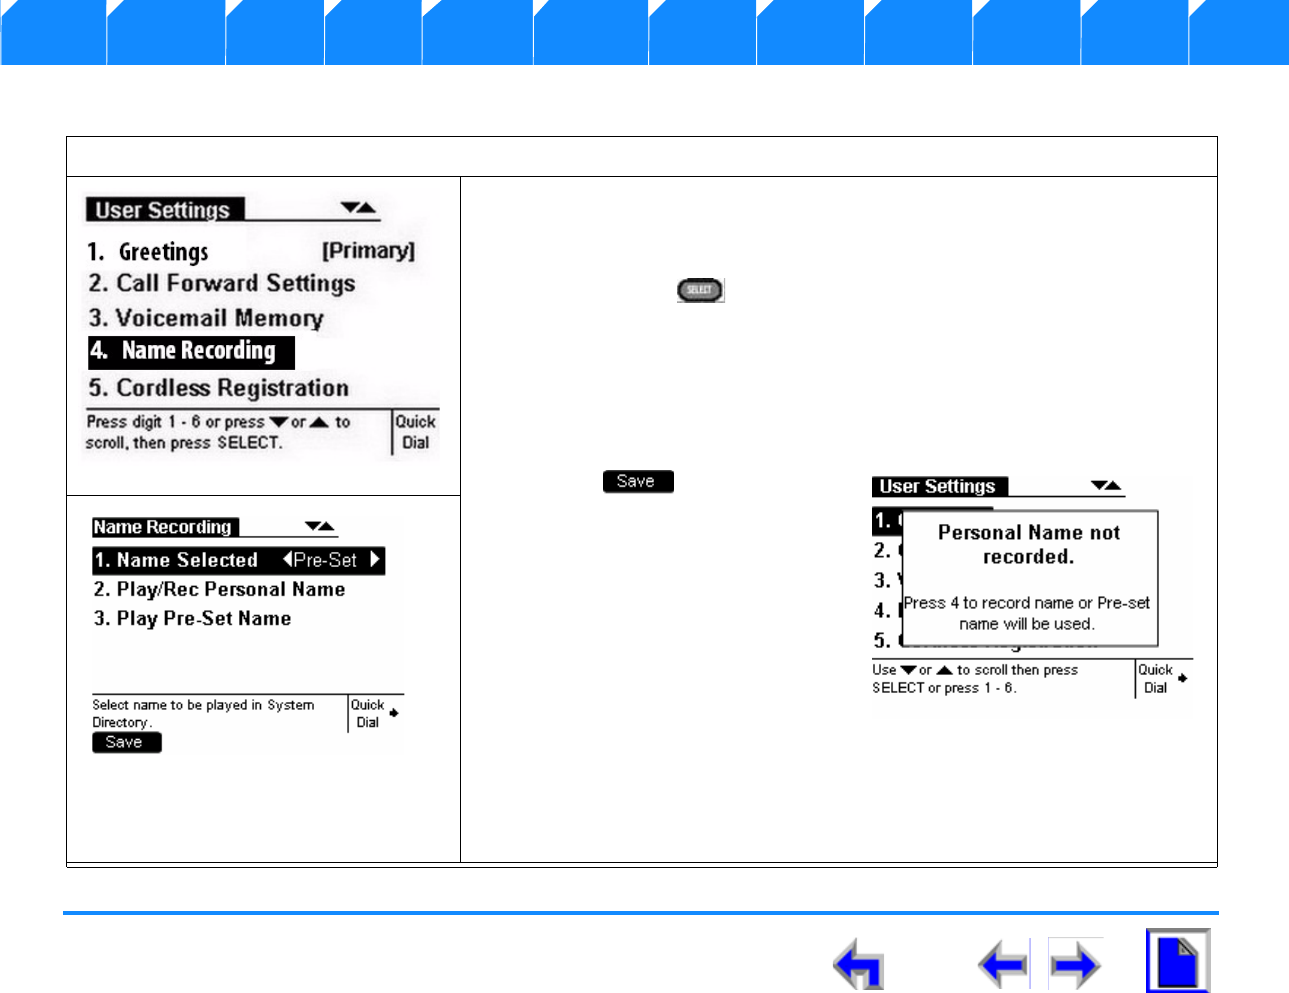
SB67030 Deskset User’s Guide - Setup Menus 69
Voice Make Call Answer
Install Overview PC UI Setup Mail Directory CallLog Call Manage Call Handset Trouble
Name Recording
To access the Name Recording:
1. Perform the procedure in “User Settings” on page 59.
2. Press 4 on the keypad or press the down NAVIGATION arrow three times
to move the highlight to Name Recording as shown in Figure 57 and
press SELECT .
3. Observe that the Name Recording menu shown in Figure 58 appears.
4. Press 1 on the keypad or press the up or down NAVIGATION arrow to
highlight Name Selected.
5. Press the left or right NAVIGATION arrow to select Personal name.
6. Press the system will
check to see if the personal name
has been recorded. If it has, the
User Settings menu displays. If it
has not, a splash screen appears
informing you that the personal
name has not been recorded and
to Press 4 to record your name or
the Pre-Set name will be used.
7. Pressing 4 displays the Name
Recording menu shown in Figure 58
8. To record your personal name see “Personal Name Recording” on page 70
9. To play the Pre-set name see “Pre-Set Name” on page 71.
Figure. 57 User Settings - Name
Figure. 58 Name Recording
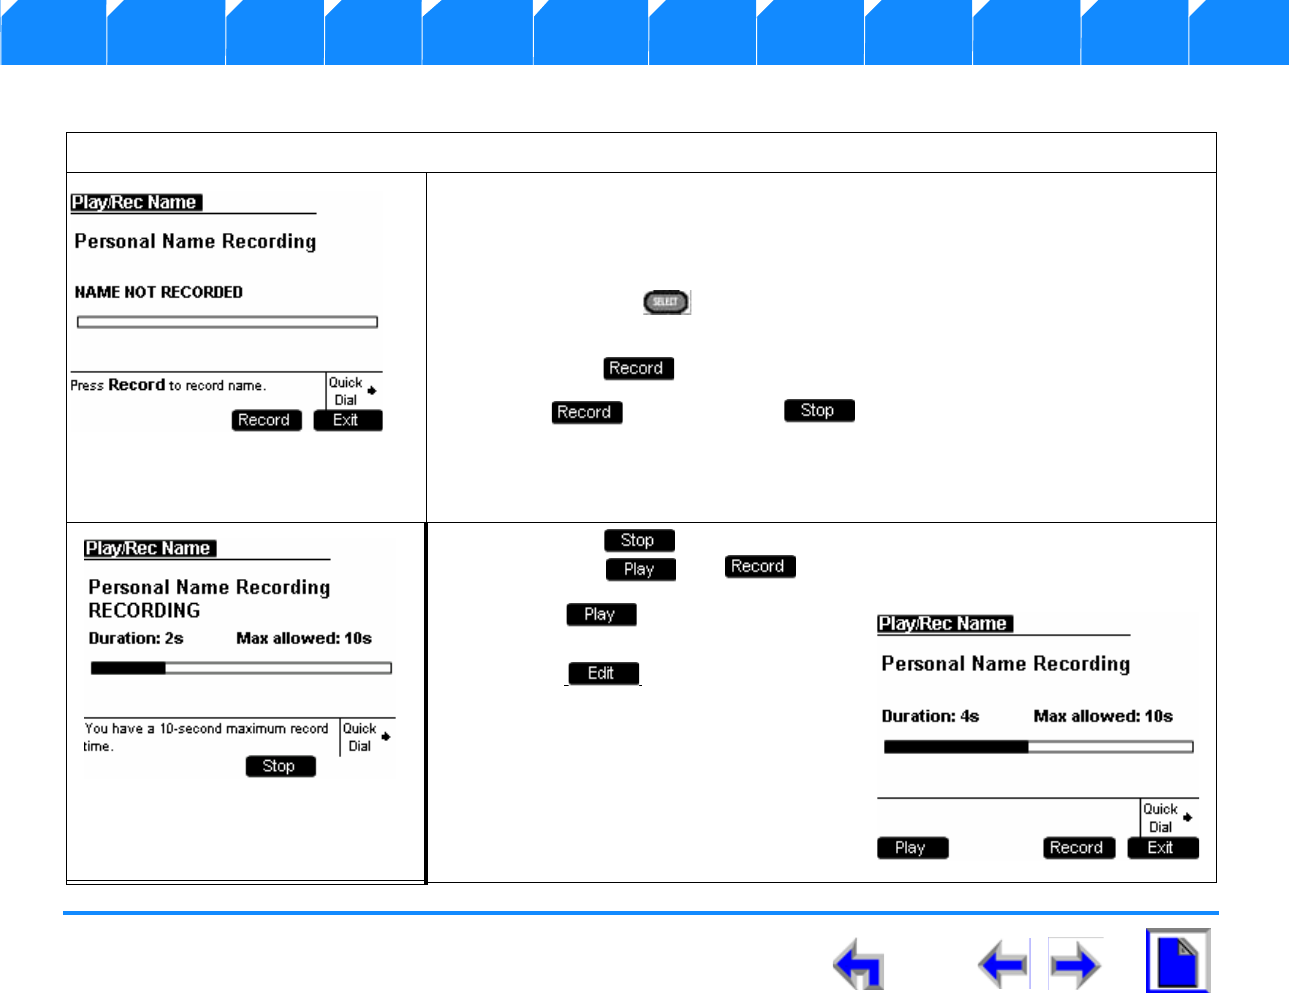
SB67030 Deskset User’s Guide - Setup Menus 70
Voice Make Call Answer
Install Overview PC UI Setup Mail Directory CallLog Call Manage Call Handset Trouble
Personal Name Recording
To play/record a personal name:
1. Follow the To access the Name Recording: procedure page 69.
2. Press 2 on the keypad or press the down NAVIGATION arrow to move the
highlight to Play/Rec Personal Name.
3. Press SELECT and observe that the Play/Rec Name menu shown in
Figure 59 appears.
4. Press the programmed key.
5. The key changes to .
lYou are limited to a 10-second recording – Recording will stop automatically
if the limit is exceeded.
6. Press the key when you are finished recording. The screen changes
to display and .
7. Press to review the name
recording.
8. Press when your review is
complete and the User Settings
menu displays.
Figure. 59 Play/Rec Name
Figure. 60 Name Recording
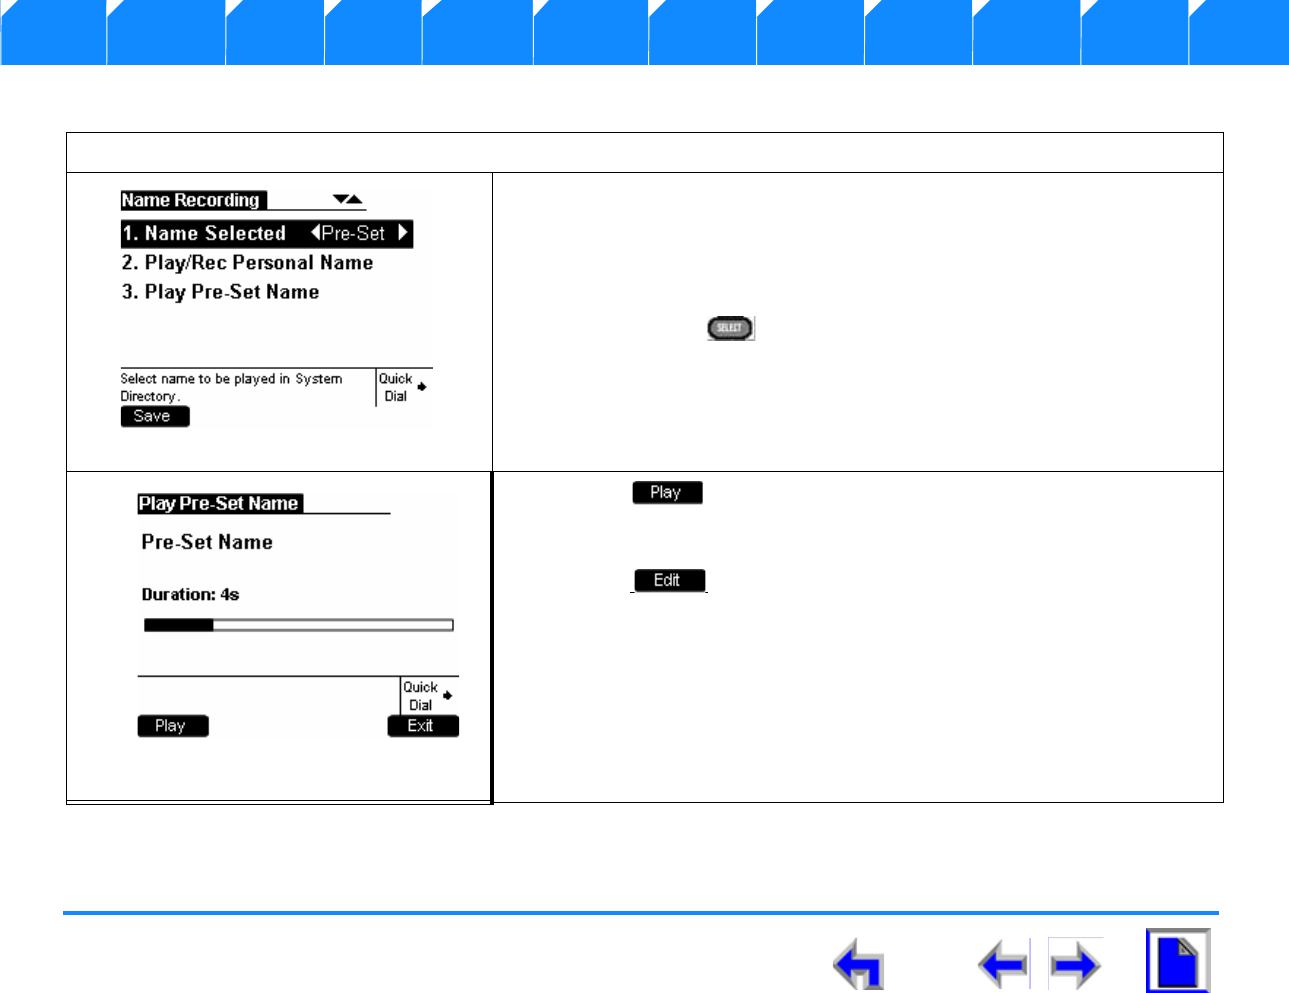
SB67030 Deskset User’s Guide - Setup Menus 71
Voice Make Call Answer
Install Overview PC UI Setup Mail Directory CallLog Call Manage Call Handset Trouble
Pre-Set Name
To play the Pre-Set name:
1. Perform the “To display the User Settings menus:” procedure on
page 59.
2. Press 3 on the keypad or press the down NAVIGATION arrow twice to
move the highlight to Play Pre-Set Name as shown in Figure 61.
3. Press SELECT and observe that the Pre-Set Name menu shown
in Figure 62 appears.
4. Press to listen to the Pre-Set Name. The Pre-Set Name is
“Extension XXX”, with X being the extension number. This voice tag will
be generated from the voice library
5. Press when your review is complete and the User Settings
menu displays.
Figure. 61 Pre-Set Name
Figure. 62 Pre-Set Name
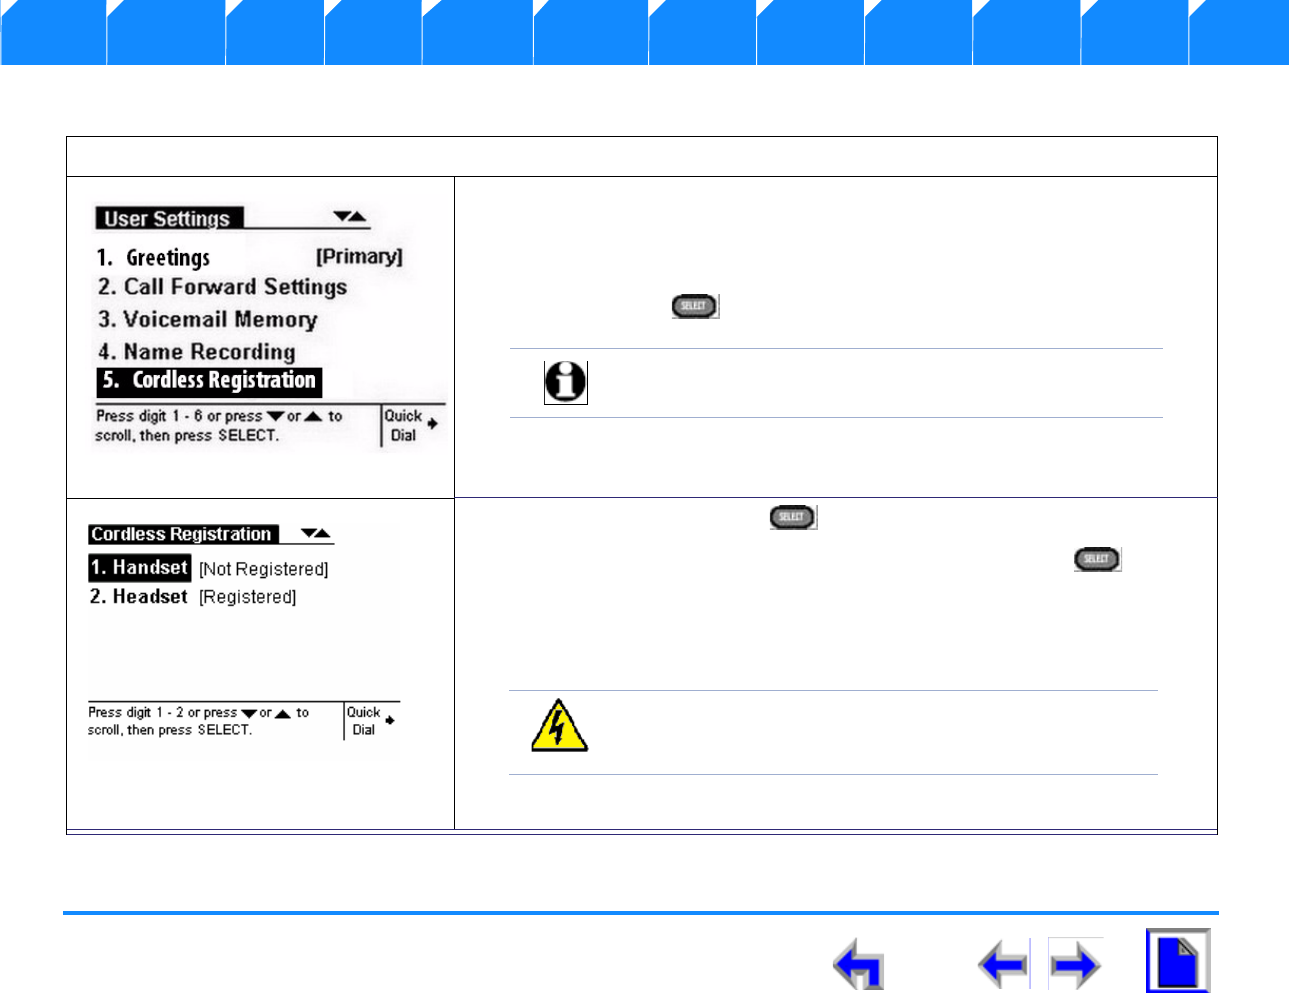
SB67030 Deskset User’s Guide - Setup Menus 72
Voice Make Call Answer
Install Overview PC UI Setup Mail Directory CallLog Call Manage Call Handset Trouble
Cordless Registration
To access the Cordless Registration function:
1. Perform the “To display the User Settings menus:” procedure on page 59.
2. Press 5 on the keypad or press the down NAVIGATION arrow four times
to move the highlight to Cordless Registration as shown in Figure 63.
3. Press SELECT and observe that the Cordless Registration menu
shown in Figure 64 appears.
4. Press 1 or press SELECT to register or deregister the Handset.
5. Press 2 or press the down NAVIGATION and press SELECT to
register or deregister the Headset.
6. See “To register a cordless device:” on page 73.
7. See “To deregister a cordless device:” on page 74.
Figure. 63 User Settings Cordless
Note Only one Cordless Handset or Headset can be
registered with the Deskset.
Figure. 64 Cordless Registration
WARNING The registration process must also be initiated on
the Handset otherwise registration cannot proceed. It does not
matter which device starts the registration process first.
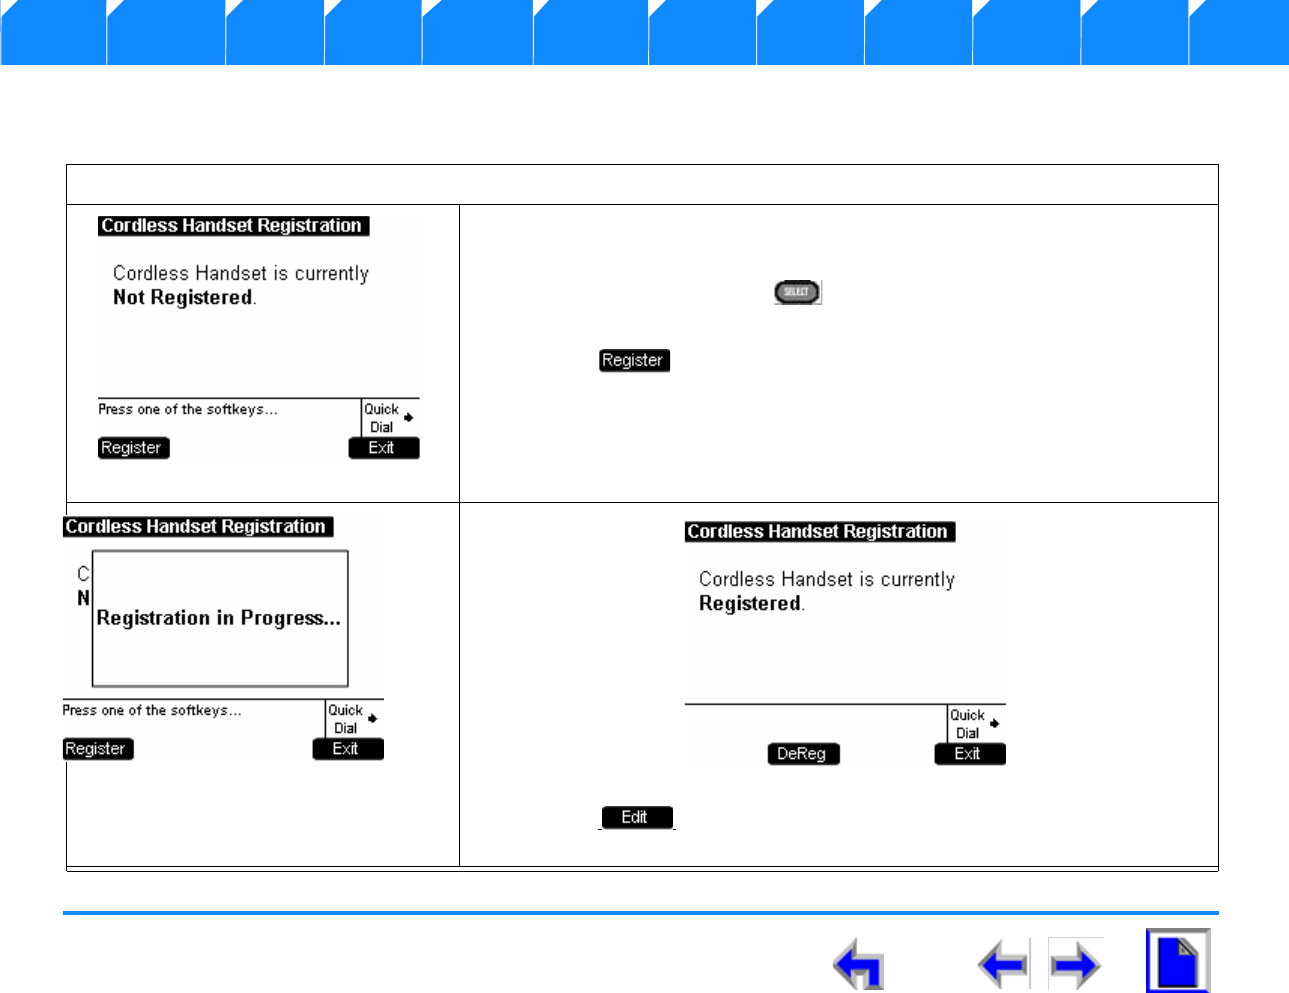
SB67030 Deskset User’s Guide - Setup Menus 73
Voice Make Call Answer
Install Overview PC UI Setup Mail Directory CallLog Call Manage Call Handset Trouble
Register a Cordless Device
The following procedure describes registering the Cordless Handset, the process is identical for the Cordless Headset
To register a cordless device:
1. Perform the “To access the Cordless Registration function:” procedure on
page 72.
2. Press 1 or press SELECT to display the Cordless Handset
Registration menu shown in Figure 65.
3. Press and observe that the Registration in Progress splash
screen appears while the Deskset searches for the Handset (See
Figure 66).
4. Observe that the Cordless Handset Registration screen displays
Cordless Handset is currently Registered.
5. Press , to return to the Cordless Registration screen (See
Figure 64 on page 72).
Figure. 65 Handset Not Registered
Figure. 66 Registration in Progress
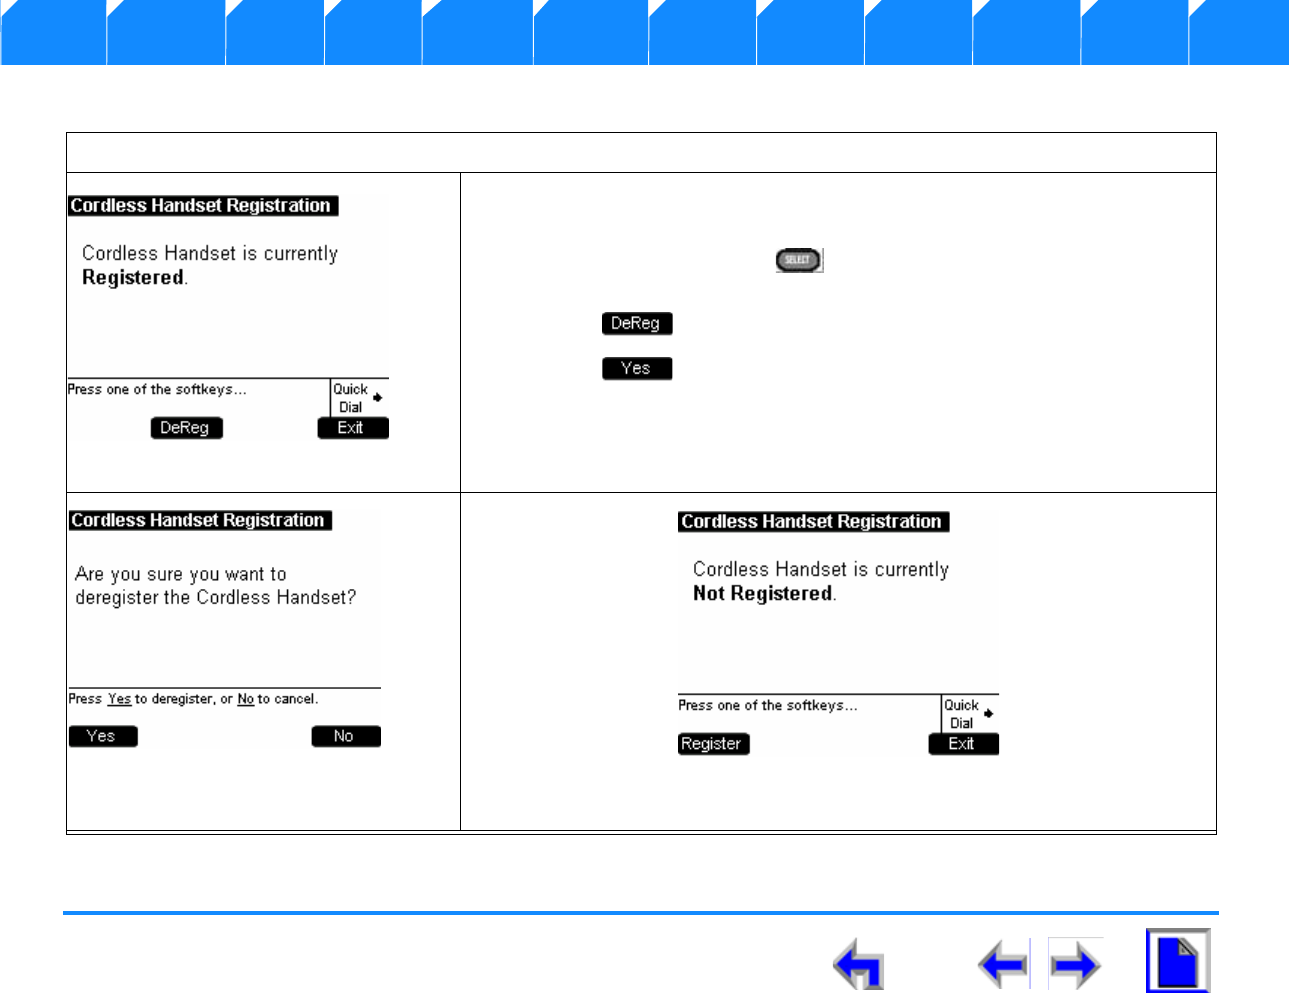
SB67030 Deskset User’s Guide - Setup Menus 74
Voice Make Call Answer
Install Overview PC UI Setup Mail Directory CallLog Call Manage Call Handset Trouble
Deregister a Cordless Device
To deregister a cordless device:
1. Perform the “To access the Cordless Registration function:” procedure on
page 72.
2. Press 1 or press SELECT to display the Cordless Handset
Registration menu shown in Figure 67.
3. Press and a confirmation splash screen appears (See Figure 68).
4. Press to confirm deregistration (See Figure 68).
5. Observe that the Cordless Handset Registration screen displays Cordless
Handset is currently Not Registered.
lThe Cordless Handset must also deregister itself from the Deskset to
complete the deregistration process.
Figure. 67 Handset Registered
Figure. 68 Deregistration Confirmation

SB67030 Deskset User’s Guide - Setup Menus 75
Voice Make Call Answer
Install Overview PC UI Setup Mail Directory CallLog Call Manage Call Handset Trouble
Password
Note The User Settings menu contains six entries. To view the Password entry it is necessary to press the down
NAVIGATION arrow.
To access the Password function:
1. Perform the “To display the User Settings menus:” procedure on page 59.
2. Press 6 on the keypad or press the down NAVIGATION arrow five times to
move the highlight to Password as shown in Figure 69.
3. Press SELECT and observe that the Password menu shown in Figure 70
appears.
4. Press 1 or SELECT to set or change the password (See “To change the
user Password” on page 76).
5. Press 2 or the down NAVIGATION arrow and press SELECT to clear the
user password.
6. If you chose Clear User Password a
confirmation screen appears.
7. Press the to confirm
password deletion.
8. The system returns to the Password
screen. Once the password has been
cleared, password entry will no longer
be necessary for User Settings and
Voicemail.
Figure. 69 User Settings - Password
Figure. 70 Password
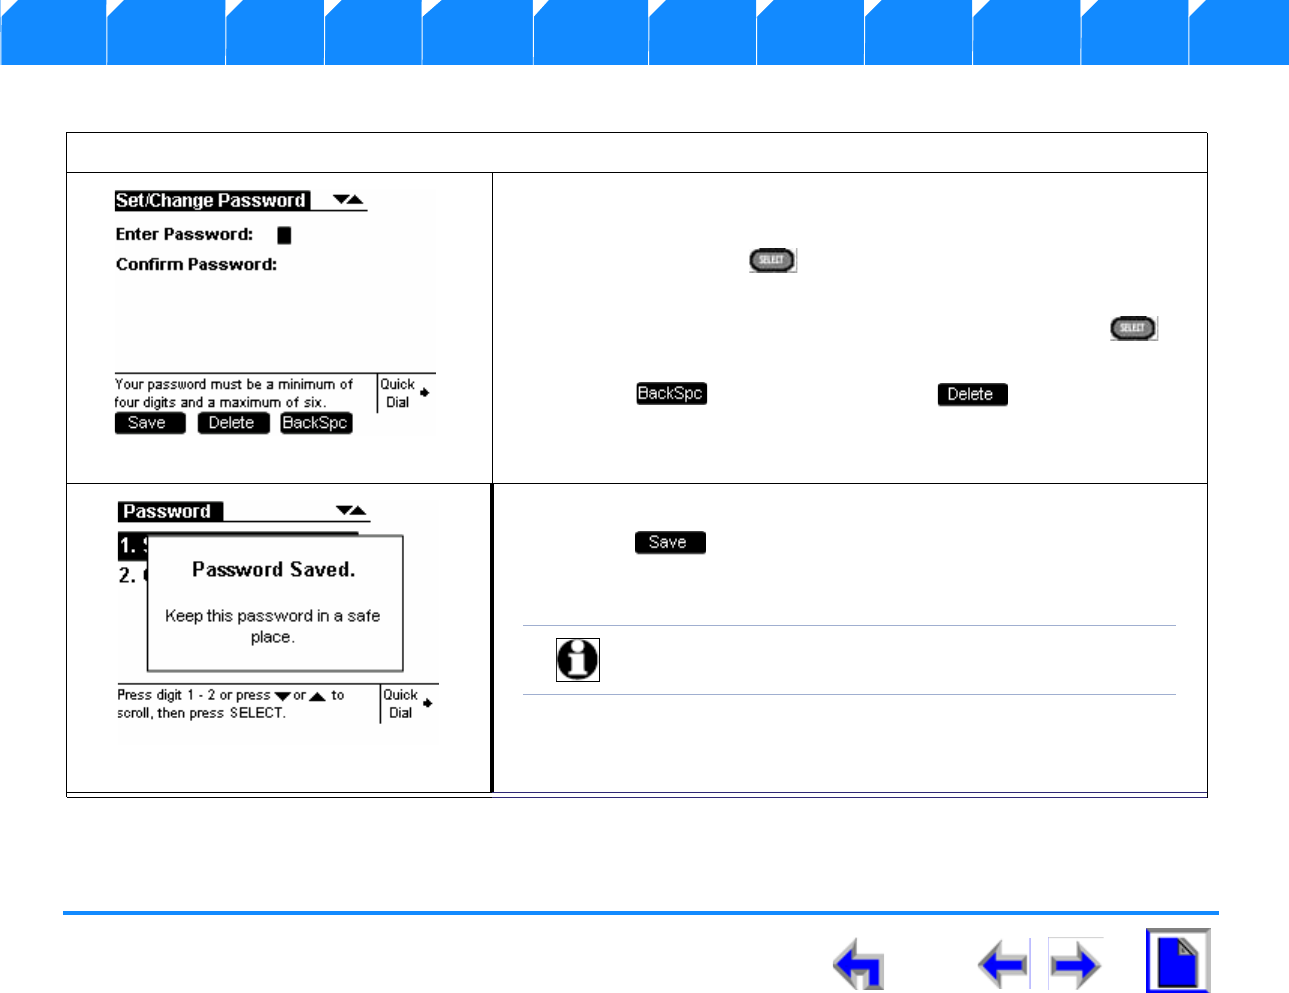
SB67030 Deskset User’s Guide - Setup Menus 76
Voice Make Call Answer
Install Overview PC UI Setup Mail Directory CallLog Call Manage Call Handset Trouble
Change User Password
To change the user Password
1. Perform the “To access the Password function:” procedure on
page 75.
1. Press 1 or SELECT to access the Set/Change Password
screen shown in Figure 71.
2. Use the dialing keys to enter a password and press SELECT , or
press the down navigation key.
3. Press to correct errors, or the to start over.
4. Enter in the new password again to confirm.
5. Press to accept the change. The Password Saved splash
screen appears and you return to the User Settings menu shown in
Figure 42 on page 60.
Figure. 71 Set/Change Password
Figure. 72 Password Saved
Note Passwords must be a minimum of four digits and a
maximum of six.

SB67030 Deskset User’s Guide - Setup Menus 77
Voice Make Call Answer
Install Overview PC UI Setup Mail Directory CallLog Call Manage Call Handset Trouble
Admin Settings
To display the Admin Settings menu
1. Press MENU and observe that the Menu screen shown in Figure 30 displays.
2. To display the Admin Settings menu shown in Figure 74 press the down
NAVIGATION arrow to move the highlight and press SELECT , or press 3.
Table 10 Deskset Menu - Admin Settings
Function Submenu
1.“Call Fwd - NA” on page 78 1. Call Forward All Target (Ext/VM/Lime)
2. to Ext: xxx
3. to Line: xxx-xxx-xxxx
Call Fwd-NA Delay <5/10/15/20…45>
2.“Fwd/Trans to line” on page 82
3.“Restore Default Settings” on page 83
4. “Event Log” on page 84 Shows event log
5.“IP Settings” on page 85 1. IP Configuration <Auto/Static>
2. Set/Edit Static IP
3. IP Status
6. “Reset User Password” on page 89
7.“Software Upgrade” on page 90 Software upgrade screen
Figure. 74 Admin Settings
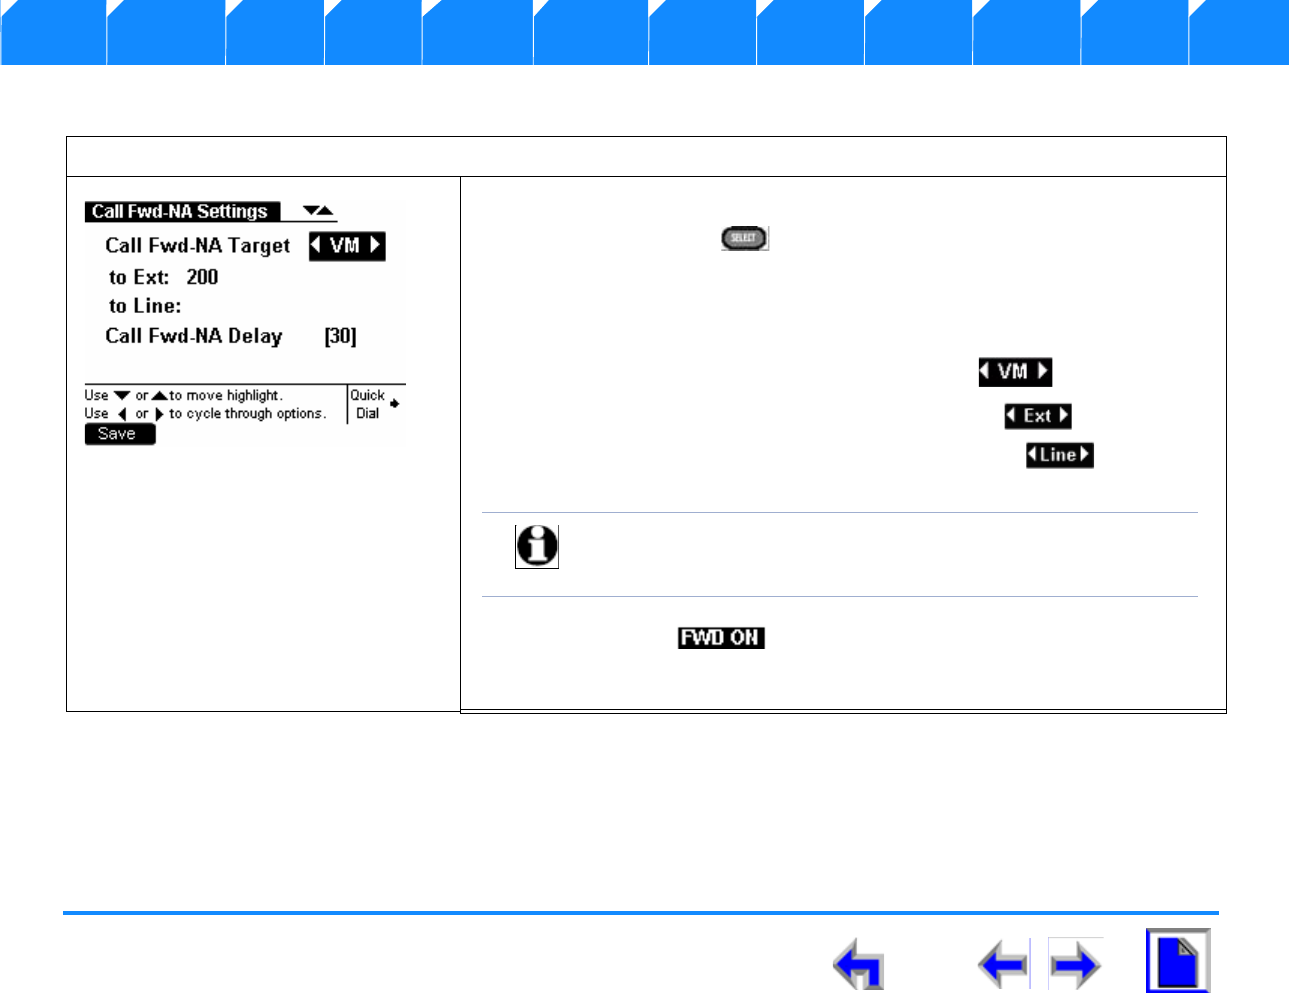
SB67030 Deskset User’s Guide - Setup Menus 78
Voice Make Call Answer
Install Overview PC UI Setup Mail Directory CallLog Call Manage Call Handset Trouble
Call Fwd - NA
To access Call Forward No Answer:
1. Perform the “To display the Admin Settings menu”procedure on page 77.
2. Press 1 or SELECT , and observe that the Call Fwd - NA Settings
menu shown in Figure 75 displays.
3. Press the left or right NAVIGATION key to toggle the setting to one of the
following targets:
a. “Call Forward - No Answer to Voicemail” . on page 79.
b. “Call Forward - No Answer to an Extension” on page 80
c. “Call Forward - No Answer to an Outside Line” on page 81
4. Verify that the indicator illuminates on the Idle screen and a call
forward splash screen appear as shown in “Call Forward Notification” on
page 67
Figure. 75 Call Fwd NA Settings
Note This setting controls the Call Forward-No Answer destination. The
default setting is Call Fwd-NA to Voicemail. If Call Forward All is
on, these settings will not apply.
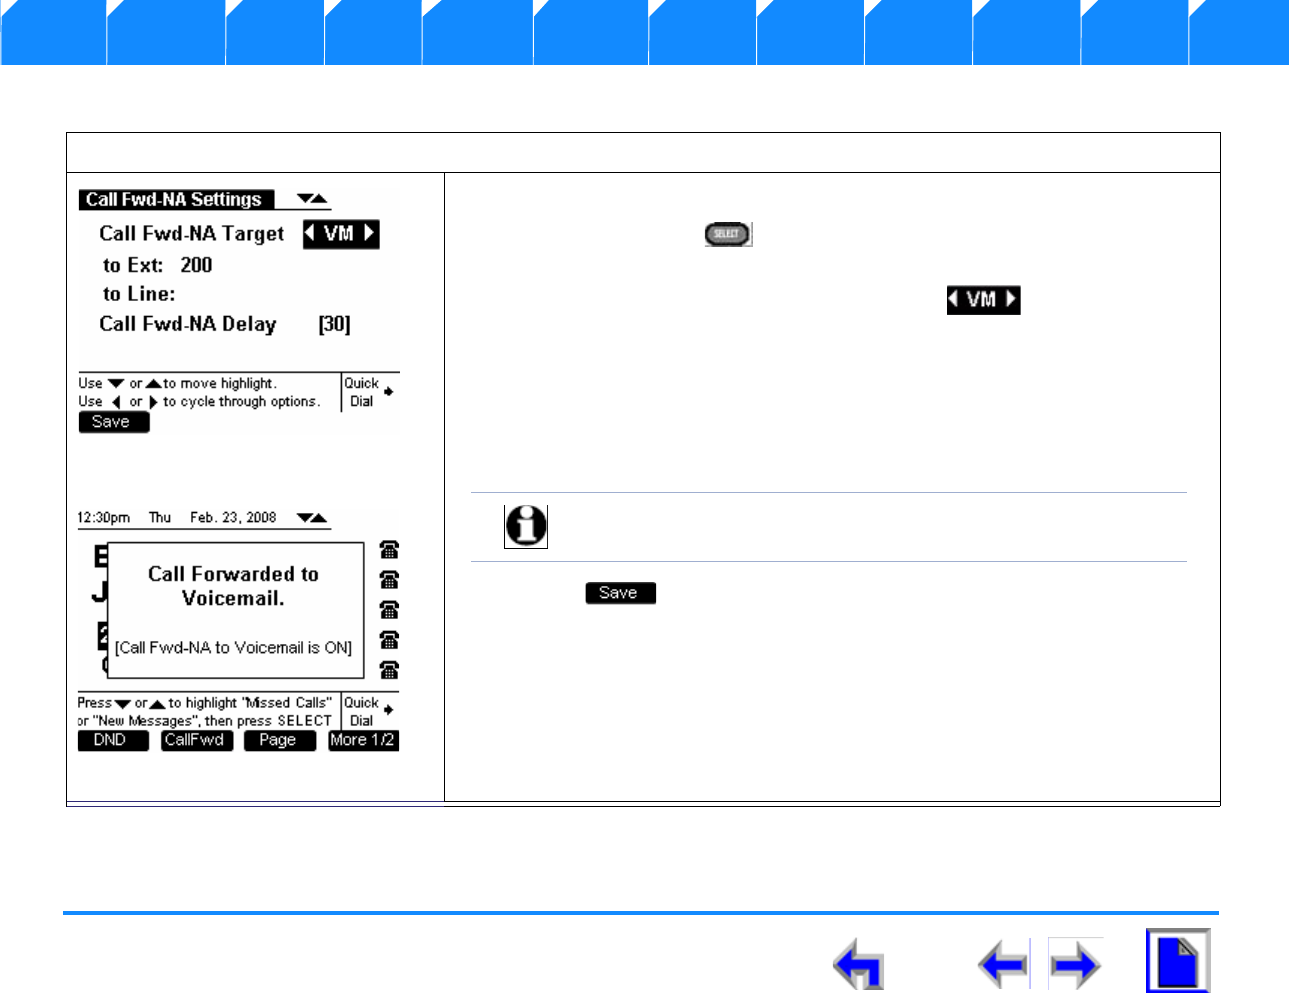
SB67030 Deskset User’s Guide - Setup Menus 79
Voice Make Call Answer
Install Overview PC UI Setup Mail Directory CallLog Call Manage Call Handset Trouble
Call Forward - No Answer to Voicemail
To forward all unanswered calls to Voicemail:
1. Perform the “To display the Admin Settings menu”procedure on page 77.
2. Press 1 or SELECT , and observe that the Call Fwd - NA Settings
menu shown in Figure 75 displays.
3. Press the left or right NAVIGATION key until . is highlighted as
shown in Figure 76.
4. Press the down NAVIGATION key three times to highlight Call Fwd-NA
Delay.
5. Press the left or right NAVIGATION key to adjust the delay in five-second
increments.
6. Press to accept the change and display the Admin Settings menu
7. Observe that the Call Fwd - NA Confirmation screen shown in Figure 77
displays when a call is received.
Figure. 76 Call Fwd NA Settings
Figure. 77 Call Fwd NA Confirmation
Note The minimum delay is five seconds and the maximum delay is
45 seconds. The default setting is 30 seconds.
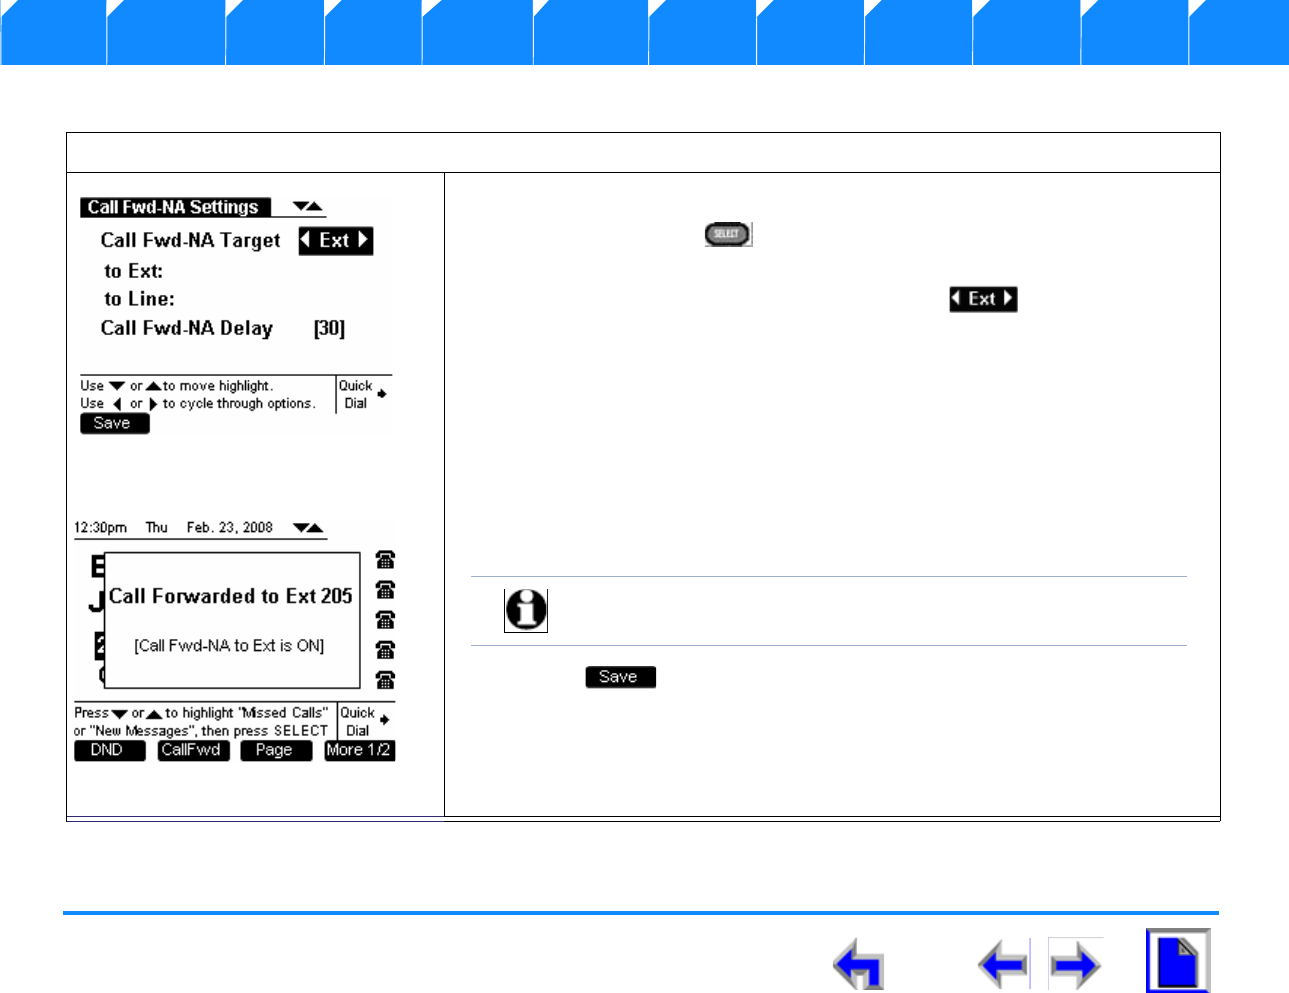
SB67030 Deskset User’s Guide - Setup Menus 80
Voice Make Call Answer
Install Overview PC UI Setup Mail Directory CallLog Call Manage Call Handset Trouble
Call Forward - No Answer to an Extension
To forward all unanswered calls to an extension:
1. Perform the “To display the Admin Settings menu”procedure on page 77.
2. Press 1 or SELECT , and observe that the Call Fwd - NA Settings
menu shown in Figure 75 displays.
3. Press the left or right NAVIGATION key until . is highlighted as
shown in Figure 78.
4. Press the down NAVIGATION key to move to the to Ext: editable field. A
blinking cursor appears in the number field.
5. Enter in a valid extension using the dialing keys.
6. Press the down NAVIGATION key to highlight Call Fwd-NA Delay.
7. Press the left or right NAVIGATION key to adjust the delay in five-second
increments.
8. Press to accept the change and display the Admin Settings menu
9. Observe that the Call Fwd - NA Confirmation screen shown in Figure 79
displays when a call is received.
Figure. 78 Call Fwd NA Settings
Figure. 79 Call Fwd NA Confirmation
Note The minimum delay is five seconds and the maximum delay is
45 seconds. The default setting is 30 seconds.

SB67030 Deskset User’s Guide - Setup Menus 81
Voice Make Call Answer
Install Overview PC UI Setup Mail Directory CallLog Call Manage Call Handset Trouble
Call Forward - No Answer to an Outside Line
To forward all unanswered calls to an outside line
1. Perform the “To display the Admin Settings menu”procedure on page 77.
2. Press 1 or SELECT , and observe that the Call Fwd - NA Settings
menu shown in Figure 75 displays.
3. Press the left or right NAVIGATION key until . is highlighted as
shown in Figure 78.
4. Press the down NAVIGATION key to move to the to Line: editable field. A
blinking cursor appears in the number field.
5. Enter in a valid phone number using the dialing keys.
6. Press the down NAVIGATION key to highlight Call Fwd-NA Delay.
7. Press the left or right NAVIGATION key to adjust the delay in five-second
increments.
8. Press to accept the change and display the Admin Settings menu
9. Observe that the Call Fwd - NA Confirmation screen shown in Figure 81
displays when a call is received.
Figure. 80 Call Fwd NA Settings
Figure. 81 Call Fwd NA Confirmation
Note The minimum delay is five seconds and the maximum delay is
45 seconds. The default setting is 30 seconds.
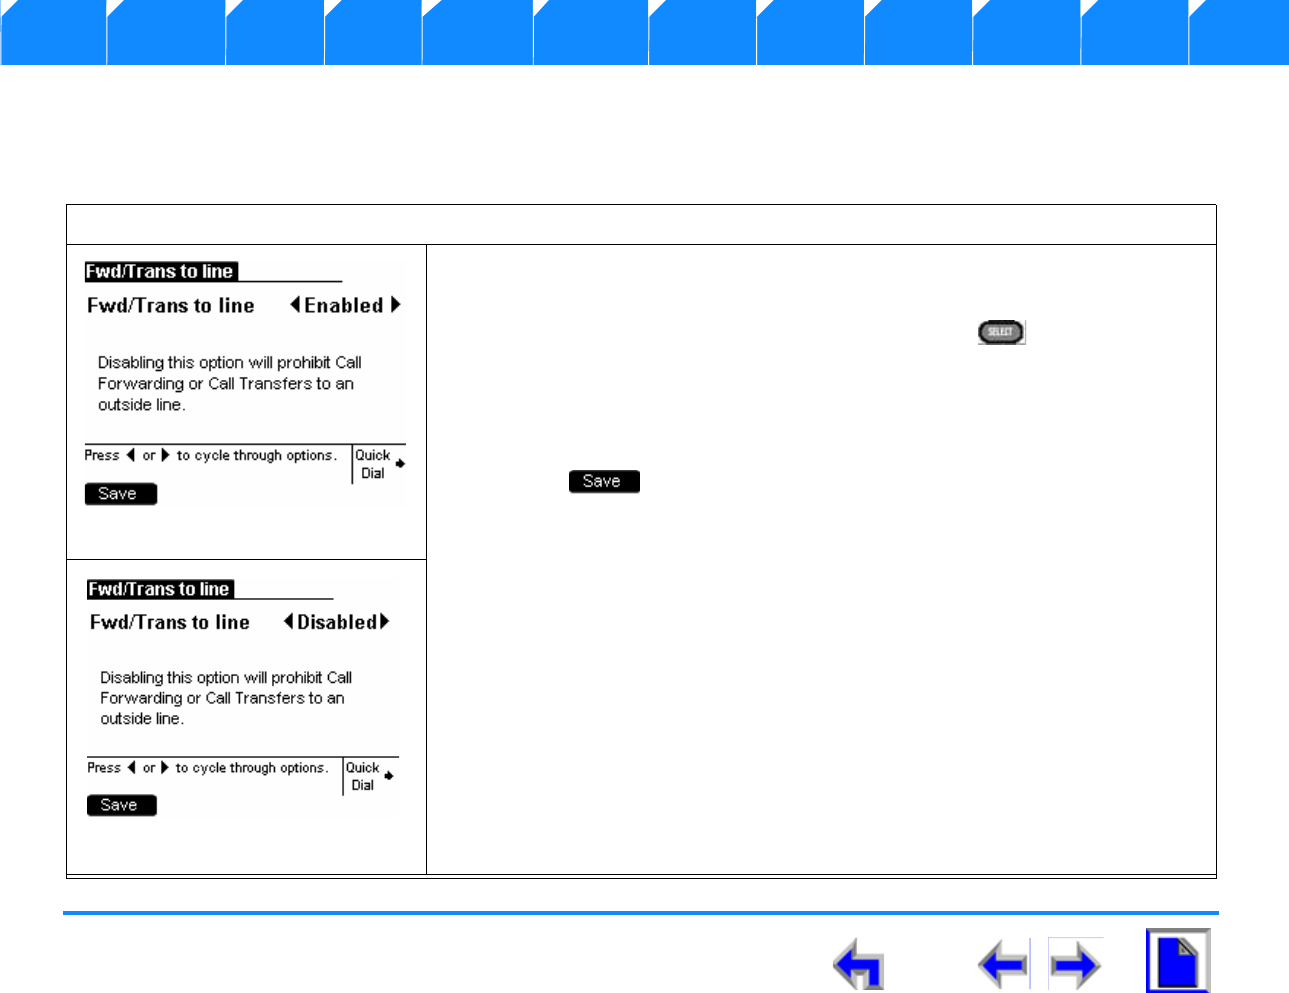
SB67030 Deskset User’s Guide - Setup Menus 82
Voice Make Call Answer
Install Overview PC UI Setup Mail Directory CallLog Call Manage Call Handset Trouble
Fwd/Trans to line
The system administrator may enable or disable the ability to forward or transfer a call to an outside line. This function is enabled by
default. Disabling this function will prohibit the user from sending a call to an outside line via the Gateway.
To toggle the Forward/Transfer to an outside line:
1. Perform the “To display the Admin Settings menu”procedure on page 77.
2. Press 2 on the keypad. or press the down NAVIGATION arrow to move the
highlight to Fwd/Trans to Line and press SELECT ,
3. Observe that the Fwd/Trans to line menu shown in Figure 82 displays.
4. Press the left or right navigation key to toggle the setting from [Enabled] to
[Disabled]. as shown in Figure 83.
5. Press to accept the changes and return to the Admin Settings
menu shown in Figure 74 on page 77.
Figure. 82 Fwd/Trans to line
Figure. 83 Toggle Fwd/Trans
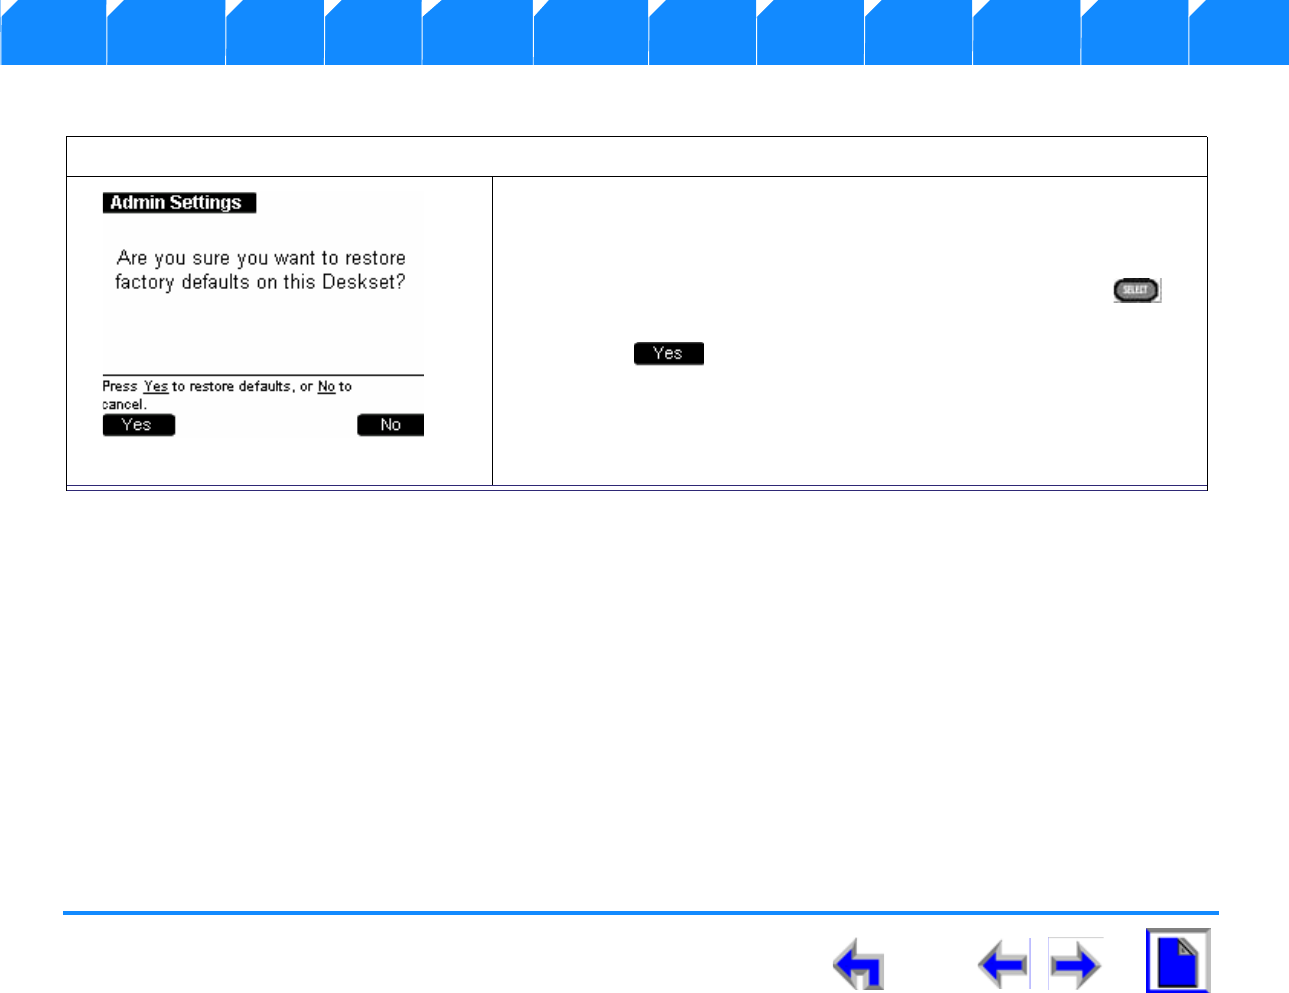
SB67030 Deskset User’s Guide - Setup Menus 83
Voice Make Call Answer
Install Overview PC UI Setup Mail Directory CallLog Call Manage Call Handset Trouble
Restore Default Settings
To restore the default settings:
1. Perform the “To display the Admin Settings menu”procedure on
page 77.
2. Press 3 on the keypad or press the down NAVIGATION arrow to
highlight the Restore Default Settings and press SELECT to
display Figure 84.
3. Press to confirm.
Figure. 84 Restore Default
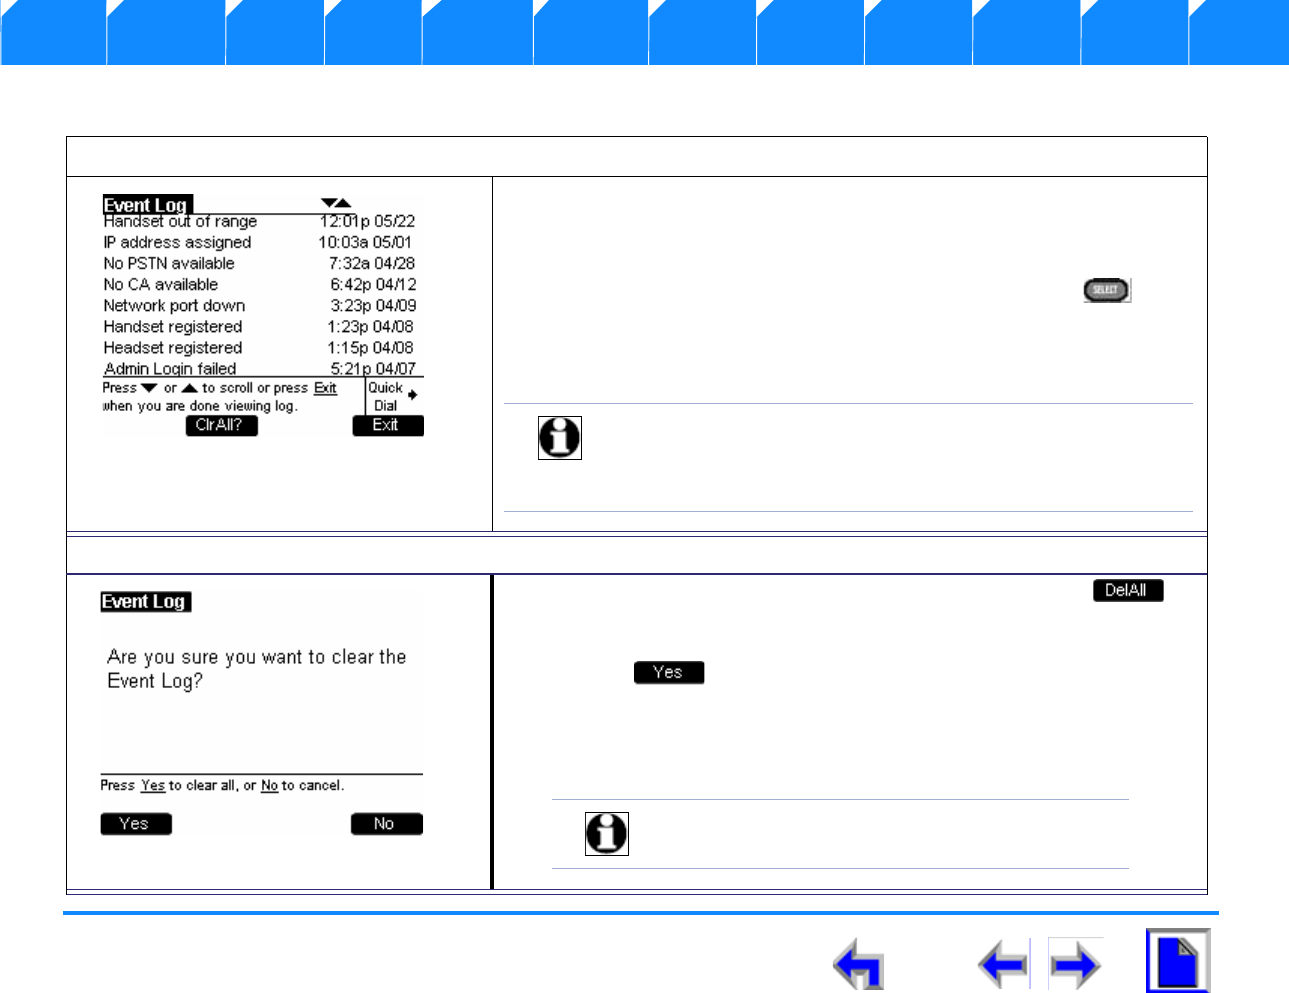
SB67030 Deskset User’s Guide - Setup Menus 84
Voice Make Call Answer
Install Overview PC UI Setup Mail Directory CallLog Call Manage Call Handset Trouble
Event Log
To access the Event Log:
1. Perform the “To display the Admin Settings menu”procedure on
page 77.
2. Press 4 on the keypad or press the down NAVIGATION arrow to
highlight Restore Default Settings and press SELECT to
display Figure 85.
3. Press the up or down NAVIGATION arrow to view logged events that
are not shown on-screen.
To clear the Event Log:
1. With the Event Log shown in Figure 85 displayed, press .
2. The confirmation screen shown in Figure 86 appears.
3. Press to confirm deletion.
4. All events in the Event Log are cleared and the system displays an
empty Event Log.
Figure. 85 Admin Settings - Event Log
Note The text is not circular so when you reach the end of the
available text, pressing the down NAVIGATION key will
do nothing. If you are at the top of the page, pressing the
up NAVIGATION key will do nothing.
Figure. 86 Admin Settings - Event Log
Note This screen is for informational purposes only.
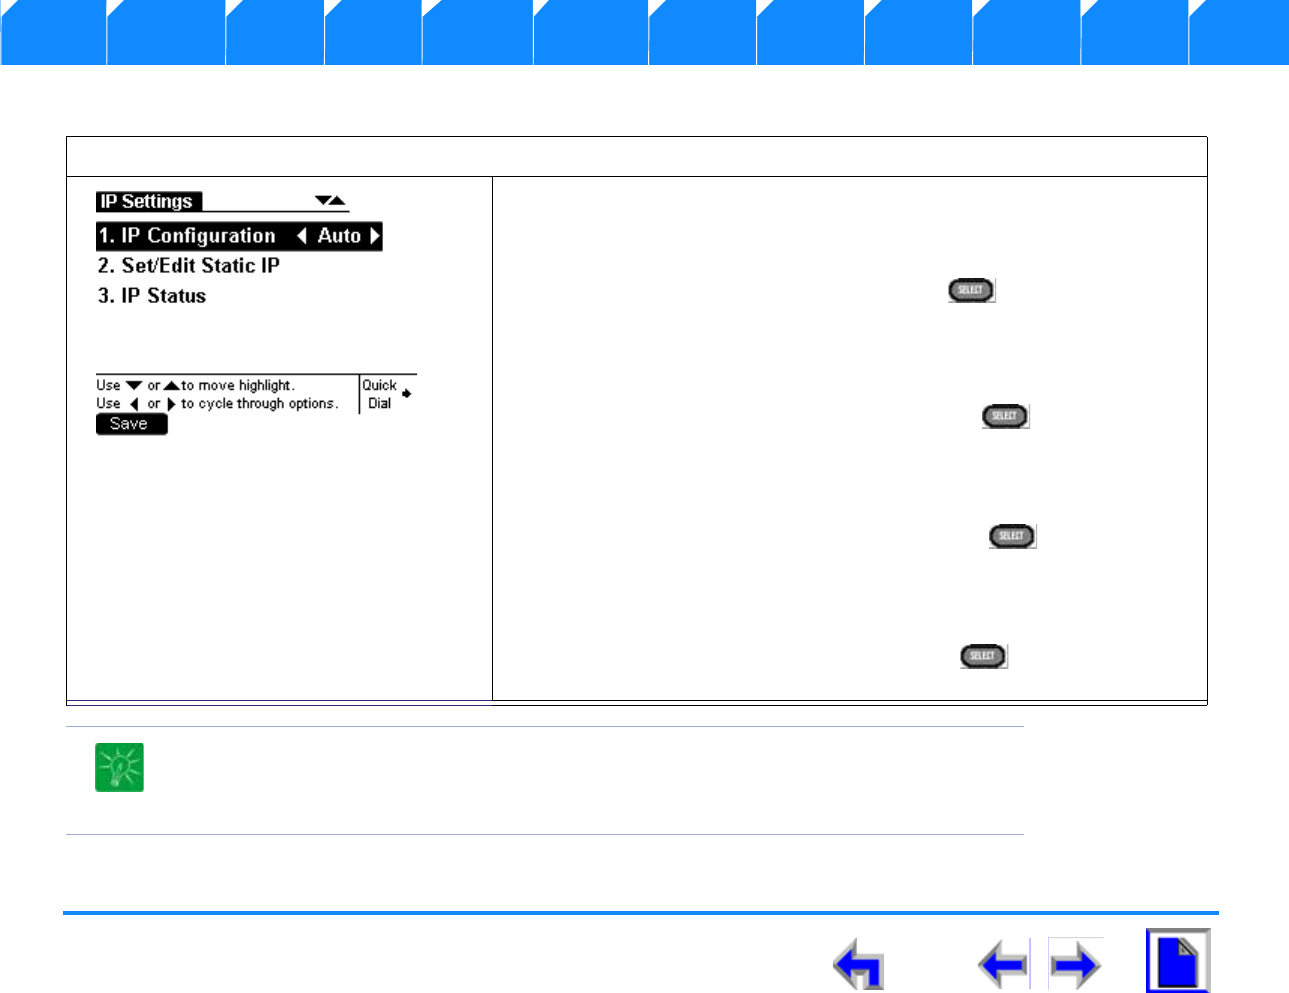
SB67030 Deskset User’s Guide - Setup Menus 85
Voice Make Call Answer
Install Overview PC UI Setup Mail Directory CallLog Call Manage Call Handset Trouble
IP Settings
To display the IP status:
1. Perform the “To display the Admin Settings menu”procedure on
page 77.
2. Press 6 on the keypad or press the down NAVIGATION arrow to
highlight IP Settings and press SELECT .
3. Observe that the IP Settings menu shown in Figure 87 displays.
4. Perform one of the following:
a. Press 1 on the keypad or press SELECT and observe that
the IP Configuration menu shown in Figure 88 on page 86
appears.
b. Press 2 or on the keypad or press the down NAVIGATION arrow
to move the highlight, and press SELECT and observe that
the Set/Edit Static IP menu shown in Figure 89 on page 87
appears.
c. Press 3 on the keypad or press the down NAVIGATION arrow to
move the highlight, and press SELECT and observe that the
IP Status menu shown in Figure 88 on page 86 appears.
Tip IP Address format: Each octet of the IP address ranges from 0 to 255. The system will,
however, not check for the accuracy of the address entered. you can enter single or double
digits and do not need to use zeros as place-markers. For example, enter “192.168.0.1”
instead of “192.168.000.001”
Figure. 87 IP Settings
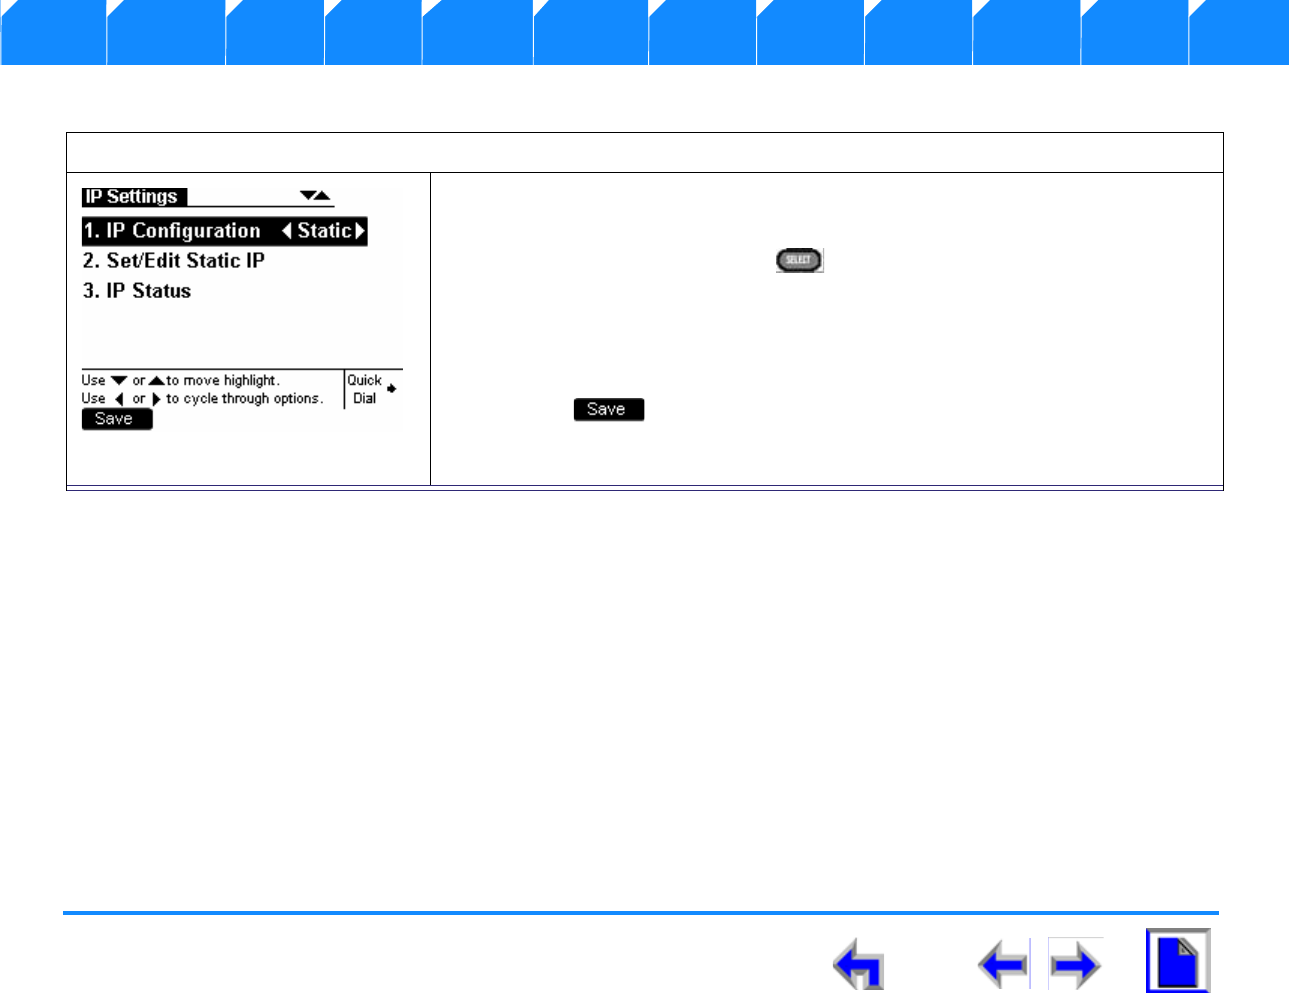
SB67030 Deskset User’s Guide - Setup Menus 86
Voice Make Call Answer
Install Overview PC UI Setup Mail Directory CallLog Call Manage Call Handset Trouble
IP Configuration
To access the IP Configuration menu and edit the IP Address:
1. Perform the “To display the Admin Settings menu”procedure on page 77.
2. Press 6 on the keypad or press the down NAVIGATION arrow to highlight IP
Settings and press SELECT .
3. Observe that the IP Settings menu shown in Figure 87 on page 85 displays.
4. Press the left or right NAVIGATION arrow to toggle between [Auto] and
[Static].
5. Press to accept the changes and return to the Admin Settings
menu shown in Figure 74 on page 77.
Figure. 88 IP Configuration
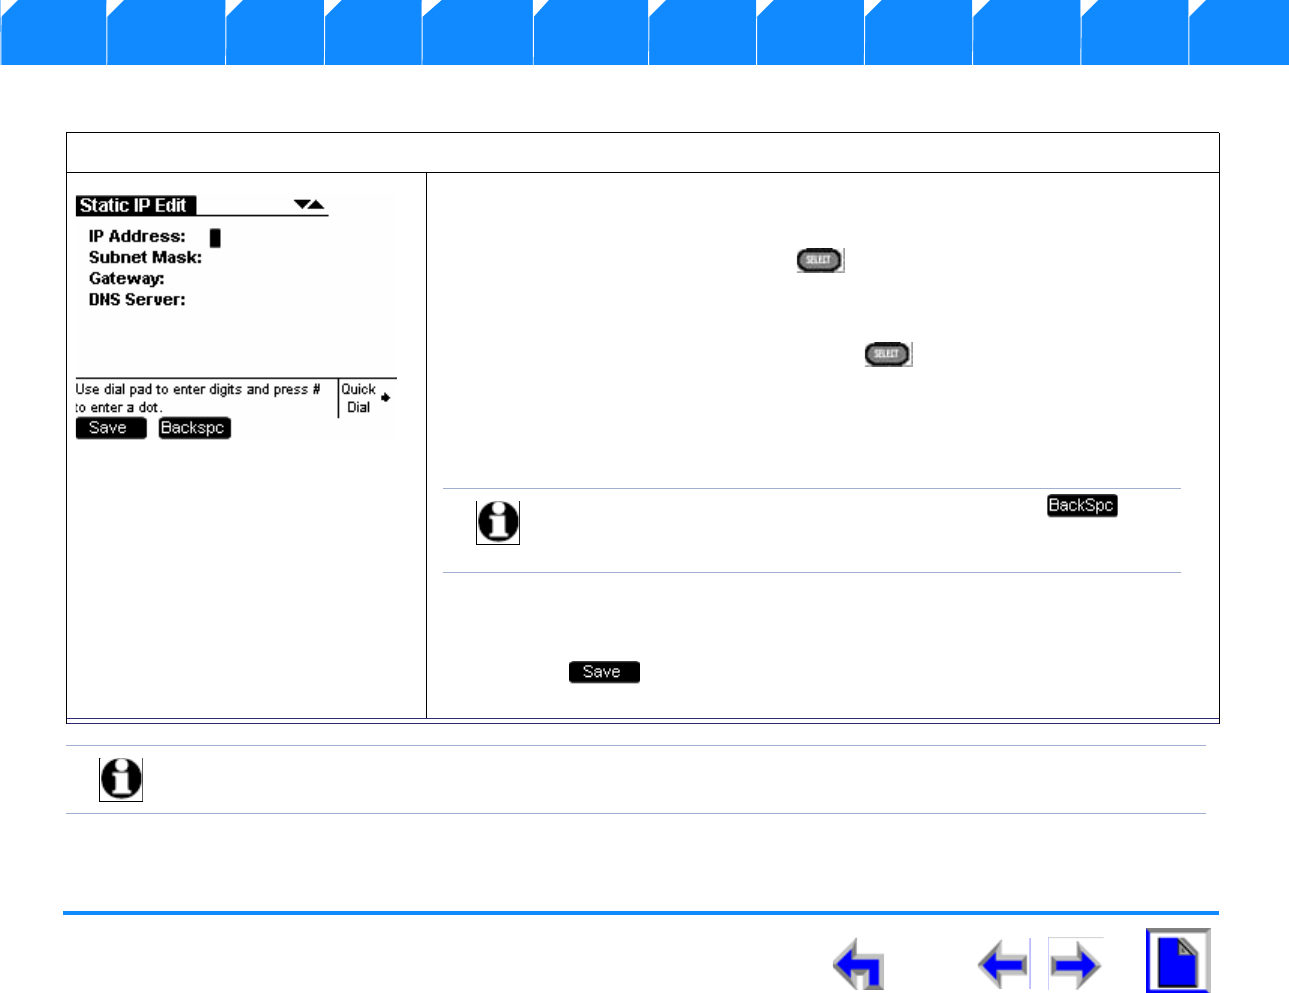
SB67030 Deskset User’s Guide - Setup Menus 87
Voice Make Call Answer
Install Overview PC UI Setup Mail Directory CallLog Call Manage Call Handset Trouble
Set/Edit Static IP
.
To access the IP Configuration menu and edit the IP Address:
1. Perform the “To display the Admin Settings menu”procedure on page 77.
2. Press 6 on the keypad or press the down NAVIGATION arrow to highlight the
IP Settings and press SELECT . The menu shown in Figure 87 on page
85 displays.
3. Press 2 on the keypad or press the down NAVIGATION arrow to highlight the
Set/Edit Static IP and press SELECT .
4. The Static IP Edit menu shown in Figure 89 displays.
5. Enter in digits using dialing keys. There is a 12-digit limit on the number field
(not including dots).
6. Press the up or down NAVIGATION arrow to cycle through the four different
fields.
7. Press to accept the changes and return to the Admin Settings
menu shown in Figure 74 on page 77.
Note When enters the edit mode for the first time, the cursor will be positioned at the beginning of the top field. If all
the fields have been filled, the cursor will be positioned at the end of the top field.
Figure. 89 Set/Edit Static IP
Note Pressing the hash (#) will insert a dot. Pressing when
the cursor is positioned next to a dot will delete the dot and
the digit to the left of the dot.
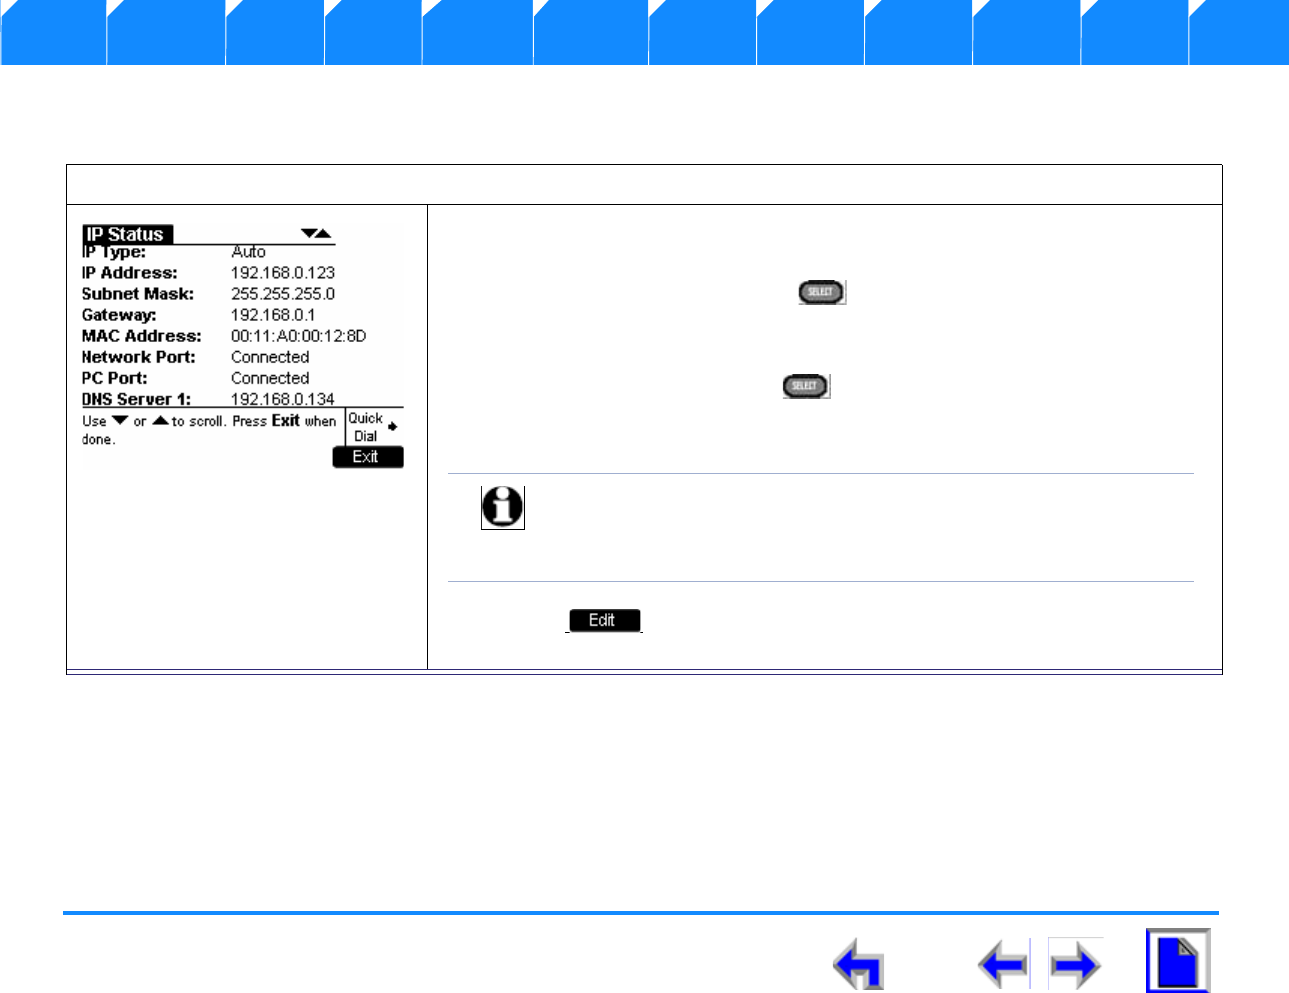
SB67030 Deskset User’s Guide - Setup Menus 88
Voice Make Call Answer
Install Overview PC UI Setup Mail Directory CallLog Call Manage Call Handset Trouble
IP Status
This screen is for informational purposes only.
To access the IP Configuration menu and edit the IP Address:
1. Perform the “To display the Admin Settings menu”procedure on page 77.
2. Press 6 on the keypad or press the down NAVIGATION arrow to highlight the
IP Settings and press SELECT . The menu shown in Figure 87 on page
85 displays.
3. Press 3 on the keypad or press the down NAVIGATION arrow to highlight the
IP Status and press SELECT . The menu shown in Figure 90 displays.
4. Press the up or down NAVIGATION arrow to view status entries that are not
shown on-screen.
5. Press when your review is complete and the User Settings menu
displays.
Figure. 90 IP Status
Note The text is not circular so when you reach the end of the
available text, pressing the down NAVIGATION key will do
nothing. If you are at the top of the page, pressing the up
NAVIGATION key will do nothing.
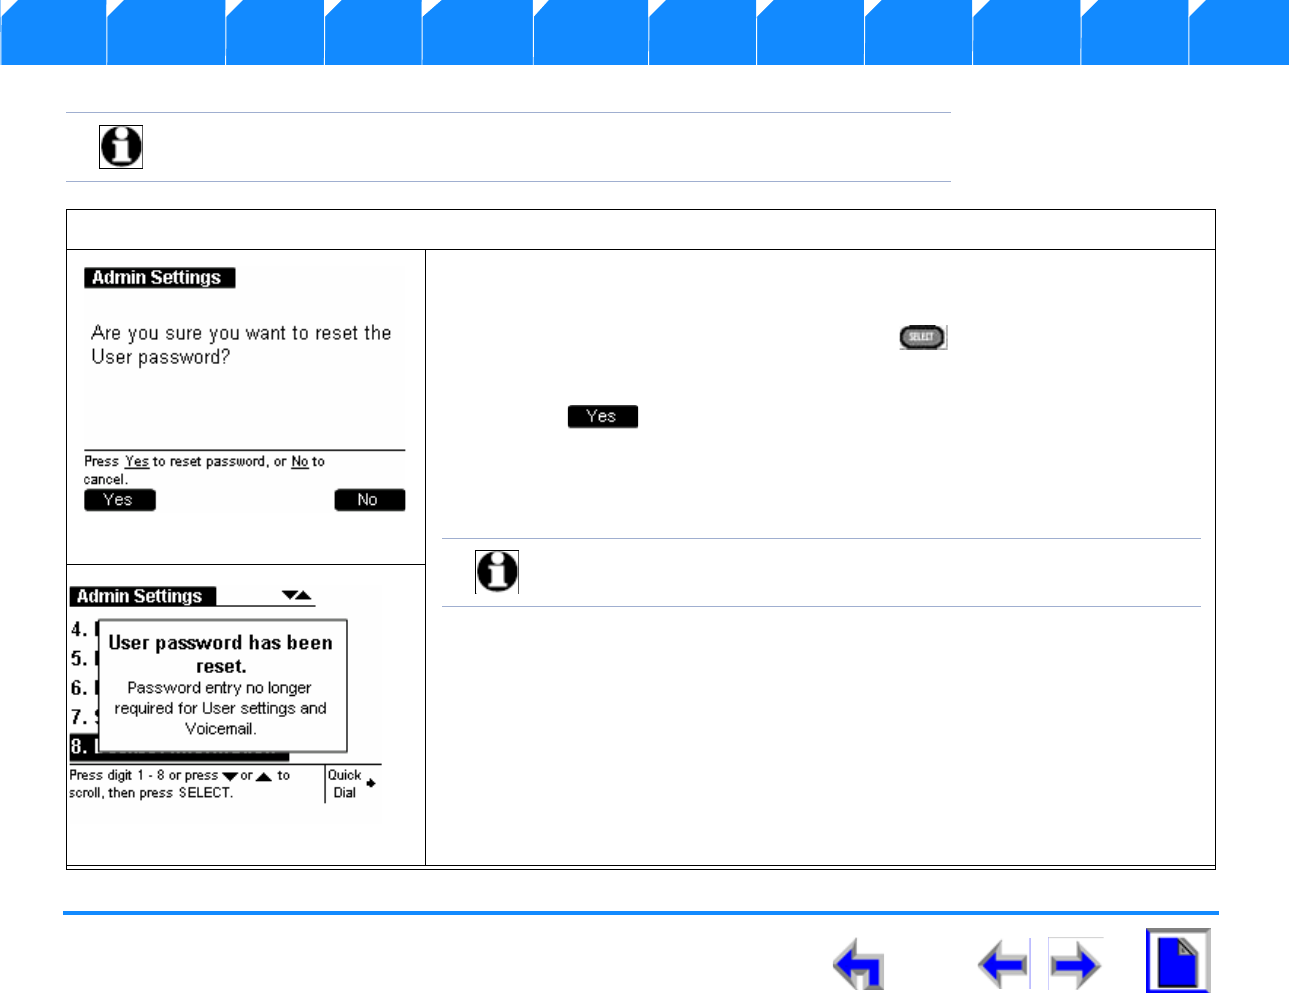
SB67030 Deskset User’s Guide - Setup Menus 89
Voice Make Call Answer
Install Overview PC UI Setup Mail Directory CallLog Call Manage Call Handset Trouble
Reset User Password
Note The Admin Settings menu contains seven entries. To view the Password entry
it is necessary to press the down NAVIGATION arrow.
To reset the user password:
1. Perform the “To display the Admin Settings menu”procedure on page 77.
2. Press 6 on the keypad or press the down NAVIGATION arrow to highlight the
Reset User Password and press SELECT .
3. The confirmation screen shown in Figure 91 appears.
4. Press to confirm password reset.
5. The splash screen shown in Figure 92 appears. informing the administrator
that the password has been reset.
Figure. 91 Reset User Password
Note The user will now be able to access User settings and Voicemail
without entering a password.
Figure. 92 User Password Confirm
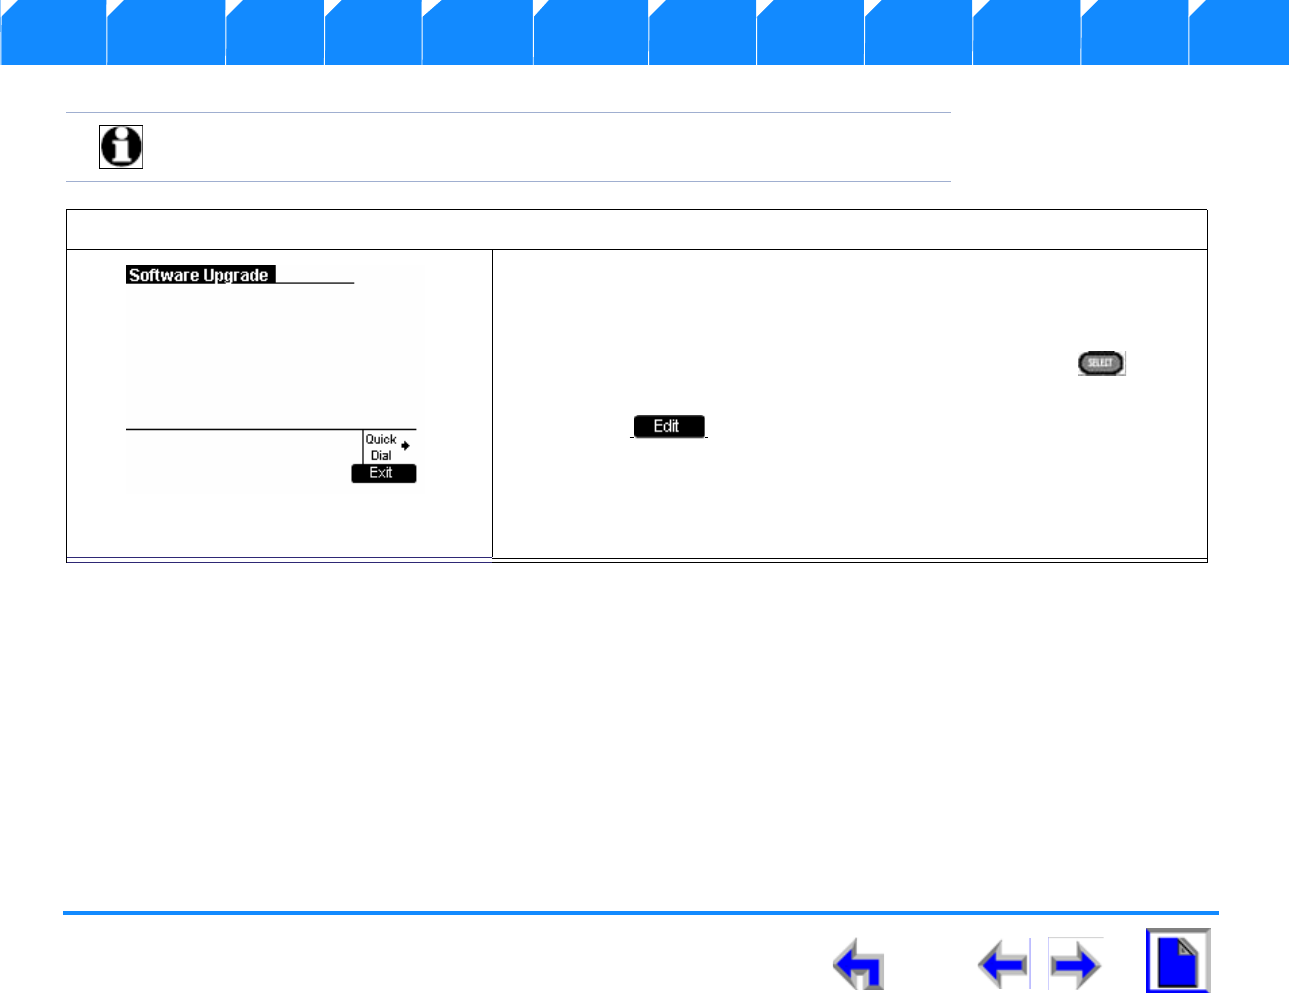
SB67030 Deskset User’s Guide - Setup Menus 90
Voice Make Call Answer
Install Overview PC UI Setup Mail Directory CallLog Call Manage Call Handset Trouble
Software Upgrade
Note The User Settings menu contains six entries. To view the Software Upgrade
entry it is necessary to press the down NAVIGATION arrow.
To access the Software upgrade feature:
1. Perform the “To display the Admin Settings menu”procedure on
page 77.
2. Press 7 on the keypad or press the down NAVIGATION arrow six times
to highlight the Software Upgrade and press SELECT to
display Figure 91.
3. Press when your review is complete and the User Settings
menu displays.
Figure. 93 Software Upgrade
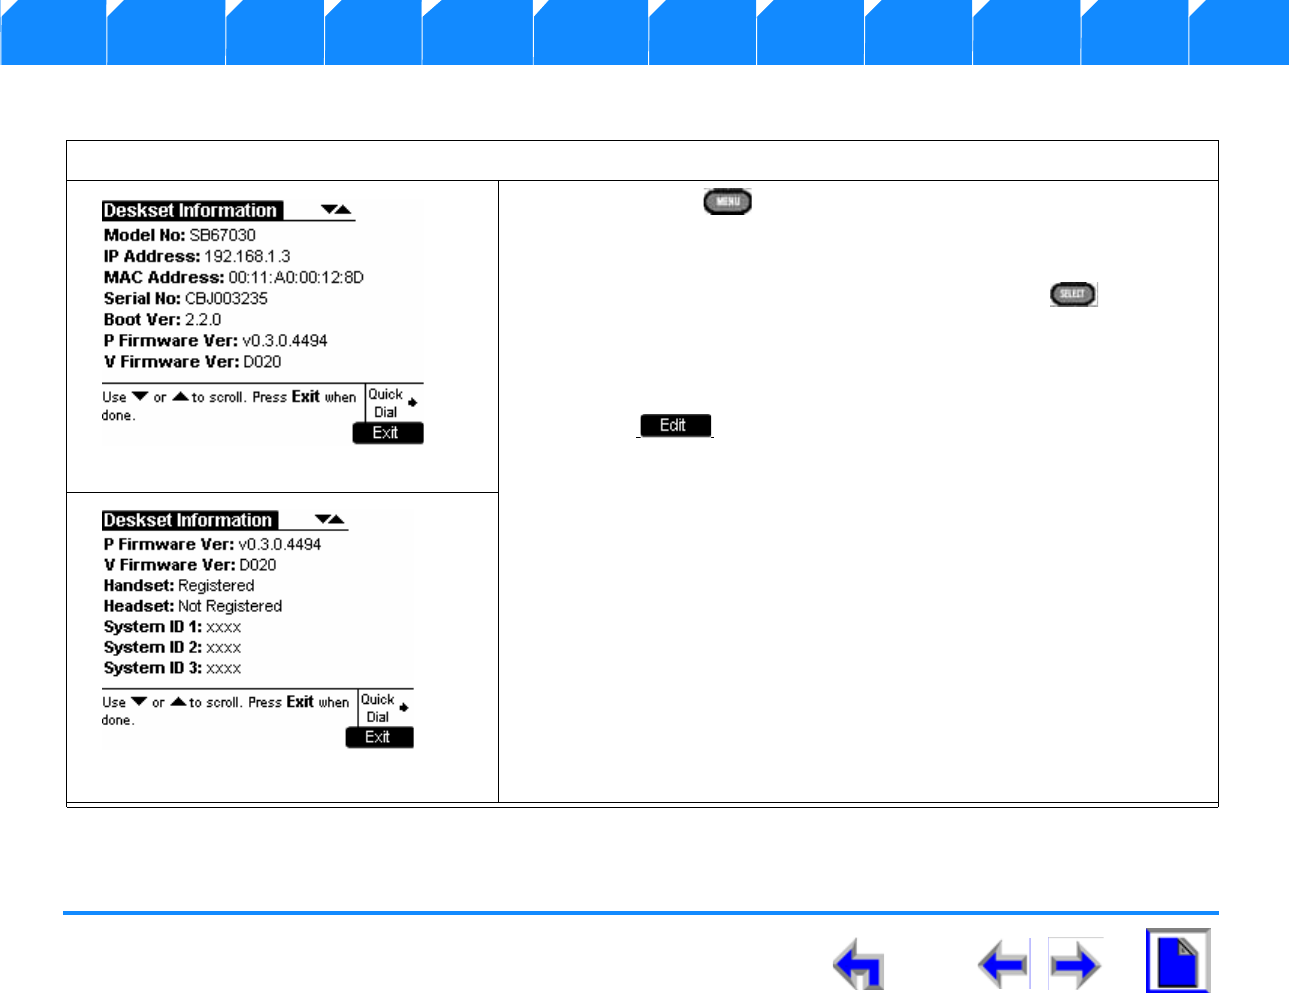
SB67030 Deskset User’s Guide - Setup Menus 91
Voice Make Call Answer
Install Overview PC UI Setup Mail Directory CallLog Call Manage Call Handset Trouble
Deskset Information
To access the deskset information menu:
1. Press MENU and observe that the Menu screen shown in
Figure 30 on page 53 displays.
2. Press 4 on the keypad or press the down NAVIGATION arrow to
highlight Deskset Information and press SELECT to display
Figure 94.
3. Press the down NAVIGATION arrow to access the additional
information shown in Figure 95.
4. Press when your review is complete and the User Settings
menu displays.
Figure. 94 Deskset Information
Figure. 95 Deskset Information
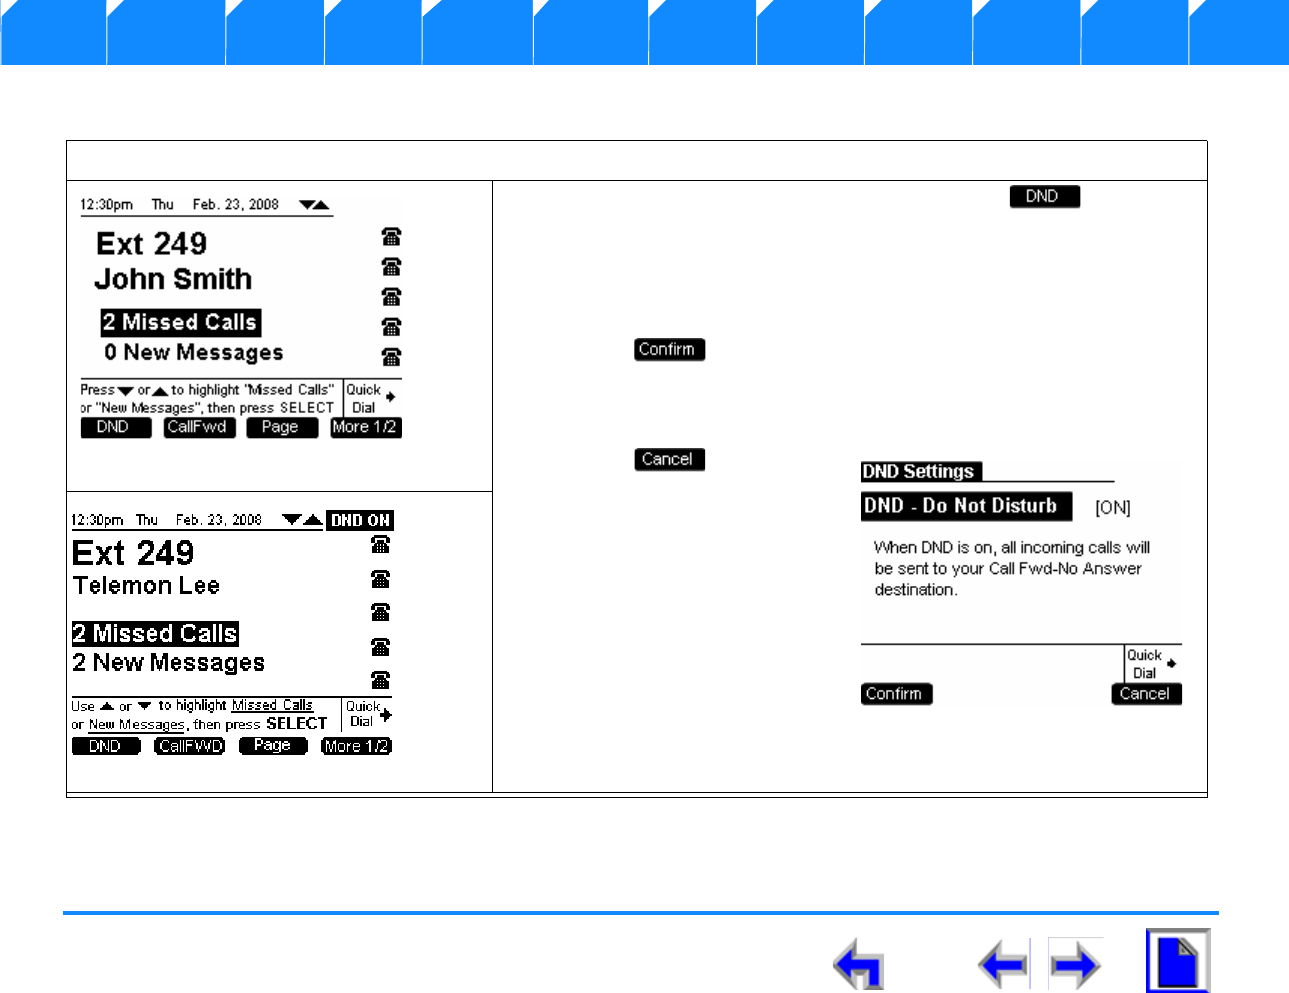
SB67030 Deskset User’s Guide - Setup Menus 92
Voice Make Call Answer
Install Overview PC UI Setup Mail Directory CallLog Call Manage Call Handset Trouble
Setting up Do Not Disturb
To enable or disable DND:
1. From the Idle screen shown in Figure 96, press .
2. Observe that the DND Settings screen shown in Figure 98 displays.
3. Press the left or right NAVIGATION key to set DND - Do Not
Disturb [ON] to enable. or DND - Do Not Disturb [OFF] to disable.
4. Press to save changes.
5. DND ON will now disappear or appear in the top right of the display
as shown in Figure 97.
6. Press to return to
Idle at any time.
Figure. 96 Idle Screen
gure. 97 DND Settings
Figure. 98 DND Set
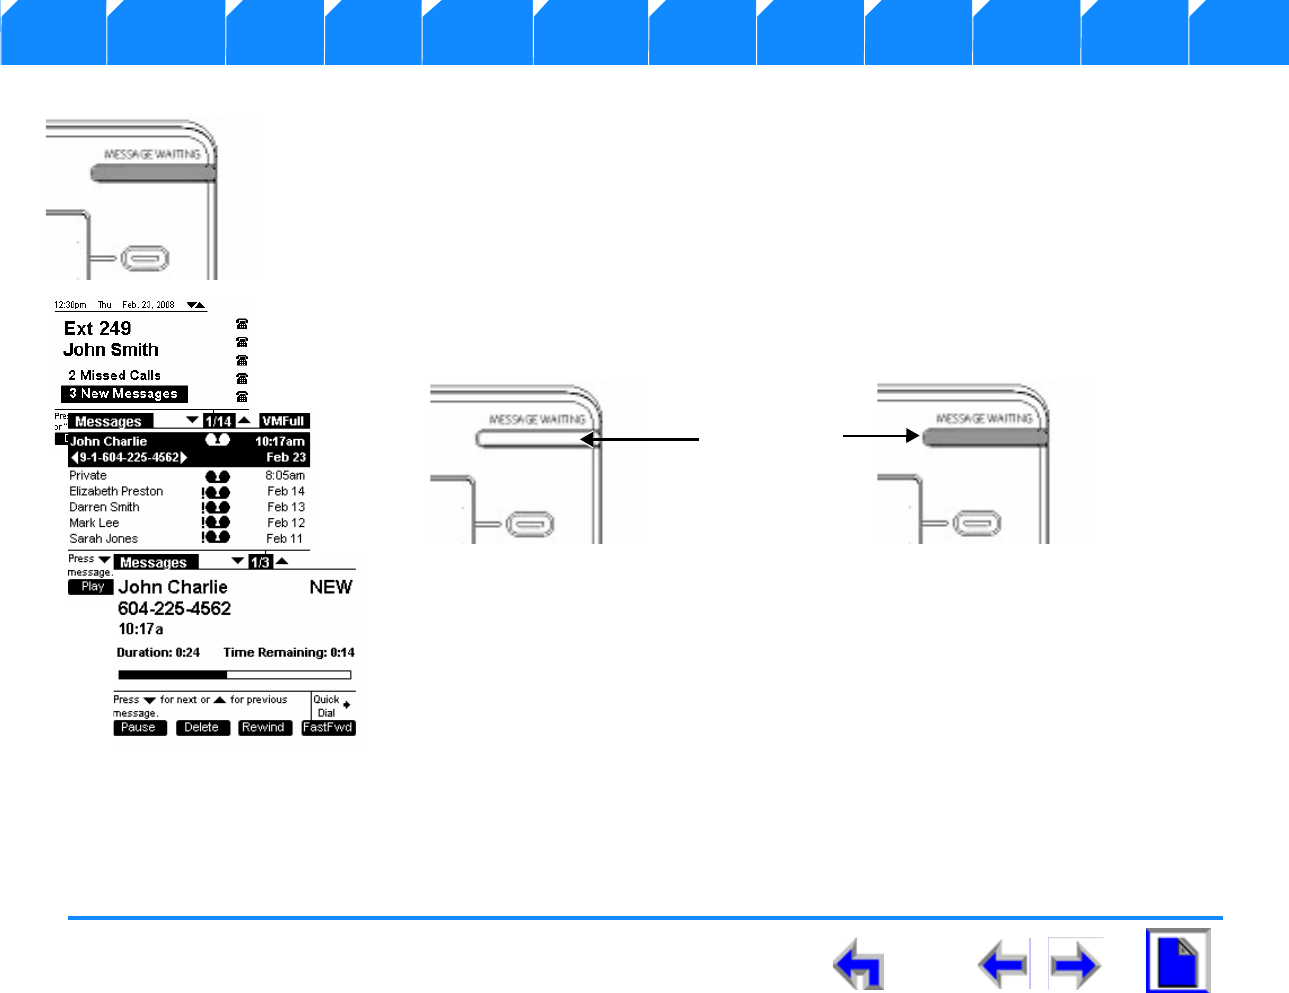
SB67030 Deskset User’s Guide - Voice Mail 93
Voice Make Call Answer
Install Overview PC UI Setup Mail Directory CallLog Call Manage Call Handset Trouble
CHAPTER
5
V
OICE
M
AIL
Your SB67030 Deskset Voicemail system provides the ability to capture important messages and
save, replay, or forward those messages. The message LED shown in Figure 99 lights up when
there are one or more new message and the # New Messages displays on the Idle screen.
.
Figure. 99 Message Waiting LED
1. “Access Voicemail” on page 94
2. “Messages Feature” on page 95
3. “Message Playback” on page 97
4. “Forwarding a Message” on page 99
5. “Deleting Messages” on page 104
6. “Clear Message Flags” on page 106
7. “Voicemail Remote Operations” on page 107
Message LED
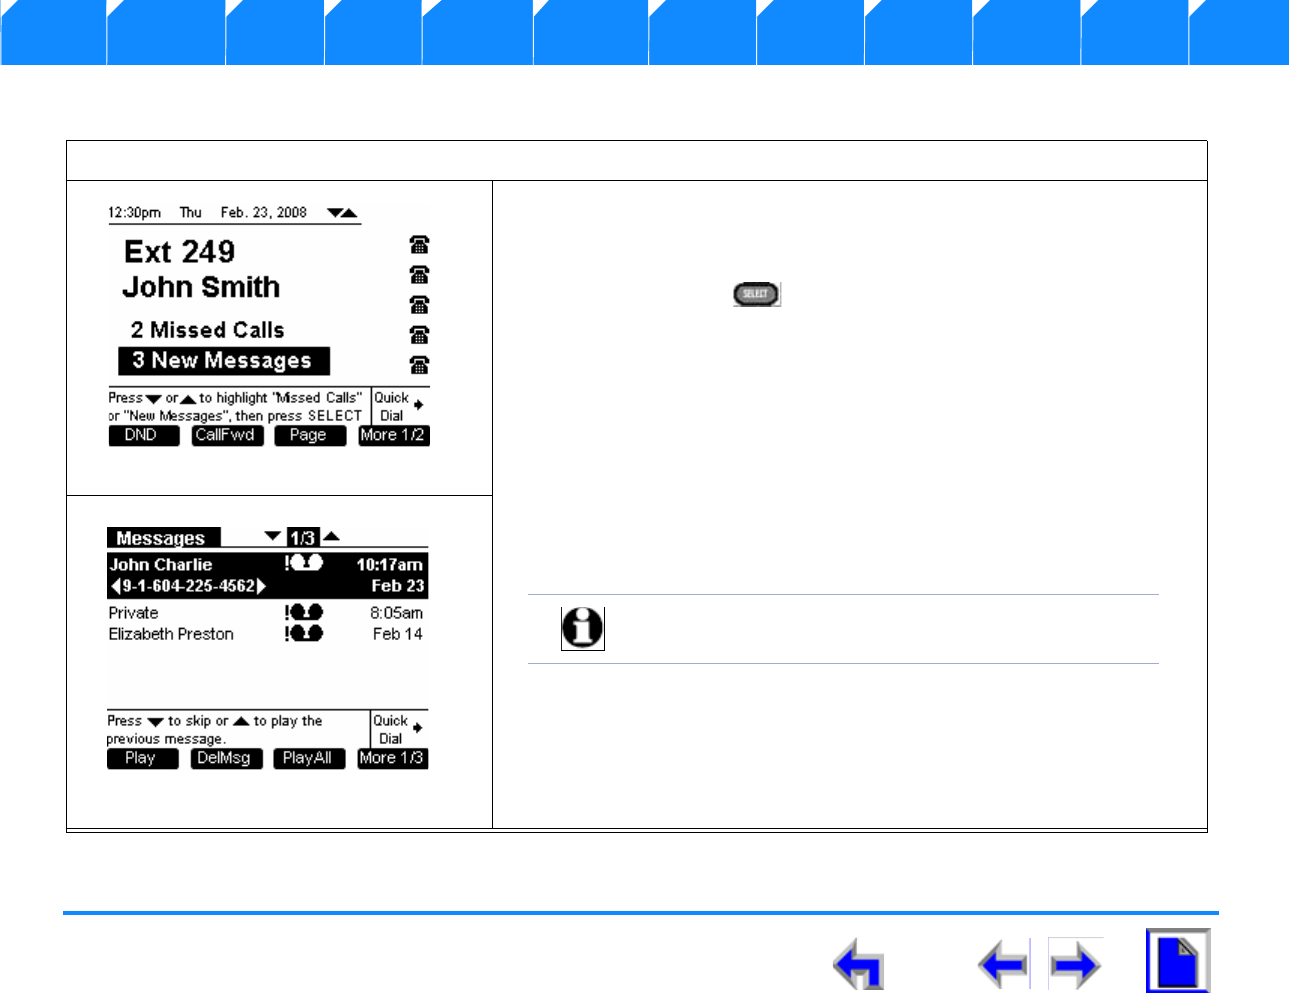
SB67030 Deskset User’s Guide - Voice Mail 94
Voice Make Call Answer
Install Overview PC UI Setup Mail Directory CallLog Call Manage Call Handset Trouble
Access Voicemail
To access the voicemail:
1. Your SB67030 Deskset Voicemail system displays the number of new
voicemail messages during idle as shown in Figure 100. A message is
considered new if it has not been played.
2. Pressing SELECT . when the notification is highlighted to display
the Message list shown in Figure 101 where only new messages are
displayed.
OR
3. Press MESSAGES. to view the available message list.
4. Once a new message is played, the new message count will go down by
one. If there are no new messages, 0 New Messages displays.
5. You can play messages when in Idle or when calls are on hold,.
Figure. 100 New Message Notification
Note Pressing the up or down navigation key will move the
highlight bar.
Figure. 101 Message List
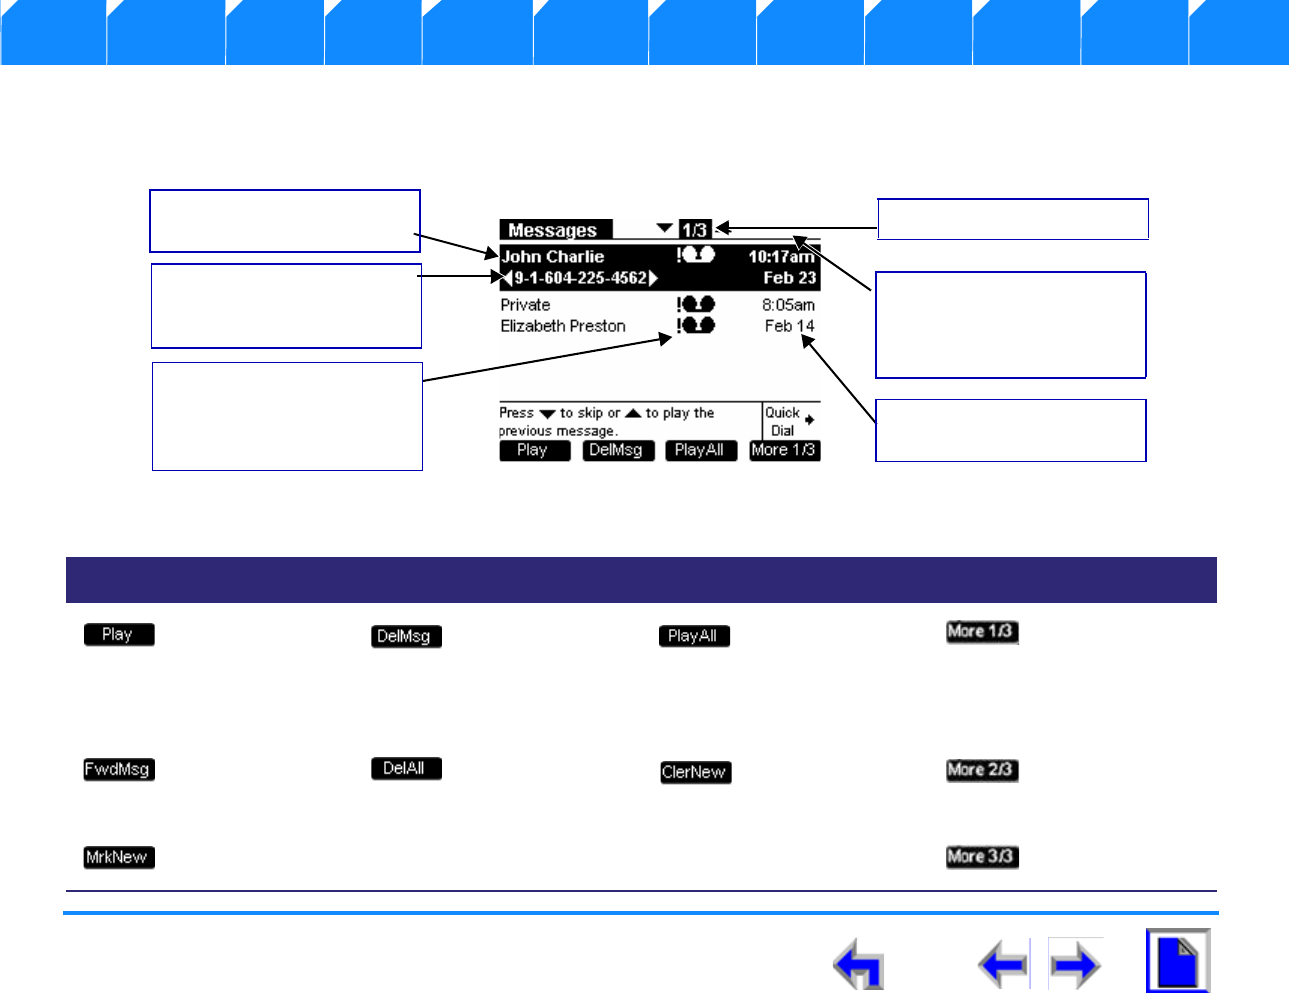
SB67030 Deskset User’s Guide - Voice Mail 95
Voice Make Call Answer
Install Overview PC UI Setup Mail Directory CallLog Call Manage Call Handset Trouble
Messages Feature
The programmed keys are available when viewing the message list from Idle. There are no programmed keys available in Active mode
or if the message list is empty.
Table 11 Voicemail Programmed Keys
Key Description Key Description Key Description Key Description
Plays recorded
audio clip. Deletes
highlighted
voicemail
message in
message list.
Plays all
messages in
Voicemail feature.
Moves to next set
of programmed
keys. If this button
is present, there
are more than
four programmed
operation keys
available. More 1/
3 indicates that
user is on page
one of three
Initiates Message
Forward function. Performs deletion
of multiple
records.
Clears all new
messages.
Marks all new
messages.
Left and right arrow
indicate dialing options
available
Name and number CID
displayed
Message icon.
(Icon accompanied by
exclamation mark (!)
indicates message is new) Time and date message
was recorded
Status notification area
(“FULL” indicates that no
more messages can be
recorded)
Message Counter

SB67030 Deskset User’s Guide - Voice Mail 96
Voice Make Call Answer
Install Overview PC UI Setup Mail Directory CallLog Call Manage Call Handset Trouble
The SB67030 Deskset Voicemail system features include:
nThere is a maximum of 30 minutes recording time (no limit on number of messages). If this limit is reached while recording is
in progress, the message will cut short and the far-end caller will be notified with a voice prompt.
nIf a caller tries to leave a message when voicemail is full, a voice prompt notifies them that a message cannot be recorded at
this time.
nThe highlighted message displays both name and number CID (if available) as well as both the time and date of the message
recording. Un-highlighted messages in the list will display either name or number field only and time or date only.
nThere is a 22-character limit on the name field. Oversized entries will be truncated with ellipses.
nIf the message was left before 12:00am on the current day, then the date of the message only will be displayed. If the message
was left after 12:00am on the current day, then the time of message recording only will be displayed.
nWhen reviewing the message list, you may call the number listed in the highlighted message.
nPressing the up or down NAVIGATION key cycles through messages in the list while pressing the left or right NAVIGATION
key cycles through dialing options.
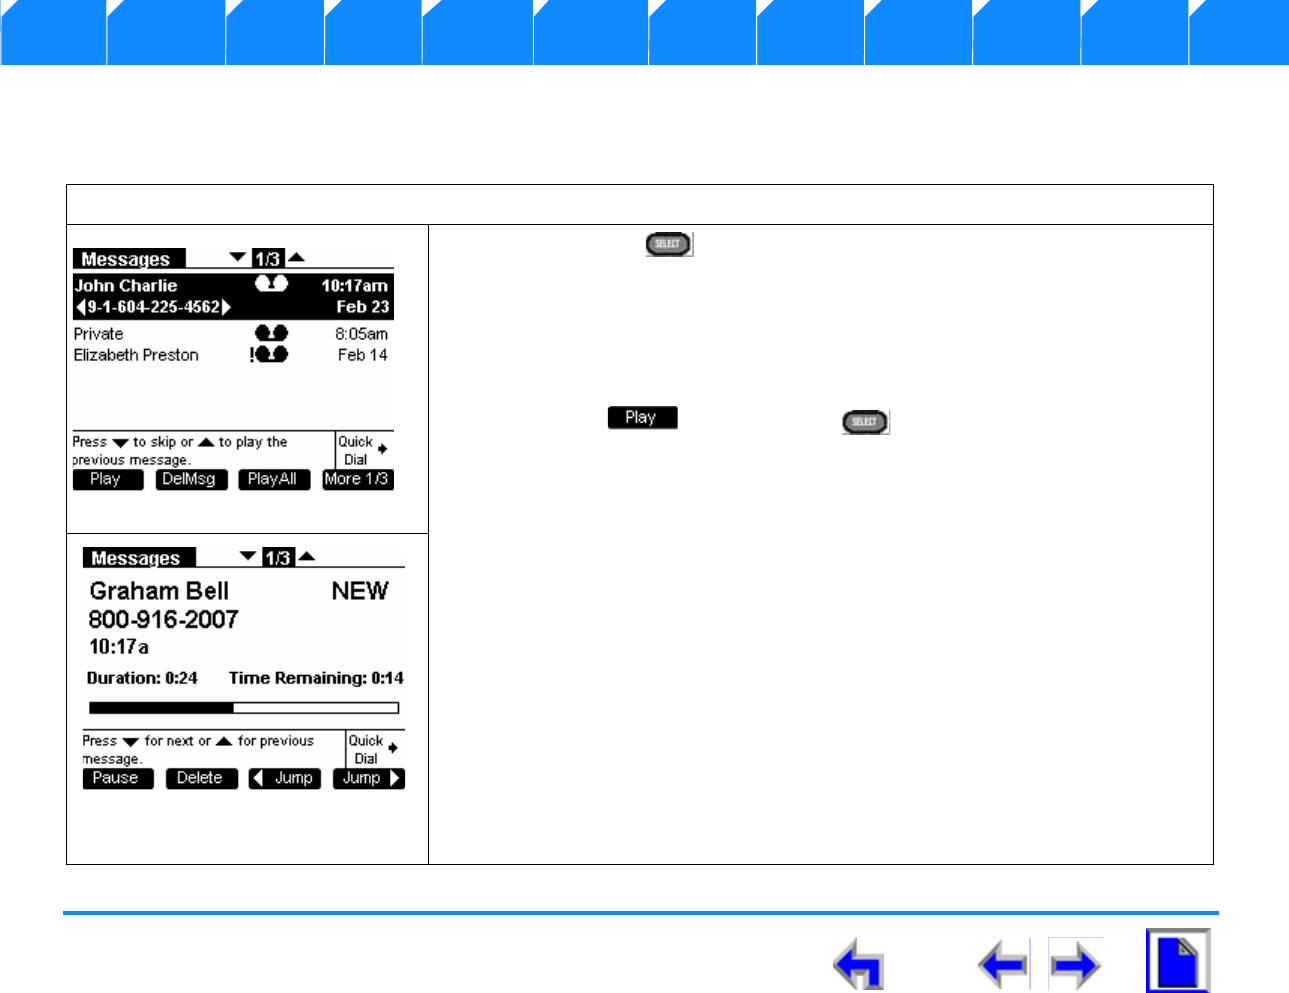
SB67030 Deskset User’s Guide - Voice Mail 97
Voice Make Call Answer
Install Overview PC UI Setup Mail Directory CallLog Call Manage Call Handset Trouble
Message Playback
The SB67030 Deskset Voicemail system provides the ability to play a single message or all of the messages in the system.
Play a single message
1. Press SELECT . when the notification is highlighted to display the
Message list shown in Figure 102.
OR
Press MESSAGES. to view the available message list.
2. Press the up or down NAVIGATION button to highlight the desired message
and press or press SELECT to play the Highlighted message
as shown in Figure 103.
3. The Message screen provides the following information:
lName and number CID displayed (if available)
lTime message recorded
lMessage progress bar
lMessage counter (30 minutes maximum recording time)
lNEW tag displays upon first playback of message
lDuration of message and time remaining in playback.
Figure. 102 Message List
Figure. 103 Message Details
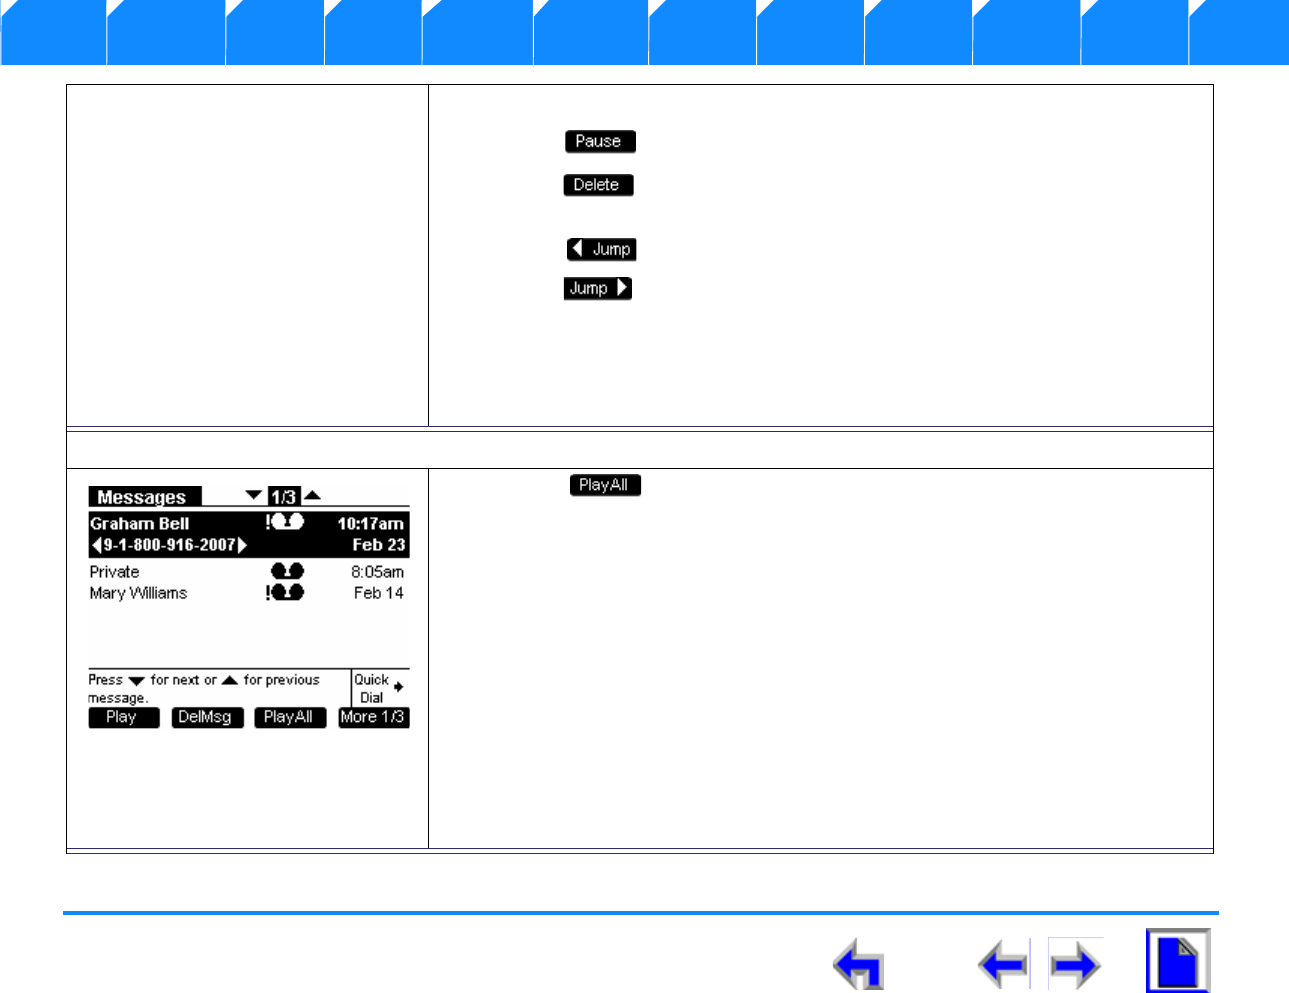
SB67030 Deskset User’s Guide - Voice Mail 98
Voice Make Call Answer
Install Overview PC UI Setup Mail Directory CallLog Call Manage Call Handset Trouble
You have the following options during message playback:
nPress to pause message playback.
nPress to delete the message. If there are more messages, the user will
go to the next message.
nPress to rewind the message in 8 second increments.
nPress to forward the message in 8 second increments.
nPress the up NAVIGATION key once to rewind to the start of the current
message, or twice to skip to the previous message.
nPress the down NAVIGATION key to skip to the next message.
To play all messages in the messages list:
1. Press . The message details screen displays for each message,
starting with the oldest, and ending with the most recent. A short tone (beep)
will emit between each message.
lYou have the option of skipping to the next message by pressing the down
NAVIGATION key or playing the previous message by pressing the up
NAVIGATION key.
lIf all messages play without interruption, you will return to the messages list
with the highlight on the last played message.
lPress CANCEL to return to the messages list with the highlight on the last
played message.
lAll messages played will have the NEW tag removed.
lThere will be no Time Stamp announcements.
Figure. 104 Play All Messages
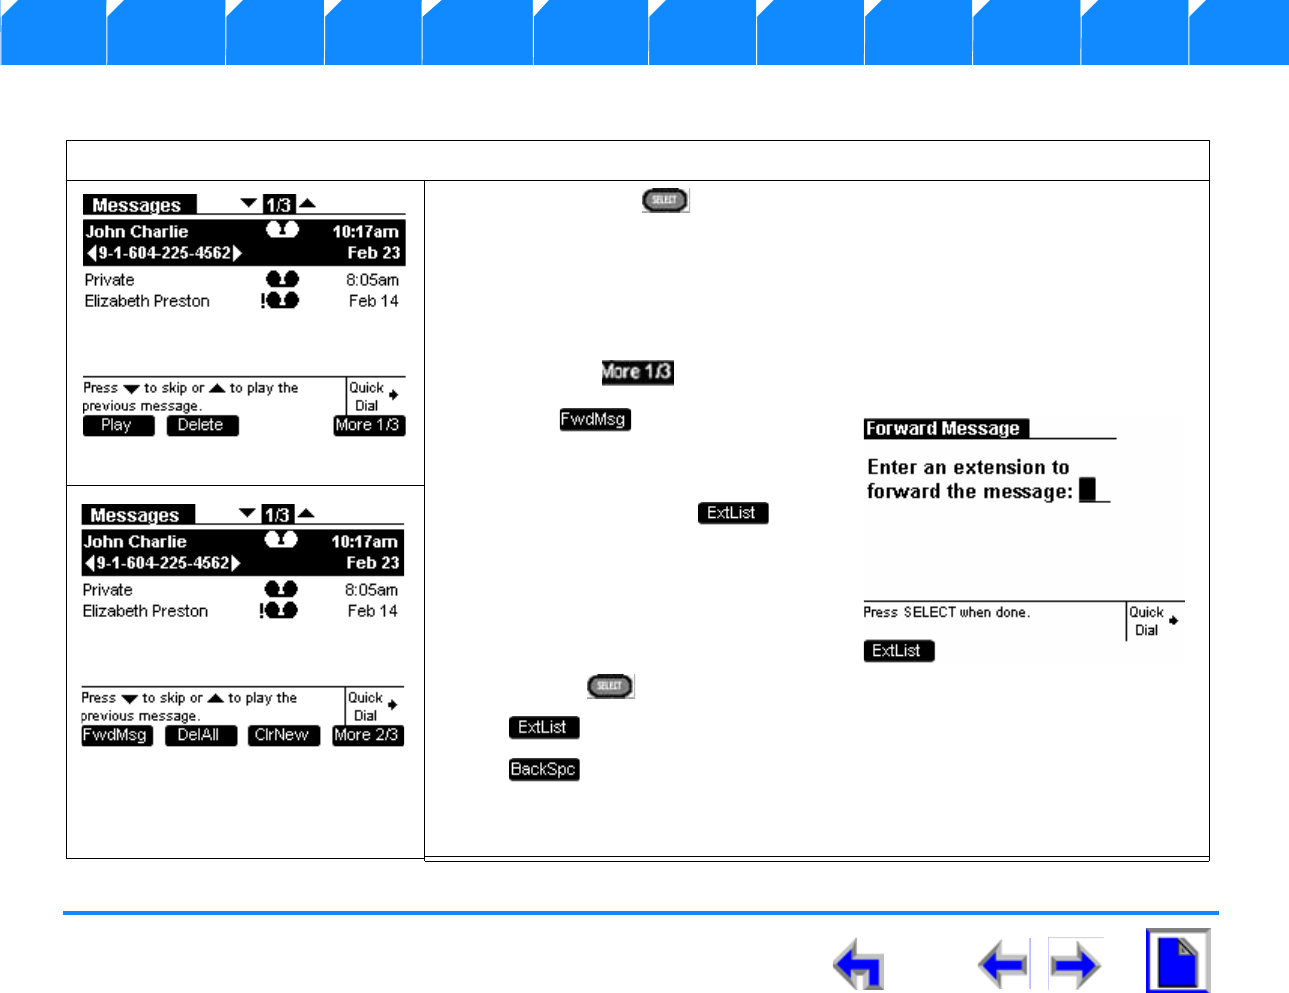
SB67030 Deskset User’s Guide - Voice Mail 99
Voice Make Call Answer
Install Overview PC UI Setup Mail Directory CallLog Call Manage Call Handset Trouble
Forwarding a Message
To forward a voicemail message:
1. Press SELECT . when the notification is highlighted to display the
Message list shown in Figure 105.
OR
Press MESSAGES. to view the available message list.
2. Press the up or down NAVIGATION button to highlight the desired message
and press to display the programmed keys illustrated in Figure 106.
3. Press to display the Forward
Message screen.
4. Enter in the extension number using the
dialing keys OR press to
choose an extension from the
Extension List shown in Figure 107 on
page 100.
5. Highlight the desired extension in the
extension list, if used, and press
SELECT .
6. will not be available after a digit is entered
7. appears after a digit is entered. This key deletes the character before the
blinking cursor.
8. Pressing the left or right NAVIGATION key will move the blinking cursor.
Figure. 105 Message List
Figure. 106 Forward Message

SB67030 Deskset User’s Guide - Voice Mail 100
Voice Make Call Answer
Install Overview PC UI Setup Mail Directory CallLog Call Manage Call Handset Trouble
9. Press SELECT ., the extension name tag and number will appear as shown
in Figure 108.
10. You have the following options:
a. Press to add another extension (up to a maximum of three
extensions).
b. Press to remove the currently highlighted extension from the list.
c. Press to record an audio annotation.
d. Press to forward the message to the extension.
11. Observe that the Message Forwarded screen shown below appears.
12. The forwarded message will appear in the recipient’s Message list.
Figure. 107 Forward Message
Figure. 108 Message Extension
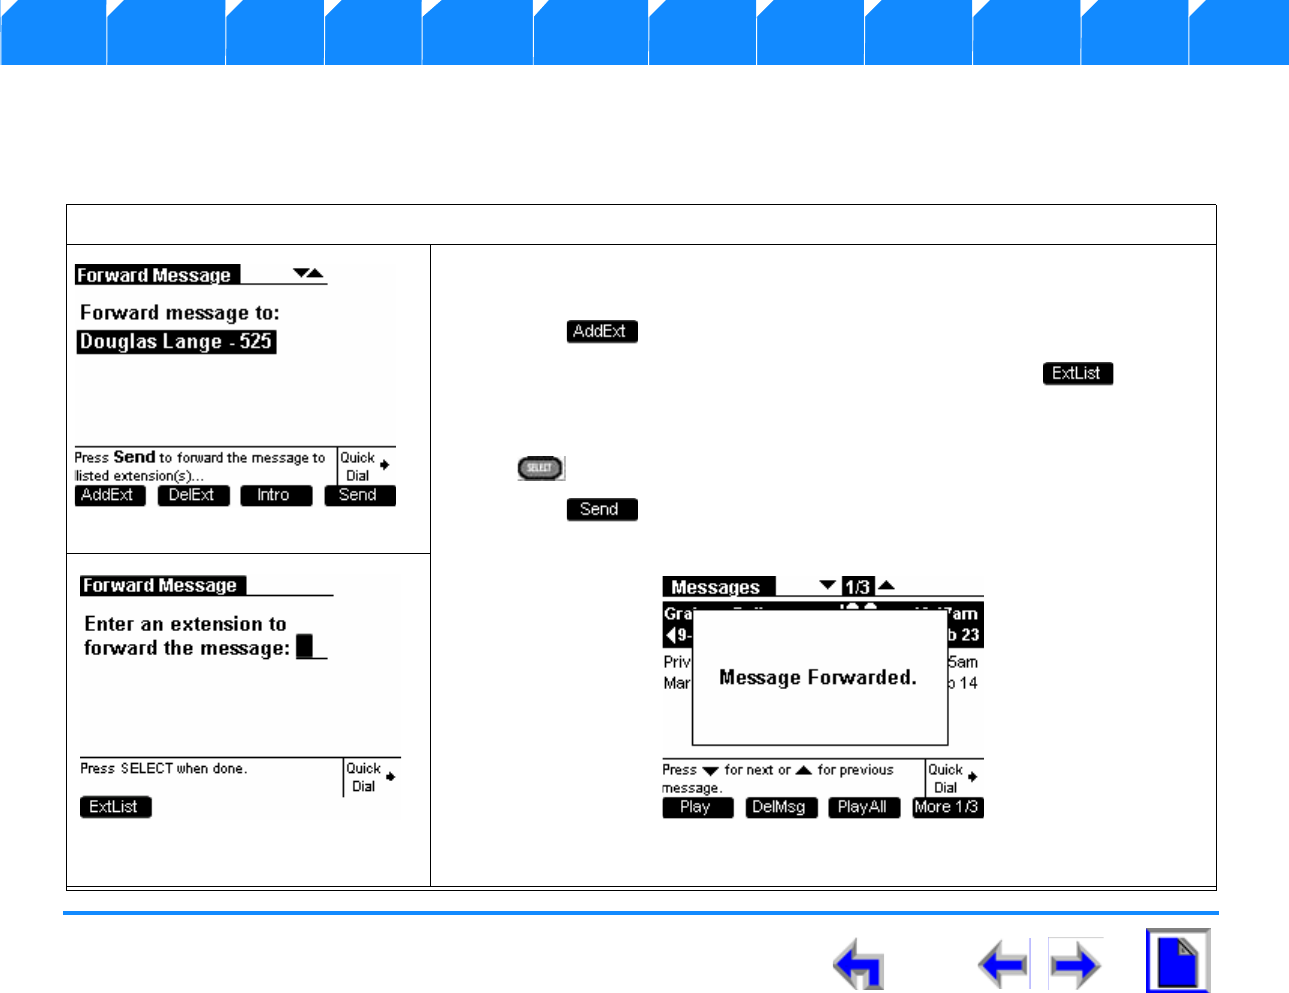
SB67030 Deskset User’s Guide - Voice Mail 101
Voice Make Call Answer
Install Overview PC UI Setup Mail Directory CallLog Call Manage Call Handset Trouble
Forward to Additional Extensions
A user can forward a new or old message to other extensions (maximum of three at a time). To forward a message, the user must follow
this procedure from the Messages list:
To forward to multiple extensions:
1. Perform the “To forward a voicemail message:” procedure on page 99 steps 1
through 9 and observe that the screen shown in Figure 109 appears.
2. Press and observe that the screen shown in Figure 110 appears.
3. Enter in the extension number using the dialing keys OR press to choose
an extension from the Extension List..
4. Highlight the desired extension in the extension list, if used, and press SELECT
.
5. Press to forward the message to the extension.
6. Observe that the Message Forwarded screen shown below appears.
7. The forwarded message will appear in the recipient’s Message list.
Figure. 109 Message List
Figure. 110 Message List
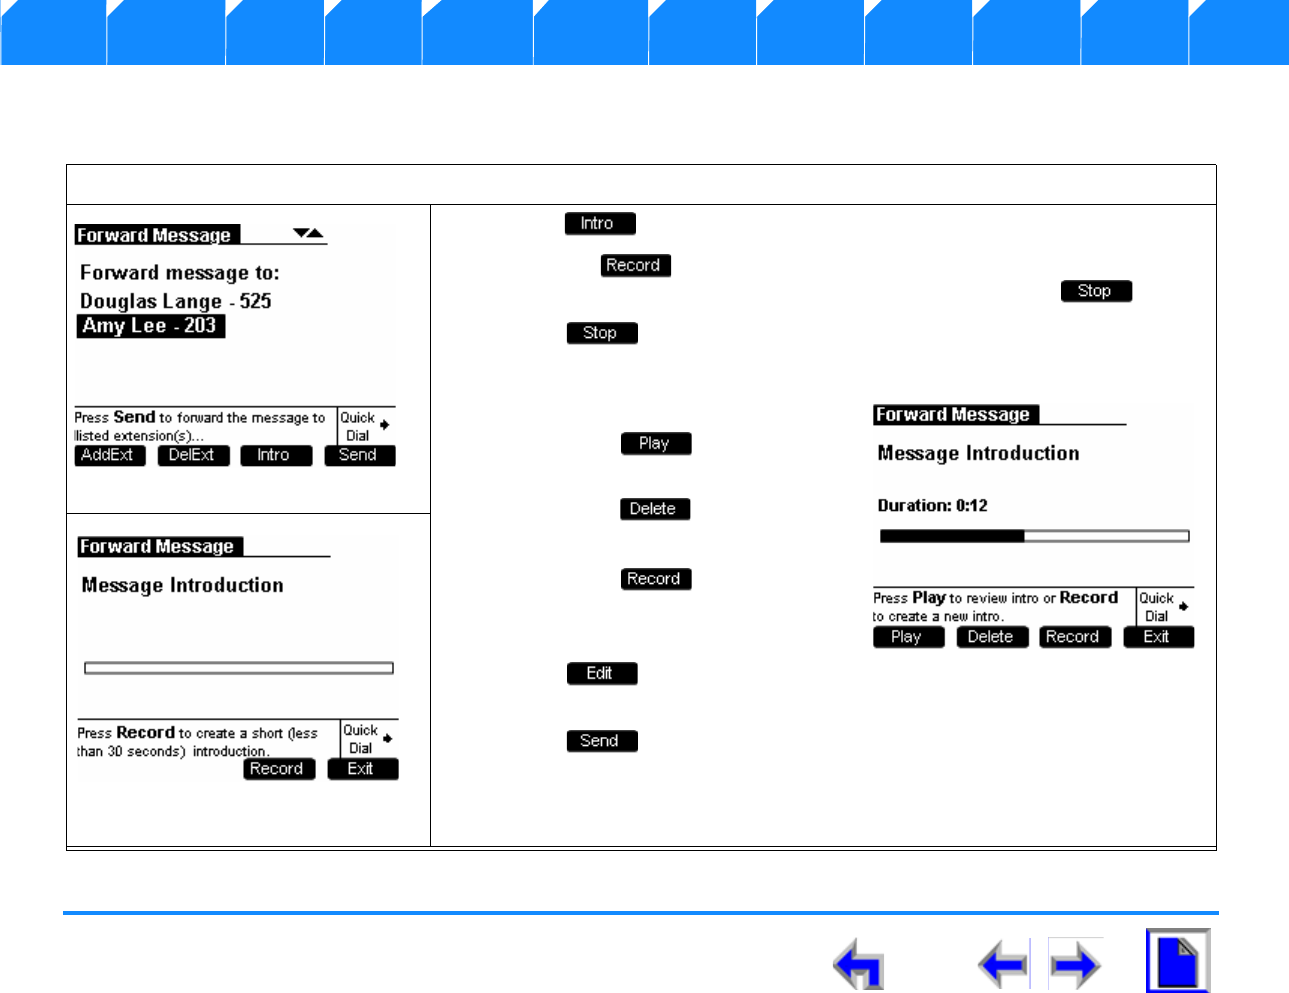
SB67030 Deskset User’s Guide - Voice Mail 102
Voice Make Call Answer
Install Overview PC UI Setup Mail Directory CallLog Call Manage Call Handset Trouble
Recording an Audio Annotation
You have the option of recording an audio annotation to append to a forwarded message.
To record an audio annotation:
1. Press. and observe that the screen shown in Figure 112 displays.
2. Press the to record an introductory message. The recording will be
limited to 30 seconds. The program keys will change to display .
3. Press when finished recording. If 30-second limit is reached, then
recording will stop automatically.
4. You have the following options:
a. Press to play the
recorded message.
b. Press to delete the
recorded message.
c. Press to record a new
message. The current recorded
message will be deleted.
5. Press and observe that the
screen shown in Figure 111 displays.
6. Press to forward the message with the audio annotation attached.
Figure. 111 Forward Message
Figure. 112 Message Introduction

SB67030 Deskset User’s Guide - Voice Mail 103
Voice Make Call Answer
Install Overview PC UI Setup Mail Directory CallLog Call Manage Call Handset Trouble
Status Notifications
Voicemail status indications:
Your SB67030 Deskset Voicemail system provides two indications of voicemail status:
1. If there is less than five minutes recording time remaining, a < 5 min status
notification appears in status notification area. as shown in Figure 113
2. If Voicemail is full, a VMFull status notification will appear in status notification
area as shown in Figure 114.
3. To increase the available time perform the procedures in “Deleting Messages” on
page 104.
Figure. 113 <5 Minutes of Voicemail
Figure. 114 Voicemail Full
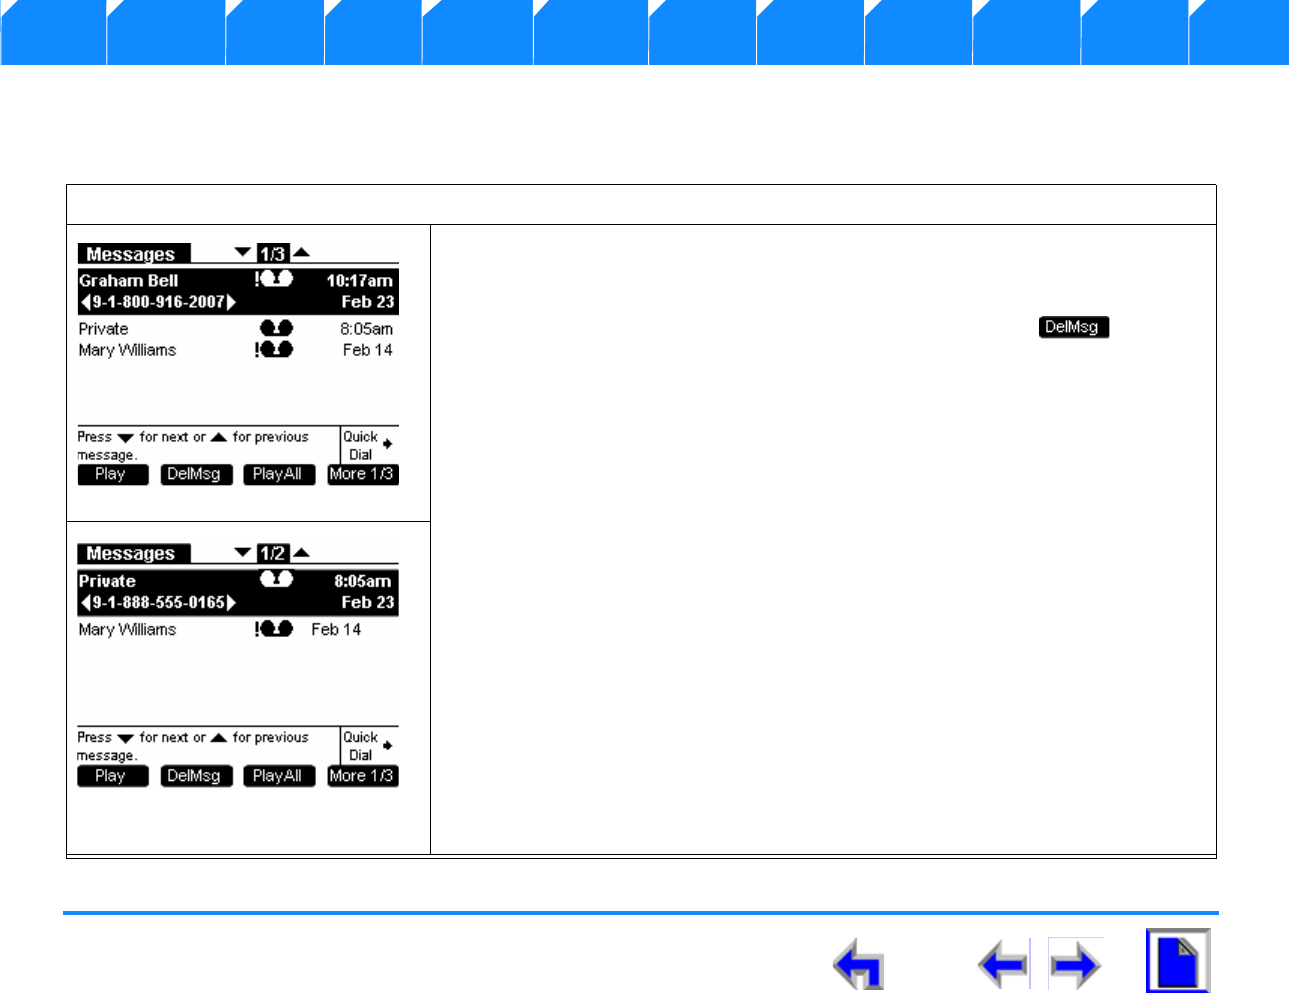
SB67030 Deskset User’s Guide - Voice Mail 104
Voice Make Call Answer
Install Overview PC UI Setup Mail Directory CallLog Call Manage Call Handset Trouble
Deleting Messages
You may delete a single message, or all messages from the Message list or from Message Playback..
To delete a single message:
1. Press MESSAGES. to view the available message list shown in Figure 115.
2. Press the up or down NAVIGATION button to highlight the desired message.
3. When the entry you wish to delete is highlighted, then press .
4. Observe that the message is removed from the list and the next messages is
highlighted as shown in Figure 116
Figure. 115 Deleting Messages
Figure. 116 Deleted Message
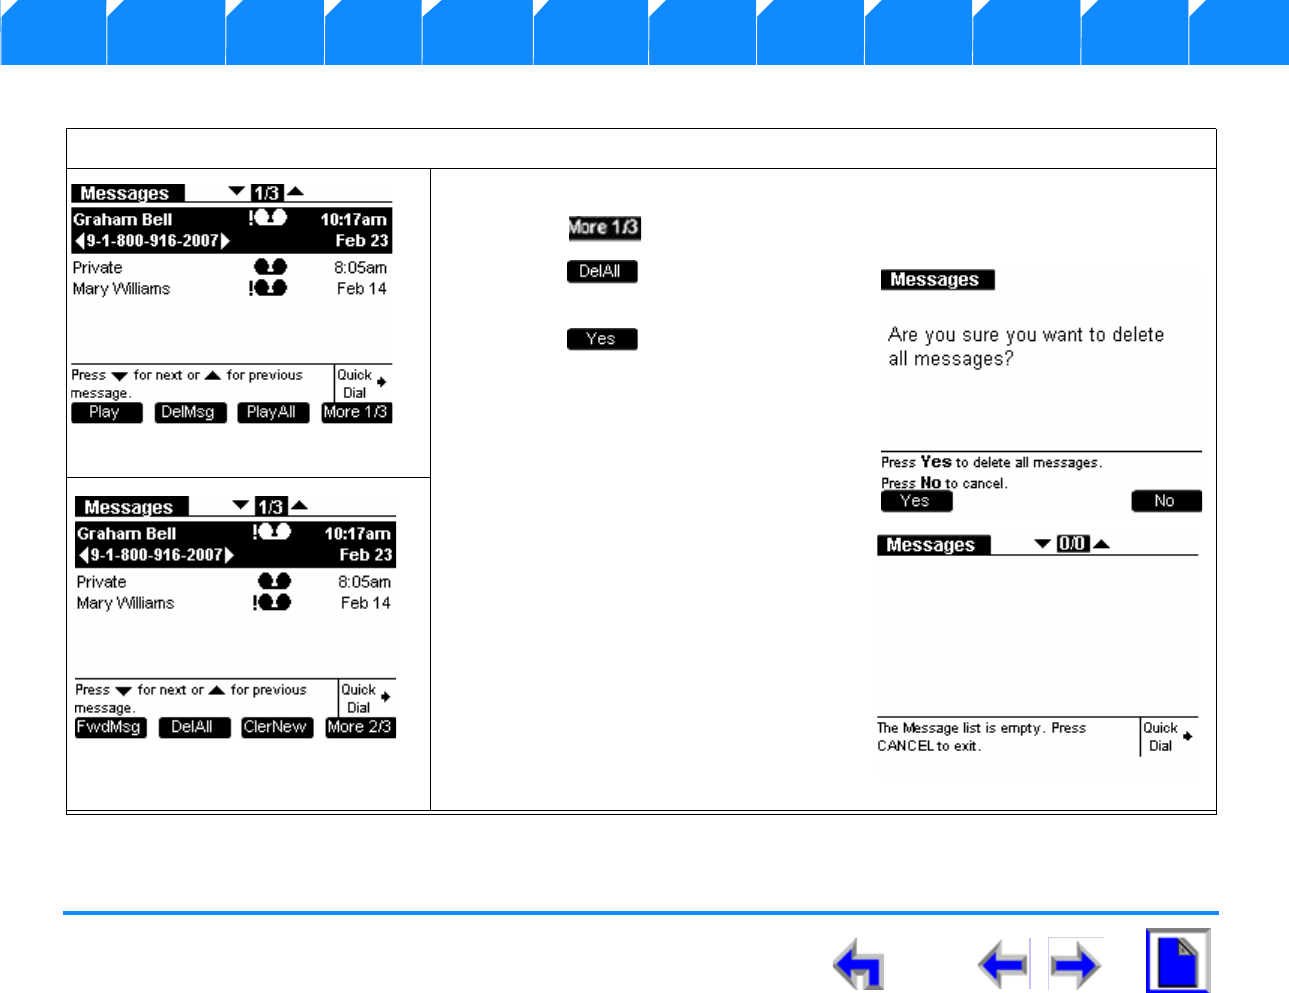
SB67030 Deskset User’s Guide - Voice Mail 105
Voice Make Call Answer
Install Overview PC UI Setup Mail Directory CallLog Call Manage Call Handset Trouble
You may delete all messages only when viewing the Messages list from Idle or with held calls.
To delete all messages:
1. Press MESSAGES. to view the available message list shown in Figure 117.
2. Press and observe that the menu shown in Figure 118 displays.
3. Press and observe that the
confirmation splash screen displays.
4. Press and observe that the
Messages screen displays with the
message counter at 0/0 messages and
no programmed operation keys
available.
Figure. 117 Messages List
Figure. 118 Delete All Message
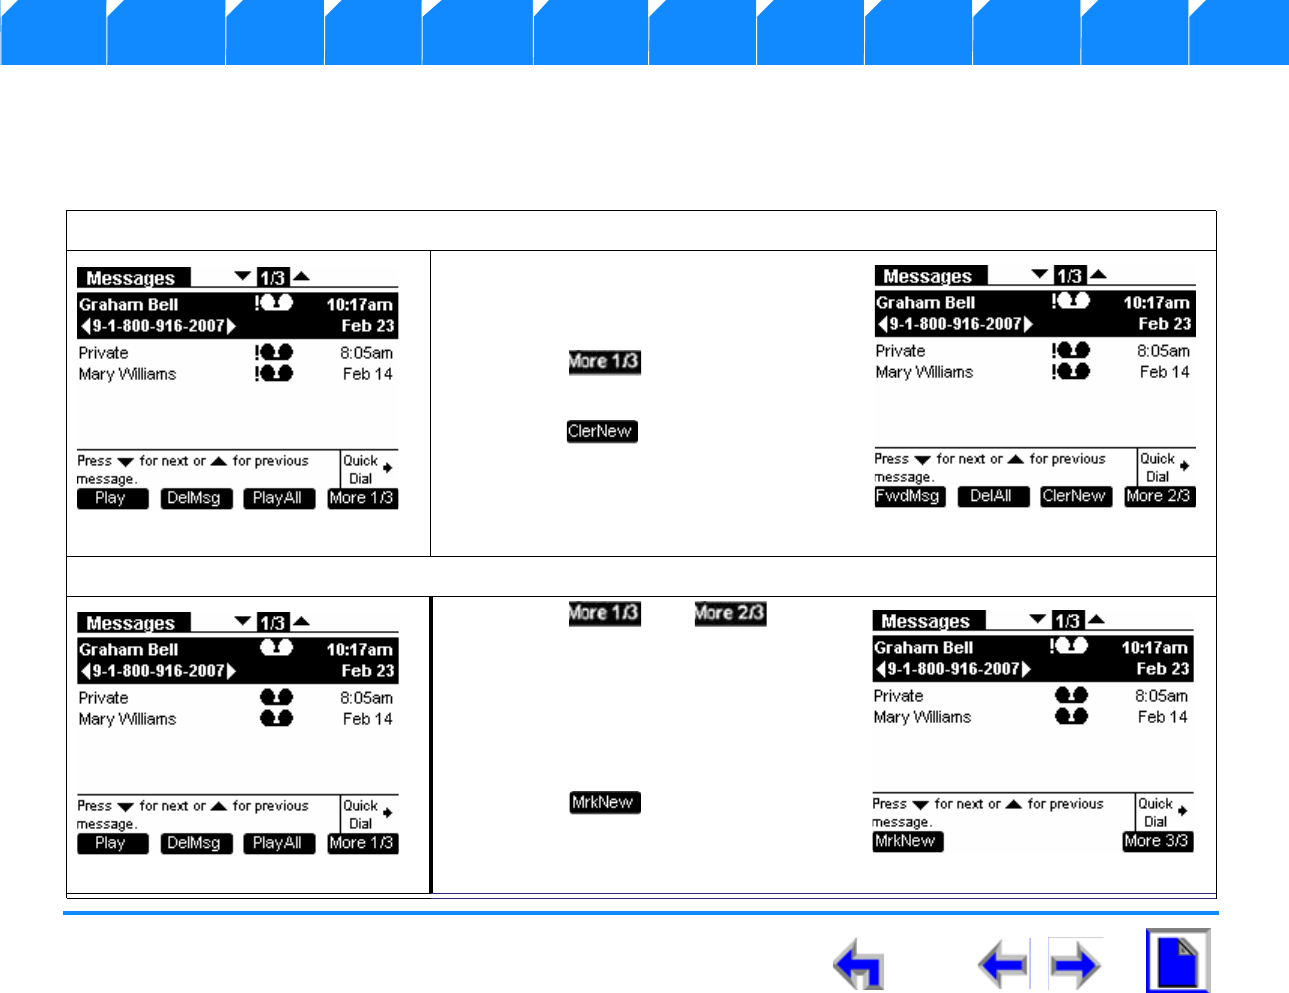
SB67030 Deskset User’s Guide - Voice Mail 106
Voice Make Call Answer
Install Overview PC UI Setup Mail Directory CallLog Call Manage Call Handset Trouble
Clear Message Flags
You can add a new message flag or delete all flags from the Message list. Messages are automatically flagged with an exclamation point
to indicate that the message has not been played.
To perform clear message flags:
1. Press MESSAGES. to view the
available message list shown in
Figure 119.
2. Press and observe that the
menu shown in Figure 121 displays.
3. Press and observe that the
Message List displays without
exclamation points. as shown in
Figure 121.
To restore a message flag:
1. Press then and
observe that the menu shown in
Figure 122 displays.
2. Press the up or down NAVIGATION
button to highlight the desired
message.
3. Press to flag the currently
highlighted message only as new.
Figure. 119 Message List
Figure. 120 Message List
Figure. 121 Message List
Figure. 122 Message List
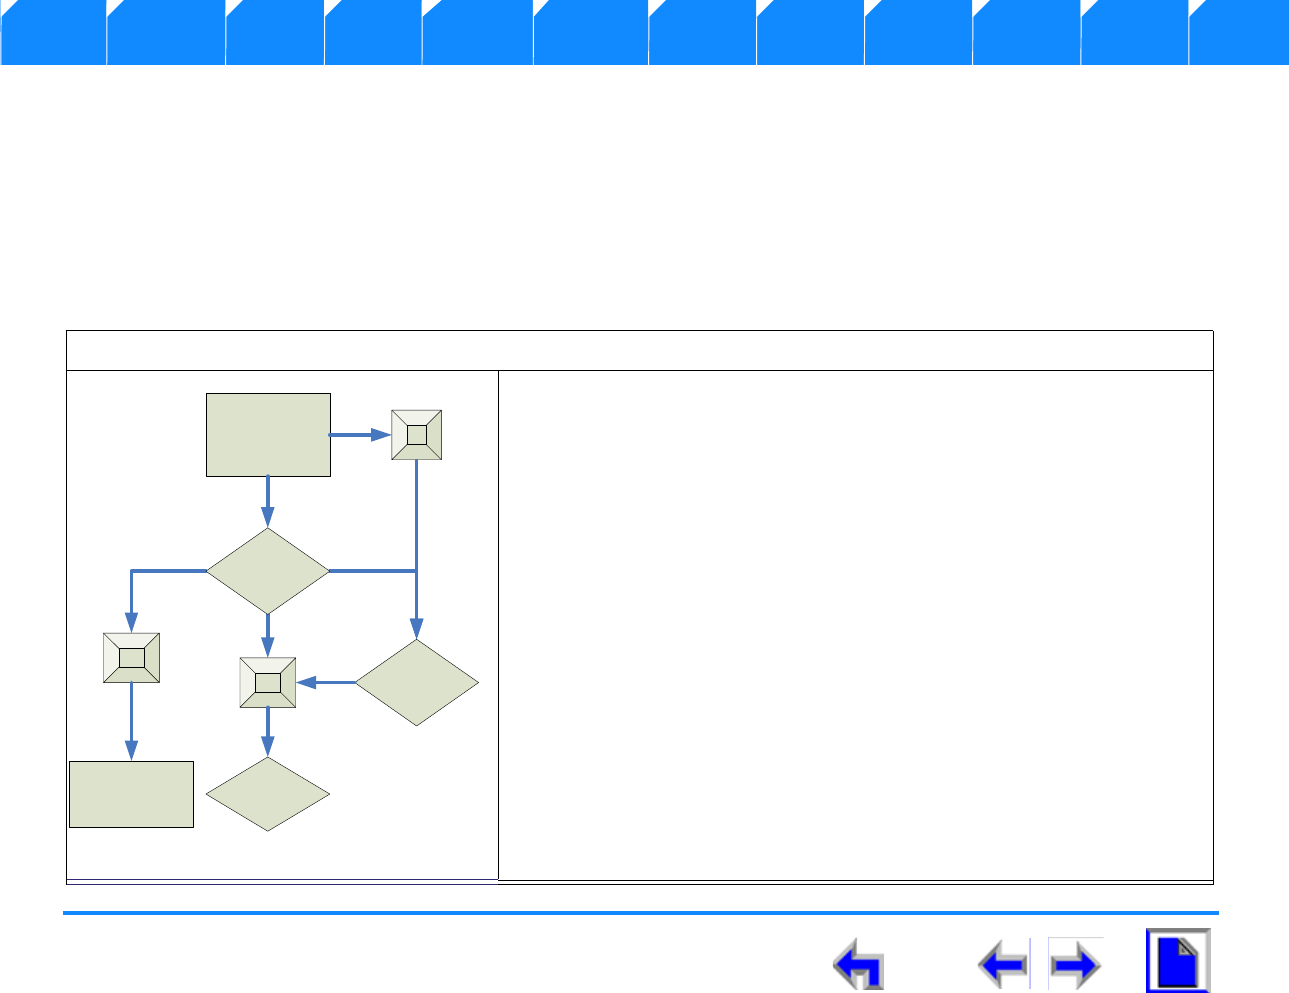
SB67030 Deskset User’s Guide - Voice Mail 107
Voice Make Call Answer
Install Overview PC UI Setup Mail Directory CallLog Call Manage Call Handset Trouble
Voicemail Remote Operations
Remote access allows you to listen to messages or change the recorded greeting. Following the voice prompts and press the
appropriate dialing keys to navigate through the system. The voice prompts in a menu list will be repeated three times with a 5-second
pause in-between each narration. If the voice prompt is narrated three times with no action, the voice will say “Goodbye” and the remote
call will be disconnected.
Listening to the Time/Date stamp does not count as listening to the message. If you access the voicemail through remote access and
skip to another message while the Time/Date stamp is playing, the message will still be considered as new.
To access voicemail remotely - enter password or record message:
1. Dial the remote access number as illustrated in the flow diagram in
Figure 123.
2. You have the following options:
a. Press 5 to skip the greeting and record a message.
b. Listen to the greeting.
3. At the end of the greeting you have the following options:
a. Press the asterisk twice (* *) and enter your password.
b. Record a message.
c. Press 0 to access the operator.
d. Record a message and then press 0 to access the operator.
4. Enter the Main Menu after entering a valid password
Figure. 123 Voicemail Flow 1
Dial Number
Record
Message
5
0
Operator
**
Enter
Password
Greeting
Skip
Greeting
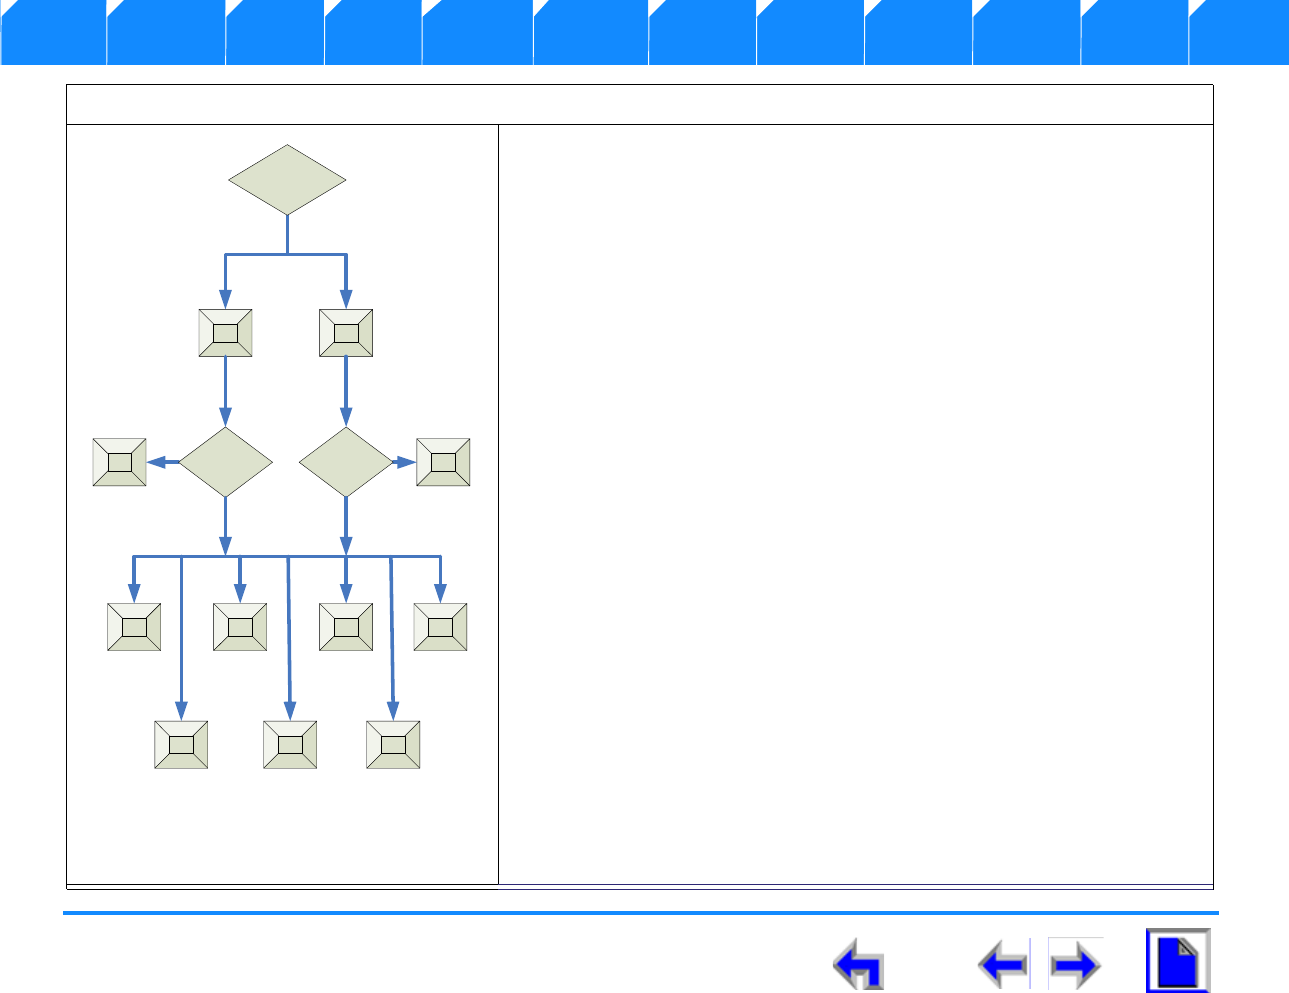
SB67030 Deskset User’s Guide - Voice Mail 108
Voice Make Call Answer
Install Overview PC UI Setup Mail Directory CallLog Call Manage Call Handset Trouble
To access voicemail remotely - listen to messages
1. After entering a valid password you can listen to old or new messages
as illustrated in the flow diagram in Figure 124.
2. You have the following options:
a. Press 1 to listen to new messages.
b. Press 2 to listen to old messages.
3. Press 5 to stop the playback.in either new or old messages.
4. Select one of the following options:
a. Press 1 to play or pause playback.
b. Press 3 to delete the current message.
c. Press 4 to repeat the previous message.
d. Press 6 to skip this message.
e. Press 7 to jump back 8 seconds.
f. Press 9 to jump forward 8 seconds.
g. Press * to return to the Main Menu.
Figure. 124 Remote Voicemail - 2
1 2
4
3 6
7
9
*
5 5
Stop
Playback Stop
Playback
Repeat
Previous
Message
Jump
Back 8
Seconds
Jump
Forward 8
Seconds
Skip This
Message
Delete
Current
Message
Return to
Main
Menu
1
Play or
Pause
Playback
Main Menu
New
Message Old
Message
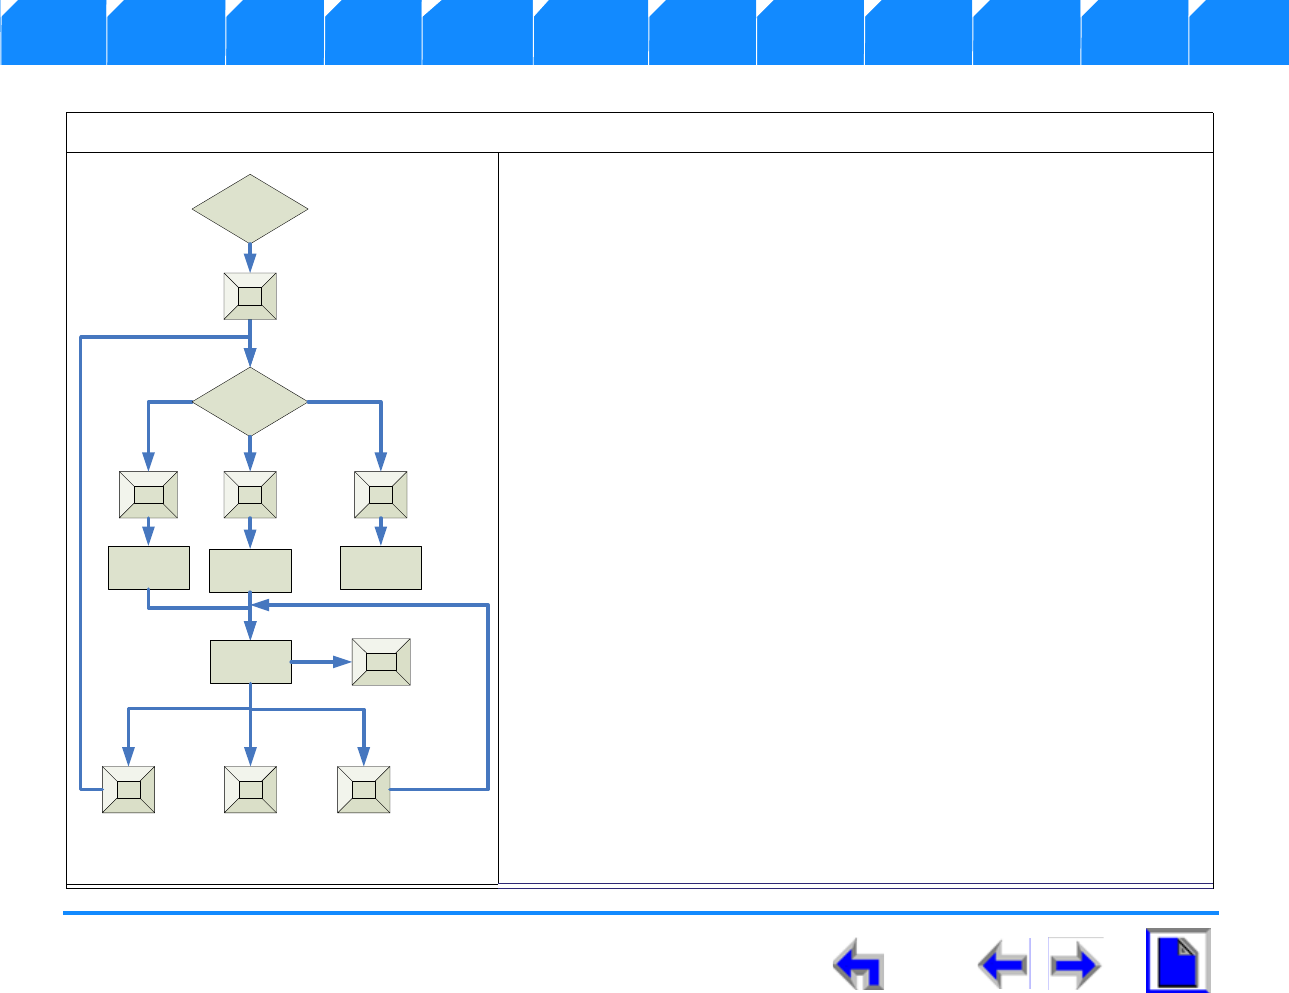
SB67030 Deskset User’s Guide - Voice Mail 109
Voice Make Call Answer
Install Overview PC UI Setup Mail Directory CallLog Call Manage Call Handset Trouble
To access voicemail remotely: setup voicemail
1. After entering a valid password, press 8 to set up voice mail as
illustrated in the flow diagram in Figure 125.
2. You have the following options:
a. Press 1 to record a primary greeting.
b. Press 2 to record a secondary greeting
c. Press 3 to use the alternate greeting.
3. Begin recording after the tone.
4. Press 5 to end the recording.
5. Select one of the following options:
a. Press 1 to review the recording.
b. Press 3 to re-record the greeting.
c. Press 9 to accept the greeting.
Figure. 125 Remote Voicemail - 3
Main
Menu
Voicemail
Setup
1 2 7
Opitons
Record
Secondary
Record
Primary Use
Alternate
Record
Greeting 5
19 3
End
Recording
8
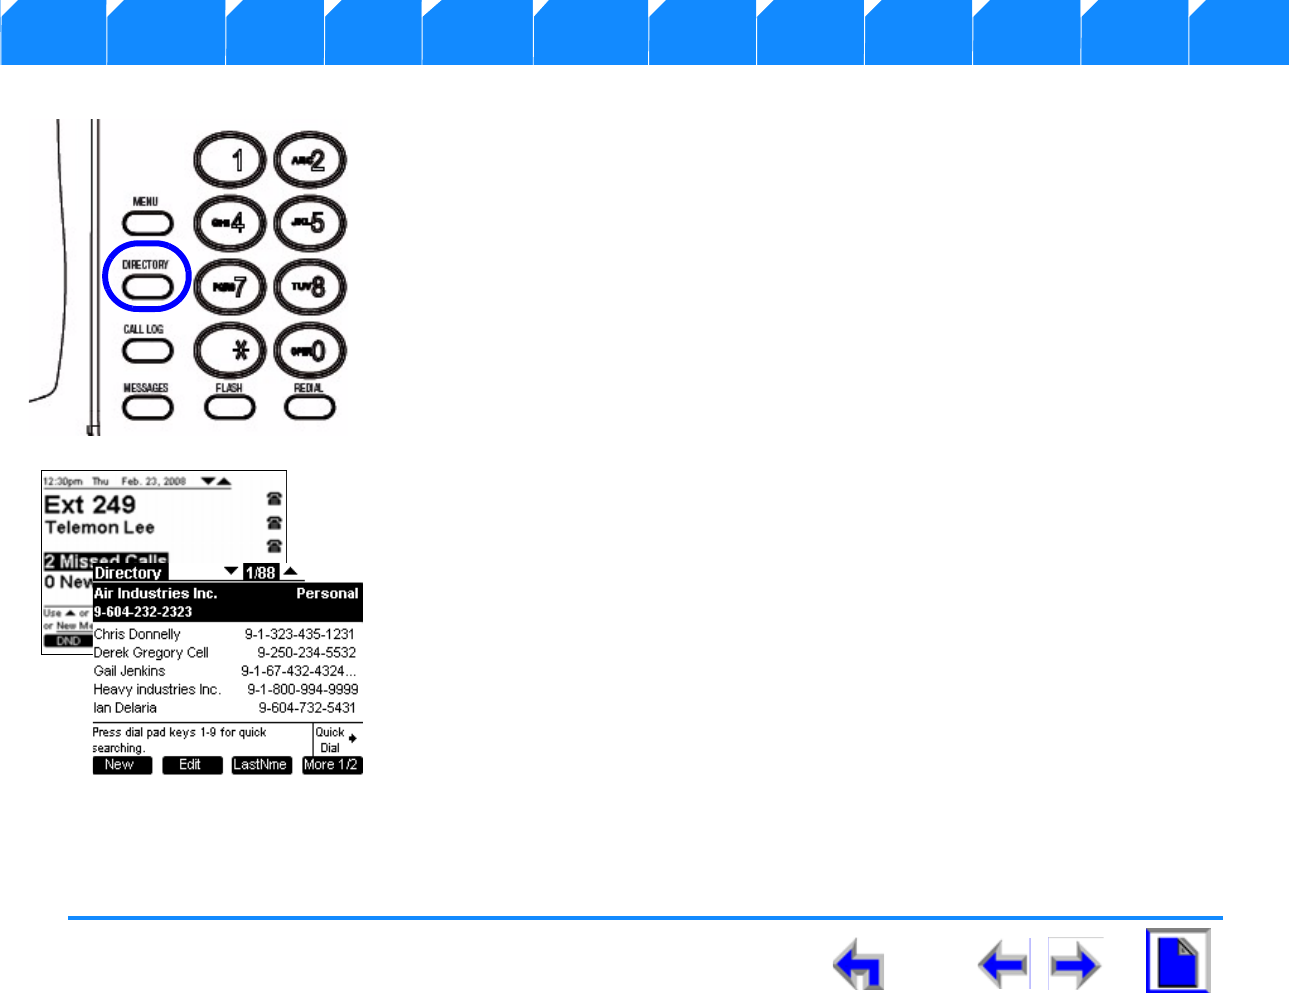
SB67030 Deskset User’s Guide - Directory 110
Voice Make Call Answer
Install Overview PC UI Setup Mail Directory CallLog Call Manage Call Handset Trouble
CHAPTER
6
D
IRECTORY
Introduction
You can access the directory from Idle, Dial, Pre-Dial, with a call on Hold, and during an active call
by pressing DIRECTORY. However, the delete, edit and create new entries features are only
available when in Idle or if all calls are held. Here is an overview of the Directory list:
1. “Using the Directory” on page 111
2. “Creating a New Directory Entry” on page 113
3. “Editing a Directory Entry” on page 114
4. “Deleting a Directory Entry” on page 115
5. “Directory Sort” on page 116
6. “Directory List” on page 117
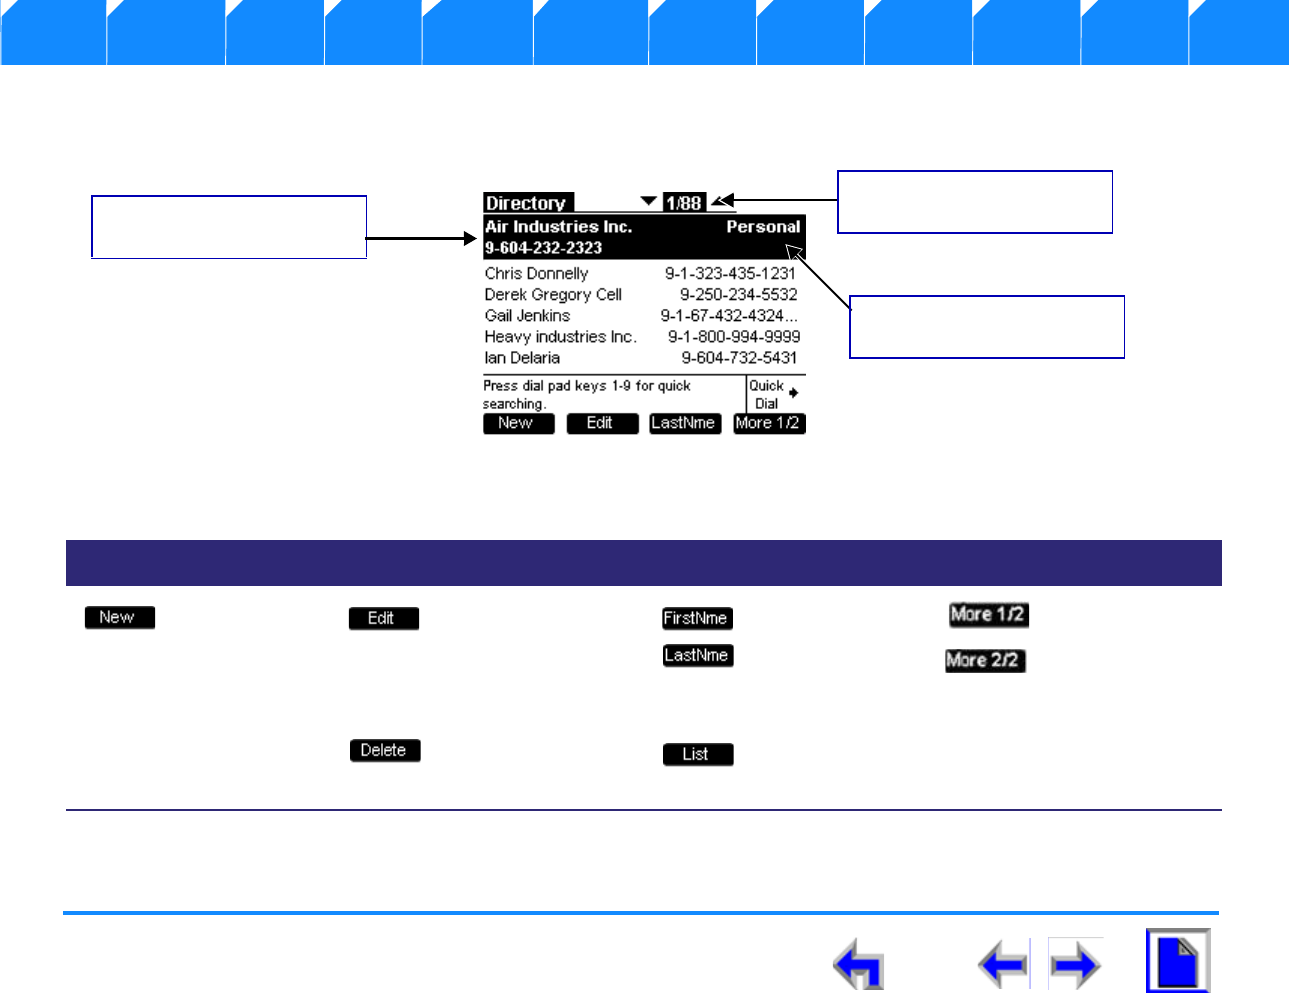
SB67030 Deskset User’s Guide - Directory 111
Voice Make Call Answer
Install Overview PC UI Setup Mail Directory CallLog Call Manage Call Handset Trouble
Using the Directory
.
Figure. 126 Directory Screen Description
nThe maximum number of directory entries is 200. (100 system-wide entries, 50 personal entries, and up to 50 extensions can
be installed on the network.) Only a system administrator can edit System and Extension entries.
Table 12 Directory Programmed keys
Key Description Key Description Key Description Key Description
Creates a new
entry. Allows you to
change previously
entered
information.
Toggles First
and Last name
sort in
Directory and
Extension list.
Moves to next set
of programmed
operation keys.
Performs a
permanent
deletion.
Opens the sort
options menu
in Directory.
Full name and number
displayed in highlight bar
Directory entry counter (200/
200 max)
Entry classification (Personal,
System, or Extension)
SB67030 Deskset User’s Guide - Directory 112
Voice Make Call Answer
Install Overview PC UI Setup Mail Directory CallLog Call Manage Call Handset Trouble
nThe highlight bar displays full name and number string. The Un-highlighted entries have a 22-character limit on both name and
number fields
nOversized names or numbers will be truncated with ellipses.
nThe search function is available. Press any digit key (except for # and *) to index into the list according to default sort criteria.
For example, pressing G will select the entry Gail Jenkins based on first name default sort criteria.
nPressing the up or down NAVIGATION key to cycle through Directory entries.
nYou can call the number listed in the highlighted entry.
List Scrolling Rules
These rules apply to all features with list modes, including Messages, Call Log, Redial, Directory, Extension list. This rule also applies to
the list of options in the settings menu.
nEvery list is circular. If the highlight bar is on the first entry in a list, pressing the up NAVIGATION arrow will take the user to
the last entry in the list.
nIf the highlight bar is on the last entry, pressing the down NAVIGATION arrow will take the user to the first entry in the list.
nIf the highlight bar is at the bottom of the screen, but not on the last entry), pressing the down NAVIGATION arrow moves the
highlight bar to the next entry and the list items will scroll up by one entry.
nIf the highlight bar is at the top of the screen but not on the first entry, pressing the up NAVIGATION arrow will move the
highlight bar to the previous entry and all list entries will scroll down by one entry (see example below).
Note If the directory is empty, only the will be available.
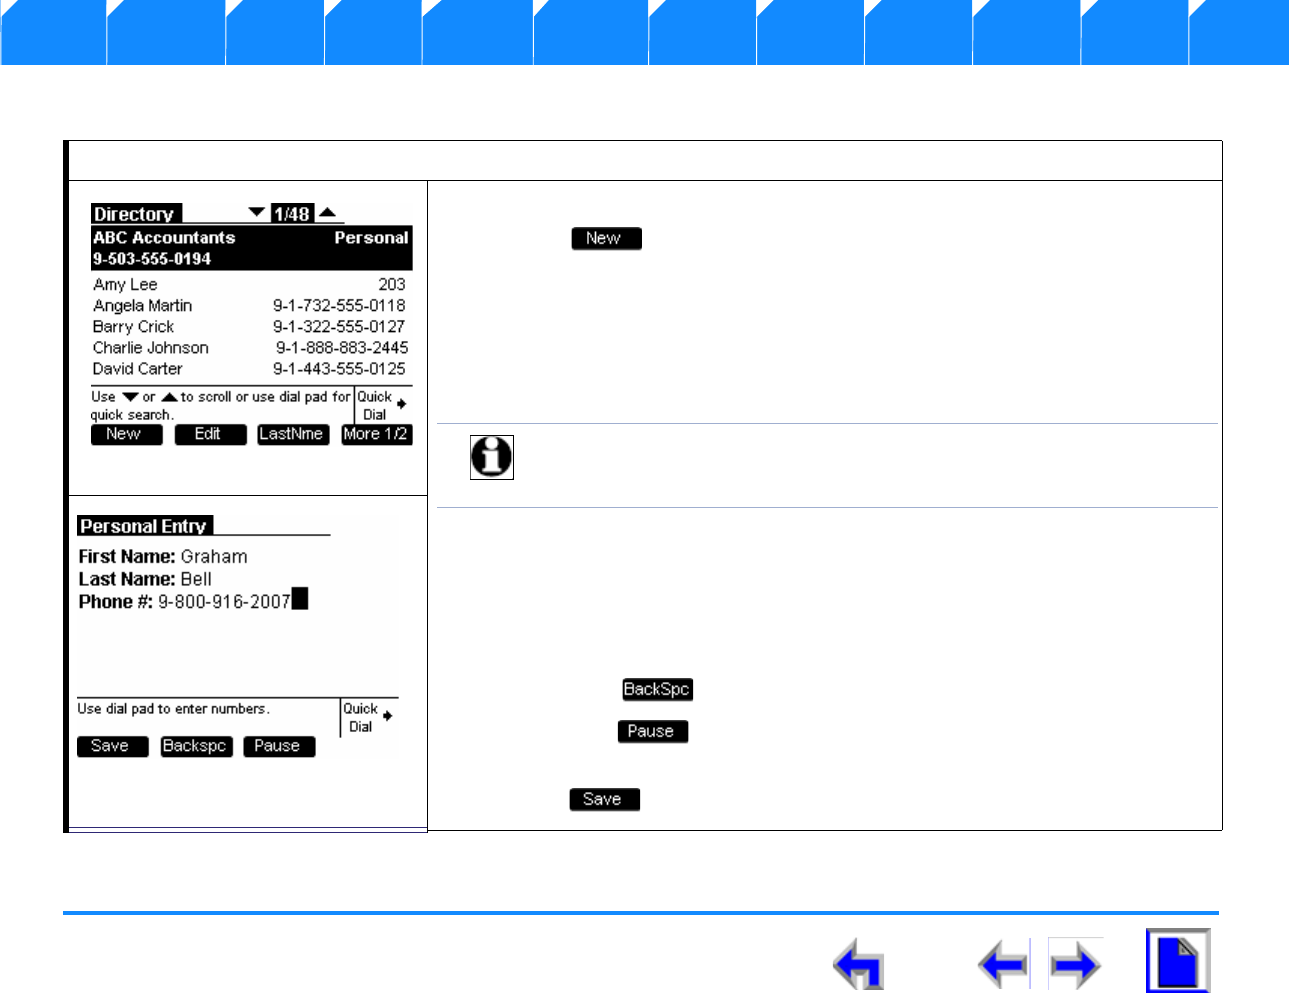
SB67030 Deskset User’s Guide - Directory 113
Voice Make Call Answer
Install Overview PC UI Setup Mail Directory CallLog Call Manage Call Handset Trouble
Creating a New Directory Entry
To create a new directory entry:
1. Press DIRECTORY to display the directory list shown in Figure 127.
2. Press to display the Personal Entry screen shown in Figure 128.
3. You will go to Directory Edit mode with the blinking cursor positioned in the
First Name field.
4. Fill in the First Name, Last Name and Number fields using the “Keypad Data
Entry” on page 43. The Name text fields are limited to 20 characters each and
the number field is limited to 32 digits.
5. The user has the following options:
a. Press the left or right NAVIGATION key to move the cursor
b. Press the up or down NAVIGATION key to move to the previous or next
field.
c. Press to erase the character before the blinking cursor.
d. Press to insert a two-second pause into the digit string. The pause
will appear as a ‘p’ in the field and will be counted as a digit.
6. Press to return to the directory list shown in Figure 127.
Figure. 127 Directory List
Note If you have exceeded the maximum number of personal entries
allowed, a Maximum of 50 Personal entries reached splash
appears.
e. 128 Personal Entry
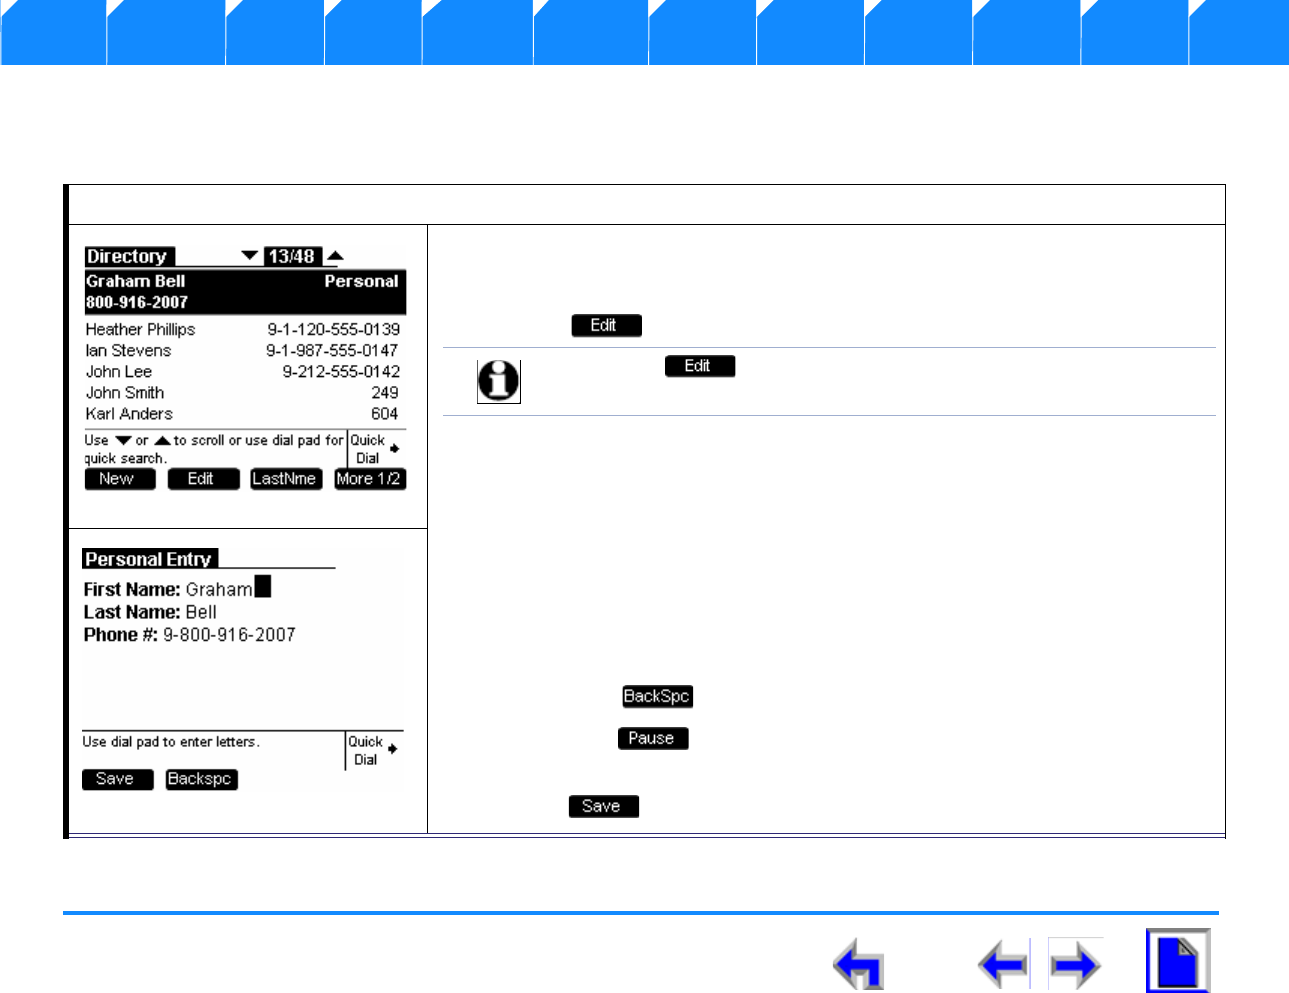
SB67030 Deskset User’s Guide - Directory 114
Voice Make Call Answer
Install Overview PC UI Setup Mail Directory CallLog Call Manage Call Handset Trouble
Editing a Directory Entry
You may edit any Personal directory entries while viewing the Directory list.
To edit a directory entry:
1. Press DIRECTORY to display the directory list shown in Figure 129.
2. Press the up or down NAVIGATION key to highlight a Personal entry.
3. Press and observe that the screen shown in Figure 130.
4. Fill in the First Name, Last Name and Number fields using the “Keypad Data
Entry” on page 43. The Name text fields are limited to 20 characters each and
the number field is limited to 32 digits.
5. The user has the following options:
a. Press the left or right NAVIGATION key to move the cursor
b. Press the up or down NAVIGATION key to move to the previous or next
field.
c. Press to erase the character before the blinking cursor.
d. Press to insert a two-second pause into the digit string. The pause
will appear as a ‘p’ in the field and will be counted as a digit.
6. Press to return to the directory list shown in Figure 127 on page 113.
Figure. 129 Personal Directory
Note The key will not be available when a System or Extension
entry is highlighted in the Directory list.
Figure. 130 Edit Directory

SB67030 Deskset User’s Guide - Directory 115
Voice Make Call Answer
Install Overview PC UI Setup Mail Directory CallLog Call Manage Call Handset Trouble
Deleting a Directory Entry
You may delete any one of their Personal directory entries while viewing the Directory list.
To delete a directory entry:
1. Press DIRECTORY to display the directory list shown in Figure 131.
2. Press the up or down NAVIGATION key to highlight a Personal entry.
3. Press . to display the screen shown in Figure 132
4. Press and observe that the
confirmation splash appears.
5. Press to confirm the
deletion.
Figure. 131 Directory List
Note The key will not be available when a System or Extension
entry is highlighted in the Directory list.
Figure. 132 Delete Entry
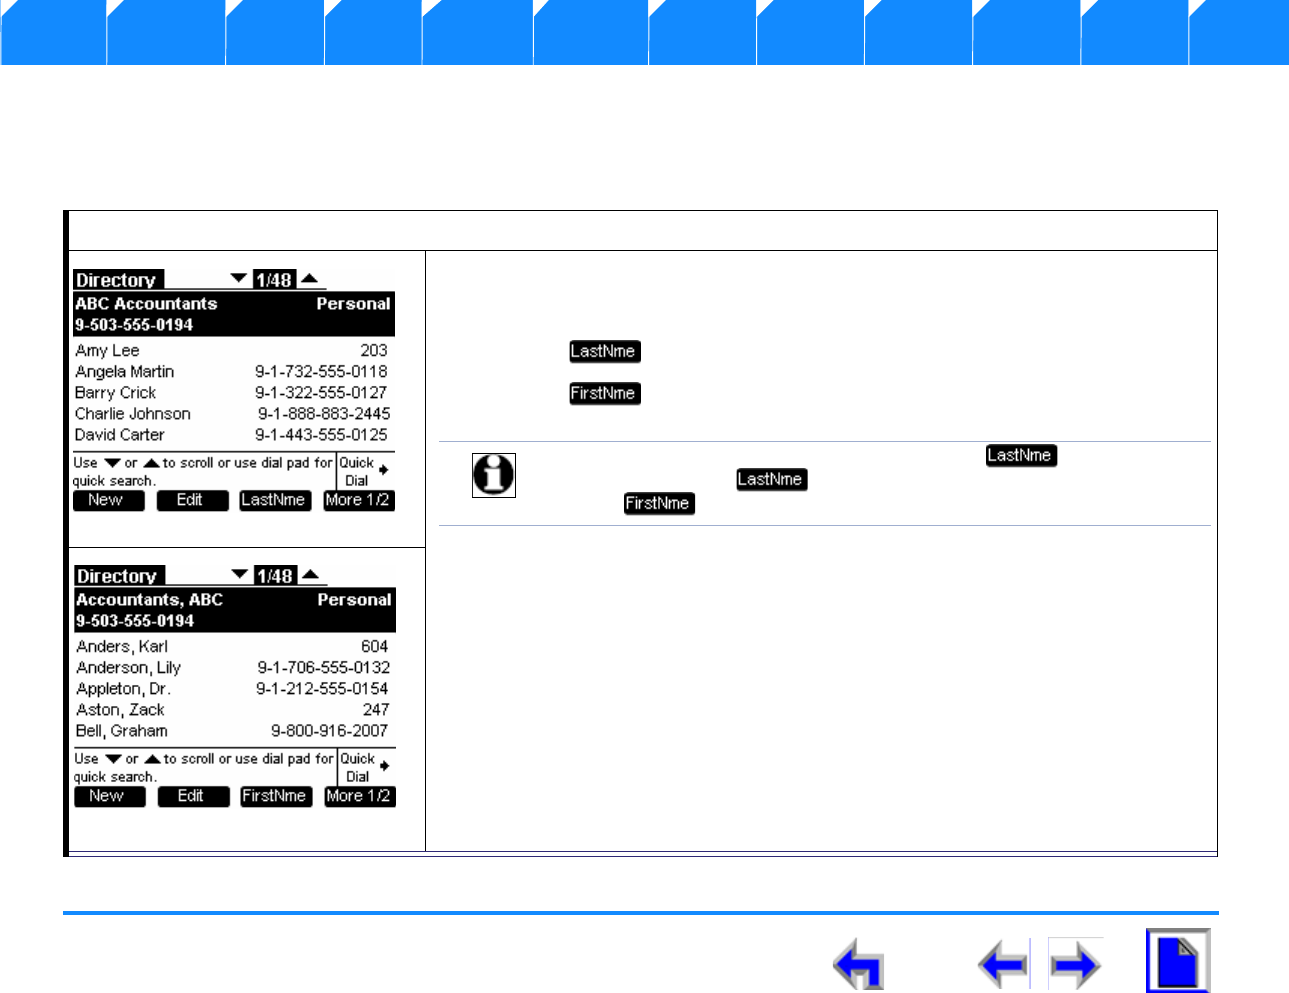
SB67030 Deskset User’s Guide - Directory 116
Voice Make Call Answer
Install Overview PC UI Setup Mail Directory CallLog Call Manage Call Handset Trouble
Directory Sort
This function is available in both Idle and Active modes. There are two ways you can sort Directory entries, with the First Name/Last
Name toggle or through selecting a specific Directory list.
First Name/Last Name toggle
1. Press DIRECTORY to display the directory list shown in Figure 133.
2. Press the up or down NAVIGATION key to highlight a Personal entry
3. Press and observe that the screen shown in Figure 134 displays.
4. Press and observe that the screen shown in Figure 133 returns.
Figure. 133 Directory List
Note If the list is currently sorted by first name, displays. If the
user presses , the list will be sorted by last name and
displays.
Figure. 134 Last Name Sort
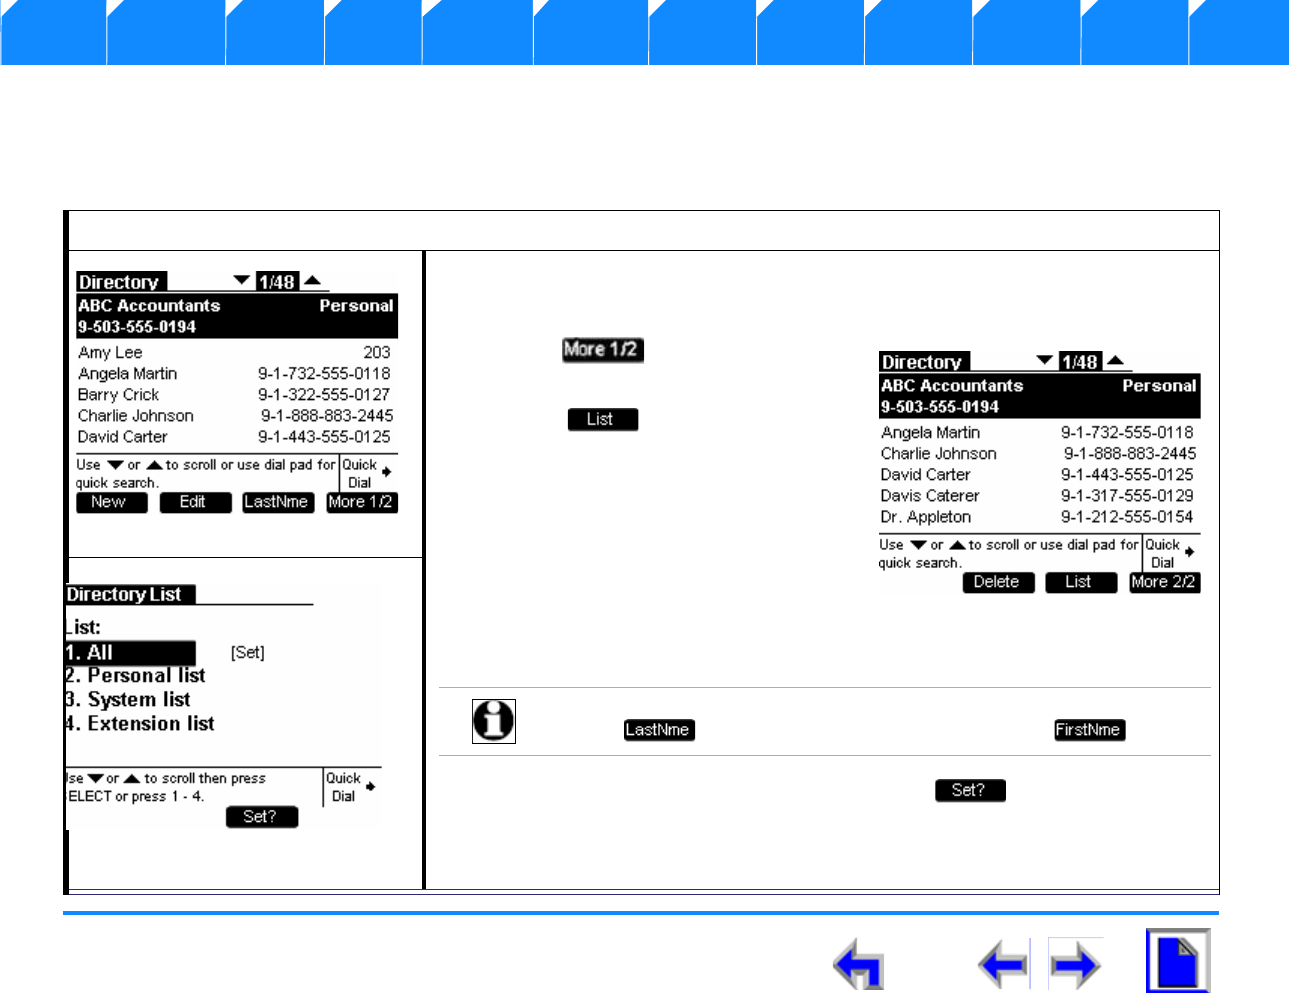
SB67030 Deskset User’s Guide - Directory 117
Voice Make Call Answer
Install Overview PC UI Setup Mail Directory CallLog Call Manage Call Handset Trouble
Directory List
This function is available in both Idle and Active modes. The user can choose to list all entries, or only personal entries, system entries,
or extensions. To view possible list options, the user must follow this procedure while viewing the Directory list:
To create a new directory entry:
1. Press DIRECTORY to display the directory list shown in Figure 133.
2. Press the up or down NAVIGATION key to highlight a Personal entry
3. Press . to display the screen
shown in Figure 137
4. Press to display the screen
shown Figure 137.
5. Press the up or down NAVIGATION key
until desired list option is highlighted.
6. Press SELECT to view the directory list.
7. The system displays the first entry in
the selected Directory list.
You may also change the default list by pressing when the desired
default list option is highlighted in the menu. When a default option is selected,
the Directory will always list entries according to the default criteria.
Figure. 135 Directory
Figure. 136 Directory List
Note If the list is currently sorted by first name, displays. If the user presses
, the list will be sorted by last name and displays.
Figure. 137 Directory List

SB67030 Deskset User’s Guide - Directory 118
Voice Make Call Answer
Install Overview PC UI Setup Mail Directory CallLog Call Manage Call Handset Trouble
Non-alphabetical character sort rules
Special non-alphabetic characters can be entered in the directory name fields. If these characters are entered as the first character in
the name field, the system will sort in the following ascending order shown from left to right:
Space!#&‘()*+,-.??@
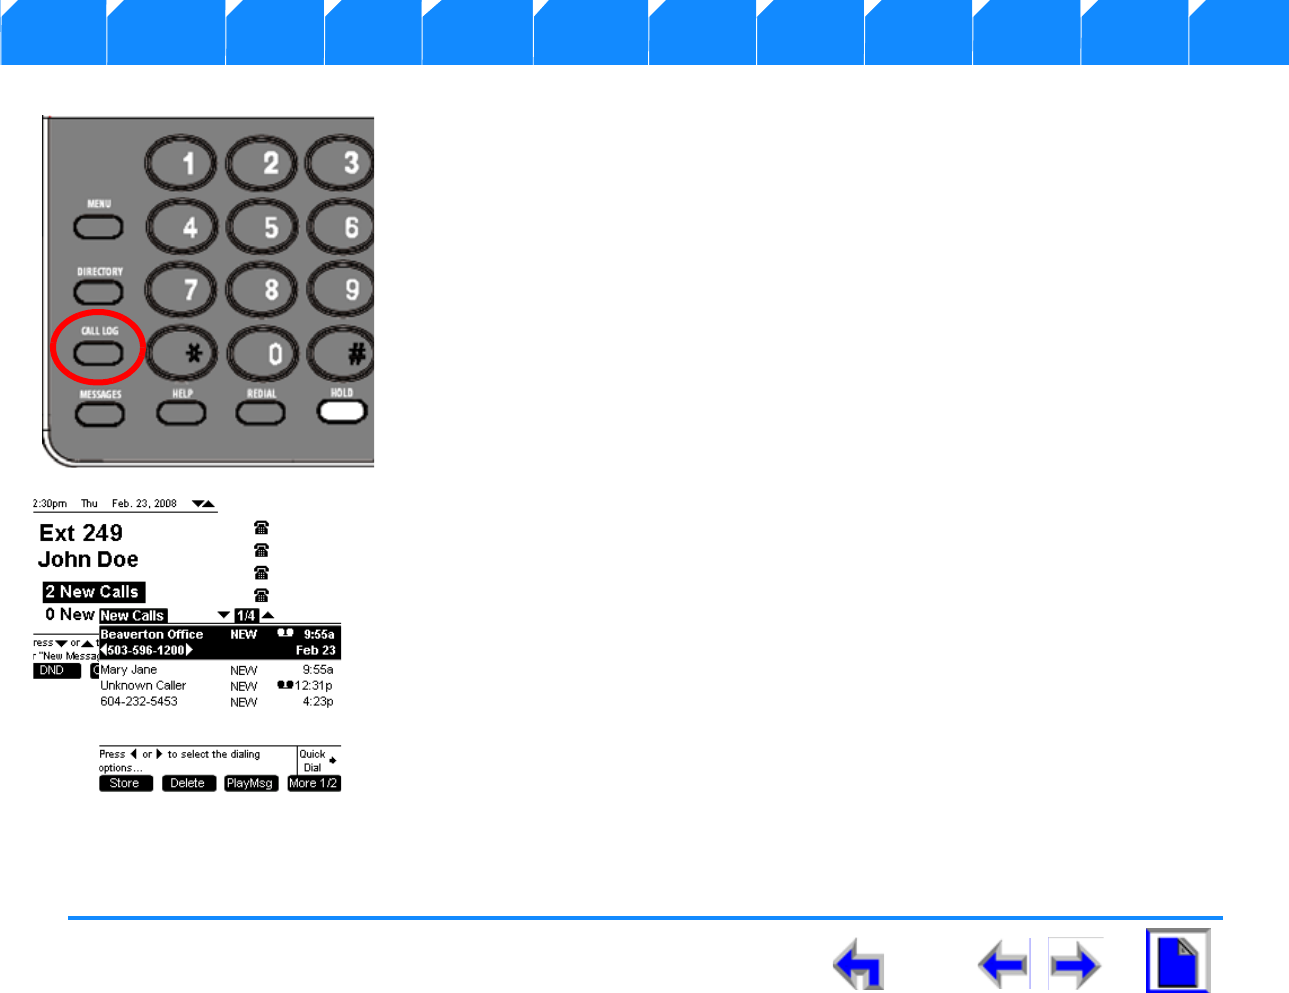
SB67030 Deskset User’s Guide - Call Log 119
Voice Make Call Answer
Install Overview PC UI Setup Mail Directory CallLog Call Manage Call Handset Trouble
CHAPTER
7
C
ALL
L
OG
Introduction
The Call Log provides a record of the last 50 calls received, whether a messages was left or not.
The newest entries replace the oldest. The log lists information based on the availability of Caller
ID (CID) data.
1. “Using the Call Log” on page 120
2. “Missed Call Notification” on page 122
3. “Reviewing the Call Log list:” on page 123
4. “Reviewing the Call Log list:” on page 123
5. “Storing Call Log Entries.” on page 125
You can display the call log shown in Figure on page 120 by either pressing CALL LOG or
highlighting # New Calls in the Idle screen and pressing SELECT.
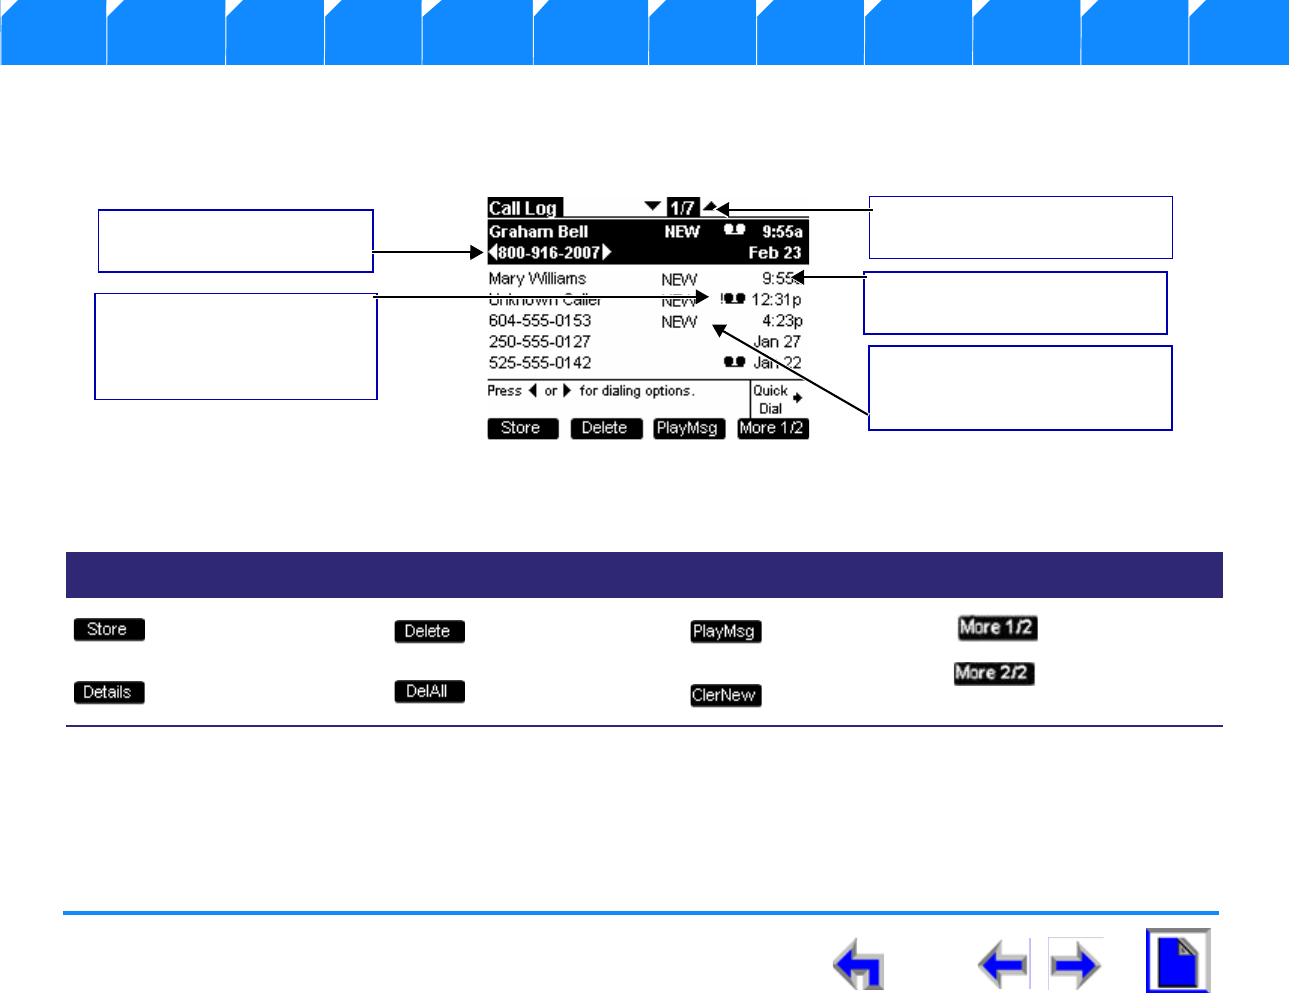
SB67030 Deskset User’s Guide - Call Log 120
Voice Make Call Answer
Install Overview PC UI Setup Mail Directory CallLog Call Manage Call Handset Trouble
Using the Call Log
The available programmed operation keys vary depending on whether the user is accessing this feature from Idle or Active mode.
Storing, Deleting, and playback are not available in Active mode. If the Call Log is empty, no programmed operation keys will be available.
Figure. 138 Call Log Functions
nThe voicemail message icon appears in call entries where the caller left a message. Playing the message will not remove the
icon from the Call Log entry, but deleting the message will.
nUn-highlighted entries display the time for calls received after 12:00am on the current day. Call received before 12:00am on
the current day will display the date.
Table 13 Call Log Programmed Keys
Key Description Key Description Key Description Key Description
Stores number in local
directory. Performs a
permanent deletion. Plays message. Moves to next set
of programmed
operation keys.
Shows you more details
for a particular entry. Performs deletion of
multiple records. Clears all new
messages.
Call Log entry counter (50/50
max)
NEW: indicates call was not
picked up and has not been
reviewed
Date and Time of highlighted call
entry
Left and right arrows indicate
dialing options available
Voicemail message available
for playback. Exclamation
mark indicates message is
new.

SB67030 Deskset User’s Guide - Call Log 121
Voice Make Call Answer
Install Overview PC UI Setup Mail Directory CallLog Call Manage Call Handset Trouble
The highlighted Call Log entry displays both the name and number fields from the available CID information as well as both the time
and date of the call. You may call the number listed in the highlighted entry. The name is shown by default, if it is not available, the
number is shown. If neither are available the system supplies an appropriate CID label.
List Scrolling Rules
These rules apply to all features with list modes, including Messages, Call Log, Redial, Directory, Extension list. This rule also applies to
the list of options in the settings menu.
nEvery list is circular. In other words, if the highlight bar is on the first entry in a list, pressing the up NAVIGATION arrow will
take the user to the last entry in the list. Conversely, if the highlight bar is on the last entry, pressing the down NAVIGATION
arrow will take the user to the first entry in the list.
nThe rule above also applies to details mode. When viewing an entry in details mode, the user can continuously cycle through
the entries by using the up or down navigation key.
nIf the highlight bar is at the bottom of the screen (but not on the last entry), pressing the down NAVIGATION arrow moves the
highlight bar to the next entry and the list items will scroll up by one entry.
nIf the highlight bar is at the top of the screen (but not on the first entry), pressing the up NAVIGATION arrow will move the
highlight bar to the previous entry and all list entries will scroll down by one entry (see example below).
nPressing the up or down NAVIGATION key cycles through Call Log entries, while pressing the left or right navigation key cycles
through dialing options
Out of Area or Unavailable Private
Number Field UNKNOWN NUMBER PRIVATE NUMBER
Name Field UNKNOWN NAME PRIVATE NAME
Both UNKNOWN CALLER PRIVATE CALLER
Note The data sent is limited to 21 characters on the Name field and 24 characters on the number field. Oversized fields
will be truncated with ellipses. The display field in the Call Log accommodates up to 24 characters.
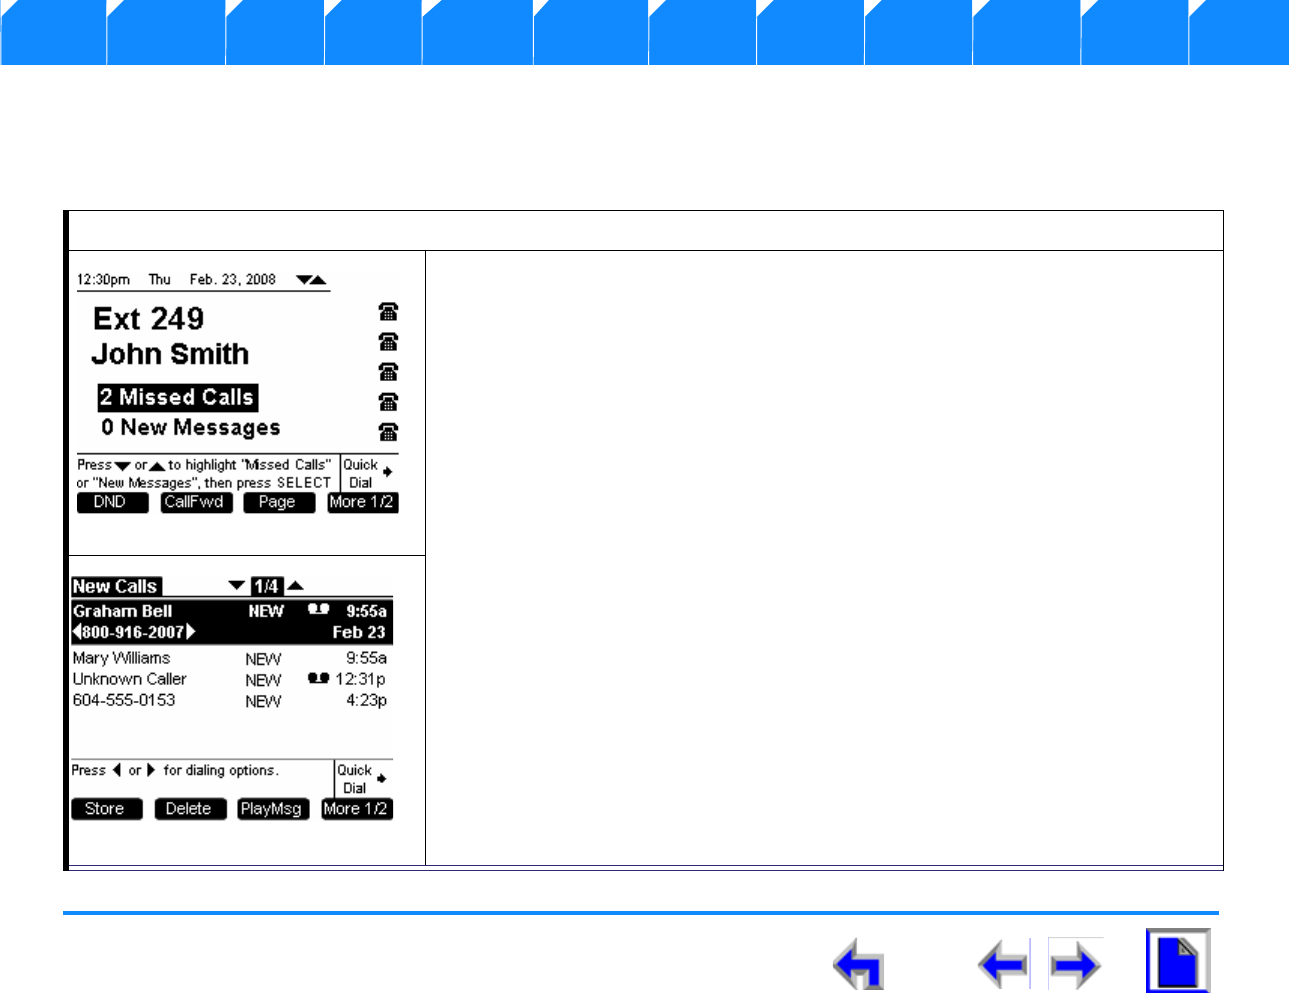
SB67030 Deskset User’s Guide - Call Log 122
Voice Make Call Answer
Install Overview PC UI Setup Mail Directory CallLog Call Manage Call Handset Trouble
Missed Call Notification
If an incoming call event occurs and the user takes no action, the new call will be recorded in the Call Log. A call is considered as new
if it has not been reviewed yet.
To view missed calls:
The system notifies you of any new calls on the Idle screen, as shown in Figure 139.
1. With # Missed Calls highlighted, press SELECT to display the New Calls
screen shown in Figure 140.
2. In the New Calls list, a new call record will no longer be considered as new
once you move the highlight bar to the next record. The only exception is when
the user moves the highlight to the last record. In this case the last record will
be considered as reviewed.
3. Once a new call is reviewed in the New Calls list or the Call Log, the call count will
go down by one. If there are no new calls, the notification will display “0 New Calls”.
4. Pressing SELECT when the notification is highlighted will take the user to the Call
Log where new calls only are displayed (i.e. calls that have not been reviewed and
are tagged as “NEW”)
Figure. 139 Missed Calls
Figure. 140 New Call Log
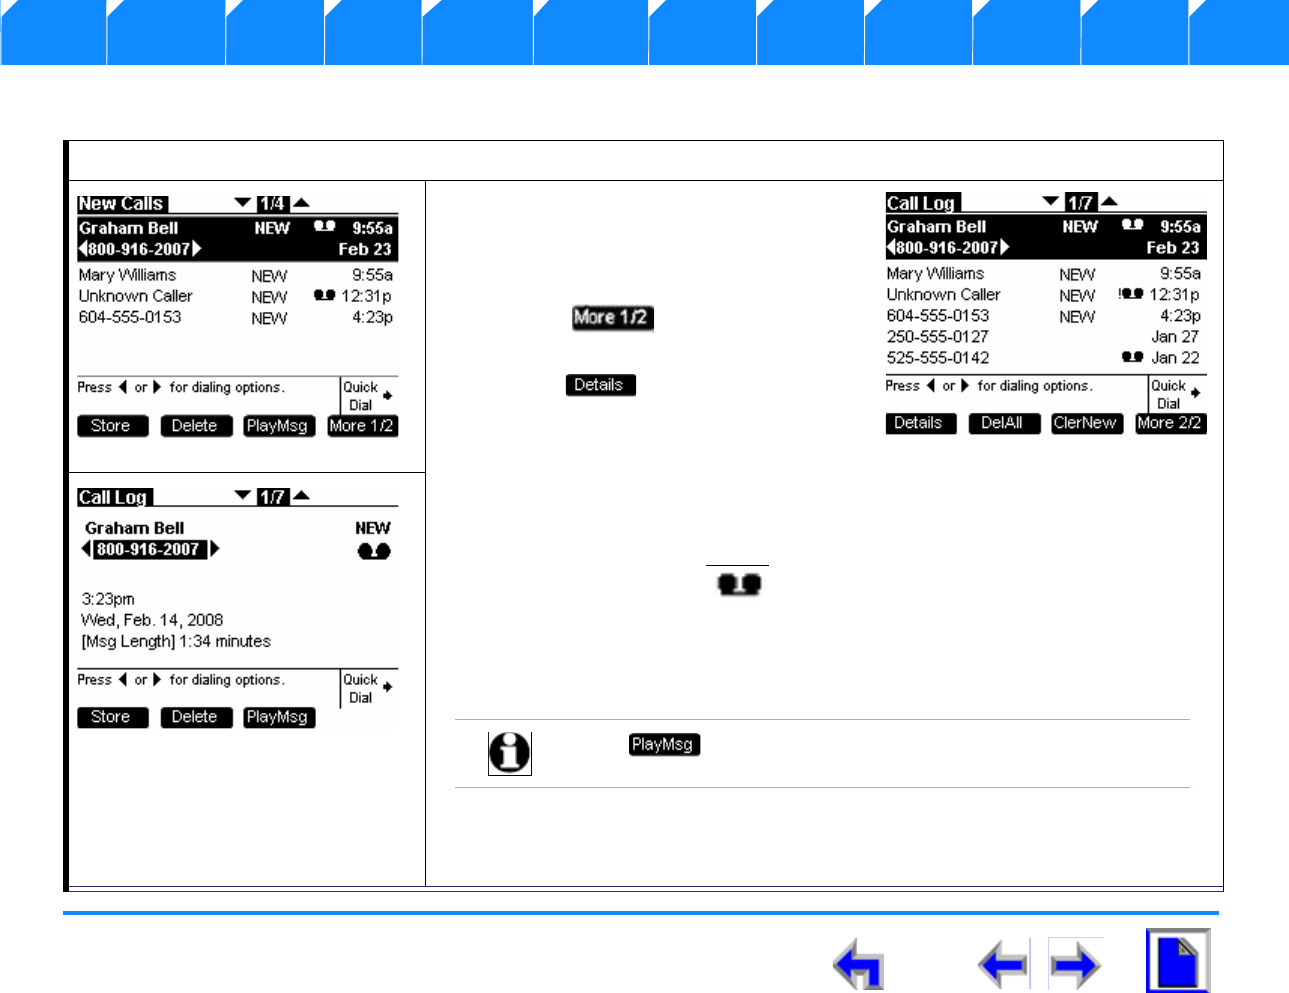
SB67030 Deskset User’s Guide - Call Log 123
Voice Make Call Answer
Install Overview PC UI Setup Mail Directory CallLog Call Manage Call Handset Trouble
Reviewing the Call Log list:
To review the Call Log list:
1. Press CALL LOG or highlighting # New
Calls in the Idle screen (See Figure on
page 122) and press SELECT to display
the screen shown in Figure 141.
2. Press to display the screen
shown in Figure 142.
3. Press to display the call
details screen shown in Figure 143
that contains the following
information:
lThe name and number of the caller (if available).
lThe NEW tag appears if this is the first time reviewing the Call Log entry.
lThe message icon appears if the caller left a message,
lThe time and date of the call.
lThe Msg Length if the call was not answered, but the caller left a message.
lThe Call Length will be displayed if the call was answered.
lWhen viewing Call Log details, you can call the number listed, save the number
in the directory, delete the entry, or play the associated voicemail message (if
available).
Figure. 141 Missed Calls
Figure. 142 Call Log List
Note only appears if the call information has an associated
voicemail.
Figure. 143 Call Log Details
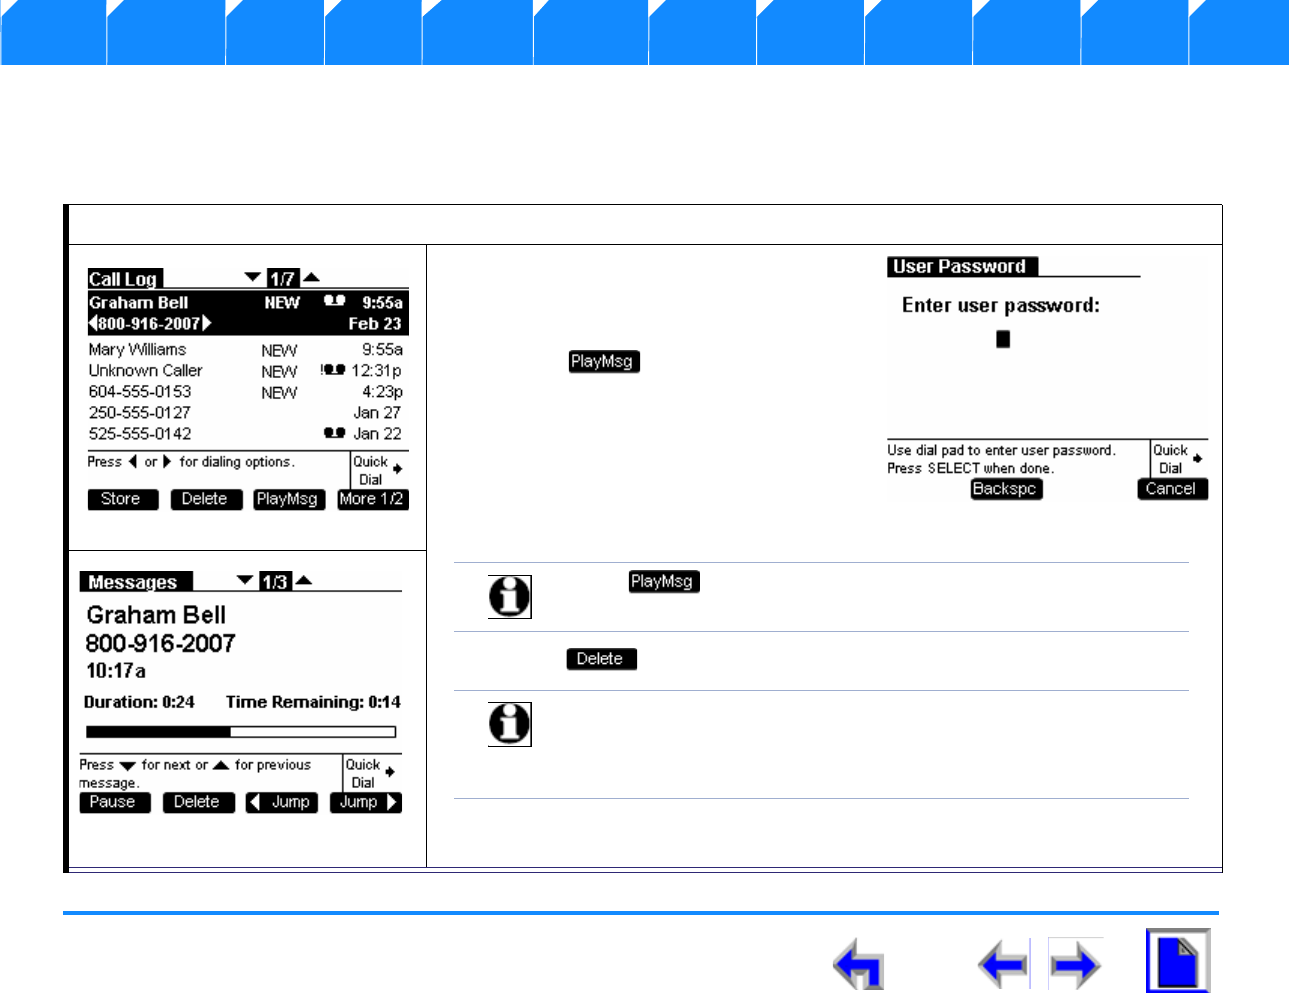
SB67030 Deskset User’s Guide - Call Log 124
Voice Make Call Answer
Install Overview PC UI Setup Mail Directory CallLog Call Manage Call Handset Trouble
Voicemail messages in Call Logs
If the caller listed in the Call Log left a voicemail message, you may play the message from the Call Log list or from Call Log Details. This
will take you out of the Call Log and into the message playback feature.
Playing a voicemail message from Call Log:
1. Press CALL LOG or highlight# Missed
Calls and press SELECT to display the
Call Log screen shown in Figure 144.
2. Press to display the User
Password screen shown in Figure 145.
3. Use the keypad (See “Keypad Data
Entry” on page 43) to enter the
password and press SELECT.
4. Observe that the Messages screen shown
in Figure 146 displays
5. Press to remove the icon from the Call Log entry.
6. When the message playback completes, the system returns you to the Call log.
Figure. 144 Call Log Screen
Figure. 145 User Password
Note only appears if the call information has an associated
voicemail.
Note Once the password has been entered, the user will not have to
re-enter it if playing other messages in the Call Log. However, if
the user exits Call Log or goes to another feature, password entry
will be necessary next time the Messages feature is accessed.
Figure. 146 Message Detail
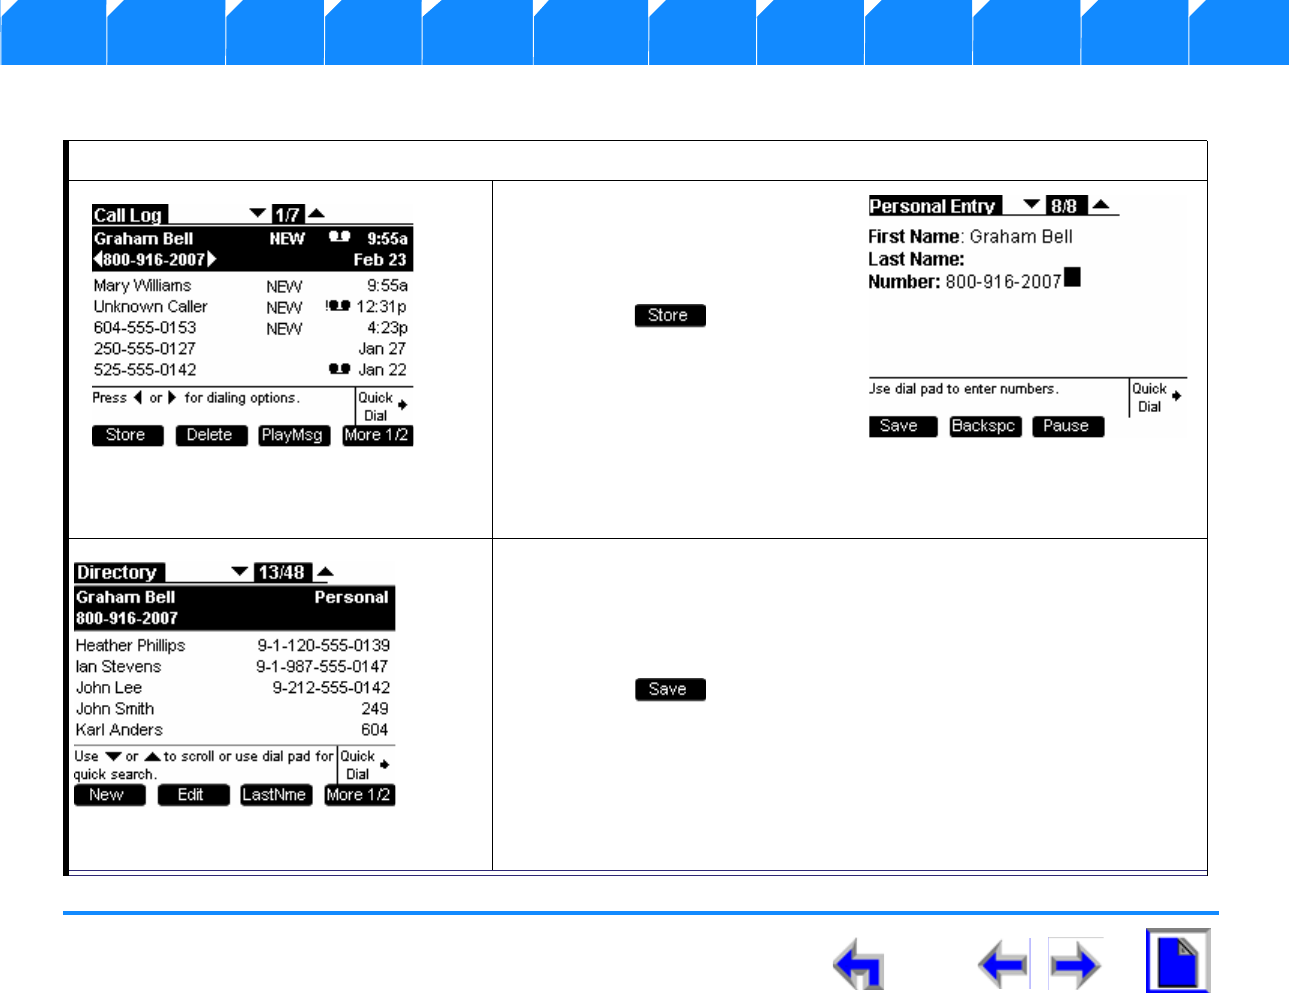
SB67030 Deskset User’s Guide - Call Log 125
Voice Make Call Answer
Install Overview PC UI Setup Mail Directory CallLog Call Manage Call Handset Trouble
Storing Call Log Entries.
To store a Call Log entry in the local phone directory:
1. Press CALL LOG or highlight#
Missed Calls and press
SELECT to display the Call Log
screen shown in Figure 147.
2. Press . to display the
Personal Entry screen shown
in Figure 148 in the Directory
Edit mode
3. The First Name and Number
fields are automatically
populated with CID
information.
4. Use the keypad (See “Keypad Data Entry” on page 43) to enter the
Last Name field.
5. Note that the system will not be checking for duplication in stored
entries.
6. Press to return to the Directory list shown in Figure 149.
Figure. 147 Call Log
Figure. 148 Personal Entry
Figure. 149 Directory List
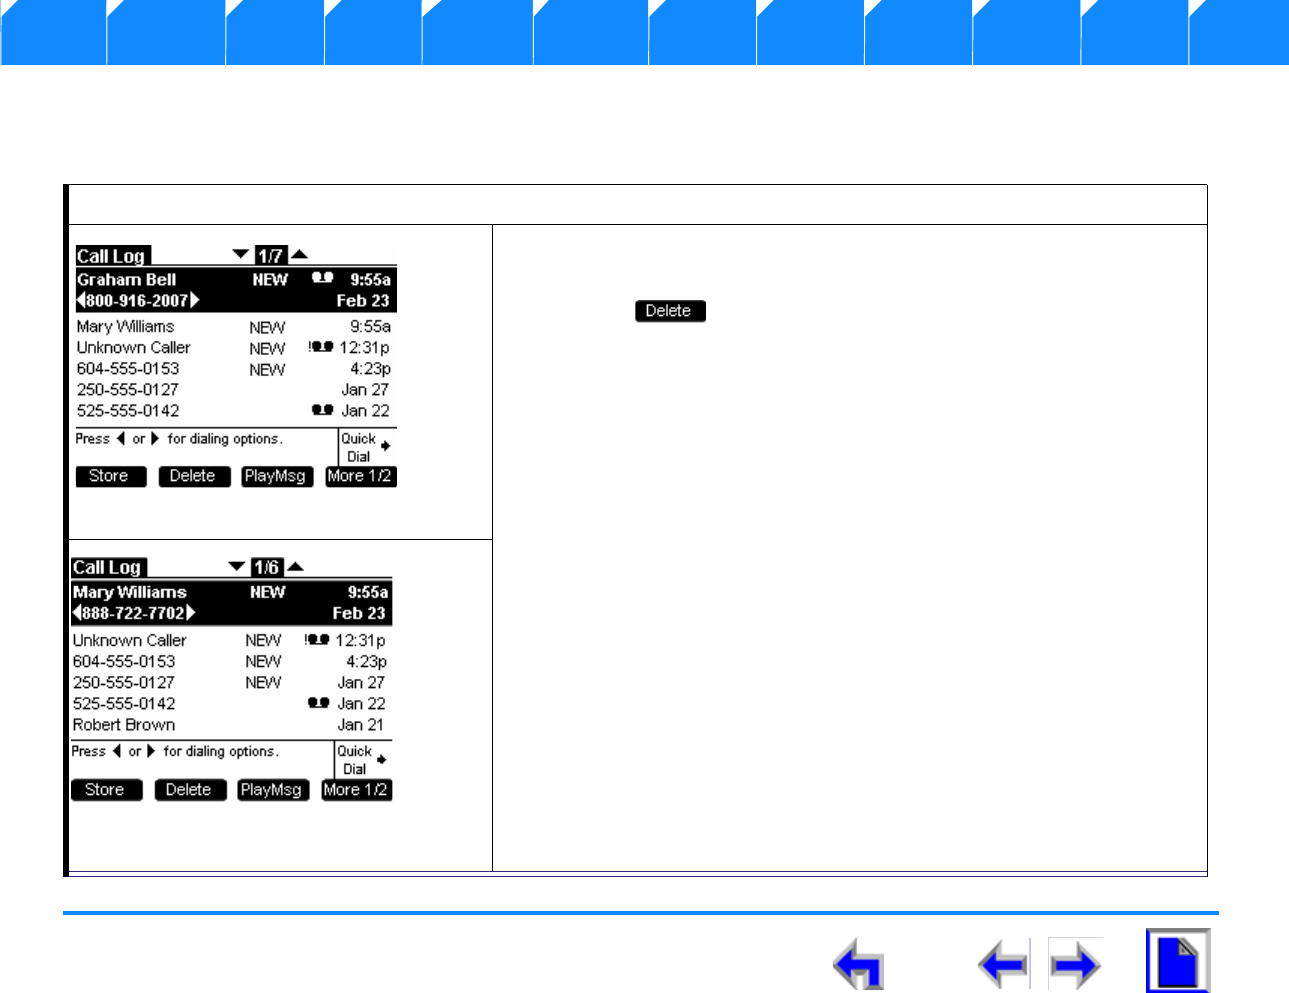
SB67030 Deskset User’s Guide - Call Log 126
Voice Make Call Answer
Install Overview PC UI Setup Mail Directory CallLog Call Manage Call Handset Trouble
Deleting Call Log Entries
The user may delete a single Call Log entry, or all Call Log entries.
To delete a single call log entry:
1. Press CALL LOG or highlight# Missed Calls and press SELECT to
display the Call Log screen shown in Figure 150.
2. Press and observe that the highlighted entry is removed
from the list and the next entry appears as shown in Figure 151.
Figure. 150 Call log
Figure. 151 Deleted Entry
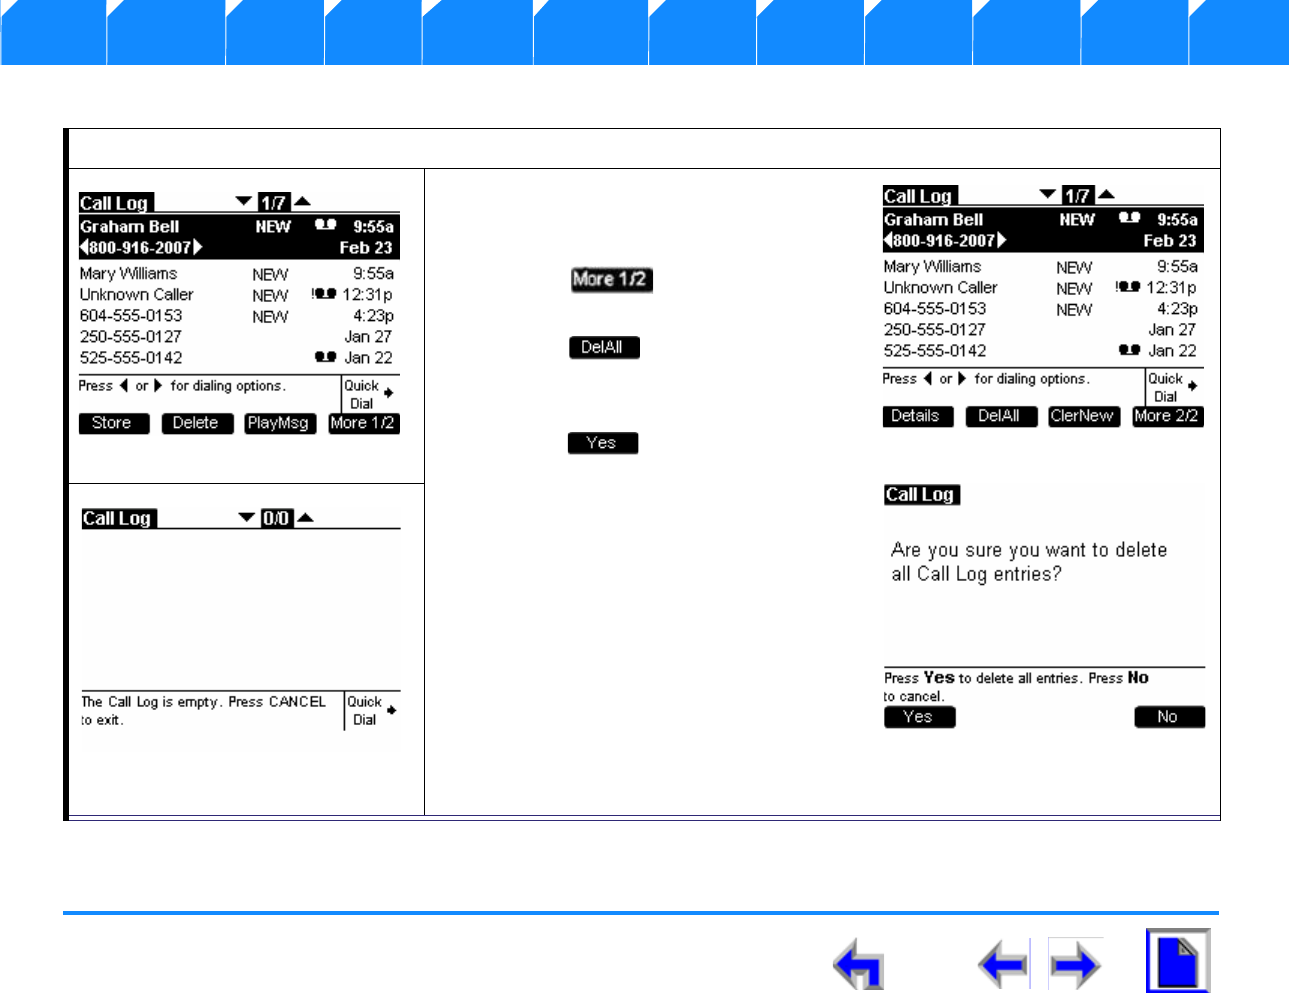
SB67030 Deskset User’s Guide - Call Log 127
Voice Make Call Answer
Install Overview PC UI Setup Mail Directory CallLog Call Manage Call Handset Trouble
. You may delete all entries only when viewing the Call Log list from Idle
To delete all of the entries in the call log list:
1. Press CALL LOG or highlight# Missed
Calls and press SELECT to display the
Call Log screen shown in Figure 152.
1. Press to display the screen
shown in Figure 153.
2. Press and observe that
confirmation screen shown in
Figure 155.
3. Press to confirm the deletion
4. All entries will disappear and there will
be no programmed operation keys
available as shown in Figure 155.
Figure. 152 Call Log List
Figure. 153 Call log 2
Figure. 154 Call log 2
Figure. 155 Confirmation Screen
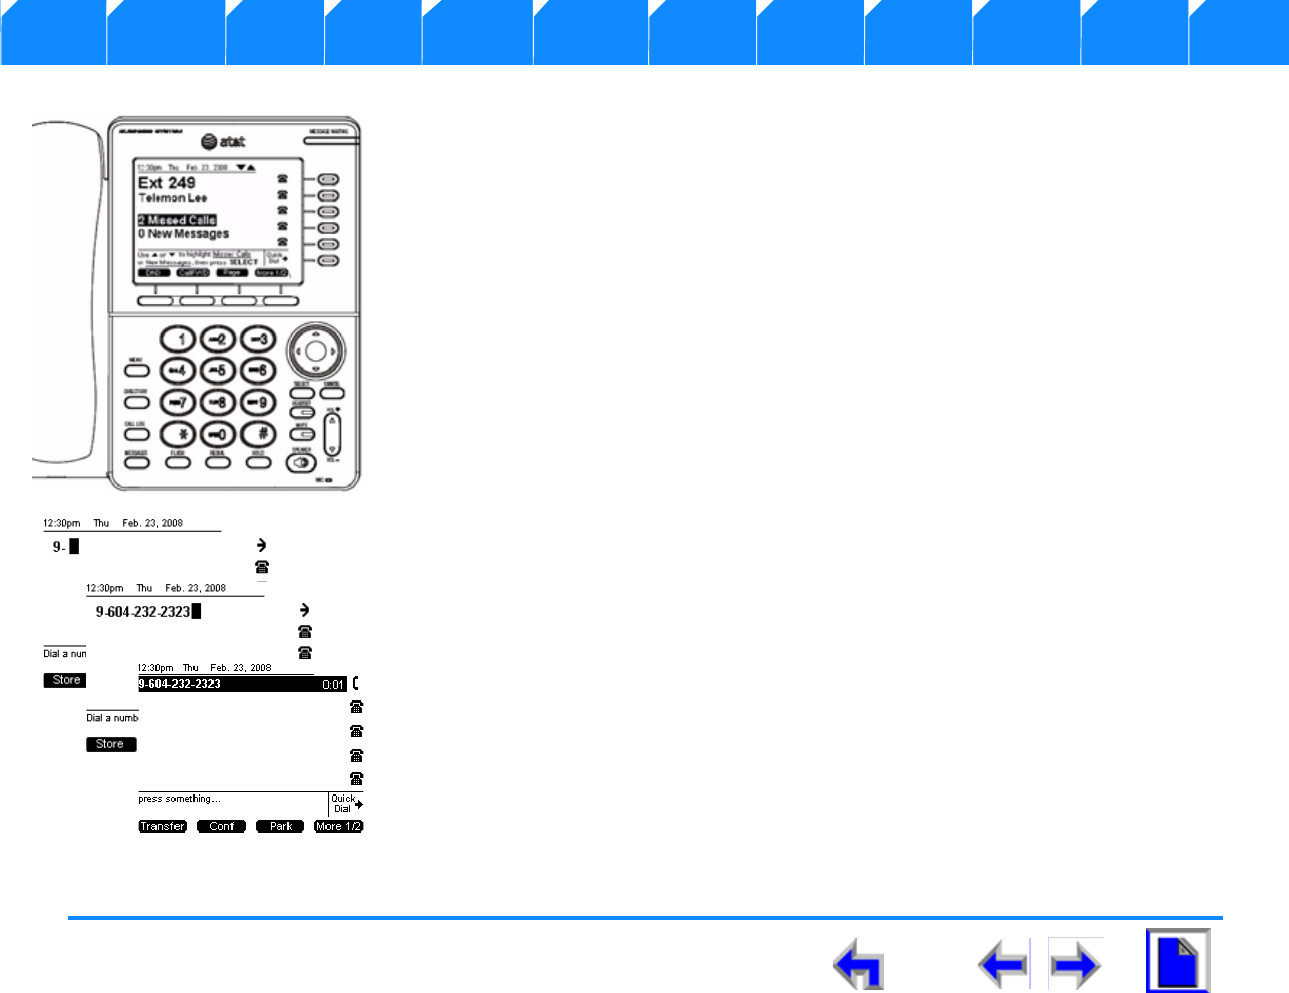
SB67030 Deskset User’s Guide - Making a Call 128
Voice Make Call Answer
Install Overview PC UI Setup Mail Directory CallLog Call Manage Call Handset Trouble
CHAPTER
8
M
AKING
A
C
ALL
The SB67030 Desk Set provides several methods for making a call. If you are in idle mode or
have calls on hold, you can press a dialing key 1-9, then go off-hook. This is referred to as Pre-
dialing. You can make a call at any time by choosing an off-hook method, then dialing a number.
This is referred to as Live Dialing. You can also make a call when viewing a list of numbers, such
as the in Directory, Call Log, Redial, and Messages List.
1. “Dialing Rules” on page 129
2. “The Idle Screen” on page 130
3. “Pre-Dialing” on page 131
4. “Live Dialing” on page 133
5. “Using the Extension List” on page 134
6. “Calling from the Directory” on page 137
7. “Calling from the Call Log ” on page 138/“Calling from Call Log Details” on
page 139
8. “Calling from Voicemail” on page 140
9. “Using Quick Dial” on page 141
10. “Using the Redial List” on page 143

SB67030 Deskset User’s Guide - Making a Call 129
Voice Make Call Answer
Install Overview PC UI Setup Mail Directory CallLog Call Manage Call Handset Trouble
Dialing Rules
The dialing rules determine when the system connects to the call destination. Once a rule applies, the system will determine that the
digits are valid and dial them to the outside phone line. There are five types of calls that are identified by the dialing rules:
Table 14 Call Identified by Dialing Rules
Call Type Dialing Rule Description
1 External call (PSTN call) 9 [0,2-8]
or
91[0,2-9]
or
99[0,2-9]
or
991[0,2-9]
nAny number starting with the external access code (9), EXCEPT 911 (see
emergency call below).
nAny additional digits dialed after the call type is determined will be
passed to the gateway (i.e. - the dial plan will NOT wait for a full number
to be dialed - it will only wait until it is determined that PSTN dialing is
required).
For example, entering the digit 9 will not pass this digit to the PSTN gateway.
However, entering 9-4 will prompt the system to pass the digit 4 to the gateway..
2 Intercom call
(extension number) [2-7]xx A 3-digit number with the 1st digit in the range 2~7. Makes a call to an
extension in the local network.
3 Operator call 0 This is a special case of an intercom call, establishing a connection to the
designated operator extension (e.g. 203) by simply dialing 0.
4 Parked call 1xx This is a special case of the intercom call and is used to directly access parked
calls - defined by a 3 digit number with a leading 1.
5 Emergency call 911 or 9911 Emergency services can be accessed either by dialing 911, or 9-911 (where the
leading 9 is used to access an external line).
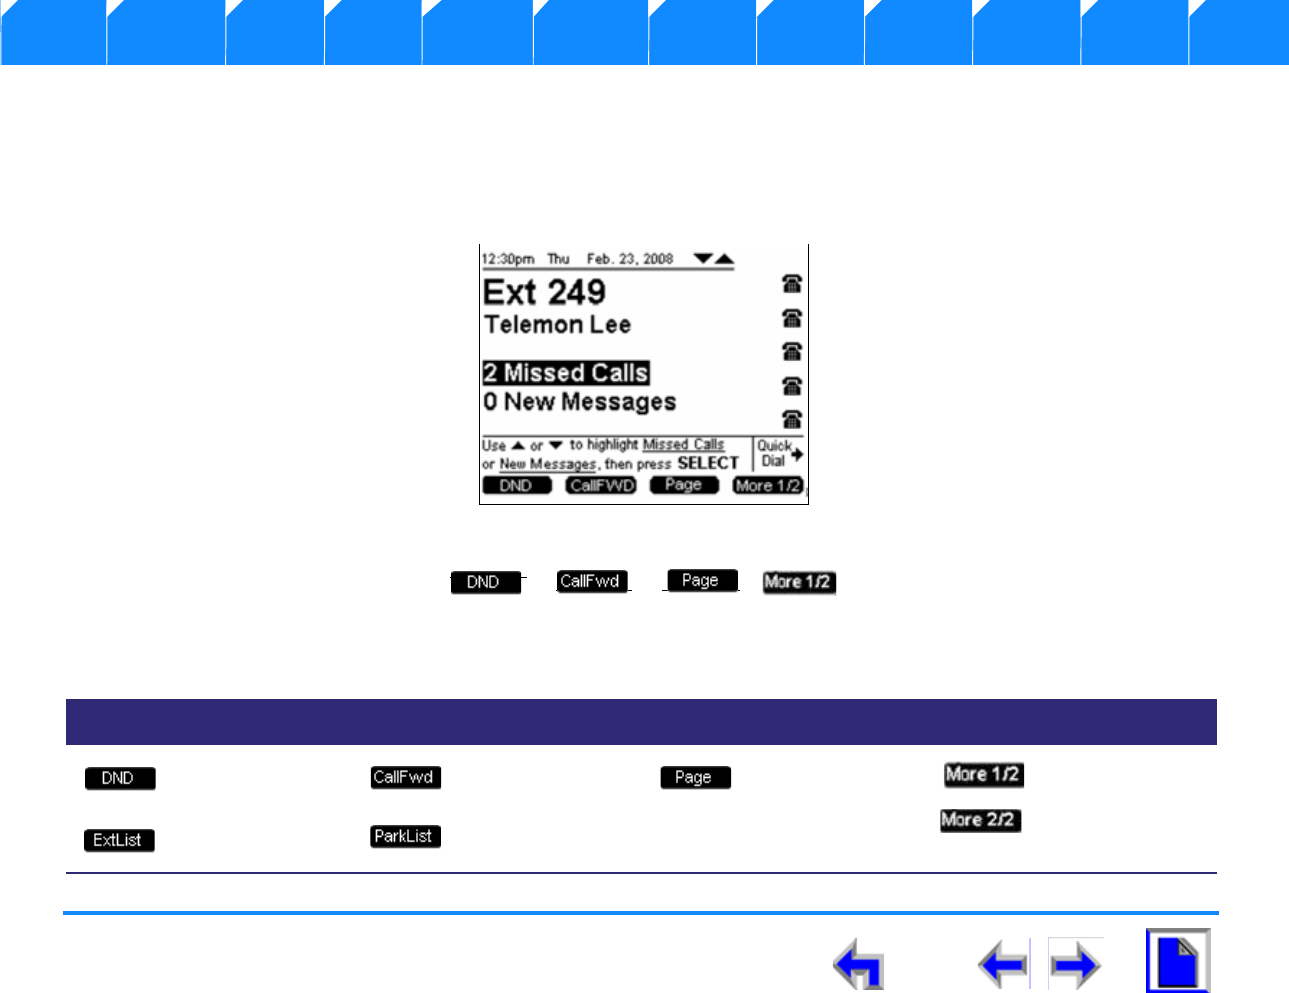
SB67030 Deskset User’s Guide - Making a Call 130
Voice Make Call Answer
Install Overview PC UI Setup Mail Directory CallLog Call Manage Call Handset Trouble
The Idle Screen
All SB67030 Desk Set call operation begins from the Idle screen shown in Figure 156. This screen is displayed when the Desk Set is
first turned on or at the end of any operation such as completion of a call, or when the extension does not have any Active or Held
Calls. “Liquid Crystal Display (LCD) Screen” on page 28 provides a complete description of the Idle screen operation. Customization
functions can only be accessed from the Idle screen
Figure. 156 The SB67030 Desk Set Idle Screen
Table 16 Idle Screen Programmed Keys
Key Description Key Description Key Description Key Description
Initiates Do Not
Disturb. Initiates Call
Forward. Pages internal
extensions.
Moves to next set
of programmed
operation keys.
Goes to Extension
List. Goes to Park List.
Table 15

SB67030 Deskset User’s Guide - Making a Call 131
Voice Make Call Answer
Install Overview PC UI Setup Mail Directory CallLog Call Manage Call Handset Trouble
Pre-Dialing
Pre-Dial is only available from Idle mode or in the call appearance state when all calls are on hold. In pre-dial mode, no dial tone is
generated, but hyphenation rules apply. There can only be one instance of Pre-Dial within the available five Call Appearances.
To enter pre-dial mode, press any dial pad keys (1-9, #, *).
1. Use the keypad (See “Keypad Data Entry” on page 43) to enter the phone
number (For example: 604-555-0123) as shown in Figure 157.
2. Lift the handset, press SPEAKER, HEADSET, or a Call Appearance associated
with the Pre-dial string to go Off-Hook and Call as shown in Figure 158.
3. Press to insert a two-second pause into the digit string.
4. Press to delete the last digit entered. If all digits are deleted, the user
will return to idle.
5. Press to store the number in the local directory.
6. Cancel Pre-Dial by answering an incoming call or switching modes away from the
Call Appearance screen.
Figure. 157 Pre-Dial Number
Note When the user is in Pre-dial mode or in the Dial state the highlight
bar does not appear on the call appearance slot in these modes.
The highlight is treated as a cursor. Once the call becomes active
then the highlight bar will appear on the CA slot
Figure. 158 Call Appearance
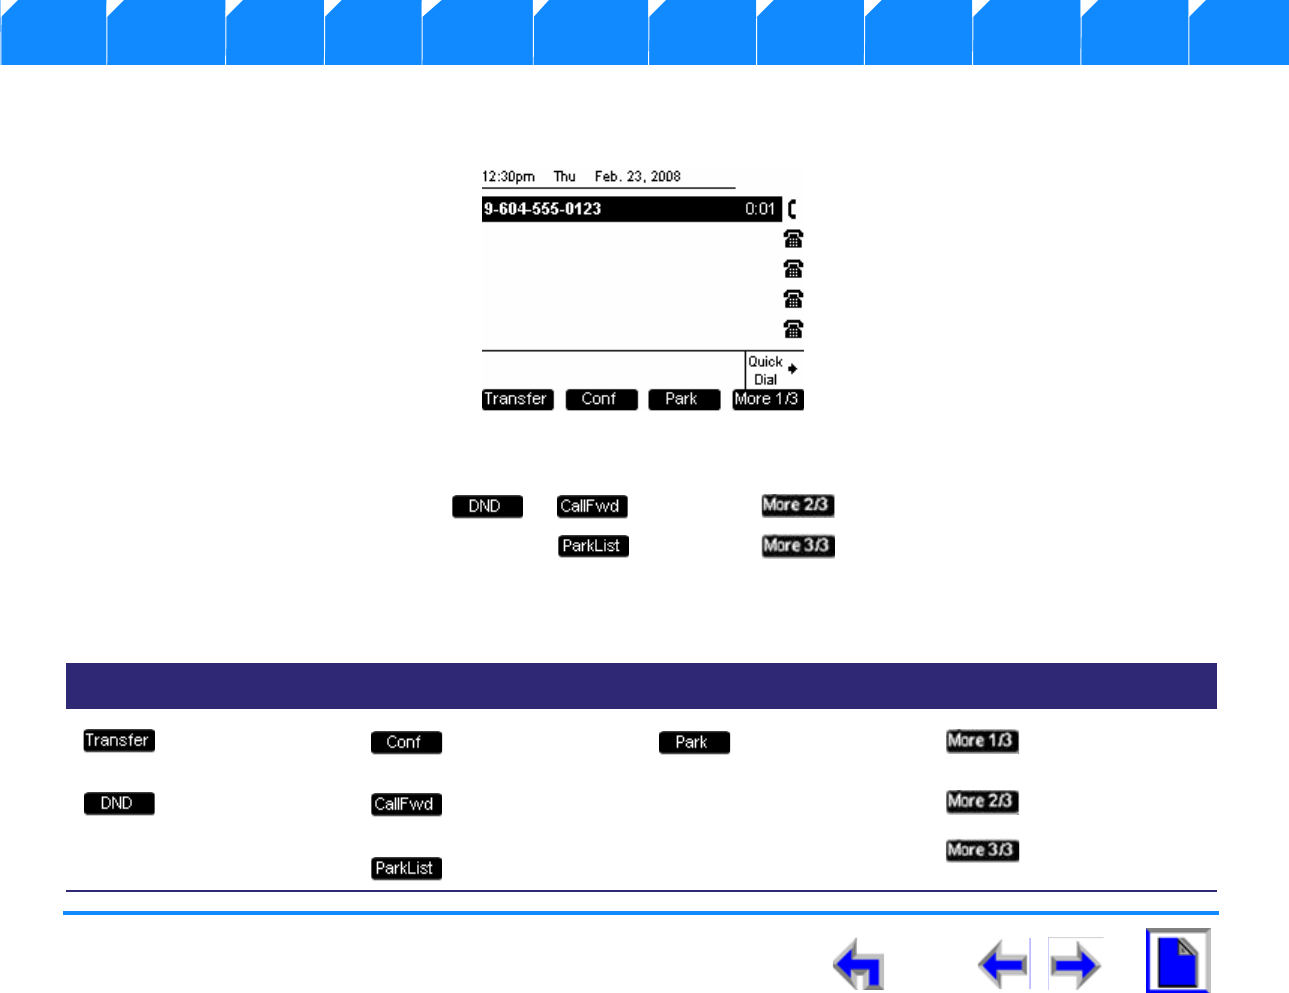
SB67030 Deskset User’s Guide - Making a Call 132
Voice Make Call Answer
Install Overview PC UI Setup Mail Directory CallLog Call Manage Call Handset Trouble
Active Call Screen
The SB67030 Desk Set call appearance screen shown in Figure 159
Figure. 159 The SB67030 Call Appearance Screen
Table 18 Call Appearance Programmed Keys
Key Description Key Description Key Description Key Description
Initiates transfer
of a call. Initiates a
conference call. Parks call.
Moves to next set
of programmed
operation keys.
Initiates Do Not
Disturb. Initiates Call
Forward.
Goes to Park List.
Table 17
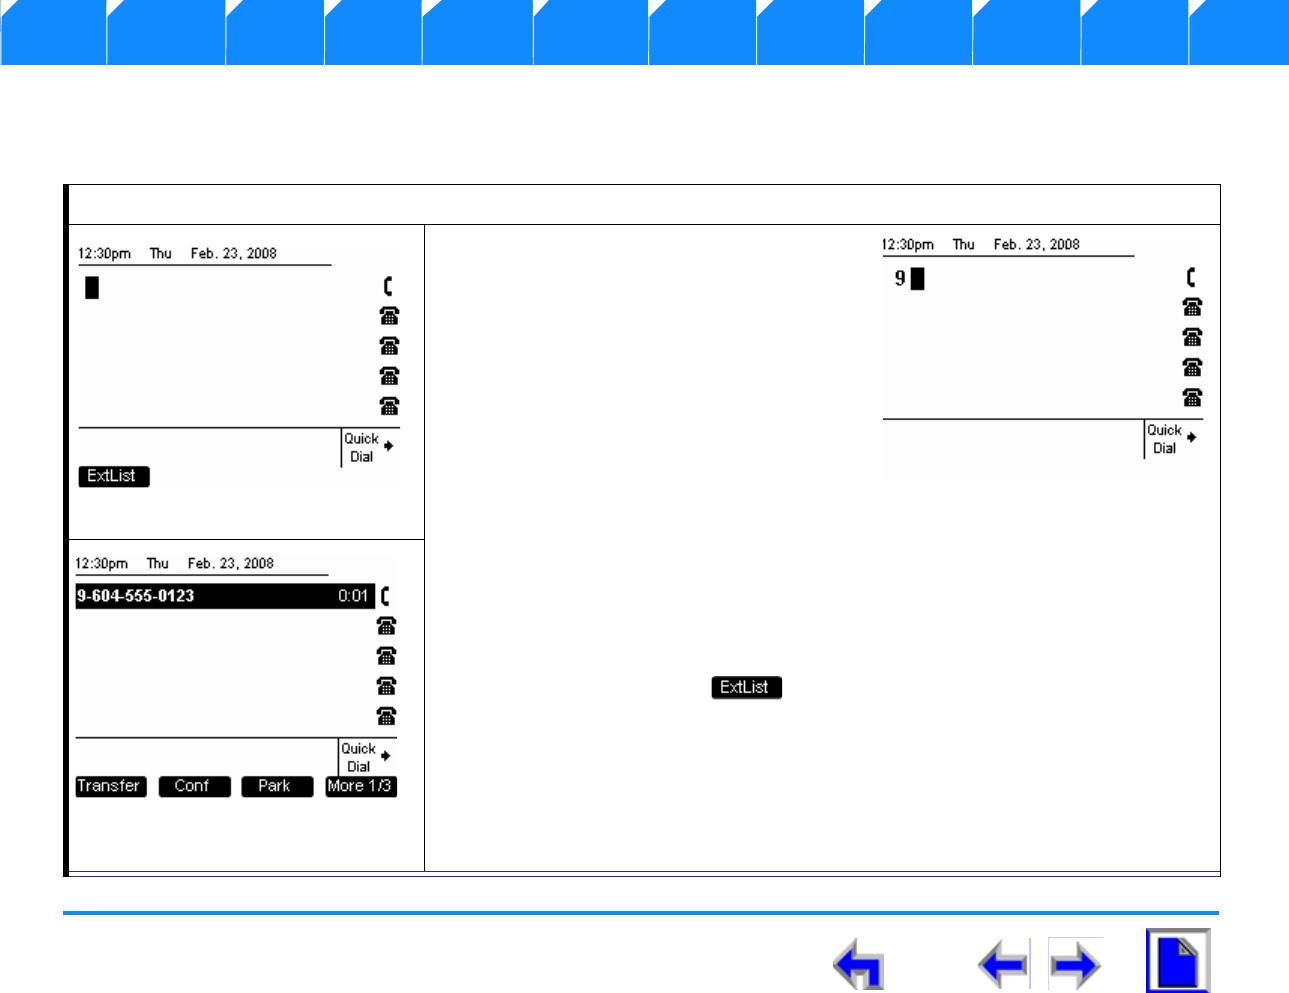
SB67030 Deskset User’s Guide - Making a Call 133
Voice Make Call Answer
Install Overview PC UI Setup Mail Directory CallLog Call Manage Call Handset Trouble
Live Dialing
You can make a call at any time by choosing an off-hook method, then dialing a number.
To dial a live number:
1. To go off-hook from Idle and display the
screen shown in Figure 160, either
a. Lift the Headset.
b. Press SPEAKER,
c. Press HEADSET (if both corded and
cordless headsets are present, the
corded headset will take control),
d. or press an available Call
Appearance key located on the right
side of the display.
2. You will go off-hook and hear a dial tone.
3. Enter the digit 9 to dial an outside number (See “Dialing Rules” on page 129)
as shown in Figure 161.
4. After a digit is entered, will no longer be available.
5. Enter the number you want to dial. No further key presses are necessary. The
Active Call screen shown in Figure 162 displays. Wait for the number to dial
and connect with the call recipient.
6. Auto-hyphenation applies when you dial.
Figure. 160 Live Dialing
Figure. 161 Entering Digits
Figure. 162 Active Call
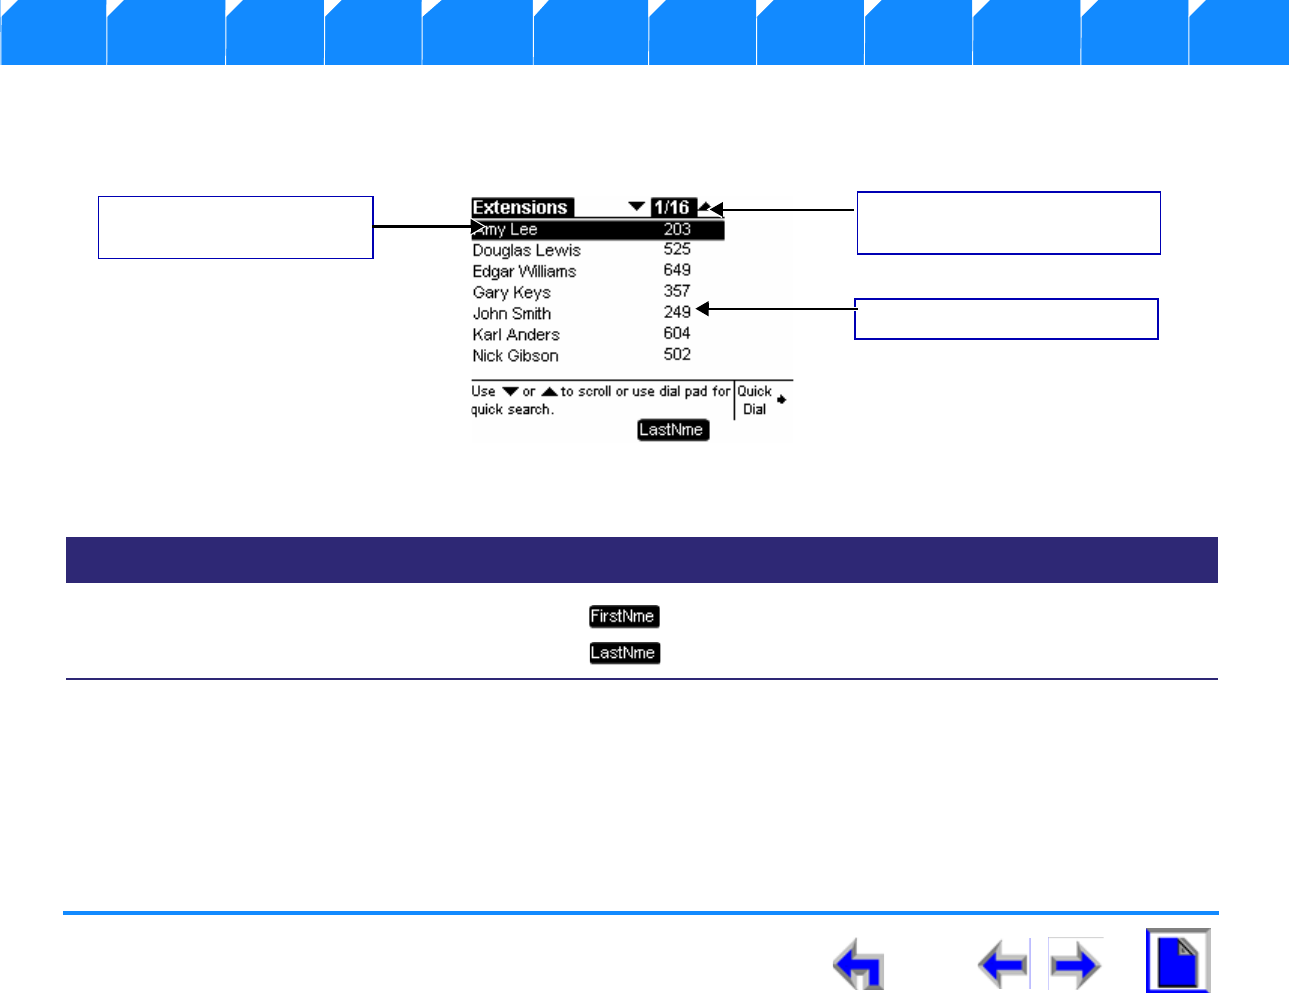
SB67030 Deskset User’s Guide - Making a Call 134
Voice Make Call Answer
Install Overview PC UI Setup Mail Directory CallLog Call Manage Call Handset Trouble
Using the Extension List
You may access the Extension list illustrated in Figure 163 from Idle or Dial mode. In addition, the Extension list is available in
Transfer and Conference Setup modes. Here is an overview of the Extension list.
Figure. 163 Extension List Functions
nA maximum of 50 extensions can be added by the system administrator.
nThere is a 22-26 character limit on the name field. Oversized entries will be truncated with ellipses.
nWhen reviewing the Extension list, you may call the highlighted extension.
nPressing the up or down navigation key cycles through Extension list entries.
nThe Keypad Data Entry quick search function is available when viewing the Extension list.
Table 19 Extension List Programmed Key
Key Description Key Description Key Description Key Description
Toggles First and Last name sort in
Directory and Extension list.
Number of extensions (50/50
max)
Extension number
First and Last Name (if
available)
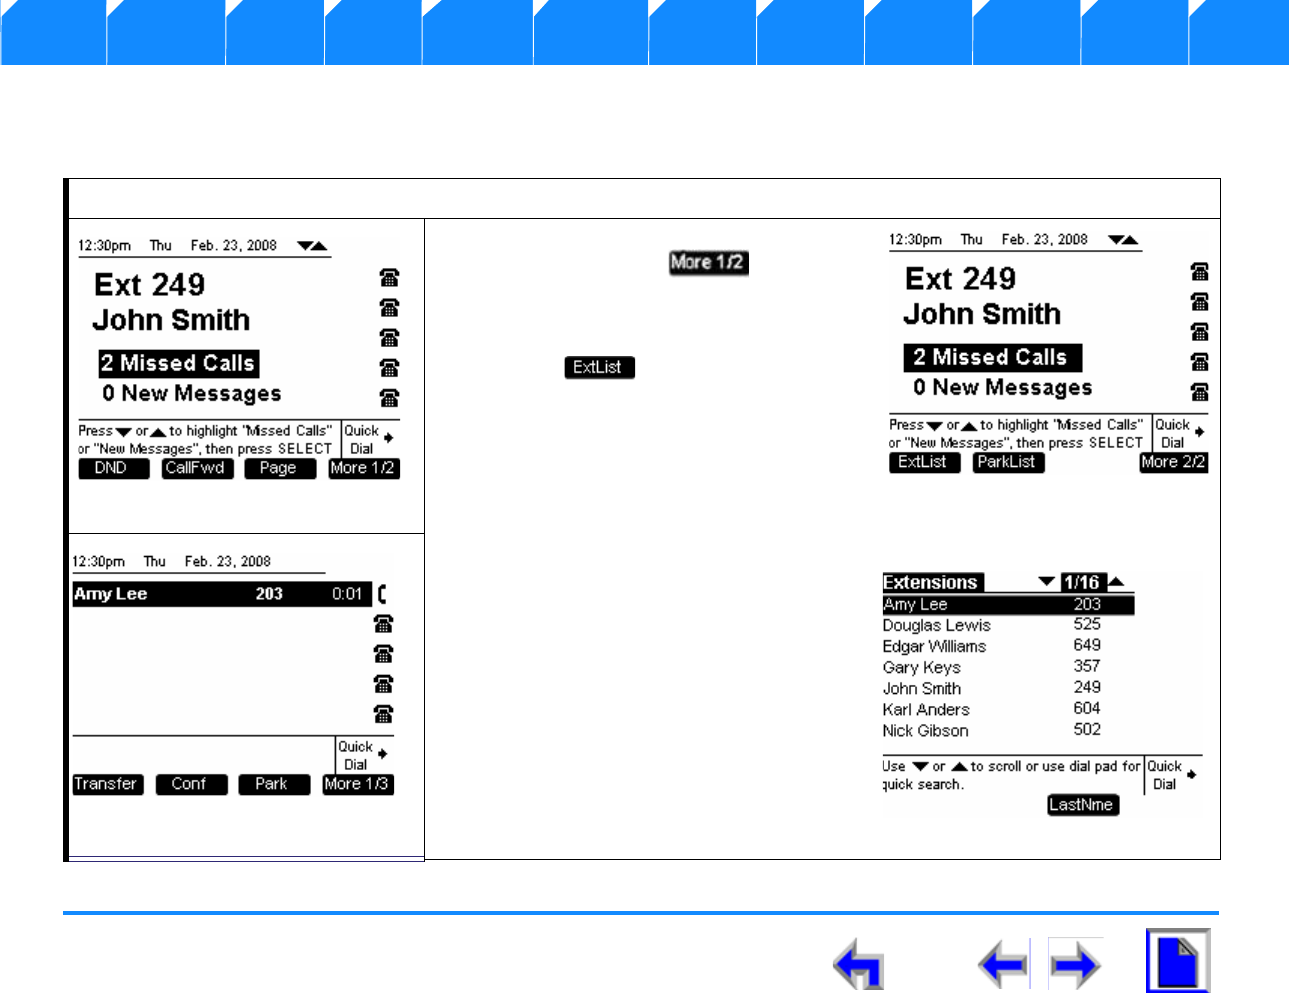
SB67030 Deskset User’s Guide - Making a Call 135
Voice Make Call Answer
Install Overview PC UI Setup Mail Directory CallLog Call Manage Call Handset Trouble
Calling an Extension in Idle Mode
The user may make a call to an internal extension in Idle mode by accessing the extension list or entering the extension number.
To make a call to an internal extension from Idle mode:
1. From the Idle screen shown in
Figure 164 press .
2. Observe that the Idle screen shown in
Figure 165 displays.
3. Press to display the screen
shown in Figure 167.
4. Press the up or down NAVIGATION key
to cycle through extension list entries.
5. Press SELECT, SPEAKER, or HEADSET
to dial the number.
6. Observe that the number is dialed and
the Active Call screen shown in
Figure 167 displays.
Figure. 164 Idle Screen
Figure. 165 Access Extension list
Figure. 166 Extension list
Figure. 167 Active Call
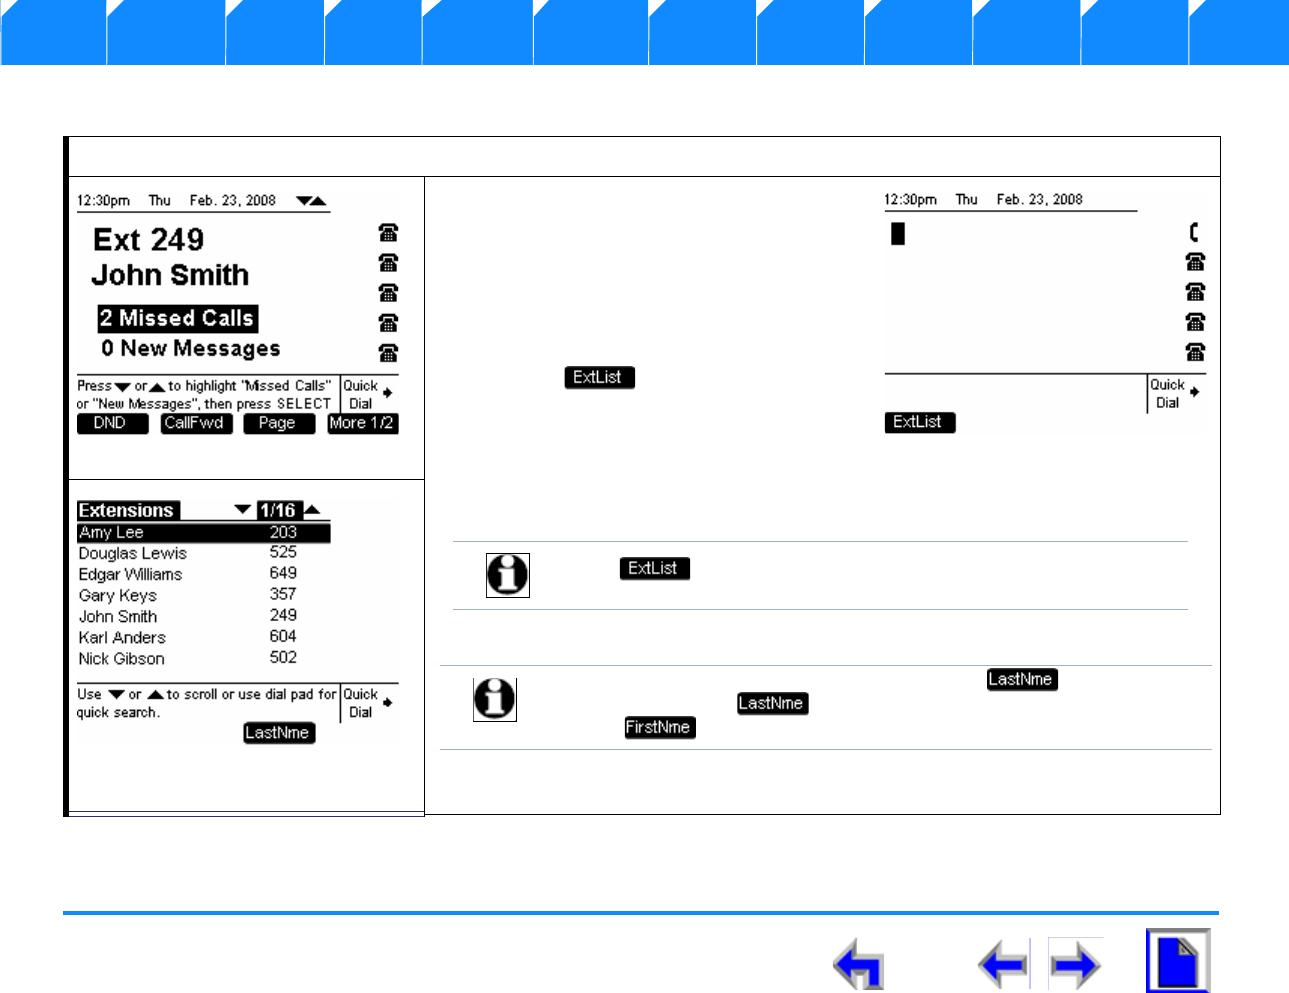
SB67030 Deskset User’s Guide - Making a Call 136
Voice Make Call Answer
Install Overview PC UI Setup Mail Directory CallLog Call Manage Call Handset Trouble
Calling an Extension from Dial
To call an extension from Dial mode:
1. From the Idle screen shown in
Figure 168 press SPEAKER, HEADSET
an available Call Appearance, or lift the
Handset to go Off Hook.
2. Observe that the Dial Mode screen
shown in Figure 169 displays.
3. Press to display the screen
shown in Figure 167.
4. Press the up or down NAVIGATION key
to cycle through Extension list entries.
5. Press SELECT to call the extension.
Figure. 168 Idle Screen
Figure. 169 Dial Mode
Note will not be available once a digit has been entered.
Note If the list is currently sorted by first name, displays. If the
user presses , the list will be sorted by last name and
displays.
Figure. 170
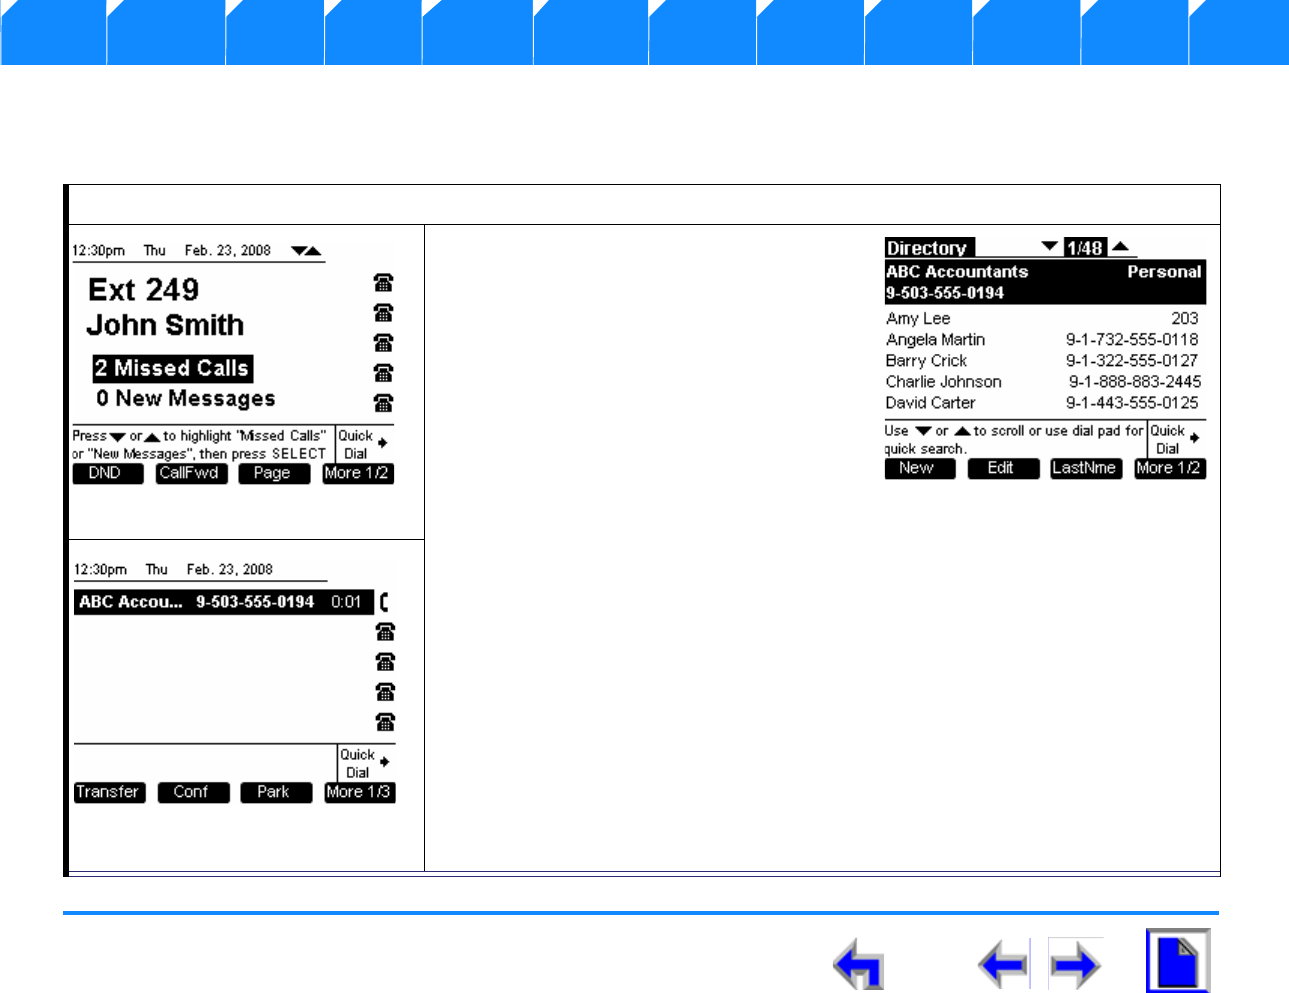
SB67030 Deskset User’s Guide - Making a Call 137
Voice Make Call Answer
Install Overview PC UI Setup Mail Directory CallLog Call Manage Call Handset Trouble
Calling from the Directory
You may access the local directory and call a number in most modes.
To place a call from a directory entry:
1. With the Idle screen shown in
Figure 171 displayed, press DIRECTORY.
2. Observe that the Directory screen shown
in Figure 171 displays.
3. Press the up or down NAVIGATION key
to highlight an entry.
4. Press SELECT, SPEAKER, or HEADSET
to dial the number.
5. Observe that the number is dialed and
the Active Call screen shown in Figure 173 displays.
Figure. 171
Figure. 172 Directory Screen
Figure. 173 Active Call

SB67030 Deskset User’s Guide - Making a Call 138
Voice Make Call Answer
Install Overview PC UI Setup Mail Directory CallLog Call Manage Call Handset Trouble
Calling from the Call Log
T.he Call Log stores the numbers of incoming calls if CID is available. The user may access the Call Log from most modes.
To place a call from the call log
1. Press CALL LOG in Idle mode shown in
Figure 174 or highlight # Missed Calls
and press SELECT.
2. Observe that the Directory screen shown
in Figure 175 displays.
3. Press the up or down NAVIGATION key
to cycle through Call Log entries.
4. Press the left or right NAVIGATION key to
scroll through dialing options for the entry.
For details on dialing options, see “Using
the Call Log” on page 120.
5. Press SELECT, SPEAKER, or HEADSET to dial the number.
6. Observe that the number is dialed and the Active Call screen shown in
Figure 176 displays.
Figure. 174 Idle Screen
Figure. 175 Call Log List
Figure. 176 Active Call
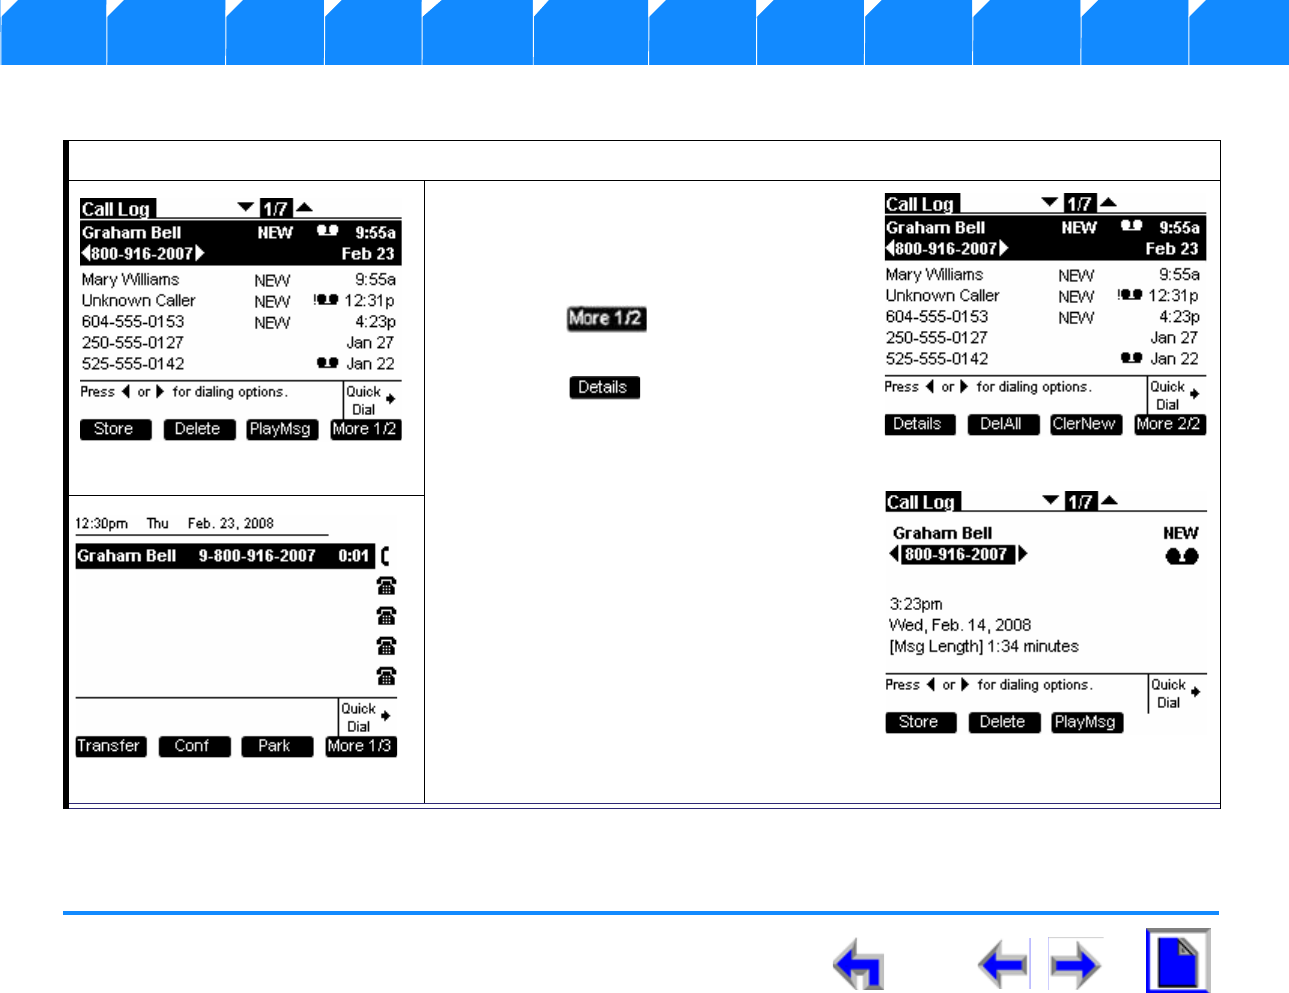
SB67030 Deskset User’s Guide - Making a Call 139
Voice Make Call Answer
Install Overview PC UI Setup Mail Directory CallLog Call Manage Call Handset Trouble
Calling from Call Log Details
To access Call Log details from the Call Log list:
1. Press CALL LOG in Idle mode, or
highlight # Missed Calls and press
SELECT to display the screen shown in
Figure 177.
2. Press to display the Call Log
screen shown in Figure 178.
3. Press to display the Call Log
Details screen shown in Figure 180.
4. Press the left or right NAVIGATION key
to scroll through dialing options. For
details on dialing options, see “Using the
Call Log” on page 120.
5. Press SELECT, SPEAKER, HEADSET, or
lift the Handset to dial the number.
6. Observe that the number is dialed and
the Active Call screen shown in
Figure 180 displays.
Figure. 177 Call log List
Figure. 178 Call Log 2
Figure. 179 Call Details
Figure. 180 Active Call
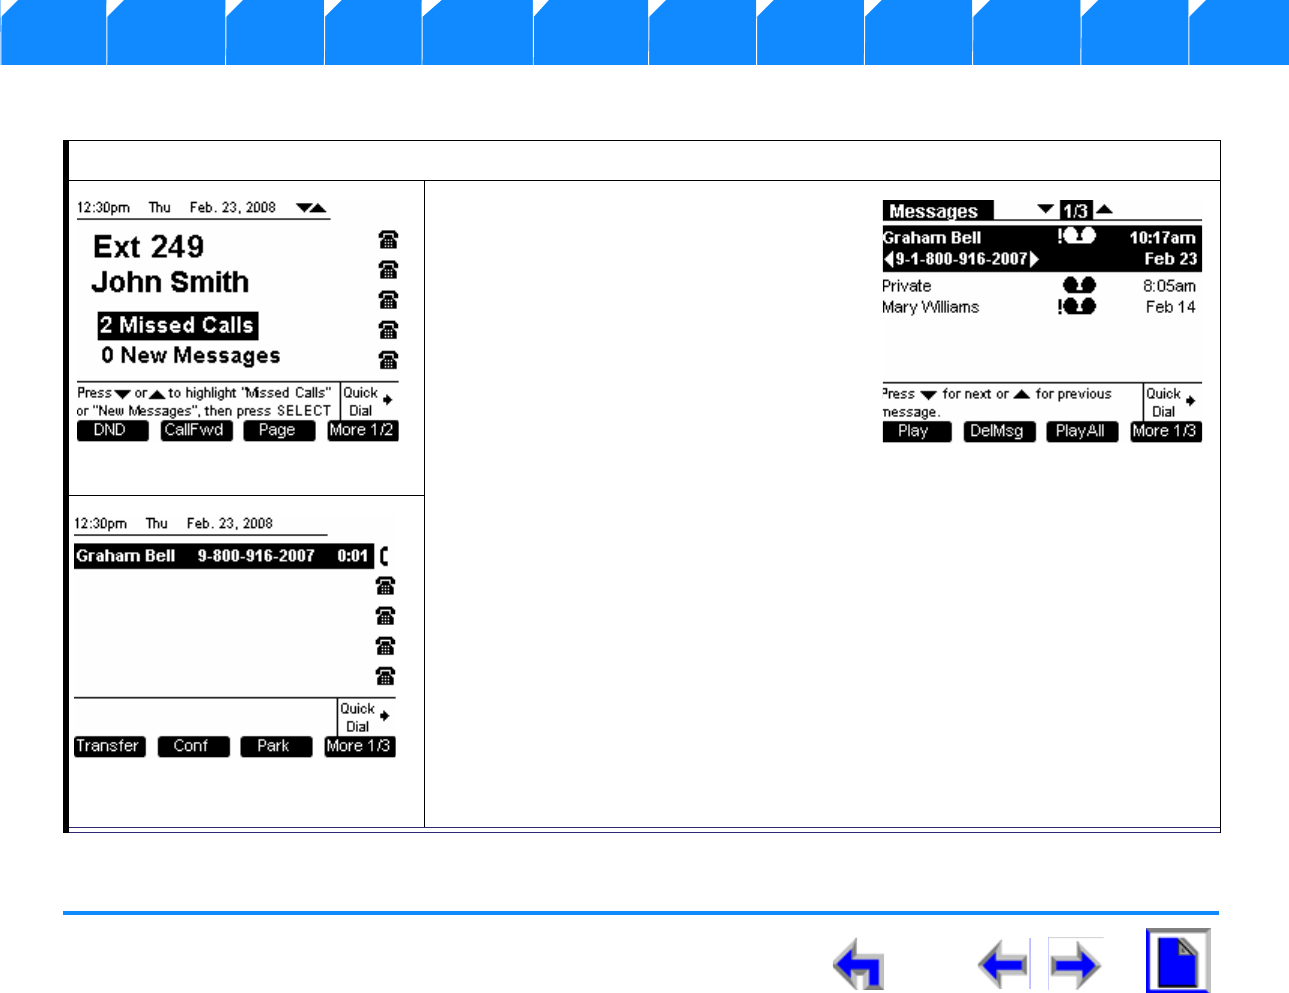
SB67030 Deskset User’s Guide - Making a Call 140
Voice Make Call Answer
Install Overview PC UI Setup Mail Directory CallLog Call Manage Call Handset Trouble
Calling from Voicemail
Note that a “9” will be automatically prefixed to the digit string before the number is dialed out.
To make a call from voicemail:
1. With the Idle screen shown in
Figure 181 displayed, press MESSAGES.
OR
Highlighted # New Messages and press
SELECT.
2. Observe that the Messages screen
shown in Figure 182 displays.
3. Press the up or down NAVIGATION key
to cycle through Call Log entries.
4. Press SELECT, SPEAKER, HEADSET or lift the handset to dial the entry.
5. Observe that the number is dialed and the Active Call screen shown in
Figure 180 displays.
Figure. 181 Idle Mode Screen
Figure. 182 Voicemail Messages
Figure. 183 Active Call
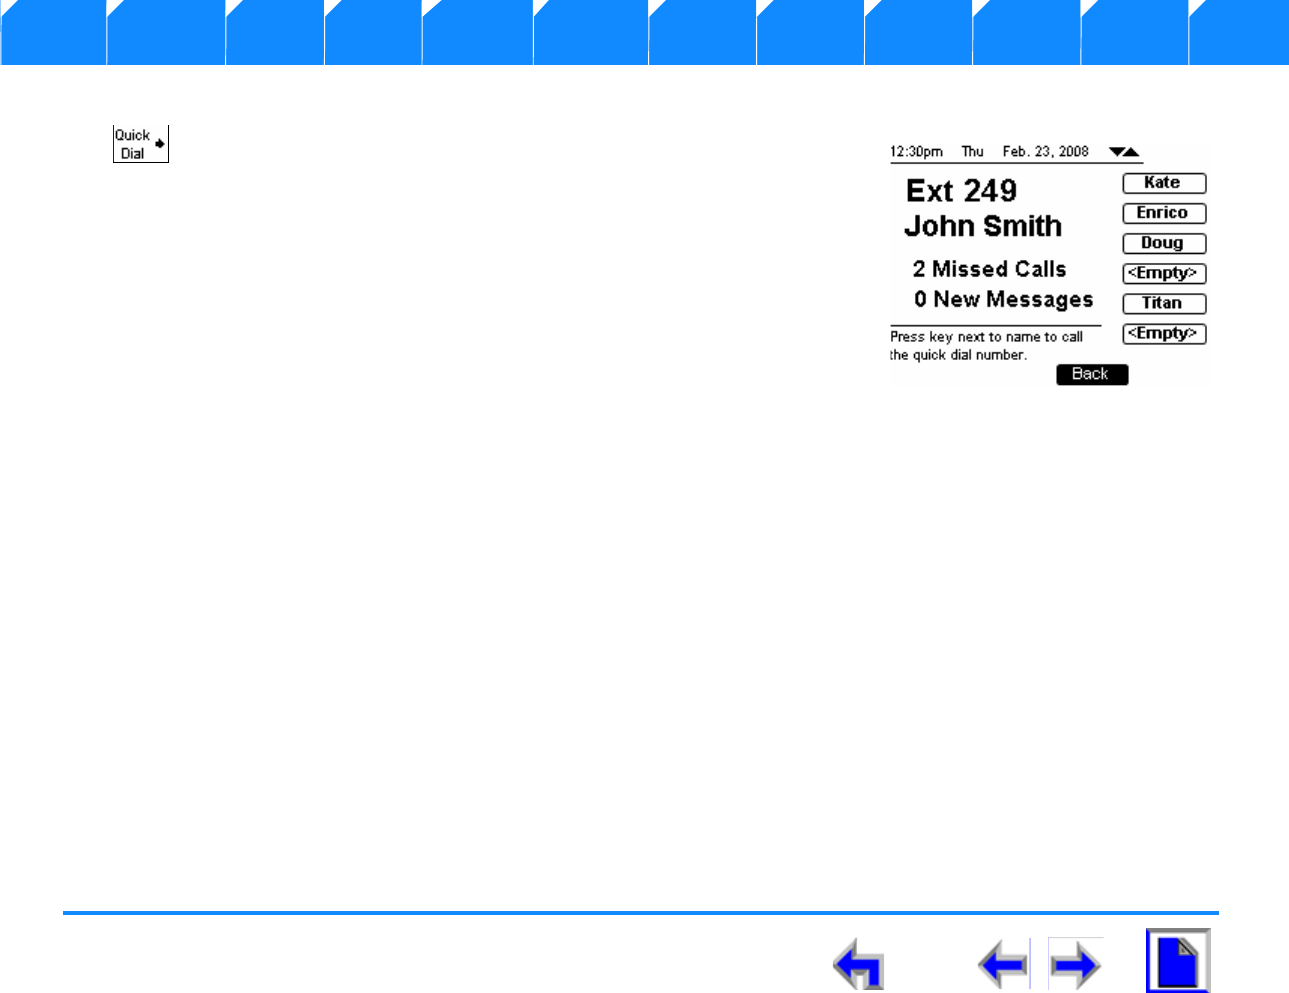
SB67030 Deskset User’s Guide - Making a Call 141
Voice Make Call Answer
Install Overview PC UI Setup Mail Directory CallLog Call Manage Call Handset Trouble
Using Quick Dial
The feature provides up to six entries for frequently called numbers. You must use the
WbUI User Interface (See “Editing Quick Dial Entries” on page 49) to create Quick Dial. The
Quick Dial feature is available in all modes. Quick Dial entries do not correspond to Call
Appearances so pressing a Quick Dial entry in the CA3 spot will not reserve an off-hook line
on CA3. Rather, a line is reserved on the first available Call Appearance for the call.
The Quick Dial application behaves like an interaction screen in that other splash or
interaction screens may overlay Quick Dial. If an Incoming Ring event occurs while in Quick
Dial and the underlying appearance is Idle, you will remain in Quick Dial, but the underlying
appearance changes to Call Appearance mode.
nPressing the accesses the Quick Dial entries.
nWhen Quick Dial is activated, it takes control of all Call Appearance soft keys.
lThis includes any flashing CA LEDs that were associated with a Held or Incoming Call before Quick Dial was activated. W
lhen Quick Dial is terminated, control will return to the underlying application and any flashing LED behavior associated with
that application will be restored.
nPressing a Quick Dial entry from:
lIdle will call that entry.
lPre-dial, pressing Quick will append then dial out the Pre-dial string. If you enter 9-011 and then press a Quick Dial entry,
9-011 appears at the beginning of the Quick Dial digit string being dialed.
nThe CA LED will not flash while in Quick Dial mode, but a ringtone will be heard. Quick Dial maintains control of all programmed
keys until it is terminated.
nQuick Dial edit is only available through the WebUI.
nThe Quick Dial entries are not associated with the Directory database
Figure. 184 Quick Dial Entries
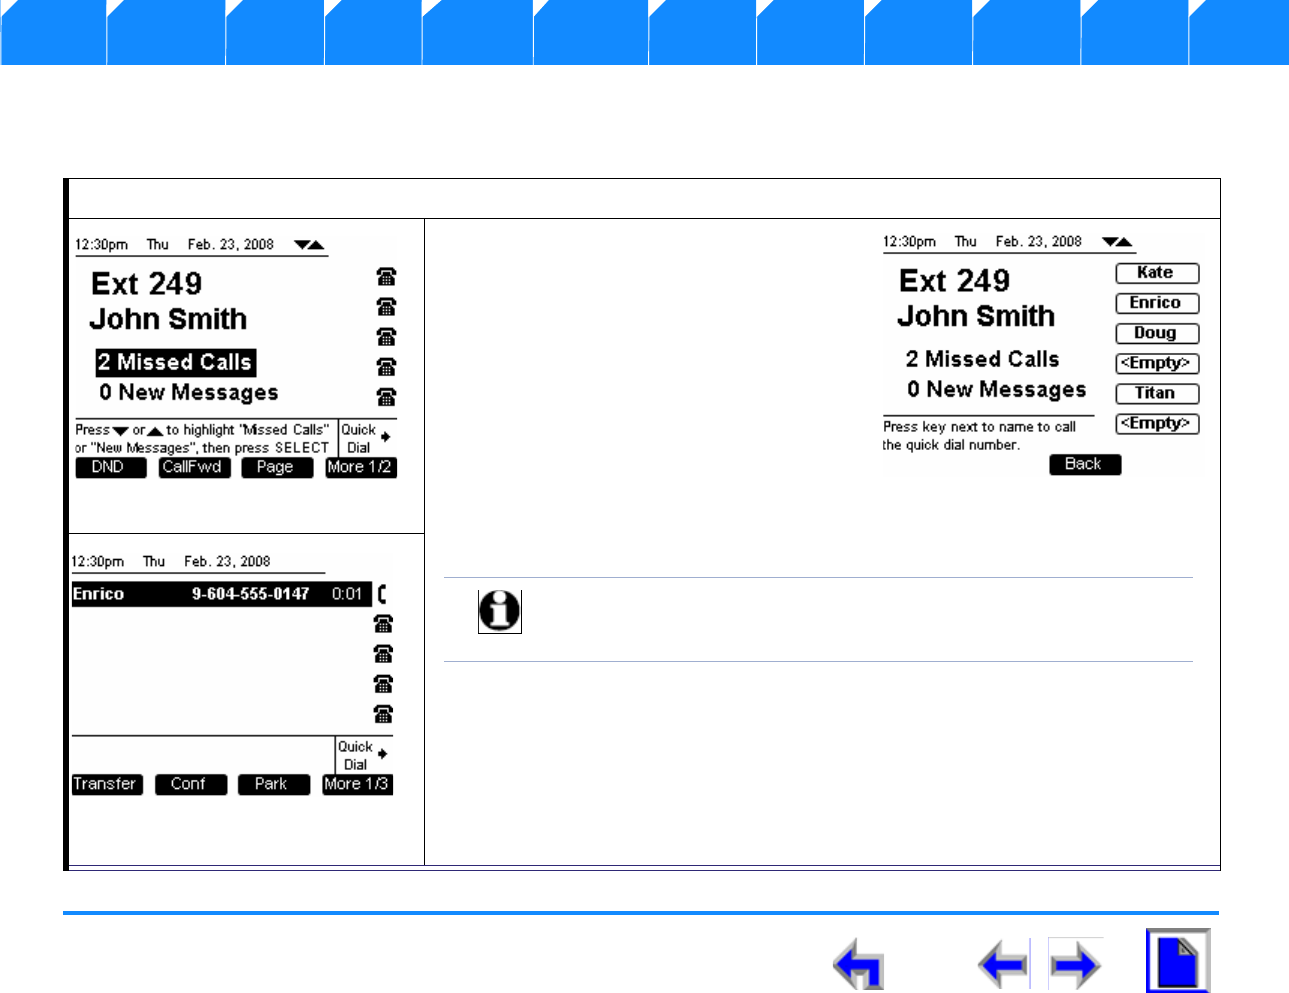
SB67030 Deskset User’s Guide - Making a Call 142
Voice Make Call Answer
Install Overview PC UI Setup Mail Directory CallLog Call Manage Call Handset Trouble
Calling from Quick Dial
The Quick Dial feature is available in almost all states except when there is an incoming ring.
To Call from Quick Dial:
1. With the Idle screen shown in
Figure 185, press Quick Dial to access
the Quick Dial entries.
2. Observe that the Quick Dial screen
shown in Figure 186 displays.
3. Press a Quick Dial CA 2 (Enrico) entry
and observe that the number is dialed
and the Active Call screen shown in
Figure 186 appears.
Figure. 185 Idle Screen
Figure. 186 Quick Dial Menu
Note The quick dial entries do not correspond to Call Appearances and
are not associated with the directory entries. Pressing a quick dial
entry in the CA3 spot will not reserve an off-hook line on CA3
Figure. 187 Active Call
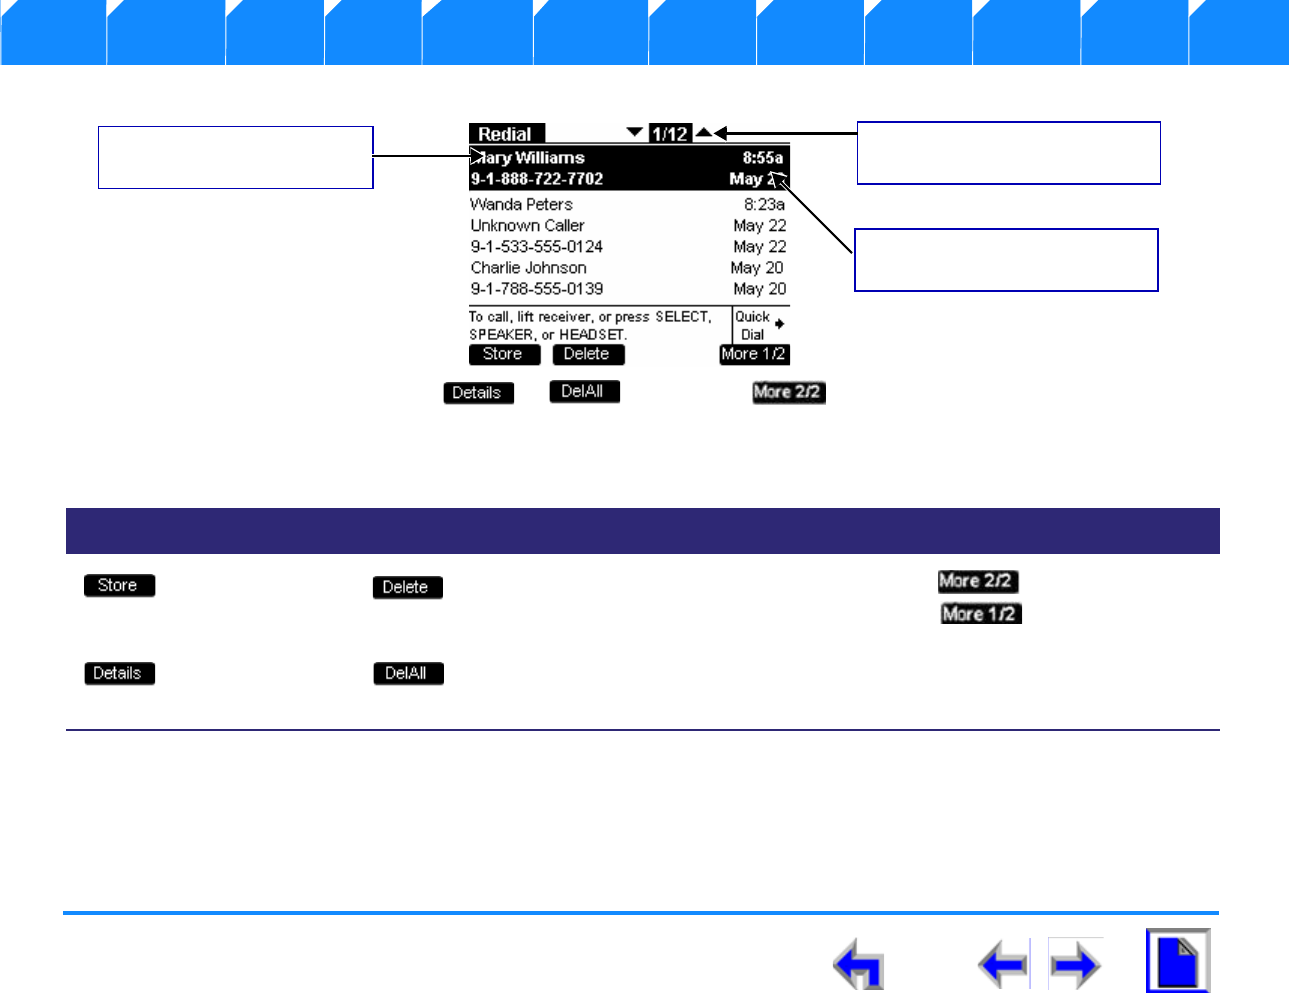
SB67030 Deskset User’s Guide - Making a Call 143
Voice Make Call Answer
Install Overview PC UI Setup Mail Directory CallLog Call Manage Call Handset Trouble
Using the
Redial entry counter (20/20
max)
Date and Time of highlighted call
entry
Name and number displayed
(if available)
Redial List
Figure. 188 Redial List Functions
Table 20 Redial List Programmed Key
Key Description Key Description Key Description Key Description
Stores number in
local directory. Performs a
permanent
deletion.
Moves to next set
of programmed
operation keys.
Shows you more
details for a
particular entry.
Performs deletion
of multiple
records.
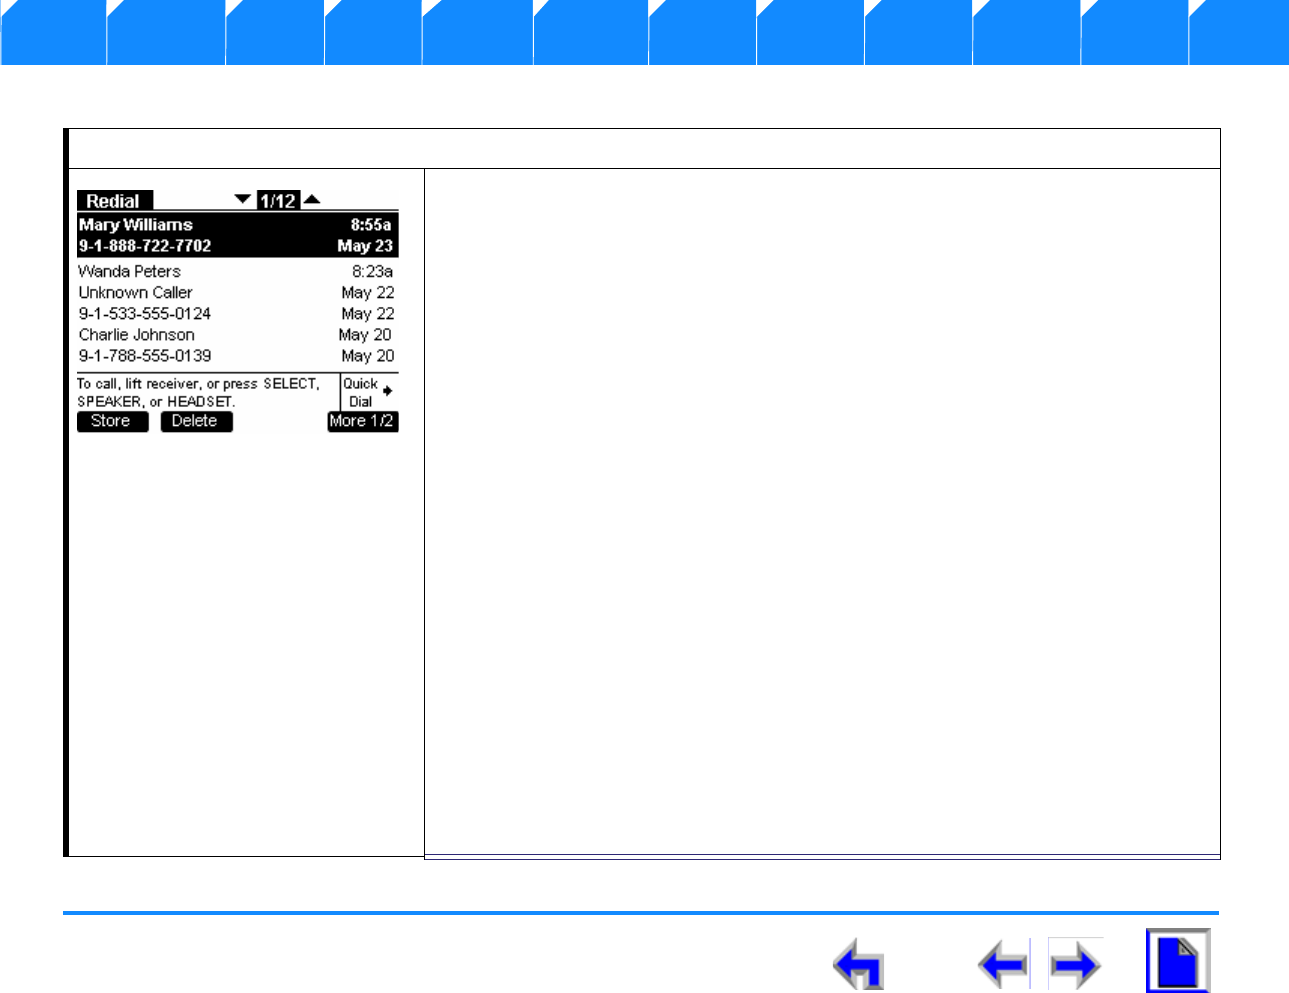
SB67030 Deskset User’s Guide - Making a Call 144
Voice Make Call Answer
Install Overview PC UI Setup Mail Directory CallLog Call Manage Call Handset Trouble
Here is an overview of the Redial list feature set
To review the Redial list:
1. Press the REDIAL and observe that the screen shown in Figure 189 displays.
lThere is a 22-26 character limit on the name field and a 24-character limit on
the number display field. Oversized entries will be truncated with ellipses.
lIf the call was made before 12:00am on the current day, then the date of call
only will be displayed. This rule applies for all un-highlighted entries.
lIf the call was made after 12:00am on the current day, then the time of call
only will be displayed. This rule applies for all un-highlighted entries.
lThe highlighted Redial entry displays both name field and number field as well
as both the time and date of the call.
lUn-highlighted entries in the list display either name or number field only and
time or date only.
lA name field will be displayed for any numbers that have an associated name
such as numbers that were called from Call Log with CID or complete
Directory entries.
lNumbers that were dialed directly by the user will not display a name field.
lThe programmed keys available when viewing the Redial list will vary
depending on whether the user is accessing this feature from Idle or Active
mode. Storing or deleting is not available in Active mode. In addition, if the
Redial list is empty, no soft keys will be available.
lWhen reviewing Redial entries, you can call the number listed in the
highlighted entry.
lThe Keypad Data Entry quick search function is not available in Redial
Figure. 189 Redial List
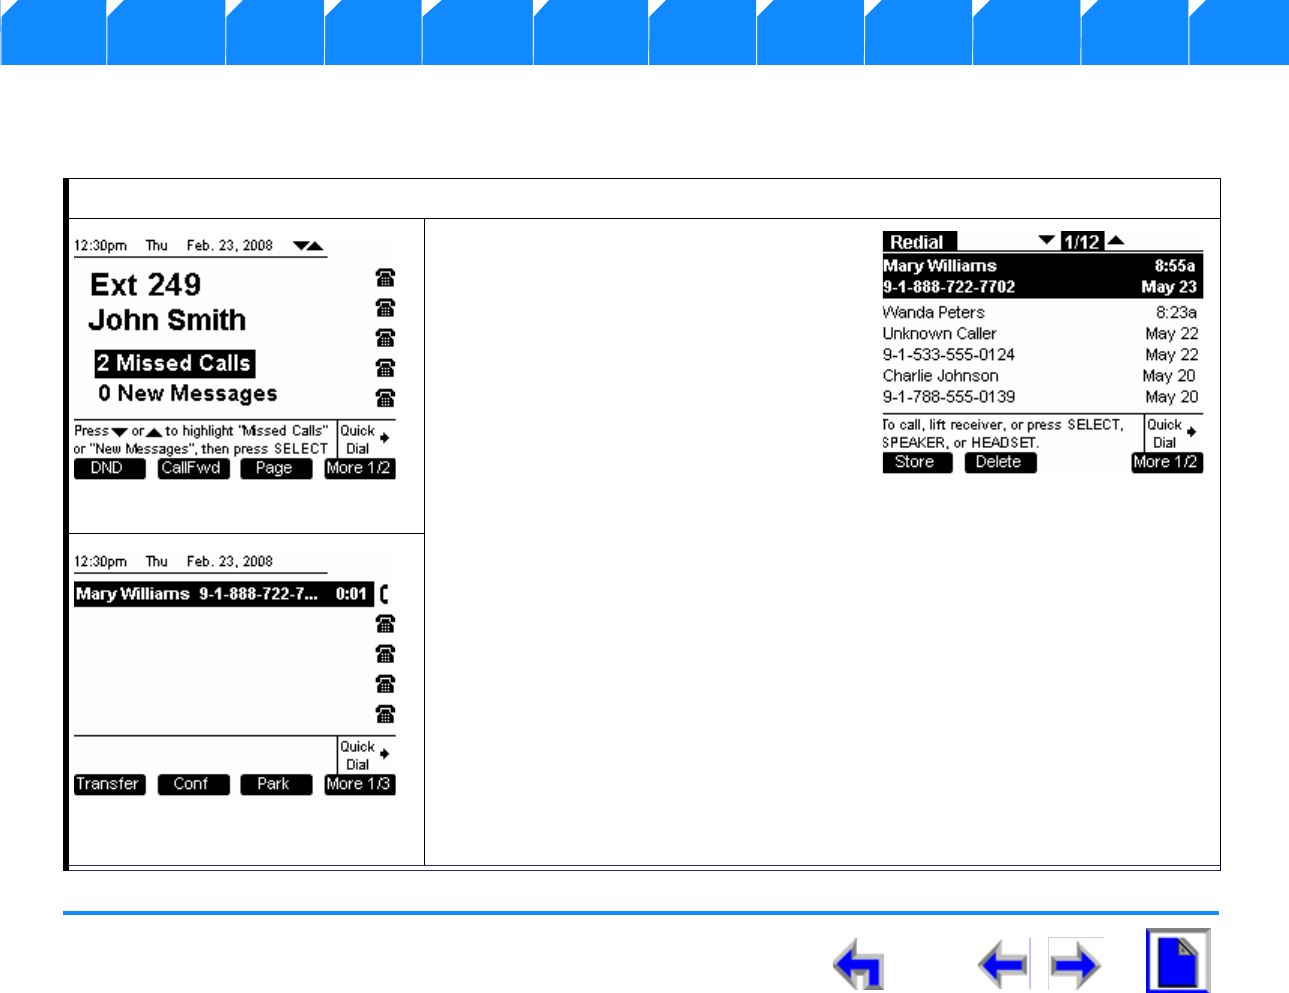
SB67030 Deskset User’s Guide - Making a Call 145
Voice Make Call Answer
Install Overview PC UI Setup Mail Directory CallLog Call Manage Call Handset Trouble
Calling from Redial
Any digits or numbers that were dialed are recorded in the Redial list. You may make a call from a number in the Redial list.
To call from the redial list:
1. Press REDIAL in the Idle screen shown
in Figure 190 to display the Redial
screen shown in Figure 191
2. Press the up or down NAVIGATION key
to cycle through redial entries.
3. Press SELECT, SPEAKER, HEADSET, or
lift the Handset to dial the number.l
4. Observe that the number is dialed and
the Active Call screen shown in
Figure 192 displays.
Figure. 190 Idle Screen
Figure. 191 Redial Screen
Figure. 192 Active Call
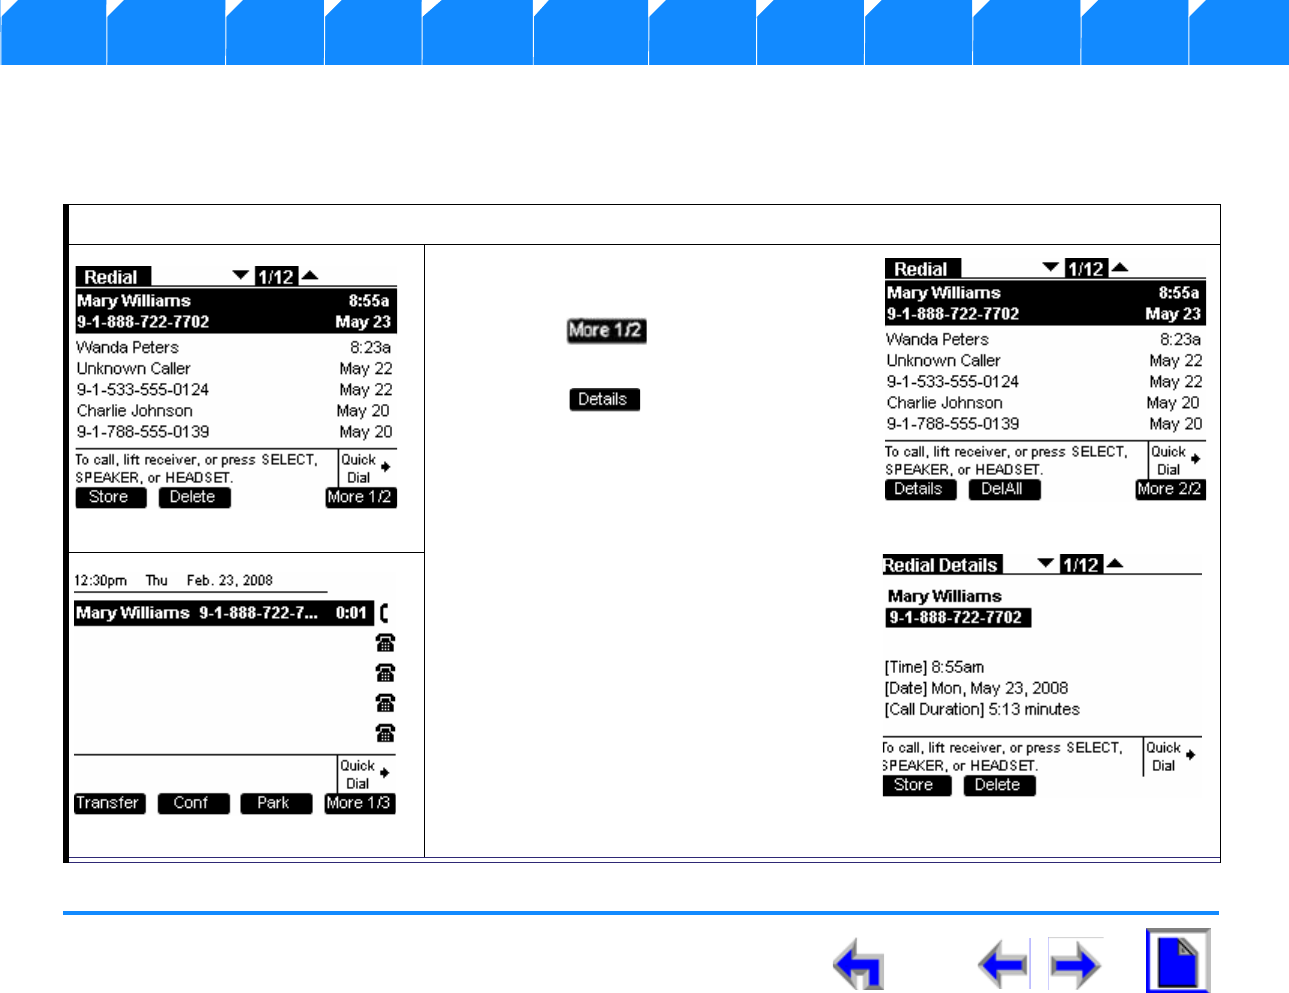
SB67030 Deskset User’s Guide - Making a Call 146
Voice Make Call Answer
Install Overview PC UI Setup Mail Directory CallLog Call Manage Call Handset Trouble
Calling from Redial Details
You can view the name and number of the caller (if available) as well as the time and date of the call. The duration of the last outbound
call to the listed phone number will also be displayed.
To call from the redial details screen:
1. Press REDIAL to display the Redial
screen shown in Figure 193
2. Press to display the Redial
screen shown in Figure 194.
3. Press to display the Redial
Details screen shown in Figure 195
4. Press the up or down NAVIGATION key
to cycle through redial entries.
5. Press SELECT, SPEAKER, HEADSET, or
lift the Handset to dial the number.l
6. Observe that the number is dialed and
the Active Call screen shown in
Figure 196 displays.
Figure. 193 Redial List
Figure. 194 Redial 2
Figure. 195 Redial Details
Figure. 196 Active Call
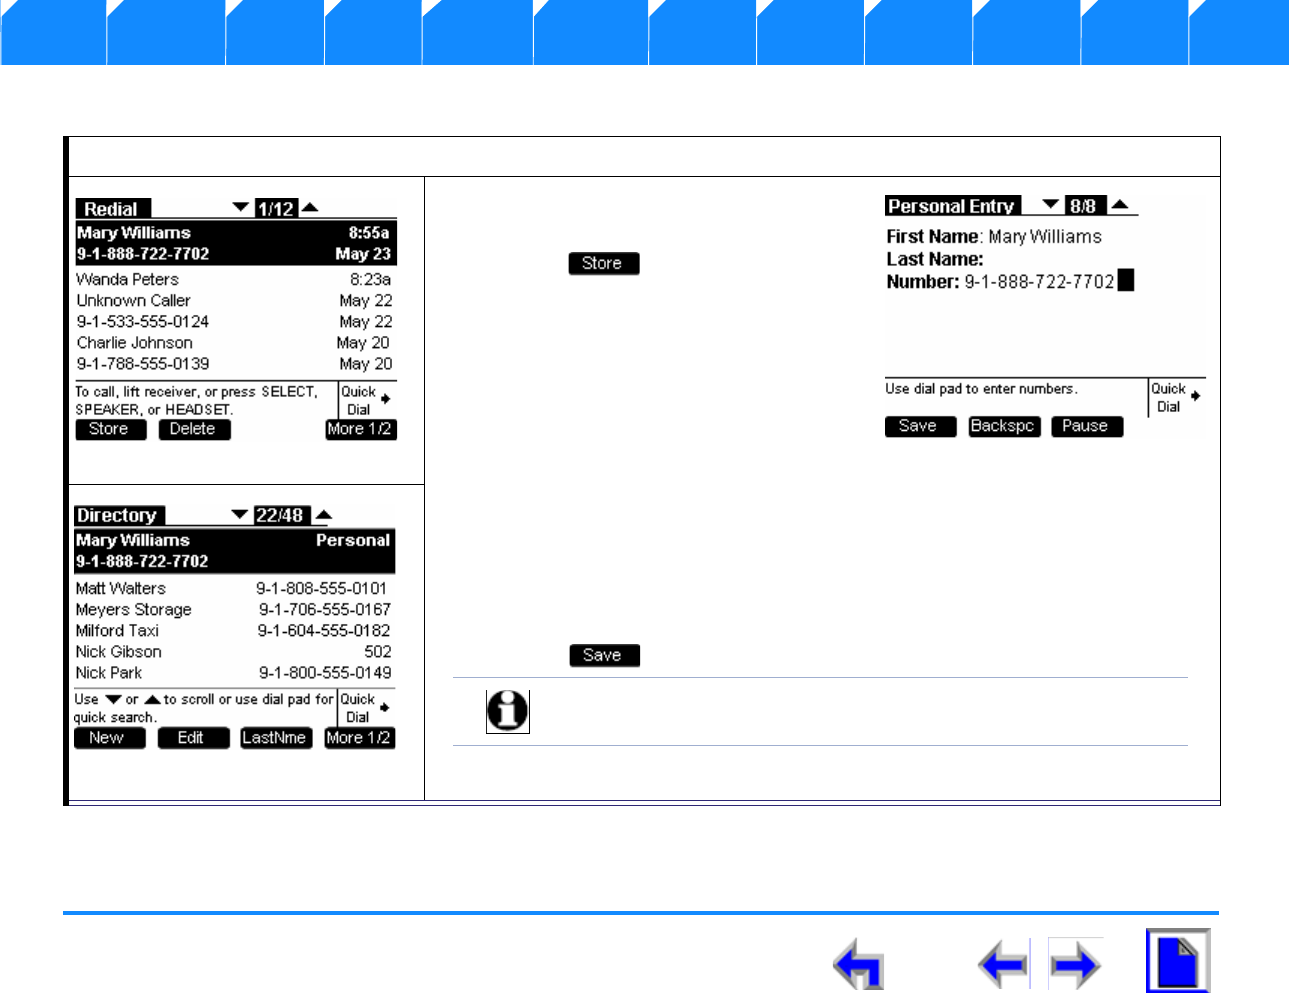
SB67030 Deskset User’s Guide - Making a Call 147
Voice Make Call Answer
Install Overview PC UI Setup Mail Directory CallLog Call Manage Call Handset Trouble
Storing Redial Entries
To store a redial entry:
1. Press REDIAL to display the Redial
screen shown in Figure 197
2. Press to display the Personal
Entry screen shown in Figure 198.
3. You will go directly to Directory Edit
mode.
a. The name (if available) will
automatically populate the First
Name field. The name could come
from the CID in a Call Log entry, or
from the user-entered name in the Directory, depending on the source of
the dialed number.
b. You must fill in the Last Name field.
c. The number will automatically populate the Number field.
4. Press to display the Directory screen shown in Figure 199.
Figure. 197 Redial List
Figure. 198 Personal Entry Screen
Note The system will not check for duplication in stored entries.
Figure. 199 Directory List
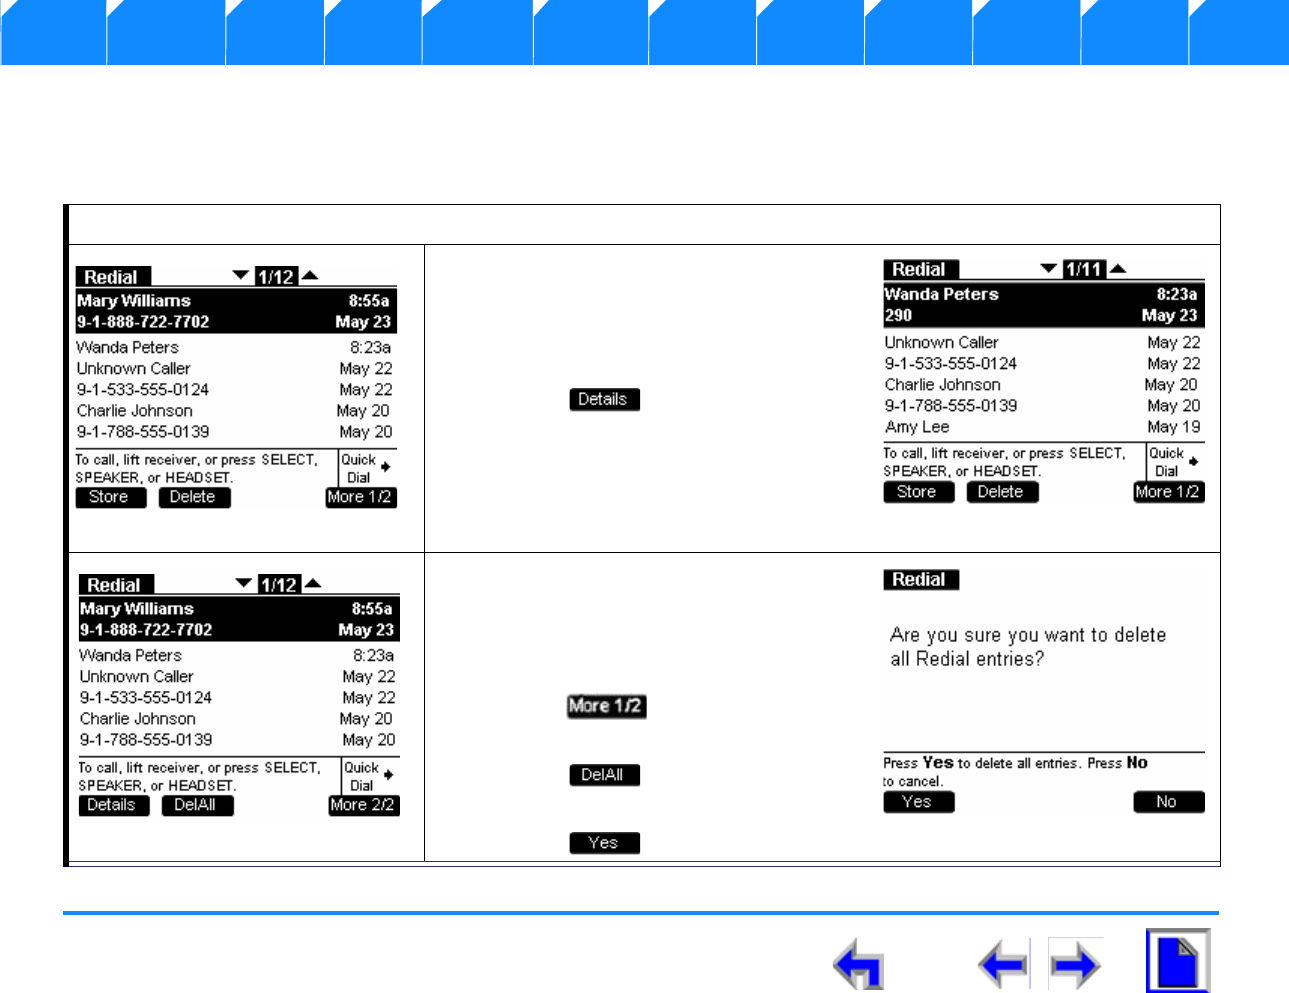
SB67030 Deskset User’s Guide - Making a Call 148
Voice Make Call Answer
Install Overview PC UI Setup Mail Directory CallLog Call Manage Call Handset Trouble
Deleting Redial Entries
You can delete a single Redial entry from the Redial list or from Redial Details or all Redial entries. If in the Redial list, ensure the entry
you wish to delete is highlighted.
To delete a single redial entry:
1. Press REDIAL to display the Redial
screen shown in Figure 200.
2. Press the up or down NAVIGATION key
to highlight the desired redial entry.
3. Press to display the Redial
Details screen shown in Figure 201.
1. Press REDIAL to display the Redial
screen shown in Figure 200.
2. Press the up or down NAVIGATION key
to highlight the desired redial entry.
3. Press to display the Redial
screen shown in Figure 202.
4. Press to display the Redial
prompt screen shown in Figure 203.
5. Press to confirm deletion.
Figure. 200 Redial List
Figure. 201 Deleted Entry
Figure. 202 Redial List 2
Figure. 203 Deleted Entry
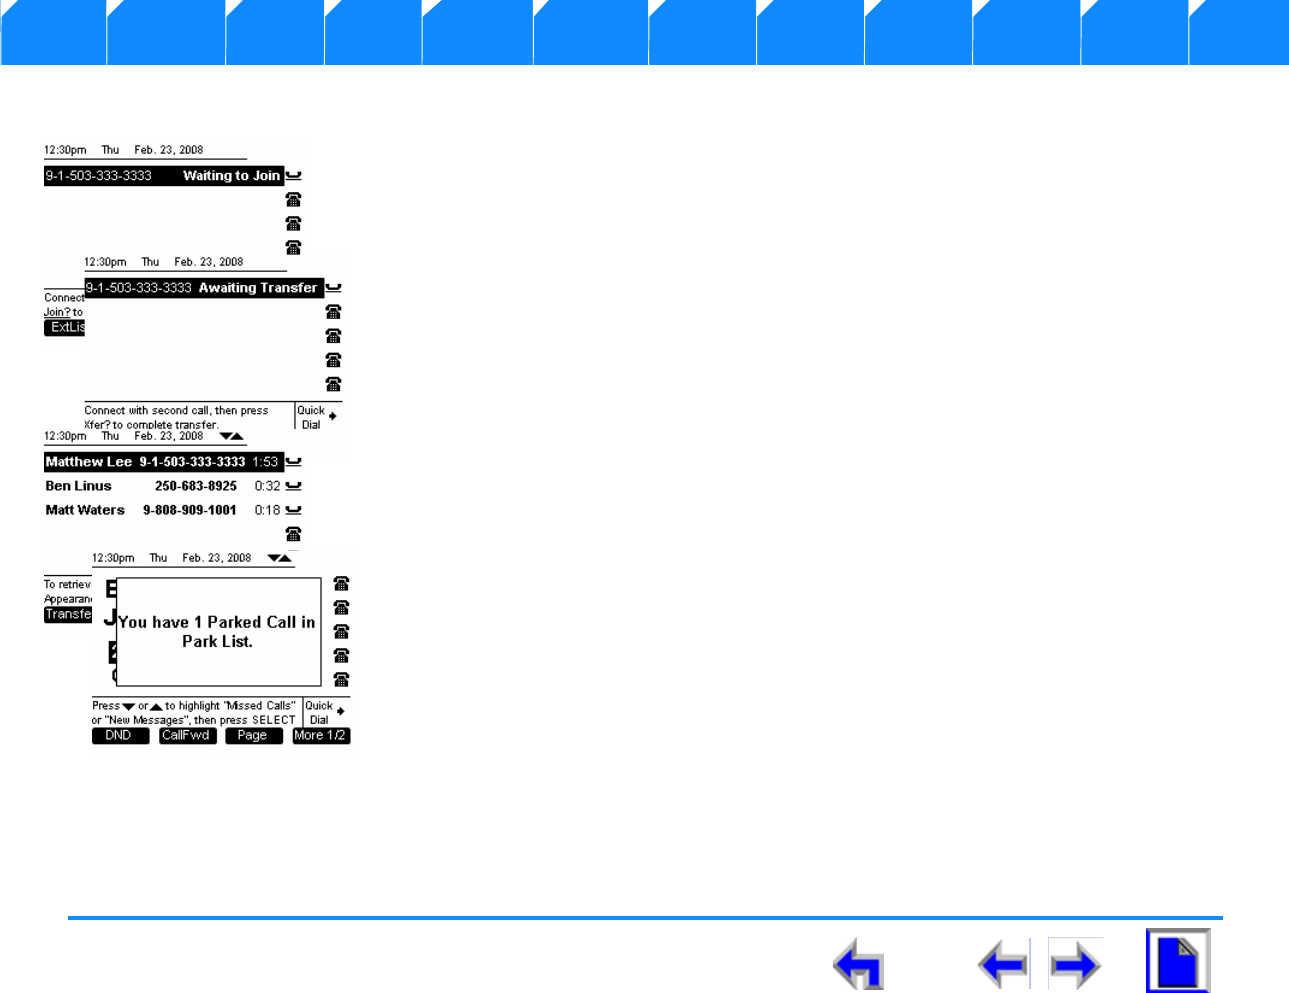
SB67030 Deskset User’s Guide - Call Management 149
Voice Make Call Answer
Install Overview PC UI Setup Mail Directory CallLog Call Manage Call Handset Trouble
CHAPTER
9
C
ALL
M
ANAGEMENT
Introduction
The SB67030 Deskset call management includes the following functions;
n“Call Management” on page 150
n“Transferring a Call” on page 151
n“Conference a Call” on page 160
n“Call on Hold” on page 171
n“Parking a Call” on page 173
n“Retrieving A Parked Call” on page 174
n“Paging” on page 175

SB67030 Deskset User’s Guide - Call Management 150
Voice Make Call Answer
Install Overview PC UI Setup Mail Directory CallLog Call Manage Call Handset Trouble
Call Management
The SB67030 Desk Set call management functions begin with the Active Call screen shown in Figure 204 and described in Table 21.
Figure. 204 The SB67030 Call Management Screen
Table 21 The SB67030 Call Management Screen Description
Key Description Key Description Key Description Key Description
Initiates transfer of a
call. Initiates a conference
call. Parks call. Moves to next set
of programmed
operation keys.
Initiates Do Not Disturb. Initiates Call Forward.
Goes to Park List.
SB67030 Deskset User’s Guide - Call Management 151
Voice Make Call Answer
Install Overview PC UI Setup Mail Directory CallLog Call Manage Call Handset Trouble
Transferring a Call
The SB67030 Desk Set can transfer an active or a held call to an external call or an internal extension. An unsupervised transfer occurs
if the user does not communicate with the transfer recipient. In this case, the call may be transferred while dialing out to the transfer
recipient. The transfer recipient does not have to pick up the phone and talk to the user before receiving the transferred call. A
supervised transfer occurs if the user communicates with the transfer recipient before completing the transfer.
Here are the rules that have been defined for a call transfer:
nYou may establish a held call as Call A by pressing , but cannot establish a held call as Call B ( will be
unavailable). To establish a held or a parked call as Call B, the call must be un-held or un-parked first. In other words, the user
can only transfer to an active call in Transfer Setup mode.
nOnce Transfer Setup is established will disappear when you navigate to a held call.
nDuring Transfer Setup, pressing on a highlighted held call will cancel Transfer setup. Call A remains on hold.
nDuring Transfer Pending, going off-hook:
lAccesses a new CA slot not associated with Call A or Call B
lCancels Transfer Pending. Call A remains on hold and Call B is placed on hold.
lThis rule includes answering an incoming call on a different CA.
nOnly one instance of Transfer in progress can exist.
nTransfer Setup can be canceled by pressing the CANCEL key when Call A is highlighted. Call A remains on hold.
nTransfer Pending can be canceled by pressing the CANCEL key when either Call A or B is highlighted. Call A remains on hold
and Call B remains in the same state – the soft keys change to those available in the DIAL or ACTIVE state appropriately.
The following are transfer functions:
n“Transfer to an Internal Extension” on page 153
n“Transfer to an External Number” on page 154

SB67030 Deskset User’s Guide - Call Management 152
Voice Make Call Answer
Install Overview PC UI Setup Mail Directory CallLog Call Manage Call Handset Trouble
n“Transferring to Call Log” on page 155
n“Transferring to Directory” on page 156
n“Transferring to Redial List” on page 157
n“Transferring to Held Calls” on page 158
n“Transferring to Quick Dial” on page 159
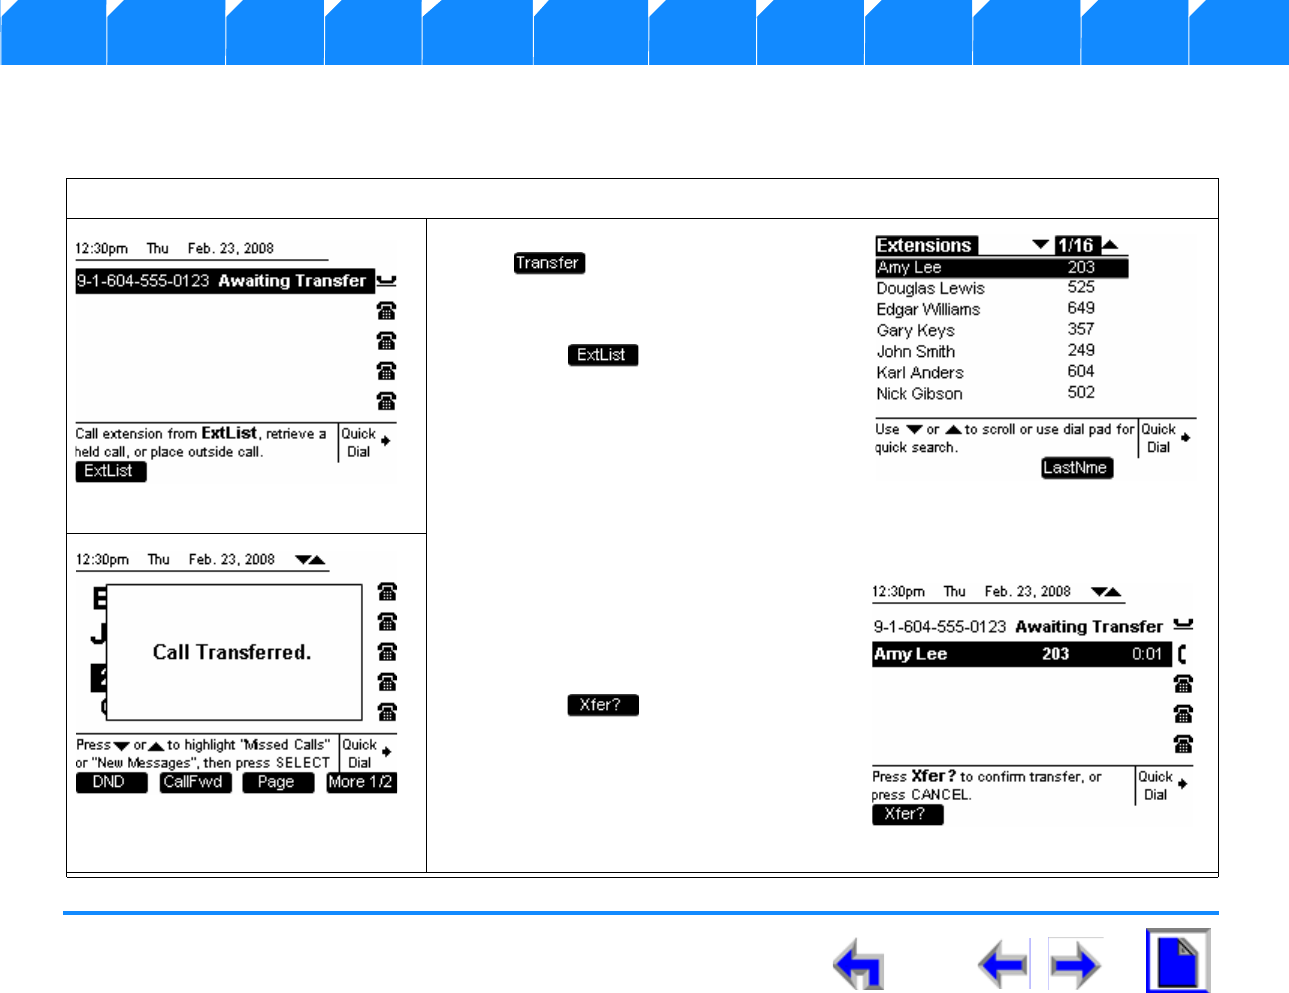
SB67030 Deskset User’s Guide - Call Management 153
Voice Make Call Answer
Install Overview PC UI Setup Mail Directory CallLog Call Manage Call Handset Trouble
Transfer to an Internal Extension
The user may only transfer a call to an external number if this function has been enabled in Admin Settings.
To transfer a call to an external extension:
1. From the Active Call screen, press
The Active Call will be
auto-held and you will go to Transfer
Setup mode.
2. Press to display the list
shown in Figure 206. This key will not
be available after digits are entered.
3. Press the up or down NAVIGATION
key to cycle through Extension list
entries.
4. Press SELECT, SPEAKER, HEADSET, or lift the handset to call the extension.
5. Once the call to the extension has
been established, you will go to
transfer pending mode shown in
Figure 207.
6. Press to complete the
transfer and display the Call
Transferred splash screen shown in
Figure 208 for 2 seconds.
7. When the transfer is complete you
will return to Idle.
Figure. 205 Awaiting Transfer
Figure. 206 Extension List
Figure. 207 Transfer Pending
Figure. 208 Call Transferred
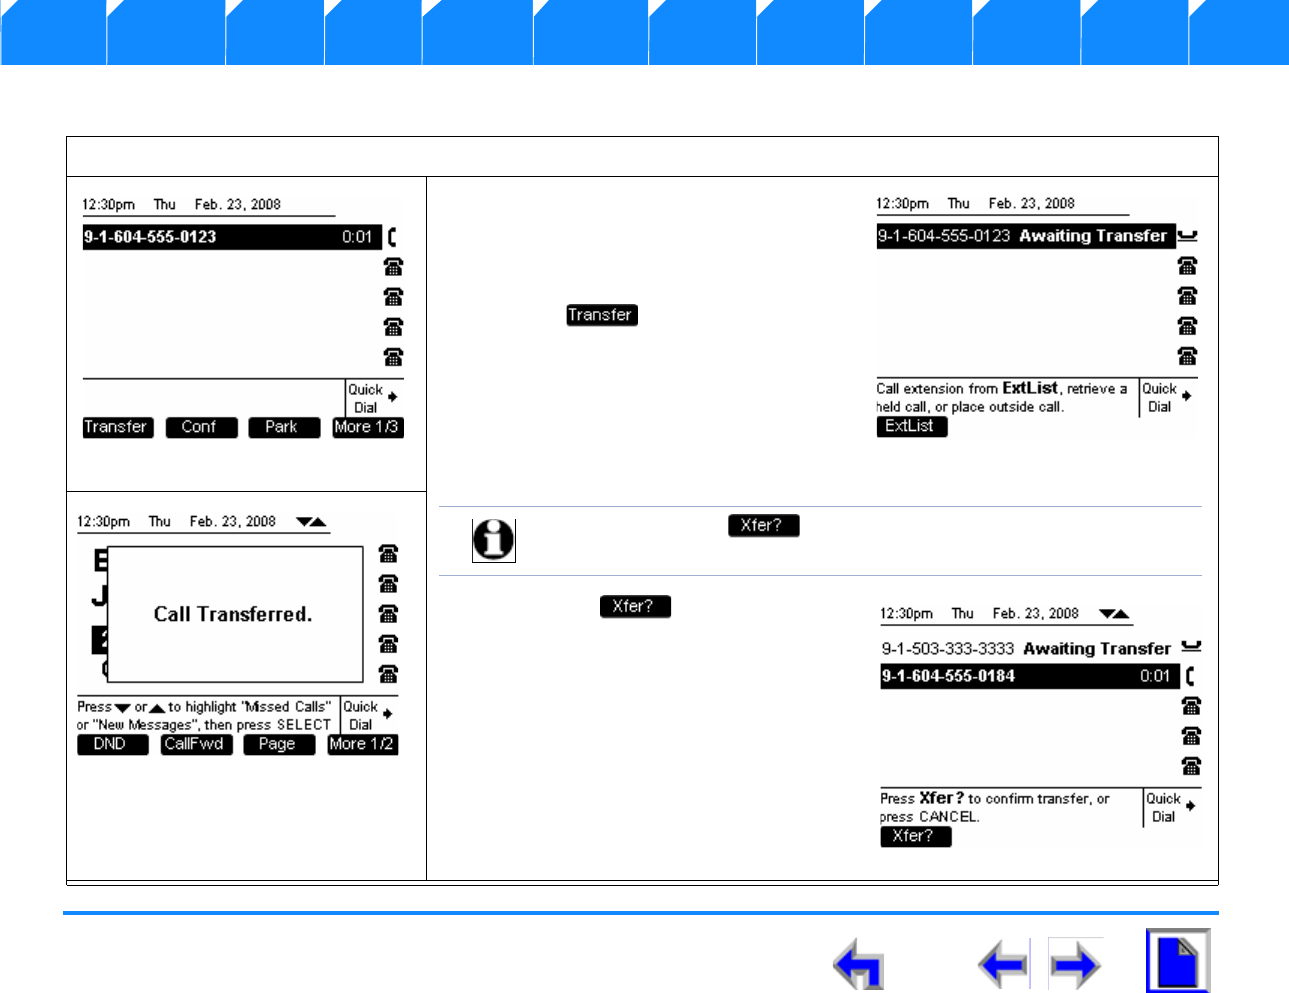
SB67030 Deskset User’s Guide - Call Management 154
Voice Make Call Answer
Install Overview PC UI Setup Mail Directory CallLog Call Manage Call Handset Trouble
Transfer to an External Number
To transfer a call to an external number:
1. Establish Call A by lifting the headset
and dialing the number as shown in
Figure 209. Only active or held calls
may be transferred.
2. Press . The Active Call, will be
auto-held and you will go to Transfer
Setup mode as shown in Figure 210.
3. Press Call appearance key 2 and dial
Call B’s number as shown in
Figure 211.
4. Press the . and display the Call
Transferred splash screen shown in
Figure 212 for 2 seconds.
5. If there are no other calls on hold you
will return to Idle. If there are still calls
on hold you will return to held Call
Appearances.
Figure. 209 Establish Call A
Figure. 210 Awaiting Transfer
Note You may press before Call B picks up (unsupervised transfer),
or after Call B picks up (supervised transfer).
Figure. 211 Transfer Pending
Figure. 212 Call Transferred
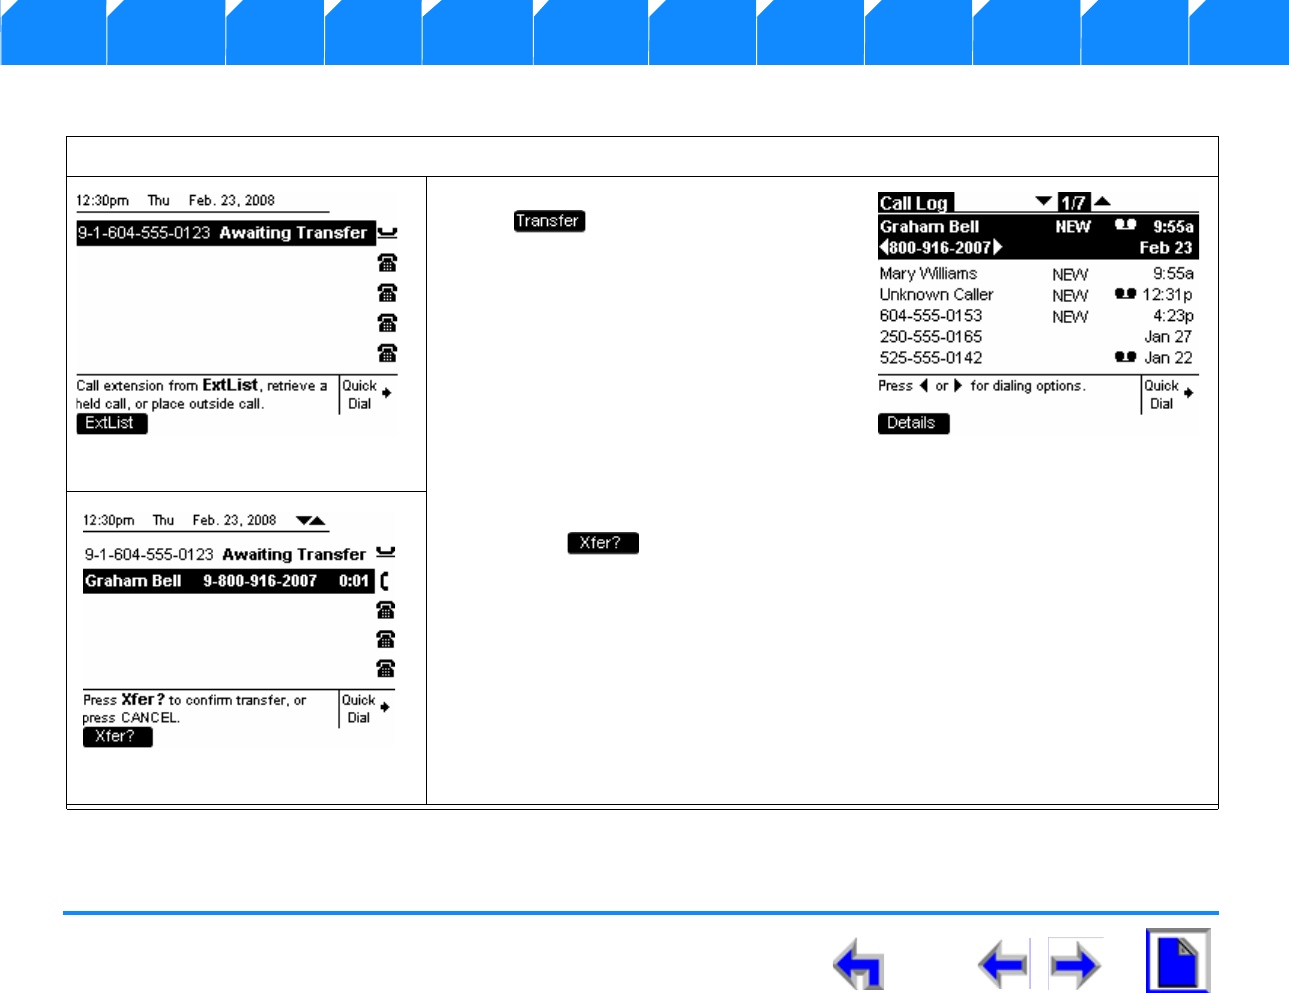
SB67030 Deskset User’s Guide - Call Management 155
Voice Make Call Answer
Install Overview PC UI Setup Mail Directory CallLog Call Manage Call Handset Trouble
Transferring to Call Log
To transfer a call to a number in the Call Log:
1. From the Active Call screen, press
The Active Call will be
auto-held and you will go to Transfer
Setup mode as shown in Figure 213.
2. Press CALL LOG to display the list
shown in Figure 214.
3. Press the up or down NAVIGATION
key to cycle through Call Log entries.
4. Press SELECT, SPEAKER, HEADSET,
or lift the handset to dial the
highlighted number and display the screen shown in Figure 215.
5. Press to complete the transfer.
Figure. 213 Awaiting Transfer
Figure. 214 Call Log
Figure. 215 Transfer Pending
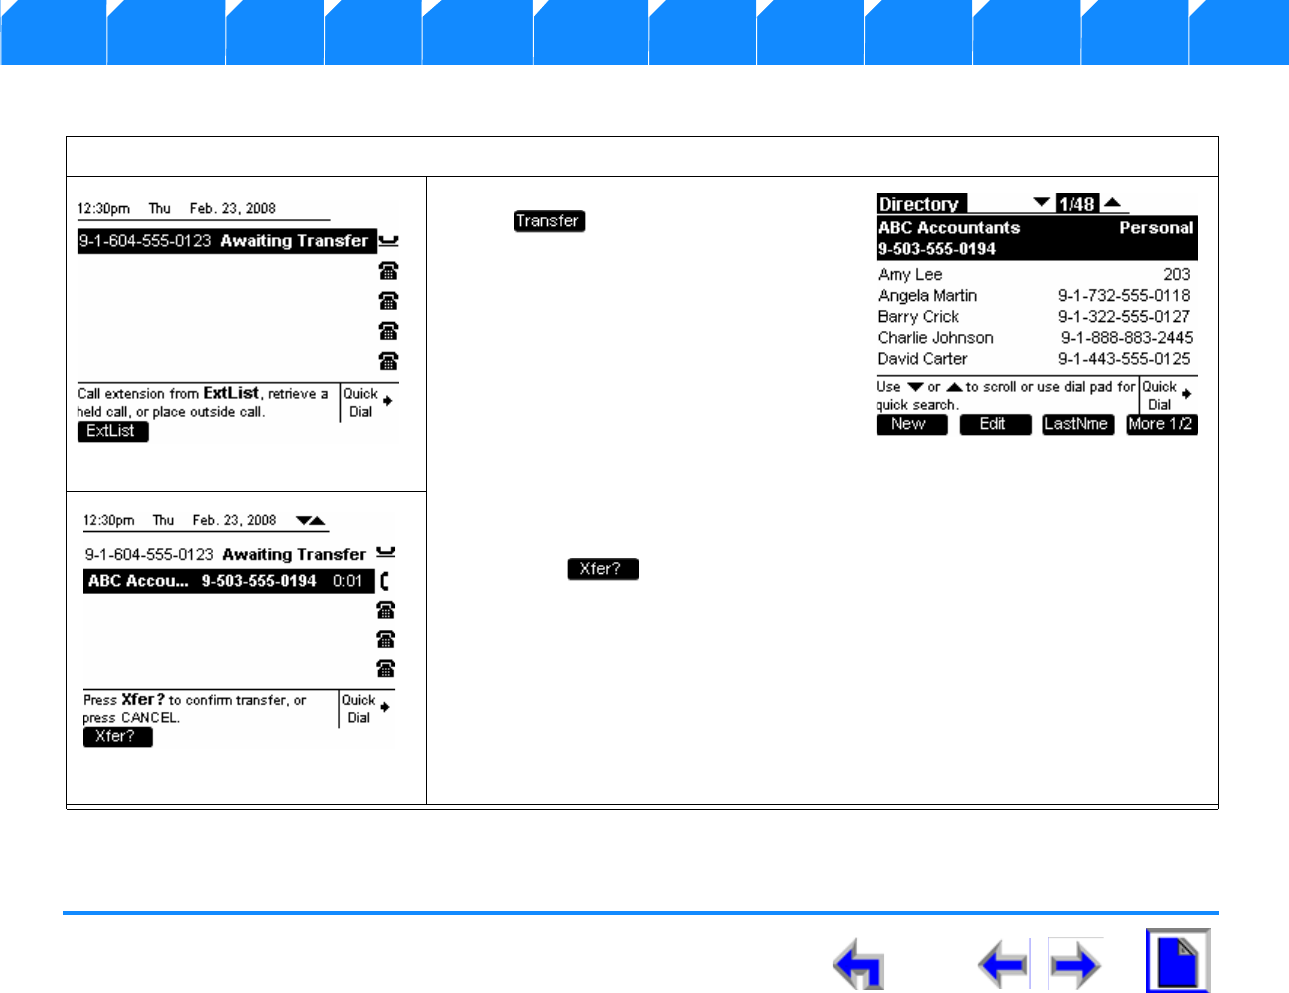
SB67030 Deskset User’s Guide - Call Management 156
Voice Make Call Answer
Install Overview PC UI Setup Mail Directory CallLog Call Manage Call Handset Trouble
Transferring to Directory
To transfer a call to a number in the Directory:
1. From the Active Call screen, press
The Active Call, it will be
auto-held and you will go to Transfer
Setup mode as shown in Figure 216.
2. Press DIRECTORY to display the list
shown in Figure 206. This key will not
be available after digits are entered.
3. Press the up or down NAVIGATION
key to cycle through Call Log entries.
4. .Press SELECT, SPEAKER, HEADSET,
or lift the handset to dial the highlighted number and display the screen
shown in Figure 215.
5. Press to complete the transfer.
Figure. 216 Awaiting Transfer
Figure. 217 Directory List
Figure. 218 Call Transferred
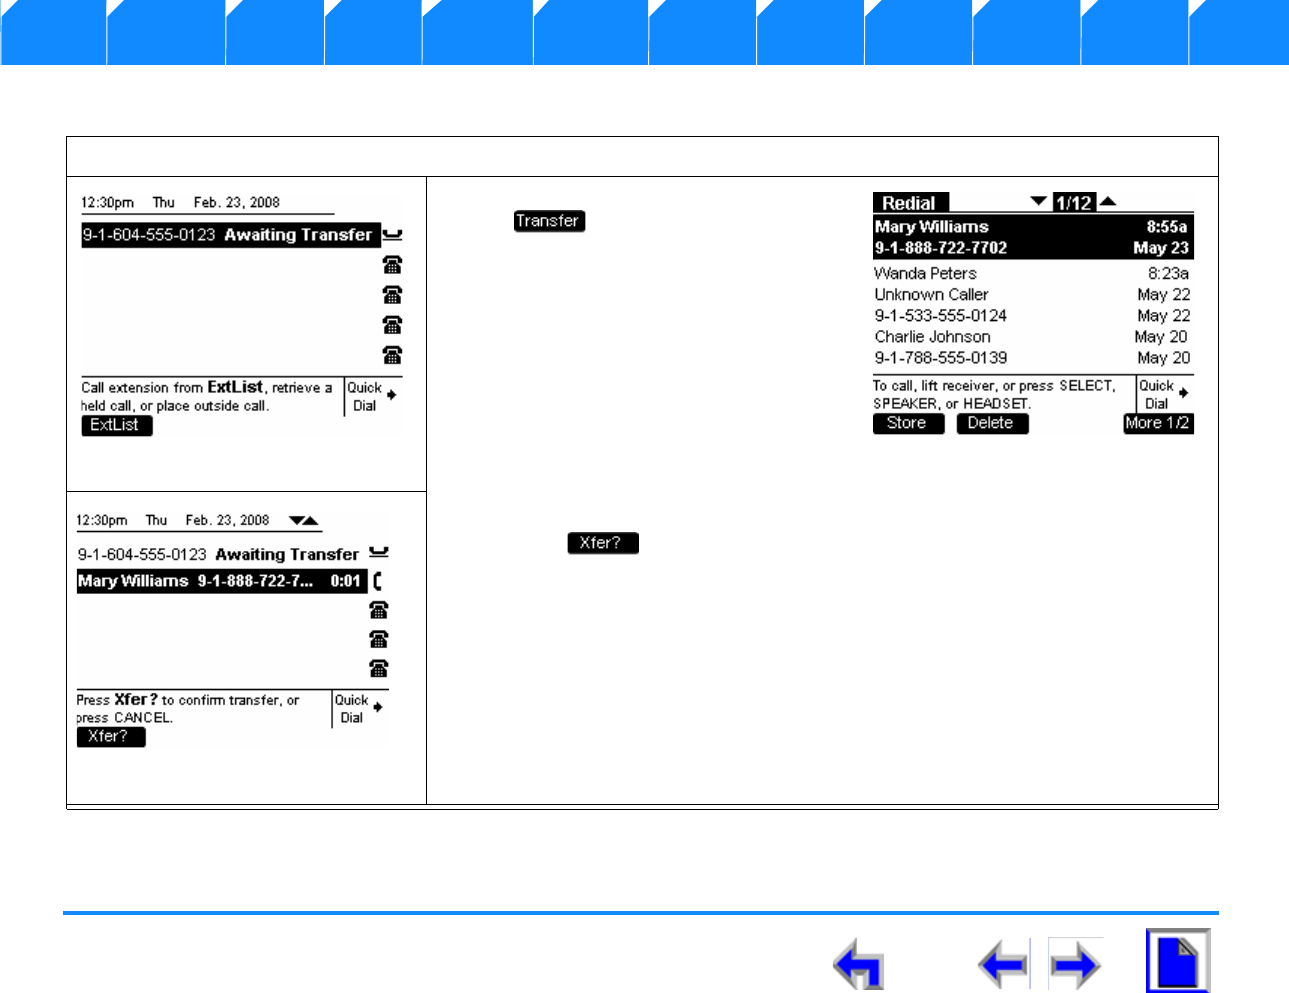
SB67030 Deskset User’s Guide - Call Management 157
Voice Make Call Answer
Install Overview PC UI Setup Mail Directory CallLog Call Manage Call Handset Trouble
Transferring to Redial List
To transfer a call to a number in the Redial List:
1. From the Active Call screen, press
The Active Call will be
auto-held and you will go to Transfer
Setup mode as shown in Figure 219.
2. Press REDIAL to display the list
shown in Figure 220.
3. Press the up or down NAVIGATION
key to cycle through Redial entries.
4. Press SELECT, SPEAKER, HEADSET,
or lift the handset to dial the
highlighted number and display the screen shown in Figure 221.
5. Press to complete the transfer.
Figure. 219 Awaiting Transfer
Figure. 220 Redial List
Figure. 221 Call Transferred
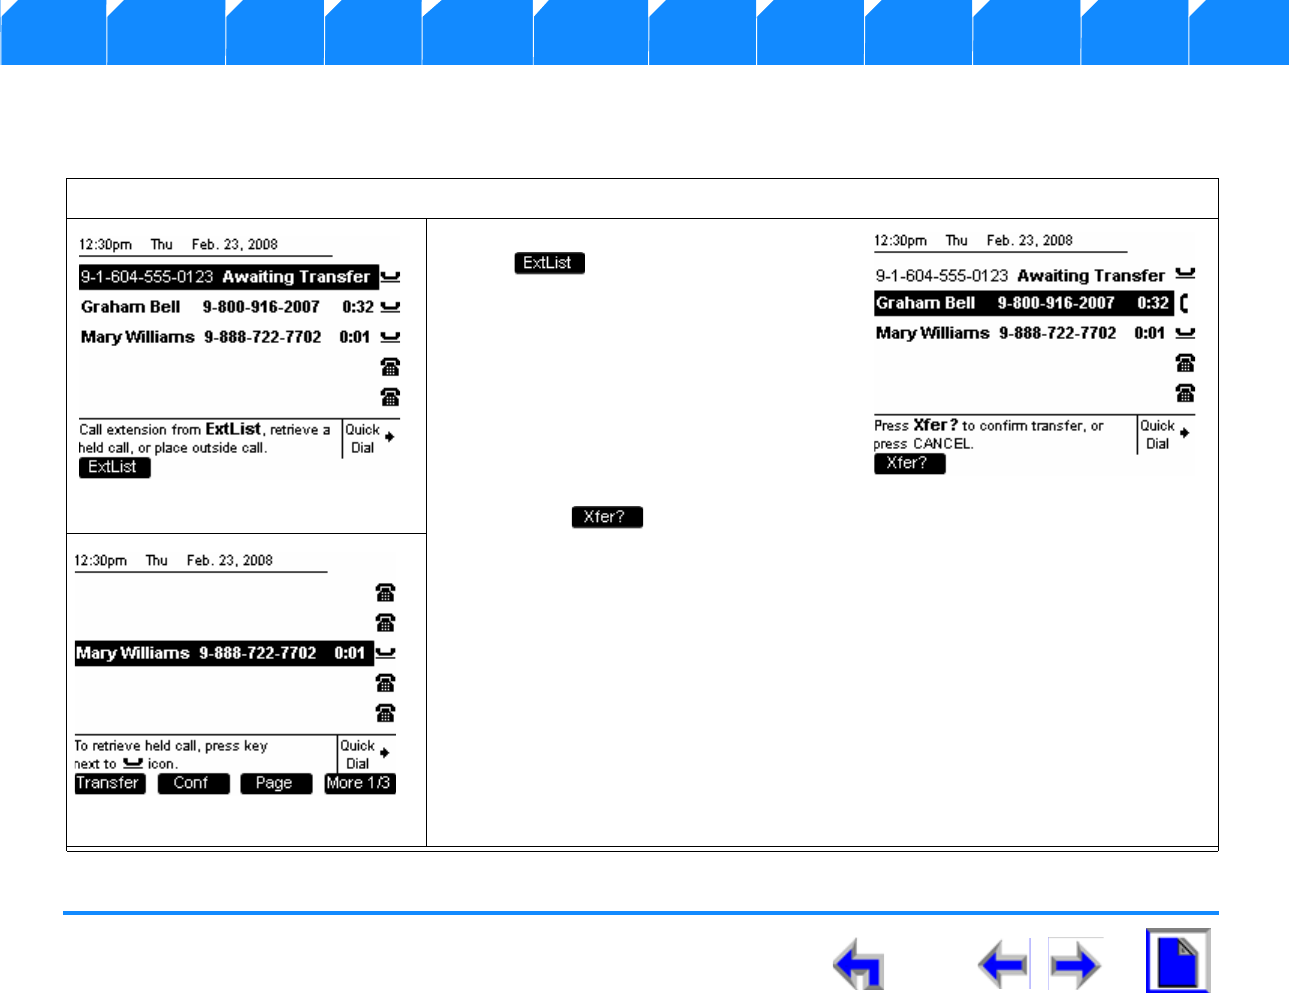
SB67030 Deskset User’s Guide - Call Management 158
Voice Make Call Answer
Install Overview PC UI Setup Mail Directory CallLog Call Manage Call Handset Trouble
Transferring to Held Calls
Once Call A has been established, you may transfer to a held call (Call B) in any of the call appearances by unholding it first.
To transfer a call to a held call:
1. From the Active Call screen, press
The Active Call, it will be
auto-held and you will go to Transfer
Setup mode as shown in Figure 222.
2. Press the up or down NAVIGATION
key to highlight the desired entry.
3. Press SELECT to unhold the
highlighted number and display the
screen shown in Figure 223.
4. .Press to complete the
transfer and display the new held Calls list shown in Figure 224.
Figure. 222 Awaiting Transfer
Figure. 223 Unheld Call
Figure. 224 Held Calls
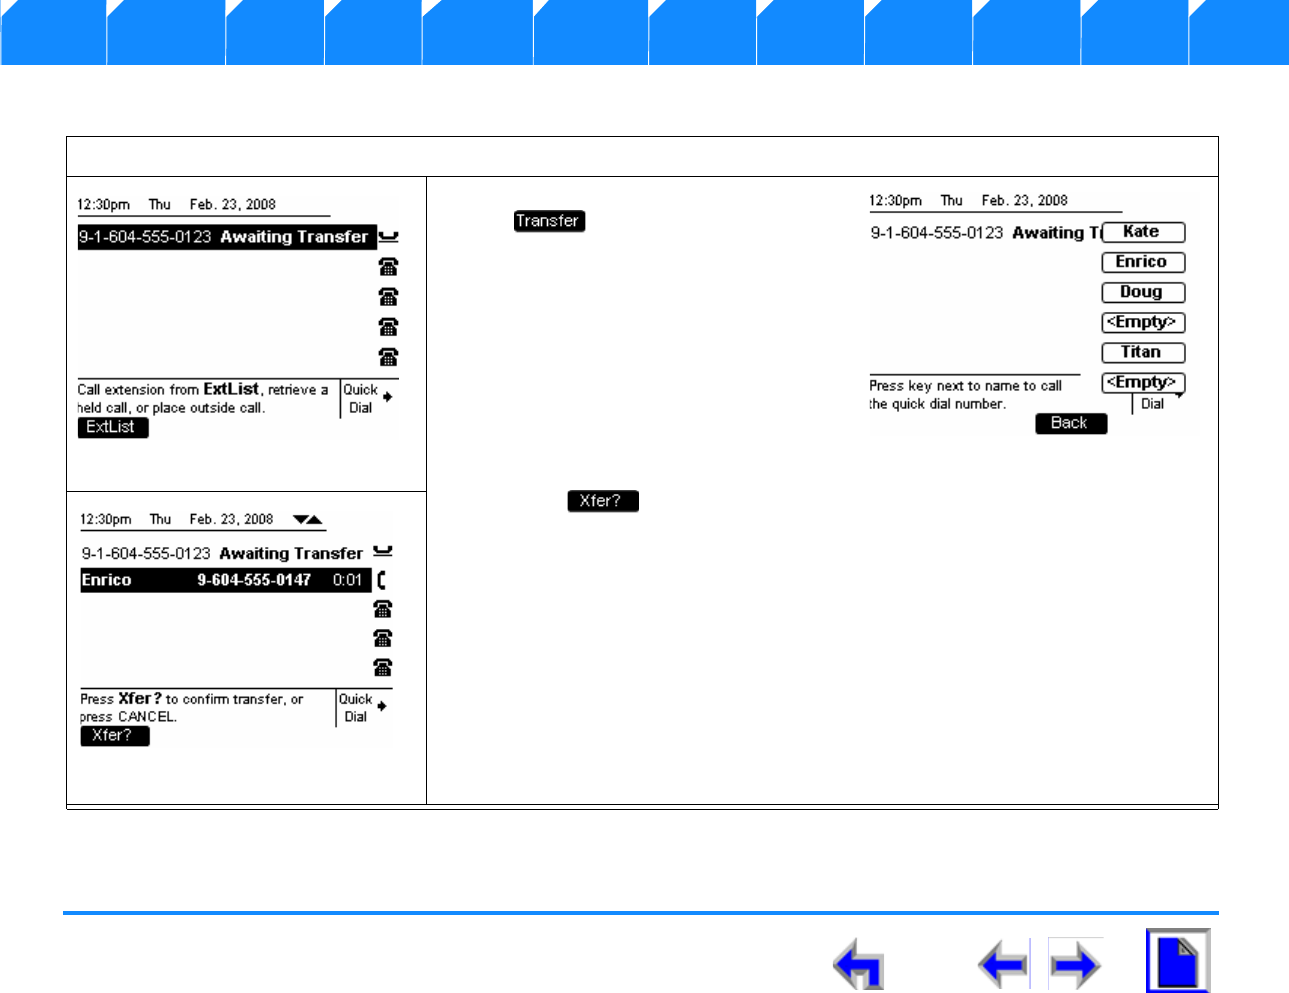
SB67030 Deskset User’s Guide - Call Management 159
Voice Make Call Answer
Install Overview PC UI Setup Mail Directory CallLog Call Manage Call Handset Trouble
Transferring to Quick Dial
To transfer a call to a number in the Quick Dial List:
1. From the Active Call screen, press
The Active Call will be
auto-held and you will go to Transfer
Setup mode as shown in Figure 225
2. Press Quick Dial to display the list
shown in Figure 226.
3. Press the Call appearance key
corresponding to the desired entry to
display the screen shown in
Figure 227.
1. Press to complete the transfer.
Figure. 225 Awaiting Transfer
Figure. 226 Quick Dial List
Figure. 227 Call Transferred
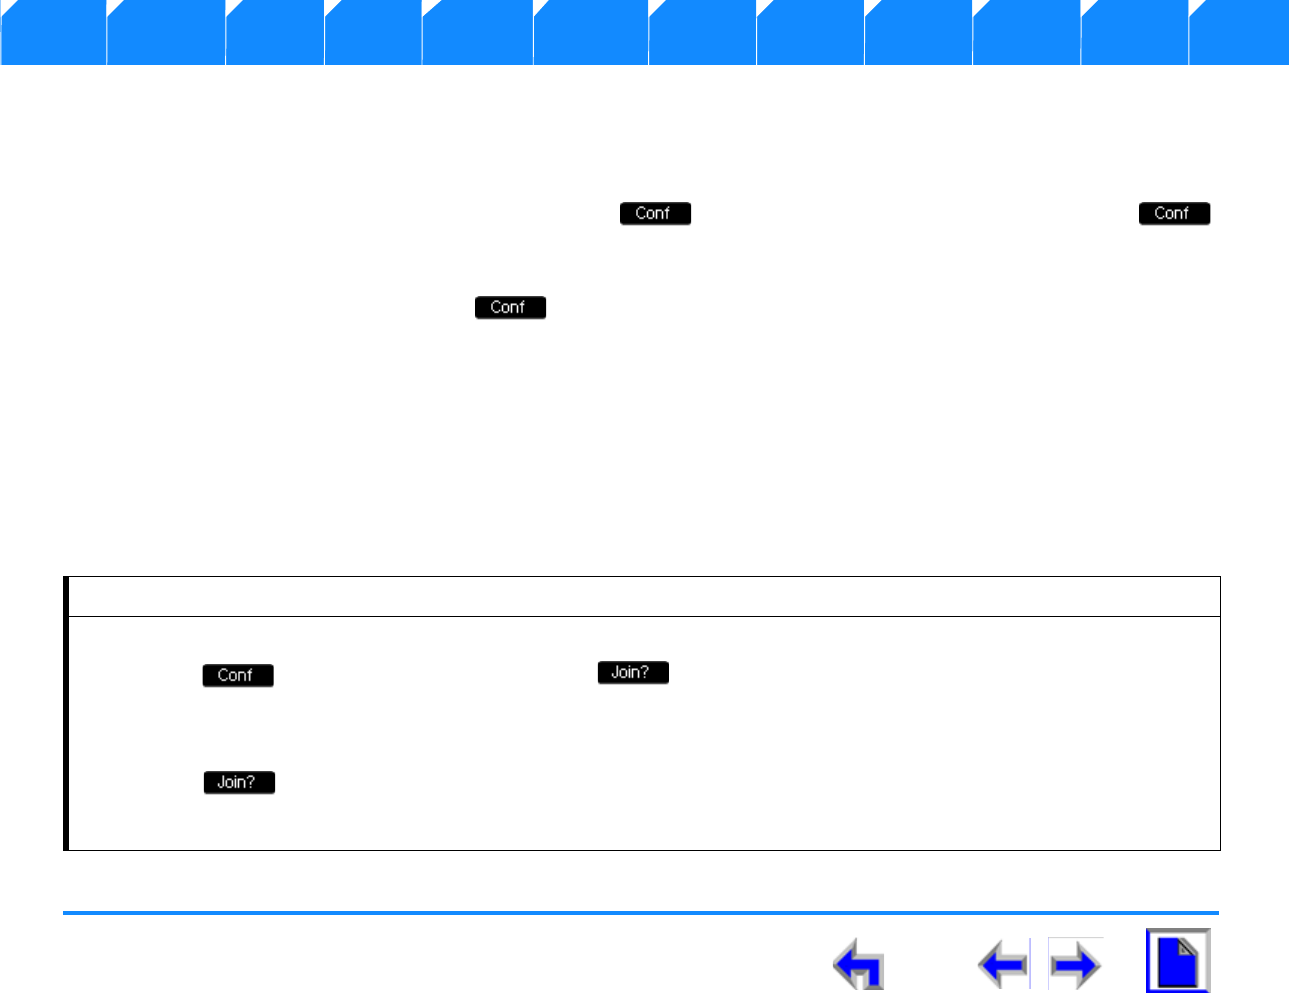
SB67030 Deskset User’s Guide - Call Management 160
Voice Make Call Answer
Install Overview PC UI Setup Mail Directory CallLog Call Manage Call Handset Trouble
Conference a Call
The SB67030 Desk Set can conference a combination of two outside and/or internal calls. Only one instance of Conference in progress
can exist. This should be guaranteed by following these rules
nThe user may establish a held call as Call A by pressing , but cannot establish a held call as Call B because
key will be unavailable). To establish a held or a parked call as Call B, the call must be un-held or un-parked first. In other words,
the user can only conference with an active call in Conference Setup mode.
nOnce Conference Setup is established disappears when the user scrolls to highlighted a held call.
nConference Setup does not automatically establish an off-hook on another CA for Call B. You must choose Call B from a held
call or parked call or manually activate a new call with Call B.
nPress CANCEL to cancel Conference Setup when Call A is highlighted. Call A remains on hold. Call A remains on hold and Call
B remains in the same state – the programmed keys change to those available in the Dial or Active state appropriately.
nDuring Conference Pending, pressing a CA key (or equivalent off-hook action which accesses a new CA slot) not associated with
Call A or Call B, cancels Conference Pending. Call A should remain on hold and Call B should be placed on hold. This rule
includes answering an incoming call on a different CA.
To conference a call:
1. Establish the first call, Call A. You must have an Active Call or have calls on hold before conference setup can begin.
2. Press . Call A will be placed on hold and appears
3. Establish the second call, Call B. You may establish Call B through direct dialing, the Extension list, Call Log, Redial list, Park
list, Directory, Quick Dial, or by taking a held call off hold.
4. Press to join Call A and Call B with the Deskset.
5. The selected parties will now be in conference.
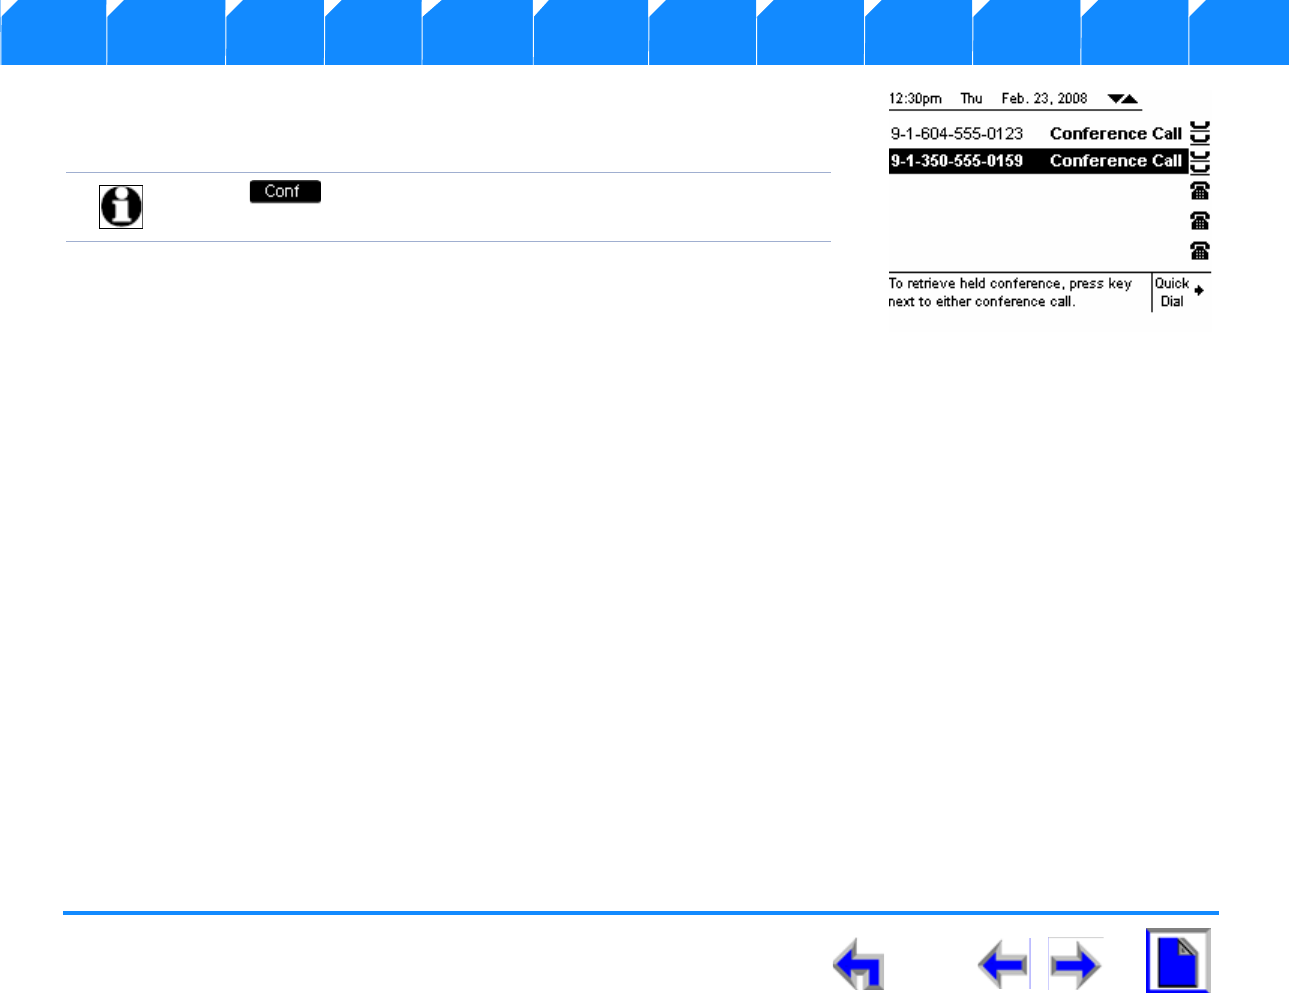
SB67030 Deskset User’s Guide - Call Management 161
Voice Make Call Answer
Install Overview PC UI Setup Mail Directory CallLog Call Manage Call Handset Trouble
nPressing HOLD during a conference will hold both Call A and B but they will still be
able to communicate with each other. The held conference icon, as shown Figure 228
designates a held conference.
nThe following events will automatically put the conference on hold (auto-hold):
a. You press an available Call Appearance to start a new call.
b. An incoming ring event occurs and you answer the new call.
The following are Conference functions:
n“Conference with Extension List” on page 162
n“Conference with Call Log” on page 163
n“Conference with Park List” on page 165
n“Conference with Directory” on page 166
n“Conference with Quick Dial” on page 167
n“Conference with a Held Call” on page 168
n“Conference Two Held Calls” on page 169
n“Canceling a Conference” on page 170
Note will be unavailable during an Active Call if you have
another conference on hold.
Figure. 228 Held Conference
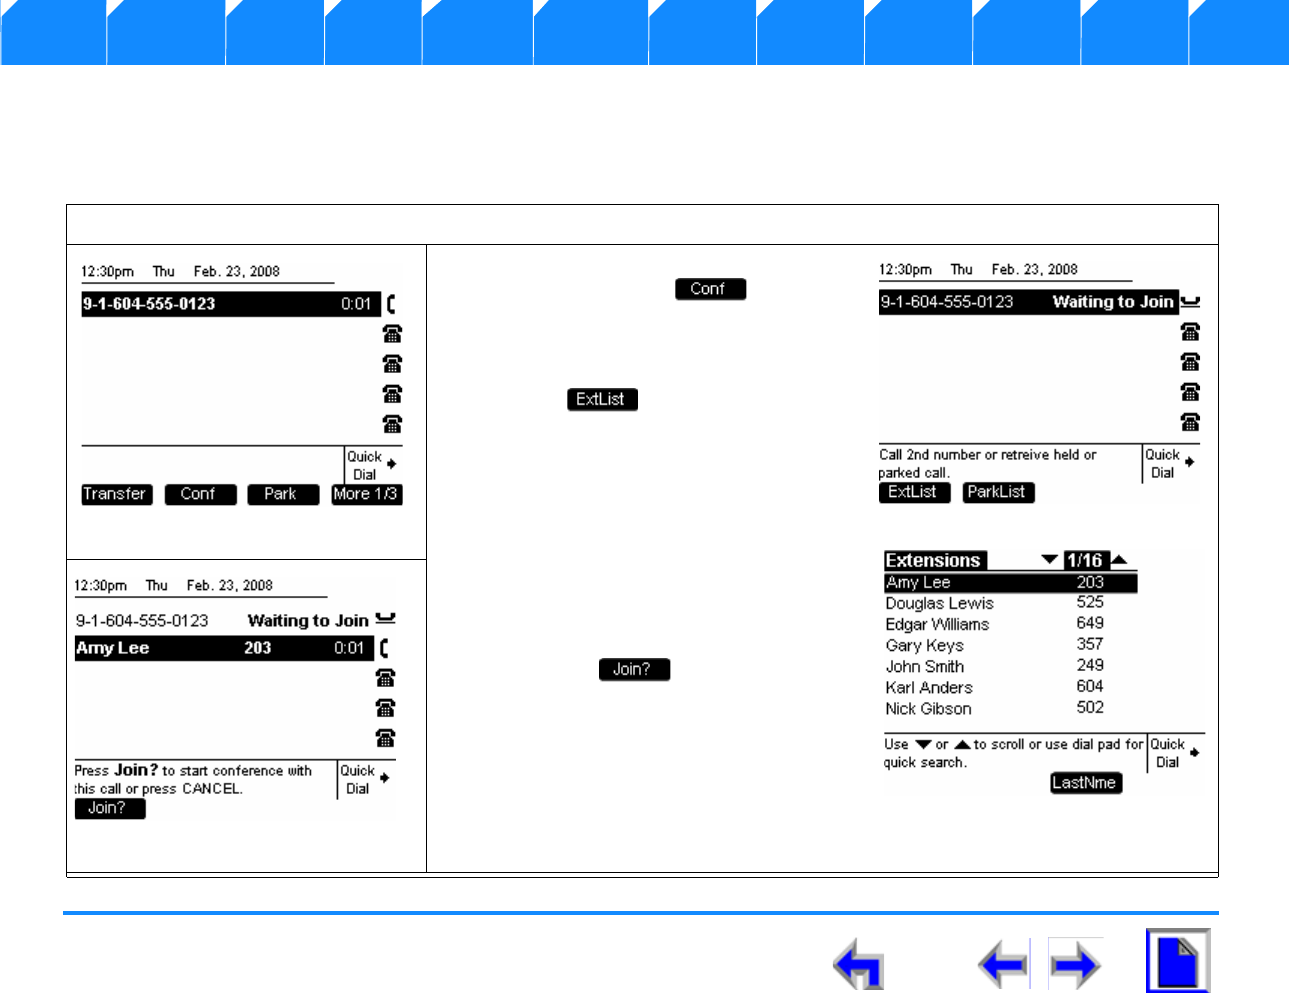
SB67030 Deskset User’s Guide - Call Management 162
Voice Make Call Answer
Install Overview PC UI Setup Mail Directory CallLog Call Manage Call Handset Trouble
Conference with Extension List
Once Call A has been established, the user may establish Call B by calling a number in the extension list. To conference with the
extension list, the user must follow this procedure from conference setup mode:
To conference calls using the extension list:
1. From the Active Call screen shown in
Figure 229, press
2. The Active Call will be auto-held and
the screen in Figure 230 displayed.
3. Press and the list shown in
Figure 231 displays.
4. Press the up or down NAVIGATION
key to highlight the desired entry.
5. Press SELECT, SPEAKER, HEADSET,
and you will go to Conference Setup
mode and display the screen shown in
Figure 232.
6. Press the to join Call A and Call
B.
Figure. 229 Active Call
Figure. 230 Extension List
Figure. 231 Extension List
Figure. 232 Call Transferred

SB67030 Deskset User’s Guide - Call Management 163
Voice Make Call Answer
Install Overview PC UI Setup Mail Directory CallLog Call Manage Call Handset Trouble
Conference with Call Log
Once Call A has been established, the user may establish Call B by calling a number in the Call Log. To conference with the Call Log,
the user must follow this procedure from conference setup mode:
To conference calls using the call log:
1. From the Active Call screen shown in
Figure 233, press
2. The Active Call will be auto-held and
the screen in Figure 234 displayed.
3. Press CALL LOG and the list shown in
Figure 231 displays.
4. Press the up or down NAVIGATION
key to highlight the desired entry.
5. Press SELECT, SPEAKER, HEADSET,
and you will go to Conference Setup
mode and display the screen shown in
Figure 232.
6. Press the to join Call A and Call
B.
Figure. 233 Active Call
Figure. 234 Conference Pending
Figure. 235 Call Log List
Figure. 236 Call Conference
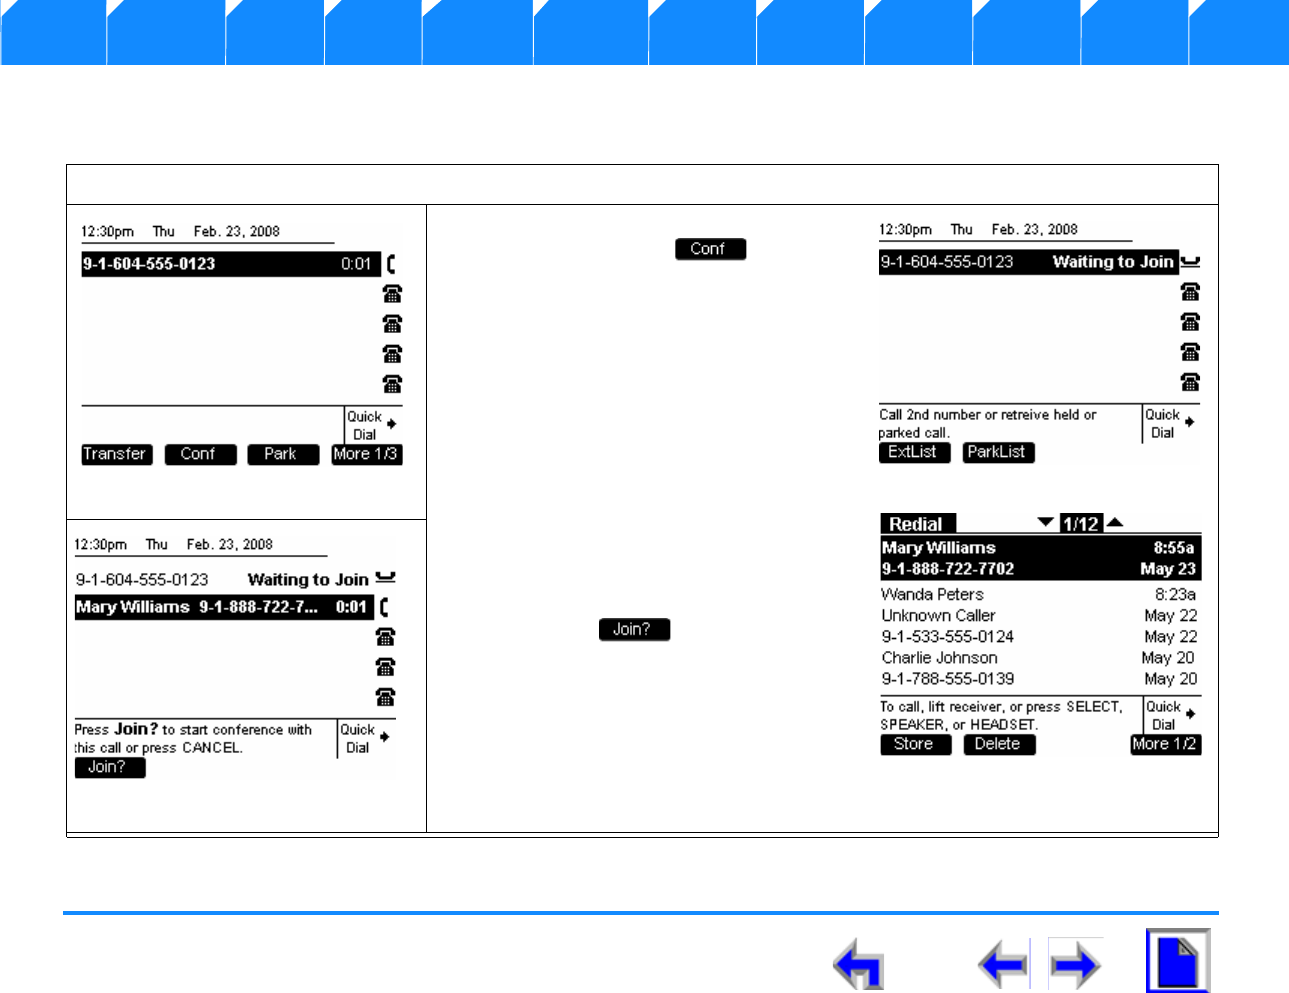
SB67030 Deskset User’s Guide - Call Management 164
Voice Make Call Answer
Install Overview PC UI Setup Mail Directory CallLog Call Manage Call Handset Trouble
Conference with Redial List
Once Call A has been established, the user may establish Call B by calling a number in the Redial List.:
To conference calls using the redial list:
1. From the Active Call screen shown in
Figure 237, press
2. The Active Call will be auto-held and
the screen in Figure 238 displayed.
3. Press REDIAL and list shown in
Figure 239 displays.
4. Press the up or down NAVIGATION
key to highlight the desired entry.
5. Press SELECT, SPEAKER, HEADSET,
and you will go to Conference Setup
mode and display the screen shown in
Figure 232.
6. Press the to join Call A and Call
B.
Figure. 237 Active Call
Figure. 238 Extension List
Figure. 239 Redial List
Figure. 240 Call Transferred
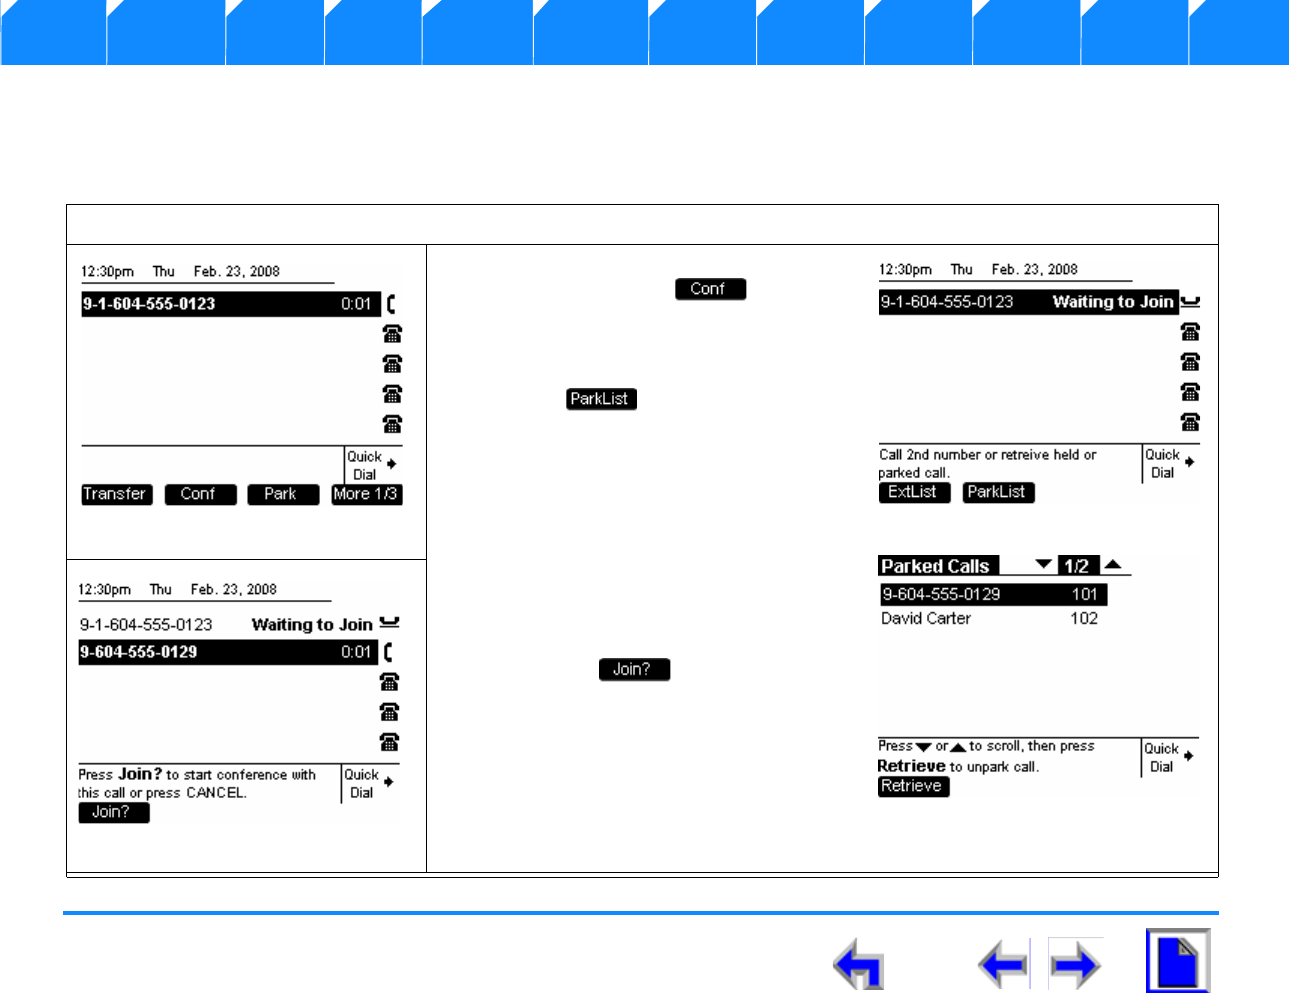
SB67030 Deskset User’s Guide - Call Management 165
Voice Make Call Answer
Install Overview PC UI Setup Mail Directory CallLog Call Manage Call Handset Trouble
Conference with Park List
Once Call A has been established, the user may establish Call B by calling a number in the Park List. To conference with the Park List,
the user must follow this procedure from conference setup mode:
To conference calls using the park list:
1. From the Active Call screen shown in
Figure 241, press
2. The Active Call will be auto-held and
the screen in Figure 242 displayed.
3. Press and list shown in
Figure 243 displays.
4. Press the up or down NAVIGATION
key to highlight the desired entry.
5. Press SELECT, SPEAKER, HEADSET,
and you will go to Conference Setup
mode and display the screen shown in
Figure 244.
6. Press the to join Call A and Call
B.
Figure. 241 Active Call
Figure. 242 Extension List
Figure. 243 Extension List
Figure. 244 Call Transferred

SB67030 Deskset User’s Guide - Call Management 166
Voice Make Call Answer
Install Overview PC UI Setup Mail Directory CallLog Call Manage Call Handset Trouble
Conference with Directory
Once Call A has been established, the user may establish Call B by calling a number in the Directory. To conference with the Directory,
the user must follow this procedure from conference setup mode:
To transfer a call to an external extension:
1. From the Active Call screen shown in
Figure 245, press
2. The Active Call will be auto-held and
the screen in Figure 246 displayed.
3. Press DIRECTORY and list shown in
Figure 247 displays.
4. Press the up or down NAVIGATION
key to highlight the desired entry.
5. Press SELECT, SPEAKER, HEADSET,
and you will go to Conference Setup
mode and display the screen shown in
Figure 248.
6. Press the to join Call A and Call
B.
Figure. 245 Active Call
Figure. 246 Extension List
Figure. 247 Extension List
Figure. 248 Call Transferred
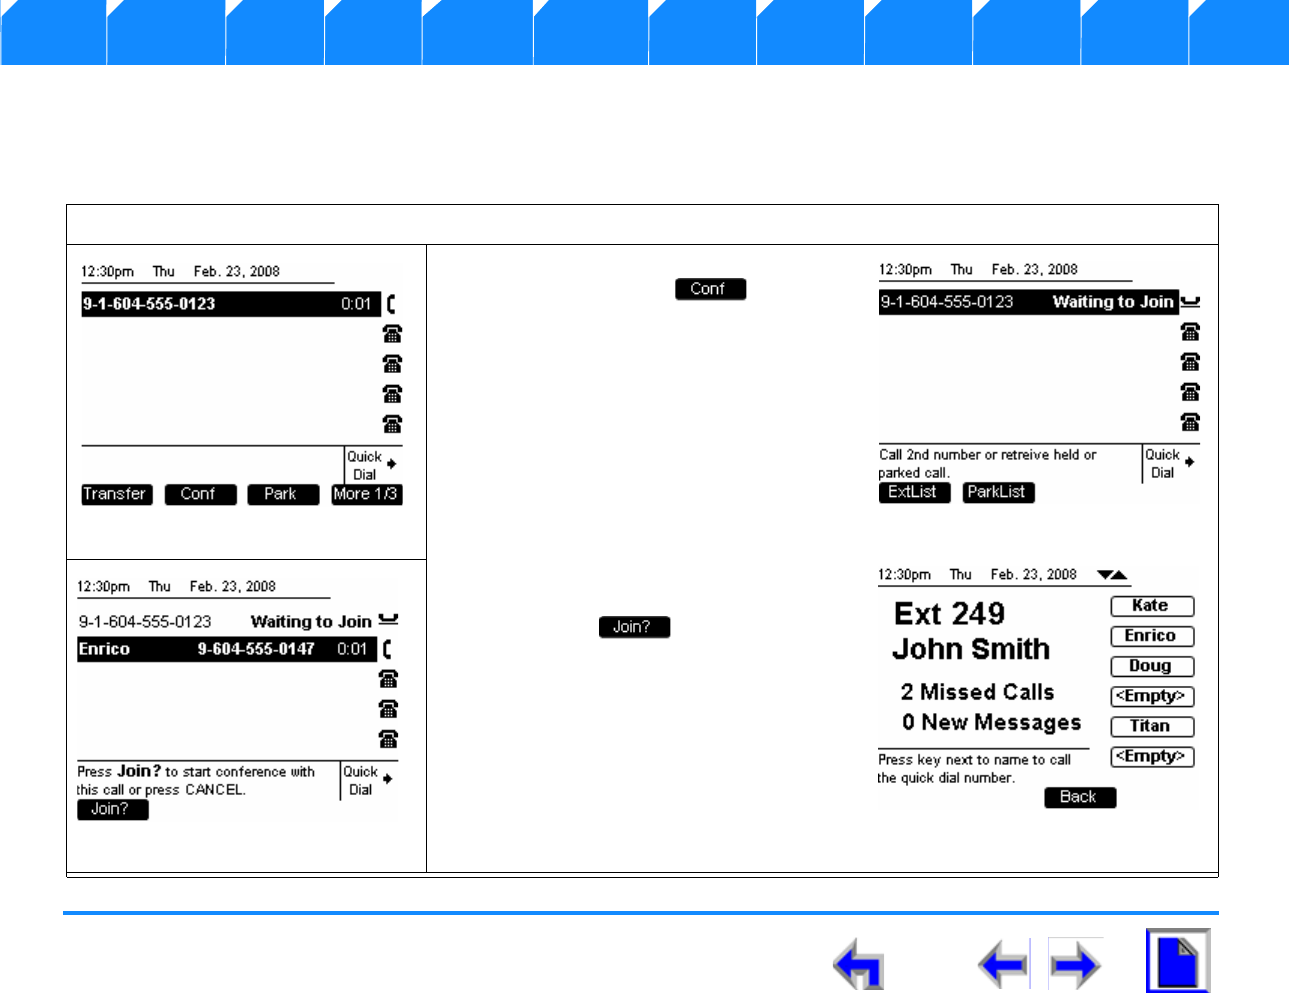
SB67030 Deskset User’s Guide - Call Management 167
Voice Make Call Answer
Install Overview PC UI Setup Mail Directory CallLog Call Manage Call Handset Trouble
Conference with Quick Dial
Once Call A has been established, the user may establish Call B by calling a number in the Quick Dial list. To conference with Quick Dial,
the user must follow this procedure from conference setup mode:
To transfer a call to an external extension:
1. From the Active Call screen shown in
Figure 249, press
2. The Active Call will be auto-held and
the screen in Figure 250 displayed.
3. Press Quick Dial and the list shown in
Figure 251 displays.
4. Press the desired Quick Dial entry Call
Appearance to dial the Quick Dial
entry.
5. You will go to conference pending
mode screen shown in Figure 252.
6. Press the to join Call A and Call
B.
Figure. 249 Active Call
Figure. 250 Extension List
Figure. 251 Extension List
Figure. 252 Call Transferred
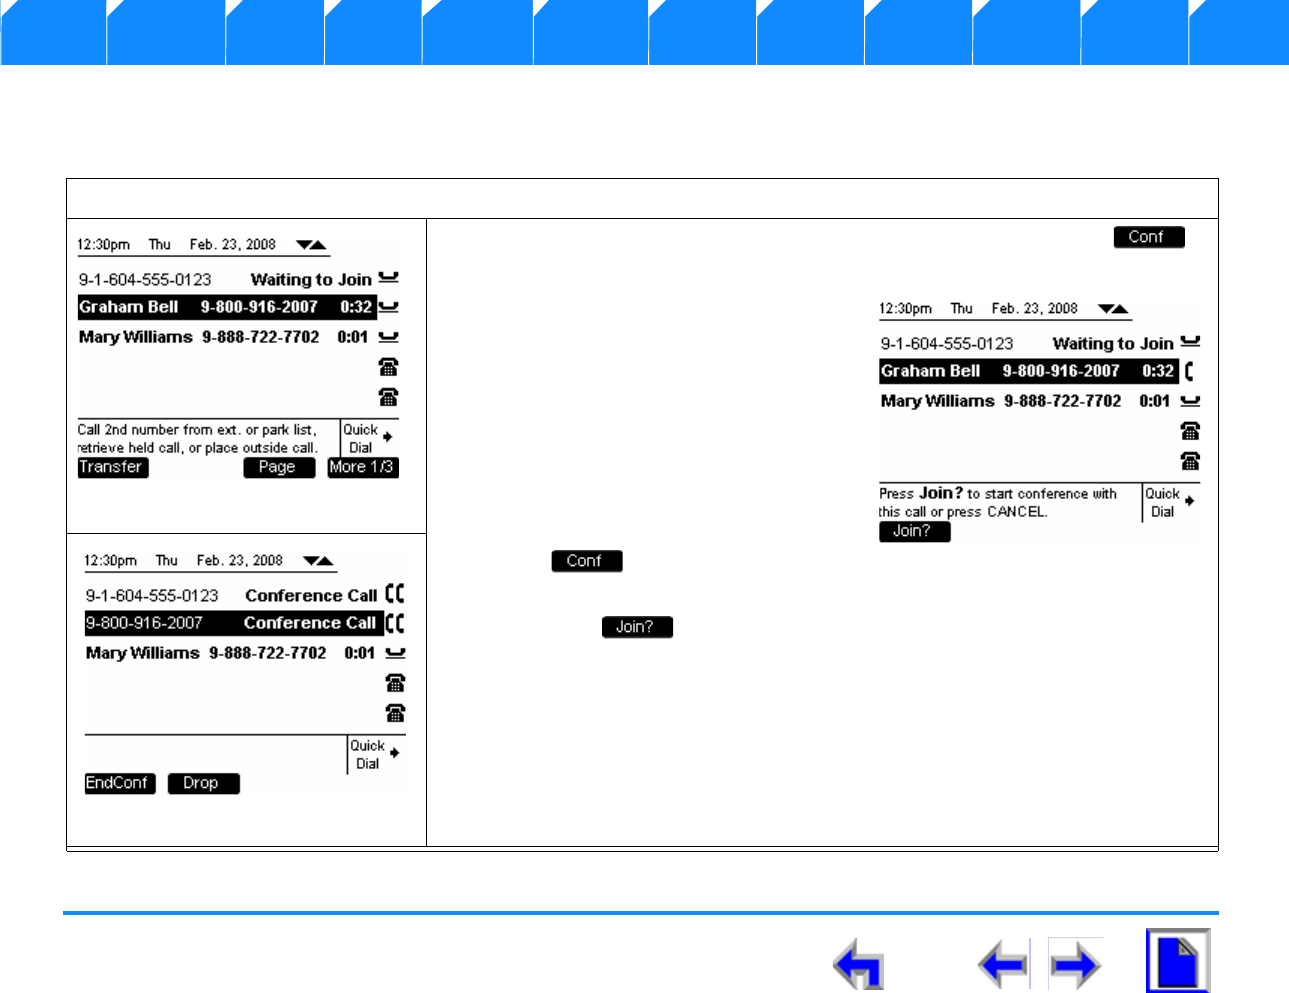
SB67030 Deskset User’s Guide - Call Management 168
Voice Make Call Answer
Install Overview PC UI Setup Mail Directory CallLog Call Manage Call Handset Trouble
Conference with a Held Call
Once Call A has been established through some other activity, you can conference with a held call (Call B).
To conference with a held call:
1. From the Active Call screen shown in Figure on page 167, press .
and observe that the screen shown in Figure 253 displays.
2. From the Held Calls screen, press
SELECT or the associated Call
appearance
3. Press the up or down NAVIGATION
key to highlight the desired entry. as
shown in Figure 254.
4. Press SELECT or the associated Call
Appearance to unhold the call.
5. The key will not be available
at this point.
6. Press the to join Call A and Call B and the Conference screen shown in
Figure 255 displays.
Figure. 253 Awaiting Transfer
Figure. 254 Conference Pending
Figure. 255 Conference Call
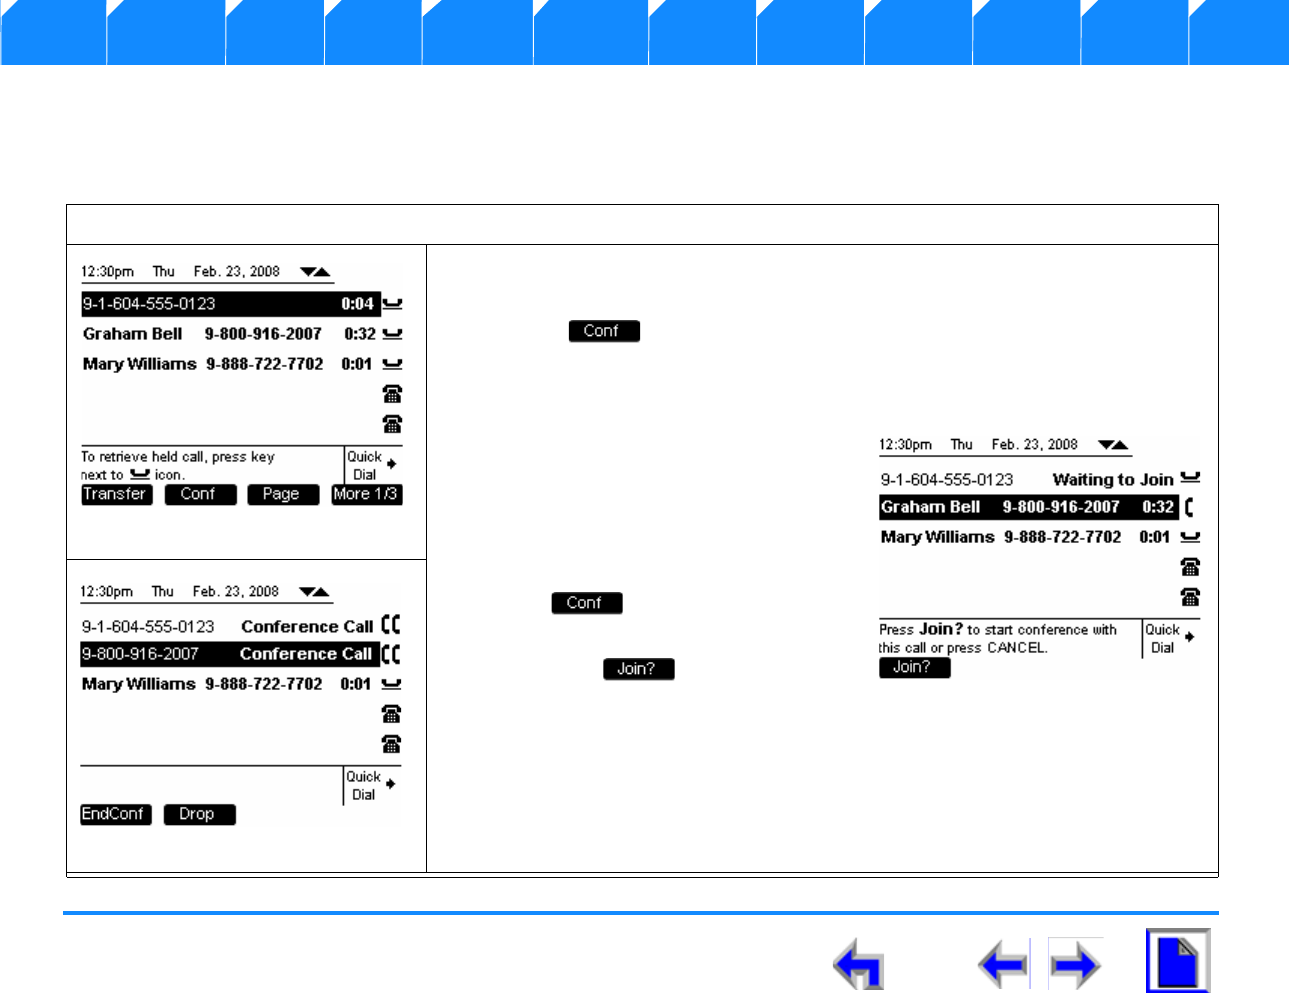
SB67030 Deskset User’s Guide - Call Management 169
Voice Make Call Answer
Install Overview PC UI Setup Mail Directory CallLog Call Manage Call Handset Trouble
Conference Two Held Calls
The user has the option of conferencing two held calls in any of the call appearances. While Call A will stay held when selected to
conference, Call B must be taken off hold and be an active call before joining all parties in conference.
To conference two held calls:
1. From the Held calls screen shown in Figure 256, press the up or down
NAVIGATION key to highlight the desired entry (Call A).
2. Press . and observe that the screen shown in Figure 257 displays.
3. The call remains on hold, the name (if present) and call timer disappear, and
the phrase Waiting to join appears.
4. Press the up or down NAVIGATION
key to highlight the second entry (Call
B), as shown in Figure 257.
5. Press SELECT or the associated Call
Appearance to unhold the call.
6. The key will not be available
at this point.
7. Press the to join Call A and
Call B and the Conference screen
shown in Figure 258 displays.
Figure. 256 Awaiting Transfer
Figure. 257 Conference Pending
Figure. 258 Call Transferred
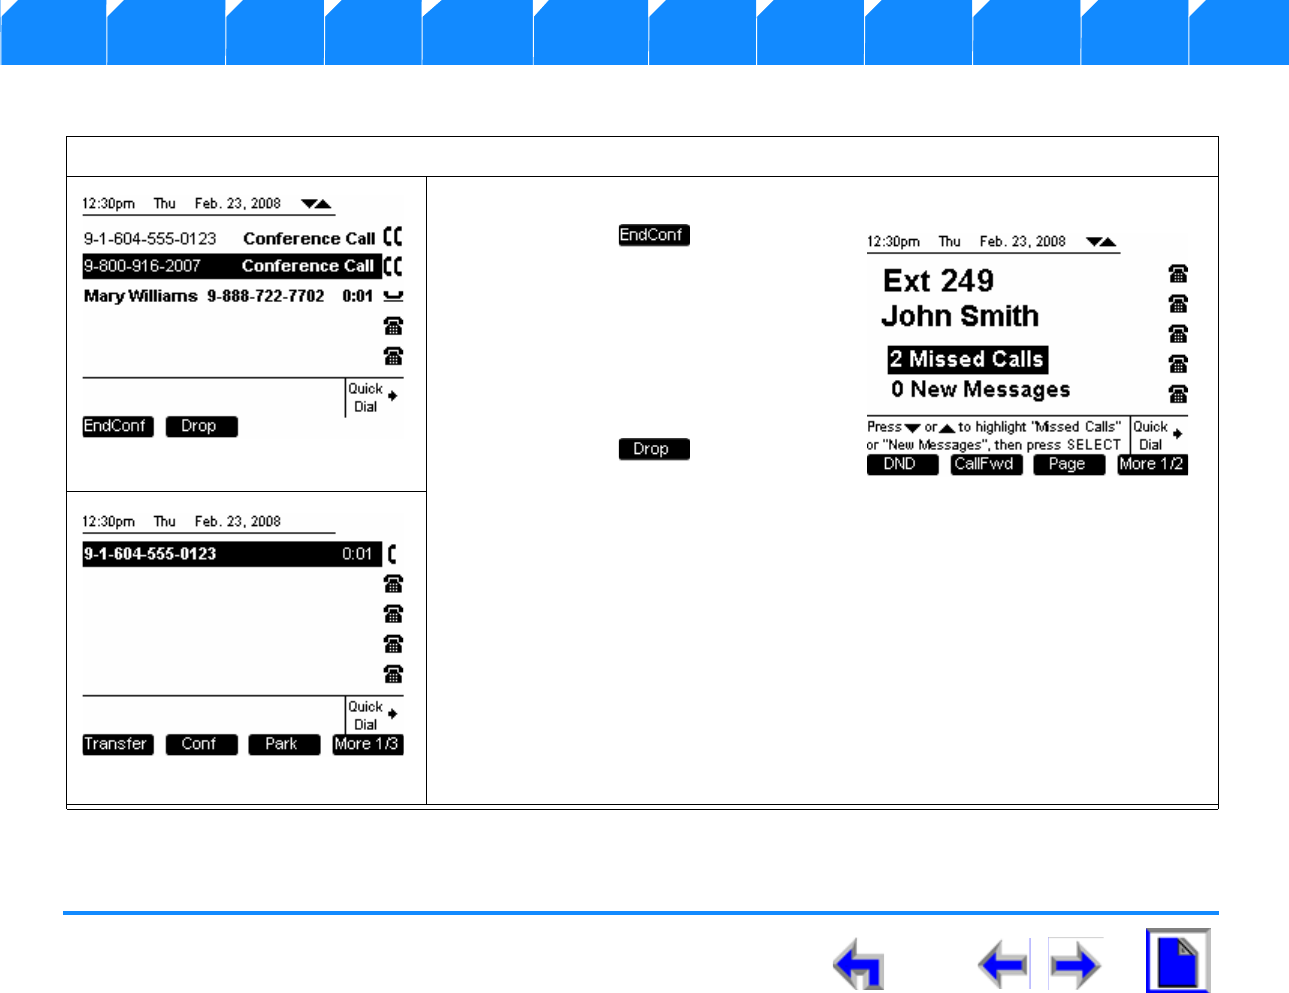
SB67030 Deskset User’s Guide - Call Management 170
Voice Make Call Answer
Install Overview PC UI Setup Mail Directory CallLog Call Manage Call Handset Trouble
Canceling a Conference
:
To cancel a conference:
1. From the Conference screen shown in Figure 259, you have 2 options:
a. Press to end the
conference. Calls A and B hang
up and the system returns to Idle
as shown in Figure 260.
b. Hang up the handset. Calls A and
B hang up and the system returns
to Idle as shown in Figure 260.
c. Press to terminate the
highlighted call. The system
makes the unhighlighted call an
Active Call as shown in Figure 261.
2. Answering an incoming call while setting up a conference or with a conference
pending will cancel the conference process.
3. Pressing CANCEL when setting up a conference or during conference pending
will cancel the conference process.
4. Pressing CANCEL when a conference is in progress or held will not cancel the
conference.
Figure. 259 Awaiting Transfer
Figure. 260 Active Call
Figure. 261 Call Transferred
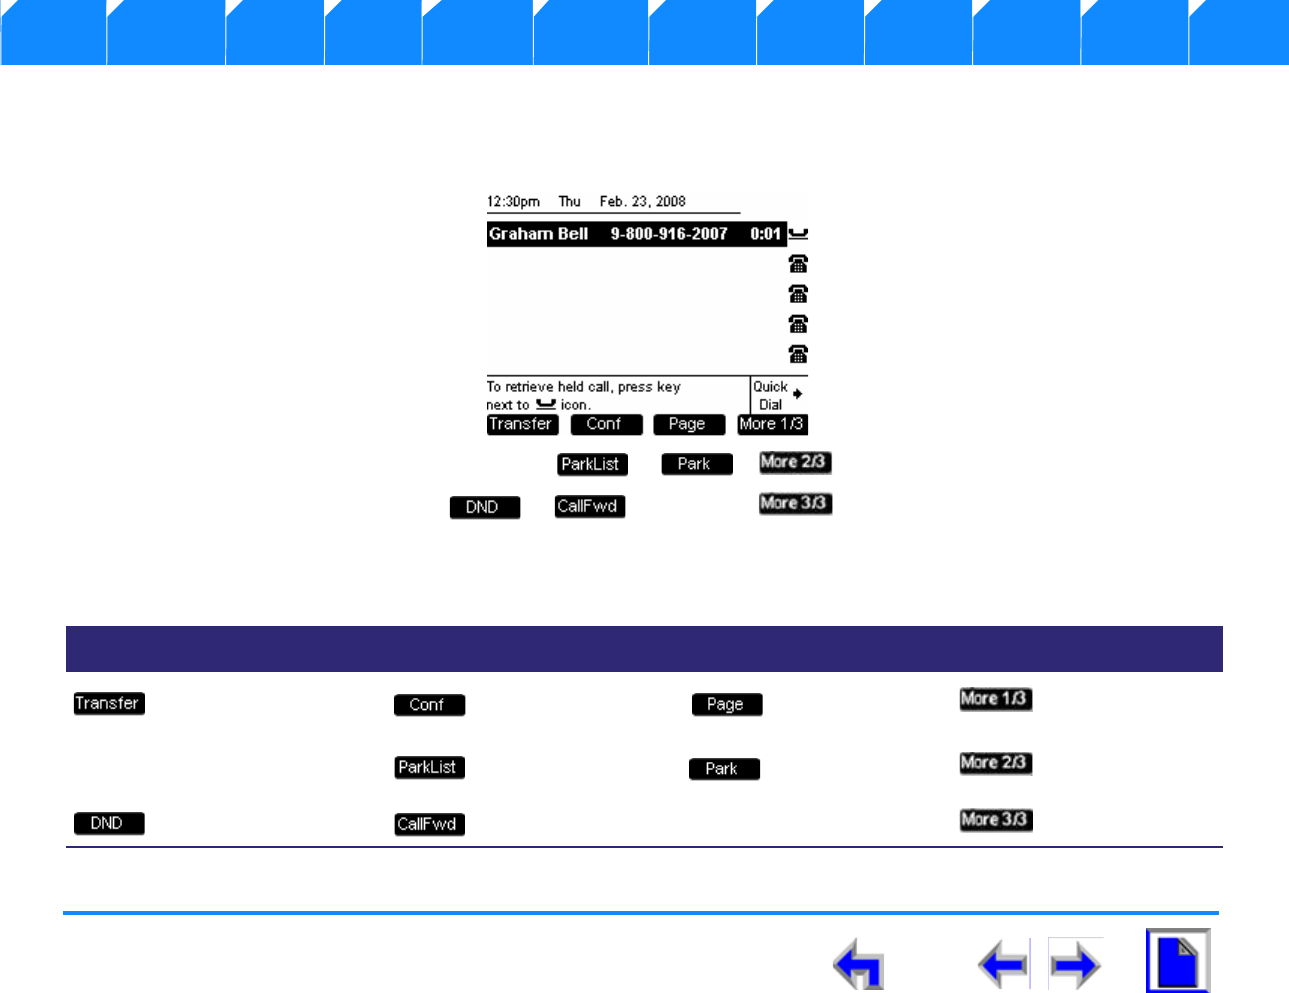
SB67030 Deskset User’s Guide - Call Management 171
Voice Make Call Answer
Install Overview PC UI Setup Mail Directory CallLog Call Manage Call Handset Trouble
Call on Hold
The SB67030 Desk Set provides the ability to place an unlimited number of calls on hold.When calls are placed on hold the
programmed keys change as shown in Figure 262 and described in Table 22.
Figure. 262 The SB67030 Call on Hold Screen
Table 22 The SB67030 Call on Hold Screen Description
Key Description Key Description Key Description Key Description
Initiates transfer of a
call. Initiates a conference
call. Pages internal
extensions. Moves to next set
of programmed
operation keys.
Goes to Park List. Parks call.
Initiates Do Not Disturb. Initiates Call Forward.
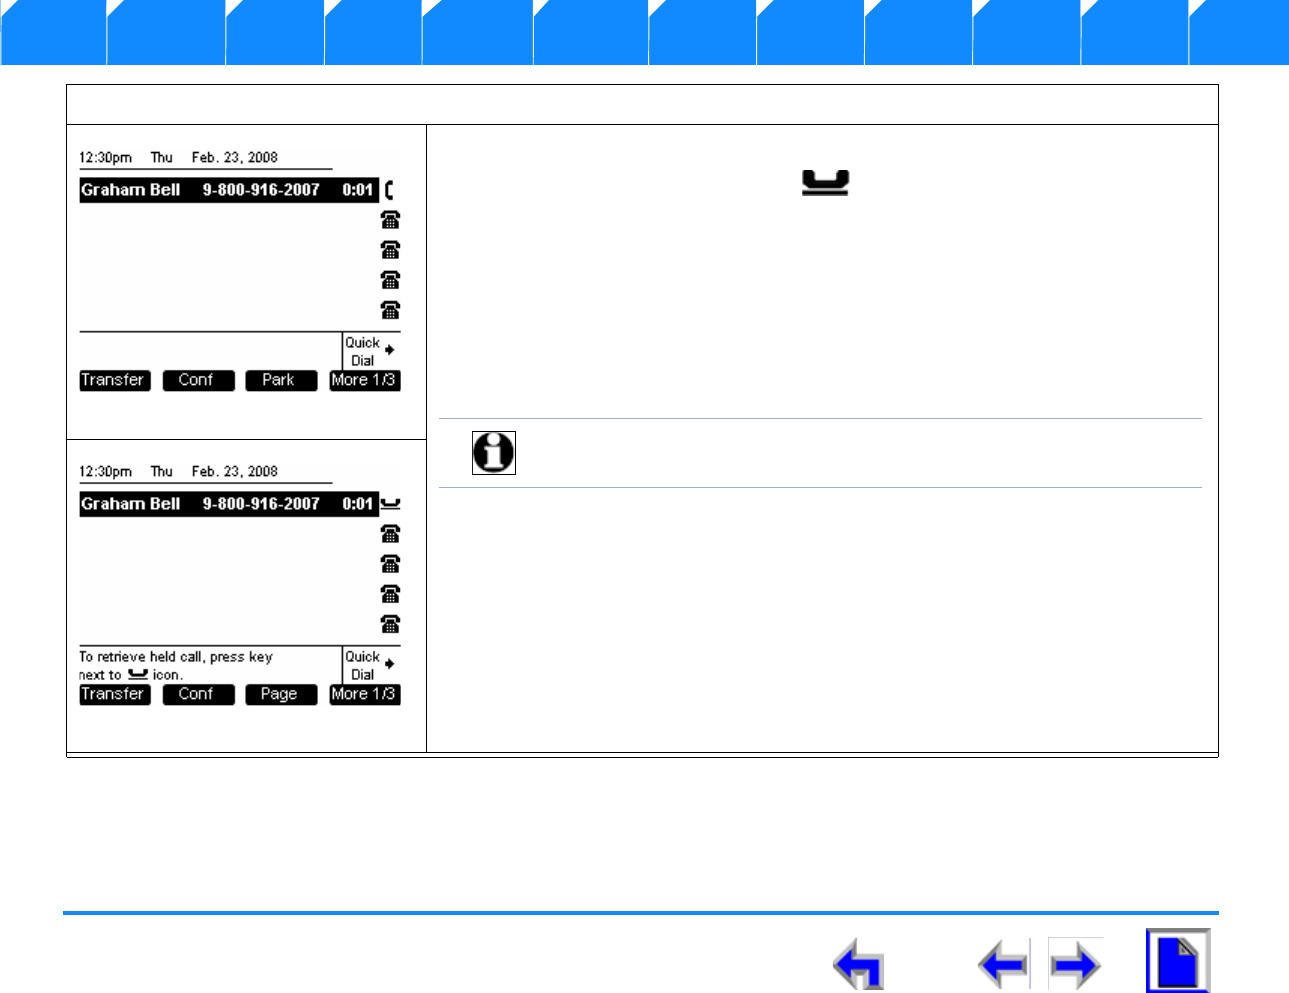
SB67030 Deskset User’s Guide - Call Management 172
Voice Make Call Answer
Install Overview PC UI Setup Mail Directory CallLog Call Manage Call Handset Trouble
To manage held calls:
1. From the Active Call screen shown in Figure 263, press HOLD.
2. The hold Call Appearance icons appears next to the highlighted call as
shown in Figure 264.
3. If a call has been placed on hold for longer than 3 minutes, the system will
provide an audible ringback reminder every 30 seconds for four minutes, then
hang up the call.
4. To unhold a call, highlight the call and press SELECT, or press the associated
Call Appearance button.
Figure. 263 Active Call
Note Lifting the headset or pressing SPEAKER or HEADSET will select a
new Call Appearance, not unhold the highlighted call.
Figure. 264 Call Transferred
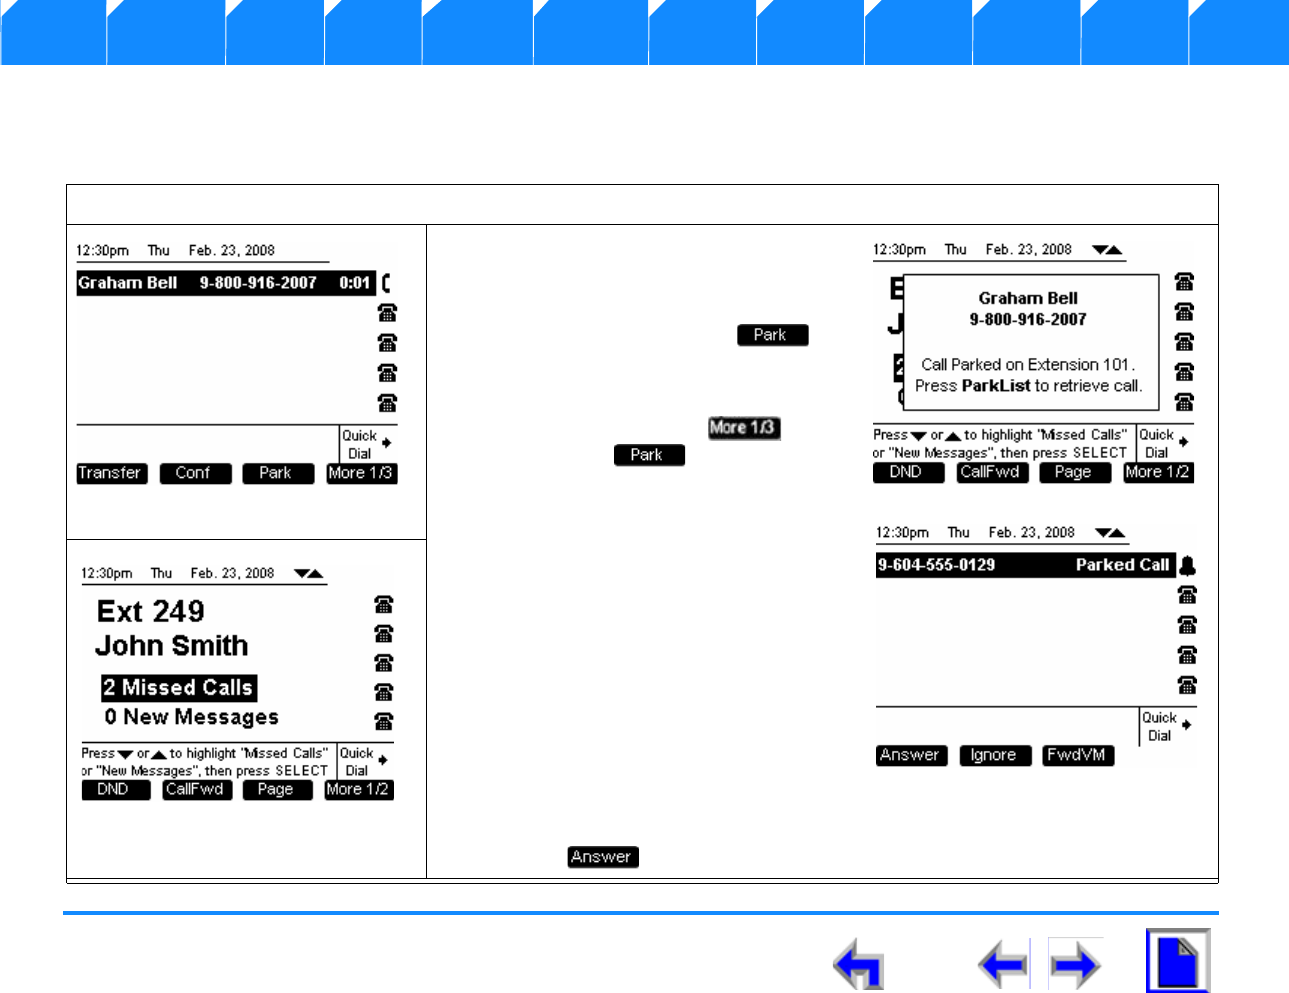
SB67030 Deskset User’s Guide - Call Management 173
Voice Make Call Answer
Install Overview PC UI Setup Mail Directory CallLog Call Manage Call Handset Trouble
Parking a Call
The SB67030 Desk Set allows you to park either Active or Held calls
To park a call:
1. Press the up or down NAVIGATION
key to highlight an active or held call
as shown in Figure 265.
2. For an Active Call, press to
display the splash screen shown in
Figure 266.
3. For a Held call, press and
then press to display the
splash screen shown in Figure 266.
4. Observe the Idle screen shown in
Figure 268.
5. A parked call must be picked up
within three minutes or a ringback to
the Deskset occurs and the screen
shown in Figure 267 displays.
6. If a name field is available, Parked
Call replaces the number field. If the
name field is not available, the
number displays to the left, and
Parked Call to the right of the highlight bar.
7. Press to return to the active call screen shown in Figure 265.
Figure. 265 Select Call
Figure. 266 Parked Call Splash
Figure. 267 Parked Call Ringback
Figure. 268 Parked Call List
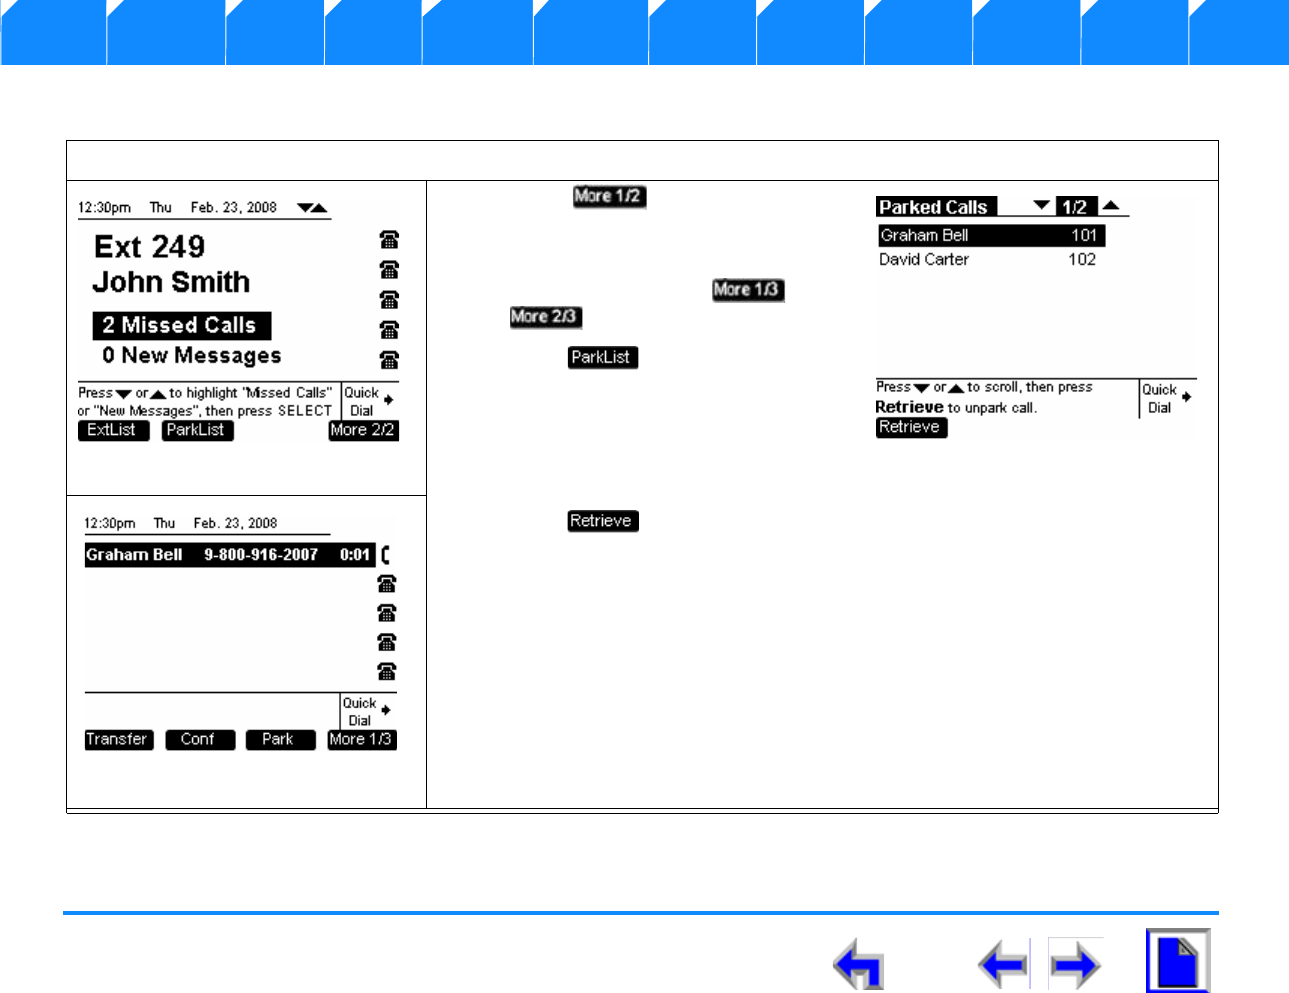
SB67030 Deskset User’s Guide - Call Management 174
Voice Make Call Answer
Install Overview PC UI Setup Mail Directory CallLog Call Manage Call Handset Trouble
Retrieving A Parked Call
To retrieve a parked call:
1. Press in Idle or held calls
mode to display the screen shown in
Figure 269
2. In Active mode, press , then
.
3. Press . to display the Park
List. shown in Figure 270.
4. Press the up or down NAVIGATION
key to highlight the desired entry as
shown in Figure 265.
5. Press .to display the retrieved call in the active mode as shown in
Figure 271.
Figure. 269 Awaiting Transfer
Figure. 270 Parked Call List
Figure. 271 Call Transferred
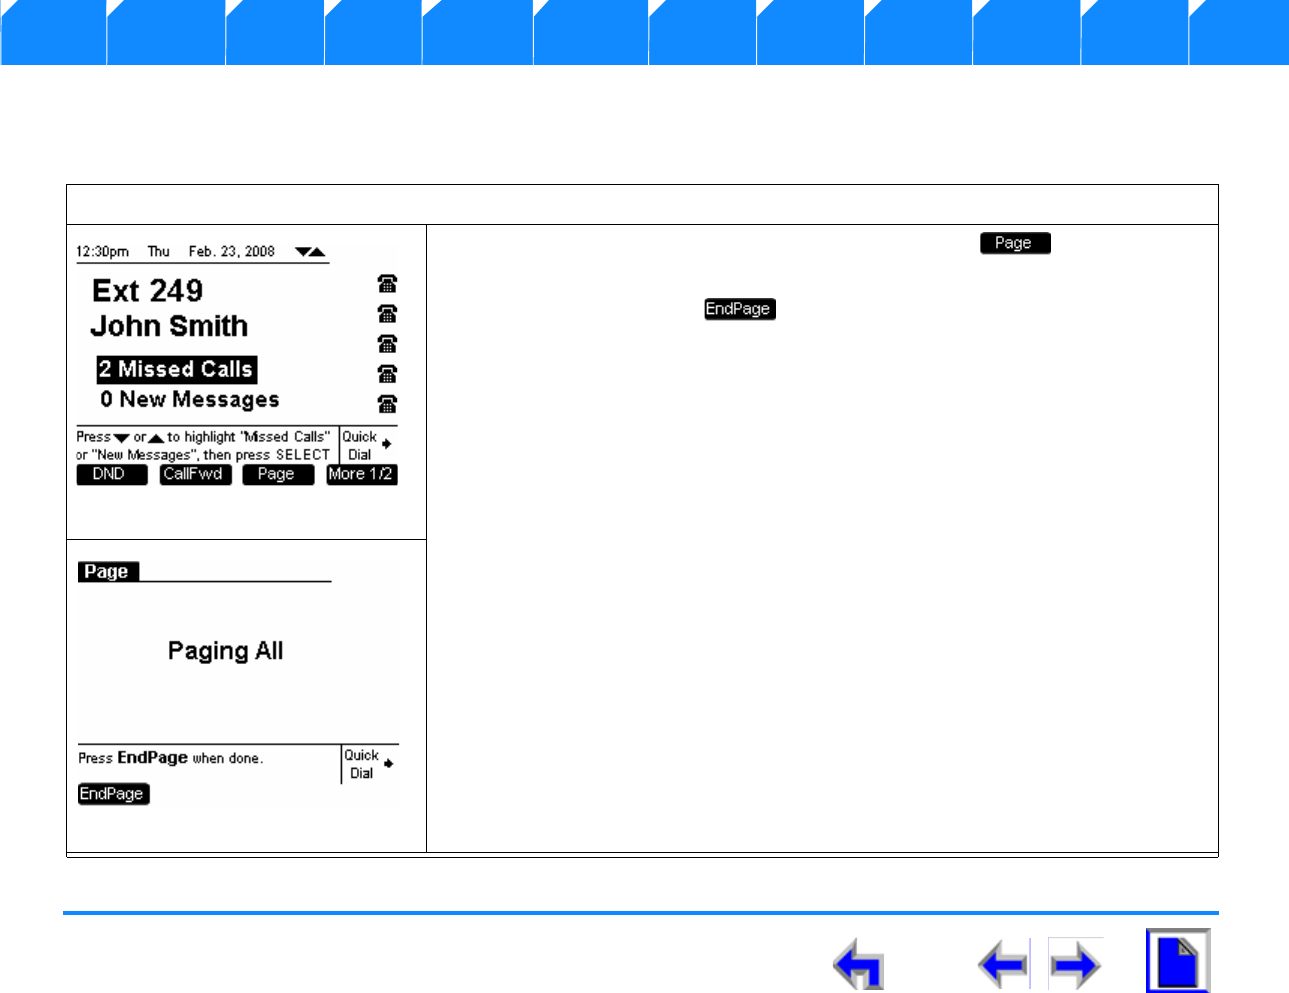
SB67030 Deskset User’s Guide - Call Management 175
Voice Make Call Answer
Install Overview PC UI Setup Mail Directory CallLog Call Manage Call Handset Trouble
Paging
You can page other extensions in the AT&T Small Business System network from Idle and held calls
To transfer a call to an external extension:
1. From Idle shown in Figure 272 or a held call, press to display the
screen shown in Figure 272.
2. When finished, press to return to the Idle screen.
3. If the user is on an active call, the user will not receive an incoming page.
4. If the user goes off-hook during an incoming page (by lifting the receiver,
pressing a CA, SPEAKER, or HEADSET) any incoming page will be terminated
on that extension.
Figure. 272 Idle Screen
Figure. 273 Page Splash Screen
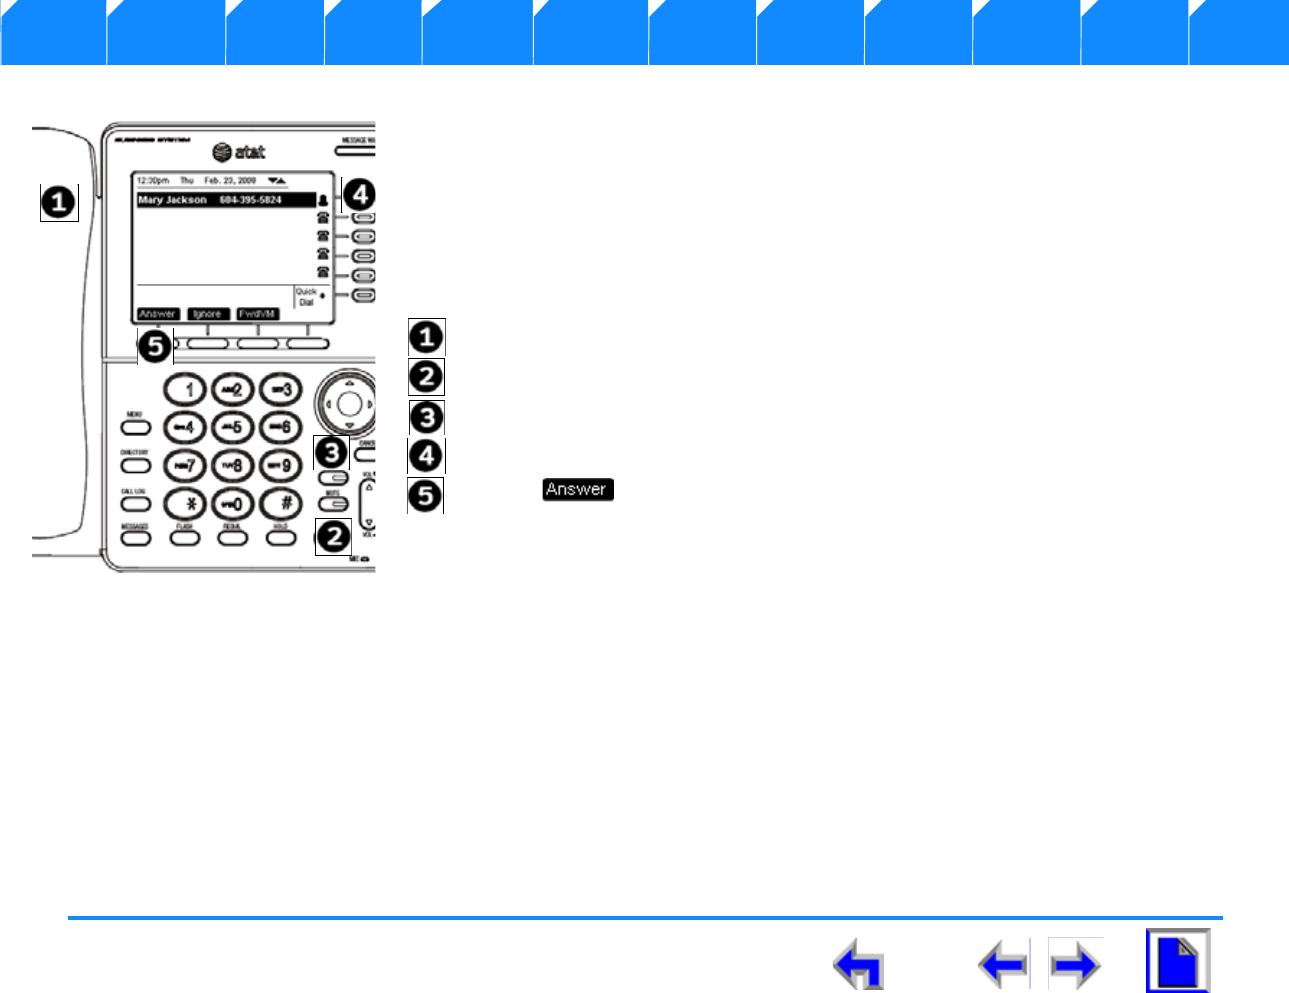
SB67030 Deskset User’s Guide - Answer a Call 176
Voice Make Call Answer
Install Overview PC UI Setup Mail Directory CallLog Call Manage Call Handset Trouble
CHAPTER
10
A
NSWER
A
C
ALL
You can answer call from the SB67030 Deskset in the following ways:
1. “Answer Screens” on page 177
2. “Answering a Call in Idle” on page 179
3. “When an incoming call occurs in Pre-dial mode (See Figure 278), the incoming call
appears next to an available Call Appearance as shown in Figure 279.” on page 180
4. “Answer With a Call on Hold” on page 183
5. “Answer a Call from Within a Menu” on page 184
6. “Answer With Multiple Incoming Calls” on page 185
7. “Answer a Call From Voicemail” on page 186
Lift the Handset.
Press SPEAKER to route audio to the speaker.
Press HEADSET to route audio to headset output.
Press the associated Programmed key.
Press the programmed key.
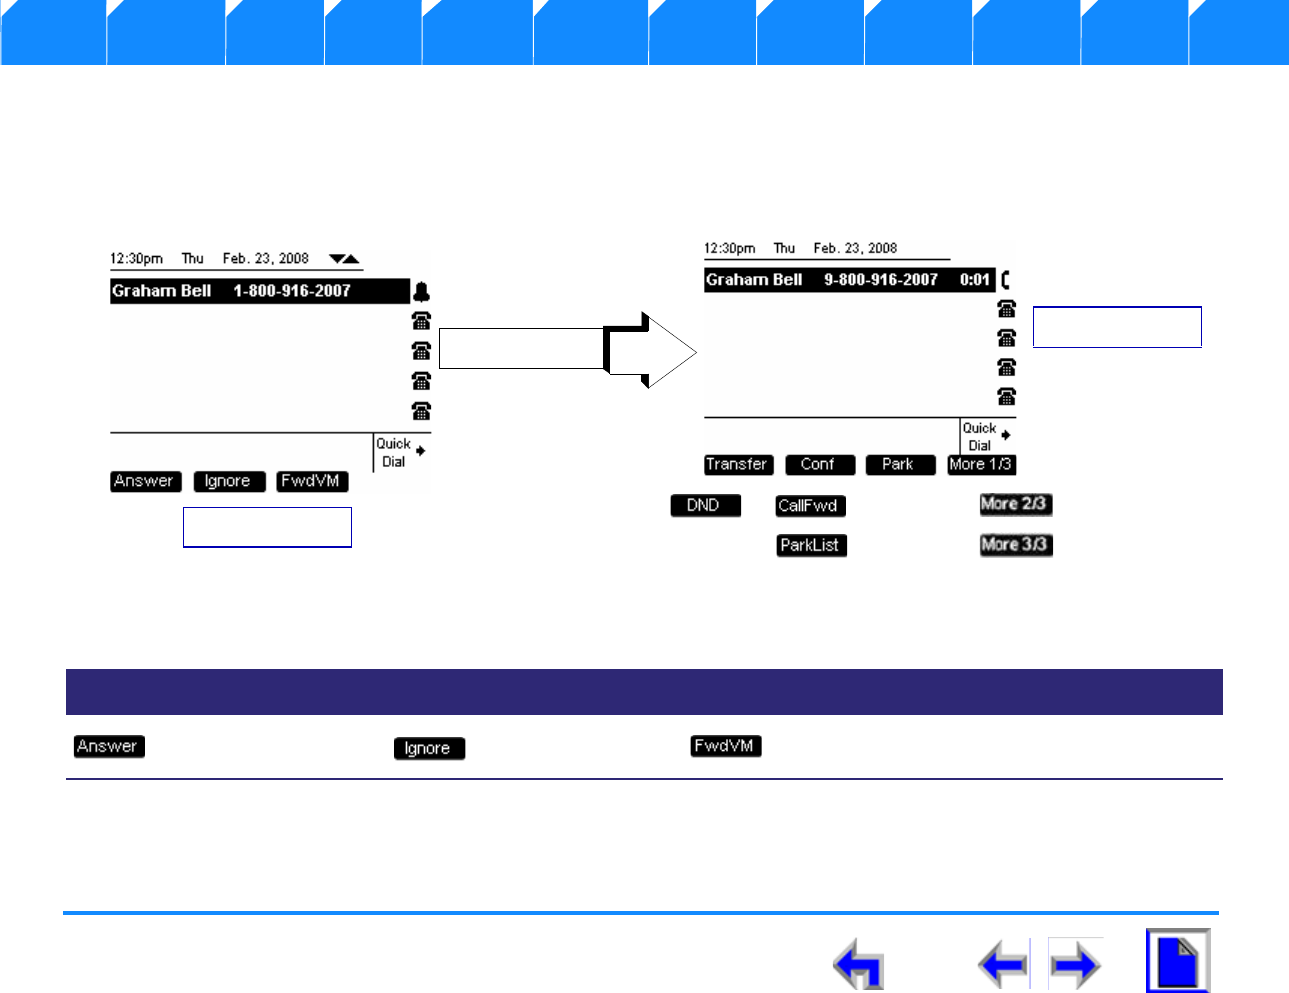
SB67030 Deskset User’s Guide - Answer a Call 177
Voice Make Call Answer
Install Overview PC UI Setup Mail Directory CallLog Call Manage Call Handset Trouble
8. “Ignoring a Call” on page 187
Answer Screens
The SB67030 Desk Set answer screen shown in Figure 274
Figure. 274 The SB67030 Answer Screens
Table 23 The SB67030 Answer Screens
Key Description Key Description Key Description Key Description
Answers incoming call. Silences ringer during
incoming call event. Initiates Message
Forward function.
Incoming Call
Select Answer Active Call
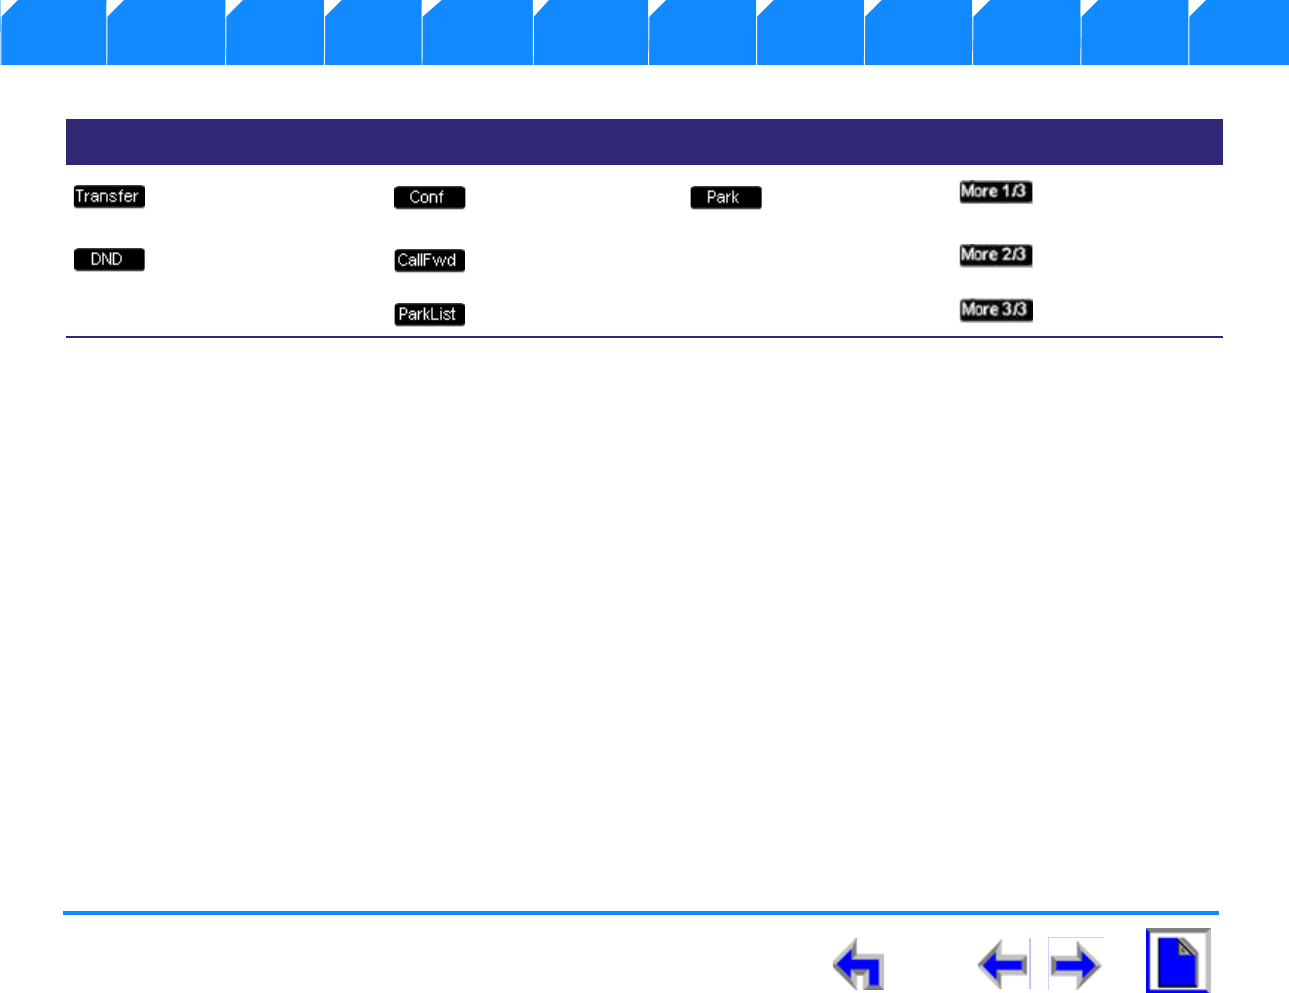
SB67030 Deskset User’s Guide - Answer a Call 178
Voice Make Call Answer
Install Overview PC UI Setup Mail Directory CallLog Call Manage Call Handset Trouble
Initiates transfer of a
call. Initiates a conference
call. Parks call. Moves to next set
of programmed
operation keys.
Initiates Do Not Disturb. Initiates Call Forward.
Goes to Park List.
Table 23 The SB67030 Answer Screens
Key Description Key Description Key Description Key Description
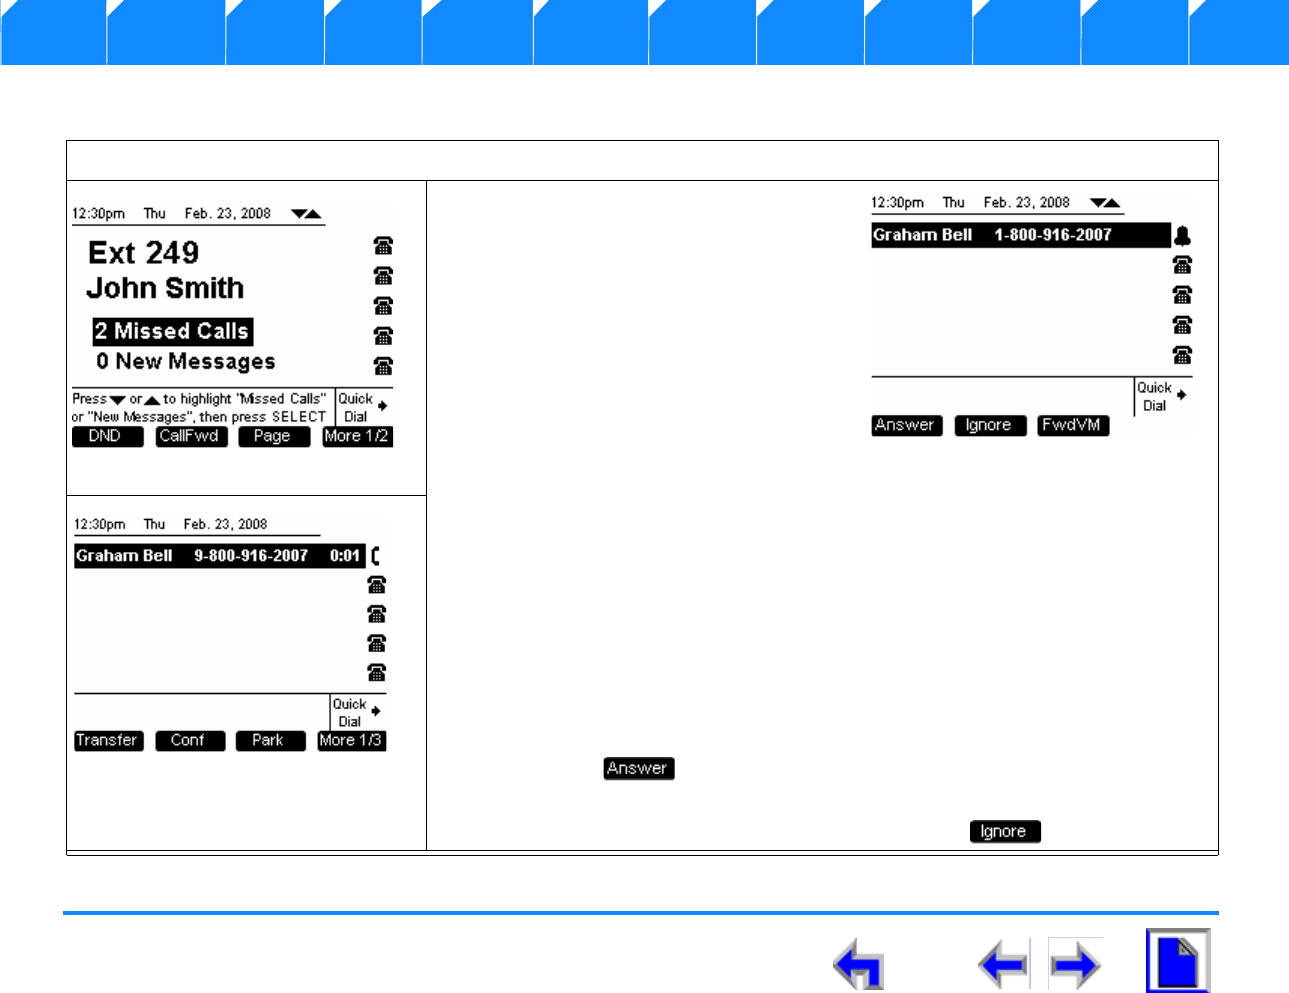
SB67030 Deskset User’s Guide - Answer a Call 179
Voice Make Call Answer
Install Overview PC UI Setup Mail Directory CallLog Call Manage Call Handset Trouble
Answering a Call in Idle
To answer a call from the Idle mode:
1. When there is an incoming call:
a. The system emits a ringtone (See
“Sounds” on page 56)
b. The highlight bar automatically
moves to the ringing call
appearance.
c. A bell icon appears next to an
available Call Appearance to
indicate an incoming call as
shown in Figure 276.
2. Perform one of the following to answer the call and display the Active Call
screen shown in Figure 277
lLift the Handset.
lPress SPEAKER to route audio to the speaker.
lPress HEADSET to route audio to headset output.
lPress the associated Call Appearance key and the system will answer using
the Preferred Audio method (See “Preferred Audio” on page 58).
lPress . and the system will answer using the Preferred Audio
method (See “Preferred Audio” on page 58).
3. You can silence the incoming call by pressing the soft key.
Figure. 275 Idle Screen
Figure. 276 Incoming Call
Figure. 277 Active Call
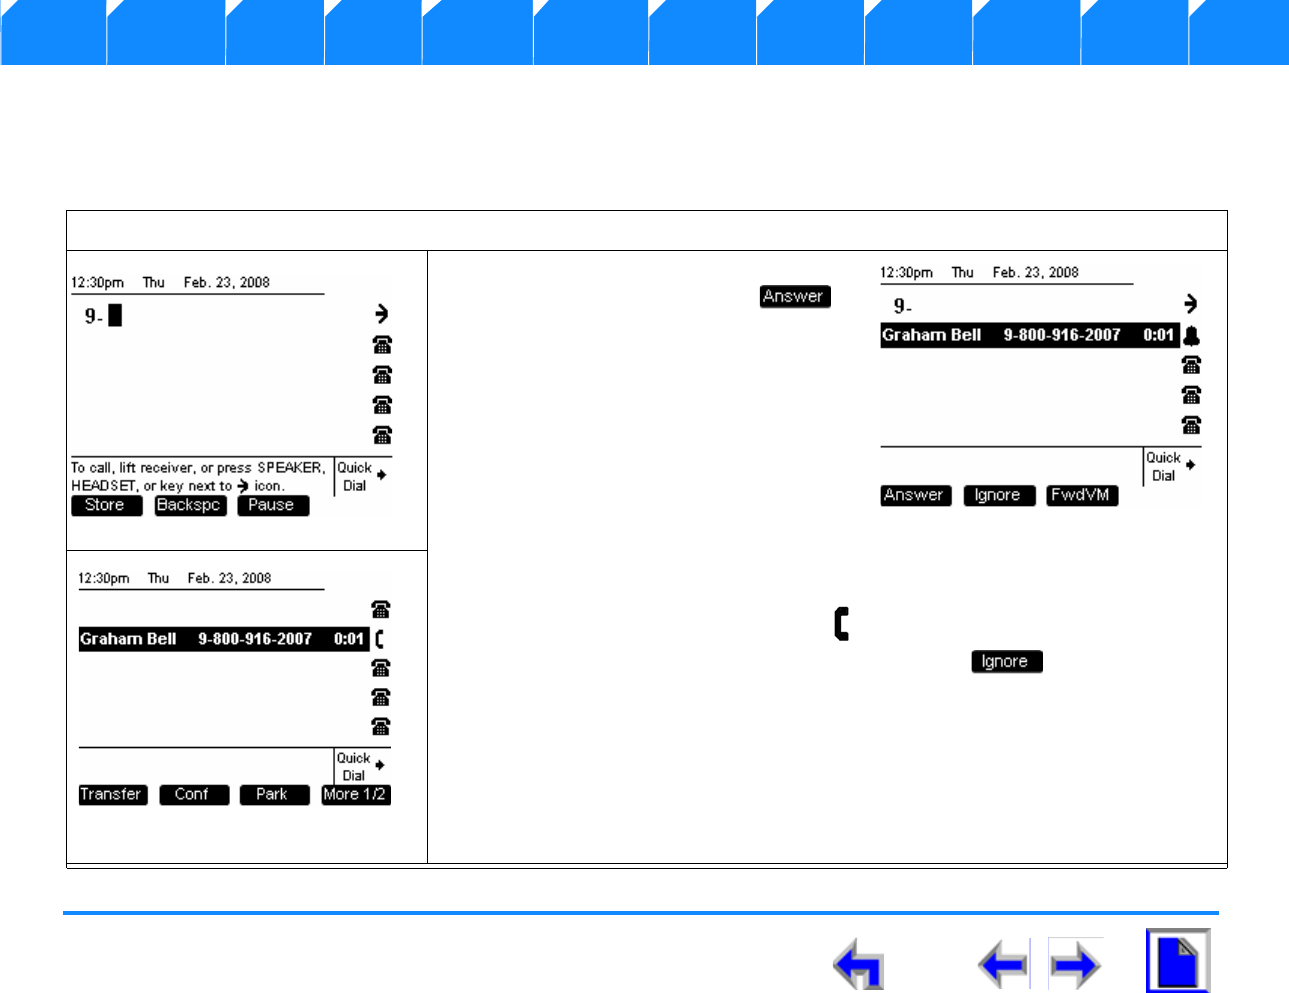
SB67030 Deskset User’s Guide - Answer a Call 180
Voice Make Call Answer
Install Overview PC UI Setup Mail Directory CallLog Call Manage Call Handset Trouble
Answer From Predial
When an incoming call occurs in Pre-dial mode (See Figure 278), the incoming call appears next to an available Call Appearance as
shown in Figure 279.
To answer a call in pre-dial:
1. Press the associated Call
Appearance key or press .
and the system will answer using the
Preferred Audio method (See
“Preferred Audio” on page 58).
2. Lift the Handset.
3. Press SPEAKER to route audio to the
speaker.
4. Press HEADSET to route audio to
headset output.
5. The Pre-dial Call Appearance disappears and the highlighted call appears next
to the Active Call Appearance icon as shown in Figure 280.
6. You can silence the incoming call by pressing the soft key. After
pressing ignore, the ringer icon will change to a silenced ringer icon and you
will return to the Pre-Dial Call Appearance (See “Ignoring a Call” on page 187).
Figure. 278 Predial Mode
Figure. 279 Incoming Call
Figure. 280 Active Call Appearance
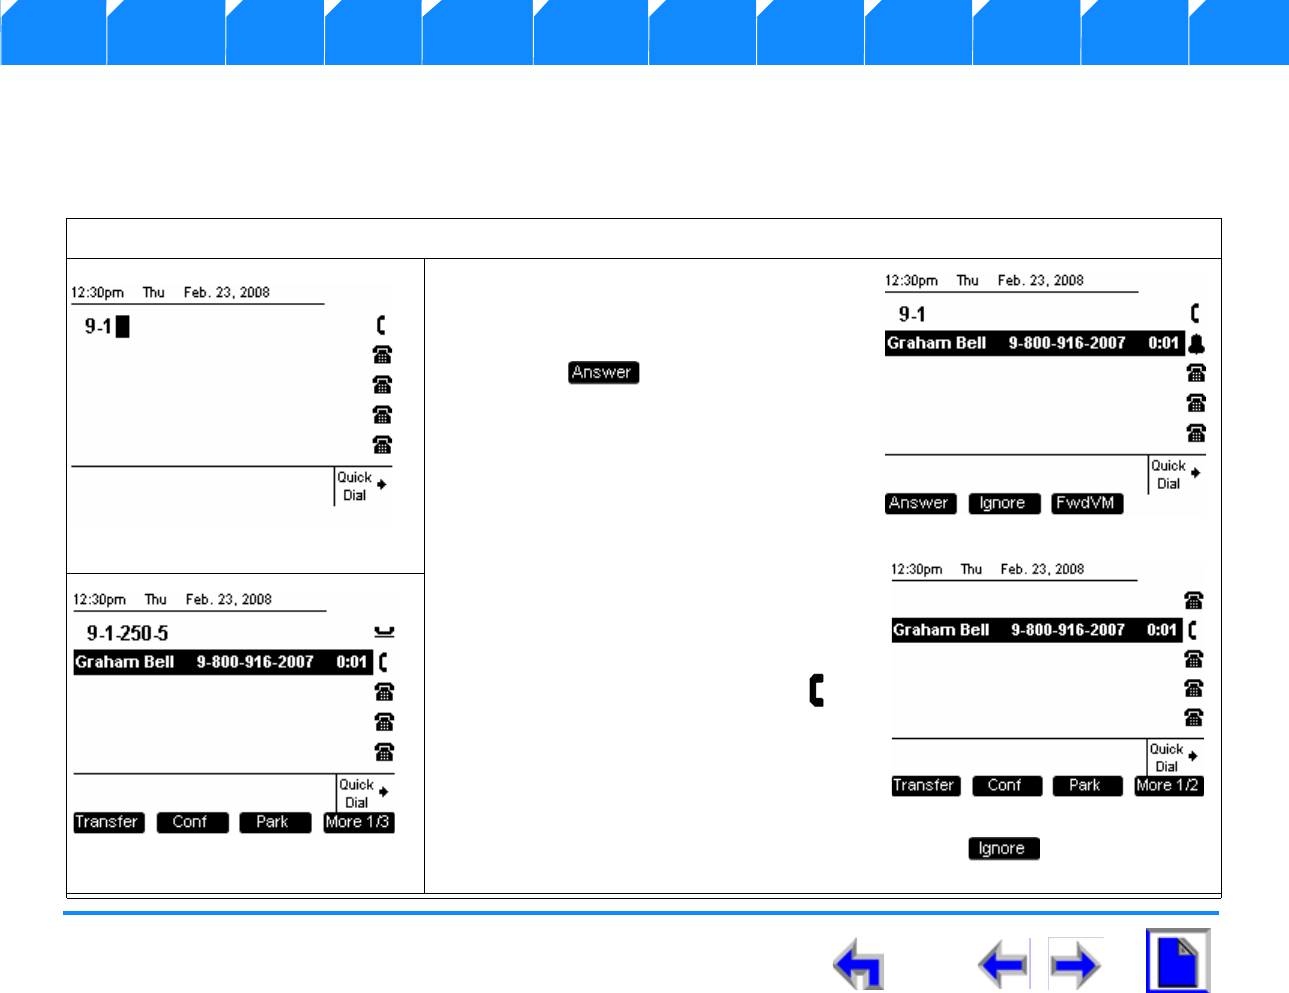
SB67030 Deskset User’s Guide - Answer a Call 181
Voice Make Call Answer
Install Overview PC UI Setup Mail Directory CallLog Call Manage Call Handset Trouble
Answer From Dial
The SB67030 Deskset indicates an incoming call by emitting a single brief tone, moving the highlight bar to the ringing call appearance,
and displaying a flashing bell icon next to an available Call Appearance as shown in Figure 282.
To answer a call in the Dial mode:
1. Perform one of the following:
a. Press the associated Call
Appearance key or press
. and the system will
answer using the Preferred Audio
method (See “Preferred Audio”
on page 58).
b. Lift the Handset.
c. Press SPEAKER to route audio to
the speaker.
d. Press HEADSET to route audio to
headset output
2. The Active Call Appearance icon
appears as shown in Figure 283.
3. if you have entered another digit after
the 1, the dialed call goes on hold as
shown in Figure 284.
4. You can silence the incoming call by pressing the soft key (See
“Ignoring a Call” on page 187).
Figure. 281 Dial Mode
Figure. 282 Incoming Call
Figure. 283 Incoming Call
Figure. 284 Dial Call Appearance
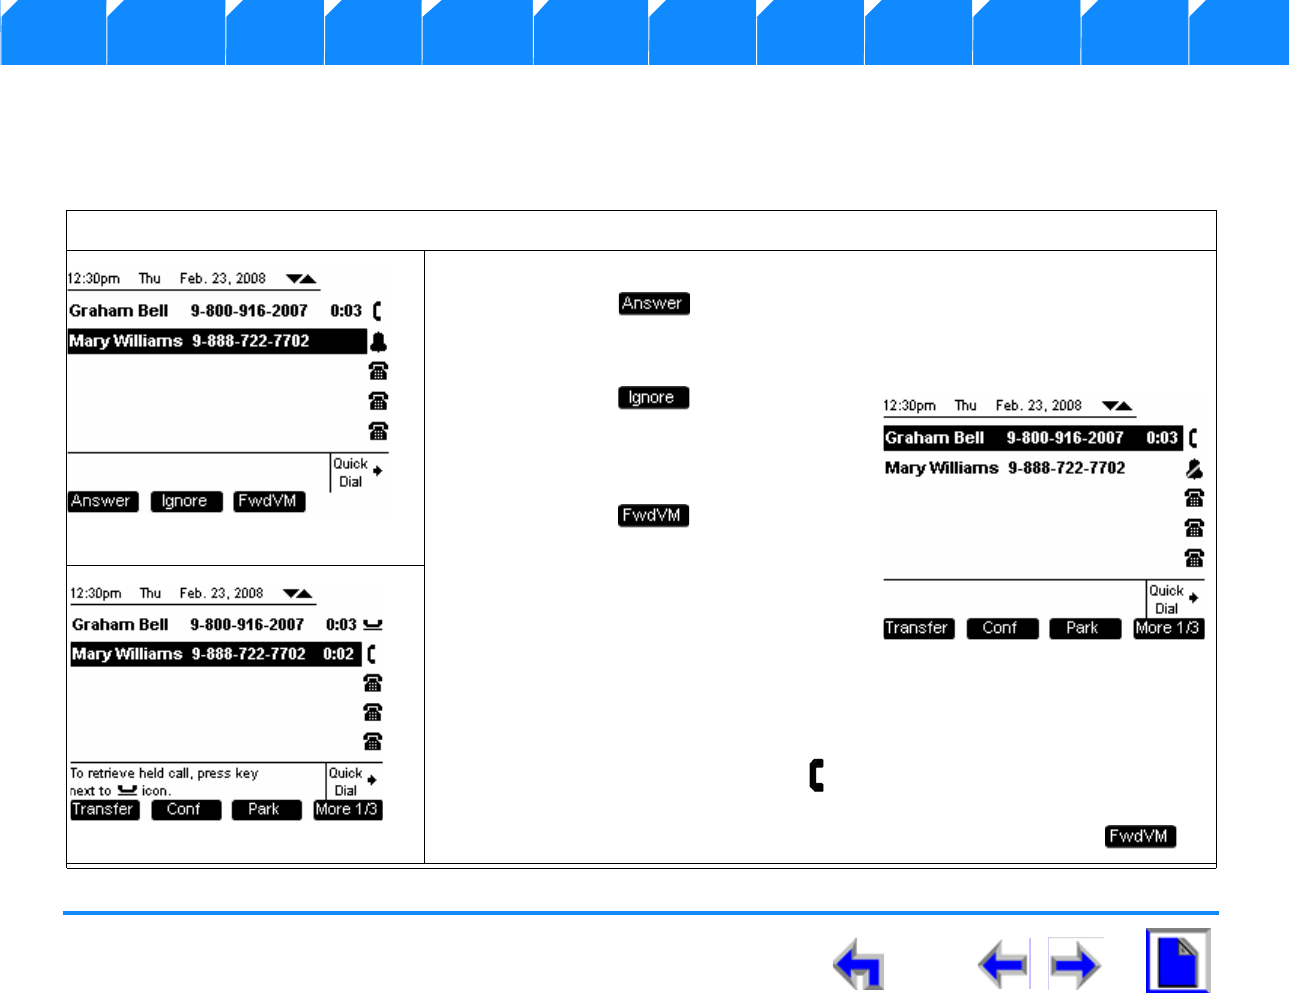
SB67030 Deskset User’s Guide - Answer a Call 182
Voice Make Call Answer
Install Overview PC UI Setup Mail Directory CallLog Call Manage Call Handset Trouble
Answer While on a Call
The SB67030 Deskset indicates an incoming call when you have an active call by emitting a single brief tone, moving the highlight bar
to the next available call appearance, and displaying a flashing bell icon as shown in Figure 285.
To answer a call while on an active call:
1. You have the following options:
a. Press or the associated Call Appearance and the system will
answer using the Preferred Audio method (See “Preferred Audio” on
page 58). The current call will automatically be placed on hold.
b. Press to turn the ringtone
off. and display the screen shown in
Figure 286. (See “Ignoring a Call”
on page 187).
c. Press to forward the call
to voicemail.
d. Press SPEAKER to route audio to
the speaker.
e. Press HEADSET to route audio to
headset output.
f. Lift the Handset.
2. The Active Call Appearance icon appears as shown in Figure 287.
lIf a second incoming call arrives, the highlight would remain on the first
incoming call until the FWD no Answer setting was met or press .
Figure. 285 Incoming Call
Figure. 286 Ignore Incoming Call
Figure. 287 Active Call
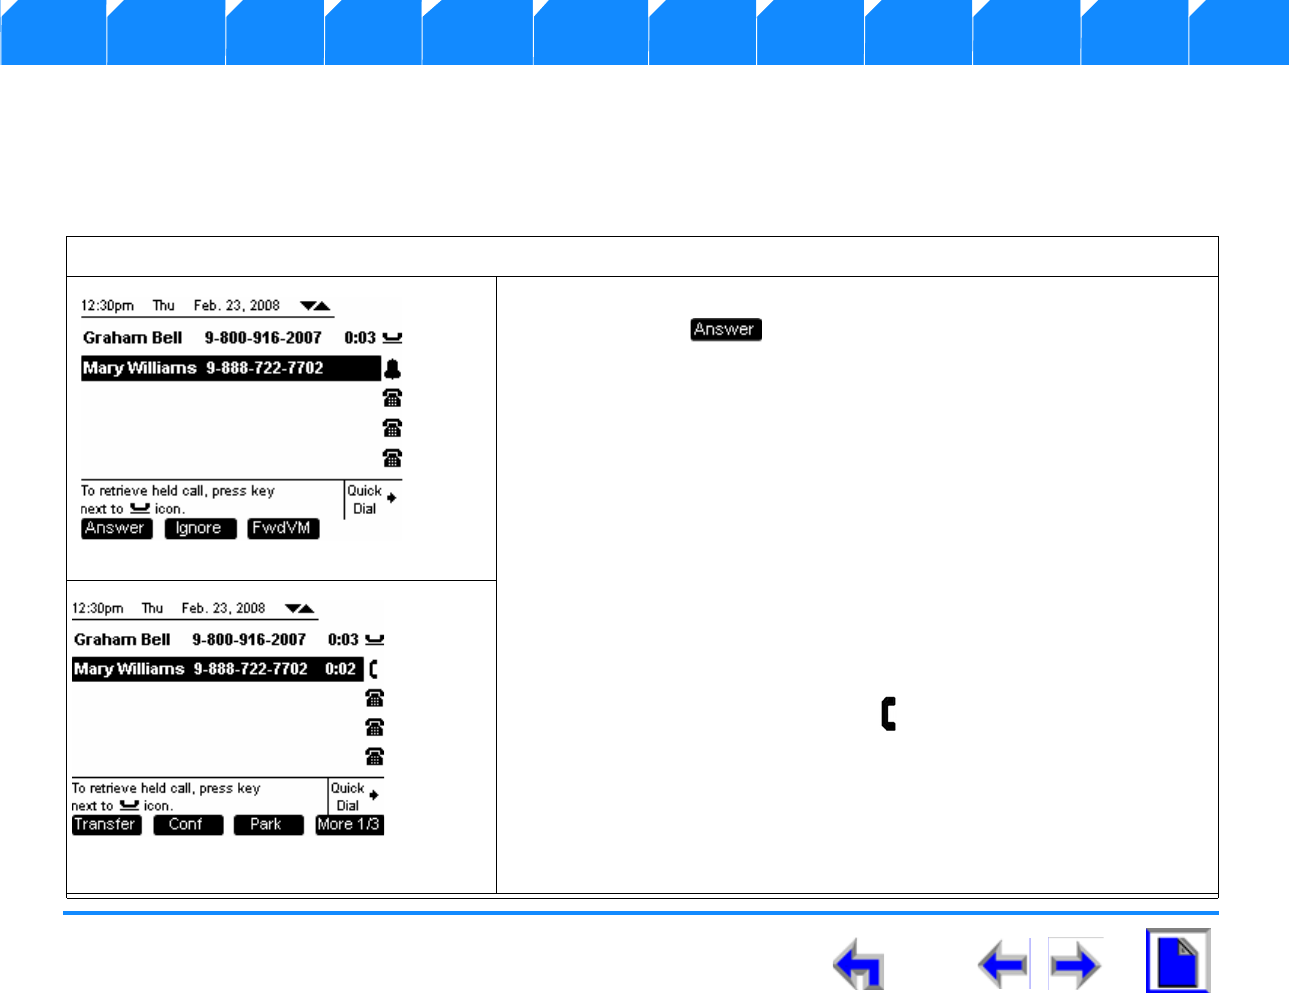
SB67030 Deskset User’s Guide - Answer a Call 183
Voice Make Call Answer
Install Overview PC UI Setup Mail Directory CallLog Call Manage Call Handset Trouble
Answer With a Call on Hold
If there are held calls taking up call appearances, the SB67030 Deskset indicates an incoming call by emitting a single brief tone, moving
the highlight bar to the ringing call appearance, and displaying a flashing bell icon next to an available Call Appearance as shown in
Figure 288.
To answer a call with a call on hold:
1. You have the following options:
a. Press or the associated Call Appearance and the system
will answer using the Preferred Audio method (See “Preferred
Audio” on page 58). The current call will automatically be placed
on hold.
b. Press SPEAKER to route audio to the speaker.
c. Press HEADSET to route audio to headset output.
d. Lift the Handset.
2. There are 2 ways to take the held call off of hold:
a. Use the NAVIGATION key to highlight the call and go off-hook.
b. Press the associated call appearance key.
3. The Active Call Appearance icon appears as shown in Figure 289.
Figure. 288 Incoming Call
Figure. 289 Active Call
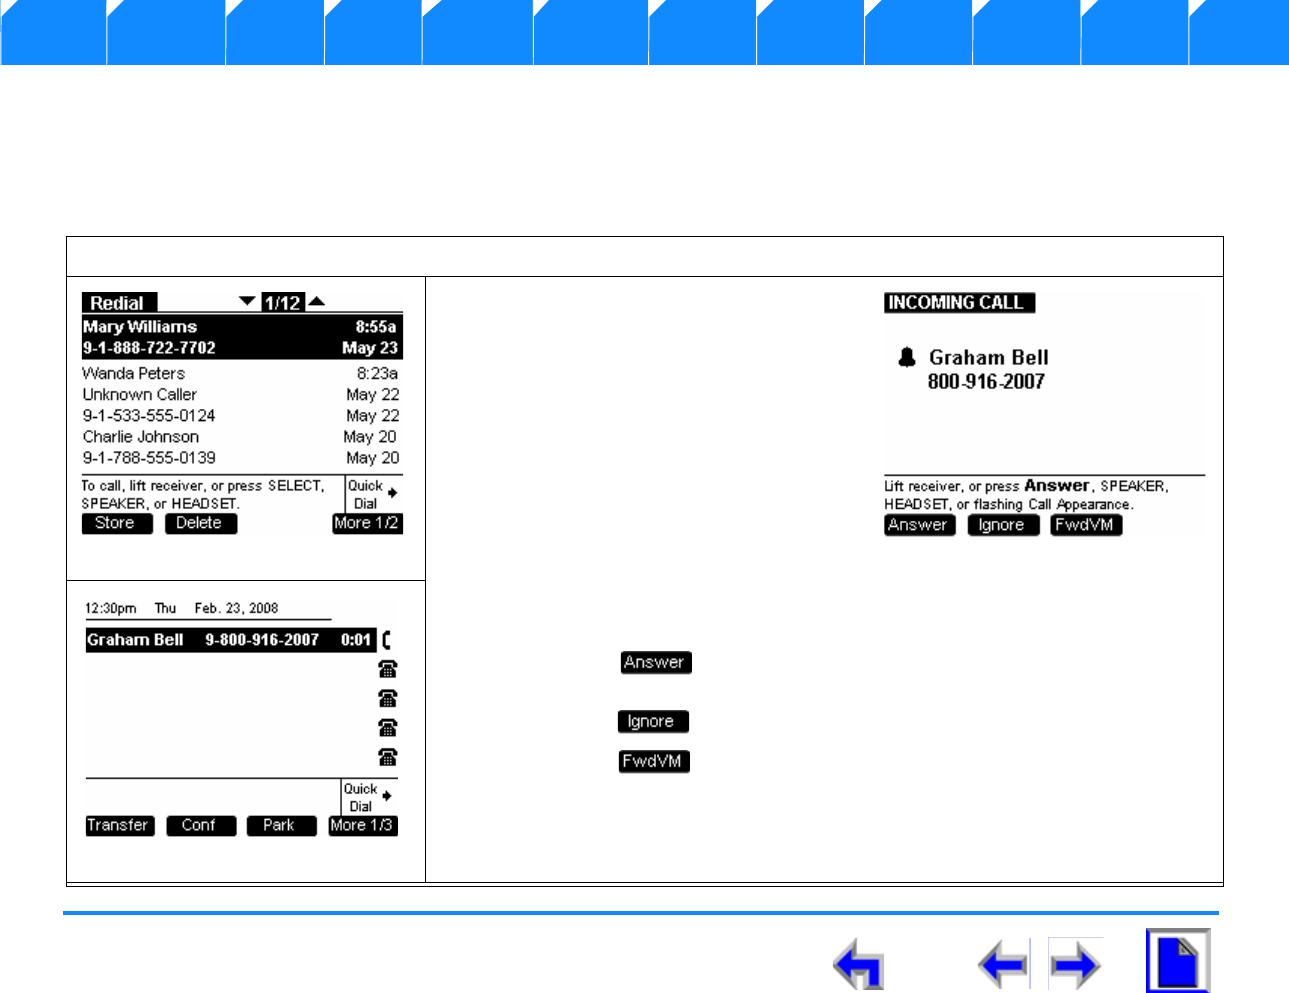
SB67030 Deskset User’s Guide - Answer a Call 184
Voice Make Call Answer
Install Overview PC UI Setup Mail Directory CallLog Call Manage Call Handset Trouble
Answer a Call from Within a Menu
If there is an incoming call while you are in the Directory, Menu, Messages, Call Log, or Redial menu (See Figure 290); the SB67030
Deskset indicates an incoming call by emitting a single brief tone, and displaying a splash screen with the flashing bell and the CID
information for the call as shown in Figure 291
To answer a Call From Within a Menu:
1. Perform one of the following to answer
the call and display the Active Call
screen shown in Figure 292.
a. Lift the Handset.
b. Press SPEAKER to route audio to
the speaker.
c. Press HEADSET to route audio to
headset output.
d. Press the associated Call
Appearance key and the system will answer using the Preferred Audio
method (See “Preferred Audio” on page 58).
e. Press . and the system will answer using the Preferred Audio
method (See “Preferred Audio” on page 58).
f. Press to turn the ringtone off (See “Ignoring a Call” on page 187).
g. Press to forward the call to voicemail.
Figure. 290 Call Menu
Figure. 291 Incoming Call Splash
Figure. 292 Active Call
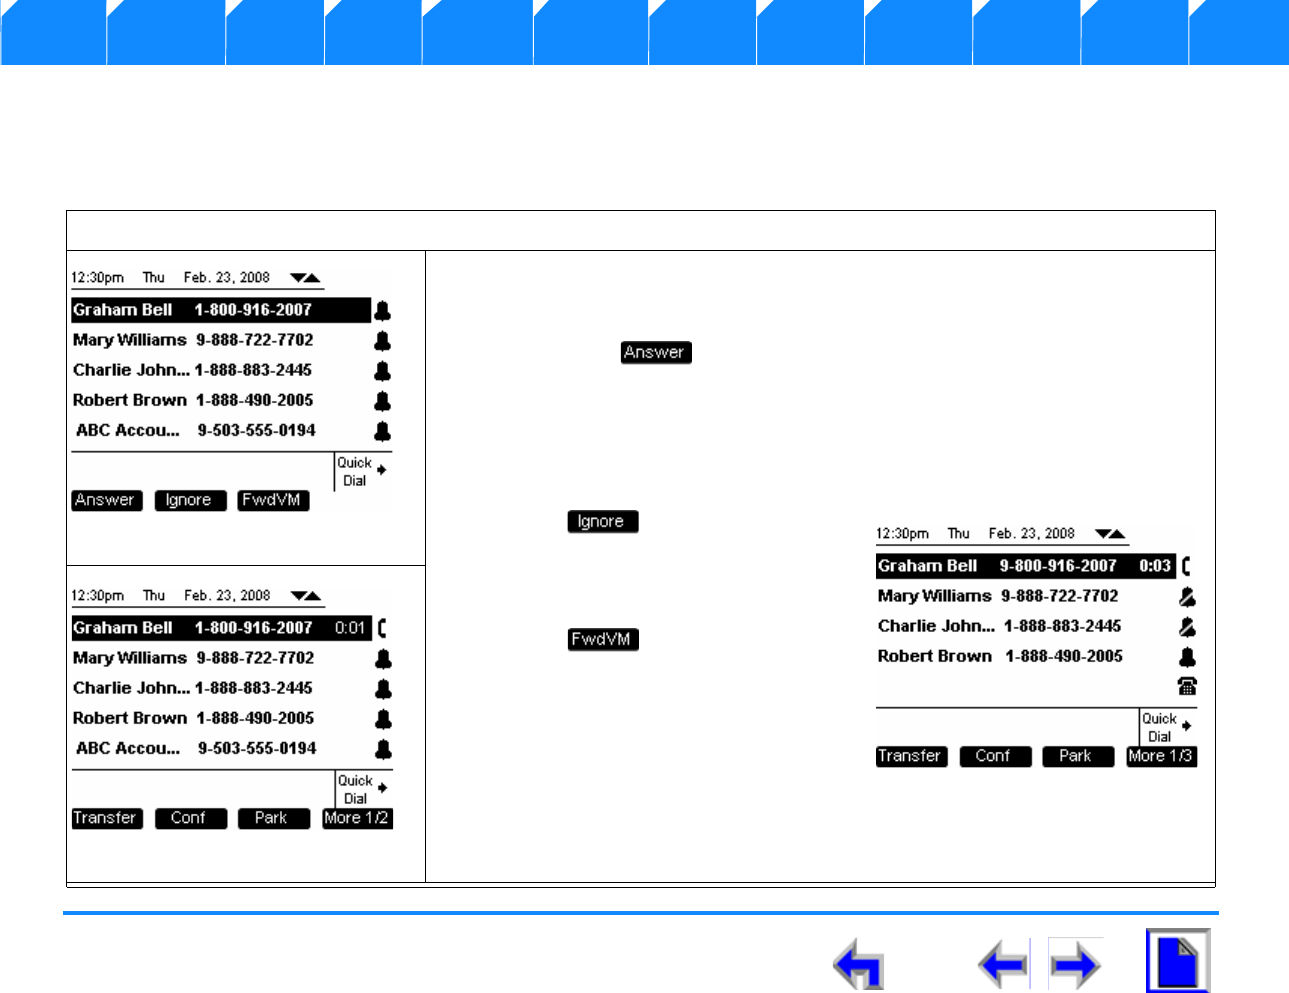
SB67030 Deskset User’s Guide - Answer a Call 185
Voice Make Call Answer
Install Overview PC UI Setup Mail Directory CallLog Call Manage Call Handset Trouble
Answer With Multiple Incoming Calls
The SB67030 Deskset displays multiple incoming calls in the Call Appearance state as shown in Figure 288. As all incoming rings have
equal priority, the reverse highlight will stay on the first incoming ring.
To answer multiple incoming calls:
You have the following options:
1. Press the up or down NAVIGATION key to select the desired call and either:
a. Press . and the system will answer using the Preferred Audio
method (See “Preferred Audio” on page 58).
OR
b. Press the associated Call Appearance key and the system will answer
using the Preferred Audio method (See “Preferred Audio” on page 58).
2. Press to turn the ringtone off
and display the screen shown in
Figure 294 (See “Ignoring a Call” on
page 187).
3. Press to forward the call to
voicemail.
4. If you answer the call, the reverse
highlight will stay on that call, not jump
to the incoming ring that’s already in
progress as shown in Figure 295.
5. Unattended incoming calls will be handled according to the Call Forward-No
Answer setting.
Figure. 293 Multiple Incoming Calls
Figure. 294 Incoming Call Splash
Figure. 295 Active Call
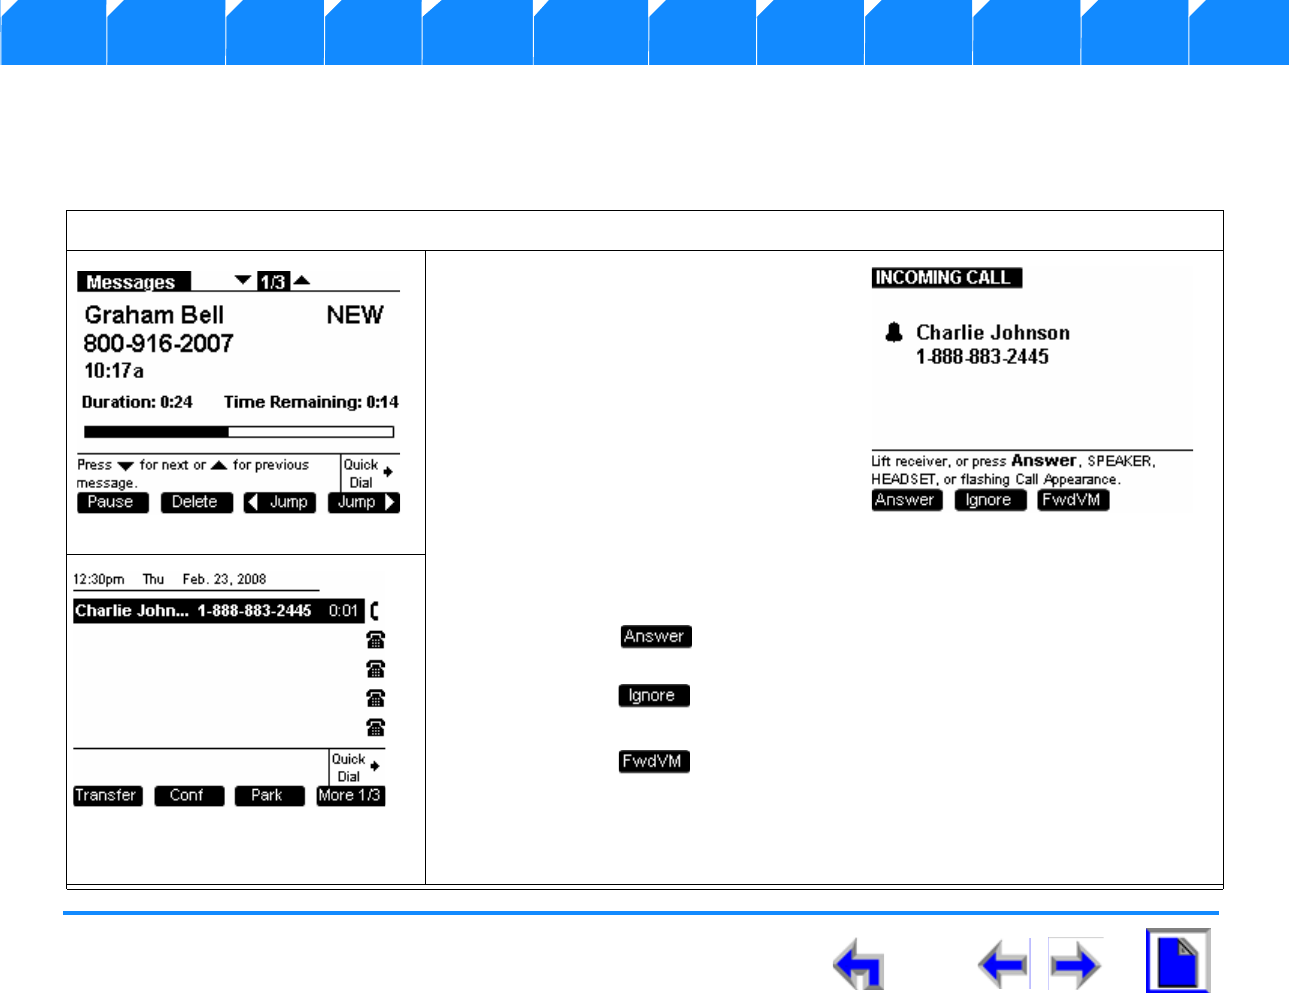
SB67030 Deskset User’s Guide - Answer a Call 186
Voice Make Call Answer
Install Overview PC UI Setup Mail Directory CallLog Call Manage Call Handset Trouble
Answer a Call From Voicemail
If there is an incoming call while you are in voicemail (See Figure 296); the SB67030 Deskset indicates an incoming call by emitting a
single brief tone, and displaying a splash screen with the flashing bell and the CID information for the call as shown in Figure 297
To answer a Call From Within voicemail:
1. Perform one of the following to
answer the call and display the Active
Call screen shown in Figure 298
a. Lift the Handset.
b. Press SPEAKER to route audio to
the speaker.
c. Press HEADSET to route audio to
headset output.
d. Press the associated Call
Appearance key and the system will answer using the Preferred Audio
method (See “Preferred Audio” on page 58).
e. Press . and the system will answer using the Preferred Audio
method (See “Preferred Audio” on page 58).
f. Press to turn the ringtone off. the message will continue to play
(See “Ignoring a Call” on page 187).
g. Press to forward the call to voicemail the message will continue
to play.
2. Answering the call will terminate message playback; you will exit the Messages
feature and go to Call Appearance mode.
Figure. 296 Voicemail
Figure. 297 Incoming Call Splash
Figure. 298 Active Call
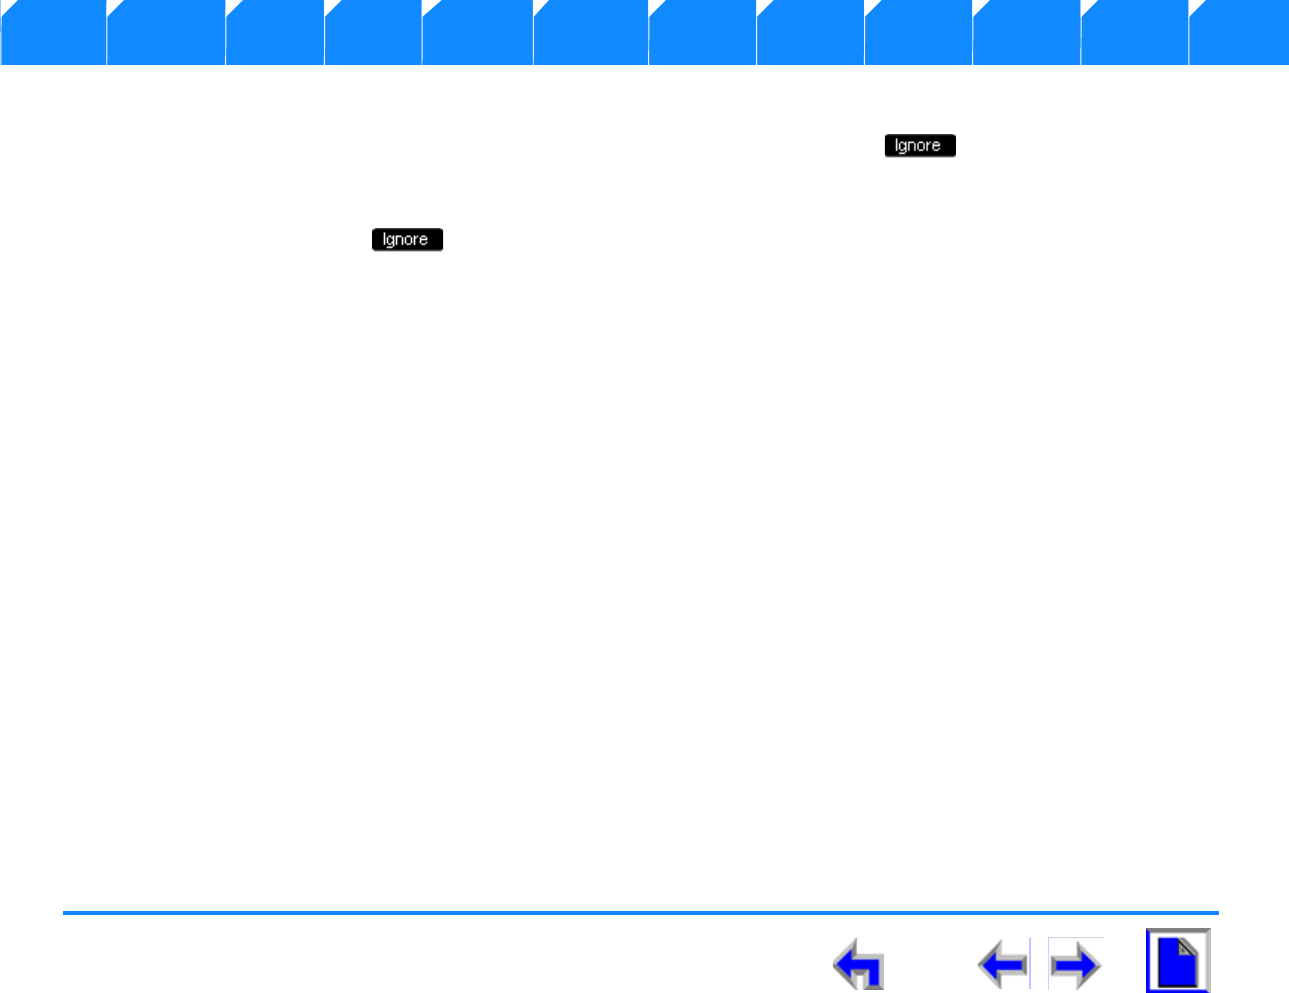
SB67030 Deskset User’s Guide - Answer a Call 187
Voice Make Call Answer
Install Overview PC UI Setup Mail Directory CallLog Call Manage Call Handset Trouble
Ignoring a Call
The user has the option of ignoring an Incoming Call when in Call Appearance mode. Pressing will silence the ringer as
indicated by the silenced ringer icon. If you were on an Active or Held call, the highlight will move back to whatever Call Appearance
you were on before the Incoming Ring event.
nOnce a call is ignored, the key will no longer be available on the Incoming Ring Call Appearance.
nIgnoring a call on the Deskset will ignore and silence that call on the Cordless Handset as well
nIf an ignored call is highlighted, going off-hook by lifting the receiver, or pressing SPEAKER, or HEADSET will not answer the
incoming call. Instead, going off-hook will establish a new call on the next available Call Appearance.
nIf you receive multiple incoming calls, they will queue up in order of arrival. The highlight will always stay on the oldest incoming
call. Ignoring each incoming call will cycle through each incoming call. If the call has already been ignored once, it cannot be
ignored again.
nIf you are on Active Call with one ignored call and one unattended incoming call, the system hangs up the Active Call, and he
unattended call starts ringing. If all incoming calls had been ignored before you hung up, there would be no ringing.
nThe Call Appearance LED will continue to flash. Pressing the flashing CA will terminate the feature and take you to an active call.
nIf you may cancel out of the feature, you will see the incoming call in the Call Appearance state with the ringer silenced.
nIf there are multiple incoming calls occurring simultaneously, they will be queued up in order of arrival. You will stay on the
current incoming call interaction screen, but additional CAs will light up to indicate additional incoming calls. Ignoring the
current incoming call will take the user to the next incoming call in the queue. If all additional incoming calls are ignored, you
will return to the previous feature.

SB67030 Deskset User’s Guide - Handset Interaction 188
Voice Make Call Answer
Install Overview PC UI Setup Mail Directory CallLog Call Manage Call Handset Trouble
CHAPTER
11
H
ANDSET
I
NTERACTION
Introduction
Your AT&T Business System operates with either the SB67030 Desk Set or the SB67040 Remote
Handset. This section identifies similarities and operating interactions involved with both units. For
a complete description of Handset functions see the SB67040 Remote Handset User’s Guide. In
this chapter the deskset and handset screens are displayed side-by-side to provide a comparison
of activity. This chapter covers:
1. “Idle Screen” on page 189.
2. “Locating the Handset” on page 191.
3. “Ignoring a Call” on page 192
4. “Incoming Ring: Deskset Answers” on page 193.
5. “Incoming Ring Event: Handset Answers” on page 194.
6. “Held Calls on Both Devices” on page 195.
7. “List Access” on page 196.

SB67030 Deskset User’s Guide - Handset Interaction 189
Voice Make Call Answer
Install Overview PC UI Setup Mail Directory CallLog Call Manage Call Handset Trouble
Idle Screen
Figure 299 illustrates the Idle screens for both the SB67030 Desk Set or the SB67040 Remote Handset. See “The Idle Screen” on page 41
for a complete description of the Deskset Idle screen. See SB67040 Remote Handset User’s Guide for a complete description of the
Handset Idle screen. The following are differences and similarities between the devices:
nBoth the Handset and the Deskset are in sync during Idle
mode. The system status at the user extension such as
missed calls and new messages is broadcast from the
Deskset to the cordless handset as new events occur. This
ensures the handset remains in sync with the Deskset.
nThe Handset synchronizes with the Deskset every time it
wakes up from power-save mode.
nBoth the Handset and Deskset are in sync if there are held
calls. The Deskset shows held calls in the Call Appearance
slots. The Handset displays the current held call with an
option to cycle through the call deck using the up or down
NAVIGATION key. See “Held Calls on Both Devices” on page 195 for a description of held call operation.
nThe clocks on each of the devices run independently. The system will synchronize the real time periodically, with the Deskset
being the master. Since the clocks are independent, there may be times when the clock rollover may not occur at the exact
moment when comparing the unit side by side.
nBoth devices show the current date and time, DND status, the same new calls and new message notifications.
Note The handset will go into power-save mode after a defined period. When it is in power-save mode, the display will
not be off but the held call information will not be visible until the user wakes up the handset or until it is woken
up with an incoming ring even.
Figure. 299 Deskset/Handset Idle Screens

SB67030 Deskset User’s Guide - Handset Interaction 190
Voice Make Call Answer
Install Overview PC UI Setup Mail Directory CallLog Call Manage Call Handset Trouble
nAn Incoming Call Event appears on both devices and both devices will emit ringtones. If one device answers the call, the other
device will cease to ring but will receive visual notification of the call in progress and stays in a mode where CA notification is
available. This behavior allows a further incoming ring event to appear on either device. If there is an incoming ring while one
device is on an Active Call, the device currently on a call will emit an abbreviated ring tone but the other device will not emit
any sound at all.
nOnly one device can control the database-dependent features such as Directory, Call Log, Redial list, Park list, Extension list,
Quick Dial list and Messages feature. The control of the database covers the read and write operation available on each of the
devices. The audio channel control means accessing or establishing an Active Call as well as accessing voicemail. If one of the
devices has control of either the database-dependent features or the audio channel, the other device cannot get control of
either unless the user switches the control over.
nIf you press a key in an attempt to access a database-dependent feature on one device while the other device has control, that
access will become available after switching control– you do not have to press the feature key again.
nIf you switch devices during a current Active Call, the audio channel will stay open and you can resume the call in progress.
nYou cannot initiate a new call or answer a new incoming call on one device if the other device is on an Active Call. You must
switch between devices to handle the current call before new calls can be handled.
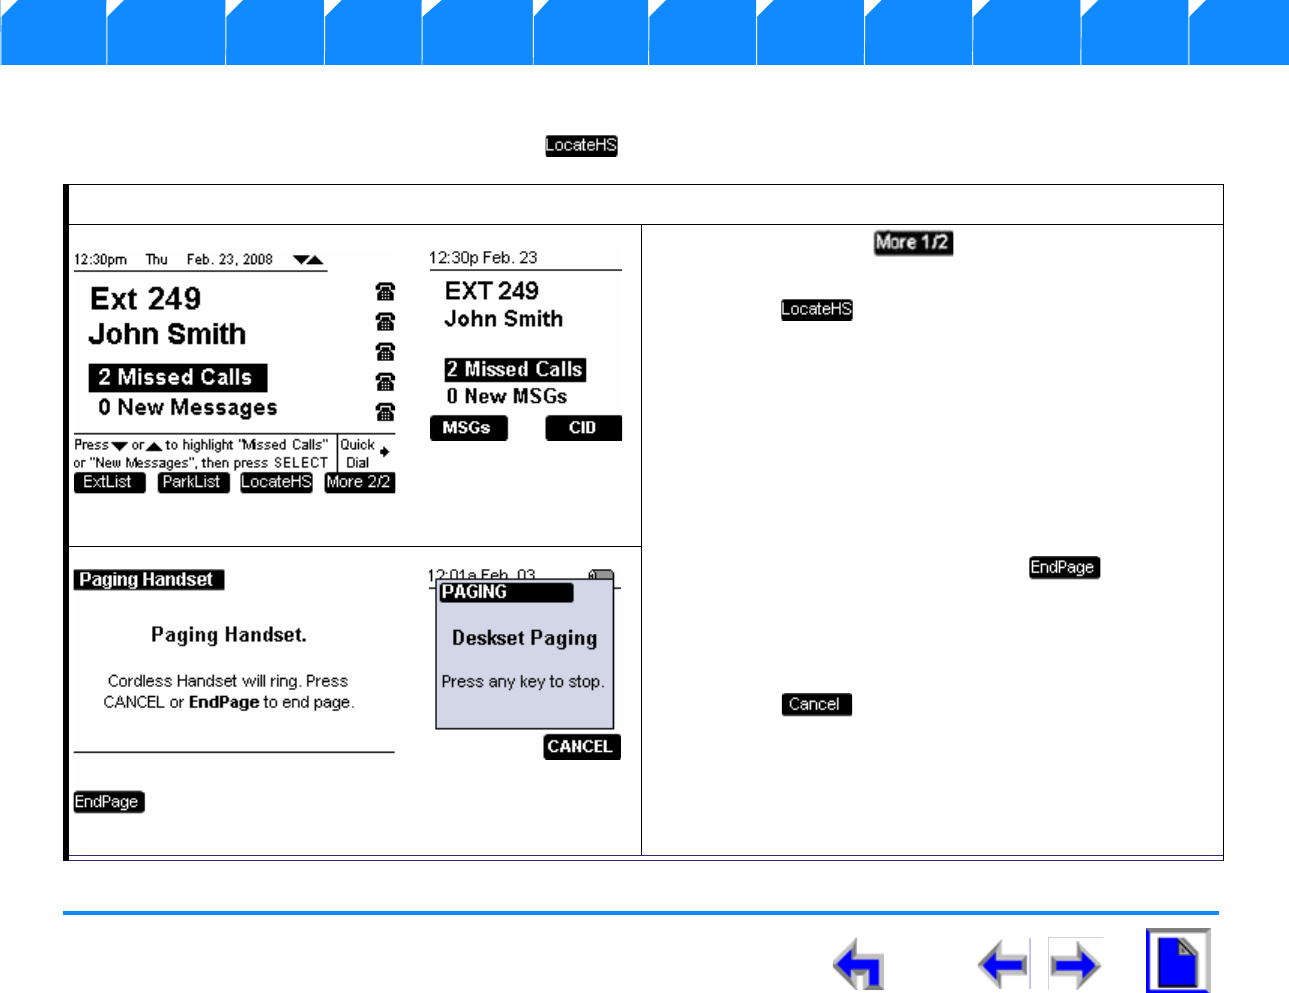
SB67030 Deskset User’s Guide - Handset Interaction 191
Voice Make Call Answer
Install Overview PC UI Setup Mail Directory CallLog Call Manage Call Handset Trouble
Locating the Handset
If a Cordless Handset is registered to the Deskset, then is available from Idle on the Deskset.
To locate the handset:
1. From Idle, press to display the screen shown
in Figure 300.
2. Press .
3. The Deskset displays a Paging Handset splash screen
shown in Figure 301.
4. The Cordless Handset will ring for 60 seconds (about
12 rings) and display a Deskset Paging interaction
screen shown in Figure 301. This splash will not
disappear until ringing stops or the user cancels the
page.
5. On the Deskset: Press CANCEL or to stop the
paging before the 60-second time-out.
6. The paging interaction screen will self-terminate after
60 seconds.
7. Press any key on the Handset: to stop the
paging.
Figure. 300 Idle Screen
Figure. 301 Paging Handset
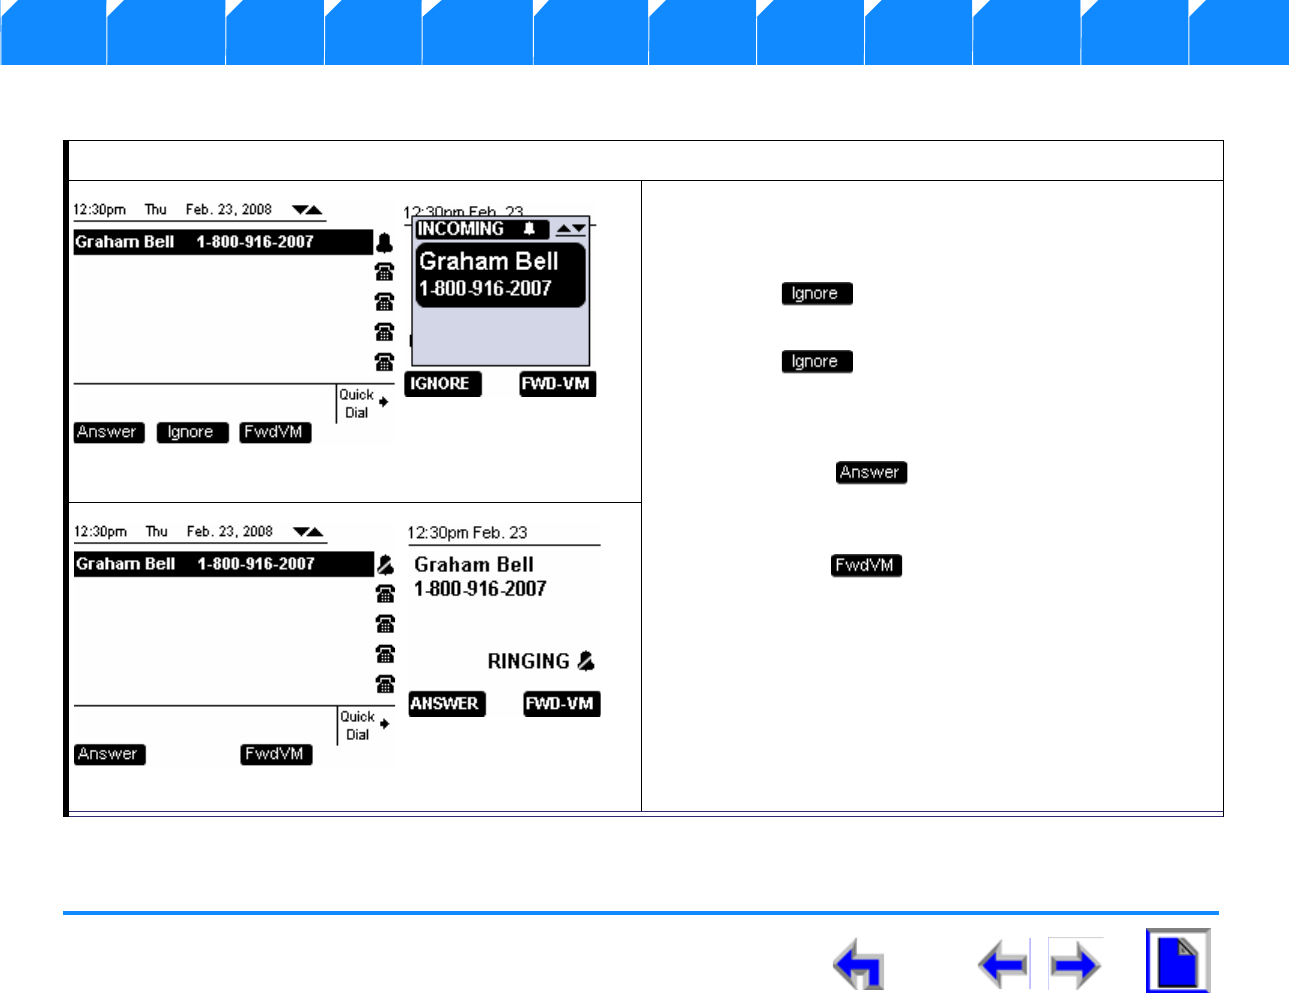
SB67030 Deskset User’s Guide - Handset Interaction 192
Voice Make Call Answer
Install Overview PC UI Setup Mail Directory CallLog Call Manage Call Handset Trouble
Ignoring a Call
To handle held calls on both devices:
1. When an incoming call is ignored, neither device has
ownership of these calls. The status is available on
both devices, as shown in Figure 308.
2. Press on the Deskset and observe that the
screen shown in Figure 308 display.
3. Press on the handset and observe that the
screen shown in Figure 308 display.
4. You have the following options:
a. Press . and the system will answer using
the Preferred Audio method (See “Preferred
Audio” on page 58).
b. Press to forward the call to voicemail.
Figure. 302 Ignore a Call
Figure. 303 Paging Handset
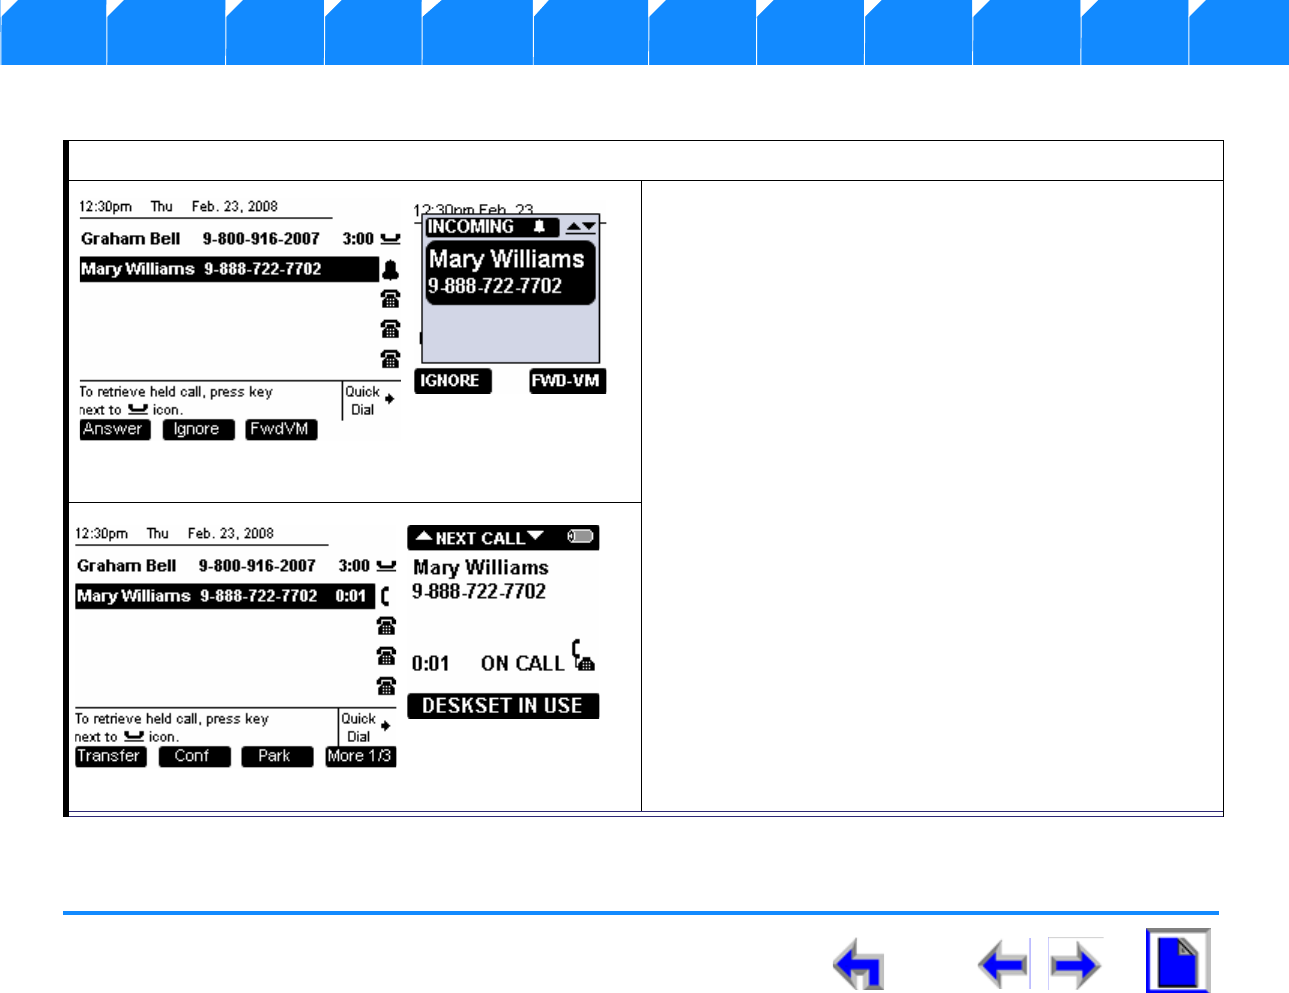
SB67030 Deskset User’s Guide - Handset Interaction 193
Voice Make Call Answer
Install Overview PC UI Setup Mail Directory CallLog Call Manage Call Handset Trouble
Incoming Ring: Deskset Answers
The Deskset answers an incoming call:
1. When there is an incoming call, none of the devices
have ownership of these calls. The status is available
on both devices, as shown in Figure 304.
2. In this state, when the Deskset answers the call with
one of the means available, (See “Answer a Call” on
page 176.) the screens shown in Figure 305 display.
Figure. 304 Active Call Screen
Figure. 305 Paging Handset
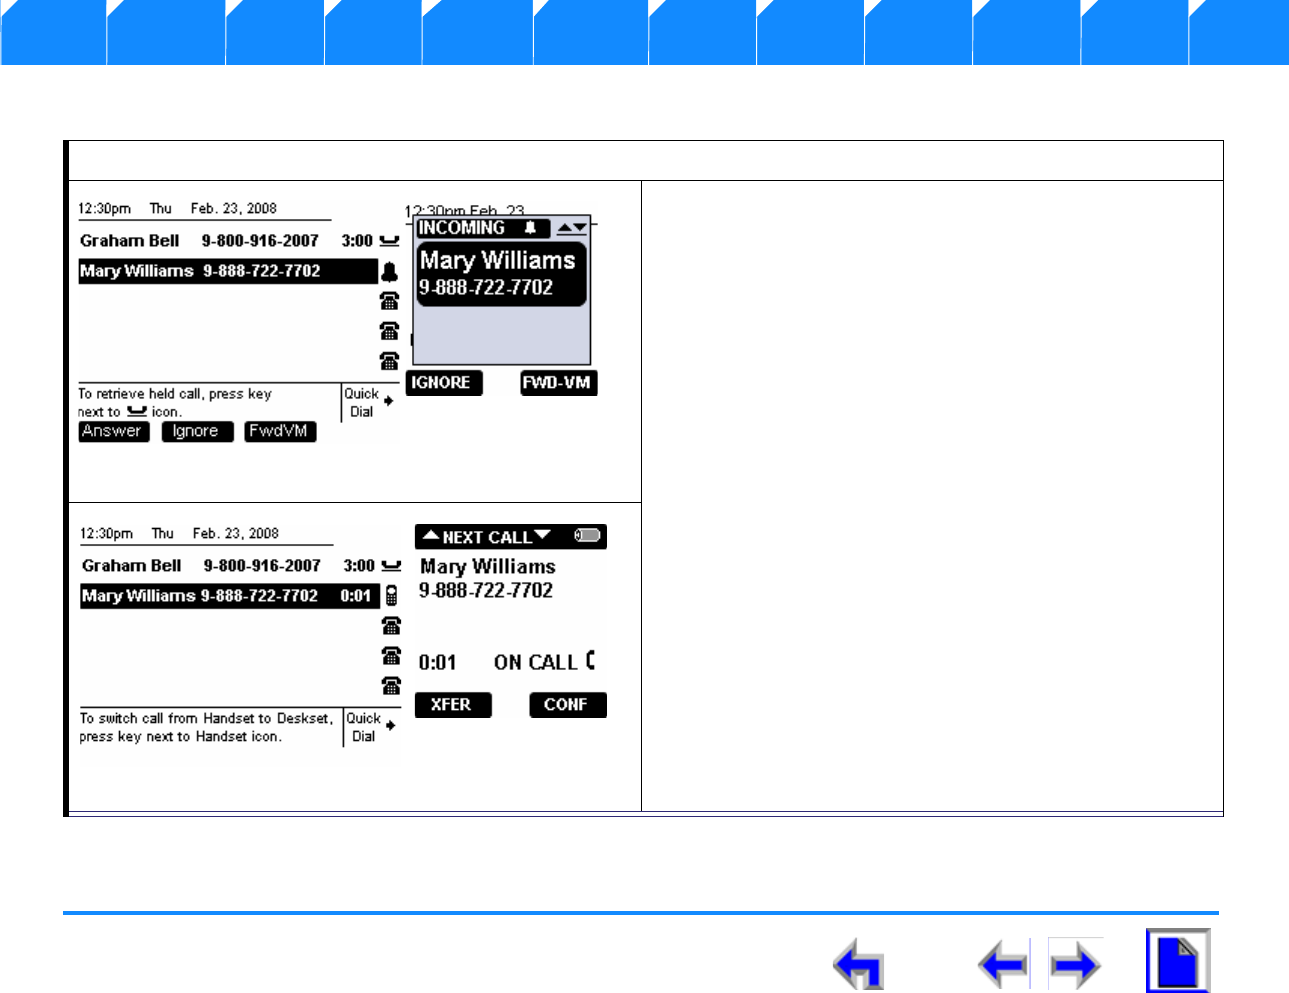
SB67030 Deskset User’s Guide - Handset Interaction 194
Voice Make Call Answer
Install Overview PC UI Setup Mail Directory CallLog Call Manage Call Handset Trouble
Incoming Ring Event: Handset Answers
The Handset answers an incoming call:
1. When there is an incoming call, none of the devices
have ownership of these calls. The status is available
on both devices, as shown in Figure 306.
2. In this state, when the Handset answers the call with
one of the means available, (See SB67040 Remote
Handset User’s Guide) the screens shown in Figure 307
display.
3. The Deskset screen in Figure 307 shows the highlight
on the Active Call with the Handset icon meaning the
cordless Handset has control and is on an Active Call.
4. The highlight will not move even though there may be
further incoming calls. This highlight behavior
indicates that the Active Call must switch back to the
Deskset before any other calls or database access
features can be activated.
5. To switch back to the Deskset, lift the receiver, press
the associated Call Appearance, press SPEAKER, or
press HEADSET.
Figure. 306 Active Call Screen
Figure. 307 Paging Handset
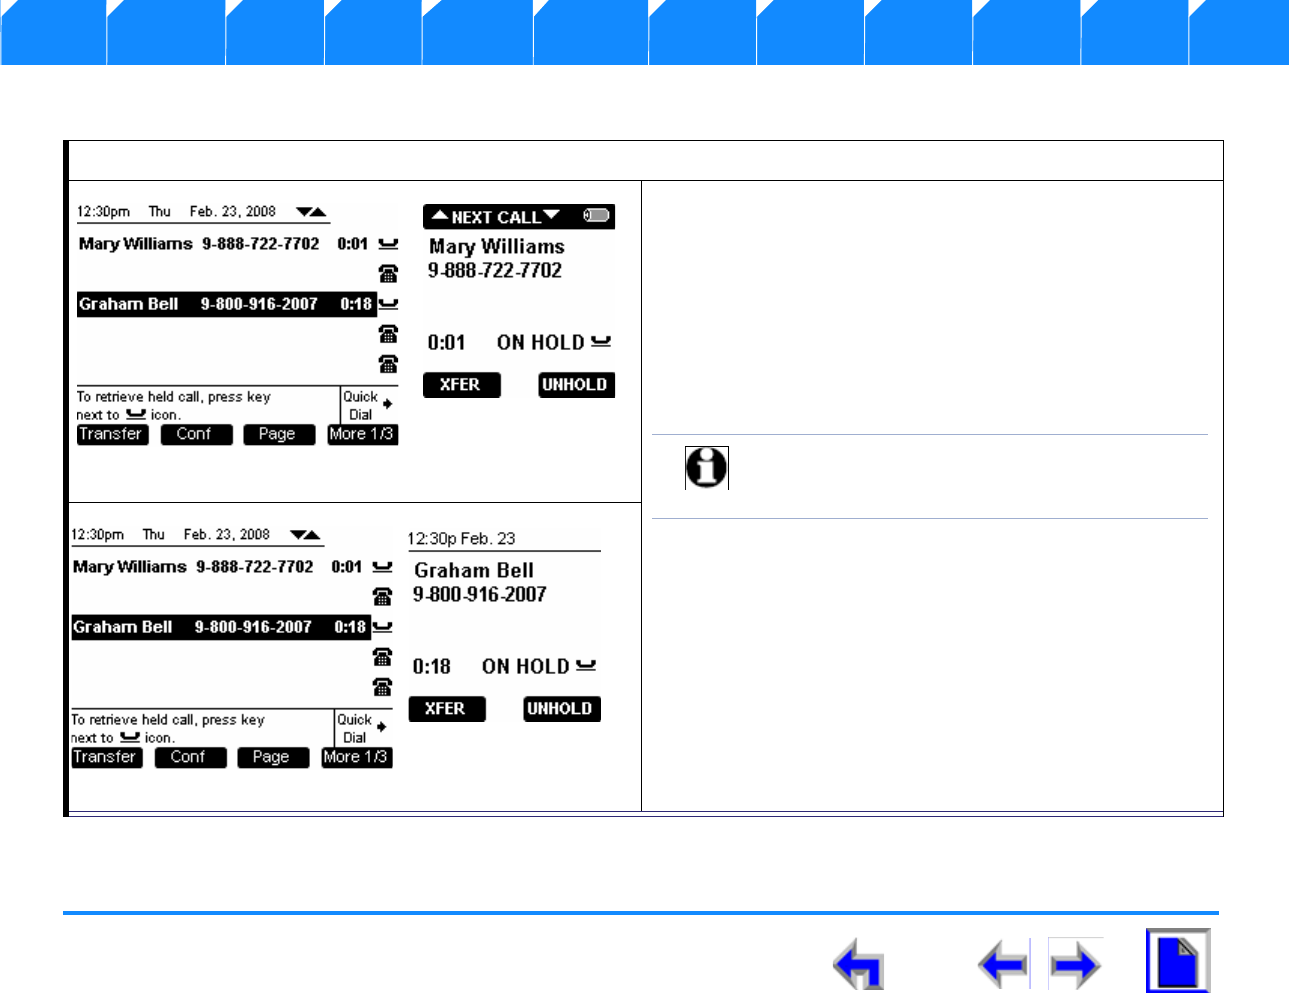
SB67030 Deskset User’s Guide - Handset Interaction 195
Voice Make Call Answer
Install Overview PC UI Setup Mail Directory CallLog Call Manage Call Handset Trouble
Held Calls on Both Devices
To handle held calls on both devices:
1. When there are held calls, neither device has
ownership of these calls. The status is available on
both devices, as shown in Figure 308.
2. In this state, any device can pick up a held call with
one of the means available (See “Call on Hold” on
page 171.)
3. Press the up or down NAVIGATION key to cycle
through held calls as shown in Figure 309.
Figure. 308 Active Call Screen
Note Switching between calls in the Handset call
deck will not switch Call Appearances in the
Deskset.
Figure. 309 Paging Handset

SB67030 Deskset User’s Guide - Handset Interaction 196
Voice Make Call Answer
Install Overview PC UI Setup Mail Directory CallLog Call Manage Call Handset Trouble
List Access
When The Deskset is in use and is accessing a database-dependent feature such as voicemail, the Handset must switch to assume
control before it can access the database feature. Figure 310 illustrates voicemail, but the other lists behaves similarly.
To handle held calls on both devices:
1. With the Handset in power-save mode and the Deskset
playing voicemail, press DIR to access the directory.
2. The Handset Lockout splash screen shown in
Figure 312 displays.
3. Press to pause the voicemail message and
display the directory on the handset as shown in
Figure 308.
Figure. 310 Active Call Screen
Figure. 311 Handset Lockout Splash
Figure. 312 Handset Directory
SB67030 Deskset User’s Guide - Troubleshooting 197
Voice Make Call Answer
Install Overview PC UI Setup Mail Directory CallLog Call Manage Call Handset Trouble
CHAPTER
12
T
ROUBLESHOOTING
If you have difficulty operating your SB67030 Desk Set, try the suggestions in Table 24.
Note For customer service or product information, visit our website at
www.telephones.att.com or call 1 (800) 222-3111. In Canada,
dial 1 (866) 288-4268.
Table 24 SB67030 Desk Set Problem Resolutions
Symptom Probable Cause Corrective Action
My SB67030 Desk Set
does not work at all. No power to the Desk Set. Make sure the power adapter is
securely plugged into an outlet
not controlled by a wall switch.
Unplug the unit? electrical power.
Wait for approximately 15
seconds, then plug it back in.
Allow up to three minutes for the
Internet radio to boot up.
Make sure the sufficient batteries
are used and installed correctly

SB67030 Deskset User’s Guide - Troubleshooting 198
Voice Make Call Answer
Install Overview PC UI Setup Mail Directory CallLog Call Manage Call Handset Trouble
Important Safety Instructions
When using your telephone equipment, basic safety precautions should always be followed to reduce the risk of fire, electric shock and
injury, including the following:
nRead and understand all instructions.
nFollow all warnings and instructions marked on the product.
nUnplug this product from the wall outlet before cleaning. Do not use liquid or aerosol cleaners. Use a damp cloth for cleaning.
nDo not use this product near water (for example, near a bathtub, kitchen sink, or swimming pool).
nDo not place this product on an unstable table, shelf, stand or other unstable surfaces.
nSlots and openings in the back or bottom of the unit are provided for ventilation. To protect it from overheating, these openings
must not be blocked by placing the product on a soft surface such as a bed, sofa or rug. This product should never be placed
near or over a radiator or heat register. This product should not be placed in any area where proper ventilation is not provided.
nThis product should be operated only from the type of power source indicated on the marking label. If you are not sure of the
type of power supply in your home, consult your dealer or local power company.
nDo not allow anything to rest on the power cord. Do not install this product where the cord may be walked on.
Remove and re-insert the
batteries. If that still does not
work, it may be necessary to
purchase a new battery.
Table 24 SB67030 Desk Set Problem Resolutions
Symptom Probable Cause Corrective Action

SB67030 Deskset User’s Guide - Troubleshooting 199
Voice Make Call Answer
Install Overview PC UI Setup Mail Directory CallLog Call Manage Call Handset Trouble
nNever push objects of any kind into this product through the slots in the unit because it may touch dangerous voltage points
or create a short circuit. Never spill liquid of any kind on the product.
nTo reduce the risk of electric shock, do not disassemble this product, but take it to an authorized service facility. Opening or
removing parts of the unit other than specified access doors may expose you to dangerous voltages or other risks. Incorrect
reassembling can cause electric shock when the product is subsequently used.
nDo not overload wall outlets and extension cords.
Unplug this product from the wall outlet and refer servicing to an authorized service facility under the following conditions:
nWhen the power supply cord or plug is damaged or frayed.
nIf liquid has been spilled onto the product.
nIf the product has been exposed to rain or water.
nIf the product does not operate normally by following the operating instructions. Adjust only those controls that are covered
by the operation instructions. Improper adjustment of other controls may result in damage and often requires extensive work
by an authorized technician to restore the product to normal operation.
nIf the product has been dropped and the unit has been damaged.
nIf the product exhibits a distinct change in performance.
nThe power adapter is intended to be correctly oriented in a vertical or floor mount position. The prongs are not designed to
hold the plug in place if it is plugged into a ceiling or an under-the-table/cabinet outlet.
Maintenance
Your SB67030 Desk Set contains sophisticated electronic parts, so it must be treated with care.
Avoid rough treatment
Handle the unit gently. Save the original packing materials to protect your telephone if you ever need to ship it.

SB67030 Deskset User’s Guide - Troubleshooting 200
Voice Make Call Answer
Install Overview PC UI Setup Mail Directory CallLog Call Manage Call Handset Trouble
Avoid water
Your unit can be damaged if it gets wet. Do not use the handset outdoors in the rain, or handle it with wet hands. Do not install the
telephone base near a sink, bathtub or shower.
Electrical storms
Electrical storms can sometimes cause power surges harmful to electronic equipment. For your own safety, take caution when using
electrical appliances during storms.
Cleaning your unit
Your unit has a durable plastic casing that should retain its luster for many years. Clean it only with a soft cloth slightly dampened with
water or a mild soap. Do not use excess water or cleaning solvents of any kind.
Warranty
Technical Specifications
I Selects the highlighted item.
Note

SB67030 Deskset User’s Guide - Chapter 202
Voice Make Call Answer
Install Overview PC UI Setup Mail Directory Call Log Call Manage Call Handset Trouble
G
LOSSARY
CA – Call Appearance
Call Appearance represents call presence on the system. The number of call appearance buttons
on the desktop dictates the number of calls on the system the User can have directed to them.
On the Cordless handset Call Appearance is different because of the lack of dedicated CA buttons.
CD Handset – Corded Handset
CS – Cordless Handset
DS – Desk Set
HL – Highlight
Highlight refers to a reverse bar in the display that brings focus of the user to a listed item.
HK – Hard Key
PK – Programmed Key
ACTIVE CALL
Active Call is a state that occurs after the system has dialed out the dialing digits. The system will
assume this as a connected state even though a connection may not be set up with the far-end.
Active call state also applies when the user answers an incoming call.

Voice Make Call Answer
Install Overview PC UI Setup Mail Directory Call Log Call Manage Call Handset Trouble
SB67030 Deskset User’s Guide - Chapter 203
DIAL
Dial state refers to an intermediary state that occurs after the user has request a calling line by going off hook. As the user enters dialing
digits, the System checks whether the dialing rules are met. The System will then dial the digit string. The state then changes from DIAL
to Active Call.
Held Calls
Held Calls are calls that are placed on hold at the extension by the user. The system can automatically hold a call based on Call
Appearance rules.
IDLE
Idle refers to a state where the extension does not have any Active or Held Calls.