VTech Telecommunications 80-6569-00 VTech IS9181 Wireless Internet Radio User Manual part C
VTech Telecommunications Ltd VTech IS9181 Wireless Internet Radio part C
Contents
- 1. User manual part A
- 2. User manual part B
- 3. User manual part C
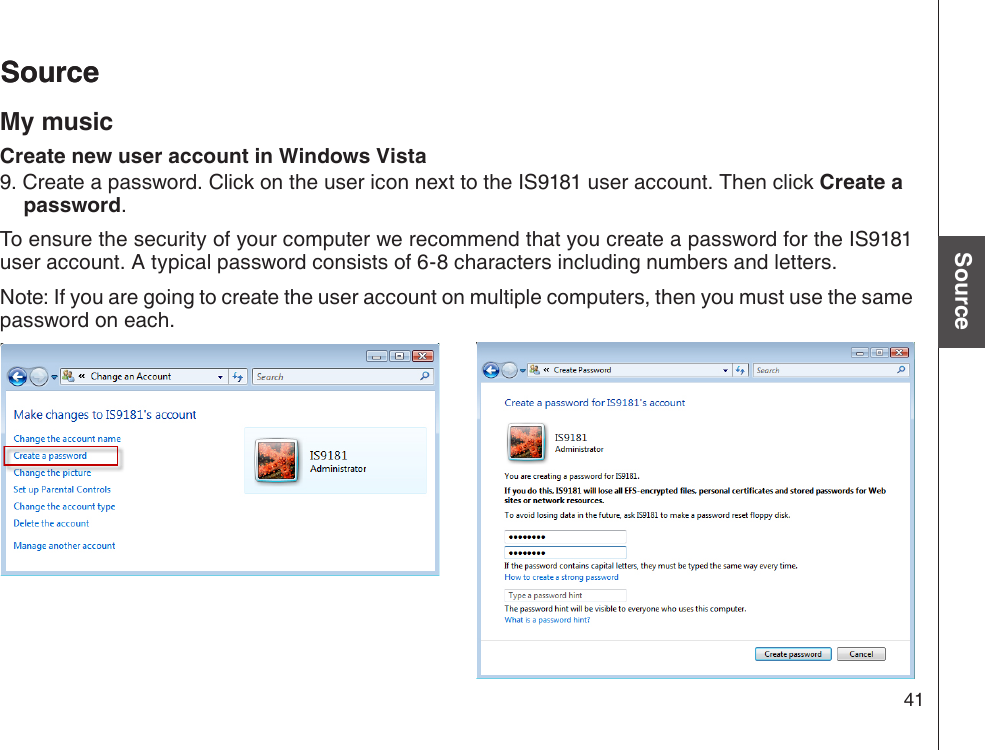
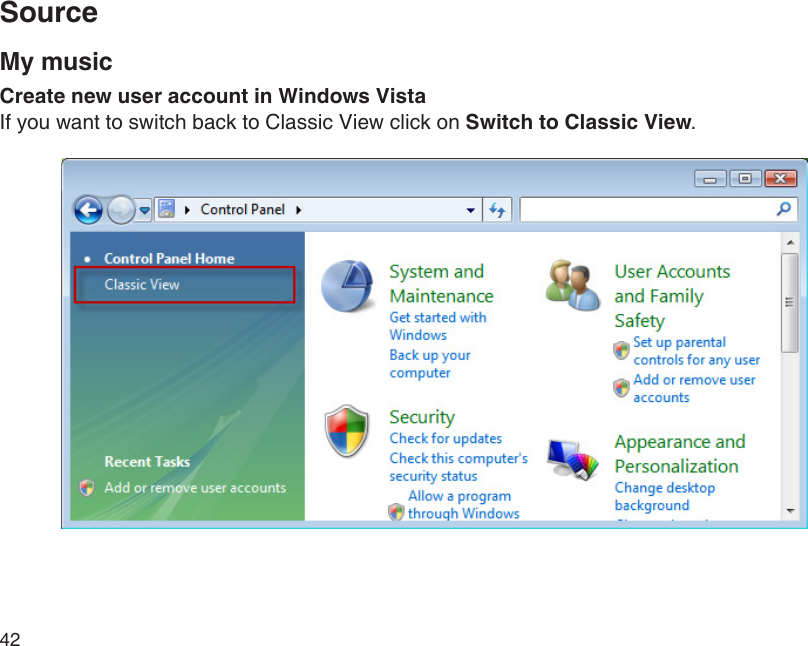
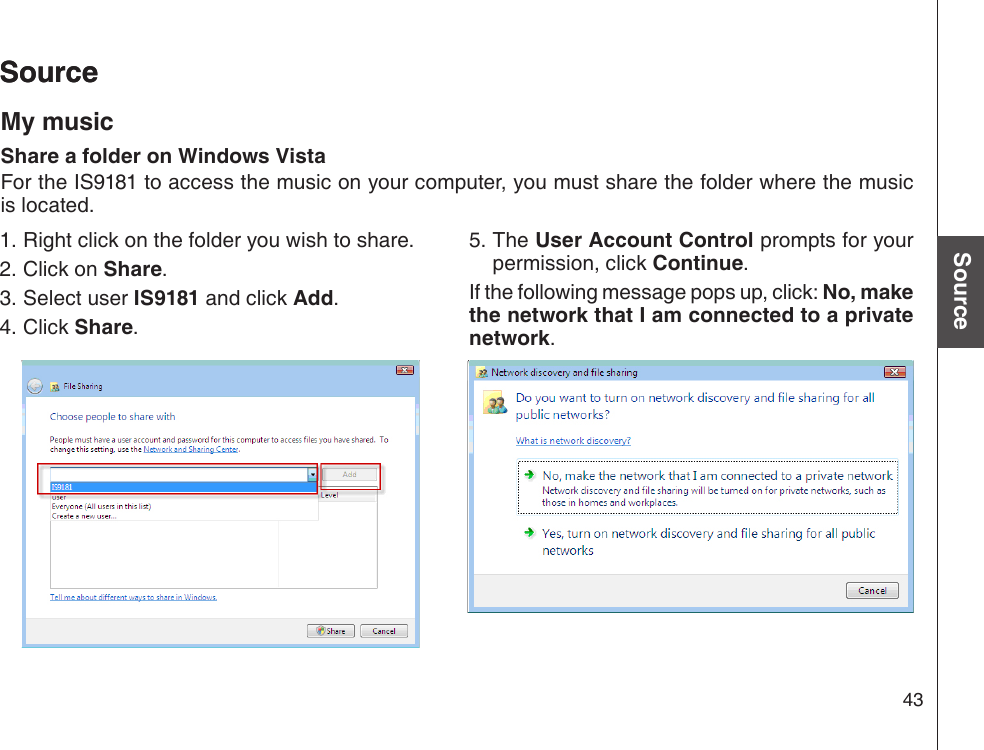
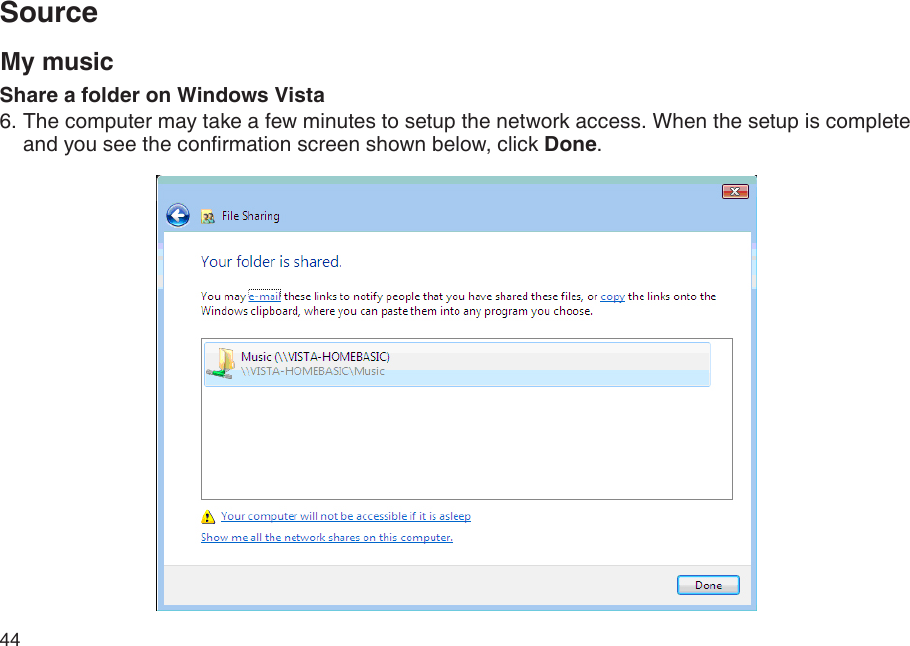
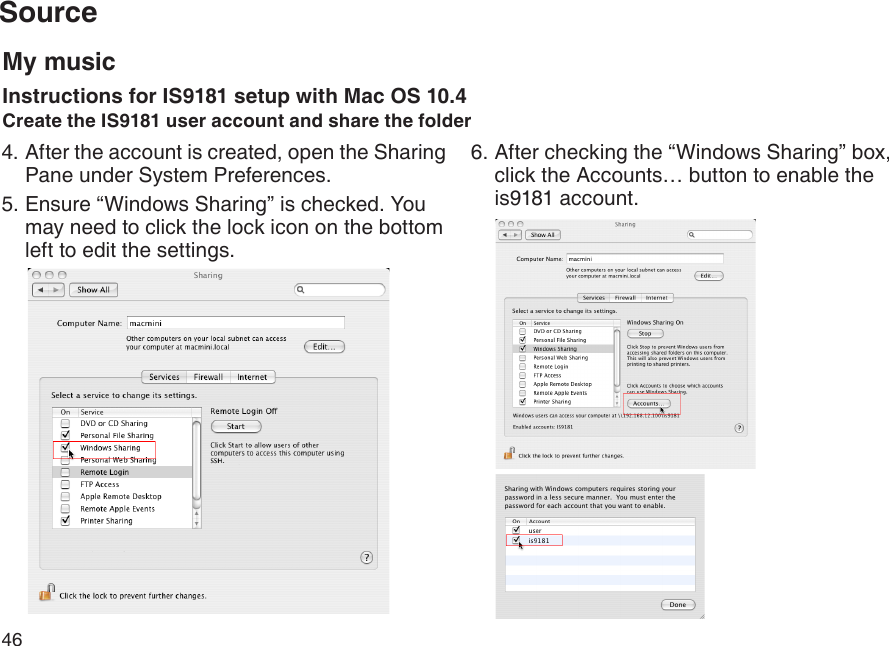
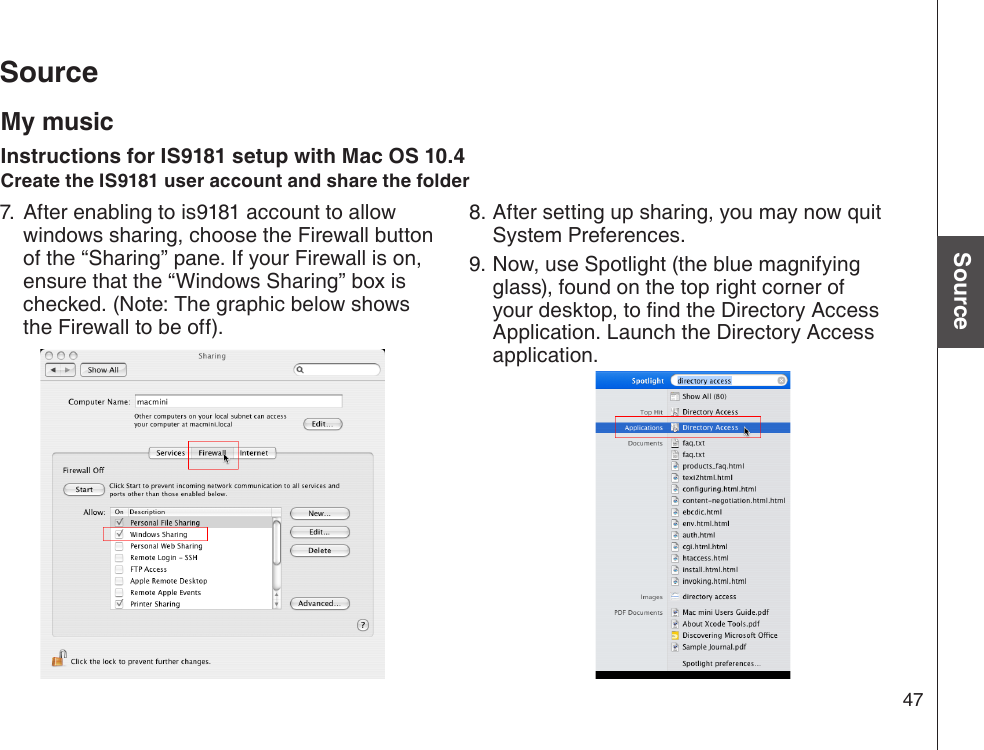
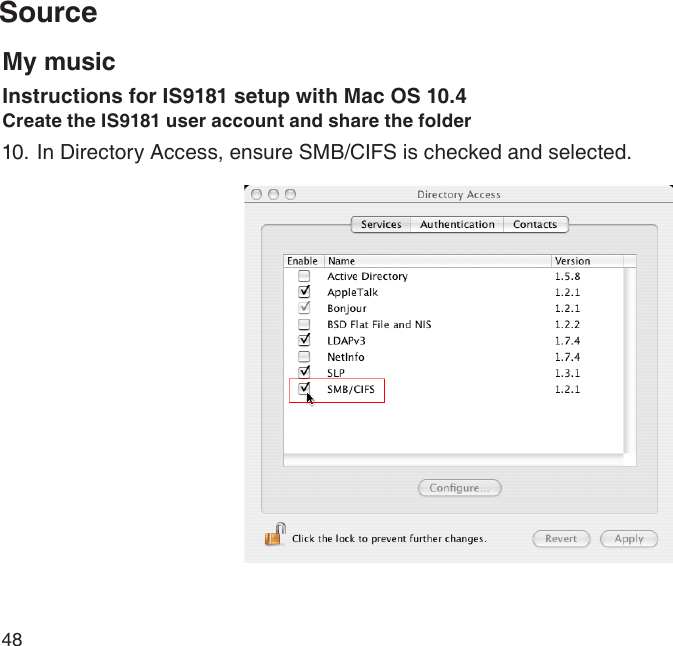
User manual part C
![41Basic operationSourceSourceSourceMy musicCreate new user account in Windows Vista9. Create a password. Click on the user icon next to the IS9181 user account. Then click Create a password.To ensure the security of your computer we recommend that you create a password for the IS9181 user account. A typical password consists of 6-8 characters including numbers and letters.Note: If you are going to create the user account on multiple computers, then you must use the same password on each.](https://usermanual.wiki/VTech-Telecommunications/80-6569-00.User-manual-part-C/User-Guide-1053433-Page-1.png)
![42My musicCreate new user account in Windows VistaIf you want to switch back to Classic View click on Switch to Classic View.Source](https://usermanual.wiki/VTech-Telecommunications/80-6569-00.User-manual-part-C/User-Guide-1053433-Page-2.png)
![43Basic operationSourceSourceSourceMy musicShare a folder on Windows VistaFor the IS9181 to access the music on your computer, you must share the folder where the music is located. Right click on the folder you wish to share.Click on Share.Select user IS9181 and click Add.Click Share.1.2.3.4.5. The User Account Control prompts for your permission, click Continue.If the following message pops up, click: No, make the network that I am connected to a private network.](https://usermanual.wiki/VTech-Telecommunications/80-6569-00.User-manual-part-C/User-Guide-1053433-Page-3.png)
![44Share a folder on Windows Vista6. The computer may take a few minutes to setup the network access. When the setup is complete and you see the conrmation screen shown below, click Done.My musicSource](https://usermanual.wiki/VTech-Telecommunications/80-6569-00.User-manual-part-C/User-Guide-1053433-Page-4.png)
![45Basic operationSourceSourceUnder the Apple menu, select System Preferences and choose the Accounts pane. Click the “+” symbol to add an account. You may need to click the lock icon on the bottom left to edit the settings. 1.2.You must name the account is9181 and create a password. This user does not have to administer the computer.3.My musicInstructions for IS9181 setup with Mac OS 10.4Create the IS9181 user account and share the folder](https://usermanual.wiki/VTech-Telecommunications/80-6569-00.User-manual-part-C/User-Guide-1053433-Page-5.png)
![46Source4. After the account is created, open the Sharing Pane under System Preferences. 5. Ensure “Windows Sharing” is checked. You may need to click the lock icon on the bottom left to edit the settings. 6. After checking the “Windows Sharing” box, click the Accounts… button to enable the is9181 account.My musicInstructions for IS9181 setup with Mac OS 10.4Create the IS9181 user account and share the folder](https://usermanual.wiki/VTech-Telecommunications/80-6569-00.User-manual-part-C/User-Guide-1053433-Page-6.png)
![47Basic operationSourceSource7. After enabling to is9181 account to allow windows sharing, choose the Firewall button of the “Sharing” pane. If your Firewall is on, ensure that the “Windows Sharing” box is checked. (Note: The graphic below shows the Firewall to be off).8. After setting up sharing, you may now quit System Preferences.9. Now, use Spotlight (the blue magnifying glass), found on the top right corner of your desktop, to nd the Directory Access Application. Launch the Directory Access application.My musicInstructions for IS9181 setup with Mac OS 10.4Create the IS9181 user account and share the folder](https://usermanual.wiki/VTech-Telecommunications/80-6569-00.User-manual-part-C/User-Guide-1053433-Page-7.png)
![48Source10. In Directory Access, ensure SMB/CIFS is checked and selected.My musicInstructions for IS9181 setup with Mac OS 10.4Create the IS9181 user account and share the folder](https://usermanual.wiki/VTech-Telecommunications/80-6569-00.User-manual-part-C/User-Guide-1053433-Page-8.png)
![49Basic operationSourceSourceMy musicInstructions for IS9181 setup with Mac OS 10.4Create the IS9181 user account and share the folder11. You will need to move your music to the is9181 account in order for the is9181 to access the music. You may make duplicates of the music you wish to play in the is9181 music folder. -OR- You can move your entire music collection to the is9181 account by following these instructions: While logged into the new is9181 account, control click the music folder in the users root directory and select “Get Info”. At the bottom of the dialog box there is a “Ownership & Permission” section. Click the arrow for “Details” to expand this section. Click the “Lock” next to the Owner drop-down and enter the is9181 user password when promoted. Change the Group drop-down box to the original user account name, which will be available in the drop-down list. Change the Access drop-down to Read & Write. Click the “Apply to enclosed items” button at the bottom of the dialog box. Enter administrator or original password when prompted. Logout of the is9181 account. Log into the administrator or original user account.i.ii.iii.iv.v.vi.vii.viii.ix.x.](https://usermanual.wiki/VTech-Telecommunications/80-6569-00.User-manual-part-C/User-Guide-1053433-Page-9.png)
![50My musicInstructions for IS9181 setup with Mac OS 10.4Create the IS9181 user account and share the folder Open up two Finder windows each looking at the music directories for both accounts. The is9181 music folder should no longer be “X” out and inaccessible. Drag the iTunes folder from the original user account music folder to the is9181 account music folder. This will copy the music. If you do not have the room on your hard drive to copy the music, you can copy the music to an external hard drive. Then delete the music from your computer. Copy the music back to the computer on in the is9181 music folder. Open iTunes. Open iTunes Preferences and select the “Advanced” tab. Ensure that the “Copy les to iTunes Music folder when adding to library” is selected. Click “Change” next to iTunes Music folder location. Create a path to the is9181 account music folder and iTunes music will point to that folder.Now the IS9181 account houses all of your music. Any new music added in iTunes will show on the PIMA after you select Update Computer list . You can use iTunes as normal and access all the content through the IS9181.xi.xii.xiii.xiv.xv.xvi.xvii.Source](https://usermanual.wiki/VTech-Telecommunications/80-6569-00.User-manual-part-C/User-Guide-1053433-Page-10.png)
![51Basic operationSourceSourceUnder the Apple menu, select System Preferences and choose the Accounts pane. Click the “+” symbol to add an account. You may need to click the lock icon on the bottom left to edit the settings. 1.2.You must name the account is9181 and create a password. The account can be a standard or admin type.3.My musicInstructions for IS9181 setup with Mac OS 10.5Create the IS9181 user account and share the folder](https://usermanual.wiki/VTech-Telecommunications/80-6569-00.User-manual-part-C/User-Guide-1053433-Page-11.png)
![52Source4. Select the Sharing pane from the System Preferences application. Ensure File Sharing box is checked and selected. Click the Options… button.5. When you press the “Options…” button, you will be able to select the type of le sharing. Ensure the “Share les and folders using SMB” box is checked, and check the box for the user is9181. Press the “Done” when nished.My musicInstructions for IS9181 setup with Mac OS 10.5Create the IS9181 user account and share the folder](https://usermanual.wiki/VTech-Telecommunications/80-6569-00.User-manual-part-C/User-Guide-1053433-Page-12.png)
![53Basic operationSourceSource6. Click the + button under the “Shared Folder” pane. Navigate to your existing iTunes or other music folder.NOTE: it is important that you drill down to the folder that your music is in, not the rst iTunes folder which has some playlist information.My musicInstructions for IS9181 setup with Mac OS 10.5Create the IS9181 user account and share the folder](https://usermanual.wiki/VTech-Telecommunications/80-6569-00.User-manual-part-C/User-Guide-1053433-Page-13.png)
![54SourceMy musicInstructions for IS9181 setup with Mac OS 10.5External USB & Firewire drivesIt is possible to share les from external drives using the same method. You have to setup the desired folder on the external drive as a shared folder. Note, however, that external drives are not accessed until you physically (not remotely) log into the Mac, so simply turning on the computer is not enough to share the les, you must log in.You can now close the System Preferences. On the is9181 go to My Music and select Update Computer List and reconnect with the desired Mac. Your music folder will now be available and you can play all unprotected music that you may have in the folder you have chosen.](https://usermanual.wiki/VTech-Telecommunications/80-6569-00.User-manual-part-C/User-Guide-1053433-Page-14.png)
![55Basic operationSourceSourceSourceMy musicAccess your music from the IS9181On your IS9181, press SOURCE.Rotate the dial to My Music and press SELECT.Rotate the dial to Computer Password and press SELECT.Rotate the dial to YES and press SELECT.Enter the password you selected for the IS9181 user account by rotating the dial and pressing SELECT for each character. Repeat this process until the entire password is displayed. Rotate the dial to highlight DONE , and then press SELECT.NOTE: Invalid Password for Accessing Computer Folders appears if you try to access a computer that does not have the IS9181 user account setup or the passwords do not match.Play music on your computerTo play the music:Press SOURCE.Rotate the dial to highlight My Music and press SELECT. Rotate the dial to highlight Update Computer list and press SELECT. The IS9181 searches and shows a list of computers on the same network as the IS9181. (continued on next page)NOTES: Other devices connected to your network such as printers will show on the computer list.If you make any changes to your music les on your computer, select Update Computer list to see the changes.If you do not see the computer or folder you want, try Update Computer list again.1.2.3.4.5.1.2.3.•••My Music Update Computer List Computer Password PC1](https://usermanual.wiki/VTech-Telecommunications/80-6569-00.User-manual-part-C/User-Guide-1053433-Page-15.png)
![56My musicPlay music on your computer4. Rotate the dial to highlight the desired computer and press SELECT. All shared folders on the computer appear.5. Continue to browse the folders until you reach the music les. Only supported music les (see page 27) appear.6. Rotate the dial to highlight the desired music le and press SELECT. All supported les in the same folder play sequentially.Press BACK to return to the previous screen. Press SOURCE to go back to the top source menu which will show My Music - Top. The IS9181 will automatically repeat all the songs that are in the folder you are playing from.If you have chosen My Music as your source and you press MENU, two additional items appear at the top of the menu:Now Playing - returns you to the source playing screen.Add to Favorites - see page 59 for instructions.••SourcePC1 Shared Music](https://usermanual.wiki/VTech-Telecommunications/80-6569-00.User-manual-part-C/User-Guide-1053433-Page-16.png)
![57Basic operationSourceSourceSource Internet Radio My Music FM Radio Aux In 12:00AMStereo95.3 MHzSourceFM radioPlay FM radio stationTo listen to FM radio stations:Press SOURCE on the top of the IS9181.Rotate the dial to highlight FM Radio and press SELECT. Press to seek the next lower FM frequency with sufcient signal strength. Press to seek the next higher FM frequency with sufficient signal strength. -OR- Rotate the dial counter clockwise to increase the FM frequency by one step. Rotate the dial clockwise to decrease the FM frequency by one step.To mute the sound, press . To resume the sound, press again.If you have chosen FM radio as your source and you press MENU, two additional items appear at the top of the menu:Now Playing - returns you to the FM radio playing screen.Add to Favorites - see page 59 for instructions.1.2.3.••](https://usermanual.wiki/VTech-Telecommunications/80-6569-00.User-manual-part-C/User-Guide-1053433-Page-17.png)
![58Source Internet Radio My Music FM Radio Aux In 12:00AMAux InSourceAux inExternal audio device connectionThe IS9181 enables you to listen to the audio from any source with a standard headset jack connection. Connect one end of the supplied auxiliary audio cable to the headset jack (audio/line out) of your device, and plug the other end of the cable into the Aux In port on the back of the IS9181.Press SOURCE. Rotate the dial to select Aux In and press SELECT. 4. Aux In appears on the screen. You can now play the music on your external audio device, and listen to it through on the IS9181. Please note that the IS9181 does not provide power or control to your external audio device.You can adjust the listening volume using the VOL+ / VOL- on the IS9181 and/or the volume control of your external audio device. 1.2.3.](https://usermanual.wiki/VTech-Telecommunications/80-6569-00.User-manual-part-C/User-Guide-1053433-Page-18.png)
![59Basic operationFavoritesMenu Now Playing Add to Favorites Alarm Screen Brightness Wireless Network Private Stream for FreeFavoritesAdd to favoritesWhen either an Internet radio station, FM radio station, or music le is playing, you can add the current station or le that is playing to your favorites for easy access. The favorites entries are sorted in numeric order and duplicate entries are allowed. The maximum number of favorites that can be added for each source follow.Internet Radio: 100 favoritesFM Radio: 20 favoritesMy Music: 100 favoritesTo add a source of Internet Radio, FM Radio, or My Music to your favorites:When you are either playing an Internet radio station, FM radio station, or music le, press MENU.Rotate the dial to highlight Add to Favorites and press SELECT. The current station or le that is playing is automatically added to the favorites.•••1.2.](https://usermanual.wiki/VTech-Telecommunications/80-6569-00.User-manual-part-C/User-Guide-1053433-Page-19.png)
![60Play favoritesTo play your favorites, you must rst select the source. To play your favorites:Press SOURCE.Rotate the dial to highlight the desired source (Internet Radio, FM Radio, or My Music) and press SELECT.Press FAVORITES and a list of saved entries for that source appears.Rotate the dial to highlight the desired favorite and press SELECT. The favorite plays.When playing My Music favorites, the IS9181 will play through all your favorites and repeat automatically.1.2.3.4.If the source is not selected rst, No Source selected appears when you press FAVORITES on the IS9181.•Favorites](https://usermanual.wiki/VTech-Telecommunications/80-6569-00.User-manual-part-C/User-Guide-1053433-Page-20.png)
![61Basic operationFavoritesMenu Now Playing Add to Favorites Move Favorite Delete Favorite Delete All Favorites Private Stream for FreeSelect new location:1. 87.5 MHz2. 104.3 MHz3. 96.5 MHz 87.5 MHzFavoritesMove favoritesYou can organize or move the favorites. To move the favorite:Press SOURCE.Rotate the dial to highlight the desired source (Internet Radio, FM Radio, or My Music) and press SELECT.Press FAVORITES and a list of saved favorites for that source appears.Rotate the dial to highlight the desired favorite to be moved and press MENU. Rotate the dial to highlight Move Favorite and press SELECT.A red line shows on the favorites screen. Rotate the dial to position the red line where you want to move the favorite (the favorite will be inserted above the red line) and press SELECT. 1.2.3.4.5.6.To go back to the screen currently playing, press MENU and select Now Playing.•](https://usermanual.wiki/VTech-Telecommunications/80-6569-00.User-manual-part-C/User-Guide-1053433-Page-21.png)
![62Delete favoritesYou can delete one favorite or all favorites. To delete favorites:Press SOURCE.Rotate the dial to highlight the desired source (Internet Radio, FM Radio, or My Music) and press SELECT.Press FAVORITES and a list of saved favorites for that source appears.Rotate the dial to highlight the desired favorite to be deleted or highlight any favorite if you want to delete all the favorites and press MENU. To delete a favorite, rotate the dial to highlight Delete Favorite and press SELECT. -OR- To delete all favorites, rotate the dial to highlight Delete All Favorites and press SELECT.6. You are prompted to conrm that you want to delete the favorite or all favorites. To delete the favorite or all favorites, rotate the dial to highlight YES and press SELECT. To cancel the deletion, rotate the dial to highlight NO and press SELECT.1.2.3.4.5.Menu Now Playing Add to Favorites Move Favorite Delete Favorite Delete All Favorites Radio PookiMenu Now Playing Add to Favorites Move Favorite Delete Favorite Delete All Favorites Radio PookiFavorites](https://usermanual.wiki/VTech-Telecommunications/80-6569-00.User-manual-part-C/User-Guide-1053433-Page-22.png)
![63Basic operationInfoPress INFO or BACK to return to the Info screen.•Info Weather HoroscopeVANCOUVER, BCMostly sunnyTodayHigh:23℃Low: 13℃InfoWeather forecastAfter you have set up the weather feature (see page 18), you can view the 5-days weather forecast on the IS9181.To view the weather forecast:Press INFO.Rotate the dial to highlight Weather and press SELECT. Today’s weather appears.Rotate the dial to view the weather forecast for the next four days.If you do not press a key within one minute, the IS9181 will return to your playing screen.1.2.3.](https://usermanual.wiki/VTech-Telecommunications/80-6569-00.User-manual-part-C/User-Guide-1053433-Page-23.png)
![64Info Weather HoroscopeHoroscopeAriesTaurusGeminiCancerLeoInfoHoroscopeYou can view daily horoscope information.To view the horoscopes:Press INFO.Rotate the dial to highlight Horoscope and press SELECT. A list of horoscopes appears.Rotate the dial to highlight the desired horoscope and press SELECT. The selected horoscope information appears.1.2.3.](https://usermanual.wiki/VTech-Telecommunications/80-6569-00.User-manual-part-C/User-Guide-1053433-Page-24.png)
![65Basic operationOptional external audio system connectionThe IS9181 can send music being played to an external audio system for more control over the sound quality. To connect the IS9181 to an external audio system:Connect one end of audio cables (RCA type, not included) to the LINE OUT jacks on the back of the IS9181, matching the cable colors. Connect the other end of the cables to the respective audio input jacks on the external audio system. You can now play music from your IS9181 and listen to it through the external audio system. 1.2.3.Optional external audio system connection](https://usermanual.wiki/VTech-Telecommunications/80-6569-00.User-manual-part-C/User-Guide-1053433-Page-25.png)
![66You can install AA alkaline or rechargeable Ni-MH batteries (sold separately) to use your IS9181 as a portable radio. To install the batteries:Press the tabs on the battery cover on the bottom of the IS9181 and open the battery door.Insert six new AA alkaline or rechargeable batteries, matching the + and - signs engraved inside the battery compartment.Replace the battery cover. It clicks into place when attached correctly.When powered by batteries, the IS9181 operates the same as when it is plugged into an AC power outlet with the following exceptions:When the IS9181 is on, a battery icon appears on the status bar at the top of the screen (see page 10).The maximum speaker volume level is 25.When the IS9181 goes into standby mode, the IS9181 automatically shuts down after one minute to save battery power (power save mode). To wake the IS9181 from power save mode, press STANDBY.1.2.3.•••Battery coverIf you use AA rechargeable batteries, the IS9181 does not recharge the batteries.If you unplug your IS9181 without batteries installed, you will lose your clock setting.••Optional battery installation](https://usermanual.wiki/VTech-Telecommunications/80-6569-00.User-manual-part-C/User-Guide-1053433-Page-26.png)
![67Basic operationOptional battery installationThe batteries do not backup the clock setting. If your clock is set manually and the IS9181 loses power, then the setting is lost. We recommend you have the clock set by the Internet (see page 16), so when the power returns, the clock setting will be automatically set by the Internet.The alarm clock does not work on battery power. The alarm clock must have AC power to work.••Optional battery installation](https://usermanual.wiki/VTech-Telecommunications/80-6569-00.User-manual-part-C/User-Guide-1053433-Page-27.png)
![68TroubleshootingIf you have difculty operating your IS9181, please try the suggestions below. For Customer Service, visit our website at www.vtechphones.com, or call VTech Communications at 1 (800) 595-9511; in Canada, visit our website at www.vtechcanada.com, or call VTech Telecommunications Canada Ltd. at 1 (800) 267-7377.GeneralReset procedure: Unplug the power cord and remove all batteries (if used) IS9181. Wait approximate 30 seconds, then plug the cord back in and re-install the batteries (if used). When powered by batteries and the IS9181 goes into standby mode, the IS9181 automatically shuts down after one minute to save battery power (power save mode). To wake the IS9181 from power save mode, press STANDBY.After pressing the STANDBY key, you cannot de-activate the IS9181 by immediately pressing the STANDBY key again. Wait at least 3 seconds between key presses.NetworkingYour wireless network name and password MUST match what you enter in the IS9181. Check that they are entered exactly the same (including capitalization and special characters).If the SSID Broadcast is turned OFF on certain brands of wireless routers, the IS9181 will not be able to connect during setup. Refer to your wireless router user’s manual for instructions to turn ON the SSID Broadcast during the IS9181 wireless network setup process. Once the IS9181 successfully connects to your wireless router, the SSID Broadcast can be turned OFF again.Make sure your wireless router does not restrict connection by particular MAC addresses (MAC ltering). Refer to you wireless router’s user manual for details.••••••](https://usermanual.wiki/VTech-Telecommunications/80-6569-00.User-manual-part-C/User-Guide-1053433-Page-28.png)
![69AppendixTroubleshootingRemote controlPoint the remote directly at the IS9181 display.Check to make sure the remote control’s battery is properly installed.Try replacing the remote control’s battery.Clock/alarmIf the clock is one hour off when set to Auto (from Internet) mode, check that the daylight saving option is set correctly.Internet radioCheck that your internet and wireless network are working.Use your computer to play the Internet radio station stream via the broadcasting website (page 23). If the station plays on your computer, try to reset the IS9181 and reconnect to the station.If you experience a slow response when browsing the Internet radio directory, buffering, or choppy audio play. Reset the IS9181, WiFi router, and DSL or Cable modem by removing power for 30 seconds.The internet radio station might not be broadcasting at this time, or the station might have reached it’s maximum number of listeners/subscribers. ••••••••](https://usermanual.wiki/VTech-Telecommunications/80-6569-00.User-manual-part-C/User-Guide-1053433-Page-29.png)
![70TroubleshootingMy musicCheck that your computer is turned on and your internet and wireless network are working. Make sure your computer is working properly - you may need to reboot/restart your computer.Make sure that you have created a user account for the IS9181 on your computer and that the folder with your music les is properly shared (see pages 28-54).Supported les extension types are: mp3, mp4, m4a, ra, rm, rmvb, and wma.WAV format music les are not supported.Follow the instructions on page 55 for entering the Computer Password. The Computer Password and the IS9181 user account password must be the same.FM radioIf the FM radio reception is poor, try moving the IS9181 to a different part of your home and on a different electrical outlet.Keep the IS9181 at least one foot away from other electronic devices and appliances to reduce interference.AUX INIf you have trouble with the volume, you can adjust the volume using the IS9181 and the volume control on your external device.Make sure the auxiliary cable is properly plugged into the IS9181 and your external device.•••••••••](https://usermanual.wiki/VTech-Telecommunications/80-6569-00.User-manual-part-C/User-Guide-1053433-Page-30.png)
![71AppendixTroubleshootingFavoritesThere are separate dedicated favorites lists for Internet Radio, My Music, and FM Radio. You must choose a SOURCE before choosing FAVORITES.To add an Internet station to the favorites list, the station must be connected and playing.You are allowed a maximum of 100 favorites for Internet Radio, 100 for My Music, and 20 for FM Radio. If you reach the maximum you will need to delete other favorites before you can add new ones.INFOWhile viewing the Weather screen, rotate the dial to view the ve day forecast weather display.••••](https://usermanual.wiki/VTech-Telecommunications/80-6569-00.User-manual-part-C/User-Guide-1053433-Page-31.png)
![72Important safety instructionsWhen using your IS9181 equipment, basic safety precautions should always be followed to reduce the risk of re, electric shock and injury, including the following:Read and understand all instructions. Follow all warnings and instructions marked on the product.Unplug this product from the wall outlet before cleaning. Do not use liquid or aerosol cleaners. Use a damp cloth for cleaning. Do not use this product near water (for example, near a bathtub, kitchen sink, or swimming pool).Do not place this product on an unstable table, shelf, stand or other unstable surfaces.Slots and openings in the back or bottom of the unit are provided for ventilation. To protect it from overheating, these openings must not be blocked by placing the product on a soft surface such as a bed, sofa or rug. This product should never be placed near or over a radiator or heat register. This product should not be placed in any area where proper ventilation is not provided. This product should be operated only from the type of power source indicated on the marking label. If you are not sure of the type of power supply in your home, consult your dealer or local power company. Do not allow anything to rest on the power cord. Do not install this product where the cord may be walked on. Never push objects of any kind into this product through the slots in the unit because it may touch dangerous voltage points or create a short circuit. Never spill liquid of any kind on the product. To reduce the risk of electric shock, do not disassemble this product, but take it to an authorized service facility. Opening or removing parts of the unit other than specied access doors may expose you to dangerous voltages or other risks. Incorrect reassembling can cause electric shock when the product is subsequently used. Do not overload wall outlets and extension cords. Unplug this product from the wall outlet and refer servicing to an authorized service facility under the following conditions:When the power supply cord or plug is damaged or frayed.If liquid has been spilled onto the product. If the product has been exposed to rain or water.If the product does not operate normally by following the operating instructions. Adjust only those controls that are covered by the operation instructions. Improper adjustment of other controls may result in damage and often requires extensive work by an authorized technician to restore the product to normal operation.If the product has been dropped and the unit has been damaged.If the product exhibits a distinct change in performance.The power adapter is intended to be correctly oriented in a vertical or oor mount position. The prongs are not designed to hold the plug in place if it is plugged into a ceiling or an under-the-table/cabinet outlet.SAVE THESE INSTRUCTIONS1.2.3.4.5.6.7.8.9.10.11.12.A.B.C.D.E.F.13.](https://usermanual.wiki/VTech-Telecommunications/80-6569-00.User-manual-part-C/User-Guide-1053433-Page-32.png)
![73AppendixMaintenanceTaking care of your unitYour IS9181 contains sophisticated electronic parts, so it must be treated with care. Avoid rough treatmentHandle the unit gently. Save the original packing materials to protect your IS9181 if you ever need to ship it. Avoid waterYour unit can be damaged if it gets wet. Do not use the handset outdoors in the rain, or handle it with wet hands. Do not install the IS9181 near a sink, bathtub or shower.Electrical stormsElectrical storms can sometimes cause power surges harmful to electronic equipment. For your own safety, take caution when using electrical appliances during storms. Cleaning your unitYour unit has a durable plastic casing that should retain its luster for many years. Clean it only with a soft cloth slightly dampened with water or a mild soap. Do not use excess water or cleaning solvents of any kind.Remember that electrical appliances can cause serious injury if used when you are wet or standing in the water. If the unit should fall into the water, DO NOT RETRIEVE IT UNTIL YOU UNPLUG THE POWER CORD FROM THE WALL.](https://usermanual.wiki/VTech-Telecommunications/80-6569-00.User-manual-part-C/User-Guide-1053433-Page-33.png)
![74WarrantyWhat does this limited warranty cover?The manufacturer of this VTech Product warrants to the holder of a valid proof of purchase (“Consumer” or “you”) that the Product and all accessories provided in the sales package (“Product”) are free from defects in material and workmanship, pursuant to the following terms and conditions, when installed and used normally and in accordance with the Product operating instructions. This limited warranty extends only to the Consumer for Products purchased and used in the United States of America and Canada.What will VTech do if the Product is not free from defects in materials and workmanship during the limited warranty period (“Materially Defective Product”)?During the limited warranty period, VTech’s authorized service representative will repair or replace at VTech’s option, without charge, a Materially Defective Product. If we repair the Product, we may use new or refurbished replacement parts. If we choose to replace the Product, we may replace it with a new or refurbished Product of the same or similar design. We will retain defective parts, modules, or equipment. Repair or replacement of the Product, at VTech’s option, is your exclusive remedy. VTech will return the repaired or replacement Products to you in working condition. You should expect the repair or replacement to take approximately 30 days.How long is the limited warranty period?The limited warranty period for the Product extends for ONE (1) YEAR from the date of purchase. If VTech repairs or replaces a Materially Defective Product under the terms of this limited warranty, this limited warranty also applies to repaired or replacement Product for a period of either (a) 90 days from the date the repaired or replacement Product is shipped to you or (b) the time remaining on the original one-year warranty; whichever is longer.What is not covered by this limited warranty?This limited warranty does not cover:1. Product that has been subjected to misuse, accident, shipping or other physical damage, improper installation, abnormal operation or handling, neglect, inundation, re, water or other liquid intrusion; or2. Product that has been damaged due to repair, alteration or modication by anyone other than an authorized service representative of VTech; or3. Product to the extent that the problem experienced is caused by signal conditions, network reliability, or cable or antenna systems; or4. Product to the extent that the problem is caused by use with non-VTech accessories; or5. Product whose warranty/quality stickers, product serial number plates or electronic serial numbers have been removed, altered or rendered illegible; or6. Product purchased, used, serviced, or shipped for repair from outside the United States of America or Canada, or used for commercial or institutional purposes (including but not limited to Products used for rental purposes); or](https://usermanual.wiki/VTech-Telecommunications/80-6569-00.User-manual-part-C/User-Guide-1053433-Page-34.png)
![75Appendix7. Product returned without a valid proof of purchase (see item 2 below); or8. Charges for installation or set up, adjustment of customer controls, and installation or repair of systems outside the unit.How do you get warranty service?To obtain warranty service in the United States of America, please call 1 (800) 595-9511. In Canada, please call 1 (800) 267-7377. NOTE: Before calling for service, please review the user’s manual - a check of the Product’s controls and features may save you a service call.Except as provided by applicable law, you assume the risk of loss or damage during transit and transportation and are responsible for delivery or handling charges incurred in the transport of the Product(s) to the service location. VTech will return repaired or replaced Product under this limited warranty. Transportation, delivery or handling charges are prepaid. VTech assumes no risk for damage or loss of the Product in transit. If the Product failure is not covered by this limited warranty, or proof of purchase does not meet the terms of this limited warranty, VTech will notify you and will request that you authorize the cost of repair prior to any further repair activity. You must pay for the cost of repair and return shipping costs for the repair of Products that are not covered by this limited warranty.What must you return with the Product to get warranty service?1. Return the entire original package and contents including the Product to the VTech service location along with a description of the malfunction or difculty; and2. Include a “valid proof of purchase” (sales receipt) identifying the Product purchased (Product model) and the date of purchase or receipt; and3. Provide your name, complete and correct mailing address, and telephone number.Warranty](https://usermanual.wiki/VTech-Telecommunications/80-6569-00.User-manual-part-C/User-Guide-1053433-Page-35.png)
![76Other LimitationsThis warranty is the complete and exclusive agreement between you and VTech. It supersedes all other written or oral communications related to this Product. VTech provides no other warranties for this Product. The warranty exclusively describes all of VTech’s responsibilities regarding the Product. There are no other express warranties. No one is authorized to make modications to this limited warranty and you should not rely on any such modication.State/Provincial Law Rights: This warranty gives you specic legal rights, and you may also have other rights, which vary from state to state or province to province.Limitations: Implied warranties, including those of tness for a particular purpose and merchantability (an unwritten warranty that the Product is t for ordinary use) are limited to one year from the date of purchase. Some states/provinces do not allow limitations on how long an implied warranty lasts, so the above limitation may not apply to you. In no event shall VTech be liable for any indirect, special, incidental, consequential, or similar damages (including, but not limited to lost prots or revenue, inability to use the Product or other associated equipment, the cost of substitute equipment, and claims by third parties) resulting from the use of this Product. Some states/provinces do not allow the exclusion or limitation of incidental or consequential damages, so the above limitation or exclusion may not apply to you.Please retain your original sales receipt as proof of purchase.Warranty](https://usermanual.wiki/VTech-Telecommunications/80-6569-00.User-manual-part-C/User-Guide-1053433-Page-36.png)
![77AppendixFCC Part 15COMPLIANCE INFORMATIONProduct Name: WiFi Internet RadioModel Number: IS9181This product contains FCC ID: EW780-6569-00This product complies with Part 15 of the FCC Rules. Operation is subject to the following two conditions: (1) this product may not cause harmful interference, and (2) this product must accept any interference received, including interference that may cause undesired operation.VTech Technologies Canada Ltd.12111 Jacobson Way, Richmond, B.C., Canada V6W 1L5IMPORTANT NOTICE: NO NOT MODIFY THIS PRODUCTThis product, when installed as indicated in the instructions contained in this manual, meets FCC requirements. Changes or modications to this equipment not expressly approved by the party responsible for compliance could void user authority to operate the equipment.CAUTIONIEEE 802.11b or 802.11g operation of this product in the U.S.A. is rmware-limited to channels 1 through 11. To comply with FCC RF exposure compliance requirement, separation distance of at least 20 cm must be maintained between the antenna of this product and all persons. This product and its antenna must not be co-located or operating in conjunction with any other antenna or transmitter.••](https://usermanual.wiki/VTech-Telecommunications/80-6569-00.User-manual-part-C/User-Guide-1053433-Page-37.png)
![78FCC Part 15FCC NOTICEThis product has been tested and found to comply with the requirements for a Class B digital device under Part 15 of the FCC Rules. These requirements are intended to provide reasonable protection against harmful interference in a residential installation.This equipment generates, uses and can radiate radio frequency energy and, if not installed and used in accordance with the instructions, may cause harmful interference to radio communications. However, there is no guarantee that interference will not occur in a particular installation. If this equipment does cause harmful interference to radio or television reception, which can be determined by turning the product OFF and ON, the user is encouraged to try to correct the interference by one or more of the following measures: Reorient or relocate the receiving antenna. Increase the separation between the equipment and receiver. Connect the product into an outlet on a circuit different from that to which the receiver is connected. Consult the local retailer authorized to distribute this type of product or an experienced radio/TV technician for help.••••](https://usermanual.wiki/VTech-Telecommunications/80-6569-00.User-manual-part-C/User-Guide-1053433-Page-38.png)
![79AppendixIC RSS-210 (Canada)PRODUCTThis product contains IC 1135A-80656900.This product complies with RSS-210 of Industry Canada. Operation is subject to the following two conditions: (1) this product may not cause harmful interference, and (2) this product must accept any interference received, including interference that may cause undesired operation.Industry Canada NoticeThis Class B digital apparatus complies with Canadian ICES-003.CAUTIONTo reduce potential radio interference to other users, the antenna type and its gains should be so chosen that the equivalent isotropically radiated power (e.i.r.p.) is not more than that permitted for successful communication.](https://usermanual.wiki/VTech-Telecommunications/80-6569-00.User-manual-part-C/User-Guide-1053433-Page-39.png)
![80Technical specicationsSize 314 mm (w) X 159 mm (d) X 88 mm (h)Weight 1420 gramsPower requirements 14V DCOperating temperature 32°F — 122°F0°C — 50°CIMPORTANT: This product is protected by certain intellectual property rights of Microsoft Corporation. Use or distribution of such technology outside of this product is prohibited without a license from Microsoft or an authorized Microsoft subsidiary.MPEG Layer-3 audio decoding technology licensed from Fraunhofer IIS and Thomson.Portions of this software are included under license from RealNetworks, Inc.Copyright 1995-2007, RealNetworks, Inc. All rights reserved. ®2008 RealNetworks, Inc. Patents Pending. All rights reserved. RealNetworks, Real, the Real logo, RealPlayer, and the RealPlayer logo are trademarks or registered trademarks of RealNetworks, Inc.](https://usermanual.wiki/VTech-Telecommunications/80-6569-00.User-manual-part-C/User-Guide-1053433-Page-40.png)
![81IndexAAccess your music from the IS9181 55Add to favorites 59Alarm 11Aux in 58BBefore you begin 1CClock 16Create a new user account for Windows 2000 30Create a new user account for Windows XP 34Create an online account 22Create new user account in Windows Vista 38Create the IS9181 user account and share the folder 45Create the IS9181 user account and share the folder 51DDelete favorites 62Determine the version of your Windows operating system 28EExternal audio device connection 58External USB & Firewire drives 54FFavorites 59FCC Part 15 77Find a Internet radio station by URL 24FM radio 57GGetting to know the IS9181 7HHoroscope 64IIC RSS-210 (Canada) 79Important safety instructions 72Index 81Info 63Installation 3Instructions for IS9181 setup with Mac OS 10.4 45Instructions for IS9181 setup with Mac OS 10.5 51Internet radio 20IS9181 installation 3IS9181 layout 7IS9181 status icons 10MMaintenance 73Menu 11Minimum requirements 1Move favorites 61My music 27My Stations 22OOptional battery installation 66Optional external audio system connection 65PParts checklist 2Play added Internet radio station 26Play favorites 60Play FM radio station 57Play Internet radio station 20Play music on your computer 55Product ID 19](https://usermanual.wiki/VTech-Telecommunications/80-6569-00.User-manual-part-C/User-Guide-1053433-Page-41.png)
![82RRemote control installation 6Remote control layout 9Replace remote control battery 6SScreen brightness 13Search for Internet radio stations online 23Share a folder on Windows 2000 Professional 29Share a folder on Windows Vista 43Share a folder on Windows XP 32Source 20Standby mode 5Suggest a station 25TTechnical specications 80To continue playing music 12To silence the alarm for 10 minutes 12To stop the alarm 13Troubleshooting 68VVolume 7, 9WWarranty 74Weather forecast 63Weather settings 18Wireless network 14Index](https://usermanual.wiki/VTech-Telecommunications/80-6569-00.User-manual-part-C/User-Guide-1053433-Page-42.png)
![VTECH TELECOMMUNICATIONS LTD.A member of THE VTECH GROUP OF COMPANIES.Distributed in the U.S.A. by VTech Communications, Inc. Beaverton, OregonDistributed in Canada by VTech Technologies Canada, Ltd., Richmond, B.C.Copyright ©2008 for VTECH TELECOMMUNICATIONS LTD.Printed in China.](https://usermanual.wiki/VTech-Telecommunications/80-6569-00.User-manual-part-C/User-Guide-1053433-Page-43.png)
![User’s manualwww.vtechphones.comModel: IS9181](https://usermanual.wiki/VTech-Telecommunications/80-6569-00.User-manual-part-C/User-Guide-1053433-Page-44.png)