VTech Telecommunications 80-7723-00 1.9GHz Cordless Phone User Manual
VTech Telecommunications Ltd 1.9GHz Cordless Phone Users Manual
UserManual.wiki
>
VTech Telecommunications
>
80 7723 00 User Manual
Users Manual
Navigation menu
Upload a User Manual
Namespaces
Wiki Guide
HTML
PDF
Info
Views
User Manual
Discussion / Help
Navigation

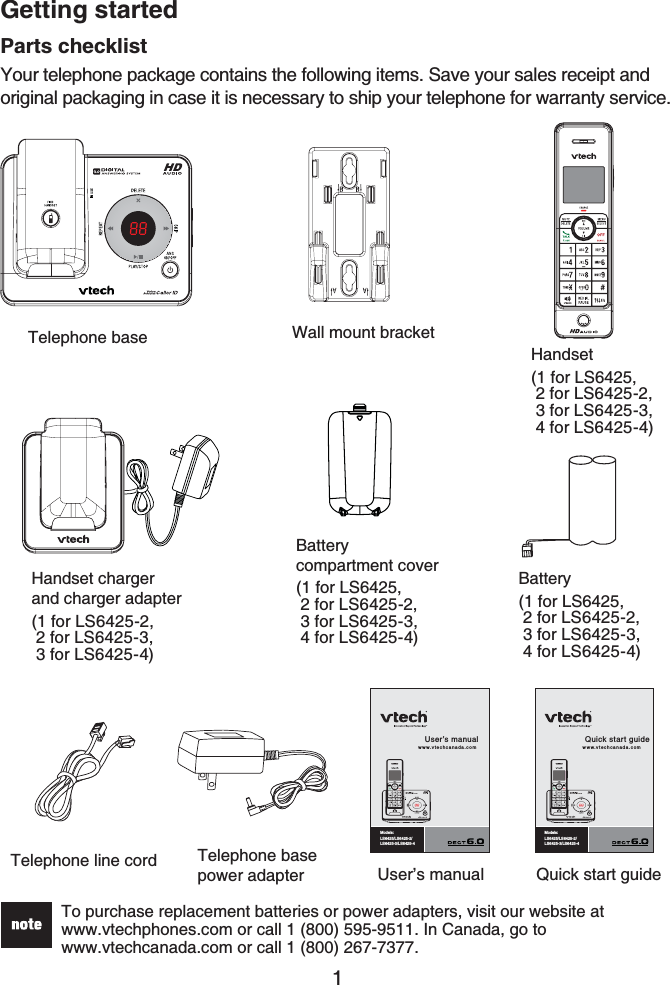
![Telephone operation26PTT to a single handsetYou have two ways to begin a PTT call:If you have a two-handset system, press and hold Push to talk when the handset is not in use.If you have more than two handsets, press Push to talk when the handset is not in use. Then use the dialing keys to enter a handset number (to call handset 10, 11 or 12, press 0,1 and 2 respectively) or pressCID or to highlight a handset number and then press MENU/SELECTor Push to talk.Your handset screen displays Connecting to HANDSET X... for a few seconds. When the connection is made, both your and the destinationhandset screens display Press and hold [PTT] to talk and beep once.Press and hold Push to talk on your handset. A chirp indicates your microphone is on. Speak towards the handset. Your voice is broadcast to the destination handset. While you are speaking, your handset screen displays PTT To X (X represents the destination handset number).Release Push to talk after speaking. Both handsets beep once again. After the handsets beep, you can press and hold Push to talk to continue speaking or the destination handset can respond (see Answer PTT on page 28).To end the PTT call, press OFF/CLEAR or place the handset in the telephone base or charger. The handset screen displays Push to talk Ended for a few seconds.After Push to talk is released, the PTT call remains open for a short time. If no one presses Push to talk within 10 seconds, the PTT call ends automatically.1.••2.3.4.](https://usermanual.wiki/VTech-Telecommunications/80-7723-00/User-Guide-1376457-Page-30.png)
![Telephone operation27PTT to all handsetsWhen there are two to five handsets registered to the phone system, PTTsupports one-to-all calls (one-to-four maximum). However if there are six or morehandsets registered to the phone system, PTT supports a maximum of one-to-three calls. The first four registered handsets will be able to use this feature. Other handsets can only use PTT for one-to-one calls.To begin a PTT-to-all call:Press and hold Push to talk when the handset is not in use.If you have more than two handsets, press Push to talk when the handset is not in use. Press CID or to highlight >All handsets, then press MENU/SELECT or Push to talk.Your handset screen displays Connecting to all handsets... for a few seconds. When the connection is made, all handsets display Press and hold [PTT] to talk and beep once.Press and hold Push to talk on your handset. A chirp indicates your microphone is on. Speak towards the handset. Your voice is broadcast to all destination handsets.While you are speaking, your handset screen displays PTT To handset: X (Xrepresents the destination handset number).Release Push to talk after speaking. Both handsets beep once again. After the handsets beep, you can press and hold Push to talk to continue speaking or the destination handset can respond (see Answer PTT on page 28).To end the PTT call, press OFF/CLEAR or place the handset in the telephone base or charger. The handset screen displays Push to talk Ended for a few seconds.After Push to talk is released, the PTT call remains open for a short time. If no one presses Push to talk within 10 seconds, the PTT call ends automatically.1.••2.3.4.](https://usermanual.wiki/VTech-Telecommunications/80-7723-00/User-Guide-1376457-Page-31.png)
![Telephone operation28Answer PTTYou can respond to a PTT call whenever the speakerphone light is off, as described below.When your handset receives a PTT call, the handset beeps and the screen displays Press and hold [PTT] to talk.When someone else is speaking, your speakerphone light is on, and your handset screen displays PTT From HS X To HS Y to (X represents the originating handset number, Y represents your handset number; a maximum of four handset numbers appear).When your speakerphone light is off (the screen displays Press and hold [PTT] to talk, press and hold Push to talk on your handset. You will hear a chirp. Speak towards the handset.While you are speaking, your handset screen displays PTT To handset: X(X represents the handset numbers of one or more destination handsets; a maximum of four handset numbers appear).Your voice is broadcast to all destination handsets.After speaking, release Push to talk. Your handset will beep. After the beep, if your speakerphone light is off, you can press and hold Push to talk to continue speaking or the destination handset can respond.Change a one-to-one PTT to intercomYou can convert a one-to-one PTT conversation to an intercom call.When your handset screen displays Press and hold [PTT] to talk, press MENU/SELECT. The screen displays >Intercom.Press MENU/SELECT.If you have two handsets system, your handset screen displays Callingother handset. The destination handset screen temporarily displays Pushto talk Ended and then Other handset is calling.If you have more than two handsets system, you handset screen displaysCalling HANDSET X. The destination handset screen temporarily displays Push to talk Ended and then HANDSET Y is calling.On the destination handset, press /FLASH,/SPEAKER or any of the dialing keys (0-9,#, ) to answer the intercom call. Both handsets now display Intercom.To end an intercom call, press OFF/CLEAR or place the handset in the telephone base or charger. Both screens display Intercom ended.1.2.3.••1.2.••3.4.](https://usermanual.wiki/VTech-Telecommunications/80-7723-00/User-Guide-1376457-Page-32.png)
![46Answering system operationNew message indicationThe message window on the telephone base flashes and XX New message(s)displays on the handset when there are new answering system messages.If the new message alert tone is turned on, the telephone base beeps every 10 seconds when there are messages that have not been reviewed.Call screening and call interceptCall screening on the telephone base:If the answering system and call screening are on (see Call screening on page 41), you hear the announcement and the incoming message when receiving a call.While the answering system is recording message, you have the following options.Press /VOL or /VOL on the telephone base to adjust the call screening volume. Press /PLAY/STOP to temporarily silence the call screening.Press /PLAY/STOP or /VOL to temporarily turn on the call screening if call screening is off.Call screening on the handset:If the answering system is on and your answering system is recording message, your handset shows To screen call, press [SELECT]. Press MENU/SELECT on your handset to hear the message. If you want to talk to the person whose message is being recorded, press /FLASH or /SPEAKER on the handset.The call screening setting does not affect the call screening on handset.Message playbackOn the telephone base, if you have new messages, the telephone plays only the new messages (oldest first). If there are no new messages, the telephone plays back all messages (oldest first).On the handset, if you have both new and old messages, you can play either new or old messages. The caller ID information displays on the handset screen when you play messages and you can call back the caller. When playback begins, you hear the total number of messages followed by the day and time of the message. If the time and date are not set, the telephone announces, “Time and date not set”. After the last message, the telephone announces, “End of messages.”•••](https://usermanual.wiki/VTech-Telecommunications/80-7723-00/User-Guide-1376457-Page-50.png)