VTech Telecommunications 80-8213-00 1.9GHz Cordless Phone User Manual TL96271 CIB 20110214 english version
VTech Telecommunications Ltd 1.9GHz Cordless Phone TL96271 CIB 20110214 english version
UserManual.wiki
>
VTech Telecommunications
>
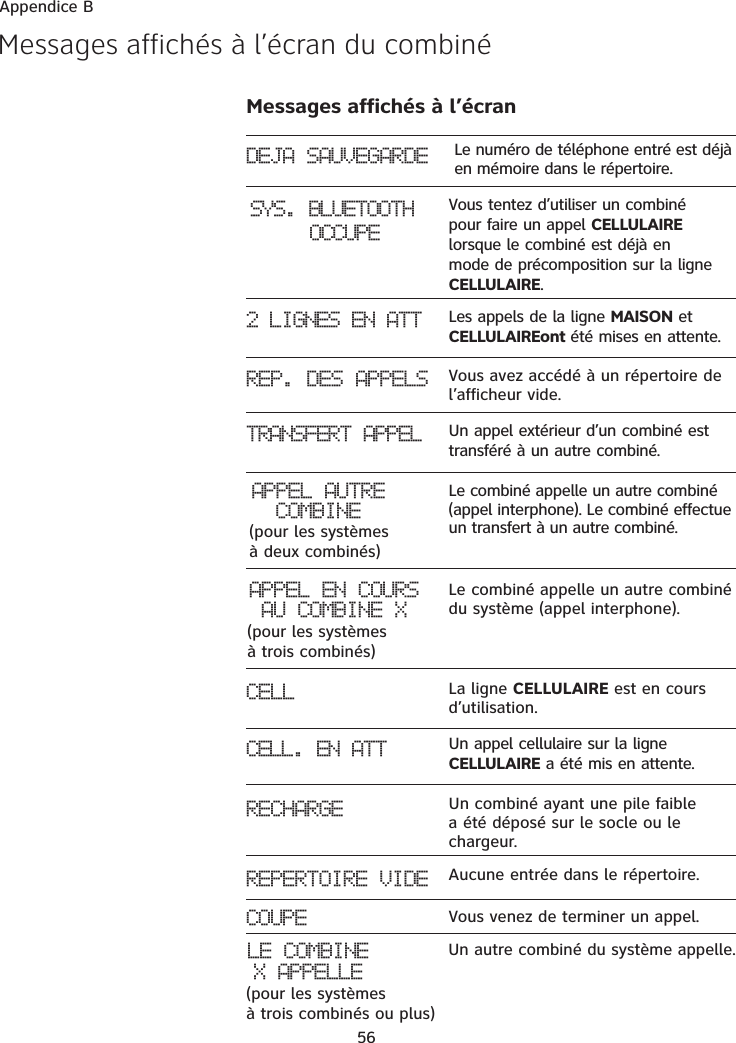
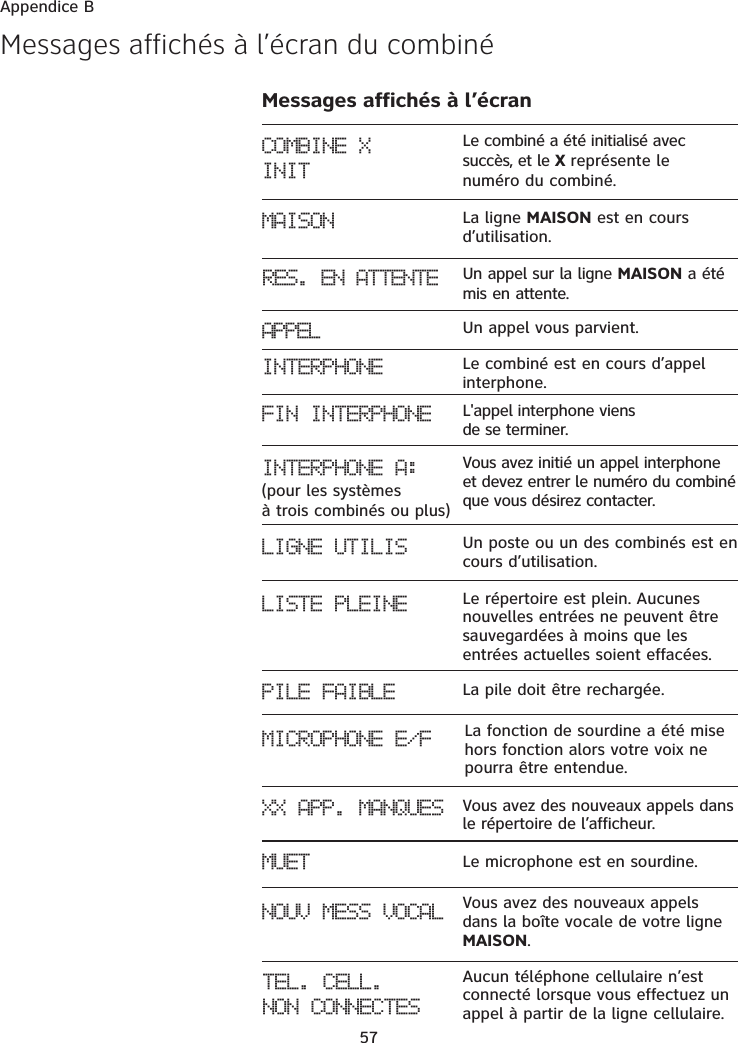
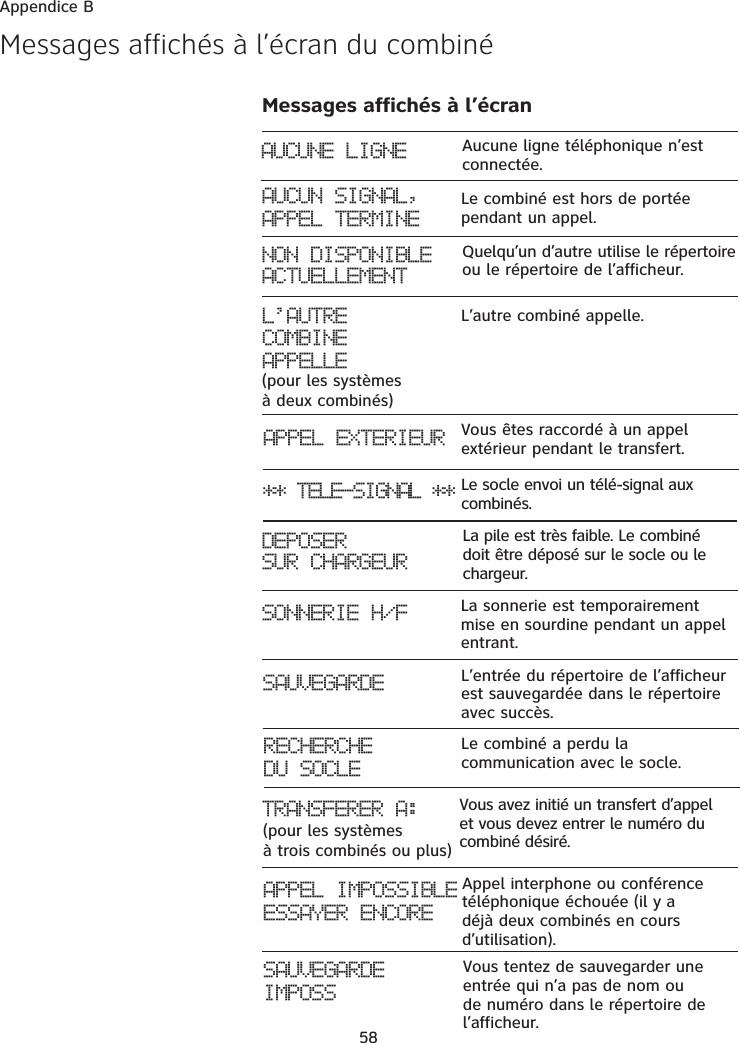
80 8213 00 User Manual
Users Manual
Navigation menu
Upload a User Manual
Namespaces
Wiki Guide
HTML
PDF
Info
Views
User Manual
Discussion / Help
Navigation


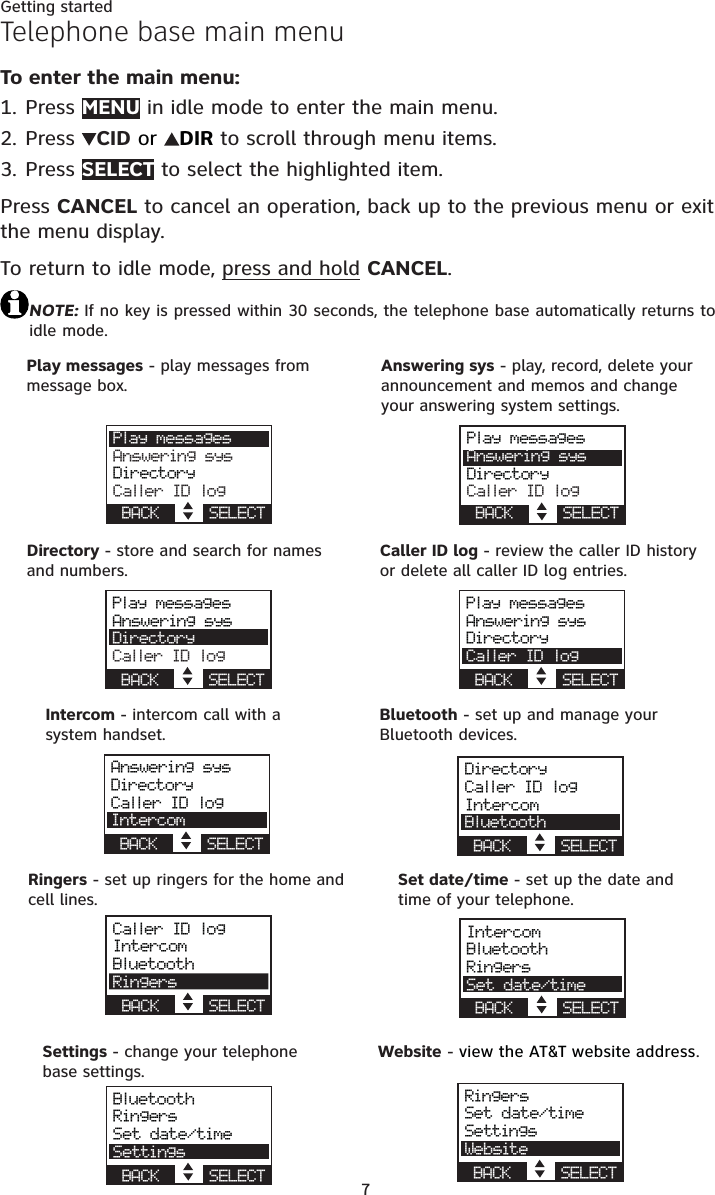
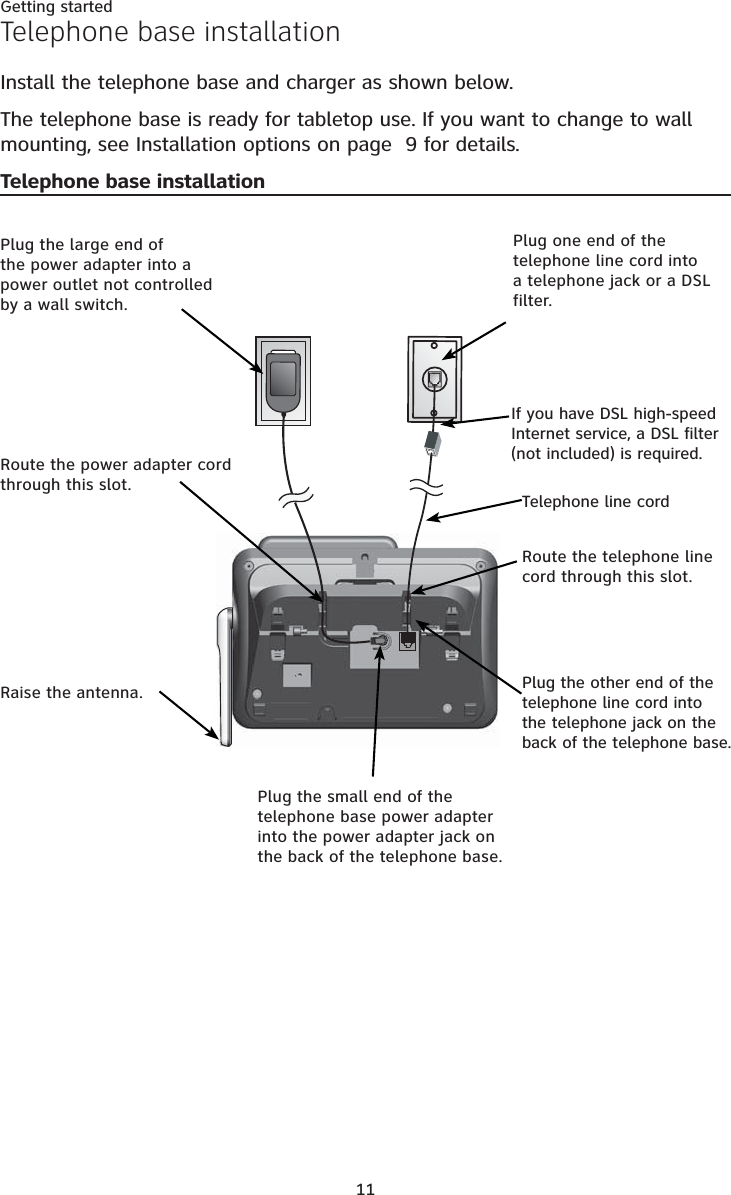
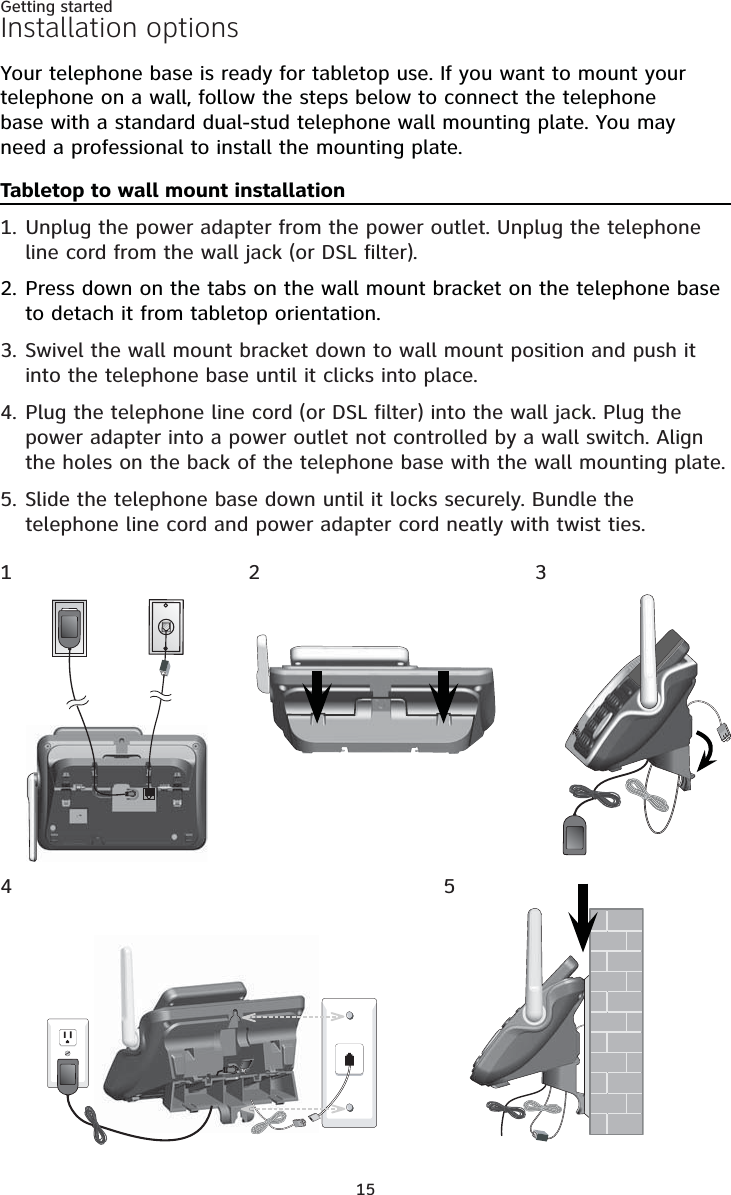

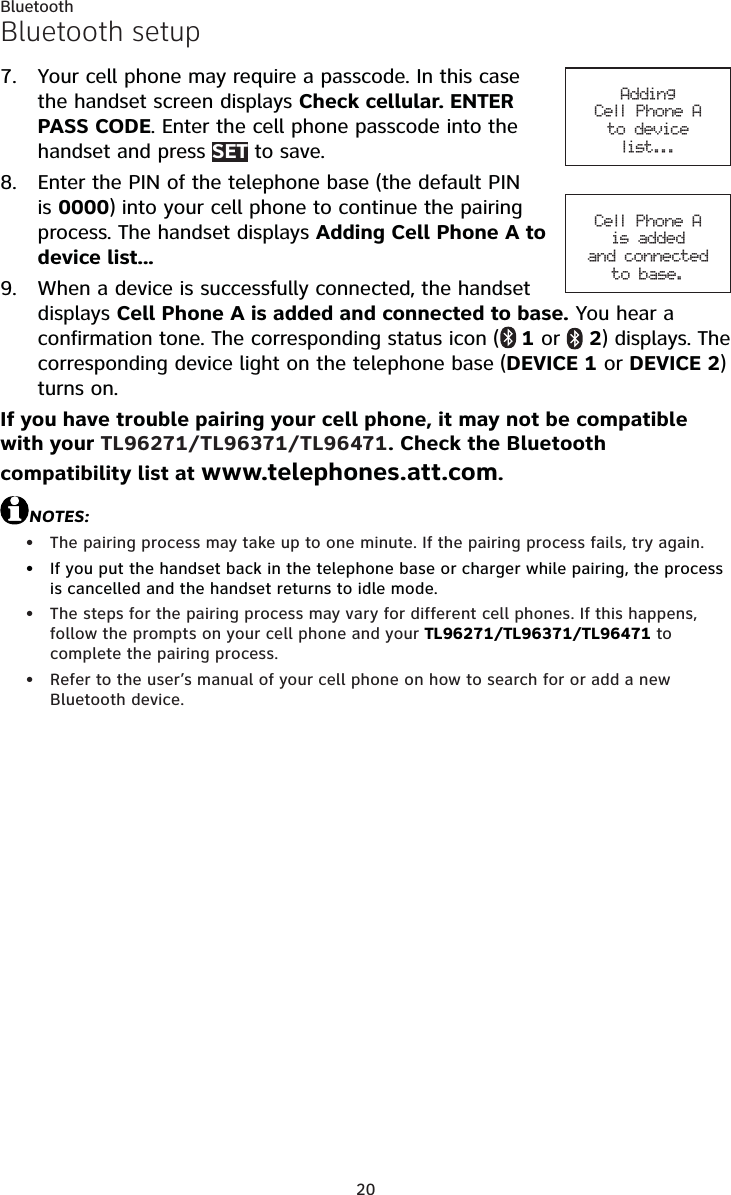


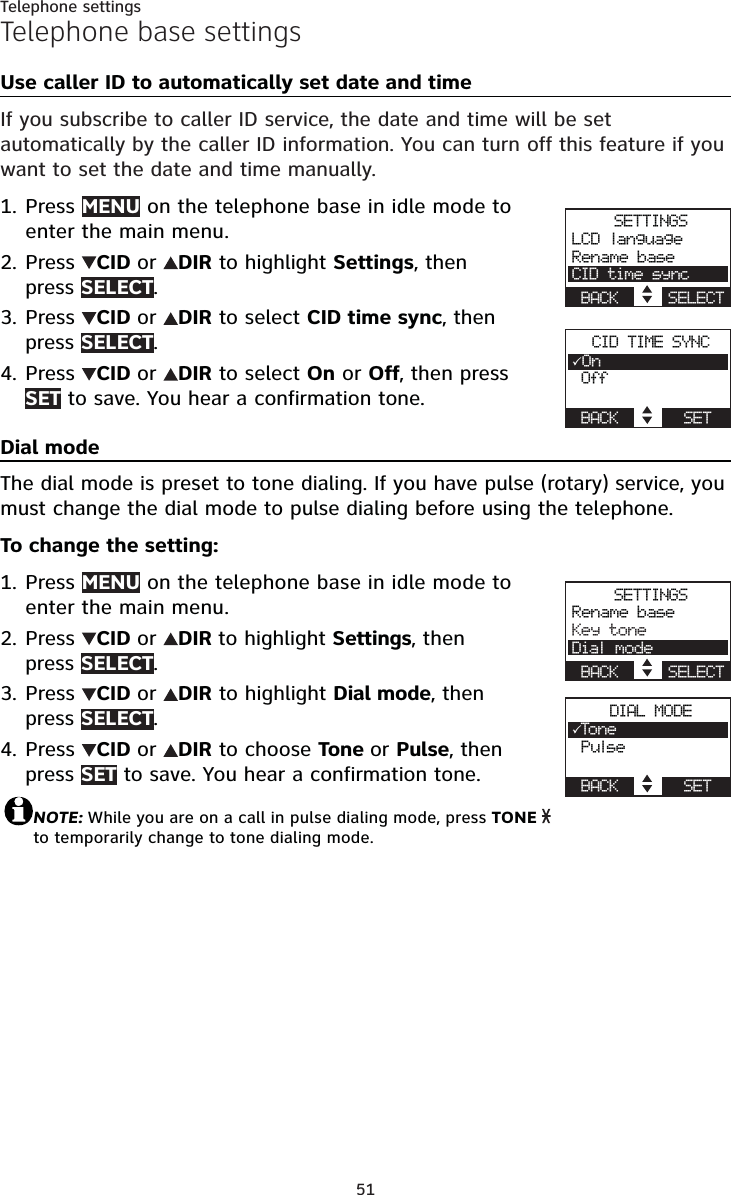
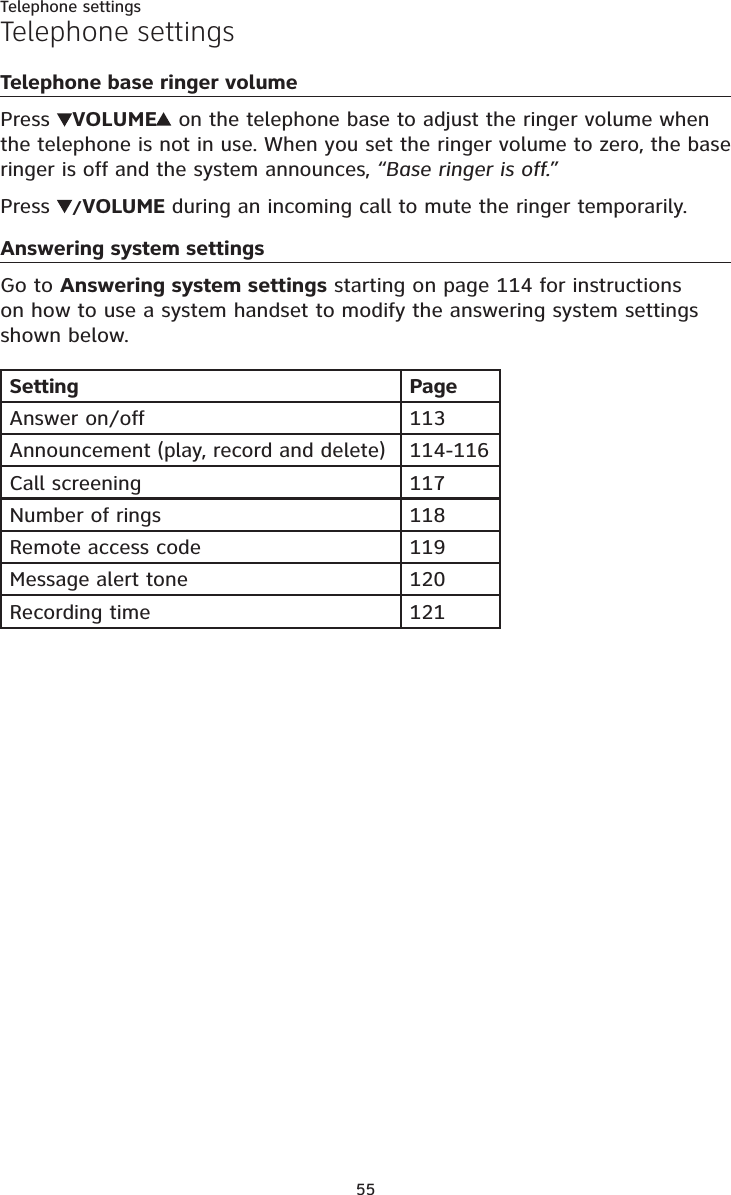

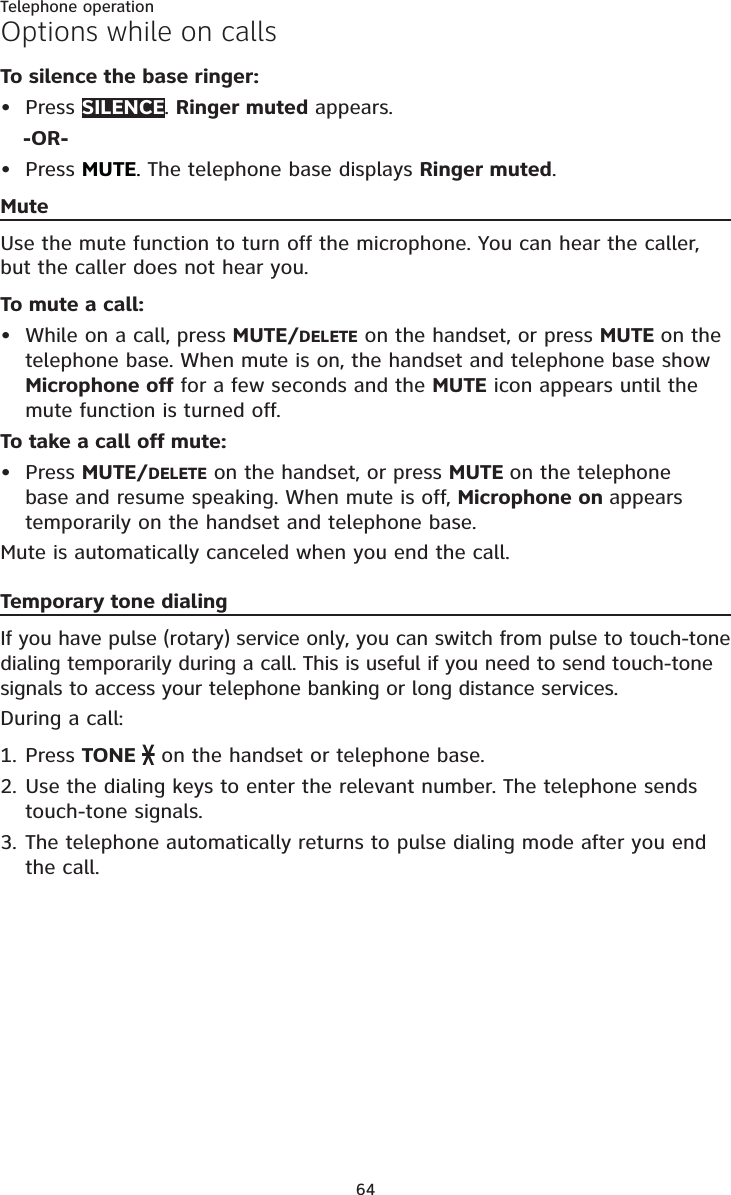
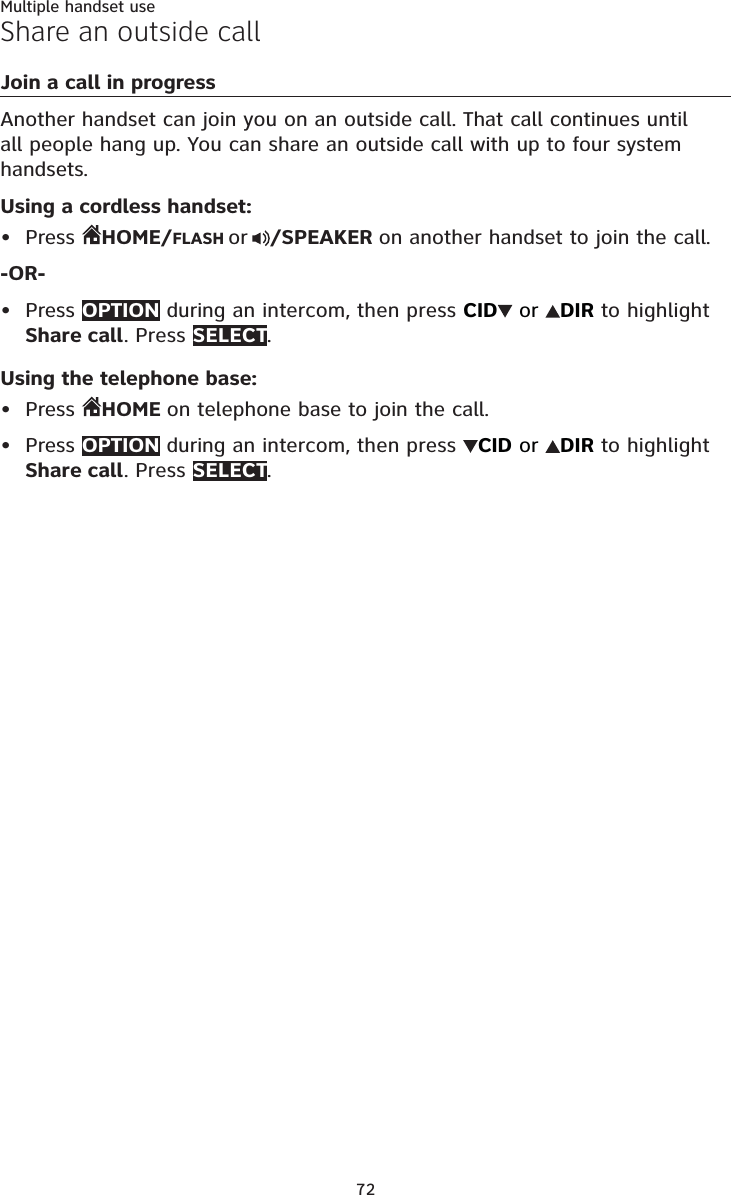
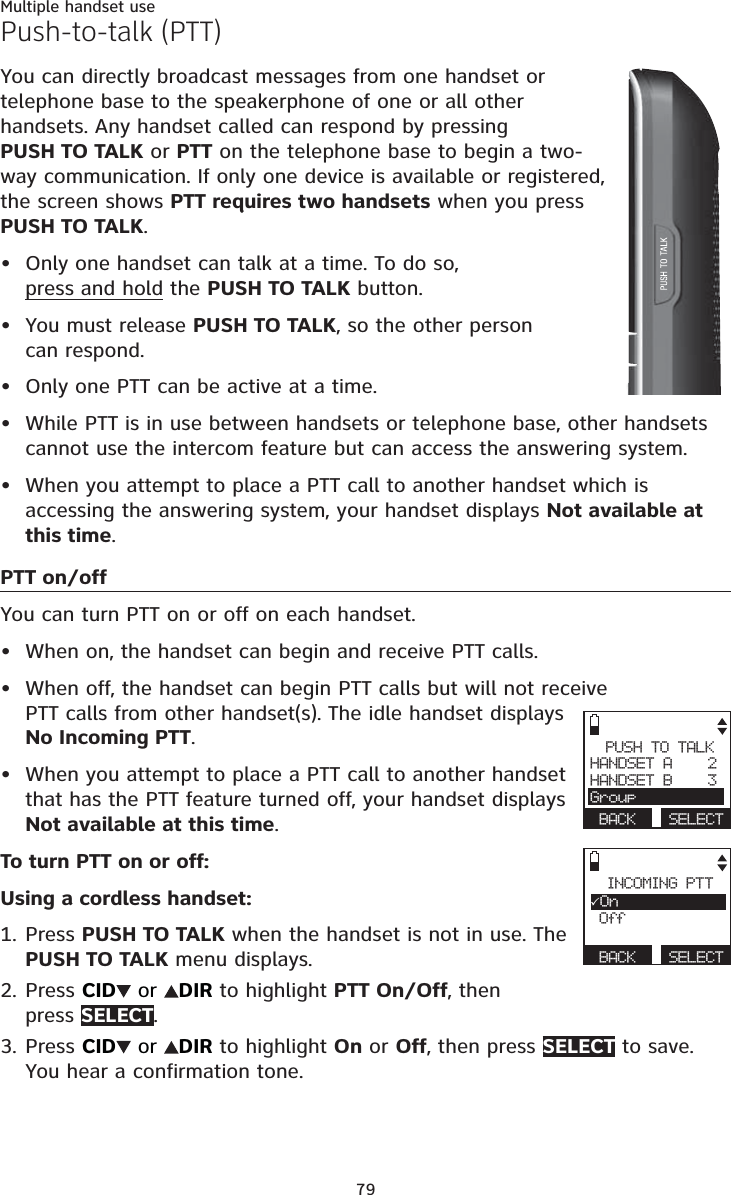
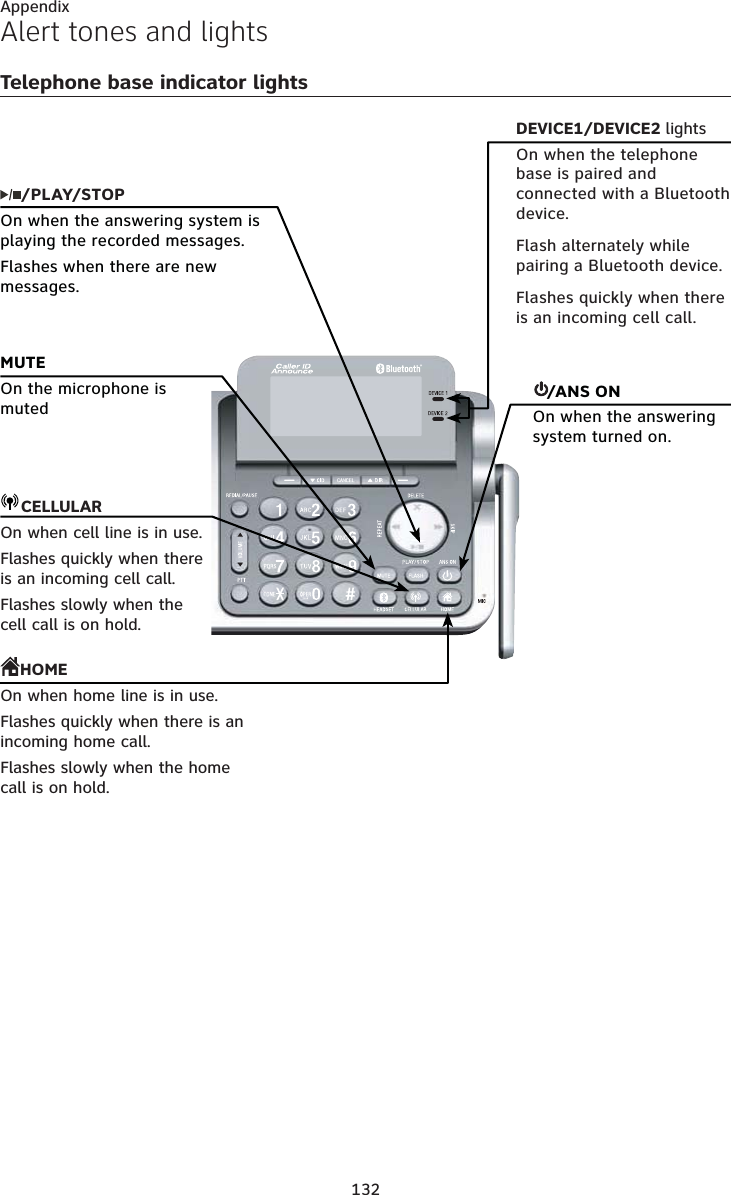
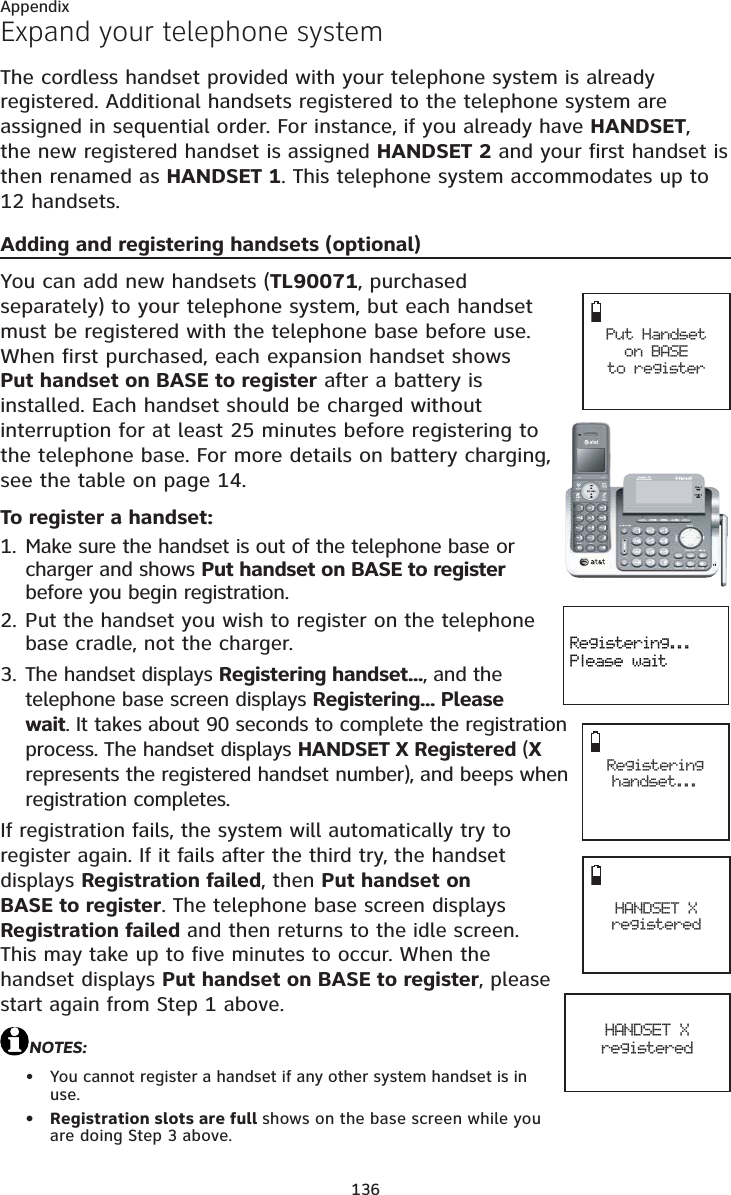
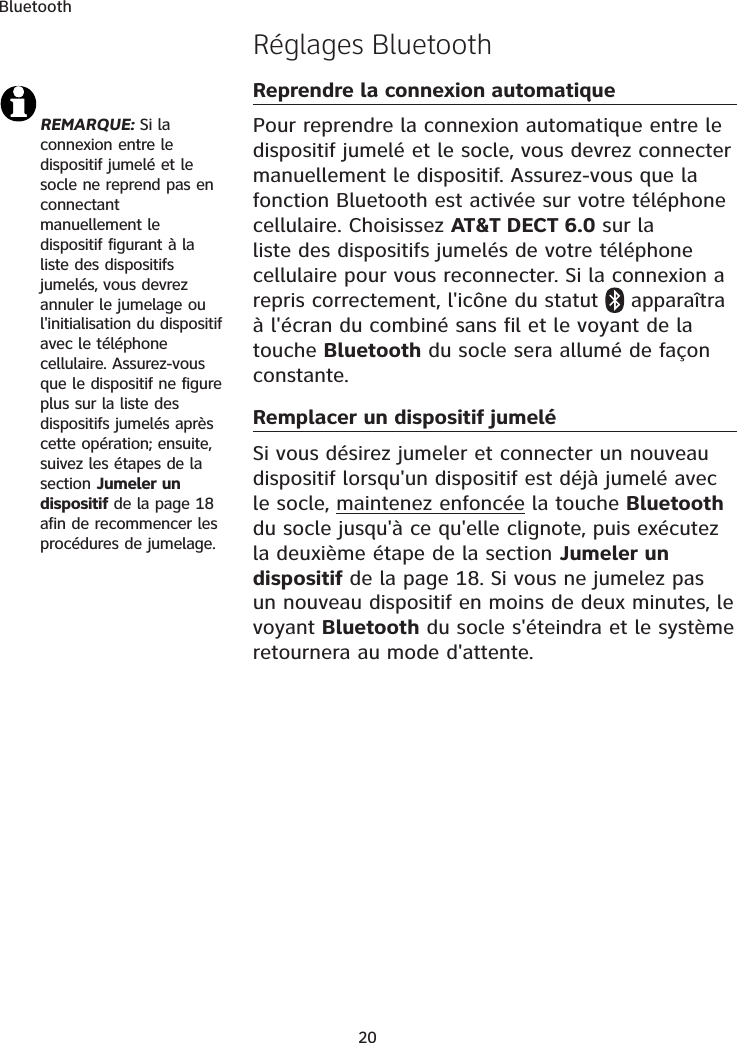
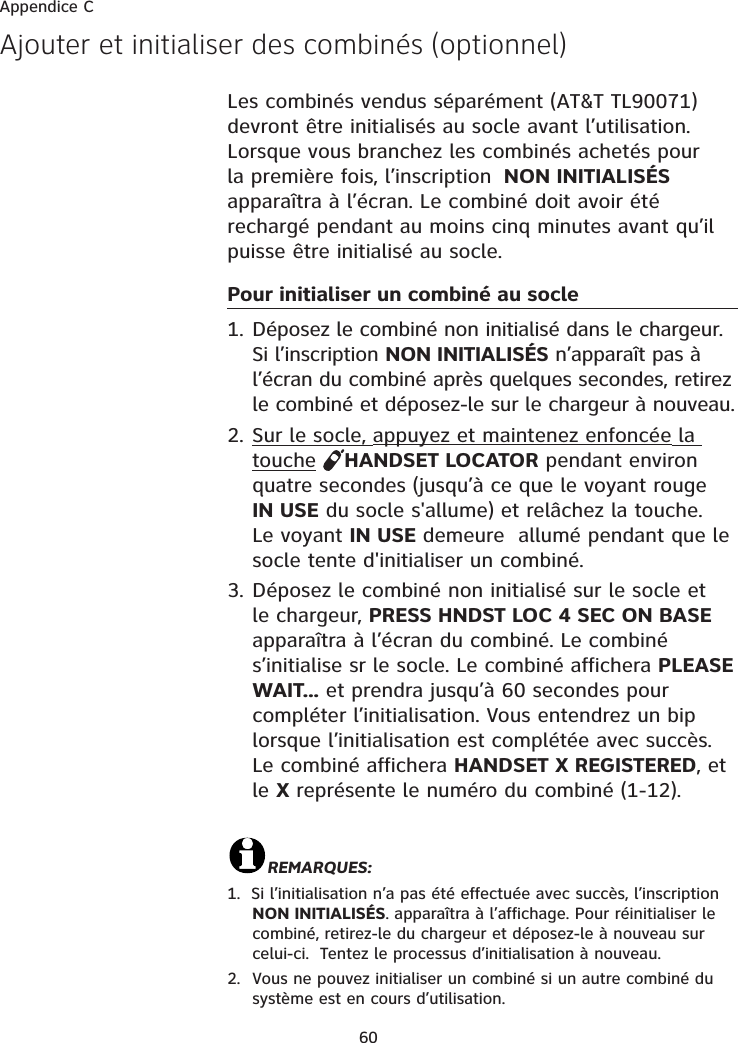
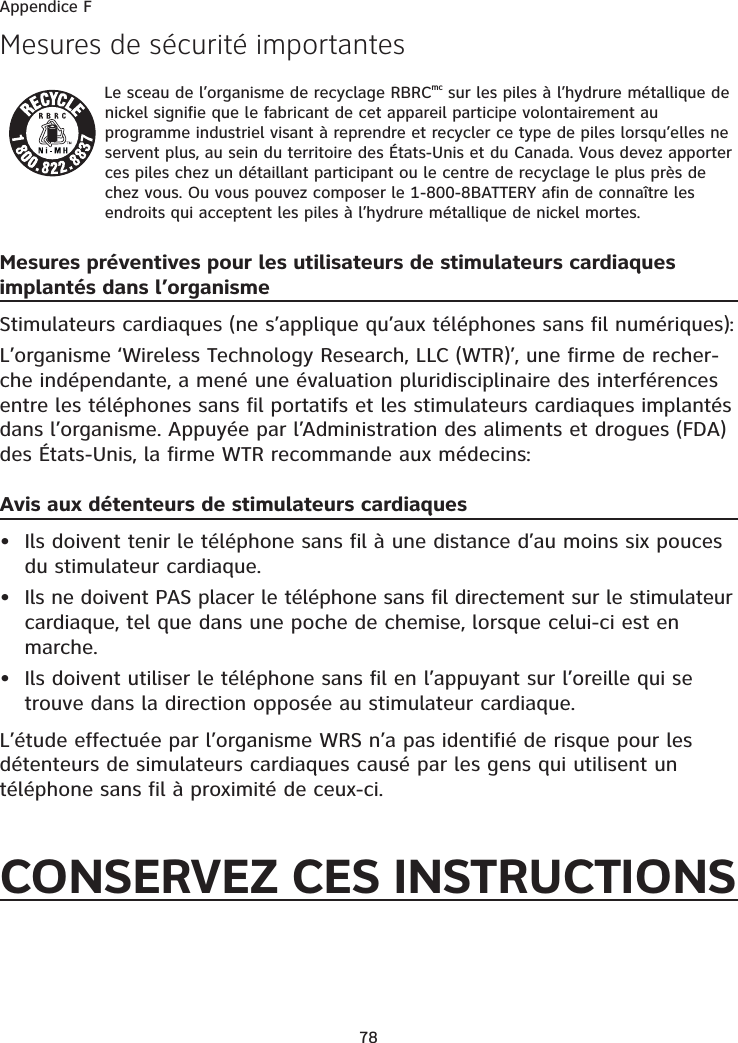
![80Multiple handset usePush-to-talk (PTT)Using the telephone base:Press PTT when the handset is not in use. The PUSH TO TALK menu displays.Press CID or DIR to highlight PTT On/Off, then press SELECT.Press CID or DIR to highlight On or Off, then press SELECT to save. You hear a confirmation tone.PTT to a single handsetUsing a cordless handset:You have two ways to begin a PTT call:If you have one handset, press and hold PUSH TO TALK when thehandset is not in use.-OR-If you have more than one handset, press PUSH TO TALK when the handset is not in use. Then use the dialing keys to enter a handset number (0 for telephone base, 1-9 for handsets 1-9, TONE and 0 for handset 10, TONE and 1 for handset 11 or TONE and 2 for handset 12), or press CID or DIR to scroll to the desired handset or the telephone base, then press SELECT or PUSH TO TALK to create the push-to-talk session.Your handset displays Connecting to HANDSET X... or Connecting toBASE 0... for a few seconds. When the connection is made, both your and the destination handsets display Press and hold [PTT] to talk and beep once.Press and hold PUSH TO TALK on your handset. A chirp indicates your microphone is on. Speak towards the handset. Your voice is broadcast to the destination handset. While you are speaking, the handset displays PTT To HANDSET X (X represents the destination handset number) or PTT To BASE 0.Release PUSH TO TALK after speaking. Both handsets beep once again. After the handsets beep, you can press and hold PUSH TO TALK to continue speaking or the destination handsets can respond (see Answer a PTT callon page 84).To end the PTT call, press OFF/CANCEL or END. The handset displays Push to talk Ended for a few seconds.-OR-Place the handset in the telephone base or charger to end the PTT call.NOTE: After PUSH TO TALK is released, the PTT call remains open for a short time. If no one presses PUSH TO TALK within 10 seconds, the PTT call ends automatically.1.2.3.1.••2.3.4.5.PUSH TO TALKHANDSET B 3GroupPTT On/OffBACK SELECTINCOMING PTT3On OffBACK SELECT](https://usermanual.wiki/VTech-Telecommunications/80-8213-00/User-Guide-1434221-Page-86.png)
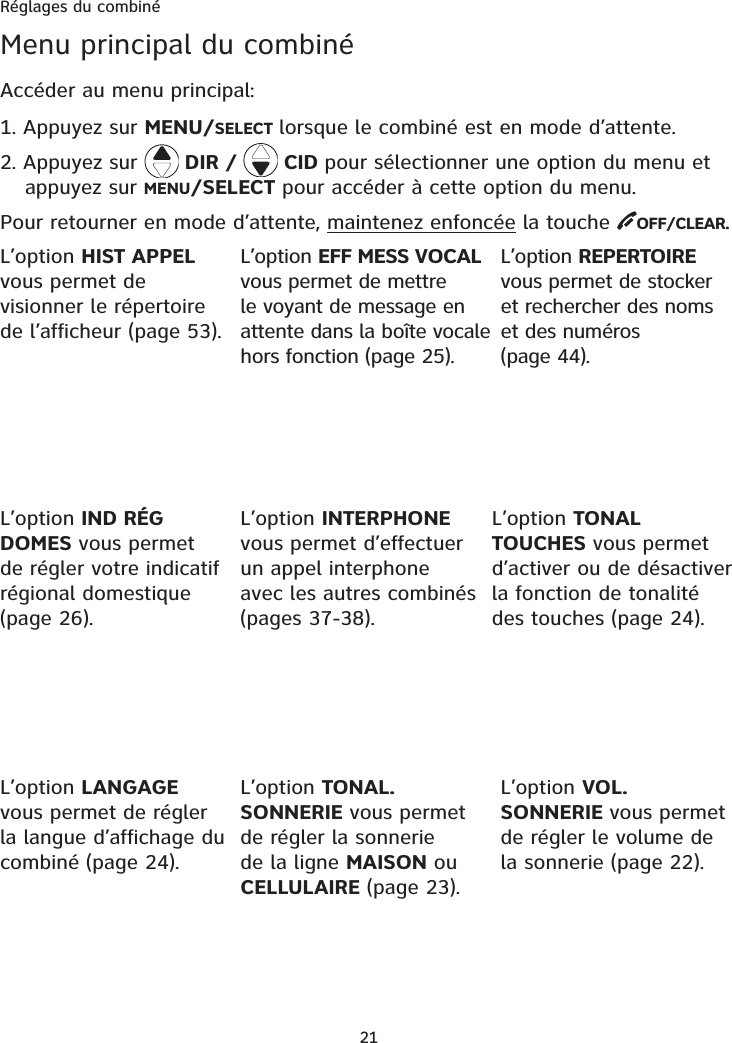
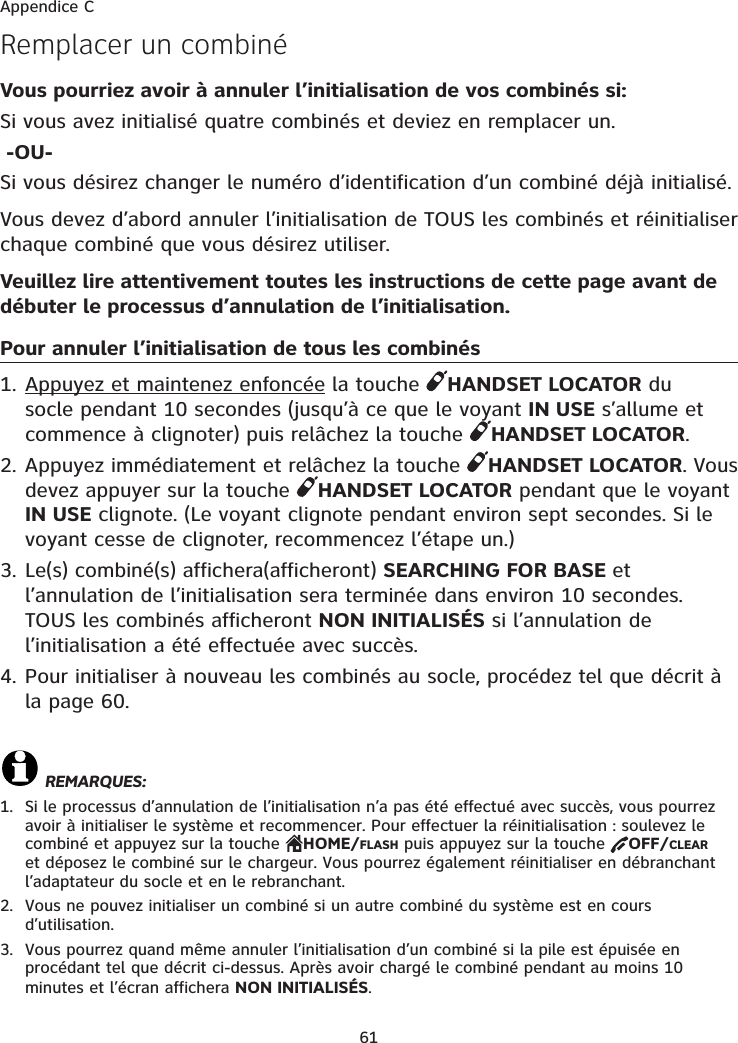
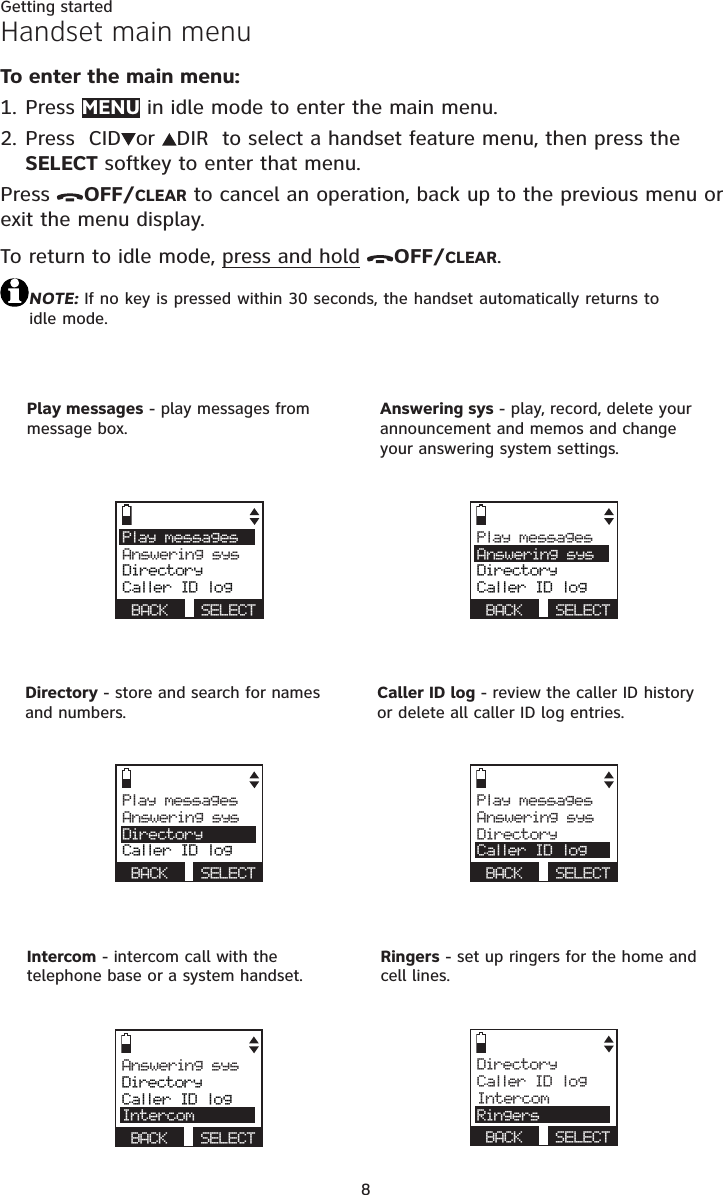
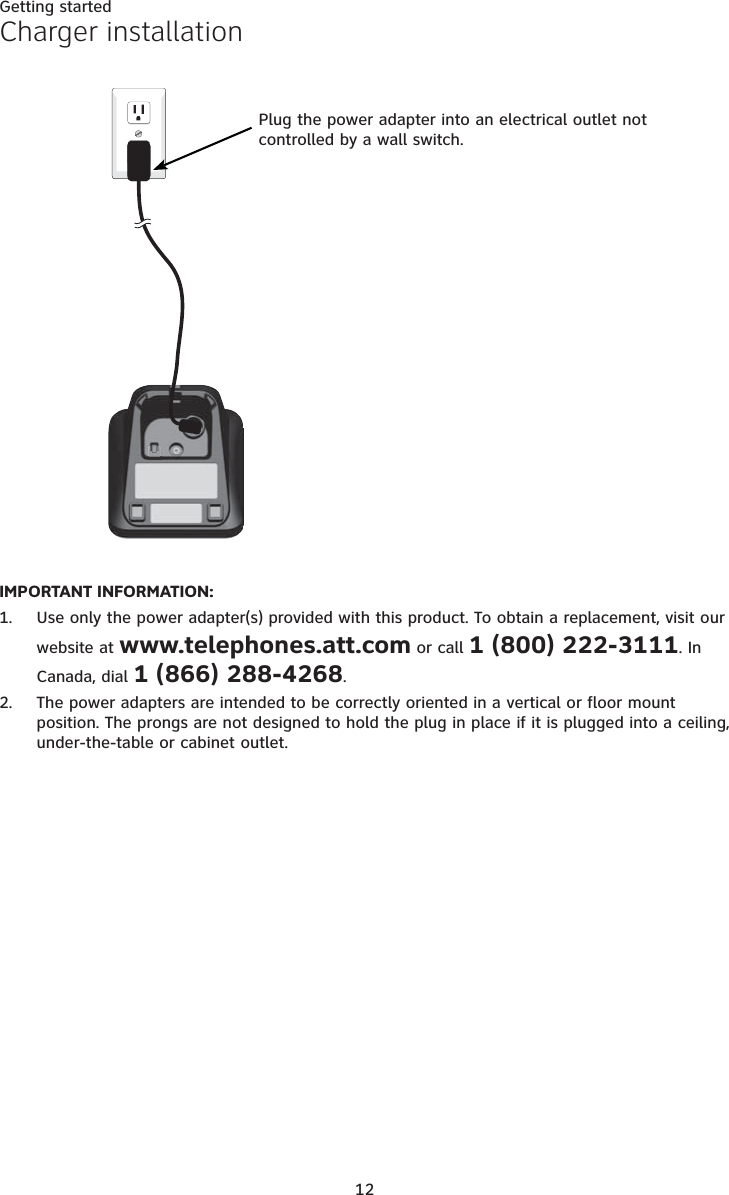
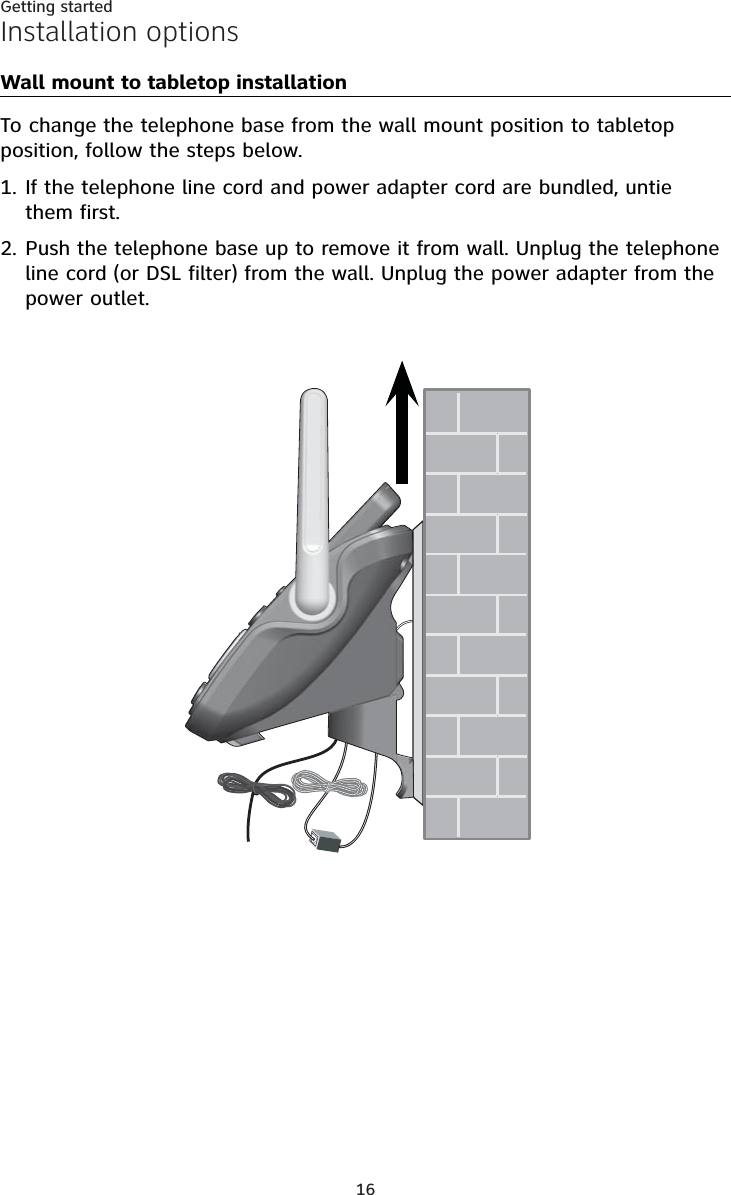
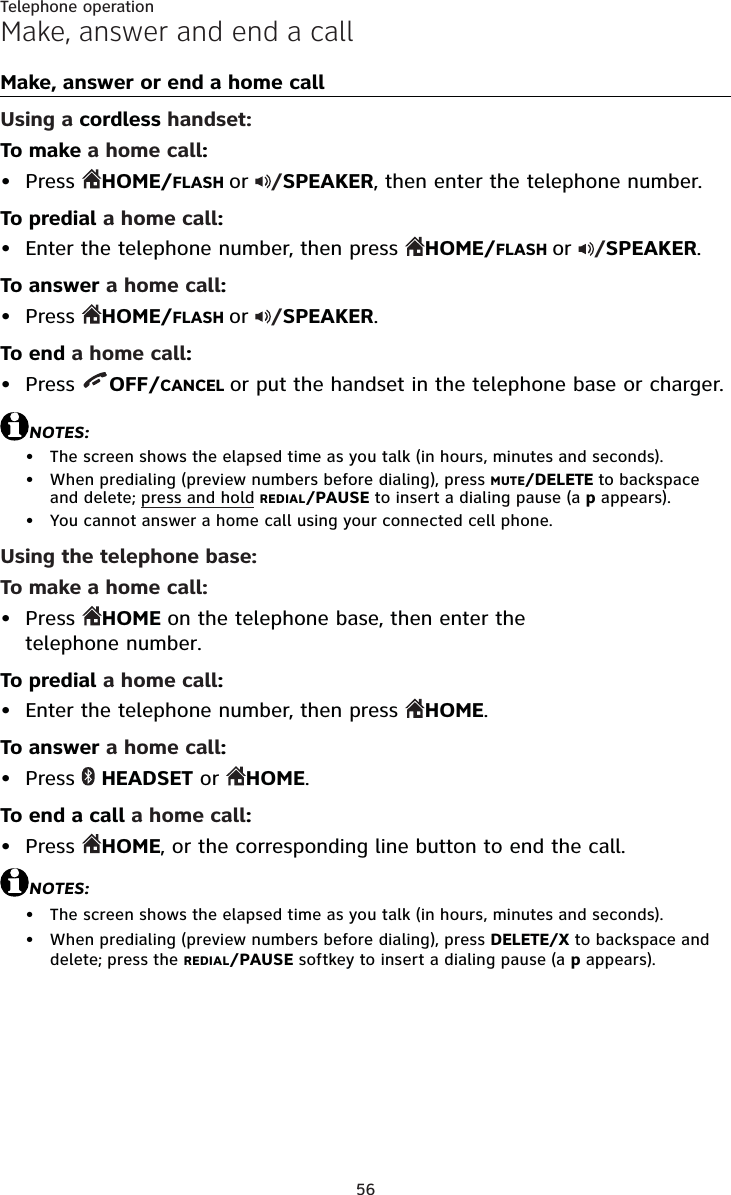
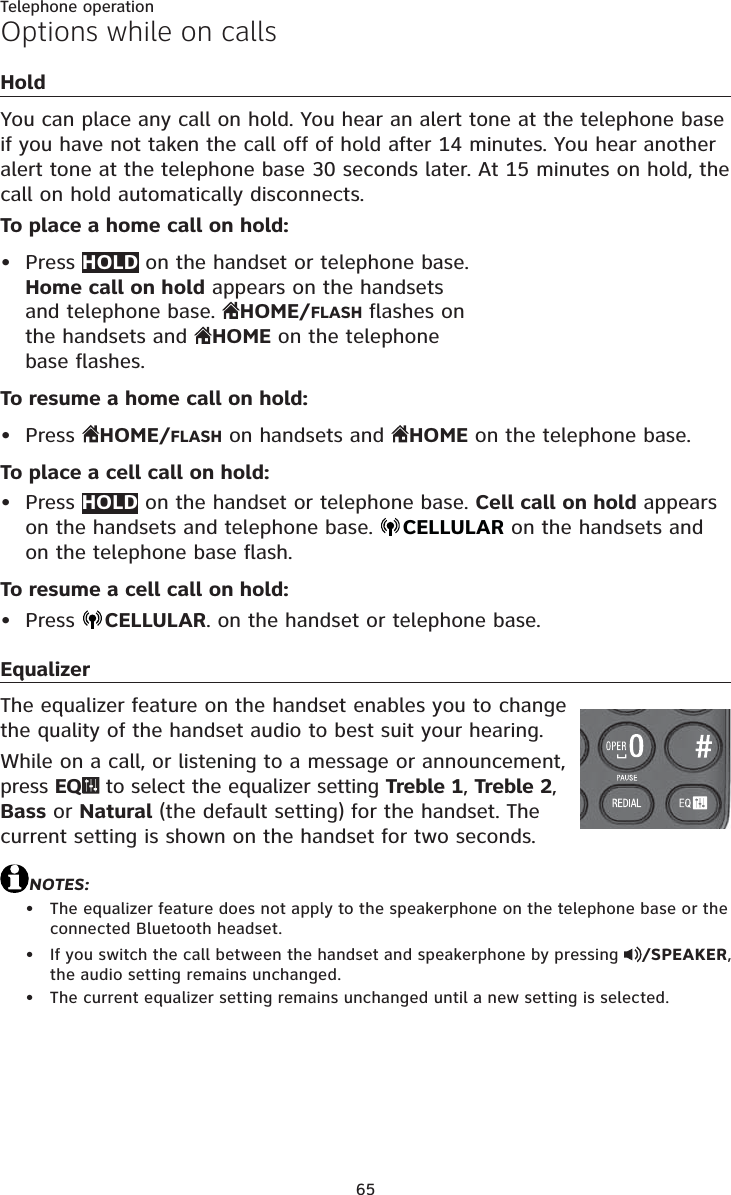
![81Multiple handset usePush-to-talk (PTT)Using the telephone base:You have two ways to begin a PTT call:If you have one handset, press and hold PTT when the telephone baseis not in use.-OR-If you have more than one handset, press PTT when the telephone base is not in use. Then use the dialing keys to enter a handset number (1-9 for handsets 1-9, TONE and 0 for handset 10, TONE and 1 for handset 11 or TONE and 2 for handset 12), or press CID or DIR to scroll to the desired handset then press SELECT or PTT to create the push-to-talk session.Your handset displays Connecting to HANDSET X... for a few seconds. When the connection is made, both screens display Press and hold [PTT] to talk and beep once.Press and hold PTT on the telephone base. A chirp indicates your microphone is on. Speak towards the MIC. Your voice is broadcast to the destination handset. While you are speaking, the telephone base displays PTT To HANDSET X (X represents the destination handset number).Release PUSH TO TALK after speaking. Both handsets beep once again. After the handsets beep, you can press and hold PUSH TO TALK to continue speaking or the destination handsets can respond (see Answer a PTT callon page 84).To end the PTT call, press CANCEL or END. The handset displays Push to talk Ended for a few seconds.NOTE: After PTT is released, the PTT call remains open for a short time. If no one presses PTT within 10 seconds, the PTT call ends automatically.1.••2.3.4.5.](https://usermanual.wiki/VTech-Telecommunications/80-8213-00/User-Guide-1434221-Page-87.png)
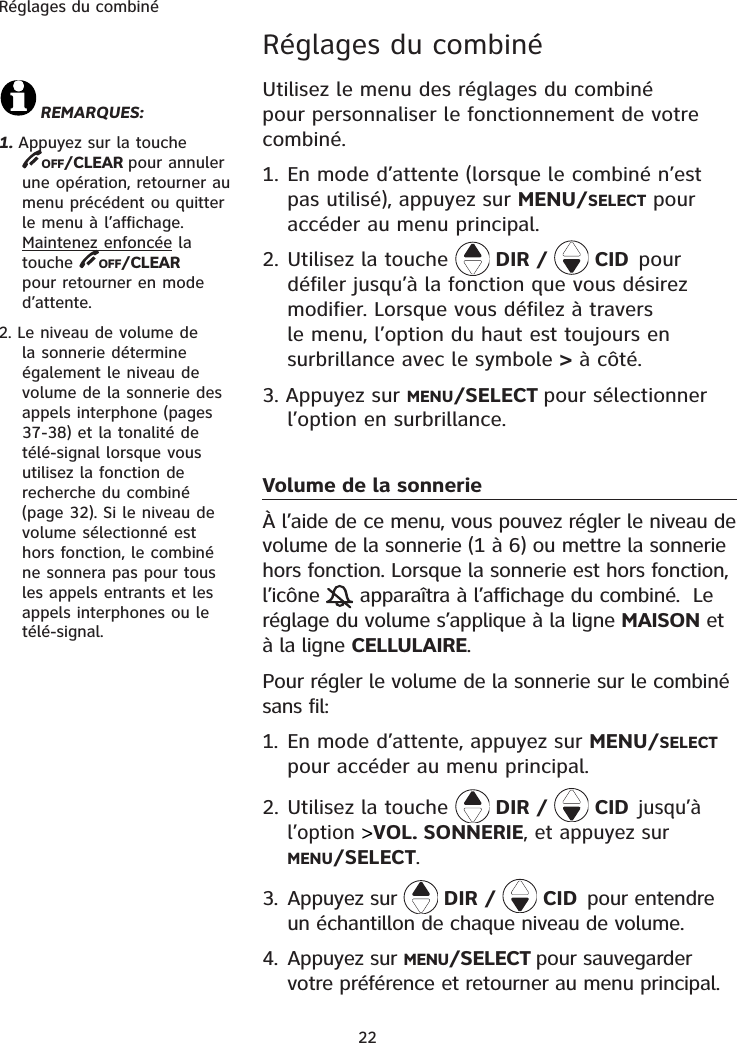
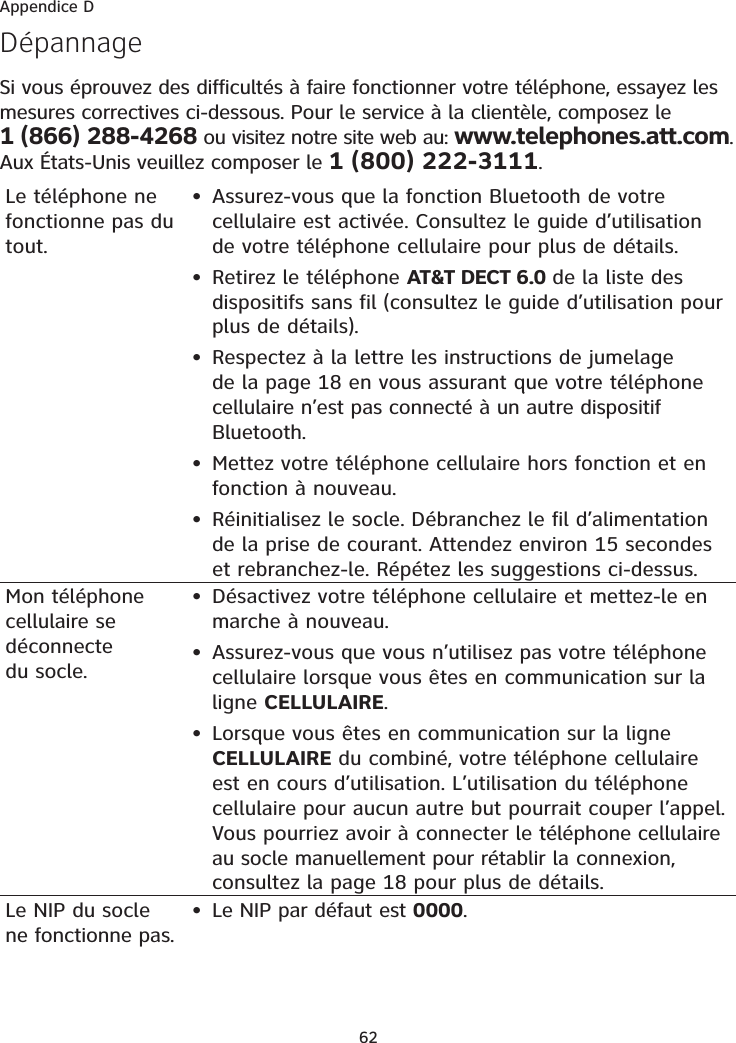
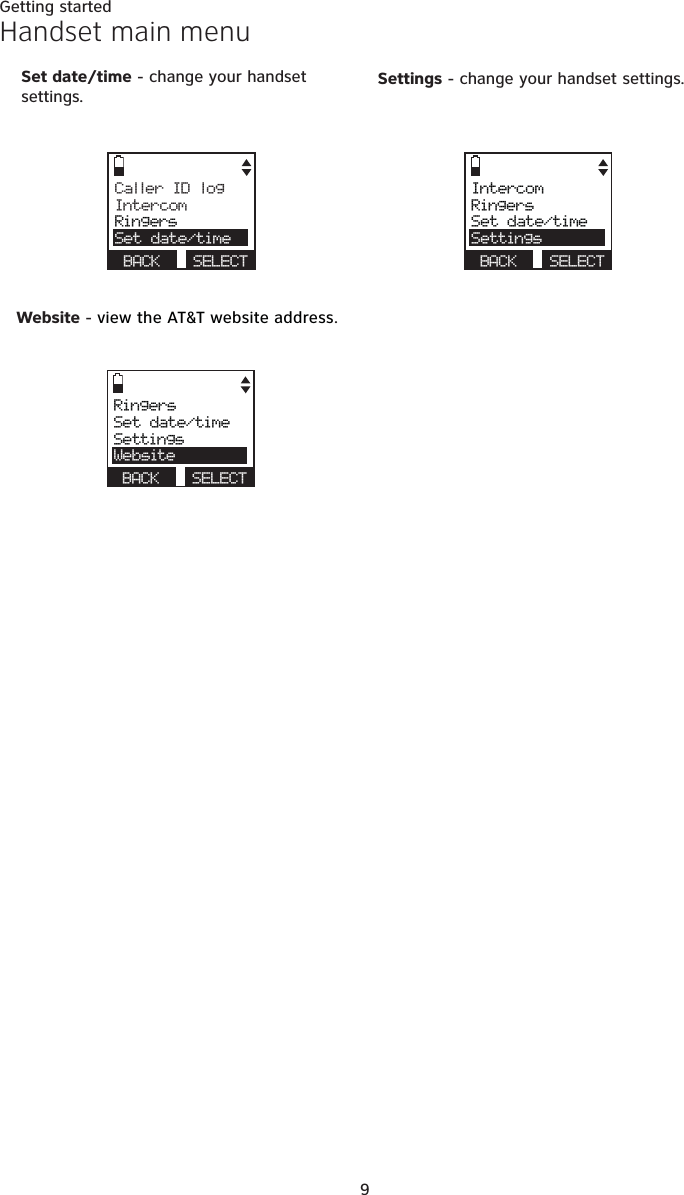
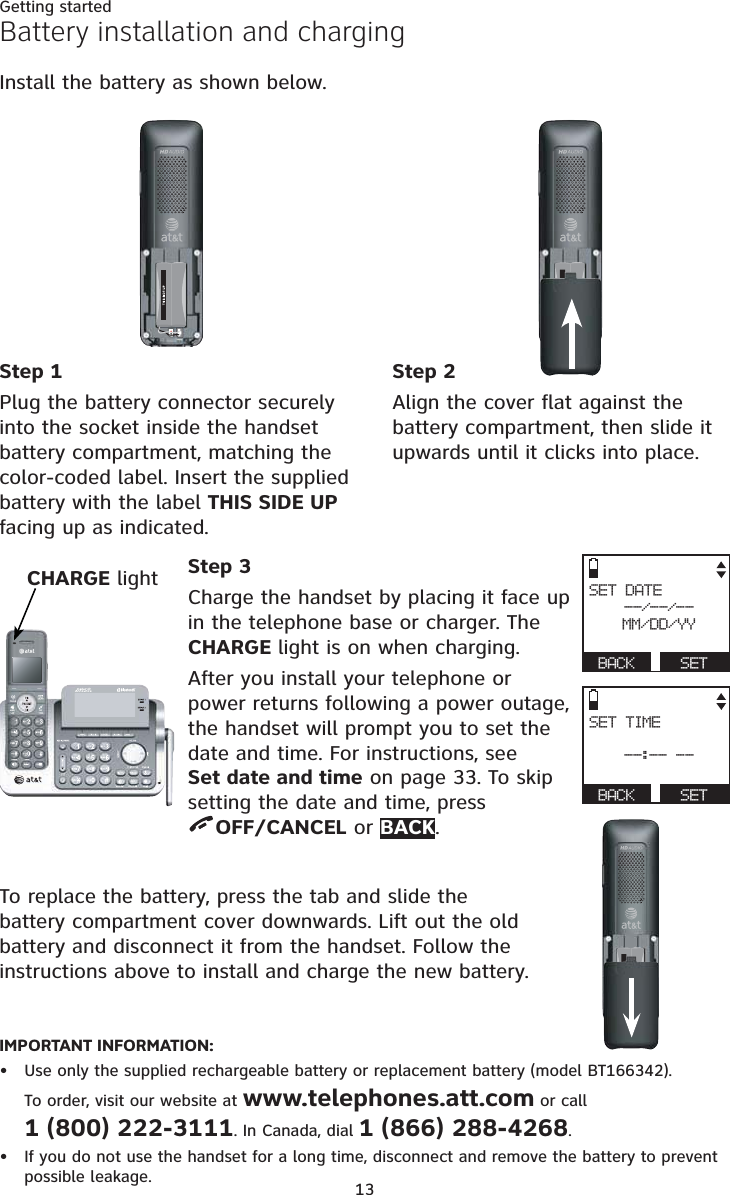
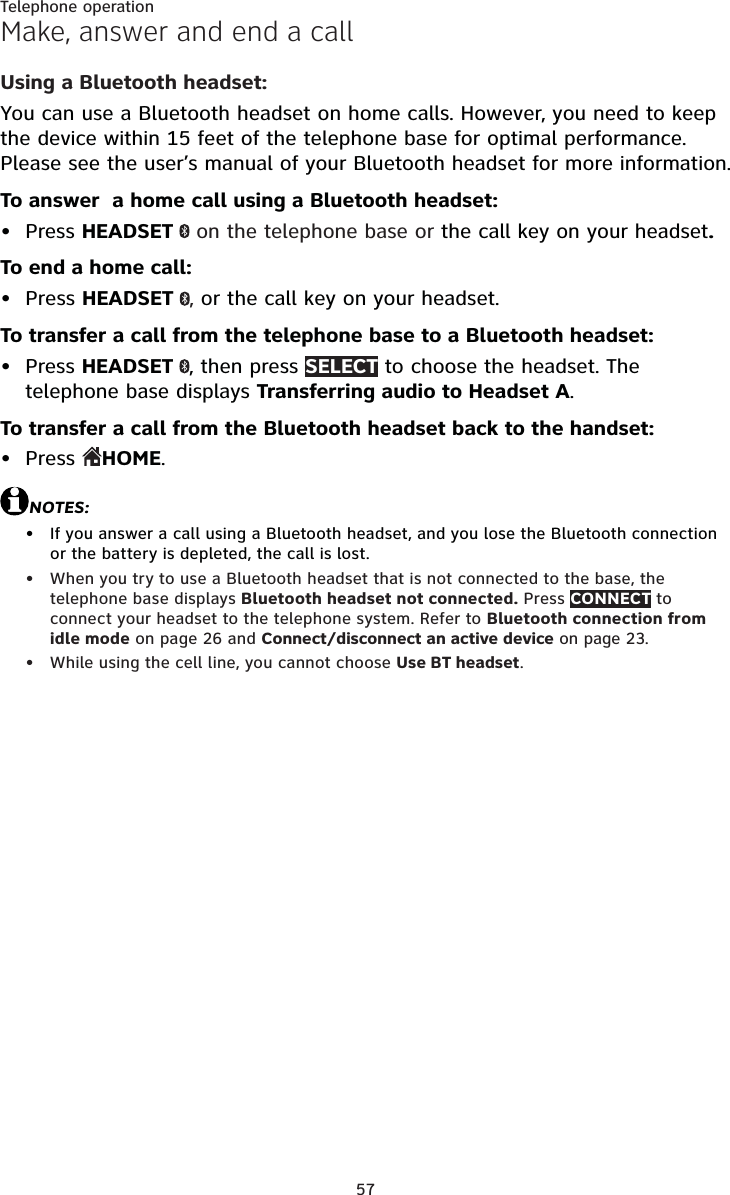
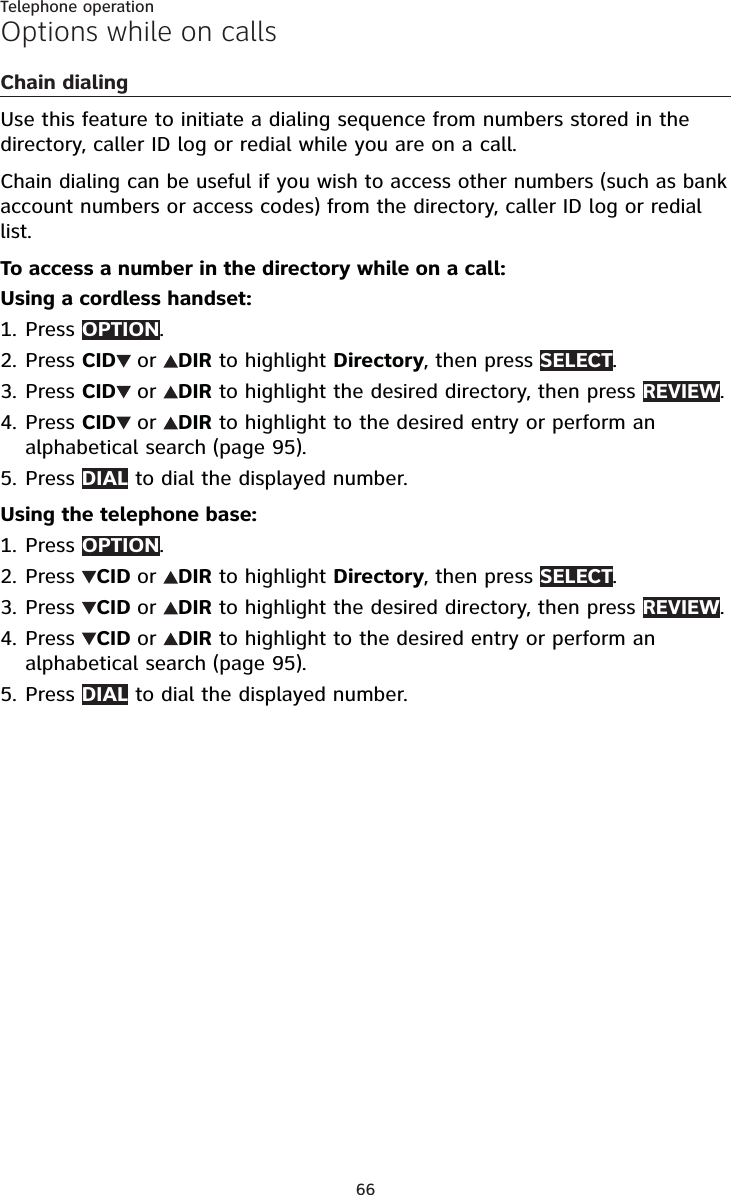
![82Multiple handset usePush-to-talk (PTT)PTT to a group of handsetsWhen there are multiple handsets registered to the phone system, PTT supports one-to-group calls. PTT supports a maximum of one-to-four calls when two to five handsets are registered, and a maximum of one-to-three calls when six or more handsets are registered. The first four registered handsets will be able to use this feature. Other handsets can only use PTT for one-to-one calls. Using a cordless handset:To begin a PTT call to a group of handsets:Press and hold PUSH TO TALK when the handset is not in use.-OR-Press PUSH TO TALK when the handset is not in use. Press TONE and #, or press CID or DIR to highlight Group then press SELECT or PUSH TO TALK.Your handset displays Connecting to group... for a few seconds. When the connection is made, both your and the destination handsets display Press and hold [PTT] to talk and beep once.Press and hold PUSH TO TALK on your handset. A chirp indicates your microphone is on. Speak towards the handset. Your voice is broadcast to the destination handset. While you are speaking, the handset displays PTT To handset X (Xrepresents the destination handset numbers).Release PUSH TO TALK after speaking. All handsets beep once again. After the handsets beep, you can press and hold PUSH TO TALK to continue speaking or the destination handsets can respond (see Answer a PTT call on page 84).Press OFF/CANCEL or END to end the PTT call. The handset displays Push to talk Ended for a few seconds.-OR-Place the handset in the telephone base or charger to end the PTT call.NOTE: After PUSH TO TALK is released, the PTT call remains open for a short time. If no one presses PUSH TO TALK within 10 seconds, the PTT call ends automatically.1.••2.3.4.](https://usermanual.wiki/VTech-Telecommunications/80-8213-00/User-Guide-1434221-Page-88.png)
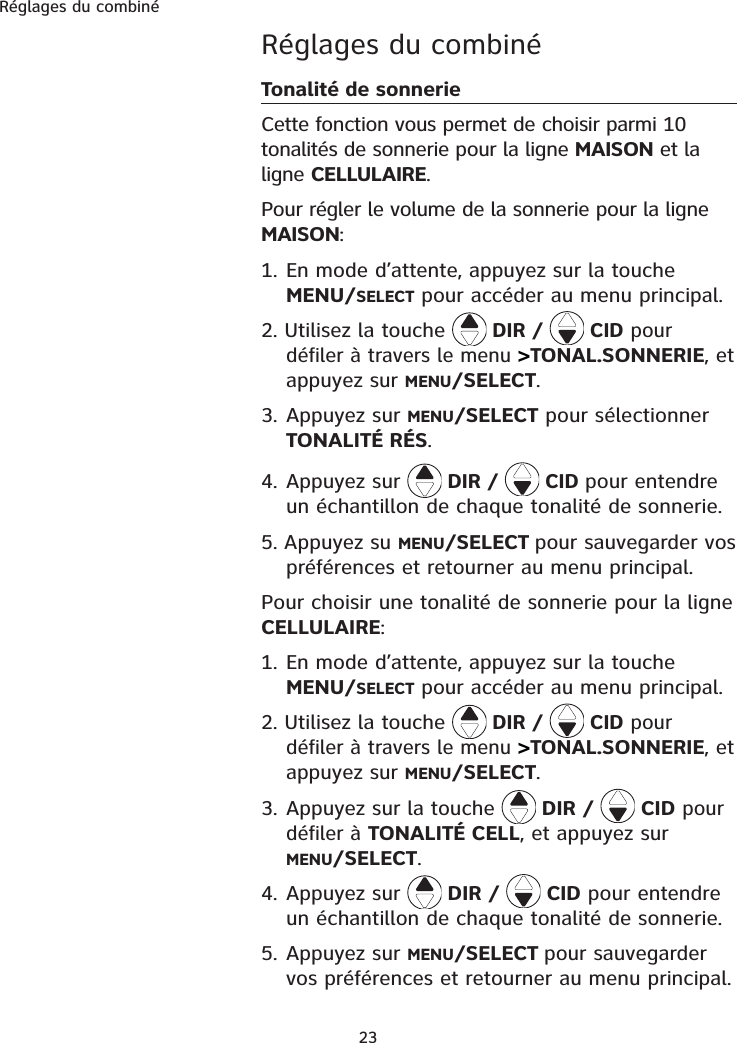
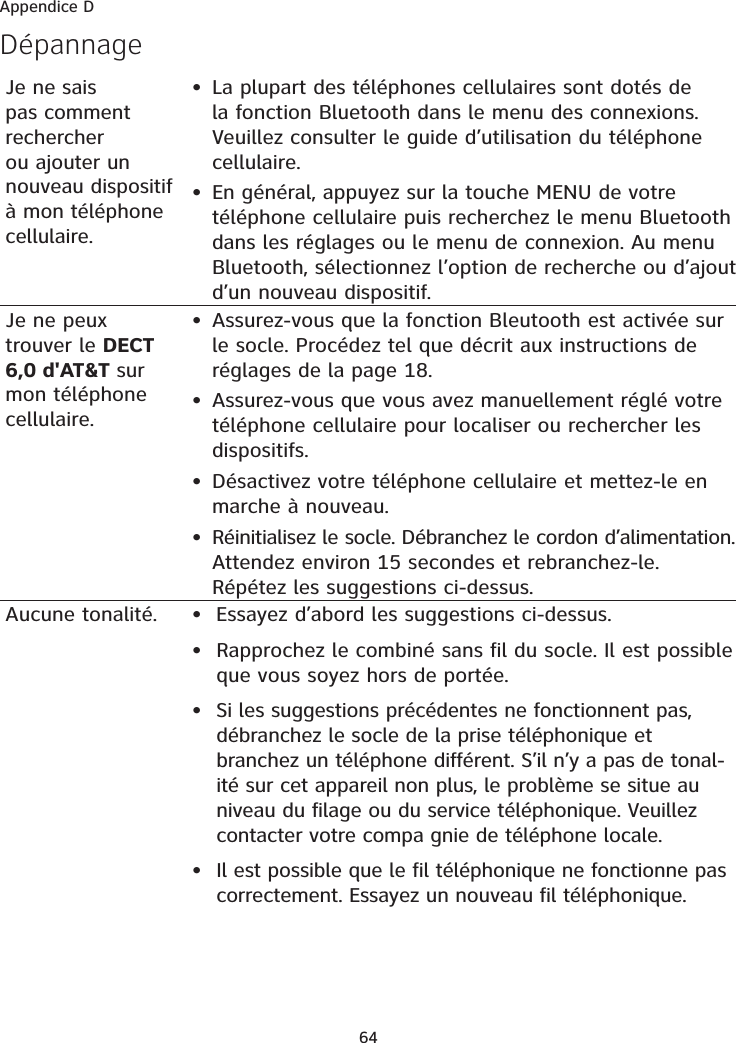
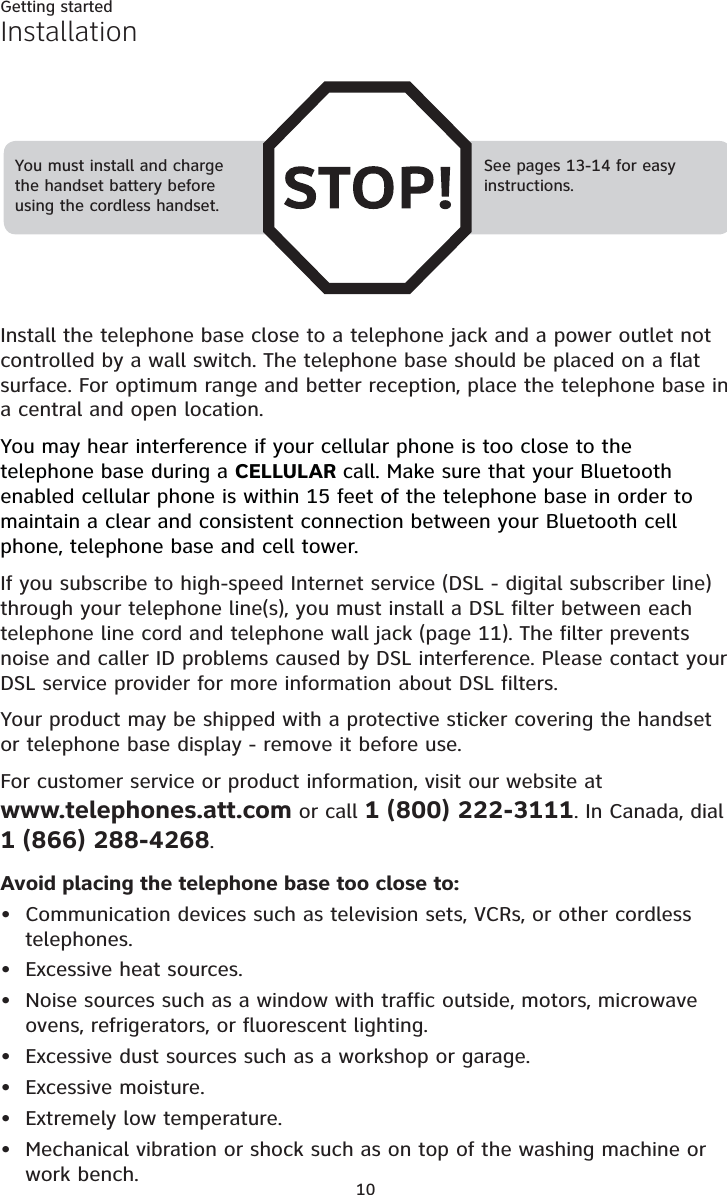
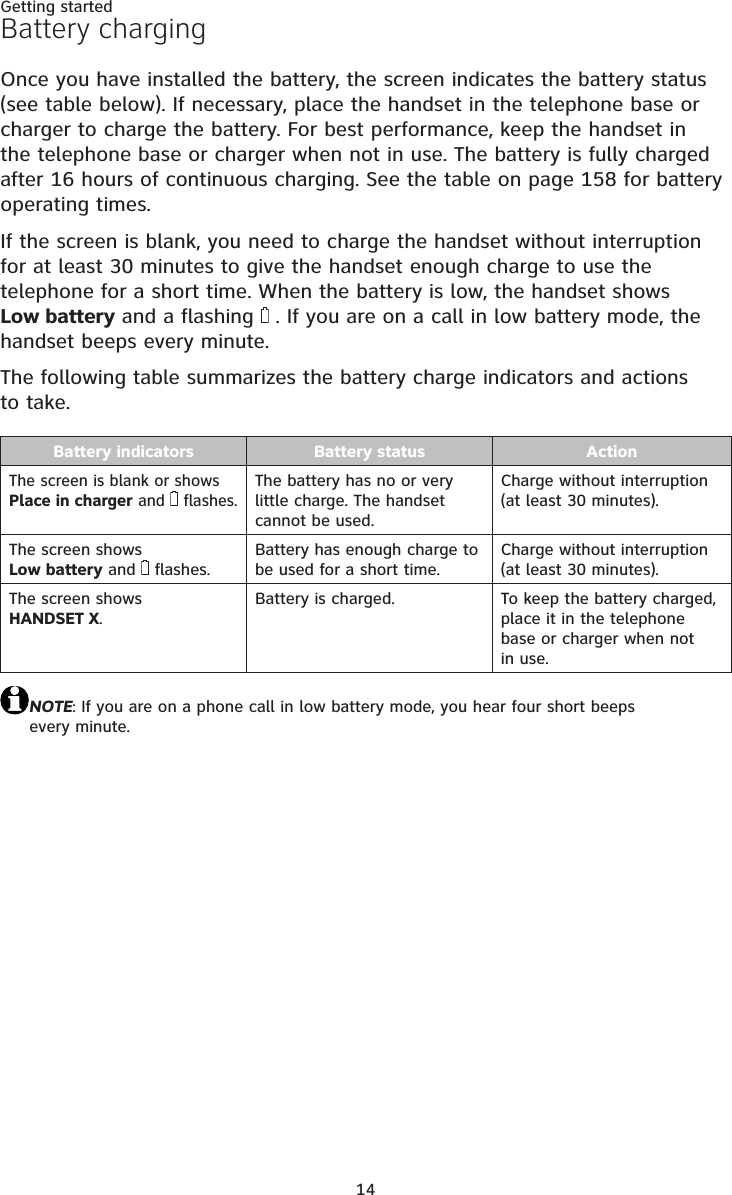
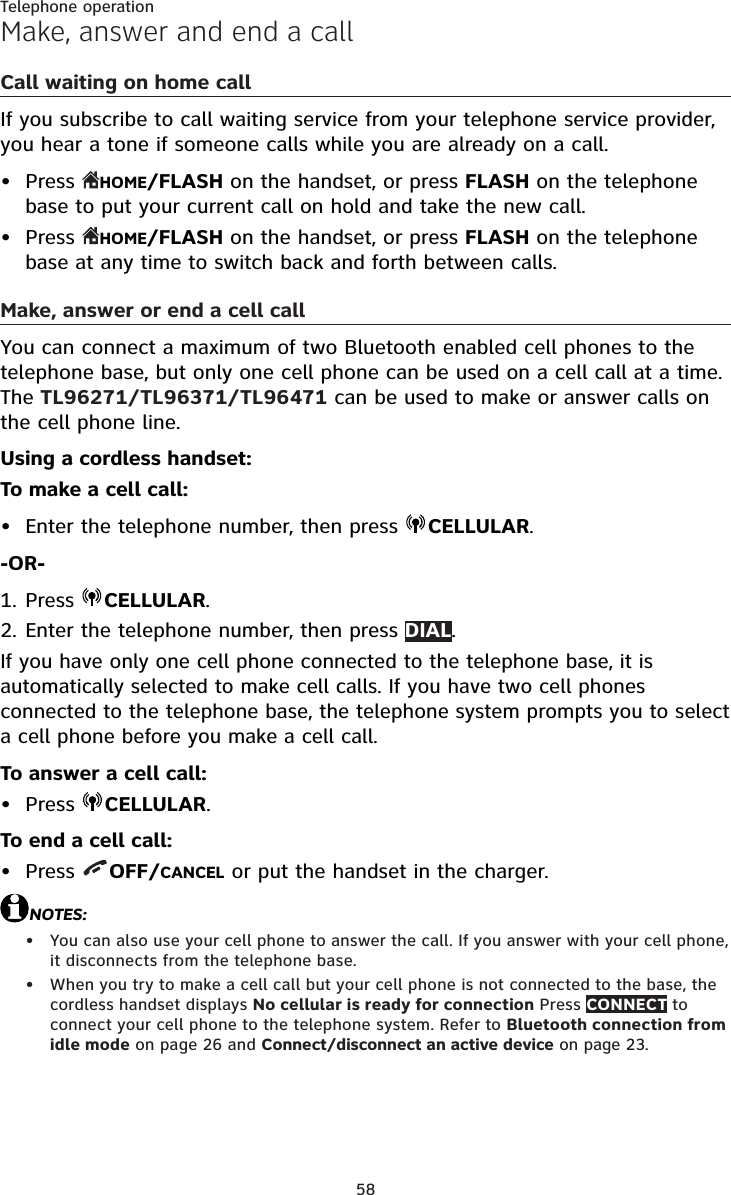
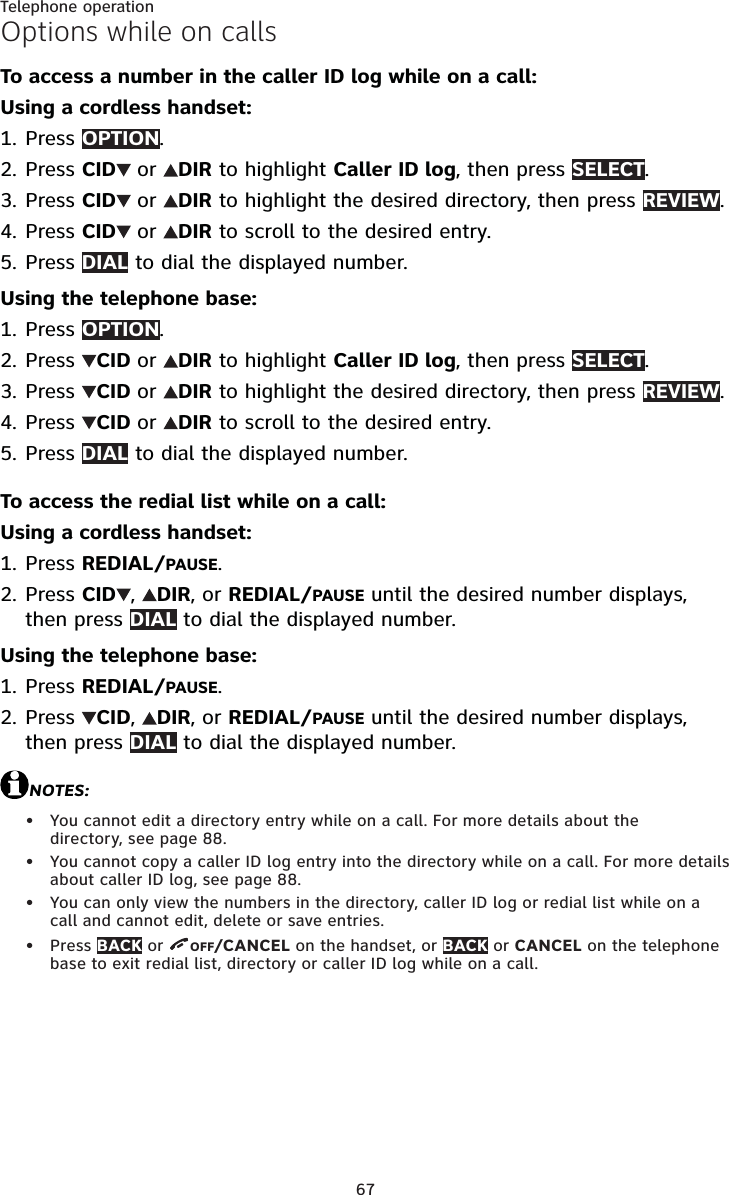
![83Multiple handset usePush-to-talk (PTT)Using the telephone base:To begin a PTT call to a group of handsets:Press and hold PTT when the telephone base is not in use.-OR-Press PTT when the telephone base is not in use. Press TONE and #,or press CID or DIR to highlight Group then press SELECT or PTT.Your screen displays Connecting to group... for a few seconds. When the connection is made, both screens display Press and hold [PTT] to talkand beep once.Press and hold PTT on your handset. A chirp indicates your microphone is on. Speak towards the MIC. Your voice is broadcast to the destination handset. While you are speaking, the screen displays PTT To handset X (Xrepresents the destination handset numbers).Release PTT after speaking. All handsets beep once again. After the handsets beep, you can press and hold PTT to continue speaking or the destination handsets can respond (see Answer a PTT call on page 84).Press CANCEL or END to end the PTT call. The handset displays Push to talk Ended for a few seconds.NOTE: After PTT is released, the PTT call remains open for a short time. If no one presses PTT within 10 seconds, the PTT call ends automatically.1.••2.3.4.](https://usermanual.wiki/VTech-Telecommunications/80-8213-00/User-Guide-1434221-Page-89.png)
![84Multiple handset usePush-to-talk (PTT)Answer a PTT callYou can respond to a PTT call whenever the speakerphone light is off, as described below.Using a cordless handset:When your handset receives a PTT call, the handset beeps and displays Press and hold [PTT] to talk.When someone else is speaking, your speakerphone light is on, and you handset displays PTT From HANDSET X To handset: Y (the first Xrepresents the initiating handset number and Y represents your handset number; a maximum of four handset numbers appear).When your speakerphone light is off (the handset displays Press and hold [PTT] to talk), you hear a beep. Press and hold PUSH TO TALK on your handset. When you hear a chirp, speak towards the handset.While you are speaking, your handset displays PTT To handset X(X represents the handset numbers of one or more destination handsets; a maximum of four handset numbers appear).Your voice is broadcast to all destination handsets.Release PUSH TO TALK when you finish speaking. Your handset will beep. After the beep, if your speakerphone light is off, you can press and holdPUSH TO TALK to continue speaking or the destination handsets can respond.Using the telephone base:When the telephone base receives a PTT call, the telephone base beeps and displays Press and hold [PTT] to talk.When someone else is speaking, the telephone base displays PTT From HANDSET X To base & HS: Y (the first X represents the initiating handset number and Y represents your handset number; a maximum of four handset numbers appear).When the telephone base displays Press and hold [PTT] to talk, you hear a beep. Press and hold PTT on your handset. When you hear a chirp, speak towards the handset.While you are speaking, your handset displays PTT To handset X(X represents the handset numbers of one or more destination handsets; a maximum of four handset numbers appear).Your voice is broadcast to all destination handsets.Release PTT when you finish speaking. Your handset will beep. After the beep, if your speakerphone light is off, you can press and hold PTT to continue speaking or the destination handsets can respond.1.2.3.••1.2.3.••](https://usermanual.wiki/VTech-Telecommunications/80-8213-00/User-Guide-1434221-Page-90.png)
![85Multiple handset usePush-to-talk (PTT)Change a one-to-one PTT call to an intercom callYou can convert a one-to-one PTT conversation to an intercom call.Using a cordless handset:When your handset displays Press and hold [PTT] to talk, press INTCOM.Your handset displays Switch to Intercom? Press SELECT to confirm.If you have a one handset, your handset displays Calling other handsetor Calling base. The destination handset temporarily displays Push to talk Ended and then Other handset is calling or Base is calling.If you have more than one handset, your handset displays CallingHANDSET Y (Y represents the destination handset number) or CallingBASE 0. The destination handset temporarily displays Push to talk Ended and then HANDSET X is calling (X represents the originating handset number) or BASE 0 is calling.On the destination handset, press HOME/FLASH or /SPEAKER to answer the intercom call. Both handsets now display Intercom.To end the intercom call, press OFF/CANCEL,END or place the handset in the telephone base or charger. Both handsets display Intercom ended.Using the telephone base:When your handset displays Press and hold [PTT] to talk, press INTCOM.The telephone base displays Switch to Intercom? Press SELECT.If you have a two-handset system, your handset displays Calling other handset or Calling base. The destination handset temporarily displays Push to talk Ended and then Other handset is calling or Base is calling.If you have three or more handsets, the telephone base displays Calling HANDSET Y (Y represents the destination handset number)or Calling BASE 0. The destination handset temporarily displays Push to talk Ended and then HANDSET X is calling (X represents the originating handset number) or BASE 0 is calling.On the destination handset, press HOME/FLASH or /SPEAKER to answer the intercom call. Both screens now display Intercom.To end the intercom call, press CANCEL or END on the telephone base.Both handsets display Intercom ended.1.••2.3.1.••2.3.](https://usermanual.wiki/VTech-Telecommunications/80-8213-00/User-Guide-1434221-Page-91.png)