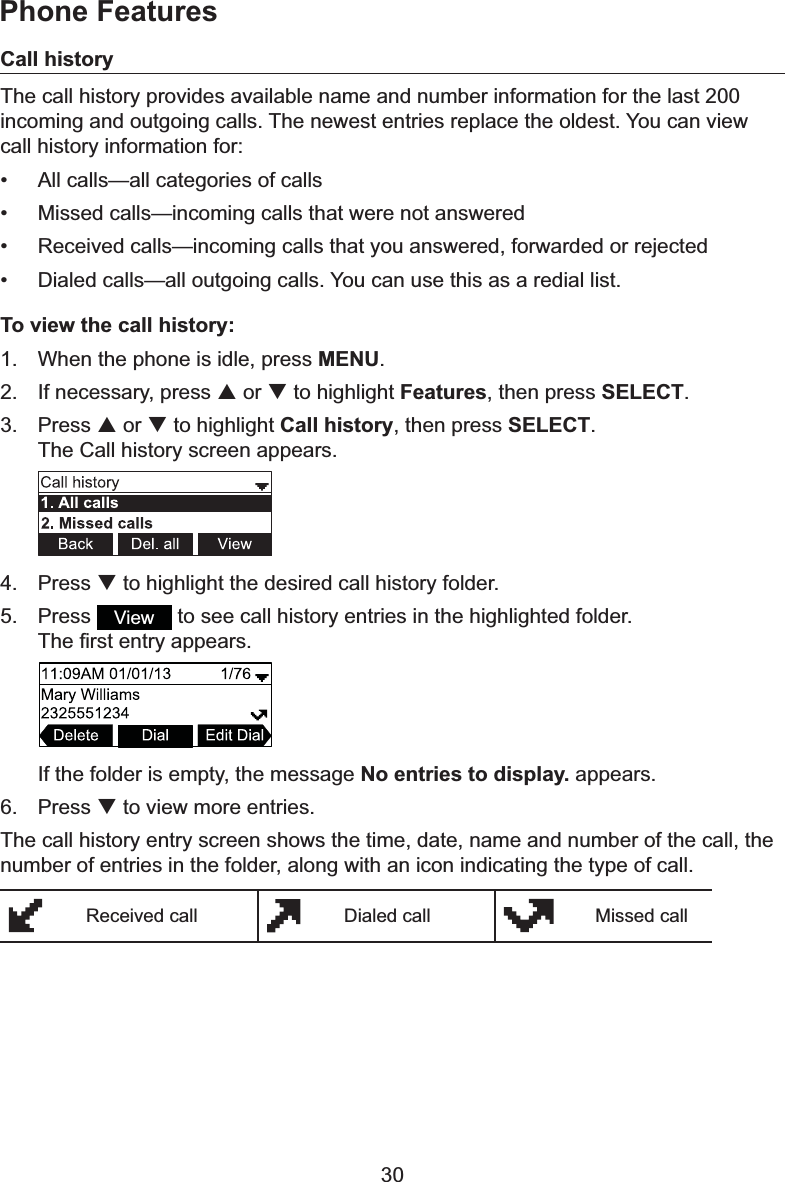
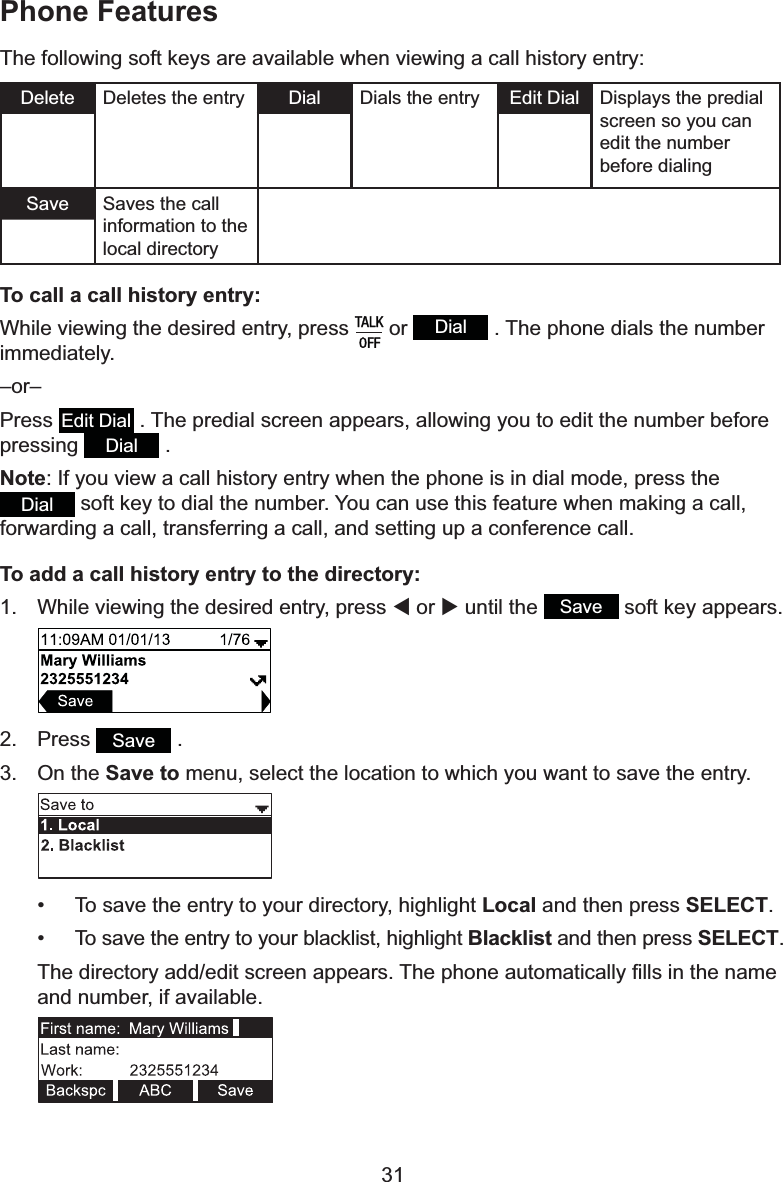
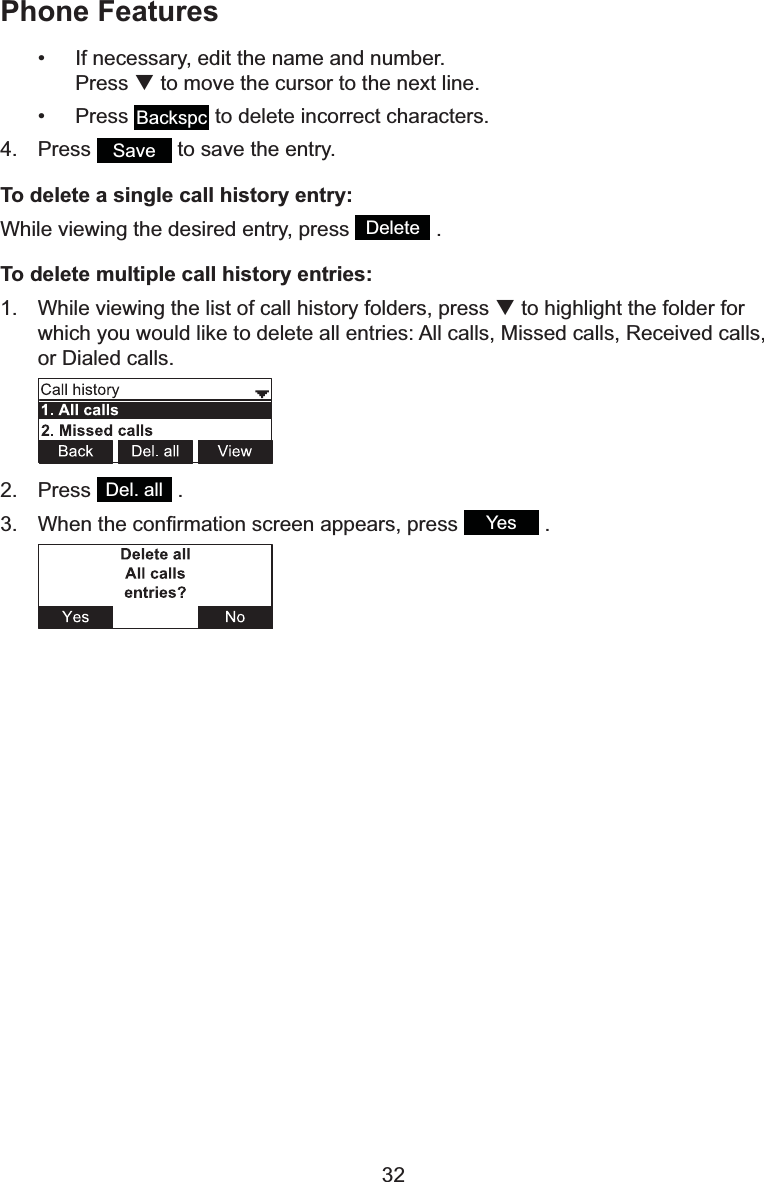
VTech Telecommunications 80-9754-00 SIP Wireless Conference-Base Unit User Manual manual
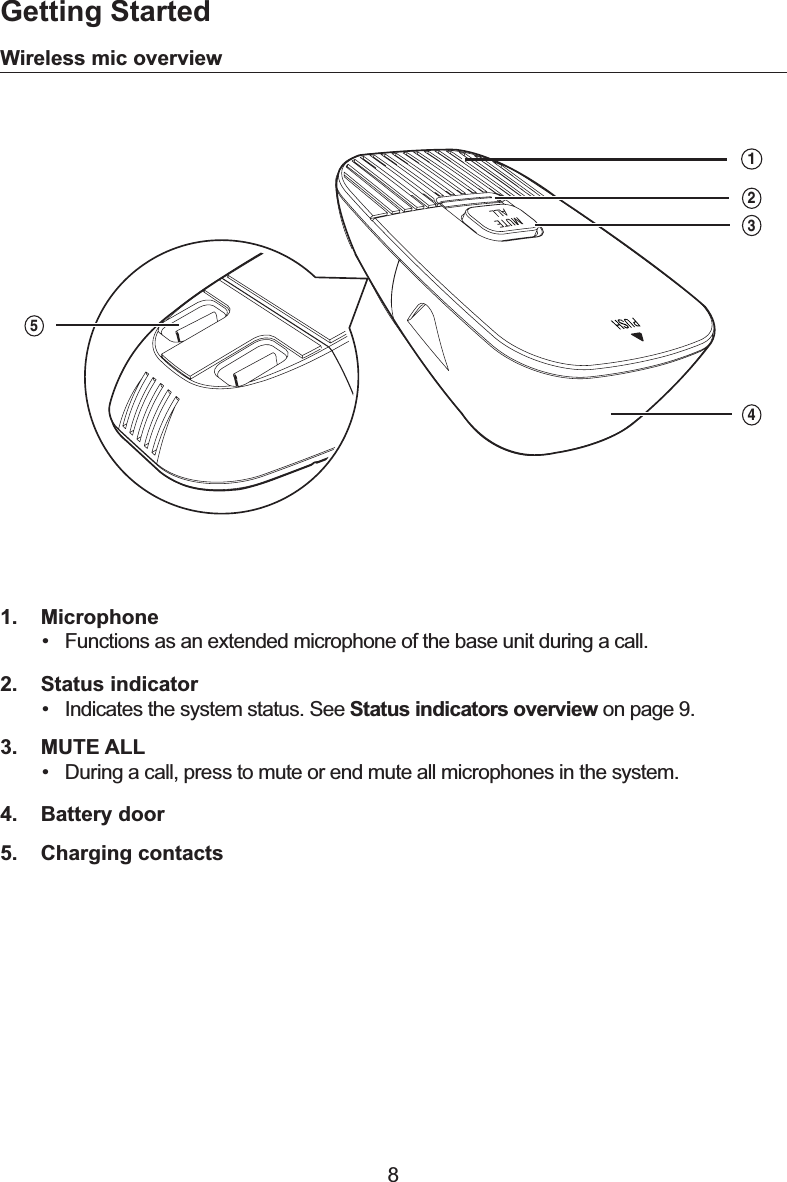
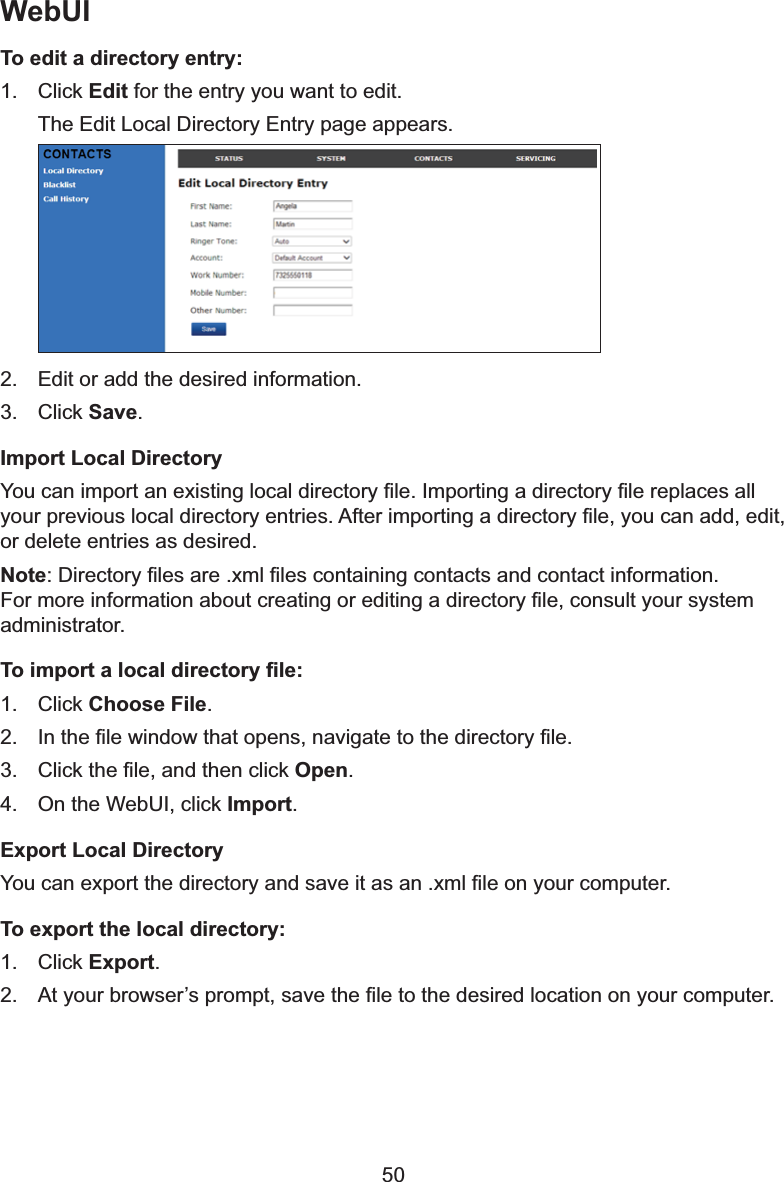
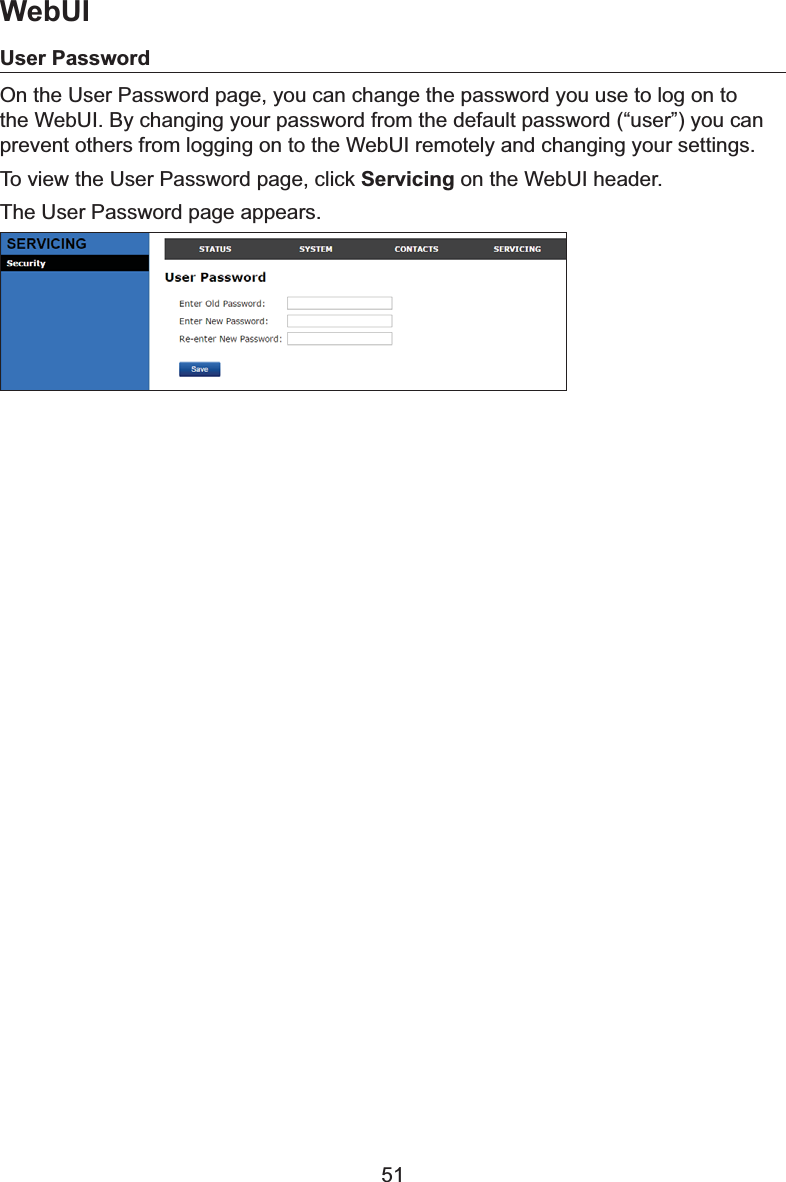
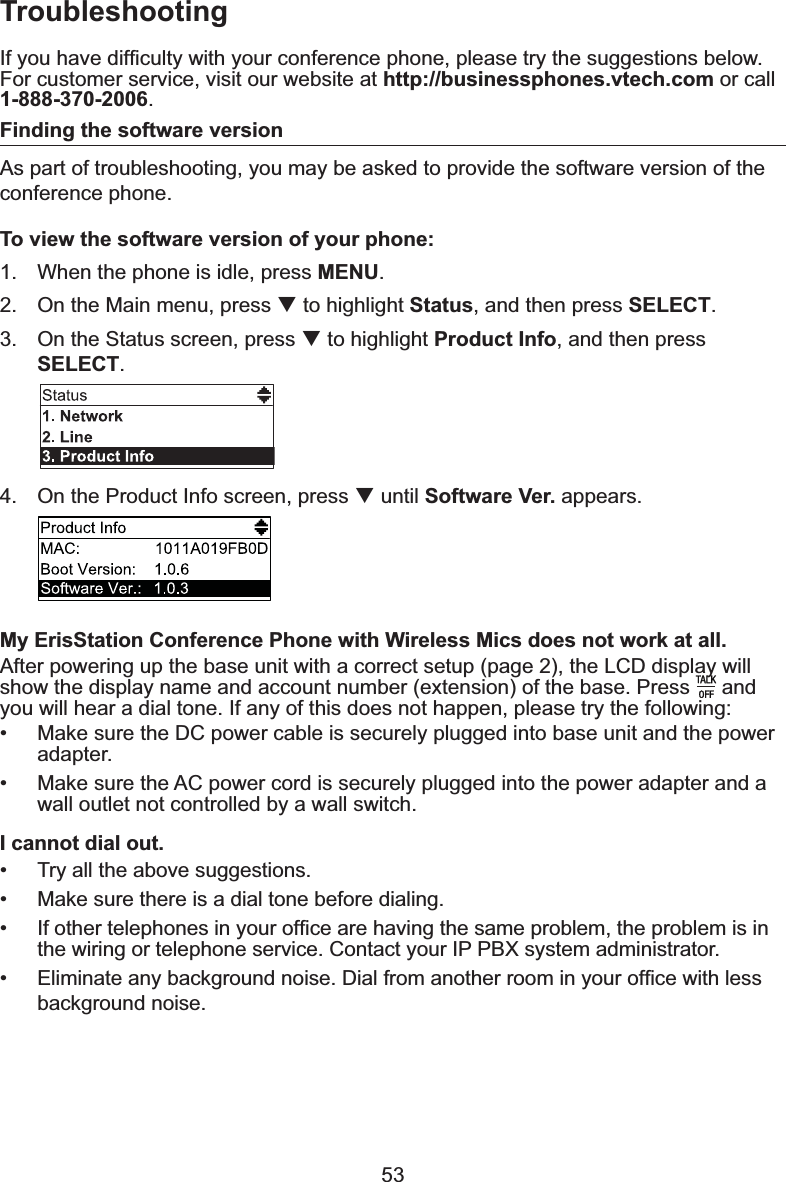
VTech Telecommunications Ltd SIP Wireless Conference-Base Unit manual
UserManual.wiki
>
VTech Telecommunications
>
80 9754 00 User Manual
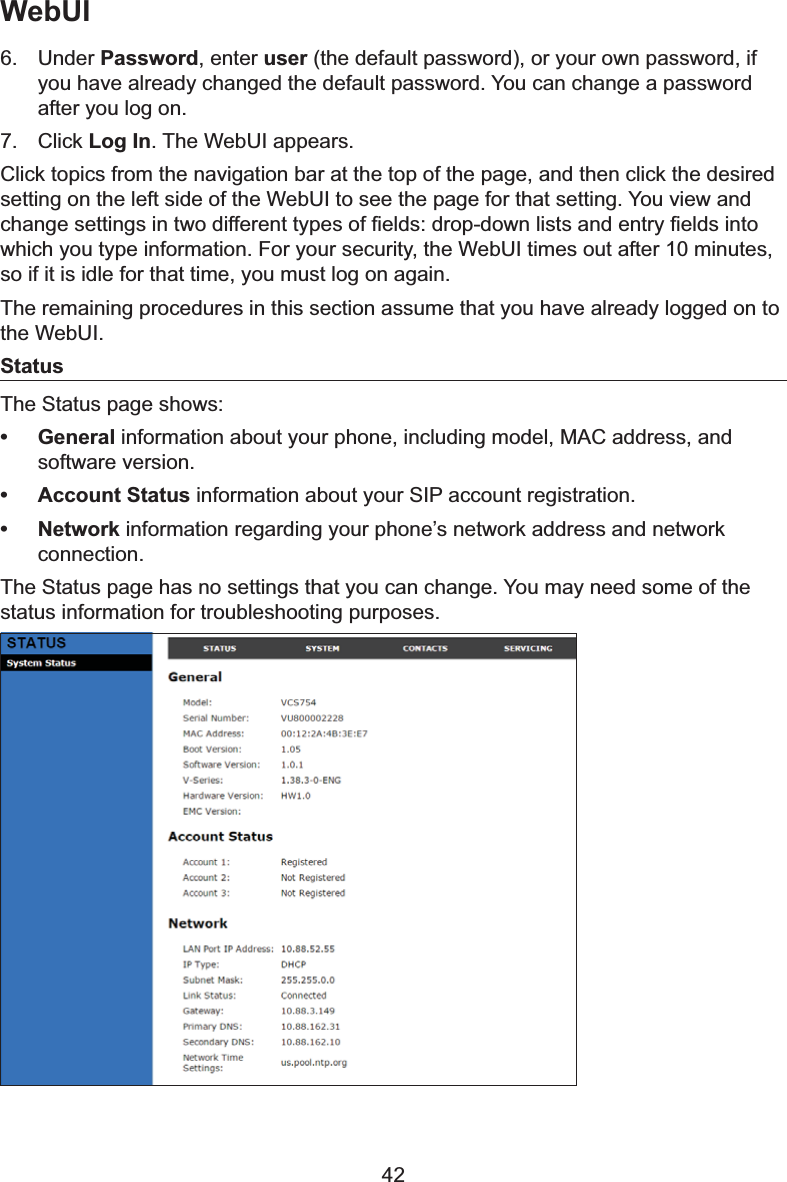
User Manual
Navigation menu
Upload a User Manual
Namespaces
Wiki Guide
HTML
PDF
Info
Views
User Manual
Discussion / Help
Navigation
![wrong type of battery is used. Use only the supplied rechargeable battery or replacement battery SDFN%7%7'RQRWGLVSRVHRIEDWWHULHVLQD¿UH7KH\PD\H[SORGH'LVSRVHRIused battery according to the information in The RBRC® seal.25. Use only the adapter included with this product. Incorrect adapter polarity or voltage can seriously GDPDJHWKHSURGXFW%DVHXQLWSRZHUDGDSWHU,QSXW±9$&+]2XWSXW9'&20P$SAVE THESE INSTRUCTIONS iii](https://usermanual.wiki/VTech-Telecommunications/80-9754-00/User-Guide-2634246-Page-4.png)
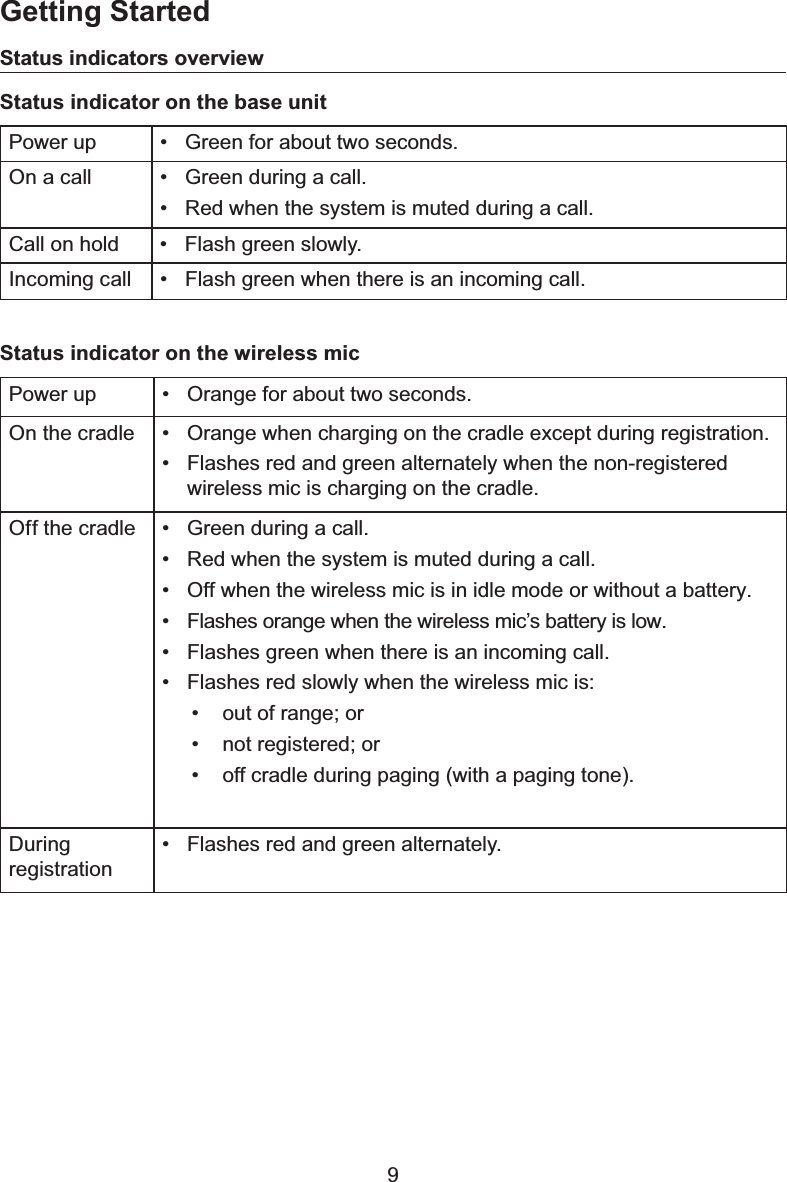


![52BatteryIt takes up to 8 hours for the wireless mic battery to be fully charged (the orange VWDWXVLQGLFDWRUWXUQVRII$OZD\VUHWXUQWKHZLUHOHVVPLFVWRWKHFKDUJLQJFUDGOHVDIWHUXVH:KHQLWLVIXOO\FKDUJHG\RXFDQH[SHFWWKHIROORZLQJRSHUDWLQJWLPHVOperation Operating time:KLOHWKHZLUHOHVVPLFLVLQXVHWDONLQJ Up to 8 hours:KLOHQRWLQXVHVWDQGE\ Up to 70 hours$FWXDOWDONWLPHZLOOEHVKRUWHUIRUFDOOVXVLQJ+'DXGLR*** The wireless mic is not charging or in use.The battery needs charging when:• A new battery is installed into the wireless mic.•7KHVWDWXVLQGLFDWRURQWKHZLUHOHVVPLFÀDVKHVRUDQJHCAUTION:7RUHGXFHWKHULVNRI¿UHRULQMXU\UHDGDQGIROORZWKHVHLQVWUXFWLRQV• Use only the batteries provided or equivalent. To order a replacement, visit our website at http://businessphones.vtech.com or call 1-888-370-2006.•'RQRWGLVSRVHRIWKHEDWWHULHVLQD¿UH&KHFNZLWKORFDOZDVWHPDQDJHPHQWcodes for special disposal instructions.• Do not open or mutilate the batteries. Released electrolyte is corrosive and PD\FDXVHEXUQVRULQMXU\WRWKHH\HVRUVNLQ7KHHOHFWURO\WHPD\EHWR[LFLIswallowed.• Exercise care in handling batteries in order not to create a short circuit with conductive materials.•&KDUJHWKHEDWWHULHVSURYLGHGZLWKRULGHQWL¿HGIRUXVHZLWKWKLVSURGXFWRQO\LQDFFRUGDQFHZLWKWKHLQVWUXFWLRQVDQGOLPLWDWLRQVVSHFL¿HGLQWKLVPDQXDO• Observe proper polarity orientation between the battery and metallic contacts.•7RSUHYHQW¿UHRUVKRFNKD]DUGGRQRWH[SRVHWKLVSURGXFWWRZDWHURUDQ\W\SHof moisture.Appendix](https://usermanual.wiki/VTech-Telecommunications/80-9754-00/User-Guide-2634246-Page-58.png)
![62California Energy Commission battery charging testing instructions7KLVWHOHSKRQHLVVHWXSWRFRPSO\ZLWKWKHHQHUJ\FRQVHUYLQJVWDQGDUGVULJKWRXWRIWKHER[7KHVHLQVWUXFWLRQVDUHLQWHQGHGIRU&DOLIRUQLD(QHUJ\&RPPLVVLRQ&(&FRPSOLDQFHWHVWLQJRQO\:KHQWKHCEC battery charging testing mode is activated, all telephone functions, except battery charging, will be disabled.To activate the CEC battery charging testing mode: 1. 3ODFHDOOZLUHOHVVPLFVZLWKEDWWHULHVLQVHUWHGLQWRWKHEDVHXQLWWRPDNHVXUHWKH\FDQZRUNnormally with the base unit.2. Turn the base unit upside down. The end with the display screen and dial pad should be closest to you.3. Access the battery testing switch, which is located beneath the base unit, midway up and to the right. The switch is hidden beneath an adhesive cover. Use a pen knife or another small blade to lift off the cover and access the switch.4. Use a small screwdriver or another instrument to slide the switch from right to left. 5. Turn the base unit right side up.6. Remove the batteries from each wireless mic.7. Insert the battery back into a wireless mic while holding the MUTE ALL key on the mic until the mic’s status indicator shows steady red.8. Release the MUTE ALL key and then press it again immediately.9. 3ODFHWKHPLFLQLWVFKDUJLQJFUDGOHRQWKHEDVHXQLW7KHPLFVWDWXVLQGLFDWRUVKRXOGÀDVKUHGDQGgreen.10.Repeat steps 6 through 8 for the remaining wireless mics.After about one minute, the base unit will enter the CEC battery charging testing mode. The base indicators turn off and all wireless mics are will be deregistered. All telephone functions, except battery charging will be disabled.If the base unit has failed to enter this mode, repeat step 5 through step 9 above.To deactivate the CEC battery charging testing mode: Turn the base unit upside down and slide the switch back to its original position. The base unit is powered up as normal. To register the wireless mics again, go to 0DLQ0HQXĺ8VHU6HWWLQJVĺ:LUHOHVVPLFURSKRQHĺ5HJLVWHU, or follow WKHLQVWUXFWLRQVLQWKH9&6:0ZLUHOHVVPLF4XLFN6WDUW*XLGH.For C-ETL compliance onlyMesures de sécurité importantes9RXVGHYH]WRXMRXUVREVHUYHUGHVPesures de précaution lorsque vous utilisez le Téléphone de FRQIpUHQFHDYHFPLFURSKRQHVVDQV¿O(ULV6WDWLRQD¿QG¶pYLWHUOHVULVTXHVG¶LQFHQGLHG¶pOHFWURFXWLRQHWGHEOHVVXUHVLQFOXDQWFHTXLVXLW1. Lisez et comprenez bien toutes les instructions.2. Observez toutes les instructions et mises en garde inscrites sur l’appareil.3. Débranchez ce téléphone de la prise murale avant de le nettoyer. N’utilisez pas de nettoyeurs liquides ni en aérosol. N’utilisez qu’un chiffon doux et légèrement humecté.4. N’utilisez pas ce produit près de l’eau, tel que près d’un bain, d’un lavabo, d’un évier de cuisine, d’un EDFGHODYDJHRXG¶XQHSLVFLQHRXGDQVXQVRXVVROKXPLGHRXVRXVODGRXFKH5. Ne déposez pas ce téléphone sur un chariot, support ou table chancelants. L’appareil pourrait tomber et être sérieusement endommagé.6. /HVRXYHUWXUHVVLWXpHVjO¶DUULqUHRXVRXVOHVRFOHHWOHPLFURSKRQHVDQV¿OVHUYHQWjODYHQWLODWLRQ$¿QG¶HPSrFKHUODVXUFKDXIIHFHVRXYHUWXUHVQHGRLYHQWSDVrWUHREVWUXpHVHQSODoDQWO¶DSSDUHLOVXUun lit, divan, tapis ou autre surface similaires. Ne placez pas cet appareil à proximité d’un élément de chauffage ni d’une plinthe électrique. De plus, ne l’installez pas dans une unité murale ou un cabinet fermé qui ne possède pas d’aération adéquate.7. Ne faites fonctionner cet appareil qu’avec le type d’alimentation indiqué sur les étiquettes de l’appareil.Si vous ne connaissez pas le voltage de votre maison, consultez votre marchand ou votre fournisseur d’électricité.](https://usermanual.wiki/VTech-Telecommunications/80-9754-00/User-Guide-2634246-Page-68.png)
![638. Ne déposez rien sur le cordon d’alimentation. Installez cet appareil dans un endroit sécuritaire, là où personne ne pourra trébucher sur la ligne d’alimentation ni le cordon téléphonique modulaire.9. 1¶HQIRQFH]MDPDLVG¶REMHWVGDQVOHVIHQWHVGXVRFOHRXGXPLFURSKRQHVDQV¿OFDUFHFLULVTXHUDLWG¶HQWUHUHQFRQWDFWDYHFGHVSRLQWVGHWHQVLRQGDQJHUHX[RXSURYRTXHUXQFRXUWFLUFXLW1¶pFKDSSH]pas de liquides dans l’appareil.10. $¿QGHUpGXLUHOHVULVTXHVG¶pOHFWURFXWLRQQHGpPRQWH]SDVO¶DSSDUHLOPDLVDSSRUWH]OHSOXW{WjXQFHQWUHGHVHUYLFHTXDOL¿pV¶LOGRLWrWUHUpSDUp/¶RXYHUWXUHRXOHUHWUDLWGHSLqFHVGXVRFOHRXGXPLFURSKRQHVDQV¿ODXWUHTXHOHVSRUWHVG¶DFFqVSHXYHQWYRXVH[SRVHUjGHVWHQVLRQVGDQJHUHXVHVHWjG¶DXWUHVULVTXHVDébranchez l’appareil avant de procéder au nettoyage. Utilisez un chiffon humide et doux.11. Ne surchargez pas les prises de courant et les rallonges.12. Débranchez cet appareil de la prise de courant et communiquez avec le département de service à la FOLHQWqOHGH97HFKGDQVOHVFDVVXLYDQWV• Lorsque le cordon d’alimentation est endommagé ou écorché.• Si du liquide a été échappé dans l’appareil.• Si l’appareil a été exposé à une source d’humidité telle que la pluie ou l’eau.• Si le produit ne fonctionne pas normalement en respectant les instructions de fonctionnement. Réglez uniquement les commandes indiquées dans le les instructions de fonctionnement. Les réglages incorrects des autres commandes pourraient provoquer un dommage qui pourrait H[LJHUXQWUDYDLOH[KDXVWLIGHODSDUWG¶XQWHFKQLFLHQDXWRULVpD¿QGHUpWDEOLUOHIRQFWLRQQHPHQWnormal de l’appareil.•6LOHSURGXLWDpWppFKDSSpHWTXHOHVRFOHHWRXOHPLFURSKRQHVDQV¿ODpWpHQGRPPDJp•6LOHSURGXLWDI¿FKHXQHQHWWHGLPLQXWLRQGHVDSHUIRUPDQFH13. eYLWH]G¶XWLOLVHUOH7pOpSKRQHGHFRQIpUHQFHDYHFPLFURSKRQHVVDQV¿O(ULV6WDWLRQSHQGDQWXQRUDJH14. 1¶XWLOLVH]SDVOH7pOpSKRQHGHFRQIpUHQFHDYHFPLFURSKRQHVVDQV¿O(ULV6WDWLRQSRXUUDSSRUWHUXQHIXLWHGHJD]jSUR[LPLWpGHODIXLWH(QFHUWDLQHVFLUFRQVWDQFHVXQHÀDPPqFKHSRXUUDLWrWUHprovoquée lorsque l’adaptateur est branché dans une prise de courant ou lorsque le microphone auxiliaire est déposé sur son socle. Ceci est un événement commun associé à la fermeture d’un circuit électrique. L’utilisateur ne doit pas brancher le téléphone dans une prise de courant ni insérer XQPLFURSKRQHVDQV¿OUHFKDUJpGDQVOHVRFOHVLOHWpOpSKRQHVHWURXYHGDQVXQHQYLURQQHPHQWFRQWHQDQWGHVFRQFHQWUDWLRQVGHPDWLqUHVLQÀDPPDEOHVRXDXWUHVJD]VXVFHSWLEOHVGHSURGXLUHGHVÀDPPHVVDXIHQSUpVHQFHG¶XQHDpUDWLRQDGpTXDWH8QHÀDPPqFKHGDQVXQWHOHQGURLWSRXUUDLWSURYRTXHUXQLQFHQGLHRXXQHH[SORVLRQ'HWHOVHQYLURQQHPHQWVSHXYHQWFRPSUHQGUHGHVHQGURLWVRO¶RQXWLOLVHGHO¶R[\JqQHPpGLFDOVDQVYHQWLODWLRQDGpTXDWHGHVJD]LQGXVWULHOVGLVVROYDQWVGHQHWWR\DJHGHVYDSHXUVG¶HVVHQFHHWFXQHIXLWHGHJD]QDWXUHOHWF15. 1HGpSRVH]TXHOHPLFURSKRQHVDQV¿OSUqVGHYRWUHRUHLOOHTXHORUVTX¶LOHVWHQPRGHGHconversation normale.16. &HVDGDSWDWHXUVRQWpWpFRQoXVSRXUrWUHRULHQWpVHQSRVLWLRQYHUWLFDOHRXPRQWpVDXVRO/HVEURFKHVQHVRQWSDVFRQoXHVSRXUPDLQWHQLUO¶DGDSWDWHXUHQSODFHVLFHOXLFLHVWEDUQFKpGDQVXQHprise au plafond ou sous une table/ armoire.17. 3RXUOHV352'8,76¬%5$1&+(5¬81(35,6('(&285$17ODSULVHGHFRXUDQWGRLWrWUHLQVWDOOpHSUqVGXSURGXLWD¿QG¶DVVXUHUXQHDFFHVVLELOLWpVpFXULWDLUHjODSULVHGHFRXUDQW18. MISE EN GARDE : Il peut y avoir un risque d’explosion si vous utilisez le mauvais type de piles. 1¶XWLOLVH]TXHOHEORFSLOHVUHFKDUJHDEOHLQFOXVRXOHEORFSLOHVGHUHFKDQJH%7%71¶LQFLQpUH]SDVOHVSLOHV&HOOHVFLULVTXHUDLHQWG¶H[SORVHU-HWH]OHVSLOHVXVpHVVHORQOHVrenseignements suivant le sceau du RBRCMD.19. N’utilisez que les adaptateurs inclus avec ce produit. L’utilisation d’un adaptateur dont la polarité ou la tension serait inadéquate risque d’endommager sérieusement le produit et mettre votre sécurité en SpULO$GDSWDWHXU(QWUpH±9&$+]6RUWLH9&&20P$CONSERVEZ CES INSTRUCTIONS](https://usermanual.wiki/VTech-Telecommunications/80-9754-00/User-Guide-2634246-Page-69.png)
![64Pile•0,6((1*$5'(1¶XWLOLVH]TXHODSLOHLQFOXVH•1HMHWH]SDVODSLOHDXIHX9pULILH]OHVLQVWUXFWLRQVVSpFLILTXHVGHPLVHDX[UHEXVDXSUès des autorités locales.• N’ouvrez pas et ne mutilez pas la pile. L’électrolyte qui s’en échapperait est corrosif et pourrait causer des brûlures ou des blessures aux yeux ou à la peau. L’électrolyte est toxique si avalé.•6R\H]SUXGHQWVORUVTXHYRXVPDQLSXOH]OHVSLOHVDILQG¶pYLWHUOHVFRXUWVFLUFXLWVSURYRTXpVSDUGHVmatériaux conducteurs.• Rechargez la pile incluse avec cet appareil, selon les instructions et limites spécifiées dans ce guide d’utilisation.Stimulateurs cardiaques implantés dans l’organisme/HVVLPXODWHXUVFDUGLDTXHVV¶DSSOLTXHXQLTXHPHQWDX[WpOpSKRQHVQXPpULTXHVVDQVILO/¶RUJDQLVPHµ:LUHOHVV7HFKQRORJ\5HVHDUFK//&:75¶XQHILUPHGHUHFKHUFKHLQGpSHQGDQWHDPHQpune évaluation pluridisciplinaire des interférences entre les téléphones sans fil portatifs et les stimulateurs FDUGLDTXHVLPSODQWpVGDQVO¶RUJDQLVPH$SSX\pHSDUO¶$GPLQLVWUDWLRQGHVDOLPHQWVHWGURJXHV)'$GHVeWDWV8QLVODILUPH:75UHFRPPDQGHDX[PpGHFLQVAvis aux détenteurs de stimulateurs cardiaques• Ils doivent tenir le téléphone sans fil à une distance d’au moins six pouces du stimulateur cardiaque.• Ils ne doivent PAS placer le téléphone sans fil directement sur le stimulateur cardiaque, tel que dans une SRFKHGHFKHPLVHORUVTXHFHOXLFLHVWHQPDUFKH• Ils doivent utiliser le téléphone sans fil en l’appuyant sur l’oreille qui se trouve dans la direction opposée au stimulateur cardiaque.L’étude effectuée par l’organisme WRS n’a pas identifié de risque pour les détenteurs de simulateurs FDUGLDTXHVFDXVpVSDUOHVJHQVTXLXWLOLVHQWXQWpOpSKRQHVDQVILOjSUR[LPLWpGHFHX[FL¬SURSRVGHVPLFURSKRQHVVDQV¿O• Confidentialité: Les mêmes caractéristiques qui constituent des avantages pour les téléphones sans fil affichent également des restrictions. Les appels téléphoniques sur les téléphones conférence sans ILOVRQWWUDQVPLVHQWUHOHFRPELQpVDQVILOHWOHVRFOHSDUOHELDLVG¶RQGHVUDGLRLO\DGRQFODSRVVLELOLWpque vos conversations téléphoniques sans fil soient interceptées par des équipements de réception radio se trouvant dans la portée du combiné sans fil. Pour cette raison, vous ne devez pas percevoir les communications sur les téléphones conférence sans fil comme étant aussi confidentielles que celles des téléphones à cordons.• Alimentation électrique: Le socle de ce téléphone conférence sans fil doit être branché à une prise pOHFWULTXHIRQFWLRQQHOOH/DSULVHpOHFWULTXHQHGRLWSDVrWUHFRQWU{OpHSDUXQLQWHUUXSWHXUPXUDO/HVappels ne pourront pas être effectués du téléphone conférence sans fil si le socle est débranché ou mis hors tension ou si le courant est interrompu.• Possibilité d’interférences aux téléviseurs: Certains microphones sans fil sans fil fonctionnent sur des fréquences pouvant causer des interférences aux téléviseurs et aux magnétoscopes. Pour réduire ou prévenir de telles interférences, ne placez pas le socle du téléphone sans fil à proximité ou sur un téléviseur ou magnétoscope. S’il y a présence de parasites, il est conseillé d’éloigner le téléphone sans fil du téléviseur ou du magnétoscope afin de réduire possiblement les interférences.• Piles rechargeables:0DQLSXOH]OHVSLOHVDYHFVRLQDILQGHQHSDVOHVFRXUWFLUFXLWHUDYHFGHVEDJXHVbracelets ou clés. Les piles ou le conducteur peut surchauffer et causer des blessures.• Les bloc-piles rechargeables à au lithium-ion:-HWH]FHVEORFVSLOHVGHPDQLqUHpFRORJLTXHet sécuritaire. Ne les incinérez pas et ne les percez pas. Tel que les autres piles de ce type, elles pourraient dégager une matière toxique qui peut causer des blessures corporelles si elles sont brûlées ou percées.For C-ETL compliance only](https://usermanual.wiki/VTech-Telecommunications/80-9754-00/User-Guide-2634246-Page-70.png)
![65What does this limited warranty cover?The manufacturer of this VTech Product warrants to the holder of a valid proof of purchase (“Consumer” or ³\RX´WKDWWKH3URGXFWDQGDOODFFHVVRULHVSURYLGHGLQWKHVDOHVSDFNDJH³3URGXFW´DUHIUHHIURPGHIHFWVin material and workmanship, pursuant to the following terms and conditions, when installed and used normally and in accordance with the Product operating instructions. This limited warranty extends only to the Consumer for Products purchased and used in the United States of America and Canada.What will VTech do if the Product is not free from defects in materials and workmanship during the limited warranty period (“Materially Defective Product”)?During the limited warranty period, VTech’s authorized service representative will repair or replace at VTech’s option, without charge, a Materially Defective Product. If we repair the Product, we may use new or refurbished replacement parts. If we choose to replace the Product, we may replace it with a new or refurbished Product of the same or similar design. We will retain defective parts, modules, or equipment. Repair or replacement of the Product, at VTech’s option, is your exclusive remedy. VTech will return the repaired or replacement Products to you in working condition. You should expect the repair or replacement to take approximately 30 days.How long is the limited warranty period?7KHOLPLWHGZDUUDQW\SHULRGIRUWKH3URGXFWH[WHQGVIRU7:2<($56IURPWKHGDWHRISXUFKDVH,IVTech repairs or replaces a Materially Defective Product under the terms of this limited warranty, this OLPLWHGZDUUDQW\DOVRDSSOLHVWRWKHUHSDLUHGRUUHSODFHPHQW3URGXFWIRUDSHULRGRIHLWKHUDGD\VIURPWKHGDWHWKHUHSDLUHGRUUHSODFHPHQW3URGXFWLVVKLSSHGWR\RXRUEWKHWLPHUHPDLQLQJRQWKHRULJLQDOWZR\HDUZDUUDQW\ZKLFKHYHULVORQJHUWhat is not covered by this limited warranty?7KLVOLPLWHGZDUUDQW\GRHVQRWFRYHU1. 3URGXFWWKDWKDVEHHQVXEMHFWHGWRPLVXVHDFFLGHQWVKLSSLQJRURWKHUSK\VLFDOGDPDJHLPSURSHULQVWDOODWLRQDEQRUPDORSHUDWLRQRUKDQGOLQJQHJOHFWLQXQGDWLRQ¿UHZDWHURURWKHUOLTXLGLQWUXVLRQRU2. 3URGXFWWKDWKDVEHHQGDPDJHGGXHWRUHSDLUDOWHUDWLRQRUPRGL¿FDWLRQE\DQ\RQHRWKHUWKDQDQDXWKRUL]HGVHUYLFHUHSUHVHQWDWLYHRI97HFKRU3. Product to the extent that the problem experienced is caused by signal conditions, network reliability, or FDEOHRUDQWHQQDV\VWHPVRU4. 3URGXFWWRWKHH[WHQWWKDWWKHSUREOHPLVFDXVHGE\XVHZLWKQRQ97HFKDFFHVVRULHVRU5. Product whose warranty/quality stickers, product serial number plates or electronic serial numbers KDYHEHHQUHPRYHGDOWHUHGRUUHQGHUHGLOOHJLEOHRU6. Product purchased, used, serviced, or shipped for repair from outside the United States of America or Canada, or used for commercial or institutional purposes (including but not limited to Products used for UHQWDOSXUSRVHVRU7. 3URGXFWUHWXUQHGZLWKRXWDYDOLGSURRIRISXUFKDVHVHHLWHPRQWKHQH[WSDJHRU8. &KDUJHVIRULQVWDOODWLRQRUVHWXSDGMXVWPHQWRIFXVWRPHUFRQWUROVDQGLQVWDOODWLRQRUUHSDLURIV\VWHPVoutside the unit.Limited warranty](https://usermanual.wiki/VTech-Telecommunications/80-9754-00/User-Guide-2634246-Page-71.png)
![66How do you get warranty service?To obtain warranty service in the USA, please visit our website at http://businessphones.vtech.com or call 1-888-370-2006.NOTE%HIRUHFDOOLQJIRUVHUYLFHSOHDVHUHYLHZWKHXVHU¶VPDQXDODFKHFNRIWKH3URGXFW¶VFRQWUROVDQGfeatures may save you a service call.Except as provided by applicable law, you assume the risk of loss or damage during transit and transportation and are responsible for delivery or handling charges incurred in the transport of the 3URGXFWVWRWKHVHUYLFHORFDWLRQ97HFKZLOOUHWXUQUHSDLUHGRUUHSODFHG3URGXFWXQGHUWKLVOLPLWHGwarranty. Transportation, delivery or handling charges are prepaid. VTech assumes no risk for damage or loss of the Product in transit. If the Product failure is not covered by this limited warranty, or proof of purchase does not meet the terms of this limited warranty, VTech will notify you and will request that you authorize the cost of repair prior to any further repair activity. You must pay for the cost of repair and return shipping costs for the repair of Products that are not covered by this limited warranty.What must you return with the Product to get warranty service?1. Return the entire original package and contents including the Product to the VTech service location DORQJZLWKDGHVFULSWLRQRIWKHPDOIXQFWLRQRUGLI¿FXOW\DQG2. ,QFOXGHD³YDOLGSURRIRISXUFKDVH´VDOHVUHFHLSWLGHQWLI\LQJWKH3URGXFWSXUFKDVHG3URGXFWPRGHODQGWKHGDWHRISXUFKDVHRUUHFHLSWDQG3. Provide your name, complete and correct mailing address, and telephone number.Other limitationsThis warranty is the complete and exclusive agreement between you and VTech. It supersedes all other written or oral communications related to this Product. VTech provides no other warranties for this Product. The warranty exclusively describes all of VTech’s responsibilities regarding the Product. There are no other H[SUHVVZDUUDQWLHV1RRQHLVDXWKRUL]HGWRPDNHPRGL¿FDWLRQVWRWKLVOLPLWHGZDUUDQW\DQG\RXVKRXOGQRWUHO\RQDQ\VXFKPRGL¿FDWLRQ6WDWH3URYLQFLDO/DZ5LJKWV7KLVZDUUDQW\JLYHV\RXVSHFL¿FOHJDOULJKWVDQG\RXPD\DOVRKDYHRWKHUrights, which vary from state to state or province to province./LPLWDWLRQV,PSOLHGZDUUDQWLHVLQFOXGLQJWKRVHRI¿WQHVVIRUDSDUWLFXODUSXUSRVHDQGPHUFKDQWDELOLW\DQXQZULWWHQZDUUDQW\WKDWWKH3URGXFWLV¿WIRURUGLQDU\XVHDUHOLPLWHGWRWZR\HDUVIURPWKHGDWHRIpurchase. Some states/provinces do not allow limitations on how long an implied warranty lasts, so the above limitation may not apply to you. In no event shall VTech be liable for any indirect, special, incidental, FRQVHTXHQWLDORUVLPLODUGDPDJHVLQFOXGLQJEXWQRWOLPLWHGWRORVWSUR¿WVRUUHYHQXHLQDELOLW\WRXVHWKH3URGXFWRURWKHUDVVRFLDWHGHTXLSPHQWWKHFRVWRIVXEVWLWXWHHTXLSPHQWDQGFODLPVE\WKLUGSDUWLHVresulting from the use of this Product. Some states/provinces do not allow the exclusion or limitation of incidental or consequential damages, so the above limitation or exclusion may not apply to you.Please retain your original sales receipt as proof of purchase.Limited warranty](https://usermanual.wiki/VTech-Telecommunications/80-9754-00/User-Guide-2634246-Page-72.png)
![677HFKQLFDOVSHFL¿FDWLRQVFrequency control Crystal controlled PLL synthesizerTransmit frequency :LUHOHVVPLF±0+]%DVHXQLW±0+]Channels 5Nominal effective rangeMaximum power allowed by FCC and IC. Actual operating range may vary according to environmental conditions at the time of use.Optimal and minimum distances2SWLPDOGLVWDQFHEHWZHHQWKHEDVHXQLWZLUHOHVVPLFDQGWKHSDUWLFLSDQWIHHW0LQLPXPGLVWDQFHEHWZHHQHDFKZLUHOHVVPLFIRRWPower requirements :LUHOHVVPLF/LLRQ%DWWHU\3DFN9P$+UHFKDUJHDEOHEDWWHU\%DVHXQLWDGDSWHU,QSXW±9$&+] Output9V DC @ 2000mAMemory /RFDOGLUHFWRU\PHPRU\ORFDWLRQVXSWRGLJLWVDQGFKDUDFWHUV&DOOORJPHPRU\ORFDWLRQVXSWRGLJLWVDQGFKDUDFWHUV](https://usermanual.wiki/VTech-Telecommunications/80-9754-00/User-Guide-2634246-Page-73.png)
