Vertu RM-389V Quad Band Phone User Manual Constellation F Reference Manual
Vertu Quad Band Phone Constellation F Reference Manual
Vertu >
Contents
User manual Part 1

REFERENCE MANUAL

English
GETTING STARTED . . . . . . . . . . . . . . . 1
REGISTER YOUR VERTU PHONE . . . . . . . . . . . . . . . 1
VERTU PACKAGE CONTENTS . . . . . . . . . . . . . . . . . 1
CD-ROM . . . . . . . . . . . . . . . . . . . . . . . . . . . . . . . . 1
NETWORKS . . . . . . . . . . . . . . . . . . . . . . . . . . . . . . 1
CONVENTIONS USED IN THIS GUIDE . . . . . . . . . . . . 1
GLOSSARY . . . . . . . . . . . . . . . . . . . . . . . . . . . . . . 1
YOUR VERTU PHONE - FRONT VIEW . . . . . . . . . . . . 2
YOUR VERTU PHONE - BACK VIEW . . . . . . . . . . . . . 2
YOUR VERTU PHONE - SIDE VIEW 1 . . . . . . . . . . . . 3
YOUR VERTU PHONE - SIDE VIEW 2 . . . . . . . . . . . . 3
OUTER DISPLAY . . . . . . . . . . . . . . . . . . . . . . . . . . 4
INSERTING THE SIM AND MEMORY CARD . . . . . . . . 5
THE SETUP WIZARD . . . . . . . . . . . . . . . . . . . . . . . 6
USING YOUR VERTU PHONE . . . . . . . . . . . . . . . . . . 6
ICONS AND INDICATORS . . . . . . . . . . . . . . . . . . . . 7
GLOWING LIGHT . . . . . . . . . . . . . . . . . . . . . . . . . . 8
PROTECTING YOUR VERTU PHONE . . . . . . . . . . . . . 8
THE MAIN MENU . . . . . . . . . . . . . . . . . . . . . . . . . . 8
PERSONALISING YOUR VERTU PHONE . . . . . . . . . . 9
LOCATION BASED FEATURES . . . . . . . . . . . . . . . . . 11
THE MEDIA PLAYER . . . . . . . . . . . . . . . . . . . . . . . . 11
CD-ROM . . . . . . . . . . . . . . . . . . . . . . . . . . . . . . . . 11
CARE AND MAINTENANCE . . . . . . . . . . . . . . . . . . . 12
SPECIFICATIONS . . . . . . . . . . . . . . . . . . . . . . . . . . 12
SECURITY . . . . . . . . . . . . . . . . . . . . . . 13
PIN CODE . . . . . . . . . . . . . . . . . . . . . . . . . . . . . . . 13
PIN2 CODE . . . . . . . . . . . . . . . . . . . . . . . . . . . . . . 13
SECURITY CODE . . . . . . . . . . . . . . . . . . . . . . . . . . 13
SECURITY LEVEL. . . . . . . . . . . . . . . . . . . . . . . . . . 14
SECURITY MODULE . . . . . . . . . . . . . . . . . . . . . . . . 14
CALL BARRING . . . . . . . . . . . . . . . . . . . . . . . . . . . 14
BARRING PASSWORD . . . . . . . . . . . . . . . . . . . . . . 14
FIXED DIALLING . . . . . . . . . . . . . . . . . . . . . . . . . . 15
CLOSED USER GROUP . . . . . . . . . . . . . . . . . . . . . . 15
AUTHORITY CERTIFICATES & USER CERTIFICATES . 15
MESSAGES . . . . . . . . . . . . . . . . . . . . . 16
MULTIMEDIA MESSAGES . . . . . . . . . . . . . . . . . . . . 20
AUDIO MESSAGES . . . . . . . . . . . . . . . . . . . . . . . . . 22
VIDEO MESSAGES . . . . . . . . . . . . . . . . . . . . . . . . . 23
E-MAIL . . . . . . . . . . . . . . . . . . . . . . . . . . . . . . . . . 23
IMS (INSTANT MESSAGING) . . . . . . . . . . . . . . . . . . 23
VOICE MESSAGES . . . . . . . . . . . . . . . . . . . . . . . . . 23
INFO MESSAGES . . . . . . . . . . . . . . . . . . . . . . . . . . 24
SERVICE MESSAGES . . . . . . . . . . . . . . . . . . . . . . . 24
BLUETOOTH MESSAGES . . . . . . . . . . . . . . . . . . . . 24
SERVICE COMMANDS . . . . . . . . . . . . . . . . . . . . . . . 24
CONTACTS . . . . . . . . . . . . . . . . . . . . . 25
CONTACTS MEMORY . . . . . . . . . . . . . . . . . . . . . . . 25
ADDING CONTACTS . . . . . . . . . . . . . . . . . . . . . . . . 26
ACCESSING CONTACTS . . . . . . . . . . . . . . . . . . . . . 26
DELETING CONTACTS . . . . . . . . . . . . . . . . . . . . . . 26
CONTACT NUMBER AND TEXT TYPES . . . . . . . . . . . 27
CONTACTS MENU . . . . . . . . . . . . . . . . . . . . . . . . . 28
GROUPS . . . . . . . . . . . . . . . . . . . . . . . . . . . . . . . . 29
OPTIONS ON CONTACT NUMBERS . . . . . . . . . . . . . 30
CALL HISTORY . . . . . . . . . . . . . . . . . . .32
THE CALL HISTORY . . . . . . . . . . . . . . . . . . . . . . . . 32
VIEWING THE CALL HISTORY. . . . . . . . . . . . . . . . . 32
VIEWING MISSED CALLS . . . . . . . . . . . . . . . . . . . . 32
VIEWING RECEIVED CALLS . . . . . . . . . . . . . . . . . . 32
VIEWING DIALLED NUMBERS . . . . . . . . . . . . . . . . . 32
VIEWING MESSAGE RECIPIENTS . . . . . . . . . . . . . . 32
CLEARING LOG LISTS . . . . . . . . . . . . . . . . . . . . . . 32
VIEWING CALL DURATION . . . . . . . . . . . . . . . . . . . 32
VIEWING THE PACKET DATA COUNTER . . . . . . . . . 32
VIEWING THE DATA TIMER . . . . . . . . . . . . . . . . . . 33
VIEWING THE MESSAGE LOG . . . . . . . . . . . . . . . . . 33
VIEWING THE POSITIONING LOG . . . . . . . . . . . . . . 33
VIEWING THE SYNC LOG . . . . . . . . . . . . . . . . . . . . 33
SETTINGS . . . . . . . . . . . . . . . . . . . . . . .34
DATE AND TIME . . . . . . . . . . . . . . . . . . . . . . . . . . 34
PROFILES . . . . . . . . . . . . . . . . . . . . . . . . . . . . . . 34
TONES . . . . . . . . . . . . . . . . . . . . . . . . . . . . . . . . . 35
DISPLAY . . . . . . . . . . . . . . . . . . . . . . . . . . . . . . . . 35
MY SHORTCUTS . . . . . . . . . . . . . . . . . . . . . . . . . . 36
CONNECTIVITY . . . . . . . . . . . . . . . . . . . . . . . . . . . 36
CALL SETTINGS . . . . . . . . . . . . . . . . . . . . . . . . . . 37
PHONE SETTINGS . . . . . . . . . . . . . . . . . . . . . . . . . 38
CONFIGURATION . . . . . . . . . . . . . . . . . . . . . . . . . 40
SECURITY . . . . . . . . . . . . . . . . . . . . . . . . . . . . . . 40
WORKSHOP RESET . . . . . . . . . . . . . . . . . . . . . . . . 40
SYNC AND BACKUP . . . . . . . . . . . . . . . . . . . . . . . . 40
ADDITIONS . . . . . . . . . . . . . . . . . . . . . .42
GAMES . . . . . . . . . . . . . . . . . . . . . . . . . . . . . . . . . 42
CALCULATOR . . . . . . . . . . . . . . . . . . . . . . . . . . . . 42
MEDIA PLAYER . . . . . . . . . . . . . . . . . . . . . . . . . . . 42
EQUALISER . . . . . . . . . . . . . . . . . . . . . . . . . . . . . 43
VIDEO RECORDER . . . . . . . . . . . . . . . . . . . . . . . . 43
VOICE RECORDER . . . . . . . . . . . . . . . . . . . . . . . . 43
NOTES . . . . . . . . . . . . . . . . . . . . . . . . . . . . . . . . . 44
COLLECTION . . . . . . . . . . . . . . . . . . . . . . . . . . . . 44
STOPWATCH . . . . . . . . . . . . . . . . . . . . . . . . . . . . 44
CALENDAR . . . . . . . . . . . . . . . . . . . . . .45
CALENDAR . . . . . . . . . . . . . . . . . . . . . . . . . . . . . . 45
CALENDAR NOTES . . . . . . . . . . . . . . . . . . . . . . . . 45
TO-DO LIST . . . . . . . . . . . . . . . . . . . . . . . . . . . . . 46
ALARM CLOCK . . . . . . . . . . . . . . . . . . .47
SETTING THE ALARM . . . . . . . . . . . . . . . . . . . . . . 47
WEB. . . . . . . . . . . . . . . . . . . . . . . . . . . .48
AUTOMATICALLY SETTING UP WEB BROWSING . . . 48
MANUALLY SETTING UP WEB BROWSING . . . . . . . . 48
VERTU MOBILE . . . . . . . . . . . . . . . . . . . . . . . . . . . 48
GO TO ADDRESS . . . . . . . . . . . . . . . . . . . . . . . . . 48
BROWSE PAGES . . . . . . . . . . . . . . . . . . . . . . . . . . 48
SETTINGS . . . . . . . . . . . . . . . . . . . . . . . . . . . . . . 48

English
CLEAR THE CACHE . . . . . . . . . . . . . . . . . . . . . . . . 49
VERTU SERVICES. . . . . . . . . . . . . . . . 51
VERTU SELECT . . . . . . . . . . . . . . . . . . . . . . . . . . . 51
CITY BRIEF . . . . . . . . . . . . . . . . . . . . . . . . . . . . . . 51
VERTU FORTRESS . . . . . . . . . . . . . . . . . . . . . . . . . 51
TRAVEL . . . . . . . . . . . . . . . . . . . . . . . . . . . . . . . . 51
SET UP MANUAL ROAMING . . . . . . . . . . . . . . . . . . . 52
VERTU CONCIERGE . . . . . . . . . . . . . . . . . . . . . . . . 52
NAVIGATE . . . . . . . . . . . . . . . . . . . . . . 53
CAMERA. . . . . . . . . . . . . . . . . . . . . . . . 55
CAMERA . . . . . . . . . . . . . . . . . . . . . . . . . . . . . . . . 55
VIDEO RECORDER . . . . . . . . . . . . . . . . . . . . . . . . . 56
GALLERY . . . . . . . . . . . . . . . . . . . . . . . 57
GALLERY . . . . . . . . . . . . . . . . . . . . . . . . . . . . . . . 57
DIGITAL RIGHTS MANAGEMENT . . . . . . . . . . . . . . . 57
ACCESSORIES . . . . . . . . . . . . . . . . . . 59
WALL CHARGER . . . . . . . . . . . . . . . . . . . . . . . . . . 59
BATTERY . . . . . . . . . . . . . . . . . . . . . . . . . . . . . . . 59
DATA CABLE . . . . . . . . . . . . . . . . . . . . . . . . . . . . . 60
SAFETY AND WARRANTY INFORMATION
61
SAFETY INFORMATION . . . . . . . . . . . . . . . . . . . . . . 61
YOUR VERTU PHONE - FRONT VIEW . . . . . . . . . . . . 63
YOUR VERTU PHONE - BACK VIEW . . . . . . . . . . . . . 64
YOUR VERTU PHONE - SIDE VIEW 1 . . . . . . . . . . . . 64
YOUR VERTU PHONE - SIDE VIEW 2 . . . . . . . . . . . . 65
INSERTING THE SIM CARD AND MEMORY CARD . . . 66
USING YOUR VERTU PHONE . . . . . . . . . . . . . . . . . . 68
ABOUT YOUR PHONE . . . . . . . . . . . . . . . . . . . . . . . 70
MANUFACTURER’S LIMITED WARRANTY . . . . . . . . . 71
SAR NOTICE – RM-389V . . . . . . . . . . . . . . . . . . . . . 72
DECLARATION OF CONFORMITY . . . . . . . . . . . . . . . 72
NOTICES . . . . . . . . . . . . . . . . . . . . . . . . . . . . . . . . 72
EXPORT CONTROLS. . . . . . . . . . . . . . . . . . . . . . . . 73
FCC/INDUSTRY CANADA NOTICE . . . . . . . . . . . . . . 73
EU RECYCLING NOTICE . . . . . . . . . . . . . . . . . . . . . 73
GENERAL PUBLIC LICENCE FOR THE SOFTWARE KNOWN
AS MSNTP . . . . . . . . . . . . . . . . . . . . . . 74
VERTU CONCIERGE TERMS AND CONDITIONS . . . . . 74

GETTING STARTED
English
1
1 GETTING STARTED
Register your Vertu phone
Vertu aims to provide you with the very best service possible.
To enable us to do this, please register your Vertu phone by using
the Menu option Register in the Vertu Services menu, or by
visiting www.verturegistration.com, or by calling Vertu Concierge
using the dedicated key on your phone.
Vertu package contents
The package contents may vary slightly in accordance with regional
regulations.
CD-ROM
The CD-ROM provided with your Vertu phone contains the
following items:
>An option to register your Vertu phone.
>Vertu PC Suite (for PC only)
>iSync Plug-in (for Macintosh only)
>An electronic version of the Reference Manual
>A link to set up multimedia messaging (MMS) and Internet
>A link to download the Map Loader application.
For more information please see “CD-ROM” on page 11.
Networks
To use the phone you must have service from a wireless service
provider. Many of the features require special network features.
These features are not available on all networks; other networks
may require that you make specific arrangements with your service
provider before you can use the network services. Your service
provider can give you instructions and explain what charges will
apply.
The wireless device described in this guide is approved for use on
EGSM 900 MHz, GSM 850/1800/1900 MHz, and WCDMA
Band I, II, V and VI.
Contact your service provider for more information about networks.
Conventions used in this guide
Glossary
1Vertu Constellation phone RM-389V
1Battery
1Wall charger (comprising wall charger plug & data cable)
plus international adaptors
18GB micro SD memory card (fitted in phone)
1Authenticity card
1Constellation guide
1Warranty and safety information
1CD-ROM
1Data cable
Menu Represents text that appears on your Vertu phone’s
display, for example, “From the Home screen, press
Menu”.
SEND Represents a Vertu phone key, for example, “Press the
SEND key to make the call”.
Important information relating to safety.
Represents useful information or a quick way to access or
operate a feature.
Represents points to be aware of when using your
Vertu phone.
4-WAY
SCROLL key
Move the cursor up, down, left and right by
pressing on the key edges.
CENTRE
SELECT key
Press this key to select an item.
NUMBER keys The keys that are used to enter text or
numbers.
Default Initial product setting as supplied by Vertu
when the phone leaves our workshop.
SIM card Subscriber Identity Module. This is a small card
supplied by your service provider to insert into
your Vertu phone for a network connection.
Service provider The provider of your SIM card and all
associated network services.
Network service A feature which is made available at the
discretion of your service provider.
Home screen The screen that appears on the inner display
when your Vertu phone is switched on, with
Menu displayed at the bottom. The screen
that displays when you repeatedly press the
END key.
PIN number A Personal Identification Number that allows
only authorised access to your Vertu phone
and SIM card. We strongly recommend that
you set these up when you receive your new
Vertu phone and SIM card.

GETTING STARTED
English
2
Your Vertu phone - front view
Your Vertu phone - back view
Earpiece
Left selection
key
Right selection
key
4-way scroll
key
End key
Glowing light
Power key
Camera key Concierge key
Send key
Sliding key
(controls call
volume)
Light sensor
Centre select
key
Speaker port
Inner display
Battery cover
release D-ring
Antenna area
Battery cover
Serial number Camera
Twin LED flash
Outer display
GETTING STARTED
English
3
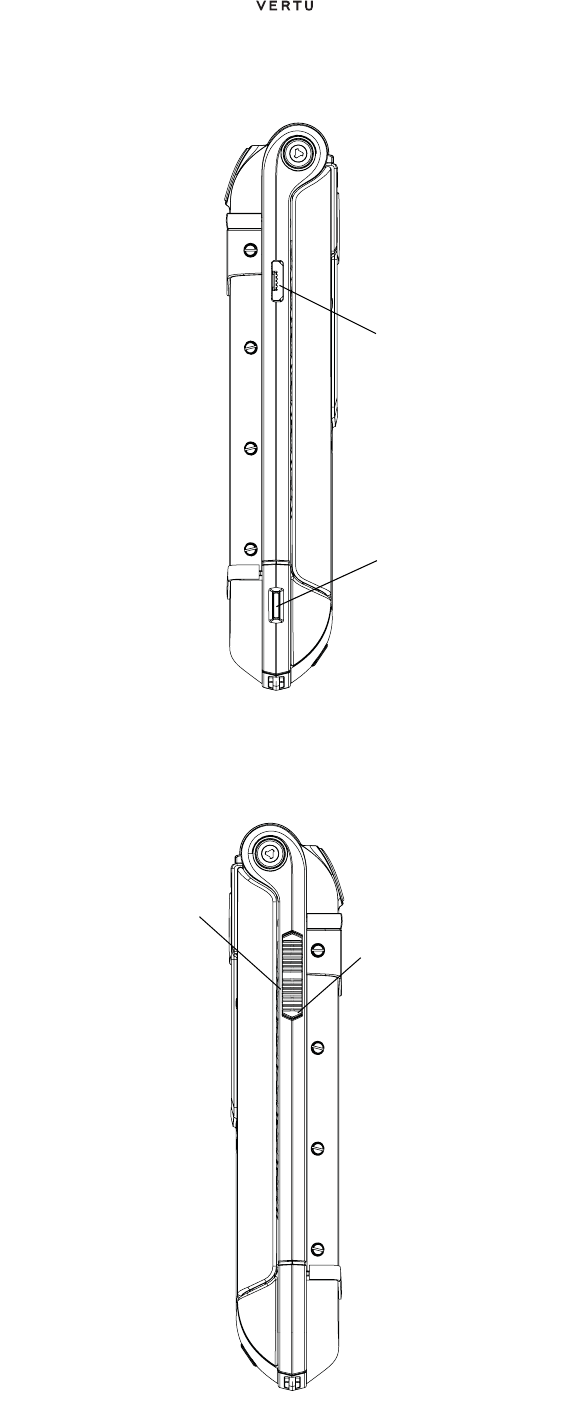
Your Vertu phone - side view 1
Your Vertu phone - side view 2
Micro-USB
connector for
charging and
data transfer
Charm
attachment
point
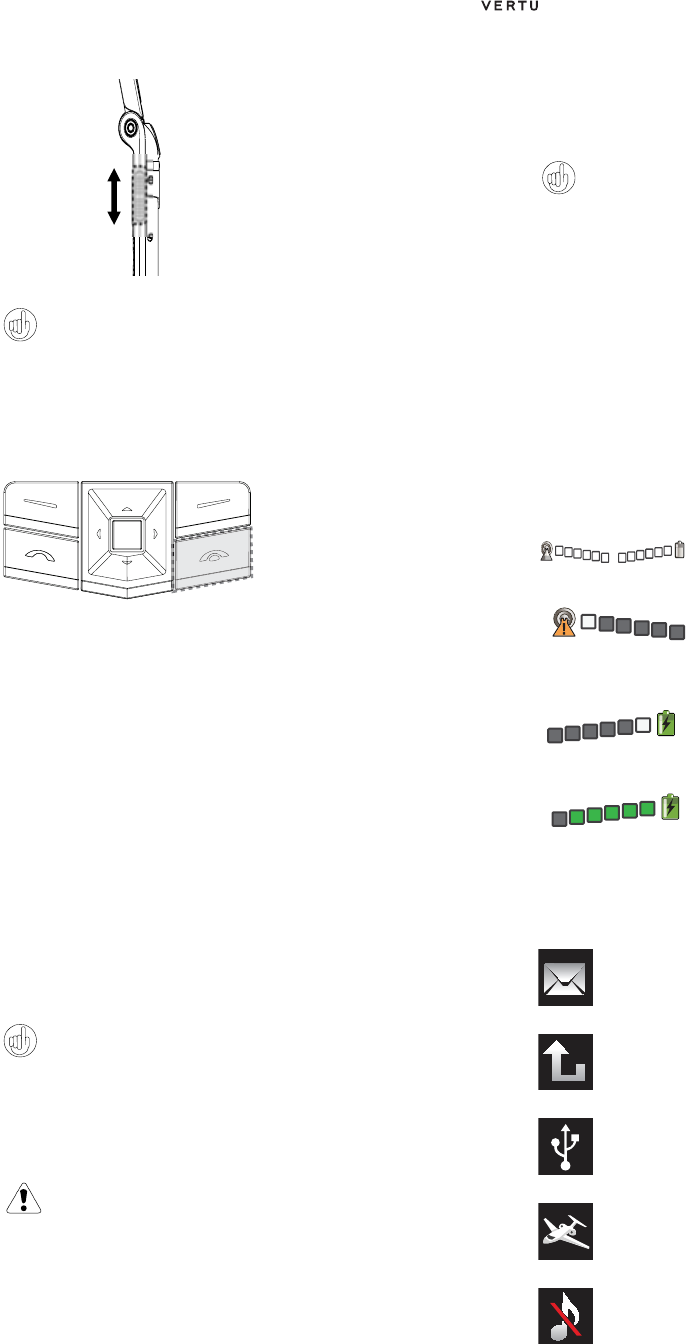
When the phone is
closed, push the
sliding key up to
illuminate the outer
display screen.
Push the the sliding
key down to open the
phone.
GETTING STARTED
English
4
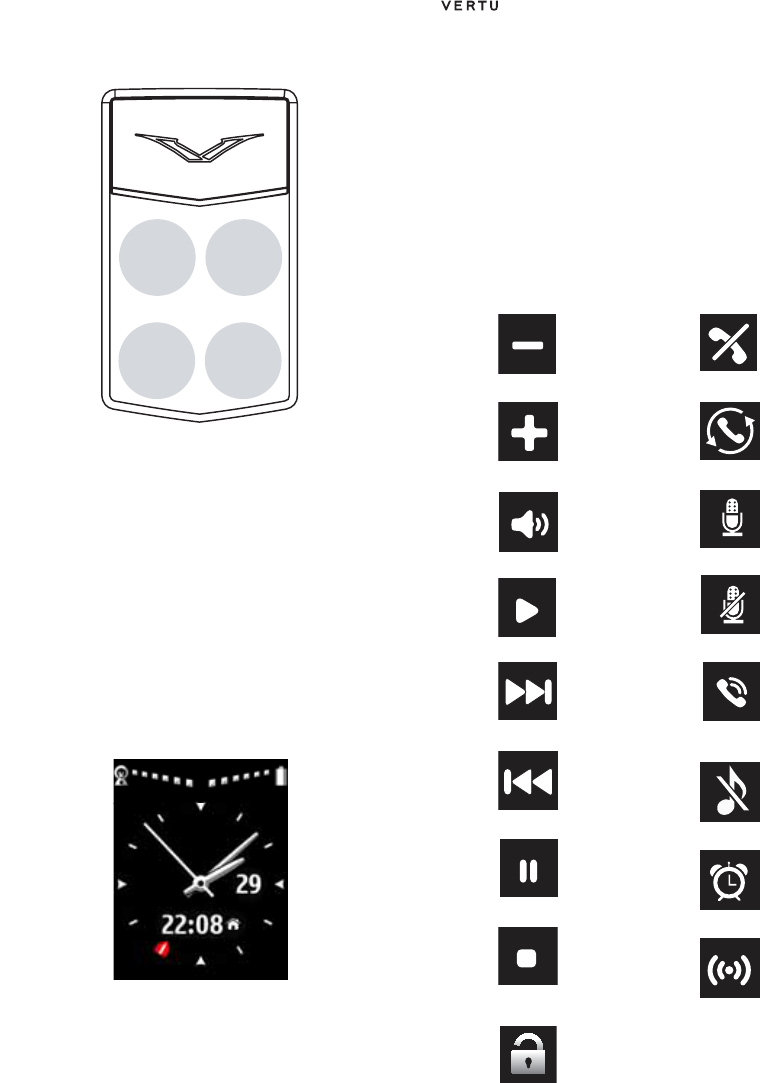
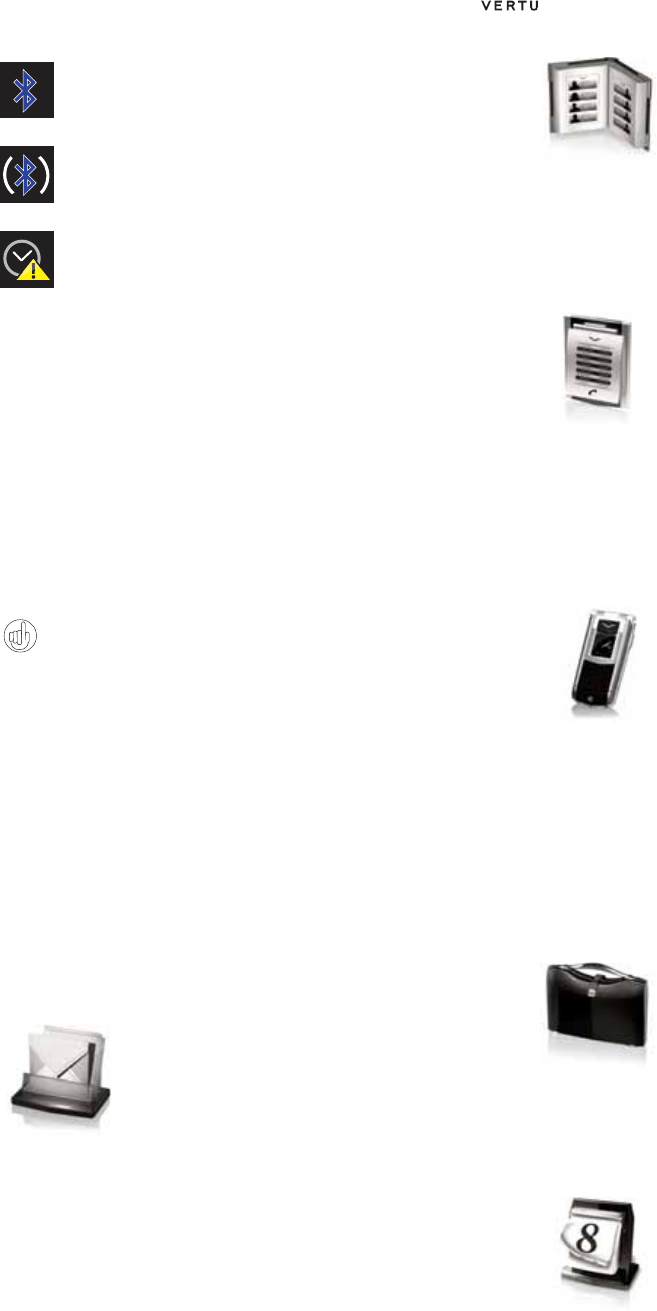
Outer display
The outer display is touch-sensitive in the four areas indicated
above and provides quick access to some useful functions.
In order to prolong battery life, the display fades out after a few
seconds. To reactivate the display, gently shake the phone, double
tap on the phone or push the sliding key up and the display comes
back to life.
The outer display is controlled by an accelerometer that gives you a
small reaction when you touch it. The alarm clock also uses this
feature to silence the alarm.
The various icons and indicators that you will see on the outer
display are described in more detail on page 7.
Accurate time
Accurate time is controlled by an atomic clock, which is the most
accurate timekeeping device in the world, located in the Vertu high
security bunker. If you are travelling and you have set the clock up
appropriately with the Setup Wizard, the larger analogue clock
shows the local time and the smaller digital clock shows the time at
your home location.
Accurate time automatically adjusts whenever you cross a time zone
and also knows when to add daylight saving time.
If you prefer to set the date and time manually, select Dual Fixed
Zone to display the time at two locations of your own choice.
Rejecting calls
Calls can be rejected from the outer display by pressing the Silence
icon, followed by the Reject icon.
Answering calls with a headset
Calls can be answered from the outer display with the phone closed
while you are using a headset. To end the call, double-tap to re-
activate the display and press the End call icon.
Music player
The music player can be controlled (but not started) by touching the
icons on the outer display.
Alarm clock
The alarm clock can be snoozed or stopped by touching the outer
display.
You can also activate the snooze by turning the phone over (see
page 47 for more details).
Outer display buttons
Reduce volume End or reject call
Increase volume Switch between
calls
Adjust volume Mute on
Play Mute off
Next Accept call
Previous Silence
Pause Alarm
Stop (music
player and alarm
clock)
Snooze
Unlock
GETTING STARTED
English
5
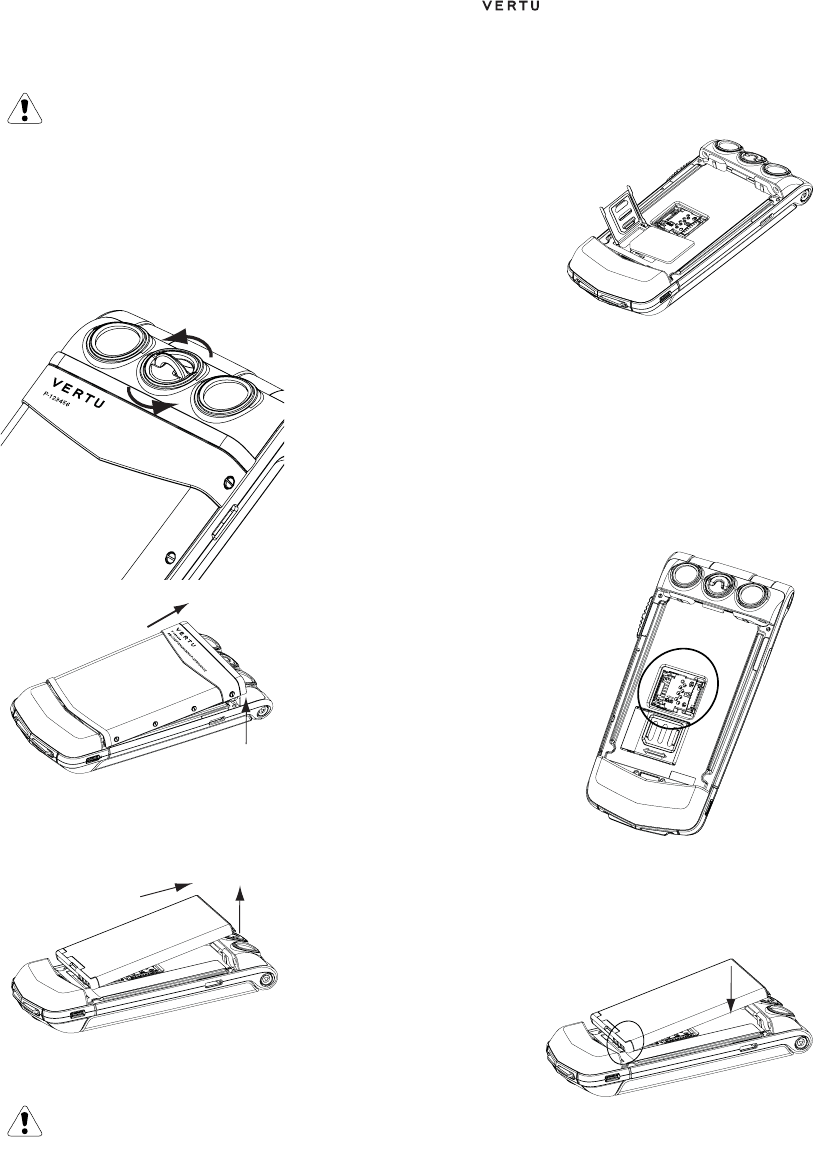
Inserting the SIM and memory card
To insert the SIM and memory card you have to first remove the
battery cover and the battery to reveal the SIM and memory card
compartments.
Remove the battery cover
Remove the battery
Insert the SIM card
The SIM card and its contacts are easily damaged.
Be careful when handling, inserting or removing the SIM card.
Insert the memory card
Be careful when handling, inserting or removing the memory card.
Replace the battery
Always switch the phone off and disconnect the
charger before touching the battery.
With the back of the Vertu
phone facing you, lift the
top half of the battery
cover release D-ring with
your finger nail.
Hold it between your
thumb and forefinger and
turn anticlockwise until
the back cover pops
open.
Raise the battery cover
slightly (1) and then move
the cover gently towards
the top of the phone (2).
Using a fingernail raise the
battery out of the battery
compartment (1).
Remove the battery from
the battery compartment
(2).
Always switch the phone off before inserting or
removing the USIM/SIM card.
Keep SIM cards out of the reach of small children.
1
2
To open the SIM door,
apply light pressure, and
slide to the left. Move the
door into a vertical
position.
Place the SIM on the SIM
contacts, aligning the
slanted corners and
ensuring that the SIM is
seated properly.
Lay the SIM door on top
of the SIM card, apply
light pressure and slide to
the right until it locks into
place.
To open the memory card
holder (1), apply light
pressure, and slide to the
left. Move the card holder
into a vertical position.
Place the memory card in
the card holder, aligning it
with the diagram on the
card holder.
Lay the card holder on top
of the contacts, apply
light pressure and slide to
the right until it locks into
place.
Insert the battery at an
angle (1) so that the
battery contacts align with
the contacts in the battery
compartment.
Lower the battery into the
battery compartment (2)
and ensure that the
battery is seated correctly
before replacing the
battery cover.
GETTING STARTED
English
6
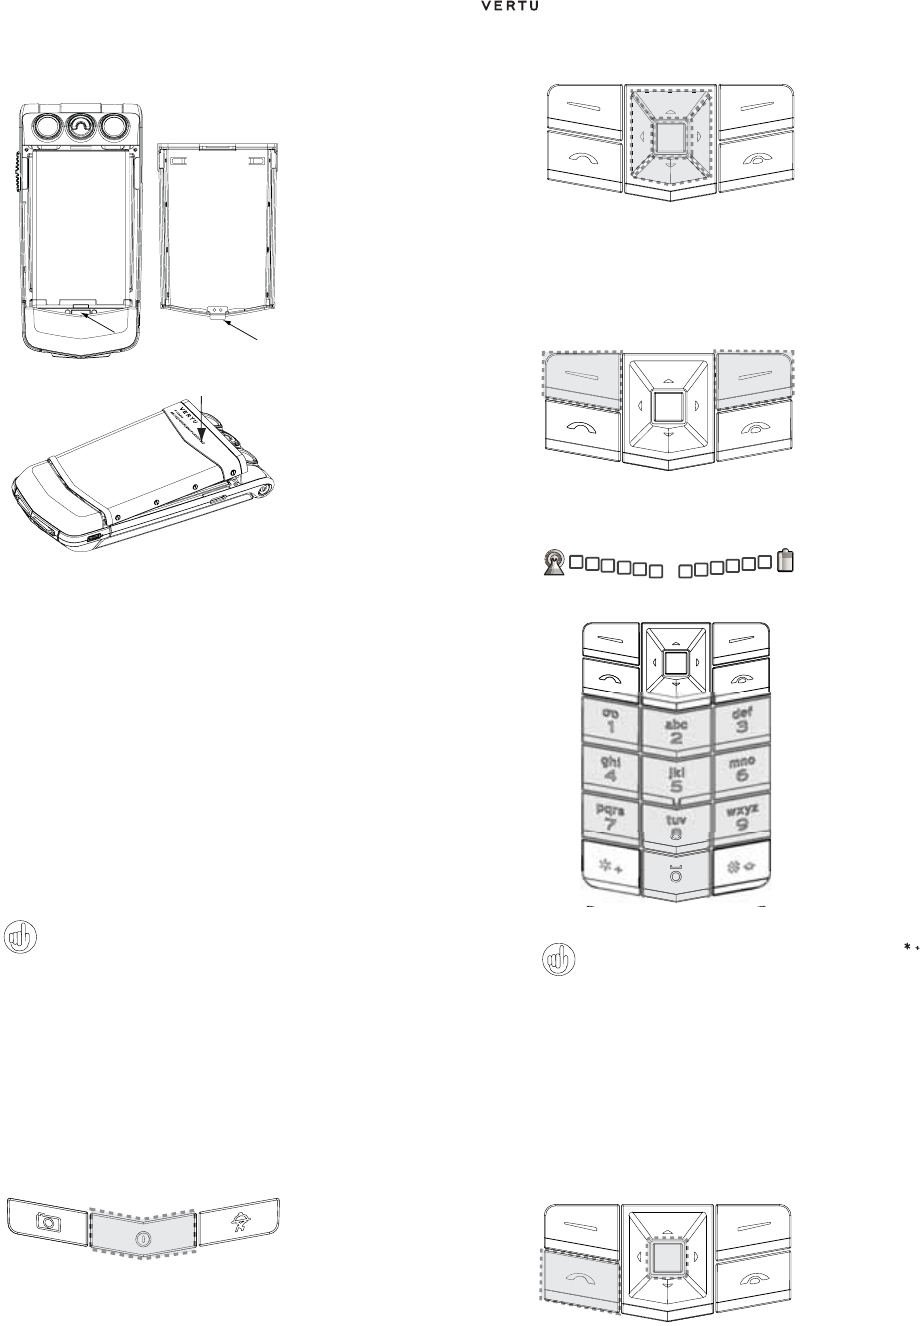
Replace the battery cover
The Setup Wizard
When you switch on your Vertu phone for the first time you will be
guided through certain setup options by the Vertu Setup Wizard.
This enables you to quickly and easily set up the following functions:
>Accurate date and time
>Home location
>Navigation keys
>Font size for all screens
>Bluetooth name
>Phone registration
Using your Vertu phone
To help you start using your Vertu phone as quickly as possible,
please read the following information carefully.
Switching your Vertu phone on and off
The battery may not be fully charged when you first receive your
Vertu phone. If a Battery low message is displayed when you first
switch on your Vertu phone please see “Charging the battery” on
page 59 for more information.
4-way scroll key and centre select key
Selection keys
Making a call
Answering a call
When you receive an incoming call, a ringing tone is played and a
call message is displayed. Your Vertu phone will also vibrate if you
have set a vibrating alert.
If the phone is closed, simply open it to answer a call. Push the
sliding key down to open the phone.
You can also
To replace the battery
cover, carefully insert the
internal clip(1) on the
inside of the battery cover
into the slot below the
battery (2).
Lower the battery cover
into position (1) until it
clicks into place. The
cover should close tightly
using only light pressure.
During the Setup Wizard you will be asked to give permission
for automatic network connections, and whether you accept the
related data charges. If you do, your Vertu phone will
automatically adjust to regional time variations and will also
receive locally customised Vertu Feeds where available.
Press and hold the
POWER key to switch
your Vertu phone on or
off.
1
The 4-WAY SCROLL key
(1) enables you to move the
cursor up, down, left and
right around the inner display.
The CENTRE SELECT key
(2) enables you to select a
highlighted option or select
the middle option at the
bottom of the screen.
The SELECTION keys
enable you to select the
options displayed at the
bottom of the inner display,
directly above the keys.
Check that you have a good
signal and the battery is
charged.
Use the NUMBER keys
(shaded) to enter the
telephone number you want
to call.
Press the SEND key (1) to
begin your call.
When calling international numbers, press the key twice to
display a + sign.
Press the SEND key to
answer an incoming call or
press the CENTRE
SELECT key when you see
Answer on the screen.
GETTING STARTED
English
7
Adjusting listening volume
Ending a call
Simply close the phone to end a call.
Your can also
Rejecting a call
Press the Silence icon followed by the Reject icon on the outer
display, or press the END key.
(If the Silent profile is set, you first have to press the Unlock icon
followed by the Reject icon), or press the END key
Sending a text message
>Using the 4-WAY SCROLL key and the CENTRE SELECT key
go to:
Menu » Messages » Create message
>Enter the recipient’s number.
>Scroll to the message field.
>Enter the message.
>Press the CENTRE SELECT key to send the message.
Making an emergency call
>If the phone is not on, switch it on. Some networks require that a
valid SIM card is properly inserted in the phone.
>Press the END key as many times as necessary to return to the
Home screen.
>Enter the emergency number, for example 000, 08, 110, 112, 118,
119, 911, *911, 999, *999 or other official emergency number.
>Press the SEND key.
If certain features are in use, you may first need to turn those
features off before you can make an emergency call. For more
information consult your local service provider.
When making an emergency call, remember to give all the
necessary information as accurately as possible.
Remember that your phone may be the only means of
communication at the scene of an accident – do not end the call
until given permission to do so.
Icons and indicators
Icons and indicators on the inner and outer screens show the
current status of your Vertu phone.
Status icons are displayed below the battery charge and signal
strength indicators. The most commonly displayed icons are:
To change the earpiece
volume while you are in a
call, move the sliding key up
or down.
While in a call, you can use the speaker phone for a hands-free
call. Use the SELECTION keys to press Loudsp. to switch to
speaker phone.
Press the END key to end a
call.
While composing a message:
Press the * key to show symbols
Press and hold the # key to change language
Press the # key to toggle between upper and lower case.
Your Vertu phone, like any wireless phone, operates using
radio signals, wireless and landline networks as well as
user-programmed functions. Because of this, connections
in all conditions cannot be guaranteed. Therefore, you
should never rely solely upon any wireless phone for
essential communications, for example medical
emergencies.
Emergency numbers vary by location and those listed above
may not be supported by your current network.
These icons shows a strong signal and a
fully charged battery.
This icon shows that the signal strength is
weak. To obtain a stronger signal move to an
area clear of obstructions that may block the
signal.
This icon shows that the battery charge level
is low and you need to recharge your Vertu
phone soon.
This icon is displayed while your battery is
recharging. The dots change to white as the
battery is charged.
You have received one or more text messages.
You have missed a call.
A USB lead is connected.
The Flight profile is selected. You can use functions of the
phone that do not require a network connection.
The Silent profile is selected. Audible alerts are disabled
and there is no ringing tone when you receive a call.
GETTING STARTED
English
8
Glowing light
The glowing light flashes at different rates to indicate the status of
your Vertu phone.
>In stand-by mode the light flashes slowly.
>If you have missed a call or received a message the light
flashes quickly.
>When you are charging your Vertu phone from the mains or
through your computer the light will be on permanently.
Protecting your Vertu phone
Setting a PIN code
We recommend that you use a PIN code to prevent unauthorised
use of your Vertu phone and SIM card.
>Using the 4-WAY SCROLL key and the CENTRE SELECT key
go to:
Menu » Settings » Security » PIN code request » On
The main menu
The main menu displays all the top level menu categories, from
which you can access all the functions of your Vertu phone.
Bluetooth is switched on.
A bluetooth headset is connected.
Accurate time may not be available.
Enter *#06# from the Home screen to find the IMEI serial
number. Make a note of your IMEI serial number and keep it in
a safe place.
Messages menu
>Create message
>Inbox
>E-mail
>Drafts
>Outbox
>Sent items
>Saved items
>Delivery reports
>Voice messages
>Info messages
>IMs
>Serv. commands
>Delete messages
>Message settings
Contacts menu
>Names
>Add new
>Settings
>Groups
>Speed dials
>My numbers
>Service numbers
>Del. all contacts
>Move contacts
>Copy contacts
Call history menu
>All calls
>Missed calls
>Received calls
>Dialled numbers
>Msg. recipients
>Clear log lists
>Call duration
>Data counter
>Data timer
>Message log
>Positioning
>Sync log
Settings menu
>Date and time
>Profiles
>Themes
>Tones
>Display
>My shortcuts
>Connectivity
>Call
>Phone
>Accessories
>Configuration
>Security
>Workshop reset
>Sync and backup
>Setup wizard
Additions menu
>Games
>Calculator
>Media player
>Equaliser
>Video recorder
>Voice recorder
>Notes
>Collection
>Stopwatch
Calendar menu
See Chapter 8
GETTING STARTED
English
9
Opening the menu
From the Home screen, press the CENTRE SELECT key to open
the Menu and display the main categories. Use the 4-WAY
SCROLL key to move through the menus.
Navigating through the menus
When navigating through the menus, press Back to return to the
previous menu without saving changes. Press Exit to return to the
Home screen from the top-level menu.
Press the END key to return to the Home screen from any menu without
saving changes.
You can also use also voice commands to activate menu functions
on your Vertu phone. Please see “Voice dialling” on page 11 for
more information.
Changing how the menu is displayed
>Go to:
Menu » Options » Main menu view
>Select one of the following options:
>List to display the main menu icons one at a time.
>Grid to display all the main menu icons on one screen. You
can move the icons around the grid to have the options you
use the most in your favourite positions.
Personalising your Vertu phone
Using Go to shortcuts
You can set up the Go to menu so that it automatically customises
itself to your needs.
There are two ways to use the Go to shortcuts in your Vertu phone.
>Auto sorting on dynamically displays the top four most
frequently used and the two last used functions, and also a link
to the Tones directory.
>Auto sorting off allows you to pick and choose which menu
options you want to see on the Go to list.
To turn on automatic sorting press Go to » Options » Auto
sorting on
To turn on manual sorting press Go to » Options » Auto
sorting off
Creating manual Go to shortcuts
To customise the options available on the Go to list, display the list
as above and select Options » Select options. Pick the options
that you want to display on the Go to list.
You can also set up the 4-WAY SCROLL key to access shortcuts.
On the Home screen press and hold one of the SCROLL keys and
select an option to associate with the key.
Using the Go to menu
To use the Go to shortcuts, from the Home screen, press the Go
to SELECTION key.
Use the 4-WAY SCROLL key and the CENTRE SELECT key to
select the desired shortcut.
Some of the most useful Go to shortcuts are:
>Toggle Bluetooth on and off
>Operator select (to select a network operator with a GPRS
roaming agreement with your home network operator).
Alarm clock menu
See Chapter 9
Web menu
>Vertu Mobile
>Home
>Bookmarks
>Go to address
>Last web addr.
>Web settings
>Clear the cache
Vertu Services menu
>Vertu Select
>City Brief
>Travel
>Vertu Fortress
>Vertu Concierge
>Register
Navigate menu
>Last map
>Find address
>Saved location
>Recent locations
>Current GPS position
>Plan route
>Extra services
>Settings
Camera menu
See Chapter 9
Gallery menu
>Images
>Video clips
>Music files
>Themes
>Graphics
>Tones
>Recordings
>Received files

GETTING STARTED
English
10
Shortcuts
The 4-WAY SCROLL key is pre-programmed with some popular
menu options. When your Vertu phone leaves our workshop the
options are:
Up - (reserved for Vertu Feeds)
Down - Names
Left - Create message
Right - Calendar
To change these to your favourite menu options go to Menu »
Settings » My shortcuts
Themes
Your Vertu phone comes with various themes containing different
colour schemes and wallpapers to use as display backgrounds.
Changing the theme
>Select Menu » Settings » Themes or use the Go to
shortcut.
>Select a theme from those available.
>Select Apply to change the theme.
If you select a personal wallpaper (see page 35) this will replace the
theme wallpaper.
If you are using Accurate time, the travel wallpaper will replace the
theme wallpaper.
Profiles
Your Vertu phone has several different profiles that enable you to
change the ringing tone, ringing volume and vibrating alert all at
once. Profiles can be timed, for example you can set the Silent
profile while you attend a meeting and, if you have set it, the
General profile will resume after the meeting.
Flight mode
Flight mode allows you to deactivate all radio frequency functions
but still have access to offline games, the calendar and phone
numbers.
>Select Menu » Settings » Profiles » Flight » Activate
Use flight mode in radio sensitive environments, for example on
board aircraft or in hospitals.
To deactivate flight mode, select any other profile.
Changing ringing tones
Your Vertu phone comes with various special ringing tones. You
can also download ringing tones in AAC, MP3 and MIDI formats.
Changing the ringing tone
>Select Menu » Settings » Tones or use the Go to shortcut.
>Scroll slowly through the ringing tones list. When you hear a ringing
tone that you would like to use, press Select.
Setting an alarm
Your Vertu phone has a simple to use alarm clock.
>Select Menu » Alarm clock or use the Go to shortcut.
Enter the time on the screen, and press the Options SELECTION
key to set snooze and repeat features.
A red alarm indicator is displayed on the face of the clock, showing
the time that the alarm is set for.
To turn the alarm clock off, press Menu » Alarm clock » Turn
alarm off.» .
To activate the snooze function turn the phone onto its front. If the
phone was already on its front when the alarm sounded, turn it
through 360 degrees and place it on its front again.
Taking photos
You can take photos and record video clips with the camera and
send them by message to your friends, or save them in the memory,
from where they can be transferred to your computer.
1. To start the camera press the CAMERA button.
2. To zoom in and out move the 4-WAY SCROLL key up or
down.
3. Press the CAMERA button or press Capture to take the
photo.
Taking videos
1. Start the camera as above and then press the right 4-WAY
SCROLL key to select the video icon.
2. To zoom in and out move the 4-WAY SCROLL key up or
down.
3. Select Record or press and hold the CAMERA button. To
pause the recording, select Pause; to resume the recording,
select Continue. To stop the recording, select Stop.
Using Bluetooth
Bluetooth technology enables you to easily share images and video
clips, and take advantage of wireless connectivity by using a
compatible Bluetooth headset. You first need to pair with the other
device which should be within 10m of your Vertu phone.
The full Bluetooth menu is located in Menu » Settings »
Connectivity.
To make an emergency call in flight mode, make the call as
normal and answer Yes when asked Exit flight profile?
To change profiles quickly, briefly press the POWER key.
Press and hold the # key to toggle between Silent and
General profiles.
Even if the phone is switched off, the alarm will sound at the
specified time. Please remember this if you are in a restricted
area.

GETTING STARTED
English
11
Using the options on these menus you can turn Bluetooth on, make
your phone discoverable, search for active devices and pair your
phone with other Bluetooth devices, for example your Bluetooth
headset.
Use the Go to menu to toggle Bluetooth on and off.
Adding a new contact
To quickly add a new contact, enter the number on the Home
screen and then press the CENTRE SELECT key. Enter the
contact name and Save the contact.
Voice dialling
Your Vertu phone can access menu options and dial contacts using
voice commands.
>Press and hold the right SELECTION key on the Home screen or
press and hold the down volume key.
>Say clearly the name of the contact or menu option you want to
access.
>Select the option you require from the displayed list. If you don’t
make a selection within 5 seconds, the option at the top of the list
will be automatically selected.
Browsing the Web
You can access mobile Internet services with the Web browser on
your Vertu phone. You can view pages that use wireless markup
language (WML) or extensible hypertext markup language
(XHTML).
Depending on which service provider you use, your Vertu phone
might already have Internet settings installed so you might be able
to browse the Internet straight away. If you cannot connect to the
Internet, please contact Vertu Concierge or visit www.vertu.com
and download your settings.
To open the Web browser select Menu » Web or press and hold
the 0 key.
Location based features
Your Vertu phone contains some useful new features to enhance
your travelling experience.
Accurate time
When you travel to another time zone and you have selected
accurate time, the larger analogue clock shows the local time and
the smaller digital clock shows the time at your home location.
If you have set an alarm it will adjust to the local time.
City Brief
Where possible, City Brief provides Vertu Feeds information
about your destination, the moment you arrive.
Travel wallpapers
When you travel to other time zones and you have selected
accurate time, the wallpaper of the inner display changes to reflect
the country that you have travelled to.
If you would prefer to use another image for your wallpaper and you
want to turn travel wallpapers off, see page 35.
The media player
Your Vertu phone includes a media player for listening to music
tracks, recordings or other MP3, MP4, AAC, eAAC+ or Windows
Media Player sound files that you have transferred to your Vertu
phone. Music files can be received via Bluetooth, MMS or using the
File Manager in Vertu PC Suite.
To open the media player scroll to Menu » Additions » Media
player.
Music files that you transfer to your Vertu phone are automatically
added to the list of songs in the media player.
When you have started the media player and have a track playing,
you can use the controls on the outer display. See page 4 for more
information.
CD-ROM
The Vertu CD-ROM works on a compatible computer with a
CD-ROM drive, with Microsoft® Windows® 2000, Microsoft®
Windows® XP or Microsoft® Vista® installed. You need at least
250 MB of free disk space and administrator rights to the PC.
The Vertu CD-ROM works on a Macintosh computer with Mac
OS X 10.4.6 (or later) and iSync 2.2 (or later) installed.
Connecting to a computer
You can connect your Vertu phone to a computer with either a Vertu
micro-USB data cable (CA-101V) or Bluetooth.
Vertu PC Suite
Vertu PC Suite includes the following applications to extend the
functionality of your Vertu phone:
Installing Vertu PC Suite
>Insert your Vertu CD-ROM into the PC’s CD-ROM drive.
>Click on the INSTALL NOW button.
>Follow the on-screen instructions to complete the installation.
Switch off Bluetooth if it’s not being used, to maximise battery
performance.
Only download and use files from sources that offer
adequate security and protection against harmful software.
Press the Stop button on the outer display or press and hold the
END key to stop the media player.
>Backup >Contacts
>Synchronise >Messages
>Connect to the Internet >Image store
>Install applications >Multimedia player
>File manager >Transfer music

GETTING STARTED
English
12
Installing the iSync plug-in
>Insert your Vertu CD-ROM into the Macintosh’s CD-ROM drive.
>On the desktop, double-click the VERTU icon.
>When the finder window opens, double-click the Vertu.osx icon.
>Click on the INSTALL NOW button.
>Follow the on-screen instructions to complete the installation.
Viewing the electronic Reference Manual
>Start the CD-ROM as described above.
>Click on the LAUNCH PDF button.
Setting up MMS, browsing and the Travel
application
>Start the CD-ROM as described above.
>Click on the ORDER SETTINGS button.
>Your computer must be connected to the Internet to set these up.
Registering your Vertu phone
>Start the CD-ROM as described above.
>Click on the REGISTER PHONE button.
>Your computer must be connected to the Internet to register your
Vertu phone.
Care and maintenance
Your Vertu products have been crafted from some of the finest
materials and care should be taken to keep them in good condition.
Ceramics and sapphire
Ceramics and sapphire are very hard materials but are also brittle
and can be scratched by harder materials or objects. They can also
be damaged if dropped.
Avoid the following:
>Contact with other hard materials such as diamond jewellery,
nail files, abrasives, and mineral crystals.
>Dropping or knocking the product on hard surfaces.
>Repeated rubbing against hard surfaces.
Leather
All Vertu leather products are made by expert craftsmen. Each
leather hide is unique and has natural markings which should be
considered part of the individuality of fine leather. All leather can be
damaged and should be treated with care.
Avoid the following:
>Exposure to water and high humidity.
>Dropping, rubbing or knocking on hard surfaces.
>Exposure to extreme temperatures.
>Contact with oily substances, make-up and solvents.
Metal
Vertu metals are finished to a high standard and care needs to be
taken to maintain their appearance.
Avoid the following:
>Contact with chemicals such as solvents, alkaline and acid
solutions, cola-based drinks and exposure to salt water. Wipe
with a clean, soft cloth as soon as possible if contact occurs.
>Contact with sharp objects.
>Dropping or knocking against hard surfaces.
>Metal polishes.
Specifications
Damage caused to your Vertu phone by failing to observe
these care instructions is not covered by the warranty.
Volume 74 cc
Weight 175 g
Length 100 mm
Width 48 mm
Thickness 18 mm

SECURITY
English
13
2 SECURITY
Your Vertu phone has a number of security features that help to
prevent:
>Unauthorised use of your Vertu phone when your SIM card is
inserted
>Unauthorised use of your Vertu phone if a different SIM card
is inserted
>Unauthorised use of your SIM card in another phone.
PIN code
The (4 to 8 digit) PIN (Personal Identification Number) code helps
protect your SIM card against unauthorised use. When the PIN
code function is active, you need to key in the PIN code each time
you switch on your Vertu phone. If you used your SIM card in
another phone previously, the code will be the same.
The default setting for the PIN code function is defined by your
service provider. Some service providers do not allow you to disable
the PIN code request.
To turn the PIN code on and off:
1. From the Home screen, press Menu » Settings » Security »
PIN code request.
2. Press Select to change the setting.
3. Scroll to On to enable the PIN code request or Off to disable it and
then press Select.
4. Key in your PIN code and then press OK.
A confirmation message is displayed.
To change your PIN code:
1. From the Home screen, press Menu » Settings » Security »
Access codes » Change PIN code.
2. When prompted, enter your current PIN code and then press OK.
3. When prompted, enter your new PIN code and then press OK.
4. Enter your new PIN code again to verify and then press OK.
A confirmation message is displayed.
PIN2 code
The PIN2 code is used to protect the advanced user functions of
your SIM card for example fixed dialling lists. Your PIN2 code must
not be the same as your PIN code.
To change your PIN2 code:
1. From the Home screen, press Menu » Settings » Security »
Access codes » Change PIN2 code.
2. When prompted, enter your current PIN2 code and then press OK.
3. When prompted, enter your new PIN2 code and then press OK.
4. Enter your new PIN2 code again to verify and then press OK.
A confirmation message is displayed.
The PIN2 protected features of your SIM card will become blocked
if you incorrectly enter your PIN2 code a number of times, normally
after three consecutive attempts. You will need to contact your
service provider to obtain a PIN2 Unblock (PUK2) code to unblock
your PIN2 and restore your SIM card’s full functionality.
Security code
The security code helps protect your Vertu phone from
unauthorised use. The first time you access this feature you will
need to choose a code (between 5 - 10 digits long). You will need
to key in this security code before you can do the following:
>Switch on the phone when a new SIM card is inserted (if you
have set up security)
>Erase all entries in your contacts list
>Restore the default settings
>Change the security level.
To change the security code:
1. From the Home screen, press Menu » Settings » Security »
Access codes » Change security code.
2. When prompted, enter your current security code and then press
OK.
3. When prompted, enter your new security code and then press OK.
4. Enter your new security code again to verify and then press OK.
A confirmation message is displayed.
Make a careful note of your new security code, ensure you keep it
secret and in a safe place.
The SIM card becomes blocked if you key in an incorrect PIN
code three times in succession. You will need to contact your
service provider for the PUK (PIN Unblocking) code.
Key in the PUK code if you have blocked your SIM card.
PUK codes cannot be changed. If you key in an incorrect
PUK code 10 times in succession your SIM card becomes
permanently blocked.
If you key in an incorrect security code five times in
succession, your Vertu phone will not accept the correct
security code for the next five minutes. Within that five
minutes, your Vertu phone will show an error when you
attempt to key in the security code, even if it is correct.

SECURITY
English
14
Locking the keypad
You can lock the keypad on your Vertu phone to prevent
accidentally dialling any numbers.
From the Home screen, press Menu followed by the * key (at the
bottom left of the keypad) within two seconds. A confirmation
message is displayed.
When the keypad is locked, a key icon appears below the signal
strength indicator.
When you receive an incoming call the keypad lock is automatically
suspended. When the call is ended, the keypad returns to the
locked state.
Unlocking the keypad
Press Unlock followed by the SPECIAL FUNCTION key within
two seconds. A confirmation message is displayed.
Security level
The security level function allows you to specify when you are
required to key in the security code. The security code helps protect
your Vertu phone against unauthorised use.
To change the security level:
1. From the Home screen, press Menu » Settings » Security »
Security level.
2. Scroll to one of the following three options and then press Select:
Press None to disable the security code and allow any SIM to be
used in the phone
Press Memory to allow any SIM to be used in the phone but you
need to enter the security code when you try to access your Vertu
phone’s directory after a different SIM card has been inserted
Press Phone to require that the security code is entered when you
switch on the phone after another SIM card has been inserted
3. When prompted, enter your security code and then press OK.
If you change the security level, the numbers in your recent calls list
are erased.
Security module
When available on your SIM, the security module improves security
services for applications requiring a browser connection, and allows
you to use a digital signature. The security module may contain
certificates as well as private and public keys. The certificates are
saved in the security module by the service provider. The security
module is not supplied by Vertu.
To view or change the security module settings:
From the Home screen, press Menu » Settings » Security »
Security module sett.
Call barring
Call barring is a network service that allows you to restrict the
incoming and outgoing calls that you make and receive. Contact
your service provider for more information about using this function.
When outgoing calls are barred, calls may be possible to the
emergency number programmed into your Vertu phone.
You need to key in the barring password to set up the call barring
service. To obtain the barring password, contact your service
provider.
To enable or disable call barring:
1. From the Home screen, press Menu » Settings » Security »
Call barring service.
2. Select Video calls, Voice calls or All call types
3. Scroll to one of the following five options and then press Select:
Press Outgoing calls to bar all outgoing calls
Press International calls to bar all international calls
Press Intl. except to home to bar all international calls with the
exception of calls made to your home country (defined by your
service provider) if abroad
Press Incoming calls to bar all incoming calls
Press Incoming if abroad to bar all incoming calls when you are
abroad
4. Scroll to Activate to enable the bar, Cancel to disable it, or
Check status to view the status of the current bar and then press
Select.
5. If you are enabling or disabling a bar, you must enter your barring
password when prompted and then press OK.
A confirmation message is displayed.
To cancel call barrings:
1. Select Cancel all barrings to cancel all call bars.
2. Enter your barring password when prompted and then press OK.
Barring password
The call barring password is used to limit access to the call barring
service. To obtain the barring password, contact your service
provider.
To change your barring password:
1. From the Home screen, press Menu » Settings » Security »
Access codes » Change barring pass.
2. When prompted, enter your current barring password and then
press OK.
You can still make calls to the emergency numbers when the
keypad is locked.

SECURITY
English
15
3. When prompted, enter your new barring password and then press
OK.
4. Enter your new barring password again to verify and then press OK.
A confirmation message is displayed.
Fixed dialling
Fixed dialling is a network service that allows you to restrict
outgoing calls to only the numbers you specify in a fixed dialling list.
Contact your service provider for more information about using this
function.
When fixed dialling is enabled, it may still be possible to call the
emergency number programmed into your Vertu phone, for example
000, 08, 110, 112, 118, 119, 911, *911, 999, *999 or other official
emergency number.
To enable or disable fixed dialling:
1. From the Home screen, press Menu » Settings » Security »
Fixed dialling.
2. Scroll to On to restrict calls to the fixed dialling list, Off to disable
fixed dialling, or Number list to view the numbers in your fixed
dialling list and then press Select.
If you are using fixed dialling for the first time, it is recommended that
your select Number list to add numbers to your list before enabling
fixed dialling. You will receive two warning messages.
3. When prompted, enter your PIN2 code and then press OK.
4. Either enter your number manually and then press OK, or press
Search to select a name from your contacts list and then press
Select.
5. If you entered a number manually, enter a name for the number and
then press OK.
6. A confirmation message is displayed and you are returned to the
fixed dialling list. Add additional numbers to your list in the same way.
Press Back when you have completed your list.
7. Scroll to On to enable fixed dialling.
To modify your fixed dialling list:
1. From the Home screen, press Menu » Settings » Security »
Fixed dialling » Number list.
2. When prompted, enter your PIN2 code and then press OK.
3. Scroll to one of the following options and then press Select:
Press View number to view the number for an entry
Press Add to add a number to your fixed dialling list
Press Edit to edit the selected entry
Press Delete to delete the selected entry
Press Delete all to delete entries in the list.
Closed user group
The closed user group is a network service that allows you to
specify a group of people you can call and who can call you.
Contact your service provider for more information about using this
function.
When outgoing calls are limited to closed user groups, calls may be
possible to the emergency number programmed into your Vertu
phone, for example 000, 08, 110, 112, 118, 119, 911, *911, 999,
*999 or other official emergency number.
To enable or disable a closed user group:
1. From the Home screen, press Menu » Settings » Security »
Closed user group.
2. Scroll to On to enable the closed user group, Off to disable it, or
Default to specify that the people included in the group, which you
have agreed with the service provider, can call you and you can call
them and then press Select.
3. If you are enabling a closed user group, enter the group number
when prompted and then press OK. A confirmation message is
displayed.
Authority certificates & user certificates
For information about Authority certificates and User
certificates downloaded onto your Vertu phone. See “WEB” on
page 48.
You will need to key in the PIN2 code to save and edit
numbers in the fixed dialling list or to call numbers not in the
list. The PIN2 code is supplied with some SIM cards. For
more information contact your service provider.
When fixed dialling is on, GPRS connections are not possible
except while sending text messages over a GPRS
connection. In this case, the recipient’s phone number and
the message centre number must be included in the fixed
dialling list. You cannot access SIM memory manually (view
or copy numbers on the SIM card) while fixed dialling is
active.
MESSAGES
English
16
3 MESSAGES
Your Vertu phone provides extensive messaging functionality to
allow you to send and receive messages of many types, where
supported by your service provider.
Text messages
Text messages (also known as SMS) are basic messages
containing only text, of up to 160 characters. Your Vertu phone
supports the sending of text messages beyond the limit for a single
message. Longer messages are sent as two or more messages.
Your service provider may charge accordingly. This is the most
common form of messaging, is compatible with the widest range of
phones and is available in most countries.
Multimedia messages
Multimedia messages allow pictures, videos and audio files to be
sent in addition to text in the body of the message. MMS is
supported by most modern phones however the recipient must
have a correctly configured phone to be able to receive the
message.
Flash Messages
Flash messages are text messages that are instantly displayed upon
receipt. Flash messages are not automatically saved.
Audio messages
You can use the multimedia message service to create and send an
audio message. Multimedia messaging service must be activated
before you can use audio messages.
E-mail messages
E-mail messages can be sent to and received from other devices,
for example PCs. E-mail messages can be received by some mobile
phones, provided the recipient has a correctly configured phone.
IMs
With Instant Messaging chat you can send short, simple text
messages to online users. You have to subscribe to a service and
register with the IM service you want to use. You should check the
availability of these services, pricing, and instructions with your
service provider.
Voice messages
Voice messages are stored by your network operator. If your
network operator provides a voice message service, people calling
you may have the option to record a message for you if your Vertu
phone is turned off, or if you do not answer your phone.
Info messages
You can receive messages on various topics from your service
provider (network service). For more information, contact your
service provider.
Text entry
You can enter text using traditional or predictive text input. When
using traditional text input, press the NUMBER keys repeatedly until
the desired character appears. In predictive text input you can enter
a letter with a single keypress.
When you enter text, the icon will appear at the top of the inner
display if predictive text input is turned on (see “Predictive text
input” on page 16). If traditional text input is enabled the icon will
be displayed.
One of the following icons will appear next to the text input icon to
signify which character case is enabled:
Indicates upper case is used in editing
Indicates mixed case is used in editing
Indicates lower case is used in editing
To scroll through the character case options, press the # key
repeatedly.
To change between letter mode and number mode, press and hold
the # key and select the appropriate mode.
Traditional text input
Press a NUMBER key, 1 to 9, repeatedly until the desired character
appears. Not all characters available under a number key are printed
on the key. The characters available depend on the selected writing
language. See “Language settings” on page 38.
If the next letter you want is located on the same key as the present
one, wait until the cursor appears, or briefly press the 4-WAY
SCROLL key and enter the letter.
The most common punctuation marks and special characters are
available under the 1 key. For more characters, press *.
Predictive text input
To turn predictive text on or to revert to traditional text input:
1. With the cursor in the Tex t : field, press Options.
2. Select Prediction options.
3. Select On for predictive text or select Off to turn predictive text off.
Because delivery of messages can fail, you should not rely
upon them for essential communications.
To quickly set predictive text input to On or Off when writing
text, press and hold Options or press and hold # and select
Prediction on or Prediction off.

MESSAGES
English
17
Using predictive text input
Predictive text input allows you to write text quickly using the phone
NUMBER keys and a built-in dictionary.
Start writing a word using the NUMBER keys. Although the key has
a number of letters associated with it, press each key only once for
one letter. The phone displays * or the letter if it separately has a
meaning as a word. The entered letters are displayed underlined.
To insert a special character or smiley, press and hold *, or press
Options » Insert symbol » Character or Smiley. Scroll to a
character or smiley, and press Use.
To accept the suggested word, press the zero NUMBER key to
add a space.
If the ? character is displayed after the word, the word you intended
to write is not in the dictionary. To add the word to the dictionary,
press Spell. Complete the word (traditional text input is used), and
press Save.
To write a compound word, enter the first part of the word, and
scroll forward to confirm it. Write the next part of the word, and
confirm the word.
Numeric input
Numeric input is the standard method used whenever number entry
is required, for example, when dialling a phone number. Press the
key with the corresponding number to enter it.
When using a text input feature, for example sending a text
message, you can switch to numeric input (for entering telephone
numbers for instance) using a single key press:
1. With the cursor in the Tex t: field, press and hold the # key until the
menu is displayed.
2. With Number mode highlighted, press Select.
3. Use the NUMBER keys to enter the numbers you require.
4. Press and hold the # key again to return to the previous text entry
mode.
Special character input
Most common special characters, for example, punctuation marks,
can be inserted by pressing the 1 NUMBER key. Other special
characters can be inserted in your text at any time using the special
characters input mode:
1. With the cursor in the Tex t : field, press the * key (or press and hold
if predictive text input is On) until the special character menu is
displayed.
2. Scroll to the required special character and press Use.
Special characters take up more space than basic characters and if
there are special characters in your message, the indicator may not
show the message length correctly. Before the message is sent, the
device tells you if the message exceeds the maximum length
allowed for one message. You can cancel sending by selecting
Cancel or you can save the message in the inbox.
Setting the font size for messages
Your Vertu phone supports different font sizes for viewing your
messages. Your font size setting affects both messages being
composed and messages received, but does not affect how the
recipient views the message.
To set the font size for your messages, contacts, display and web
pages:
1. From the Home screen, press Menu » Settings » Display »
Font size.
2. Scroll to Small font, Normal font or Large font and then
press OK.
A message confirms that the font size has been updated.
Groups
If you frequently send messages to a fixed group of recipients, you
can define a group to simplify the process.
When you send a message to a group the phone automatically
sends the message separately to each recipient in the list. Sending
a message using a group will incur charges for each recipient in the
list. See “Groups” on page 29.
Undelivered messages
If you send a message and it fails to be delivered, your Vertu phone
behaves in different ways depending on the type of message sent.
Single recipient messages
If a message you have sent to a single number fails, your screen will
display Message sending failed. Check details.
1. Press OK.
2. The unsent message will appear in your Outbox.
3. With the message highlighted, either press Open to read the
message or press Options, scroll to one of the options and then
press Select:
Retry sending resends the message to the original recipient
Delete removes the message from the Outbox
Send copy sends the message to an alternative number
Edit enables you to modify the message or the recipient’s number
Move moves the message into an alternative folder
Use detail makes use of any numbers, e-mail addresses or Web
addresses from the current message when creating new messages
or contacts
Copy as template saves the message as a template for use
when composing future messages
Message details displays message data for example the time
and date when sent
New message opens a new message
Mark marks the message for future deletion
Mark all marks all messages for future deletion if the Outbox
contains more than one message.
If you only need to enter a single number, press and hold that
number
key and the single number will be entered into your
message.
Some service providers do not allow international sending or
receiving of text messages. For more information contact your
service provider.

MESSAGES
English
18
Group messages
If a message cannot be sent to one or more of the recipients in a
group, a new group will be added to the list with the name
Undelivered.
To view the undelivered message(s) options:
1. From the Home screen, press Menu » Contacts » Groups »
Undelivered » Options.
2. Scroll to one of the options and then press Select:
Resend to list resends the message to the recipients on the
undelivered list
View list displays the list of recipients to whom the message
sending failed
Delete list removes the undelivered list from your Vertu phone
View message displays the failed message.
Message folders
All text and multimedia messages stored in your Vertu phone are
organised in folders. In addition to the default folders, you can
create new folders to organise your messages.
To browse your message folders:
1. From the Home screen, press Menu » Messages.
2. Scroll to one of the following folders and then press Select:
Inbox - Messages are automatically stored in this folder when they
arrive and, by default, after they have been read
Drafts - Contains messages created by you and saved for sending
at a later date
Outbox - Messages that you have queued for sending but are yet to
be sent are saved in this folder
Sent items - Messages that you have sent are automatically
stored in this folder
Saved items - Default location for messages that have been read
and saved. This is also where the Templates folder can be found (see
below)
To create a new personal folder in Saved items:
1. Select Menu » Messages » Saved items » Options » Add
folder.
2. Use the NUMBER keys to enter a name for the new folder.
3. Press OK.
To rename or delete a personal folder:
1. Select Menu » Messages » Saved items.
2. Scroll to the personal folder you want to rename or delete.
3. Press Options.
To rename the folder, scroll to Rename folder and then press
Select. Use the NUMBER keys to rename the folder and then
press OK.
To delete the folder press Delete folder » Yes to confirm the
action.
Erasing multiple text and multimedia
messages
You can erase all of the text and multimedia messages from any of
the standard or personal folders, or from all of the folders at once.
To delete multiple messages:
1. From the Home screen, press Menu » Messages » Delete
messages.
2. Scroll to one of the options and then press Select:
By message enables you to navigate into folders and delete
individual messages
By folder enables you to delete all messages in a selected folder
All messages deletes all messages currently stored on the
phone. You will be given the opportunity to save unread messages
before deleting.
3. Confirm the deletion when prompted. You cannot recover deleted
messages.
Text mess ag es
Standard text messages can be up to 160 basic characters in
length. Linked messages can be used to create larger messages.
Linked messages
Your Vertu phone can send and receive long text messages (up to
1000 basic characters). Long text messages are automatically split
into multiple messages and sent as a series. The series of
messages is then linked by a compatible phone when received and
displayed as a single SMS message. For this feature to work
properly, the receiving phone must also support linked messages.
While you write a message, the number of available characters and
the current part number of linked message (for example, 904/1) is
shown in the top right corner of the display.
While receiving linked messages, you can start reading the first part
before the phone has received the entire message. While viewing
the message, you may see * some text missing * on the display.
This is normal, and the message content will be updated as soon as
the missing sequence arrives.
Messages can be moved to this and other personal folders on
your Vertu phone (see “Reading and replying to text
messages” on page 20).
MESSAGES
English
19
Message settings
When you write or reply to a text message, your Vertu phone uses a
sending profile that defines how the phone will handle the message
sending interaction with your service provider. For most service
providers you will not need to modify these settings as the
necessary information will be obtained from your SIM card
automatically. Depending on your SIM card, you may be able to
store more than one set of message profiles.
To edit the message settings:
1. From the Home screen, press Menu » Messages » Message
settings » Tex t me s sag e s.
2. Scroll to one of the options and then press Select:
Request reports requests that the network sends you delivery
reports for your messages. These are stored in Messages »
Delivery reports
Message centres enables you to examine, modify and add the
details of the message centre(s), used for sending text messages.
You should obtain this number from your service provider
Msg. centre in use enables you to select which message centre
should be used by your Vertu phone to send text messages
Message validity enables you to define how long the network
attempts to send your messages before it gives up
Messages sent via enables you to select the message type as
Text, Paging or Fax. Your service provider may have limited
support for different message types
Use packet data determines whether or not GPRS is the
preferred SMS bearer
Character support and then select Full ensures all characters
are sent as viewed or select Reduced where characters with marks
for example accents may be converted to other characters
Rep. via same centre allows the recipient of your message to
send you a reply using your message centre (network service).
Message overwrite
When the message memory is full, your Vertu phone cannot send or
receive any new messages. To avoid this, you can set your phone to
automatically replace the oldest messages in the Sent items folder
when new ones arrive or are sent.
To enable automatic overwrite in Sent items:
1. From the Home screen, press Menu » Messages » Message
settings » General settings » Save sent messages »
Yes.
2. From the General settings menu, press Overwrite sent
items » Allowed.
Writing and sending text messages
The Create message option allows you to write and send text
messages.
To write a new message:
1. From the Home screen, press Menu » Messages » Create
message.
2. Use the NUMBER keys to enter the recipient’s phone number in the
To: field.
3. Alternatively, to retrieve a phone number from Contacts select Add
followed by:
Press <Favourite> to define easily available message recipients
or groups when sending messages
Press Recently used to send a message to a recently used
number
Press Call register to access contacts from the Call log
Press Contacts to send a message to number in your Contacts list
Press Contact groups to send a message to multiple recipients
saved as a group in your Contacts list. See “Groups” on page 29.
4. Scroll down and use the NUMBER keys to write the message in the
Text: field.
5. Press Options in the Text field while creating a message to display
the following options:
Send to send the message immediately
Insert enables you to insert multimedia content as an attachment
Add recipient to add another person to the recipient list
Add subject to add a subject field to the message
Clear field deletes the text that has been entered into the
message field
Insert contact detail selects a name from your Contacts list
and insert it into the message body
Insert symbol displays all the available symbols and smileys you
can use in the message
Editing options to cut, copy or paste text.
Writing language selects one of the alternative languages stored
on your Vertu phone to compose your message
Prediction options configures predictive text entry see
“Predictive text input” on page 16 for more information about
Predictive text
Change msg. type to change to email, flash or audio message.
Change to multim. to change text message to multimedia
message
Save message saves the message in your Saved messages
folder
A flashing message icon on the Home screen indicates
that the message memory is full. Before you can receive or
send any more text messages you must erase some of your
existing text messages or move them to a personal folder.
This operation can be repeated to add a number of recipients
for the text message.

MESSAGES
English
20
Sending options enables various settings when sending the
message:
Message priority can be set to Normal, High or Low
Delivery report enables you to request a delivery report for
this and all other text messages
Save sent message enables you to save a copy of the
message in the Sent items folder
Message validity enables you to select the length of time that
the network attempts to deliver your message
Message sent via enables you to send the message via
Tex t , Paging or Fax
Exit editor leaves the text entry environment (you will be asked if
you want to save any incomplete messages).
6. Once the message is complete, press Send.
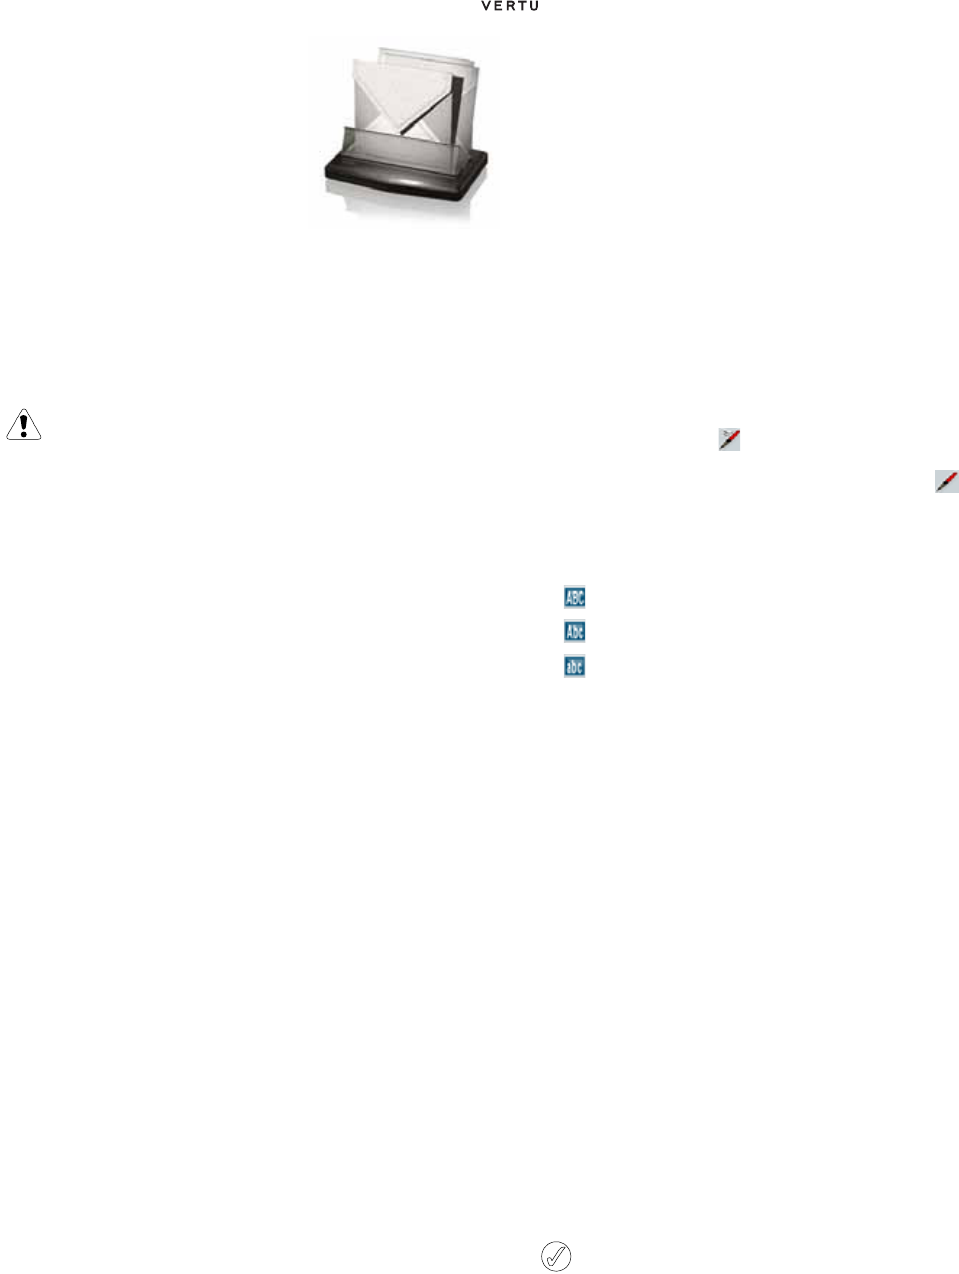
Reading and replying to text messages
When you receive a message, you will receive an information note
on the outer display.
A message icon will appear on the display and will remain on
the display until you read the message.
By default there is also an audible message alert.
1. Open the fold and press Show to open the message.
2. To ignore the message and view it later, press Exit.
To read a stored message:
1. From the Home screen, press Menu » Messages » Inbox.
2. The most recently received message will be highlighted. Scroll to the
message you want to read and press Open.
To view the list of available options while reading a message:
1. Press Options.
2. Scroll to the required option and then press Select:
Reply to reply to the message
Reply as to reply and change the type of message to be sent
Delete removes the message you are viewing from your Vertu
phone
Call to call the sender of the message
Use detail makes use of any numbers, e-mail addresses or Web
addresses from the current message
Forward sends the message to another recipient of your choosing
Edit enables you to edit the message before sending or saving
Move enables you to move the message to another selected folder
Copy to Calendar creates a reminder note in the calendar
Copy as template saves the message as a template for use
when composing future messages
Message details displays the sender’s name and phone
number, the message centre used, and the date and time sent.
To reply to a message being read:
1. With the message open, press Reply.
2. The To: field displays the sender’s number. The type of message
defaults to the same type as you have open.
Refer to the Text message, multimedia message, Flash message
and Audio message sections of this guide to complete and send
your reply.
Multimedia messages
A multimedia message (MMS) can contain text, sound, video and
pictures. Your Vertu phone supports multimedia messages that are
up to 600 KB. If the maximum size is exceeded, the phone may not
be able to receive the message. Depending upon your network, you
may receive a message that includes an Internet address where you
can go to view the multimedia message. Pictures are scaled to fit
the display area of the phone. Your Vertu phone has a multimedia
message viewer for playing messages and an Inbox for storing all
saved messages.
Copyright protections may prevent some images, ringing tones, and
other content from being copied, modified, transferred, or
forwarded.
Multimedia messaging supports a wide range of standards for each
of the following formats:
>Picture: JPEG, GIF, animated GIF, WBMP, BMP, and PNG
>Sound: SP-MIDI, AMR audio, MP3 and AAC
>Video: clips in H.263 format with SubQCIF image size and
AMR audio
If a received message contains unsupported attachments, these
may be replaced with a message.
You cannot receive multimedia messages if you have a call in
progress, a Java application running, or an active browsing session.
If you are sent a multimedia message while you are on a call of any
type, receipt will be delayed until your Vertu phone becomes free.
MMS settings
Depending on which service provider you use, your Vertu phone
might already have MMS settings installed. If you encounter any
difficulties, please contact Vertu Concierge or visit www.vertu.com
and download your settings.
MMS configuration settings
To update your configuration settings:
1. From the Home screen, press Menu » Messages » Message
settings » Multimedia messages » Configuration sett.
» Configuration.
2. Select one of the available options.
Message settings
In addition to your connection settings, there are several other
settings that control your multimedia messaging functions. To
modify these settings:
1. From the Home screen, press Menu » Messages » Message
settings » Multimedia messages.
2. Scroll to one of the options and then press Select:
If your Vertu phone memory is full, you may have to delete
messages from your Inbox or Outbox before you can send or
receive further messages.
Multimedia messaging functions can only be used if
supported by your service provider. For availability and a
subscription to the multimedia messaging service, contact
your service provider. Only compatible devices can receive
and display multimedia messages.

MESSAGES
English
21
Request reports will inform you of message delivery
Allow read report lets you choose whether you want to be
informed when your message has been delivered to the recipient
and also if the recipient has read the message or deleted it without
reading
MMS creation mode If you select Guided, the phone informs
you if you try to send a message that may not be supported by the
recipient. If you select Restricted, the phone prevents you from
sending messages that may not be supported. To include content in
your messages without notifications, select Free.
Image size in MMS enables you to define the maximum size of
an image used in an MMS. Your Vertu phone automatically resizes
the image if necessary
Default slide timing will enable you to set the default time in
mm:ss format that each slide (equivalent of a page) in an MMS is
displayed on the screen
MMS reception enables you manually or automatically receive
multimedia messages or allow only messages in your home network,
or disallow them completely.
Allow adverts enables or disables the automatic reception of
multimedia advertisements
Configuration sett. will enable you to define the MMS
connection parameters. See “MMS configuration settings” on
page 20.
Writing and sending multimedia messages
You can create multimedia messages with one or more attachments
up to the maximum 600KB message size. When creating your
multimedia message, the current remaining space is shown on the
top line just under the status line.
Unlike text messages, multimedia messages can be formed of
multiple pages, known as slides. You can control how long each
slide is displayed. Each slide can contain up to 1000 basic text
characters (less for complex languages) one image, and one sound
clip.
To write and send a multimedia message:
1. From the Home screen, press Menu » Messages » Create
message.
2. Press Options in the Text field while creating a message to display
the following options:
Send enables you to send the completed message (see above)
Insert enables you to insert a file as an attachment
Add recipient to add another person to the recipient list
Add subject to add a subject field to the message
Clear field deletes the text that has been entered into the
message field
Insert contact detail selects a name from your Contacts list
and insert it into the message body
Insert symbol displays all the available symbols and smileys you
can use in the message
Editing options to cut, copy or paste text.
Writing language selects one of the alternative languages stored
on your Vertu phone to compose your message
Prediction options configures predictive text entry see
“Predictive text input” on page 16 for more information about
Predictive text
Slide options
Slide timing enables you to set the time interval between the
slides. Use the NUMBER keys to enter the time interval and then
press OK
Change msg. type to change to email, flash or audio message.
Change to text msg to change multimedia message to text
message
Save message saves the message in your Saved messages
folder
Sending options enables various settings when sending the
message:
Message priority can be set to Normal, High or Low
Request reports enables you to request a delivery and read
report
Save sent message enables you to save a copy of the
message in the Sent items folder
Message validity enables you to select the length of time that
the network attempts to deliver your message
Message sent via enables you to send the message via
Te x t, Paging or Fax
Exit editor leaves the text entry environment (you will be asked if
you want to save any incomplete message).
3. Use the NUMBER keys to enter the recipient’s phone number in the
To: field.
4. Alternatively, to retrieve a phone number from Contacts press Add
followed by:
Press <Favourite> to define easily available message recipients
or groups when sending messages
Recently used to send a message to a recently used number
Call register to access contacts from the call log
Contacts to send a message to a number in your Contacts list
Contact groups to send a message to multiple recipients saved
as a group in your Contacts list.
5. Press the Send key. The message is sent.
It takes the network longer to send a multimedia message than to
send a text message. While the multimedia message is being sent,
an animated indicator is displayed on the status line, but you can
carry on using your Vertu phone as normal. If there is an interruption
while the message is being sent, the network tries to resend it a few
times. If this fails, the message remains in the Outbox folder and
you can try to resend it later. Check your Outbox folder for unsent
messages.
For more information about multimedia messaging, contact your
service provider.
Reading and replying to multimedia
messages
When you receive a multimedia message, you will receive an
information note and an envelope icon will appear on the status line.
By default there is also an audible alert.
This operation can be repeated to add a number of recipients
for the multimedia message.
After sending a message, your Vertu phone displays a
confirmation message. This is an indication that the message
has been sent by your Vertu phone to the message centre.
This is not an indication that the message has been received
at the intended destination.

MESSAGES
English
22
To read a new multimedia message as soon as it is received press
Show.
To ignore the message and view it later, press Exit.
To read a stored message:
1. From the Home screen, press Menu » Messages » Inbox.
2. The most recently received message will be highlighted. Scroll to the
message you want to read and then press Select.
3. To view the whole message, including any attachments, press Play.
4. To view just the files in the presentation or the attachments, press
Options and select one of the following:
Objects enables you to examine files attached to the message
Reply sends a reply to the message sender
Reply to all sends a reply to all recipients of the original message
Delete removes the message you are viewing from your Vertu
phone
Use detail enables you to use any numbers, e-mail addresses or
Web addresses from the current message when you create a new
message or contact
Forward sends the message to another recipient of your choosing
Edit enables you to edit the message before sending or saving
Move moves the message to another folder
Copy as template enables you to save the message as a
template for future messages
Message details displays the sender’s name and phone
number, the message centre used, and the date and time sent.
5. Scroll to Objects and then press Select.
6. Scroll to the relevant object type and then press Select.
To reply to a multimedia message:
1. With the message open, press Options.
2. Scroll to Reply to reply to the sender or Reply to all to send a
reply to all recipients of the original message and then press Select.
3. To send the message, press Send.
Audio messages
You can use the multimedia message service to create and send an
audio message. Multimedia messaging service must be activated
before you can use audio messages. See “MMS settings” on
page 20.
Creating and sending audio messages
1. From the Home screen, press Menu » Messages » Create
message » Audio message.
2. The recorder opens (see “Voice recorder” on page 43 for more
information). Press Select to start recording the Audio message.
3. Press Select again to stop the recording.
4. Press Options while creating an audio message to select from the
following features:
Send sends the completed message
Preview enables you to listen to how the message will sound to the
recipient
Change msg. type enables you to change the type of message
being created
Sending options enables you to select from the following
options when sending the message:
Message prioritydetermines the priority level. Choose from
High, Normal or Low
Delivery report determines whether the network sends you
delivery reports for your messages
Save sent message determines whether or not the phone
saves the message in the Sent items folder once it is sent
Save message saves the message in your Saved messages
folder
Add subject enables you to include a subject for your message
Exit editor closes the text entry environment (you will be asked if
you want to save any incomplete message).
5. Use the NUMBER keys to enter the recipient’s phone number in the
To: field.
6. Alternatively, to retrieve a phone number from Contacts select Add
followed by one of the following:
Press <Favourite> to define easily available message recipients
or groups when sending messages
Recently used sends a message to a recently used number
Press Call register to access contacts from the Call log
Contacts enables you to send a message to a number in your
Contacts list
Contact groups enables you to send a message to multiple
recipients saved as a group in your Contacts list.
7. Scroll to the Message: field and press Play to preview the
message.
8. Press Send.
If you have unread messages in your Inbox, the envelope icon
will remain on the Home screen.

MESSAGES
English
23
Receiving and listening to audio messages
When you receive an audio message, you will receive an information
note, and the message icon appears on the display. By default
there is also an audible message alert.
1. Open the fold and press Play.
2. To ignore the message and view it later, press Exit.
To listen to a stored audio message:
From the Home screen, press Menu » Messages » Inbox » Play.
Video messages
You can make and receive video messages with your Vertu phone.
E-mail
You can write, send, and read e-mails with your Vertu phone. Your
phone supports POP3 and IMAP4 e-mail servers.
E-mail settings
To manually enter your connection settings or to modify your current
settings:
1. From the Home screen, press Menu » Messages » Message
settings » E-mail messages » Edit mailboxes » Add.
2. Scroll to each of the options and modify the parameters with the
information supplied by your service provider and/or e-mail provider.
Writing and sending e-mail messages
You can create e-mail messages and also attach images and video
clips. You can write your e-mail message before connecting to the
e-mail service; or connect to the service first, then write and send
your e-mail.
To write and send an e-mail message:
1. From the Home screen, press Menu » Messages » Create
message.
2. Press Options » Change msg. type. » E-mail message.
3. Follow the instructions for composing a text message.
4. To send the e-mail message, select Send.
5. If more than one e-mail account is defined, select the account from
which you want to send the e-mail.
6. To edit or continue writing your e-mail later, select Exit » Yes. The
e-mail is saved in Drafts.
Downloading and reading e-mail
To download your e-mail messages:
1. From the Home screen, press Menu » Messages » E-mail.
2. If more than one e-mail account is defined, select the account from
which you want to download the e-mail.
3. The e-mail application connects, synchronises and displays e-mails.
4. To open an e-mail, highlight a header and press Open.
Replying to e-mail
To reply to e-mail:
1. To reply to an e-mail, open it as above, and then select Options »
Reply.
2. Write the reply and then press Send.
Deleting e-mail messages
You can delete e-mails one-by-one or mark a group for deletion all at
once.
To delete one e-mail message:
1. From the Home screen, press Menu » Messages » E-mail. The
e-mail application is started.
2. Highlight an e-mail and press Options » Delete.
3. Select from From phone to delete e-mails from your Vertu phone
only. Deleting an e-mail from your phone does not delete it from
the e-mail server.
4. Select Also from server to delete e-mails from your Vertu phone
and also from the e-mail server.
To delete more than one e-mail message:
1. From the Home screen, press Menu » Messages » E-mail. The
e-mail application is started.
2. Press Options » Mark or Mark all.
3. Mark the e-mail or e-mails for deletion.
Press Options » Delete marked. The marked messages will be
deleted from your Vertu phone.
IMs (Instant Messaging)
With IMa (Instant Messaging) you can send short, simple text
messages to online users. You have to subscribe to a service and
register with the IM service you want to use. For more information
contact your service provider.
To log in to IMs:
1. From the Home screen, press Menu » Messages » IMs.
2. Select from the following options:
Login - to log in to IMs
Saved conversations to access your stored message
conversations.
Voice messages
The voice mailbox is a network service and you may need to
subscribe to it. For more information and for your voice mailbox
number, contact your service provider.
If you have unread messages in your Inbox, the envelope icon
will remain on the Home screen.
Due to the complexity of entering all of the settings manually,
it is strongly recommended that you use the order ettings link
from your CD-ROM to take you directly to the appropriate
page on the Vertu website to obtain the settings for your Vertu
phone.
After sending a message, your Vertu phone may display
Message Sent. This is an indication that the message has
been sent by your Vertu phone. This is not an indication that
the message has been received at the intended destination.
Exercise caution when opening messages. E-mail
messages may contain malicious software or otherwise
be harmful to your Vertu phone or your computer.
IMs support DRM2.