Vonger Electronic Technology VOCOREV2 VoCore2 User Manual
Vonger Electronic Technology Co.,Ltd. VoCore2
UserManual.wiki
>
Vonger Electronic Technology
>
VOCOREV2 User Manual
User manual
Navigation menu
Upload a User Manual
Namespaces
Wiki Guide
HTML
PDF
Info
Views
User Manual
Discussion / Help
Navigation

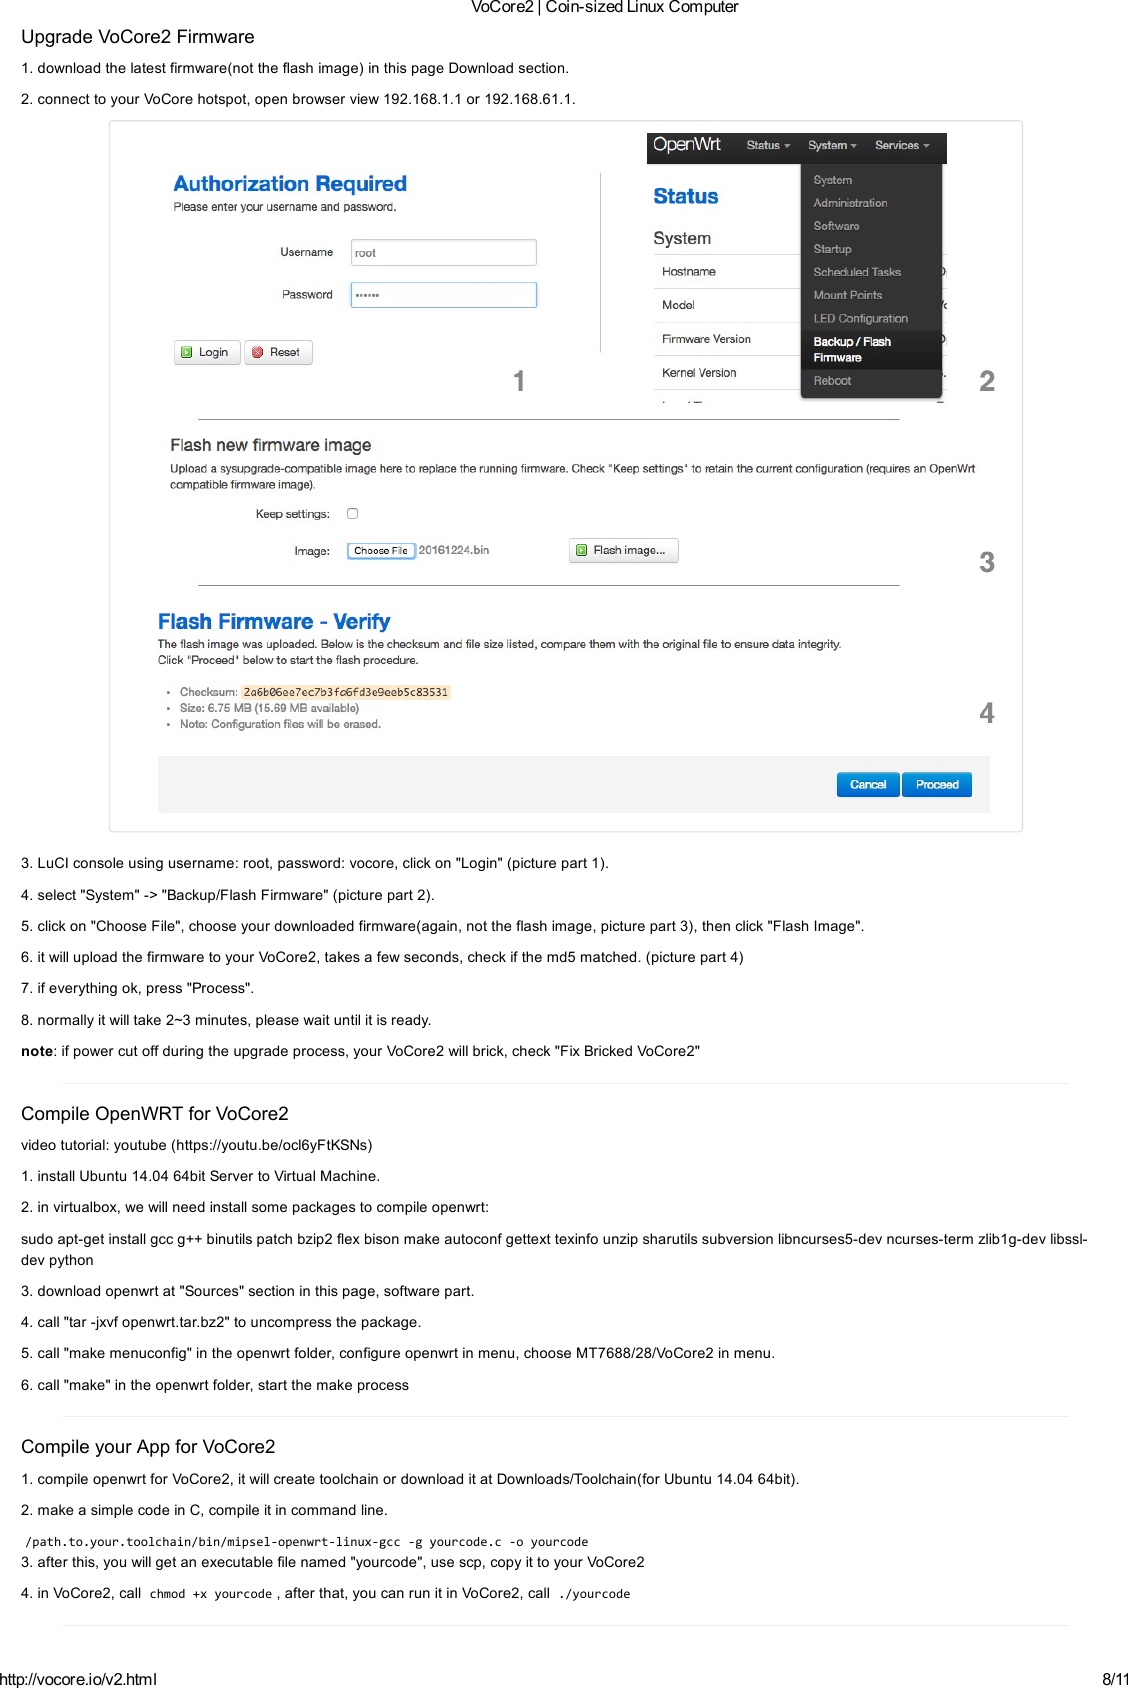
![VoCore2|CoinsizedLinuxComputerhttp://vocore.io/v2.html 7/11videotutorial:youtube(https://youtu.be/W3UVXb5YM2k)1. connectUSB2TTL.TXDtoVoCore2.RXD2,USB2TTL.RXDtoVoCore2.TXD2,USB2TTL.GNDtoVoCore2.GND.2. setupyourserialapplication(suchasputtyforwindows,kermitformac,linux)inyourcomputerto115200bps,8databits,noeven,1stopbit.3. poweronyourVoCore2,noyoushouldfindsometextoutput.SetupAP+STAModevideotutorial(requireUSB2TTL):youtube(https://youtu.be/IPt5cxg5K98)1. connecttoyourVoCorethroughUSB2TTL.2. runcommandinconsole(UARTconsole).3. setupnetworktoenabledhcp(getipfromyourhotspot).ucideletenetwork.wwanucisetnetwork.wwan=interfaceucisetnetwork.wwan.proto=dhcpucicommit4. setupfirewalltoenableaccesstointernetthroughyourhotspot.ucidel_listfirewall.@zone[1].network=wwanuciadd_listfirewall.@zone[1].network=wwanucisetfirewall.@zone[1].input=ACCEPTucisetfirewall.@zone[1].output=ACCEPTucisetfirewall.@zone[1].forward=ACCEPTucisetfirewall.@zone[1].masq=1ucisetfirewall.@zone[1].mtu_fix=1ucicommit5. setupwirelesstoenableap+stamode.ucisetwireless.sta.ssid="[TARGETAPSSID]"ucisetwireless.sta.key="[TARGETAPPASSWORD]"ucisetwireless.sta.network=wwanucisetwireless.sta.disabled=0ucicommitnote:replace[TARGETAPSSID]tothetargetapssidyouwanttoconnectto,[TARGETAPPASSWORD]isitspassword.5. restartyournetwork,itwillwork./etc/init.d/networkrestart6.(option)onceap+staistotallyup,disableitinconfig,soifnexttimeyourtargetapismissing,youstillabletoconnecttoVoCore2.ucisetwireless.sta.disabled=0ucicommit/etc/init.d/networkrestartsleep10ucisetwireless.sta.disabled=1ucicommitnote:bettercopythethreelinesto/etc/rc.localUpgradeVoCore2Firmware](https://usermanual.wiki/Vonger-Electronic-Technology/VOCOREV2/User-Guide-3868524-Page-7.png)
![VoCore2|CoinsizedLinuxComputerhttp://vocore.io/v2.html 9/11UploadFirmware1. uploadfirmwarethroughluci,pleaseread"UpgradeFirmware"section.2. uploadfirmwarethroughconsole,connectedtoVoCorehotspot.(1) copyfrompctoVoCore[operateinPC]:scp[yourfirmware].binroot@192.168.61.1:/tmp/vocore2.binhereistwochoices,2.awillerasealldata/configyouwritetoVoCore,2.bjustupgradethefirmwarebutkeepthem.(2.a)writetoVoCorenorflash[operateinVoCore]:mtdefirmwarewrite/tmp/vocore2.binfirmware(2.b)systemupgradeVoCorenorflash[operateinVoCore]:sysupgrade/tmp/vocore2.binfirmware(3) waituntilmtddone,rebootyourVoCore.note:ifyouwantsetyourVoCorebacktofirsttimebootup,call"firstboot"inconsole.FixBrickedVoCore2(ubootalive)1. connectyourVoCore2tocomputerthroughUSB2TTL(UART2RXD2+TXD2+GND).2. openttytools(musthavekermitprotocol),suchaskermit,ckermit.3. powerupyourVoCore,onceyoufind:"0:LoadsystemcodethenwritetoFlashviaSERIAL.",press'0'.note:VoCorewillshow"##Readyforbinary(kermit)downloadto0x80100000at115200bps..."note:kermit:pressCtrland'\'sametimethenpress'c',youwillswitchtokermitcommandconsole.5. sendupgradefirmwaretoVoCore,afterthat,backtoVoCoreubootconsole.note:kermit:call"sendpath/to/your/upgrade/file/on/pc.bin"tosendfirmware,around10minutes,onceitfinished,call'c'backtoconsole.6. waitaround20~30seconds,firmwareuploaded,yourVoCorewillreboot.FixBrickedVoCore2(ubootdead)1. YoumusthaveanotherVoCore/VoCore2oroneflashloaderandsixwires.2.1usinganotherVoCore/VoCore2torecoveryourbrickedVoCore2.2.1checkbloghttp://vonger.cn/?p=8054.2.2usingflashloadertorecoveryourbrickedVoCore2.2.2.adisconnectVoCore2frompower;2.2.bconnectVoCore2GNDtoflashloaderGND;2.2.cVoCore2+3.3Vtoflashloader+3.3V;2.2.dVoCore2SPIMISO>flashloaderSPIMISO;2.2.eVoCore2SPIMOSI>flashloaderSPIMOSI;2.2.gVoCore2SPICS0>flashloaderSPICS;2.2.hVoCore2SPICLK>flashloaderSPICLOCK;2.2.iVoCore2RST>VoCore2GND;(keepVoCore2inresetmode)note:ifnotwork,swapMISO/MOSI.2.2.jnow,downloadthensend"FlashImage"toVoCore2.2.2.2.kremovewires,connectVoCore2backtopower,everythingshouldbacknormal.3. option:bettertoupgradeyourfirmwareafterrecover,FlashImageisoutofdate.RecoverfactorysettingSometimes,wemightmessthefactorysettingsectiononVoCore2flash(addresscanbefindby"cat/proc/mtd"),thatwillcausewifidriverfailedtostart.Torecoverit,weneedthefollowingsteps:](https://usermanual.wiki/Vonger-Electronic-Technology/VOCOREV2/User-Guide-3868524-Page-9.png)
![VoCore2|CoinsizedLinuxComputerhttp://vocore.io/v2.html 10/111. getintoVoCoreconsole,byehternetorserialport(TTL).2. copymt7628.sh(http://vonger.cn/misc/vocore2/tools/mt7628.sh)toyourVoCore2/tmp,ordirectlycopythetxtinthescriptandruninconsole.3. runmt7628.shby"sh/tmp/mt7628.sh",thenreboot.note:yourmacaddresswillbefixedtob8:d8:12:67:01:73,youcanchangethistomodifyyourVoCore2macaddress.UpdateUBOOTfromserialport1. rebootvocore2atserialconsole,check"ConnecttoVoCorethroughUSB2TTL"2. oncereboot,itwillshow"7:LoadBootLoadercodethenwritetoFlashviaSerial.",nowwearereadytosendthedata.3. usekermitorcompatibletoolssenduboot.bin,uboot.bincanbegetfromfromDownloadsection.4. waituntilitreboot.Directlywritetomemory/registerWemadeasimpletoolforthis,downloadhere(http://vonger.cn/misc/vocore2/tools/mem.zip),itsnameis"mem",puttheexecutablefileinto/bin/inVoCore2.1. readfromregister/memory,forexample:0x10000060,pincontrolregisterexample: mem0x100000602. writetoregister/memory,mustin32bits(4bytes)example: mem0x100000640x05540555hereisanexamplebashscriptflashtheLEDeverysecondonVoCore2mem0x100000640x05540555;mem0x100006040x1000;while[1];domem0x100006340x1000;sleep1;mem0x100006440x1000;sleep1;doneMountVoCore2ontocustomizedPCB(ASMT)1. oncustomizedPCB,suggestkeeping16mmx16mmrectangleclearance(nocopper)forbettersignalonboardantenna.2. suggestusinghotairinsteadofiron,DDR2isaESDsencetivepart,mightcausepermanentdamage.3. mustusemiddleleveltempraturepaste(180C,SnBiAg)orlowerone,VoCore2isusinghightempraturepaste(220C,SnCuAg),sametempraturelevelmightcausedamagetoVoCore.VoCoreStudio©20142016·Contactus:support@vocore.io(mailto:support@vocore.io)](https://usermanual.wiki/Vonger-Electronic-Technology/VOCOREV2/User-Guide-3868524-Page-10.png)