Vonger Electronic Technology VOCOREV2 VoCore2 User Manual
Vonger Electronic Technology Co.,Ltd. VoCore2
User manual
VoCore2|CoinsizedLinuxComputer
http://vocore.io/v2.html 1/11
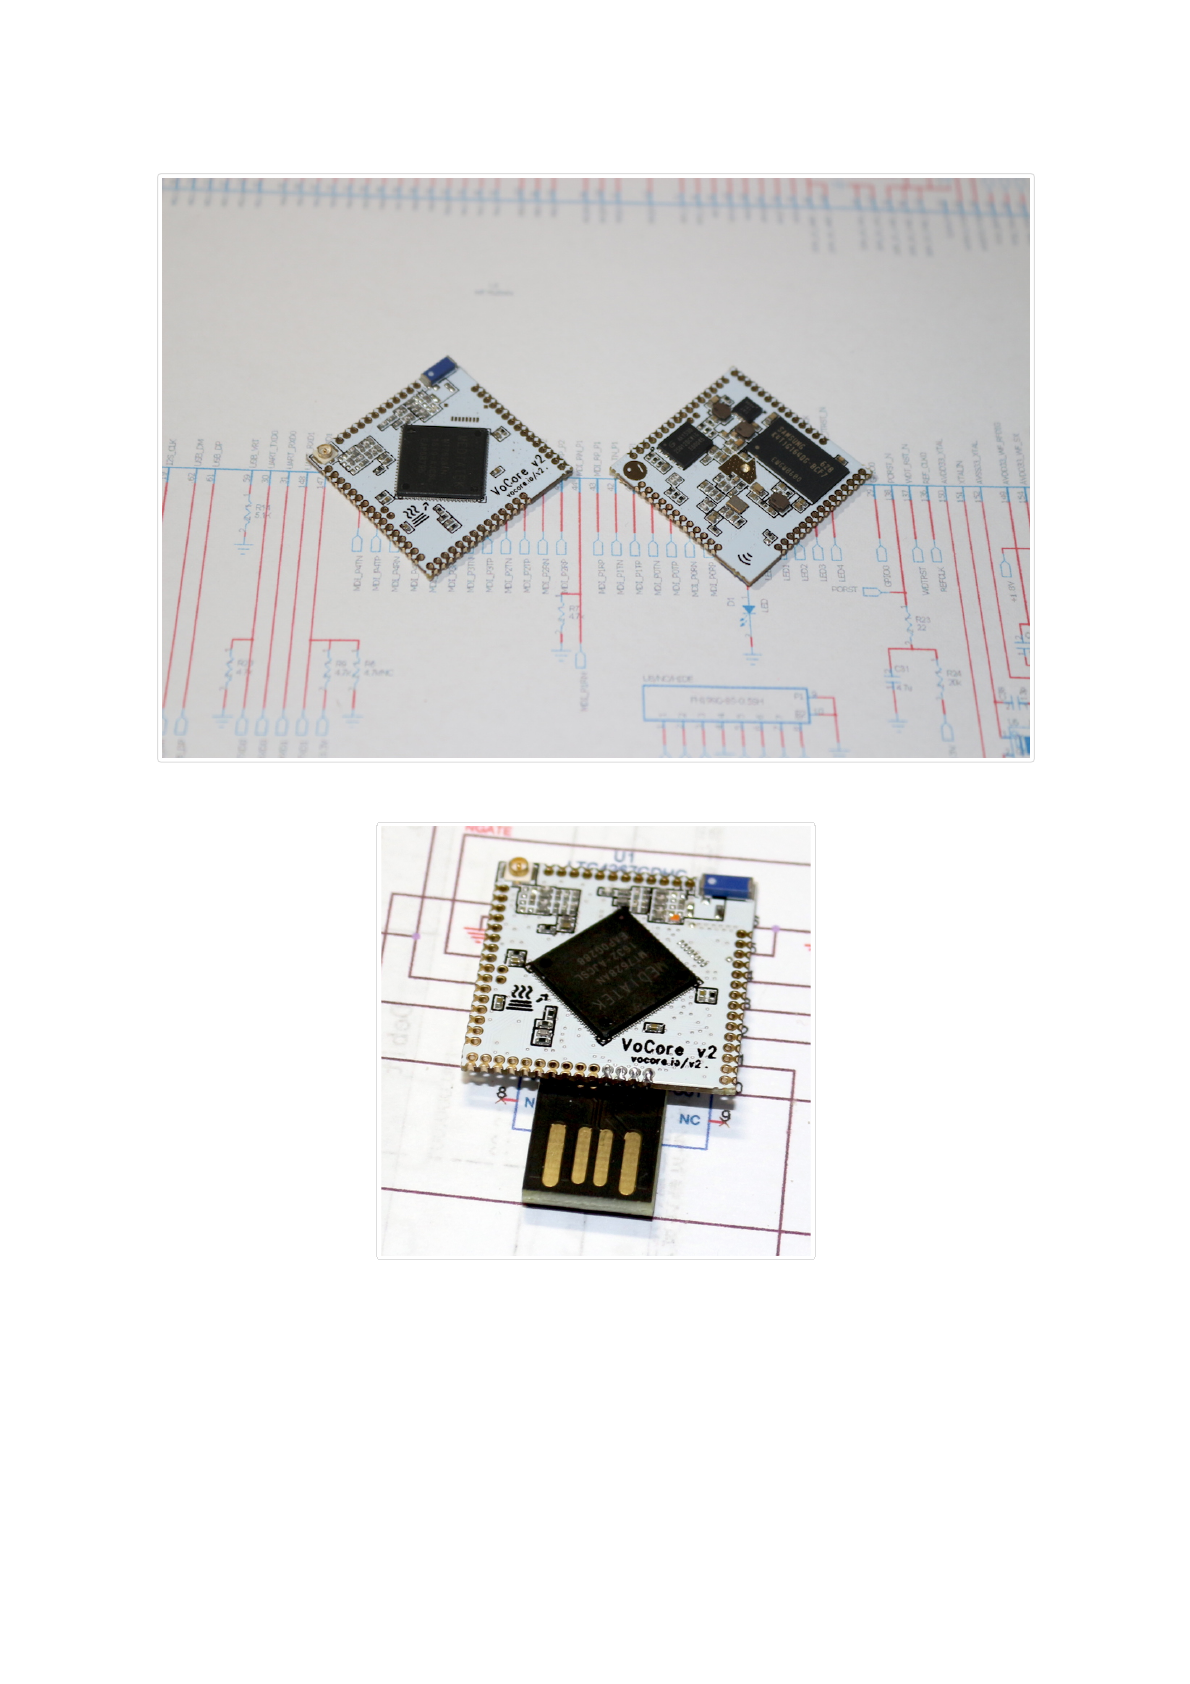
VoCore2
TheCoinsizedLinuxComputer
VoCore2+USBHeader(PowerSupplyOnly)
VoCore2+MicroSD
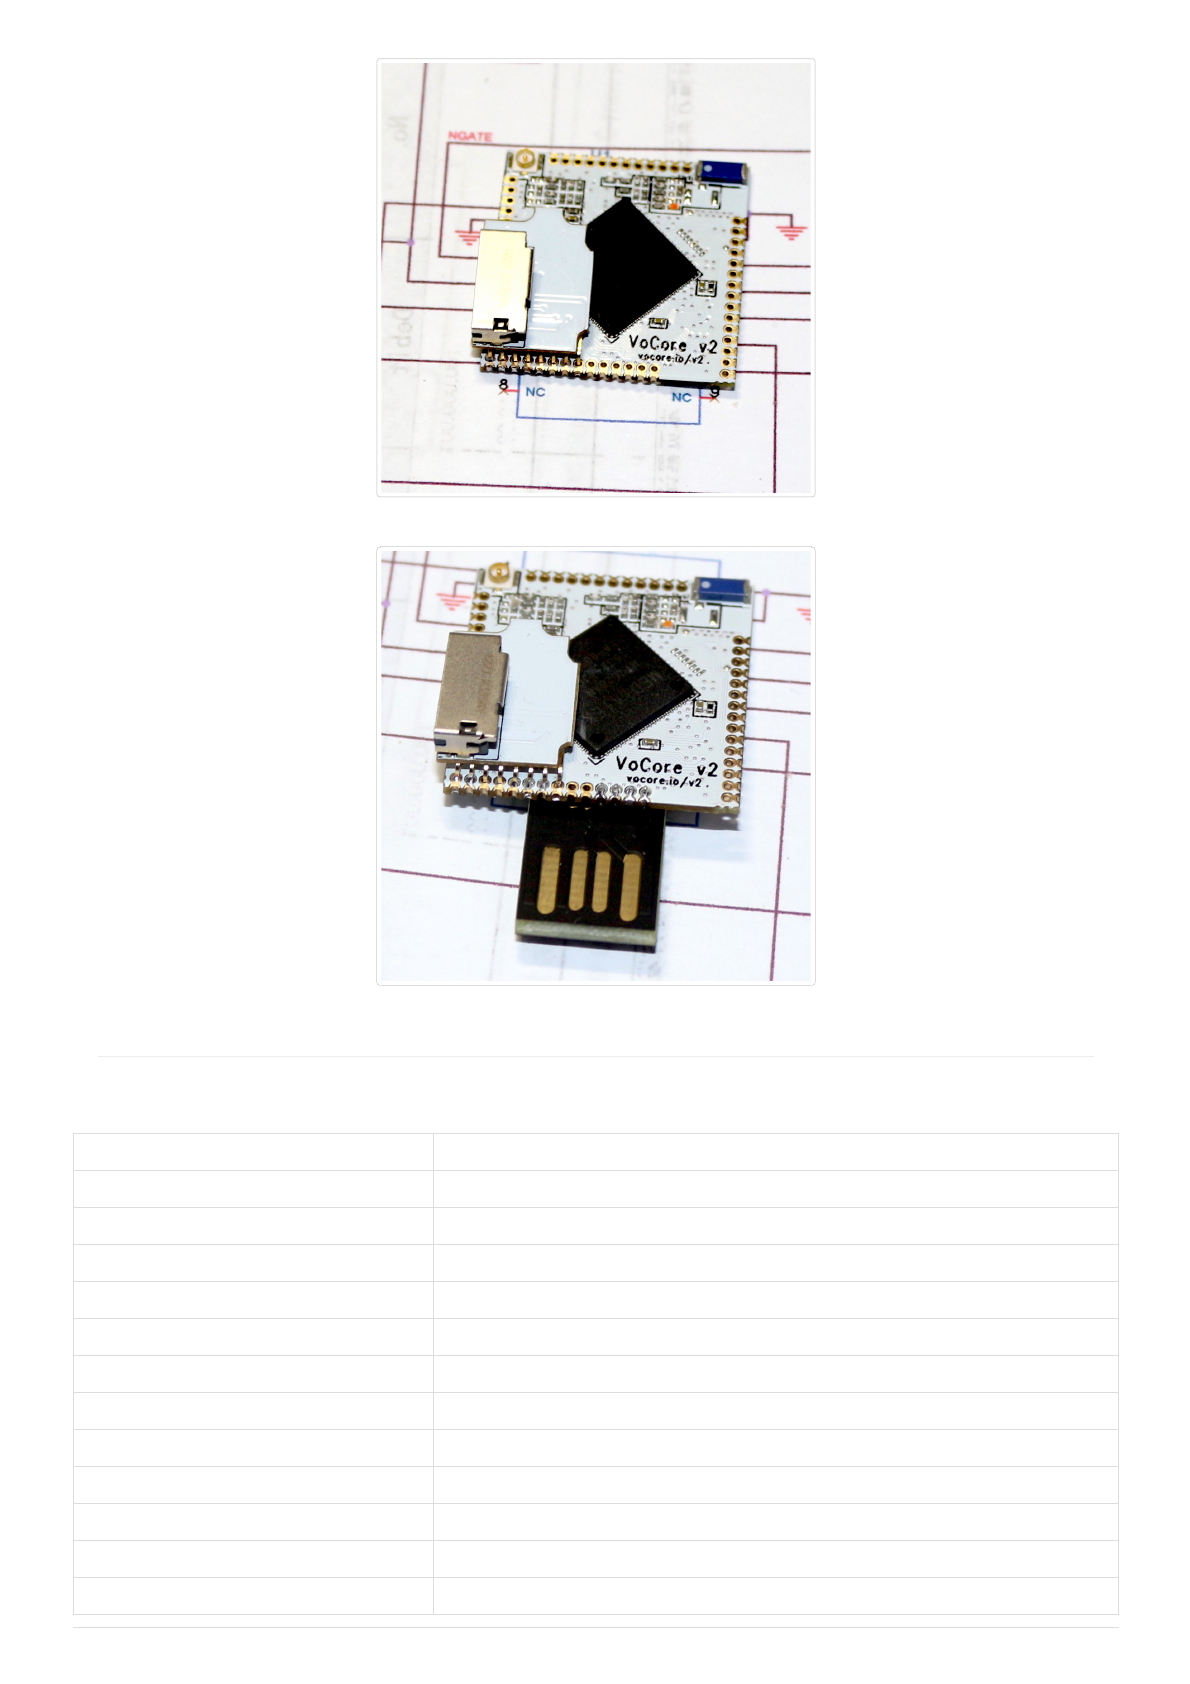
VoCore2|CoinsizedLinuxComputer
http://vocore.io/v2.html 2/11
VoCore2+USBHeader+MicroSD
note:DDR2isESDsencitive,bettertousehotairsolderwithouttouch
Parameters
Details
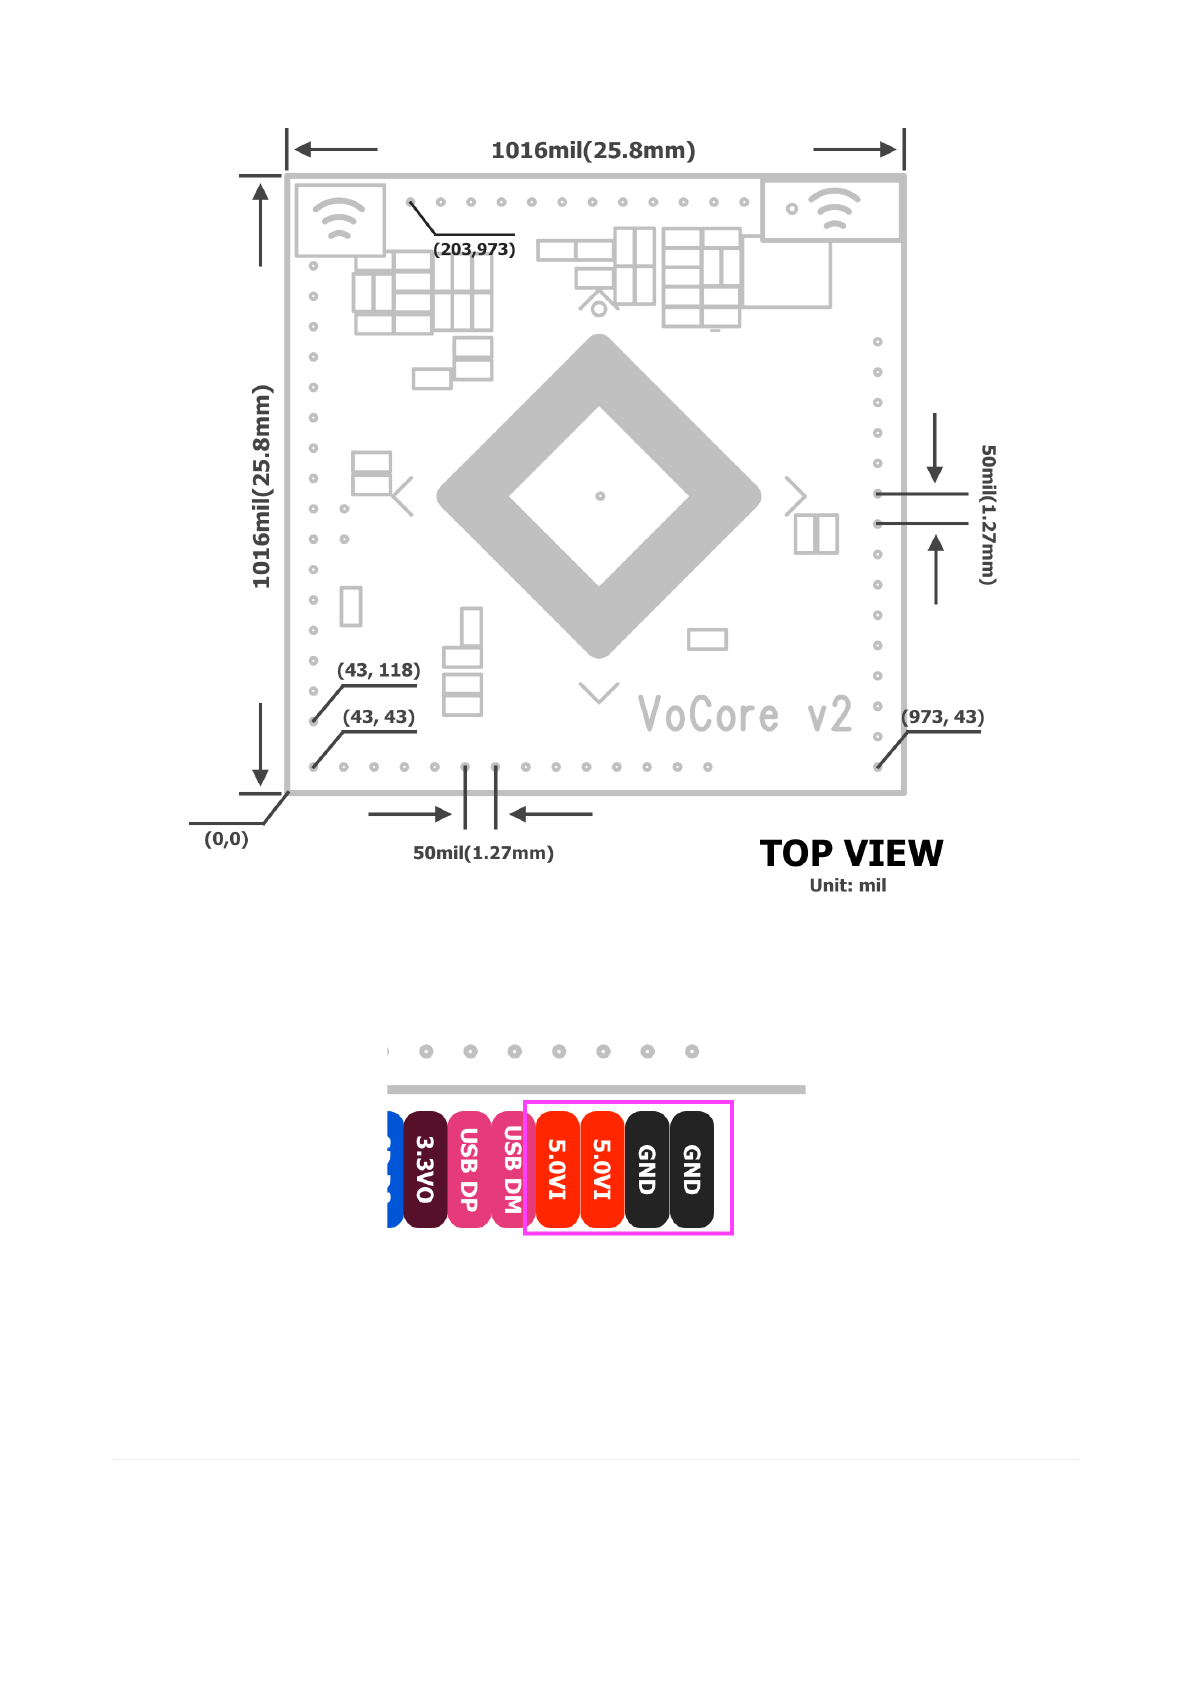
SIZE 25.6mmx25.6mmx3.0mm
CPU MT7628AN,580MHz,MIPS24K
MEMORY 128MB,DDR2,166MHz
STORAGE 16MNORonboard,supportSDXCupto2TB
WIRELESS 802.11n,2T2R,speedupto300Mbps.
ANTENNA OneU.FLslot,oneonboardantenna.
ETHERNET 1port/5ports,upto100Mbps.
USB SupportUSB2.0,upto480MBit/s.
GPIO around40(pinmux)
UART x3(UART2fordebugconsole)
PWM x4
TEMPERATURE 0~40C,indooronly
VoCore2|CoinsizedLinuxComputer
http://vocore.io/v2.html 3/11
Details
POWERSUPPLY 3.6V~6.0V,500mA
POWERCONSUMPTION 74mAwifistandby,230mAwififullspeed,5Vinput.
Sources
Hardware:Download(http://vonger.cn/misc/vocore2/source.zip) md5:710ce05e5f95076b5e42b2feaf8a4de4
OpenWrt1505:Download(http://vonger.cn/misc/vocore2/openwrt.tar.bz2) md5:613621b833102e7ccde7b50c5f5ef6a7
MediaTekSDK:Download(http://vonger.cn/misc/vocore2/mtksdkopenwrt3.10.142014112730965ec3.tar.bz2) md5:4591c418ba6599920337859633d2aa18
UBoot:Download(Github)(https://github.com/Vonger/DasUboot)
WiFiDriver:Download(Github)(https://github.com/Vonger/vocore2) supportlatestopenwrt
Downloads
note:normally,weupgradeorfixbrickareusingFirmware.FlashImageisacloneofthefullflash,forprofessionalusageonly.
Firmware(128MB):Download(http://vonger.cn/misc/vocore2/20170527V.bin) md5:6f7c4b019577a7cec077562b75bc838b
Firmware(64MB,forLite):Download(http://vonger.cn/misc/vocore2/20170211L.bin) md5:2162ef05b5232154d4f20dee57561da7
FlashImage:Download(http://vonger.cn/misc/vocore2/ultimate.16m.img) md5:f4c527a1e563d0ad7ef9ab0b5e0b35c6
Toolchain:Download(Ubuntu14.04x64)(http://vonger.cn/misc/vocore2/toolchain.tar.bz2)
UBoot:Download(http://vonger.cn/misc/vocore2/uboot.20180427.bin) md5:47166dd2acae029b072ad7fe735c7bc9
Datasheet:Download(http://vonger.cn/misc/vocore2/datasheet.zip)
Links
VoCore2+Dock(v2u.html)Ultimateversionmakesiteasytouse.
VoCoreCamera(camera.html)Tinycamerasupportsh264+microphone.
Details
VoCore2isasuccessorofVoCore,makeitmorefast,stable,butstillsamesize.
pinidissameastheoneonMT76x8datasheetinsource

VoCore2|CoinsizedLinuxComputer
http://vocore.io/v2.html 4/11
pinidissameastheoneonMT76x8datasheetinsource
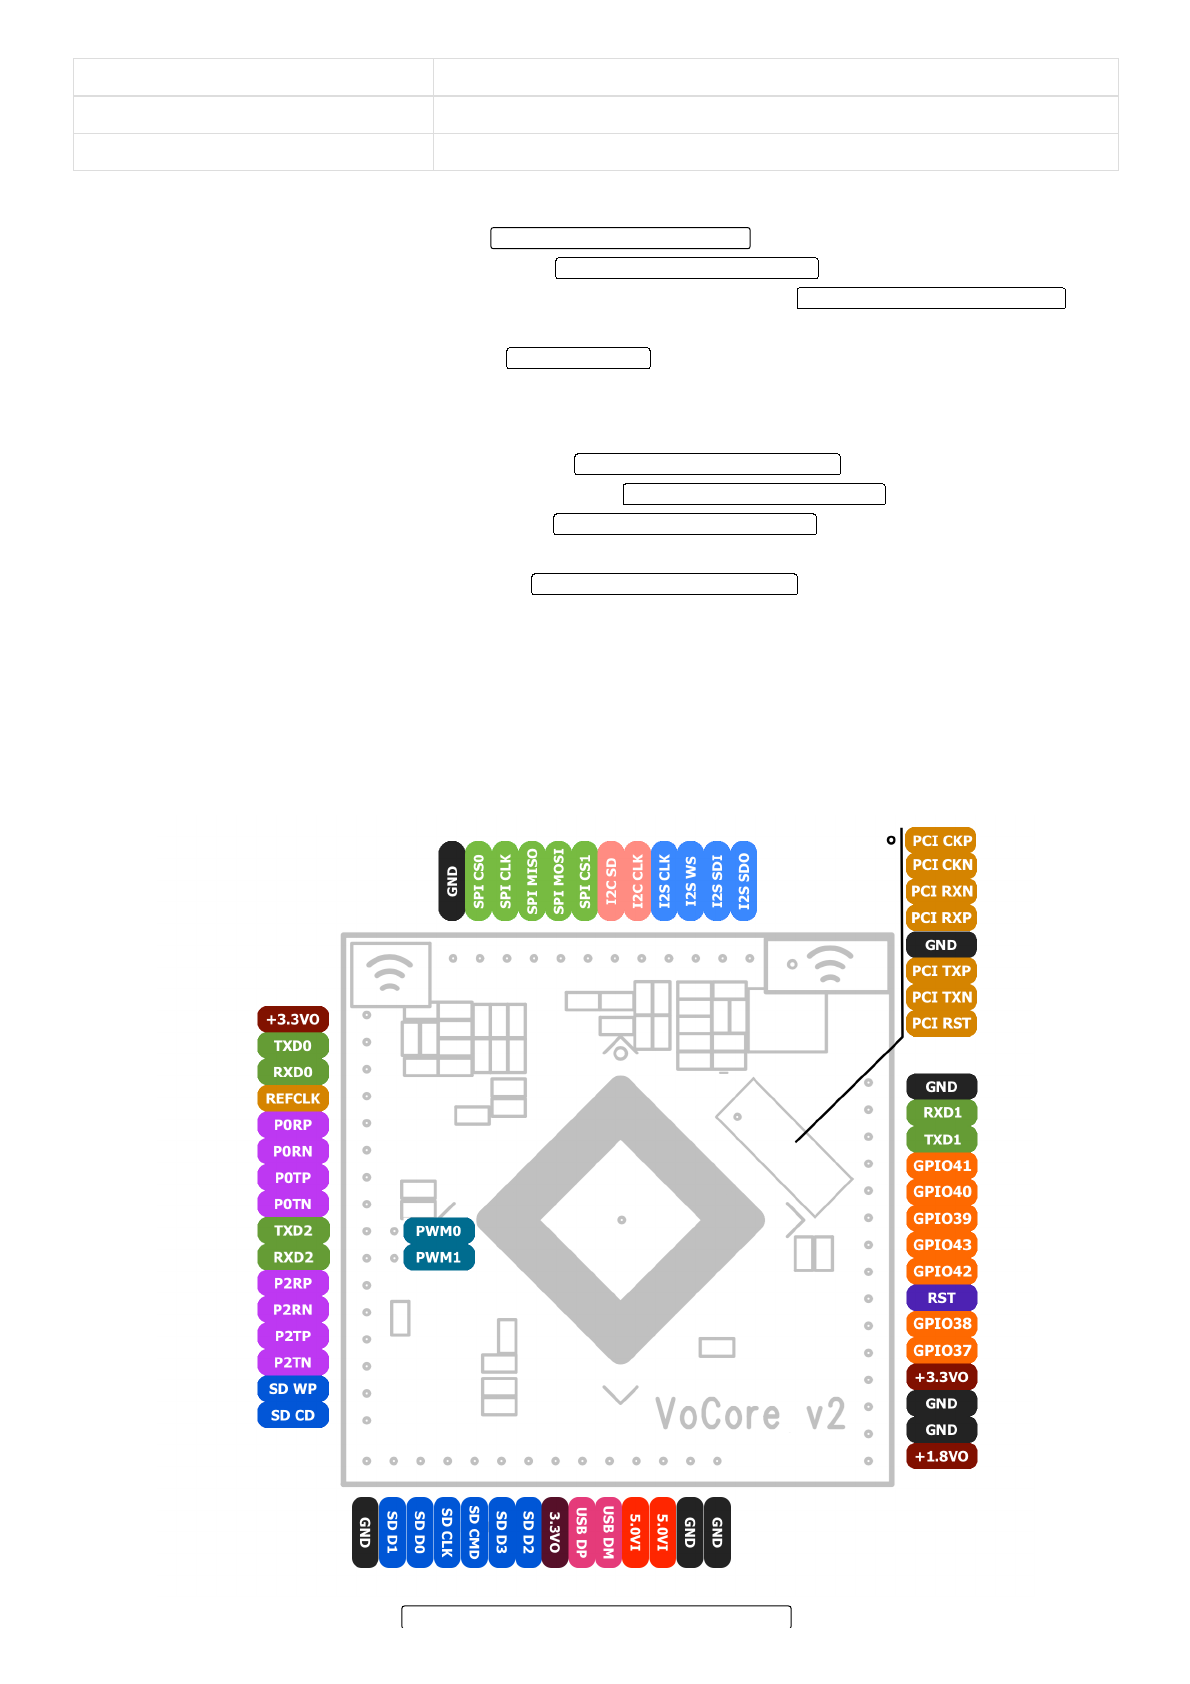
Left Name Mux Note
+3.3VO +3.3Voutput maxoutputcurrent100mA
30 TXD0 GPIO12,UART0LiteTXD 3.3V
31 RXD0 GPIO13,UART0LiteRXD 3.3V
29 REFCLK GPIO11,referenceclock,SDXCCLK*
33 P0RP 10/100PHYPort#0RXP
34 P0RN 10/100PHYPort#0RXN
35 P0TP 10/100PHYPort#0TXP
36 P0TN 10/100PHYPort#0TXN
43 TXD2 10/100PHYPort#1TXN,GPIO15,PWMChannel,SPISlaveClock
44 RXD2 10/100PHYPort#1TXP,GPIO14,PWMChannel,SPISlaveChipSelect
40 PWM0 10/100PHYPort#1RXN,GPIO17,UART2LiteTXD,SPISlaveMOSI 4.7KpulldowntoGND
42 PWM1 10/100PHYPort#1RXP,GPIO16,UART2LiteRXD,SPISlaveMISO
45 P2RP 10/100PHYPort#2RXP,GPIO18,PWMChannel
46 P2RN 10/100PHYPort#2RXN,GPIO19,PWMChannel
47 P2TP 10/100PHYPort#2TXP,GPIO20,PWMChannel
48 P2TN 10/100PHYPort#2TXN,GPIO21,PWMChannel
49 SDWP GPIO22,10/100PHYPort#3TXP,SDXCWP
50 SDCD GPIO23,10/100PHYPort#3TXN,SDXCCD
Top Name Mux Note
GND Groud
28 SPICS0 GPIO10,SPIMasterChipSelect0 4.7Kpullupto3.3V
25 SPICLK GPIO7,SPIMasterClock 4.7Kpullupto3.3V
26 SPIMISO GPIO9,SPIMasterInSlaveOut
27 SPIMOSI GPIO8,SPIMasterOutSlaveIn 4.7KpulldowntoGND
24 SPICS1 GPIO6,SPIMasterChipSelect1 4.7KpulldowntoGND
21 I2CSD GPIO5,I2CData,SDXCD2* 4.7Kpullupto3.3V
20 I2CCLK GPIO4,I2CClock,SDXCD3* 4.7Kpullupto3.3V
19 I2SCLK GPIO3,I2SBitClock,SDXCCMD*
18 I2SWS GPIO2,I2SL/RClock,SDXCD0*
16 I2SSDI GPIO0,I2SDataIn,SDXCD1*
17 I2SSDO GPIO1,I2SDataOut 4.7KpulldowntoGND
Right Name Mux Note
GND Ground
148 RXD1 GPIO12,UART1LiteRXD 3.3V
147 TXD1 GPIO13,UART1LiteTXD 3.3V
141 GPIO41 GPIO41,JTAGTMS JTAGneeds10Kpullup,R9>R6
140 GPIO40 GPIO40,JTAGClock JTAGneeds10Kpullup,R9>R6
139 GPIO39 GPIO39,JTAGReset JTAGneeds10Kpullup,R9>R6
143 GPIO43 GPIO43,JTAGTDO JTAGneeds10Kpullup,R9>R6
142 GPIO42 GPIO42,JTAGTDI JTAGneeds10Kpullup,R9>R6

VoCore2|CoinsizedLinuxComputer
http://vocore.io/v2.html 5/11
Right Name Mux Note
138 RST Reset,touchGNDtoreset
137 GPIO38 GPIO38
136 GPIO37 GPIO37
+3.3VO +3.3Voutput maxoutputcurrent100mA
GND Ground
GND Ground
+1.8VO +1.8Voutput maxoutputcurrent100mA
Bottom Name Mux Note
GND Ground
51 SDD1 GPIO24,10/100PHYPort#3RXP,SDXCD1
52 SDD0 GPIO25,10/100PHYPort#3RXN,SDXCD0
54 SDCLK GPIO26,10/100PHYPort#4RXP,SDXCCLK
55 SDCMD GPIO27,10/100PHYPort#4RXN,SDXCCMD
56 SDD3 GPIO28,10/100PHYPort#4TXP,SDXCD3
57 SDD2 GPIO29,10/100PHYPort#4TXN,SDXCD2
+3.3VO +3.3Voutput maxoutputcurrent100mA
61 USBDP USB2.0Data+
62 USBDM USB2.0Data
+5.0VI +5.0Vinput mininputcurrent500mA
+5.0VI +5.0Vinput mininputcurrent500mA
GND Ground
GND Ground
Middle Name Mux Note
133 PCICKP PCIExpressExternalReferenceClockOutput+
132 PCICKN PCIExpressExternalReferenceClockOutput
130 PCIRXN PCIExpressDifferentialReceiverRX
129 PCIRXP PCIExpressDifferentialReceiverRX+
GND Ground
127 PCITXP PCIExpressDifferentialTransmitTX+
126 PCITXN PCIExpressDifferentialTransmitTX
135 PCIRST PCIExpressDeviceReset
*fiveethernetportmode,sdcardmuxtoi2s/i2c.
VoCore2|CoinsizedLinuxComputer
http://vocore.io/v2.html 6/11
Tutorials
ConnecttoPower
1. connectto3.6V~6.0VandGNDwithastablepowersource,suchasUSBcharger.
note:becareful,highvoltagewilldamageyourVoCore.
2. ifeverythingworks,after30seconds,youwillfindVoCore2inyourcomputerhotspotlist.
3. connecttoVoCore2hotspot.
4.ausingsshorputtyorsimilartoolslogintoVoCore2(root/vocore).
4.busingUSB2TTL,pleasecheck"ConnecttoVoCorethroughUSB2TTL"section.
important: UARTspeedis115200bps,8bits,noeven,1stopbit
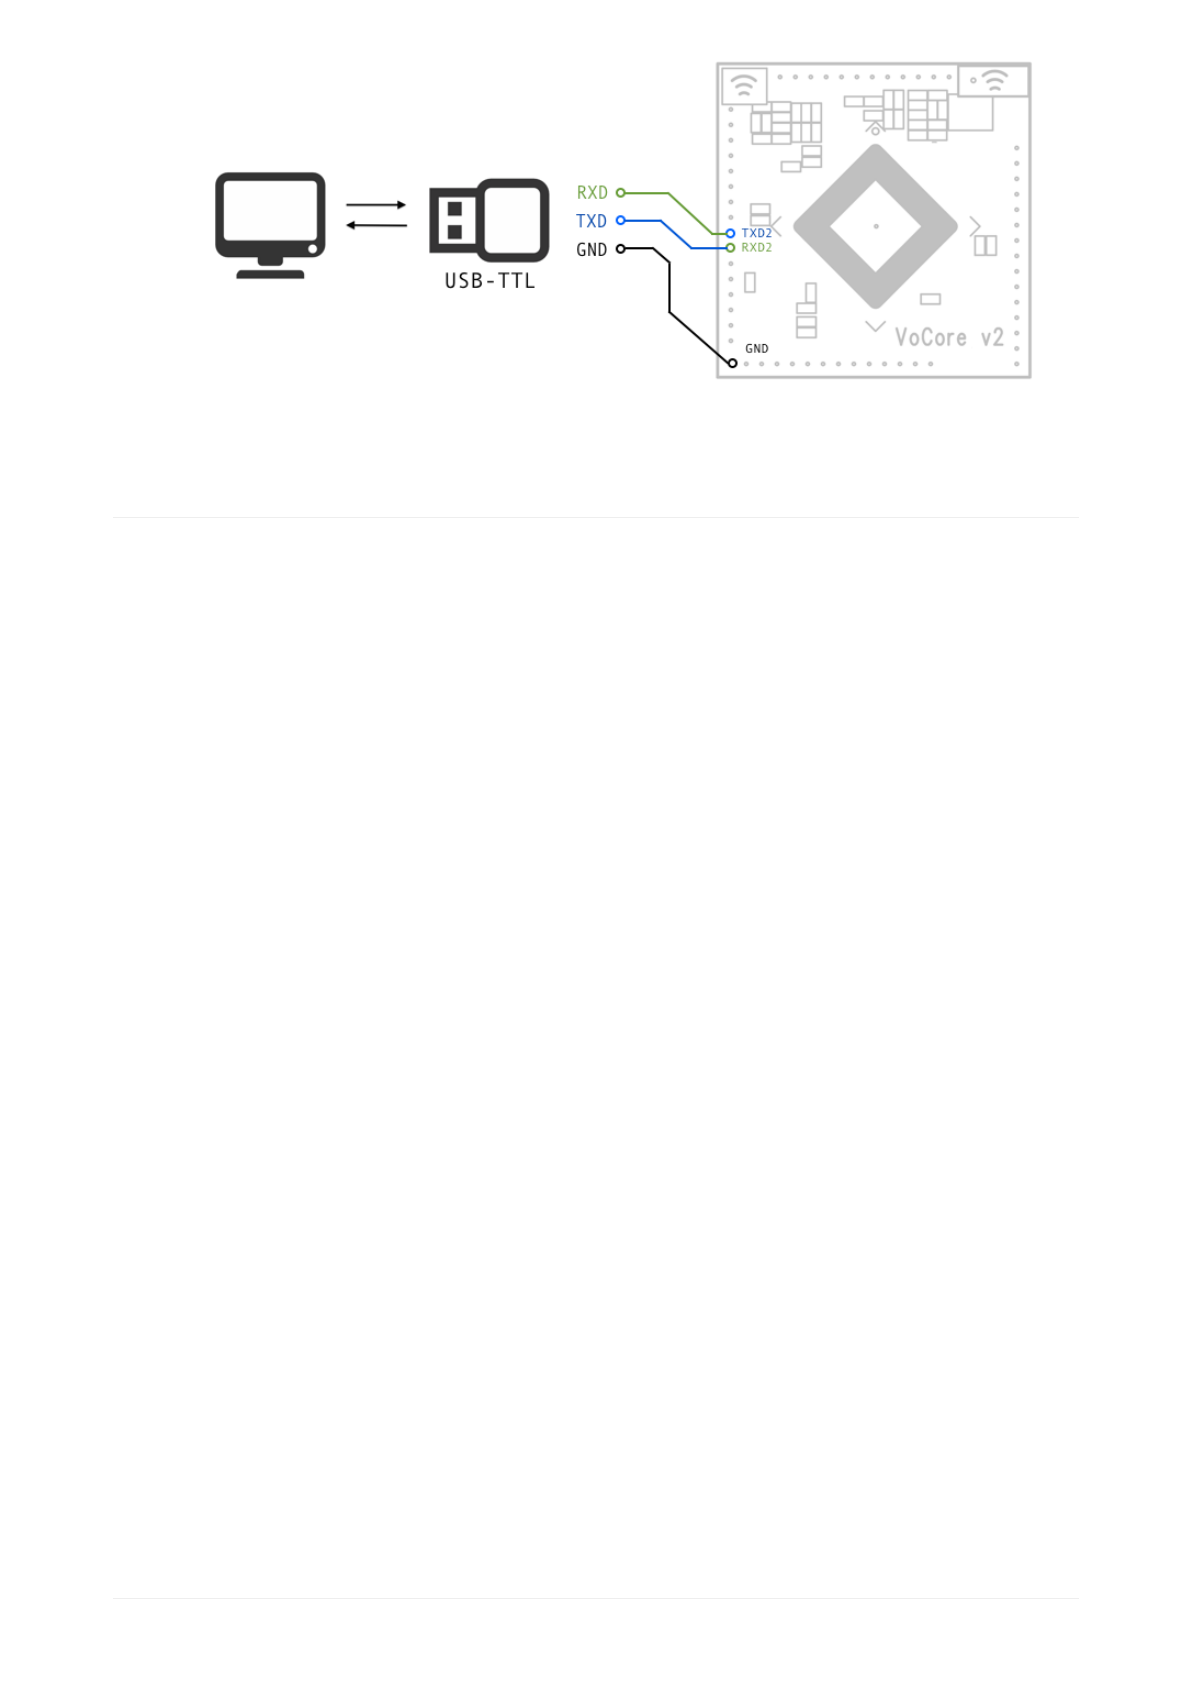
ConnecttoVoCorethroughUSB2TTL
VoCore2|CoinsizedLinuxComputer
http://vocore.io/v2.html 7/11
videotutorial:youtube(https://youtu.be/W3UVXb5YM2k)
1. connectUSB2TTL.TXDtoVoCore2.RXD2,USB2TTL.RXDtoVoCore2.TXD2,USB2TTL.GNDtoVoCore2.GND.
2. setupyourserialapplication(suchasputtyforwindows,kermitformac,linux)inyourcomputerto115200bps,8databits,noeven,1stopbit.
3. poweronyourVoCore2,noyoushouldfindsometextoutput.
SetupAP+STAMode
videotutorial(requireUSB2TTL):youtube(https://youtu.be/IPt5cxg5K98)
1. connecttoyourVoCorethroughUSB2TTL.
2. runcommandinconsole(UARTconsole).
3. setupnetworktoenabledhcp(getipfromyourhotspot).
ucideletenetwork.wwan
ucisetnetwork.wwan=interface
ucisetnetwork.wwan.proto=dhcp
ucicommit
4. setupfirewalltoenableaccesstointernetthroughyourhotspot.
ucidel_listfirewall.@zone[1].network=wwan
uciadd_listfirewall.@zone[1].network=wwan
ucisetfirewall.@zone[1].input=ACCEPT
ucisetfirewall.@zone[1].output=ACCEPT
ucisetfirewall.@zone[1].forward=ACCEPT
ucisetfirewall.@zone[1].masq=1
ucisetfirewall.@zone[1].mtu_fix=1
ucicommit
5. setupwirelesstoenableap+stamode.
ucisetwireless.sta.ssid="[TARGETAPSSID]"
ucisetwireless.sta.key="[TARGETAPPASSWORD]"
ucisetwireless.sta.network=wwan
ucisetwireless.sta.disabled=0
ucicommit
note:replace[TARGETAPSSID]tothetargetapssidyouwanttoconnectto,[TARGETAPPASSWORD]isitspassword.
5. restartyournetwork,itwillwork.
/etc/init.d/networkrestart
6.(option)onceap+staistotallyup,disableitinconfig,soifnexttimeyourtargetapismissing,youstillabletoconnecttoVoCore2.
ucisetwireless.sta.disabled=0
ucicommit
/etc/init.d/networkrestart
sleep10
ucisetwireless.sta.disabled=1
ucicommit
note:bettercopythethreelinesto/etc/rc.local
UpgradeVoCore2Firmware
VoCore2|CoinsizedLinuxComputer
http://vocore.io/v2.html 8/11
UpgradeVoCore2Firmware
1. downloadthelatestfirmware(nottheflashimage)inthispageDownloadsection.
2. connecttoyourVoCorehotspot,openbrowserview192.168.1.1or192.168.61.1.
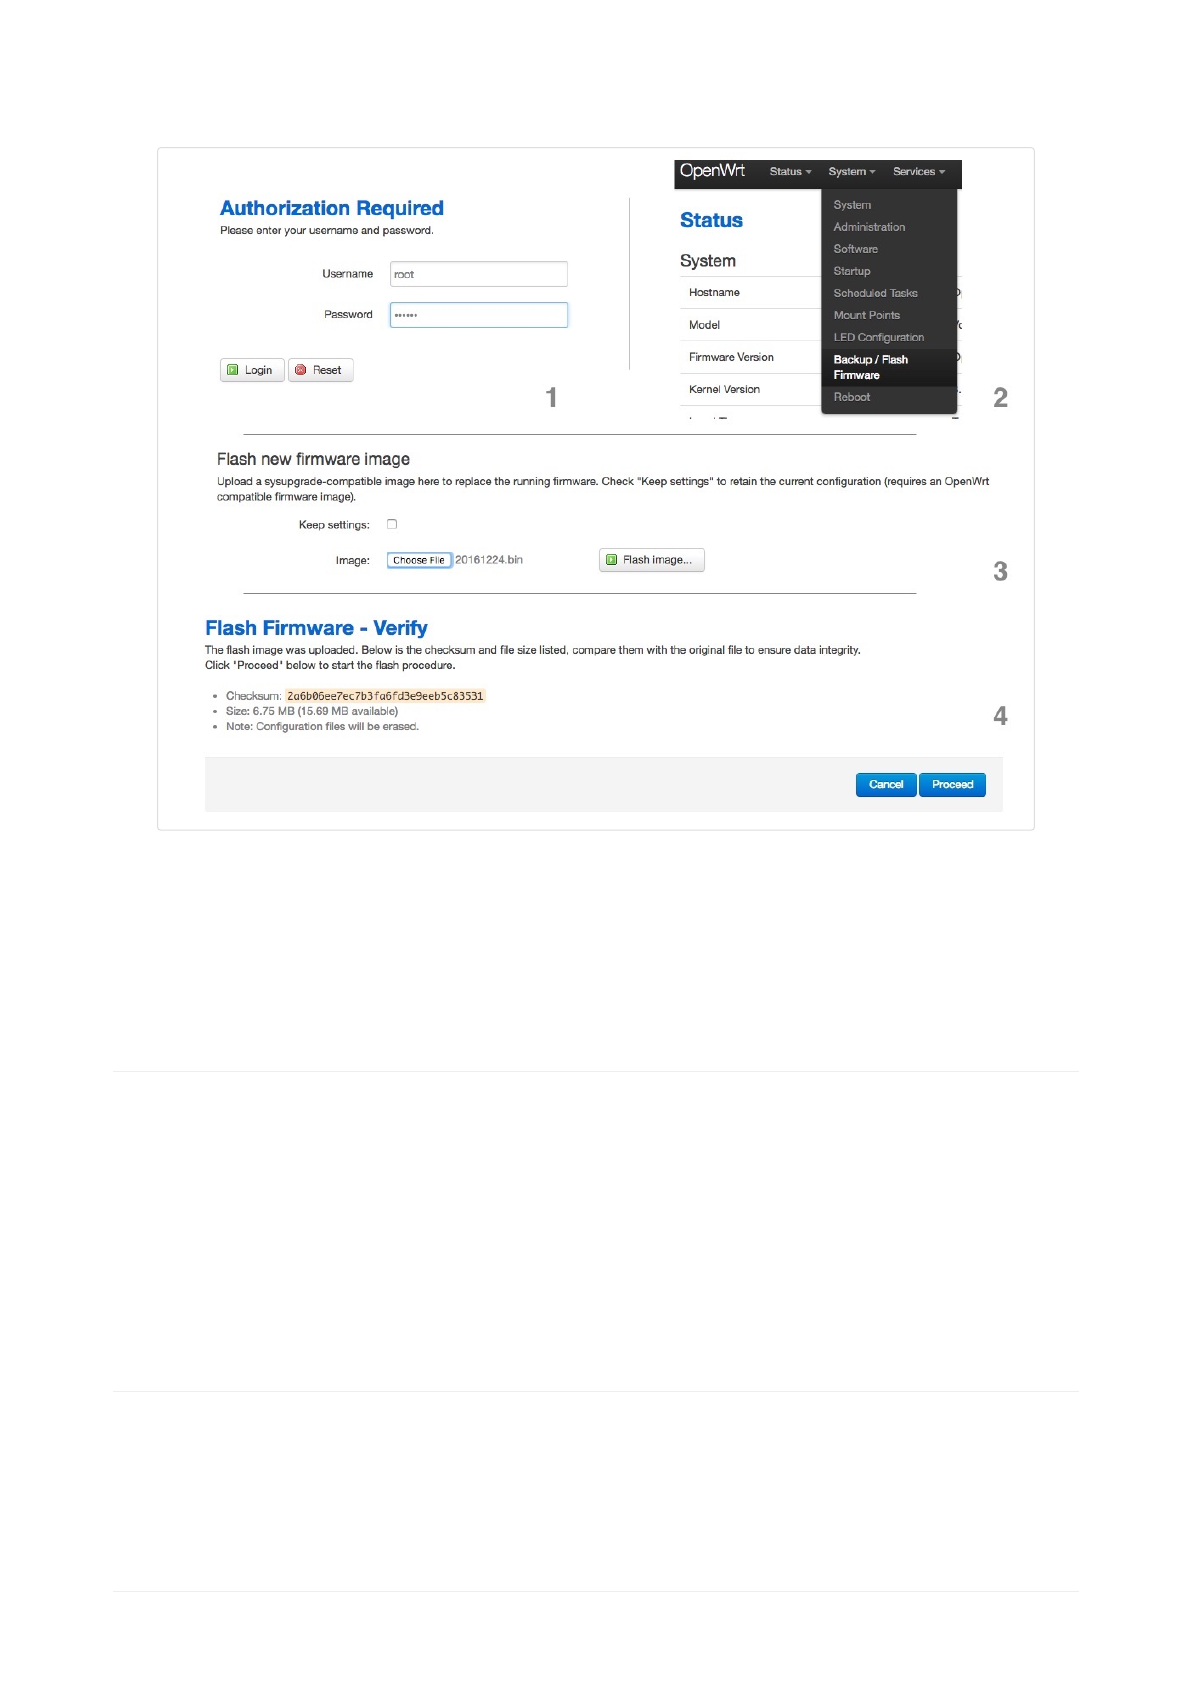
3. LuCIconsoleusingusername:root,password:vocore,clickon"Login"(picturepart1).
4. select"System">"Backup/FlashFirmware"(picturepart2).
5. clickon"ChooseFile",chooseyourdownloadedfirmware(again,nottheflashimage,picturepart3),thenclick"FlashImage".
6. itwilluploadthefirmwaretoyourVoCore2,takesafewseconds,checkifthemd5matched.(picturepart4)
7. ifeverythingok,press"Process".
8. normallyitwilltake2~3minutes,pleasewaituntilitisready.
note:ifpowercutoffduringtheupgradeprocess,yourVoCore2willbrick,check"FixBrickedVoCore2"
CompileOpenWRTforVoCore2
videotutorial:youtube(https://youtu.be/ocl6yFtKSNs)
1. installUbuntu14.0464bitServertoVirtualMachine.
2. invirtualbox,wewillneedinstallsomepackagestocompileopenwrt:
sudoaptgetinstallgccg++binutilspatchbzip2flexbisonmakeautoconfgettexttexinfounzipsharutilssubversionlibncurses5devncursestermzlib1gdevlibssl
devpython
3. downloadopenwrtat"Sources"sectioninthispage,softwarepart.
4. call"tarjxvfopenwrt.tar.bz2"touncompressthepackage.
5. call"makemenuconfig"intheopenwrtfolder,configureopenwrtinmenu,chooseMT7688/28/VoCore2inmenu.
6. call"make"intheopenwrtfolder,startthemakeprocess
CompileyourAppforVoCore2
1. compileopenwrtforVoCore2,itwillcreatetoolchainordownloaditatDownloads/Toolchain(forUbuntu14.0464bit).
2. makeasimplecodeinC,compileitincommandline.
/path.to.your.toolchain/bin/mipsel‐openwrt‐linux‐gcc‐gyourcode.c‐oyourcode
3. afterthis,youwillgetanexecutablefilenamed"yourcode",usescp,copyittoyourVoCore2
4. inVoCore2,call chmod+xyourcode ,afterthat,youcanrunitinVoCore2,call ./yourcode
UploadFirmware

VoCore2|CoinsizedLinuxComputer
http://vocore.io/v2.html 9/11
UploadFirmware
1. uploadfirmwarethroughluci,pleaseread"UpgradeFirmware"section.
2. uploadfirmwarethroughconsole,connectedtoVoCorehotspot.
(1) copyfrompctoVoCore[operateinPC]:scp[yourfirmware].binroot@192.168.61.1:/tmp/vocore2.bin
hereistwochoices,2.awillerasealldata/configyouwritetoVoCore,2.bjustupgradethefirmwarebutkeepthem.
(2.a)writetoVoCorenorflash[operateinVoCore]:mtdefirmwarewrite/tmp/vocore2.binfirmware
(2.b)systemupgradeVoCorenorflash[operateinVoCore]:sysupgrade/tmp/vocore2.binfirmware
(3) waituntilmtddone,rebootyourVoCore.
note:ifyouwantsetyourVoCorebacktofirsttimebootup,call"firstboot"inconsole.
FixBrickedVoCore2(ubootalive)
1. connectyourVoCore2tocomputerthroughUSB2TTL(UART2RXD2+TXD2+GND).
2. openttytools(musthavekermitprotocol),suchaskermit,ckermit.
3. powerupyourVoCore,onceyoufind:"0:LoadsystemcodethenwritetoFlashviaSERIAL.",press'0'.
note:VoCorewillshow"##Readyforbinary(kermit)downloadto0x80100000at115200bps..."
note:kermit:pressCtrland'\'sametimethenpress'c',youwillswitchtokermitcommandconsole.
5. sendupgradefirmwaretoVoCore,afterthat,backtoVoCoreubootconsole.
note:kermit:call"sendpath/to/your/upgrade/file/on/pc.bin"tosendfirmware,around10minutes,onceitfinished,call'c'backtoconsole.
6. waitaround20~30seconds,firmwareuploaded,yourVoCorewillreboot.
FixBrickedVoCore2(ubootdead)
1. YoumusthaveanotherVoCore/VoCore2oroneflashloaderandsixwires.
2.1usinganotherVoCore/VoCore2torecoveryourbrickedVoCore2.
2.1checkbloghttp://vonger.cn/?p=8054.
2.2usingflashloadertorecoveryourbrickedVoCore2.
2.2.adisconnectVoCore2frompower;
2.2.bconnectVoCore2GNDtoflashloaderGND;
2.2.cVoCore2+3.3Vtoflashloader+3.3V;
2.2.dVoCore2SPIMISO>flashloaderSPIMISO;
2.2.eVoCore2SPIMOSI>flashloaderSPIMOSI;
2.2.gVoCore2SPICS0>flashloaderSPICS;
2.2.hVoCore2SPICLK>flashloaderSPICLOCK;
2.2.iVoCore2RST>VoCore2GND;(keepVoCore2inresetmode)
note:ifnotwork,swapMISO/MOSI.
2.2.jnow,downloadthensend"FlashImage"toVoCore2.2.
2.2.kremovewires,connectVoCore2backtopower,everythingshouldbacknormal.
3. option:bettertoupgradeyourfirmwareafterrecover,FlashImageisoutofdate.
Recoverfactorysetting
Sometimes,wemightmessthefactorysettingsectiononVoCore2flash(addresscanbefindby"cat/proc/mtd"),thatwillcausewifidriverfailedtostart.Torecoverit,
weneedthefollowingsteps:
VoCore2|CoinsizedLinuxComputer
http://vocore.io/v2.html 10/11
1. getintoVoCoreconsole,byehternetorserialport(TTL).
2. copymt7628.sh(http://vonger.cn/misc/vocore2/tools/mt7628.sh)toyourVoCore2/tmp,ordirectlycopythetxtinthescriptandruninconsole.
3. runmt7628.shby"sh/tmp/mt7628.sh",thenreboot.
note:yourmacaddresswillbefixedtob8:d8:12:67:01:73,youcanchangethistomodifyyourVoCore2macaddress.
UpdateUBOOTfromserialport
1. rebootvocore2atserialconsole,check"ConnecttoVoCorethroughUSB2TTL"
2. oncereboot,itwillshow"7:LoadBootLoadercodethenwritetoFlashviaSerial.",nowwearereadytosendthedata.
3. usekermitorcompatibletoolssenduboot.bin,uboot.bincanbegetfromfromDownloadsection.
4. waituntilitreboot.
Directlywritetomemory/register
Wemadeasimpletoolforthis,downloadhere(http://vonger.cn/misc/vocore2/tools/mem.zip),itsnameis"mem",puttheexecutablefileinto/bin/inVoCore2.
1. readfromregister/memory,forexample:0x10000060,pincontrolregister
example: mem0x10000060
2. writetoregister/memory,mustin32bits(4bytes)
example: mem0x100000640x05540555
hereisanexamplebashscriptflashtheLEDeverysecondonVoCore2
mem0x100000640x05540555;mem0x100006040x1000;while[1];domem0x100006340x1000;sleep1;mem0x100006440x1000;sleep1;done
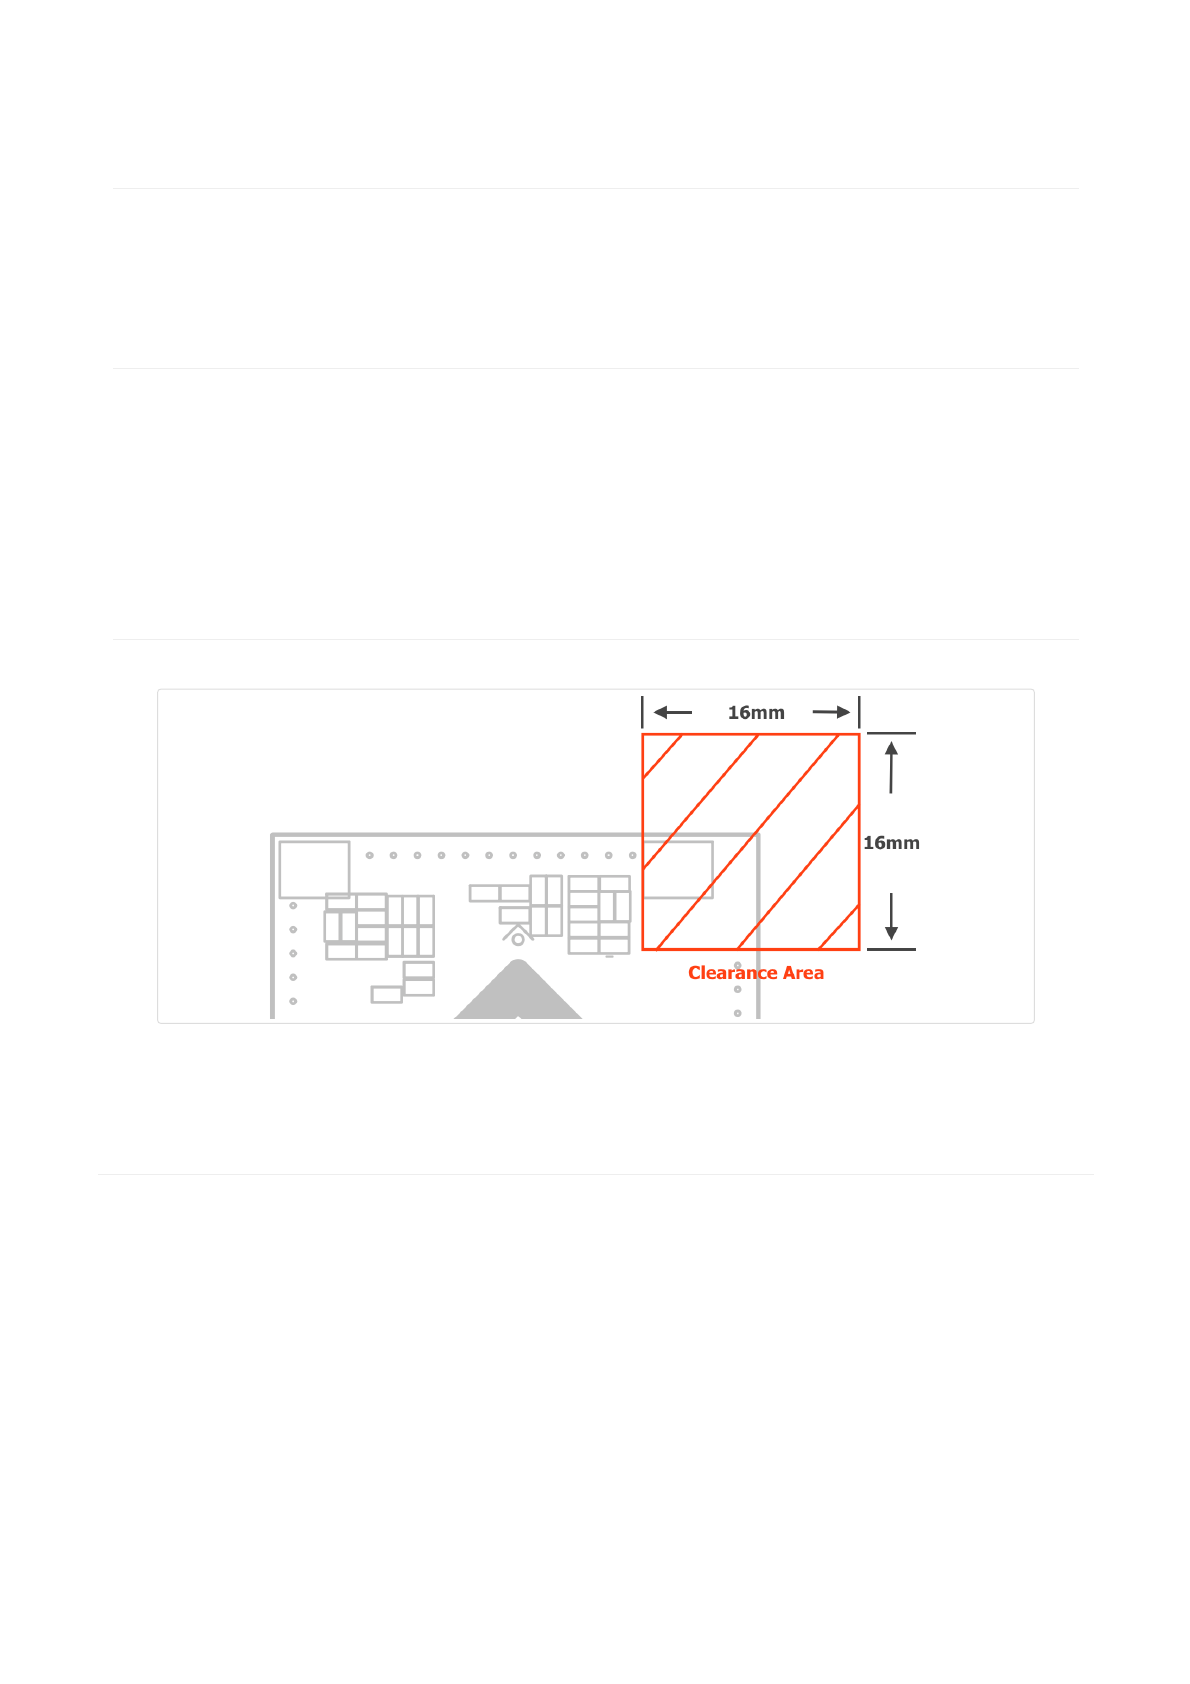
MountVoCore2ontocustomizedPCB(ASMT)
1. oncustomizedPCB,suggestkeeping16mmx16mmrectangleclearance(nocopper)forbettersignalonboardantenna.
2. suggestusinghotairinsteadofiron,DDR2isaESDsencetivepart,mightcausepermanentdamage.
3. mustusemiddleleveltempraturepaste(180C,SnBiAg)orlowerone,VoCore2isusinghightempraturepaste(220C,SnCuAg),sametempraturelevelmight
causedamagetoVoCore.
VoCoreStudio©20142016·Contactus:support@vocore.io(mailto:support@vocore.io)
FCC Statement
This device complies with part 15 of the FCC rules. Operation is subject to the following two conditions: (1) this device
may not cause harmful interference, and (2) this device must accept any interference received, including interference
that may cause undesired operation.
Changes or modifications not expressly approved by the party responsible for compliance could void the user’s
authority to operate the equipment.
NOTE: this equipment has been tested and found to comply with the limits for a Class B digital device, pursuant to
part 15 of the FCC Rules. These limits are designed to provide reasonable protection against harmful interference in
a residential installation. This equipment generates uses and can radiate radio frequency energy and, if not installed
and used in accordance with the instructions, may cause harmful interference to radio communications. However,
there is no guarantee that interference will not occur in a particular installation. If this equipment does cause harmful
interference to radio or television reception, which can be determined by turning the equipment off and on, the user
is encouraged to try to correct the interference by one or more of the following measures:
● Reorient of relocate the receiving antenna.
● Increase the separation between the equipment and receiver.
● Connect the equipment into an outlet on a circuit difference from that to which the receiver is connected.
● Consult the dealer or an experienced radio/TV technician for help.
Important Note:
Radiation Exposure Statement
This equipment complies with FCC radiation exposure limits set forth for an uncontrolled environment. This
equipment should be installed and operated with minimum distance 20 cm between the radiator and your body.
This transmitter must not be co-located or operating in conjunction with any other antenna or transmitter.
Country Code selection feature to be disabled for products marketed to the US/Canada.
1. The antenna must be installed such that 20 cm is maintained between the antenna and users, and
2. The transmitter module may not be co-located with any other transmitter or antenna.
As long as the three conditions above are met, further transmitter testing will not be required. However, the OEM
integrator is still responsible for testing their end-product for any additional compliance requirements required with
this module installed.
Important Note:
In the event that these conditions cannot be met (for example certain laptop configurations or co-location with
another transmitter), then the FCC authorization is no longer considered valid and the FCC ID cannot be used
on the final product. In these circumstances, the OEM integrator will be responsible for re-evaluating the end
product (including the transmitter) and obtaining a separate FCC authorization.
Any company of the host device which install this modular with limit modular approval should perform the test
of radiated emission and spurious emission according to FCC part 15C:15.247 and 15.209 requirement, only if
the test result comply with FCC part 15.247 and 15.209 requirement, then the host can be sold legally.
End Product Labeling:
The final end product must be labeled in a visible area with the following “Contains FCC ID: 2AC4RVOCOREV2”
Manual Information to the End User:
The OEM integrator has to be aware not to provide information to the end user regarding how to install or
remove this RF module in the user’s manual of the end product which integrates this module.
The end user manual shall include all required regulatory information/warning as show in this manual.
The modular is not intended to be fielded serviceable as without shielding, host manufacturer must be
considered shielding when integrating a module.
When the module is installed inside another device, the user manual of this device must contain below warning
statements;
1. This device complies with Part 15 of the FCC Rules. Operation is subject to the following two conditions:
(1) This device may not cause harmful interference.
(2) This device must accept any interference received, including interference that may cause
undesired operation.
2. Changes or modifications not expressly approved by the party responsible for compliance could void
the user's authority to operate the equipment. The devices must be installed and used in strict
accordance with the manufacturer's instructions as described in the user documentation that comes
with the product.