WINIA Electronics DPN4274NH 42 Inches Plasma Display Panel User Manual 2
Dongbu Daewoo Electronics Corporation 42 Inches Plasma Display Panel 2
Contents
- 1. User Manual 1
- 2. User Manual 2
- 3. User Manual 3
- 4. User Manual 4
User Manual 2
11
Note
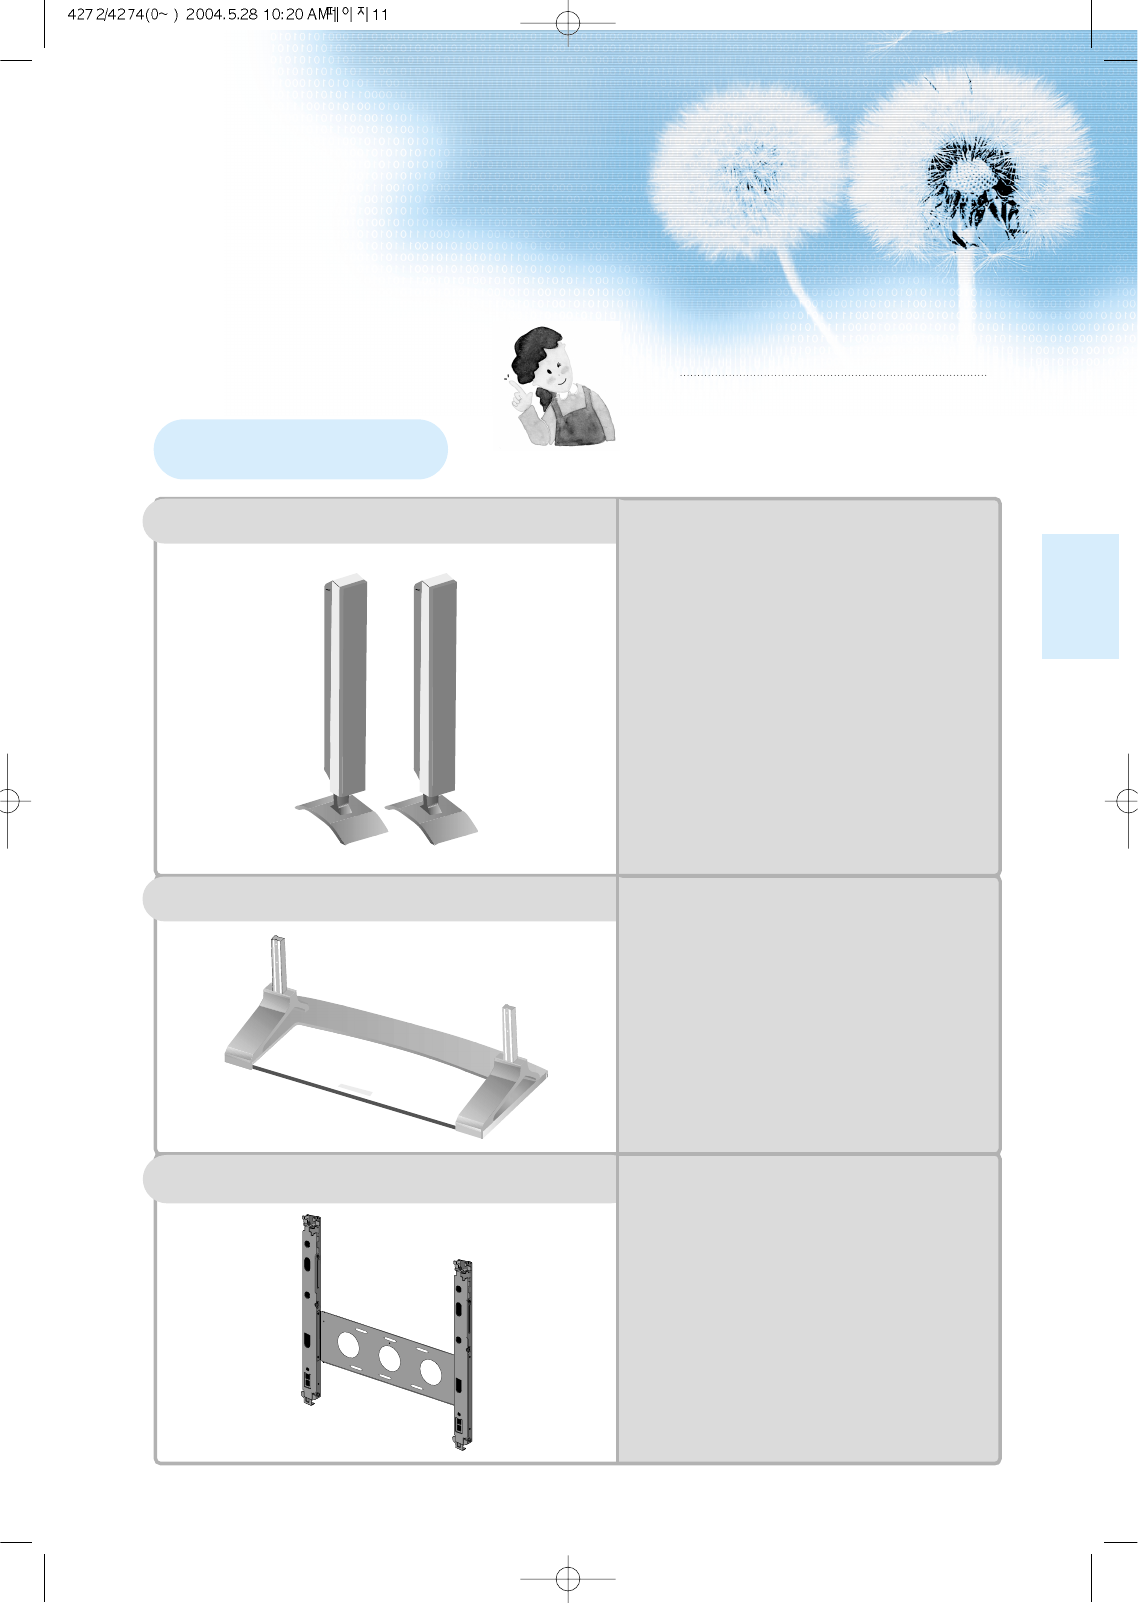
The following items are optional accessories.
Refer purchasing optional accessories from
Daewoo Electronics Local retailer or the retailer
from where you purchased the unit.
Optional Accessories
Table Top Stand
Speakers
DPE-P20J
- Speaker Main Unit Dimension :
100(W) x 628(H) x 83(D) mm
39.37(W) x 24.72(H) x 3.27(D) inch
- Dimension Including Speaker Stand :
170(W) x 729(H) x 194(D) mm
6.69(W) x 28.7(H) x 7.64(D) inch
- Audio Amplifier : 10W + 10W
- Impedance : 8Ω
- Weight : 6.4kg(14.11 Lbs)
DPE-T20G
-
Dimension
: 667(W) x 212(H) x
320(D) mm
26.26(W) x 8.35(H) x
12.6(D) inch
- Weight : 7kg(15.43 Lbs)
Wall Mounting Unit
DSP/DP-HG10, DSP/DP-HG20,
DSP/DP-HG22
-
Variable Angles : 0o, 10o, 15o, 20o
-
Dimension
:
601(W) x 592(H) x 35(D) mm
23.66(W) x 23.31(H) x 1.9(D) inch
-
Weight
: 4.5kg(10 Lbs)
13
4•Safety Precautions
8•Checking Accessories
12 •Panel Controls
13 •Remote control
14 •To setup device change of remote control
PREPARATION
CONNECTION
15 •Antenna Connection
18 •To Watch TV
20 •Automatic Channel Memory
26 •Watching Digital Broadcasts
28 •Watching Cable Broadcasts
30 •Watching Satellite Broadcasts
32 •Watching a DVD Image
34 •Watching a VCR Image
36 •Watching a Camcorder/Game Console Image
38 •Connecting PC(15Pin D-Sub)
40 •Connecting PC(DVI)
APPLICATION
MISC.
76 •Before Requesting Service
77 •SPECIFICATIONS
CONTENTS
43 •Selecting Picture Mode 59 •
MENU Background, Languages
44 •Customizing Picture
and key pad Lock Setting
46 •
Adjusting Screen Size
61 •
Enhancer Demo and Auto
48 •
Adjusting Screen Position and Size Power Setting.
50 •Enlarging Screen Size 63 • Closed Caption Setting
52 •Watching a Still Image 65 • Time Setting
53 •Adjusting Auto Sound Mode 67 • Image Sticking
54 •Customizing Sound Mode Minimization(ISM)
56 •Selecting INPUT SIGNAL 69 • Parental Lock Setting
58 •
Checking the Current Input Signal
73 • Initialize Setting
75 • Setting Sleep Timer
Panel Controls
14
Front Panel, Back Panel, Remote Control
*
Items having same names on Plasma display and the remote control would function in exactly
the same way.
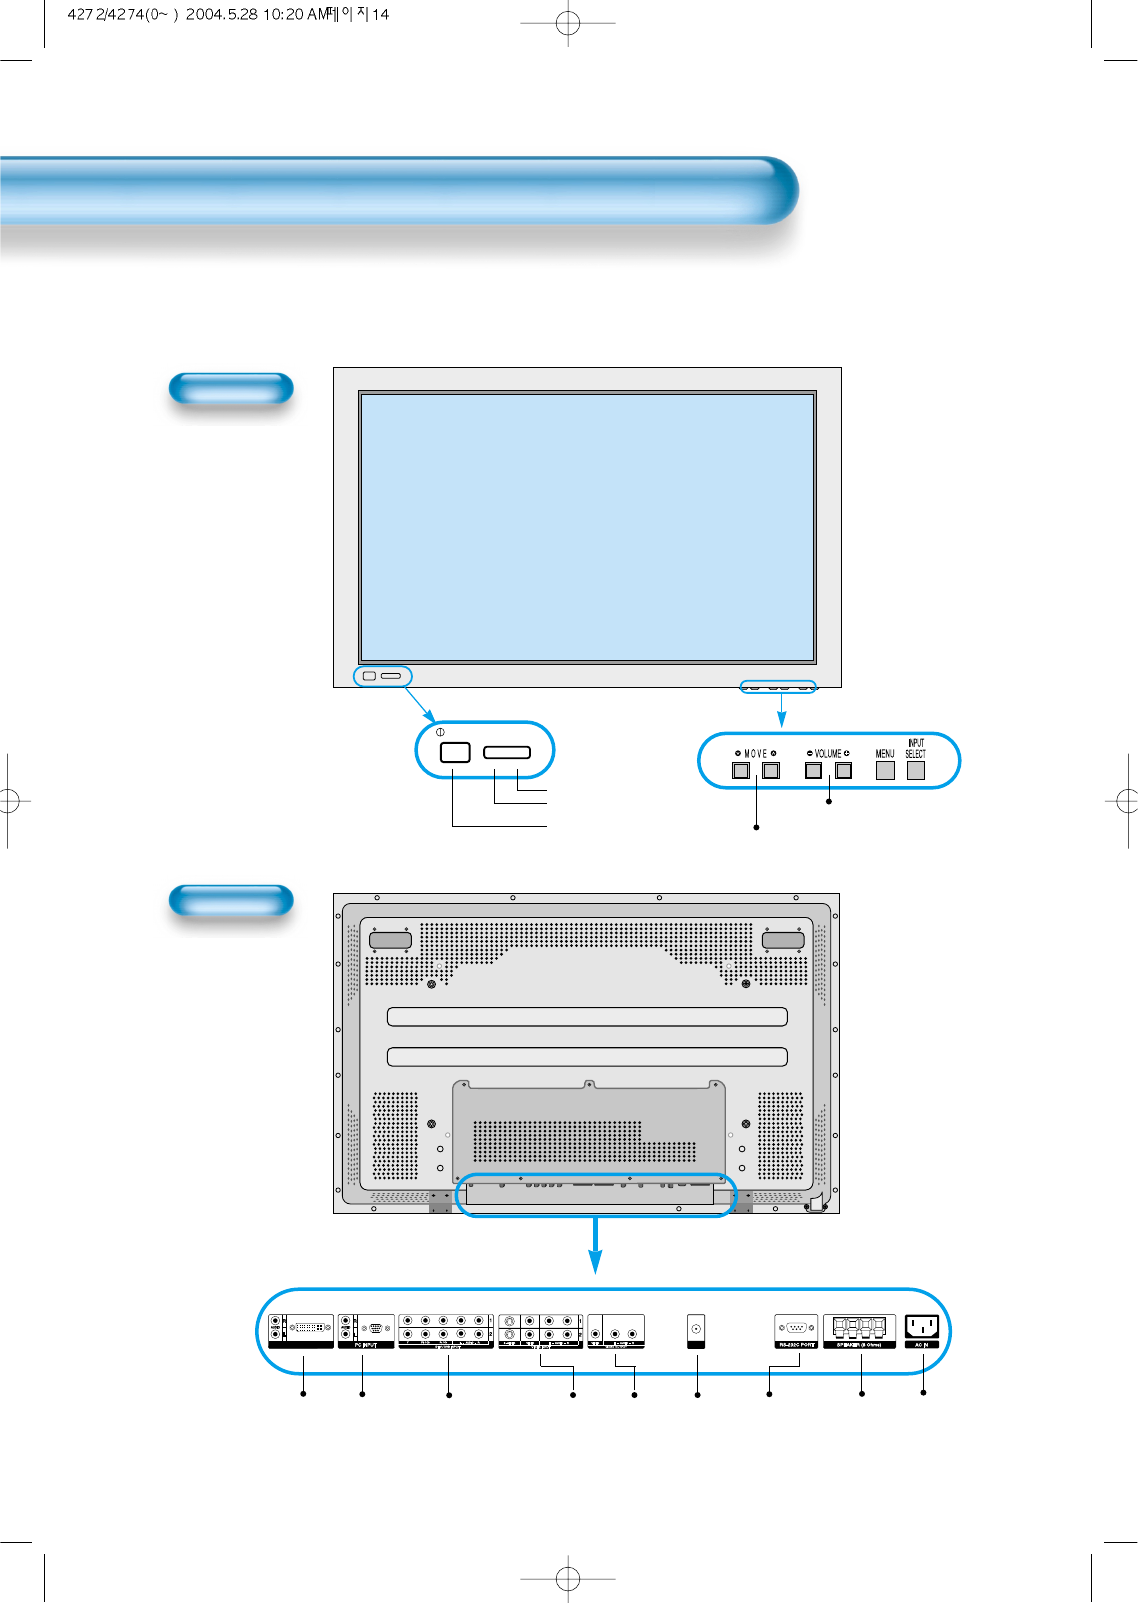
Front
Rear
Power
• Power control sensor
• Power Standby: Red - Standby
Green - ON
• Power button
Select when adjusting volume or
select/adjust “MENU.”
Press when moving “MENU.”
STAND BY/OPERATE
DVI-D INPUT ANT
Used when
manufacturing(For
manufacturer use
only)
PC INPUT(15 pin
D-sub)
DVI-D
INPUT COMPONENT A/V jacks
(DTV/DVD INPUT jacks)
S-VIDEO,
A/V INPUT,
Cable
Receiver
INPUT
jacks
External
Speaker
Power
ANT
Monitor out
15
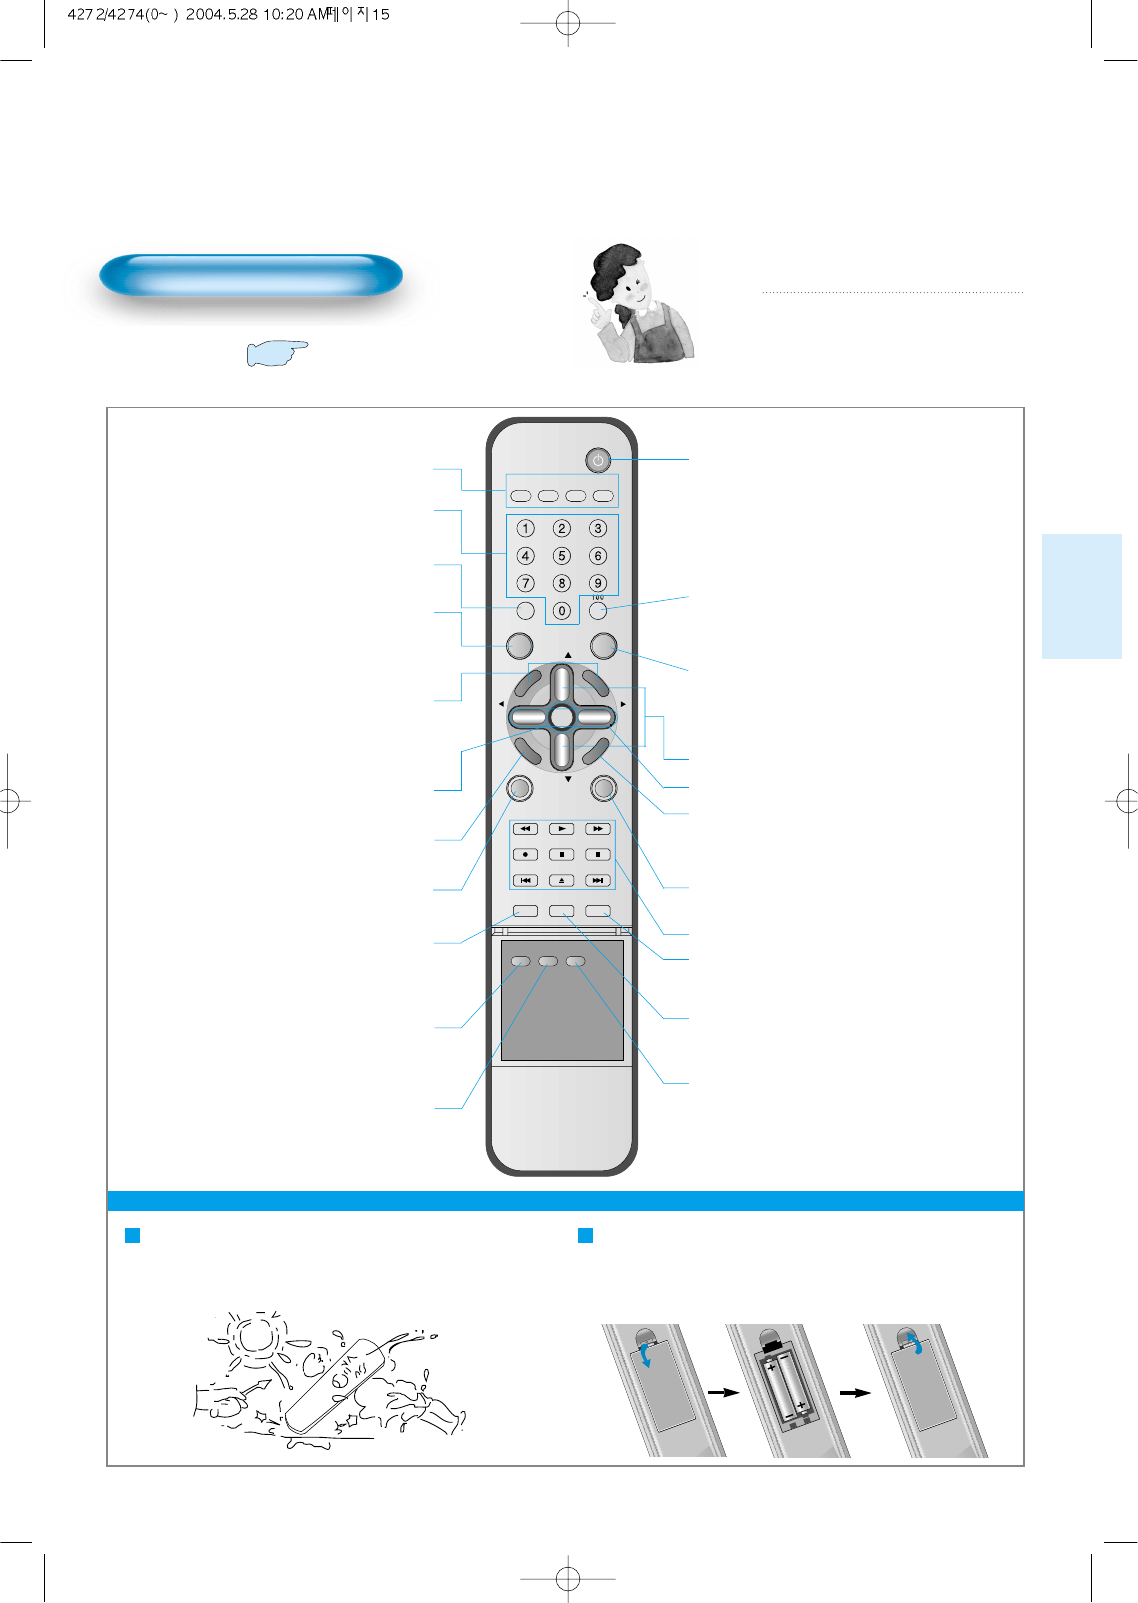
Remote Control
When Using Remote Control:
•
Be sure not to allow the Remote Control to drop or to become wet.
•Keep it away from hot or moist locations.
Installing the Batteries in your Remote Control:
•
Push to open the cover of the remote controller
•
Set the batteries in the battery cell after checking the
electrode, and then shut the cover.
TV/VIDEO(DVD)/SAT/CATV
Use to select channel directly 0~9
Indicates the current state and resolution.
Use this function to make video input selection.
It changes in the following sequence
TV -> Video1 -> Video2 -> TV
Used to zoom the screen. To enlarge, press the(+)
button, and to recturn to the previous condition,
press the(-) button.(Zoom Mode : Zoom 0~20)
Used to display a desired menu.
Pressing the Power button of the Monitor
allows the Display to be standby. (Red light
is shown in the Remote Control Sensor.)
At this time, if you press the Power button
of the Remote Control, the Display is
turned ON (Green light in the Sensor).
Use it when selecting a channel number of
over 100
Use this function to make video input selection.
It changes in the following sequence DVI -> PC
-> Component 1-> Component 2 -> DVI
Adjusts the size of the screen
(Normal, 16:9, etc.)
This feature allows you to choose the caption.
Display button
TV/VIDEO
ZOOM button
Menu button Volume button ◀◀/▶▶Adjusts the volume.
Screen Size button
Caption button
Power button
100
Channel number (0~9)
Multimedia
CH button
▼▼/▲▲Adjusts the channel.
Note
• Use two “AAA” batteries.
• Be sure to use replacement batteries of the
same type as the original ones.
• The life of a battery depends on how much
it has been used.
*The number in
()
indicates the page in which
the function of each button is explained in detail.
VIDEO/
DVD SATTV CATV
DISPLAY
MULTIMEDIATV/VIDEO
CH
CH
V
O
L
V
O
L
Z
O
O
M
+
Z
O
O
M
-
MENU
P
R
E
V
C
H
S
C
R
E
E
N
S
I
Z
E
MUTE CAPTION
F.F/SLOW
PLAYF.R/SLOW
REC STOP PAUSE
PREV
OPEN/CLOSE
NEXT
PICTURE
MODE SOUND
MODE STILL
POWER
MTS ADD/
ERASE SLEEP
It recturns to previous channel.
Previous Channel button
Mute sound.
Mute button
Every press of the button cycles through the
four different.
Normal -> Movie -> Music -> News -> User.
Picture Mode button
This feature allows you to select the language and
stereo sound while broadcasting
MTS button
The feature either memorizes the current channel
or erases a channel that has previously memorized
CHANNEL ADD/ERASE
VIDEO/DVD Function
Used to view a still picture during watching
moving images.(Sound can be heard.)
Still button
Every press of the button cycles through the five different
modes: Normal -> Movie -> Music -> News -> User.
Sound Mode button
Each time you press this button, a different input mode
appears. The sequence is as follows: 15Min. -> 30Min. ->
60Min. -> 90Min. -> 120Min. -> OFF
After the time is selected, it automatically becomes stand-
by state.
Sleep Timer button
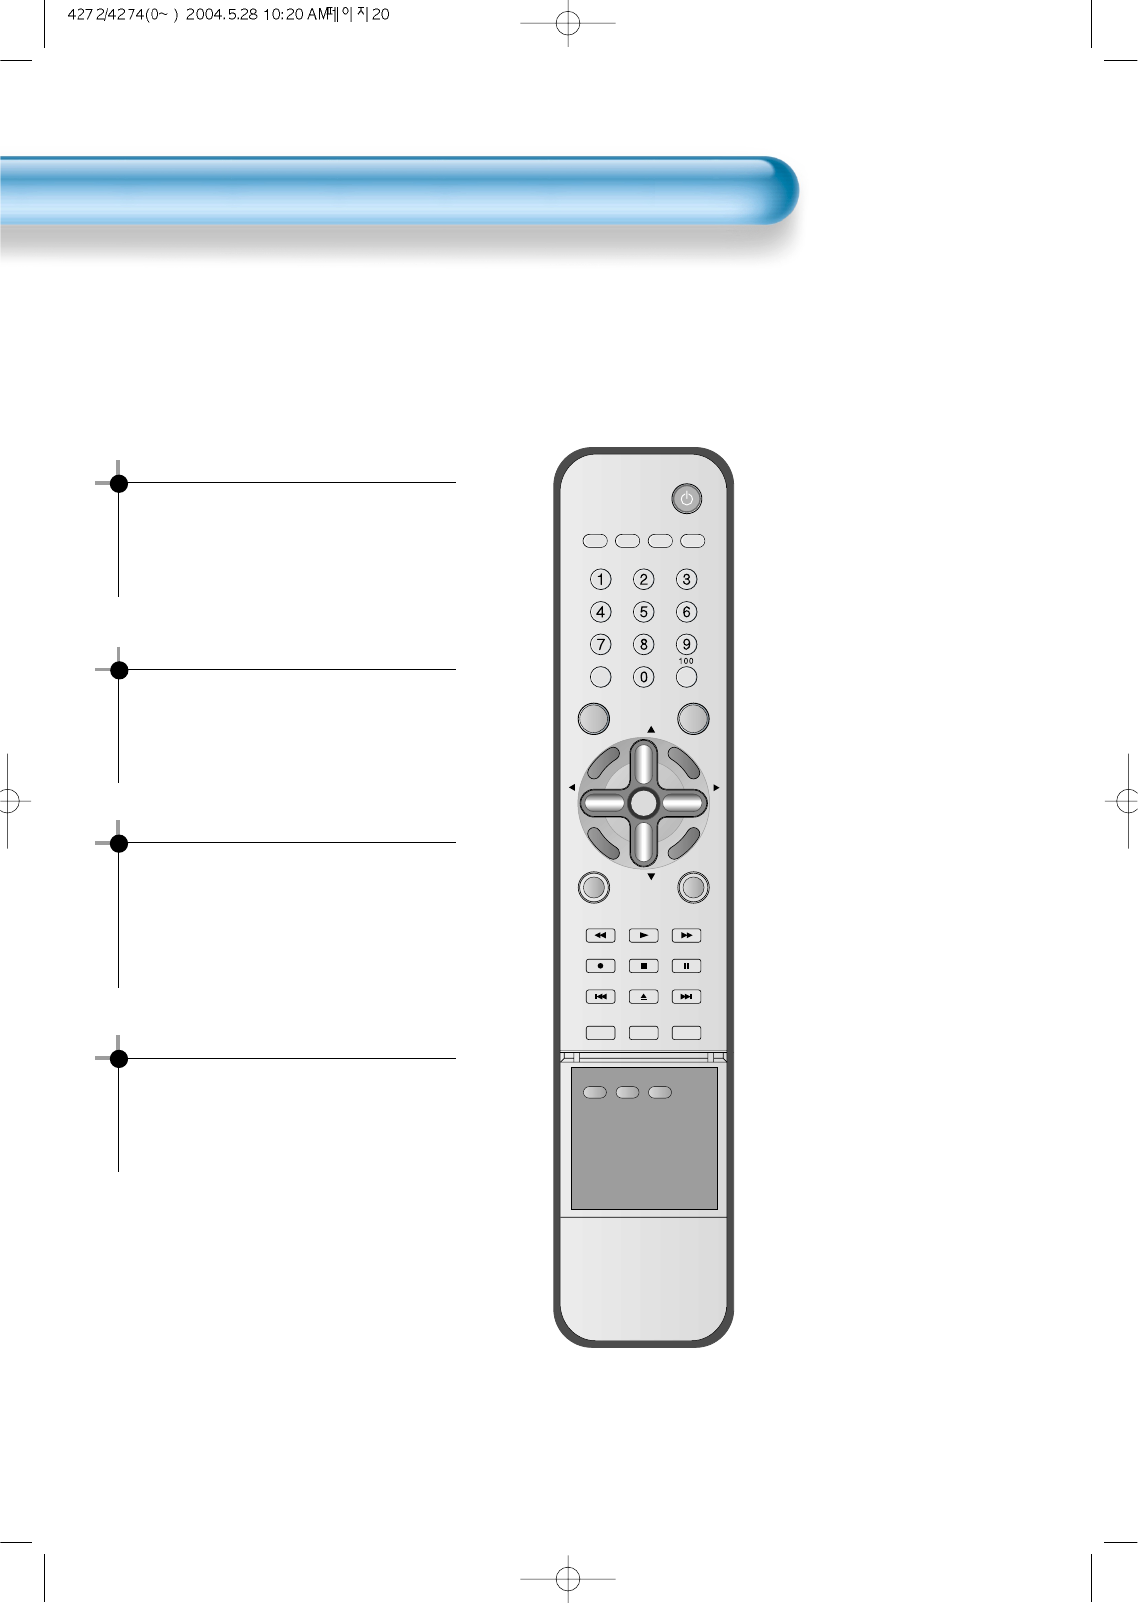
To setup device change of remote control
16
- The remote control is setup to be used for operating the HDTV provided together.
You may also setup the remote control in order to operate cable TV receiver or video, etc with a remote control.
METHOD TO SETUP DEVICE CHANGE OF REMOTE CONTROL
• Ensure that power plugs of the outside device to be used are connected and that power turns off.
• Find the code number of the outside device to be used in the code list (See Setup Code of Remote Control).
• Continue to press the device change button related with the outside device to be used when the device
change lamp (video / cable) flashes.
• With the remote control oriented downward, enter the remote control setup code number made of three
numbers by using the number button of the remote control. If the code is correctly entered, power will turn on
in the designated device (if no power turns on, repeat this process by using another code).
• Continue to press the device change button until the device change lamp flashes three times.
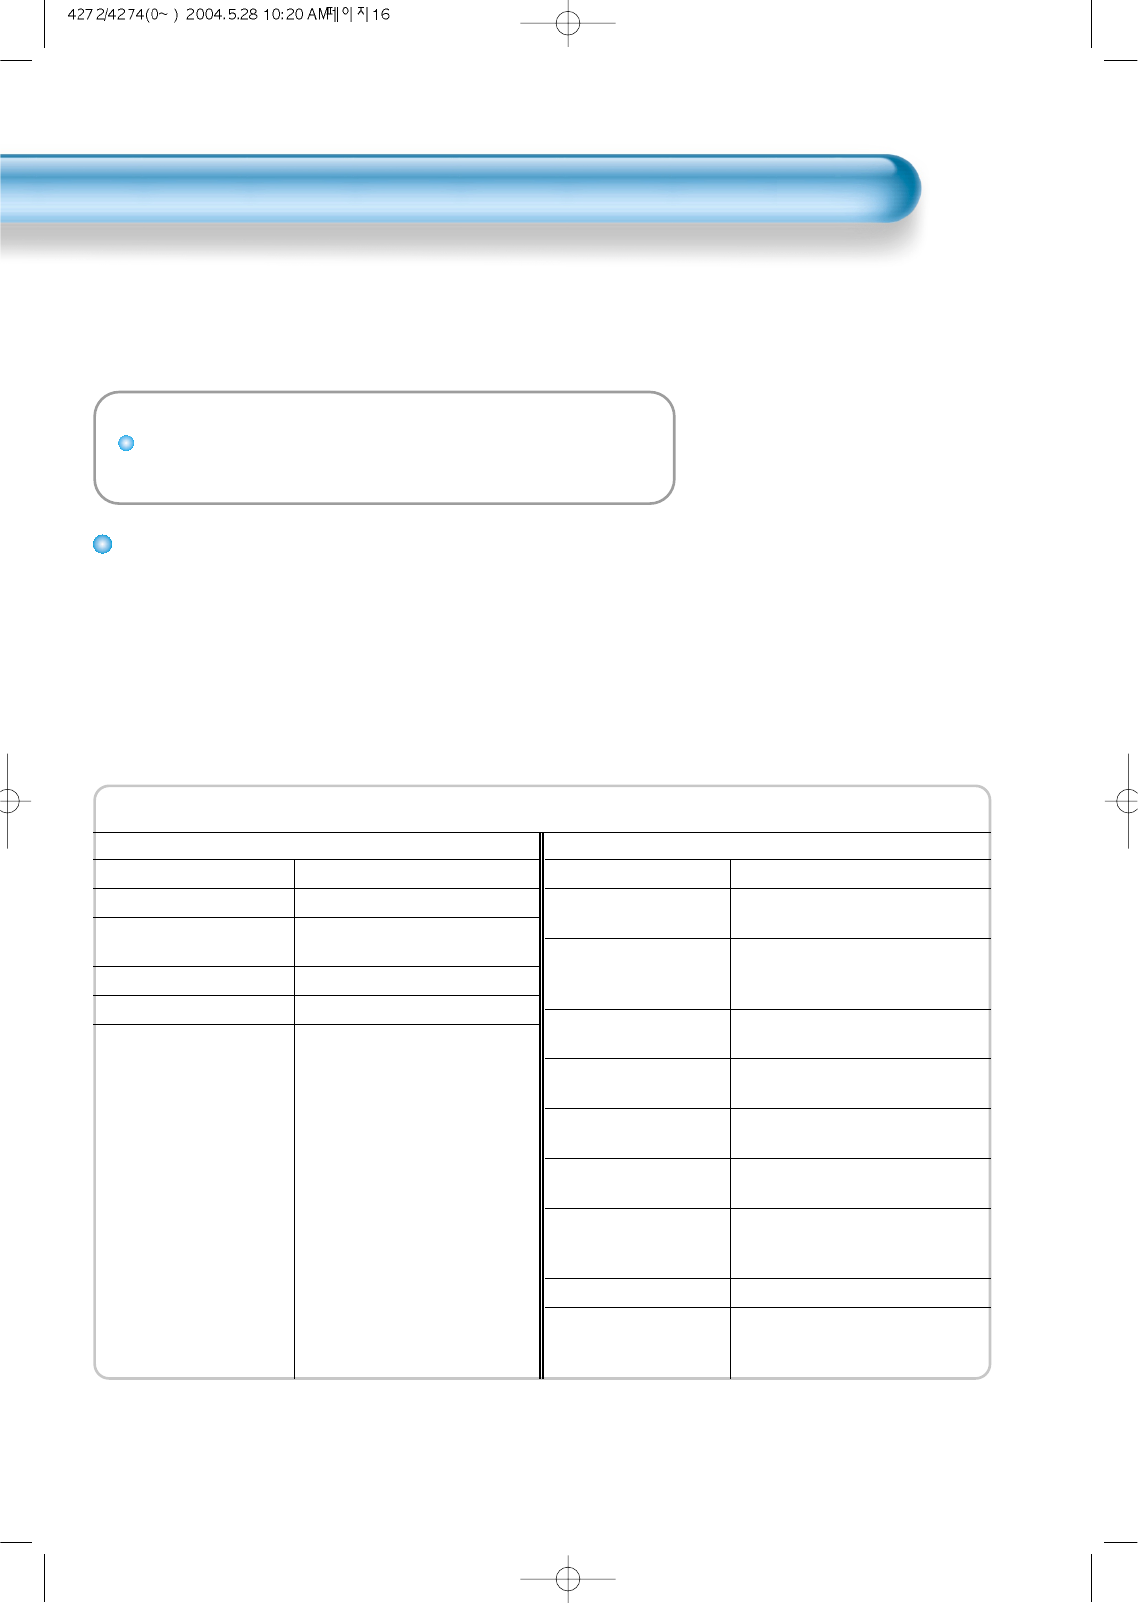
Remote Control Setup Code
Cable TV receiver
Brand Code
Panasonic 046 049
Philips 009 015 016 023
064 078 083
Samsung 001 033 067
Toshiba 054
Video
Brand Code
Daewoo 001 007 009 012 060 061
086 088 090 094 095 096
JVC 013 030 032 040 044 046
051 056 103 119 121 128
166
Mitzubisi 014 020 041 042 045 047
055 057 120 145
LG 013 014 020 079 084 092
099 127
Panasonic 062 066 070 078 106 114
122 146 147 156 160 161
Philips 030 032 033 050 063 067
079
Samsung 031 038 080 082 083 085
087 090 091 093 097 098
101 153 163
Sharp 030 050 118 143 150 164
Sony 005 011 030 048 052 053
054 072 073 074 118 136
151
Method to setup device change of remote control
Notices:
Caution
• l All the preset codes are erased when replacing the battery.
l In this case, you must reset the remote control again.
Antenna Connection
17
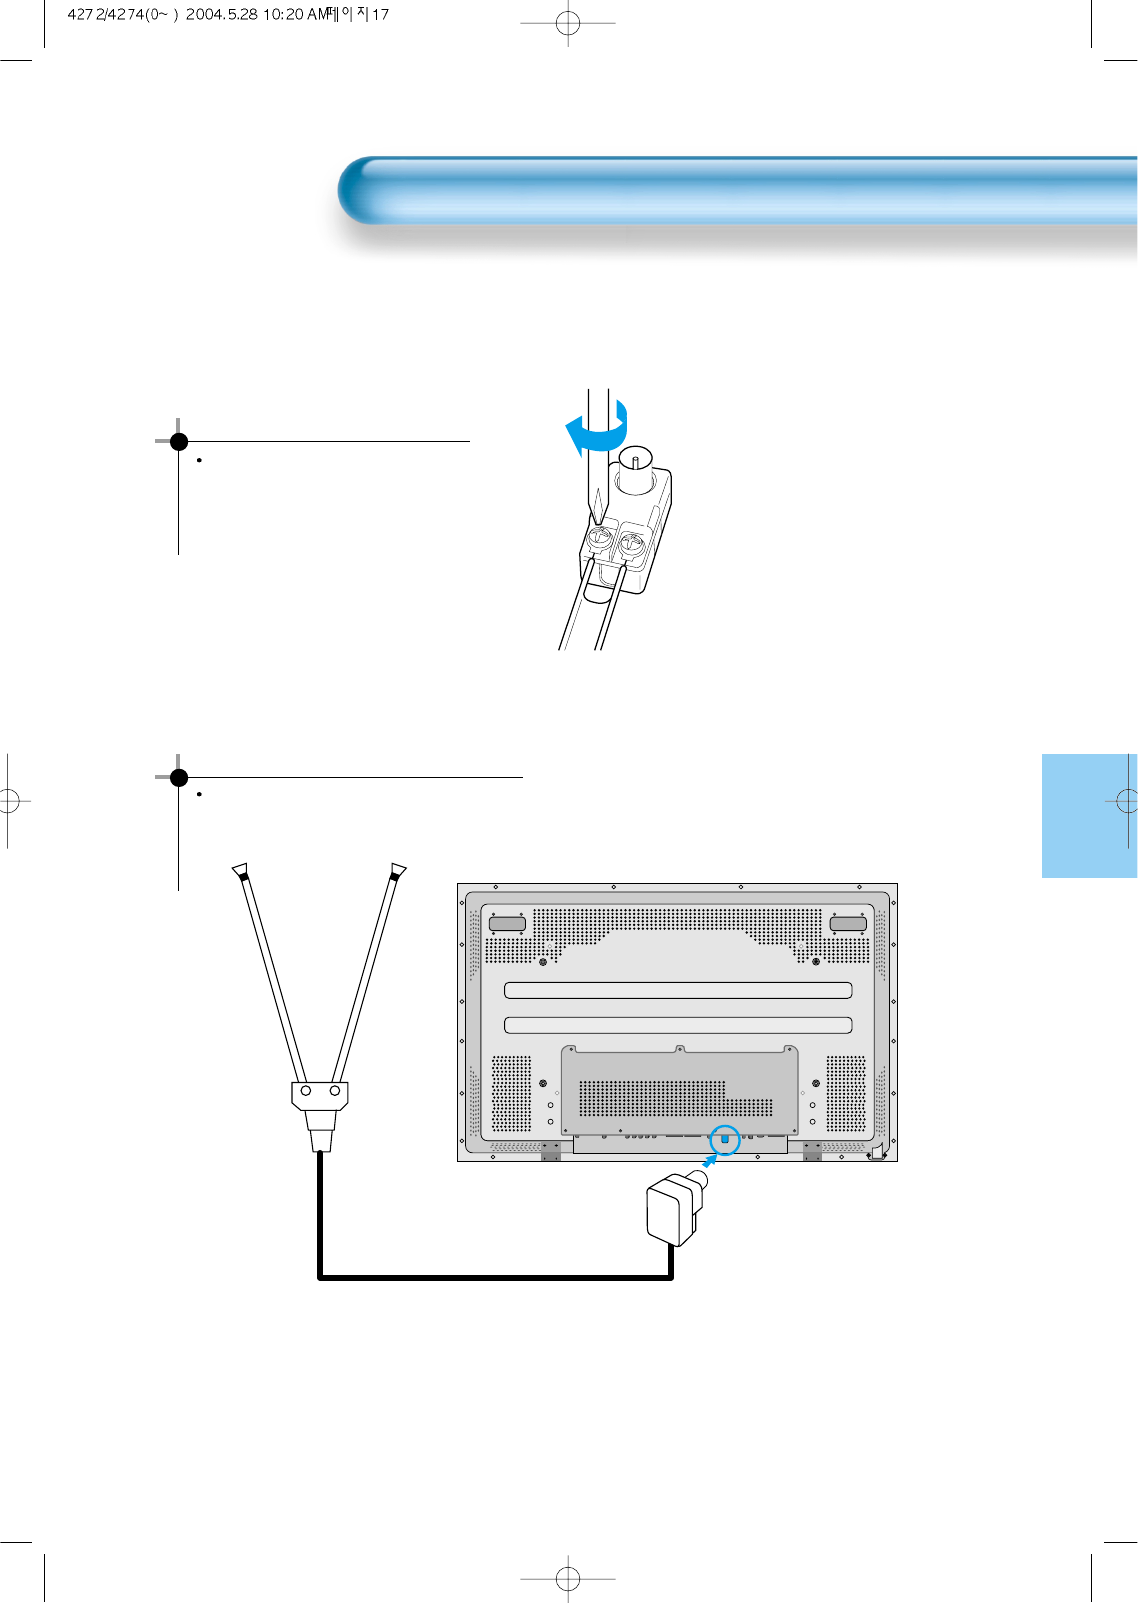
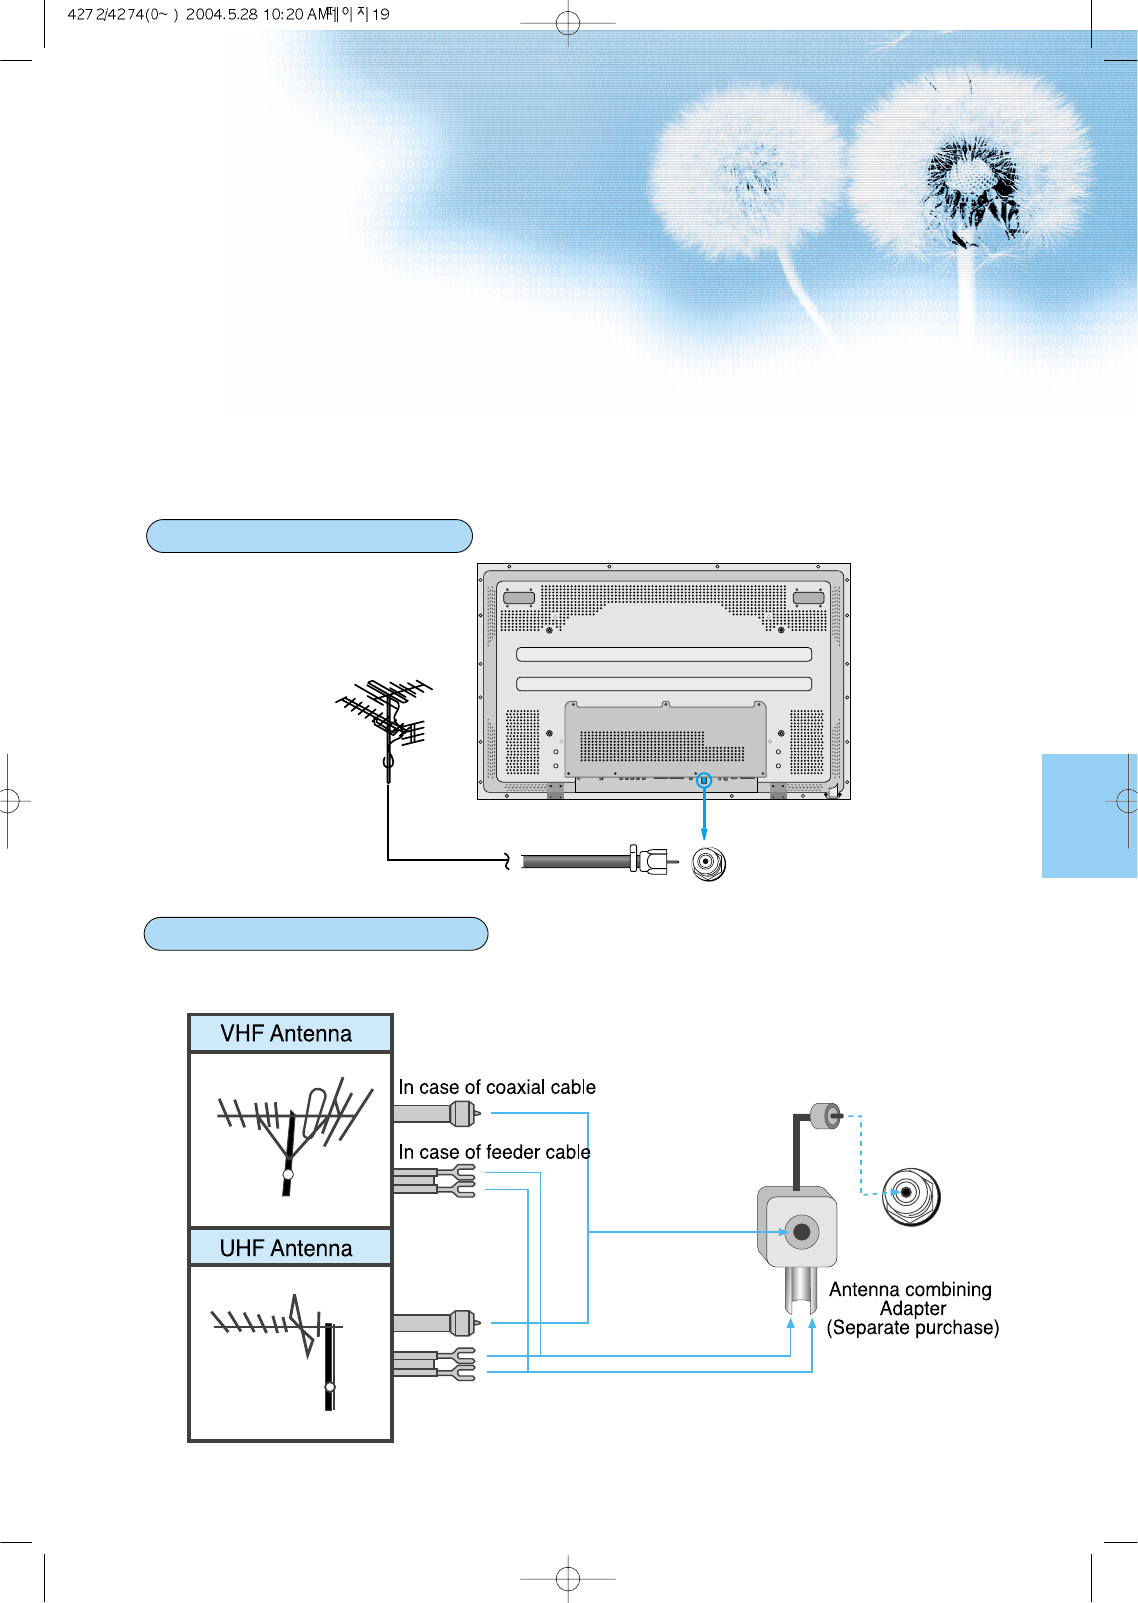
1. Connect the feeder cable of the antenna to the combining adapter.
2. Connect the combining adapter to the antenna input at the back of the TV set.
WHEN THE IMAGE IS NOT CLEAR
Unclear screen image and bad
reception may be a cause of wrong
antenna connection. Be sure to check
its direction and place when installing.
WHEN USING THE COMBINING ADAPTER
You may obtain the combining adapter
at your closest Service Center.
Antenna Input
Indoor Antenna Connection
CTV Antenna Connection
18
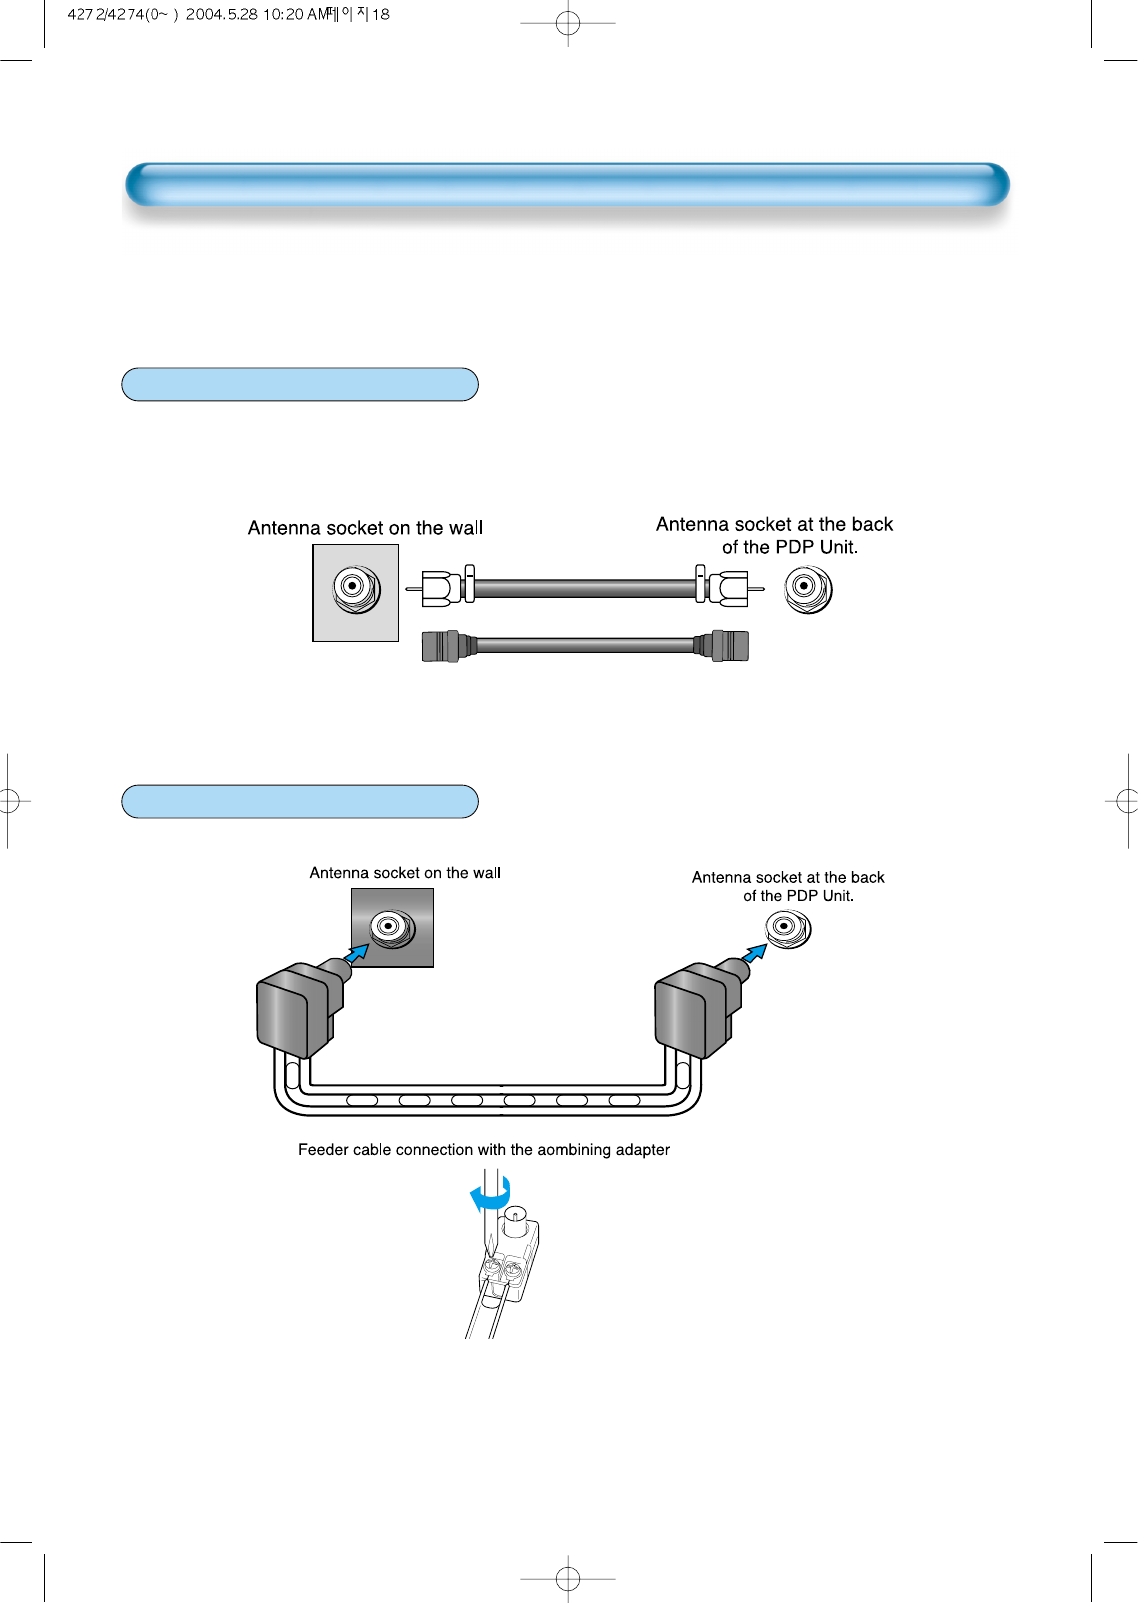
- Such community TV Antenna installation may be found in most of co-op apartments.
- If you use the provided coaxial cable, only plug the calbe.(recommendation)
When a coaxial cable is used
Plug the coaxial cable to the antenna socket, and fix it firmly by turning it to the right.
When a feeder cable is used
ANT/CABLE 1
ANT/CABLE 1
Provided coaxial cable
19
Outdoor Antenna connection-such as VHF or/and UHF-may be necessary for installation at private
houses
Single Antenna Connection.
Separate Antenna Connection.
VHF Antenna
UHF Antenna
ANT/CABLE 1
ANT/CABLE 1
Outdoor Antenna Connection
To Watch TV
20
- Buttons with same name in the pdp set performs same function.
VIDEO/
DVD SATTV CATV
DISPLAY
MULTIMEDIATV/VIDEO
CH
CH
V
O
L
V
O
L
Z
O
O
M
+
Z
O
O
M
-
MENU
P
R
E
V
C
H
S
C
R
E
E
N
S
I
Z
E
MUTE CAPTION
F.F/SLOW
PLAYF.R/SLOW
REC STOP PAUSE
PREV
OPEN/CLOSE
NEXT
PICTURE
MODE SOUND
MODE STILL
POWER
MTS ADD/
ERASE SLEEP
Press the “Main Power” button of the
pdp set.
•The buttons of the remote control and the
pdp set operate only when pressing the
“Main Power” button of the pdp set.
The remote control and the pdp set do not
operate if turning the “Main Power” button of
the pdp set off.
To mute the sound
1. Press the “Mute” button.
2. No sound is heard if “Mute” is displayed on
the screen.
3. Sound is heard again if pressing the “Mute”
button once again.
For example, please use this button when
telephone rings or when guest comes while
watching TV.
Check of TV operation status
• If pressing the “Display” button, status of
channel or broadcasting being currently
watched or entry status of video component
is displayed on the screen.
To Watch TV
When pressing the Channel button
•Select two digits if using the number button
for channel selection.
For example, to watch the No.9 channel,
Press the number button 0 and 9.
If pressing only number 9, it takes long time
for selecting channel.