Wavetrend Technologies LTG500 Tag SlimLine, L-TG500 User Manual User Guide
Wavetrend Technologies Limited Tag SlimLine, L-TG500 User Guide
UserManual.wiki
>
Wavetrend Technologies
>
LTG500 User Manual
>
Users Guide
Contents
1.
Product Information Sheet
2.
User Manual
3.
Users Guide
Users Guide
Navigation menu
Upload a User Manual
Namespaces
Wiki Guide
HTML
PDF
Info
Views
User Manual
Discussion / Help
Navigation

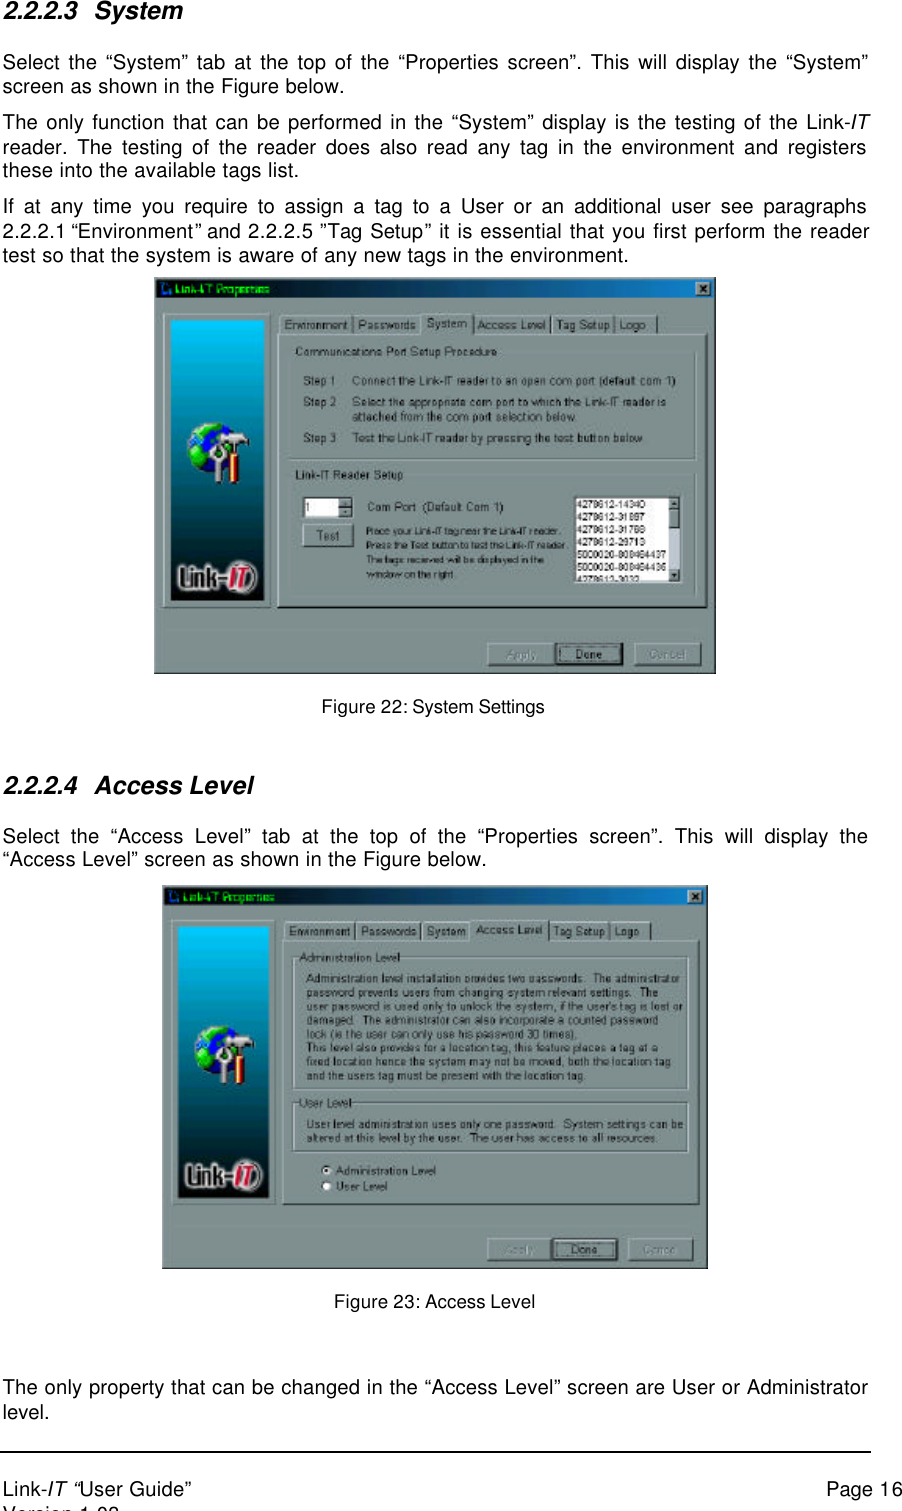
![Link-IT “User Guide” Page 3Version 1.031 GETTING STARTEDThank you for purchasing the AIT “Link-IT” system. The Link-IT system will provide you withunequalled protection of your Computer and its data. The package includes all the necessarycomponents needed to install and operate the Link-IT system. The product you havepurchased provides access protection to your Computer and it’s data.1.1 CONTENTS OF THE LINK-IT PACKAGE.On opening your package please check that the following items are included:• 1 * Link-IT reader• 1 * Personnel RFID (Radio Frequency Identification) Tag including card holder and clip• 1 * CD with all the necessary software and user documentationPlease check the contents of the “Link-IT package” and report any inconsistency to the dealerfrom which the product was purchased. Alternatively, mail any AIT office with the nature of theproblem together with a copy of your purchase Invoice. (Refer to the last page for addressesof AIT offices in your country)1.2 OVERVIEW1.2.1 CompatibilityThis product is designed to work with Computer’s running one of the following Microsoft®operating systems: Windows® 95/ 98 ,Windows NT 4.0 and Windows 2000.1.2.2 Basic DescriptionThe Link-IT system is an RFID system that automatically protects your computer fromunauthorised access when you or an authorised user is away from the workstation.This is achieved with three easy to install components, these being:• A tag reader connected to your workstation• The protection software• An active (regularly transmitting) identification tagWith the tag reader connected to your workstation via a serial communications port (RS232),the protection software interrogates the tag reader to determine whether the reader can readthe transmissions from your registered identifying tag. If your tag can be read then yourworkstation is enabled for normal operation. If however the reader cannot read your tag thesoftware will display a screen saver that cannot be removed until the tag reader can onceagain see your tag. This effectively locks your computer in your absence.The protection software works at a very low level inside your workstation thereby providingprotection from operations such as [Ctrl][Alt][Del], even switching the workstation “Off” and“On” has no neutralising effect on the screen saver. In the event that you lose your tag orhave left it at home the system provides for override via a password.1.3 INSTALLATIONBefore installing the Link-IT system you should decide whether the installation will be for anAdministrator or a User.ADMINISTRATOR LEVEL INSTALLATION: Has the rights to change any property in theLink-IT system. This includes adding or removing Users. The Administrator entry to the](https://usermanual.wiki/Wavetrend-Technologies/LTG500.Users-Guide/User-Guide-135178-Page-3.png)
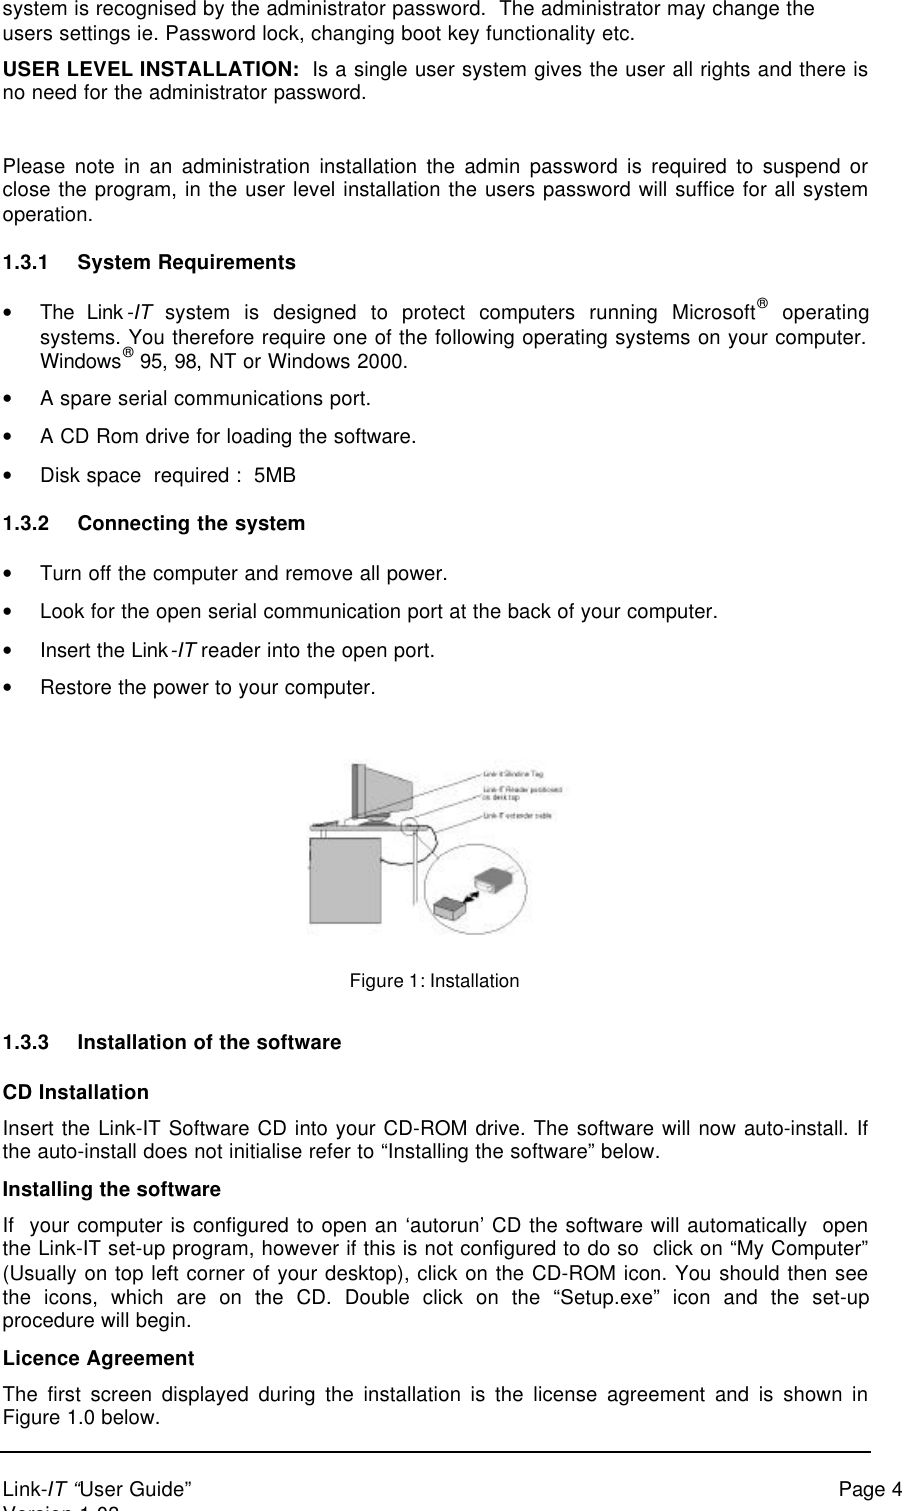
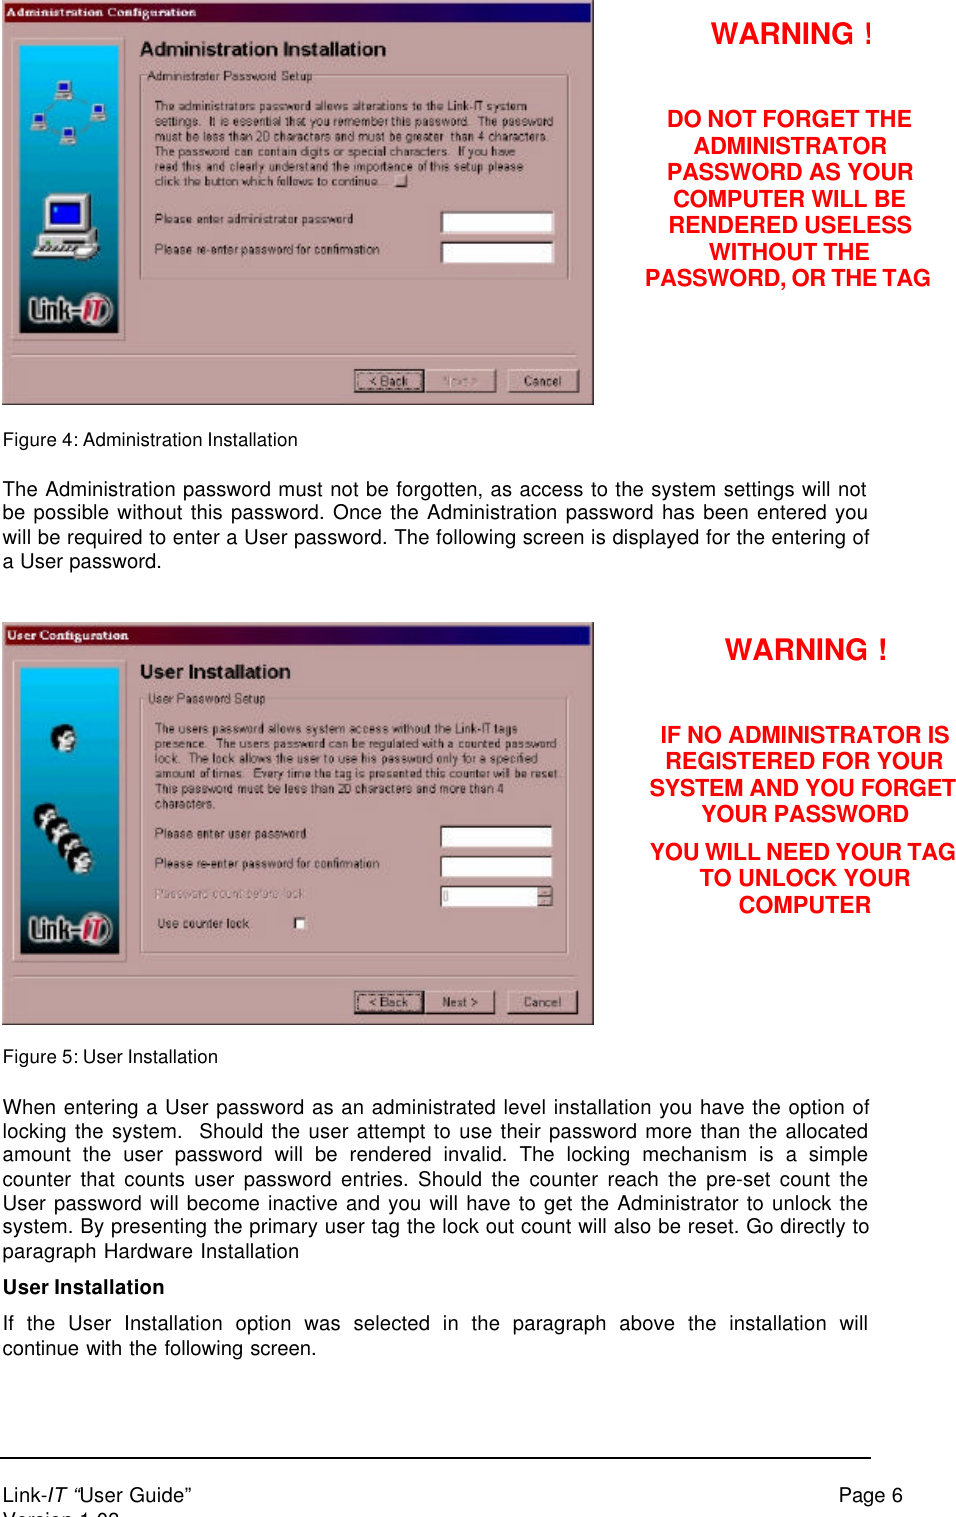
![Link-IT “User Guide” Page 5Version 1.03Figure 2: License AgreementPlease read the licence agreement carefully!For the installation to continue it is necessary to accept the license agreement and thereafterpress [Next >]. Following the acceptance of the License agreement the installation willcontinue.Installation OptionsThe next step in the installation is to select whether you are installing as a User (default) or asan Administrator. The primary difference between the two options is that the Administratorhas control over relevant system settings while the User option only allows for the User tooverride the screen saver in the event that the User has mislaid their Link-IT tag.Figure 3: Installation OptionsOnce you have selected either Administrator or User installation press [Next >] to continue.Administration InstallationSelecting the Administration installation option will require you to register an Administratorpassword as well as a User password. The following two screens are displayed:](https://usermanual.wiki/Wavetrend-Technologies/LTG500.Users-Guide/User-Guide-135178-Page-5.png)
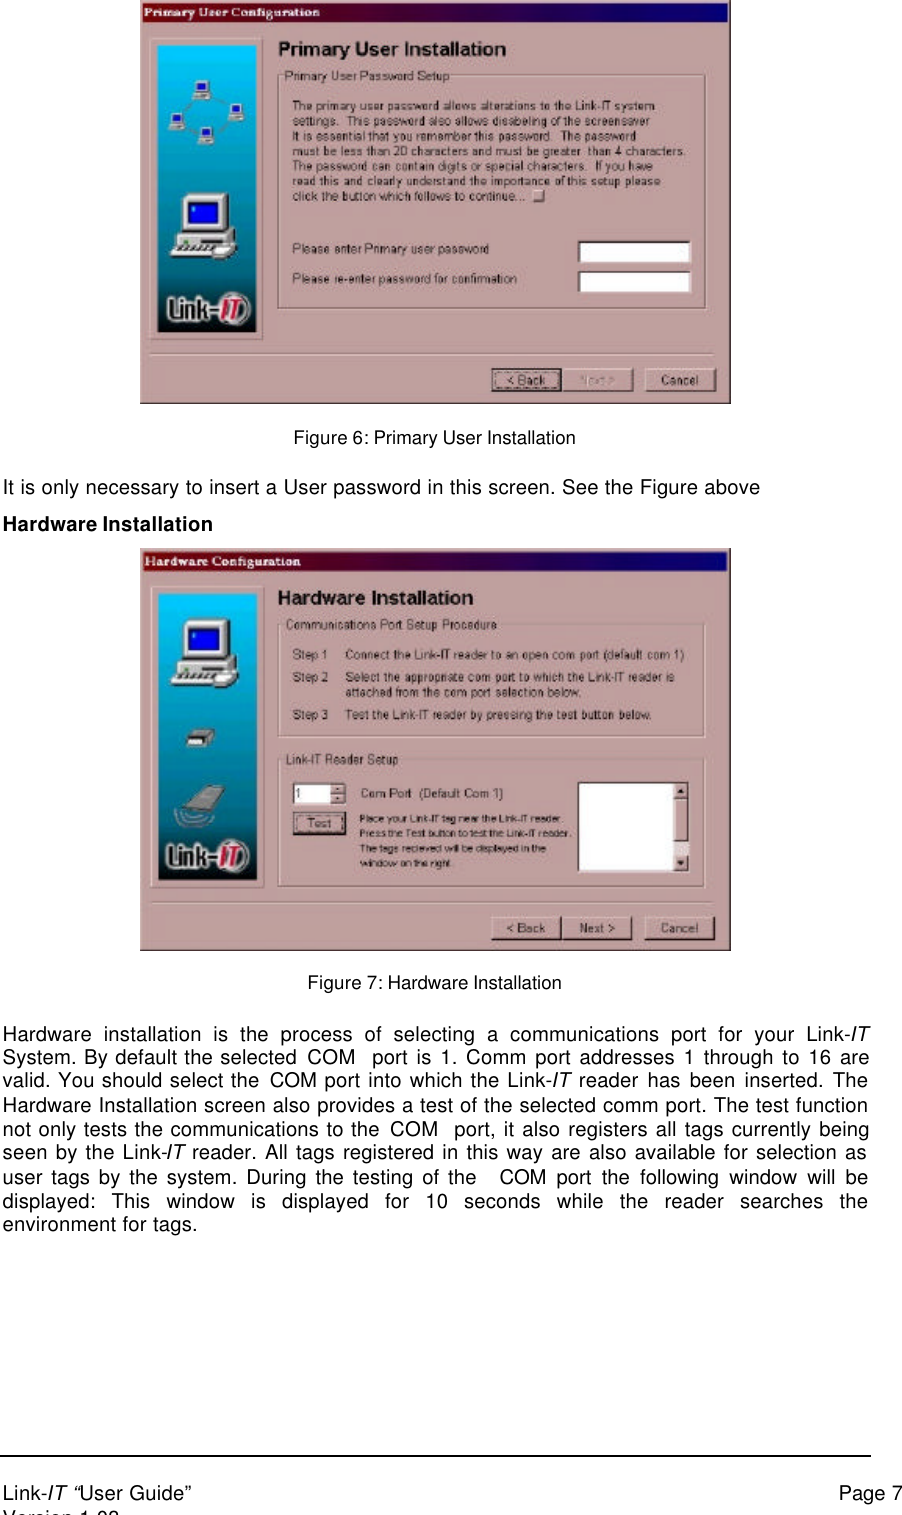
![Link-IT “User Guide” Page 8Version 1.03Figure 8: Detecting TagsOnce the test is completed the Hardware Installation screen will show any tags detectedduring the test as shown in Figure 1.7 below.Figure 9: Detected TagsUser ConfigurationOnce passwords have been set-up and the Hardware installation completed it is necessary toassign Tags to the User/s of the system. Prior to assigning a tag, check the Identity number ofyour tag. The Tag ID is a two- part number and is printed on your tag. Refer to the Figure 1.8Figure 10: Tag ID numberOnce you have identified your tag number you can proceed with the adding of users to thesystem. In the following screen (Figure 1.9) select [Add Primary User]](https://usermanual.wiki/Wavetrend-Technologies/LTG500.Users-Guide/User-Guide-135178-Page-8.png)
![Link-IT “User Guide” Page 9Version 1.03Figure 11: User ConfigurationAdd Primary UserSelecting Primary User will display the screen shown in the Figure below.The first step is to type in your “User Name” example Joe Bloggs.The next step is to assign your tag ID number to your User Name. This can be achieved inone of two ways:1. Type your Tag Identity Number into the text box provided for this number. (This approachis NOT recommended as the relatively large identity number could easily be typedincorrectly)2. Look for your tag identity number in the “Auto Detected Tags” list. If no tags are displayeduse the [Back] command button to return to the “Hardware Configuration” screen andselect the [Test] command button. This will read all the tags currently in the environment.Once the Reader has completed you can simply page forward using the [Next] commandbutton until you return to the “User Configuration” screen. Once you find your tag in the“Auto Detected Tags” list, select this tag, by positioning the mouse cursor on the list entryand pressing the [left mouse button]. Once selected, press the [Assign Tag ID] button.The registration is only completed once the [Apply] button is pressed.Figure 12: Primary User Details](https://usermanual.wiki/Wavetrend-Technologies/LTG500.Users-Guide/User-Guide-135178-Page-9.png)
![Link-IT “User Guide” Page 10Version 1.03If for any reason you do not find your tag in the “Auto Detected Tags” list.• Check that the Reader is installed into a serial COM port.• Check that the correct COM port is selected in the “Hardware Installation” screen• Check that the tag is within one meter (3 feet) of the reader.• Redo the test function in the “Hardware Installation” screen.If you can still not identify your Tags identity, cancel the installation by pressing “Cancel” andrefer the problem to the distributor from whom you purchased the product.Add UserThe “User Configuration” screen also allows for the registration of additional Users. Thisfunctionality provides for up to 10 additional Users to be registered with User rights only. Thefunction is intended at allowing Users such as Managers, Secretaries, etc to have access toyour computer. Each of these Users must have their own Link-IT tag. Additional Users areadded by pressing the [Add User] button on the “User Configuration” screen. The aboveprocess must be repeated for each additional User that is to be added to the system. This willresult in the following screen being displayed. See Figure below.Figure 13: Other User DetailsThe process of registering additional Users is identical to that of registering the primary User.This process is repeated below for clarity:The first step is to type in your “User Name”The next step is to assign the additional tag ID number to the User Name. This can beachieved in one of two ways:1. Type the additional Tag Identity Number into the text box provided for this number. (Thisapproach is NOT recommended as the relatively large identity number could easily betyped incorrectly)2. Look for the additional tag identity number in the “Auto Detected Tags” list. If no tags aredisplayed use the [Back] command button to return to the “Hardware Configuration”screen and select the [Test] command button. This will read all the tags currently in theenvironment. Once the Reader is completed you can simply page forward using the[Next] command button until you return to the “User Configuration” screen. Once you findthe additional tag in the “Auto Detected Tags” list select this tag by positioning the mousecursor on the list entry and press the [left mouse button]. Once so selected press the[Assign Tag ID] button. The registration is only completed once the [Apply] button ispressed.Once the User configuration is complete press the [Next] button to continue the installation.](https://usermanual.wiki/Wavetrend-Technologies/LTG500.Users-Guide/User-Guide-135178-Page-10.png)
![Link-IT “User Guide” Page 12Version 1.03be read. If either tag is missing the computer will be disabled. The location tag is registered ina two step procedure:1. Select the [Enable Location Tagging] check box.2. Select a tag from the “Tag List” and press the [Assign Tag ID] button.Enable / Disable [Fx] keysWhen starting your computer in a Windows environment the operating system can beinterrupted using [Function] keys. Enabling these function keys provides a loophole throughwhich your PC could be accessed even with the Link-IT system installed. To prevent this TheAdministrator can disable the function keys.Set-up CompleteThe final step in setting up your Link-IT product is to press [Next] on the “Set-up Complete”screen.Please note that this is your last chance to review your set-up by scrolling through the variousscreens using [Back] and [Next] buttons. Pressing [Finish] while on the “Set-up Complete”screen will initiate the copying of files to your hard drive.Figure 16: Set-up Complete](https://usermanual.wiki/Wavetrend-Technologies/LTG500.Users-Guide/User-Guide-135178-Page-12.png)
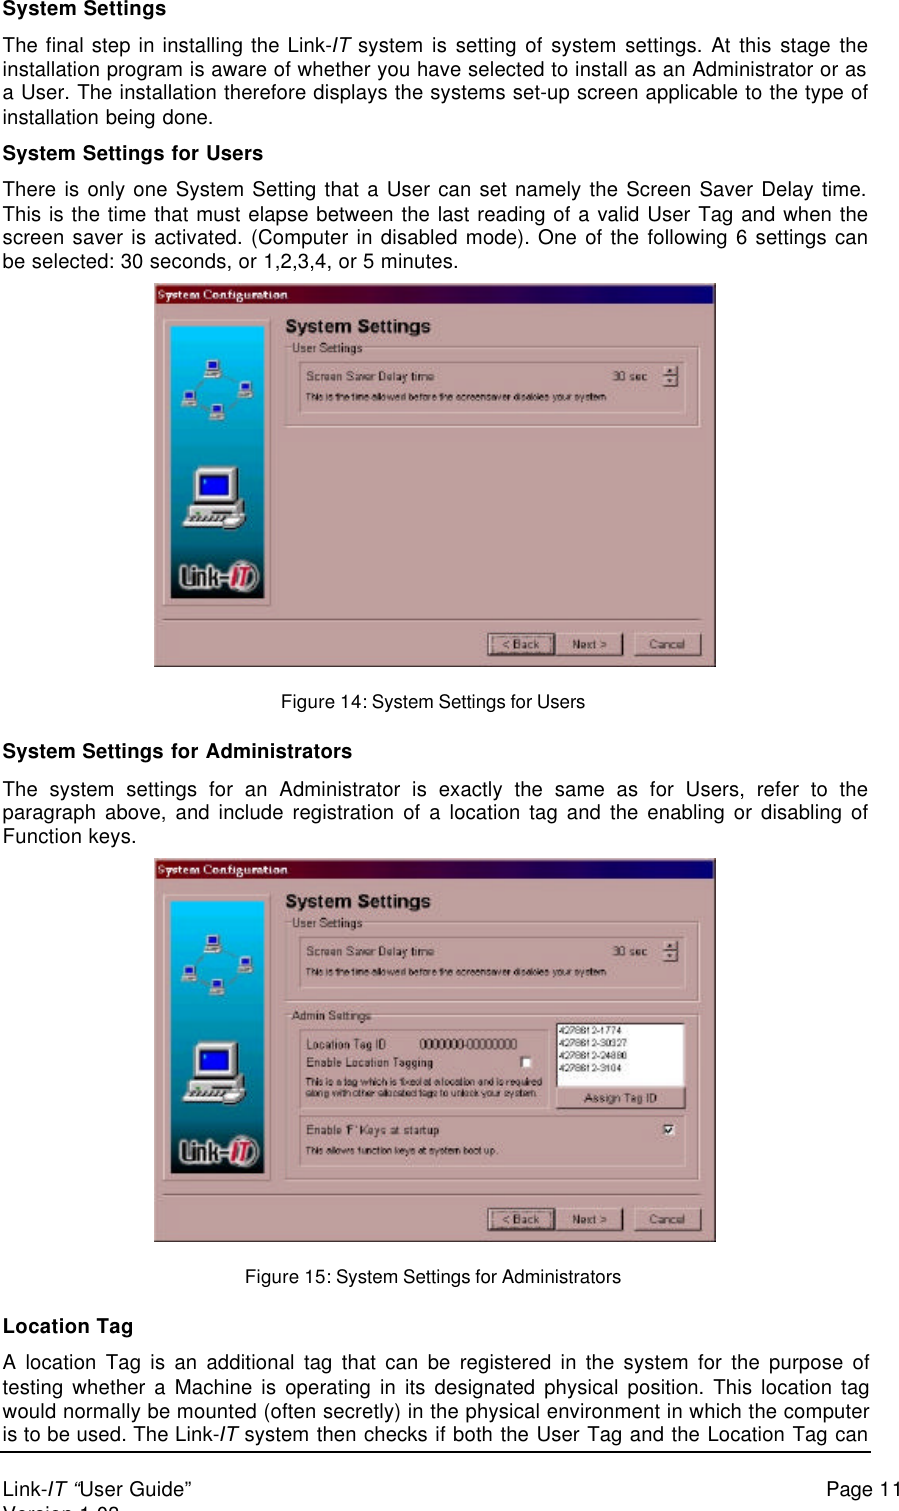
![Link-IT “User Guide” Page 13Version 1.032 USING THE LINK-IT SYSTEM2.1 STARTING THE LINK-IT SYSTEMThere are three ways of starting the Link-IT system namely:1. The system will start automatically after installation.2. The system will start automatically after power switch on.3. If an Administrator stopped the system, it can be restarted by clicking on the Link-IT icon under the Link-IT Section in the Start Menu.2.2 THE LINK-IT SYSTEM IN OPERATIONWhen the Link-IT system is in operation the Link-IT icon is included in theWindows task Bar.Figure 17: MenuPositioning the computer mouse pointer over the Link-IT icon and pressing the [Right MouseButton] will display a menu pop-up as shown in Figure 2.0 opposite.This menu provides the User with a mechanism to view the status of the system, to view andalter system setting via the Properties, and to close the application down.2.2.1 Viewing System StatusTo view system status select the “Show Status” menu item or press [S] while the pop-upmenu is being displayed. The status window shown in the Figure below will be displayed:Figure 18: Status WindowThe Status Window provides the User with the following information:1. A “Green light”, when illuminated, indicates that power is being supplied to theLink-IT reader.](https://usermanual.wiki/Wavetrend-Technologies/LTG500.Users-Guide/User-Guide-135178-Page-13.png)
![Link-IT “User Guide” Page 14Version 1.032. A “Red light” is illuminated each time the Link-IT reader reads a valid Tag. (Avalid Tag is any Link-IT Tag which is in the read range of the Reader).3. “Remaining Time” displays in digital form the time remaining until the Link-ITscreen saver will be displayed and the system disabled.4. “Reader Activity” provides the User with an indication as to how busy the readeris.5. “Loc. Tag” is a bar graph showing how long the Location Tag has been missing.This bar graph is only active if the system has been set-up to include a LocationTag. Should the bar grow to full size the computer will be disabled until a validLocation tag is seen again.6. “User Tag” is a bar graph showing how long the User Tag has been missing.Should the bar grow to full size the computer will be disabled until a valid Usertag is seen againThe Status window includes a [Hide] button to close this window.2.2.2 View or change SettingsSelecting the “Properties” menu option will result in aprompt for your password. Either the User or theAdministrator passwords may be entered. If the Userpassword is entered you will not have access to theAdministration settings. The Administrator Passwordgives full access to all settings. Once a valid passwordhas been entered and accepted the system will displaythe Properties Environment screen.Figure 19: Password Prompt2.2.2.1 EnvironmentIf you have entered the “Properties” with a User password the screen shown opposite inFigure 19: Password Prompt will be displayed. This screen allows the User to modify the“Screen Saver Delay Time”. The time is altered by repeatedly pressing the up and downarrows of the spin control. The available options are 10,20,30 seconds, 1, 2, 3, 4, or 5minutes.](https://usermanual.wiki/Wavetrend-Technologies/LTG500.Users-Guide/User-Guide-135178-Page-14.png)
![Link-IT “User Guide” Page 15Version 1.03To Enable or Disable the Location tag simply check the “Enable Location Tagging” check box.If you are registering a location tag for the first time or changing to a different tag you mustselect a tag in the list box and then assign the tag by pressing the [Assign Tag ID] button. Ifyour location tag is not displayed in the list box you will need to refresh the data. Refer toparagraph 2.2.2.3 below.2.2.2.2 PasswordsSelect the “Passwords” tab at the top of the “Properties screen”. The screen displayed willdepend on whether you are signed on as a User or an Administrator.Figure 20: User PasswordIf you are a User then the screen shown opposite will be displayed. The User can changetheir password at any time by typing a new password into the “Enter User Password” text box.Note all Password changes must be confirmed by typing the password into the “Confirm UserPassword” text box.Entering the Passwordscreen as anAdministrator enablesyou to alter both theAdministrator as well asthe User passwords.The counter lock is afacility by which theadministrator can limitthe amount of userpassword attempts willbe allowed.Figure 21: Administrator Password](https://usermanual.wiki/Wavetrend-Technologies/LTG500.Users-Guide/User-Guide-135178-Page-15.png)