Wavetrend Technologies LTG500 Tag SlimLine, L-TG500 User Manual User Guide
Wavetrend Technologies Limited Tag SlimLine, L-TG500 User Guide
Contents
- 1. Product Information Sheet
- 2. User Manual
- 3. Users Guide
Users Guide

Another Superior Product from:
USER GUIDE
Version 1.03
For use with Link-
IT
Version 3.x

Link-IT “User Guide” Page 2
Version 1.03
INDEX
1Getting Started..........................................................................................................................3
1.1 Contents of the Link-IT package.....................................................................................................3
1.2 Overview......................................................................................................................................3
1.2.1 Compatibility .........................................................................................................................3
1.2.2 Basic Description...................................................................................................................3
1.3 Installation....................................................................................................................................3
1.3.1 System Requirements............................................................................................................4
1.3.2 Connecting the system ..........................................................................................................4
1.3.3 Installation of the software......................................................................................................4
2Using the Link-IT system.....................................................................................................13
2.1 Starting the Link-IT system..........................................................................................................13
2.2 The Link-IT System in operation...................................................................................................13
2.2.1 Viewing System Status ........................................................................................................13
2.2.2 View or change Settings.......................................................................................................14
2.2.3 Suspending the Application..................................................................................................18
2.2.4 Un-Installing the Application .................................................................................................18
2.2.5 Closing the Application.........................................................................................................18
3Notes on installation.............................................................................................................20
3.1 Effects of Mechanical shielding....................................................................................................20
3.2 Adding Additional Software Security.............................................................................................20
3.2.1 Setting Your Boot Sequence.................................................................................................20
4Encryption Error.....................................................................................................................21
5Power requirements of the Link-IT system.....................................................................22
5.1 Link-IT Reader............................................................................................................................22
5.2 Identification Tag........................................................................................................................22
6Hot keys....................................................................................................................................23
6.1 “Right” Mouse button (Display on-line menu)................................................................................23
6.2 Screen Saver override.................................................................................................................23
7General Problems ..................................................................................................................24
7.1 The Screen saver will not go away ...............................................................................................24
7.2 Obtaining additional Tags............................................................................................................24
7.3 Email and Internet addresses ......................................................................................................24
8Licence .....................................................................................................................................25
9AIT Offices ...............................................................................................................................26

Link-IT “User Guide” Page 3
Version 1.03
1 GETTING STARTED
Thank you for purchasing the AIT “Link-IT” system. The Link-IT system will provide you with
unequalled protection of your Computer and its data. The package includes all the necessary
components needed to install and operate the Link-IT system. The product you have
purchased provides access protection to your Computer and it’s data.
1.1 CONTENTS OF THE LINK-IT PACKAGE.
On opening your package please check that the following items are included:
• 1 * Link-IT reader
• 1 * Personnel RFID (Radio Frequency Identification) Tag including card holder and clip
• 1 * CD with all the necessary software and user documentation
Please check the contents of the “Link-IT package” and report any inconsistency to the dealer
from which the product was purchased. Alternatively, mail any AIT office with the nature of the
problem together with a copy of your purchase Invoice. (Refer to the last page for addresses
of AIT offices in your country)
1.2 OVERVIEW
1.2.1 Compatibility
This product is designed to work with Computer’s running one of the following Microsoft®
operating systems: Windows® 95/ 98 ,Windows NT 4.0 and Windows 2000.
1.2.2 Basic Description
The Link-IT system is an RFID system that automatically protects your computer from
unauthorised access when you or an authorised user is away from the workstation.
This is achieved with three easy to install components, these being:
• A tag reader connected to your workstation
• The protection software
• An active (regularly transmitting) identification tag
With the tag reader connected to your workstation via a serial communications port (RS232),
the protection software interrogates the tag reader to determine whether the reader can read
the transmissions from your registered identifying tag. If your tag can be read then your
workstation is enabled for normal operation. If however the reader cannot read your tag the
software will display a screen saver that cannot be removed until the tag reader can once
again see your tag. This effectively locks your computer in your absence.
The protection software works at a very low level inside your workstation thereby providing
protection from operations such as [Ctrl][Alt][Del], even switching the workstation “Off” and
“On” has no neutralising effect on the screen saver. In the event that you lose your tag or
have left it at home the system provides for override via a password.
1.3 INSTALLATION
Before installing the Link-IT system you should decide whether the installation will be for an
Administrator or a User.
ADMINISTRATOR LEVEL INSTALLATION: Has the rights to change any property in the
Link-IT system. This includes adding or removing Users. The Administrator entry to the
Link-IT “User Guide” Page 4
Version 1.03
system is recognised by the administrator password. The administrator may change the
users settings ie. Password lock, changing boot key functionality etc.
USER LEVEL INSTALLATION: Is a single user system gives the user all rights and there is
no need for the administrator password.
Please note in an administration installation the admin password is required to suspend or
close the program, in the user level installation the users password will suffice for all system
operation.
1.3.1 System Requirements
• The Link-IT system is designed to protect computers running Microsoft® operating
systems. You therefore require one of the following operating systems on your computer.
Windows® 95, 98, NT or Windows 2000.
• A spare serial communications port.
• A CD Rom drive for loading the software.
• Disk space required : 5MB
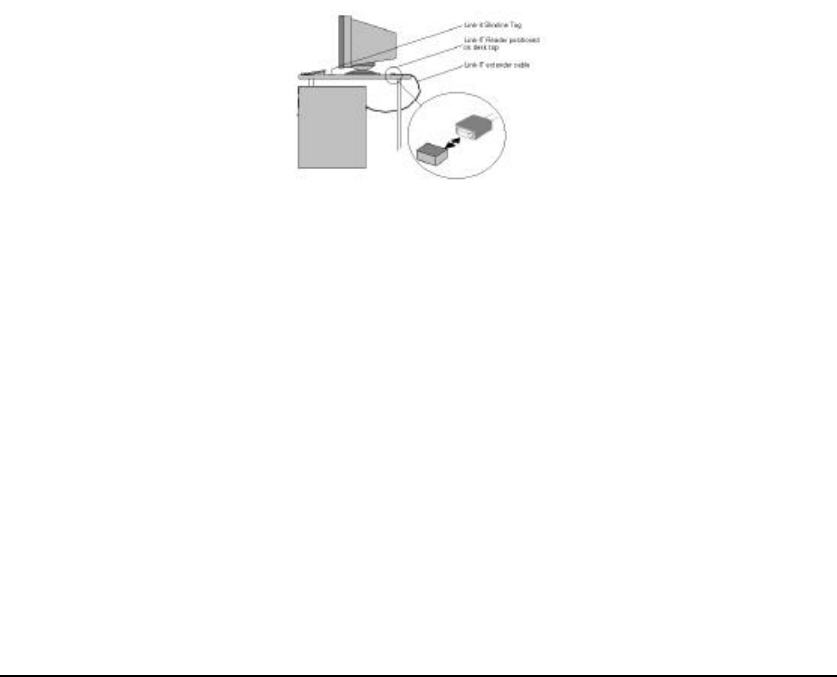
1.3.2 Connecting the system
• Turn off the computer and remove all power.
• Look for the open serial communication port at the back of your computer.
• Insert the Link-IT reader into the open port.
• Restore the power to your computer.
Figure 1: Installation
1.3.3 Installation of the software
CD Installation
Insert the Link-IT Software CD into your CD-ROM drive. The software will now auto-install. If
the auto-install does not initialise refer to “Installing the software” below.
Installing the software
If your computer is configured to open an ‘autorun’ CD the software will automatically open
the Link-IT set-up program, however if this is not configured to do so click on “My Computer”
(Usually on top left corner of your desktop), click on the CD-ROM icon. You should then see
the icons, which are on the CD. Double click on the “Setup.exe” icon and the set-up
procedure will begin.
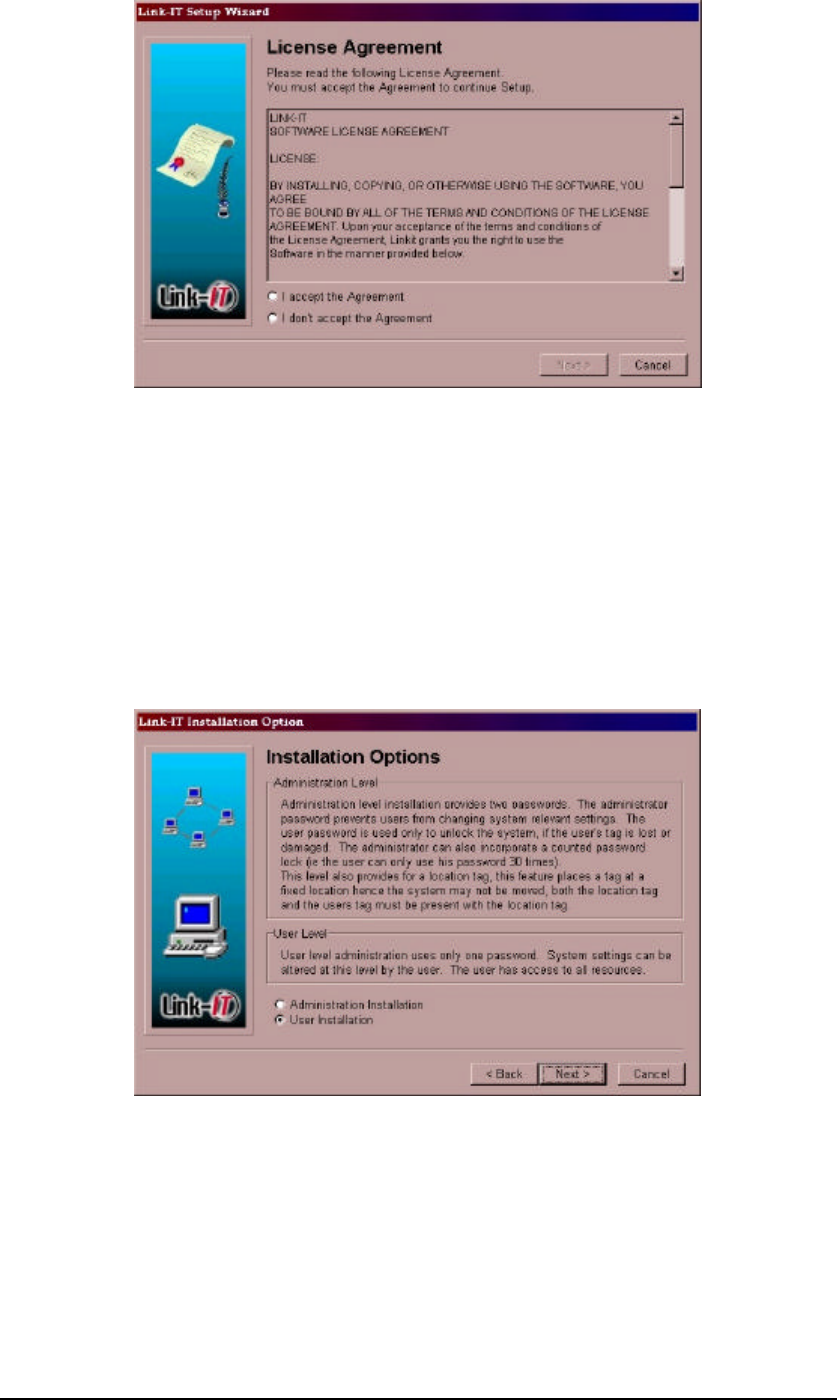
Licence Agreement
The first screen displayed during the installation is the license agreement and is shown in
Figure 1.0 below.
Link-IT “User Guide” Page 5
Version 1.03
Figure 2: License Agreement
Please read the licence agreement carefully!
For the installation to continue it is necessary to accept the license agreement and thereafter
press [Next >]. Following the acceptance of the License agreement the installation will
continue.
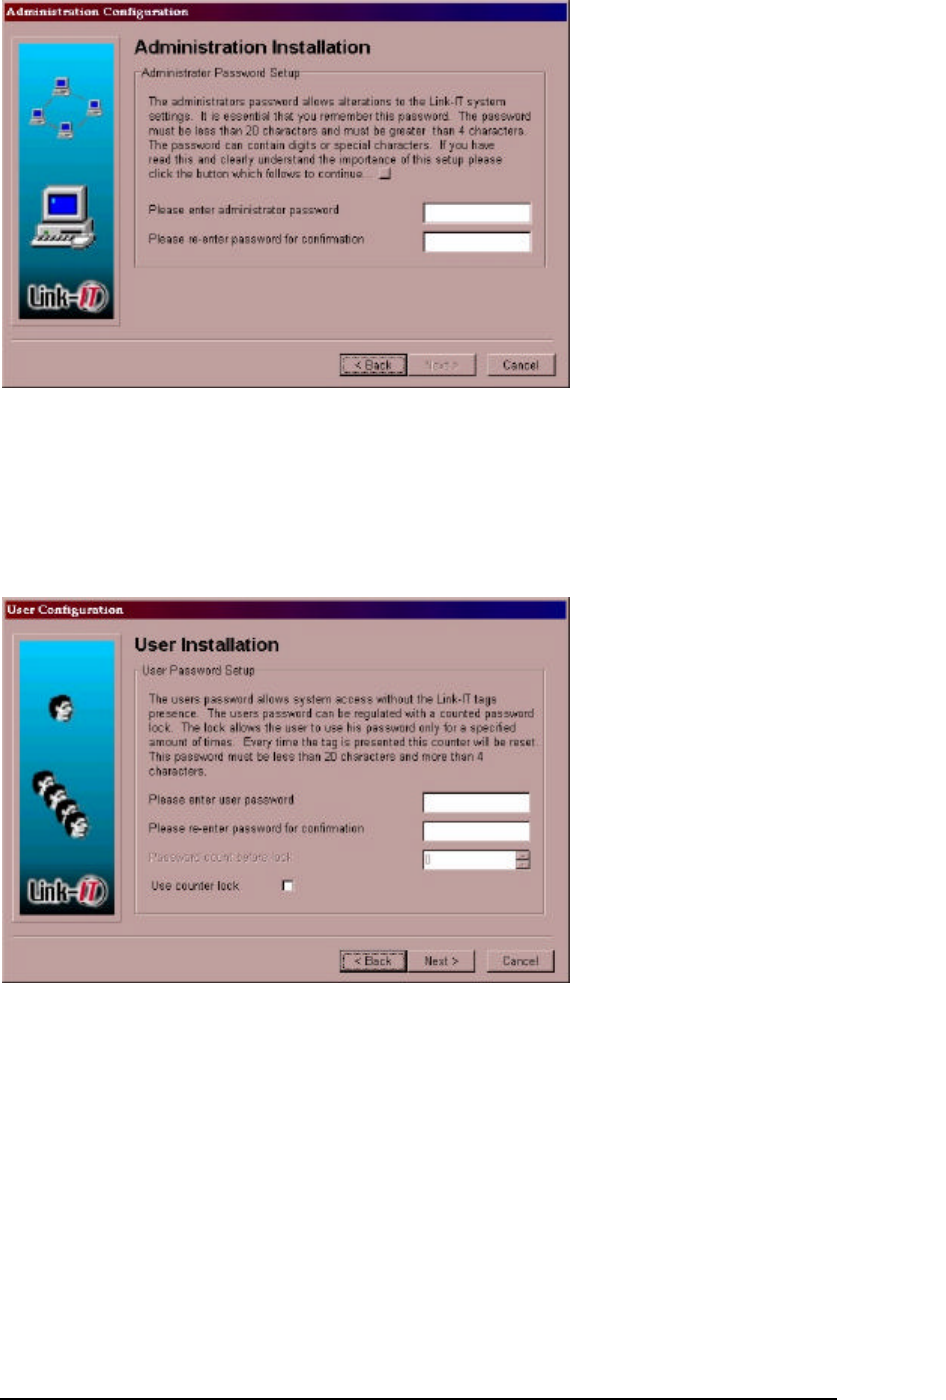
Installation Options
The next step in the installation is to select whether you are installing as a User (default) or as
an Administrator. The primary difference between the two options is that the Administrator
has control over relevant system settings while the User option only allows for the User to
override the screen saver in the event that the User has mislaid their Link-IT tag.
Figure 3: Installation Options
Once you have selected either Administrator or User installation press [Next >] to continue.
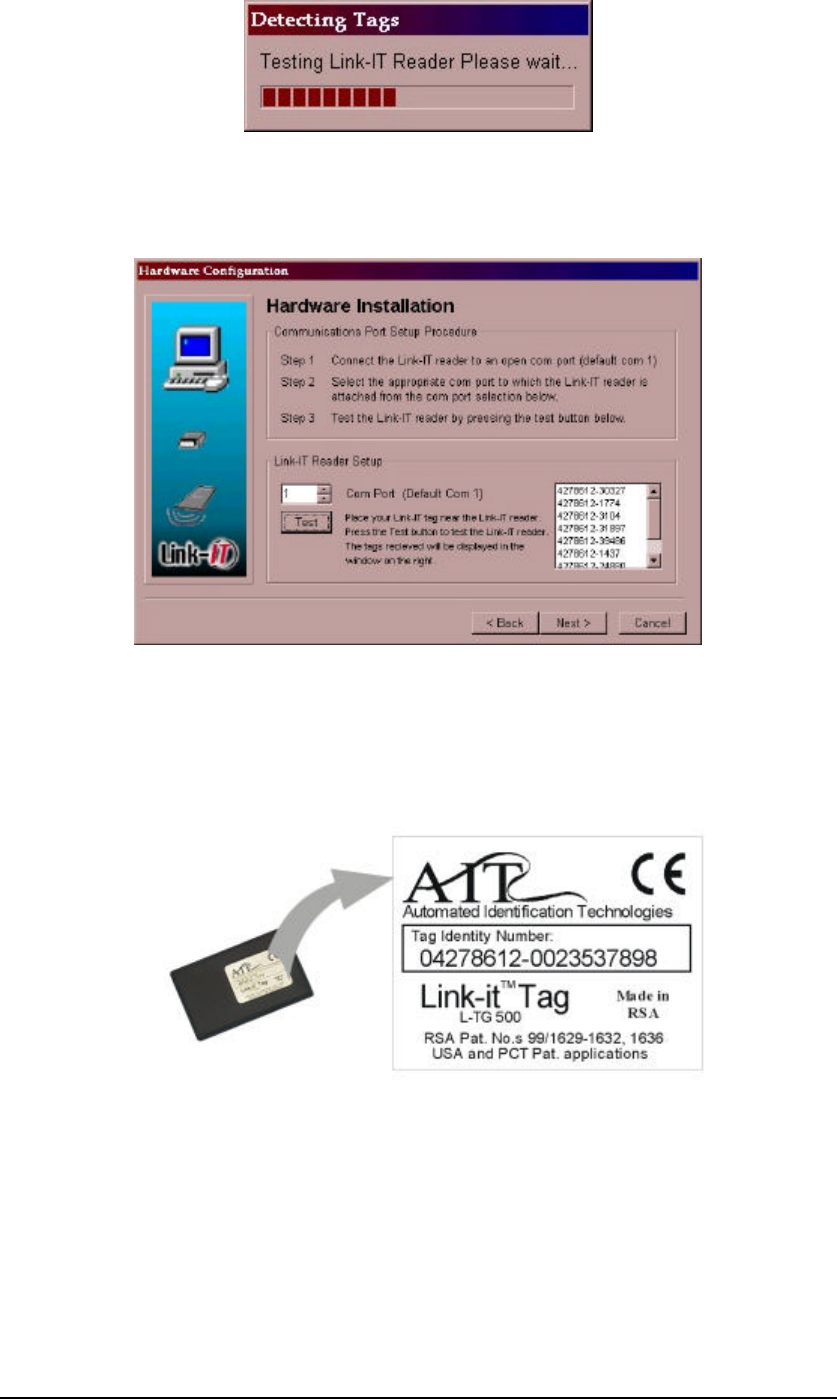
Administration Installation
Selecting the Administration installation option will require you to register an Administrator
password as well as a User password. The following two screens are displayed:
Link-IT “User Guide” Page 6
Version 1.03
Figure 4: Administration Installation
The Administration password must not be forgotten, as access to the system settings will not
be possible without this password. Once the Administration password has been entered you
will be required to enter a User password. The following screen is displayed for the entering of
a User password.
Figure 5: User Installation
When entering a User password as an administrated level installation you have the option of
locking the system. Should the user attempt to use their password more than the allocated
amount the user password will be rendered invalid. The locking mechanism is a simple
counter that counts user password entries. Should the counter reach the pre-set count the
User password will become inactive and you will have to get the Administrator to unlock the
system. By presenting the primary user tag the lock out count will also be reset. Go directly to
paragraph Hardware Installation
User Installation
If the User Installation option was selected in the paragraph above the installation will
continue with the following screen.
WARNING !
DO NOT FORGET THE
ADMINISTRATOR
PASSWORD AS YOUR
COMPUTER WILL BE
RENDERED USELESS
WITHOUT THE
PASSWORD, OR THE TAG
WARNING !
IF NO ADMINISTRATOR IS
REGISTERED FOR YOUR
SYSTEM AND YOU FORGET
YOUR PASSWORD
YOU WILL NEED YOUR TAG
TO UNLOCK YOUR
COMPUTER

Link-IT “User Guide” Page 7
Version 1.03
Figure 6: Primary User Installation
It is only necessary to insert a User password in this screen. See the Figure above
Hardware Installation
Figure 7: Hardware Installation
Hardware installation is the process of selecting a communications port for your Link-IT
System. By default the selected COM port is 1. Comm port addresses 1 through to 16 are
valid. You should select the COM port into which the Link-IT reader has been inserted. The
Hardware Installation screen also provides a test of the selected comm port. The test function
not only tests the communications to the COM port, it also registers all tags currently being
seen by the Link-IT reader. All tags registered in this way are also available for selection as
user tags by the system. During the testing of the COM port the following window will be
displayed: This window is displayed for 10 seconds while the reader searches the
environment for tags.
Link-IT “User Guide” Page 8
Version 1.03
Figure 8: Detecting Tags
Once the test is completed the Hardware Installation screen will show any tags detected
during the test as shown in Figure 1.7 below.
Figure 9: Detected Tags
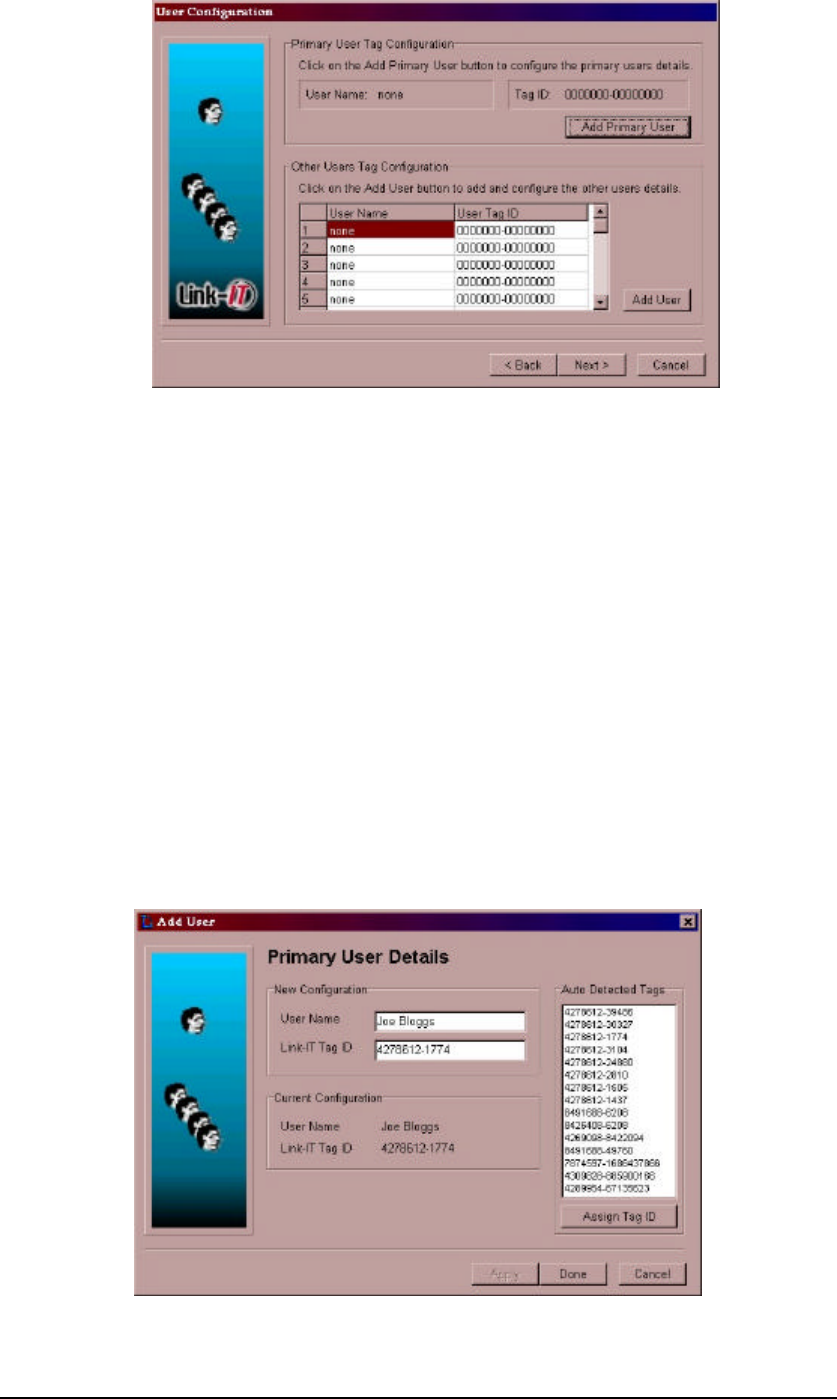
User Configuration
Once passwords have been set-up and the Hardware installation completed it is necessary to
assign Tags to the User/s of the system. Prior to assigning a tag, check the Identity number of
your tag. The Tag ID is a two- part number and is printed on your tag. Refer to the Figure 1.8
Figure 10: Tag ID number
Once you have identified your tag number you can proceed with the adding of users to the
system. In the following screen (Figure 1.9) select [Add Primary User]
Link-IT “User Guide” Page 9
Version 1.03
Figure 11: User Configuration
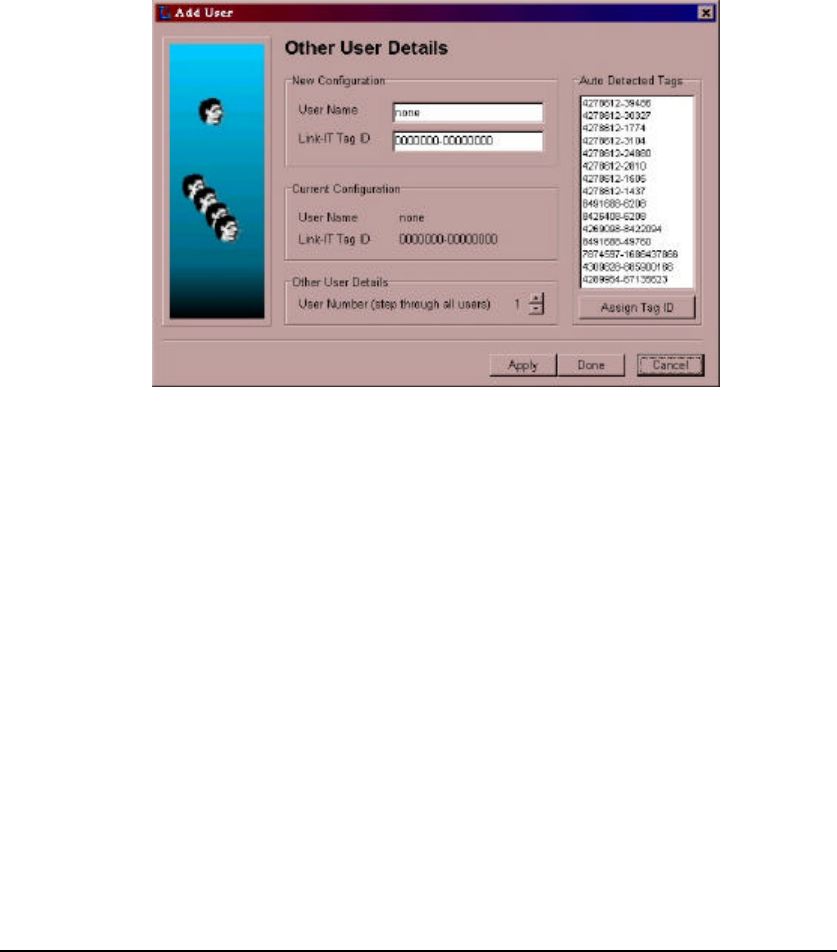
Add Primary User
Selecting Primary User will display the screen shown in the Figure below.
The first step is to type in your “User Name” example Joe Bloggs.
The next step is to assign your tag ID number to your User Name. This can be achieved in
one of two ways:
1. Type your Tag Identity Number into the text box provided for this number. (This approach
is NOT recommended as the relatively large identity number could easily be typed
incorrectly)
2. Look for your tag identity number in the “Auto Detected Tags” list. If no tags are displayed
use the [Back] command button to return to the “Hardware Configuration” screen and
select the [Test] command button. This will read all the tags currently in the environment.
Once the Reader has completed you can simply page forward using the [Next] command
button until you return to the “User Configuration” screen. Once you find your tag in the
“Auto Detected Tags” list, select this tag, by positioning the mouse cursor on the list entry
and pressing the [left mouse button]. Once selected, press the [Assign Tag ID] button.
The registration is only completed once the [Apply] button is pressed.
Figure 12: Primary User Details
Link-IT “User Guide” Page 10
Version 1.03
If for any reason you do not find your tag in the “Auto Detected Tags” list.
• Check that the Reader is installed into a serial COM port.
• Check that the correct COM port is selected in the “Hardware Installation” screen
• Check that the tag is within one meter (3 feet) of the reader.
• Redo the test function in the “Hardware Installation” screen.
If you can still not identify your Tags identity, cancel the installation by pressing “Cancel” and
refer the problem to the distributor from whom you purchased the product.
Add User
The “User Configuration” screen also allows for the registration of additional Users. This
functionality provides for up to 10 additional Users to be registered with User rights only. The
function is intended at allowing Users such as Managers, Secretaries, etc to have access to
your computer. Each of these Users must have their own Link-IT tag. Additional Users are
added by pressing the [Add User] button on the “User Configuration” screen. The above
process must be repeated for each additional User that is to be added to the system. This will
result in the following screen being displayed. See Figure below.
Figure 13: Other User Details
The process of registering additional Users is identical to that of registering the primary User.
This process is repeated below for clarity:
The first step is to type in your “User Name”
The next step is to assign the additional tag ID number to the User Name. This can be
achieved in one of two ways:
1. Type the additional Tag Identity Number into the text box provided for this number. (This
approach is NOT recommended as the relatively large identity number could easily be
typed incorrectly)
2. Look for the additional tag identity number in the “Auto Detected Tags” list. If no tags are
displayed use the [Back] command button to return to the “Hardware Configuration”
screen and select the [Test] command button. This will read all the tags currently in the
environment. Once the Reader is completed you can simply page forward using the
[Next] command button until you return to the “User Configuration” screen. Once you find
the additional tag in the “Auto Detected Tags” list select this tag by positioning the mouse
cursor on the list entry and press the [left mouse button]. Once so selected press the
[Assign Tag ID] button. The registration is only completed once the [Apply] button is
pressed.
Once the User configuration is complete press the [Next] button to continue the installation.

Link-IT “User Guide” Page 11
Version 1.03
System Settings
The final step in installing the Link-IT system is setting of system settings. At this stage the
installation program is aware of whether you have selected to install as an Administrator or as
a User. The installation therefore displays the systems set-up screen applicable to the type of
installation being done.
System Settings for Users
There is only one System Setting that a User can set namely the Screen Saver Delay time.
This is the time that must elapse between the last reading of a valid User Tag and when the
screen saver is activated. (Computer in disabled mode). One of the following 6 settings can
be selected: 30 seconds, or 1,2,3,4, or 5 minutes.
Figure 14: System Settings for Users
System Settings for Administrators
The system settings for an Administrator is exactly the same as for Users, refer to the
paragraph above, and include registration of a location tag and the enabling or disabling of
Function keys.
Figure 15: System Settings for Administrators
Location Tag
A location Tag is an additional tag that can be registered in the system for the purpose of
testing whether a Machine is operating in its designated physical position. This location tag
would normally be mounted (often secretly) in the physical environment in which the computer
is to be used. The Link-IT system then checks if both the User Tag and the Location Tag can
Link-IT “User Guide” Page 12
Version 1.03
be read. If either tag is missing the computer will be disabled. The location tag is registered in
a two step procedure:
1. Select the [Enable Location Tagging] check box.
2. Select a tag from the “Tag List” and press the [Assign Tag ID] button.
Enable / Disable [Fx] keys
When starting your computer in a Windows environment the operating system can be
interrupted using [Function] keys. Enabling these function keys provides a loophole through
which your PC could be accessed even with the Link-IT system installed. To prevent this The
Administrator can disable the function keys.
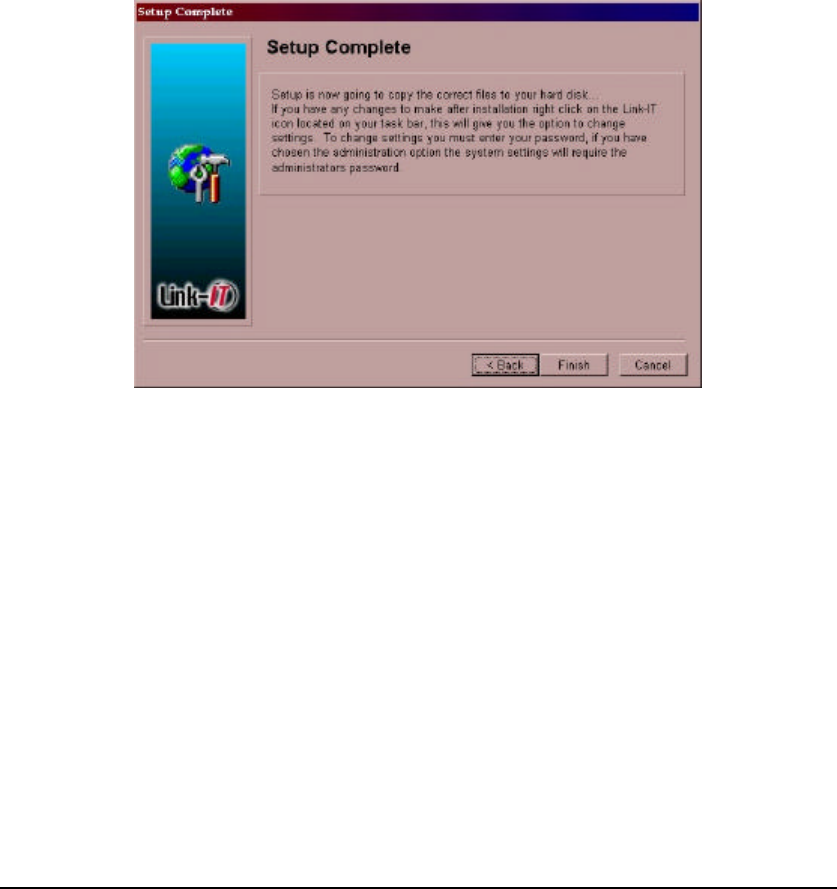
Set-up Complete
The final step in setting up your Link-IT product is to press [Next] on the “Set-up Complete”
screen.
Please note that this is your last chance to review your set-up by scrolling through the various
screens using [Back] and [Next] buttons. Pressing [Finish] while on the “Set-up Complete”
screen will initiate the copying of files to your hard drive.
Figure 16: Set-up Complete
Link-IT “User Guide” Page 13
Version 1.03
2 USING THE LINK-IT SYSTEM
2.1 STARTING THE LINK-IT SYSTEM
There are three ways of starting the Link-IT system namely:
1. The system will start automatically after installation.
2. The system will start automatically after power switch on.
3. If an Administrator stopped the system, it can be restarted by clicking on the Link-
IT icon under the Link-IT Section in the Start Menu.
2.2 THE LINK-IT SYSTEM IN OPERATION
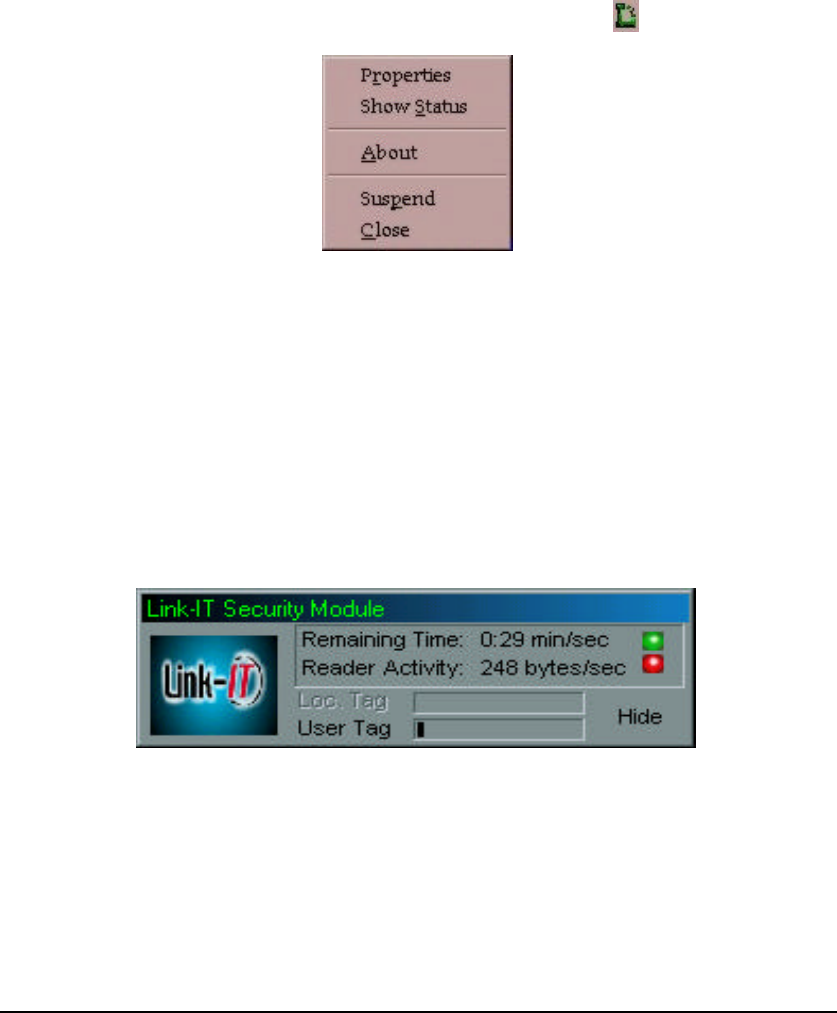
When the Link-IT system is in operation the Link-IT icon is included in the
Windows task Bar.
Figure 17: Menu
Positioning the computer mouse pointer over the Link-IT icon and pressing the [Right Mouse
Button] will display a menu pop-up as shown in Figure 2.0 opposite.
This menu provides the User with a mechanism to view the status of the system, to view and
alter system setting via the Properties, and to close the application down.
2.2.1 Viewing System Status
To view system status select the “Show Status” menu item or press [S] while the pop-up
menu is being displayed. The status window shown in the Figure below will be displayed:
Figure 18: Status Window
The Status Window provides the User with the following information:
1. A “Green light”, when illuminated, indicates that power is being supplied to the
Link-IT reader.
Link-IT “User Guide” Page 14
Version 1.03
2. A “Red light” is illuminated each time the Link-IT reader reads a valid Tag. (A
valid Tag is any Link-IT Tag which is in the read range of the Reader).
3. “Remaining Time” displays in digital form the time remaining until the Link-IT
screen saver will be displayed and the system disabled.
4. “Reader Activity” provides the User with an indication as to how busy the reader
is.
5. “Loc. Tag” is a bar graph showing how long the Location Tag has been missing.
This bar graph is only active if the system has been set-up to include a Location
Tag. Should the bar grow to full size the computer will be disabled until a valid
Location tag is seen again.
6. “User Tag” is a bar graph showing how long the User Tag has been missing.
Should the bar grow to full size the computer will be disabled until a valid User
tag is seen again
The Status window includes a [Hide] button to close this window.
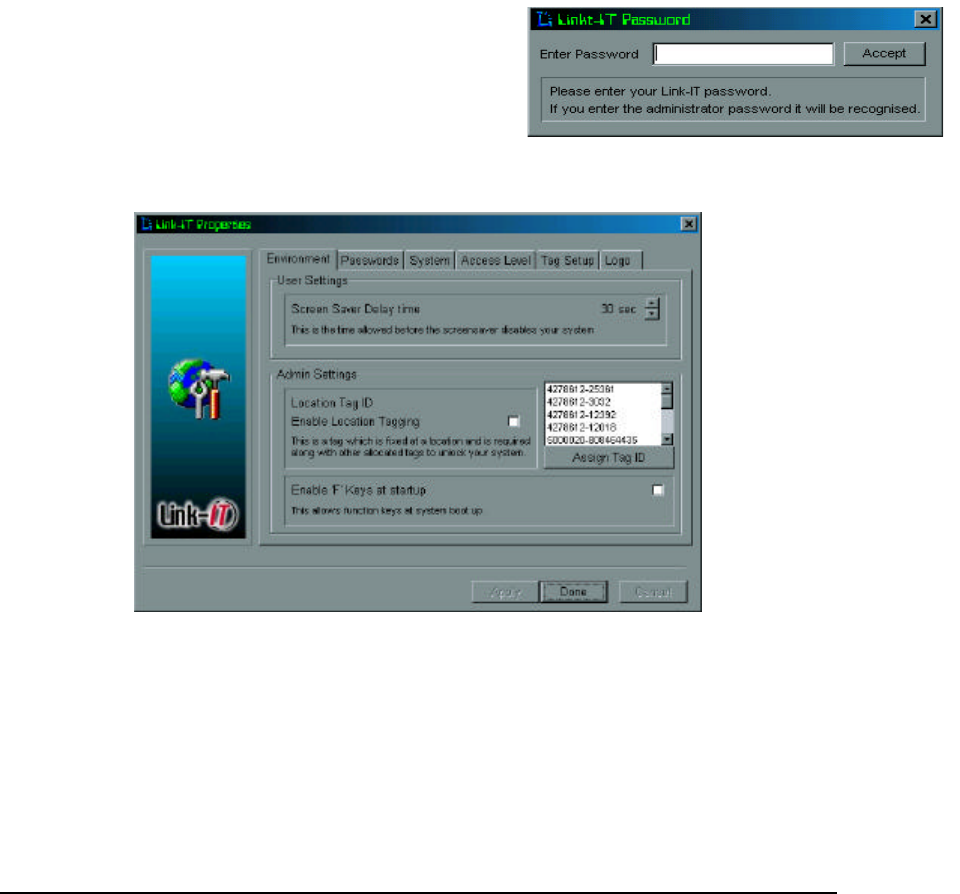
2.2.2 View or change Settings
Selecting the “Properties” menu option will result in a
prompt for your password. Either the User or the
Administrator passwords may be entered. If the User
password is entered you will not have access to the
Administration settings. The Administrator Password
gives full access to all settings. Once a valid password
has been entered and accepted the system will display
the Properties Environment screen.
Figure 19: Password Prompt
2.2.2.1 Environment
If you have entered the “Properties” with a User password the screen shown opposite in
Figure 19: Password Prompt will be displayed. This screen allows the User to modify the
“Screen Saver Delay Time”. The time is altered by repeatedly pressing the up and down
arrows of the spin control. The available options are 10,20,30 seconds, 1, 2, 3, 4, or 5
minutes.
Link-IT “User Guide” Page 15
Version 1.03
To Enable or Disable the Location tag simply check the “Enable Location Tagging” check box.
If you are registering a location tag for the first time or changing to a different tag you must
select a tag in the list box and then assign the tag by pressing the [Assign Tag ID] button. If
your location tag is not displayed in the list box you will need to refresh the data. Refer to
paragraph 2.2.2.3 below.
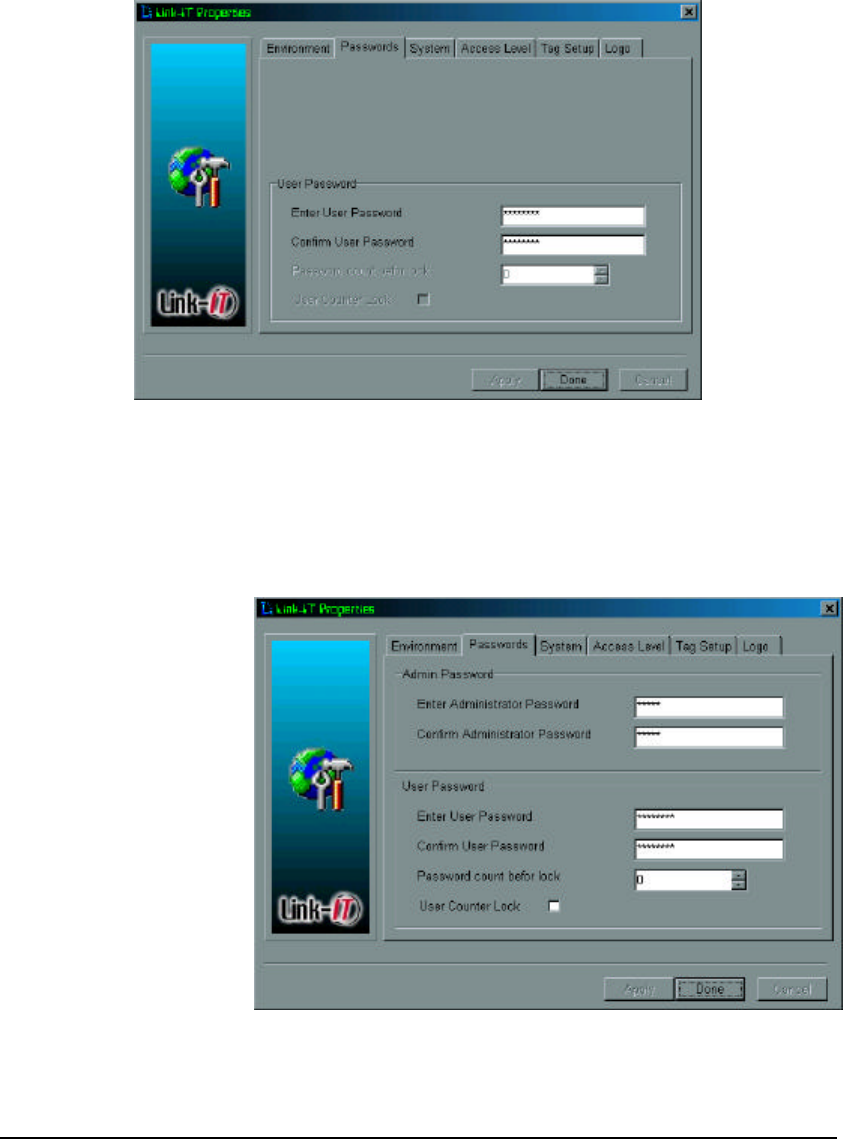
2.2.2.2 Passwords
Select the “Passwords” tab at the top of the “Properties screen”. The screen displayed will
depend on whether you are signed on as a User or an Administrator.
Figure 20: User Password
If you are a User then the screen shown opposite will be displayed. The User can change
their password at any time by typing a new password into the “Enter User Password” text box.
Note all Password changes must be confirmed by typing the password into the “Confirm User
Password” text box.
Entering the Password
screen as an
Administrator enables
you to alter both the
Administrator as well as
the User passwords.
The counter lock is a
facility by which the
administrator can limit
the amount of user
password attempts will
be allowed.
Figure 21: Administrator Password
Link-IT “User Guide” Page 16
Version 1.03
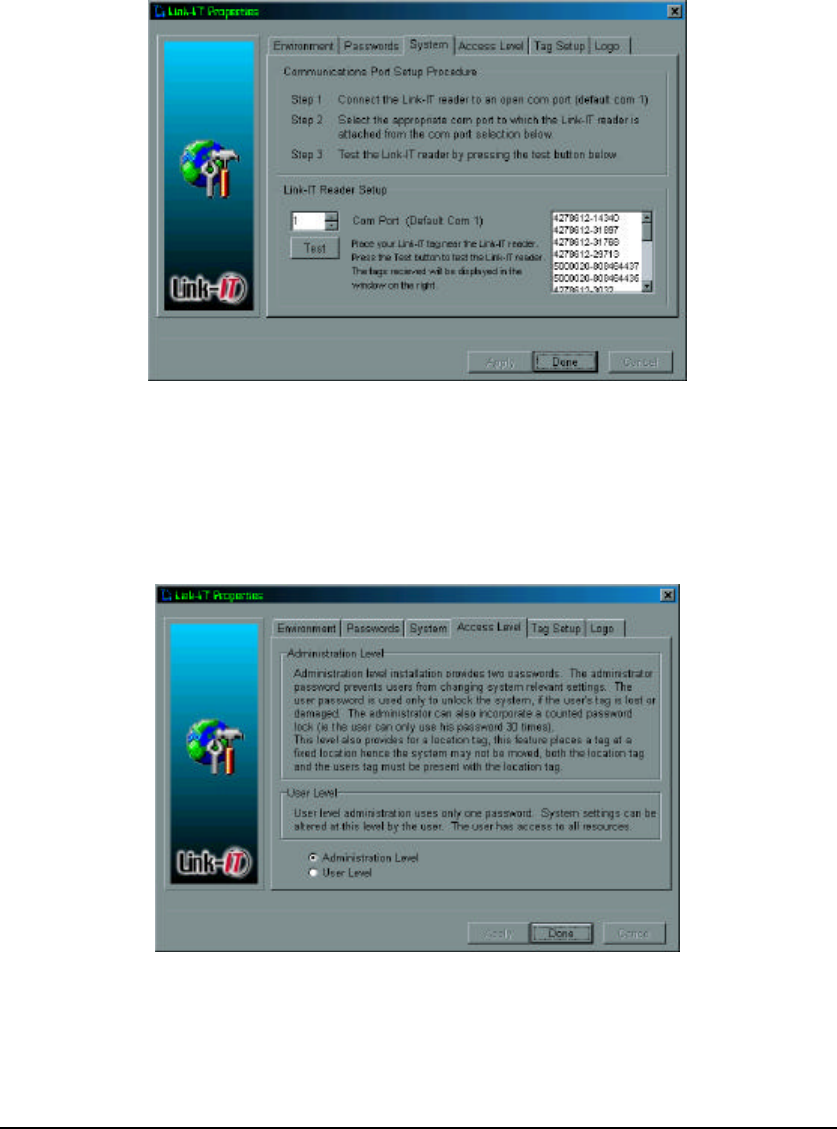
2.2.2.3 System
Select the “System” tab at the top of the “Properties screen”. This will display the “System”
screen as shown in the Figure below.
The only function that can be performed in the “System” display is the testing of the Link-IT
reader. The testing of the reader does also read any tag in the environment and registers
these into the available tags list.
If at any time you require to assign a tag to a User or an additional user see paragraphs
2.2.2.1 “Environment” and 2.2.2.5 ”Tag Setup” it is essential that you first perform the reader
test so that the system is aware of any new tags in the environment.
Figure 22: System Settings
2.2.2.4 Access Level
Select the “Access Level” tab at the top of the “Properties screen”. This will display the
“Access Level” screen as shown in the Figure below.
Figure 23: Access Level
The only property that can be changed in the “Access Level” screen are User or Administrator
level.
Link-IT “User Guide” Page 17
Version 1.03
The following rules apply:
1. If there has never been an Administrator then a User can change to an
Administrator.
2. If there is a registered Administrator and you are signed on as a User then you
cannot change to an Administrator.
3. An Administrator can make any change.
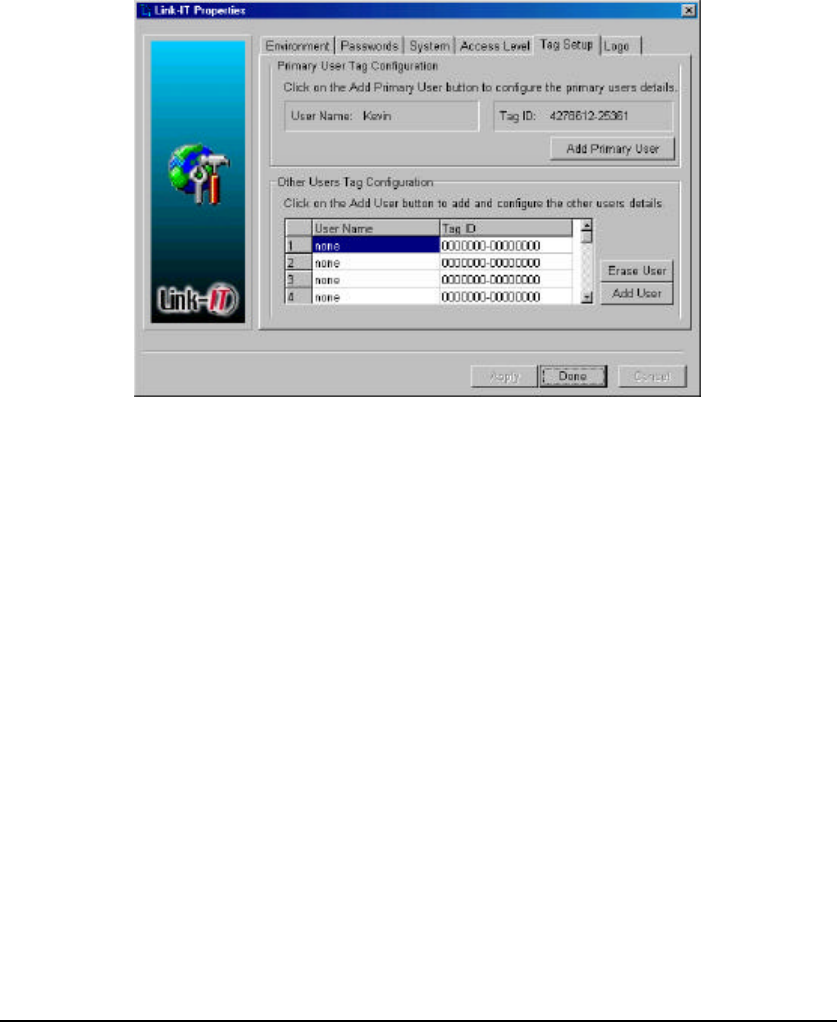
2.2.2.5 Tag Setup
Select the “Tag Setup” tab at the top of the “Properties screen”. This will display the “Tag
Setup” screen as shown in the Figure below. The Tag set-up screen allows for the adding of
Users to the system. Adding a Primary User replaces the existing Primary user.
For instruction on how to add users please refer to the paragraph above (Tag Setup).
Figure 24: Tag Setup
Link-IT “User Guide” Page 18
Version 1.03
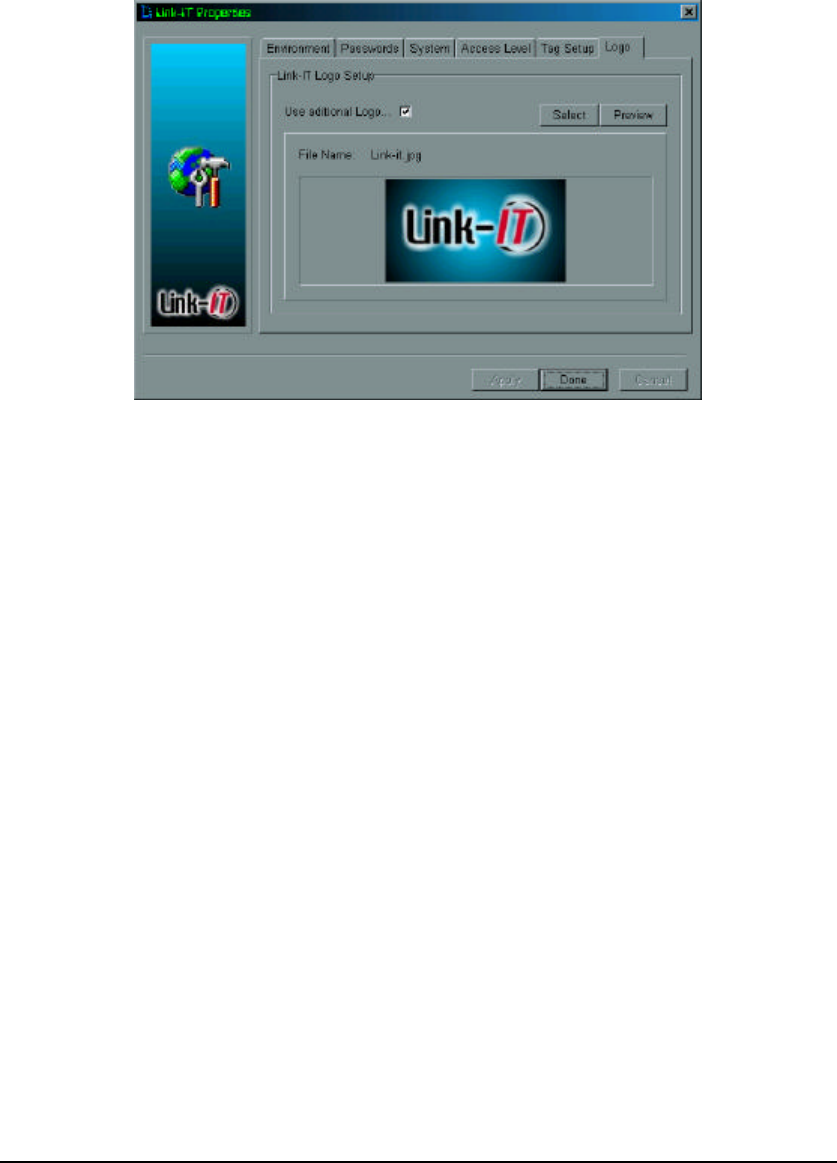
2.2.2.6 Logo Setup
Select the “Logo” tab, this will display an option to add another picture to the Link-IT
screensaver. Click on the “Use additional Logo” box then click on the “Select” button then
find the selected file, the file name will be displayed along with the preview of the image
selected. If you would like to see how the logo looks in screensaver mode press the
“Preview” button. After selection click the “Apply” button to save settings.
Figure 25: Logo Setup
2.2.3 Suspending the Application
Selecting the “Suspend” option the Link-IT system will release the selected comm port and
the screensaver will be suspended. After selecting this option the caption for this option will
change to “Resume”. Selecting the “Resume” will enabled the comm port again and the
screensaver will continue with normal operation. If an administrated installation is used the
administrator password will be required to suspend the Link-IT system.
2.2.4 Un-Installing the Application
On the CD-ROM provided there is a Un-Install application. First close the Link-IT Security
Module (refer to 2.2.5). Then double click on the Uninstall icon, this will completely remove
the Link-IT system from your computer.
2.2.5 Closing the Application
Selecting the “Close” menu option will result in you being prompted to supply your password.
Typing the correct password will result in the Link-IT system being shut down.
2.2.5.1 Password override
While the Link-IT system is running and the screen saver is active there are two ways to
deactivate the screen saver:
1. By bringing the Tag within reading distance of the Link-IT reader
2. By password override.

Link-IT “User Guide” Page 19
Version 1.03
To override the screen saver press any key while the screen saver is on. The system will
prompt you to enter your password. Entering your password will disable the screen saver and
allow you access to your computer. The override will remain active until the system is shut
down OR, until the system once again sees its master tag. After either of these events the
system returns to its normal operational state.

Link-IT “User Guide” Page 20
Version 1.03
3 NOTES ON INSTALLATION
3.1 EFFECTS OF MECHANICAL SHIELDING
The Link-IT tag uses low power Radio Frequency transmissions to communicate with the
Link-IT reader plugged into your computer. These transmissions can be adversely effected by
the environment especially the presence of metal. The result would be loss of range on your
Link-IT system. Repositioning your computer can rectify this situation. Should this approach
not rectify the situation, an extension cable is available from AIT as an accessory. Please
contact your supplier for more information. (Product code L-EC100)
3.2 ADDING ADDITIONAL SOFTWARE SECURITY
3.2.1 Setting Your Boot Sequence
It is important to set your boot sequence so that the system first boots from your primary hard
disk to ensure that the Link-IT software will be running. This is easy to set, just follow the
steps below:
NB: This sequence might not apply to your system, if your system is different and you can not
find the boot sequence consult your PC users manual or contact your supplier.
• Switch off the system (Shut Down)
• Switch the system on (Power Up)
• Press the delete button “Del” (some systems use “F1”, some use F2, some use Ctrl-Esc)
to go to “CMOS Setup”
• Choose “Bios Features Setup”
• Choose “Boot Sequence” eg. A, C, SCSI
• Change the sequence so that your primary boot device boots first or that your primary
boot device is your only boot device.
• Press “Esc”, go to “Save Settings And Exit”
The system will now restart, booting from your hard disk first. For additional security you
should password protect your CMOS settings.
Link-IT “User Guide” Page 21
Version 1.03
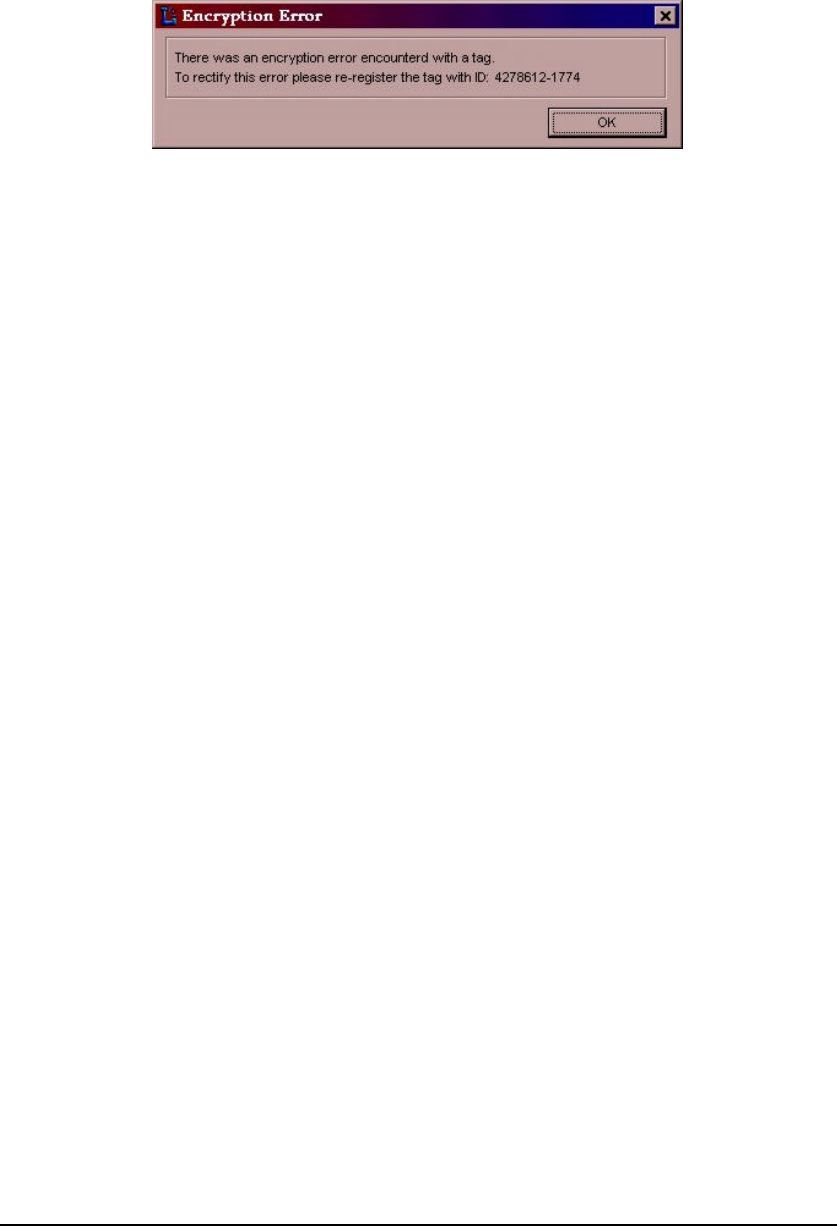
4 ENCRYPTION ERROR
Link-IT Tags include an encryption mechanism that is checked by the Link-IT software. This
mechanism is unique to every tag. The encryption mechanism protects your system from
access by a fraudulent tag with the correct tag identity. Should your system detect such a tag
the following message will be displayed.
Figure 26: Encryption Error
The encryption error requests you to reregister your User Tag ID (in the Figure 4.1 above tag
ID 4278612-1774 is used as an example) This is because the system can no longer decipher
your tag data. If you are the authorised user you will know the password to override the
system and reregister your tag.

Link-IT “User Guide” Page 22
Version 1.03
5 POWER REQUIREMENTS OF THE LINK-IT SYSTEM
5.1 LINK-IT READER
The Link-IT reader derives its entire power requirement directly from the RS232 serial port.
5.2 IDENTIFICATION TAG
The Identification Tag includes a non-replaceable lithium battery. The battery is warranteed
for 12 months and has an expected life of 5 years.

Link-IT “User Guide” Page 23
Version 1.03
6 HOT KEYS
6.1 “RIGHT” MOUSE BUTTON (DISPLAY ON-LINE MENU)
When the mouse is positioned over the Link-IT icon (located in the Windows task bar) the
“right mouse button is used to display the Link-IT on-line menu options as shown in figure 6.1
below:
Figure 27: Hot Keys
6.2 SCREEN SAVER OVERRIDE
While the screen saver is active, pressing any key will prompt you for the override password.
Typing in the correct password will override the screen saver.

Link-IT “User Guide” Page 24
Version 1.03
7 GENERAL PROBLEMS
Please contact your administrator or visit our web site www.ait-linkit.com.
7.1 THE SCREEN SAVER WILL NOT GO AWAY
1. Click the mouse and press the any key and enter your password.
2. Try re-booting the system
Should this problem persist please contact your supplier or e-mail AIT at help@linkit.co.za.
7.2 OBTAINING ADDITIONAL TAGS
Additional tags can be purchased from your Link-IT supplier or by contacting AIT at
help@linkit.co.za.
7.3 EMAIL AND INTERNET ADDRESSES
Email: help@linkit.co.za
Internet: www.ait-linkit.com

Link-IT “User Guide” Page 25
Version 1.03
8 LICENCE
Link-IT™ Link-IT. HARDWARE AND SOFTWARE LICENSE AGREEMENT
BY INSTALLING, COPYING, OR OTHERWISE USING THE Link-IT PRODUCT HARDWARE
AND OR SOFTWARE, YOU AGREE TO BE BOUND BY ALL OF THE TERMS AND
CONDITIONS OF THIS LICENSE AGREEMENT.
Upon your acceptance of the terms and conditions of the Licence Agreement, AIT grants you
the right to use the Link-IT™ Link-IT product in the manner provided below.
All intellectual rights to the product are owned by AIT and are protected by copyright law and
several patents. Therefore you must treat this product and its various components like any
other copyright material, except that you may make one copy of the software for backup or
archival purposes. The software may be transferred to a single hard disk provided you keep
the original solely for backup or archival purposes. Except as provided you may not transfer,
rent, lease, lend, copy, or modify, translate, time-share or electronically transmit or receive the
software, media or documentation. Any attempt to reverse engineer the product will be
deemed an infringement of the Licence agreement.
THE Link-IT™ Link-IT PRODUCT IS DISTRIBUTED "AS IS" WITHOUT WARRANTY OF ANY
KIND, EITHER EXPRESSED OR IMPLIED. YOU USE THE PRODUCT AT YOUR OWN
RISK. AUTOMATED IDENTIFICATION TECHNOLOGIES (PTY) LTD. WILL NOT BE LIABLE
FOR ANY DATA LOSS, DAMAGES, LOSS OF PROFITS OR ANY KIND OF LOSS WHILE
USING OR MISUSING THIS PRODUCT.

Link-IT “User Guide” Page 26
Version 1.03
9 AIT OFFICES
Automated Identification Technologies Ltd.
Unit 6
Amber Business Village
Amber Close
Tamworth
Staffordshire
B77 4RP
United Kingdom
Automated Identification Technologies (Pty) Ltd.
P.O. Box 490,
Parklands, 2121
Republic of South Africa