Wayne Fueling Systems WAYNETRACII User Manual correction for installation manual section one
Wayne Fueling Systems LLC correction for installation manual section one
Contents

correction for installation manual section one
1-1July 2000 Part No. 920472 Rev. C Section     1Before You Start1.1 IntroductionThis manual explains how to install the EasyPAY™ retrofit kit in selected models of Wayne™ Vista 90 series dispensers.  This includes all Models V390, V395, V490 and V590 except those with 2/ and 3/ prefix numbers.By following this instruction manual in the sequences presented, you will be assured of a successful in-stall. For best results, perform the steps in the sequence given for the particular kit or kits that are being installed. Important: These retrofit kits require installation of several wiring and hardware assemblies. Any installation or modification must comply with the requirements of the National Electrical Code (NFPA 70), the Automotive and Marine Service Station Code (NFPA 30A) and any other applicable codes. Refer to the information in Table 1-1 for identification of the EasyPAY™ retrofit kits.
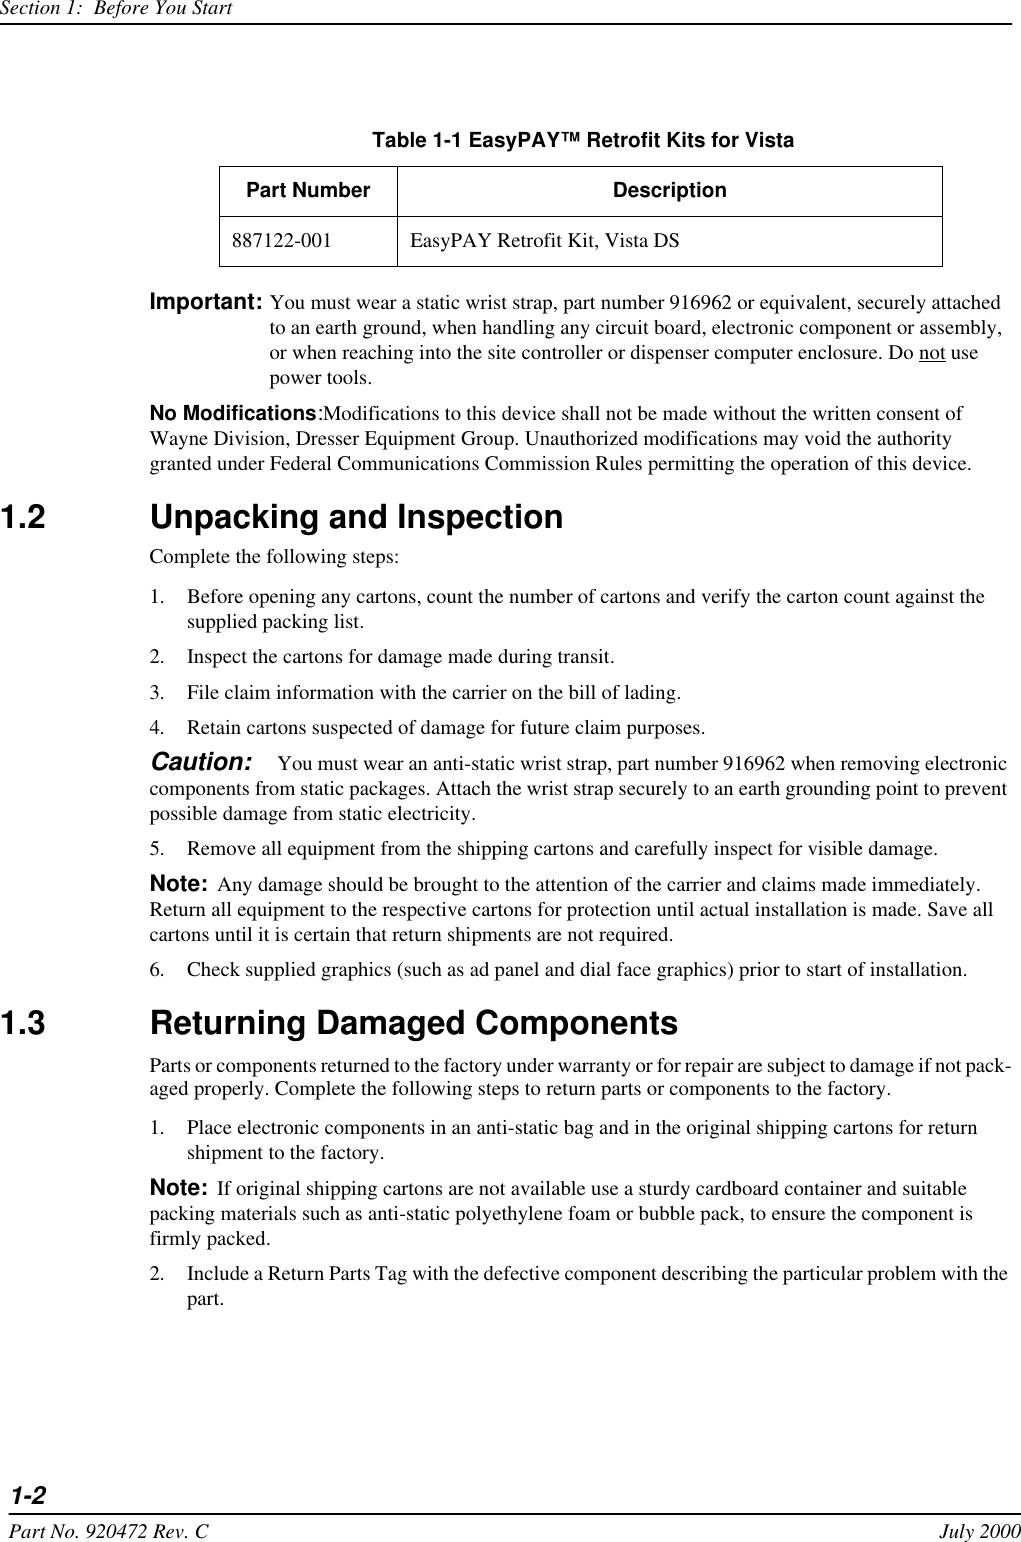
1-2Part No. 920472 Rev. C July 2000Section 1:  Before You StartImportant: You must wear a static wrist strap, part number 916962 or equivalent, securely attached to an earth ground, when handling any circuit board, electronic component or assembly, or when reaching into the site controller or dispenser computer enclosure. Do not use power tools.No Modifications:Modifications to this device shall not be made without the written consent of Wayne Division, Dresser Equipment Group. Unauthorized modifications may void the authority granted under Federal Communications Commission Rules permitting the operation of this device.1.2 Unpacking and InspectionComplete the following steps:1. Before opening any cartons, count the number of cartons and verify the carton count against the supplied packing list.2. Inspect the cartons for damage made during transit.3. File claim information with the carrier on the bill of lading. 4. Retain cartons suspected of damage for future claim purposes. Caution: You must wear an anti-static wrist strap, part number 916962 when removing electronic components from static packages. Attach the wrist strap securely to an earth grounding point to prevent possible damage from static electricity. 5. Remove all equipment from the shipping cartons and carefully inspect for visible damage.Note: Any damage should be brought to the attention of the carrier and claims made immediately. Return all equipment to the respective cartons for protection until actual installation is made. Save all cartons until it is certain that return shipments are not required.6. Check supplied graphics (such as ad panel and dial face graphics) prior to start of installation. 1.3 Returning Damaged ComponentsParts or components returned to the factory under warranty or for repair are subject to damage if not pack-aged properly. Complete the following steps to return parts or components to the factory. 1. Place electronic components in an anti-static bag and in the original shipping cartons for return shipment to the factory. Note: If original shipping cartons are not available use a sturdy cardboard container and suitable packing materials such as anti-static polyethylene foam or bubble pack, to ensure the component is firmly packed. 2. Include a Return Parts Tag with the defective component describing the particular problem with the part.  Table 1-1 EasyPAY™ Retrofit Kits for Vista Part Number Description887122-001 EasyPAY Retrofit Kit, Vista DS
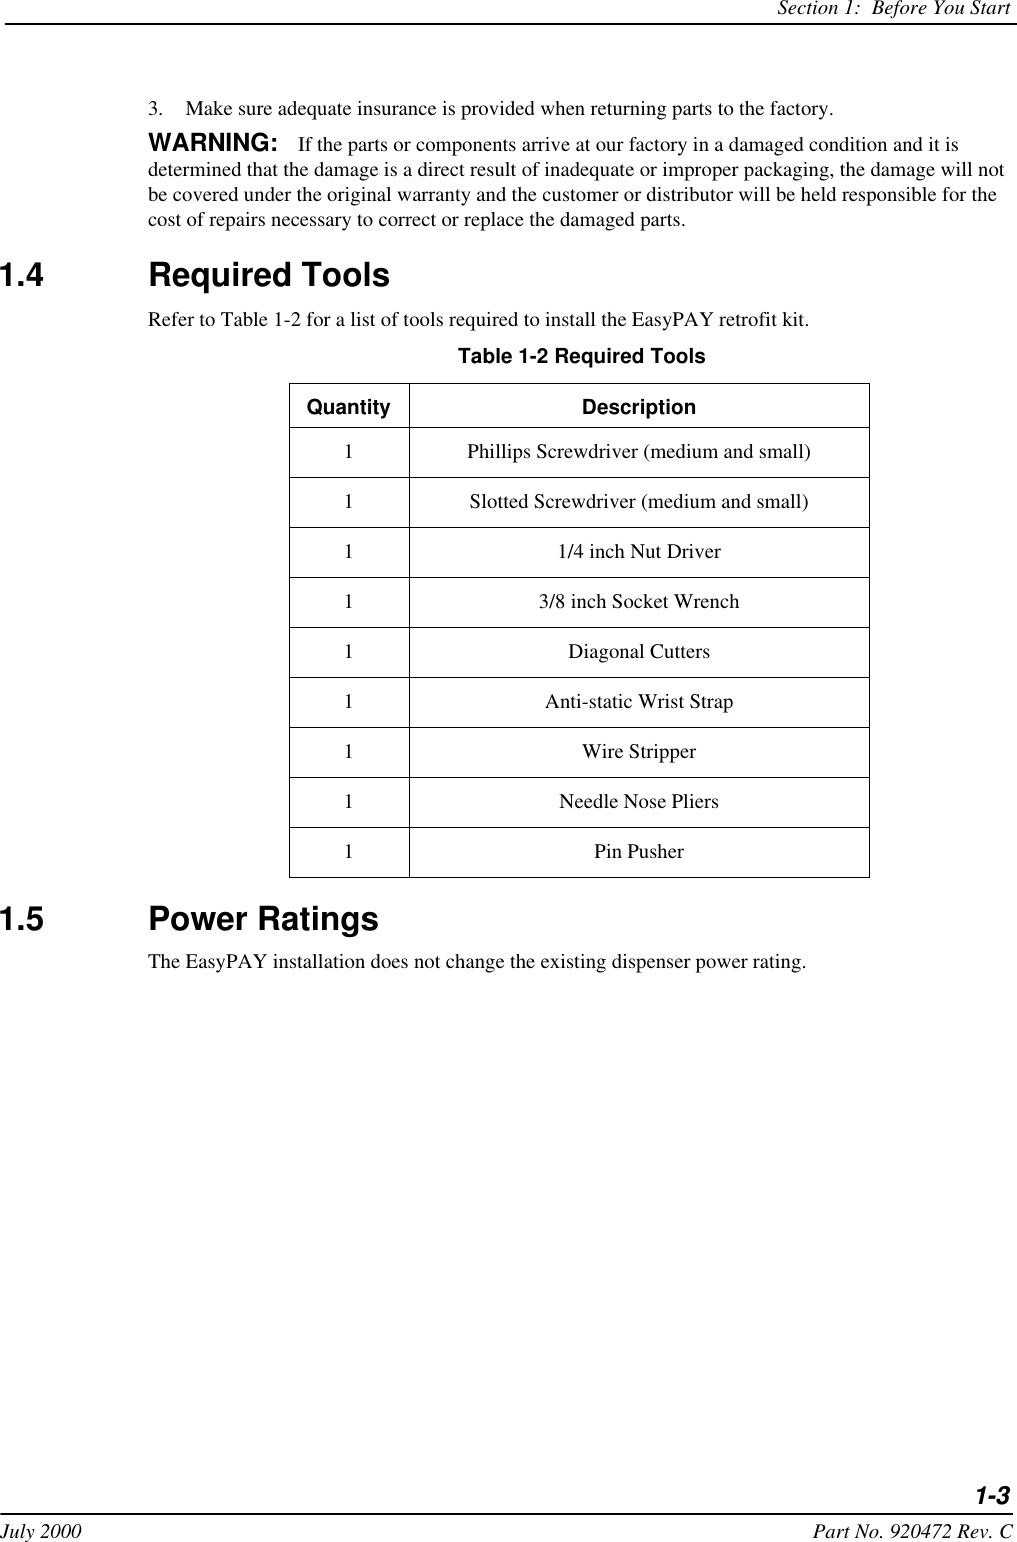
Section 1:  Before You Start1-3July 2000 Part No. 920472 Rev. C3. Make sure adequate insurance is provided when returning parts to the factory.WARNING: If the parts or components arrive at our factory in a damaged condition and it is determined that the damage is a direct result of inadequate or improper packaging, the damage will not be covered under the original warranty and the customer or distributor will be held responsible for the cost of repairs necessary to correct or replace the damaged parts.1.4 Required ToolsRefer to Table 1-2 for a list of tools required to install the EasyPAY retrofit kit.1.5 Power RatingsThe EasyPAY installation does not change the existing dispenser power rating. Table 1-2 Required ToolsQuantity Description1Phillips Screwdriver (medium and small)1Slotted Screwdriver (medium and small)11/4 inch Nut Driver13/8 inch Socket Wrench1Diagonal Cutters1Anti-static Wrist Strap1Wire Stripper1Needle Nose Pliers1Pin Pusher
1-4Part No. 920472 Rev. C July 2000Section 1:  Before You Start

Navigation menu