Welcat XIT100BW Barcode Reader with 802.11b&Bluetooth; Transmitters User Manual
Welcat, Inc. Barcode Reader with 802.11b&Bluetooth; Transmitters Users Manual
Welcat >
Contents
- 1. User Manual 1 of 2
- 2. User Manual 2 of 2
User Manual 2 of 2

3-10 Network Menu
3-33ġ
³±°Îåô÷ïòëÍåîõ
Network related setting such as TCP/IP.
1. From the System menu, select "3:Network".
Select the item to setup.
ˁÔÃЯÉÐ
ˁÄÈÃÐ
ˁÆÔÐ
ˁÄÎÓ
ˁÓÎÍÐ
³±°±ÔÃЯÉÐ
Set an IP address and other details for TCP/IP communications. Automatic setup is possible when the DHCP
function is enabled.
1. From the Network, select "1:TCP/IP".
Current setting contents are displayed.
Select the item to setup.
2. Input the address.
Input the number from 000 to 255 to the field segmented by
the period (exampleȇ192.168.254.254).
* The Display is an example of "IP address". "NetMask" and
"Gateway" is operated in the same way.
Chapter 3 System menu
3-34ġ
ˁÉÐáääòåóó
Set the IP address assigned by the network administrator. Set a unique IP address to each of the
XIT-100-BW terminals connected to the same network.
ˁÎåôÍáóë¨Óõâîåôíáóë©
Set the subnet mask assigned by the network administrator. Since a subnet mask specifies which
network you belong to, it should set up along with the IP address.
ˁÇáôå÷áù¨Äåæáõìôçáôå÷áù©
Set the address of the default gateway. Setup is required when connecting to a different network
through a router.
ˁÍÔÕ
The maximum length of IP packet. 1500 octets (bytes) is common for Ethernet. In such cases as
being used over the routers, this value should be modified according to the communication me-
dia. Please ask the network administrator about the value settings for different items.
×èåîôèåóôáôõóïæôèåÉÐáääòåóóéóÛ°°°®°°°®°°°®°°°Ý¬ôèå×ÌÁÎ
ãïííõîéãáôéïîéóõîáâìåôïâååøåãõôåä®
Ðìåáóåáóëôèåîåô÷ïòëáäíéîéóôòáôïòáâïõôôèåöáìõåóåôôéîçóæïò
äéææåòåîôéôåíó®
Æòïí ôèå ¢Óôáòôõð ôùðå¢ ïæ ÄÈÃÐ óåôôéîç ¨Ð®³³µ©¬ éî ãáóå åéôèåò
¢Áððìéãáôéïî âïïô¢ ïò ¢Óùóôåí íåîõ âïïô¢ éó óåìåãôåä¬ ôèå öáìõå
åøãåðôæïòÍÔÕãáîïîìùâåãïîæéòíåäâõôõîáâìåôïâåíïäéæéåä®
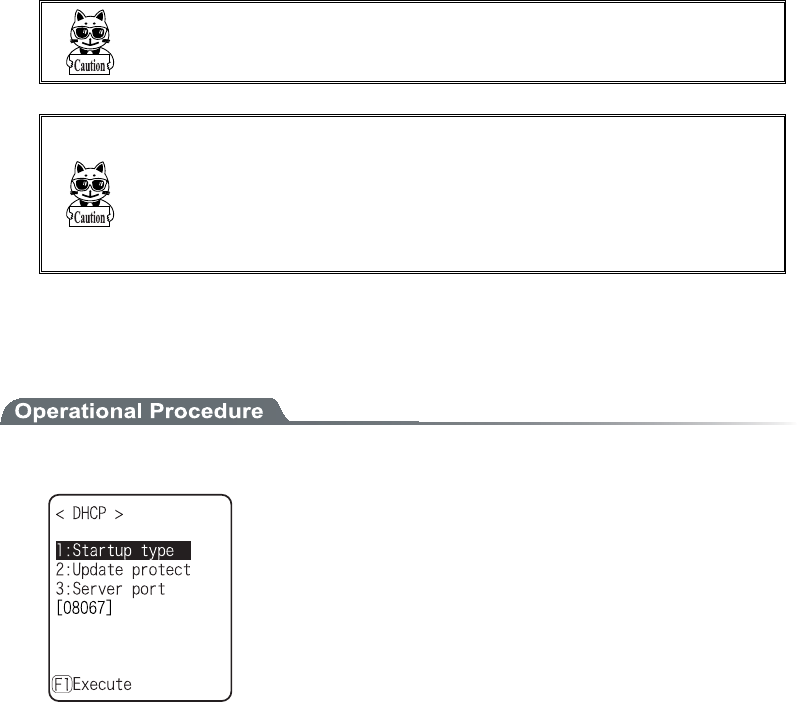
³±°²ÄÈÃÐ
Set the DHCP client function that is used for automatic setup of TCP/IP and various set items.
1. From the Network menu, select "2:DHCP."
Select the item to setup.
ˁÓôáòôõðôùðå
ˁÕðäáôåðòïôåãô
ˁÓåòöåòðïòô
3-10 Network Menu
3-35ġ
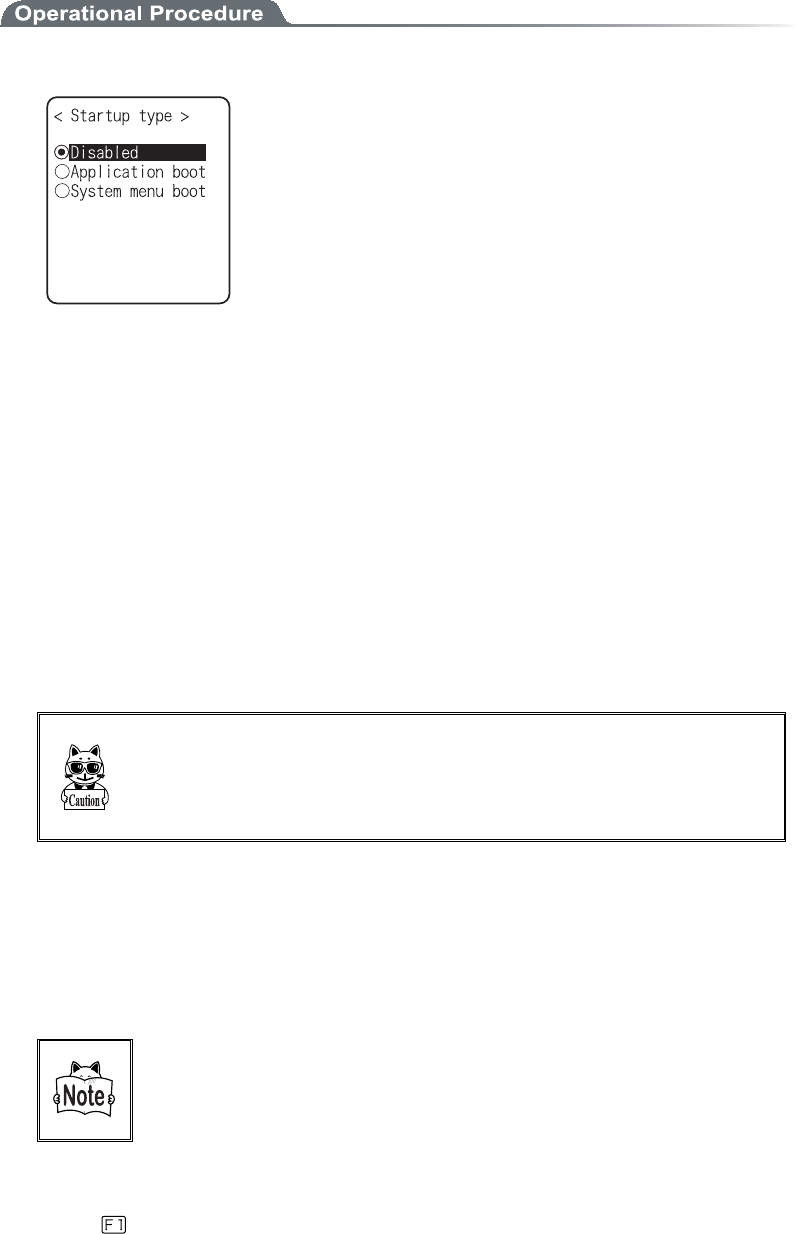
ǪÓôáòôõðôùðå
1. Select the item to setup.
ˁÄéóáâìåä¨Æáãôïòùóåôõð©
DHCP is not executed when the terminal started up.
ˁÁððìéãáôéïîâïïô
DHCP is executed before the application is executed.
The application file is selected from <System
menu>[1:System], and then[2:Auto execute], DHCP function
is executed before application , after the terminal started up. In
addition, when the application is started up from <File menu>,
DHCP is not executed.
ˁÓùóôåííåîõâïïô
DHCP is executed before System menu is started up. The Sys-
tem menu is selected from <System menu>[1:System], and
then[1:Auto execute], DHCP function is executed before Sys-
tem menu is started up , after the terminal started up.
ǪÕðäáôåðòïôåãô
Following information unique to the terminal is setup so as not to be modified, before executing
DHCP function.
ˁÉÐáääòåóó
ˁÎåôÍáóë
ˁÇáôå÷áù
ˁÉÄ
Éîôèåãáóå÷èåîôèåãèåãëéóáððìéåäôïÉÐáääòåóó¨ÉÐáääòåóóõð
äáôåéóðòïèéâéôå䩬ôèåÉÐáääòåóó¬÷èéãèèáóóåôõðáôôèåôåòíéîáì¬éó
îïôíïäéæéåä®Âåóõòåôïõóåãïîæéòíéîçôèáôôèåôèåòåéóîïèïóô÷éôè
ôèåóáíåÉÐáääòåóóïîôèåÎåô÷ïòë®
ǪÓåòöåòðïòôîõíâåò
DHCP server port is setup (Factory setupȇ08067).
If you do not execute the automatic setup, which is unique to the XIT-100-BW, and want to use exist-
ing server only to perform the assigning of IP address, the value is modified (the well known port is
67).
ÔèåðïòôîõíâåòïæôèåÄÈÃÐóåòöåòïæ¢×åâÇìéäåòØ¢Îåô÷ïòë
íáîáçåòéó°¸°¶·áóäåæáõìô®Ôèéóéóôï áöïéäáãïíðåôéôéïî÷éôè
ïôèåòÄÈÃÐóåòöåòó÷ïòëéîçéîôèåóáíåîåô÷ïòë®
ǪÅøåãõôå
Press the key, and, DHCP is executed immediately, regardless of "Startup type"(P.3-35).
Chapter 3 System menu
3-36ġ
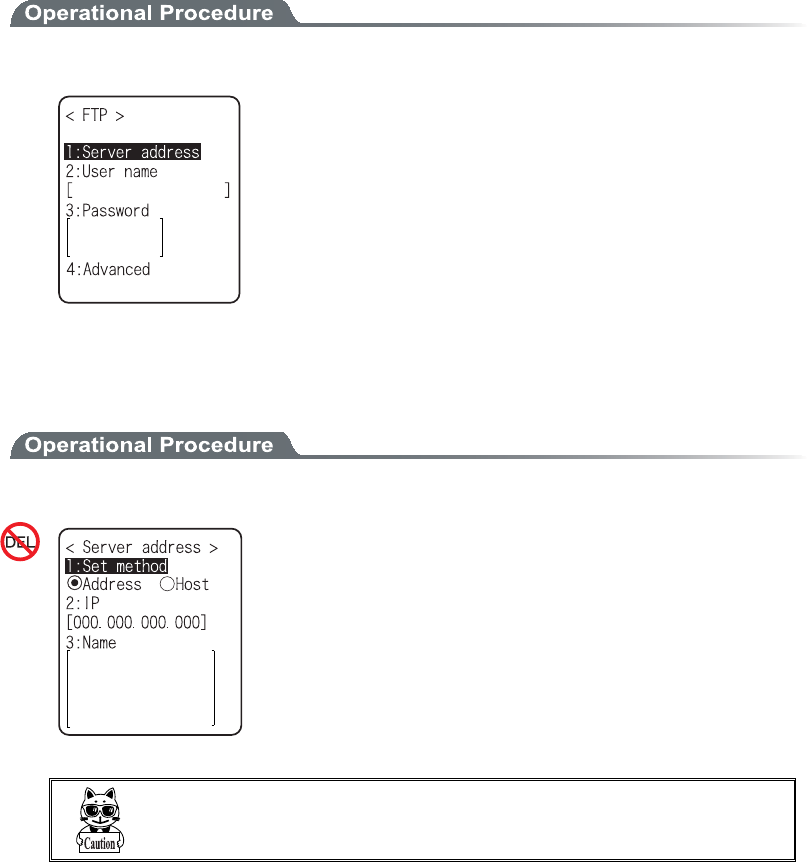
³±°³ÆÔÐ
Set up for using the FTP client function, as described below. Automatic setup is possible when the DHCP func-
tion is enabled.
1. From the Network, select "3:FTP".
Select the item to setup.
ˁÓåòöåòáääòåóó
ˁÕóåòîáíå
ˁÐáóó÷ïòä
ˁÁäöáîãåä
ǪÓåòöåòáääòåóó
Set up the host name for FTP server.
1. Select from either IP, or, URL.
ˁÁääòåóó
The IP address setup at 2:IP" is set as FTP server.
ˁÎáíå
The host specified at "3: host name" is set as FTP server.
The host name can not contain the space character.
×èåîõóéîç¢Îáí墬ðìåáóåðåòæïòíôèåÄÎÓóåôõð¨Ð®³³¹©®¢
3-10 Network Menu
3-37ġ
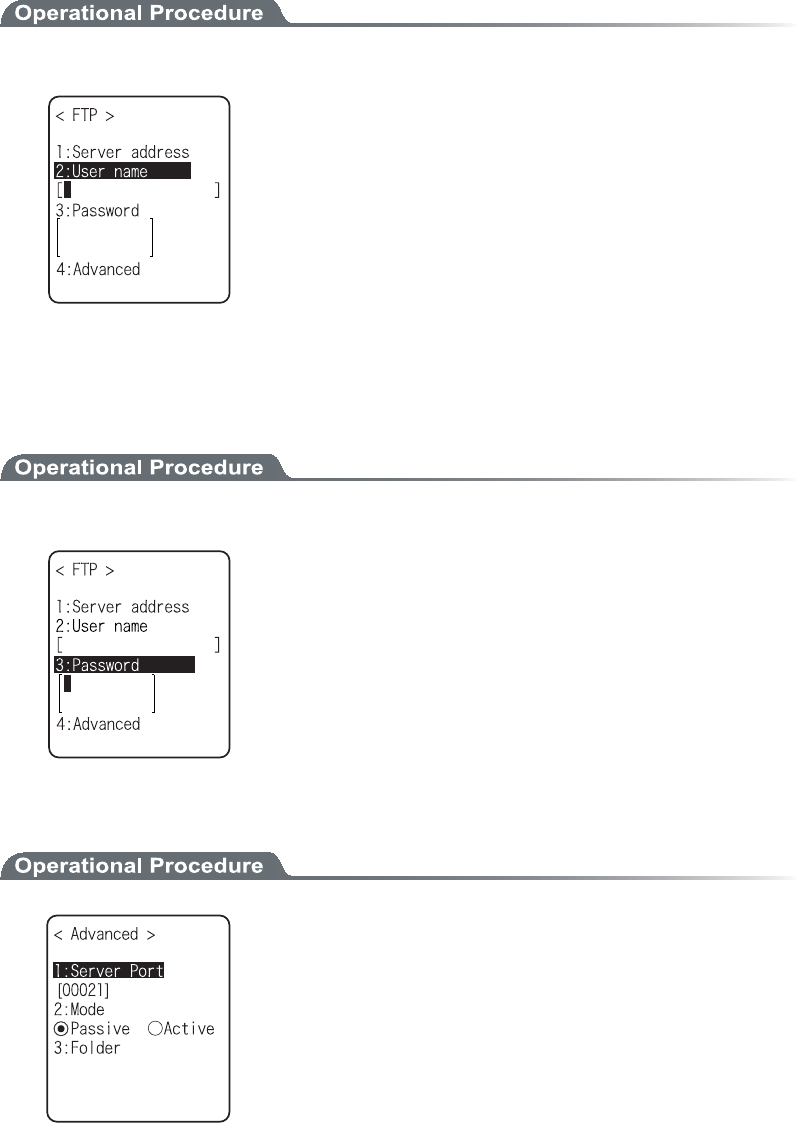
ǪÕóåòîáíå
Specify the FTP server login user name using up to 18 alphanumeric characters, and up-
per-case/lower-case should be distinguished.
1. Input the User name.
User name should not include the space.
ǪÐáóó÷ïòä
Specify the FTP server login password using up to 20 alphanumeric characters, and up-
per-case/lower-case should be distinguished.
1. Input the Password.
The Password is converted to a hidden character (*) and is
displayed for security purpose.
Password should not include the space.
ǪÁäöáîãåä
Chapter 3 System menu
3-38ġ
ǴÓåòöåòðïòô
Specify FTP server control port number. The well-known port is 21.
ǴÍïäå
The default is Passive mode. If the FTP server does not support Passive mode, change it to the Active
mode.
ÔèåòåéóáæõîãôéïîôïòåêåãôôèåãïîîåãôéïîæòïíïõôóéäåôèåÆéòå÷áìì
ôïéîóéäåéîôèåÆéòå÷áììóåôõð®Éæôèéó æõîãôéïîéóåîáâìåä¬ôèåÆÔÐ
ãïííõîéãáôéïîãáîîïôâåðåòæïòíåäéîôèåÁãôéöåíïäå®Âùõóéîç
Ðáóóéöåíïäå¬ôèåãïííõîéãáôéïîâåô÷ååîôèåÆÔÐóåòöåòïöåòôèå
Æéòå÷áìì®
ǴÆïìäåò
ˁÃõòòåîô
/(root)
In some FTP server, the User name folder is specified as root folder.
/(user name)
The folder in the root folder with the same as the user name of the FTP server is specified as the
current folder. If FTP function (file transmission or reception) is executed without setting the
user name, the error screen appears.
/(Specified)
The relative path setup at the "specified folder" which is to be explained later becomes the cur-
rent folder.
ˁÓðåãéæéåä
When selected "/(Specified)" in the folder above, the character string setup here are added to the
FTP method "CWD". As the setup character string communicates directly by FTP communica-
tion, please setup the corresponding character string to the server.
(Example) "dir1/dir2/dir3"
The specified folder cannot include the space.
3-10 Network Menu
3-39ġ
³±°´ÄÎÓ
Set the DNS server address, as described below. Automatic setup is possible when the DHCP function (P.3-34)
is enabled.
1. From the Network, select "4:DNS".
2. Select the item to setup.
ǴÐòéíáòù
Set the IP address for the Primary server.
ǴÓåãïîäáòù
Set the IP address for the Secondary server.
ǴÁäöáîãåä
ˁÓåòöåòðïòô
Specify the control port number for the DNS server. The well-known port is 53.
ˁÔéíåïõôôéíå
Setup range is from 1 to 99 seconds. Set the response packet waiting time.
ˁÔòéáìãïõîô
When 0 is set, only one packet is transmitted without RETRY.
ˁÃáãèåôéíå
Setup range is from 0 to 9999 min. When 0 is setup, the cache function is disabled. The MAX
value allowed to enter to the cache table is 8. When the entered number is over the MAX value,
a new entry will be performed after discarding the old entry.
Chapter 3 System menu
3-40ġ
³±°µÓÎÍÐ
Make the various SNMP settings. Automatic setup is possible when the DHCP function (P.3-34) is enabled.
1. From the Network, select "5ȇSNMP".
Select the item to setup.
ˁÃïííõîéôù¨Ò¯Ïîìù©óåôôéîç
ˁÃïííõîéôù¨Ò¯×©Óåôõð
ˁÔòáð
ˁÁäöáîãåä
ǪÃïííõîéôù¨Ò¯Ïîìù©óåôôéîç
1. Input the community name and the manager IP address.
ǴÃïííõîéôùîáíå
The operations permitted for a community name are read only. GET and GET-NEXT requests are
supported under a community name. When a SET request is sent using a community name, an authen-
tication trap is transmitted. A community name can be specified using a maximum of 16 alphanumeric
characters.
ǴÍáîáçåòÉÐáääòåóó
Set the SNMP manager's IP address, which permits the use of the community name set under the
"Community name" option. If "000.000.000.000" is set as the IP address, this community name is
permitted on all the SNMP managers.
3-10 Network Menu
3-41ġ
ǪÃïííõîéôù¨Ò¯×©Óåôõð
1. Input the community name and the manager IP address.
ǴÃïííõîéôùîáíå
The operations permitted for the community name are "Read-Write".
GET, GET-NEXT and SET request are supported under a community name. The community name
can be specified using a maximum of 16 alphanumeric characters.
ǴÍáîáçåòÉÐáääòåóó
Set the SNMP manager's IP address, which permits The use of the community name set under the
[community name]option. If "000.000.000.000" is set as the SNMP manager's IP address, this com-
munity name is permitted on all the SNMP managers.
ǪÔòáðóåôôéîç
1. Input a community name and a manager IP address.
ǴÃïííõîéôùîáíå
Set a community name for the Trap. A community name can be specified using a maximum of 16 alphanu-
meric characters.
ǴÍáîáçåòÉÐÁääòåóó
Set the SNMP manager's IP address to which the Trap should be transmitted. Trap is not transmitted if
the IP address of "000.000.000.000" has been set.
Chapter 3 System menu
3-42ġ
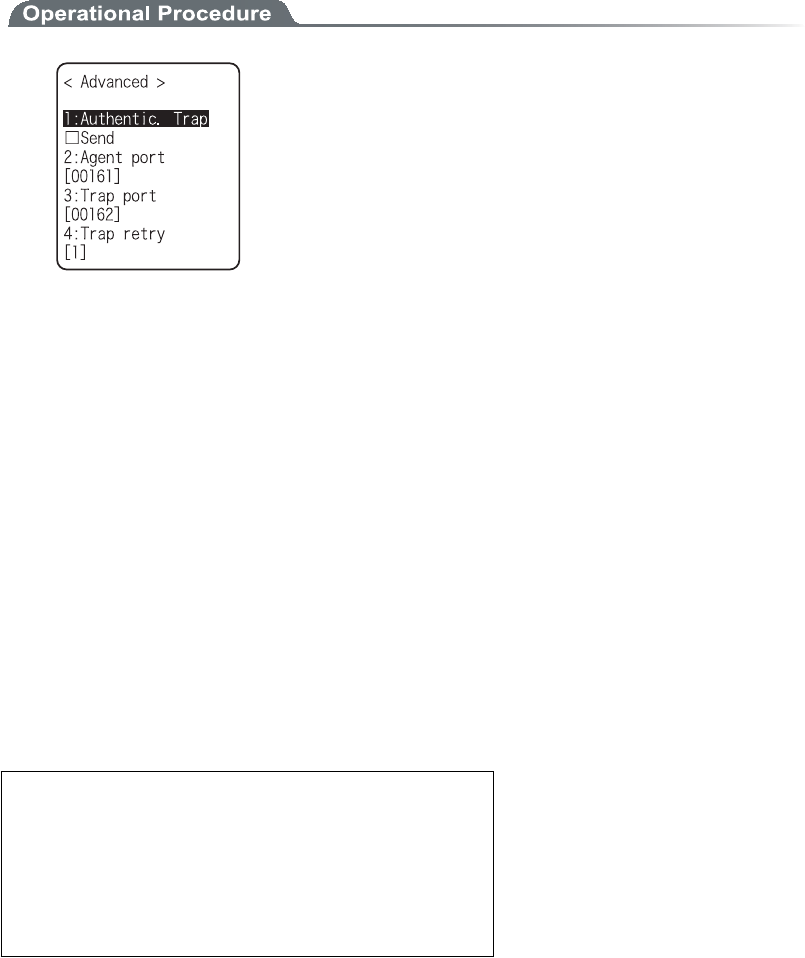
ǪÁäöáîãåä
ǴÁõôèåîôéã®ôòáð
Set the action of authentication trap to either "send" or "don't send" when access is recognized except
from the community name and SNMP manager's IP address set in "1: Community (R/Only)" and "2:
Community (R/W)." This Trap is sent to the SNMP manager, which is set in "2:Target address."
ǴÁçåîôðïòô
The port number to communicate with SNMP manager. The well-known port is 161.
ǴÔòáððïòô
The port number to transmit the Trap. The well-known port is 162.
ǴÔòáðòåôòù
The number of times Trap transmission retrial.
ǪÁâïõôÓÎÍÐ
Ȇ XIT-100-BW can be managed by using Our "WebGlider-X"(WBG-001W).
Ȇ SNMP-PDU(Protocol Data Unit) conforms to SNMPv1.
Ȇ XIT-100-BWsupports the management of the objects in the following MIB group.
[1.3.6.1.2.1.1] MIB2-System
[1.3.6.1.2.1.2] MIB2-Interfaces
[1.3.6.1.2.1.4] MIB2-IP
[1.3.6.1.2.1.5] MIB2-ICMP
[1.3.6.1.2.1.6] MIB2-TCP
[1.3.6.1.2.1.7] MIB2-UDP
[1.3.6.1.2.1.11] MIB2-SNMP
[1.3.6.1.4.1.12392] Welcat Enterprise MIB
Welcat Enterprise MIB is described by ASN.1 format.
Welcat Enterprise MIB is included in the optional "WebGlider-X". (About details, please con-
tact our sales department.)

3-10 Network Menu
3-43ġ
ǴÓõððïòôåäÔòáðó
Cold Start Cold Start Transmitted after MIB is initialized and the communications
starts. MIB is initialized when the XIT-100-BW has been turned ON us-
ing the PW key. Note that MIB is not initialized when the XIT-100-BW
has been turned ON in the resume mode.
Warm Start Warm Start Transmitted when communication starts except Cold Start.*1
Link up Link up Transmitted when XIT-100-BW synchronizes with an access
point. However, a Link Up is not transmitted when the XIT-100-BW
synchronizes with an access point for the first time (When a Cold Start or
a Warm Start is transmitted). When the XIT-100-BW newly enters a ser-
vice area of an access point and synchronizes, or when it synchronizes
with a new access point while roaming, a Link Up is transmitted (in the
same timing as signal SIGRFU_INSYNC).
Link down Link down Transmitted when the communication ends. However, it is
not transmitted when the XIT-100-BW is outside the service area of an
access point.
Authentication Transmitted when a third person tries to access the XIT-100-BW with an
invalid community. This authentication trap is sent to the IP address set
through the System menu "Trap Manager IP address" (P.3-41). However,
this is transmitted only when the value "send" is set through the System
menu "Illegal access Trap" (P.3-42).
*1 MIB is not initialized even if the " XIT-100-BW " setup corresponding to MIB (IP address,
subnet mask, default gateway, etc.) has been changed. In this case, a Warm Start is transmitted
instead of a Cold Start. When initializing MIB, restart the terminal.
Chapter 3 System menu
3-44ġ
³±±ÒåãåéöéîçÍåîõ
Receiving files via WLAN, or Bluetooth. The XIT-100-BW can receive files transmitted from a host computer
via WLAN, or Bluetooth.
Before receiving a file, please check the following. The received files are all created in the F drive.
Ǵ×ÌÁÎ
Ȇ The communication setting (IP address, SSID, WEP etc.) between the XIT-100-BW and the Access
point are correctly set up.
Ȇ The power of the access point and host computer is ON.
Ȇ The access point and host computer is correctly setup or connected.
Ȇ The access point is normally operating.
Ȇ FTP server is running on the host computer.
Ȇ FTP setup (host name, user name etc.) of XIT-100-BW is correctly setup.
ǴÂìõåôïïôè¨Òåãåéöéîçóéäåéóôèåèïóôãïíðõôåò©
Ȇ The power of the host computer is ON.
Ȇ The "BluePorter(WLF-001:optional)" on the host computer is started up.
Ȇ The default device of XIT-100-BW is setup on the host computer at the receiving side. (only in the
case selected from the file list)
ǴÂìõåôïïôè¨ÒåãåéöéîçóéäåéóØÉÔ±°°Âש
Ȇ Wait only is enabled.
Ȇ The default device of XIT-100-BW is setup on the XIT-100-BW at the receiving side.
1. From the System menu, select "4:Receive".
Select the device to use.
ˁ×ÌÁÎo³®
ˁÂìõåôïïôèo²®
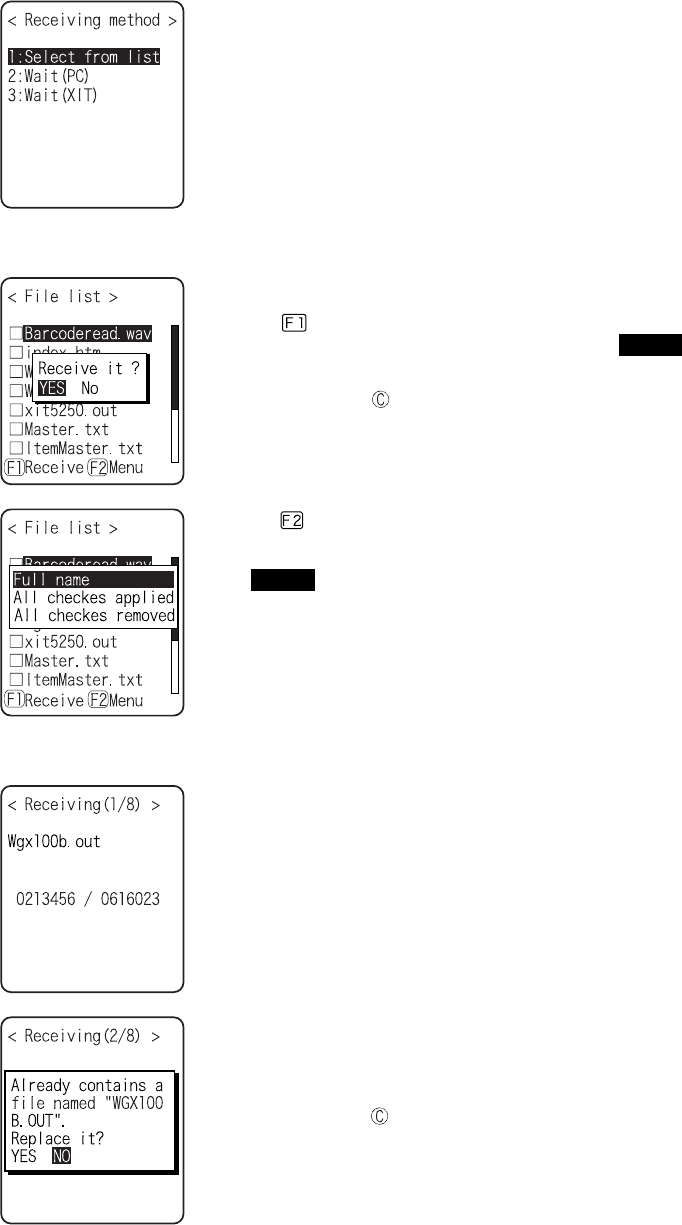
3-11 Receiving Menu
3-45ġ
2. Selecting receiving method.
Select "1: Select from list " to obtain the file list from the transmis-
sion side. The receiver side can select the file to receive from the list.
Select "2:Wait(PC)" or "3:Wait(XIT)”, then get into receiving wait-
ing status immediately. If it is the transmission from the host com-
puter select "2:Wait(PC)", when it is from XIT, Select
"3:Wait(XIT)". The receiving file depends on the transmission side.
ˁ±ᴷÓåìåãôæòïíôèåæéìåìéóôo³
ˁ²ᴷ×áéô¨Ð鬳ᴷ×áéô¨ØÉÔ©o´®
3. Acquire the file list, and select receiving file.
Apply checks to the check box of the receiving file.
Press the key, and Receiving Confirmation dialog is displayed.
In this case, if there is no file that the check is applied, Selected file is
received. Select from[Yes][No].
In addition, Press the key, and [No] is selected.
Press the key, and Sub menu to operate the file lists displayed.
ˁ¢Æõììîáíå¢
Selected file name is displayed.
ˁ¢Áììãèåãëóáððìéåä¢
Apply checks to all the check boxes of the file list.
ˁ¢Áììãèåãëóòåíïöåä¢
Remove checks from all the check boxes of the file list.
4. Receiving start.
Receiving status is displayed.
When there is a same file name as that of receiving file, overwriting
confirmation dialog is displayed.
Select[Yes]or [No].
In addition, press the key, and [No] is selected.
Chapter 3 System menu
3-46ġ
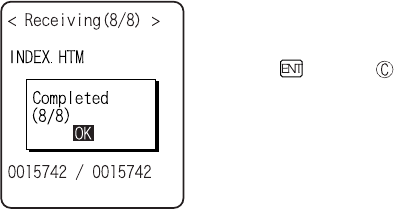
5. Receiving is completed.
When many files are checked,"(the number of success/ the number of
checked)" is displayed in the Message box.
Press the key, or key.

3-12 File Menu
3-47ġ
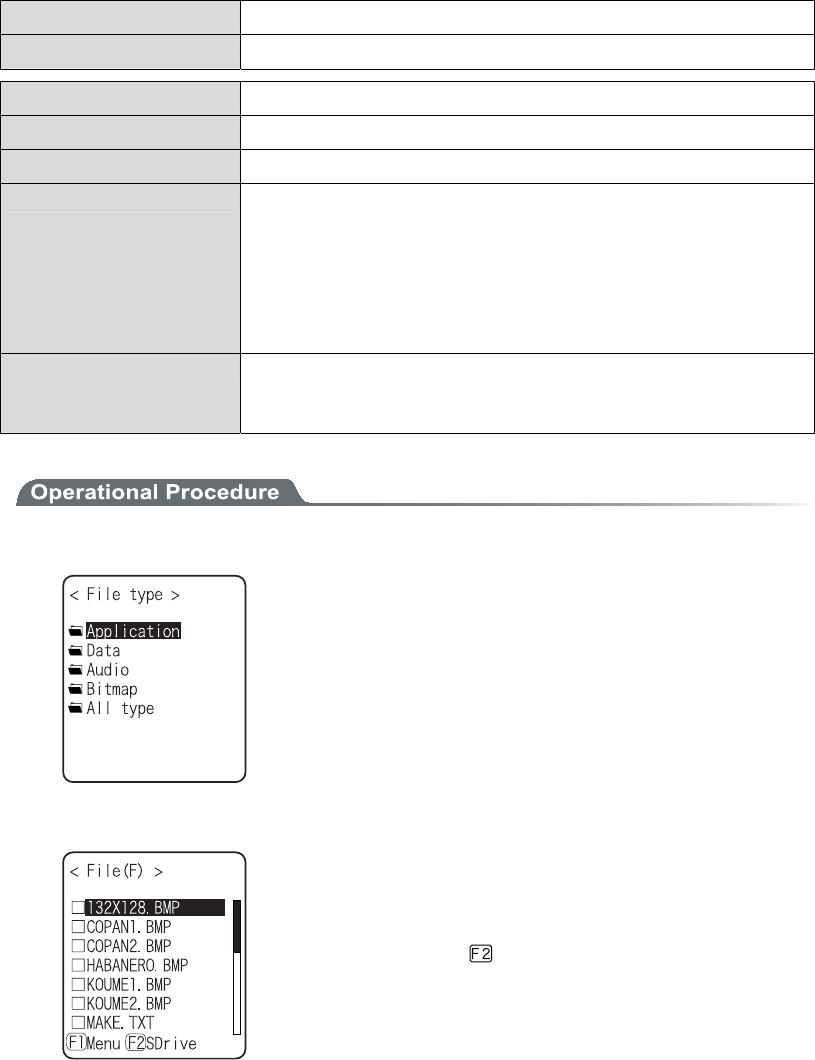
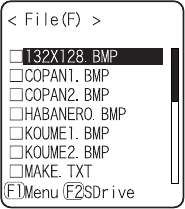
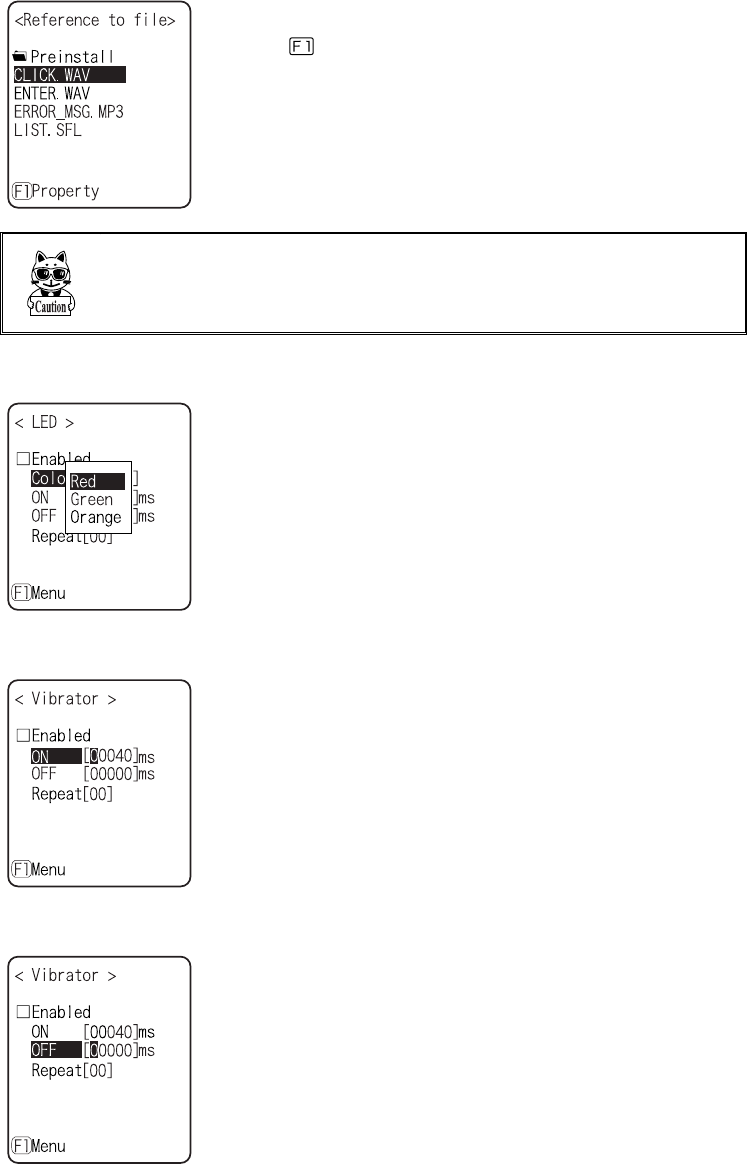
³±²ÆéìåÍåîõ
By searching the targeted file, varieties of operations such as transmission and Deletion are performed.
Select the file for operation from the classified file list in each drive.
The files are recognized by the extensions (3 characters following after the period of the file name), and classi-
fied as below.
Åøôåîóéïî Ëéîäïæáæéìå
OUT Application
WAV, MP3, SFL Audio
BMP Bitmap
Others Data
Operation is that can be executed are as follows. There are operations that are related to some specific files and
the operation enabled in all files.
Ïðåòáôéïî Áâïõô
Execute*1 Starting up the application. Only the application files can be operated.
Play*1*3 Play audio file. Only audio files can be operated.
Viewer*2 Bitmap images displayed. Only bitmap files can be operated.
Properties Various kind of properties related to the file are displayed.
Upload Uploading a file.
Delete Deleting a file.
Test Check if a file is broken or not.
All checks applied. Apply checks on all check boxes in the file list.
All checks removed Remove all checks of the check box in the list.
*1 The file in the S drive Operation is disabled.
*2 Supported Bitmap file is as follows.
Format Windows Bitmap monochrome image
Size 132×128 pixel fixed
*3 Supported audio file is as follows.
Extension WAV
Format Windows Standard WAVE Format
Audio sampling rate 8000/11025/16000/22050/44100/48000[Hz]
Channels Monaural
Audio samples size 16bit
Audio style PCM
Extension MP3
Format MPEG-1 Audio Layer-3
Audio sampling rate 44100/48000[Hz]
Chapter 3 System menu
3-48ġ
Bit rate 32/40/48/56/64/80/96/112/128/160/192/224/256/320(kbps)
Channels Monaural/Stereo
Extension SFL
Format Audio file list (text style)
MAX items 32
Explanation By using SFL file, many audios and files can be played continuously.
In the file list, the file name is cited by line feeding to the MAX 32 items.
The cited audio file should be stored in the terminal beforehand.
The file names written in the file list are all played only once.
When an Error occurred during playing, the audio file play will stop and
will not play any more.
It is impossible to cite other SFL file inside the SFL file.
Description example ALARM_MELODY.WAV(Changing line)
LOCATION_3F_2.WAV(Changing line)
SHIP_ERROR.WAV
1. From the System menu, select "5:file ".
Select the kind of the file for Operation. Select "All types ", regard-
less of the kind of the file all files stored in the drives targeted.
2. Selecting a drive.
F Drive becomes the current drive.
When there is no file stored in the F Drive, S Drive will be the cur-
rent drive.
Each time by pressing the key, the current drive changes.
3-12 File Menu
3-49ġ
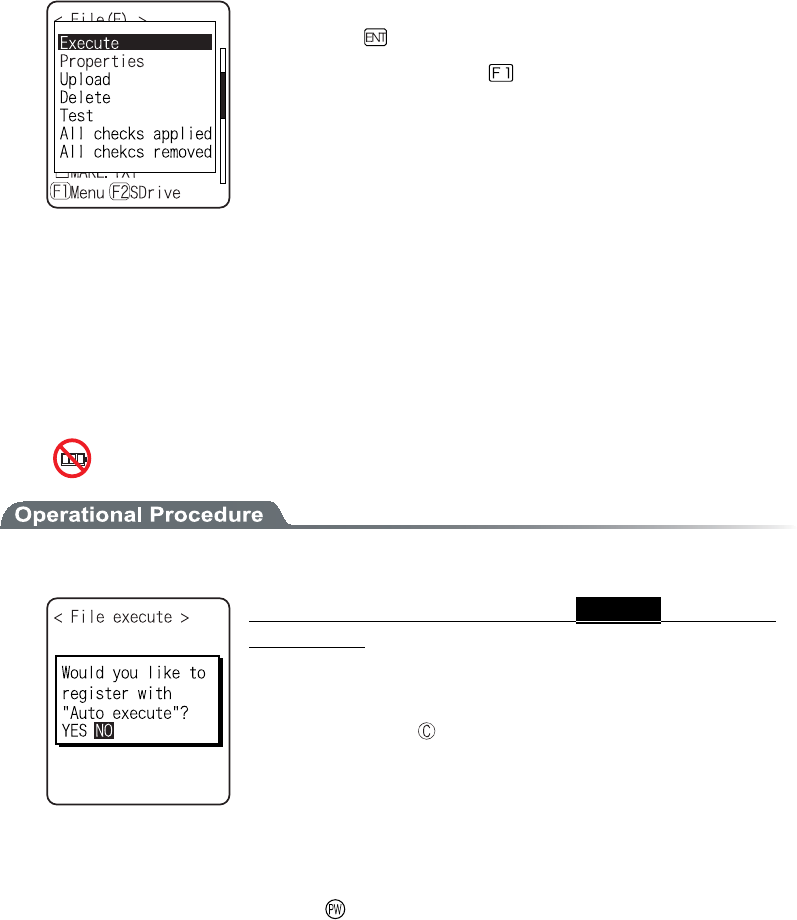
3. File operation.
File alone check box operation (apply checks /remove checks) is per-
formed by the key.
For other operation, press the key, From the Sub menu, Select
the Operation.
ˁÅøåãõôå
ˁÐìáù
ˁÖéå÷åò
ˁÐòïðåòôéåó
ˁÕðìïáä
ˁÄåìåôå
ˁÔåóô
ˁÁììãèåãëóáððìéåä
ˁÁììãèåãëóòåíïöåä
ǪÅøåãõôå
1. From the Sub menu, select "Execute".
Òåçáòäìåóóïæãèåãëâïøóôáôõó¬Óåìåãôåäáððìéãáôéïî
éóåøåãõôåä®
When an SFL file application to be executed is not registered in the
Automatic Launch, register confirmation dialog is displayed.
In addition, Press the key, and [No] is selected.
After selecting, execute the program. To end the application, perform
the operation specified for each application. After termination,
whether the System menu is displayed again or, the power of the ter-
minal turns off is depends on the application.
When the battery lost its power, the alarm appears and the power of
the terminal turns OFF. If you want to stop the application by force,
press the key continuously for 10 seconds while it is running.
Chapter 3 System menu
3-50ġ
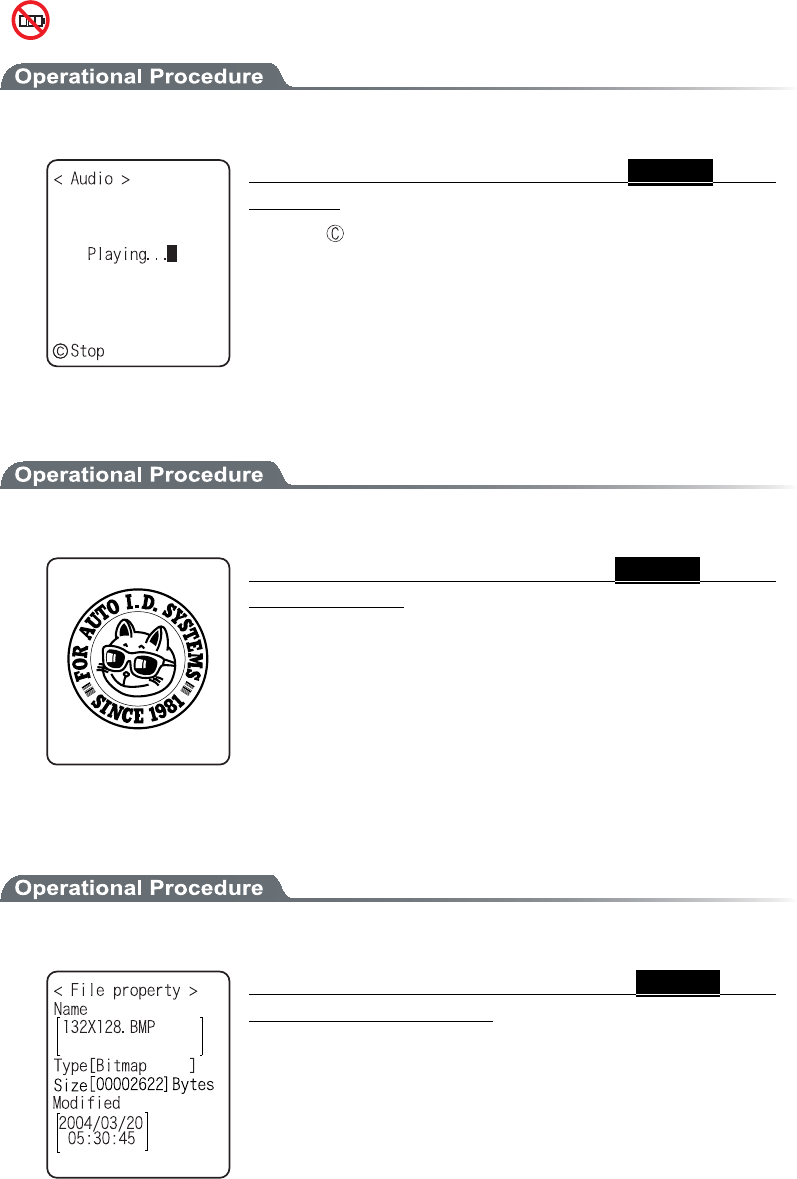
ǪÐìáù
1. From the sub menu, select "Play".
Òåçáòäìåóó ïæ ôèå ãèåãë âïø óôáôõó¬ Óåìåãôåäáõäéï
æéìåðìáùó®
Press the key to stop and playing.
ǪÖéå÷åò
1. From the Sub menu, select "Viewer".
Òåçáòäìåóóïæôèåãèåãëâïøóôáôõó¬Óåìåãôåäâéôíáð
æéìåéóäéóðìáùåä®
Press any key to return to the previous operation.
ǪÐòïðåòôéåó
1. From the Sub menu, select "Properties".
Òåçáòäìåóó ïæ ôèå ãèåãë âïø óôáôõó¬ Óåìåãôåäæéìå§ó
ðòïðåòôéåóáòåäéóðìáùåä®
Following properties are displayed.
Ȇ File name
Ȇ File type
Ȇ File size
Ȇ Last modified
Ȇ Library version(application only)
Press any key, to return to the previous operation.
3-12 File Menu
3-51ġ
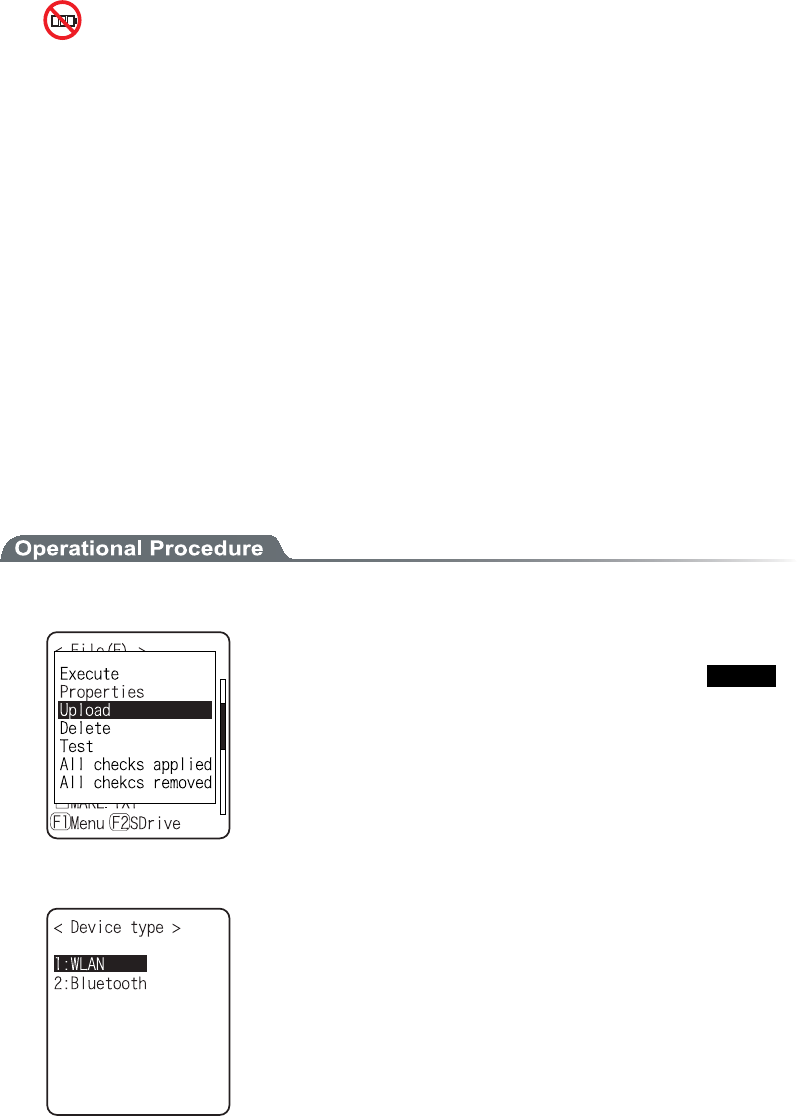
ǪÕðìïáä
When uploading, please check the following beforehand.
Ǵ×ÌÁÎ
Ȇ The communication setting (IP address, SSID, WEP etc.) between the XIT-100-BW and the
Access point are correctly set up.
Ȇ The power of the access point and host computer is ON.
Ȇ The access point and host computer is correctly setup or connected.
Ȇ The access point is normally operating.
Ȇ FTP server is running on the host computer.
Ȇ FTP setup (host name, user name etc.) of XIT-100-BW is correctly setup.
ǴÂìõåôïïôè¨Òåãåéöéîçóéäåéóôèåèïóôãïíðõôåò©
Ȇ The power of the host computer is ON.
Ȇ The "BluePorter(WLF-001:optional)" on the host computer is started up.
Ȇ The default device of XIT-100-BW is setup on the host computer at the receiving side.
ǴÂìõåôïïôè¨ÒåãåéöéîçóéäåéóØÉÔ±°°Âש
Ȇ The default device of XIT-100-BW is setup on the XIT-100-BW at the receiving side.
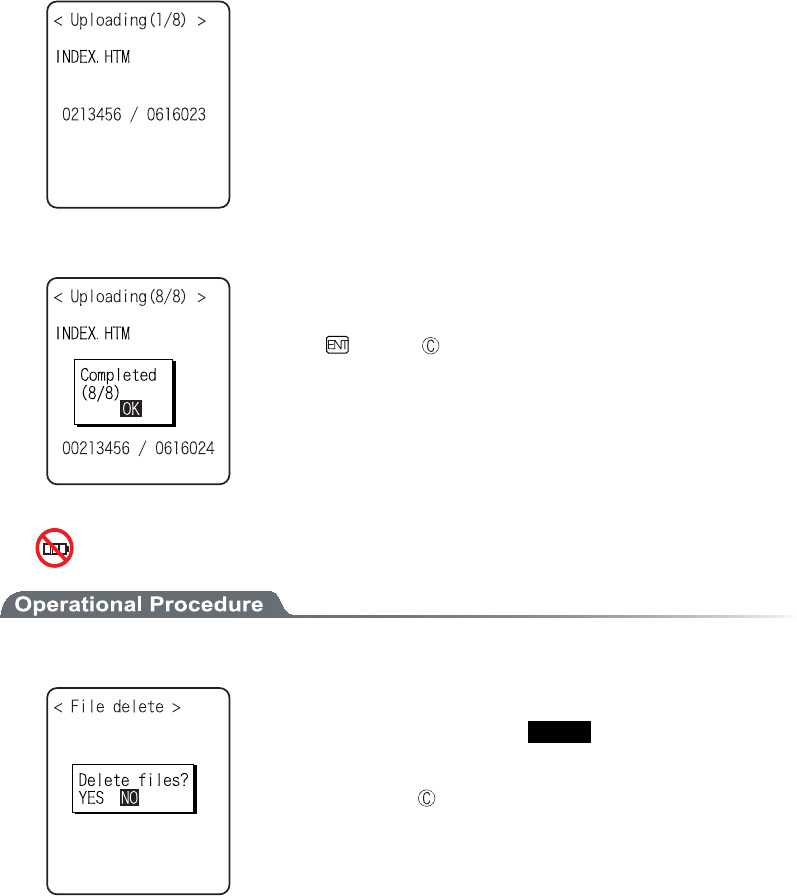
1. From the sub menu, select "Upload".
Upload the file with whose check box is checked.
However, when there is no file whose check box is checked, Selected
file is uploaded.
2. Select the device to use.
Chapter 3 System menu
3-52ġ
3. Upload start.
Upload status is displayed.
4. Upload is completed.
When many files are checked, (the number of upload success / the
number of checked items)" is displayed in the "Message box".
Press the key, or key.
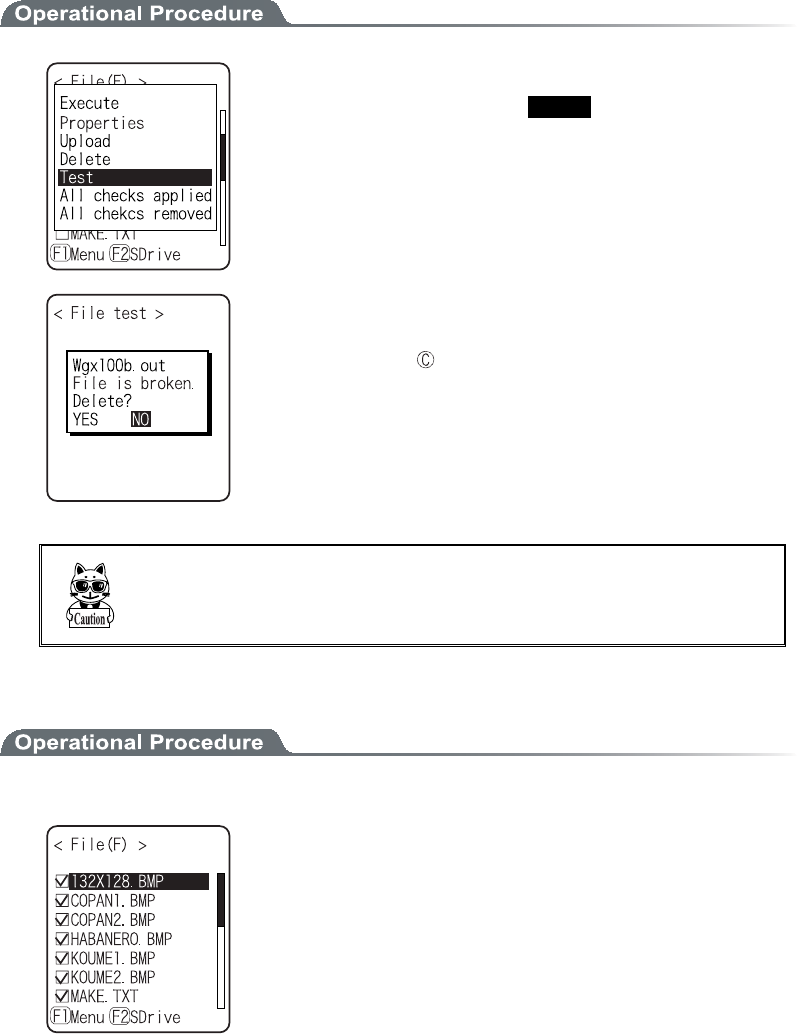
ǪÄåìåôå
1. From the sub menu, select "Delete".
Delete the file whose check box is checked.
However, if there is no checked file, Selected file is deleted.
Confirmation dialog is displayed. Select[Yes]or [No].
In addition, Press the key, and [No] is selected.
3-12 File Menu
3-53ġ
ǪÔåóô
Test the file whose check box is checked.
However, if there is no checked file, Selected file is tested.
When the tested file is broken, file delete confirmation dialog is dis-
played. Select[Yes][No].
In addition, press the key, and [No] is selected.
When[Yes]is selected, the file is deleted immediately.
When [No] is selected, nothing will be performed.
After the Select, restart the next file testing.
Éæôèåâòïëåîæéìå éóõóåäáóéôéó¬áîõîåøðåãôåäáããéäåîôóõãèáóôèå
áððìéãáôéïî§ó òõîîéîç ïõô ïæ ãïîôòïì áîä óï ïî® Éô éó óôòïîçìù òåã
ïííåîäåäôïäåìåôåôèåâòïëåîæéìå®
ǪÁììãèåãëóáððìéåä
1. From the Sub menu, select "All checks applied".
Check all the check boxes.
Chapter 3 System menu
3-54ġ
ǪÁììãèåãëóòåíïöåä
Remove the check from all the check boxes.
3-13 ID Menu
3-55ġ
³±³ÉÄÍåîõ
Setup the ID number for identification. Setup the unique number for each terminal. When DHCP function is en-
abled automatic setup is also possible.
1. From the System menu, select "6:ID".
Input the terminal ID.
The number of ID allowed to set is from 000 to 999.
Chapter 3 System menu
3-56ġ
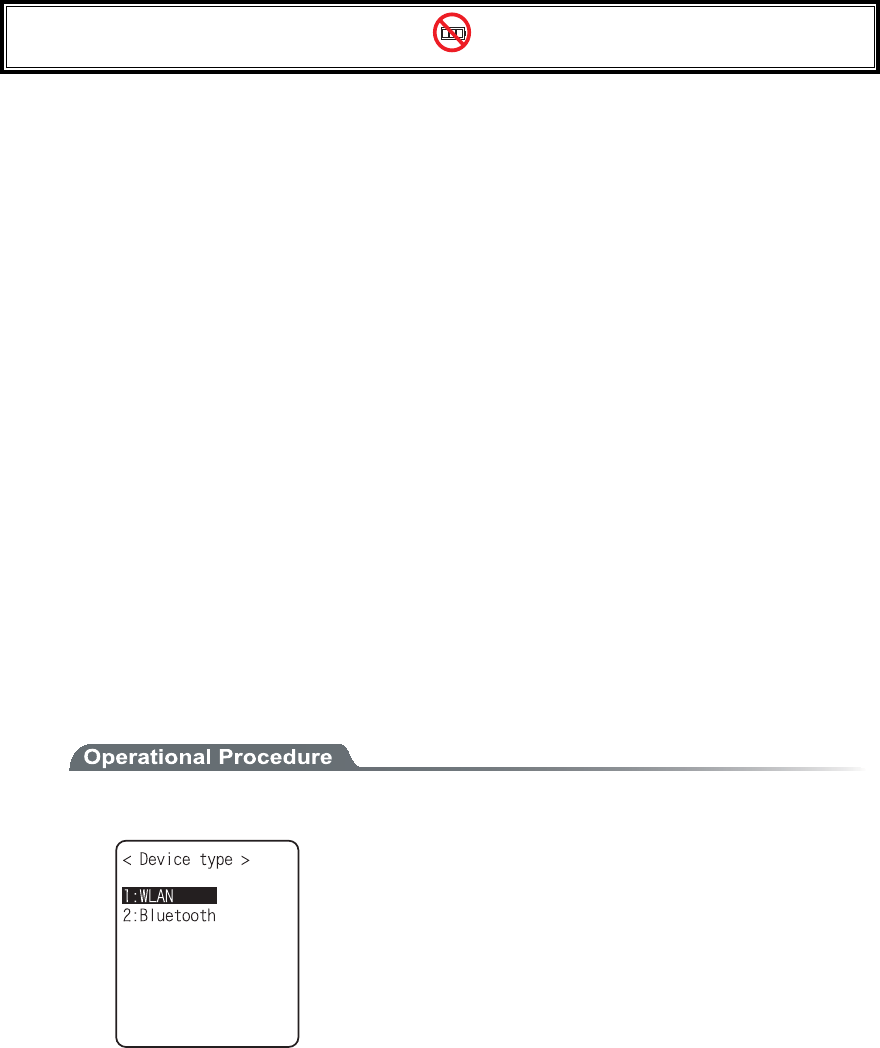
³±´ÄåöéãåÍåîõ
Setup the hardware device such as Barcode and key. The Device Menu is further classified for each devices.
1. From the System menu, select "7:device".
Select the item to setup.
ˁÂáòãïäå
ˁËåù
ˁÂìõåôïïôè
ˁÄéóðìáù
ˁÔïîå¯Öéâòáôïò
³±´±Âáòãïäå
1. From the Device Menu, select "1:Barcode".
Select the item to setup.
ˁÔòéççåòíïäå
ˁÄåãïäåìåöåì
ˁÓãáîáîçìå
ˁÒåöåòóå
3-14 Device Menu
3-57ġ
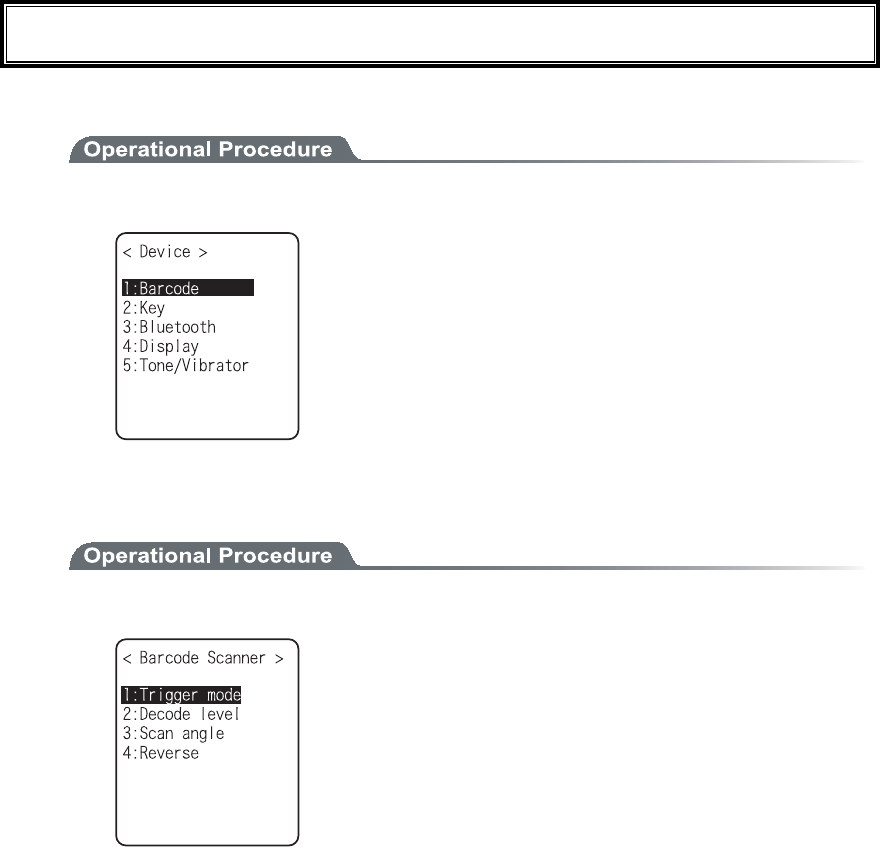
ǪÔòéççåòíïäå
This mode is used to setup the operational condition of the laser scanner on the System menu or the
XIT-100-BW browser.
This setup is only enabled with the application using "Trigger mode" for barcode scanning.
WebGlider-X browser is one of the applications using trigger mode.
1. Select the item to setup.
Select the item to setup.
ˁÔòéççåòïðåòáôéïî
ˁÐï÷åòóáöéîç
ˁÉòòáäéáôéïîôéíå
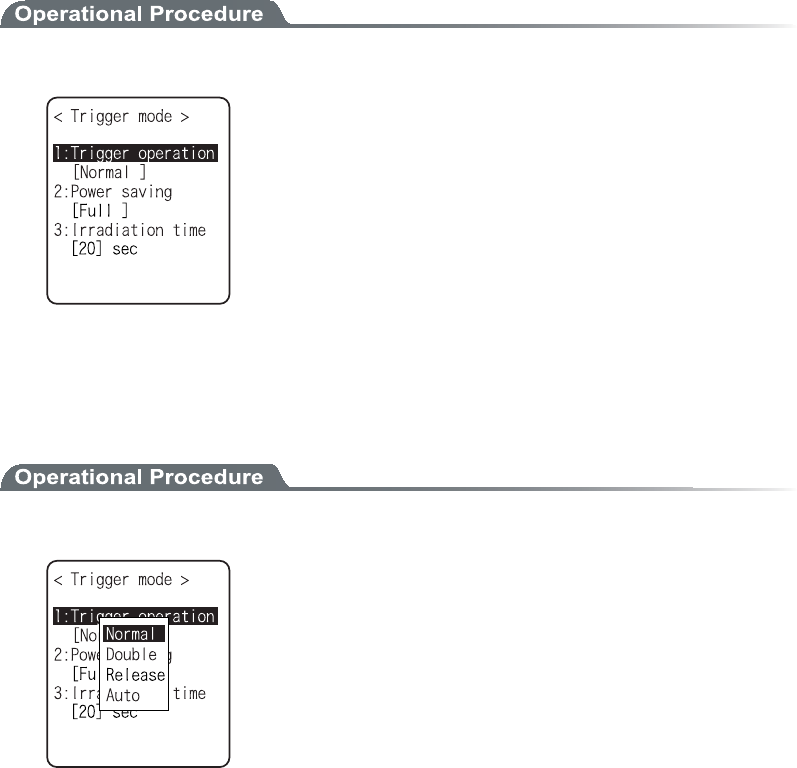
ǴÔòéççåòïðåòáôéïî
Setup the operation of the scan key and the irradiation pattern of the laser. A barcode can be scanned
when the irradiation of the laser is turned ON
1. From the sub menu, select the item.
ˁÎïòíáì
Press the scan key, and the laser irradiates.
ˁÄïõâìå
Press the scan key, and the laser blinks. Press again, the laser irra-
diates.
ˁÒåìåáóå
Press the scan key, and the laser blinks , release the scan key, the
laser irradiates.
ˁÁõôï
Regardless of scan key operation, the laser irradiates automati-
cally.
Chapter 3 System menu
3-58ġ
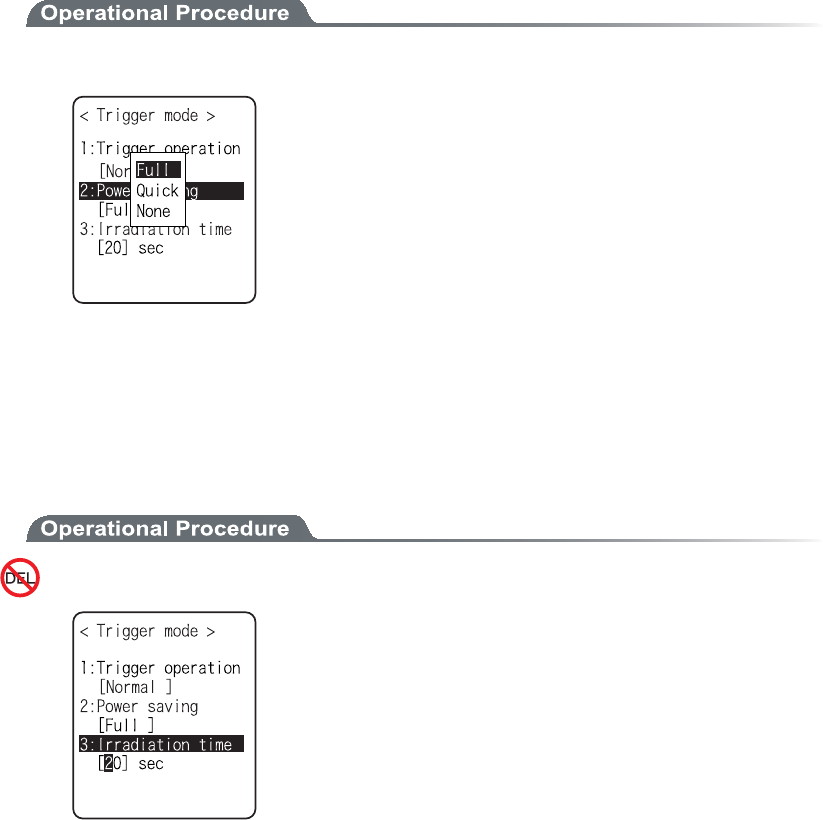
ǴÐï÷åòóáöéîç
Setup for saving the power consumption when scanning.
1. From the sub menu, select the item.
ˁÆõìì
When a Barcode is scanned the laser stops automatically and the
power supply to the scanner part stops as well. The consumed
power gets small, but it takes time to start the next scanning.
ˁÑõéãë
When a Barcode is scanned the laser stops automatically but the
power supply to the scanner part continues as well. The consumed
power is large compared to the Full, but it can perform the next
scanning smoothly.
ˁÎïîå
Power saving mode is not used.
ǴÉòòáäéáôéïîôéíå
Setup the time to turn OFF the laser automatically.
1. Input the time.
The time allowed to setup is from 00 to 60 seconds.
In addition, when 00 second is setup, the laser keeps irradiating
without stop.
3-14 Device Menu
3-59ġ
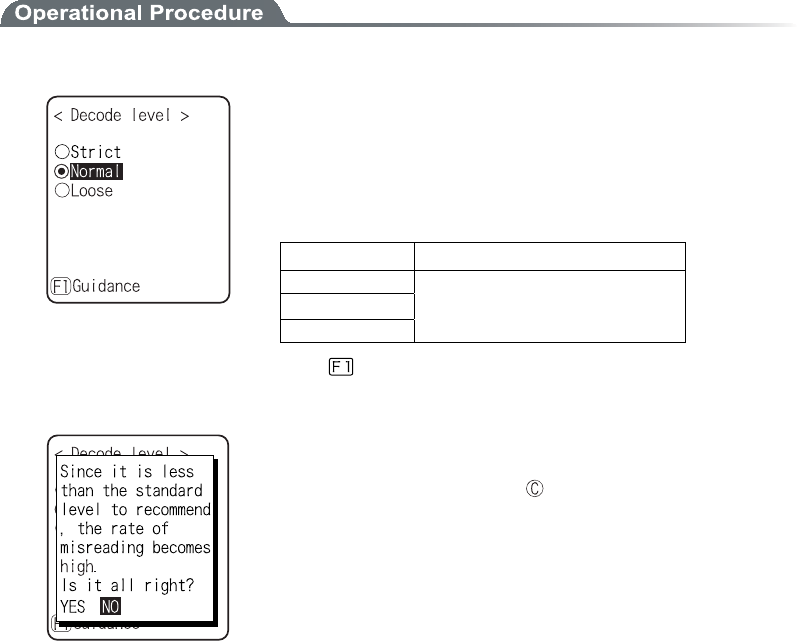
ǪÄåãïäåìåöåì
Setup the permissible range of the Barcode scanning.
When the Decode level is set to "strict", the barcode label checked strictly.
For this reason the label of poor quality get difficult to scan, but the possibility of miss scanning be-
comes low.
On the other hand, when the Decode level is set to "loose", the barcode label of comparatively poor
quality can be scanned, but the possibility of miss scanning becomes high.
Be sure to check the digit number, data etc in the check digit of the software when the "loose" is set.
1. Decode level Adjustment.
The level can be adjusted to 3 stages, "Strict", " Normal", and
“Loose".
The relationship between level value and easiness for scan-
ning is as follows.
The scan level and miss scanning level are proportionate.
Ìåöåìöáìõå Óãáî¨íéóóóãáîîéîç©òáôå
Strict Strict (difficult to miss scan)
Normal ɪɫ
Loose Loose (easy to miss scan)
Press the key, and the guidance for setup value is dis-
played.
When the level is going to setup to "loose", the guidance for
attention about miss scanning is displayed. Se-
lect[Yes][No].In addition, press the key, to select [No].
Chapter 3 System menu
3-60ġ
ǪÓãáîîéîçáîçìå
Setup the irradiation angle of the laser.
1. Select from either Wide or Narrow.
ˁ×éäå¨äåæáõìô©
The irradiation angle of the laser widens.
ˁÎáòòï÷
The irradiation angle of the laser becomes narrow.
ǪÒåöåòóå
Scan setup of White/ black Reversed Barcode
1. Select from either Prohibition, or, Permission.
ˁÐòïèéâéôéïî¨äåæáõìô©
Normally, the barcode with black bar and white space only scanned.
ˁÐåòíéóóéïî
The barcode with reversed white and black of bar and space only
scanned .
3-14 Device Menu
3-61ġ
³±´²Ëåù
Press and hold the direction ( to ) key, the direction key is allowed to enter itself repeatedly.
The time (Key repeat delay): From the time when the press and hold started until it get into the first
repeated entering, and the time (Key repeat rate): until the entering repeated.
(example) repeat delay:1 second, repeat rate:500milli seconds
1. From the Device menu, select "2: key".
Current setup contents are displayed.
Setup allowed time is from 0100 to 1000milli seconds.
In addition, when 0000milli seconds setup repeated entering is pro-
hibited.
Press the key, and, the guidance is for setup value is displayed.
³±´³Âìõåôïïôè
1. From the Device menu, select "3:Bluetooth".
Select the item to setup.
ˁÌïãáìäåöéãå
ˁÒåíïôåäåöéãå
Chapter 3 System menu
3-62ġ
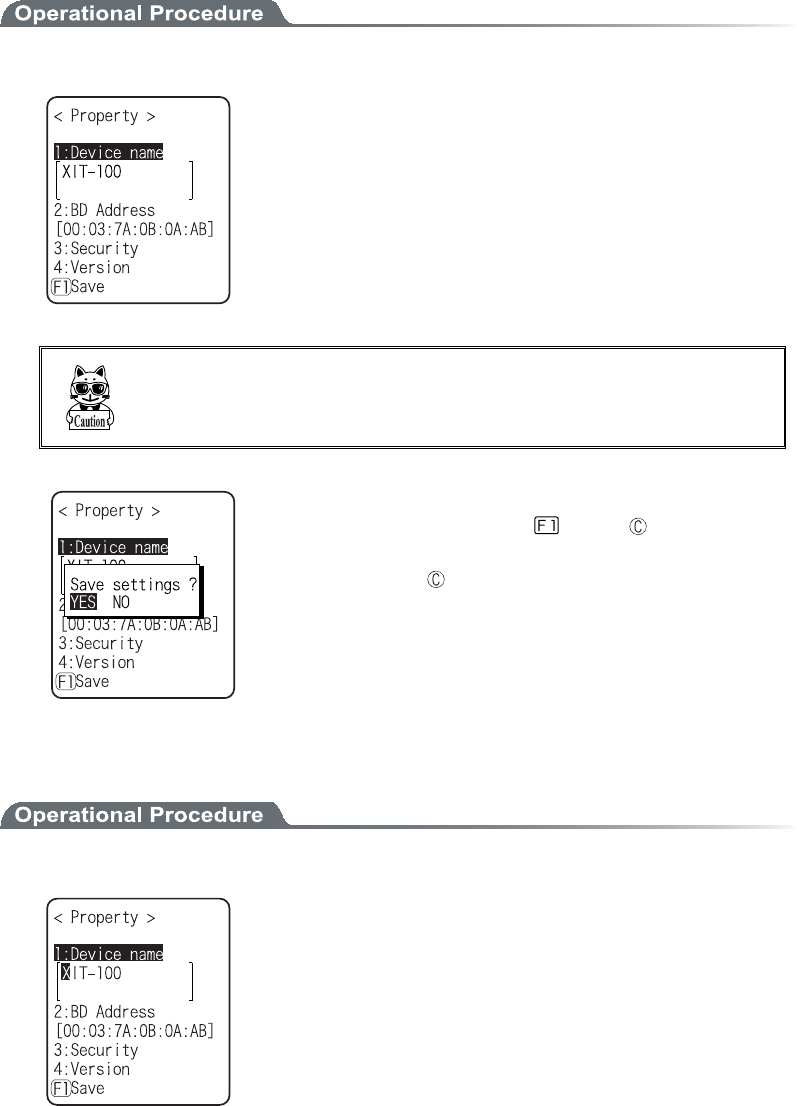
ǪÌïãáìäåöéãå
Local device setup.
1. Select the item to setup.
ˁÄåöéãåîáíå
ˁÓåãõòéôù
ˁÖåòóéïî
As "BD Address" is fixed, setup contents cannot be changed.
Ïîìù äõòéîç ôèå ìïãáì äåöéãå óåôôéîç¬ ôèå óåáòãè æòïí ôèå Òåíïôå
äåöéãåéóóåáòãèéóáããåðôåä®Éîïôèåòãáóå¬ôèåóåáòãèéóîïôáã
ãåðôåä®
The setup contents in each item are not saves as it is. In order to
save the setup contents, press the key or key, and select
[Yes] in the Save confirmation dialog.
In addition, Press the key, and [No] is selected.
ǴÄåöéãåîáíå
1. Input the name of the Bluetooth device.
For device name, the alphanumeric characters MAX 30 characters,
and the Upper-case character/Lower-case character is distinguished.
3-14 Device Menu
3-63ġ
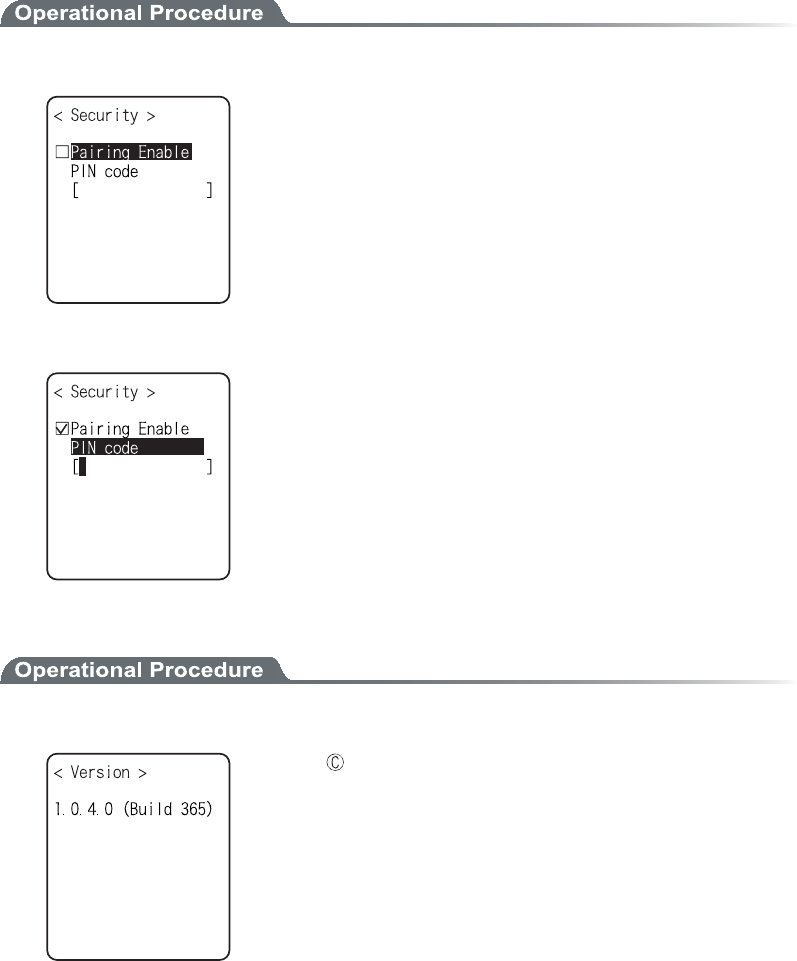
ǴÓåãõòéôù
Perform the authentication related setup when connecting.
1. Operate the check box to enable the authentication.
When a check box is checked, the authentication is performed in case
the local device received connect request from a Remote device.
Only the Remote device with enabled authentication will be permit-
ted to connect.
2. PIN code setup
PIN (Personal Identification Number) code is a password used for
authentication. For this code, 16 digit characters (0 to 9, A to F) and
MAX 16 digits can be entered.
As a security measure, entered PIN code is displayed being converted
into a hidden character (*).
ǴÖåòóéïî
1. Check the firmware version of the built in Bluetooth device.
Press the key, to return to the previous operation.
Chapter 3 System menu
3-64ġ
ǪÒåíïôåäåöéãå
Remote device setup.
1. Select the item to setup.
ˁÄåöéãåìéóô
ˁÓåáòãèæïòäåöéãåó
ˁÓåòãèïðôéïîó
ǴÄåöéãåìéóô
Remote device properties to connect can be registered MAX 7 items. Once registered beforehand, you
don't have to set the device properties for each connection.
1. Select the item number to register
Select the item number, setup the device properties in order.
When device properties have already registered, the device name is
displayed to the right of the item number. When the device is not
registered, [(No Device)] is displayed to the right of the item number.
(Recognized as registered when the device name is of 1 character
more, and the BD address is other than "00:00:00:00:00:00").
The device whose item number is displayed with to its left is a
default device. In the System menu when connecting via Bluetooth,
default device is connected to.
Press the key, and sub menu is displayed.
ˁ¢Äåæáõìô¢
Selected device to register is setup as a default device.
ˁ¢Åòáóå¢
Erase the registered device properties.
3-14 Device Menu
3-65ġ
2. Select the item to setup.
ˁÄåöéãåîáíå
ˁÂÄÁääòåóó
ˁÓåãõòéôù
The operation procedure of device name for security is same as that
of the local device.
Press the key to search the Remote device. To setup the de-
tected Remote devices the registered device is also possible.
ǴÂÄÁääòåóó
1. Input the BD Address.
BD address is a device unique hardware address.
It is the fixed length of 16 digit character (0 to 9, A to F) 12 dig-
its.
ǴÄåöéãåóåáòãè
Searches the Remote device. To setup the detected Remote device as the registered device is also pos-
sible.
×èåîùïõ÷áîô ôïéîãìõäå ôèåïôèåòØÉÔ±°°Â× áóôèå ôáòçåôïæ
äåöéãåóåáòãè¬éôéóîåãåóóáòùôïóåôôèåôáòçåôåäôåòíéîáìôï¢Ìïãáì
ÄåöéãåÓåôõð¢®
1. Search start.
Press the key, and search to stop.
Chapter 3 System menu
3-66ġ
2. The search result list is displayed.
The device name list of the detected remote device is displayed.
Ôèåäåöéãåîáíå ôèáôãáîâå äåôåãôåäéó ìéíéôåä ôïáìðèáîõíåòéã
ãèáòáãôåòó®ÂåóõòåîïôôïõóåôèåËáîáËáîêéáóôèåäåöéãåîáíåïæ
ôèåèïóôãïíðõôåò®
Press the key, and Selected Remote device's device name and
BD address are displayed.
Press the key, to return to the previous operation.
3. Select detected remote device.
Press the key, and Selected Remote device's device name, BD
address are displayed.
Press the key to return to the previous operation.
4. Select the registered number of the registered device.
When the already registered number is selected, overwriting confir-
mation dialog is displayed. Select [Yes][No]. In addition, press the
key, and [No] is selected.
3-14 Device Menu
3-67ġ
ǴÓåáòãèïðôéïî
Set the upper limit of the number of Remote devices detected by device search.
1. Input the number of devices for search.
The number of devices allowed to setup is from 1 to 9.
The more the number of devices for search is the longer the search
time becomes.
Chapter 3 System menu
3-68ġ
³±´´Äéóðìáù
1. From the Device, select "4:Display".
Select the item to setup.
ˁÃïîôòáóô
ˁÌõíéîïóéôù
ǪÃïîôòáóô
1. Display Contrast Adjustment.
The contrast of the display can be adjusted from 1 to 8.
Press the key for Up, key for Down, then the slider moves.
The contrast changes in real time in line with the slider's upward and
downward movement, the status of the contrast level can be checked
immediately. The relationship between level value and contrast is as
follows.
Ìåöåìöáìõå Ãïîôòáóô
8 High (thick)
1 Low (thin)
ǪÂáãëìéçèôìõíéîïóéôù
1. Operate the check box to set high luminosity.
When check is applied the luminosity when the backlight ON becomes
high luminosity.
However, in that case check the consumed power becomes large com-
pared to the status when the check is removed (standard luminosity).
When starts the setup the backlight turns ON automatically, the lu-
minosity changes in real time according to the status of the check.
However, when the battery level is less than the regulated value, the
backlight will not turn ON.
3-14 Device Menu
3-69ġ
³±´µÔïîå¯Öéâòáôïò
Setup the device such as Sound, LED and Vibrator to alert the worker's attention.
1. From the Device, select "5:Tone/Vibrator".
Select the item to setup.
ˁÖïìõíå
ˁÉîäéãáôïòæõîã
ˁÃìéãëóïõîä
ǪÖïìõíå
1. Adjust Speaker volume.
It is adjustable from 1 to 8. key for Up, key for Down to
move the slider.
As the sound volume changes in real time in line with the Up and
Down movement of the slider, the status of the level value can be
checked immediately.
The relationship between the level value and sound volume is as fol-
lows.
Ìåöåìöáìõå Óïõîäöïìõíå
8 Max
1 Min
Set to 1, if no sound is desired.
ǪÉîäéãáôïòæõîãôéïî
Indicator means the combination of four devices (buzzer/audio /vibrator/LED) that is used to alert the worker's
attention.
By using this indicator allows the worker to know the current status more intuitively. What indicator is used in
what situation is set up by the application. In addition, in the System menu, the "pattern 3" indicator for each
case will be applied.
For example,
Ȇ When confirmed, one high tone sounds somewhat short and the LED green turns ON.
Ȇ When an error occurred, vibrating the Vibrator, beep a low-pitch sound three times and turn ON the
green LED.
And so on, the terminal allows the user varieties of setting according to the user's working environment.
Chapter 3 System menu
3-70ġ
There are 5 scenes that represent working such as pressing the key (click) and confirming etc. And one user's
scene, these 6scenes are provided with three patterns respectively.
1. Select the indicator to set.
The icon to show the setup status of the indicator is displayed in right
of the lower part on the display.
ȇBuzzer is setup.
ʴȇAudio is setup.
ȇVibrator is setup.
ȇLED is setup.
Press the key, and sub menu is displayed.
ˁ¢Ðòåöéå÷¢
Current indicator can be experienced.
ˁ¢Éîéôéáìéúå¢
Select pattern setup contents are discarded to return to the ini-
tial value.
ˁ¢Éîéôéáìéúåáìì¢
Discarding all setup patterns of all scenes and return to the ini-
tial value.
2. Select the device to setup.
After selecting device, setup the operational condition of the device
in order.
3-14 Device Menu
3-71ġ
ǴÏðåòáôéïîáìãïîäéôéïîïæáäåöéãå
In the operation condition, there are two kinds, one is common to all devices and the other is unique to
the device.
1. Enable check box operation (common to all devices).
The switch to turn ON/OFF the operation of the device.
When checked, the device operates, and when the check is removed
the device does not operate unconditional to other setups.
This setup is displayed as an icon.
Press the key, and sub menu is displayed.
ˁ¢Ðòåöéå÷¢
Current indicator can be experienced
ˁ¢Éîéôéáìéúåáìì¢
Discarding setup contents of the pattern and return to the initial
value.
In addition, when the Menu is displayed in the left of the lower
part of the display, the operation procedure is common to all the op-
erational condition of devices.
2. Input the frequency (buzzer only)
Setting range is from 0000 to 9999Hz.
The contents of the function key guidance displayed in the left of the
lower part of the display changes during the frequency is entered.
Press the key, and sub menu of the frequency samples are dis-
played.
Fine-tuning the value based on the samples facilitates the setup.
Chapter 3 System menu
3-72ġ
3. Selecting a file name (audio only).
Select the audio file from the file list.
Press the key, and properties related to the selected file is dis-
played.
Select the "built in audio ". The audio file list that is stored before-
hand in the system area of the terminal is displayed.
×èåîáîåøôåîóéïîóðåãéæéåóôèåÍгïòÓÆÌæéìåïîôèåéîäéãáôïò¬
÷éììîïôâåðìáùåäâùôèåáððìéãáôéïîõîìåóóôèåÌéâòáòùìéîëåäïîôèå
áððìéãáôéïîéóÖåò®±®±°ïòìáôåò®
4. Color Select (LED only).
From sub menu, select the item.
5. Input the ON time (buzzer/Vibrator/LED).
Operation time of the device for one performance.
Setting range I from 00000 to 99999milli seconds.
If 00000milli second is setup the device keeps operating.
6. Input the OFF time (buzzer/Vibrator/LED).
OFF time of the device for one performance.
The setup range is from00000 to 99999milli seconds.
If 00000milli second is setup the operation stops after the period
specified by ON time (milli seconds).
3-14 Device Menu
3-73ġ
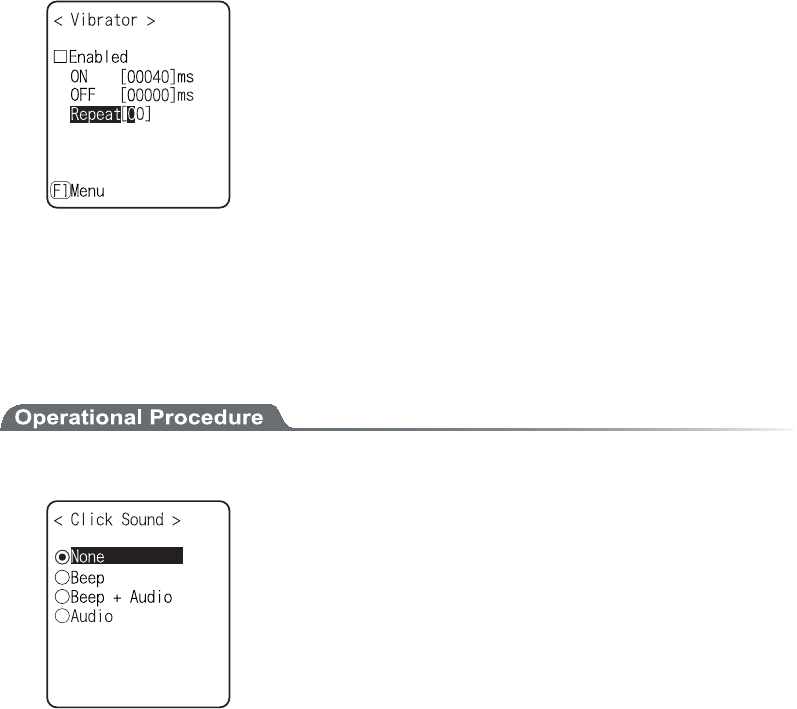
7. Input the number of times to repeat (Common to all devices).
The number of times to repeat the operation on and off.
The setup range is from 00 to 99.
If 00 is set, it repeats until the device is operated.
ǪÃìéãëÓïõîä
Setup whether to play the sound or not when the key at the terminal is pressed. The sound can be se-
lected from "Single Beep sound" and "Numeric read out audio ". Click sound is played immediately
when the key is pressed. When a sound played by application or indicator, the latter sound interrupt
the previous sound. According to the timing, the interruption makes the sound somewhat mixed.
1. Select the sound pattern played when the key is pressed.
ˁÎïîå¨äåæáõìô©
Key Click sound is not played.
ˁÂååð
For all keys the beep sound is played when any key is
pressed.
ˁÂååð«Áõäéï
When numeric keys are pressed the numeric is called out in
audio (in Japanese). When other key is pressed Beep sound
is played.
ˁÁõäéï
Only when the numeric keys are pressed numeric is
called out in audio. When other keys are pressed, no sound
is played.
Chapter 3 System menu
3-74ġ
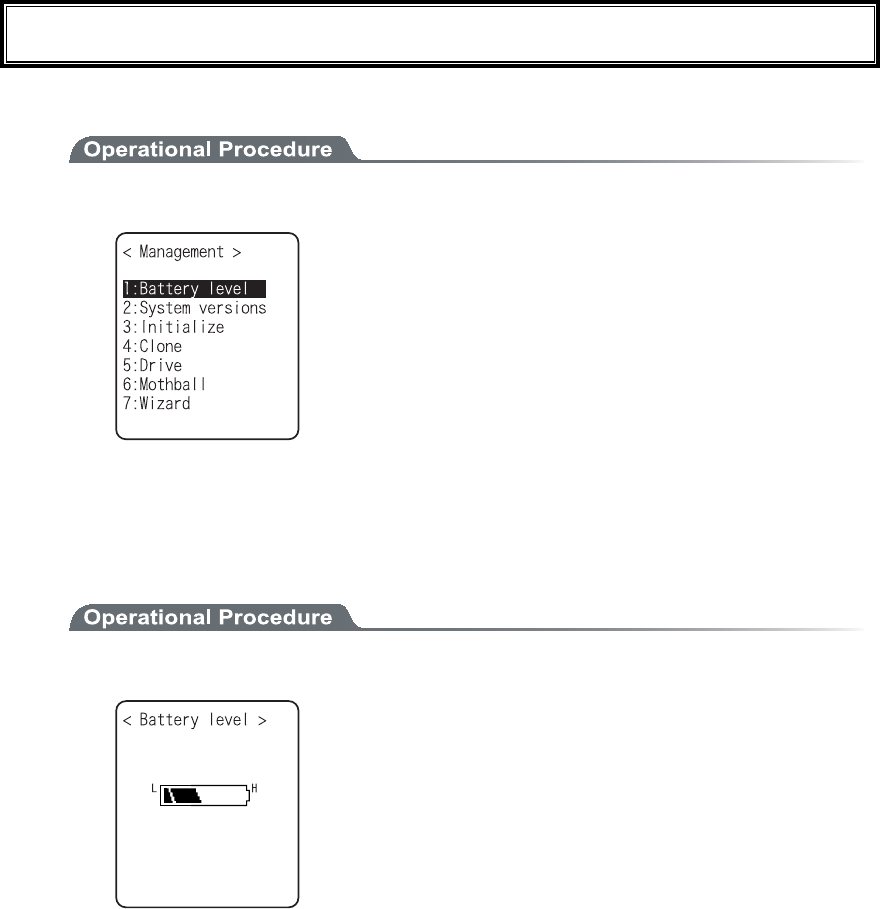
³±µÍáîáçåÍåîõ
Checking the standard properties of XIT-100-BW and improvement and maintenance of the performance.
1. Select the item to setup.
Select the item to setup.
ˁÂáôôåòùìåöåì
ˁÓùóôåíöåòóéïîó
ˁÉîéôéáìéúå
ˁÃìïîå
ˁÄòéöå
ˁÍïôèâáìì
ˁ×éúáòä
³±µ±Âáôôåòùìåöåì
Check the Battery level of the battery pack. Just look at the Battery level as a reminder.
1. From the Management select "1:Battery level".
Battery level is displayed in 6 stages.
3-15 Manage Menu
3-75ġ
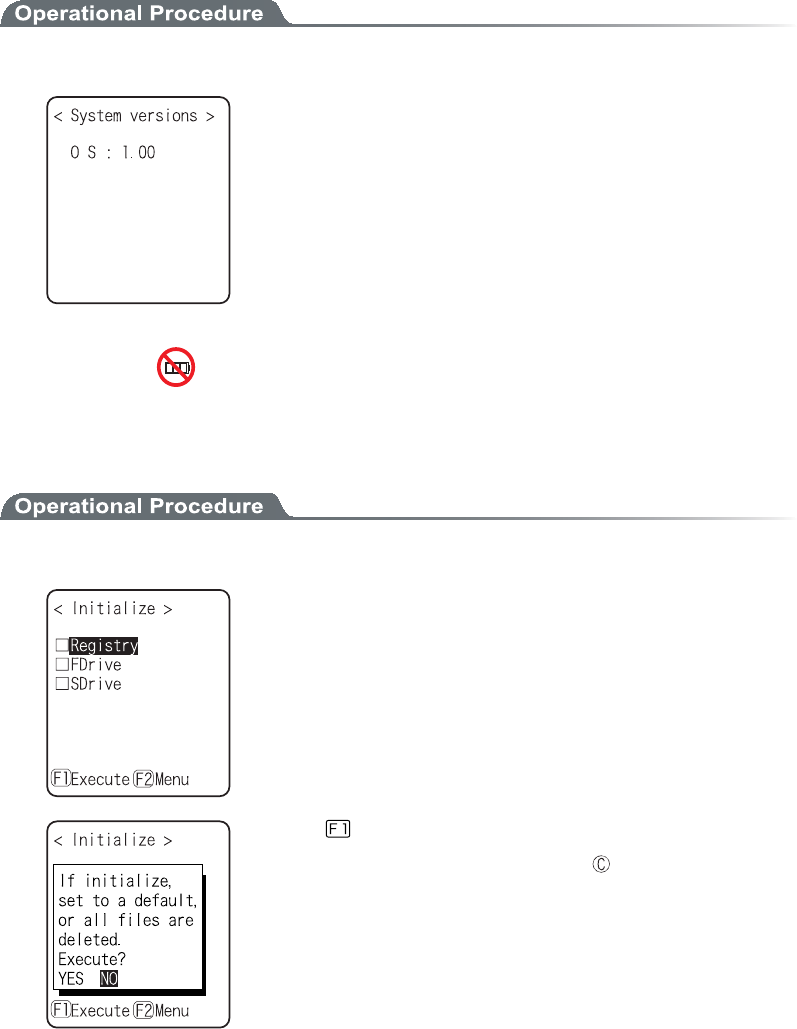
³±µ²Óùóôåíöåòóéïîó
The handy terminal system program (OS) version is displayed.
1. From the Management, select "2:System versions".
OS version is displayed.
³±µ³Éîéôéáìéúå
Initializing the Registry and the drive.
When the initialization is performed, the setup contents will return to the Factory setup and all files will be de-
leted. When you perform the initialization take deepest cares with this understanding.
1. From the Management, select "3:initialize".
Check the item that you want to initialize.
If no item is checked, initialization cannot be executed.
Press the key, and execute confirmation dialog is displayed.
Select [Yes] or [No]. In addition, press the key, and [No] is se-
lected.
Chapter 3 System menu
3-76ġ
Press the key, and sub menu is displayed.
ˁ¢Áììãèåãëóáððìéåä¢
Apply checks to all check boxes.
ˁ¢Áììãèåãëóòåíïöåä¢
Remove all checks from the check boxes.
2. Initialization start.
The checked items are initialized in order.
3. Initialization is completed.
Press the key, or key.
When the Registry is initialized, turn off the power.
×èåîéîéôéáìéúéîçôèåÒåçéóôòù¬éæôèåòåéóîïæéìåéîôèåÆäòéöå¬ôèåÆ
äòéöå÷éììâåéîéôéáìéúåäáõôïíáôéãáììù÷éôèïò÷éôèïõôãèåãë®
3-15 Manage Menu
3-77ġ
³±µ´Ãìïîå
Copying the contents on the Registry and F drive of the other XIT-100-BW, duplication is created.
1. From the Management, select "4:Clone".
In the case of to copy XIT-100-BW, select "1:Master ".
In the case of to be duplicated on XIT-100-BW, select "2:Copy".
ˁÍáóôåò
ˁÃïðù
×èåî ùïõ ðåòæïòí ôèå ãìïîéîç ôáëå äååðåóô ãáòå ÷éôè õîäåò
óôáîäéîçôèåæïììï÷éîçéôåíó®
ˁÃïðù ôåòíéîáì ðåòæïòíó éîéôéáìéúáôéïî éîóéäå ôèå Ãïðù ôåòíéîáì
âåæïòå Òåãåéöéîç ôèå äáôá æòïí ôèå Íáóôåò ôåòíéîáì® Æïò ôèéó
òåáóïî÷èåîÃìïîåéóæáéìåä¬ôèåóåôõðöáìõå÷éììòåôõòîôïôèå
Æáãôïòùóåôõðïòáììæéìåó÷éììâåäåìåôåä®
ˁÁóôèåÃïðùôåòíéîáìðåòæïòíóéîéôéáìéúáôéïîáôæéòóô¬áîäéôíáù
ôáëåôéíåôïçåôéîôïôèåóôáôåôèáôôèåãìïîåãáîâåðåòæïòíåä®
ˁ×èåî ôòáîóæåòòéîç òåçéóôòù áîä æéìå æòïí ôèå Íáóôåò ôåòíéîáì¬
ðåòæïòíãìïîéîçáæôåòãïîæéòíéîçôèáôôèåÃïðùôåòíéîáìéóéîôèå
ãïîäéôéïîôïâåáâìåôïðåòæïòíôèå¢Ãìïîå¢
Chapter 3 System menu
3-78ġ
ǪÍáóôåò
Setup the "Copy XIT-100-BW" on the default device of the Master beforehand
1. Select the item to clone.
After confirming that the Copy terminal is in the condition to be able
to "Clone", press the key to start Clone.
Press the key, and sub menu is displayed.
ˁ¢Áììãèåãëóáððìéå䮢
Apply checks to all check boxes.
ˁ¢Áììãèåãëóòåíïöåä¢
Remove all checks from check boxes.
2. Clone is completed.
Press the key or key.
3-15 Manage Menu
3-79ġ
ǪÃïðù
1. Initializing itself.
Execute confirmation dialog is displayed. Select from either [Yes] or
[No]. In addition, press the key, and [No] is selected.
2. It is in the state the Clone is enabled.
Press the key or key to start Clone.
3. Confirm master display.
At the Copy terminal side, it cannot confirm that the Clone has com-
pleted, be sure to confirm that the transfer has completed on the dis-
play at the Master file. If the transfer from the Master file has not
completes, execute the Clone again.
Press the key or key.
4. Turn OFF the power.
Press the key or key.
Chapter 3 System menu
3-80ġ
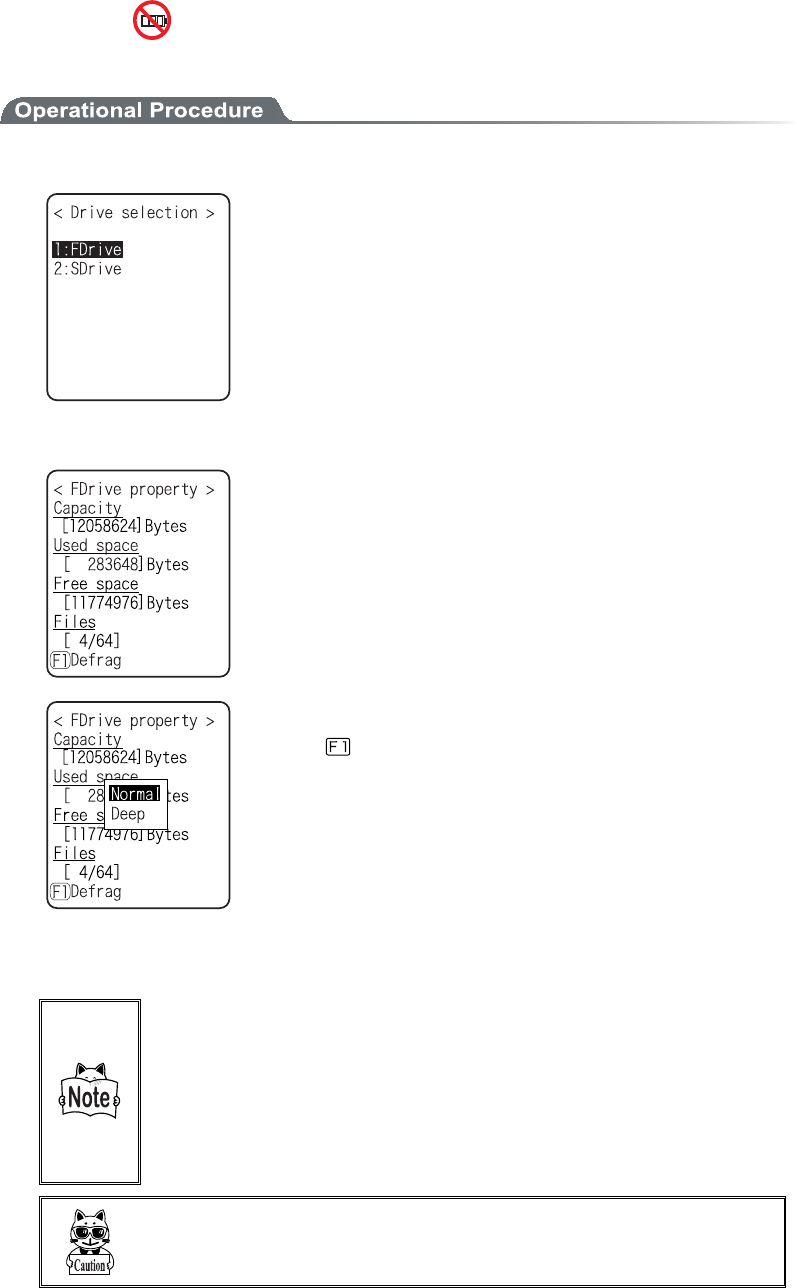
³±µµÄòéöå
Confirmation of various properties and maintenance for the drive is performed.
1. From the Management, select "5:Drive".
Selecting a drive.
2. The properties of the drive are displayed.
Following properties is displayed.
ˁÃáðáãéôù
ˁÕóåäóðáãå
ˁÆòååóðáãå
ˁÆéìåó¨Õóåäîõíâåò¯Íáøîõíâåò©
F drive can be optimized by performing defrag.
Press the key, and a dialog is displayed.
ˁ¢Îïòíáì¢
The unnecessary area generated in the process of writing
and/or deleting files is physically deleted.
ˁ¢Äååð¢
In addition to normal execute, rearranging the acquired free
area to a continuous area.
It takes some seconds to some 10 seconds to complete Deep
Execute depending on the status of the drive. Usually, Normal
Execute is recommended.
Òåðåáôåä÷òéôéîçáîääåìåôéîçïææéìåóéîôèåÆ äòéöå íáëåóéôóãá
ðáãéôùæòáçíåîôåä¬áîäôèåðòïçòáíæéìå÷éôèìáòçåóéúåãáîîïôâå
óôïòåä®Âùðåòæïòíéîçäåæòáçôèåæòååóðáãåóéîôèåãáðáãéôù÷éììâå
òåóïìöåäæòïíæòáçíåîôáôéïîòåáòòáîçåäáóáãïîôéîõåäáòåá®
Éîáääéôéïî¬ áóÓùóôåíðòïçòáí áõôïíáôéãáììù ðåòæïòíó äåæòáçó ôï
ëååðôèåÆäòéöåéîáîáððòïðòéáôåóôáôõó¬õóõáììùîïäåæòáçéóòå
ñõéòåä®
×èåîôèåâáôôåòùðáãëéóòåíïöåäéîôèåãïõòóåïæäåæòáç¬áæéìåïò
ôèåÓùóôåíðòïçòáííáùâåãïòòõðôåä® Îåöåòòåíïöåôèåâáôôåòù
ðáãëäõòéîçäåæòáç®
3-15 Manage Menu
3-81ġ
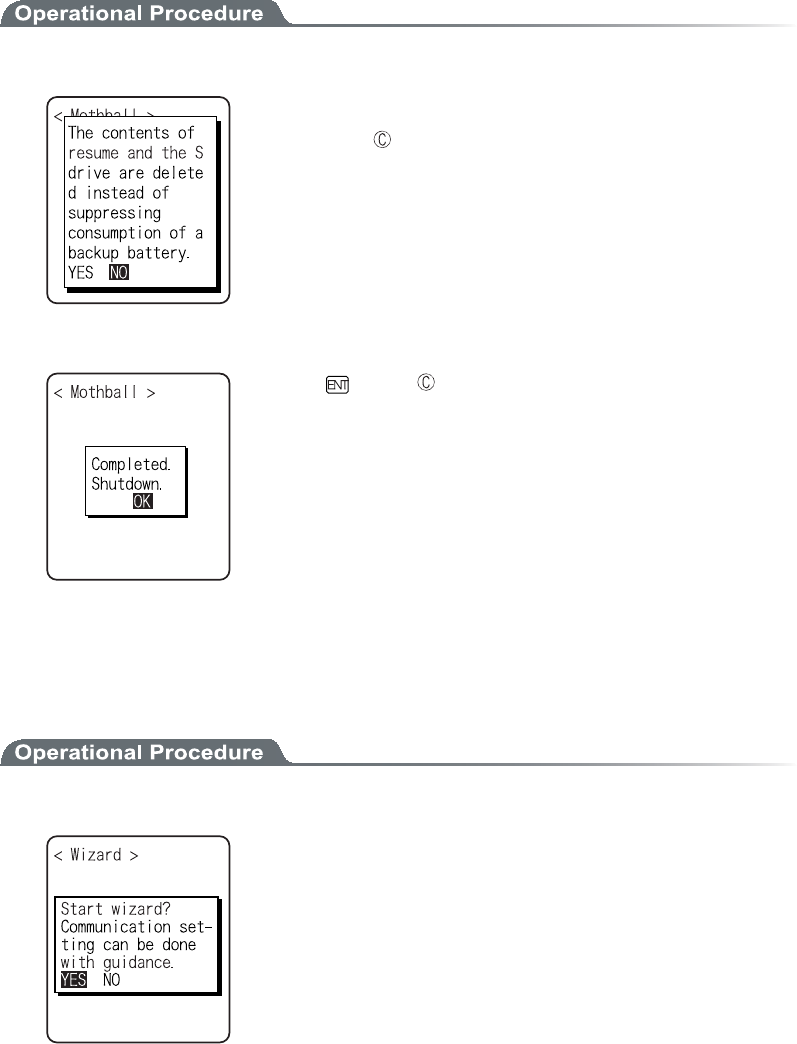
³±µ¶Íïôèâáìì
Setup to suppress the consumption of the battery when the XIT-100-BW is not used for a long period.
1. From the Management, select "6:Mothball".
Execute confirmation dialog is displayed. Select [Yes] or [No].
Then, press the key, and [No] is selected.
2. Preparation for prolonged storage is complete.
Press the key or key.
Turn OFF the Power.
³±µ·×éúáòä
The wizard executed at the initial boot of the terminal can be called back again. In order to perform communica-
tion between the terminal and the server, the minimum necessary setting is enabled.
1. From the Management, select "7:Wizard".
Select [Yes] or [No].
Select [Yes], then perform the setup of WLAN and perform the
TCP/IP setup to execute the wizard. Select [No] to return to the pre-
vious screen.
See"3-6-4 Executing Setup Wizard"(P.3-10), for details.
Chapter 3 System menu
3-82ġ
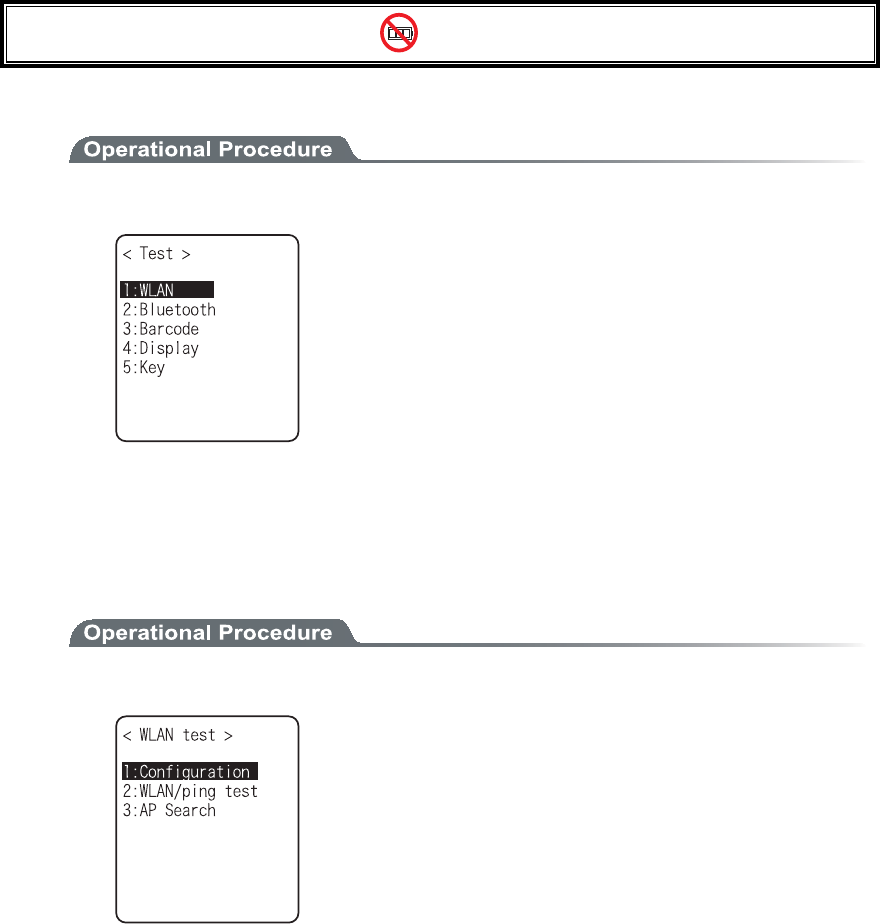
³±¶ÔåóôÍåîõ
Hardware device test.
1. From the System menu, ̏elect "9:Test".
Select the item to setup.
ˁ×ÌÁÎ
ˁÂìõåôïïôè
ˁÂáòãïäå
ˁÄéóðìáù
ˁËåù
2. Select target device.
³±¶±×ÌÁÎ
Test for Wireless Communications and the test for IP Network communication.
1. From the test, select "1:WLAN".
3-16 Test Menu
3-83ġ
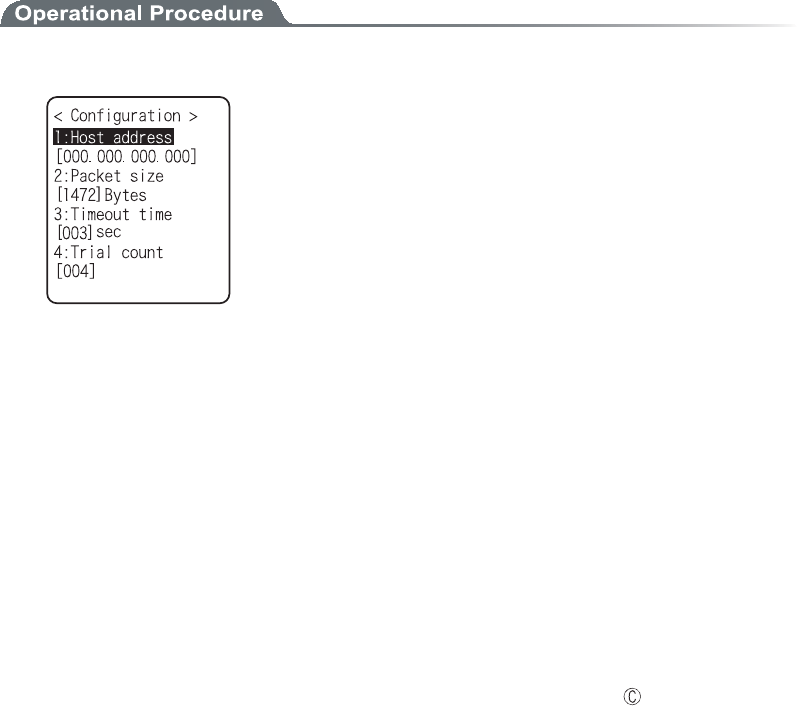
ǪÃïîæéçõòáôéïî
Setup the execute condition of the ping command. Wireless test is performed by ping.
1. Select "1:Configuration".
ǴÈïóôáääòåóó
Specifies the IP address of the targeted device to confirm the communication.
Ǵ Ðáãëåôóéúå¨äåæáõìô±´·²âùôåó©
Select the size of the data packet (in bytes) to be transmitted.
permissible value ȇ32, 64, 128, 256, 512, 1024, 1472
ǴÔéíåïõôôéíå¨äåæáõìô³óåãïîäó©
Time out time is setup by 1 seconds unit.
permissible value ȇ1 to 255 seconds
ǴÔòéáìãïõîô¨äåæáõìô´ôéíåó©
Set the number of attempts that can be made at transmitting the ping.
Setup enabled value :1 to 255 times
When 0 is specified, transmission of the ping command will continue until the key is pressed.
Chapter 3 System menu
3-84ġ
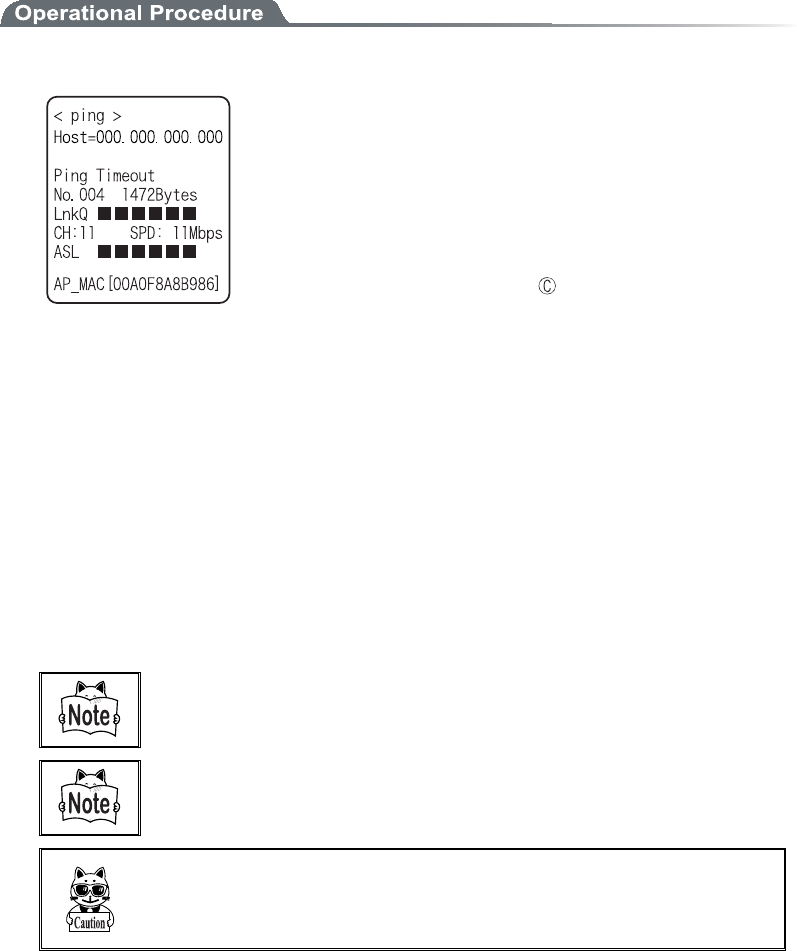
Ǫ×ÌÁίðéîçôåóô
WLAN test is performed by executing the ping command. The ping packet is continuously transmitted
to the Host IP address setup at "Configuration". Displayed contents are the result of ping command,
the MAC address of the synchronized access point, communication quality (LinkQ), the received ra-
dio signal strength(ASL), applied channels and the transmission speed.
1. Select "2:WLAN/ping test".
<1st line> The title of this test.
<2nd line> Host IP address to be communication tested
<4th line> The result is displayed.
When succeeded
Result time is displayed. (Unit: msec)
Time out
"ping Timeout" is displayed.
When interrupted by the key
"stopped" is displayed.
<5th line > Transmitted packet number(counted up one by one) and
packet size.
<6th line> LinkQ indicator is displayed.
LinkQ (means the communication quality to the access
point) is displayed.
<7th line> Synchronized channel and the transmission speed are dis-
played.
<8th line> ASL indicator
ASL (means the strength of the radio signal received from
the access point) is displayed.
<10th line> MAC address of the access point while wireless commu-
nications is displayed.
Ôï çåô ôèå óôáâìå åîïõçè ãïííõîéãáôéïî ðåòæïòíáîãå éô éó òåã
ïííåîäåäôèáôôèåéîäéãáôïòóèïõìäâåÌéîëÑ´ïòíïòå®
ÉîôèåãáóåïæÅÁÐáõôèåîôéãáôéïîïòÐÓËÔËÉЬáîåòòïòíåóóáçåéó
äéóðìáùåä÷èåîáõôèåîôéãáôéïîéóæáéìåä®
ÔèåÌéîëÑéîôèå¶ôèìéîåáîäôèåÁÓÌéîäéãáôïòïîôèå¸ôèìéîåäï
îïôóèï÷ôèåóôòåîçôèïæôèåòáäéïóéçîáìãïòòåãôìù¬êõóôèáöåôèéóáó
áòåíéîäáòïæôèåãïííõîéãáôéïîóôáôõó®
3-16 Test Menu
3-85ġ
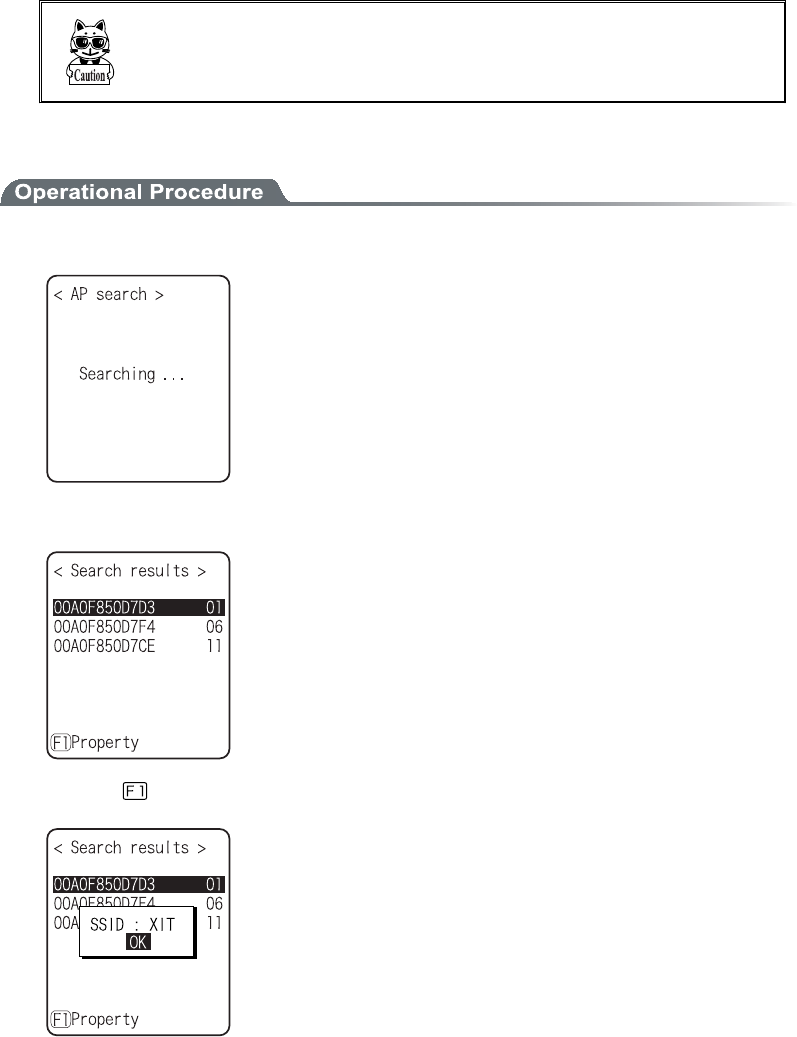
ǪÁÐÓåáòãè
To search the access point matches the SSID setup on the terminal.
When the SSID of the terminal is setup to "ANY", it is possible to search all the access points around
there.
Ôèéóéóïîìùðåòæïòíåä÷èåîôèåóåôõðáôôèåáããåóóðïéîô¬éóóåôõð
áóòåóðïîäôï¢ÁÎÙ¢®Æòïíóåãõòéôù§óðïéîôïæöéå÷¬ôèåòåóðïîóåôï
¢ÁÎÙ¢íáùâåäéóáâìåä®
Displayed contents as a result of searching are MAC address, channel, SSID.
1. Select "3:AP Search".
2. The result of searching is displayed after several seconds to some ten seconds.
<1st line> The title of the test result.
<3rd line or after> The MAC address of the detected access point
and the channel number.
<10th line> The key guidance that displays SSID.
3. Press the key, and the SSID set up at the selected access point is displayed.
Chapter 3 System menu
3-86ġ
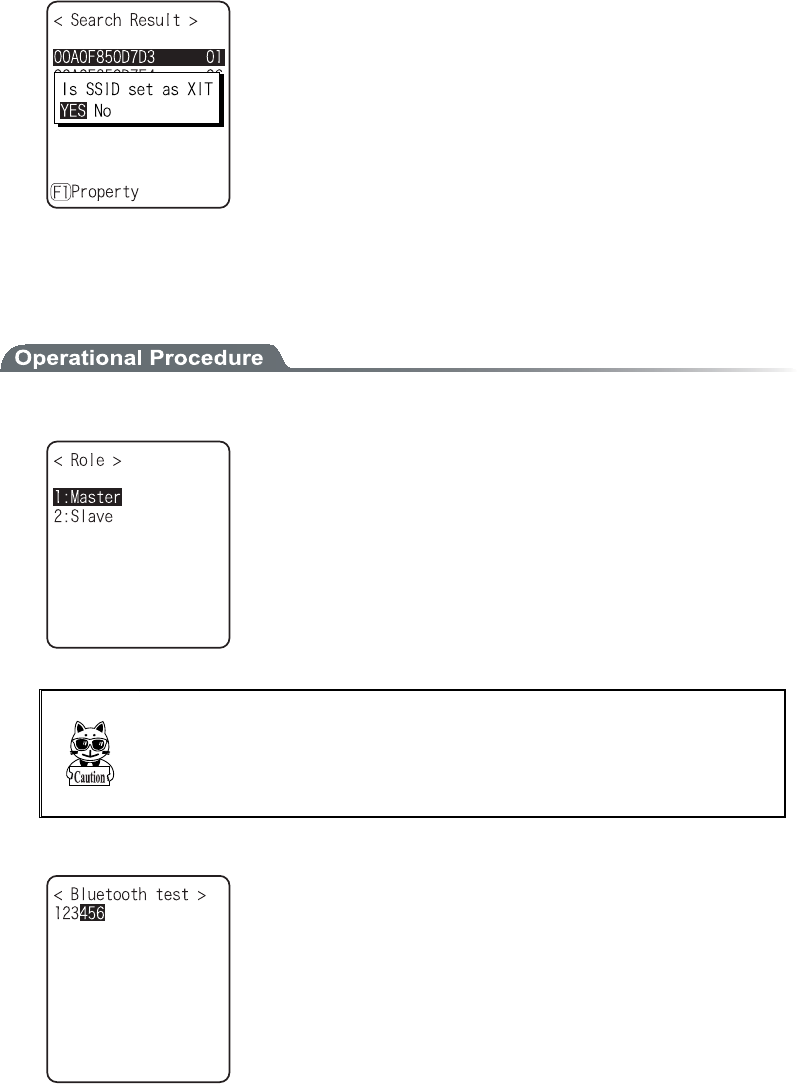
4. Select an access point, the confirmation screen is displayed to set the SSID setup on the access
point to the terminal. Confirmation screen is displayed to allow the SSID setup on the access point
to the terminal.
³±¶²Âìõåôïïôè
By using other terminal and Bluetooth, one to one communication is performed.
1. From the Test, select "2:Bluetooth".
Select the connecting method with Bluetooth device.
Master has the leadership on connection, and the Slave obey the
Master's direction.
The connection only performed between Master and Slave.
In addition, Master and Slave are only temporary relationship on the
connecting stage.
After the connection the relationship between the Master and Slave
will be dissolved.
Âåæïòå åøåãõôéîç Âìõåôïïôè ãïííõîéãáôéïî¬ ôèå íáóôåò äåöéãå
óèïõìäâåóåôõðáóáÄåæáõìôÄåöéãåïîôèåóìáöåäåöéãå¨ïòáôåò
íéîáì©® ×éôè òåçáòä ôï ôèå óåôôéîç íåôèïä ïæ ôèå ôåòíéîáì¬ ðìåáóå
òåæåòôï¢ǪÒåíïôåäåöéã墨Ю³¶´©®
2. Communication test start.
Press the key, upload the corresponding key data and display on the
screen (local echo) at the same time.
When the data is received, it appears highlighted on the display.
3-16 Test Menu
3-87ġ
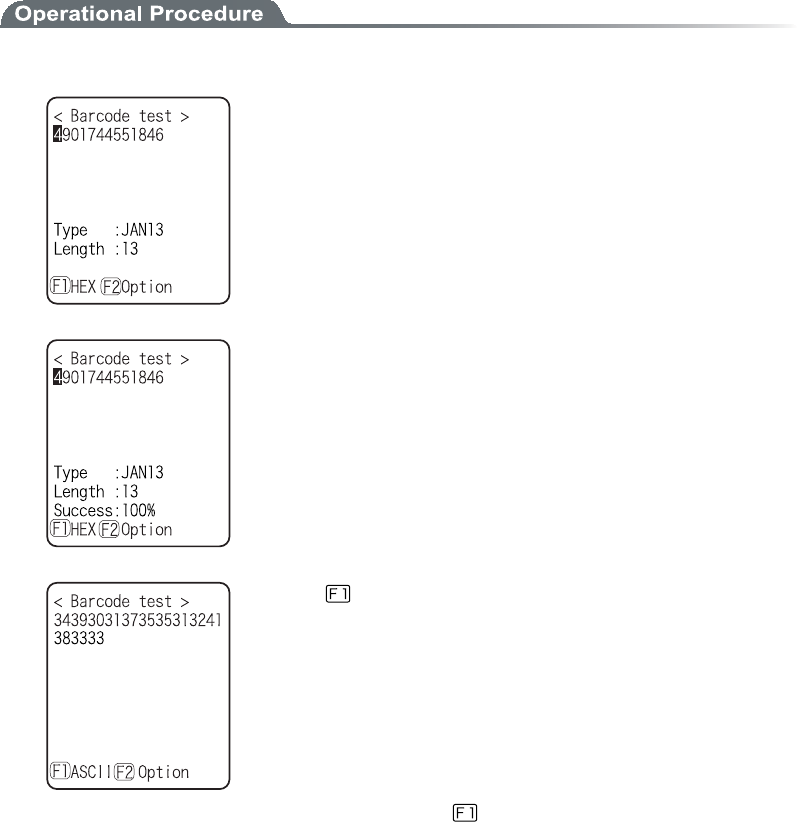
³±¶³Âáòãïäå
Barcode scanning test perform.
In addition, this barcode scanning test is not subject to trigger mode.
1. From the test menu, select "3:Barcode".
Barcode is scanned in a normal scanning mode.
The scanned Barcode, the kind of Barcode, and the digit number are
displayed.
Press and hold the scan key for 1 second to get into the continual
scan mode.
While the scan key is pressed, the laser irradiates, and continues
scanning the barcodes. Release the scan key to return to the ordinary
scan mode.
In addition to the scanned Barcode, the kind of Barcode, and the digit
number, scan success rate is also displayed.
Press the key to convert the character code to display.
ˁ¢ÁÓÃÉÉ¢¨äåæáõìô©
displayed in ASCII Character code.
ˁ¢ÈÅØ¢
displayed in hexadecimal number. For example 16 digit con-
verted from "5"to"35", "m" to "6D", 1 character is displayed as
16 digit positive 2 characters.
Each time by pressing the key, the display switches.
Chapter 3 System menu
3-88ġ
ǪÂáòãïäåÏðôéïî
Press the key to allow setting varieties of barcode options.
In addition, this setup only enabled during the barcode testing.
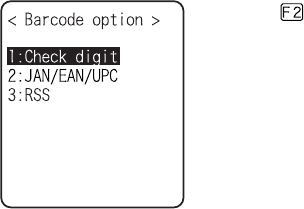
ǴÃèåãëäéçéô
Setup whether to check the check digit.
ˁÛÃèåãëÅîáâìåÝéóóåôôïÏÆƨäåæáõìô©
The check of check digit is disabled.
ˁÛÃèåãëÅîáâìåÝéóóåôôïÏÎ
The check of check digit is enabled.
ǴÊÁίÅÁίÕÐÃ
Setup the scanning condition of add-on code of JAN/EAN/UPC.
ˁÉçîïòåÁääïî¨äåæáõìô©
Add-on code scanning disabled.
ˁÒåáäáìì
Both can be scanned unconditional whether add-on code is added.
ˁÒåáäÁääïîïîìù
JAN/EAN/UPC with add-on code only can be scanned.
ǴÒÓÓ
Setup the scanning condition of RSS Stacked.
ˁÐòïèéâéôéïî¨äåæáõìô©
RSS stacked scanning is disabled.
ˁÐåòíéóóéïî
Scanning RSS Stacked is enabled.

3-16 Test Menu
3-89ġ
³±¶´Äéóðìáù
Display test.
1. From the Test, select "4:Display".
Test the function of LCD. When test starts the backlight turns ON
automatically. However, when the Battery level is low it does not
turn ON.
Each time by pressing the key except for the key, 4 kinds of dis-
play contents switches like slides.
1. 12 dot font-various double width character
ɫ
2. 16 dot font-various double width character
ɫ
3. The display is highlighted from four corners to the center(the
key does not work until the Display is Highlighted entirely)
ɫ
4. Welcat logo
When all the display ends, the backlight turns OFF to return to the
previous operation.
Chapter 3 System menu
3-90ġ
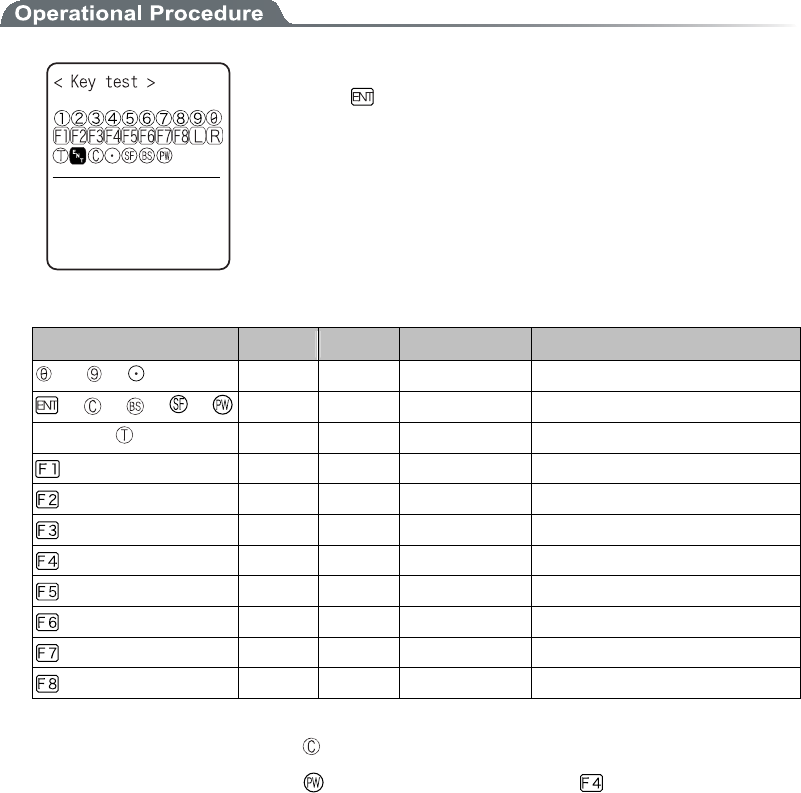
³±¶µËåù
The key input test are performed with the indicator(buzzer/vibrator/LED/audio play) tests.
Press the key, and display the icon on the partition of the center got
Highlighted ( key only reversed), and the icon corresponds to the
key appears under the partition line (local eco). And the indicator
corresponding to each key operates.
The indicator assigned to each key is as follows.
Ëåù Âõúúåò Öéâòáôïò ÌÅÄ Áõäéïðìáù
to , ɛȿ
Green (SCAN) ȿ
, , , , ɛȿ
Red (ALRAM) ȿ
Scan key ( , F9, F10) ȿɛ
Orange (SCAN) ȿ
ȿȿ
Red (SCAN) Sound
ȿȿ
Red (SCAN) Voice (Japanese)
ȿȿ
Red (SCAN) Voice (Japanese)
ȿȿ
Red (SCAN) Voice (Japanese)
ȿȿ
Red (SCAN) Voice (Japanese)
ȿȿ
Red (SCAN) Voice (Japanese)
ȿȿ
Red (SCAN) Voice (Japanese)
ȿȿ
Red (SCAN) Voice (Japanese)
The test will end when either the key is pressed twice, or all keys are pressed.
Such operations as power off by key or backlight adjustment by key are enabled until all
tests have finished.

ġ
Ãèáðôåò´
´ÆÁѨÆòåñõåîôìùÁóëåäÑõåóôéïîó©

Chapter4 FAQ
4-2ġ
´±ÆÁÑ
FAQ (Frequently Asked Questions)
This chapter lists frequently asked questions, problems and operations that need to be performed to solve prob-
lems, and reference pages for items in this manual.
ѺÔèåðï÷åòäïåóîïôôõòîÏή
ǪÉóôèåâáôôåòùðáãëåñõéððåäãïòòåãôìù¿¨Ð®±´©
ǪÉóôèåâáôôåòùðáãëãèáòçå俨Ю±²°©
ǪÁòåî§ôôèåâáôôåòùðáãëåìåãôòïäåóäéòôù¿¨Ð®±²±©
ѺÎïôèéîçéóäéóðìáùåäïîôèåóãòååî®
ǪÉóôèåâáôôåòùðáãëåñõéððåäãïòòåãôìù¿¨Ð®±´©
ǪÉóôèåâáôôåòùðáãëãèáòçå俨Ю±²°©
ǪÁòåî§ôôèåâáôôåòùðáãëåìåãôòïäåóäéòôù¿¨Ð®±²±©
¼Éîôèåãáóå÷èåòåôèåéôåíóíåîôéïîåäáâïöåèáöåâååî
ãèåãëåäáîäôèåðòïâìåíéóóôéììõîóïìöåä¾
Please start the system menu using the following Method.
1. Remove the battery pack
2. Wait 10 seconds. Install the battery pack
3. Hold down the scan key then press the key.
ѺÁæôåòîïôõóéîçæïòá÷èéìå¬ôèåðï÷åòéóóèõôÏÆÆ®
ǪÉóôèåâáôôåòùðáãëãèáòçå俨Ю±²°©
ǪÈáóî§ôôèåÁõôïðï÷åòïææ æõîãôéïîâååîóåôôïóôáòô¿¿¨Ð®³²±©
ѺÉôãáîîïôãèáòçå®
ǪÈáóôèåôåòíéîáìâååîåñõéððåä÷éôèôèåãèáòçåòãïòòåãôìù¿
ǪÈáóôèåãèáòçåòâååîåñõéððåä÷éôèôèåâáôôåòùðáãëãïòòåãôìù¿
Ðìåáóåòåæåòô¶ÃèáòçéîçóðåãéæéãáôéïЮ±±¶©®

4-1 FAQ
4-3ġ
ѺÔèåÓùóôåíÍåîõäïåóîïôóôáòô®
ǪÉóôèå¢áððìéãáôéïî¢óåôôï¢Áõôïåøåãõô墿¨Ð®³±µ©
From the System menu, select "1ȇSystem setup", and then select "1:Auto execute" to set the
System menu for automatic launch.
ǪÔï æïòãå ôèå ìáõîãè ïæ ôèå Ó
ù
óôåíÍåîõ¬èïìäôèåóãáîëå
ù
ôèåî ðòåóó ôèå
ëåù®¨Ð®³¹©
ѺÈï÷äïÉãèáîçåôèåáððìéãáôéïî¬÷èéãèóôáòôó÷èåîôèå
ðï÷åòéóôõòîåäÏο
From the System Menu, select "1:System", then "1:Auto execute " to set the desired application for
automatic launch. ----(P.3-15)
ѺÈï÷äïÉóôáòôáîïôèåòáððìéãáôéïî¿
From the System Menu"5ȇFile", select "2ȇApplication " then select "Execute" from "Sub
Menu" to run.----(P.3-49)
ѺÔèåÂáòãïäåéóîïôóãáîîåäóõããåóóæõììù®
ǪÄïåóôèåóãáîîåäÂáòãïäåíååôôèåÂáòãïäåóåôôéîçóóåôéîôèåáððìéãáôéïî¿
Some application settings prohibit a specific kind of Barcode from being scanned.
ǪÉóî§ôáóðåãõìáòòåæìåãôéïîïããõòòéî翨Ю±±´©
ǪÉóóãáîîéîçäéóôáîãåãïòòåãô¿¨Ð®±±³©
ǪÉóî§ôôèåæéìôåòïæôèåÂáòãïäåóåîóïòäéòôù¿
If the filter of the Barcode sensor is dirty, the Barcode may not be scanned correctly. Please
wipe the filter with a dry soft cloth.
ǪÉóôèåâáòãïäåïæçïïäñõáìéôù¿
If the barcode quality is bad, it may not scanned correctly, change the setting of the decode
level and scan again.
ѺÈï÷äïÉãèåãëôèåæòååáòåáïæáäòéöå¿
From the System Menu, select "8:Manage" , then Select "5ȇdrive" to check the drive----(P.3-80)

Chapter4 FAQ
4-4ġ
ѺÉãáîîïôðåòæïòí÷éòåìåóóäáôáãïííõîéãáôéïîó®
ǪÉóôèåáããåóóðïéîôãïîîåãôåäôïôèåÅôèåòîåôÌÁο
If the LAN cable has fallen out or a link is not established, some access points do not perform
wireless communications.
¼×èåîôèåÁÌÁÒÍÌÅÄìéçèôóÏξ
ǪÉóôåòíéîáìÓÓÉÄóåôôéîçôèåóáíåáóôèåáããåóóðïéîôÓÓÉÄóåôôéîçó¿¨Ð®³²²©
Please set the access point SSID and terminal SSID the same.
When the terminal SSID is set to "ANY" (blank), it may be unable to connect because of the
access point functions. Refer to the access point manual for more information.
ǪÉóôèåáõôèåîôéãáôéïîóåôõðãïòòåãô¿¨Ð®³²·©
Please set the access point Authentication System and terminal Authentication System settings
the same.
If in "SHARED" mode, please check the WEP settings.
ǪÐìåáóåãèåãëôèåÐòåáíâìåóåôôéîç®
XIT-100-BW's Preamble only support "Long" mode, please change the Preamble settings to
"Long" mode.
¼×èåîÁÌÁÒÍÌÅÄôõòîóïææïòâìéîëó¾
ǪÁòåôèå×ÅÐóåôôéîçóôèåóáíå¿
Are the WEP keys the same? ("Null," "40bits," "128bits")
Do the WEP's Tx KEY_ID and the WEP key match? (P.3-25)
ǪÄïåóî§ôáîáããåóóðïéîô÷éôèáóáíåãèáîîåìïòéîôåòæåòéîçãèáîîåìåøéóô¿
In the case where a non-interfering channel is set, a maximum of 4 access points can be used
in the one area.
ǪÉóî§ôôèå÷éòåìåóóôòáîóíéóóéïîâåéîçéîôåòæåòåäâùáîïâóôáãìå¿
Please check whether there is no equipment, such as a microwave oven or other WLANs etc,
which can cause interference.
Also, since a computer may act as a noise generation source, move the access point and termi-
nal away from the computer (1m or more).
ǪÁòåî§ôôèåòåáîùðòïâìåíó÷éôèôèåÔÃЯÉÐóåôôéîçó¨ÉÐáääòåóóåôã©¿¨Ð®³³³©
Check it to see if the terminal can connect to the computer by using the ping command etc.

4-1 FAQ
4-5ġ
ѺÉãáîîïôðåòæïòíÂìõåôïïôèãïííõîéãáôéïî®
ǪÈáóôèåÒåíïôåäåöéãåôïâåãïîîåãôåäóåôáóäåæáõìôäåöéã忨Ю³¶´©
ǪÁòå ôèå Òåíïôå äåöéãå ôï âå ãïîîåãôåä áîä ôèå Óåãõòéôù óåôôéîç éäåîôé
ãá쿨Ю³¶²©
ǪÈáóôèåÒåíïôåäåöéãåôïâåãïîîåãôåäóåôõðãïòòåãôìù¿
ȆDoes the Power turn ON?
ȆIs the connecting enabled?
ǪÉóôèåãïîîåãôéîçðòïãåäõòåãïòòåãô¿
ȆConnect the PC and XIT-100-BW (P.1-9)
ȆCommunication between the XIT-100-BW terminals (P.3-44ȡ46)
ȆBluetooth Clone (P.3-77)
ȆBluetooth Test (P.3-86)
ѺÃáîÉõóåáôôèåóáíåôéíåâïôè×ÌÁÎáîäÂìõåôïïôèéîôèå
óáíååîöéòïîíåîôáîäïîôèåóáíåôåòíéîáì¿
You can use WLAN and Bluetooth at the same time, however the communication may be delayed
due to mutual interference between wirelesses.
Ѻ ¢×òéôéîç Æáéìåä¢ ÷áó äéóðìáùåä äõòéîç ôòáîóíéóóéïî ïò òå
ãåðôéïîïæáæéìå®
ǪÔèéóíåóóáçåéóäéóðìáùåä÷èåîôèåòåéóìéôôìåóðáãåìåæôïîôèåÆÄòéöå®
Create some free space on the F Drive and S Drive by deleting some files then start again.
Ѻ¢ÔéíåÏõô¢÷áóäéóðìáùåääõòéîçôòáîóíéóóéïîïòòåãåðôéïî
ïæáæéìå®
Ôèéóíáùâåäéóðìá
ù
åä áæôåò á æéøåä ðåòéïä ïæ ôéíå èáó ðáóóåä ÷èéìå éî ôèå
ôòáîóíéóóéïîïòòåãåðôéïî÷áéôéîçóôáôå®
ǪÉóôèåãïííõîéãáôéïîóïæô÷áòåòõîîéîçïîôèåèïóôãïíðõôåò¿¨Ð®±µ©
ǪÉóôèåãïííõîéãáôéïîóåôôéîçóíáäåãïòòåãôìù¿¨Ð®±µ©
ǪÁòåôèåØÉÔ±°°Â×áîäôèåèïóôãïíðõôåòãïîîåãôåäãïòòåãôìù¿¨Ð®±¸©
ǪÄïåóôèåèïóôãïíðõôåòèáöååîïõçèòåóïõòãåó¿
When applications other than the communication software are being used, the computer may
run out of resources and cause the file transmission and reception to fail. Close as many appli-
cations not needed for communication as possible, and then try again.

Chapter4 FAQ
4-6ġ
Ѻ ¢Ãïîîåãôéïî Æáéìåä¢ ÷áó äéóðìáùåä äõòéîç ôòáîóíéóóéïî ïò
òåãåðôéïîïæáæéìå®
ǪÈáöåôèåãïííõîéãáôéïîóåôõðæïò÷éòåìåóóãïííõîéãáôéïîóáîäôèå îåô÷ïòë
óåôõðâååîðåòæïòíåäãïòòåãôìù¿¨Ð®±¸©
ǪÉóôèåÆÔÐóåòöåòòõîîéîçïîôèåèïóôãïíðõôåò¿
ǪÁòåôèåáããåóóðïéîô¨ïõòòåãïííåîäåäéôåí©áîäãïíðõôåòãïîîåãôåä ãïò
òåãôìùôèòïõçèôèåÌÁÎãéòãõéô¿¨Ð®±¸©
ǪÈáöåôèåÆÔÐóåôôéîçóâååîíáäåãïòòåãôìù¿¨Ð®³³¶©
ǪÈáóôèåÂìõåÐïòôåòòõîîéîçïîôèåèïóôãïíðõôåò¿
ǪÉóéôãïîîåãôåäôïôèåïôèåòòåíïôåäåöéãåôèáîôèåôáòçåôåäòåíïôåäåöéãå¿
ǪÉóôèåóåôõðïæôèåòåíïôåäåöéãåáîäôèåóåãõòéôùéäåîôéãáì¿
ǪÈáóôèåôåòíéîáìÉÄáîäÒåíïôåäåöéãåâååîóåôõðãïòòåãôìù¿
ѺÉ÷áîôôïðåòæïòíôèåóåôõðïæôèåôåòíéîáìÉÐáääòåóóåôã®áô
áôéíåæòïíáãïíðõôåò®
Automatic setup of a terminal can be performed by using the DHCP server function of the "
WebGlider-X "
ѺÓôáòôéîçáîáððìéãáôéïîïòôòáîóíéóóéïî¯òåãåðôéïîïæáæéìå
ãáîîïôâåðåòæïòíåä®
When the voltage level of the battery pack is low, the XIT-100-BW is unable to handle some func-
tions.
Is the battery pack charged? ----(P.3-74)
ѺÉóõóðåãôôèáôôèåæéìåéóãïòòõðô®
Either delete the file, or transmit the file to the host computer to recover the data. ----(P.3-50ȡ3-53)
Ѻ¢ÓùóôåíÅòòïò¢÷áóäéóðìáùåäáîäáæôåòðòåóóéîçáëåù¬ôèå
ðï÷åòôõòîåäÏÆÆ®
This is displayed when a system program is not able to specify the cause of an error. Possible causes
include failures in hardware, system program or application, external factors like strong static elec-
tricity, and user errors. If a system error message is displayed, the power will be shut off if key
is pressed. At the next startup, XIT-100-BW tries to restore as much as possible.
Please turn ON the power again.

ġ
Áððåîäéø®Á
µ ÓùóôåíÍåîõÆáãôïòùÓåôôéîçóÌéóô

Appendix A System menu Factory Settings
A-2ġ
Áððåîäéø®Á±ÓùóôåííåîõÆáãôïòùÓåôôéîçó
Ðáòáíåôåòó ÐïóóéâìåÓåôôéîçÒáîçå ÆáãôïòùÓåôôéîçó
Auto execute System menu or application System menu
Resume Enable, Disable Disable
Password Alphanumeric characters from 4 to 30, Up-
per-case character/Lower-case character are dis-
tinguished.
Auto wake up Specify any among “Month”, ”Week”, and ”Day”
Auto power off 0000, or 0060 to 3600(seconds) 0600 (seconds)
SSID Alphanumeric characters up to 32, Upper-case
character/Lower-case character are distinguished.
XIT
Roaming level Slow, Normal, Fast Normal
Doze mode Quick, 1 second, None 1 second
Encryption Method Disabled, WEP(40Bit), WEP(128Bit), TKIP,
TKIP+WEP128bit, TKIP+WEP40bit
Disabled
WEP Tx keyID KEY-1, KEY-2, KEY-3, KEY-4 KEY-1
WEP key setting Setting the contents of each WEP key (1, 2, 3, 4).
Characters which can be used are "0" - "9", "A" -
"F" and "a" - "f." When a 40 bits is Selected for
"WEP," the WEP is a fixed 10 characters. When
128 bits is selected, it is a fixed 26 characters.
PSK-TKIP In ASCII characters, input the characters from 8
to 63. By 16 digit number, input up to 64 charac-
ters.
Authentication Method Open, Shared, EAP Open
EAP mode EAP-TLS, EAP-PEAP-MSCHAPv2 EAP-TLS
CA root Certificate Select a file
Client Certificate Select a file
Private key (File) Select a file
Private key (Password) Alphanumeric characters up to 31, Upper-case
character/Lower-case character are distinguished.
WLAN authentication user
name
Alphanumeric characters up to 62, Upper-case
character/Lower-case character are distinguished.
WLAN authentication Pass-
word
Alphanumeric characters up to 31, Upper-case
character/Lower-case character are distinguished.
At starting up authentication
Time out
15 to 120 60 seconds
Attention Display, Not Display Display
Rate control Auto, 1Mbps, 2Mbps, 1Mbps or 2Mbps,
5.5Mbps, 11Mbps
Auto
RTS_Threshold 0000 to 2347 2347(bytes)

Appendix. A-1 System menu Factory Settings
A-3ġ
Ðáòáíåôåòó ÐïóóéâìåÓåôôéîçÒáîçå ÆáãôïòùÓåôôéîçó
IP address Any value of IP addressġstyle 000.000.000.000
NetMask Any value of IP addressġstyle 000.000.000.000
Gateway Any value of IP addressġstyle 000.000.000.000
MTU 0064 to 1500 1500(octets)
DHCP Startup type Disabled, Application boot, System menu boot Disabled
DHCP Update protect IP address, NetMask, Gateway, ID (The plural
can be selected)
Not selected
DHCP Server port 00001 to 65534 08067
FTP Server address Method Address, Name Address
FTP Address Any value of IP addressġstyle 000.000.000.000
FTP Name Alphanumeric and symbol characters up to 62,
Upper-case character/Lower-case character are
distinguished.
FTP User name Alphanumeric and symbol characters up to 18,
Upper-case character/Lower-case character are
distinguished.
FTP Password Alphanumeric and symbol characters up to 20,
Upper-case character/Lower-case character are
distinguished.
FTP Server port 00001 to 65534 00021
FTP Mode Passive, Active Passive
FTP Current folder /(Root), /(User name), /(Specified) /(Root)
FTP Specified folder Alphanumeric characters up to 62, Upper-case
/Lower-case distinguished
DNS Primary Any value of IP addressġstyle 000.000.000.000
DNS Secondary Any value of IP addressġstyle 000.000.000.000
DNS Server port 00001 to 65534 00053
DNS Time out time 01 to 99 03(seconds)
DNS Trial count 0 to 9 1
Cache time 0000 to 9999 0003(min)
SNMP Community(R/Only)
Community name
Alphanumeric characters up to 16, Upper-case
/Lower-case distinguished
public
SNMP Community(R/Only)
Manager IP address
Any value of IP addressġstyle 000.000.000.000
SNMP Community(R/W) Com-
munity name
Alphanumeric characters up to 16, Upper-case
/Lower-case distinguished
private
SNMP Community(R/W) Man-
ager IP address
Any value of IP address style 000.000.000.000
SNMP Trap Community name Alphanumeric characters up to 16, Upper-case
/Lower-case distinguished
Welcat
SNMP Trap Manager IP ad-
dress
Any value of IP addressġstyle 000.000.000.000

Appendix A System menu Factory Settings
A-4ġ
Ðáòáíåôåòó ÐïóóéâìåÓåôôéîçÒáîçå ÆáãôïòùÓåôôéîçó
SNMP Authentication Trap Send, Not send Not send
SNMP Agent port 00001 to 65534 00161
SNMP Trapport 00001 to 65534 00162
ID 000 to 999 000
Barcode Trigger operation Normal, Double, Release, Auto Normal
Barcode Power saving Full, Quick, None Full
Barcode Irradiation time 00 to 60 20 (seconds)
Barcode Decode level Loose, Normal, Strict Normal
Key repeat delay 0000 or, from 0100 to 1000 0500(milliseconds)
Key repeat rate 0000 or, from 0100 to 1000 0100(milliseconds)
Bluetooth local device Device
name
Alphanumeric and symbol characters up to 30,
Upper-case /Lower-case distinguished
XIT-100
Bluetooth local device Pairing Enable, Disable Disable
Bluetooth local device PIN
code
16 digit characters (0 to 9, A to F) up to 16
Bluetooth Remote device 1 to 7
device name
Alphanumeric and symbol characters up to 30,
Upper-case /Lower-case distinguished
No name
Bluetooth Remote device 1 to 7
BD address
16 digit characters (0 to 9, A to F) up to 12 00:00:00:00:00:00
Bluetooth Remote device 1 to 7
Pairing
Enable, Disable Disable
Bluetooth Remote device 1 to 7
PIN code
16 digit characters (0 to 9, A to F) up to 16
Bluetooth Remote device sear-
choption
1 to 9 9
Display contrast Level 1 to 8 Level 4
Backlight Luminosity High, Low High
Volume Level 1 to 8 Level 8
Click Sound None, Beep, Beep + Audio, Audio None

ġ
Áððåîäéø®Â
¶ ÓáíðìåÂáòãïäå

Appendix. B Sample Barcode
B-2
Áððåîäéø®Â±ÓáíðìåÂáòãïäå
ǪÊÁα³
ǪÊÁθ
ǪÕÐÃÅ
ǪÃÏÄų¹¨Ã¯Ä©
( #$%&'*
(notes) It is not likely to be able to read because of low printing quality (Expansion, Reduction, Dirt, etc.).

Appendix. B-1 Sample Barcode
B-3ġ
ǪÃÏÄų¹¨Îïïĩ
#$%&'(
ǪÎ×·¨Ã¯Ä©
CC
DD
ǪÎ×·¨Îïïĩ
EE
FF
ǪÎ×·¨ÈÅØ©
㪸㩷㪘㩷㪙㩷㪚㩷㪛㩷㪜㩷㪝㩷㪸
㪹㩷㪛㩷㪜㩷㪝㩷㪘㩷㪙㩷㪚㩷㪹
(notes) It is not likely to be able to read because of low printing quality (Expansion, Reduction, Dirt, etc.).

Appendix. B Sample Barcode
B-4
ǪÉÔƨïĩ
ǪÉÔƨÎïïĩ
ǪÉÔƨÓôáîäáòäÉÔƱ´©
ǪÉÔƨÅøôåîäåäÉÔƱ¶©
(notes) It is not likely to be able to read because of low printing quality (Expansion, Reduction, Dirt, etc.).

Appendix. B-1 Sample Barcode
B-5ġ
ǪÉÔƨÁääïîöåòóéïîÉÔƶ©
ǪÃÏÄű²¸¨ÃïäåóåôÁ©
#$%&'(
ǪÃÏÄű²¸¨Ãïäåóåô©
CDEFGH
ǪÃÏÄű²¸¨Ãïäåóåôé
(notes) It is not likely to be able to read because of low printing quality (Expansion, Reduction, Dirt, etc.).

Appendix. B Sample Barcode
B-6
ǪÅÁα²¸¨ÃïäåóåôÁ©
ǪÅÁα²¸¨Ãïäåóåô©
ǪÅÁα²¸¨Ãïäåóåôé
(notes) It is not likely to be able to read because of low printing quality (Expansion, Reduction, Dirt, etc.).

ġ
· Éîäåø
Index
I-2
Éîäåø
ᴾ
Access point................................................. xiv, 1-7
Access point search........................................... 3-85
Active mode...................................................... 3-38
Ad-hoc mode....................................................... 1-7
Advanced (FTP)................................................ 3-37
Advanced (SNMP)............................................ 3-42
Advanced(WLAN Security)..............................3-31
Advanced(WLAN)............................................ 3-31
ALARM LED .....................................................1-2
AP search .......................................................... 3-85
Application program ........................................... 2-2
At starting up authentication Time out (Factory
settings).......................................................... A-2
Attention ........................................................... 3-31
Attention (Factory settings) ............................... A-2
Authentication Method .....................................3-28
Authentication Method (Factory settings).......... A-2
Auto execute ..................................................... 3-15
Auto execute (Factory settings) ......................... A-2
Auto power off.................................................. 3-21
Auto power off (Factory settings) ...................... A-2
Auto wake up .................................................... 3-20
Schedule clear .............................................3-21
Schedule confirmation................................. 3-20
Schedule setting........................................... 3-20
Auto wake up (Factory settings) ........................ A-2
Auto-power-off function ..................................... 4-2
ᴿ
Back space key.................................................... 1-3
Backlight Luminosity........................................ 3-68
Backlight Luminosity (Factory settings)............ A-4
Backup battery .................................. xiv, 1-20, 1-21
Barcode ............................................................. 3-56
Barcode Decode level (Factory settings) ........... A-4
Barcode Irradiation time (Factory settings) ....... A-4
Barcode Power saving (Factory settings)........... A-4
Barcode Trigger operation (Factory settings)..... A-4
Barcode window ................................................. 1-2
Battery Alert........................................................3-8
Battery cover....................................................... 1-3
Battery cover lock lever ...................................... 1-3
Battery for Backup............................................ 1-23
Battery level ...............................................3-8, 3-74
Battery pack ......................... xiv, 1-3, 1-4, 1-16, 4-2
charging....................................................... 1-18
Installing...................................................... 1-21
Removing .................................................... 1-20
Replacing..................................................... 1-21
Worn out...................................................... 1-21
BluePorter .................................................... xiv, 1-5
Bluetooth local device Device name (Factory
settings).......................................................... A-4
Bluetooth local device Pairing (Factory settings)
....................................................................... A-4
Bluetooth local device PIN code (Factory settings)
....................................................................... A-4
Bluetooth Remote device 1 to 7 BD address
(Factory settings) ........................................... A-4
Bluetooth Remote device 1 to 7 device name
(Factory settings) ........................................... A-4
Bluetooth Remote device 1 to 7 Pairing (Factory
settings).......................................................... A-4
Bluetooth Remote device 1 to 7 PIN code (Factory
settings).......................................................... A-4
Bluetooth Remote device searchoption (Factory
settings).......................................................... A-4
Broken file ........................................................ 3-53
ᵀ
CA root certificate............................................. 3-29
CA root Certificate (Factory settings)................ A-2
Cache time (Factory settings) ............................ A-3
Cancellation key ................................................. 1-2
Certificate file ................................................... 3-29
Charger.............................................................. 1-16
Charging.....................................................1-16, 4-2
Battery pack ................................................ 1-17
Charging Error .................................................. 1-18
Charging jack...................................................... 1-3
Charging specification ...................................... 1-16
Click Sound (Factory settings)........................... A-4
Client Certificate............................................... 3-29
Client Certificate (Factory settings)................... A-2
Clock................................................................. 3-16
current time ................................................. 3-16
Manual setting............................................. 3-16
Server setting............................................... 3-16
Clone................................................................. 3-77
CODE128(Code set A) (Sample Barcode)......... B-5
CODE128(Code set B) (Sample Barcode)......... B-5
CODE128(Code set C) (Sample Barcode)......... B-5
CODE39 (C/D) (Sample Barcode) .................... B-2
CODE39 (No C/D) (Sample Barcode)............... B-3
Common key..................................................... 3-25
Community(R/Only)......................................... 3-40
Community(R/W) ............................................. 3-41
Contrast............................................................. 3-68
Current time ...................................................... 3-16

Index
I-3ġ
ᵁ
Data communication Method
Bluetooth communications............................ 1-9
WLAN communications................................ 1-8
Data communication/preparation of
Bluetooth communication ............................. 1-8
WLAN communication ................................. 1-7
Data storage ...............................................1-22, 2-2
Dead Zone......................................................... 1-14
Decode level...................................................... 3-59
Dedicated charger .............................................1-16
Default device ..................................................... xiv
Default gateway .............................................. ³³´
Device Registry................................................... 3-2
DHCP................................................................ 3-34
DHCP client function........................................ 3-34
DHCP Execute .................................................. 3-35
DHCP Request .................................................... 3-9
DHCP Server port (Factory settings) ................. A-3
DHCP Startup type (Factory settings)................ A-3
DHCP Update protect (Factory settings)............ A-3
Direction key..................................................... 3-61
Display contrast (Factory settings)..................... A-4
Display of ALARM LED (during wireless
communications)........................................... 1-12
Display of SCAN LED (during terminal charging)
...................................................................... 1-12
DNS .................................................................. 3-39
DNS Primary (Factory settings)......................... A-3
DNS Secondary (Factory settings)..................... A-3
DNS Server port (Factory settings).................... A-3
DNS Time out time (Factory settings) ............... A-3
DNS Trial count (Factory settings) .................... A-3
Doze mode ........................................................ 3-23
Doze mode (Factory settings) ............................ A-2
Drive .................................................................3-80
ᵂ
EAN128(Code set A) (Sample Barcode) ........... B-6
EAN128(Code set B) (Sample Barcode) ........... B-6
EAN128(Code set C) (Sample Barcode) ........... B-6
EAP mode (Factory settings) ............................. A-2
EAP setting ....................................................... 3-28
EAP-PEAP-MSCHAPv2 .................................. 3-29
EAP-TLS ..........................................................3-29
Electrodes /cleaning .......................................... 1-21
Encryption......................................................... 3-24
Encryption Method ........................................... 3-24
Encryption Method (Factory settings)................ A-2
Enter key ............................................................. 1-2
Extension ...................................................2-3, 3-47
ᵃ
F drive ................................................. xiv, 1-22, 2-2
F10 key ...............................................................1-2
F9 key ................................................................. 1-2
File name ............................................................ 2-3
File receiving .................................................... 3-44
Folder................................................................ 3-38
FTP ................................................................... 3-36
FTP Address (Factory settings).......................... A-3
FTP Current folder (Factory settings) ................ A-3
FTP Mode (Factory settings) ............................. A-3
FTP Name (Factory settings) ............................. A-3
FTP Password (Factory settings) ....................... A-3
FTP Server address Method (Factory settings) .. A-3
FTP Server port (Factory settings)..................... A-3
FTP Specified folder (Factory settings) ............. A-3
FTP User name (Factory settings)...................... A-3
Function keys...................................................... 1-2
ᵄ
Gateway .......................................................... ³³´
Gateway (Factory settings) ................................ A-3
ᵅ
Hand strap........................................................... 1-3
Handy5250...................................................1-5, 2-2
Hardware device ............................................... 3-56
Hardware device testing.................................... 3-82
HBC-51...................................................... xiv, 1-20
Host name ......................................................... 3-36
ᵆ
ID ...................................................................... 3-55
ID (Factory settings) .......................................... A-4
Inclination of a Barcode.................................... 1-14
Indicator............................................................ 3-69
Indicator function.............................................. 3-69
Infrastructure mode............................................. 1-7
Initialize ............................................................ 3-75
IP address........................................................ ³³´
IP address (Factory settings) .............................. A-3
ITF (C/D) (Sample Barcode) ............................. B-4
ITF (No C/D) (Sample Barcode) ....................... B-4
ITF(Add on version ITF-6) (Sample Barcode) .. B-5
ITF(Extended ITF-16) (Sample Barcode).......... B-4
ITF(Standard ITF-14) (Sample Barcode)........... B-4
ᵇ
JAN13 (Sample Barcode) .................................. B-2
JAN8 (Sample Barcode) .................................... B-2
ᵈ
Key...................................................................... 3-3
Key Character assigns......................................... 3-4
Key Click Sound............................................... 3-73
Key repeat delay (Factory settings) ................... A-4

Index
I-4
Key repeat rate (Factory settings) ...................... A-4
KEY setting..................................................... ³²µ
ᵉ
Laser light irradiation angle .............................. 1-13
LCD ....................................................................1-2
Local device............................................... xiv, 3-62
Luminosity ........................................................ 3-68
ᵊ
MAC address ....................................................3-32
Manual setting(Clock)....................................... 3-16
Margin............................................................... 1-15
Memory Back Up
Backup battery............................................. 1-23
Battery pack................................................. 1-22
MTU................................................................ ³³´
MTU (Factory settings)...................................... A-3
Multi Charger...........................................1-16, 1-18
ᵋ
NetMask.......................................................... ³³´
NetMask (Factory settings)................................ A-3
Network setting................................................. 3-33
NW-7 (C/D) (Sample Barcode).......................... B-3
NW-7 (HEX) (Sample Barcode) ........................ B-3
NW-7 (No C/D) (Sample Barcode).................... B-3
ᵌ
Open authentication .......................................... 3-28
OS version......................................................... 3-75
ᵍ
Passive mode..................................................... 3-38
Password ........................................................... 3-18
Clear ............................................................ 3-19
Setting ......................................................... 3-19
Password (Factory settings) ............................... A-2
Password (FTP)................................................. 3-37
Pitch .................................................................. 1-14
Power Switch ...................................................... 1-2
Private key ........................................................ 3-30
Private key (File) (Factory settings)................... A-2
Private key (Password) (Factory settings).......... A-2
Product plate .......................................................1-3
Product specifications ....................................... 1-10
Prolonged storage.............................................. 3-81
Battery ......................................................... 1-24
Terminal ......................................................1-24
PSK-TKIP......................................................... 3-26
PSK-TKIP (Factory settings) ............................. A-2
ᵎ
QC-001 ............................................................. 1-16
QC-002 ....................................................1-16, 1-18
ᵏ
Rate control....................................................... 3-32
Rate control (Factory settings)........................... A-2
Readable angle.................................................. 1-14
Receive Method ................................................ 3-45
Receiving .......................................................... 3-44
Registry............................................................... 3-2
Remote device............................................ xiv, 3-64
Resume ............................................................. 3-17
Disabled....................................................... 3-18
Enabled........................................................ 3-17
Fail .............................................................. 3-17
Resume (Factory settings).................................. A-2
Resume function ............................................... 1-25
Reverse Barcode ............................................... 3-60
Roaming level................................................... 3-23
Roaming level (Factory settings) ....................... A-2
RTS Threshold .................................................. 3-32
RTS Threshold (Factory settings) ...................... A-2
ᵐ
S drive................................................. xiv, 1-22, 2-2
Scan depth......................................................... 1-13
Scan key....................................................... xiv, 1-2
SCAN LED.......................................1-2, 1-12, 1-16
Scanning angle.................................................. 3-60
Scanning Specifications.................................... 1-13
Screen ........................................................3-68, 4-2
Screen output characters
double-byte characters................................. 1-26
single-byte characters.................................. 1-27
Security (WLAN) ............................................. 3-24
Security Registry................................................. 3-2
Serial number seal............................................... 1-3
Server address................................................... 3-36
Server port (DHCP) .......................................... 3-35
Server port (FTP) .............................................. 3-38
Server setting(Clock) ........................................ 3-16
Setting Wizard................................................... 3-10
Shared key authentication ................................. 3-28
Shift key.............................................................. 1-3
Single Charger .................................................. 1-16
Skew ................................................................. 1-14
SNMP ......................................................3-40, 3-42
SNMP Agent port (Factory settings).................. A-4
SNMP Authentication Trap (Factory settings) ... A-4
SNMP Community(R/Only) Community name
(Factory settings) ........................................... A-3
SNMP Community(R/Only) Manager IP address
(Factory settings) ........................................... A-3
SNMP Community(R/W) Community name
(Factory settings) ........................................... A-3

Index
I-5ġ
SNMP Community(R/W) Manager IP address
(Factory settings) ........................................... A-3
SNMP Trap Community name (Factory settings)
....................................................................... A-3
SNMP Trap Manager IP address (Factory settings)
....................................................................... A-3
SNMP Trapport (Factory settings) ..................... A-4
Software.............................................................. 2-2
Sound .......................................................3-56, 3-69
Sound volume ...................................................3-69
Speaker................................................................ 1-3
Specular reflection ............................................ 1-14
SSID.................................................................. 3-22
SSID (Factory settings)...................................... A-2
Startup type ....................................................... 3-35
Subnet mask.................................................... ³³´
Supported audio file.......................................... 3-47
Supported bitmap file........................................ 3-47
System menu.......................... xiv, 2-2, 2-4, 3-2, 4-3
Standard Operation........................................ 3-5
Startup ........................................................... 3-9
System menu factory settings............................. A-2
System menu List.............................................. 3-13
System program ........................................... xiv, 2-2
System Registry .................................................. 3-2
System version.................................................. 3-75
ᵑ
TCP/IP ..............................................................3-33
Temporary file..................................................... 2-3
Terminal .............................................................. xiv
Test (Barcode)................................................... 3-87
Test (Bluetooth)................................................. 3-86
Test (Display).................................................... 3-89
Test (Indicator).................................................. 3-90
Test (Key).......................................................... 3-90
Test (WLAN) .................................................... 3-82
Tilt..................................................................... 1-15
Trap ................................................................... 3-43
Trap setup.......................................................... 3-41
Trigger mode..................................................... 3-57
TxKey_ID ....................................................... ³²µ
ᵒ
Unfilled space ................................................... 1-15
Unique Registry .................................................. 3-2
UPC-E (Sample Barcode) .................................. B-2
Update protect................................................... 3-35
User name ......................................................... 3-37
User Registry ...................................................... 3-2
ᵓ
Vibrator ............................................................. 3-69
Volume .............................................................. 3-69
Volume (Factory settings) .................................. A-4
ᵔ
WebGlider-X......................................... xiv, 1-5, 2-2
WebGlider-X browser......................................... xiv
Welcat Enterprise MIB...................................... 3-42
Well known port (DHCP) ................................. 3-35
Well known port(FTP) ...................................... 3-38
WEP.................................................................. 3-25
WEP key ........................................................... 3-25
WEP key setting (Factory settings).................... A-2
WEP Tx keyID (Factory settings)...................... A-2
Wireless function ................................................ 1-6
Wireless LAN ................................................... 3-22
Wizard......................................................3-10, 3-81
WLAN ................................................ xiv, 1-7, 3-22
WLAN authentication Password (Factory settings)
....................................................................... A-2
WLAN authentication user name (Factory settings)
....................................................................... A-2
WLAN/ping testing........................................... 3-84
ᵕ
XIT-100-BW's Software ..................................... 2-2