Welch Allyn WAM2500 Wireless Acquisition Module User Manual 3 Section 2
Mortara Instrument Inc Wireless Acquisition Module 3 Section 2
Contents
- 1. 3 Sction 2 Manual
- 2. 2 Section Manual
- 3. 1 Cover Manual
- 4. 4 Section 3 Manual
- 5. 5 Appendix A
3 Sction 2 Manual

OPERATION
SECTION 2
7
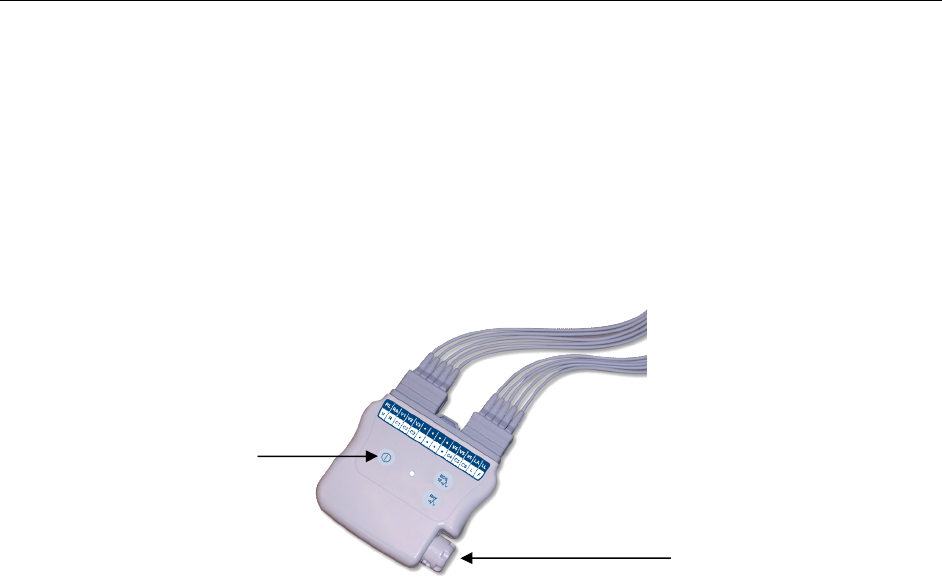
Opening Battery Cover
The bottom cover seals the battery compartment, makes contact with the battery to power up the device, and locks in
place. Removal of the battery cover will automatically turn the power off.
NOTE: The device On/Off button can also be used to power off the device.
To remove the battery cover, twist the cover in a counterclockwise direction.
Figure 2-1
Battery Installation
The battery compartment is accessible on the bottom side area of the WAM.
Insert one AA battery into the battery compartment. Align the positive (+) and negative (-) indicators of the battery
with the designators shown on the device’s back label.
Attaching the Patient Lead Wires
The patient lead wires consist of two connector blocks with 5 lead wires in each block. The lead wires are
positioned on the cable to follow the contour of the torso. Each lead wire terminates in a Medi-clip or 4 mm Banana
connector.
Securely insert the connector block into the ECG input connector on the top of the WAM.
NOTE: Be careful to insert the connector block into the appropriate input connector.
Battery Cover
On / Off Button

SECTION 2
8
Turning the WAM On
The WAM will power up as soon as a battery has been inserted into the battery compartment and the cover applied.
If the WAM was turned off after its last use, the user can power the WAM on by pressing the On /Off button on the
front side of the cable yoke:
Turning the WAM Off
The user has two options to power the WAM off:
1. Remove the battery cover, or
2. Press the On/Off button
a. The LED display will turn off
b. An audible tone will sound indicating power off and RF disconnect
Connecting the WAM to the ELI 350 (Pairing Mode)
To pair the unit with the ELI 350:
1. Enter WAM pairing mode on the ELI 350.
2. Bring the WAM very close to the ELI 350.
3. Ensure the unit is off
4. Enter pairing mode on the WAM by holding the ECG 12 Lead and Rhythm buttons
simultaneously and pressing the On/Off button.
5. Wait a few seconds,
6. If the WAM beeps three times it is permanently paired with the ELI 350 in pairing mode. Pairing
will be retained until this process is repeated.
7. If three beeps are not heard and the green and yellow LEDs are toggling intermittently, pairing
has failed. Please try steps 1-6 again.

SECTION 2
9
Patient ECG Hookup
Skin Preparation
Skin preparation is important to perform before electrode attachment to help ensure good signal quality when
transmitting patient data. Poor skin-electrode contact may cause noise or artifact which can affect the analysis of the
ECG data. Low amplitude signals may also be the result of poor skin-electrode contact.
To prepare the skin
1. Identify the electrode sites on the torso by referring to Positioning the Electrodes.
2. Remove any hair from the electrode sites using a razor.
3. Wipe oils from the electrode sites with an alcohol prep pad.
4. Remove any dead skin from the electrode sites with an abrasive pad. Two to three moderate rubs at each site
should be sufficient.
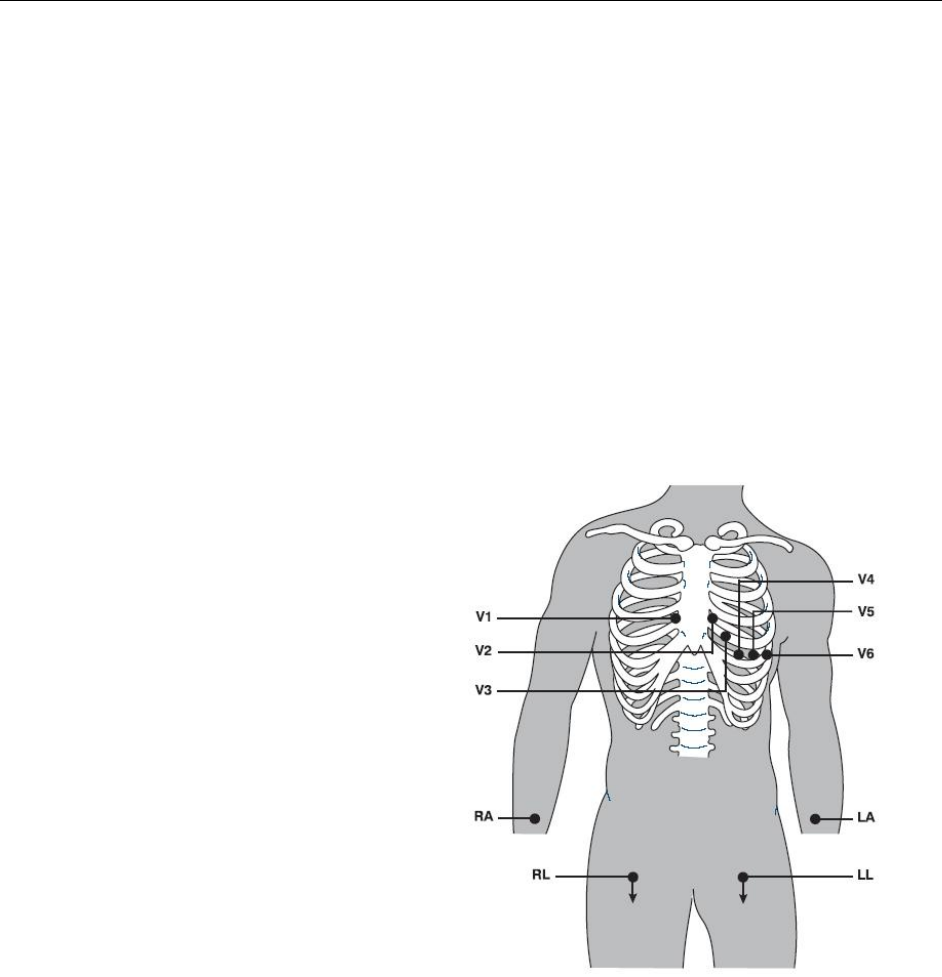
Positioning the Electrodes for 10-wire (12-lead) Hookup
Limb
Electrodes Placement
AAMI
IEC
RA
R
Right arm lead should be
placed on the right deltoid,
forearm, or wrist.
LA
L
Left arm lead should be
placed on the left deltoid,
forearm, or wrist.
RL
N
Right leg lead should be
placed on the right thigh or
ankle.
LL
F
Left leg should be placed
on the left thigh or ankle.
Precordial
Electrode Placement
AAMI
IEC
V1
C1
Fourth intercostal space at the right sternal border
V2
C2
Fourth intercostal space at the left sternal border
V3
C3
Midway between V2 and V4
V4
C4
Fifth intercostal space at the left midclavicular line
V5
C5
Anterior axillary line on the same horizontal level as V4
V6
C6
Mid-axillary line on the same horizontal level as V4 and V5

SECTION 2
10
LED Display Battery Voltage Indicator
The WAM is powered with a single AA battery.
When the battery contains sufficient voltage and the patient is connected, the LED’s on the front of the WAM will
display a solid Green LED representing the current battery voltage is sufficient to operate and communicate with
ELI 350. If a battery with low voltage is inserted and the LED does not illuminate, or a Yellow LED is present a
new battery must be installed. Please review table on following page to assure indicator messages are understood.
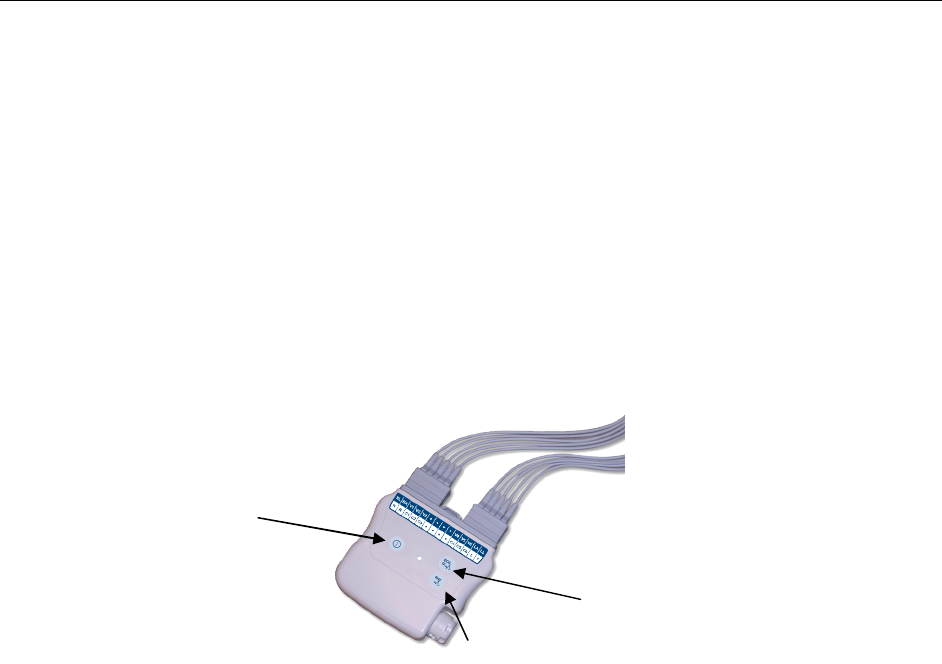
Using the Buttons
Three buttons located on the front of the WAM are available for powering the WAM On/Off, acquire a 12 lead
ECG, and for acquire a rhythm strip:
Figure 2-4
Start Up
On initial start up, the green and yellow LEDs on the WAM will briefly turn and and the unit will beep. The WAM
indicates the following information through the LED:
o Solid Green: appropriate battery power level, good electrode-to-skin impedance, and good
bidirectional communication with the electrocardiograph.
o Flashing Green: Low battery
o Solid Yellow: Lead Fail
o Flashing Yellow: Low battery and lead fail
o LED Off: unit not powered on, very low battery (no sound), or device out of range (WAM
will beep intermittently).
Note: See LED Indicators page for further information
Lead Check
LEAD CHECK is a valuable tool for verifying and optimizing signal quality. This is done automatically through
visual communication with two LEDs located on the front of the WAM. These two LEDs are green and yellow in
color and may be seen as a solid color, flashing on and off, or alternating between green and yellow.
Note: A solid Green LED represents the impedance measured at the right arm (RA), left arm (LA), left
leg (LL), and V1 through V6 electrodes is adequate for ECG acquisition. A yellow LED indicates a
lead fail condition is present. See the cardiograph for more information.
.
On / Off
12 lead ECG
Rhythm Print

SECTION 2
11
LED Indicators
WAM Status
LED
+ Audio
MODE
Unpaired with Device or
OUT OF RANGE
GREEN OFF
YELLOW OFF
Audio tick at 2Hz,
Starting 2 sec after unit
is turned ON.
If the unit is unpaired
(meaning does not have
a host assigned) the
status is permanent
until pairing occurs.
If paired but OUT OF
RANGE the GREEN and
YELLOW LED are OFF,
the audio is ON but if
the unit goes back in
range, audio will stop
and GREEN or YELLOW
led will resume status as
normal.
Lead Fault
YELLOW solid (unless
Low battery )
GREEN OFF
One or more leads is
not connected properly.
ALL OK
GREEN ON solid
YELLOW OFF
No lead fail condition is
detected, Battery is OK.
Collecting 10 seconds of
data…..
GREEN ON solid
YELLOW OFF
Audio at 2 Hz until 10
seconds of data are
acquired and the
electrodes can be
disconnected.
The WAM is collecting a
10 second ECG.
Low Battery
Blinking LED (Yellow or
Green depending on
lead fault status)
The WAM has detected
a low battery condition
please replace the
battery within 15
minutes.
Very Low Battery
GREEN OFF
YELLOW OFF
¼ sec audio on, then
units turns off
The WAM has detected
the very low battery
status and will turn OFF.

SECTION 2
12
Starting an ECG Acquisition Session
1. Ensure an AA battery is in the battery compartment (see note below).
2. Press On/Off button to turn the WAM on.
3. Connect the patient to the lead wires of the WAM.
4. Use LED LEAD CHECK to check the electrode-to skin impedances and verify patient hookup quality as
explained in this section.
5. Use LED to assure communication has been established with the electrocardiograph and signal quality of each
ECG is transmitted as expected.
6. ECG data should be automatically transmitted to the ELI 350
7. Press the 12 Lead ECG button to complete the acquisition of the 12 lead ECG.
8. Press the Rhythm button to acquire a rhythm print followed by pressing the Rhythm button again to stop the
rhythm printing.
NOTE: if battery voltage is too low, the WAM may not power on. Insert a new AA battery into the unit to
continue operation.
NOTE: During normal operation, the Green LED will continuously display on the front of the WAM.
NOTE: If the battery cover is open during transmission, the WAM will stop transmitting. The cover must
be applied and the battery must be reinserted to resume operation.
NOTE: If a lead fail condition occurs during operation, the yellow LED will turn on indicating lead fail in
the center of the WAM yoke.
Ending an ECG Acquisition Session
At the end of the ECG acquisition session, the WAM should be turned off.
Note: ECG data may now be reviewed, plotted, or edited as needed on the ELI 350.