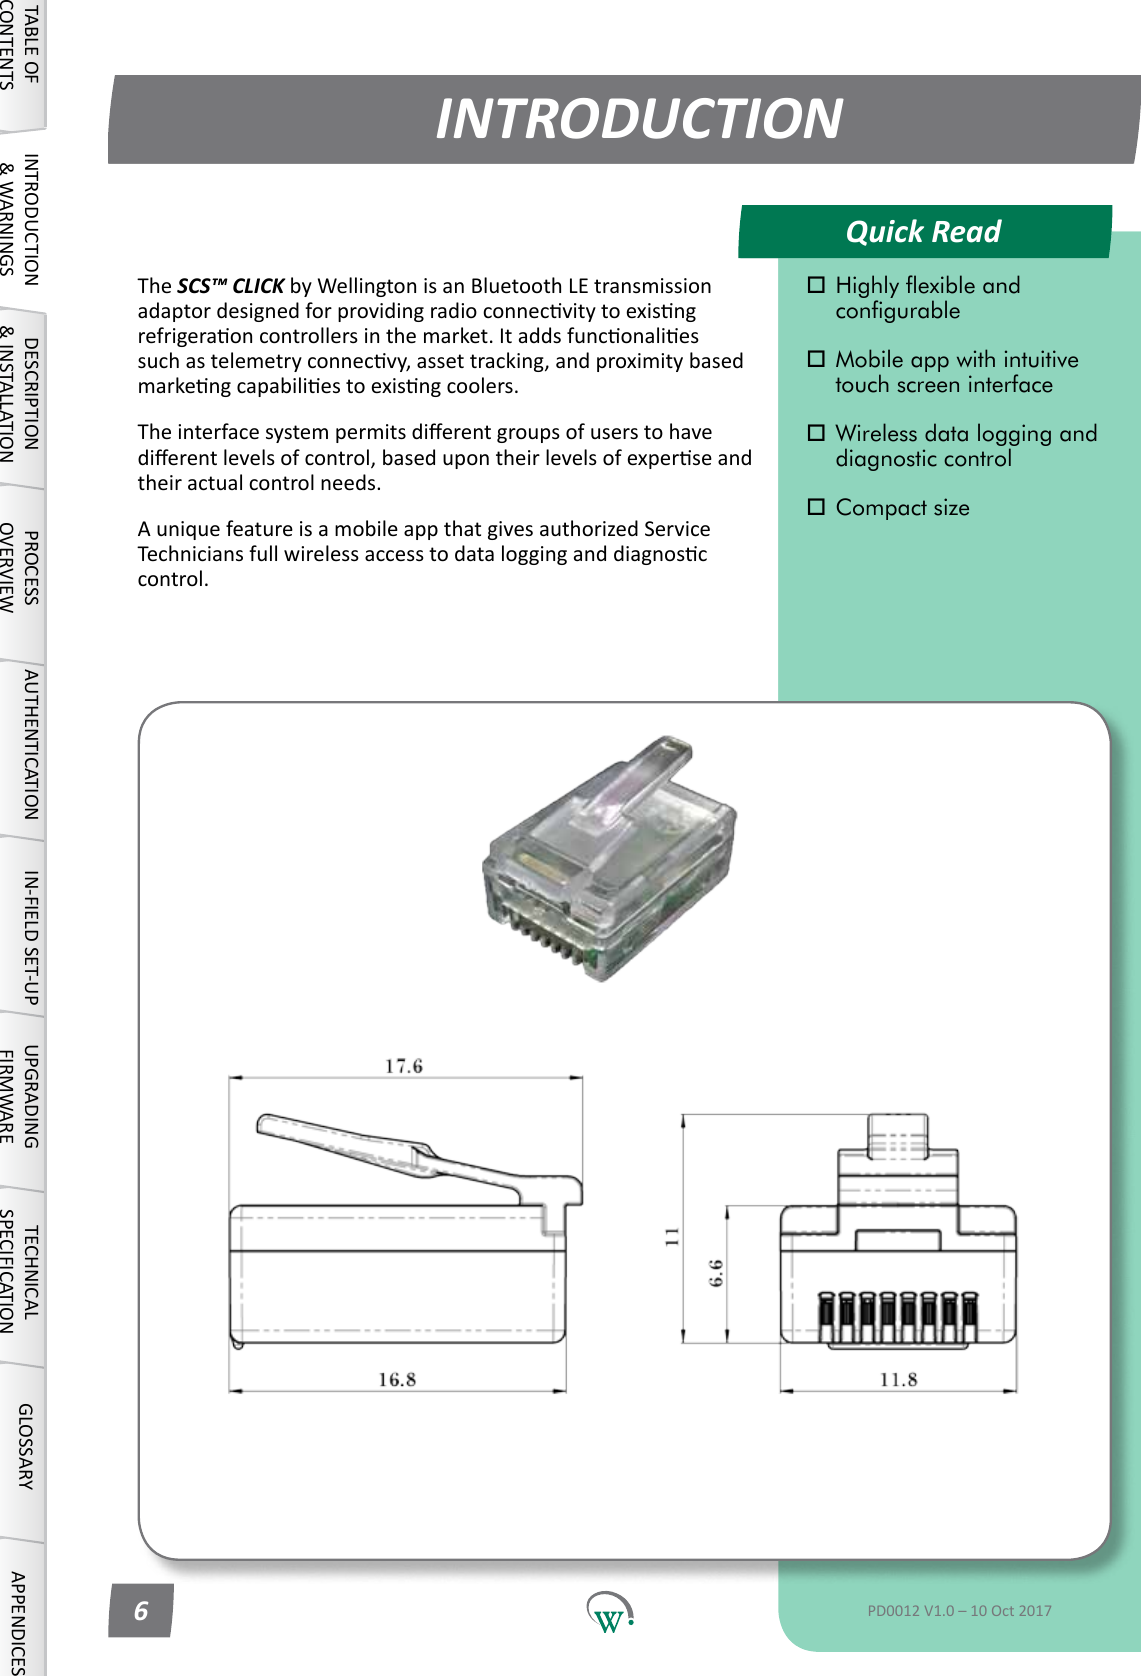
Wellington Drive Technologies CLICK1 Bluetooth LE transmission adaptor, SCS Click User Manual Part 1 of 2

Wellington Drive Technologies Ltd Bluetooth LE transmission adaptor, SCS Click Users Manual Part 1 of 2

Contents

Users Manual_Part 1 of 2

TECHNICAL USER MANUALCLICK
 © 2017 Wellington Drive Technologies Limited 21 Arrenway Drive, Rosedale, Auckland 0632, New Zealand PO Box 302-533, North Harbour, Auckland 0751, New ZealandTel.:    + 64 9 477 4500,  Fax:   + 64 9 479 5540, E-mail: info@wdtl.com  Website: www.wdtl.com
1  TECHNICAL USER MANUAL3  TABLE OF CONTENTS4 WARNINGS!6 INTRODUCTION7  InstallaonDiagrams8    EMS55 Set-up10    Process Overview12  GRAPHICAL USER INTERFACES21  UPGRADING FIRMWARE23  TECHNICAL SPECIFICATIONS26 GLOSSARYTABLE OF CONTENTSQuick ReadTABLE OF CONTENTSINTRODUCTION & WARNINGSDESCRIPTION & INSTALLATIONPROCESSOVERVIEWAUTHENTICATIONIN-FIELD SET-UPUPGRADING FIRMWARETECHNICAL SPECIFICATIONGLOSSARYAPPENDICESPD0012 V1.0 – 10 Oct 2017 3
Quick ReadWARNINGS!TABLE OF CONTENTSINTRODUCTION & WARNINGSDESCRIPTION & INSTALLATIONPROCESSOVERVIEWAUTHENTICATION IN-FIELD SET-UP UPGRADING FIRMWARETECHNICAL SPECIFICATIONGLOSSARY APPENDICESImportant Do’s and Dont’s:Do not drop the SCS™ CLICK.There are no serviceable parts inside the SCS™ CLICK. Do not open the housing. Warning!  Risk of electrocution.The SCS™ CLICK must only be used for the purposes described in this manual.The design and specication of the SCS™ CLICK is subject to change without warning.PD0012 V1.0 – 10 Oct 20174 4PleasereadthefollowingwarningstomaintainthesafefunconandconnuedperformanceofyourWellingtonDriveTechnologiesLimited SCS™ CLICK:Installaon; InstallaonoftheSCS™ CLICK other than in accordance with the“Descripon&Install”seconofthismanualwillinvalidatethe warranty.  The SCS™ CLICK must only be installed and conguredbytrainedandauthorizedsta.Noserviceableparts; There are no serviceable parts inside the SCS™ CLICK.  Do notopenthehousing.Openingoftheelectronicshousing,alterangormodifyingtheSCS™ CLICK will invalidate the warrantyandcancauseriskofelectrocuon.Consequenalfailures; FailureofconnectedcomponentsmaycausedamagetotheSCS™ CLICK.Cricalorvulnerablecomponentsshouldbeprotectedindependentlyagainstfailure.SCS™ CLICK is not warrantedagainstdamagecausedbyortoothercomponents.Fitforpurpose; The SCS™ CLICK must only be used for the purpose and funconsdescribedinthismanual.WhileWellingtonDriveTechnologiesLimitedmayprovidetechnicalsupportonsuitableapplicaonsandconguraonoftheSCS™ CLICK (where such arelaonshipmayexist),noliability,responsibilityorriskisacceptedindeterminingiftheSCS™ CLICK istforpurposeforanyparcularapplicaon.noliability,responsibilityorriskisacceptedbyWellingtonDriveTechnologiesLimitedforthecorrectoperaonalfunconofanyparcularinstallaonorconguraon.Connuousdevelopment; WellingtonDriveTechnologiesLimitedundertakestoconnuouslydevelopandimproveproductsandservices.ThedesignandspecicaonfortheSCS™ CLICK issubjecttochangewithoutwarning.Thecontentsofthismanualaresubjecttochangewithoutwarning.Whileeveryendeavourismadetoensurethatallspecicaonsanddocumentsarecurrentandcomplete,WellingtonDriveTechnologiesLimitedacceptsnoliability,responsibilityorriskduetoomissionsorchangescausedbyconnuousimprovementanddesignchanges.Usersof this manual should verify that they have the current released version(publishedontheWellingtonDriveTechnologieswebsitewww.wdtl.com)beforeproceeding.
Quick ReadWarnings - contTABLE OF CONTENTSINTRODUCTION & WARNINGSDESCRIPTION & INSTALLATIONPROCESSOVERVIEWAUTHENTICATIONIN-FIELD SET-UPUPGRADING FIRMWARETECHNICAL SPECIFICATIONGLOSSARYAPPENDICESThe SCS Click must not be disposed off in municipal collections; it must be disposed off through an approved e-waste collection point.Do not drop the SCS™ CLICK.Do not connect the SCS™ CLICK  to the incorrect supply voltage.PD0012 V1.0 – 10 Oct 2017 5Correctdisposal; The SCS™ CLICK issubjecttoEUDirecve2002/96/EC(WEEE)fore-waste.Itmayalsobesubjecttoothernaonallegislaonforthesafedisposalofe-waste.TheSCS™ CLICK mustnotbedisposedoinmunicipalcollecons;itmustbedisposedothroughanapprovedWEEEcolleconpoint.Alternavely,theSCS™ CLICK may be returned to an authorizedWellingtonDriveTechnologiesLimiteddistributorattheendofitsworkinglife.Penalesmaybeapplicableforincorrectdisposal,asspeciedbynaonallegislaon.Thecircuitboardmaycontainhazardoussubstanceswhichcouldaecthealthandtheenvironmentifdisposedoincorrectly.  The SCS™ CLICK complieswithEUDirecve2002/95/EC(RoHS).Chemicals: The SCS™ CLICK must not be exposed to any solvents or chemicals, as this will invalidate the warranty and may damagethehousing,leadingtounsafeoperaon.Temperature: The SCS™ CLICK must only be subjected to temperatures asspeciedinthe“Datasheet”andthe“Techinicalspecicaon”seconofthismanual.Exceedingtheserangeseitherinoperaon,installaon,transportaonorstorage,willinvalidatethewarrantyandmaydamageelectroniccircuitsandhousingcomponents,leadingtoprematurefailure.Vibraonandimpact: The unit must be installed in such a way as to be protected fromimpactinoperaon.Exposuretoimpacts,eitherinoperaon,installaon,transportaon,orstorage,maydamageelectroniccircuitsandhousingcomponents,leadingto premature failure, and may cause the SCS™ CLICK to becomeunsafe.Anyimpactwhichcausesvisualdamagetothehousingwillinvalidatethewaranty.Voltages: The SCS™ CLICK must only be connected to equipment whichcomplywiththeacceptablevoltagerangesspeciedinthe“Datasheet”andthe“TechnicalSpecicaon”seconofthismanual.Connecontosupplyvoltagesoutsideoftheserangescandamageelectricalcircuits,leadingtopremature failure, and may cause the SCS™ CLICK to become unsafe and invalidates any warranty due to incorrect voltages.
Quick ReadINTRODUCTIONTABLE OF CONTENTSINTRODUCTION & WARNINGSDESCRIPTION & INSTALLATIONPROCESSOVERVIEWAUTHENTICATION IN-FIELD SET-UP UPGRADING FIRMWARETECHNICAL SPECIFICATIONGLOSSARY APPENDICES Highly exible and      congurable Mobile app with intuitive    touch screen interface Wireless data logging and    diagnostic control Compact sizePD0012 V1.0 – 10 Oct 20176The SCS™ CLICKbyWellingtonisanBluetoothLEtransmissionadaptordesignedforprovidingradioconnecvitytoexisngrefrigeraoncontrollersinthemarket.Itaddsfunconaliessuchastelemetryconnecvy,assettracking,andproximitybasedmarkengcapabiliestoexisngcoolers.Theinterfacesystempermitsdierentgroupsofuserstohavedierentlevelsofcontrol,basedupontheirlevelsofexperseandtheir actual control needs.AuniquefeatureisamobileappthatgivesauthorizedServiceTechniciansfullwirelessaccesstodatalogginganddiagnosccontrol.
InstallaonInstallaon DiagramsINSTALLATION PROCEDURE:STEP 1 Remove the two screws holdingtheRJ45coverinplace with PZ1 screwdriver and remove coverSTEP 2 Push SCS Click fully into the RJ45socket.Ensure it makes a Click sound,andtheretainingfeature is clicked into place. STEP 3 Ensure that the SCS Click isashinggreeneveryfewseconds.  This means it is installed correctly and powered up. STEP 4 Replace the cover and two screws.TABLE OF CONTENTSINTRODUCTION & WARNINGSDESCRIPTION & INSTALLATIONPROCESSOVERVIEWAUTHENTICATIONIN-FIELD SET-UPUPGRADING FIRMWARETECHNICAL SPECIFICATIONGLOSSARYAPPENDICESPD0012 V1.0 – 10 Oct 2017 7
EMS55 Set-upInstallaonEMS55 SETUP PROCEDURE:STEP 1Pressthetoplebuon(“a“),Willthenbereadytoaccept the password.STEP 2Enter the password by pressingthebuonsinthefollowingorder.TopLe(“a“)-3mesTopright(“b“)-2mesBoomright(“c“)-1meBoomle(“d“)-4mes STEP 3 The display will now show P5.STEP 4 PresstheBoomright(“c“)buon5mesunl“ddP”is displayed.  It will the alternatebetweendisplaying“ddP’and“00”TABLE OF CONTENTSINTRODUCTION & WARNINGSDESCRIPTION & INSTALLATIONPROCESSOVERVIEWAUTHENTICATION IN-FIELD SET-UP UPGRADING FIRMWARETECHNICAL SPECIFICATIONGLOSSARY APPENDICESPD0012 V1.0 – 10 Oct 20178
EMS55 Set-upInstallaonEMS55 SETUP PROCEDURE:STEP 5 PresstheTopLe(“a“)buononce.Thedisplaywillnowbealternangbetweendisplaying“ddP’and“00”.STEP 6HoldtheTopright(“b“)buonunl“01”isdisplayed.Display will then alternate between“ddP”and“01”. STEP 7 Wait for 20-30 secs for the Elstattomeout.Itwillthenre-boot and return to normal operaon.TABLE OF CONTENTSINTRODUCTION & WARNINGSDESCRIPTION & INSTALLATIONPROCESSOVERVIEWAUTHENTICATIONIN-FIELD SET-UPUPGRADING FIRMWARETECHNICAL SPECIFICATIONGLOSSARYAPPENDICESPD0012 V1.0 – 10 Oct 2017 9
InstallaonProcess OverviewInstall CabinetSet Installation AddressSet SERIAL NUMBER Set Store PhotoSet ASSET NUMBER Take Cooler PhotoTake Store PhotoSet Cooler PhotoARRIVE AT STORECOMPLETEConnect to ControllerInstall CabinetTABLE OF CONTENTSINTRODUCTION & WARNINGSDESCRIPTION & INSTALLATIONPROCESSOVERVIEWAUTHENTICATION IN-FIELD SET-UP UPGRADING FIRMWARETECHNICAL SPECIFICATIONGLOSSARY APPENDICESPD0012 V1.0 – 10 Oct 201710Processstepsinvolvingthe SCS Connect Field mobile app are described step by step below.Beforeconnecngtothecoolerwiththeapp,takephotosof•  Theoutlet(fromtheoutside).•  The cooler.•  Theareaoftheoutletwherethecoolerislocated,showingenoughofthesurroundingstounderstandthecooler’sin-storeposion.It is VITAL that the asset number is set.  If this isnotset,noreporngorassettrackingofthe cooler can be made.
Process OverviewTABLE OF CONTENTSINTRODUCTION & WARNINGSDESCRIPTION & INSTALLATIONPROCESSOVERVIEWAUTHENTICATIONIN-FIELD SET-UPUPGRADING FIRMWARETECHNICAL SPECIFICATIONGLOSSARYAPPENDICESPD0012 V1.0 – 10 Oct 2017 11Duringtwooftheprocesssteps,dataisrequiredtobeenteredinto the controller. Cabinetinstallaonintheeld. Informaonisenteredthroughtheuseofamobilephoneapplicaon(Seepage15)The order in which data is entered into the SCS CLICK, and atwhichprocessstepmaydierfrommanufacturertomanufacturerandownertoownerdependingonexisngmanufacturingprocesses.The SCS ConnectFieldmobileapprequiresfouraributestobeenteredduringtheenreinstallaonprocess: Model Usedbytheautomatedfaultdetecon Serial No. Usedforrecordingpurposes Asset No. Usedforcooleridencaoninassettracking InstallaonAddress UsedbytheassettrackingAddionaributeswhichcanbeenteredintothe SCS Connect  mobileappintheeldare; Addionaldata Photo and Notes Attributes can be set Model Serial No. Asset No. Installation Address Additional data Photo and NotesQuick Read
Quick ReadGRAPHICAL USER INTERFACESUser InterfacesTABLE OF CONTENTSINTRODUCTION & WARNINGSDESCRIPTION & INSTALLATIONPROCESSOVERVIEWAUTHENTICATION IN-FIELD SET-UP UPGRADING FIRMWARETECHNICAL SPECIFICATIONGLOSSARY APPENDICES Bluetooth® SMART compliant. Wireless diagnostics and   control. Customized app branding    available on special request. Secure, only authorized    connections permitted.PD0012 V1.0 – 10 Oct 201712TheWellingtonSCS ConnectAppprovidesawirelessconneconto the SCS CLICK from mobile devices ed with Bluetooth®LE.Thisgivesusersandtechniciansanunprecedentedlevelofvisibilityandcontrol.Thefollowingguideprovidesanoverviewoftheappanditscapabilies.Note: Screen shots shown are indicave only.  Dierentdeviceshavedierentscreenraos,sizesandresoluons.Theactual image seen on your device may vary from the screenshotsshowninthisguide.Holdingyourdeviceinportraitorlandscapemodemayhaveaneectonappearanceandmaychange how the various windows and graphics are displayedandarrangedonyourscreen.
Installaon and AuthencaonStep 1 Step 2Step 4Step 3In-Field Set-upYour9-digittouch panel codeDownload and install the Connect Field appfromGooglePlay(Searchfor“scswellington”tondit)Whenyourstrun“ConnectField”,youwillberequestedtoenteranacvaoncode.ContactyourUserManagerorWellingtontoreceiveyouracvaoncode(Youmustbeconnectedtotheinternetatthemeofacvaon).Onceacvaoniscomplete,youmustdenea4-digitPINcode.Thiscanbeanycodeuniquetoyou.Eachmeyoustartthe app, you will be required to enter this same PIN code.  This is to prevent other peopleaccessingtheappfromunlockedphones. You can see which databases you are acvatedagainstfromthe“Sengs”screen.Youcanbeacvatedtomorethanonedatabaseatthesameme.Simplyselect“ACTIVATEANOTHERDATABASE”,andenterthenewdatabasesuniqueacvaoncode,as in Step 2.TABLE OF CONTENTSINTRODUCTION & WARNINGSDESCRIPTION & INSTALLATIONPROCESSOVERVIEWAUTHENTICATIONIN-FIELD SET-UPUPGRADING FIRMWARETECHNICAL SPECIFICATIONGLOSSARYAPPENDICESPD0012 V1.0 – 10 Oct 2017 13Note: Youracvaoncodeisuniquetoyou,andshouldNEVERbesharedwithanyoneelse,asitdeterminesyourpersonalaccesslevelfortheapp.ThesamecodewillgiveyouaccesstoallSCS apps you are authorised to use.
Home ScreenIn-Field Set-upMOBILE GUI - contNote: Thislistislteredbyyouracvaonpermissions, so devices you are not authorised to connect to will not be displayed.Select a device to connect to from the list of visable devices.Select“Connect”to connect to the coolerStatus BarReturn-air TemperatureCooler TemperatureMain MenuMenuBuonGraph and Output Control Event History Home Screen (FridgeStatus)Home ScreenTheHomeScreenshowsagraphicrepresentaonofthecurrentstateoftherefrigeraonunitbeingcontrolled.TABLE OF CONTENTSINTRODUCTION & WARNINGSDESCRIPTION & INSTALLATIONPROCESSOVERVIEWAUTHENTICATION IN-FIELD SET-UP UPGRADING FIRMWARETECHNICAL SPECIFICATIONGLOSSARY APPENDICESPD0012 V1.0 – 10 Oct 201714Note: ThesignalstrengthisthenumberinbracketsontherightofthecoolerID.Ifsignalstrengthislower(more–ve)than-80,conneconmaybeunreliable:moveclosertothecooler.IfmulplecoolerIDsarevisible,thestrongest(least–ve)signalislikelytobetheoneclosesttoyou and make sure Bluetooth is turned on.
MOBILE GUI - contIn-Field SetupSelect“SCSSetup”from the Main menuSelect the dropdown menu and select the cooler manufacturer.A pop up will show with “Manufacturer needs to be set”Dialoguebox.Push OKChoose EDIT to add the Cooler Asset Number.TABLE OF CONTENTSINTRODUCTION & WARNINGSDESCRIPTION & INSTALLATIONPROCESSOVERVIEWAUTHENTICATIONIN-FIELD SET-UPUPGRADING FIRMWARETECHNICAL SPECIFICATIONGLOSSARYAPPENDICESPD0012 V1.0 – 10 Oct 2017 15

Navigation menu