Wellington Drive Technologies CLICK1 Bluetooth LE transmission adaptor, SCS Click User Manual Part 1 of 2
Wellington Drive Technologies Ltd Bluetooth LE transmission adaptor, SCS Click Users Manual Part 1 of 2
Contents
- 1. Users Manual_Part 1 of 2
- 2. Users Manual_Part 2 of 2
Users Manual_Part 1 of 2

TECHNICAL USER MANUAL
CLICK

© 2017 Wellington Drive Technologies Limited
21 Arrenway Drive, Rosedale, Auckland 0632, New Zealand
PO Box 302-533, North Harbour, Auckland 0751, New Zealand
Tel.: + 64 9 477 4500, Fax: + 64 9 479 5540,
E-mail: info@wdtl.com Website: www.wdtl.com

1 TECHNICAL USER MANUAL
3 TABLE OF CONTENTS
4 WARNINGS!
6 INTRODUCTION
7 InstallaonDiagrams
8 EMS55 Set-up
10 Process Overview
12 GRAPHICAL USER INTERFACES
21 UPGRADING FIRMWARE
23 TECHNICAL SPECIFICATIONS
26 GLOSSARY
TABLE OF CONTENTS
Quick Read
TABLE OF
CONTENTS
INTRODUCTION
& WARNINGS
DESCRIPTION
& INSTALLATION
PROCESS
OVERVIEW
AUTHENTICATION
IN-FIELD SET-UP
UPGRADING
FIRMWARE
TECHNICAL
SPECIFICATION
GLOSSARY
APPENDICES
PD0012 V1.0 – 10 Oct 2017 3

Quick Read
WARNINGS!
TABLE OF
CONTENTS
INTRODUCTION
& WARNINGS
DESCRIPTION
& INSTALLATION
PROCESS
OVERVIEW
AUTHENTICATION IN-FIELD SET-UP UPGRADING
FIRMWARE
TECHNICAL
SPECIFICATION
GLOSSARY APPENDICES
Important Do’s and Dont’s:
Do not drop the SCS™
CLICK.
There are no serviceable
parts inside the SCS™
CLICK. Do not open the
housing. Warning! Risk of
electrocution.
The SCS™ CLICK must only
be used for the purposes
described in this manual.
The design and
specication of the SCS™
CLICK is subject to change
without warning.
PD0012 V1.0 – 10 Oct 2017
4 4
Pleasereadthefollowingwarningstomaintainthesafefuncon
andconnuedperformanceofyourWellingtonDriveTechnologies
Limited SCS™ CLICK:
Installaon;
InstallaonoftheSCS™ CLICK other than in accordance with
the“Descripon&Install”seconofthismanualwillinvalidate
the warranty. The SCS™ CLICK must only be installed and
conguredbytrainedandauthorizedsta.
Noserviceableparts;
There are no serviceable parts inside the SCS™ CLICK. Do
notopenthehousing.Openingoftheelectronicshousing,
alterangormodifyingtheSCS™ CLICK will invalidate the
warrantyandcancauseriskofelectrocuon.
Consequenalfailures;
Failureofconnectedcomponentsmaycausedamagetothe
SCS™ CLICK.Cricalorvulnerablecomponentsshouldbe
protectedindependentlyagainstfailure.SCS™ CLICK is not
warrantedagainstdamagecausedbyortoothercomponents.
Fitforpurpose;
The SCS™ CLICK must only be used for the purpose and
funconsdescribedinthismanual.WhileWellingtonDrive
TechnologiesLimitedmayprovidetechnicalsupportonsuitable
applicaonsandconguraonoftheSCS™ CLICK (where such
arelaonshipmayexist),noliability,responsibilityorriskis
acceptedindeterminingiftheSCS™ CLICK istforpurpose
foranyparcularapplicaon.noliability,responsibilityorrisk
isacceptedbyWellingtonDriveTechnologiesLimitedforthe
correctoperaonalfunconofanyparcularinstallaonor
conguraon.
Connuousdevelopment;
WellingtonDriveTechnologiesLimitedundertakesto
connuouslydevelopandimproveproductsandservices.The
designandspecicaonfortheSCS™ CLICK issubjecttochange
withoutwarning.Thecontentsofthismanualaresubjectto
changewithoutwarning.Whileeveryendeavourismadeto
ensurethatallspecicaonsanddocumentsarecurrentand
complete,WellingtonDriveTechnologiesLimitedacceptsno
liability,responsibilityorriskduetoomissionsorchanges
causedbyconnuousimprovementanddesignchanges.Users
of this manual should verify that they have the current released
version(publishedontheWellingtonDriveTechnologies
websitewww.wdtl.com)beforeproceeding.
Quick Read
Warnings - cont
TABLE OF
CONTENTS
INTRODUCTION
& WARNINGS
DESCRIPTION
& INSTALLATION
PROCESS
OVERVIEW
AUTHENTICATION
IN-FIELD SET-UP
UPGRADING
FIRMWARE
TECHNICAL
SPECIFICATION
GLOSSARY
APPENDICES
The SCS Click must not be
disposed off in municipal
collections; it must be
disposed off through an
approved e-waste collection
point.
Do not drop the SCS™
CLICK.
Do not connect the SCS™
CLICK to the incorrect
supply voltage.
PD0012 V1.0 – 10 Oct 2017 5
Correctdisposal;
The SCS™ CLICK issubjecttoEUDirecve2002/96/EC
(WEEE)fore-waste.Itmayalsobesubjecttoothernaonal
legislaonforthesafedisposalofe-waste.TheSCS™
CLICK mustnotbedisposedoinmunicipalcollecons;it
mustbedisposedothroughanapprovedWEEEcollecon
point.Alternavely,theSCS™ CLICK may be returned to an
authorizedWellingtonDriveTechnologiesLimiteddistributor
attheendofitsworkinglife.Penalesmaybeapplicable
forincorrectdisposal,asspeciedbynaonallegislaon.
Thecircuitboardmaycontainhazardoussubstanceswhich
couldaecthealthandtheenvironmentifdisposedo
incorrectly. The SCS™ CLICK complieswithEUDirecve
2002/95/EC(RoHS).
Chemicals:
The SCS™ CLICK must not be exposed to any solvents or
chemicals, as this will invalidate the warranty and may
damagethehousing,leadingtounsafeoperaon.
Temperature:
The SCS™ CLICK must only be subjected to temperatures
asspeciedinthe“Datasheet”andthe“Techinical
specicaon”seconofthismanual.Exceedingtheseranges
eitherinoperaon,installaon,transportaonorstorage,
willinvalidatethewarrantyandmaydamageelectronic
circuitsandhousingcomponents,leadingtopremature
failure.
Vibraonandimpact:
The unit must be installed in such a way as to be protected
fromimpactinoperaon.Exposuretoimpacts,eitherin
operaon,installaon,transportaon,orstorage,may
damageelectroniccircuitsandhousingcomponents,leading
to premature failure, and may cause the SCS™ CLICK to
becomeunsafe.Anyimpactwhichcausesvisualdamageto
thehousingwillinvalidatethewaranty.
Voltages:
The SCS™ CLICK must only be connected to equipment
whichcomplywiththeacceptablevoltagerangesspecied
inthe“Datasheet”andthe“TechnicalSpecicaon”secon
ofthismanual.Connecontosupplyvoltagesoutsideof
theserangescandamageelectricalcircuits,leadingto
premature failure, and may cause the SCS™ CLICK to become
unsafe and invalidates any warranty due to incorrect
voltages.

Quick Read
INTRODUCTION
TABLE OF
CONTENTS
INTRODUCTION
& WARNINGS
DESCRIPTION
& INSTALLATION
PROCESS
OVERVIEW
AUTHENTICATION IN-FIELD SET-UP UPGRADING
FIRMWARE
TECHNICAL
SPECIFICATION
GLOSSARY APPENDICES
Highly exible and
congurable
Mobile app with intuitive
touch screen interface
Wireless data logging and
diagnostic control
Compact size
PD0012 V1.0 – 10 Oct 2017
6
The SCS™ CLICKbyWellingtonisanBluetoothLEtransmission
adaptordesignedforprovidingradioconnecvitytoexisng
refrigeraoncontrollersinthemarket.Itaddsfunconalies
suchastelemetryconnecvy,assettracking,andproximitybased
markengcapabiliestoexisngcoolers.
Theinterfacesystempermitsdierentgroupsofuserstohave
dierentlevelsofcontrol,basedupontheirlevelsofexperseand
their actual control needs.
AuniquefeatureisamobileappthatgivesauthorizedService
Techniciansfullwirelessaccesstodatalogginganddiagnosc
control.
Installaon
Installaon Diagrams
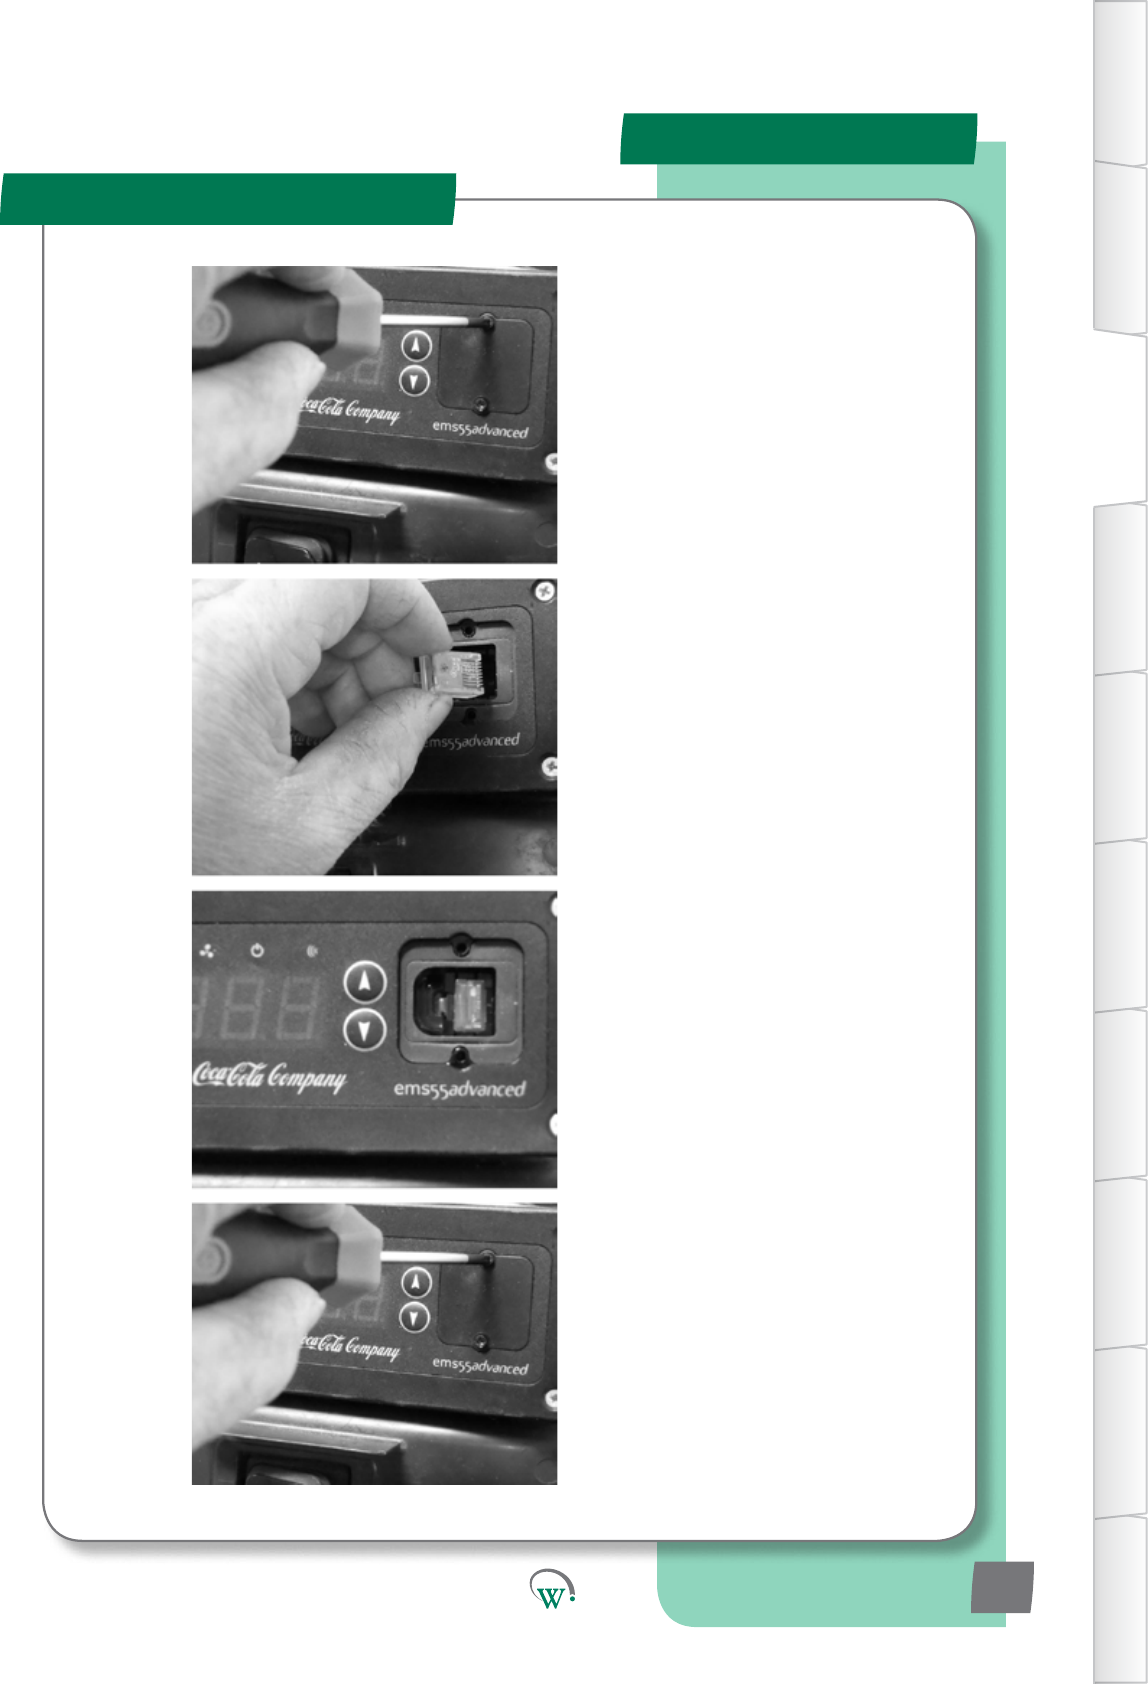
INSTALLATION PROCEDURE:
STEP 1
Remove the two screws
holdingtheRJ45coverin
place with PZ1 screwdriver
and remove cover
STEP 2
Push SCS Click fully into the
RJ45socket.
Ensure it makes a Click
sound,andtheretaining
feature is clicked into place.
STEP 3
Ensure that the SCS Click
isashinggreeneveryfew
seconds. This means it
is installed correctly and
powered up.
STEP 4
Replace the cover and two
screws.
TABLE OF
CONTENTS
INTRODUCTION
& WARNINGS
DESCRIPTION
& INSTALLATION
PROCESS
OVERVIEW
AUTHENTICATION
IN-FIELD SET-UP
UPGRADING
FIRMWARE
TECHNICAL
SPECIFICATION
GLOSSARY
APPENDICES
PD0012 V1.0 – 10 Oct 2017 7

EMS55 Set-up
Installaon
EMS55 SETUP PROCEDURE:
STEP 1
Pressthetoplebuon
(“a“),Willthenbereadyto
accept the password.
STEP 2
Enter the password by
pressingthebuonsinthe
followingorder.
TopLe(“a“)-3mes
Topright(“b“)-2mes
Boomright(“c“)-1me
Boomle(“d“)-4mes
STEP 3
The display will now show
P5.
STEP 4
PresstheBoomright(“c“)
buon5mesunl“ddP”
is displayed. It will the
alternatebetweendisplaying
“ddP’and“00”
TABLE OF
CONTENTS
INTRODUCTION
& WARNINGS
DESCRIPTION
& INSTALLATION
PROCESS
OVERVIEW
AUTHENTICATION IN-FIELD SET-UP UPGRADING
FIRMWARE
TECHNICAL
SPECIFICATION
GLOSSARY APPENDICES
PD0012 V1.0 – 10 Oct 2017
8
EMS55 Set-up
Installaon
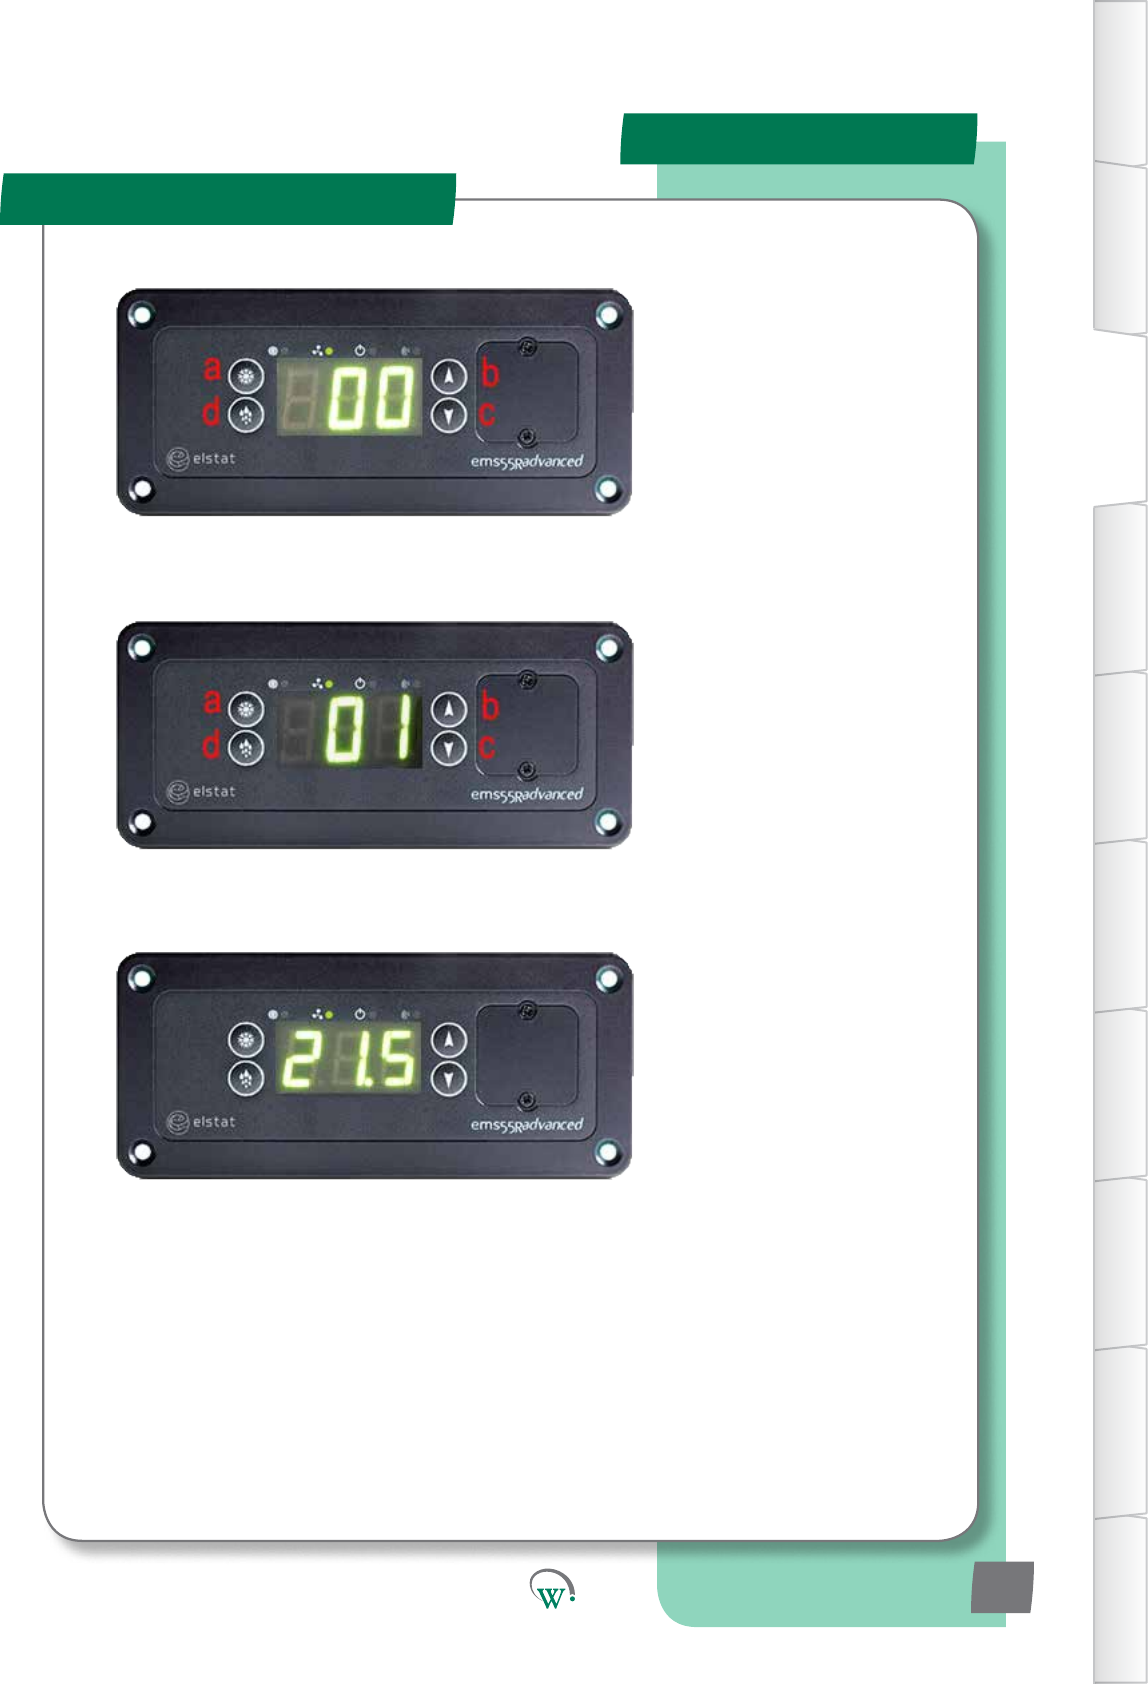
EMS55 SETUP PROCEDURE:
STEP 5
PresstheTopLe(“a“)
buononce.Thedisplaywill
nowbealternangbetween
displaying“ddP’and“00”.
STEP 6
HoldtheTopright(“b“)
buonunl“01”isdisplayed.
Display will then alternate
between“ddP”and“01”.
STEP 7
Wait for 20-30 secs for the
Elstattomeout.Itwillthen
re-boot and return to normal
operaon.
TABLE OF
CONTENTS
INTRODUCTION
& WARNINGS
DESCRIPTION
& INSTALLATION
PROCESS
OVERVIEW
AUTHENTICATION
IN-FIELD SET-UP
UPGRADING
FIRMWARE
TECHNICAL
SPECIFICATION
GLOSSARY
APPENDICES
PD0012 V1.0 – 10 Oct 2017 9
Installaon
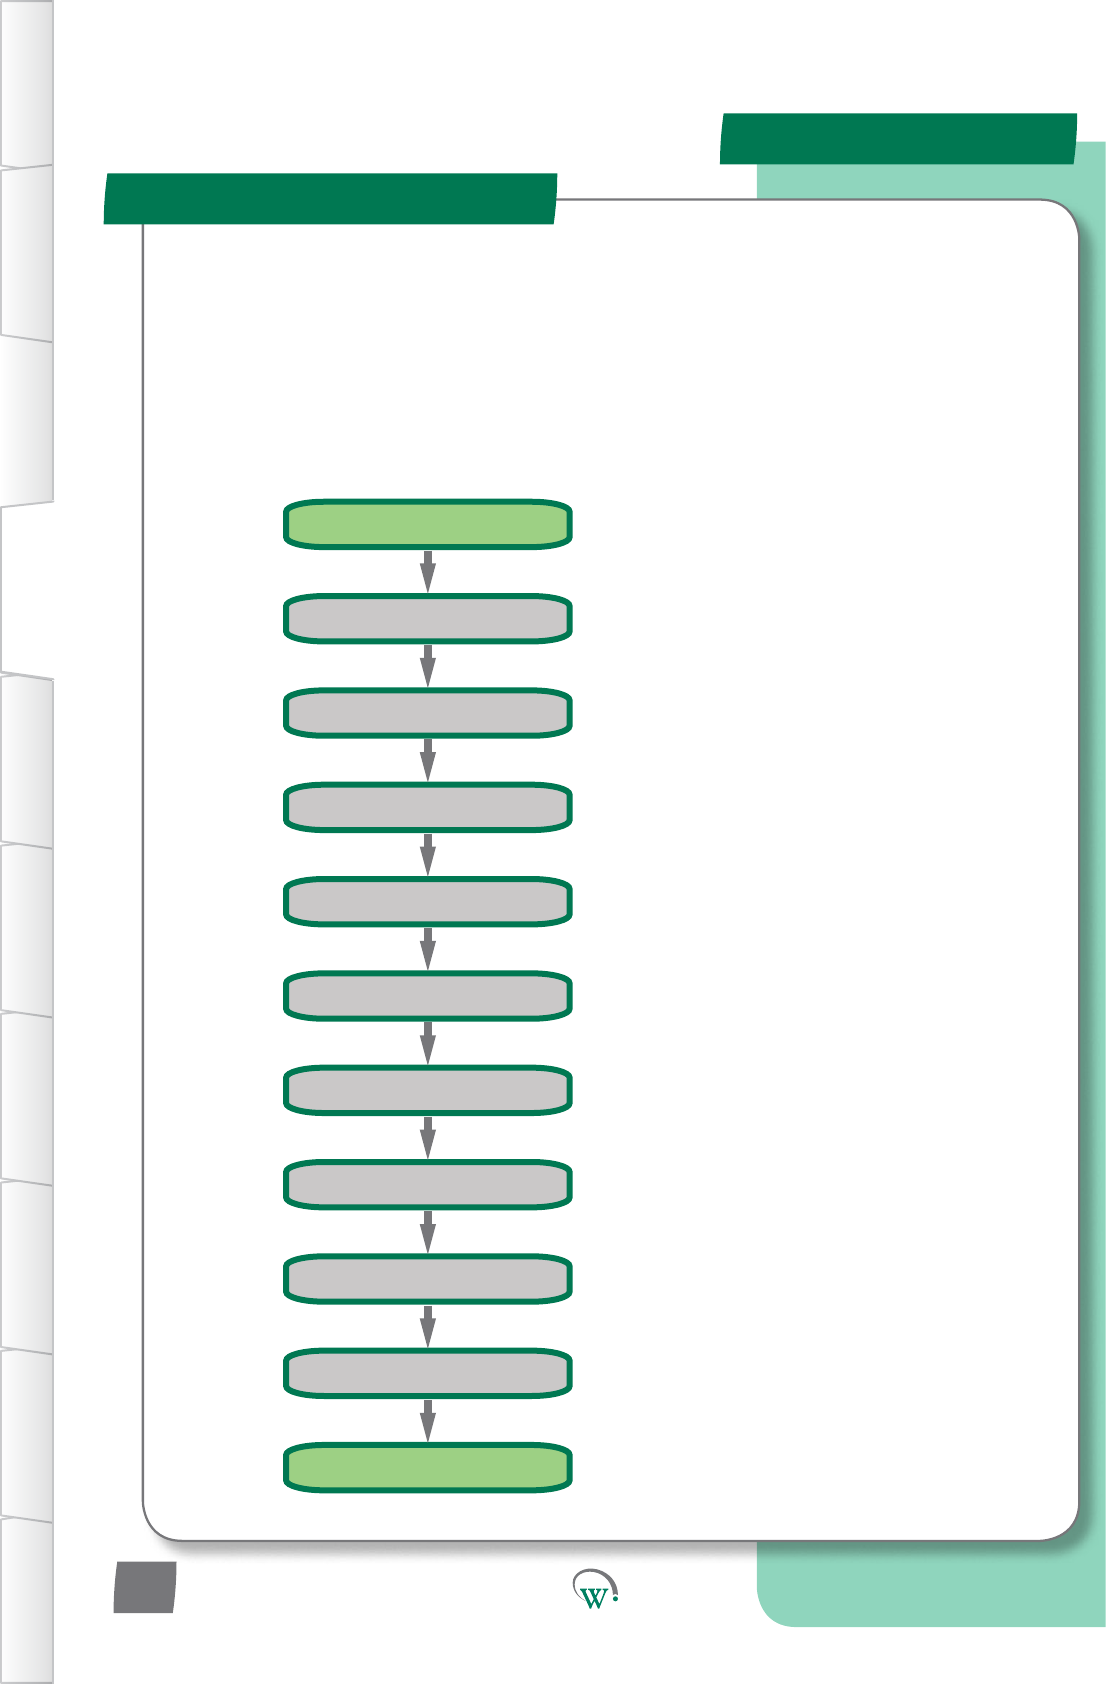
Process Overview
Install Cabinet
Set Installation Address
Set SERIAL NUMBER
Set Store Photo
Set ASSET NUMBER
Take Cooler Photo
Take Store Photo
Set Cooler Photo
ARRIVE AT STORE
COMPLETE
Connect to Controller
Install Cabinet
TABLE OF
CONTENTS
INTRODUCTION
& WARNINGS
DESCRIPTION
& INSTALLATION
PROCESS
OVERVIEW
AUTHENTICATION IN-FIELD SET-UP UPGRADING
FIRMWARE
TECHNICAL
SPECIFICATION
GLOSSARY APPENDICES
PD0012 V1.0 – 10 Oct 2017
10
Processstepsinvolvingthe SCS Connect Field mobile app are described step by step below.
Beforeconnecngtothecoolerwiththeapp,takephotosof
• Theoutlet(fromtheoutside).
• The cooler.
• Theareaoftheoutletwherethecoolerislocated,showingenoughofthesurroundingsto
understandthecooler’sin-storeposion.
It is VITAL that the asset number is set. If this
isnotset,noreporngorassettrackingof
the cooler can be made.

Process Overview
TABLE OF
CONTENTS
INTRODUCTION
& WARNINGS
DESCRIPTION
& INSTALLATION
PROCESS
OVERVIEW
AUTHENTICATION
IN-FIELD SET-UP
UPGRADING
FIRMWARE
TECHNICAL
SPECIFICATION
GLOSSARY
APPENDICES
PD0012 V1.0 – 10 Oct 2017 11
Duringtwooftheprocesssteps,dataisrequiredtobeentered
into the controller.
Cabinetinstallaonintheeld.
Informaonisenteredthroughtheuseofamobilephone
applicaon(Seepage15)
The order in which data is entered into the SCS CLICK, and
atwhichprocessstepmaydierfrommanufacturerto
manufacturerandownertoownerdependingonexisng
manufacturingprocesses.
The SCS ConnectFieldmobileapprequiresfouraributestobe
enteredduringtheenreinstallaonprocess:
Model
Usedbytheautomatedfaultdetecon
Serial No.
Usedforrecordingpurposes
Asset No.
Usedforcooleridencaoninassettracking
InstallaonAddress
Usedbytheassettracking
Addionaributeswhichcanbeenteredintothe SCS Connect
mobileappintheeldare;
Addionaldata
Photo and Notes
Attributes can be set
Model
Serial No.
Asset No.
Installation Address
Additional data
Photo and Notes
Quick Read
Quick Read
GRAPHICAL USER INTERFACES
User Interfaces
TABLE OF
CONTENTS
INTRODUCTION
& WARNINGS
DESCRIPTION
& INSTALLATION
PROCESS
OVERVIEW
AUTHENTICATION IN-FIELD SET-UP UPGRADING
FIRMWARE
TECHNICAL
SPECIFICATION
GLOSSARY APPENDICES
Bluetooth® SMART compliant.
Wireless diagnostics and
control.
Customized app branding
available on special request.
Secure, only authorized
connections permitted.
PD0012 V1.0 – 10 Oct 2017
12
TheWellingtonSCS ConnectAppprovidesawirelessconnecon
to the SCS CLICK from mobile devices ed with Bluetooth®
LE.Thisgivesusersandtechniciansanunprecedentedlevelof
visibilityandcontrol.Thefollowingguideprovidesanoverview
oftheappanditscapabilies.
Note: Screen shots shown are indicave only. Dierent
deviceshavedierentscreenraos,sizesandresoluons.The
actual image seen on your device may vary from the screen
shotsshowninthisguide.Holdingyourdeviceinportraitor
landscapemodemayhaveaneectonappearanceandmay
change how the various windows and graphics are displayed
andarrangedonyourscreen.

Installaon and Authencaon
Step 1 Step 2
Step 4
Step 3
In-Field Set-up
Your9-digit
touch panel
code
Download and install the Connect Field
appfromGooglePlay(Searchfor“scs
wellington”tondit)
Whenyourstrun“ConnectField”,youwill
berequestedtoenteranacvaoncode.
ContactyourUserManagerorWellington
toreceiveyouracvaoncode(Youmust
beconnectedtotheinternetatthemeof
acvaon).
Onceacvaoniscomplete,youmust
denea4-digitPINcode.Thiscanbeany
codeuniquetoyou.Eachmeyoustart
the app, you will be required to enter this
same PIN code. This is to prevent other
peopleaccessingtheappfromunlocked
phones.
You can see which databases you are
acvatedagainstfromthe“Sengs”screen.
Youcanbeacvatedtomorethanone
databaseatthesameme.Simplyselect
“ACTIVATEANOTHERDATABASE”,andenter
thenewdatabasesuniqueacvaoncode,
as in Step 2.
TABLE OF
CONTENTS
INTRODUCTION
& WARNINGS
DESCRIPTION
& INSTALLATION
PROCESS
OVERVIEW
AUTHENTICATION
IN-FIELD SET-UP
UPGRADING
FIRMWARE
TECHNICAL
SPECIFICATION
GLOSSARY
APPENDICES
PD0012 V1.0 – 10 Oct 2017 13
Note:
Youracvaoncodeisuniquetoyou,andshouldNEVERbesharedwithanyoneelse,asit
determinesyourpersonalaccesslevelfortheapp.Thesamecodewillgiveyouaccesstoall
SCS apps you are authorised to use.

Home Screen
In-Field Set-up
MOBILE GUI - cont
Note: Thislistislteredbyyouracvaon
permissions, so devices you are not
authorised to connect to will not be
displayed.
Select a device to
connect to from the list
of visable devices.
Select“Connect”
to connect to the
cooler
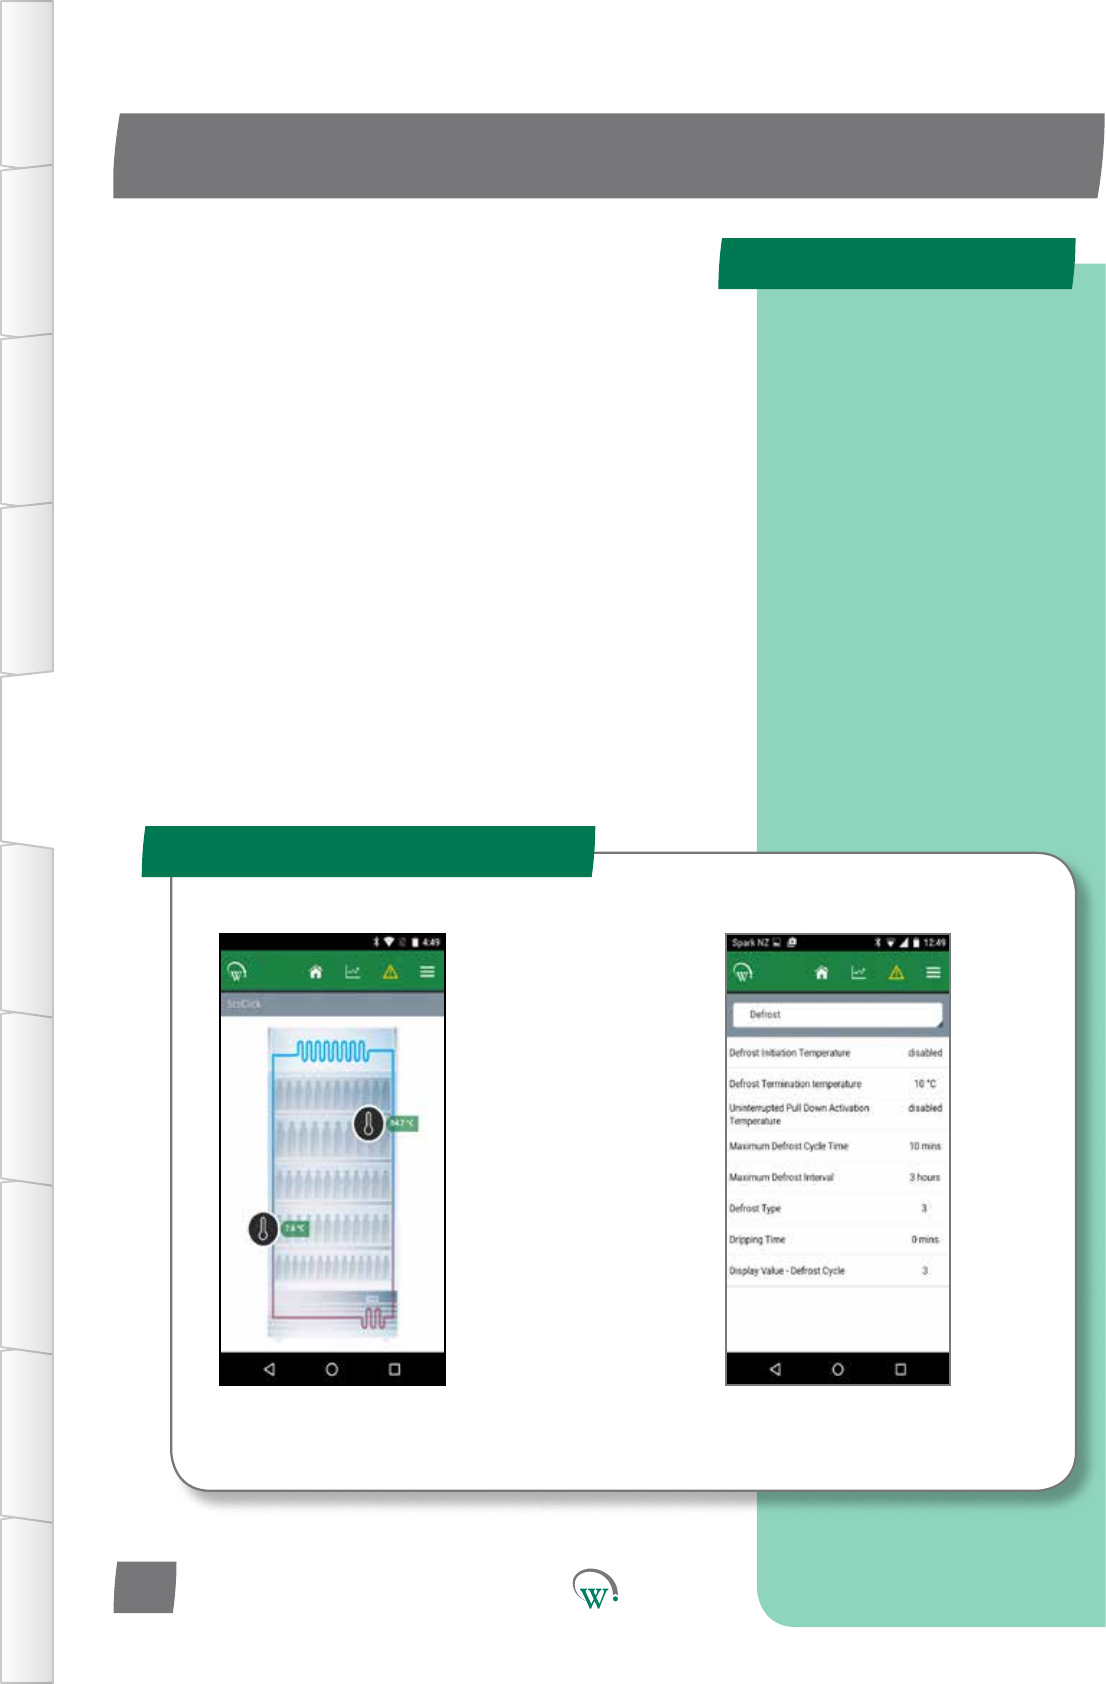
Status Bar
Return-air
Temperature
Cooler
Temperature
Main Menu
MenuBuon
Graph and
Output Control Event History
Home Screen
(FridgeStatus)
Home Screen
TheHomeScreenshowsagraphicrepresentaonofthecurrentstateoftherefrigeraonunit
beingcontrolled.
TABLE OF
CONTENTS
INTRODUCTION
& WARNINGS
DESCRIPTION
& INSTALLATION
PROCESS
OVERVIEW
AUTHENTICATION IN-FIELD SET-UP UPGRADING
FIRMWARE
TECHNICAL
SPECIFICATION
GLOSSARY APPENDICES
PD0012 V1.0 – 10 Oct 2017
14
Note:
ThesignalstrengthisthenumberinbracketsontherightofthecoolerID.Ifsignalstrength
islower(more–ve)than-80,conneconmaybeunreliable:moveclosertothecooler.If
mulplecoolerIDsarevisible,thestrongest(least–ve)signalislikelytobetheoneclosestto
you and make sure Bluetooth is turned on.
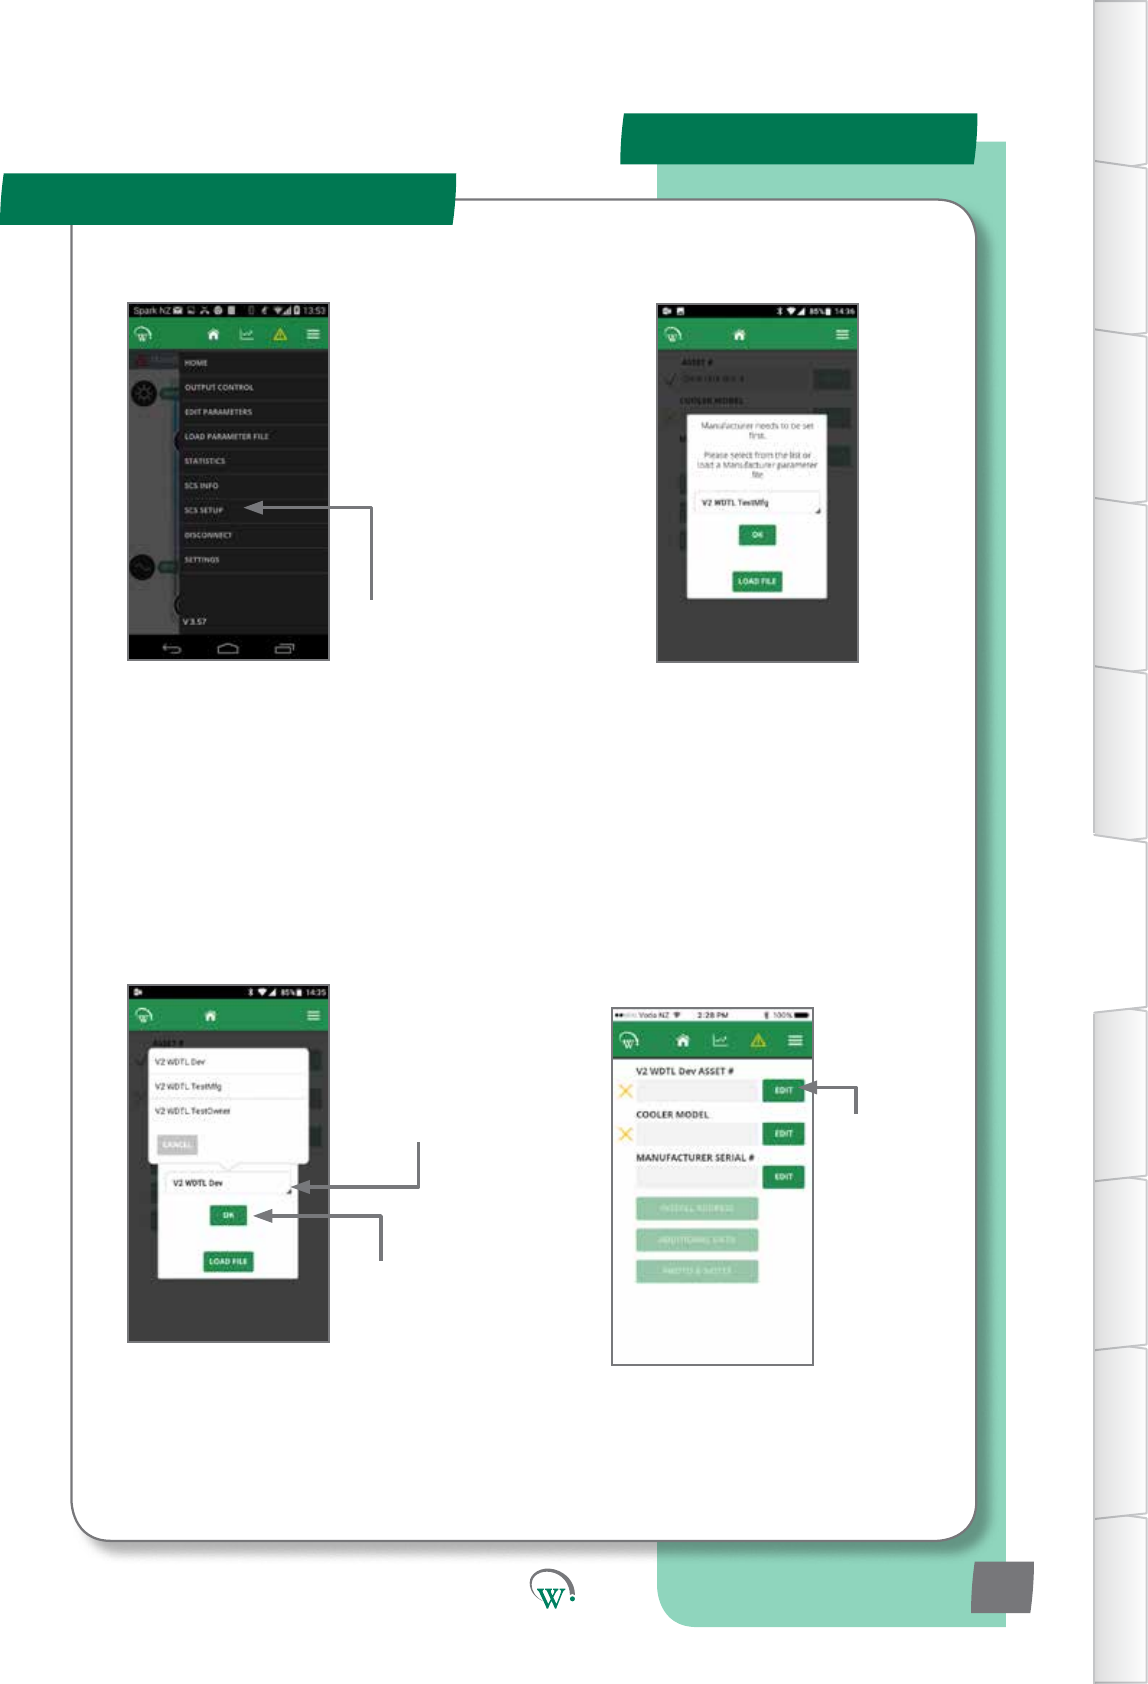
MOBILE GUI - cont
In-Field Setup
Select“SCSSetup”
from the Main menu
Select the dropdown
menu and select the
cooler manufacturer.
A pop up will show with
“Manufacturer needs to be
set”Dialoguebox.
Push OK
Choose EDIT to
add the Cooler
Asset Number.
TABLE OF
CONTENTS
INTRODUCTION
& WARNINGS
DESCRIPTION
& INSTALLATION
PROCESS
OVERVIEW
AUTHENTICATION
IN-FIELD SET-UP
UPGRADING
FIRMWARE
TECHNICAL
SPECIFICATION
GLOSSARY
APPENDICES
PD0012 V1.0 – 10 Oct 2017 15