Westell ULS3-C Dual Moca 4-Port Ethernet Wi-Fi Gateway User Manual UltraLine Series 3 User Guide Draft 1

Westell Inc Dual Moca 4-Port Ethernet Wi-Fi Gateway UltraLine Series 3 User Guide Draft 1

Contents

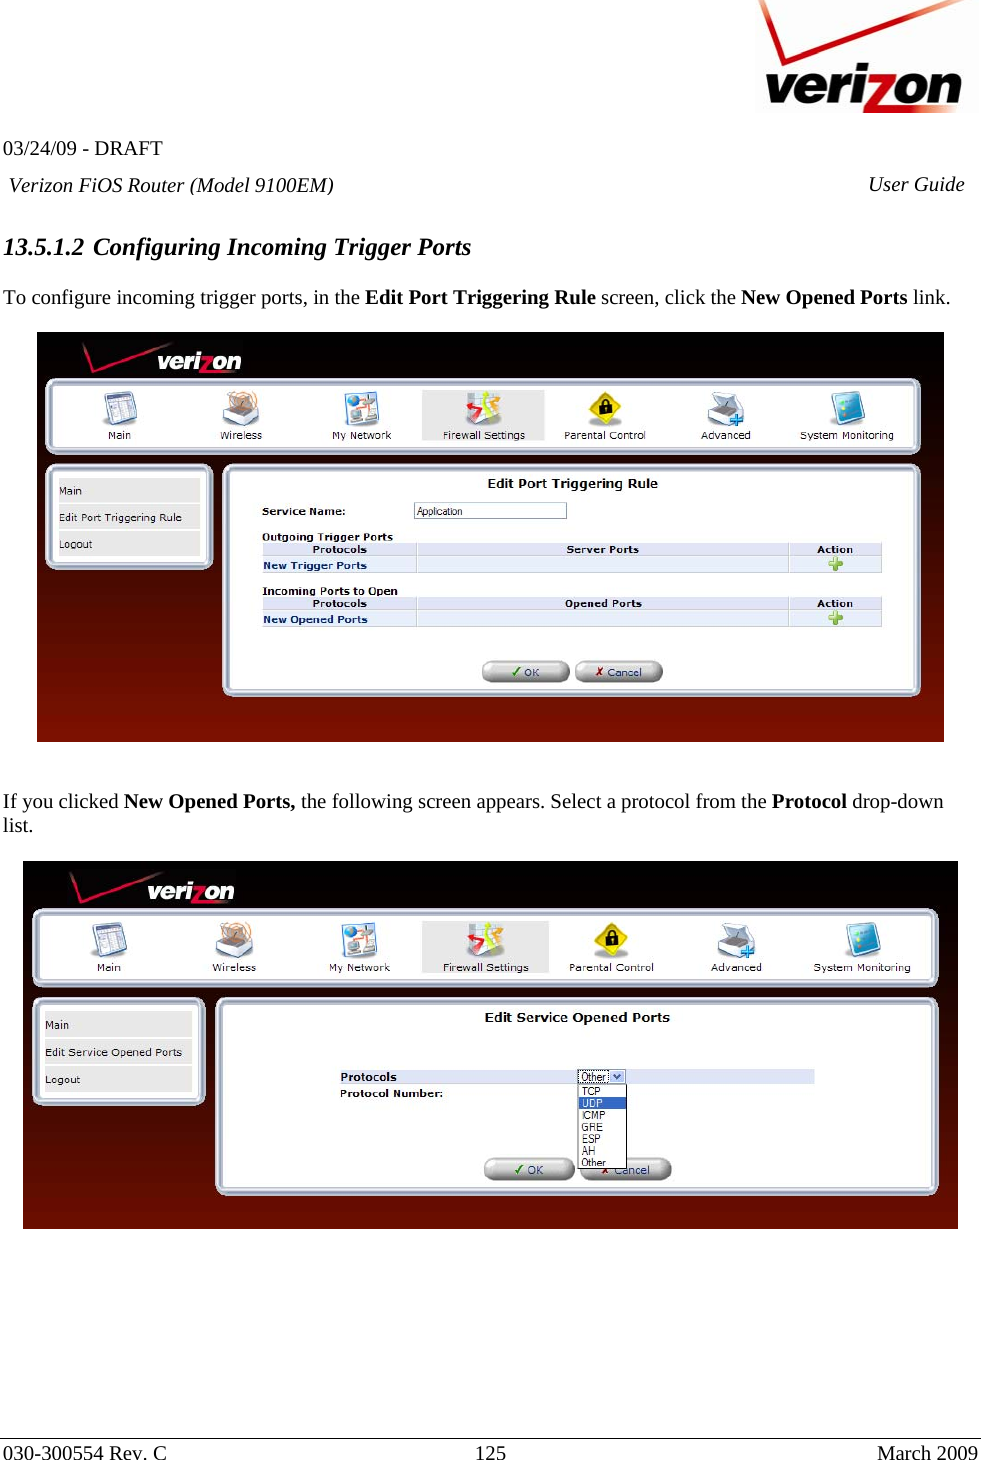
Users Manual Part Two

  03/24/09 - DRAFT   030-300554 Rev. C  76      March 2009  Verizon FiOS Router (Model 9100EM) User Guide 12.2 Network Connections  Your Router supports various local area network (LAN) and wide area network (WAN, on Internet) connections via Ethernet or coaxial cables. The Network Connections screen is used to configure the various parameters of the Router’s network and Internet connections, and to create new connections.  To edit your connection settings, from the top navigation menu, select My Network. Next, select Network Connections in the left submenu. The following screen appears.   Determine which screen you are viewing by looking at the buttons on the bottom of the page. If the third button from the left displays Advanced, as shown below, this means you are viewing the basic Network Connections screen. Conversely, if the third button from the left displays Basic, this means you are viewing the advanced Network Connections screen. To go to the basic screen, click the Basic button.  For example, to go to the advanced Network Connections screen, click the Advanced button.
  03/24/09 - DRAFT   030-300554 Rev. C  77      March 2009  Verizon FiOS Router (Model 9100EM) User GuideThe advanced Network Connections screen displays additional links that allow you to access various connection settings in your Router. The following sections describe the different network connections available in the Router, as well as the connection types that can be created.
  03/24/09 - DRAFT   030-300554 Rev. C  78      March 2009  Verizon FiOS Router (Model 9100EM) User Guide12.2.1  Network (Home/Office) Properties  In the Network Connections screen, click the Network (Home/Office) link to access the Router’s local network properties. The Network (Home/Office) connection is a bridge that is used to combine several network devices under one single “virtual network.” For example, a home/office network can be created that includes your Ethernet Switch as well as your Wireless computers. Network (Home/Office) is the Router’s default setting.    At this screen, do any of the following:  • Click the Ethernet Switch link to edit the Router’s Ethernet Switch properties. • Click the Coax link to edit the Router’s Coax properties. • Click the Wireless 802.11g Access Point link to edit the Router’s Wireless 802.11g Access Point properties. • Click the IP Address Distribution link to access the Router’s IP Address Distribution settings.
  03/24/09 - DRAFT   030-300554 Rev. C  79      March 2009  Verizon FiOS Router (Model 9100EM) User Guide12.2.1.1 COAX  If you click the Coax link in the Network (Home/Office) Properties screen, the following screen appears. View the coax properties in this screen. If you change the connection name, click Apply to save the changes. Then, click OK to return to the Network Connections screen.     Configure Connection (Coax)  If you select Configure Connection from the left submenu, the following screen appears. In this screen, you can do any of the following:  • Enter the desired properties for the coax connection, and then click Apply to save the settings. • Click the View Coax Node Detailed Stats link to view the Coax  statistics page • Click the Go to Coax Stat link to view the coax statistics
  03/24/09 - DRAFT   030-300554 Rev. C  80      March 2009  Verizon FiOS Router (Model 9100EM) User GuideGo to Coax Stats  If you clicked the Go to Coax Stats link in the Configure Coax screen, the following screen appears. This screen displays the Tx/Rx rate between the Router and other devices or nodes in a MoCA network. View the information in this screen, and then click Close to return to the Configure Coax screen.     12.2.1.2 Ethernet Switch Properties  For example, if you click the Ethernet Switch link in the Network (Home/Office) Properties screen, the following screen appears. View the properties in this screen. If you change the connection name, click Apply to save the changes. Then, click OK to return to the Network Connections screen.
  03/24/09 - DRAFT   030-300554 Rev. C  81      March 2009  Verizon FiOS Router (Model 9100EM) User Guide12.2.1.3 Wireless 802.11g Access Point  To view the wireless access properties, in the Network (Home/Office) Properties screen, click the Wireless 802.11g Access Point link. The following screen appears. View the wireless properties in this screen. If you change the connection name, click Apply to save the changes. Click OK to return to the Network Connections screen.     Configure Connection—Wireless 802.11g Access Point  If you select Configure Connection from the left submenu, the following screen appears. Configure your wireless access point properties, and then click Apply to save the settings. Refer to section 11, “Wireless,” for details on the following wireless features listed in the left submenu of this screen.  • Wireless Status • Basic Security Settings • Advanced Security Settings • Device List • Advanced
  03/24/09 - DRAFT   030-300554 Rev. C  82      March 2009  Verizon FiOS Router (Model 9100EM) User Guide 12.2.1.4 IP Address Distribution  If you click the IP Address Distribution link in the Network (Home/Office) Properties screen, the following screen appears. This screen allows you to access your Router’s DHCP settings. See section 15.27 for details on DHCP settings.
  03/24/09 - DRAFT   030-300554 Rev. C  83      March 2009  Verizon FiOS Router (Model 9100EM) User Guide12.2.2  Broadband Connection (Ethernet)  The Router’s Broadband Connection types describe the interface used to connect your Router to your broadband network. Broadband Connection (Ethernet) means that Ethernet is the hardware used to connect the Router to the Internet. By factory default, Broadband Connection (Ethernet) is Disabled in the Router. However, you can Enable this connection type. To Enable Broadband Connection (Ethernet) you must (1) connect your Router to your existing network device using an Ethernet cable, as described in section 5.1, and (2) configure your Router’s network connection settings for the physical connection type.   NOTE: After you have installed the Router to your network and turned on the Router, it will automatically detect which connection protocol type is being used.  In this example, the Router is connected to the broadband network using the Router’s WAN port. Remember, when you use the Router’s WAN port, you must also configure the Router’s network connection settings.  To configure the Router’s network connection settings, click the My Network icon in the top navigation menu, and then click Network Connections in the left submenu. In the Network Connections screen, click the Broadband Connection (Ethernet) link.
  03/24/09 - DRAFT   030-300554 Rev. C  84      March 2009  Verizon FiOS Router (Model 9100EM) User Guide The following screen appears. View the connection setting properties in this screen. If you change the connection name, click Apply to save the changes.     12.2.2.1 Configure Connection—Broadband Connection Ethernet  In the Broadband Connection (Ethernet) Properties screen, select Configure Connection in the left submenu. The following screen appears. Next, click the Quick Setup button.
  03/24/09 - DRAFT   030-300554 Rev. C  85      March 2009  Verizon FiOS Router (Model 9100EM) User Guide The following screen appears. Select Ethernet from the WAN Interface drop-down list. Selecting Ethernet Enables the WAN port on the rear of your Router. When the WAN port is Enabled, this means you are connecting from the WAN port on the Router to another device on your network, for Internet access. Click Apply to save the settings.  NOTE: Verizon provides the protocol mode for your connection to the Internet. Depending on your connection type, a login user name and password may be required. These values are provided by Verizon.
  03/24/09 - DRAFT   030-300554 Rev. C  86      March 2009  Verizon FiOS Router (Model 9100EM) User Guide 12.2.2.2 QoS—Broadband Connection Ethernet  NOTE: This section is only intended to be modified by a Verizon technician.  Any changes to this section may result in a disruption of service.    If you select QoS in the left submenu of the Broadband Connection (Ethernet) Properties screen, the following screen appears.    You may use this section to remove VLAN tags to your incoming (Ingress) packets, or to allow specific tagged packets to enter. To add a new entry, click the New Entry link. The following screen appears. Enter the desired port in the VLAN ID in the field, and then select an Egress Policy from the drop-down list. Click OK to continue.
  03/24/09 - DRAFT   030-300554 Rev. C  87      March 2009  Verizon FiOS Router (Model 9100EM) User GuideAfter you click OK, the following screen appears, indicating that your management console might require reloading. Click OK to continue, and then please wait a brief moment while the page reloads.    The following screen appears. The VLAN ID displays the port that you added and the policy assigned to the port. Click Apply to save the settings.    For outgoing (Egress) packets you may enable a Rate Limit by checking the rate limit check box, and you may also enable the pass through of standard QoS classifiers. These are 802.1p, DSCP, and port tags. Note that any changes to your egress setting will likely result in a disruption of your FiOS service.
  03/24/09 - DRAFT   030-300554 Rev. C  88      March 2009  Verizon FiOS Router (Model 9100EM) User Guide12.2.2.3 Advanced—Broadband Connection Ethernet  If you select Advanced in the left submenu of the Broadband Connection (Ethernet) Properties screen, the following screen appears. To add a new IP address, click the New IP Address link.    The following screen appears. Enter the desired IP Address and Subnet Mask in the fields provided. Then, click Apply to allow the settings to take effect.
  03/24/09 - DRAFT   030-300554 Rev. C  89      March 2009  Verizon FiOS Router (Model 9100EM) User GuideThe entry will be added to the list of broadband connection IP addresses.      12.2.3  Broadband Connection (Coax)  To access the Router’s broadband configurations (Coax), click the My Network icon in the top navigation menu. Then, click Network Connections in the left submenu. The following screen appears. This screen displays the interfaces that can be used to connect the Router to your broadband network. In this setup, Coax is Connected and Ethernet is Disabled. This means that Coax is the hardware used to connect the Router to the Internet. To access the settings for broadband connection (Coax), click the Broadband Connection (Coax) link.
  03/24/09 - DRAFT   030-300554 Rev. C  90      March 2009  Verizon FiOS Router (Model 9100EM) User GuideThe following screen appears. This screen displays the properties for  broadband connection coax. If desired you can change the connection name. To change the name, type your desired name in the Name field. Click Apply to save the change.     12.2.3.1 Configure Connection —Broadband Connection Coax  To configure the Router’s Broadband Connection (Coax) settings, click Configure Connection in the left submenu. The following screen appears. Enter the desired settings for your broadband (coax) connection, and then click Apply to save the settings.
  03/24/09 - DRAFT   030-300554 Rev. C  91      March 2009  Verizon FiOS Router (Model 9100EM) User GuideGo to Broadband Connection (Coax) Stats  If you click the Go to Broadband Connection (Coax) Stats link in the preceding Configure Broadband Connection (Coax) screen, the following screen appears. To display the most current values, click Refresh. To return to the Configure Broadband Connection (Coax) screen, click Close.     12.2.3.2 QoS—Broadband Connection Coax  NOTE: This section is only intended to be modified by a Verizon technician. Any changes to this section may result in a disruption of service.    If you select QoS in the left submenu of the Broadband Connection (Coax) Properties screen, the following screen appears. You may use this section to remove VLAN tags to your incoming (Ingress) packets, or allow specific tagged packets to enter.  To add a new entry, click the New Entry link.
  03/24/09 - DRAFT   030-300554 Rev. C  92      March 2009  Verizon FiOS Router (Model 9100EM) User GuideThe following screen appears. Enter the desired port in the VLAN ID field, and then select an Egress Policy from the drop-down list. Click OK to continue.    After you click OK, the following screen appears, indicating that your management console might require reloading. Click OK to continue, and then please wait a brief moment while the page reloads.
  03/24/09 - DRAFT   030-300554 Rev. C  93      March 2009  Verizon FiOS Router (Model 9100EM) User GuideThe VLAN ID  table will display the port that you added. Click Apply to save the settings.    For outgoing (Egress) packets you may enable a Rate Limit by checking the rate limit check box, and you may also enable the pass through of standard QoS classifiers. These are 802.1p, DSCP, and port tags. Note that any changes to your Egress setting will likely result in a disruption of your FiOS service.     12.2.3.3 Advanced—Broadband Connection Coax  If you select Advanced in the left submenu of the Broadband Connection (Coax) Properties screen, the following screen appears. To add a new IP address, click the New IP Address link.
  03/24/09 - DRAFT   030-300554 Rev. C  94      March 2009  Verizon FiOS Router (Model 9100EM) User Guide The following screen appears. Enter the desired IP Address and Subnet Mask in the fields provided. Then, click Apply to allow the settings to take effect.    The entry will be added to the list of broadband connection IP addresses.
  03/24/09 - DRAFT   030-300554 Rev. C  95      March 2009  Verizon FiOS Router (Model 9100EM) User Guide 12.2.4  WAN PPPoE  WAN Point-to-Point Protocol over Ethernet (PPPoE) is a protocol used to connect the Router to the Internet. PPPoE enables Ethernet-networked computers to exchange information with computers on the Internet.   NOTE: The protocol used for your Internet connection is determined by Verizon. The Router is capable of automatically detecting the protocol used for your Internet connection.  If you are configuring your Router’s protocol setting for WAN PPPoE, in the Network Connections screen, select the WAN PPPoE link.    The following screen appears. View the details in this screen. If desired, you can change the connection name. To change the name, type your desired name in the Name field. Then, click Apply to save the changes. Select an option in the left submenu to access that configuration page:  • Select Configure Connection to access the WAN PPPoE Properties screen. • Select Routing to configure the Routing properties for your WAN PPPoE. Refer to section 15.23 for details on Routing. • Select PPP to configure the Router’s PPP settings.  The following sections describe these options.
  03/24/09 - DRAFT   030-300554 Rev. C  96      March 2009  Verizon FiOS Router (Model 9100EM) User GuideConfigure Connection—WAN PPPoE  To configure the WAN PPPoE properties, click Configure Connection in the left submenu of the WAN PPPoE Properties screen. The following screen appears. Enter the desired settings and click Apply to save the settings.     Routing—WAN PPPoE  To configure the Router’s Routing properties, click Routing in the left submenu screen. The following screen appears. If you change the settings in this screen, click Apply to save the settings. To configure the advanced Routing properties, select Advanced from the Routing drop-down list.
  03/24/09 - DRAFT   030-300554 Rev. C  97      March 2009  Verizon FiOS Router (Model 9100EM) User GuideIf you selected Advanced in the preceding screen, the following screen appears. Enter the desired values and click Apply. To add a new route, click the New Route link.     If you clicked New Route in the preceding screen, the following screen appears. Enter the desired routing values and click OK to save the settings.
  03/24/09 - DRAFT   030-300554 Rev. C  98      March 2009  Verizon FiOS Router (Model 9100EM) User GuidePPP—WAN PPPoE  NOTE: The settings in the screen are provided by Verizon. Do not change the settings unless instructed by Verizon.  To configure the Router’s PPP properties, click PPP in the left submenu screen. The following screen appears. If you change the settings in this screen, click Apply to save the settings. The new Route will be added to the Routing table.     12.2.5  Status  To view the status of the Router’s connections, in the Network Connections screen, click the Status button at the bottom of the page.
  03/24/09 - DRAFT   030-300554 Rev. C  99      March 2009  Verizon FiOS Router (Model 9100EM) User GuideThe following screen appears. This screen displays connection information for devices connected to your Router. At this screen, do any the following:  • Click the Automatic Refresh On/Off button to turn on/off Automatic Refresh. When Automatic Refresh is On, the screen will be updated automatically to display the most current statistics.  • Click the Refresh to manually refresh this screen.  • Click the links in this screen to access the Router’s connection settings. • Click Close to return to the Network Connections screen.    verizonfios
  03/24/09 - DRAFT   030-300554 Rev. C  100      March 2009  Verizon FiOS Router (Model 9100EM) User Guide13. FIREWALL SETTINGS  The Firewall Settings section provide access to all your Router’s security functions. Click Firewall Settings in the top navigation menu to enter the settings menu.  CAUTION: Only Advanced Users should access the firewall settings.
  03/24/09 - DRAFT   030-300554 Rev. C  101      March 2009  Verizon FiOS Router (Model 9100EM) User Guide13.1   General Firewall Security Settings  This section explains how to configure your Router’s firewall security features. The Router’s firewall security settings allow you to reduce the risk of unauthorized access to your network by prohibiting certain types of inbound and outbound network traffic and by allowing you to configure specific firewall rules.  IMPORTANT: If you need help, click Main in the top navigation menu to go to the home page. In the Quick Links section of the home page, click Verizon Help. Clicking this link takes you to Verizon’s Online Help site, where you can access additional information about your Router.   To change your firewall security level, click the option button next to the desired security setting. Next, click Apply to allow the changes to take effect.      General Firewall Settings Maximum Security (High)  High security level only allows basic Internet functionality. Only Mail, News, Web, FTP, VoIP/SIP and IPSEC traffic is allowed. All other traffic is prohibited. Typical Security (Medium)  Like High security, Medium security only allows basic Internet functionality by default. However, Medium security allows customization of Network Address Translation (NAT) so you can enable certain types of traffic. This is the factory default security level. Minimum Security (Low)  Low security setting will allow all traffic except for known malicious attacks. With Low security, your Router is visible to other computers on the Internet. Block IP Fragments  This option can prevent hackers from using fragmented data packets to possibly sabotage your network. Note: Some VPN and UDP services use IP fragments, and this feature may need to be disabled. If you have questions about this feature, check with Verizon technical support. It is disabled (box is unchecked) by default.
  03/24/09 - DRAFT   030-300554 Rev. C  102      March 2009  Verizon FiOS Router (Model 9100EM) User Guide 13.2   Access Control  If you select Firewall Settings in the top navigation menu and then select Access Control in the left submenu, the following screen appears.   Access Control is used to block specific computers within the local network (or even your entire network) from accessing certain services on the Internet. For example, one computer can be prohibited from surfing the Internet, another computer from transferring files using FTP, and the whole network from receiving incoming E-mail. Access control defines restrictions on the types of requests that can pass from the local network out to the Internet, and thus may block traffic flowing in both directions.  To add an Access Control rule, click the New Entry link or, alternatively, you can click the plus icon.    Adding a new entry will allow you to choose a device from the known network devices (For example, your computers) or enter a MAC address of a new device. Then you must choose the Protocol (or service) to be blocked.
  03/24/09 - DRAFT   030-300554 Rev. C  103      March 2009  Verizon FiOS Router (Model 9100EM) User Guide13.2.1  Selecting an Address  From the Address drop-down list, select the desired computer to which you want to apply this rule.     If your computer or device is not listed in the drop-down list, you may create a new Network Object manually by choosing the User Defined option. Please see section 15.11, “Network Objects,” for more details on setting up a network object.   After you have selected a computer, the following screen appears. Next, proceed to section 13.2.2 to select a protocol.
  03/24/09 - DRAFT   030-300554 Rev. C  104      March 2009  Verizon FiOS Router (Model 9100EM) User Guide13.2.2  Selecting an Protocol  From the Protocols drop-down list, select the desired option that you want to prohibit the computer from using. To notify the user of this blockage via an HTML (Web) page, click the check box (a check mark will appear in the box). Note: This feature only works for HTTP services.    To see more than the basic listed services choose Show All Services from the Protocols drop-down. This will show you many pre-defined services such as games and IM clients.     After you have selected the protocol, the following screen appears. Proceed to section 15.21 to configure a schedule rule.
  03/24/09 - DRAFT   030-300554 Rev. C  105      March 2009  Verizon FiOS Router (Model 9100EM) User Guide13.2.3  Configuring a Schedule Rule  After you have selected the protocol, the following screen appears. If desired, select a schedule from the Schedule drop-down menu. If you select User Defined, refer to the procedure explained in section 15.21, “Scheduler Rules,” to set up a schedule rule. Otherwise, select Always, and then click OK to continue.  • Select Always to allow the rule to be active all the time. • Select User Defined to allow the rule to be active only at certain time, as defined by the rules you set up.    After you have set up a User Defined rule, the following screen will display the rule. Click OK to save the settings.
  03/24/09 - DRAFT   030-300554 Rev. C  106      March 2009  Verizon FiOS Router (Model 9100EM) User GuideIf the Status field displays Resolving, this means that the Router is attempting to locate the restricted Web site. Click Resolve Now to resolve the Web site.    The restricted Web site will be resolved into the IP address (or device name) that you have specified, and the Status field will display Active.
  03/24/09 - DRAFT   030-300554 Rev. C  107      March 2009  Verizon FiOS Router (Model 9100EM) User Guide13.2.4  Completing the Access Control Rule Configuration  If you clicked OK, the following screen appears. The rule has been added to the list of security rules. To disable the security rule for an entry, click the adjacent check box, and then click Apply. To add additional access control rules, click the New Entry link.
  03/24/09 - DRAFT   030-300554 Rev. C  108      March 2009  Verizon FiOS Router (Model 9100EM) User Guide13.3 Port Forwarding  If you select Firewall Settings in the top navigation menu and then select Port Forwarding in the left submenu, the following screen appears.   By default the Router blocks all external users from connecting to your network. However, you can configure specific applications on your network to be accessible from the Internet. Port Forwarding allows the Router to enable applications (Games, Webcams, IM & Others) by opening a tunnel between remote (Internet) computers and a specific device port inside your local area network (LAN). Services on the LAN will be exposed to external Internet users.
  03/24/09 - DRAFT   030-300554 Rev. C  109      March 2009  Verizon FiOS Router (Model 9100EM) User Guide 13.3.1  Setting Up a Predefined Port Forwarding Rule  To set up a predefined port forwarding rule, at the Security screen, click the New Entry link.    If you clicked New Entry, the following screen appears. In the Local Host field, enter a local host name or the IP address of the computer providing the service. If you will use a public IP address, click the check box next to Specify Public IP Address.  NOTE: Only one computer can be assigned to provide a specific service or application. If you want use public IP addresses in your Router’s configuration, you must first obtain them from Verizon.
  03/24/09 - DRAFT   030-300554 Rev. C  110      March 2009  Verizon FiOS Router (Model 9100EM) User GuideNext, select a predefined service from the Protocol drop-down list.  NOTE: For your convenience, the Router provides predefined protocols for applications, games, and VPN-specific programs.   The screen below displays the protocols of basic services provided in the Router. If you select Show All Services from the Protocols drop-down list, all available services will be displayed in the drop-down list.    Select a predefined service from the Protocols drop-down list.
  03/24/09 - DRAFT   030-300554 Rev. C  111      March 2009  Verizon FiOS Router (Model 9100EM) User GuideAfter you have selected a predefined service, the following screen appears. Next select an option from the Forward to Port drop-down list to indicate the port to which traffic will be forwarded.     If you selected Same as Incoming Port from the Forward to Port drop-down list, the following screen appears. Click OK to continue.
  03/24/09 - DRAFT   030-300554 Rev. C  112      March 2009  Verizon FiOS Router (Model 9100EM) User GuideNext, set up a schedule rule using the instructions explained in section 15.21 “Scheduler Rules.” After you have set up a schedule, enter the address of the local Host, and then click OK to save the settings.    If you clicked OK the following screen appears. The predefined port forwarding rule has been assigned.
  03/24/09 - DRAFT   030-300554 Rev. C  113      March 2009  Verizon FiOS Router (Model 9100EM) User Guide 13.3.2  Setting Up a User Defined Port Forwarding Rule  To set up a user-defined port forwarding rule, in the Port Forwarding screen, click the New Entry link.      The following screen appears. In this screen, do the following to add a port forwarding rule:  • Specify the local computer to which you want to apply port forwarding rule. This is done in the Local Host field. The field will accept either your computer name (the NetBios name; for example DADS-PC) or the computer IP address.  These values can be found on your My Network page.    • If you are setting up a NAT/NAPT rule you must also specify the public IP address that data will be coming in on. Check the Specify Public IP Address check-box and enter a specific external IP address such as the WAN IP address of the router or a Static NAT IP address.   • Optionally, you can specify a remote network (to forward packets to (this is a network that it outside the control of your Router).  This is common in a small business or advanced configuration that uses multiple routers.  Select the Specify Network IP Address check-box if you would like to apply this rule to send packets to a host IP address outside the local network (such as a remote gaming server). The screen will refresh and present you with a field in which to insert this IP address.  NOTE: Only one computer can be assigned to provide a specific service or application. If you use public IP addresses in your Router’s configuration, you must first obtain them from Verizon.
  03/24/09 - DRAFT   030-300554 Rev. C  114      March 2009  Verizon FiOS Router (Model 9100EM) User Guide   Next, choose the protocol that you want to forward. You can select from many common applications provided in the Forward to Port drop-down list. If you want to define your own port forwarding rule, select User Defined.
  03/24/09 - DRAFT   030-300554 Rev. C  115      March 2009  Verizon FiOS Router (Model 9100EM) User GuideIf you selected User Defined in the preceding screen, the following screen appears. If desired, you can name your service by typing the desired name in the Service Name field. Next, click the New Server Ports link to define the ports for your newly created service.    NOTE: At least one server port entry must be defined before you can enter a service name.    The following screen appears. From the Protocols drop-down list, select the desired protocol.   NOTE: Protocol information should be provided by your application developer or documentation.    Next, enter your protocol number in the Protocol Number field. Click OK to continue.
  03/24/09 - DRAFT   030-300554 Rev. C  116      March 2009  Verizon FiOS Router (Model 9100EM) User GuideFor example, if you selected TCP, from the drop-down list, the following screen appears. Select the desired source and destination port settings from the drop-down lists.     To set up a range of ports, select “Range” from the Source Ports and Destination Ports drop-down lists.    Next, enter the desired port range values in the fields provided, and then click OK to continue.
  03/24/09 - DRAFT   030-300554 Rev. C  117      March 2009  Verizon FiOS Router (Model 9100EM) User GuideIf clicked OK in the preceding screen, the following screen appears. If desired, click the New Server Port link to add additional server ports. Then, click OK to save the settings.    Now you must specify a local host for which you to assign this user-defined port forwarding rule. To assign the rule to a public IP address, click the Specify Public IP Address check box.  NOTE: Only one computer can be assigned to provide a specific service or application. If you want use public IP addresses in your Router’s configuration, you must first obtain them from Verizon.   At the Add Port Forwarding Rule screen, you can enter the name of a local host or click the Specify Public IP Address check box to indicate the host or IP Address to which the port forwarding rule will be assigned.
  03/24/09 - DRAFT   030-300554 Rev. C  118      March 2009  Verizon FiOS Router (Model 9100EM) User GuideTo assign the port forward rule to a NAT policy (or external IP address) click the Specify Public IP Address check box, and enter the appropriate IP address.    From the Forward to Port drop-down list, select the desired option to indicate the port to which traffic will be forwarded. This is almost always the same as the incoming port. You may define a custom port map by specifying a new port to send this traffic to. (For example you could forward all the incoming traffic, coming in on Port 80, to an external IP address assigned to your internal computer, except Port 81).
  03/24/09 - DRAFT   030-300554 Rev. C  119      March 2009  Verizon FiOS Router (Model 9100EM) User GuideIf desired, set up schedules for your port forwarding rules. To add a schedule rule, select an option from the Schedule drop-down menu.   • Select Always to allow the rule to be active all the time. • Select User Defined to allow the rule to be active only at certain time, as defined by the rules you set up.  If you select User Defined, refer to the procedure explained in section 15.21, “Scheduler Rules,” to set up a schedule rule. Otherwise, select Always, and then click OK to continue.    After you have entered the desired values in the preceding screen and clicked OK, the following screen appears. Your port forwarding rule will be added to the list of rules. You may need to click Resolve Now while the Router is attempting to save the rule to the local host. To disable a port forwarding rule, clear the check box next to the appropriate host name or IP address. Then, click Apply to save the setting.
  03/24/09 - DRAFT   030-300554 Rev. C  120      March 2009  Verizon FiOS Router (Model 9100EM) User Guide13.4 DMZ Host  If you select Firewall Settings in the top navigation menu and then select DMZ Host in the left submenu, the following screen appears. The DMZ (Demilitarized) Host feature allows the user to forward unsolicited inbound WAN traffic to any single IP on the LAN. One computer on your LAN will be fully exposed to the Internet. The designated computer will be connected to your network without regard to firewall security or restrictions. Use this feature in cases where you want to use Internet services that are not available in the Port Forwarding list, such as Web games or video-conferencing.  WARNING: The computer that is configured as a DMZ Host will not have security or firewall protection.  To configure a computer for DMZ Host, click the DMZ Host IP Address check box, and then enter the IP Address of the computer that you want to be accessible from the Internet. The computer will answer to the default WAN IP address of the Router.  Click Apply to save the settings.  To disable DMZ Host (if previously enabled), click to clear the check box. Then click Apply to save the settings.
  03/24/09 - DRAFT   030-300554 Rev. C  121      March 2009  Verizon FiOS Router (Model 9100EM) User Guide13.5   Port Triggering  If you select Firewall Settings in the top navigation menu and then select Port Triggering in the left submenu, the following screen appears. You can define port triggering rules to dynamically open the firewall for specific protocols or ports. The specified ports will be opened for incoming traffic. Port triggering can be used for dynamic port forwarding configuration. By setting port triggering rules, you can allow inbound traffic to arrive at a specific LAN host, using ports different than those used for the outbound traffic. This is called port triggering because the outbound traffic triggers the ports to which inbound traffic is directed.     13.5.1  Setting Up a User Defined Port Triggering Rule  To set up a user-defined port triggering rule, in the Add drop-down list, select User Defined.
  03/24/09 - DRAFT   030-300554 Rev. C  122      March 2009  Verizon FiOS Router (Model 9100EM) User Guide13.5.1.1 Configuring Outgoing Trigger Ports  If you selected User Defined in the preceding screen, the following screen appears. Enter the desired name in the Service Name field. Next, click the New Trigger Ports link to configure outgoing trigger ports.     If you clicked New Trigger Ports, the following screen appears. Select the desired protocol from the Protocol drop-down list.
  03/24/09 - DRAFT   030-300554 Rev. C  123      March 2009  Verizon FiOS Router (Model 9100EM) User Guide For example, if you selected TCP from the Protocol drop-down list, the following screen appears. Select the desired source and destination settings from the drop-down lists.    For example, if you selected Single, the following screen appears. Enter the desired source port and destination port values, and then click OK to save the settings.
  03/24/09 - DRAFT   030-300554 Rev. C  124      March 2009  Verizon FiOS Router (Model 9100EM) User GuideIf you entered source and destination port values clicked OK in the preceding screen, the following screen appears. If you desire to configure incoming trigger port, proceed to section 13.5.1.2. Otherwise, click OK to continue.    If you clicked OK, the following screen appears. Click Apply to save the settings. If you want to edit a rule, click the pencil icon next to the rule that you want to edit. To delete a rule, click the “X” icon next to the rule that you want to delete.
  03/24/09 - DRAFT   030-300554 Rev. C  125      March 2009  Verizon FiOS Router (Model 9100EM) User Guide 13.5.1.2 Configuring Incoming Trigger Ports  To configure incoming trigger ports, in the Edit Port Triggering Rule screen, click the New Opened Ports link.      If you clicked New Opened Ports, the following screen appears. Select a protocol from the Protocol drop-down list.

Navigation menu