Winners Sun Plastic and Electronic WS-SQB842B Smartphone 3-axis Stabilizer ( BT) User Manual
Winners'Sun Plastic & Electronic (Shenzhen) Co., Ltd. Smartphone 3-axis Stabilizer ( BT)
User Manual
Gendelson Plastic Electronics(Shenzhen) Co., Ltd.
Shenzhenshilonghua, Dalang Street, Yingtai Industrial Zone, Building E
3-Axis Handheld Stabilizing Gimbal
for Smartphone
Quick Guide V1.1
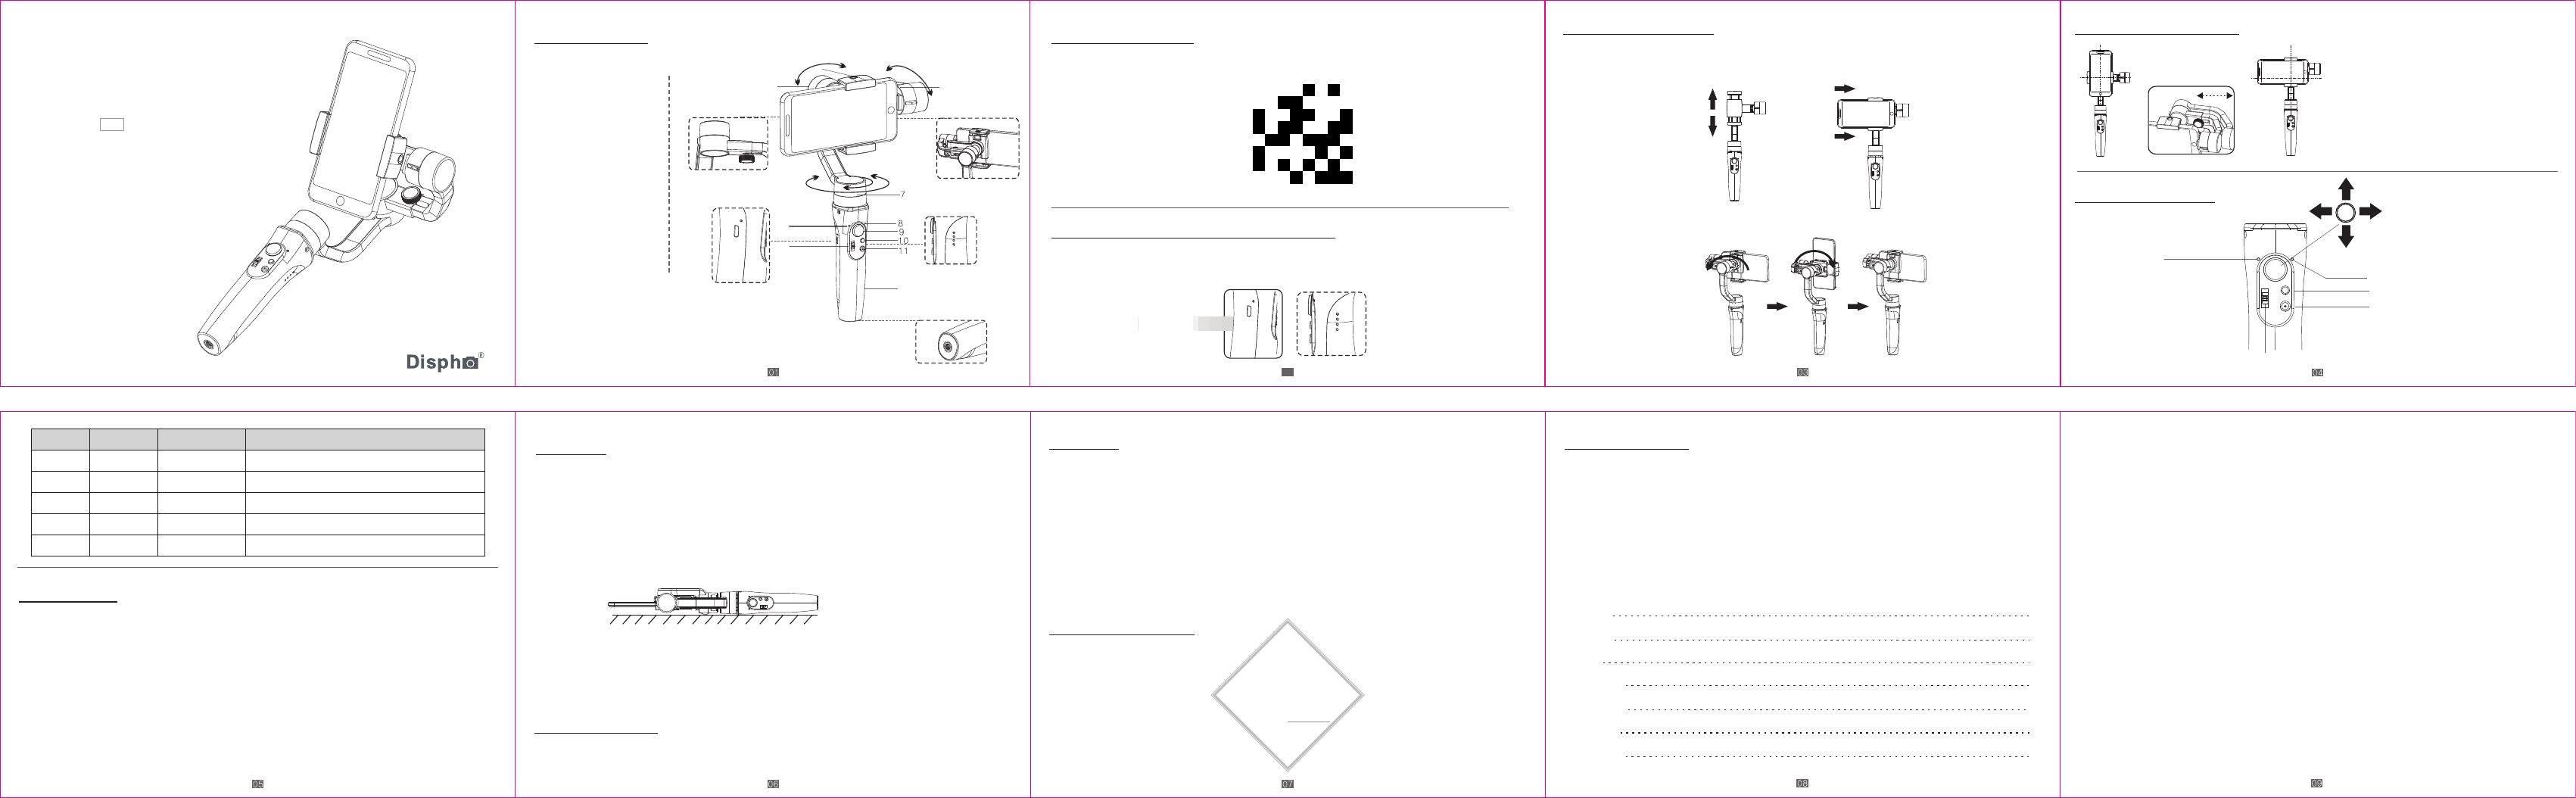
Product overview
APP Guideline
Calibration Disclaimer Warranty card
User name:
Contact No.:
Address:
Purchase date:
Prod serial No.:
Failure issue:
Service record:
1. 15 days upon date of purchase, if there is function problem, the commodity and package without any damage, after we
check and confirm, we wer the same product for replacement.
Certificate of approval
Certificate of Quallty
This product is confirmed to meet quality
standards and permitted for sale after
strict in spection.
QC Inspector:
Firmware Upgrade
Installation Instruction Balance the smartphone
Operation Instruction
Stabilizer Charging& Smartphone Charging
1. Roll Motor
2.Slide arm
3. Bluetooth Light
4. Zoom In/Zoom Out
5. 1/4 Inch Extension
Screw Hole
6. Tilt Motor
7. Pan Motor
8. Mode Light
9. Joystick
10. Mode Button
11. ON/OFF (Shutter Button)
12. Handle( Battery inside)
Rolling 320° Tilting 320°
Panning 640°
Slide arm Rotated holder
Power
Indicator
Light
Charging Port
For iPhone, please off “Portrait Orientation”.
For Android phone, please enable “Auto-rotate screen”.
It's the better to connect bluetooth in the APP,rather than setting in mobile phone
*Make sure the gimbal indicator keeps on.
1/4 Inch
Extension
Screw Hole
*Smartphone not included
Fully charge the stabilizer before using it for the first time.
Using the standard USB cable connecting to the stabilizer charging port.
(or other power sources)
1. Enable the Bluetooth on the mobilephone.
2. Open the App, choose the product model then confirm into Bluetooth connection.
3. Make sure the gimbal indicator keeps on.
1. If the gimbal has the following situations, please calibrate it:
① The pitch angle is not leveled with the horizontal surface.
② The roll angle is not parallel to the horizontal surface.
③ Under the lock mode, the panning angle drifting.
2. Calibration Operation Instruction:
Method 1: Off-line Calibration
(1)Power on the gimbal(around 3 seconds), long press the mode button over 6 seconds till the mode light is solid.
(2)Lay the gimbal on a static flat surface; make sure it has no shaking Calibration is finish when the mode light is
continuously flashing for 3 times.
1. Please install and use the product according to the manual!
2. Please use the standard battery charger!
3. Please reconfirm the gimbal and the smartphone are well installed before power on!
4. Keep the battery away from fire and heat source!
5. Prohibit any user for any illegal purpose. Users will be responsible for all behavior of purchasing and using the products.
6. For any unknown sources or usage, we will not provide any service.
7. If there is any question, please contact the technician of Hohem Tech, we won't be responsible for any wrong operations
by users.
8. Hohem Tech reserves the right for final explanation.
(3) Power off the gimbal and restart it, if the calibration is unsuccessful, you can repeat step(1)(2)to reinitialize.
Method 2: 6-Side Calibration Via App
Please ensure the stabilizer is connected with App via bluetooth,
then enter “Calibration” and follow the tips to calibrate in the App
Please ensure the stabilizer is connected with App via Bluetooth, then enter
the “Firmware Upgrade” and follow the tips to upgrade the latest firmware.
Install the ‘Gimbal Studio’App
Please make sure the gimbal is turned off before mount the phone and we suggest remove the phone case.
(2) Manually rotate the phone clamp to make the phone in vertical shooting.
*8 shifts for optional
Bluetooth Light:
Solid on: Bluetooth connected
Quickly flash twice: Power on/off
Not lit: Bluetooth is not connected
Zoom in/out& Focus
(Setting in the App)
Panning right/left
Tilting/ down
Mode light
Mode Button
①On/Off(Long press for 3 seconds
② Shutter Button:
Single Press: Take photo
Double press: Start video
(Bluetooth is connected)
(1)Push and open the phone clamp, insert the smartphone until the home button side as close as possible against to
the tilt motor. To adjust the smartphone gravity
center by sliding arm until it keeps
balance on the tilt axis to ensure
the best stabilizing status and
enduration time.
NOTE: The phone Home button side must be placed closed to the tilt motor and ensure it is fixed tightly in order to avoid the gimbal shaking.
Search for ‘Gimbal Studio’in the App Store or Google Playand install the app on your mobile phone.
A. 4Led lights indicators
4Led lights on means power is 100%
3Led lights on means power is 75%
2Led lights on means power is 50%
1Led lights on means power is 25%
B. lndicator Light Fast Flashing: Charging status
C. lndicator Light Solid: Fully charged status
*‘Gimbal Studio’ supports iOS 9.0 and Android 8.0 or above.
Mode Button
Operation
Single Click
Double Click
Triple click
Quartic Click
Long Press For
6 Seconds
Pan Following
Pan& Tilt Following
All Locked
All Following
Calibration
Flash for once
(Quick flash)
Flash for twice
Flash for triple
Flash for
once(Slow fiash)
Solid on
Work Modes Mode Light Instruction
Default mode. tilt & roll axis both locked, camera can move to left or
right smoothly.
Roll axis locked, camera can move to left/right, and tilt up/down.
The camera stays in its current orientation.
Tilt axis, roll axis and pan axis all follow.
Calibration will be needed when tilt or roll angle not leveled with
horizontal surface, or pan angle drift in lock mode.
Gimbal Studio
0 2
Mount the Smartphone
Micro USB Port:Charging the stabilizer
2. Warranty valid only under normal use.
3. Used in the normal circumstances, 1 year warranty, maintenance of life(not include the All accidents or man-made
damage, teardowns or misuse damage is outside the scope of the warranty.
4. Please keep the warranty card properly and show them together when asking for free of charge repair If you failed to
provide the warranty card or to alter it, maybe cause we deal with the product as without warranty.
5. All accidents or man-made damage, teardowns or misuse damage is outside the scope of the warranty.
12
1
2
3
4
5
6
Federal Communication Commission (FCC) Radiation Exposure Statement
The device has been evaluated to meet general RF exposure requirement, The device
can be used in portable exposure condition without restriction Federal
Communication Commission (FCC) Radiation Exposure Statement Power is so low
that no RF exposure calculation is needed.
This device complies with part 15 of the FCC rules. Operation is subject to the
following two conditions: (1) this device may not cause harmful interference, and (2)
this device must accept any interference received, including interference that may
cause undesired operation.
NOTE: The manufacturer is not responsible for any radio or TV interference caused
by unauthorized modifications or changes to this equipment. Such modifications or
changes could void the user’s authority to operate the equipment.
NOTE: This equipment has been tested and found to comply with the limits for a
Class B digital device, pursuant to part 15 of the FCC Rules. These limits are designed
to provide reasonable protection against harmful interference in a residential
installation. This equipment generates uses and can radiate radio frequency energy
and, if not installed and used in accordance with the instructions, may cause harmful
interference to radio communications. However, there is no guarantee that
interference will not occur in a particular installation. If this equipment does cause
harmful interference to radio or television reception, which can be determined by
turning the equipment off and on, the user is encouraged to try to correct the
interference by one or more of the following measures:
‐ Reorient or relocate the receiving antenna.
‐ Increase the separation between the equipment and receiver.
‐Connect the equipment into an outlet on a circuit different from that to which the
receiver is connected.
‐Consult the dealer or an experienced radio/TV technician for help.
FCC Caution: Any changes or modifi cations not expres sly approved by the p artyresponsible for
compliance could void the user's authority to operate this equipment.