Wireless Environment MB130 Remote Controlled LED Light User Manual
Wireless Environment LLC Remote Controlled LED Light Users Manual
Users Manual
1. Remove front
cover of Spotlight
by rotating count-
er-clockwise as
shown above. Pull
face out from cup
to reveal battery
holder.
Spotlight features:
Fully Adjustable: Light can be rotated 360° as well as up and down
Light Coverage: up to 400 sq ft
Durable, Weather Resistant: Tight seals and UV resistant material allow the light
to work in all weather conditions
Remote Control: Control from up to 70 ft away
2. Push down on
battery door tab to
release. Insert 3 D-Cell
batteries into Spotlight.
Attach battery door by
matching the tabs to
the rectangular holes
and then push down
on front until door
clicks into place.
4. Match arrows
then turn clock-
wise. Make sure
unit is securely
closed with arrow
pointing at the
lock symbol to
ensure weather
proof seal is tight.
10. Loosen larger
thumb screw that
connects Spotlight
head to mounting
base and adjust
Spotlight head to
proper direction as
shown above. Tight-
en thumb screw.
32333 Aurora Rd. Suite 100 Solon, OH 44139
877.298.9082
Installation Instructions
Customizable Wireless Spotlight with Motion Sensor and
Remote Control
MB130
• 1 Small Screwdriver
• 3 D-Cell Alkaline Batteries
• 1 Remote Controlled Spotlight
• Mounting Base
• 3 Screws & 3 Anchors
• 1 Remote Control with Mounting
Bracket + 2 screws
• (1) 3V Coin Battery
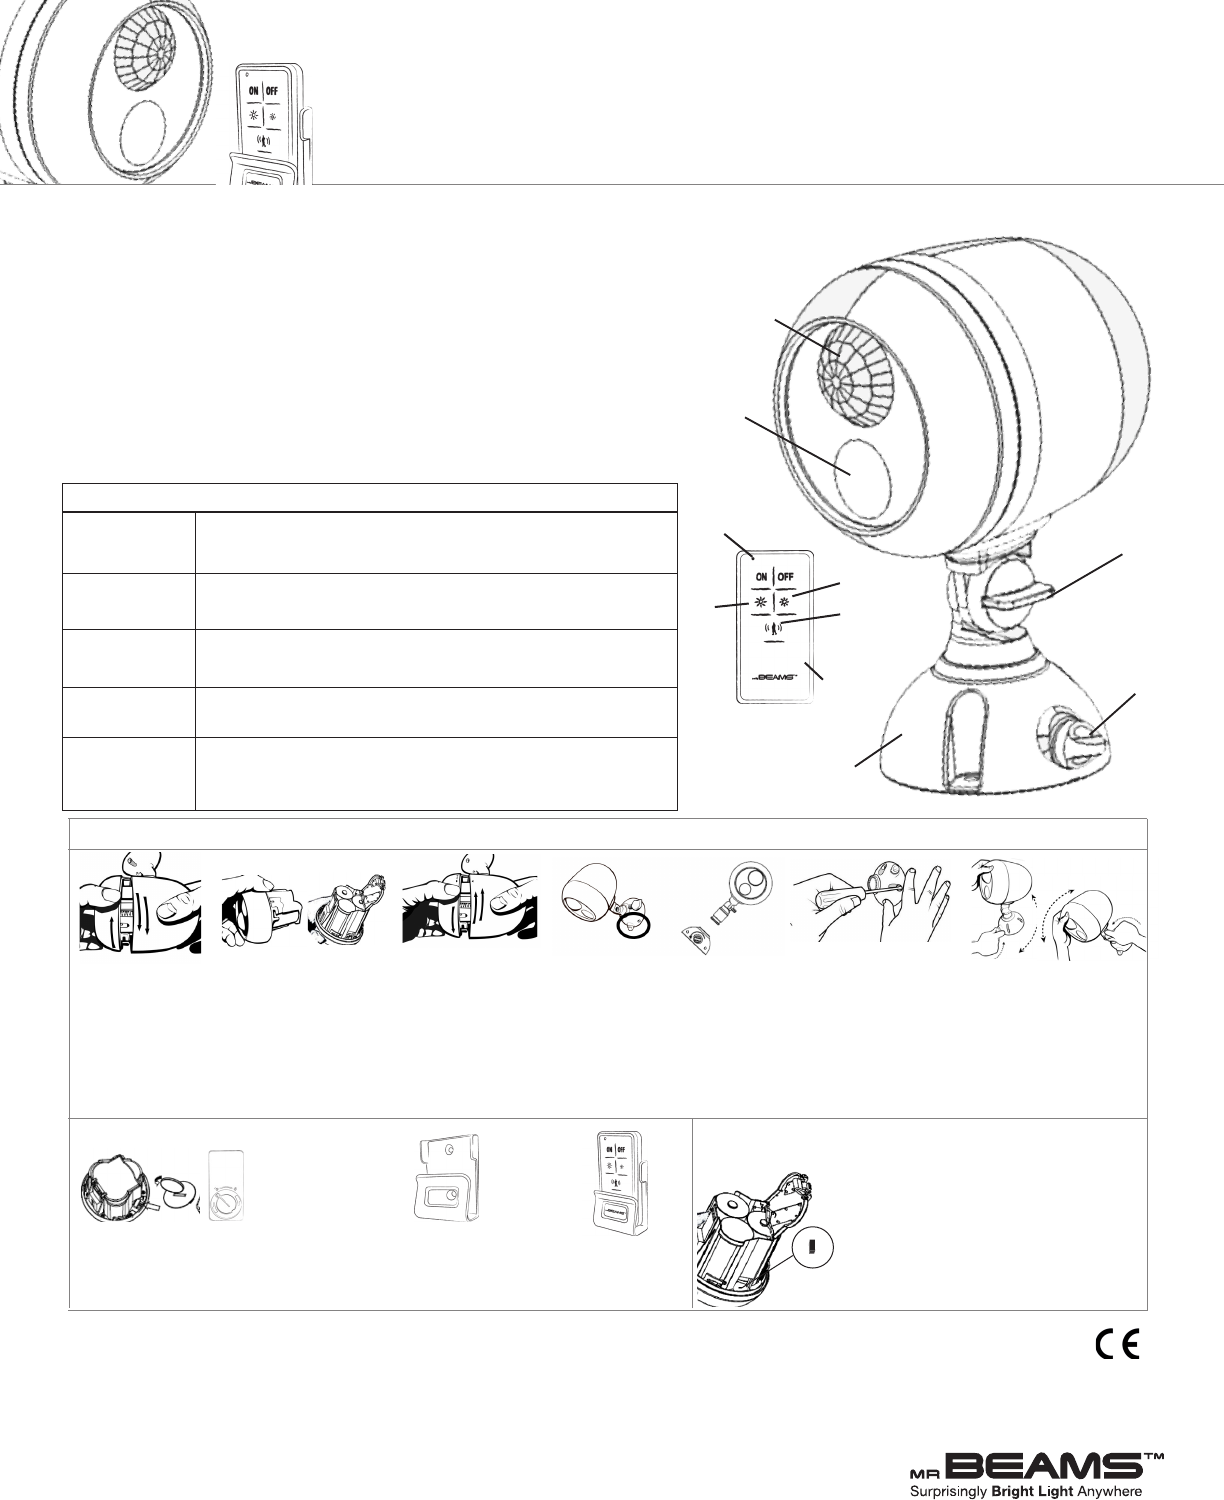
LED Light
Mounting Base
Mounting Base
Thumb Screw
Knuckle Screw
Motion &
Light Sensor
Dim
Bright Motion
Control
Indicator
Light
Mounting
Bracket
Syncing your light
What you need to install:
What is included per light:
www.mrbeams.com
5. Determine location for mount-
ing Spotlight. NOTE: For best
performance, Spotlight should be
positioned so motion sensor is on
top and light is on bottom.
6. Remove mounting base by
turning thumb screw counter-
clockwise.
7. Pull mounting base o stem.
8. Drive three screws
into the three holes
located on mounting
base.
9. Insert spotlight stem
back into mounting
base pointed in desired
direction and tighten
thumb screw in base.
Tips:
• Use only new alkaline D-Cell batteries with 1.5V rating.
• Do not mix old and new batteries. If batteries are not new, it may cause light to malfunction.
• Install batteries with polarity in correct position.
• Antenna is only connected at one end. It acts as a receptor for the remote. * 1 year limited warranty. See enclosed card for details.
* Visit our website to view installation video.
Battery Caution:
1) Do not mix old and new batteries
2) Do not mix Alkaline, Standard (Carbon-Zinc) or Rechargeable (Nickel Cadmium) or (Nickel Metal
Hydride) batteries
3) Do not dispose of batteries in re
4)Batteries should be recycled or disposed of as per state and local guidelines
1. The remote is paired to work only with
the Spotlight it is packaged with. To sync
additional spotlights to a single remote,
press the exposed black button on the
spotlight next to the battery compartment
for 3 seconds while pressing the ON button
on the remote.
1. Open the Remote Control with a small coin
and insert one at 3V battery (included) as
shown on the inside of the Remote Control.
Smooth side of battery should be facing up.
2. Determine
placement for bracket
for remote and attach to
wall using two screws
(included) or tape.
3. Slide Remote
into bracket as
shown above.
Patent # 8,203,445
Using the remote
Set up
Spotlight will activate when motion is sensed from up to 30 ft away.
Motion sensor only activates in darkness to conserve energy.
Activate light with the remote. Hold the motion sensor button down
until light blinks. When it blinks 2x the motion sensor has been
disabled. When it blinks 4x, the motion sensor has been enabled.
Light will remember your last brightness setting.
Spotlight can be turned on or o by pressing the remote control. Activat-
ing the remote will override the light sensor, and light can be activated at
any time. Default mode is motion sensor on 30 second auto shut-o.
First activate the light with remote control. Next, hold the ON button
down until light blinks. When it blinks 1x, auto shut o is set to 1 hour.
When it blinks 2x, it is set to 4 hours.
First activate the light with remote control. Next, press the Bright
or Dim button on the remote to adjust the brightness. Brightness
Options: 60, 90, or 140 lumens.
Customize your remote settings
Motion Sensor
Activation
Disable Motion
Remote Control
Activation
2 Auto Shut-off
Options
3 Brightness
Modes
Power supply: DC 3V
Operating Frequency:433.7MHz
FCC ID: W7DMB130
1. This device complies with Part 15 of the FCC Rules. Operation is subject to the following two conditions:
(1) This device may not cause harmful interference.
(2) This device must accept any interference received, including interference that may cause undesired operation.
2. Changes or modifications not expressly approved by the party responsible for compliance could void the user's
authority to operate the equipment.