Xiamen Tongren IOT Technology US-SC201 Smart Surveillance Camera User Manual
Xiamen Tongren IOT Technology Co.,Ltd. Smart Surveillance Camera
User Manual
SmartSurveillanceCamera–Manual
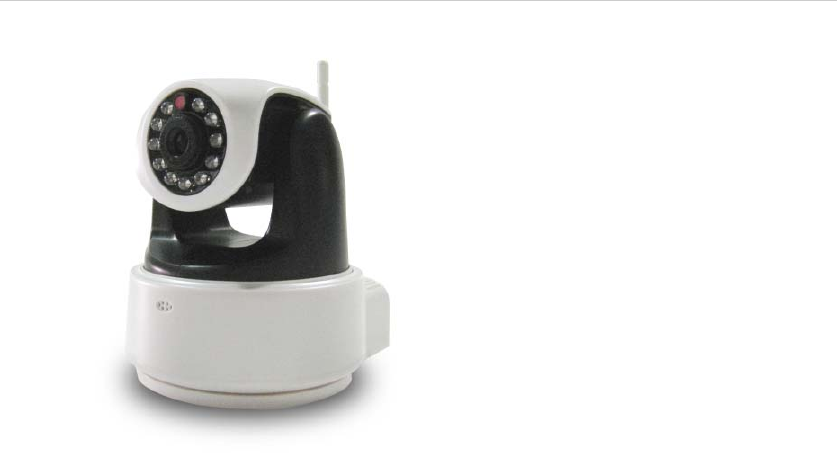
ProductName:SmartHome–WirelessSmartSurveillanceCamera
ProductDescription:
ThisproductisakeypartintheUSUNGSmartHomeSafeguarding&SurveillanceSystem,
anditmaytransmitlocallivevideotoUSUNGSmartHomeControllingClientSoftwarethrough
LANorInternet,asallowstheusertoviewlivesurveillancescenethroughtheirmobilephoneat
anytime.
Moreover,thisproductalsocomesupwithwirelessdatalinkmodule,whichallowsyou
installthesecamerasinyourhomewhereverpowersupplyisavailablewithoutconsiderationof
networkcabling.
Installation:
Beforethehardwareinstallation,pleaserefertoandfollowthemethodintroducedin
the“SoftwareUsage&Settings”sectionofthe“HomeSafeguarding&SurveillanceSuiteInitial
Setup&UsageGuide”toaddthesurveillancecameratoyourhomewirelessnetwork,and
thereafter,toproceedwiththefixingandinstallation.
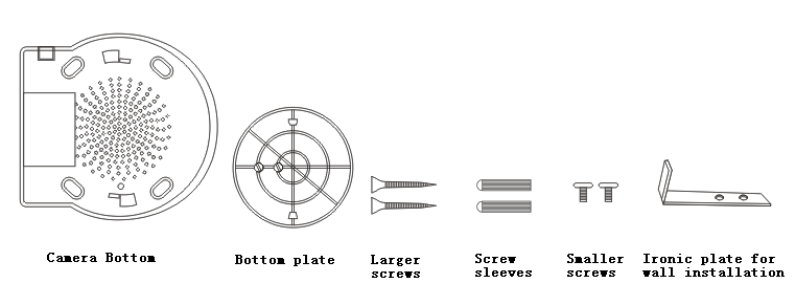
1)CeilingInstallation
• Drilltwoholesforscrewsatproperpositionsonthebottomplate;
• Insertthelargerscrewsthroughthebottomplateandusethemtofixthebottomplate
totheceiling;
• Alignthetwoholesinthecamerabottomtotheholesonthebottomplate,lockand
tightenthemup.
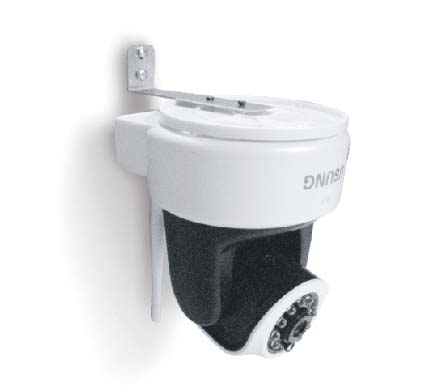
2)WallInstallation
• Fixtheironplatetothebottomplatebyfasteningtwosmallerscrewsintothesmaller
screwholesonthebottomplate.
• Drilltwoholesatproperpositionsinthewallwitha6mmdrillbit,andinsertthescrew
sleeves,andfastenbothlargerscrewsthroughthetwosideholesontheironplate.
• Alignthetwoholesinthecamerabottomtotheholesonthebottomplate,lockand
tightenthemup.
ConnecttoNetwork
WiredConnection:ConnectoneoftheRJ45jacksofaTwistedPairCable(NetworkCable)
totheEthernetinterfaceontherearofthecamera,andanothertoarouteroraswitch(note
thattwistedpaircableusuallycannotexceed100meters,otherwisemayleadtounstable
communicationorconnectionfailure.Fordistanceexceeding100meters,aswitchis
recommendedasrelay;
Wirelessconnection:usinghomeWIFInetworktoestablishdataconnections(forwireless
configurationfortheSurveillanceCamera,pleasereferto“USUNGHomeSafeguarding&
SurveillanceSuiteInitialSetupandUsageGuide”fordetails.
Power‐on
Connectthepowercablejacktothecameraandthepoweradaptertoapowersource
outlet.Dopleaseusetheoriginalin‐packagepoweradapter,otherwisemaypossiblycause
hardwaredamage.
ChecktheNetworkIndicator
Afterpoweron,thecamerastartstowork,undernormalcase,thegreenlightontheback
oftheSurveillanceCamerawillbesteadilyon,andtheyellowlightwillbeflashing.

InterfaceDescription:
AdjustableLens:Slightlyrotatethelensclockwiselyorcounterclockwisely,untilyougetthe
clearestview.
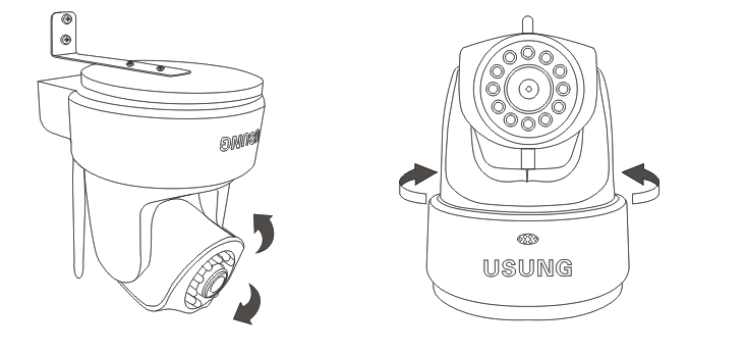
Rotatethecamera:throughthemobileclientsoftware,youmaycontroltorotatethe
camera,fordetailspleasereferto“HomeSafeguarding&SurveillanceSuiteInitialSetup&Usage
Guide”
Monitorthroughasmartphone:thisdevicesupportappleiPhoneandsmartphonewith
Androidsystem.AssoonastheuserinstallstheUSUNGHomeSafeguarding&SurveillanceClient
Software,andconfigurestheSurveillanceCameraproperlybyfollowingthe“HomeSafeguarding
&SurveillanceSuiteInitialSetup&UsageGuide”thatisincludedintheproductpackage,he/she
maymonitorlivesurveillancescenesthroughthecamerasfromhis/hersmartphone.
Precautions:
1. Please do not disassemble or try to repair the product in your own will;
2. Please do not put the product under extreme conditions like high
temperature or high pressure , etc.;
3. Please keep the product away from baby or child;
4. Please keep the product dry and away from humidity;
Xiamen Tongren IOT Technology Co.,Ltd.
24Hr hotline service:4008888022
Website:http://home.iusung.com
Usung Home Safeguarder Manual
Firstly, please download and install appropriate version of our client software
from:http://home.iusung.com/en
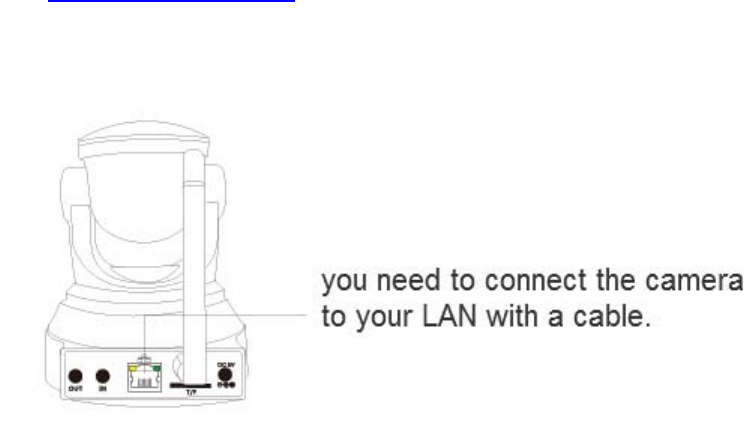
Secondly, you need to connect the camera to your LAN with a cable.
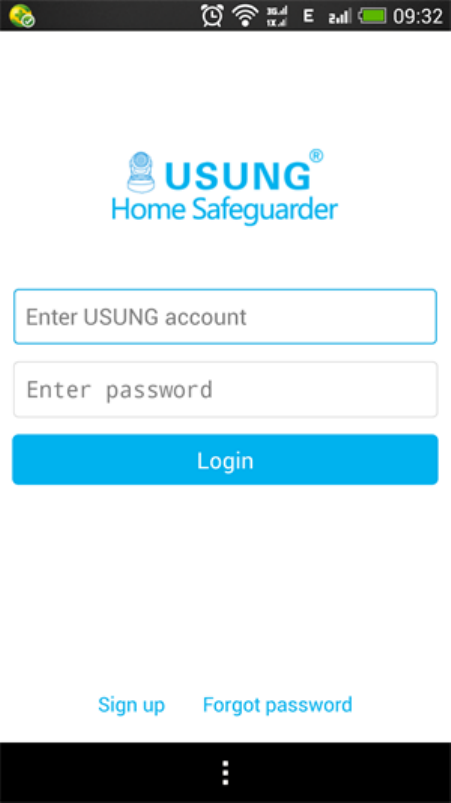
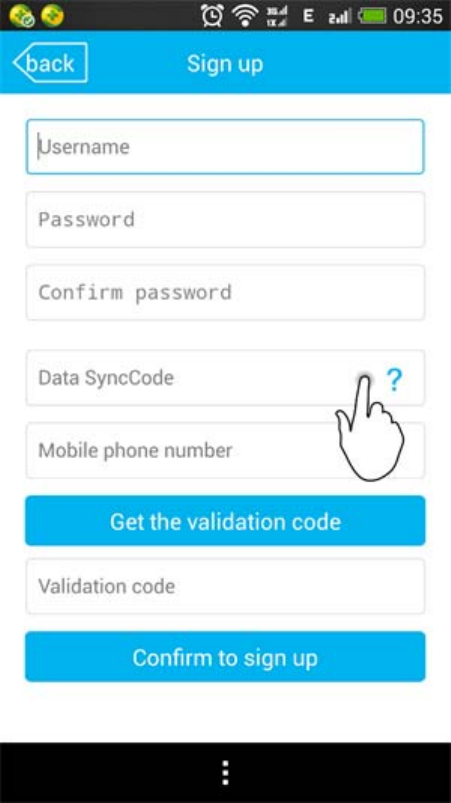
Open the client software, please sign-up for a USUNG account, and log in.
You may set a Sync Code during the sign-up process so that other family members may
take advantage of the existing configuration.
Please Add the Camera after login.
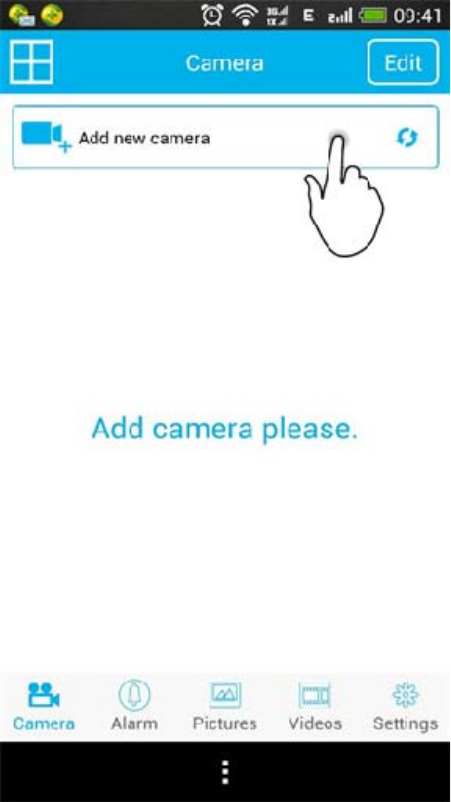
You may add camera(s):
1.by inputting device ID
2.by scanning the camera barcode from your mobile
(Device ID and barcode are printed on label at the bottom of the camera)

3.by searching – automatically search and add cameras in the LAN.
4.by adding from shared accounts.
(Enter the Sync Code set in the sign-up process for a USUNG Account, once signed-in
you may acquire shared camera information under this account.)
Lastly, input the password for the camera itself (default no password), click on the “Done ”
button to finish adding.
The camera will be shown in the main interface, click to view the monitor screen, and click
the Gear Button in the right side to configure the camera.
You may click on the Edit Button at the top right corner to modify camera information such
as name, access code etc., or delete camera.
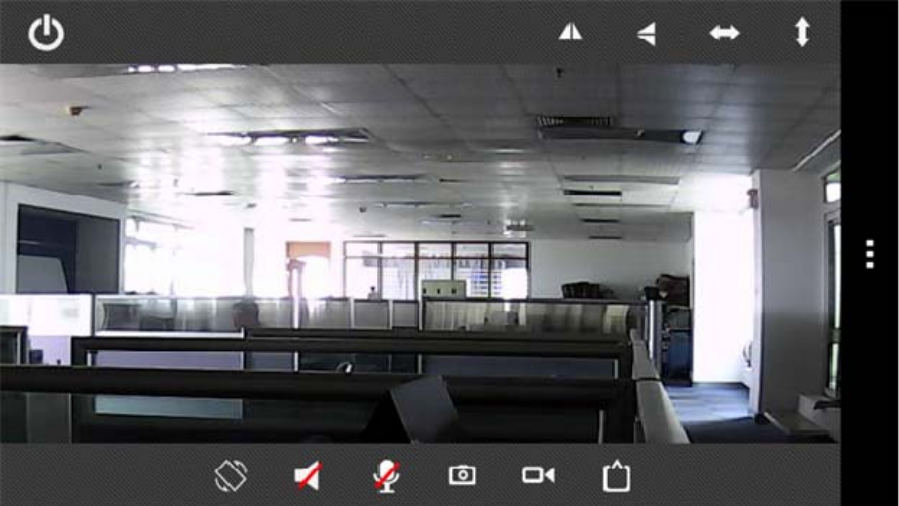
Operations that you can perform in the monitor view interface:
Horizontal/vertical mirror view, cradle head auto-rotation, live sound, rotation lock,
photographs, video, watch mode settings and exit.
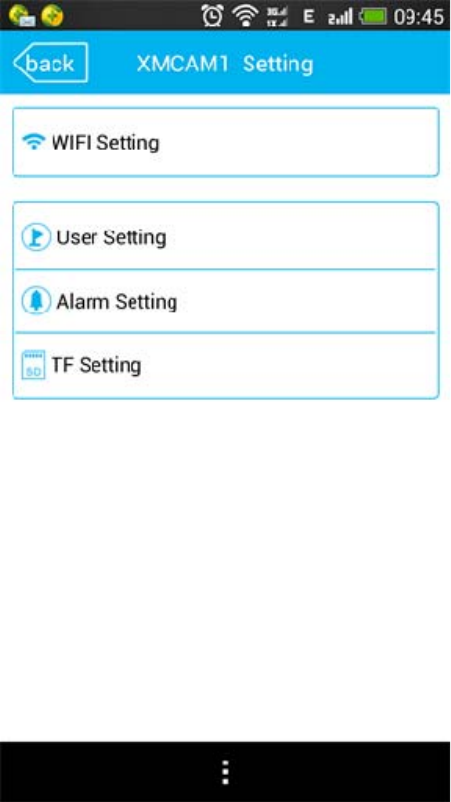
In the Camera Settings interface
You can set the camera to connect to your home LAN through WIFI;
You can set an independent password for the camera;
Alarm & push message settings and TF card settings for video storage.
By touching navigation icons at the bottom, you may view alarm history, snapshots, and
video information at any time;
In Settings you may configure your USUNG Account;
In Settings interface, you may set to share your cameras, and only those shared cameras
can be synchronized to other mobile with a Sync Code.
You may insert a TF card at the back of the camera, then the camera may start recording
videos automatically. You may view recently recorded videos from the Video function that
you can find in the navigation section at the bottom of the main interface.
Firstly, click on the Video button at the bottom, and switch to remote mode.
Secondly, click on the camera that you want to view its videos recorded.
Note:
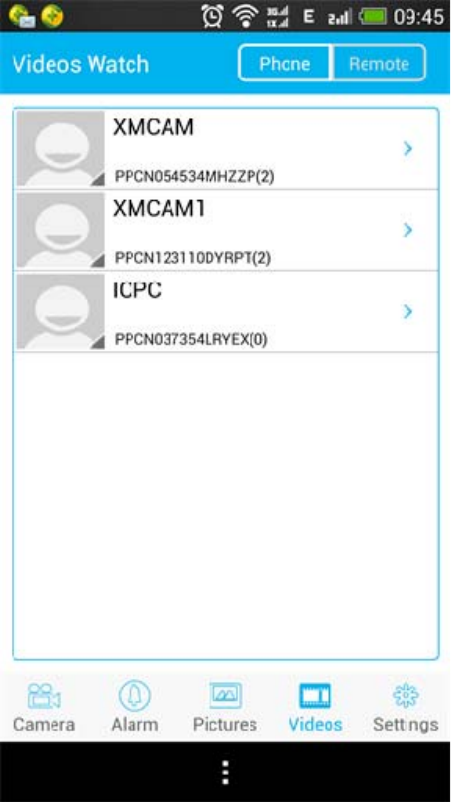
Remote: video will be stored in the TF card inserted into the camera.
Mobile: videos will be stored in your mobile when you click on the Video button to record
videos while viewing the monitor screen.
Precautions:
1. Please do not disassemble or try to repair the product in your own will;
2. Please do not put the product under extreme conditions like high temperature or
high pressure, etc.;
3. Please keep the product away from baby or child;
4. Please keep the product dry and away from humidity;
FCC Radiation Exposure Statement
This equipment complies with FCC RF radiation exposure limits set forth for an
uncontrolled environment. This transmitter should be installed and operatated with a
minimum distance of 20 centimeters between the radiator and your body and must not be
co-located or operating in conjunction with any other antenna or transmitter.
FCC Caution: Any changes or modifications not expressly approved by the party
responsible for compliance could void the
user's authority to operate this equipment.
This device complies with Part 15 of the FCC Rules. Operation is subject to the
following two conditions: (1) This device may
not cause harmful interference, and (2) this device must accept any interference
received, including interference that may
cause undesired operation. This device and its antenna(s) must not be co-located or
operating in conjunction with any other
antenna or transmitter.
NOTE: This equipment has been tested and found to comply with the limits for a Class
B digital device, pursuant to Part 15 of
the FCC Rules. These limits are designed to provide reasonable protection against
harmful interference in a residential
installation. This equipment generates, uses and can radiate radio frequency energy
and, if not installed and used in
accordance with the instructions, may cause harmful interference to radio
communications. However, there is no guarantee
that interference will not occur in a particular installation. If this equipment does cause
harmful interference to radio or
television reception, which can be determined by turning the equipment off and on,
the user is encouraged to try to correct the
interference by one or more of the followingmeasures:
-- Reorient or relocate the receiving antenna.
-- Increase the separation between the equipment and receiver.
-- Connect the equipment into an outlet on a circuit different from that to which the
receiver is connected.
-- Consult the dealer or an experienced radio/TV technician for help.