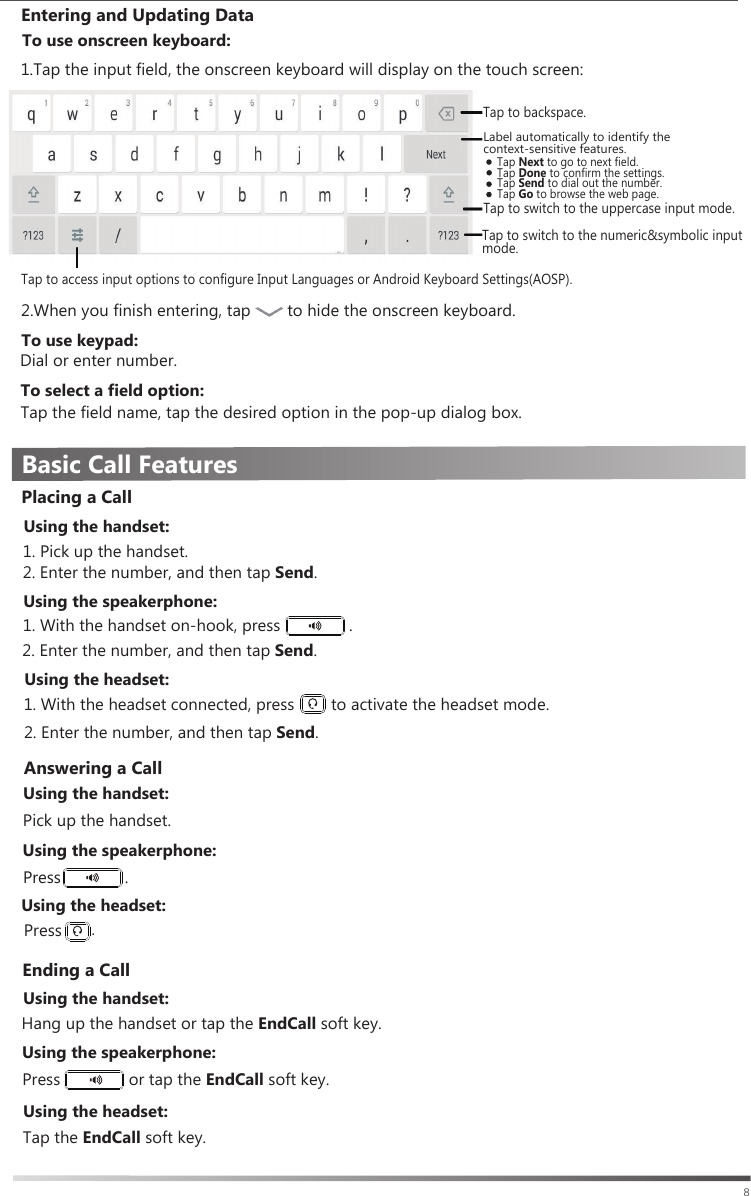
YEALINK T56A Smart Media Phone User Manual Yealink SIP T56A Quick Start Guide V80 10

YEALINK (XIAMEN ) NETWORK TECHNOLOGY CO., LTD. Smart Media Phone Yealink SIP T56A Quick Start Guide V80 10

Users Manual

Smart Media PhoneSIP-T56AQuick Start Guide (V80.10)www.yealink.com Applies to firmware version 58.80.0.10 or later.
1Packaging ContentsThe following items are included in your package. If you find anything missing, contact your system administrator.Assembling the PhoneNote: We recommend that you use the accessories provided or approved by Yealink. The use of unapproved           third-party accessories may result in reduced performance.   Quick Start Guide StandHandset CordHandsetIP PhoneEthernet CableWall Mount BracketPower Adapter    (Optional)(Optional)(2m CAT5E FTP cable)1. Attach the stand, as shown below:PUSH         The hookswitch tab has a lip which allows the handset to stay on-hook when the IP phone is mounted          vertically. For more information, refer to Yealink Wall Mount Quick Installation Guide for Yealink IP Phones.Note: 2. Attach the optional wall mount bracket, as shown below:PUSH
24. Connect the optional USB flash drive, as shown below:3. Connect the handset and optional headset, as shown below:         The headset should be purchased separately.Note: 5. Connect the AC power or PoE, as shown below:Note: The IP phone should be used with Yealink original power adapter (5V/2A) only. The use of the third-party           power adapter may cause the damage to the phone.   ABAC Power OptionPoE ( Power over Ethernet ) OptionPower Adapter      (DC 5V)IEEE 802.3af compliant     PoE Hub/SwitchPC InternetDC5VPC InternetDC5V         The USB port can also be used to connect color-screen expansion module EXP50 or USB headset. For more          information on how to use EXP50, refer to Yealink EXP50 User Guide. For more information on how to use          USB headset, refer to the documentation from the manufacturer.Note: PC InternetDC5V
3    2) Tap Settings->Basic->Wi-Fi.    4) Select an available wireless network from the list of networks.5) If the network is secure, enter its password in the Password field.6) Tap Connect to connect to the wireless network.b) Connect to the wireless network: The phone will automatically search for available wireless networks in your area.3) Tap the On radio box in the Wi-Fi field. You have two options for network connection. You can select one of them according to the current office  environment.6. Connect to the network, as shown below: a) Connect to the wired network:1) Swipe down from the top of the screen to enter the control center.PC Connection    (Optional)PCPC InternetDC5VNote: If you are connecting a PC to your phone, we recommend that you use the Ethernet cable provided by          Yealink.
4Hardware Component InstructionsMESSAGE KeyVolume KeySpeakerphone KeyREDIAL KeyItemItem8910Power Indicator LEDTouch ScreenHEADSET KeyTRANSFER KeyMUTE KeyHOLD Key23456Item11HookswitchSpeakerKeypad1314171215 USB2.0 portHookswitch Tab12213234567891011131414121215
5After the IP phone is connected to the network and supplied with power, it automatically begins the initialization process. After startup, the phone is ready for use. You can configure the phone via web user interface or phone user interface.StartupWelcomeInitializing...  Please waitIt is provided by ITSP for registration (required).    Server Host: It is provided by ITSP for registration (required).It is provided by ITSP for registration (required).It is an authenticated ID for authentication provided by ITSP (required).Display Name:                            Line Active:                     You can select Enabled/Disabled to enable/disable the account. Register Name:  User Name:Password:Label:                              It is shown on the touch screen to identify the account.Account Settings:  Click on Account->Register->Account X (X=1,2,3...15,16)Parameters of the account:Note: The IP phone also supports IPv6, but IPv6 is disabled by default.             Register Status:              It shows the register status of the current account.It is shown as Caller ID when placing a call.The wrong network settings may result in inaccessibility of your phone and may have an impact on the network performance. Contact your system administrator for more information.Configuring Your Phone2. Tap Settings->Status to obtain the IP address of the phone. 3. Open a web browser on your computer, enter the IP address into the address bar     (e.g., "http://192.168.0.10" or "192.168.0.10"), and then press Enter.4. Enter the user name (default: admin) and password (default: admin) in the login page and click    Confirm.Network Settings:  Click on Network->Basic->IPv4 ConfigStatic IP Address: If the phone cannot contact a DHCP server for any reason, you need to                               configure IP address, subnet mask, gateway address, primary DNS address                               and secondary DNS address for the phone manually.Accessing the web user interface:Configuring via web user interfacePPPoE: If you are using an xDSL modem, you can connect your phone to the Internet via             PPPoE mode. Contact the ITSP for the PPPoE user name and password.You can configure the network settings in the following ways:DHCP: By default, the phone attempts to contact a DHCP server in your network to obtain             its valid network settings, e.g., IP address, subnet mask, gateway address and DNS             address.1. Swipe down from the top of the screen to enter the control center.
6Using Your PhoneThe icons on the status bar of the touch screen give information about phone:Status IconsRegisteringConfiguring via phone user interfaceRegister status icons on the touch screen:Note: Check with your system administrator if any error appears during the registration process or a specific           configuration is required for your registration.           Registered Register Failed(Green) (Gray) (Green and Flashing)  Account Settings:Network Settings:2. Tap Settings->Advanced (default password: admin)->Network->WAN Port/VLAN   /Webserver Type/802.1x/VPN/LLDP/CDP/NAT to configure the network.1. Swipe down from the top of the screen to enter the control center.2. Tap Settings->Advanced (default password: admin)->Accounts to configure the account.1. Swipe down from the top of the screen to enter the control center.Icons DescriptionShows that Wi-Fi is turned on.Shows that wired network is unavailable.Shows that Bluetooth is turned on.Shows that “Do Not Disturb” is turned on.Shows that you have missed calls.Shows that “Forward” is turned on.Shows that “Auto Answer” is turned on.Shows that “Silent” is turned on.Shows that a USB flash drive is detected. (White)(Green) Shows that Bluetooth headset is paired successfully.Shows that the phone is connected to wireless network successfully.(Green)(White)(Green) Shows that Bluetooth-Enabled mobile phone is paired successfully.Shows that the phone is locked.Shows that you have unread voice mails.
Control Center and Notification Center   To turn on/off common functions quickly, capture a    screenshot or go to the Settings screen, tap    corresponding icons.Notification center displays the list of Notification, Missed Calls, Voice Mail and Forwarded.To delete a specific notification, swipe left or right.To delete all notifications, tap        .  To adjust the screen brightness, drag the slider.Swipe down from the top of the screen to enter the control center and the notification center.Control CenterSwipe up from the bottom of the screen to hide this screen.7Using the Touch ScreenBy default, the IP phone supports three idle screens. The home screen displays as below:Status BarDigital Clock WidgetTap to add DSS keys.Screen IndicatorAndroid KeysPhone DialerDirectoryHistoryTo add a widget to the idle screen:3. Drag the desired widget up/down/left/right to the destination spot on the idle screen.2. Tap WIDGETS.1. Long tap the empty spot on the idle screen.Tap      to go back to the previous screen.Tap      to return to the idle screen.Tap      to view and manage recently used applications.To navigate the touch screen:Swipe left or right to switch among different idle screens.To change the wallpaper:4. Tap Set wallpaper.3. Select a desired picture.2. Tap WALLPAPERS.1. Long tap the empty spot on the idle screen.To view the details, tap the desired notification message.Notification CenterDisplay the phone’s time and date.Android keys.
Basic Call Features8Ending a CallUsing the handset:Hang up the handset or tap the EndCall soft key.Using the speakerphone:Using the headset:Press               or tap the EndCall soft key.Tap the EndCall soft key. Entering and Updating Data1.Tap the input field, the onscreen keyboard will display on the touch screen:To use keypad:To select a field option:Tap the field name, tap the desired option in the pop-up dialog box.Tap to backspace.Tap Next to go to next field.Tap Done to confirm the settings.Tap Send to dial out the number.Tap Go to browse the web page.Tap to switch to the uppercase input mode.Tap to switch to the numeric&symbolic input mode.2.When you finish entering, tap        to hide the onscreen keyboard.To use onscreen keyboard:Dial or enter number.Tap to access input options to configure Input Languages or Android Keyboard Settings(AOSP).Label automatically to identify the context-sensitive features.1. Pick up the handset.Placing a CallUsing the handset:1. With the handset on-hook, press               .  2. Enter the number, and then tap Send.Using the speakerphone:  2. Enter the number, and then tap Send. 1. With the headset connected, press        to activate the headset mode.Using the headset:Using the headset:Using the handset:Pick up the handset.Press              .  Press.Answering a CallUsing the speakerphone:2. Enter the number, and then tap Send.
9If there is more than one call on hold, tap the call you want to resume, and press        or tap the Resume soft key. Call Hold and ResumeTo place a call on hold:To resume the call, do one of the following:If there is only one call on hold, press        or tap the Resume soft key.Press        or tap the Hold soft key during an active call.RedialPress        to enter the Placed Calls list, and then tap the desired entry. Press        twice when the phone is idle to dial out the last dialed number.Call Mute and Un-mutePress        to mute the microphone during a call.  Press        again to un-mute the call.Semi-Attended TransferBlind TransferCall TransferYou can transfer a call in the following ways:1. Press        or tap the Transfer soft key during a call. The call is placed on hold.1. Press        or tap the Transfer soft key during a call. The call is placed on hold.2. Enter the number you want to transfer to, and then press         .3. Press        or tap the Transfer soft key when you hear the ring-back tone.3. Press        .2. Enter the number you want to transfer to.Attended Transfer1. Press        or tap the Transfer soft key during a call. The call is placed on hold.2. Enter the number you want to transfer to, and then press         . 3. Press        or tap the Transfer soft key when the second party answers.Call ForwardTo enable call forward:Always Forward----Incoming calls are forwarded unconditionally.   Busy Forward----Incoming calls are forwarded when the phone is busy.   No Answer Forward----Incoming calls are forwarded if not answered after a period of time.         3. Select the desired forward type:5. Tap      to accept the change.4. Enter the number you want to forward to. For No Answer Forward, tap the After Ring Time    field, and then tap the desired ring time to wait before forwarding.2. Tap Settings->Features->Call Forward.1. Swipe down from the top of the screen to enter the control center.
Tap Send to place a call.Tap Add to add the entry to the local directory.1. Tap     , and then select the desired call list on the left. Customizing Your PhoneCall History2. Drag up and down to scroll.3. Tap      after the desired entry, and then you can do the following:Tap Edit to edit the phone number of the entry before placing a call.Tap Blacklist to add the entry to the blacklist.Tap Delete to delete the entry from the list.Contact DirectoryTo add a contact:1. Tap     , and then select the desired group on the left.Volume AdjustmentTo edit a contact:To delete a contact:Press                during a call to adjust the receiver volume of the handset/speakerphone/headset.Press                when the phone is idle or ringing to adjust the ringer volume.1. Tap     , and then select the desired group on the left.2. Tap      after the desired contact.3. Edit the contact information.3. Tap OK when the touch screen prompts “Delete selected item?”.Note: You can add contacts from call history easily. For more information, refer to Call History above.1. Tap     , and then select the desired group on the left.2. Tap      after the desired contact and then tap Delete.2. Tap        to add a contact.3. Enter a unique contact name in the Name field and contact numbers in the corresponding fields.4. Tap      to accept the change. 4. Tap      to accept the change.10Voice MessageMessage waiting indicator on the idle screen indicates that one or more voice messages are waiting at the message center. The power indicator LED slowly flashes red.4. Tap the EndCall soft key to disconnect all parties.2. Enter the number of the second party, and then press         or tap Conference.3. Tap the Conference soft key again when the second party answers. All parties are now joined in     the conference. Note: You can split the conference call into two individual calls by tapping the Split soft key.    Call Conference 1. Tap the Conference soft key during an active call. The call is placed on hold.To listen to voice messages:2. Follow the voice prompts to listen to your voice messages.(Ensure the voice mail code is already configured on the phone.)                                1. Do one of the following:                                       Press       .                                       Swipe down from the top of the screen to enter the notification center, tap Voice Mail and                                        then select the desired item. Press                to adjust the media volume in the corresponding screen.
About usFounded in 2001, Yealink, a leading provider of VoIP Phone and IP communication solutions, has been focusing on VoIP products characterized by reliable quality, easy deployment and affordable price for more than a decade. Today, customers from over 140 countries rely on Yealink as the backbone of global collaboration to extend the value of networkcommunications.More about YealinkSince 2001, Yealink  has  continued  to  develop  state-of-the  art,  hi-tech  VoIP communication terminals that include IP video phones, IP phones and USB phones. With a worldwide market in more than 140 countries, the company has alsoestablished a first-class international service network.Our priorities are quality, functionality, ease-of-use, customer support and competitive pricing. To provide new solutions for the future in this fast-evolving sector, Yealink’s large, talented and highly-experienced VoIP R&D team is totally purcommitted to the suit of excellence.To date, we have passed more than 80 interoperability tests and meet certification requirements set by leading VoIP system and platforms. Yealink works in close partnership with T-Mobile, Telefonica, Portugal Telecom and other leading telecommunication service providers.YEALINK(XIAMEN) NETWORK TECHNOLOGY CO.,LTD.Web: www.yealink.comAddr: 309, 3th Floor, No.16, Yun Ding North Road, Huli           District, Xiamen City, Fujian, P.R. ChinaCopyright©2017 YEALINK(XIAMEN) NETWORK TECHNOLOGY CO.,LTD.All rights reserved.6938818 301665''This product meets the applicable Innovation, Science and Economic Development Canada technical specifications. / Ce produit répond à la innovation, des sciences et de Développement économique Canada spécifications techniques applicables.”''The Ringer Equivalence Number (REN) indicates the maximum number of devices allowed to be connected to a telephone interface. The termination of an interface may consist of any combination of devices subject only to the requirement that the sum of the RENs of all the devices not exceed five. / Le nombre équivalent de sonneries (REN) indique le nombre maximal de terminaux qui peuvent être raccordés à une interface téléphonique. La terminaison d'une interface peut consister en une combinaison de dispositifs, à la seule condition que la somme des REN de tous les dispositifs ne dépasse pas cinq.''FCC StatementThis device is compliant with Part 15 of the FCC Rules. Operation is subject to the following two conditions:1. This device may not cause harmful interference, and2. This device must accept any interference received, including interference that may cause undesired operation.Note: This equipment has been tested and found to comply with the limits for a Class B digital device, pursuant to part 15 of the FCC Rules. These limits are designed to provide reasonable protection against harmful interference in a residential installation. This equipment generates, uses and can radiate radio frequency energy and, if not installed and used in accordance with the instructions, may cause harmful interference to radio communications. However, there is no guarantee that interference will not occur in a particular installation. If this equipment does cause harmful interference to radio or television reception, which can be determined by turning the equipment off and on, the user is encouraged to try to correct the interference by one or more of the following measures:1. Reorient or relocate the receiving antenna.2. Increase the separation between the equipment and receiver.3. Connect the equipment into an outlet on a circuit different from that to which the receiver is connected.4. Consult the dealer or an experienced radio/TV technician for help.This equipment must be installed and operated in accordance with provided instructions and the antenna(s) used for this transmitter must be installed to provide a separation distance of at least 20 cm from all persons and must not be co-located or operating in conjunction with any other antenna or transmitter. End-users and installers must be provided with antenna installation instructions and transmitter operating conditions for satisfying RF exposure compliance.Canada StatementThis device complies with Industry Canada's licence-exempt RSSs.Operation is subject to the following two conditions:(1) This device may not cause interference; and (2) This device must accept any interference, including interference that may cause undesired operation of the device.Le présent appareil est conforme aux CNR d'Industrie Canada applicables aux appareils radio exempts de licence. L'exploitation est autorisée aux deux conditions suivantes :(1) l'appareil ne doit pas produire de brouillage;(2) l'utilisateur de l'appareil doit accepter tout brouillage radioélectrique subi, même si le brouillage est susceptible d'en compromettre le fonctionnement.The device meets the exemption from the routine evaluation limits in section 2.5 of RSS 102 and compliance with RSS-102 RF exposure, users can obtain Canadian information on RF exposure and compliance.Le dispositif rencontre l'exemption des limites courantes d'évaluation dans la section 2.5 de RSS 102 et la conformité à l'exposition de RSS-102 rf, utilisateurs peut obtenir l'information canadienne sur l'exposition et la conformité de rf.This transmitter must not be co-located or operating in conjunction with any other antenna or transmitter. This equipment should be installed and operated with a minimum distance of 20 centimeters between the radiator and your body.Cet émetteur ne doit pas être Co-placé ou ne fonctionnant en même temps qu'aucune autre antenne ou émetteur. Cet équipement devrait être installé et actionné avec une distance minimum de 20 centimètres entre le radiateur et votre corps.

Navigation menu