YEALINK W52P IP DECT Phone User Manual
YEALINK (XIAMEN ) NETWORK TECHNOLOGY CO., LTD. IP DECT Phone Users Manual
YEALINK >
Users Manual
Copyright
Copyright©2013YEALINKNETWORKTECHNOLOGYCO.,LT D .
Copyright©2013YealinkNetworkTechnologyCO.,LT D. Allrightsreserved.Nopartsofthispublicationmaybe
reproducedortransmittedinanyformorbyanymeans,electronicormechanical,photocopying,recording,or
otherwise,foranypurpose,withouttheexpresswrittenpermissionofYeal inkNetworkTechnologyCO.,LTD.
Underthelaw,reproducingincludestranslatingintoanotherlanguageorformat.
Whenthispublicationismadeavailableonmedia,Yeal inkNetworkTechnologyCO.,LT D. givesitsconsentto
downloadingandprintingcopiesofthecontentprovidedinthisfileonlyforprivateuseandnotfor
redistribution.Nopartsofthispublicationmaybesubjecttoalteration,modificationorcommercialuse.
YealinkNetworkTechnologyCO.,LT D. willnotbeliableforanydamagesarisingfromuseofanillegally
modifiedoralteredpublication.
Warranty
THESPECIFICATIONSANDINFORMATIONREGARDINGTHEPRODUCTSINTHISGUIDEARESUBJECTTO
CHANGEWITHOUTNOTICE.ALLSTATEMENTS,INFORMATION,ANDRECOMMENDATIONSINTHISGUIDE
AREBELIEVEDTOBEACCURATEBUTAREPRESENTEDWITHOUTWARRANTYOFANYKIND,EXPRESSOR
IMPLIED.USERSMUSTTAKEFULLRESPONSIBILITYFORTHEIRAPPLICATIONOFPRODUCTS.
YEALINKNETWORKTECHNOLOGYCO.,LT D . MAKESNOWARRANTYOFANYKINDWITHREGARDTOTHIS
GUIDE,INCLUDING,BUTNOTLIMITEDTO,THEIMPLIEDWARRANTIESOFMERCHANTABILITYANDFITNESS
FORAPARTICULARPURPOSE.Yeal inkNetworkTechnologyCO.,LT D. shallnotbeliableforerrorscontained
hereinnorforincidentalorconsequentialdamagesinconnectionwiththefurnishing,performance,oruseof
thisguide.
Declaration of Conformity
Hereby,Yeal inkNetworkTechnologyCO.,LT D . declaresthatthisphoneisinconformitywiththeessentialrequirementsand
otherrelevantprovisionsoftheCE,FCC.
CE Mark Warning
ThisdeviceismarkedwiththeCEmarkincompliancewithECDirectives1999/5/EC(R&TTE).
Thisdevicecomplieswiththefollowingstandards:
1.Safety:EN60950‐1:2006+A11:2009+A1:2010+A12:2011
2.SAR:EN62479:2010
3.EMC:ETSIEN301489‐1V1.9.2(2011‐09)&ETSIEN301489‐6V1.3.1(2008‐08)
4.Radio:ETSIEN301406V2.1.1(2009‐07)
Part 15 FCC Rules
ThisdeviceiscompliantwithPart15oftheFCCRules.Operationissubjecttothefollowingtwocondit ions:
1.Thisdevicemaynotcauseharmfulinterference,and
2.Thisdevicemustacceptanyinterferencereceived,includinginterferencethatmaycauseundesiredoperation.
Changesormodificat ionstothisunitthatarenotexpresslyapprovedbythepartyresponsiblefor
compliancecouldvoidtheuser'sauthoritytooperatetheequipment.
Privacyofcommunicationsmaynotbeensuredwhenusingthisproduct!
Class B Digital Device or Peripheral
ThisequipmentistestedandcomplieswiththelimitsforaClassBdigitaldevice,pursuanttoPart15oftheFCCRules.These
limitsaredesignedtoprovidereasonableprotectionagainstharmfulinterferenceinaresidentialinstallation.Thisequipment
generates,uses,andcanradiateradiofrequencyenergyand,ifnotinstalledandusedinaccordancewiththeinstructions,may
causeharmfulinterferencetoradiocommunications.However,thereisnoguaranteethatinterferencewillnotoccurina
particularinstallation.Privacyofcommunicationsmaynotbeensuredwhenusingthistelephone.Ifthisequipmentdoes
causeharmfulinterferencetoradioortelevisionreception,whichcanbedeterminedbyturningtheequipmentoffandon,the
userisencouragedtotrytocorrecttheinterferencebyoneormoreofthefollowingmeasures:
1.Reorientorrelocatethereceivingantenna.
2.Increasetheseparationbetweentheequipmentandreceiver.
3.Connecttheequipmentintoanoutletonacircuitdifferentfromthattowhichthereceiverisconnected.
4.Consultthedealeroranexperienceradio/TVtechnicianforhelp.
Note:ChangesormodificationsnotexpresslyapprovedbyYeal inkNetworkTechnologyCo.,Ltdcouldvoidtheuser's
authoritytooperatetheequipment.
ACTA Information
1. ThisequipmentcomplieswithPart68oftheFCCrulesandtherequirementsadoptedbytheACTA.Onthebottomofthis
equipmentisalabelthatcontains,amongotherinformation,aproductidentifierintheformatUS:AAAEQ##TXXXX.If
requested,thisnumbermustbeprovidedtothetelephonecompany.
2. Aplugandjackusedtoconnectthisequipmenttothepremiseswiringandtelephonenetworkmustcomplywiththe
applicableFCCPart68rulesandrequirementsadoptedbytheACTA.Acomplianttelephonecordandmodularplugis
providedwiththisproduct.Itisdesignedtobeconnectedtoacompatiblemodularjackthatisalsocompliant.See
installationinstructionsfordetails.
3. Ifthisequipment[US:T2LIPNANW52P]causesharmtothetelephonenetwork,thetelephonecompanywillnotifyyouin
advancethattemporarydiscont inuanceofservicemayberequired.Butifadvancenoticeisn'tpractical,thetelephone
companywillnotifythecustomerassoonaspossible.Also,youwillbeadvisedofyourrighttofileacomplaintwiththe
FCCifyoubelieveitisnecessary.
4. Thetelephonecompanymaymakechangesinitsfacilit ies,equipment,operationsorproceduresthatcouldaffectthe
operationoftheequipment.Ifthishappensthetelephonecompanywillprovideadvancenoticeinorderforyoutomake
necessarymodificat ionstomaintainuninterruptedservice.
5. Iftroubleisexperiencedwiththisequipment[US:T2LIPNANW52P],forrepairorwarrantyinformation,Servicecanbe
facilitatedthroughourofficeat:
U.S.AgentCompanyname:AmericanTechnologies,LLC.
Address:7620SenecaSt.EastAurora,NYUSA
Tel:888‐864‐7786ext.204
Fax:866‐824‐0836
Iftheequipmentiscausingharmtothetelephonenetwork,thetelephonecompanymayrequestthatyoudisconnectthe
equipmentuntiltheproblemisresolved.

6. Pleasefollowinstructionsforrepairingifany(e.g.batteryreplacementsection);otherwisedonotalternateorrepairany
partsofdeviceexceptspecified.
7. Connectiontopartylineserviceissubjecttostatetariffs.Contactthestatepublicutilitycommission,publicservice
commissionorcorporationcommissionforinformation.
8. Ifyourhomehasspeciallywiredalarmequipmentconnectedtothetelephoneline,ensuretheinstallationofthis
[US:T2LIPNANW52P]doesnotdisableyouralarmequipment.Ifyouhavequestionsaboutwhatwilldisablealarm
equipment,consultyourtelephonecompanyoraqualifiedinstaller.
9. Ifthetelephonecompanyrequestsinformationonwhatequipmentisconnectedtotheirlines,informthemof:
a) Theringerequivalencenumber[NAN]
b) TheUSOCjackrequired[RJ45C]
c) FacilityInterfaceCodes(“FIC”)[N/A]
d) ServiceOrderCodes(“SOC”)[N/A]
e) TheFCCRegistrat ionNumber[US:T2LIPNANW52P]
10. TheRENisusedtodeterminethenumberofdevicesthatmaybeconnectedtoatelephoneline.ExcessiveRENsona
telephonelinemayresultinthedevicesnotringinginresponsetoanincomingcall.Inmostbutnotallareas,thesumof
RENsshouldnotexceedfive(5.0).Tobecertainofthenumberofdevicesthatmaybeconnectedtoaline,asdetermined
bythetotalRENs,contactthelocaltelephonecompany.TheRENforthisproductispartoftheproductidentifierthat
hastheformatUS:AAAEQ##TXXXX.Thedigitsrepresentedby##aretheRENwithoutadecimalpoint.Forthisproduct
theFCCRegistrationnumberis[US:T2LIPNANW52P]indicatestheRENwouldbeNAN.
Hearing Aid Compatibility (HAC)
ThistelephonesystemmeetsFCCstandardsforHearingAidCompatibility.
FCC RF Radiation Exposure Statement
This equipment complies with FCC RF radiation exposure limits set forth for an uncontrolled environment.
For base unit it should be installed and operated with a minimum distance of 20 centimeters
between the radiator and your body..
Information for DECT Product
ThistelephoneiscompliantwiththeDECT6.0standardwhichoperatesinthe1.92GHzto1.93GHz
frequencyrange.InstallationofthisequipmentissubjecttonotificationandcoordinationwithUTAM.Any
relocationofthisequipmentmustbecoordinatedthroughandapprovedbyUTAM.UTAMmaybe
contactedat1‐800‐429‐8826.
WEEE Warning
Toavoidthepotentialeffectsontheenvironmentandhumanhealthasaresultofthepresenceof
hazardoussubstancesinelectricalandelectronicequipment,endusersofelectricalandelectronic
equipmentshouldunderstandthemeaningofthecrossed‐outwheeledbinsymbol.Donotdisposeof
WEEEasunsortedmunicipalwasteandhavetocollectsuchWEEEseparately.
GNU GPL INFORMATION
YealinkW52Pfirmwarecontainsthird‐partysoftwareundertheGNUGeneralPublicLicense(GPL).Yealinkusessoftware
underthespecifictermsoftheGPL.PleaserefertotheGPLfortheexacttermsandconditionsofthelicense.
TheoriginalGPLlicense,sourcecodeofcomponentslicensedunderGPLandusedinYealinkproductscanbedownloaded
fromYealinkwebsite:http://www.yealink.com/GPLOpenSource.aspx?BaseInfoCateId=293&NewsCateId=293&CateId=293.

UserGuideW52PIPDECTPhone
vi
About This Guide
TheYealinkW52PIPDECTphoneisafull‐featuredmobiledevice,whichcanprovidereliableand
convenientwirelessvoicecommunications.Inaddition,itprovidesmanywidelyacceptedbenefitsof
theDECTstandard,includinghighsecurity,scalability,andlowpowerconsumptiontobettermeet
yourrequirements.
Thisguideprovideseverythingyouneedtoquicklyuseyournewphone.Besuretoverifywithyour
systemadministratorthatyournetworkispreparedforconfiguringyourIPDECTphone.Aswell,be
suretoreadthePackingListandRegulatoryNoticessectionsinthisguidebeforeyousetupanduse
yourW52PIPDECTphone.
IfthisisyourfirsttimeusingtheW52PIPDECTphone,werecommendthatyoufirstrefertothe
QuickInstallationGuideandQuickReferenceGuide.Documentsareavailablefordownloadingat:
http://www.yealink.com/DocumentDownload.aspx?CateId=142&flag=142.
In This Guide
Thetopicsprovidedinthisguideinclude:
Chapter1Gett ing Started
Chapter2Overview
Chapter3BasicOperations
Chapter4PhoneSettings
Chapter5CallFeatures

TableofContents
vii
Table of Contents
AboutThisGuide .........................................................................vi
InThisGuide .................................................................................................................................. vi
TableofContents........................................................................vii
Gett i ngStarted.............................................................................1
PackagingContents........................................................................................................................1
ConnectingtheW52PBaseStation ................................................................................................ 3
SettinguptheW52P/W52HHandset .............................................................................................. 5
SettinguptheChargerCradle ........................................................................................................ 5
ChargingtheHandset.....................................................................................................................6
Overview .....................................................................................7
BaseStat ionDescription ................................................................................................................ 7
HandsetDescription.......................................................................................................................8
DisplayingInformationonLCDScreen ......................................................................................... 10
IconInstructions........................................................................................................................... 11
BasicOperations ........................................................................12
HandsetRegistration....................................................................................................................12
BasicNetworkSettings................................................................................................................. 13
CheckingSystemStatus................................................................................................................ 14
AccountRegistration....................................................................................................................15
CheckingLineStatus..................................................................................................................... 16
TurningHandsetOn/Off................................................................................................................ 16
AdjustingRingerVolume .............................................................................................................. 16
Locking/UnlockingKeypad ............................................................................................................17
LocatingaHandset .......................................................................................................................17
SwitchingSilentModeOn/Off .......................................................................................................17
MenuGuidance............................................................................................................................. 18
MainMenu ................................................................................................................................ 18
Submenu................................................................................................................................... 18
ReturningtoIdleScreen............................................................................................................ 19
PhoneSettings...........................................................................20

UserGuideW52PIPDECTPhone
viii
HandsetName.............................................................................................................................. 21
Language...................................................................................................................................... 21
RingTones .................................................................................................................................... 21
AdvisoryTones.............................................................................................................................. 22
Backlight ...................................................................................................................................... 22
ScreenSaver................................................................................................................................. 22
ColourSchemes............................................................................................................................ 23
KeypadLight ................................................................................................................................ 23
NotificationLight ........................................................................................................................ 23
DateandTime .............................................................................................................................. 24
Shortcuts...................................................................................................................................... 25
ContactManagement...................................................................................................................26
LocalDirectory..........................................................................................................................26
Blacklist ....................................................................................................................................29
RemotePhonebook .................................................................................................................. 30
NetworkDirectory..................................................................................................................... 31
CallHistoryManagement ............................................................................................................. 32
NetworkCallLog .......................................................................................................................... 34
DialPlan ....................................................................................................................................... 35
ReplaceRule.............................................................................................................................. 35
AreaCode ................................................................................................................................. 36
BlockOut .................................................................................................................................. 37
EmergencyNumbers .................................................................................................................... 37
OutgoingLines ............................................................................................................................. 38
IncomingLines ............................................................................................................................. 38
SpeedDial .................................................................................................................................... 38
AssigningaSpeedDialNumber................................................................................................. 39
DeletingaSpeedDialNumber .................................................................................................. 39
PlacingaCallUsingSpeedDialKey ........................................................................................... 39
AutoAnswer .................................................................................................................................40
AutoIntercom .............................................................................................................................. 40
HandsetReset ..............................................................................................................................40
BaseReset .................................................................................................................................... 41
AutoProvision .............................................................................................................................. 41
EcoMode+....................................................................................................................................42
EcoMode ..................................................................................................................................... 42
RepeaterMode ............................................................................................................................. 43
CallFeatures ..............................................................................44
PlacingCalls .................................................................................................................................44
PlacingInternalCalls ................................................................................................................. 45
PlacingExternalCalls ................................................................................................................ 45
AnsweringCalls ............................................................................................................................46
EndingCalls.................................................................................................................................. 47

TableofContents
ix
RedialingCalls .............................................................................................................................. 47
CallMute ...................................................................................................................................... 47
CallHold/Resume .........................................................................................................................48
CallWaiting..................................................................................................................................48
DoNotDisturb(DND)...................................................................................................................49
CallForward .................................................................................................................................49
CallTransfer.................................................................................................................................. 50
ConferenceCall ............................................................................................................................51
AnonymousCall............................................................................................................................52
AnonymousCallRejection............................................................................................................ 52
VoiceMail ..................................................................................................................................... 53
Troubleshooting.........................................................................55
Appendix ...................................................................................57
FirmwareUpgrading..................................................................................................................... 57
UpgradingtheBaseStation ...................................................................................................... 57
UpgradingtheHandsetviaUSBPort......................................................................................... 57
MenuStructure ............................................................................................................................. 59
RegulatoryNotices.....................................................................60
ImportantSafetyInformation.......................................................................................................60
Index .........................................................................................62

Gett ingStarted
1
Getting Started
Thischapterprovidesbasicinstallationinstructionsandinformationforobtainingthebest
performancewiththeW52PIPDECTphone.Thetopicsinclude:
PackagingContents
ConnectingtheW52PBaseStat ion
Sett inguptheW52P/W52HHandset
Sett inguptheChargerCradle
ChargingtheHandset
Ifyourequireadditionalinformationorassistancewithyournewphone,contactyoursystem
administrator.
Packaging Contents
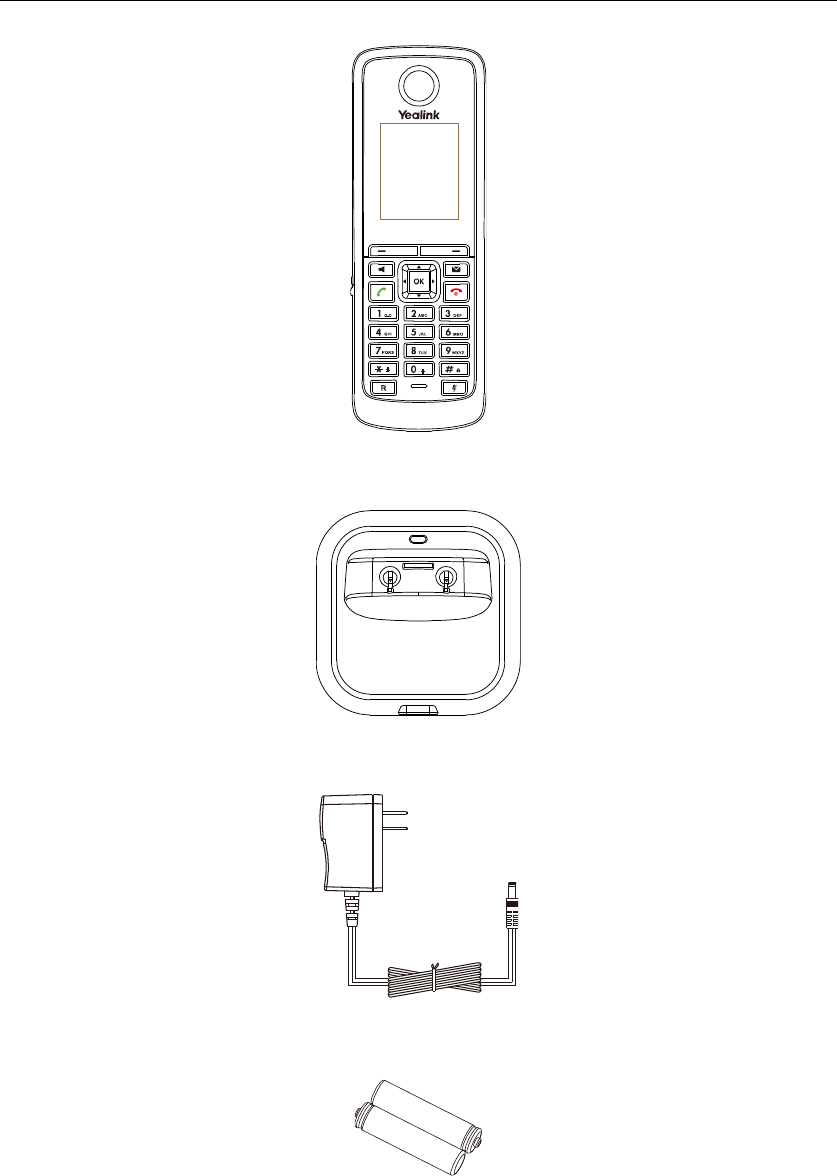
ThefollowingcomponentsareincludedinyourW52P/W52HIPDECTphonepackage:
W52PPackageW52HPackage
1basestation
1handset
1chargecradle
2poweradapters
2rechargeablebatteries
1Ethernetcable
1beltclip
1QuickInstallationGuideandQuick
ReferenceGuide
1CDROM
1handset
1chargecradle
1poweradapter
2rechargeablebatteries
1beltclip
W52PBaseStat ion
W52P/W52HHandset
UserGuideW52PIPDECTPhone
2
ChargerCradle
PowerAdapter
TwoRechargeableBatteries

Gett ingStarted
3
EthernetCable
BeltClip
QuickInstallationGuide&QuickReferenceGuide
CD‐ROM
Checkthelistbeforeinstallation.Ifyoufindanythingmissing,contactyoursystemadministrator.
Connecting the W52P Base Station
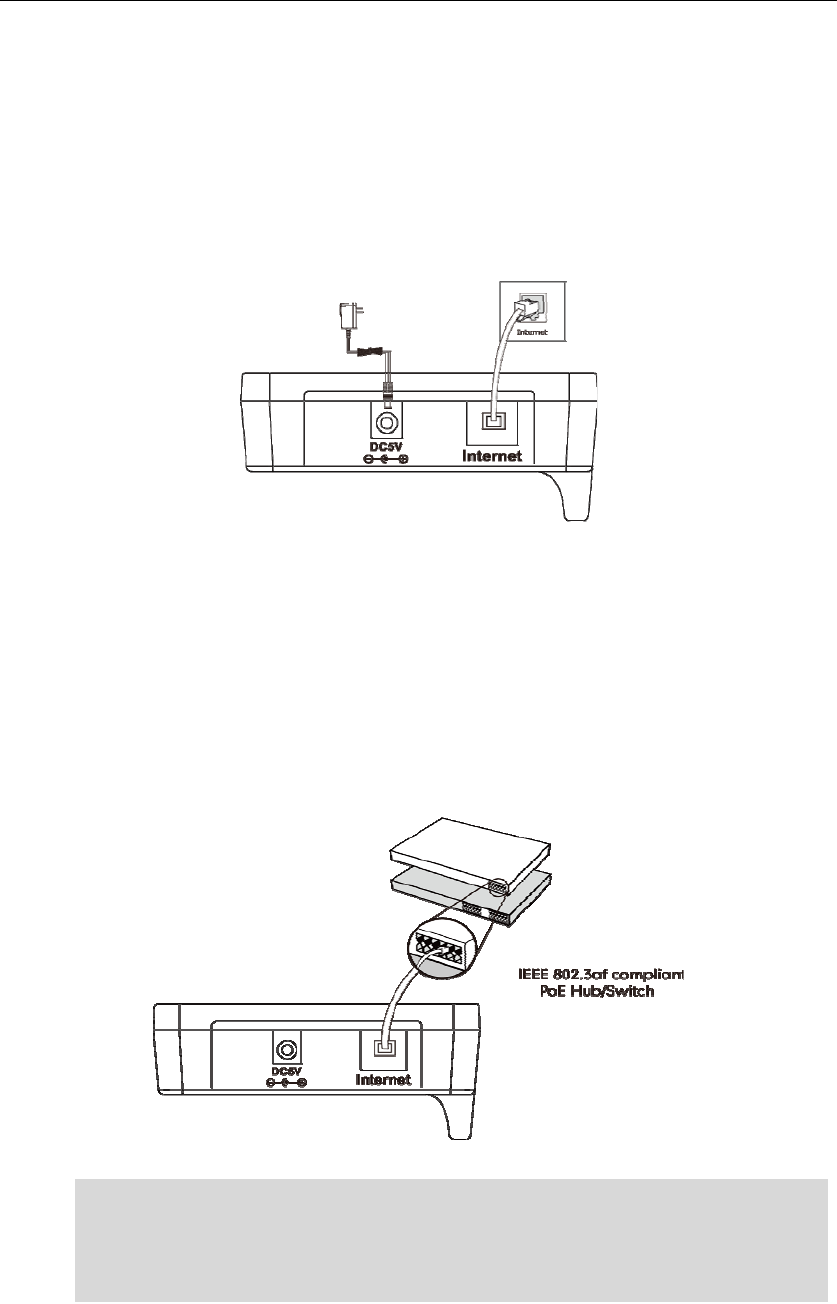
Youhavetwooptionsforpowerandnetworkconnectionofthebasestation.Yoursystem
administratorwilladviseyouwhichonetouse.
ACpower
PoweroverEthernet(PoE)
Note
Pleasepayattentiontotherangeofthebasestat ion.Thisisupto300minunobstructedoutdoorareas
andupto50minsidebuildings.
Setupthebasestationandthechargercradleatacentrallocationonaflat,non‐slipsurfaceinyour
houseorapartment.
UserGuideW52PIPDECTPhone
4
ACPower
ToconnecttheACpower:
1. ConnecttheDCplugonthepoweradaptertotheDC5Vportonthebasestationandconnectthe
otherendofthepoweradapterintoanelectricalpoweroutlet.
2. ConnectthesuppliedEthernetcablebetweentheInternetportonthebasestationandthe
Internetportinyournetworkortheswitch/hubdeviceport.
PoweroverEthernet
UsingaregularEthernetcable,thebasestationcanbepoweredfromaPoE(IEEE802.3af)compliant
switchorhub.
ToconnectthePoE:
1. ConnecttheEthernetcablebetweentheInternetportonthebasestationandanavailableport
onthein‐linepowerswitch/hub.
Note
Ifin‐linepowerisprovided,youdonotneedtoconnecttheACadapter.MakesuretheEthernetcable
andswitch/hubarePoEcompliant.
Important!Donotunplugorremovethepowerandnetworktothebasestationwhileitisupdating
firmwareandconfigurations.
Gett ingStarted
5
Setting up the W52P/W52H Handset
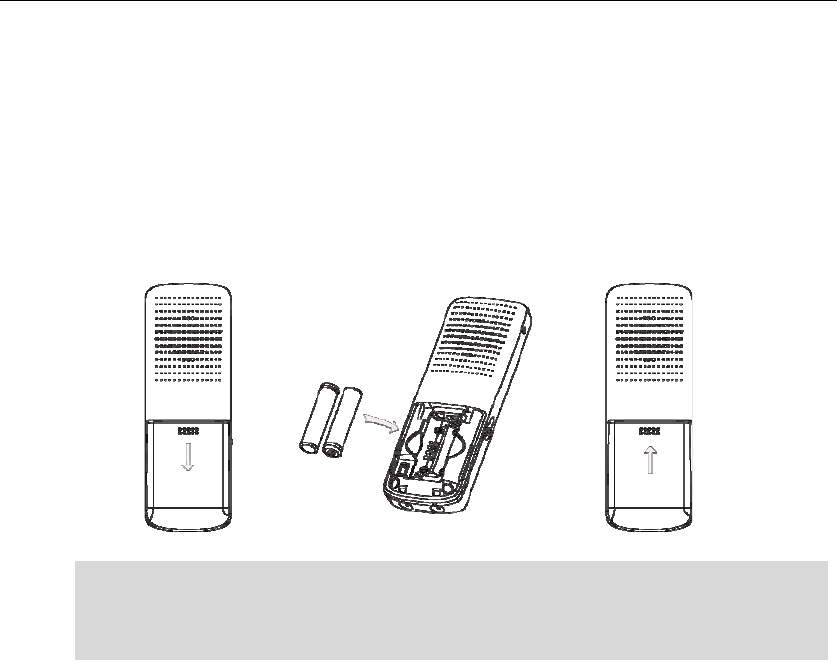
Toinsertbatteriesintothehandset:
1. Openthebatterycover.
2. Insertthebatteriesinthecorrectpolarity.
3. Closethebatterycover.
Note
BatteryInformation
Technology:NickelMetalHydride(NiMH)
Size:AAA
Vol tage:1.2V
Capacity:800mAh
Westronglyrecommendyouusethebatteriescomplyingwiththeaboveparameters.Becausethe
compliantonescanguaranteethespecifiedoperatingtime,fullfunctionalityandlongservicelife.
Theoperatingtimeofyourhandsetdependsonthecapacityandageofthebatteriesandtheway
theyareused.
Werecommendyouuseonlythebatteriesthatcamewiththehandsetorreplacementbatteries
approvedbyYeal inktechnology:
SanyoNiMH800
GP850mAh
YuasaTechnologiesAAA800
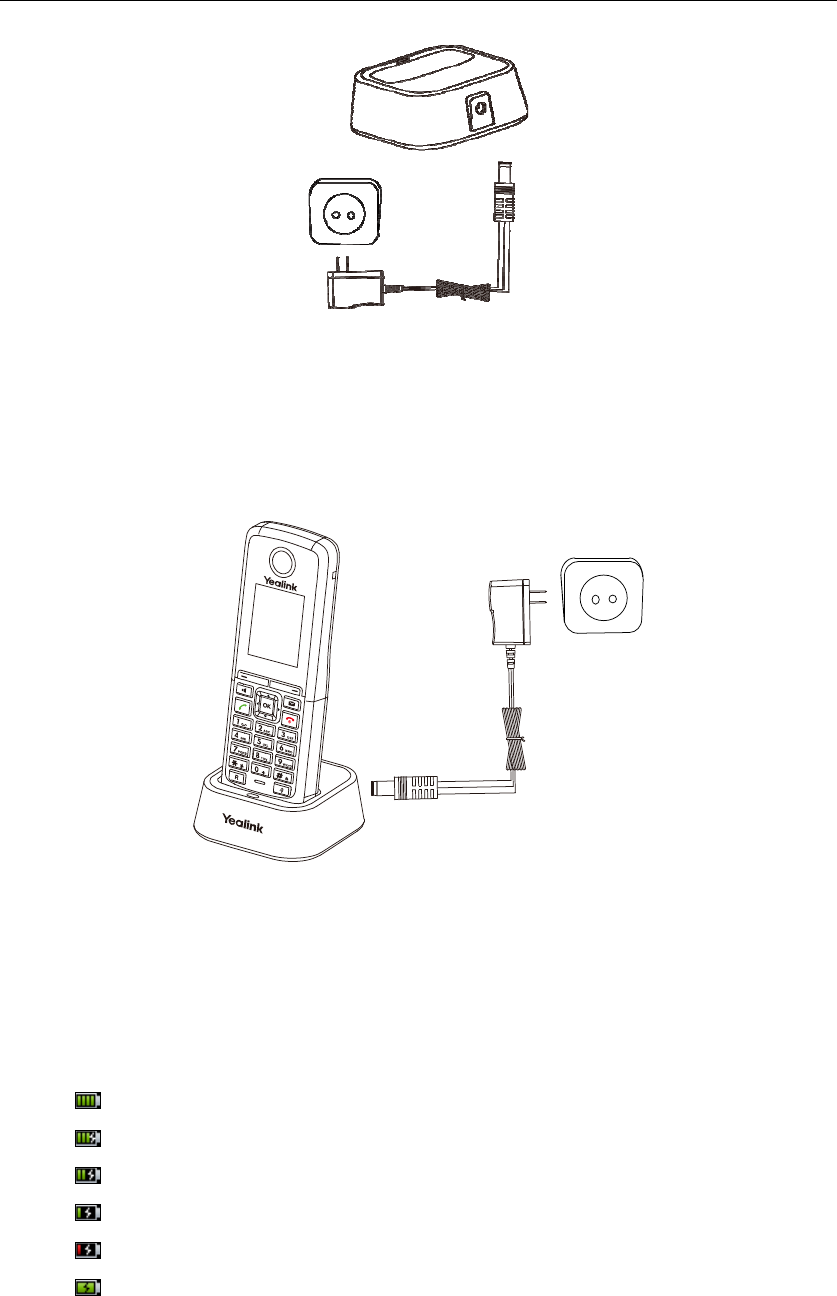
Setting up the Charger Cradle
1. ConnecttheDCplugonthepoweradaptertotheDC5Vportonthechargercradle.
2. Connecttheotherendofthepoweradapterintoanelectricalpoweroutlet.
Donotshort‐circuitthebatteries,asshort‐circuitingtheterminalsmaydamagethebatteriesorthe
handset.
Donotusedamagedbatteries,asusingdamagedbatteriesmaycauseanexplosion.
UserGuideW52PIPDECTPhone
6
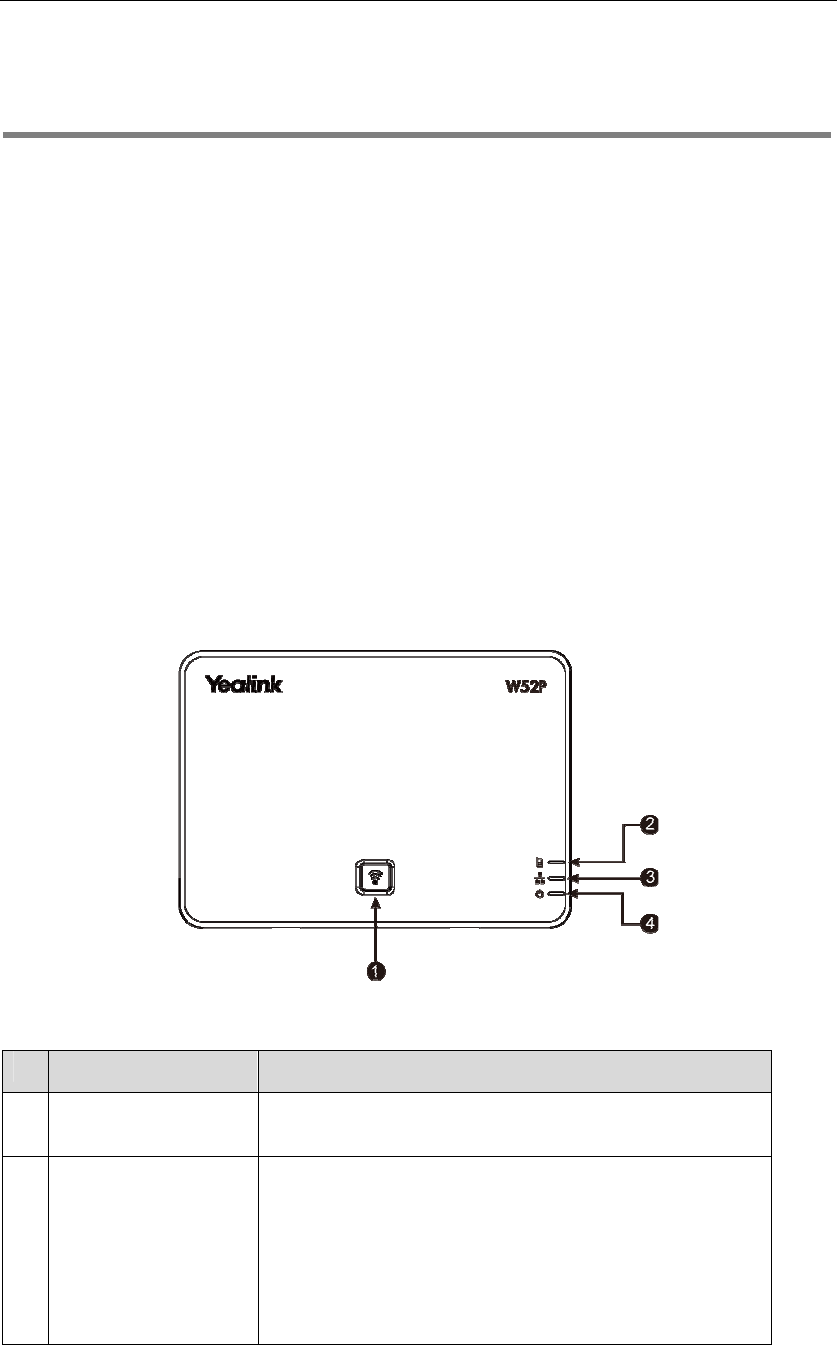
Charging the Handset
Tochargethehandset:
1. Aftersettingupthehandsetandchargercradle,placethehandsetinthechargercradle.
TheoriginalhandsetincludedintheW52Ppackageispre‐registeredtothebasestation.After
charging,thehandsetisreadytouse.
BatteryChargingStatus
Thechargingstatusofbatteriesdisplaysonthetopright‐handcorneroftheLCDscreen:
IconChargeStatus
FullyCharged
75%Charged
50%Charged
25%Charged
10%Charged
AlmostFlat
Overview
7
Overview
ThischapterprovidestheoverviewoftheW52PIPDECTphone.Thetopicsinclude:
BaseStat ionDescription
HandsetDescription
DisplayingInformationonLCDScreen
IconInstructions
Ifyourequireadditionalinformationorassistancewithyournewphone,contactyoursystem
administrator.
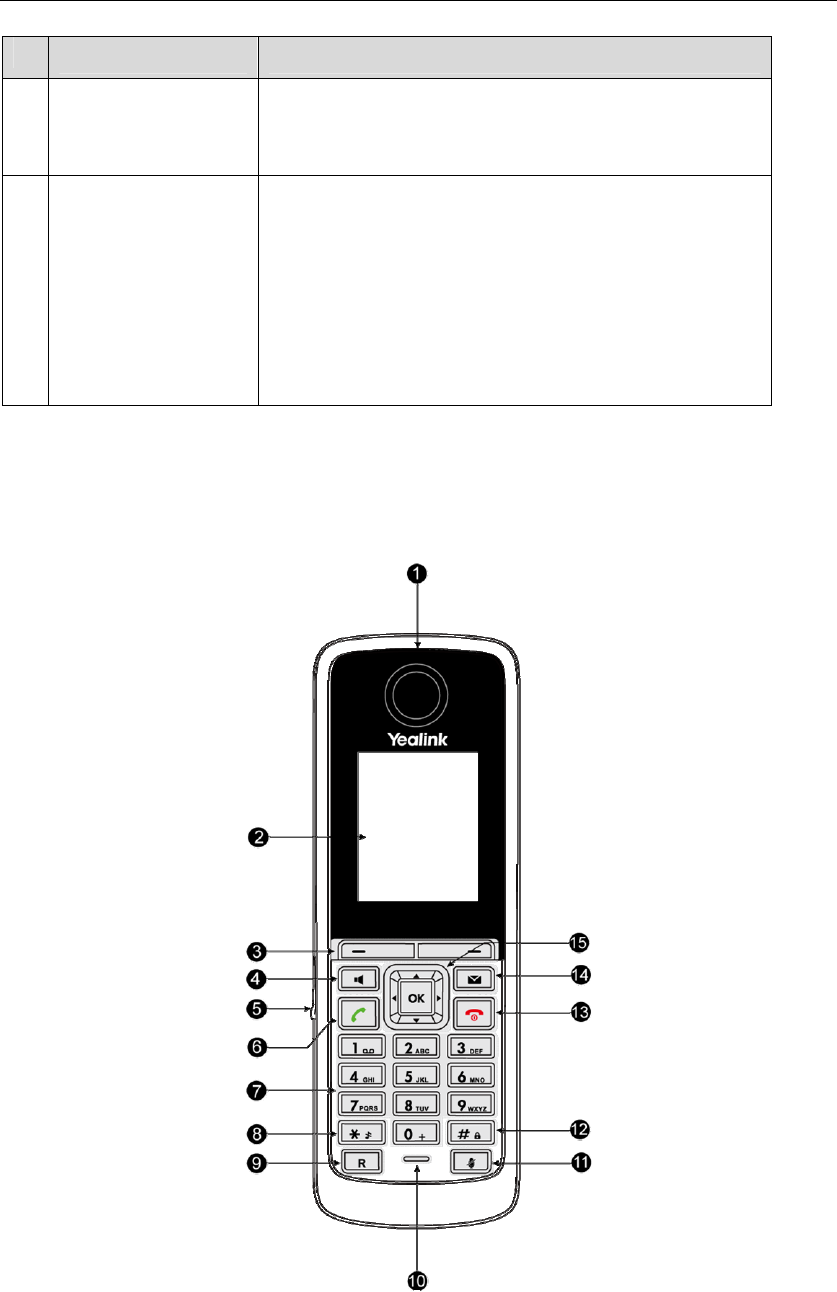
Base Station Description
Afterthebasestationstartsupsuccessfullyandthehandsetisregisteredtothebasestation,allLEDs
onthebasestationilluminatesolidgreen.
HardwarecomponentinstructionsoftheW52Pbasestationare:
ItemDescription
PagingKeyLocatesamisplacedhandset.
Togglestheregistrationmode.
②
Registrat ionLED
Indicatesthemodeofthebasestation.
Fastflashesgreenwhenthebasestationisinthepagingmode.
Slowflashesgreenwhenthebasestationisintheregistration
mode.
Illuminatessolidgreenwhenthereisanyhandsetregisteredto
thebasestation.
UserGuideW52PIPDECTPhone
8
ItemDescription
③
NetworkStatusLED
Indicatesthenetworkstatus.
Slowflashesgreenwhenthenetworkisunavailable.
Illuminatessolidgreenwhenthenetworkisready.
④
PowerIndicatorLED
Indicatesthepowerstatusofthebasestation.
Slowflashesgreenwhenthebasestationisduringthefirmware
upgradingprocess.
Slowflashesgreenwhenthebasestationisduringtheresetting
process.
Illuminatessolidgreenwhenthebasestationispoweredon.
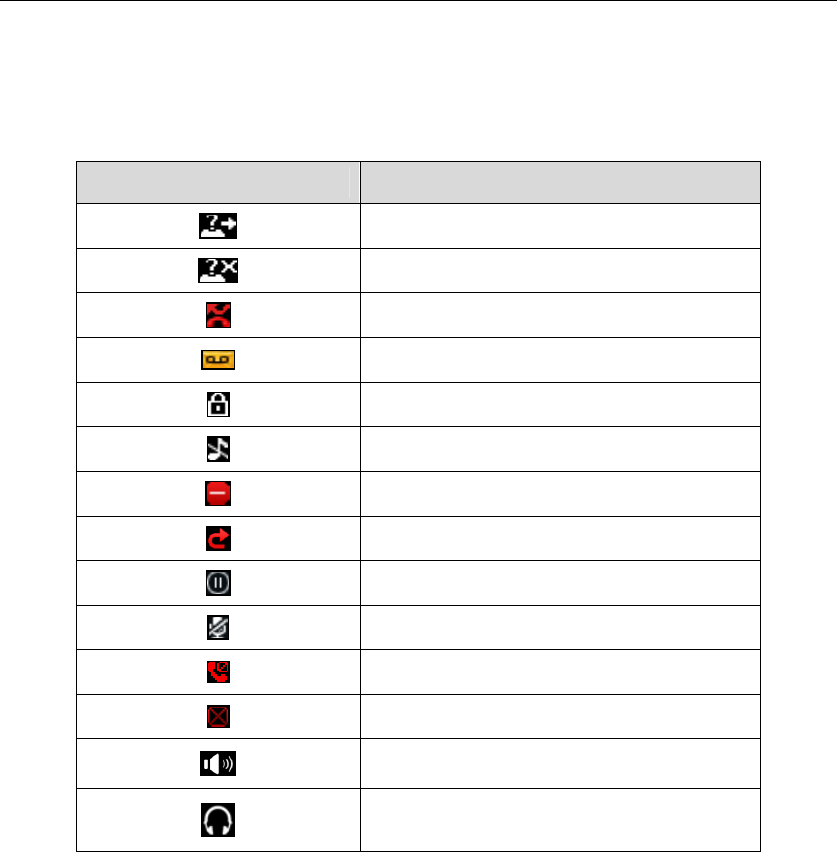
Handset Description
ThemainhardwarecomponentsoftheW52P/W52HhandsetaretheLCDscreenandthekeypad.

Overview
9
HardwarecomponentinstructionsoftheW52P/W52Hhandsetare:
ItemDescription
①EarpieceOutputsaudioduringtheearpiececall.
②LCDScreenShowscallinformation,handsetstatusicons,promptmessages
andsoon.
③SoftKeysLabelautomaticallytoidentitytheircontext‐sensitivefeatures.
④SpeakerphoneKeySwitchesbetweentheearpieceandspeakerphonemodes.
Answersanincomingcall.
⑤HeadsetConnectorConnectsaheadset.
⑥Off‐hookKey
Answersanincomingcall.
Entersintotheredialcalllist.
Placesacall.
⑦KeypadProvidesthedigits,letters,andspecialcharactersin
context‐sensitiveapplications.
⑧StarKeyEntersthestarsymbol.
Switchesthesilentmodeonoroff.
⑨RedirectKeyTransfersacalltoanotherparty.
⑩MicrophonePicksupaudioduringearpieceandhands‐freecalls.
⑪MuteKeyTogglestheMutefeatureonoroff.
⑫PoundKey
Entersthepoundsymbol.
Locksorunlocksthehandsetkeypad.
Switchestheinputmethod.
⑬On‐hookKey/Power
key
Longpresstoreturntotheidlescreeninthemenumode.
Longpresstoturnthehandsetonoroffwhenthehandsetis
idle.
Cancelsactionsorendacall.
Rejectsanincomingcall.
⑭MessageKey
Indicatesthenewreceivingvoicemailormissedcall.
Accessesthevoicemailormissedcalllist.
Indicatesthehandsetisduringthefirmwareupgradingprocess.
Scrollthroughthedisplayinginformation.
Movethecursor.
Adjusttheringervolume.
Actasshortcutkeys.
⑮
Confirmsactionsorenterintothemainmenu.

UserGuideW52PIPDECTPhone
10
Displaying Information on LCD Screen
Theidlescreenmaybeshownasbelow:
TheLCDscreenisdividedintothreeparts:statusline,textlineandsoftkeyline.
Theinformationshowninthestatusline:
Onhook(idle)—displayssignalstrengthindicator,internalhandsetnumberandbatterystatus.
Offhook—displayslineID.
Theinformationshowninthetextline:
Onhook(idle)—displayshandsetname,timeanddate,callerinformationwhenreceivingan
incomingcallandpromptmessages.
Offhook—displaysthedialeddigits.
Theinformationshowninthesoftkeyline:
Onhook(idle)—displaysHistoryandLine.
Offhook—displaysvarioustermsaccordingtothecontextofthespecificfeature.
SignalStrength
Thestrengthofthereceptionsignalbetweenthebasestationandthehandsetmaydisplayas:
Weaktostrong:
Noreception:
BatteryStatus
Thestatusofthebatterydisplaysonthetopright‐handcorneroftheLCDscreen:
IconBatteryLevel
Full
High
Medium
Low
NeedCharging
StatusLine
TextLine
SoftKeyLine
Overview
11
Icon Instructions
IconsappearontheLCDscreenaredescribedinthefollowingtable:
IconDescription
AnonymousCall
AnonymousCallRejection
MissedCall
VoiceMail
KeypadLock
SilentMode
DoNotDisturb
CallForward
CallHold
CallMute
UnassignedOutgoingLine
UnusableLine
LoudspeakerOn
HeadsetModeOn

UserGuideW52PIPDECTPhone
12
Basic Operations
ThischapterprovidesyouwiththebasicoperatinginstructionsoftheW52PIPDECTphone.The
topicsinclude:
HandsetRegistrat ion
BasicNetworkSettings
CheckingSystemStatus
AccountRegistration
CheckingLineStatus
TurningHandsetOn/Off
Adjust ingRingerVolume
Locking/UnlockingKeypad
LocatingaHandset
SwitchingSilentModeOn/Off
MenuGuidance
Ifyourequireadditionalinformationorassistancewithyournewphone,contactyoursystem
administrator.
Handset Registration
Youcanregisterupto5handsetstooneW52Pbasestation.Eachhandsetcanberegisteredto4base
stations.
Toregisterahandsetmanually:
1. Longpressonthebasestation.
TheregistrationLEDslowflashes,indicatingthebasestationisintheregistrationmode.
2. Pressonthehandsettoenterthemainmenu.
3. Select‐>Registration‐>RegisterHandset.
TheLCDscreendisplaysthebase(1‐4).
4. Pressortohighlightthedesiredbase,andpresstheOKsoftkey.
Thehandsetbeginstosearchforbasestation.
5. PresstheOKsoftkeywhentheLCDscreendisplaystheIDofthebasestation.
6. EnterthesystemPIN(default:0000).
7. PresstheDonesoftkey.
Thehandsetplaysawarningtoneandpromptsthemessage“HandsetSubscribed”ontheLCD

BasicOperations
13
screen,whichindicatestheregistrationhasfinished.
Aftersuccessfulregistration,theinternalhandsetnumberandhandsetnameappearontheLCD
screen.
Tode‐registerahandset:
1. Presstoenterthemainmenu.
2. Select‐>Registration‐>De‐reg.Handset.
3. EnterthesystemPIN(default:0000).
4. PresstheDonesoftkey.
TheLCDscreendisplaysthenamesofthehandsetsregisteredtothesamebasestation.The
nameofthehandsetitselfishighlightedandfollowedbyaleftarrow.
5. Pressortohighlightthedesiredhandsetname,andpresstheOKsoftkey.
TheLCDscreenpromptsthemessage“De‐registerHandset”.
6. PresstheYessoftkeytode‐registerthehandsetortheNosoftkeytocancel.
Toselectthebasestation:
1. Presstoenterthemainmenu.
2. Select‐>Registrat ion‐>SelectBase.
TheLCDscreendisplaysallbasestationsthehandsetregisteredtoandtheBestbaseoption(if
thehandsetisregisteredtomorethanonebasestations).Theradioboxofthecurrentlyused
basestationismarked.YoucanselectBestbasetosearchforthebasestationwiththebestsignal
strength.
3. PressortohighlightthedesiredbasestationortheBestbaseoption,andpressthe
Selectsoftkey.
Thehandsetbeginstosearchforbasestation.Aftersuccessfulconnection,thehandsetplaysa
warningtoneandpromptsthemessage“Baseselectedsuccessfully!”ontheLCDscreen.
Basic Network Settings
Bydefault,thebasestationattemptstocontactaDHCPserverinyournetworktoobtainthevalid
networksettings,e.g.IPaddress,subnetmask,gateway,DNSserver.
IfyourbasestationcannotcontactaDHCPserverforanyreason,youneedtoconfigureastaticIP
addressmanually.
Toconf igureastaticIPaddressmanually.
1. Presstoenterthemainmenu.
2. Select‐>SystemSettings‐>Network.
3. EnterthesystemPIN(default:0000).
4. PresstheDonesoftkey.
5. PressortoselectStat icfromtheIPAddressTypefield.

UserGuideW52PIPDECTPhone
14
6. EnterthevalidvaluesintheIPAddress,SubnetMask,DefaultGateway,PrimaryDNSand
SecondaryDNSfields.
7. PresstheSavesoftkeytoacceptthechange.
IfyouareusinganxDSLmodem,youcanconnectyourbasestationtotheInternetviaPPPoEmode.
ThePPPoEportwillperformaPPPnegotiat iontoobtaintheIPaddress.Contactyoursystem
administratorforthePPPoEusernameandpassword.
Toconf igurePPPoE:
1. Presstoenterthemainmenu.
2. Select‐>SystemSettings‐>Network.
3. EnterthesystemPIN(default:0000).
4. PresstheDonesoftkey.
5. PressortoselectPPPoEfromtheIPAddressTypefield.
6. EnterthevalidvaluesinthePPPoEUserandPPPoEPasswordfields.
7. PresstheSavesoftkeytoacceptthechange.
Note
Checking System Status
Youcanviewthesystemstatusonyourhandset.Availableinformationofthesystemstatusincludes:
Generalinformation—includingtheIPaddress,MACaddress,firmwareversionandRFPIcodeofthe
basestation.
Networkstatus—includingtheIPtype,subnetmask,gateway,primaryDNSandsecondaryDNS.
Handsetstatus—includingthedevicemodel,hardwareversion,firmwareversion,productID,IPUI
codeandareaofthehandset.
Tocheckthegeneralinformation:
1. Presstoenterthemainmenu.
2. Select‐>SystemStatus.
TheLCDscreendisplaysthegeneralinformationandtheMore…option.
3. Pressortoscrollthroughthelistandviewthespecificinformation.
Usingthewrongnetworkparametersmayresultininaccessibilityofyourphoneandmayalsohavean
impactonyournetworkperformance.Formoreinformationabouttheseparameters,contactyour
systemadministrator.

BasicOperations
15
Tocheckthenetworkstatus:
1. Presstoenterthemainmenu.
2. Select‐>SystemStatus.
TheLCDscreendisplaysthegeneralinformationandtheMore…option.
3. SelectMore…‐>Network.
TheLCDscreendisplaysthenetworkstatus.
4. Pressortoscrollthroughthelistandviewthespecificinformation.
Tocheckthehandsetstatus:
1. Presstoenterthemainmenu.
2. Select‐>SystemStatus.
TheLCDscreendisplaysthegeneralinformationandtheMore…option.
3. SelectMore…‐>Handset.
TheLCDscreendisplaysthehandsetstatus.
4. Pressortoscrollthroughthelistandviewthespecificinformation.
Account Registration
Thebasestationsupportsupto5lines.Youcanregisteranaccountforeachlineviathewebuser
interface.Tologinthewebuserinterfaceofthebasestation,youshouldobtaintheIPaddressofthe
basestationinadvance.FormoreinformationonobtainingtheIPaddress,refertoCheckingSystem
Statusonpage14.
Toregisteranaccountviawebuserinterface:
1. EntertheIPaddressofthebasestationintheaddressbarofthebrowserandpresstheEnterkey.
2. Entertheusername(admin)andpassword(admin)inthecorrespondingfieldsofthepop‐up
dialoguebox.
3. ClickConfirmtologin.
4. ClickonAccount‐>Basic.
5. Selectthedesiredaccountfromthepull‐downlistofAccount.
6. SelectEnabledfromthepull‐downlistofAccountActive.
7. EnterthevalidvaluesintheLabel,Name,RegisterName,UserName,PasswordandSIPServer
fieldsrespectively.
Contactyoursystemadministratorfortheaccountinformation.
8. ClickConfirmtoacceptthechange.

UserGuideW52PIPDECTPhone
16
Checking Line Status
Youcanregisterupto5linestoonebasestation.Thestatusofeachregisteredlinecanbechecked
usingthemenuofthehandset.
Tocheckthelinestatus:
1. Presstoenterthemainmenu.
2. Select‐>LineStatus.
TheLCDscreendisplaysalllinesregisteredtothebasestationwithiconsforindicatingline
status.Forexample,theiconinthebottomofalineindicatesthatthehandsethasno
privilegetoplaceacallusingthisline.
Turning Handset On/Off
Toturnthehandseton:
Dooneofthefollowing:
- LongpressuntiltheLCDscreenlightsup.
- Placethehandsetinthechargercradle.
Thehandsetwillbeturnedonautomatically.
Toturnthehandsetoff:
1. Longpressagainwhenthehandsetisidletoturnthehandsetoff.
Adjusting Ringer Volume
Youcanadjusttheringervolumeofyourhandsetaccordingtothenoiselevelofthesurrounding
environment.Theringervolumecanbeadjustedusingthemenuorthepredefinedshortcutkeys(left
andrightnavigationkeys)onthekeypadwhenthehandsetisidle.Thehandsetsupports5different
ringervolumelevels.Thedefaultlevelis3.
Formoreinformationonadjustingtheringervolumeusingthemenu,refertoRingTonesonpage21.
Toadjusttheringervolumeusingthepredefinedshortcutkeys:
1. Pressorwhenthehandsetisidle.
Presstodecreasetheringervolume,orpresstoincreasetheringervolume.
2. PresstheSavesoftkeytoacceptthechangeortheBacksoftkeytocancel.
NoteIftheringervolumeisadjustedtotheminimum,theiconwillappearontheidlescreen.

BasicOperations
17
Locking/Unlocking Keypad
Youcanlockthehandsetkeypadtopreventkeysfrombeingaccidentallypressed.
Tolockthekeypad:
1. LongpresswhenthehandsetisidleuntiltheLCDscreenpromptsthemessage“Keypad
Locked,Pressandhold‘#’tounlock!”.
Thekeypadislockedandtheiconappearsontheidlescreen.
Youcanstillanswerorrejectincomingcallsasusual.Youcanalsoendtheansweredcallby
pressing.
Tounlockthekeypad:
1. LongpressagainuntiltheLCDscreenpromptsthemessage“KeypadUnlocked”.
Thekeypadisunlockedandtheicondisappearsfromtheidlescreen.
Note
Locating a Handset
Youcanlocateamisplacedhandsetusingthebasestationtowhichthishandsetisregistered.
Tolocateahandset:
1. Pressonthebasestation.
Allhandsetsregisteredtothisbasestationwillringsimultaneously(Paging)anddisplaytheIP
addressofthebasestationontheLCDscreen.
Thishelpsyoulocateyourhandseteasily.
Youcanpressanykeyonthehandsetorpressagainonthebasestationtoendpaging.
Switching Silent Mode On/Off
Ifthesilentmodeisswitchedon,thehandsetwillnotringwhenreceivinganincomingcall,butyou
canstillseetheincomingcallinformationontheLCDscreen.Youcanswitchthesilentmodeonifyou
donotwanttobedisturbed.
Ifthekeypadislocked,onlytheemergencynumberscanbedialedout.Youmustenterthedigitsofthe
emergencynumbercontinuously.Tomakeemergencycalls,youshouldconfiguretheemergency
numbersinadvance.Formoreinformation,refertoEmergencyNumbersonpage38.
UserGuideW52PIPDECTPhone
18
Toswitchthesilentmodeon:
1. LongpressuntiltheLCDscreenpromptsthemessage“Al lRingTonesOff”.
Thesilentmodeison.Theiconappearsontheidlescreen.
Toswitchthesilentmodeoff:
1. LongpressagainuntiltheLCDscreenpromptsthemessage“Al lRingTonesOn”.
Thesilentmodeisoff.Theicondisappearsfromtheidlescreen.
Menu Guidance
Thehandsetprovidesavarietyoffeaturesthataregroupedintomenu.Thissectionprovidesyouwith
somebasicguidanceofaccessingandnavigatingthemenu.
Main Menu
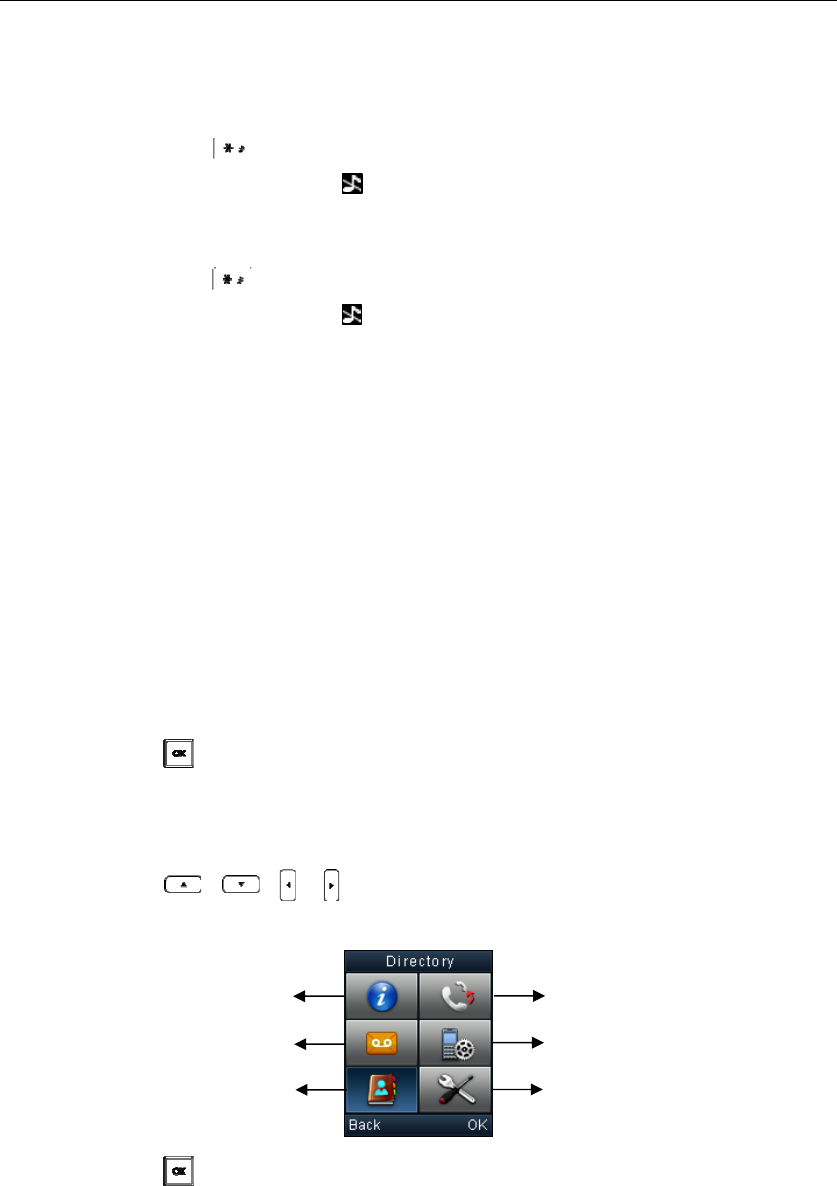
Thehandsetmenuhasanumberoflevels.Themainmenuisthetop‐levelmenu,whichconsistsofsix
mainmenufeatures:Status,Intercom,VoiceMail,CallFeatures,DirectoryandSett ings.
Toenterthemainmenu:
1. Presswhenthehandsetisidle.
ThemainmenufeaturesareshownontheLCDscreenasalistoficons.
Toaccessamainmenufeature:
1. Press,,ortoscrollthroughthemainmenufeaturelist.
ThenameoftheselectedmainmenufeaturedisplaysonthetopoftheLCDscreen.
2. PressortheOKsoftkeytoenterthecorrespondingsubmenu.
Submenu
ThesubmenufeaturesdisplayontheLCDscreenandtheyareshownasalist.Youcanaccessthe
desiredsubmenufeaturebyselectingthecorrespondingsubmenu.
Intercom
CallFeatures
Sett ings
Status
VoiceMail
Directory

BasicOperations
19
Toaccessasubmenufeature:
1. Pressortohighlightthedesiredsubmenu.
2. PressortheOKsoftkeytoaccessthenextmenulevel.
Youcancancelthecurrentoperationandreturntothepreviousmenulevelbypressingor
theBacksoftkey.
Returning to Idle Screen
Toreturntotheidlescreen:
1. Longpresstoquicklyexitthemenuandreturntotheidlescreen.
Ifyoudonotpressanykeyinaperiodoftime,theLCDscreenwillautomaticallyexitthemenuand
returntotheidlestatus.
Note
Ifyouarenavigatingthemenu,andanincomingcallarrives,theLCDscreenwillautomaticallyexitthe
menuandthecallwillbehandledasusual.Whenthecallisterminated,theLCDscreenreturnstothe
idlestatus.

UserGuideW52PIPDECTPhone
20
Phone Settings
Thischapterprovidesyouwithsomeinstructionstochangethesettingsofyourphone.Thetopics
include:
HandsetName
Language
RingTones
AdvisoryTones
Backlight
ScreenSaver
ColourSchemes
KeypadLight
NotificationLight
DateandTime
Shortcuts
ContactManagement
CallHistoryManagement
NetworkCallLog
DialPlan
EmergencyNumbers
OutgoingLines
IncomingLines
SpeedDial
AutoAnswer
AutoIntercom
HandsetReset
BaseReset
AutoProvision
EcoMode+
EcoMode
RepeaterMode
Ifyourequireadditionalinformationorassistancewithyournewphone,contactyoursystem
administrator.

PhoneSett ings
21
Handset Name
Thehandsetwillbeassignedanamebydefaultifsuccessfullyregisteredtothebasestation.Youcan
personalizethehandsetname.
Torenamethehandset:
1. Presstoenterthemainmenu.
2. Select‐>HandsetName.
3. EditthecurrentvalueintheRenamefield.
4. PresstheSavesoftkeytoacceptthechange.
Language
Thehandsetsupportsdisplayingtextindifferentlanguages.Thedefaultlanguageofthehandsetis
English.Youcanchangethelanguageaccordingtoyourrequirement.
Tochangethelanguageofthehandset:
1. Presstoenterthemainmenu.
2. Select‐>Language.
3. PressortohighlightthedesiredlanguageandpresstheSelectsoftkey.
TheLCDscreenpromptsthewarning“ChangephonelanguagetoFrench(thelanguageyou
select)?”.
4. PresstheYessoftkeytochangethelanguageortheNosoftkeytocancel.
Note
Ring Tones
Ringtonesareusedtoindicateincomingcalls.Youcansetdifferentringtonestodistinguishthe
incominglinesfromeachotheronyourhandset.Youcanalsosetaringtonetodistinguishan
incomingintercomcall.Whenreceivinganincomingcall,thehandsetringsthespecifiedringtone.
Toconfiguretheringtones:
1. Presstoenterthemainmenu.
2. Select‐>Audio‐>RingTones‐>Melodies.
3. PressortohighlighttheIntercomCalloptionorthedesiredline.
4. Pressortoselectandlistentothedesiredringtone.
5. PresstheSavesoftkeytoacceptthechangeortheBacksoftkeytocancel.
Youcanalsoenterthemenu‐>Audio‐>RingTones‐>Volume,pressorto
Thelanguagesavailableforselectiondependonthelanguagepackscurrentlyloadedtothehandset.
Pleasecontactyoursystemadministratorformoreinformat ionontheavailablelanguagesofyour
handset.

UserGuideW52PIPDECTPhone
22
decrease/increasetheringervolume.
Advisory Tones
Advisorytonesareacousticsignalsofyourhandset,whichinformyouofdifferentactionsandstates.
Thefollowingadvisorytonescanbeconfiguredindependentlyofeachother:
KeypadTone:playswhenauserpressesanykeyofthekeypad.
Confirmation:playswhenausersavessettingsorplacesthehandsetinthechargercradle.
LowBattery:playswhenthecapacityofthebatteriesislowandthehandsetrequirescharging.
Toconf iguretheadvisorytones:
1. Presstoenterthemainmenu.
2. Select‐>Audio‐>AdvisoryTones.
3. PressortoselectthedesiredvaluefromtheKeypadTonefield.
4. PressortoselectthedesiredvaluefromtheConfirmationfield.
5. PressortoselectthedesiredvaluefromtheLowBatteryfield.
6. PresstheSavesoftkeytoacceptthechangeortheBacksoftkeytocancel.
Backlight
Thehandsetbacklightstatusinthechargingstateoroutofthechargingstatecanbeconfigured
independentlyofeachother.Ifenabled,thebacklightisalwayson.Otherwise,thebacklightisturned
offafterthehandsetisidleforaperiodoftime.Butthebacklightisautomaticallyturnedonwhenan
incomingcallarrives,akeyispressedorthestatusofthehandsetchanges.Youcandisablethe
backlighttosavepower.
Toconf igurethebacklight:
1. Presstoenterthemainmenu.
2. Select‐>Display‐>DisplayBacklight.
3. PressortoselectthedesiredvaluefromtheInChargerfield.
4. PressortoselectthedesiredvaluefromtheOutOfChargerfield.
5. PresstheSavesoftkeytoacceptthechangeortheBacksoftkeytocancel.
Screen Saver
YoucanenablethescreensavertoprotecttheLCDscreenifyoudonotuseyourhandsetforalong
time.ThescreensaverofthehandsetisdesignedtoprotectyourLCDscreenbyfillingitwithan
analogclock.Whenthescreensaverisenabled,ananalogclockwillbeactivatedanddisplaysonthe
LCDscreenifnouseractivityissensedforapproximately10seconds.

PhoneSett ings
23
Toconf igurethescreensaver:
1. Presstoenterthemainmenu.
2. Select‐>Display‐>ScreenSaver.
3. PresstheChangesoftkeytocheckorunchecktheScreenSavercheckbox.
Colour Schemes
Youcanchangethebackgroundofyourhandsetbychangingthecolourtheme.Thereare2colour
themesavailable.
Tochangethecolourscheme:
1. Presstoenterthemainmenu.
2. Select‐>Display‐>ColourSchemes.
3. Pressortohighlightthedesiredcolourschemeandpreviewitseffect.
4. PresstheSelectsoftkeytoselectthecolourscheme.
Theradioboxoftheselectedcolourthemeismarked.Thecolourthemeofthehandsetis
changedaccordingly.
Keypad Light
Youcanenablethekeypadlighttomakethekeypadlightupwhenanykeyispressed.Thishelpsyou
distinguishthekeysfromeachotherinadarkenvironment.
Toconf igurethekeypadlight:
1. Presstoenterthemainmenu.
2. Select‐>Display‐>KeypadLight.
3. PresstheChangesoftkeytocheckorunchecktheKeypadLightcheckbox.
Notification Light
Thenotificationlightisusedtoindicatevoicemailsandmissedcalls.Whenthehandsetreceivesa
voicemailormissesacall,themessagekeyLEDflashesred.Youcanconfigurethenotificationlight
toindicatethevoicemailsormissedcallsrespectively.
Toconf igurethenotificationlight:
1. Presstoenterthemainmenu.
2. Select‐>Display‐>NotificationLight.
3. PressortoselectthedesiredvaluefromtheVoiceMailfield.
IfEnabledisselected,themessagekeyLEDflashesredwhenthehandsetreceivesanewvoice
mail.

UserGuideW52PIPDECTPhone
24
4. PressortoselectthedesiredvaluefromtheMissedCallfield.
IfEnabledisselected,themessagekeyLEDflashesredwhenthehandsetreceivesanewmissed
call.
5. PresstheSavesoftkeytoacceptthechangeortheBacksoftkeytocancel.
Date and Time
Thedateandtimedisplayontheidlescreenofyourhandset.Bydefault,thehandsetobtainsthedate
andtimefromtheSimpleNetworkTimeProtocol(SNTP)server.Ifyourhandsetcannotobtainthe
dateandtimefromtheSNTPserver,youcanconfigurethedateandtimemanually.
Youcanalsoconfigurethetimeformatanddateformatrespectively.Thehandsetsupportstwotime
formats(12Houror24Hour)andsixdateformats.Theavailabledateformatsarelistedinthe
followingtable:
DateFormatExample(2011‐8‐17)
dM,D17Aug,Wed
Md,DAug17,Wed
D,dMWed,17Aug
DD/MM/YYYY17/08/2011
MM/DD/YYYY08/17/2011
YYYY/MM/DD2011/08/17
Toconf igurethedateandtimemanually:
1. Presstoenterthemainmenu.
2. Select‐>Date&Time.
3. EditthecurrentvaluesintheDateandTimefields.
4. PresstheSavesoftkeytoacceptthechange.
ThedateandtimethatdisplayontheLCDscreenwillchangeaccordingly.

PhoneSett ings
25
Toconf igurethetimeformat:
1. Presstoenterthemainmenu.
2. Select‐>Display‐>TimeFormat.
3. Pressortohighlightthedesiredtimeformat,andpresstheChangesoftkey.
Theradioboxoftheselectedtimeformatismarked.TheformatofthedisplaytimeontheLCD
screenwillbechangedaccordingly.
Toconf igurethedateformat:
1. Presstoenterthemainmenu.
2. Select‐>Display‐>DateFormat.
3. Pressortohighlightthedesireddateformat,andpresstheChangesoftkey.
Theradioboxoftheselecteddateformatismarked.TheformatofthedisplaydateontheLCD
screenwillbechangedaccordingly.
Shortcuts
Therearetwotypesofshortcutkeysonthehandset:changeableandunchangeableshortcutkeys.
Eachshortcutkeyisassignedafeaturebydefault.Forexample,longpresstoturnon/offthe
silentmode,longpresstolock/unlockthekeypad,presstoaccessthedirectoryandso
on.
Thechangeableshortcutkeysarethetwosoftkeysandfournavigationkeys.Theavailablefeatures
thatcanbeassignedtoeachkeymaybealittledifferent.
Youcanassignthefrequentlyusedfeaturestothechangeableshortcutkeysofyourhandsetas
shortcuts.Thishelpsyougetquickaccesstoafeaturebydirectlypressingthecorrespondingshortcut
keywhenthehandsetisidlewithouthavingtoscrollthroughthemenu.
Toconf igureashortcut:
1. Presstoenterthemainmenu.
2. Select‐>Shortcut.
TheLCDscreendisplaysthechangeableshortcutkeysandthefeaturescurrentlyassignedto
them.
3. Pressortohighlightthedesiredshortcutkey.
4. PresstheChangesoftkeytoaccesstheavailablefeatures.
Thefeaturecurrentlyassignedtotheselectedkeyishighlightedandfollowedbyaleftarrow.
5. Pressortohighlightthedesiredfeature.
6. PresstheOKsoftkeytoacceptthechangeortheBacksoftkeytocancel.

UserGuideW52PIPDECTPhone
26
Contact Management
Thissectionprovidestheoperatinginstructionsformanagingcontacts.Thetopicsinclude:
LocalDirectory
Blacklist
RemotePhonebook
NetworkDirectory
Local Directory
Youcanstorethefrequentlyusedcontactsinthehandset’slocaldirectory,wherenamesandnumbers
canbefreelyadded,deletedandedited.Thisallowsyoutomakecallswithouthavingtodialthe
numbermanually.Youcanstoreupto100contacts,eachwithaname,amobilenumberandanoffice
number.Youcanalsodialacontactfromthelocaldirectory.
Thedirectoryentriesareusuallysortedinalphabeticalorderbythenameattribute.Spacesanddigits
takefirstpriority.Thesortorderisasfollows:
1. Space
2. Digits(0‐9)
3. Letters(alphabetical)
OtherspecialcharactersaresortedcompletelyinaccordancewiththeASCIIsortorder.
Using Alphanumeric Keys
Youcaneditthenamesandnumbersofthecontactsstoredinthelocaldirectoryusingthekeypad.
Thedigitkeys0‐1aredevoidofanyletters.Butthedigitkeys2‐9areallalphanumerickeyscontaining
onedigitandthreeorfourlettersinalphabeticalorder.Thefollowingdescribeshowtousethe
alphanumerickeysindetail.
Toconf iguretheinputmethods:
Thehandsetprovidesyouwith8differentinputmethods.Youcandisabletheinfrequentlyusedinput
methods.Thenyoucanonlyswitchamongtheenabledinputmethodswhenediting.
1. Presstoenterthemainmenu.
2. Select‐>Display‐>InputMethod.
TheLCDscreendisplaysallavailableinputmethods.
3. Pressortohighlightthedesiredinputmethod.
4. PresstheChangesoftkeytocheckoruncheckthecheckbox.

PhoneSett ings
27
Toenteracharacter:
Youcanpressthekeywhichcontainsyourdesiredcharacteracertainnumberoftimestoenterthe
character.
Toswitchtheinputmethod:
1. Press.
Thecurrentinputmethodisindicatedonthetopright‐handcorneroftheLCDscreen.For
example,“ABC”representstheupper‐caseinputmethod,“abc”representsthelower‐caseinput
methodand“123”representsthedigitalinputmethod.
Tomakeaspace:
1. Presswhentheinputmethodisnot“123”.
Tomovethecursor:
1. Pressortomovethecursor.
Todeleteawronginputcharacter:
1. Placethecursorbehindthewronginputcharacter.
2. PresstheDelsoftkeytodeletethecharacter.
Adding Contacts
Youcanaddcontactstoyourlocaldirectorymanuallyorfromthecallhistory.Youcanalsoadd
contactstoyourlocaldirectoryfromtheremotephonebookorthenetworkdirectory,formore
information,refertoRemotePhonebookonpage30andNetworkDirectoryonpage31.
Toaddacontacttothelocaldirectorymanually:
1. Presstoenterthemainmenu.
2. Select.
3. PresstheOptionssoftkey,andselectNewContact.
4. EnterthedesiredvaluesintheName,OfficeandMobilefields.
5. PresstheSavesoftkeytoacceptthechangeortheBacksoftkeytocancel.
Toaddacontacttothelocaldirectoryfromthecallhistory:
1. PresstheHistorysoftkeywhenthehandsetisidle.
2. Pressortohighlightthedesiredcallhistorylist,andpresstheOKkey.
3. Pressortohighlightthedesiredentry.
4. PresstheOptionssoftkey,andselectAddToLocal‐>NewEntry.
5. Pressortosetthenumbertobetheofficenumberorthemobilenumberofthenew
entry,andpresstheOKsoftkey.
6. Enterthenameofthenewentry.

UserGuideW52PIPDECTPhone
28
7. PresstheSavesoftkeytoacceptthechangeortheBacksoftkeytocancel.
Note
Editing Contacts
Toeditacontactinthelocaldirectory:
1. Presstoenterthemainmenu.
2. Select.
3. Pressortohighlightthedesiredentry.
4. PresstheOptionssoftkey,andselectEdit.
5. EditthevaluesintheName,OfficeandMobilefields.
6. PresstheSavesoftkeytoacceptthechange.
Deleting Contacts
Youcandeleteacontactorallcontactsfromthelocaldirectory.
Todeleteacontact:
1. Presstoenterthemainmenu.
2. Select.
3. Pressortohighlightthedesiredentry.
4. PresstheOptionssoftkey,andselectDelete.
Theselectedentrywillbedeletedsuccessfully.
Todeleteallcontacts:
1. Presstoenterthemainmenu.
2. Select.
3. PresstheOptionssoftkey,andselectDeleteAll.
TheLCDscreenpromptsthewarning“DeleteAll?”.
4. PresstheYessoftkeytodeleteallcontactsortheNosoftkeytocancel.
Searching for Contacts
Youcansearchforthecontactsbysimplytypingafewcontinuouscharactersofthedesiredcontact
nameornumber,andtheresultsofpotentialmatchesaredynamicallyfilteredanddisplayontheLCD
screen.
Tosearchforcontactsinthelocaldirectory:
Whenyouareaddingacontact,boththeofficenumberandthemobilenumbercannotbeleftblankat
thesametime.Whenthecontactnameisleftblank,thehandsetsetstheofficenumberorthemobile
numberasthecontactname.
Iftheinformationofthecontactyouwanttoaddistotallysamewiththatofanexistingentryinthe
localdirectory,thescreenwillprompt“Contactsavefailed.”.

PhoneSett ings
29
1. Presstoenterthemainmenu.
2. Select.
3. Enterafewcontinuouscharactersofthedesiredcontactnameornumberusingthekeypad.
ThecontactswhosenameornumbermatchesthesearchwillappearontheLCDscreenaftera
timeoutorwhentheSearchsoftkeyispressed.Youcandialacontactfromtheresultlist.
Placing a Call from Local Directory
Toplaceacallfromthelocaldirectory:
1. Presstoenterthemainmenu.
2. Select.
3. Pressortohighlightthedesiredentry.
4. Dooneofthefollowing:
‐ Ifonlyonenumberofthecontactisstoredinthelocaldirectory,presstodialoutthe
number.
‐ Ifboththeofficenumberandthemobilenumberofthecontactarestoredinthelocaldirectory,
presstheViewsoftkeytodisplaythetwonumbers.
Pressortohighlightthedesirednumber.
Presstodialout.
Blacklist
Youcanstoreupto30numbersinthehandset’sblacklist.Youcanadd,editordeletenumbersinthe
blacklist.Youcanalsodialacallfromtheblacklist,butanincomingcallfromanumberintheblacklist
willberejectedautomatically.
Toaddanentrytotheblacklistmanually:
1. Presstoenterthemainmenu.
2. Press‐>Telephony‐>CallerBlacklist.
3. PresstheOptionssoftkey,andselectNewEntry.
4. EnterthedesirednumberinthePhoneNumberfield.
5. PresstheSavesoftkeytoacceptthechangeortheBacksoftkeytocancel.
Youcanalsoaddanentrytotheblacklistfromthecallhistory.Formoreinformation,refertoCall
HistoryManagementonpage32.

UserGuideW52PIPDECTPhone
30
Todeleteanentryfromtheblacklist:
1. Presstoenterthemainmenu.
2. Select‐>Telephony‐>CallerBlacklist.
3. Pressortohighlightthedesiredentry.
4. PresstheOptionssoftkey,andselectDelete.
Theselectedentrywillbedeletedsuccessfully.
Todeleteallentriesfromtheblacklist:
1. Presstoenterthemainmenu.
2. Select‐>Telephony‐>CallerBlacklist.
3. PresstheOptionssoftkey,andselectDeleteAll.
TheLCDscreenpromptsthewarning“DeleteAll?”.
4. PresstheYessoftkeytodeleteallentriesortheNosoftkeytocancel.
Toplaceacallfromtheblacklist:
1. Presstoenterthemainmenu.
2. Select‐>Telephony‐>CallerBlacklist.
3. Pressortohighlightthedesiredentry.
4. Presstodialout.
Remote Phonebook
Youcanaccessyourcorporatedirectoryonyourhandset.Youcanaddlocalcontactsfromthe
corporatedirectory.Youcanalsodialacontactfromthecorporatedirectory.Contactyoursystem
administratorfortheaccessURLofthecorporatedirectory.
Toconf igureaccessURLforthecorporatedirectoryviawebuserinterface:
1. ClickonContacts‐>RemotePhoneBook.
2. EnterthenameintheNamefield.
3. EntertheaccessURLinthePhoneBookURLfield.
4. ClickConfirmtoacceptthechange.
Toaccessyourcorporatedirectory:
1. Presstoenterthemainmenu.
2. Select.
3. Pressortohighlightthenameofyourcorporatedirectory,andpresstheEntersoft
key.
Thehandsetconnectstoloadthecorporatedirectory,andthendisplaysthecorporatecontactlist
ontheLCDscreen.

PhoneSett ings
31
Toplaceacallfromthecorporatedirectory:
1. Presstoenterthemainmenu.
2. Select.
3. Pressortohighlightthenameofyourcorporatedirectory,andpresstheEntersoft
key.
4. Selectthedesiredcontactfromthecorporatedirectory.
5. Dooneofthefollowing:
‐ Ifonlyonenumberofthecontactisstoredinthelocaldirectory,presstodialoutthe
number.
‐ Ifboththeofficenumberandthemobilenumberofthecontactarestoredinthelocaldirectory,
presstheViewsoftkeytodisplaythetwonumbers.
Pressortohighlightthedesirednumber.
Presstodialout.
Toaddacontacttothelocaldirectoryfromthecorporatedirectory:
1. Presstoenterthemainmenu.
2. Select.
3. Pressortohighlightthenameofyourcorporatedirectory,andpresstheEntersoft
key.
4. Selectthedesiredcontactfromthecorporatedirectory.
5. PresstheOptionssoftkey,andselectAddtoLocal‐>NewEntry.
6. PresstheSavesoftkeytoaddthecontacttothelocaldirectory.
Network Directory
Youcanaccessthenetworkdirectoryonyourhandset.Youcanaddlocalcontactsfromthenetwork
directory.Youcanalsodialacontactfromthenetworkdirectory.
ContactyoursystemadministratorfortheXSIserveraddress,XSIusernameandXSIpasswordfor
accessingthenetworkdirectory.
Toconf igurethenetworkdirectoryviawebuserinterface:
1. ClickonContacts‐>NetworkDirectories.
2. EnterthevalidvaluesintheXSIServer,XSIUsernameandXSIPasswordfields.
3. Selectthedesiredvaluesfromthepull‐downlistsofGroup,GroupCommon,Enterpriseand
EnterpriseCommon.
4. ClickConfirmtoacceptthechange.
Toaccessthenetworkdirectory:
1. Presstoenterthemainmenu.
2. Select‐>NetworkDir.

UserGuideW52PIPDECTPhone
32
3. Pressortohighlightthedesiredgroup,andpresstheEntersoftkey.
Thehandsetconnectstoloadthenetworkdirectory,andthendisplaysthedesirednetwork
contactlistontheLCDscreen.
Toplaceacallfromthenetworkdirectory:
1. Presstoenterthemainmenu.
2. Select‐>NetworkDir.
3. Pressortohighlightthedesiredgroup,andpresstheEntersoftkey.
TheLCDscreendisplaysthedesirednetworkcontactlist.
4. Pressortohighlightthedesiredentry.
6. Dooneofthefollowing:
‐ Ifonlyonenumberofthecontactisstoredinthenetworkdirectory,presstodialoutthe
number.
‐ Ifmultiplenumbersofthecontactarestoredinthenetworkdirectory,presstheViewsoftkey
todisplayallthenumbers.
Pressortohighlightthedesirednumber.
Presstodialout.
Toaddacontacttothelocaldirectoryfromthenetworkdirectory:
1. Presstoenterthemainmenu.
2. Select‐>NetworkDir.
3. Pressortohighlightthedesiredgroup,andpresstheEntersoftkey.
TheLCDscreendisplaysthedesirednetworkcontactlist.
4. Pressortohighlightthedesiredentry.
5. PresstheOptionssoftkey,andselectAddtoLocal‐>NewEntry.
6. PresstheSavesoftkeytoaddthecontacttothelocaldirectory.
Call History Management
Thecallhistorycontainscallinformationsuchascalling/calledpartyidentification,timeanddate,
andcallduration.ThehandsetmaintainscallhistorylistsofAllCalls,OutgoingCalls,MissedCallsand
AcceptedCalls.Eachcallhistorylistcanstoreamaximumof120entriessortedbydateandtimeof
thecall,startingwiththelatestcallentry.Youcancheckthedetailinformationofanentryinthecall
history.Youcanalsodialacall,addanentrytotheblacklistordeleteentriesfromthecallhistory.
Tocheckthelocalcallhistory:
1. PresstheHistorysoftkeywhenthehandsetisidle.
TheLCDscreendisplays4callhistorylists:AllCalls,OutgoingCalls,MissedCallsandAccepted
Calls.
2. Pressortohighlightthedesiredlist,andpresstheOKsoftkey.

PhoneSett ings
33
TheLCDscreendisplaysallentriesoftheselectedlist.
3. Pressortohighlightthedesiredentry,andpresstheViewsoftkey.
TheLCDscreendisplaysthedetailinformationoftheentry.
Toaddanentrytotheblacklistfromthecallhistory:
Youcanblockphonecallsfromanumberbyaddingthisnumbertotheblacklist.Formoreinformation
onblacklist,refertoBlacklistonpage29.
1. PresstheHistorysoftkeywhenthehandsetisidle.
TheLCDscreendisplays4callhistorylists:AllCalls,OutgoingCalls,MissedCallsandAccepted
Calls.
2. Pressortohighlightthedesiredlist,andpresstheOKsoftkey.
TheLCDscreendisplaysallentriesoftheselectedlist.
3. Pressortohighlightthedesiredentry.
4. PresstheOptionssoftkey,andselectAddToBlacklist.
TheLCDscreenpromptsthewarning“Areyousure?”.
5. PresstheYessoftkeytoaddtheselectedentrytotheblacklistortheNosoftkeytocancel.
Todeleteanentryfromthecallhistory:
1. PresstheHistorysoftkeywhenthehandsetisidle.
TheLCDscreendisplays4callhistorylists:AllCalls,OutgoingCalls,MissedCallsandAccepted
Calls.
2. Pressortohighlightthedesiredlist,andpresstheOKsoftkey.
TheLCDscreendisplaysallentriesoftheselectedlist.
3. Pressortohighlightthedesiredentry.
4. PresstheOptionssoftkey,andselectDelete.
Theselectedentryisdeletedsuccessfully.
Todeleteallentriesofalistfromthecallhistory:
1. PresstheHistorysoftkeywhenthehandsetisidle.
TheLCDscreendisplays4callhistorylists:AllCalls,OutgoingCalls,MissedCallsandAccepted
Calls.
2. Pressortohighlightthedesiredlist,andpresstheOKsoftkey.
TheLCDscreendisplaysallentriesoftheselectedlist.
3. PresstheOptionssoftkey,andselectDeleteAll.
TheLCDscreenpromptsthewarning“DeleteAll?”.
4. PresstheYessoftkeytodeleteallentriesoftheselectedlistortheNosoftkeytocancel.
Toplaceacallfromthecallhistory:
1. PresstheHistorysoftkeywhenthehandsetisidle.
TheLCDscreendisplays4callhistorylists:AllCalls,OutgoingCalls,MissedCallsandAccepted

UserGuideW52PIPDECTPhone
34
Calls.
2. Pressortohighlightthedesiredlist,andpresstheOKsoftkey.
TheLCDscreendisplaysallentriesoftheselectedlist.
3. Pressortohighlightthedesiredentry.
4. Press.
Network Call Log
Youcanaccessthenetworkcalllogonthehandset.Thenetworkcalllogcontainscallinformat ion
suchascalling/calledpartyidentification,timeanddate.Youcancheckthecallloganddialacall
fromthecallloglist.Thenetworkcalllogallowsuserstoviewanddialthestorednumbersinthe
followinglists:AllCalls,OutgoingCalls,MissedCallsandAcceptedCalls.
Tomanagetheentriesofthenetworkcalllog,youshouldenablethenetworkcalllogfeaturein
advance.
Toenablethenetworkcalllogfeatureviawebuserinterface:
1. ClickonContacts‐>NetworkDirectories.
2. SelectEnabledfromthepull‐downlistofNetworkCallLog.
TheLCDscreendisplaysthenetworkcallloglistswhenyoupresstheHistorysoftkey.
IfDisabledisselected,theLCDscreendisplaysthelocalcallhistorylistswhenyoupressthe
Historysoftkey.
3. ClickConfirmtoacceptthechange.
Tocheckthenetworkcalllog:
1. PresstheHistorysoftkeywhenthehandsetisidle.
TheLCDscreendisplays4networkcallloglists:AllCalls,OutgoingCalls,MissedCallsand
AcceptedCalls.
2. Pressortohighlightthedesiredlist,andpresstheOKsoftkey.
TheLCDscreendisplaysallentriesoftheselectedlist.
3. Pressortohighlightthedesiredentry,andpresstheViewsoftkey.
TheLCDscreendisplaysthedetailinformationoftheentry.
Toplaceacallfromthenetworkcalllog:
1. PresstheHistorysoftkeywhenthehandsetisidle.
TheLCDscreendisplays4networkcallloglists:AllCalls,OutgoingCalls,MissedCallsand
AcceptedCalls.
2. Pressortohighlightthedesiredlist,andpresstheOKsoftkey.
TheLCDscreendisplaysallentriesoftheselectedlist.
3. Pressortohighlightthedesiredentry.
4. Press.

PhoneSett ings
35
Dial Plan
Dialplanisastringofcharactersthatgovernsthewayyourhandsetprocessestheinputsreceived
fromyourhandsetkeypad.Thehandsetsupportsthefollowingdialplanfeatures:
ReplaceRule
AreaCode
BlockOut
Thebasicexpressionsyntaxyouneedtoknow:
.
Thedot“.”canbeusedasaplaceholderormultipleplaceholdersforanycharacter.
Example:
“12.”wouldmatch“123”,“1234”,“12345”,“12abc”,etc.
xAn“x”canbeusedasaplaceholderforanycharacter.Example:
“12x”wouldmatch“121”,“122”,“123”,“12a”,etc.
[]
Thesquarebrackets“[]”canbeusedasaplaceholderforasinglecharacterwhichmatches
anyofasetofcharacters.Example:
“91[5‐7]1234”wouldmatch“9151234”,“9161234”,“9171234”,etc.
()
Theparentheses“()”canbeusedtogrouptogetherpatterns,forinstance,tologically
combinetwoormorepatterns.Example:
“91([5‐7])1(x)”wouldmatch“91511”,“91618”,“91715”,etc.
$
The“$”shouldbefollowedbythesequencenumberofaparenthesis.The“$”plusthe
sequencenumbermeansthewholecharacterorcharactersplacedintheparenthesis.The
numberdirectstotherightparenthesiswhentherearemorethanone.Example:
Areplaceruleconfiguration:Number:“9([5‐7])(.)”,Replace:“5$2”.Whenyouenter
“96123”todialoutonyourphone,thenumberwillbereplacedas“5123”andthendialed
out.“$2”meansthecharactersinthesecondparenthesis,thatis,“123”.
Note
Replace Rule
Youcanconfigureoneormorereplacerulestoremovethespecifiedstringandreplaceitwithanother
string.Youcanconfigureapatternwithwildcards(refertotheexpressionsyntaxinthetableabove),so
thatanystringthatmatchesthepatternwillbereplaced.Thisfeatureisconvenientforyoutodialout
alongnumber.Forexample,areplaceruleisconfiguredas“Number:1”and“Replace:1234567”,when
youwanttodialoutthenumber“1234567”,youjustneedtoenter“1”.
Whenaddingadialplanrule,youcanspecifytheaccountstoapplythedialplanruleintheAccount
field.Thevalidvalueofthe“Account”parametercanbeoneormoredigitsamong1,2,3,4and5,each
ofwhichrepresentsalineID.Eachdigitmustbeseparatedbyacomma.Forexample,whenyouenter
thevalue“1,2”intheAccountfield,thisdialplanrulewillapplytoaccount1andaccount2.
IfyouleavetheAccountfieldblankorenteraninvalidvalue,thenthedialplanrulewillapplytoall
accounts.

UserGuideW52PIPDECTPhone
36
Toaddareplaceruleviawebuserinterface:
1. ClickonPhone‐>DialPlan‐>ReplaceRule.
2. Enterthestring(e.g.2xx)intheNumberfield.
3. Enterthestring(e.g.12345)intheReplacefield.
4. EnterthedesiredlineIDintheAccountfieldorleaveitblank.
5. ClickAddtoaddthereplacerule.
Whenyouenterthenumber“234”usingthekeypadandthendialout,thehandsetwilldialout
“12345”instead.
Toeditareplaceruleviawebuserinterface:
1. ClickonPhone‐>DialPlan‐>ReplaceRule.
2. Selectthedesiredreplacerulebycheckingthecheckbox.
3. EditthevaluesintheNumberandReplacefields.
4. EnterthedesiredlineIDintheAccountfieldorleaveitblank.
5. ClickEdittoacceptthechange.
Todeleteoneormorereplacerulesviawebuserinterface:
1. ClickonPhone‐>DialPlan‐>ReplaceRule.
2. Selecttheoneormorereplacerulesbycheckingthecheckbox(es).
3. ClickDeletetodeletethereplacerule(s).
Area Code
AreacodesarealsoknownasNumberingPlanAreas(NPAs).Theyusuallyindicategeographicalareas
inacountry.Thisfeatureisnecessaryonlywhendialingthenumberoutsidethecodearea.For
example,areacodeisconfiguredas“Code:011,MinimumLength:4,MaximumLength:11”,then
whenyoudialoutthenumber“56789”,whichhasdigitsbetween4and11,thephonewilladdthearea
codeanddialoutthenumber“01156789”.

PhoneSett ings
37
Toconf iguretheareacodeviawebuserinterface:
1. ClickonPhone‐>DialPlan‐>AreaCode.
2. EnterthedesiredvaluesintheCode,MinimumLength(1‐15)andMaximumLength(1‐15)
fields.
3. EnterthedesiredlineIDintheAccountfieldorleaveitblank.
4. ClickConfirmtoacceptthechange.
Note
Block Out
Youcanblockthedialingofspecificnumbers.Whenyoudialablockoutnumberonthehandset,the
dialingwillfailandtheLCDscreenwillprompt“NumBlock”.
Toaddablockoutnumberviawebuserinterface:
1. ClickonPhone‐>DialPlan‐>BlockOut.
2. EnterthedesiredvalueintheBlockOutNumberfield.
3. EnterthedesiredlineIDintheAccountfieldorleaveitblank.
4. ClickConfirmtoaddtheblockoutnumber.
Emergency Numbers
Publictelephonenetworksincountriesaroundtheworldhaveasingleemergencytelephonenumber
(emergencyservicesnumber),thatallowsacallertocontactlocalemergencyservicesforassistance
whenrequired.Theemergencytelephonenumbermaydifferfromcountrytocountry.Itistypicallya
three‐digitnumbersothatitcanbeeasilyrememberedanddialedquickly.Somecountrieshave
differentemergencynumbersfordifferentemergencyservices.
Youcanspecifytheemergencynumbersforcontactingtheemergencyservicesinanemergency
situation.
Note
Tospecifyemergencynumbersviawebuserinterface:
1. ClickonPhone‐>Features.
2. EntertheemergencyservicesnumberintheEmergencyNumbersfield.
Formultiplenumbers,enteracommabetweeneachemergencynumber.
3. ClickConfirmtoacceptthechange.
Thedefaultvaluesofminimumandmaximumlengthare1and15respectively.
Contactyourlocalphoneserviceproviderforavailableemergencynumbersinyourarea.

UserGuideW52PIPDECTPhone
38
Outgoing Lines
Afterthehandsetisregisteredtothebasestation,youcanassignoneormoreoutgoinglinesforthe
handset.Thehandsetcanonlyusetheassignedoutgoingline(s)toplacecalls.Whenmultiple
outgoinglinesareassignedtothehandset,thehandsetusesthefirstlineastheoutgoinglineby
default.Youcanchangethedefaultoutgoinglineofthehandset.
Tochangethedefaultoutgoinglineofthehandset:
1. Presstoenterthemainmenu.
2. Select‐>Telephony‐>DefaultLine.
TheLCDscreendisplaysalloutgoinglinescurrentlyassignedtothehandset.Thedefault
outgoinglineishighlightedandfollowedbyaleftarrow.
3. Pressortohighlightthedesiredline,andpresstheOKsoftkey.
Thedefaultoutgoinglineischangedsuccessfully.
Incoming Lines
Afterthehandsetisregisteredtothebasestation,youcanassignoneormoreincominglinesforthe
handset.Thehandsetcanonlyreceiveincomingcallstotheassignedincomingline(s).Youcanassign
incominglinestoallhandsetsregisteredtothesamebasestationonyourhandset.
Toassigntheincominglinetothehandsets:
1. Presstoenterthemainmenu.
2. Select‐>Telephony‐>IncomingLines.
3. EnterthesystemPIN(default:0000).
4. PresstheDonesoftkey.
TheLCDscreendisplaysallhandsetsregisteredtothebasestation.Thehandsetitselfis
highlightedandfollowedbyaleftarrow.
5. Pressortohighlightthedesiredhandset,andpresstheOKsoftkey.
6. PressortoselectAcceptfromthedesiredlinefields.
7. PresstheSavesoftkeytoacceptthechange.
8. PresstheBacksoftkeytoreturntothepreviousinterface.
9. Repeatthestep5‐7toassignincominglinesforotherhandsets.
Ifalineisassignedtomultiplehandsetsasanincomingline,anincomingcalltothislinewill
causethesehandsetstoringsimultaneously,buttheincomingcallcanbeansweredonlybyone
ofthem.
Speed Dial
Speeddialallowsyoutoperformsingle‐digitdialingtopredefinednumbers.Thisfeatureisparticular

PhoneSett ings
39
usefultouserswhodialcertainnumbersonregularbasis.Amaximumof8speeddialnumbersare
allowed.
Assigning a Speed Dial Number
Youcanassigntheimportantnumbersofyourdirectory(includinglocaldirectory,remotephonebook
andnetworkdirectory)tothespeeddialkeysofyourhandset.Thishelpsyoudialacontactquicklyand
easilybylongpressingthespeeddialkeywithouthavingtoenterthedirectory.Theavailablespeed
dialkeysarethedigitkeys2‐9.
Toassignaspeeddialnumberfromthedirectory:
1. Presstoenterthemainmenu.
2. Select‐>Telephony‐>SpeedDial.
TheLCDscreendisplaysallavailablespeeddialkeys.
3. Pressortohighlightthedesiredspeeddialkey,andpresstheAssignsoftkey.
4. Pressortohighlightthedesireddirectory.
5. Selectthedesiredcontactfromthedirectory.
6. Dooneofthefollowing:
‐ Ifonlyonenumberofthecontactisstoredintheselecteddirectory,presstheOKsoftkeyto
assignthenumbertotheselectedspeeddialkey.
‐ Ifboththeofficenumberandthemobilenumberofthecontactarestoredintheselected
directory,presstheOKsoftkeytodisplaythetwonumbers.
Pressortohighlightthedesirednumber.
PresstheOKsoftkeyagaintoassignthenumbertotheselectedspeeddialkey.
Deleting a Speed Dial Number
Todeleteaspeeddialnumber:
1. Presstoenterthemainmenu.
2. Select‐>Telephony‐>SpeedDial.
TheLCDscreendisplaysallavailablespeeddialkeys.
3. Pressortohighlightthedesiredspeeddialkey,whichisalreadyassignedanumber.
4. PressortheClearKeysoftkeytodeletethespeeddialnumber.
Placing a Call Using Speed Dial Key
Toplaceacallusingthespeeddialkey:
1. Longpressthespeeddialkey(digitkey)whenthehandsetisidle.
Thenumberassignedtothisspeeddialkeyisdialedout.

UserGuideW52PIPDECTPhone
40
Auto Answer
Whentheautoanswerfeatureisenabled,youcansimplyanswertheincomingcallsbyliftingthe
handsetfromthechargercradlewithouthavingtopresstheoff‐hookkey.Theautoanswerfeature
worksonlyifthehandsetisplacedinthechargercradle.
Toconf iguretheautoanswerfeature:
1. Presstoenterthemainmenu.
2. Select‐>Telephony‐>AutoAnswer.
3. PresstheChangesoftkeytocheckorunchecktheAutoAnswercheckbox.
Auto Intercom
Intercomcallsareinternalcallsmadebetweenhandsetsregisteredtothesamebasestation.Youcan
enabletheautointercomfeatureonthehandsettoautomaticallyansweranincomingintercomcall.
Thefollowingthreeconfigurationtypesoftheautointercomfeatureareavailableforselection:
On(BeepOn):Theautointercomfeatureison.Thehandsetwillansweranincomingintercomcall
automaticallyafterplayingawarningtone.
On(BeepOff):Theautointercomfeatureison.Thehandsetwillansweranincomingintercomcall
automaticallywithoutplayinganytone.
Off:Theautointercomfeatureisoff.Youneedtoansweranincomingintercomcallbypressingthe
Acceptsoftkey.
Toconf iguretheautointercomfeature:
1. Presstoenterthemainmenu.
2. Select‐>Telephony‐>AutoIntercom.
TheLCDscreendisplaysthreeconfigurationtypesforselection.
3. Pressortohighlightthedesiredconfigurationtype,andpresstheChangesoftkey.
Theradioboxoftheselectedconfigurationtypeismarked.
Handset Reset
Youcanresetanyindividualsettingsthatyouhavemadeonthehandset.Resettingyourhandsetwill
notaffecttheentriesofthedirectory,thecallhistory,thevoicemailandthehandset’sregistrationto
thebasestation.Butyouneedtonotethatothercustomizedsettingsonthehandsetwillberesetto
factorysettingsafterresetting.Werecommendthatyouaskyoursystemadministratorforadvice
beforeresettingyourhandset.
Toresetthehandset:
1. Presstoenterthemainmenu.

PhoneSett ings
41
2. Select‐>SystemSettings‐>HandsetReset.
TheLCDscreenpromptsthewarning“Resethandsettodefault?”.
3. PresstheYessoftkeytoresetthehandsetortheNosoftkeytocancel.
Base Reset
Youcanresetthebasestationtofactorysettings.Thiswillclearallindividualsettingsofthebase
station,entriesofthedirectoryandactiveSIPregistrations.Allregisteredhandsetsarede‐registered.
Youneedtore‐registeryourhandsettouse.Werecommendthatyouaskyoursystemadministrator
foradvicebeforeresettingyourbasestation.
Toresetthehandset:
1. Presstoenterthemainmenu.
2. Select‐>SystemSettings‐>BaseReset.
3. EnterthesystemPIN(default:0000).
4. PresstheDonesoftkey.
Thebasestationisresettofactorysettingssuccessfully.ThepowerindicatorLEDonthebase
stationslowflasheswhenthebasestationisduringtheresettingprocess.
Auto Provision
YoucantriggertheautoprovisioningprocessusingtheVoIPwizard.Afteryouentertheusernameand
passwordinthewizardandconfirmtoperformanupdate,thebasestationtriestoconnecttotheRPS
server.IfthebasestationsuccessfullyconnectstotheRPSserver,theRPSserverrespondsthebase
stationwiththeURLfordownloadingtheconfigurationfiles.Thenthebasestationtriestoperform
theautoprovisioningprocess.Contactyoursystemadministratorformoreinformationonthe
usernameandpasswordforconnectingtotheRPSserver.

UserGuideW52PIPDECTPhone
42
Totriggertheautoprovisioning:
1. Presstoenterthemainmenu.
2. Select‐>SystemSettings‐>AutoProvision.
3. EnterthesystemPIN(default:0000)andpresstheDonesoftkey.
4. EnterthevalidvalueintheUsernamefieldandpresstheOKsoftkey.
5. EnterthevalidvalueinthePasswordfieldandpresstheOKsoftkey.
TheLCDscreenpromptsthewarning“Updatenow?”.
6. PresstheYessoftkeytoperformanupdateorpresstheNosoftkeytocancel.
Eco Mode+
Ecomode+turnsoffthetransmissionpowerandtheradiowavesemittedarevirtuallyzero
whenthephoneisinthestandbymode.Iftheecomode+isenabled,thebasestationonly
transmitsasignalwhennecessary,forexample,whenacallcomesin,whenthephoneisin
use,orwhenaconnectionoccurs.
Toconf iguretheecomode+:
1. Presstoenterthemainmenu.
2. Select‐>SystemSettings‐>EcoMode+.
3. PresstheChangesoftkeytocheckorunchecktheEcoMode+checkbox.
4. EnterthesystemPIN(default:0000)andpresstheDonesoftkey.
TheLCDscreenpromptsthewarning“Areyousureyouwanttorebootthebasestation?”.
5. PresstheYessoftkeytorebootthehandset.
Thebasestationrebootstomaketheconfigurationtakeeffect.Theconfigurationappliestoall
thehandsetsregisteredtothesamebasestation.
Eco Mode
Ecomodegreatlyreducesthetransmissionpowerandsignaloutputnomatterthephoneis
instandbymodeortalkmode.
Ecomodeisdisabledbydefaultandthecolourofthesignalstrengthindicatorshownonthe
topleft‐handcorneroftheidlescreeniswhite.
Toconf iguretheecomode:
1. Presstoenterthemainmenu.
2. Select‐>SystemSettings‐>EcoMode.
3. PresstheChangesoftkeytocheckorunchecktheEcoModecheckbox.

PhoneSett ings
43
IftheEcoModecheckboxischecked,theecomodeisenabled.Thecolourofthesignalstrength
indicatorontheidlescreenwillchangetogreen.
Note
Repeater Mode
RepeatermodeextendsthesignalcoverageofDECTphones.Thisfeatureisespeciallyusefultothe
userswhorequiremobilityinlargedwellings.Ifrepeatermodeisenabled,thehandsetregisteredto
thebasestationcanbeusedeitherinthebasestationortherepeatercoveragearea,thereby
providingtheuserswithgreaterfreedominmobility.
Toconf iguretheecomode:
1. Presstoenterthemainmenu.
2. Select‐>SystemSettings‐>RepeaterMode.
3. PresstheChangesoftkeytocheckorunchecktheEcoModecheckbox.
Thebasestationrebootstomaketheconfigurationtakeeffect.Theconfigurationappliestoall
thehandsetsregisteredtothesamebasestation.
Note
Repeatermodeandecomode+canceleachotherout.Bothfeaturescannotbeusedatthesametime.
Iftheecomodeisenabled,therangeofthebasestationwillbereduced.

UserGuideW52PIPDECTPhone
44
Call Features
TheW52PIPDECTphoneisdesignedtobeeasilyusedlikearegularphoneonapublicswitched
telephonenetwork(PSTN).Youcanplaceinternalandexternalcalls,answercalls,transferacallto
someoneelse,orconductaconferencecall.
Thischapterprovidesoperatinginstructionsofthecallfeatures.Thetopicsinclude:
PlacingCalls
AnsweringCalls
EndingCalls
RedialingCalls
CallMute
CallHold/Resume
CallWaiting
DoNotDisturb(DND)
CallForward
CallTransfer
ConferenceCall
AnonymousCall
AnonymousCallRejection
VoiceMail
Ifyourequireadditionalinformationorassistancewithyournewphone,contactyoursystem
administrator.
Placing Calls
Youcanuseyourhandsettoplaceaninternalorexternalcall.Youcanplaceacallusingthefollowing
callmodes:
Earpiecemode—pressingtheoff‐hookkeytodialout.
Speakerphonemode—pressingthespeakerphonekeytodialout.
Headsetmode—connectingaheadset.
Duringthecall,youcanswitchthecallmodebypressingthecorrespondingkeysorconnectinga
headset.
Youcancancelthedialingoperationbypressingtheon‐hookkey.Duringthecallconversation,you
canpresstheleftandrightnavigationkeystoadjustthevolumeofthecurrentlyusedaudiodevices

CallFeatures
45
(earpiece,headsetorloudspeaker).Thecalldurat iondisplaysontheLCDscreenwhilethecallisin
progress.
Placing Internal Calls
Youcanmakefreeinternalcallsbetweenthehandsetsregisteredtothesamebasestation.Youcan
placeaninternalcalltoonehandsetorallhandsetsregisteredtothesamebasestation.
Toplaceaninternalcalltoonehandset:
1. Presstoenterthemainmenu.
2. Select.
TheLCDscreendisplaysallotherregisteredhandsetnamesandtheAllHSoption.
3. Pressortohighlightthedesiredhandsetname.
4. Press,,ortheOKsoftkeytodialout.
Toplaceaninternalcalltoallhandsets:
1. Presstoenterthemainmenu.
2. Select.
TheLCDscreendisplaysallregisteredhandsetnamesandtheAllHSoption.
3. SelectAllHS.
4. Press,,ortheOKsoftkeytodialout.
Allotherhandsetsregisteredtothisbasestationwillringsimultaneously.
Placing External Calls
Youcanplaceexternalcallsonthehandset.Externalcallsbasedonthepublictelephonenetwork
requiretheuseofSIPlines.YoursystemadministratorwillassigntheSIPlinetothehandset
beforehand,sothatafteryouregisterthehandsettothebasestation,thehandsetisreadytouse.
Toplaceanexternalcall:
1. Enterthedesirednumberusingthekeypad.
2. Press,ortodialout.
Iftherearemultiplelinesassignedtoyourhandsetasoutgoinglines,presstheLinesoftkeyto
selectthedesiredlineandthenpressortheDialsoftkeytodialout.Ifyoudonotselecta
line,thehandsetusesthedefaultoutgoinglinetodialout.

UserGuideW52PIPDECTPhone
46
Toplaceanewcallduringanactivecall:
Youcanhaveatmosttwocallsonyourhandset.
1. PresstheExt.Callsoftkey.
Theactivecallisplacedonhold.
2. EnterthedesirednumberintheCallTofieldusingthekeypad.
3. Pressortodialout.
Note
Answering Calls
Youcanansweracallinthreeways:
Usingtheearpiece
Usingthespeakerphone
Usingtheheadset
Note
AnsweringWhenNotinAnotherCall
Inallcases,theactivecallwillappearontheLCDscreenshowingcalldurationanddestination.
Toansweracallusingtheearpiece:
1. PressortheAcceptsoftkey.
Toansweracallusingthespeakerphonemode:
1. Press.
Toansweracallusingtheheadset:
1. Withaheadsetconnected,presstheAcceptsoftkey.
AnsweringWheninAnotherCall
Ifyouareduringanactivecall,anincomingcallarrivesonthehandset,dothefollowing:
1. Press,ortheAcceptsoftkey.
Theincomingcallisansweredandtheoriginalcallisplacedonhold.
YoucanignoreanincomingcallbypressingtheSilencesoftkeyorrejectanincomingcallbypressing
theon‐hookkey.
YoucanalsoactivateDoNotDisturbmodeonaper‐linebasistorejectallincomingcallsofthe
specifiedline.
YoucanalsomakeanIPcallbydirectlydialingtheIPaddressofanyIPphone.Forexample,IP:
192.168.1.15.

CallFeatures
47
Ending Calls
Toendacall:
Dooneofthefollowing:
- Press.
- Placethehandsetinthechargercradle.
Redialing Calls
Theredialnumberliststoresthetwentylastdialedphonenumbers.Whenthememoryoftheredial
numberlistisfull,thehandsetwillautomaticallyerasetheoldestdialednumberwhenanewnumber
isdialed.Youcanredialacallfromtheredialnumberlist.
Toredialthelastdialednumber:
1. Presswhenthehandsetisidle.
2. Pressagain.
Acalltoyourlastdialednumberisattempted.
Toredialapreviouslydialednumber:
1. Presswhenthehandsetisidle.
Thehandsetdisplaysthelastdialedphonenumbers.
2. Pressortohighlightthedesiredentry.
YoucanpressOptions‐>EditBeforeCalltoeditthephonenumberorselectthedesiredline.
3. Pressagain.
Youcanaddlocalcontactsfromtheredialnumberlist.Youcanalsodeleteanentryorallentriesfrom
theredialnumberlist.
Call Mute
Youcanmutethemicrophoneduringanact ivecall.Whenmutingthemicrophone,youcanhearthe
otherpartybutheorshecannothearyou.Forexample,ifyoudonotwanttheotherpartytolistenin
whileyoutalktosomeoneintheroom,youcanmutethemicrophonetemporarily.
Tomuteacall:
1. Pressduringanactivecall.
ThecallisonmuteandtheicondisplaysontheLCDscreen.

UserGuideW52PIPDECTPhone
48
Toun‐muteacall:
1. Pressagain.
TheicondisappearsfromtheLCDscreen.
Call Hold/Resume
Youcanplaceanactivecallonhold.Atanytime,atmostoneactivecallcanbeinprogressonyour
handset.Anothercallcanbeansweredandmadewhileplacingtheoriginalcallonhold.
Toplaceacallonhold:
1. PresstheOptionssoftkeyduringacall,andselectHold.
ThecallisplacedonholdandtheicondisplaysontheLCDscreen.
Toresumeaholdcall:
Dooneofthefollowing:
- PresstheResumesoftkey.
- Press.
- Press.
TwoCallsonHold:
Iftwocallsareplacedonholdonthehandset,presstheResumesoftkeytoresumethecurrentcall.
Press,ortheSwapsoftkeytoswapbetweenthetwocalls.
Note
Call Waiting
Youcanenableordisablethecallwaitingfeatureonthehandset.Ifthecallwaitingfeatureisenabled,
thehandsetwillnotifyyouofanewincomingcallduringacall,andpresenttheincomingcall
informationvisuallyontheLCDscreen.Youcanalsoenablethehandsettoplayawarningtonewhen
receivinganewincomingcallduringacall.Ifthecallwaitingfeatureisdisabled,thenewincomingcall
willbeautomaticallyrejectedbythehandset.
Toconf igurethecallwaitingfeature:
1. Presstoenterthemainmenu.
2. Select‐>CallWaiting.
3. PressortoselectthedesiredvaluefromtheStatusfield.
Whenthecallonthehandsetisonhold,placingthehandsetinthechargercradlewillnotendthecall.

CallFeatures
49
4. PressortoselectthedesiredvaluefromtheTonefield.
5. PresstheSavesoftkeytoacceptthechangeortheBacksoftkeytocancel.
Note
Toansweranewincomingcallduringacall:
Ifcallwaitingfeatureisenabled,anewincomingcallcanbeansweredduringacall.
1. PresstheAcceptsoftkeytoanswerthenewincomingcall.
Theoriginalcallisplacedonhold.
Do Not Disturb (DND)
YoucanactivateordeactivatetheDNDmodeonaper‐linebasis.IfDNDmodeisactivatedfora
specificline,allincomingcallstothelinewillberejectedautomatically,andthecallerswillheara
busysignal.
ToactivateDNDmodeforaspecificline:
1. Presstoenterthemainmenu.
2. Select‐>DoNotDisturb.
TheLCDscreendisplaystheincominglinescurrentlyassignedtothehandset.
3. Pressortohighlightthedesiredline,andpresstheOKsoftkey.
4. PressortoselectEnabledfromtheStatusfield.
5. PresstheOKsoftkeytoacceptthechange.
TheiconontheidlescreenindicatestheDNDmodeisactivated.YoucanpresstheLinesoftkey
whenthehandsetisidletocheckthelinestatus.Theiconinthebottomofalineindicatesthatthe
DNDmodeisactivatedforthisline.
Thehandsetwillrejectallincomingcallstotheline,andtheLCDscreendisplaysthemissedcallicon
followedbythenumberofmissedcalls.
Call Forward
Youcanenablethecallforwardfeatureonaper‐linebasis.Thehandsetwillforwardincomingcallsto
thelinetoanotherparty.Therearethreeforwardingtypes:
AlwaysForward:Incomingcallsareimmediatelyforwarded.
BusyForward:Incomingcallsareimmediatelyforwardedifthelineisbusy.
NoAnswerForward:Incomingcallsareforwardedifnotansweredafteraperiodoftime.
Thecallwaitingtoneworksonlyifthecallwaitingfeatureisenabled.

UserGuideW52PIPDECTPhone
50
Toenablethecallforwardfeatureforaspecificline:
1. Presstoenterthemainmenu.
2. Select‐>CallForward.
TheLCDscreendisplaystheincominglinescurrentlyassignedtothehandset.
3. Pressortohighlightthedesiredline,andpresstheOKsoftkey.
4. Pressortohighlightthedesiredforwardingtype,andpresstheOKsoftkey.
5. PressortoselectEnabledfromtheStatusfield.
6. EnterthedestinationnumberyouwanttoforwardincomingcallstointheTargetfield.
7. PressortoselectthedesiredringtimetowaitbeforeforwardingfromtheAfterRingTime
field(onlyavailableforNoAnswerForward).
8. PresstheSavesoftkeytoacceptthechange.
Theiconontheidlescreenindicatesthecallforwardfeatureisenabled.
IfAlwaysForwardisselected,thereisnopromptontheLCDscreenwhenthelinereceivesanincoming
call.TheincomingcallisloggedintheAcceptedCallslist.
Note
Call Transfer
Youcantransferacalltoanotherpartyinoneofthefollowingways:
BlindTransfer:Transferacalldirectlytoanotherpartywithoutconsulting.
Semi‐AttendedTransfer:Transferacallwhenreceivingthering‐back.
AttendedTransfer:Transferacallwithpriorconsulting.
Toperformablindtransfer:
1. PresstheOptionssoftkeyduringacall,andselectBlindTransfer.
2. Dooneofthefollowing:
‐ Enterthenumberorselectthehandsetyouwanttotransferthecallto.
Press,ortheTransfersoftkey.
‐ PresstheDirectorysoftkey,andselectthedesiredcontact.
PresstheCallsoftkey.
Ifboththeofficenumberandthemobilenumberofthecontactarestored,selectthe
desirednumberandpressortheOKsoftkey.
Thecallisconnectedtothenumberorhandsetyouspecified,andtheLCDscreenpromptsthe
message“CallTransferred”.
Callforwardfeaturemaybeoverriddenbytheserversettings.Formoreinformation,contactyour
systemadministrator.

CallFeatures
51
Toperformasemi‐attendedtransfer:
1. PresstheOptionssoftkeyduringacall,andselectTransfer.
2. Dooneofthefollowing:
‐ Enterthenumberorselectthehandsetyouwanttotransferthecallto.
PressortheTransfersoftkeytodialout.
‐ PresstheDirectorysoftkey,andselectthedesiredcontact.
PresstheCallsoftkey.
Ifboththeofficenumberandthemobilenumberofthecontactarestored,selectthe
desirednumberandpressortheOKsoftkeytodialout.
3. PressortheTransfersoftkeytocompletethetransferwhenreceivingthering‐back.
TheLCDscreenpromptsthemessage“CallTransferred”.
Toperformanattendedtransfer:
1. PresstheOptionssoftkeyduringacall,andselectTransfer.
2. Dooneofthefollowing:
‐ Enterthenumberorselectthehandsetyouwanttotransferthecallto.
PressortheTransfersoftkeytodialout.
‐ PresstheDirectorysoftkey,andselectthedesiredcontact.
PresstheCallsoftkey.
Ifboththeofficenumberandthemobilenumberofthecontactarestored,selectthe
desirednumberandpressortheOKsoftkeytodialout.
3. PresstheTransfersoftkeytocompletethetransferafterthepartyanswersthecall.
TheLCDscreenpromptsthemessage“CallTransferred”.
Conference Call
Youcanusethehandsettocreatealocalconferencewithotherparties.Thehandsetsupportsupto3
parties(includingyourself)inaconferencecall.Youcancreateaconferencebetweenanactivecall
andaheldcallonthehandset(onthesamelineordifferentlines).
Tosetupalocalconferencecall:
1. Placeacalltothefirstparty.
2. PresstheOptionssoftkey,andselectConference.
3. Dooneofthefollowing:
‐ Enterthenumberofthesecondpartyorselectthehandsetyouwanttoaddtotheconference.
PressortheConf.softkeytodialout.
‐ PresstheDirectorysoftkey,andselectthedesiredcontact.
PresstheCallsoftkey.
Ifboththeofficenumberandthemobilenumberofthecontactarestored,selectthe

UserGuideW52PIPDECTPhone
52
desirednumberandpressortheOKsoftkeytodialout.
4. Whenthesecondpartyanswersthecall,youcanconsultwithhimorherbeforeaddingtothe
conference.
5. PresstheConf.softkeyagaintojoinallpartiesintheconference.
Tojointwocallsinaconference:
1. Placetwocallsonthehandset.
2. Selectthedesiredcallandmakesurethecallisactive.
3. PresstheOptionssoftkey,andselectConference.
Twocallsarejoinedintheconference.
Todroptheconferencecall,pressortheEndsoftkey.
Anonymous Call
Youcanuseanonymouscallfeaturetoblocktheidentityandphonenumberfromshowinguptothe
calledpartywhenyoucallsomeone.Forexample,youwanttocalltoconsultsomeservice,butyoudo
notwanttobeharassed.Youcanconfiguretheanonymouscallfeatureonaper‐linebasis.
Note
Toenabletheanonymouscallfeatureforaspecificline:
1. Presstoenterthemainmenu.
2. Select‐>AnonymousCall.
TheLCDscreendisplaystheoutgoinglinescurrentlyassignedtothehandset.Thedefault
outgoinglineishighlightedandfollowedbyaleftarrow.
3. Pressortohighlightthedesiredline,andpresstheOKsoftkey.
4. PressortoselectEnabledfromtheStatusfield.
5. PresstheOKsoftkeytoacceptthechange.
Toplaceananonymouscall:
1. Usingthespecificlineonthehandsettoplaceacall.
TheLCDscreenofthephonereceivingthiscallpromptsanincomingcallfromanonymity.
Anonymous Call Rejection
Youcanuseanonymouscallrejectionfeaturetorejectincomingcallsfromanonymouscallers.
Anonymouscallrejectionautomaticallyrejectsincomingcallsfromcallerswhodeliberatelyblock
theiridentitiesandnumbersfromshowingup.Youcanconfiguretheanonymouscallrejectionfeature
onaper‐linebasis.
Theanonymouscallfeatureisnotavailableonallservers.Contactyoursystemadministratorformore
information.

CallFeatures
53
Toenabletheanonymouscallrejectionfeatureforaspecificline:
1. Presstoenterthemainmenu.
2. Select‐>Anon.CallReject ion.
TheLCDscreendisplaystheincominglinescurrentlyassignedtothehandset.
3. Pressortohighlightthedesiredline,andpresstheOKsoftkey.
4. PressortoselectEnabledfromtheStatusfield.
5. PresstheOKsoftkeytoacceptthechange.
Voice Mail
Youcanleavevoicemailstosomeoneelse.Youcanalsoreceiveandlistentothevoicemails.Thevoice
mailfeatureensuresthatyouwillnevermissanyimportantmessages.Whenreceivinganewvoice
mail,theiconappearsontheLCDscreenwiththenumberofunreadvoicemailsandthemessage
keyLEDflashesred.
Note
Toleaveavoicemail:
Youcanleaveavoicemailtosomeoneelsewhenheorsheisbusyorinconvenienttoanswerthecall.
Followthevoicepromptsfromthesystemservertoleaveavoicemail,andthenhangupafter
completing.
Toconf igurethevoicemailaccesscode:
1. Presstoenterthemainmenu.
2. Select‐>SetVoiceMail.
TheLCDscreendisplaysthelinesassignedtothehandsetasincominglinesandoutgoinglines
simultaneously,andthenumberofvoicemailsofeachline.
3. Pressortohighlightthedesiredline,andpresstheSelectsoftkey.
4. PressortoselectEnabledfromtheStatusfield.
5. EnterthevoicemailaccesscodeintheNumberfield.
6. PresstheOKsoftkeytoacceptthechangeortheBacksoftkeytocancel.
Thevoicemailfeatureisnotavailableonallservers.Contactyoursystemadministratorformore
information.

UserGuideW52PIPDECTPhone
54
Toconf igurefastaccessforvoicemail:
Youcanconfigurefastaccesstoconnectstraighttothevoicemailsofthedesiredlinebylongpressing
thedigitkey1,whenthehandsetisidlewithouthavingtoscrollthroughthemenu.
1. Presstoenterthemainmenu.
2. Select‐>SetKey1.
TheLCDscreendisplaysthelinesassignedtothehandsetasincominglinesandoutgoinglines
simultaneously,andthenumberofvoicemailsofeachline.
3. PressortohighlightthedesiredlineandpresstheSelectsoftkey.
Theradioboxoftheselectedlineismarked.
Tolistentothevoicemailusingthemenu:
1. PresstheOKkeytoenterthemainmenu.
2. Select‐>PlayMessage.
TheLCDscreendisplaysthelinesassignedtothehandsetasincominglinesandoutgoinglines
simultaneously,andthenumberofvoicemailsofeachline.
3. Pressortohighlightthedesiredline,andpresstheSelectsoftkey.
Thehandsetdialsoutthevoicemailaccesscodeusingtheselectedlineautomatically.
4. Listentothevoicemailfollowingthevoicepromptsfromthesystemserver.
Tolistentothevoicemailviafastaccess:
1. Longpresswhenthehandsetisidle.
Thehandsetautomaticallydialsoutthevoicemailaccesscodeusingthelineyouselectedwhen
configuringfastaccessforvoicemail.
2. Listentothevoicemailofthislinefollowingthevoicepromptsfromthesystemserver.
YoucanalsolistentothevoicemailbypressingtoenterintotheMessage&Callinterface.
SelectthedesiredlineandpresstheSelectsoftkey.
NoteBeforelisteningtothevoicemails,makesurethevoicemailaccesscodehasbeenconfigured.
Whenallnewvoicemailsareretrieved,theicondisappearsfromthescreen.

Troubleshooting
55
Troubleshooting
Thischapterprovidessomegeneraltroubleshootinginformationtohelpyousolvetheproblemsyou
mightencounterwhenusingyourW52PIPDECTphone.
Ifyourequireadditionalinformationorassistancewithyournewphone,contactyoursystem
administrator.
Whydoesn’tthehandsetring?
Ensuretheringervolumeofyourhandsetisnotadjustedtotheminimum.RefertoAdjustingRinger
Volumeonpage16.
Makesurethesilentmodeisnotswitchedon.RefertoSwitchingSilentModeOn/Offonpage17.
Whycan’tIreceivecalls?
EnsuretheDNDmodeisnotactivated.RefertoDoNotDisturb(DND)onpage49.
EnsuretheAlwaysForwardfeatureisnotenabled.RefertoCallForwardonpage49.
Whydoesthehandsetpromptthemessage”NotSubscribed”?
Checktheregistrationstatusofyourhandset.Ifyourhandsetisnotregisteredtothebasestation,
registeritmanually.RefertoHandsetRegistrat iononpage12.
Whydoesthehandsetpromptthemessage”Notinrange”?
EnsurethebasestationisproperlypluggedintoafunctionalACoutlet.
Ensurethehandsetisnottoofarfromthebasestation.
Whydoesthehandsetpromptthemessage”NoLANConnection”?
EnsuretheEthernetcableispluggedintotheInternetportonthebasestationandtheEthernet
cableisnotloose.
Ensuretheswitchorhubinyournetworkisoperational.
Whydoespagingfail?
Checkthecurrentmodeofthebasestation.Ifthebasestationisnotonthepagingmode,pressthe
pagingkeyonthebasestationtocastthebasestationintothepagingmode.

UserGuideW52PIPDECTPhone
56
Whycan’tIturnthehandseton?
Ensurethebatteriesareinsertedintothehandset.Ifthebatteriesarealreadyinsertedintothehandset,
placethehandsetintothechargercradle.
WhydoIhearsomenoiseduringacall?
Ensureyouarenotusingthehandsetorbasestationinanareawithhighelectricalinterference.You
canrepositionthehandsetandthebasestationtokeepthemfarawayfromsourcesofhigh
electricalinterference
Ensurethehandsetisnottoofarfromthebasestation.
Turnoffthehandset.Restartthebasestation,turnonthehandsetandplaceacalltoseeifthereis
stillnoiseheardduringthecall.

Appendix
57
Appendix
Firmware Upgrading
Youcanupgradeyourbasestationorhandsettothelatestfirmwareversion.Thelatestfirmware
versionnotonlyimprovestheperformanceofthebasestationorhandset,butalsoprovidesmore
featurescomparedtothepreviousversions.
Upgrading the Base Station
Youcanupgradethebasestationfirmwareviaautoprovisioningorviathewebuserinterface.This
sectionprovidesyouwiththeinstructionofupgradingthebasestationviathewebuserinterface.For
moreinformationonupgradingthebasestationviaautoprovisioning,refertothedocumentYeal ink
W52PAutoProvisioningUserGuide.
Toupgradethebasestationfirmware,contactyoursystemadministratorforthelatestfirmwarefile,
andstoreitonyourlocalsystem.
Toupgradethebasestationfirmwareviawebuserinterface:
1. ClickonPhone‐>Upgrade.
2. IntheSelectandUpgradeFirmwarefield,locatethefirmwarefilefromyourlocalsystem.
3. ClickUpgradetoupgradethefirmwareofthebasestation.
Theupgradingprocesswilltakeafewminutes.ThepowerindicatorLEDonthebasestationslow
flasheswhenthebasestationisduringthefirmwareupgradingprocess.
Oncethebasestationfirmwarehasbeensuccessfullyupgraded,thebasestationreboots
automatically.Thehandsetwillperformanautoregistrationtothebasestation.
Youcancheckthefirmwareversionofthebasestationusingthehandset.Formoreinformation,refer
toCheckingSystemStatusonpage14.
Note
Upgrading the Handset via USB Port
YoucanupgradeyourhandsetfirmwareviatheUSBportlocatedunderneaththebatterycover.USB
portsallowstandaloneelectronicdevicestobeconnectedviacablestoacomputer.
Toupgradethehandsetfirmware,contactyoursystemadministratorforthelatestfirmwarefileand
thefirmwareupgradingtool(W52P‐HS‐Flasher.exe),andstorethemonyourlocalsystem.
ToconnectthehandsettothePCusingtheUSBcable:
Donotrefreshorclosethebrowserduringtheupgradingprocessofthebasestation.
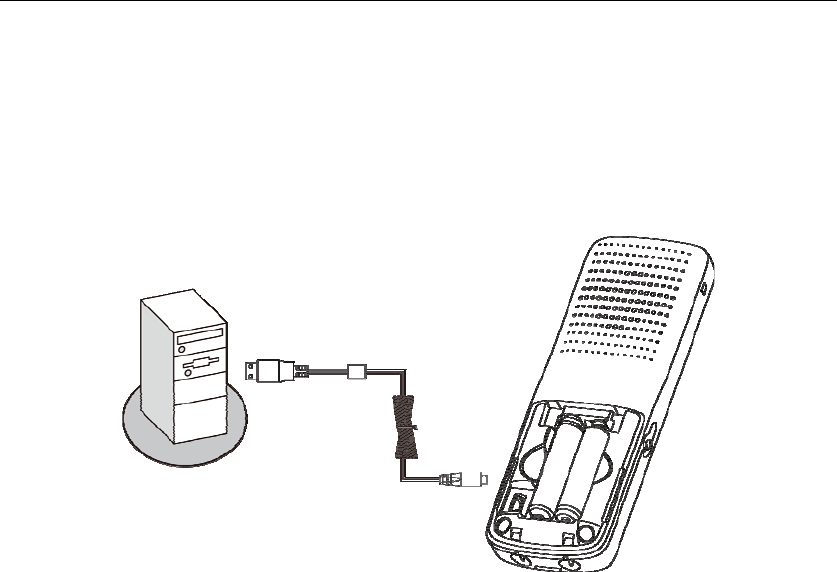
UserGuideW52PIPDECTPhone
58
Beforeupgradingthehandset,youneedtoconnectthehandsettothecomputer.
1. Openthebatterycoverofthehandset.
AUSBminiportislocatedunderneaththebatterycover.
2. ConnecttheUSBcabletothecomputer.
3. ConnecttheotherendoftheUSBcabletotheUSBportonthehandset.
Toupgradethehandsetfirmware:
1. DoubleclicktheW52P‐HS‐Flasher.exeapplication.
2. ClicktheBrowsebuttontolocatethelatestfirmwarefilefromyourlocalsystem.
3. ClicktheUpgradebutton.
Thehandsetisturnedoff.Thestatusoftheupgradingprocessisindicatedontheinterfaceofthe
firmwareupgradingtool.Theupgradingprocesswilltakeafewminutes.
Oncethehandsetfirmwarehasbeensuccessfullyupgraded,thehandsetisturnedonautomatically,
playsawarningtoneandperformsanautoregistrationtothebasestation.Youcancheckthe
firmwareversionofthehandset.Formoreinformation,refertoCheckingSystemStatusonpage14.
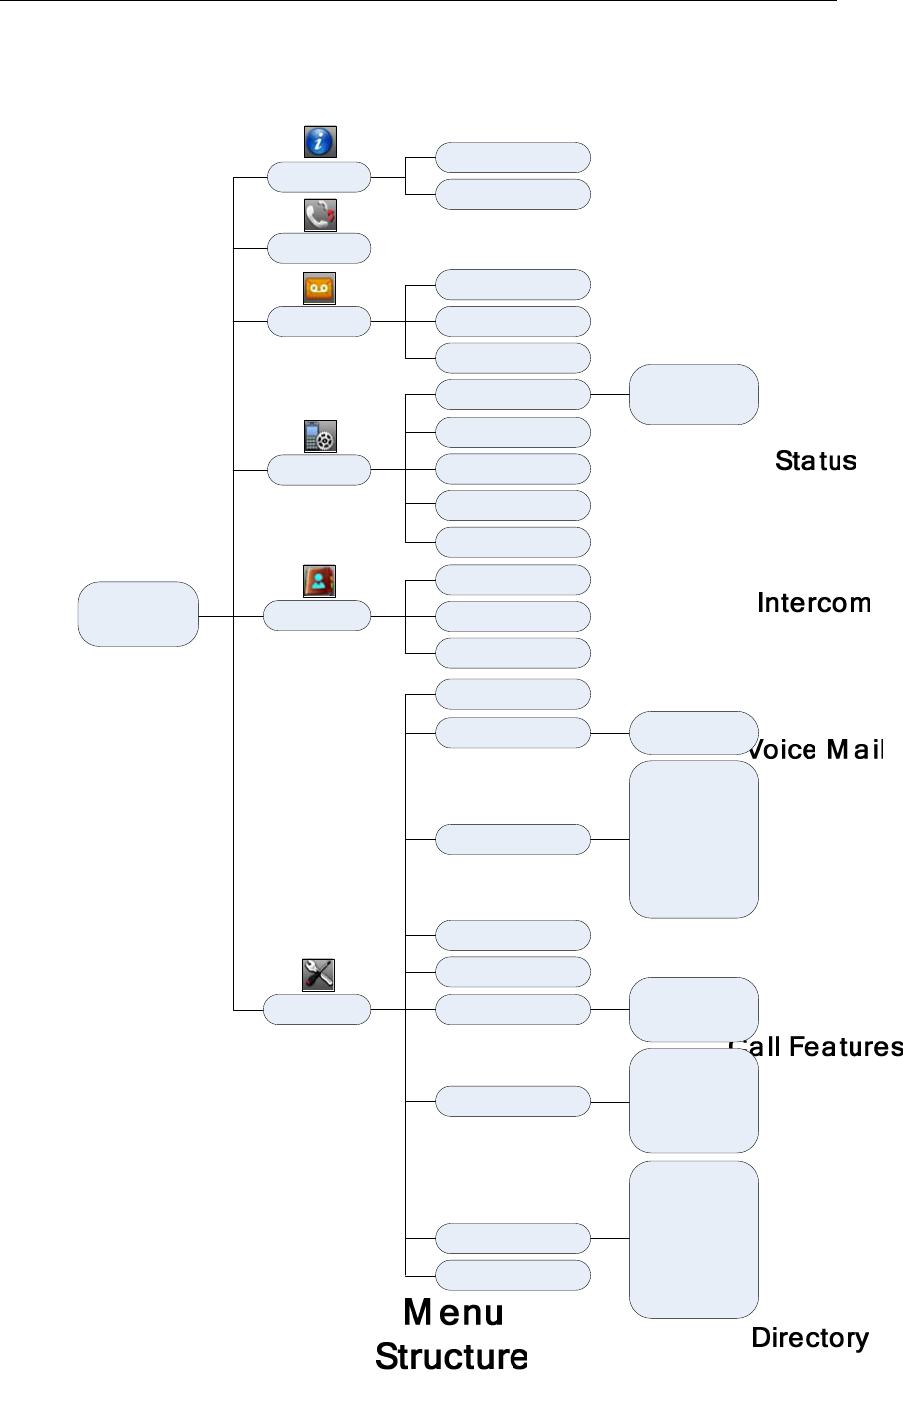
Appendix
59
Menu Structure
Anon. Call Rejection
Play Message
Set Vo ice M a il
Set Ke y 1
Do Not Disturb
Anonymous Call
Call Forw ard
Call Waiting
Scre en Sa ver
Colour Schemes
Display Backlight
Keypad Light
Notification Light
Ti m e Fo r m a t
Date Format
Input M ethod
Always
Busy
No Answer
Date & Time
Audio
Display
Sho rtcut
La ng ua g e
Re g i s t r a t i o n
Te l e p h o n y
Syste m Set ting s
Handset Name
Advisory Tones
Ring Tones
Re g ist e r H a nd se t
De-reg. Ha ndset
Sele ct Ba se
Auto Answer
Auto Intercom
Default Line
Incoming Lines
Sp e ed Dia l
Caller Blacklist
Network
Handset Reset
Change Base PIN
Ba se Rese t
Ba se Resta rt
Auto Provision
Ec o M o d e +
Ec o M o d e
Repeater Mode
Lo ca l Di r
Network Dir
Syste m Sta tus
Lin e St a tu s
Remote Phonebook

UserGuideW52PIPDECTPhone
60
Regulatory Notices
Important Safety Information
Toreduceriskoffire,severepersonalinjuryanddamagetoproperty,readthefollowingsafety
informationcarefullybeforeusingtheproduct.
EnvironmentalRequirements
Placetheproductonastable,levelandnon‐slipsurface.
Donotplacetheproductclosetoheatsources,indirectsunlightornexttoanyhousehold
appliancewithstrongmagneticfieldorelectromagneticfield,suchasamicrowaveoven
orarefrigerator.
Donotallowtheproducttocomeintocontactwithwater,dustandchemicals.
Protecttheproductfromaggressiveliquidsandvapors.
Donotplacetheproductonornearanyinflammableorfire‐vulnerableobject,suchas
rubber‐madematerials.
Donotinstalltheproductinroomswithhighhumidity,forexample,inbathrooms,
laundryroomsandwetbasements.
SafetyNotesDuringOperation
UseonlysparepartsandaccessoriessuppliedorauthorizedbyYealink.Theoperationof
non‐authorizedpartscannotbeguaranteed.
Donotplaceheavyobjectsontopofthehandsetorthebasestationincaseofdamage
anddeformationcausedbytheheavyload.
Donotopenthehandsetorthebasestationbyyourselfforrepairpurpose,whichcould
exposeyoutohighvotages.Haveallrepairscarriedoutbyauthorizedservicepersonel.
Donotletachildoperatetheproductwithoutguidance.
Keepthesmallaccessoriescontainedinyourproductoutofreachofsmallchildrenin
caseofaccidentalswallowing.
Beforepluggingorunplugginganycable,makesurethatyourhandsarecompletelydry.
Donotholdthehandsetuptoyourearwhenspeakphoneisonorwhentheringeris
ringingasthevolumncanbeveryloud,whichmaybeharmfultoyourhearing.
Duringathunderstorm,stopusingtheproductanddisconnectitfromthepowersupply
toavoidlightningstrike.
Iftheproductisleftunusedforaratherlongtime,disconnectthebasestationfromthe
powersupplyandunplugthepoweradapter.
Whenthereissmokeemittedfromtheproduct,orsomeabnormalnoiseorsmell,
disconnecttheproductfromthepowersupply,andunplugthepoweradapter
immediately.
Removetheelectricalcordfromanoutletbypullinggentlyonthepoweradapter,notby
pullingthecord.

RegulatoryNotices
61
BatteryPrecautions
Donotimmersethebatteryintowater,whichcouldshort‐circuitanddamagethebattery.
Donotexposethebatterytoanopenflameorleavethebatterywhereitcouldbe
subjectedtoextremlyhightemperatues,whichcouldcausethebatterytoexplode.
Dopowerthehandsetoffbeforeremovingthebattery.
Donottrytousethebetteryforthepowersupplyofanydeviceotherthanthishandset.
Donotopenormutilatethebattery,releasedelectrolyteiscorrosiveandmaycause
damagetotheyoureyesorskin.
Useonlytherechargeablebatterypackdeliveredwiththehandsetorthoserechargeable
batterypacksexpresslyrecommendedbyYealink.
Defectiveorexhaustedbatteriesshouldneverbedisposedofasmunicipalwaste.Return
oldbatteriestothebatterysupplier,alicensedbatterydealeroradesignatedcollection
facility.
NoticesofCleaning
Beforecleaningthebasestation,stopusingitanddisconnectitfromthepowersupply.
Removethebatterybeforecleaningthehandsettoreduceriskofelectricshock.
Onlycleanyourproductwithapieceofslightlymoistandanti‐staticcloth.
Keepthepowerplugcleananddry.Usingadirtyorwetpowerplugmayleadtoelectric
shockorotherperils.

UserGuideW52PIPDECTPhone
62
Index
A
AboutThisGuidevi
AccountRegistration15
AddingContacts27
AdjustingRingerVolume16
AdvisoryTones22
AlwaysForward49
AnonymousCall52
AnonymousCallRejection52
AnsweringCalls46
Appendix57
AreaCode36
AssigningaSpeedDialNumber39
AttendedTransfer50
AutoAnswer40
AutoIntercom40
AutoProvision41
ACPower4
B
Backlight22
BaseReset41
BaseStationDescription7
BasicNetworkSettings13
BasicOperations12
BatteryChargingStatus6
BatteryInformation5
BatteryStatus10
Blacklist29
BlindTransfer50
BlockOut37
BusyForward49
C
CallFeatures44
CallForward49
CallHold/Resume48
CallHistoryManagement32
CallMute47
CallTransfer50
CallWaiting48
ConnectingtheW52PBaseStation3
ConferenceCall51
ChargingtheHandset6
CheckingLineStatus16
CheckingSystemStatus14
Copyrightii
ColourSchemes23
D
DateandTime24
DeletingContacts28
DeletingaSpeedDialNumber39
DeclarationofConformityii
DialPlan35
DisplayingInformationonLCDScreen10
DoNotDisturb(DND)49
E
EcoMode+42
EcoMode42
EditingContacts28
EmergencyNumbers37
EndingCalls47
F
FirmwareUpgrading57
G
GettingStarted1
GNUGPLInformationv
H
HandsetDescription8
HandsetName21
HandsetRegistration12
HandsetReset40
I
IconInstructions11
IncomingLines38
InformationforDECTProductiv
ImportantSafetyInformation60
InThisGuidevi
Index62
K
KeypadLight23
L
Language21
LocalDirectory26
LocatingaHandset17
Locking/UnlockingKeypad17
M
MainMenu18
MenuGuidance18
MenuStructure59

Index
63
N
NoAnswerForward49
NotificationLight23
O
Overview7
OutgoingLines38
P
PackagingContents1
PhoneSettings20
PlacingaCallfromLocalDirectory29
PlacingaCallUsingSpeedDialKey39
PlacingCalls44
PlacingExternalCalls45
PlacingInternalCalls45
PoweroverEthernet4
R
RedialingCalls47
RegulatoryNotices60
RemotePhonebook30
RepeaterMode43
ReplaceRule35
ReturningtoIdleScreen19
RingTones21
S
ScreenSaver22
SearchingforContacts28
Semi‐AttendedTransfer50
SettinguptheChargerCradle5
SettinguptheW52P/W52HHandset5
Shortcuts25
SignalStrength10
SpeedDial38
Submenu18
SwitchingSilentModeOn/Off17
T
TableofContentsvii
TurningHandsetOn/Off16
U
UpgradingtheBaseStation57
UpgradingtheHandsetviaUSBPort57
UsingAlphanumerickeys26
V
VoiceMail53
W
Warrantyii
WEEEWarningiv