Yaesu Musen 20461X50 Scanning Receiver User Manual FTDX3000 Operating Manual
Yaesu Musen Co., Ltd. Scanning Receiver FTDX3000 Operating Manual
UserManual.wiki
>
Yaesu Musen
>
20461X50 User Manual
>
Users Manual 1
Contents
1.
Users Manual 1
2.
Users Manual 2
3.
Users Manual 3
4.
Users Manual 4
5.
Users Manual 5
6.
Users Manual 6
7.
Users Manual 7
8.
Users Manual 8
9.
Users Manual 9
10.
Users Manual 10
11.
Users Manual 11
12.
Users Manual 12
13.
Users Manual 13
14.
Users Manual 14
Users Manual 1
Navigation menu
Upload a User Manual
Namespaces
Wiki Guide
HTML
PDF
Info
Views
User Manual
Discussion / Help
Navigation
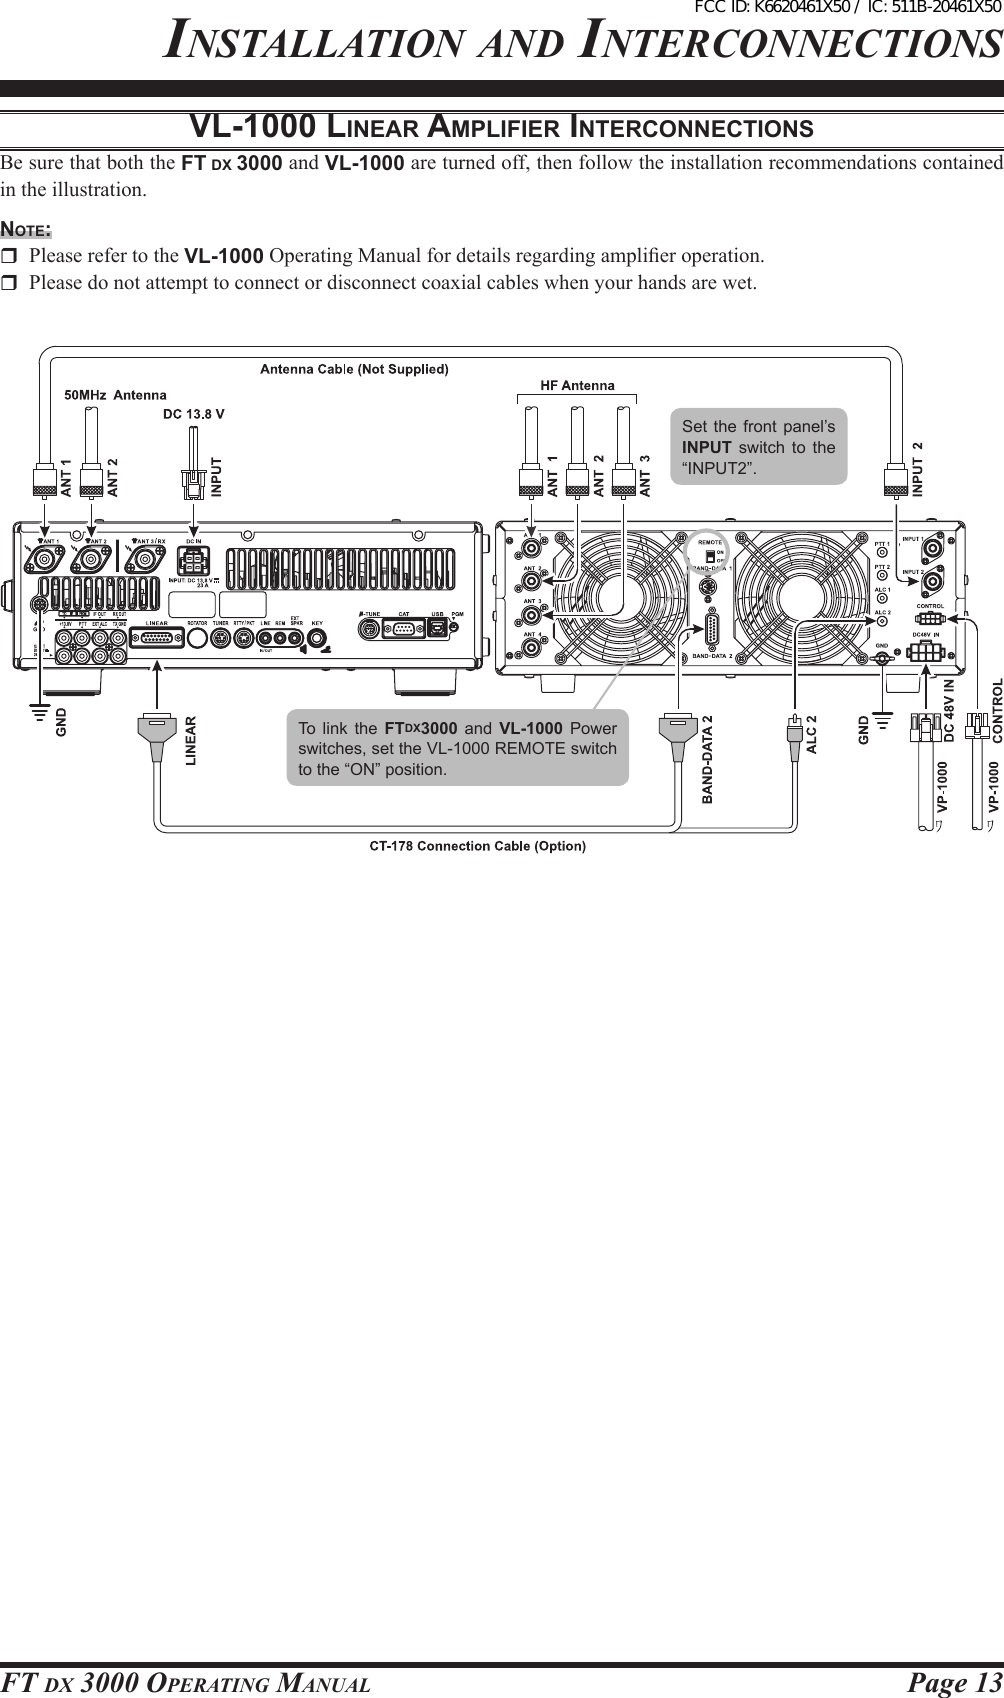
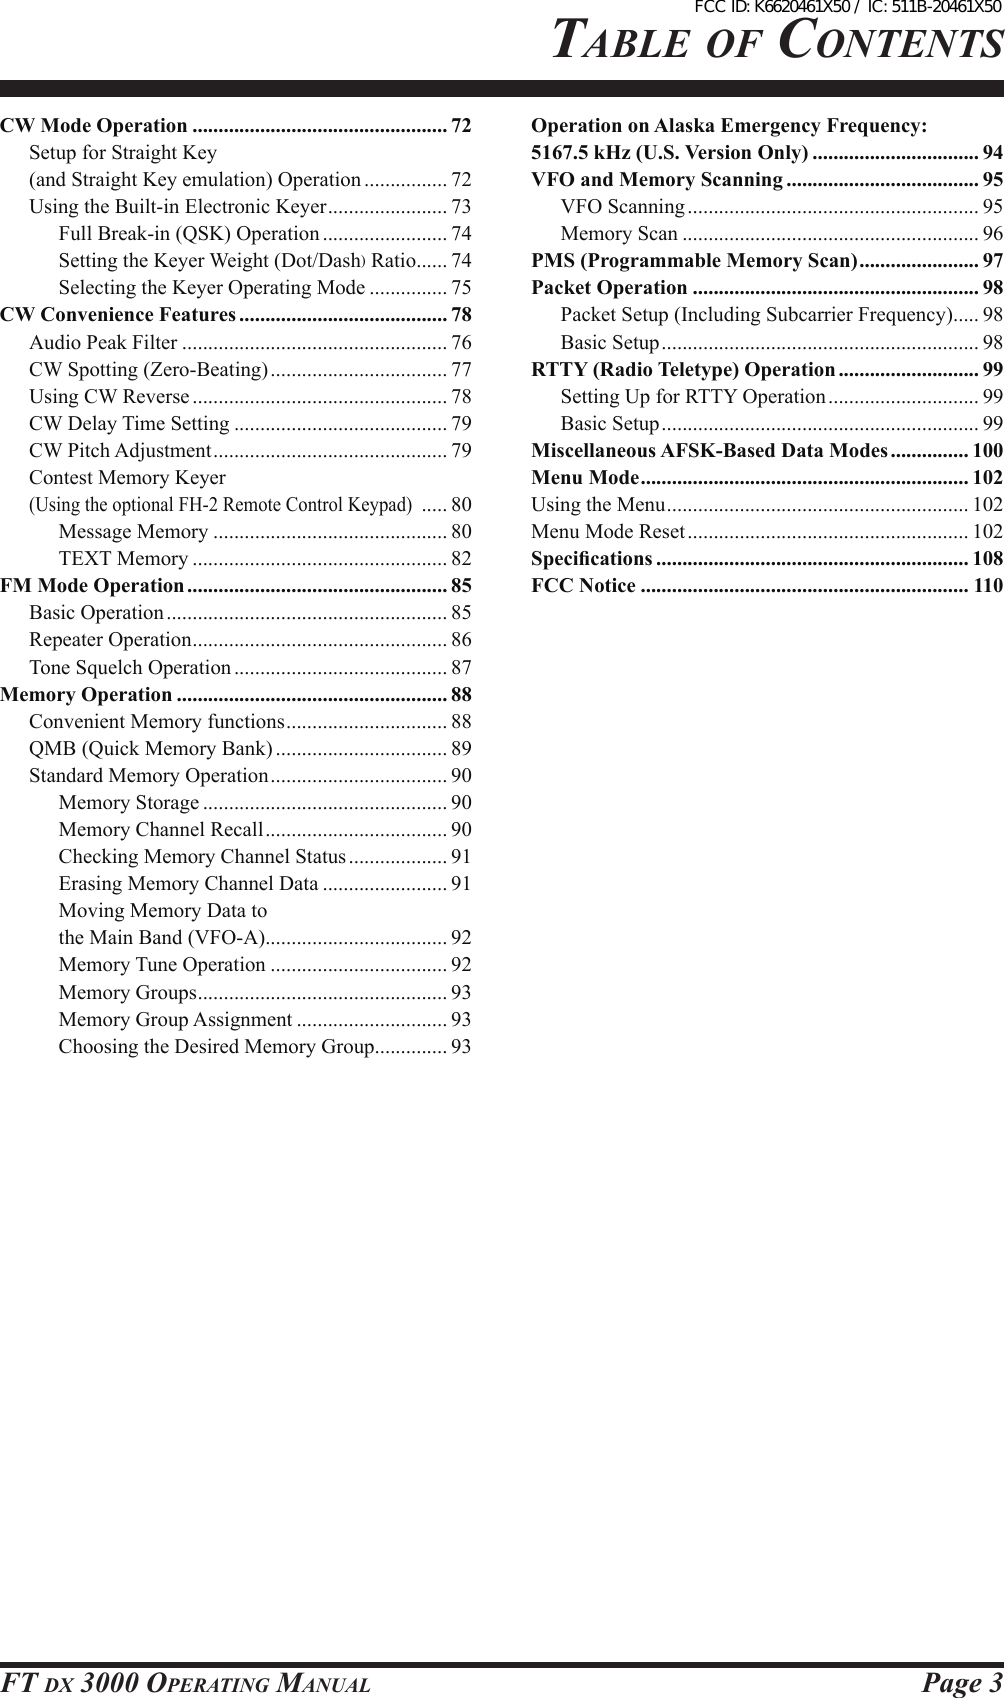
![Page 2 FT DX 3000 OperaTing ManualTable OF cOnTenTsGeneral Description ..................................................... 1Accessories & Options ................................................. 4Supplied Accessories ................................................ 4Available Options ..................................................... 5Before You Begin .......................................................... 6Extending the Front Feet .......................................... 6Adjusting the Main Tuning Dial Torque .................. 6Resetting the Microprocessor ................................... 7Resetting Memories (Only) ................................ 7Menu Resetting ................................................... 7Full Reset ............................................................ 7Installation and Interconnections ............................... 8Antenna Considerations ........................................... 8About Coaxial Cable ................................................ 8Grounding ................................................................. 9Connection of Antenna and Power Cables ............. 10Connection of Microphone and Headphone ........... 11Key, Keyer, and Computer-Driven Keying Interconnections ..................................................... 12VL-1000 Linear Amplier Interconnections .......... 13Interfacing to Other Linear Ampliers ................... 14Plug/Connector Pinout Diagrams ............................. 15Front Panel Controls & Switches ............................. 16Display Indications..................................................... 26Rear Panel ................................................................... 29Basic Operation: Receiving on Amateur Bands ...... 31Operation on 60-Meter (5 MHz) Band(U.S and U.K. version only) ................................... 34CLAR (Clarier) Operation ................................... 35LOCK ..................................................................... 36DIMMER ............................................................... 36Convenience Features ................................................ 37Using VFO-B ......................................................... 37Band Stack Operation ............................................. 39C.S (Custom Switch) .............................................. 39Rotator Control Functions ...................................... 40More Frequency Navigation Techniques ............... 41Keyboard Frequency Entry .................................... 41Using the [CLAR/VFO-B] knob ...................... 41Using the UP/DOWN switches of the supplied MH-31B8 Hand Microphone ........ 41Interference Rejection ............................................... 42Receiver Operation (Front End Block Diagram) ... 42ATT ......................................................................... 43µ-Tune Filter .......................................................... 44IPO (Intercept Point Optimization) ........................ 46R.FLT (Roong Filters) .......................................... 47IF Noise Blanker (NB) Operation .......................... 48CONTOUR Control Operation .............................. 49IF SHIFT Operation ............................................... 50WIDTH (IF DSP Bandwidth) Tuning .................... 51Using IF Shift and Width Together ................... 51NARROW (NAR) One-Touch IF Filter Selection 52IF Notch Filter Operation ....................................... 53Digital Notch Filter (DNF) Operation .................... 54Digital Noise Reduction (DNR) Operation ............ 54RF Gain (SSB/CW/AM Modes) ............................ 55Tools for Comfortable and Effective Reception ...... 56Audio Pitch Control ............................................... 56Mute Feature .......................................................... 56AGC (Automatic Gain Control) ............................. 57SSB/AM Mode Transmission .................................... 58Using the Automatic Antenna Tuner ........................ 60ATU Operation ....................................................... 60About ATU Operation ............................................ 61Enhancing Transmit Signal Quality ......................... 62Parametric Microphone Equalizer .......................... 62Using the Speech Processor ................................... 64Adjusting the SSB Transmitted Bandwidth ........... 65Transmitter Convenience Features .......................... 66Voice Memory ........................................................ 66Voice Memory Operation from the optional FH-2 Remote Control Keypad ...... 66VOX (Automatic TX/RX Switching using Voice Control) ........... 68MONITOR ............................................................. 69Split Operation Using the TX Clarier .................. 70Split-Frequency Operation ..................................... 71Quick Split Operation ....................................... 71FCC ID: K6620461X50 / IC: 511B-20461X50](https://usermanual.wiki/Yaesu-Musen/20461X50.Users-Manual-1/User-Guide-1770286-Page-4.png)

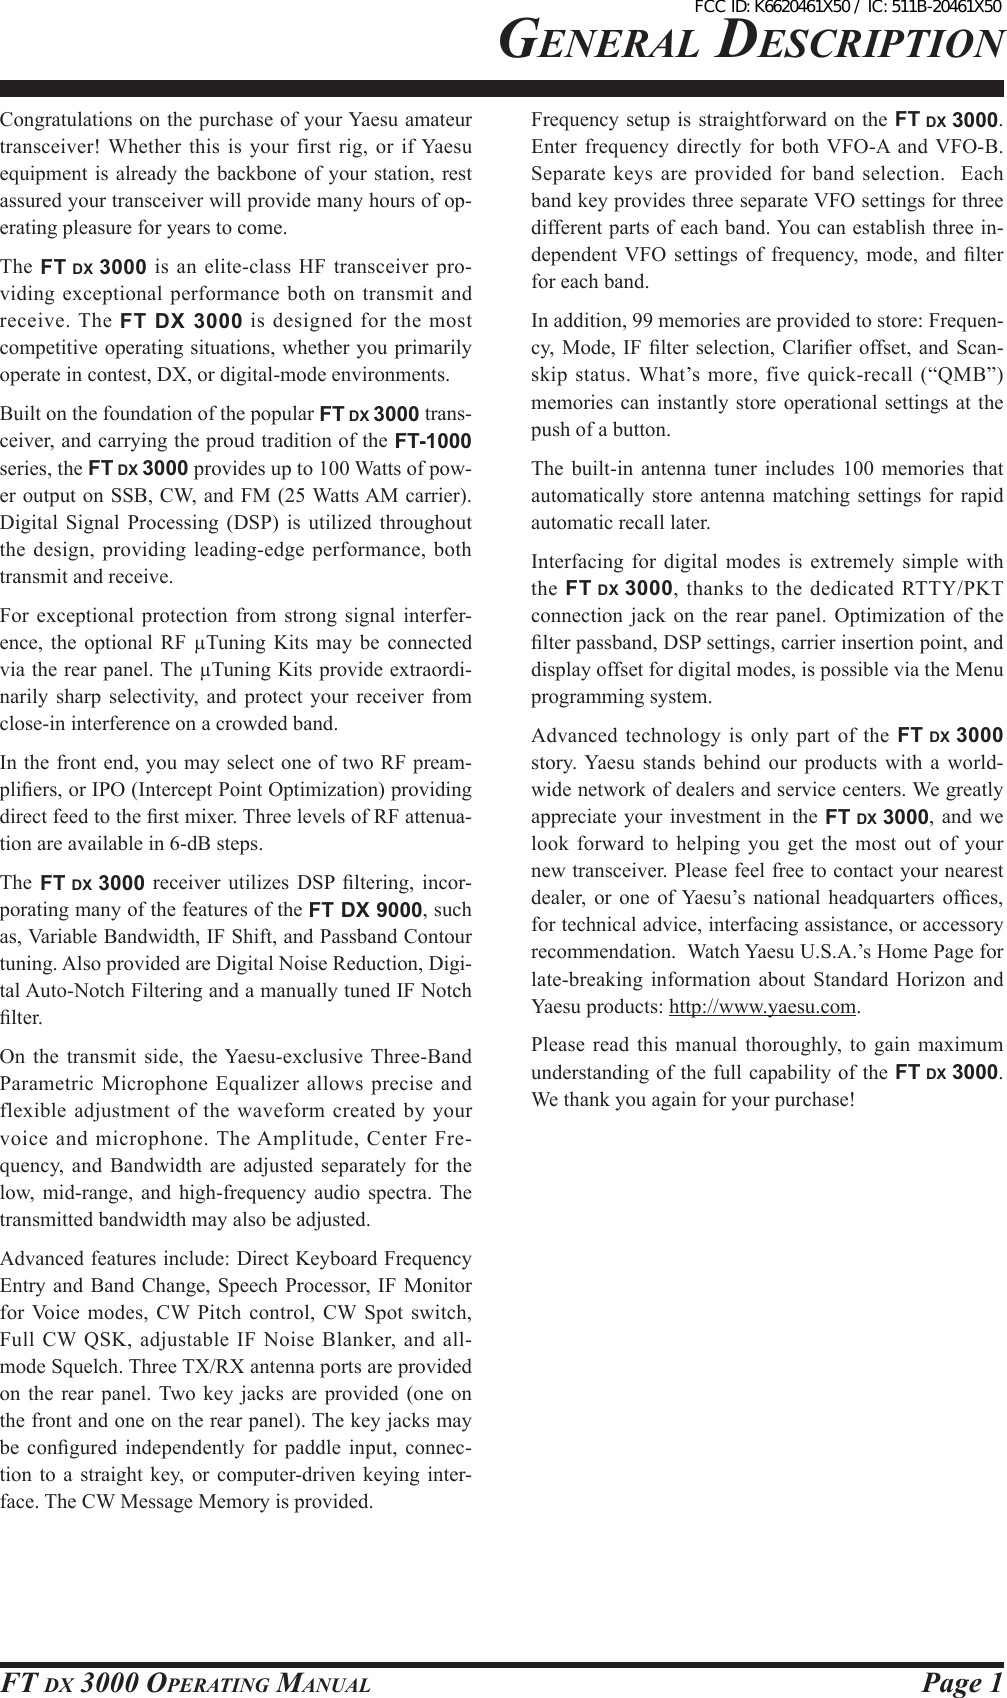
![Page 7FT DX 3000 OperaTing Manual[POWER] button [AM] buttonbeFOre YOu beginreSetting the MicroproceSSorreSetting MeMorieS (only)Use this procedure to reset (clear) the previously stored Memory channels, without affecting any conguration changes you may have made to the Menu settings.1. Press the front panel’s [POWER] switch to turn the transceiver off.2. Press and hold in the [AM] button; while holding it in, press and hold in the front panel’s [POWER] switch to turn the transceiver on. Once the transceiv-er comes on, you may release the buttons.Menu reSettingUse this procedure to restore the Menu settings to their factory defaults, without affecting the memories you have programmed.1. Press the front panel [POWER] switch to turn the transceiver off.2. Press and hold in the [MENU] button; while holding it in, press and hold in the front panel [POWER] switch to turn the transceiver on. Once the transceiv-er comes on, you may release the buttons.Full reSetUse this procedure to restore all Menu and Memory set-tings to their original factory defaults. All Memories will be cleared by this procedure.1. Press the front panel [POWER] switch to turn the transceiver off.2. Press and hold the [FAST] and [LOCK] buttons; while holding them in, press and hold in the front panel [POWER] switch to turn the transceiver on. Once the transceiver comes on, you may release the buttons.iMportAnt note:When the optional µTuning Kit is connected to the FT DX 3000, disconnect all the cables from the µTuning Kit before performing the Full Reset.[LOCK] button[FAST] button[POWER] button [MENU] button[POWER] buttonFCC ID: K6620461X50 / IC: 511B-20461X50](https://usermanual.wiki/Yaesu-Musen/20461X50.Users-Manual-1/User-Guide-1770286-Page-9.png)