Yaesu Musen 30573X30 HANDHELD MARINE TRANSCEIVER User Manual
Yaesu Musen Co., Ltd. HANDHELD MARINE TRANSCEIVER
UserManual.wiki
>
Yaesu Musen
>
30573X30 User Manual
>
User Manual
Contents
1.
User Manual
2.
User Manual 2
3.
User Manual 3
4.
User Manual 4
5.
User Manual 5
User Manual
Navigation menu
Upload a User Manual
Namespaces
Wiki Guide
HTML
PDF
Info
Views
User Manual
Discussion / Help
Navigation

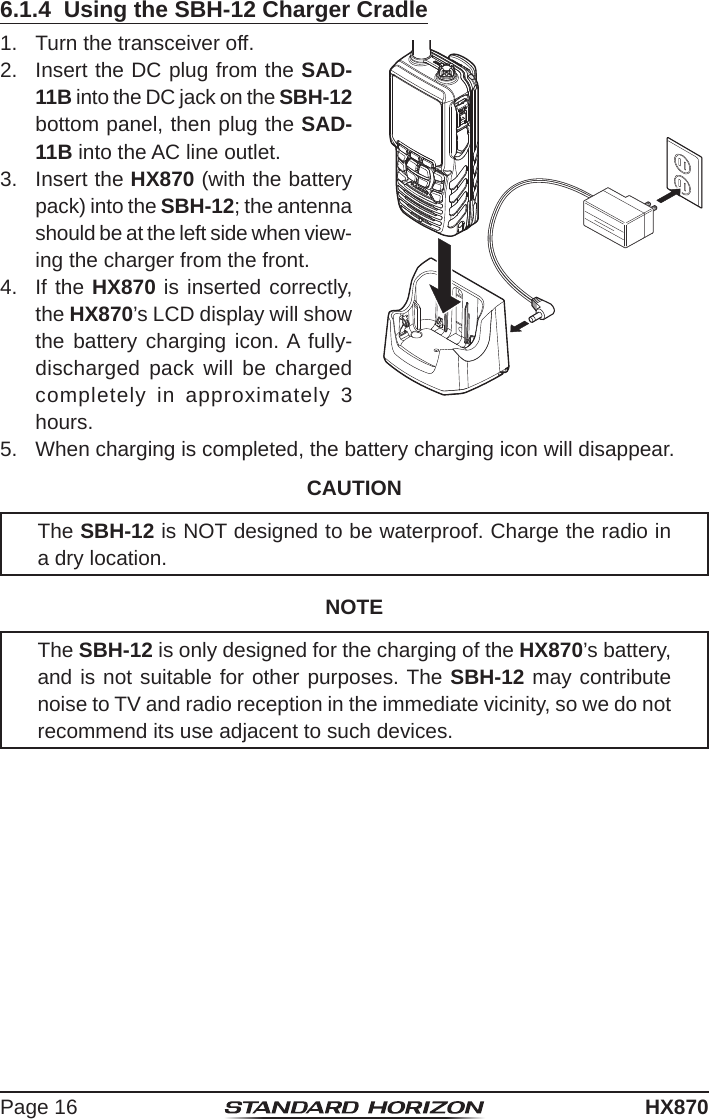
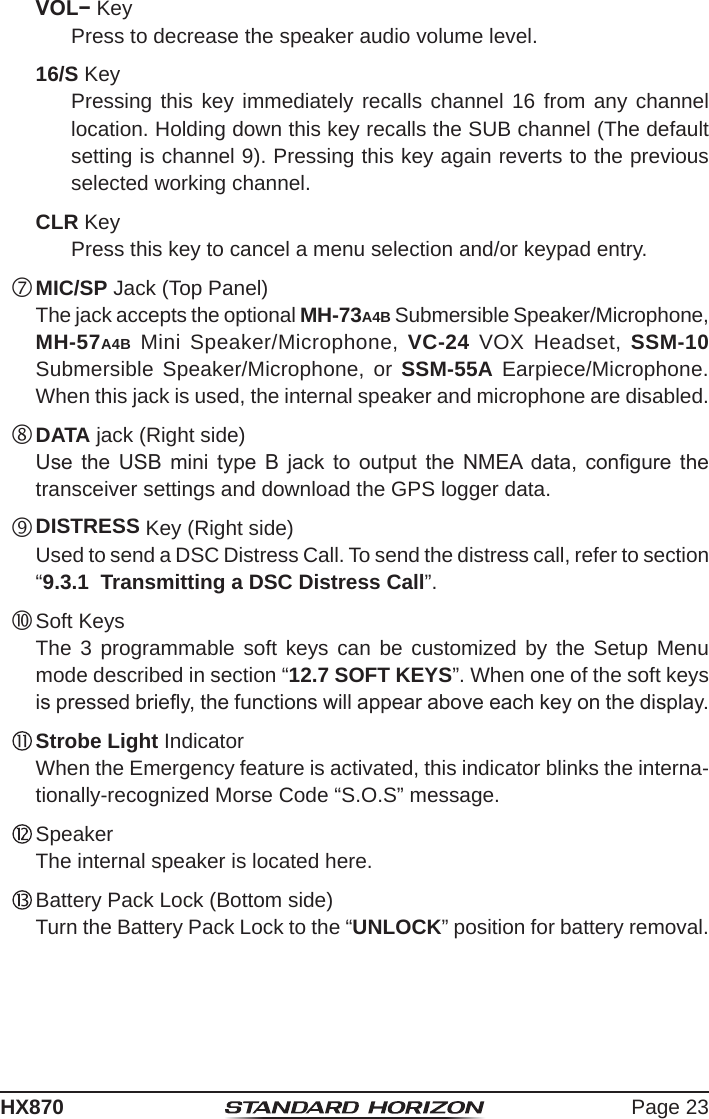
![Page 6HX8701 GENERAL INFORMATIONThe STANDARD HORIZON HX870 Portable Marine transceiver is designed to be used in USA, International, and Canadian Marine bands. The HX870 can be operated from 11 to 16 VDC and has a switchable RF output power of 1 watt, 2 watts or 6 watts.The HX870 is capable of DSC (Digital Selective Calling) ITU Class D operation. Class D operation allows continuous receiving of Digital Selective Calling func-tions on channel 70 even if the radio is receiving a call. The HX870 operates on all currently-allocated marine channels which are switchable for use with USA, International, or Canadian regulations. Emergency channel 16 can be immediately selected from any channel by pressing the red 16/S key. NOAA weather channel can also be accessed immediately by selecting [WX] on the main menu screen.With the internal high-performance GPS receiver, WASS and QZSS satellites can be received.](https://usermanual.wiki/Yaesu-Musen/30573X30.User-Manual/User-Guide-2360588-Page-6.png)
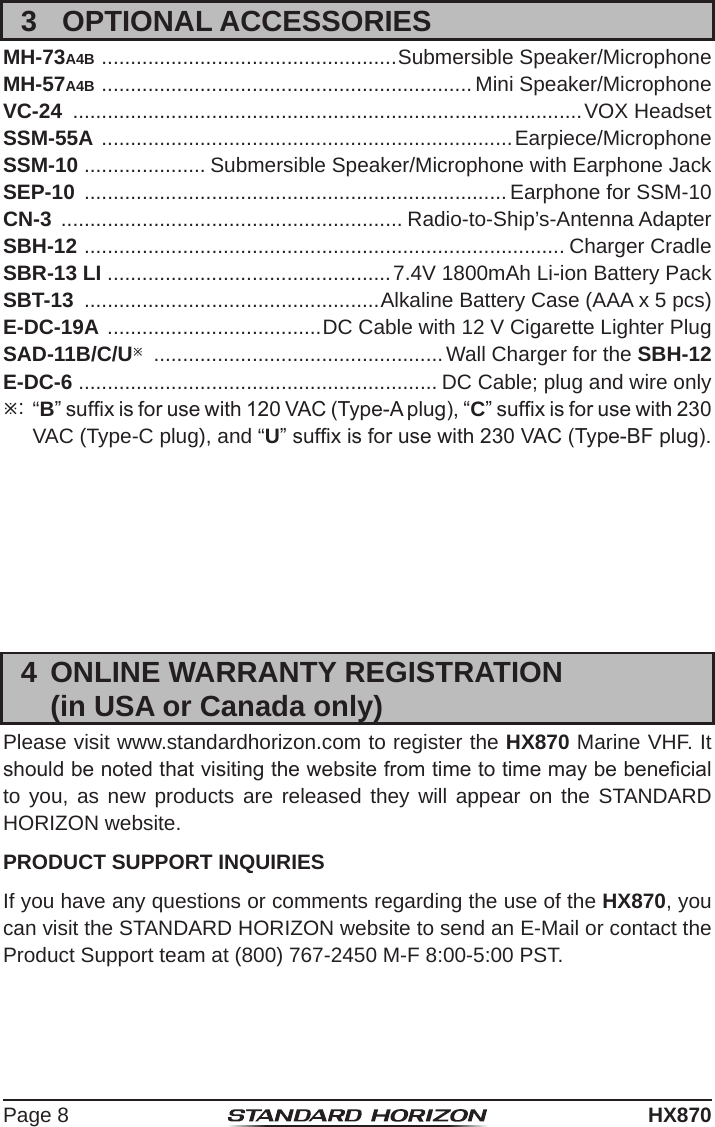

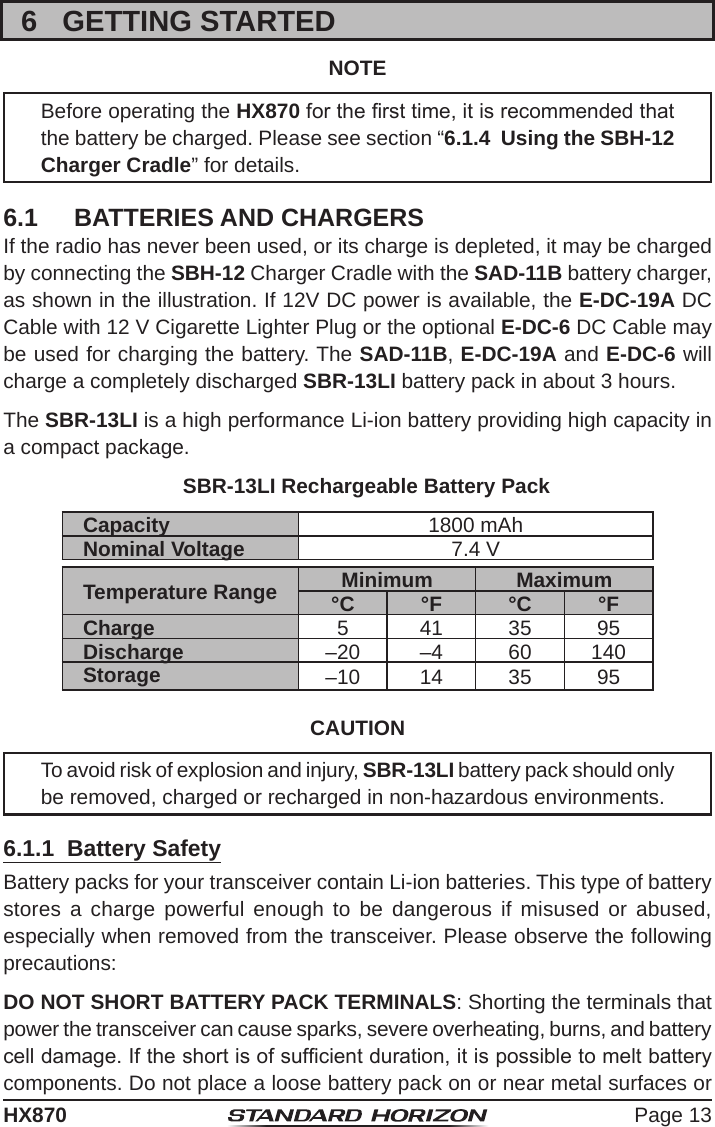
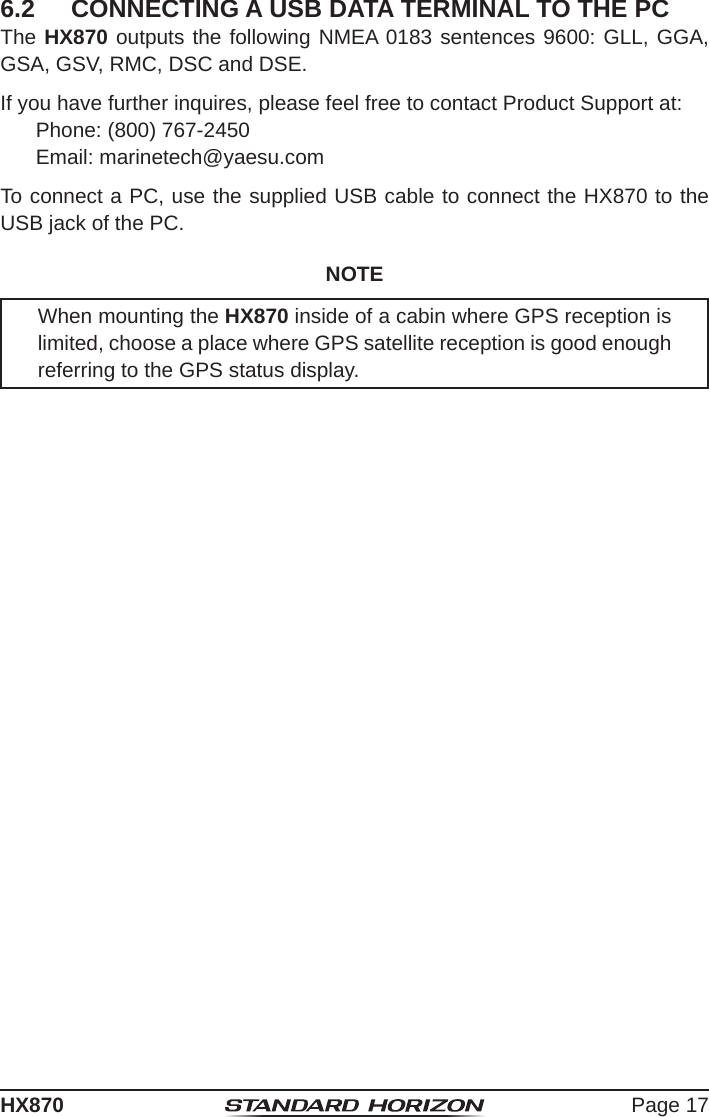
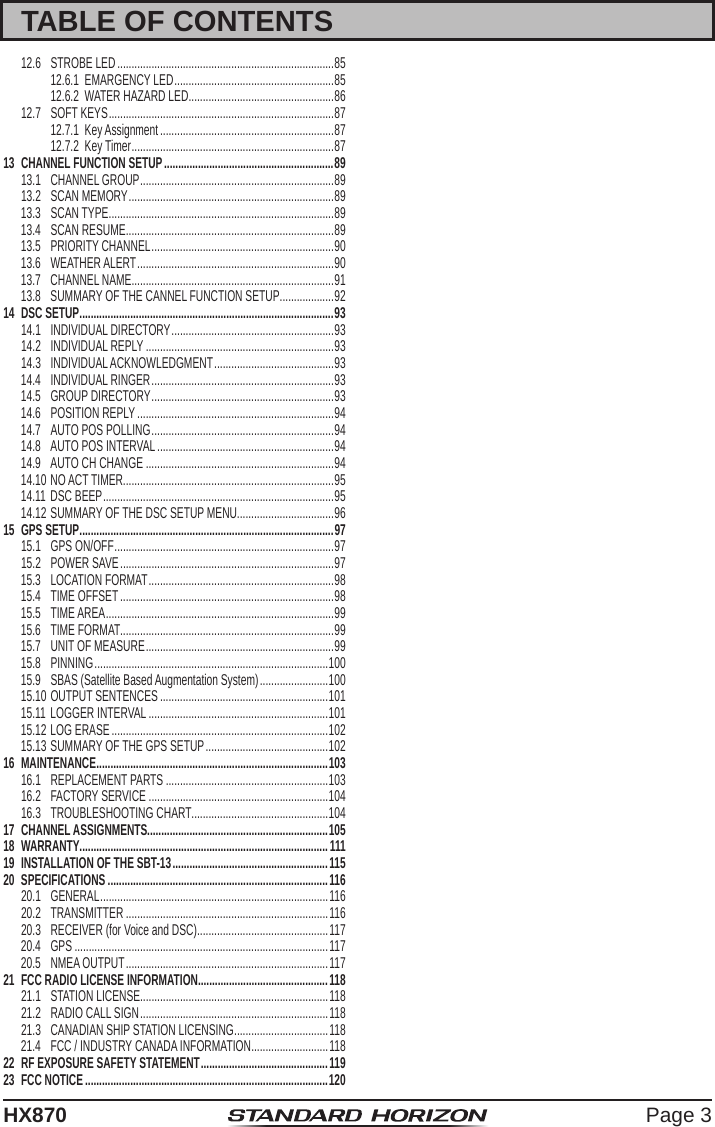
![Page 18HX8706.3 CHECKING GPS SIGNAL (GPS STATUS DISPLAY)The HX870 has a GPS status display which shows the satellites currently being received, along with a graphical (bar-graph) representation of the relative signal strengths from the satellites.When the HX870 receives the GPS signal through the internal GPS, a small satellite icon or “ ” will appear on the top right corner of the display and your current location (latitude/longitude) is shown on the display.(GPS StatuS DiSPlay moDe)HIUSALAT/LON 23°56.890E123°56.890WOct/25 09:56AMDATESTATUSFIX 3D65ABUSY1. Press the MENU key to display “MENU”, then select “GPS” with the CH▲/CH▼/◄/► key.GPS INFOCOMPASSENTERGPSGPS STATUSBACKHIUSALAT/LON 23°56.890E123°56.890WOct/25 09:56AMDATESTATUSSEARCH65ABUSY2. Press the [SELECT] soft key, then select “GPS STATUS” with the CH▲/CH▼ key.3. Press the [ENTER] soft key to display the GPS status currently being received.4. Press the CLR key to return to radio opera-tion.NOTEWhen the HX870 is rst turned on, it may take several minutes to compute a x of your position. This is normal, as the HX870 is down-loading “almanac” information from the GPS satellites.](https://usermanual.wiki/Yaesu-Musen/30573X30.User-Manual/User-Guide-2360588-Page-18.png)
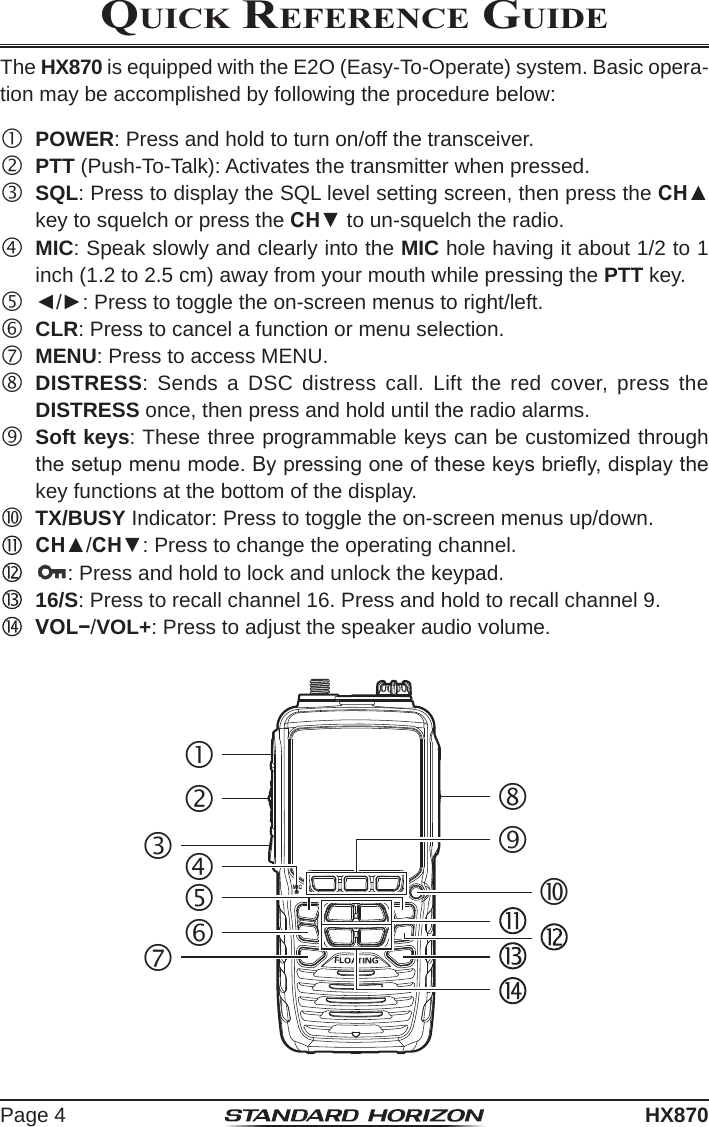
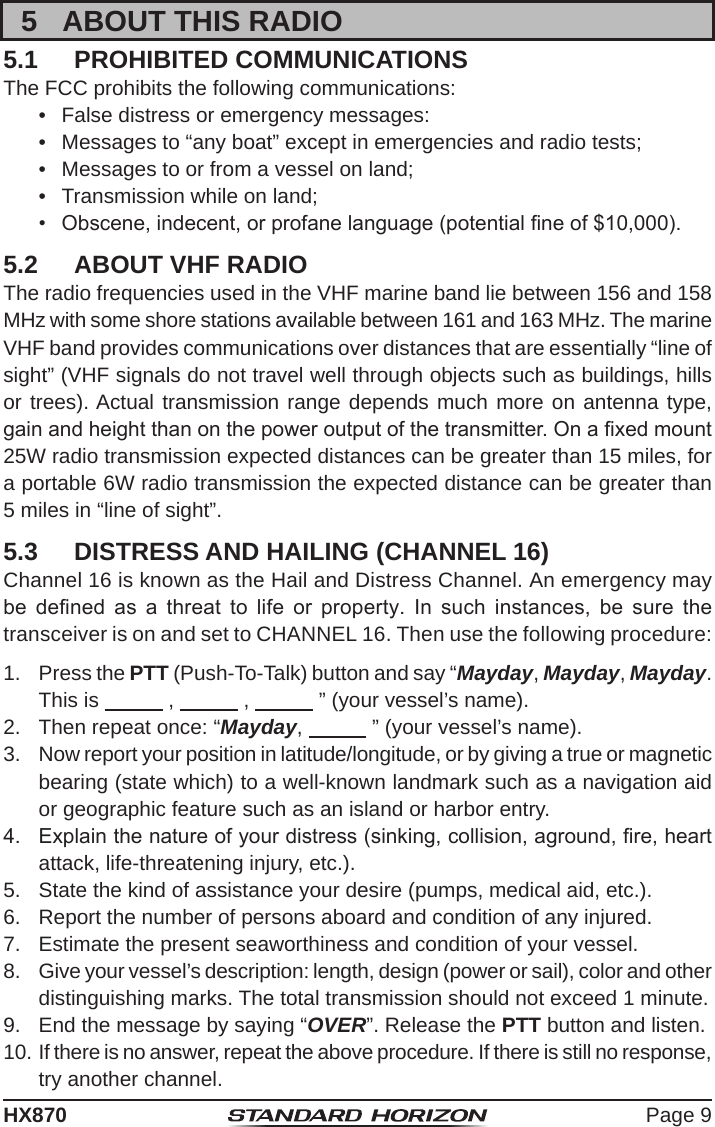
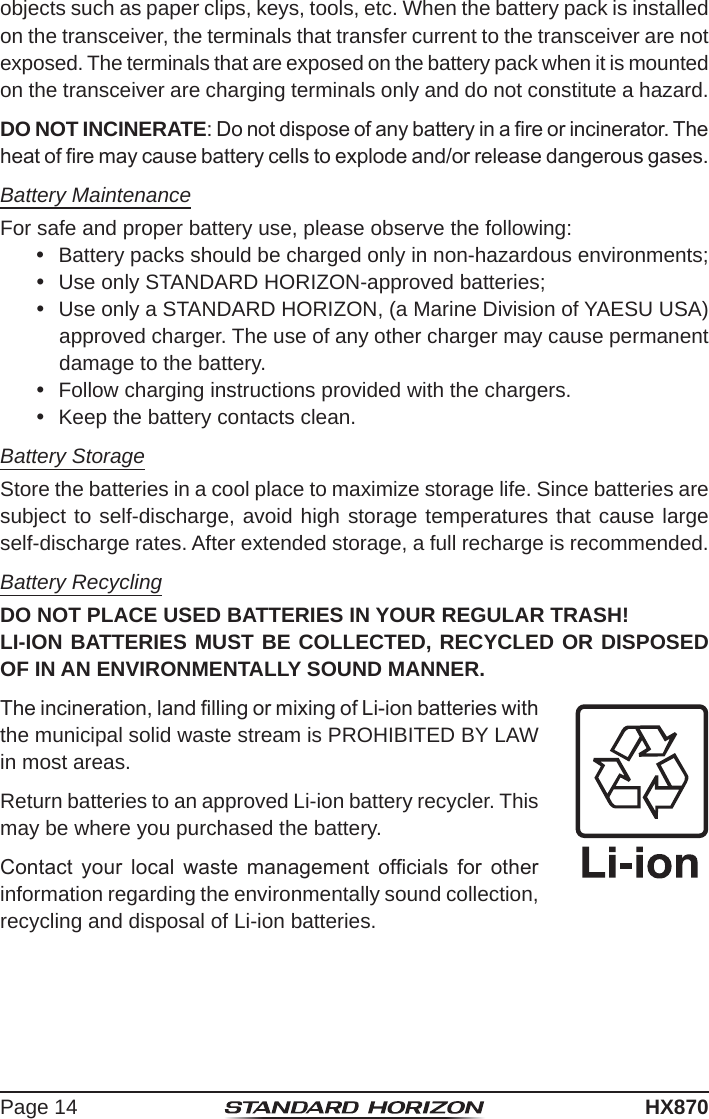
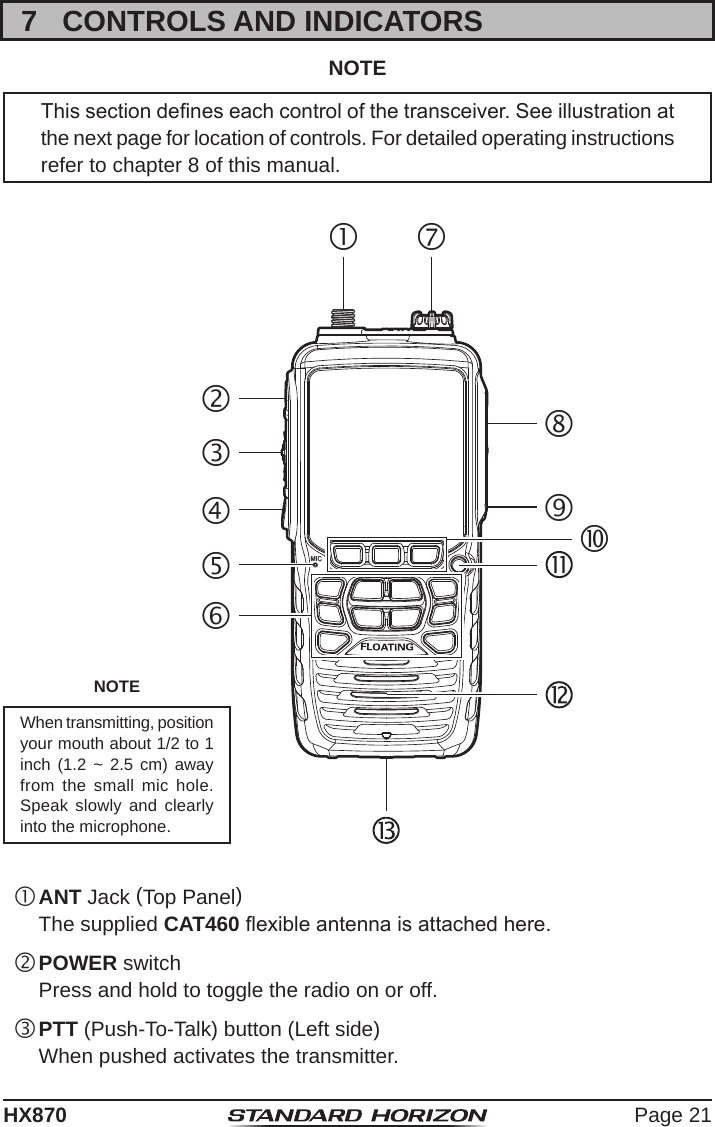
![Page 19HX8706.4 CHANGING THE GPS TIMEFrom the factory the HX870 shows GPS satellite time or UTC (Universal Time Coordinated) time. A time offset is needed to show the local time in your area. The time offset must be changed in order for the radio to display the current time in your area. See the Offset Time Table below.offSet time table1. Press the MENU key to display “MENU”, then select “SETUP” with the CH▲/CH▼/◄/► key.DSC SETUPGM SETUPBACKSETUPWAYPOINT SETUPCH SETUPGPS SETUPATIS SETUPSELECTGPS ON/OFFPOWER SAVEDIRECTIONLOCATION FORMATTIME OFFSETTIME AREATIME FORMATGPS SETUPBACK SELECTON+09:00BACKGPS SETUP+09:30+10:00+10:30+11:00ENTERTIME OFFSET2. Select “GPS SETUP” with the CH▲/CH▼ key.3. Press the [SELECT] soft key, then select “TIME OFFSET” with the CH▲/CH▼ key.4. Press the [SELECT] soft key, then press the CH▲/CH▼ key to select time offset of your location. See illustration above to nd your offset time. If “00:00” is assigned, the time is the same as UTC or GPS satellite time.5. Press the [ENTER] soft key to store the time offset.6. Press the CLR key to return to radio operation.](https://usermanual.wiki/Yaesu-Musen/30573X30.User-Manual/User-Guide-2360588-Page-19.png)
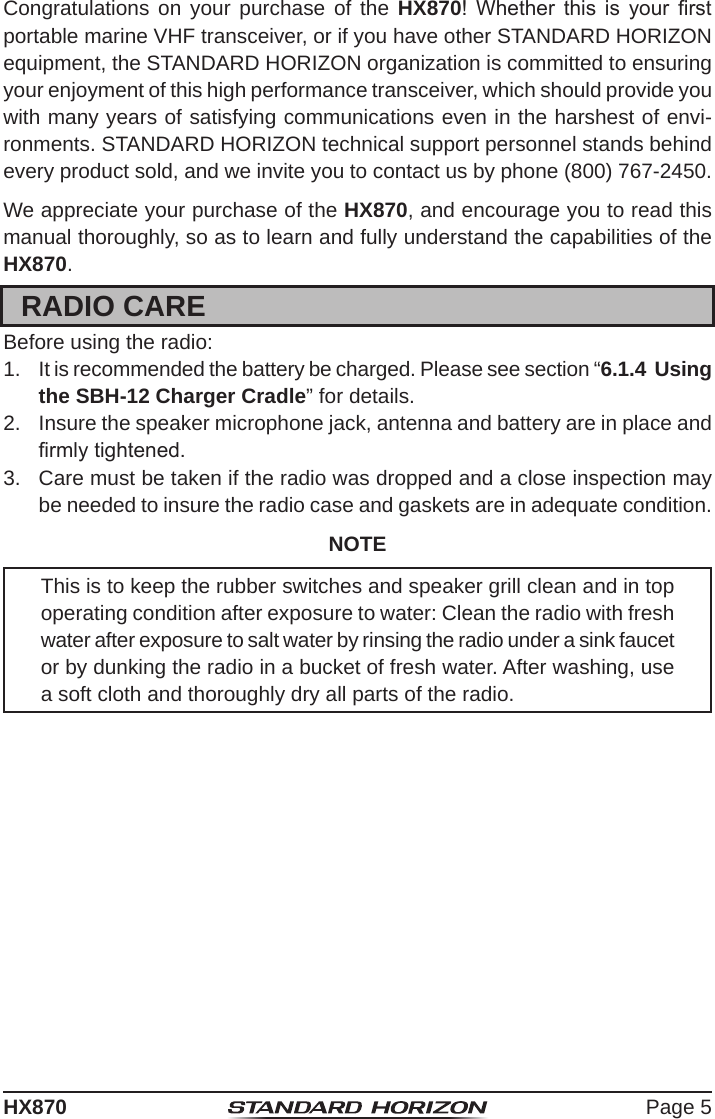
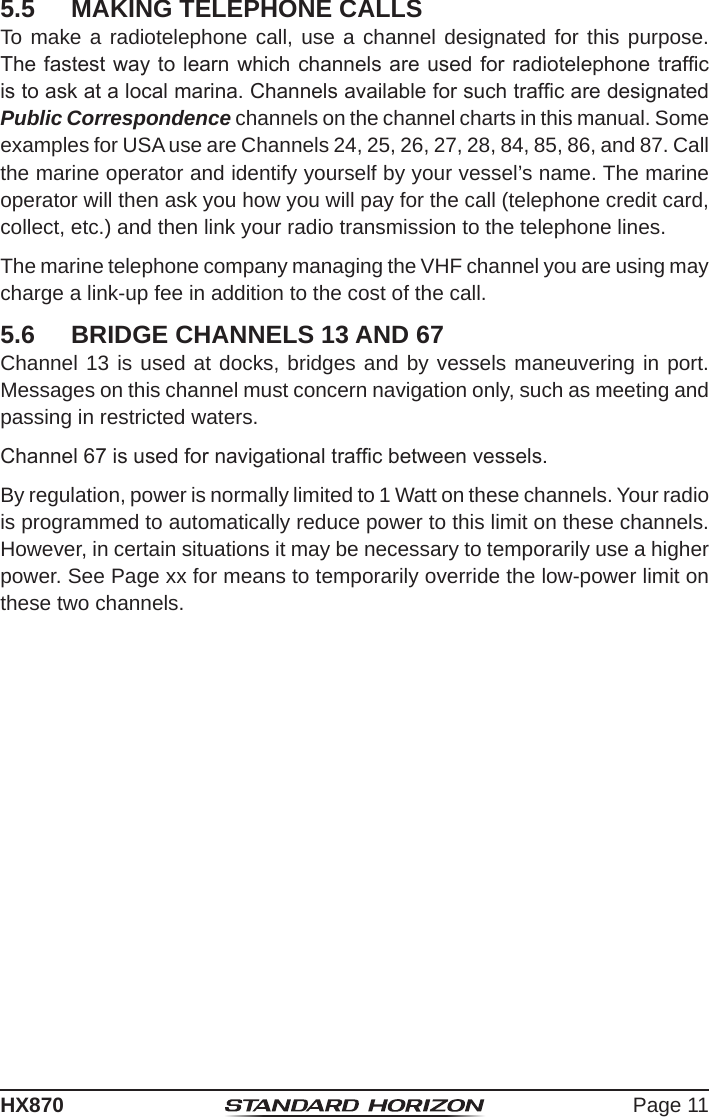
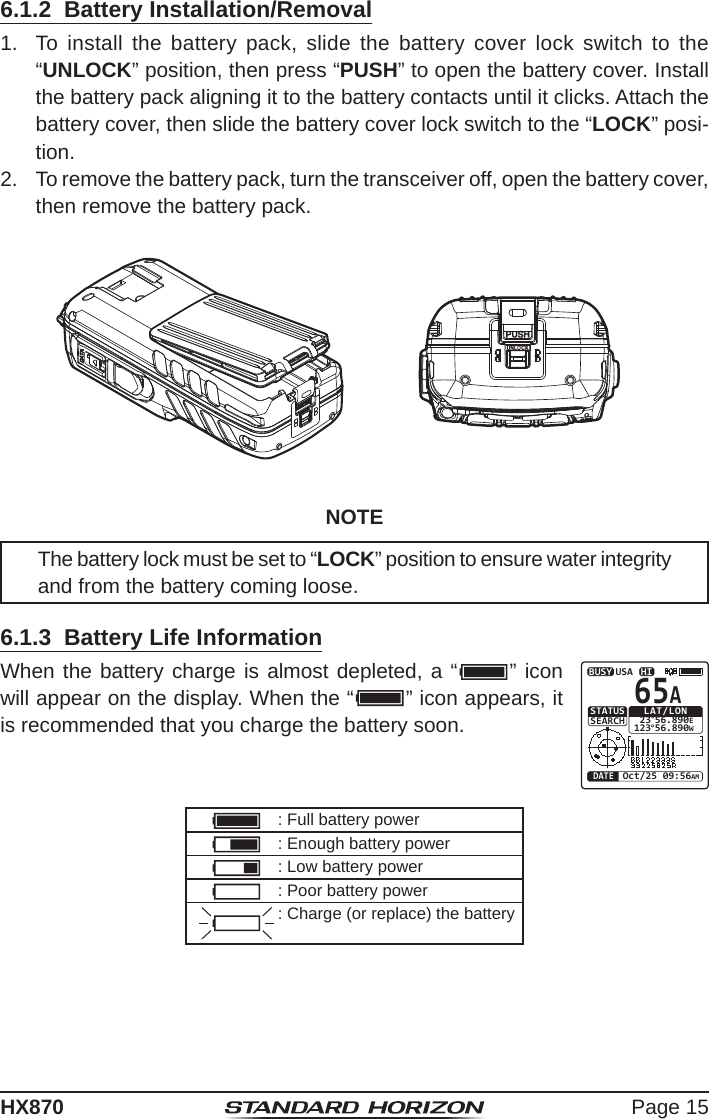
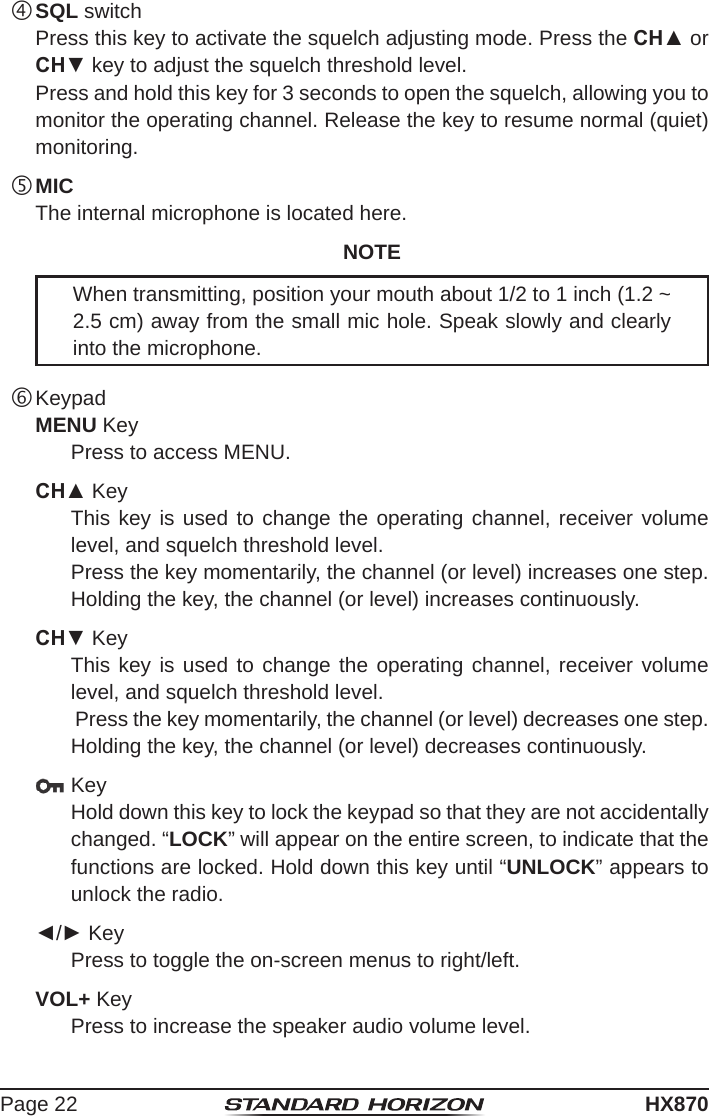
![Page 20HX8706.5 CHANGING THE TIME LOCATIONThis menu selection allows the radio to show UTC time or local time with the offset.1. Press the MENU key to display “MENU”, then select “SETUP” with the CH▲/CH▼/◄/► key.DSC SETUPGM SETUPBACKSETUPWAYPOINT SETUPCH SETUPGPS SETUPATIS SETUPSELECTGPS ON/OFFPOWER SAVEDIRECTIONLOCATION FORMATTIME OFFSETTIME AREATIME FORMATGPS SETUPBACK SELECTONUTCBACKGPS SETUPLOCALENTERTIME AREA2. Select “GPS SETUP” with the CH▲/CH▼ key.3. Press the [SELECT] soft key, then rotate the CH▲/CH▼ key to “TIME AREA”.4. Press the [SELECT] soft key.5. Press the CH▲/CH▼ key to select “UTC” or “LOCAL”.6. Press the [ENTER] soft key to store the selected setting.7. Press the CLR key to return to radio opera-tion.6.6 CHANGING THE TIME FORMATThis menu selection allows the radio to setup to show time in 12-hour or 24-hour format.1. Press the MENU key to display “MENU”, then select “SETUP” with the CH▲/CH▼/◄/► key.DSC SETUPGM SETUPBACKSETUPWAYPOINT SETUPCH SETUPGPS SETUPATIS SETUPSELECTGPS ON/OFFPOWER SAVEDIRECTIONLOCATION FORMATTIME OFFSETTIME AREATIME FORMATGPS SETUPBACK SELECTON24hourBACKGPS SETUP12hourENTERTIME FORMAT2. Select “GPS SETUP” with the CH▲/CH▼ key.3. Press the [SELECT] soft key, then rotate the CH▲/CH▼ key to select “TIME FORMAT”.4. Press the [SELECT] soft key.5. Press the CH▲/CH▼ key to select “12 HOUR” or “24 HOUR”.6. Press the [ENTER] soft key to store the selected setting.7. Press the CLR key to return to radio opera-tion.](https://usermanual.wiki/Yaesu-Musen/30573X30.User-Manual/User-Guide-2360588-Page-20.png)
![Page 25HX8708 BASIC OPERATION8.1 INITIAL SETUP1. Install the battery pack on the transceiver (see section “6.1.2 Battery Installation/Removal”).2. Install the antenna onto the transceiver, hold the bottom end of the antenna, then screw it onto the mating connector on the transceiver until it is snug. Do not over-tighten.NOTEWater resistance of the transceiver is assured only when the battery cover is attached to the transceiver, DATA jack cover is locked and MIC/SP cap is installed in the MIC/SP jack.8.2 RECEPTION1. Press and hold the POWER key until the radio turns on.2. Press the SQL key, then press the CH▼ key. This state is known as “squelch off”.3. Press the VOL−/VOL+ key until noise or audio from the speaker is at a comfortable level.4. Press the SQL key, then press the CH▲ key until the random noise disap-pears. This state is known as the “squelch threshold”.5. Press the CH▲/CH▼ key to select the desired channel. Refer to the chan-nel chart on Page 136 for available channels.6. When a message is received, adjust the volume to the desired listening level. The “[BUSY]” indicator on the display indicates that communications are being received.8.3 TRANSMISSION1. Perform steps 1 through 5 of RECEPTION.2. Before transmitting, monitor the channel to ensure it is clear. THIS IS AN FCC REQUIREMENT!3. Press the PTT (push-to-talk) button. The “[TX]” indicator on the LCD is displayed.4. Speak slowly and clearly into the MIC.5. When the transmission is nished, release the PTT button.NOTEThis is a noise-canceling microphone. Position “MIC” within 1/2” (1.5 cm) from the mouth for optimum performance.](https://usermanual.wiki/Yaesu-Musen/30573X30.User-Manual/User-Guide-2360588-Page-25.png)
![Page 26HX8708.4 TRANSMIT TIME - OUT TIMER (TOT)When the PTT button is held down, transmit time is limited to 5 minutes. This limits unintentional transmissions due to a stuck microphone. About 10 seconds before automatic transmitter shutdown, a warning beep will be heard from the speaker(s). The transceiver will automatically go to receive mode, even if the PTT button is continually held down. Before transmitting again, the PTT button must rst be released and then pressed again.8.5 SIMPLEX/DUPLEX CHANNEL USERefer to the VHF MARINE CHANNEL CHART (Page 136) for instructions on use of simplex and duplex channels.NOTEAll channels are factory-programmed in accordance with FCC (USA), Industry Canada (Canada), and International regulations. Mode of operation cannot be altered from simplex to duplex or vice-versa.8.6 USA, INTERNATIONAL, AND CANADA MODETo change the channel group from USA to International or Canada: 1. Press the MENU key to display “MENU”, then select “SETUP” with the CH▲/CH▼/◄/► key.DSC SETUPGM SETUPBACKSETUPWAYPOINT SETUPCH SETUPGPS SETUPATIS SETUPSELECTCH GROUPWX ALERTSCAN MEMORYSCAN TYPESCAN RESUMEPRIORITY CHSUB CHCH SETUPBACK SELECTONUSABACKCH SETUPINTLCANENTERCH GROUP2. Press the CH▲/CH▼ key to select “CH SETUP”.3. Press the [SELECT] soft key, then press the CH▲/CH▼ key to select “CH GROUP”.4. Press the [SELECT] soft key.5. Press the CH▲/CH▼ key to select desired channel group “USA”, “INTL”, or “CAN”.6. Press the [ENTER] soft key to store the selected setting.7. Press the CLR key to return to radio opera-tion.](https://usermanual.wiki/Yaesu-Musen/30573X30.User-Manual/User-Guide-2360588-Page-26.png)
![Page 27HX8708.7 NOAA WEATHER CHANNELS1. To receive a NOAA weather channel on the main menu screen, press ◄/► key repeatedly until the [WX] soft key is displayed at the bottom of the screen.07162.525MHzVOL118°09.582 33°37.120WsLOC 09.56 AMBUSYWXTIMELONLAT2. Press the [WX] soft key. The “WX” indicator appears on the top part of the screen.3. Press the CH▲/CH▼ key to select a different NOAA weather channel.4. To exit from the NOAA weather channels, press the [CH] soft key. The transceiver returns to the channel it was on prior to a weather channel and the “WX” icon disappears from the display.8.7.1 NOAA Weather AlertIn the event of extreme weather disturbances, such as storms and hurricanes, the NOAA (National Oceanic and Atmospheric Administration) sends a weather alert accompanied by a 1050 Hz tone and subsequent weather report on one of the NOAA weather channels.The HX870 can receive weather alerts when on a weather channel and on the last selected weather channel during scanning modes or while on another channel.When an alert is received on a NOAA weather channel, scanning will stop and the transceiver will emit a loud beep to alert the user of a NOAA broadcast. Press any key to stop the alert. After stopping the beep sound, the weather alert reception conrmation screen will appear. Press [OK] to display a conrmation screen. The conrmation screen will ask you whether to move to the weather channel or return in the marine channel. Press [YES] to remain in the weather channel, and press [NO] to return to the marine channel.To disable the weather alert function, refer to section “13.6 WEATHER ALERT”.07162.525MHzVOL118°09.582 33°37.120WsLOC 09.56 AMBUSYWXTIMELONLAT 1 BUSY VOL163.275MHz WX0 !Warning! Radio received Press any keysWeather Alert! 1BUSYVOL163.275MHzWX0!Warning!Radio received OKWeather Alert! 1BUSY VOL163.275MHzWX0!Warning!Do you want to change the CH? YES NO 1 BUSY VOL163.275MHz WX0 !Warning! Radio received Press any keysWeather Alert! 1BUSYVOL163.275MHzWX0!Warning!Radio received OKWeather Alert! 1BUSY VOL163.275MHzWX0!Warning!Do you want to change the CH? YES NO 1 BUSY VOL163.275MHz WX0 !Warning! Radio received Press any keysWeather Alert! 1BUSYVOL163.275MHzWX0!Warning!Radio received OKWeather Alert! 1BUSY VOL163.275MHzWX0!Warning!Do you want to change the CH? YES NOAP26USCGVOL118°09.582 33°37.120WsLOC 09.56 AMBUSY HIUSATIMELONLATCAMEMP-SETNOTEIf any key is not pressed the alert will sound for 5 minutes and then the weather report will be received.](https://usermanual.wiki/Yaesu-Musen/30573X30.User-Manual/User-Guide-2360588-Page-27.png)
![Page 28HX8708.7.2 NOAA Weather Alert TestingNOAA tests the alert system ever Wednesday between 11AM and 1PM. To test the HX870’s NOAA weather feature, on Wednesday between 11AM and 1PM, setup as in section “8.7.1 NOAA Weather Alert” and conrm the alert is heard.8.8 DUAL WATCH (TO CHANNEL 16)Dual watch is used to scan two channels for communications. One channel is a normal VHF channel and the other is the priority, Channel 16. When a signal is received on the normal channel the radio briey switches between the normal channel and Channel 16 to look for a transmission. If the radio receives communications on Channel 16 the radio stops and listens to Channel 16 until communication ends and then starts dual watch scan again.1. Press the SQL key, then press the CH▲/CH▼ key until the background noise disappears.2. Press the CH▲/CH▼ key to select a channel you wish to watch.3. Press one of the soft keys, then press the [DW] soft key. AP26DISTRESSDW16VOL118°09.582 33°37.120WsLOC 09.56 AMBUSY HIUSATIMELONLATCAMEMP-SET The radio will monitor CH16 and the channel that was selected in step 2. If a transmission is received on the channel selected in step 2, the HX870 will dual watch to CH16.4. To stop dual watch, press one of the soft keys, then press the [DW] soft key again.NOTEThe priority channel may be changed from CH16 to another channel. Refer to section “13.5 PRIORITY CHANNEL”.8.9 SCANNINGThe HX870 will automatically scan channels programmed into the preset channel memory and also the scan channel memory, and the last selected weather channel.When an incoming signal is detected on one of the channels during scan, the radio will pause on that channel, allowing you to listen to the incoming transmis-sion. The radio will automatically start scanning again after the transmission stops.](https://usermanual.wiki/Yaesu-Musen/30573X30.User-Manual/User-Guide-2360588-Page-28.png)
![Page 29HX8708.9.1 Selecting the Scan Type1. Press the MENU key to display “MENU”.DSC SETUPGM SETUPBACKSETUPWAYPOINT SETUPCH SETUPGPS SETUPATIS SETUPSELECTCH GROUPWX ALERTSCAN MEMORYSCAN TYPESCAN RESUMEPRIORITY CHSUB CHCH SETUPBACK SELECTONPRIORITYBACKCH SETUPMEMORYENTERSCAN TYPE2. Press the CH▲/CH▼/◄/► key to select “CH SETUP”.3. Press the [SELECT] soft key, then select “SCAN TYPE” with the CH▲/CH▼ key.4. Press the [SELECT] soft key.5. Press the CH▲/CH▼ key to select “PRI SCAN” or “MEM SCAN”.6. Press the [ENTER] soft key to store the selected setting.7. Press the CLR key to return to radio opera-tion.memoRy Scan (m-Scan)CH12CH09CH01ACH15CH18CH22ACH61ACH68ACH68ACH88A PRioRity Scan (P-Scan)PriorityChannelCH12CH09CH01ACH15CH18CH22ACH61ACH68ACH68ACH88A](https://usermanual.wiki/Yaesu-Musen/30573X30.User-Manual/User-Guide-2360588-Page-29.png)
![Page 30HX8708.9.2 Programming Scan Memory1. Press the MENU key to display “MENU”. DSC SETUPGM SETUPBACKSETUPWAYPOINT SETUPCH SETUPGPS SETUPATIS SETUPSELECTCH GROUPWX ALERTSCAN MEMORYSCAN TYPESCAN RESUMEPRIORITY CHSUB CHCH SETUPBACK SELECTONCH:16BACKCH SETUPCH:17CH:18ACH:19CH:20MEMSCAN MEMORYONONONFINISH2. Press the CH▲/CH▼/◄/► key to select “CH SETUP”.3. Press the [SELECT] soft key, then press the CH▲/CH▼ key to select “SCAN MEMORY”.4. Press the [SELECT] soft key.5. Press the CH▲/CH▼ key to select a desired channel to be scanned, then press the [MEM] soft keys. “ON” icon will appear at the right side of the selected channel.6. Repeat step 5 for all the desired channels to be scanned.7. To DELETE a channel from the list, select the channel then press the [MEM] soft key. “ON” icon of the selected channel will disap-pear.8. When you have completed your selection, press the CLR key to return to radio opera-tion. When “SCAN MEMORY” is assigned to the soft key, every time you press the [MEM] soft key, the memory function switches between on and off. To check the scanned channel on the normal display, while pressing [SCAN], press the CH▲/CH▼ key. 8.9.3 Memory Scanning (M-SCAN)1. Press the SQL key, then press the CH▲/CH▼ key until background noise disappears.2. Press the ◄/► key repeatedly, then press the [SCAN] soft key. “M-SCAN” appears on the display. Scanning will proceed from the lowest to the highest programmed channel number and preset channel (described in the next section) and will stop on a channel when a transmission is received.AP26M-SCANVOL118°09.582 33°37.120WsLOC 09.56 AMBUSY LOUSATIMELONLATCAMEMP-SET The channel number will blink during reception.3. To stop scanning, press the 16/S, [SCAN] or CLR key.](https://usermanual.wiki/Yaesu-Musen/30573X30.User-Manual/User-Guide-2360588-Page-30.png)