Yaesu Musen 30573X30 HANDHELD MARINE TRANSCEIVER User Manual 2
Yaesu Musen Co., Ltd. HANDHELD MARINE TRANSCEIVER 2
UserManual.wiki
>
Yaesu Musen
>
30573X30 User Manual
>
User Manual 2
Contents
1.
User Manual
2.
User Manual 2
3.
User Manual 3
4.
User Manual 4
5.
User Manual 5
User Manual 2
Navigation menu
Upload a User Manual
Namespaces
Wiki Guide
HTML
PDF
Info
Views
User Manual
Discussion / Help
Navigation
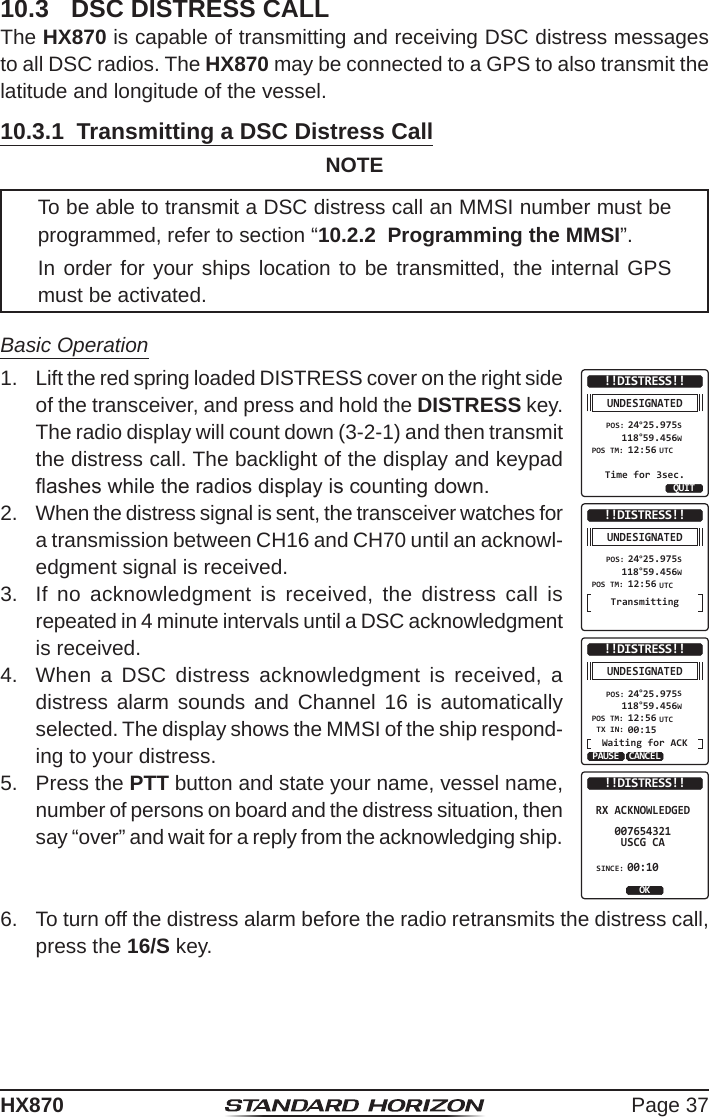
![Page 31HX8708.9.4 Priority Scanning (P-SCAN)In the default setting, Channel 16 is set as the priority channel. You may change the priority channel to the desired channel from Channel 16 on the main menu screen, refer to section “13.5 PRIORITY CHANNEL”.1. Press the SQL key, then press the CH▲/CH▼ key until background noise disappears.2. Press the ◄/► key repeatedly, then press the [SCAN] soft key. “P-SCAN” appears on the display. Scanning will proceed between the memorized channels and preset channel (described in next section) and the priority channel. The priority channel will be scanned after each programmed channel.AP26P-SCANVOL118°09.582 33°37.120WsLOC 09.56 AMBUSY LOUSATIMELONLATCAMEMP-SET3. To stop scanning, press the 16/S, [SCAN] or CLR key.8.10 PRESET CHANNELS: INSTANT ACCESS10 preset channels can be programmed for instant access. Press the ◄/► key repeatedly, then press the [PRESET] soft key. Pressing the [PRESET] key activates the user assigned channel bank. If the [PRESET] soft key is pressed and no channels have been assigned, an alert beep will be emitted from the speaker.Before beginning the Instant Access operation, assign the “PRESET” command into one of the programmable keys, refer to section “12.7 SOFT KEYS”.8.10.1 Programming1. Press the CH▲/CH▼ key to select the chan-nel to be programmed.AP26USCGVOL118°09.582 33°37.120WsLOC 09.56 AMBUSY LOUSATIMELONLATCAMEMP-SETAP26USCGVOL118°09.582 33°37.120WsLOC 09.56 AMBUSY LOUSATIMELONLATCAMEMP-SETAP26USCGVOL118°09.582 33°37.120WsLOC 09.56 AMBUSY LOUSATIMELONLATCAMEMP-SET2. Press the ◄/► key repeatedly to indicate the function on the display, then press and hold the [PRESET] soft key until the “P-SET” icon and channel number are blinking.3. Press the [ADD] soft key to program the channel into the preset channel. “P-SET” icon will blink.4. Repeat steps 1 through 4 to program the desired channels into the preset channels. Up to 10 channels can be registered. If you attempt to register the 11th channel, error beep will sound.](https://usermanual.wiki/Yaesu-Musen/30573X30.User-Manual-2/User-Guide-2360589-Page-1.png)
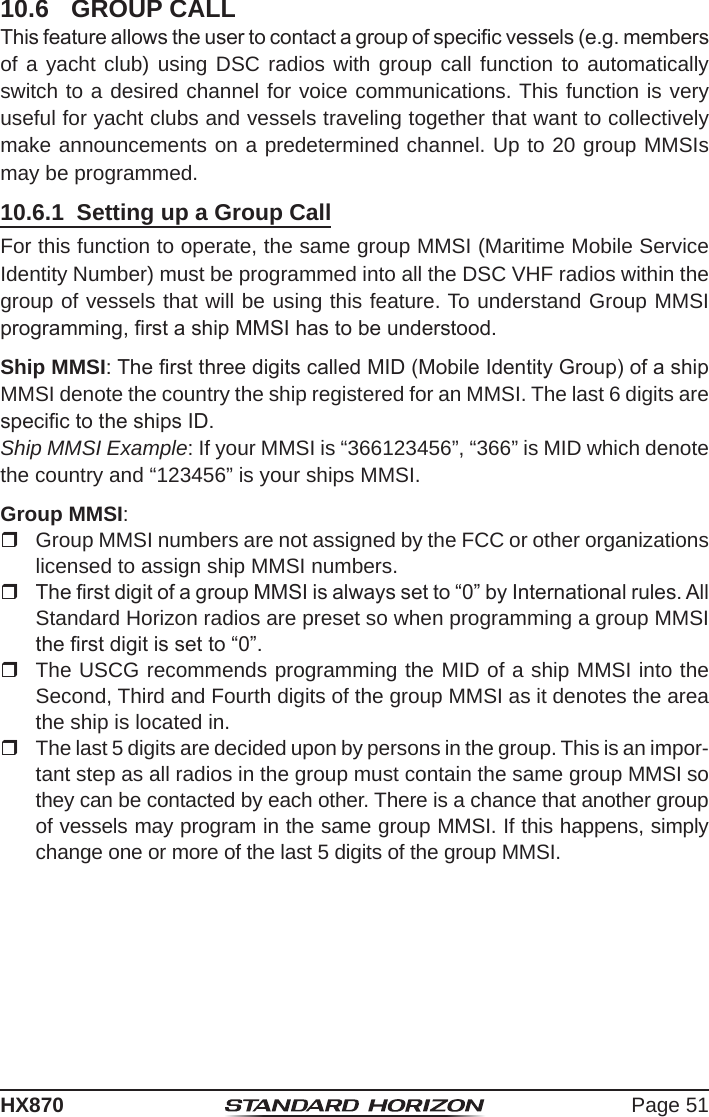
![Page 32HX8708.10.2 Operation1. Press the ◄/► key repeatedly, then press the [PRESET] soft key to recall the preset channel. The “P SET” icon will appear on the display.2. Press the CH▲/CH▼ key to select the desired preset channel.3. Press one of soft keys, then press the [PRESET] soft key to return to the last selected channel. The “P SET” icon will disappear from the display.8.10.3 Deletion1. Press the ◄/► key repeatedly, then press the [PRESET] soft key to recall the preset channel.2. Press the CH▲/CH▼ key to select the preset channel to be deleted.3. Press one of soft keys, then press and hold the [PRESET] soft key until the “P-SET” icon and channel number are blinking.4. Press the [DELETE] soft key to delete the channel from the preset channel.5. Repeat steps 2 through 4 to delete the desired channels from preset chan-nels.6. To exit from deleting the preset channels, press the [QUIT] soft key.](https://usermanual.wiki/Yaesu-Musen/30573X30.User-Manual-2/User-Guide-2360589-Page-2.png)
![Page 33HX8708.10.2 Operation1. Press the ◄/► key repeatedly, then press the [PRESET] soft key to recall the preset channel. The “P SET” icon will appear on the display.2. Press the CH▲/CH▼ key to select the desired preset channel.3. Press one of soft keys, then press the [PRESET] soft key to return to the last selected channel. The “P SET” icon will disappear from the display.8.10.3 Deletion1. Press the ◄/► key repeatedly, then press the [PRESET] soft key to recall the preset channel.2. Press the CH▲/CH▼ key to select the preset channel to be deleted.3. Press one of soft keys, then press and hold the [PRESET] soft key until the “P-SET” icon and channel number are blinking.4. Press the [DELETE] soft key to delete the channel from the preset channel.5. Repeat steps 2 through 4 to delete the desired channels from preset chan-nels.6. To exit from deleting the preset channels, press the [QUIT] soft key.9 GPS Operation9.1 GPS Logger OperationThe HX870 includes a logger for position information that allows you to record your location at a regular interval.1. Press the [LOGGER] soft key to switch the function on and off. The recording starts and the display returns to the previous screen with the “@” icon on the top of the display.• You may change the interval time of recording via the SETUP mode. Notes:• The power save operation of the GPS unit is disabled while the logger is activated.• To utilize the records, connect the HX870 to a PC and take the log data from the radio by using the PC Programming Software YCE02 (the YCE02 may be downloaded through the YAESU website).Logger operation alert: When the memory for log data becomes full, three beeps will sound and a warning message will be displayed. Afterwards the logger does not operate until the log data in the memory are erased. When the logger cannot record for some reasons, three beeps will sound and a warning message will be displayed. Afterwards the logger does not operate anymore. An error message will be displayed when the radio cannot erase the log data in the memory during the operation following the alert of memory full (see above) or in the SETUP mode (page xx).9.2 GPS Compass Display1. Press the MENU key to display “MENU”, then select “GPS” with the CH▲/CH▼/◄/► key.2. Press the [SELECT] soft key, then select “COMPASS” with the CH▲/CH▼ key.3. Press the [ENTER] soft key to display the compass display.4. Press the CLR key to return to radio operation.](https://usermanual.wiki/Yaesu-Musen/30573X30.User-Manual-2/User-Guide-2360589-Page-3.png)
![Page 34HX8709.3 GPS Information Display1. Press the MENU key to display “MENU”, then select “GPS” with the CH▲/CH▼/◄/► key.2. Press the [SELECT] soft key, then select “GPS INFO” with the CH▲/CH▼ key.3. Press the [ENTER] soft key to display the information display.4. Press the CLR key to return to radio operation.9.4 Numerical display with GPS status1. Press the MENU key to display “MENU”, then select “GPS” with the CH▲/CH▼/◄/► key.GPS INFOCOMPASSENTERGPSGPS STATUSBACKHIUSALAT/LON 23°56.890E123°56.890WOct/25 09:56AMDATESTATUSSEARCH65ABUSY2. Press the [SELECT] soft key, then select “GPS STATUS” with the CH▲/CH▼ key.3. Press the [ENTER] soft key to display the GPS status currently being received.4. Press the CLR key to return to radio opera-tion.](https://usermanual.wiki/Yaesu-Musen/30573X30.User-Manual-2/User-Guide-2360589-Page-4.png)
![Page 35HX8709.3 GPS Information Display1. Press the MENU key to display “MENU”, then select “GPS” with the CH▲/CH▼/◄/► key.2. Press the [SELECT] soft key, then select “GPS INFO” with the CH▲/CH▼ key.3. Press the [ENTER] soft key to display the information display.4. Press the CLR key to return to radio operation.9.4 Numerical display with GPS status1. Press the MENU key to display “MENU”, then select “GPS” with the CH▲/CH▼/◄/► key.GPS INFOCOMPASSENTERGPSGPS STATUSBACKHIUSALAT/LON 23°56.890E123°56.890WOct/25 09:56AMDATESTATUSSEARCH65ABUSY2. Press the [SELECT] soft key, then select “GPS STATUS” with the CH▲/CH▼ key.3. Press the [ENTER] soft key to display the GPS status currently being received.4. Press the CLR key to return to radio opera-tion.10 DIGITAL SELECTIVE CALLING (DSC)10.1 GENERALWARNINGThis HX870 is designed to generate a digital maritime distress and safety call to facilitate search and rescue. To be effective as a safety device, this equipment must be used only within communication range of a shore-based VHF marine channel 70 distress and safety watch system. The range of signal may vary but under normal conditions should be approximately 5 nautical miles.Digital Selective Calling (DSC) is a semi-automated method of establishing a radio call, it has been designated by the International Maritime Organization (IMO) as an international standard for establishing VHF, MF and HF radio calls. It has also been designated as part of the Global Maritime Distress and Safety System (GMDSS). It is planned that DSC will eventually replace aural watches on distress frequencies and will be used to announce routine and urgent maritime safety information broadcasts.This system allows mariners to instantly send a distress call with GPS position (when connected to the transceiver) to the Coast Guard and other vessels within range of the transmission. DSC will also allow mariners to initiate or receive Distress, Urgency, Safety, Routine, Position Request, and Position Report, Automatic Position Polling, and Group calls to or from another vessel equipped with a DSC transceiver.10.2 MARITIME MOBILE SERVICE IDENTITY (MMSI)10.2.1 What is an MMSI?An MMSI is a nine digit number used on marine transceivers capable of using Digital Selective Calling (DSC). This number is used like a telephone number to selectively call other vessels.THIS NUMBER MUST BE PROGRAMMED INTO THE RADIO TO OPERATE DSC FUNCTIONS.How can I obtain an MMSI assignment?In the USA, visit the following websites to register: http://www.boatus.com/mmsi/ http://seatow.com/boating_safety/mmsi.asp http://www.usps.org/php/mmsi/rules.phpIn Canada, visit http://www.ic.gc.ca/epic/site/smt-gst.nsf/en/sf01032e.html](https://usermanual.wiki/Yaesu-Musen/30573X30.User-Manual-2/User-Guide-2360589-Page-5.png)
![Page 36HX87010.2.2 Programming the MMSIWARNINGThe MMSI can be inputted only once. Therefore please be careful not to input the incorrect MMSI number. If you need to change the MMSI number after it has been entered, the radio will have to be returned to Factory Service. Refer to the section “16.2 FACTORY SERVICE”.1. Press the MENU key to display “MENU”. BACK SELECTFINISHMMSI INPUTMMSI-----------1st:1 5 6 7 8 9 02 4Delete3BACK SELECTFINISHMMSI INPUTMMSI3669000011st:1 5 6 7 8 9 02 4Delete3BACK SELECTFINISHMMSI INPUTMMSI*********1st:3669000012st:1 5 6 7 8 9 02 4Delete3OKMMSI INPUTMMSISTORED MMSI!3669000012. Press the CH▲/CH▼/◄/► key to select “MMSI/POS INFO”.3. Press the [SELECT] soft key. (To cancel, press the [BACK] soft key.)4. Press the CH▲/CH▼/◄/► key to select the rst number of your MMSI, then press the [SELECT] soft key to step to the next number.5. Repeat step 4 to set your MMSI number (9 digits).6. If a mistake was made entering in the MMSI number, press the [BACK] soft key until the wrong number is selected, then press the CH▲/CH▼ key to correct the entry and press the [SELECT] soft key.7. When nished programming the MMSI number, press the [FINISH] soft key. The radio will ask you to input the MMSI number again. Use steps 4 through 6 above.8. After the second number has been input, press the [FINISH] soft key to store the MMSI.9. Press the [OK] soft key to return to radio operation.NOTETo view your MMSI after programming to ensure it is correct, perform steps 1 to 3. Look that the MMSI number shown on the display is correct.](https://usermanual.wiki/Yaesu-Musen/30573X30.User-Manual-2/User-Guide-2360589-Page-6.png)
![Page 38HX870Transmitting a DSC Distress Alert with Nature of DistressThe HX870 is capable of transmitting a DSC distress alert with the following “Nature of Distress” categories: Undesignated, Fire, Flooding, Collision, Grounding, Capsizing, Sinking, Adrift, Abandoning, Piracy, MOB.1. Press the MENU key to display “MENU”, then select “DSC CALL” with the CH▲/CH▼/◄/► key.INDIVIDUALGROUPBACKDSC CALLALL SHIPSPOS REQUESTPOS REPORTDIST ALERT MSGSELECTUNDESIGNATEDBACKDIST ALERT MSGFIRE.EXPLSIONFLOODINGCOLLISIONGROUNDINDSELECTNATURE OFNATURE QUITPOS!!DISTRESS!!UNDESIGNATEDTime for 3sec.POS: 24°25.975S 118°59.456WUTCPOS TM: 12:562. Press the CH▲/CH▼ key to select “DIST ALERT MSG”. 3. Press the [SELECT] soft key. (To cancel, press the [BACK] soft key.) The “DIST ALERT MSG” menu will appear on the display.4. Press the [NATURE] soft key, then press the CH▲/CH▼ key to select the desired nature of distress category. Nature of distress categories: Fire, Flood, Collision, Grounding, Capsizing, Sinking, Adrift, Abandoning, Piracy, and MOB.5. Press the [SELECT] soft key.6. Press and hold the DISTRESS key until a distress alert is transmitted.7. Perform the steps 1 through 6 of the basic operation described in the previ-ous section.Pausing a DSC Distress CallAfter a DSC distress call is transmitted, the DSC distress call is repeated every 4 minutes until the call is canceled by the user or until the radio is turned on and off again. The HX870 has provision to suspend (pause) the retransmitting of the distress call by the procedure below.1. After the distress call is transmitted, the radio will show the top display to the right. Looking at this display you will notice “TX IN: 0:15”, this is the time when the radio will re-transmit the DSC distress call. PAUSE CANCEL!!DISTRESS!!UNDESIGNATEDWaiting for ACKPOS: 24°25.975S 118°59.456WUTCPOS TM: 12:56TX IN: 00:15PAUSE!!DISTRESS!!UNDESIGNATEDWaiting for ACKPOS: 24°25.975N 118°59.456EUTCPOS TM: 12:56TX IN: 00:15PAUSE2. To suspend re-transmitting the DSC call, press the [PAUSE] soft key.3. To resume counting down to transmit the DSC Distress call, press the [RESUME] soft key.](https://usermanual.wiki/Yaesu-Musen/30573X30.User-Manual-2/User-Guide-2360589-Page-8.png)
![Page 39HX870Canceling a DSC Distress CallIf a DSC distress call was sent by error the HX870 allows you to send a message to other vessels to cancel the distress call that was made.Press the [CANCEL] soft key, then press the [OK] soft key.!!DISTRESS!!CANCELDo you want tocancel a DIST?UNDESIGNATEDOK NO OK!!DISTRESS!!UNDESIGNATEDDIST CANCELTransmitted 10.3.2 Receiving a DSC Distress Call1. When a DSC distress call is received, an emergency alarm sounds.STOP ALERMRX DISTRESSYaesu 24°25.975N 118°59.456366901235EUTCPOS TM:POS: 12:56SINCE: 00:05NOT ACKNOELESGEDNATURE:UNDESIGNEACCEPT QUITPAUSERX DISTRESSYaesu 24°25.975N 118°59.456366901235EUTCPOS TM:POS: 12:56SINCE: 00:05NOT ACKNOELESGEDNATURE:UNDESIGNE2. Press any key to stop the alarm.3. Press the CH▼ key several times to show information on the vessel in distress. On the display you will notice 3 soft key selections. These selections are described below: [ACCEPT]: Press this key to accept the DSC distress call and to switch to Channel 16. Note: If a key is not pressed for 15 seconds or longer the radio will auto-matically select Channel 16. (Timer setting time is set in “CH SWITCH TIME” from “DSC SETUP”. The default setting is 15 sec.) [PAUSE]: Press this key to temporarily disable automatic switching to Channel 16. [QUIT]: Press this key to quit the automatic Channel 16 switching and revert to the last selected working channel.4. Press the [TO WPT] soft key to enter the “Waypoint Input” menu, then enter the desired waypoint name (up to 11 charac-ters), described previously (select the letter/number by pressing the CH▲/CH▼ key and move the cursor by pressing the [SELECT]/[BACK] soft keys). The ID is the MMSI from the vessel in distress.BACK QUITTO WPTRX DISTRESS ACKDIST:366901235DIST INFOHorizonDST: 10:00NATURE:UNDESIGNED 24°25.975N 118°59.456EUTCNMPOS TM:POS: 12:56](https://usermanual.wiki/Yaesu-Musen/30573X30.User-Manual-2/User-Guide-2360589-Page-9.png)
![Page 40HX8705. When you nish entering the waypoint name, press the [ENTER] soft key to replace the display to the waypoint screen. The display indicates the distance and direction of the distressed vessel, and also the compass indicates the distressed vessel by dot ().NAME:001WPT---------POSITION:ENTERWAYPOINTSAVESAVE & GOTOBACK 34°25.975S 118°59.456WSOGkph36.0DSTkm35.2BRG TWPT 001WPTHIUSAWPTN-UP 20nmBUSY30016°DW-166. To stop navigating to a waypoint, press one of the soft keys, then press the [STOP] soft key. The radio is switched to the normal mode.NOTEYou must continue monitoring Channel 16 as a coast station may require assistance in the rescue attempt.NOTEWhen there is an unread distress alert, “ ” icon will appear on the display. You may review the unread distress alert from the DSC log, refer to the section “10.13.2 Reviewing a Logged DSC Distress Call”.](https://usermanual.wiki/Yaesu-Musen/30573X30.User-Manual-2/User-Guide-2360589-Page-10.png)
![Page 41HX87010.4 ALL SHIPS CALLThe all ships call function allows contact to be established with DSC equipped vessels without having their MMSI in the individual calling directory. Also, priority for the call can be designated as “Urgency” or “Safety”.URGENCY Call: This type of call is used when a vessel may not truly be in distress, but have a potential problem that may lead to a distress situation. This call is the same as saying “PAN PAN, PAN PAN, PAN PAN” on Channel 16.SAFETY Call: This type of call is used to transmit boating safety information to other vessels. This message usually contains information about an overdue boat, debris in the water, loss of a naviga-tion aid or an important meteorological message. This call is the same as saying “Securite, Securite, Securite”.10.4.1 Transmitting an All Ships Call1. Press the MENU key to display “MENU”, then select “DSC CALL” with the CH▲/CH▼/◄/► key.INDIVIDUALGROUPBACKDSC CALLALL SHIPSPOS REQUESTPOS REPORTDIST ALERT MSGSELECTSAFETYBACKALL SHIPS CALLURGENCYSELECTCATEGORYCH:16BACKALL SHIPS CALLCH:17CH:67CH:69CH:72SELECTINTERSHIP CHALL SHIPS CALLDo you want totransmit a Call?CATEG: URGENCY 16CH:YES NOALL SHIPS CALLCATEG: URGENCYCH: 16SINCE: 00:05QUITTransmittedALL SHIPS CALLTransmittingCATEG: URGENCYCH: 162. Press the CH▲/CH▼ key to select “All SHIPS”.3. Press the [SELECT] soft key. (To cancel, press the [BACK] soft key.)4. Press the CH▲/CH▼ key to select the nature of call (“SAFETY” or “URGENCY”), then press the [SELECT] soft key.5. Press the CH▲/CH▼ key to select the oper-ating channel you want to communicate on, then press the [SELECT] soft key.6. Press the [YES] soft key to transmit the selected type of all ships call.7. After the all ships call is transmitted, the transceiver will switch to the selected chan-nel.8. Listen to the channel to make sure it is not busy, then key the microphone and say “PAN PAN, PAN PAN, PAN PAN” or “Securite, Securite, Securite” depending on the priority of the call.9. Press the [QUIT] soft key to exit the all ships call menu.](https://usermanual.wiki/Yaesu-Musen/30573X30.User-Manual-2/User-Guide-2360589-Page-11.png)
![Page 42HX87010.4.2 Receiving an All Ships Call1. When an all ships call is received, an emer-gency alarm will sound. The display shows the MMSI of the vessel transmitting the all ships call and the radio will change to the requested channel after 15 seconds (the default setting of “CH SWITCH TIMER”).STOP ALARMRX ALL SHIPSYaesu366901234SINCE:CATEG:CH:00:1516SAFETYRX ALL SHIPSYaesu366901234SINCE:CATEG:CH:00:1516SAFETYACCEPT QUITPAUSERX ALL SHIPSYaesu366901234SINCE:CATEG:CH:00:1516SAFETYQUIT2. Press any key to stop the alarm.3. Monitor the requested channel until the all ships voice communication is completed. On the display you will notice 3 soft key selections. These selections are described below: [ACCEPT]: Press this key to accept the DSC all ships call and to switch to requested channel. Note: If a key is not pressed for 15 seconds or longer the radio will automati-cally change to the requested channel (the default setting of “CH SWITCH TIMER”). [PAUSE]: Press this key to temporarily disable automatic switching to the requested channel. Note: In some cases automatically switching to a requested channel might disrupt import ongoing communications. This feature allows commercial users to suspend channel switching and stay on the working channel selected before the all ships call was received. [QUIT]: Press this key to quit the automatic channel switching and revert to the last selected working channel.4. Press the [QUIT] key to return to the channel display.NOTEWhen there is an unread all ships call, “ ” icon will appear on the display. You may review the unread all ships call from the DSC log, refer to the section “10.13.3 Reviewing Other Logged Calls”.](https://usermanual.wiki/Yaesu-Musen/30573X30.User-Manual-2/User-Guide-2360589-Page-12.png)
![Page 43HX87010.5 INDIVIDUAL CALLThis feature allows the HX870 to contact another vessel with a DSC VHF radio and automatically switch the receiving radio to a desired communications chan-nel. This feature is similar to calling a vessel on CH16 and requesting to go to another channel (switching to the channel is private between the two stations). Up to 100 individual contacts may be programmed.10.5.1 Setting up the Individual / Position Call DirectoryThe HX870 has a DSC directory that allows you to store a vessel or person’s name and the MMSI (Maritime Mobile Service Identity Number) number asso-ciated with vessels you wish to transmit individual calls, auto polling, position request, position report, and polling transmissions.To transmit an individual call you must program this directory with information of the persons you wish to call, similar to a cellular phones telephone directory.1. Press the MENU key to display “MENU”. DSC SETUPGM SETUPBACKSETUPWAYPOINT SETUPCH SETUPGPS SETUPATIS SETUPSELECTINDIVIDUAL DIR.INDIVIDUAL REPLYINDIVIDUAL ACK.INDIVIDUAL RINGGROUP DIR.POSITION REPLY AUTO POS INTERVALDSC SETUPBACK SELECTADDBACKDSC SETUPEDITDELETESELECTINDIVIDUAL DIR.NAME:--------------------------MMSI:SELECTINDIVIDUAL DIR.BACKBACK SELECTFINISHINDIVIDUAL DIR.NAMEZY 1 2a&[3 4 5 6 7 8 9 0NM O P Q R ST U V W XBA C D E F G H I J K LDelete---------------S2. Press the CH▲/CH▼/◄/► key to select “SETUP”.3. Select “DSC SETUP” menu with the CH▲/CH▼ key.4. Press the [SELECT] soft key, then select “INDIVIDUAL DIR.” with the CH▲/CH▼ key.5. Press the [SELECT] soft key.6. Select “ADD” with the CH▲/CH▼ key, then press the [SELECT] soft key.7. Press the CH▲/CH▼ key to scroll through the rst letter of the name of the vessel or person you want to reference in the direc-tory.8. Press the [SELECT] soft key to store the rst letter in the name and step to the next letter to the right. 9. Repeat steps 7 and 8 until the name is complete. The name can consist of up to eleven characters, if you do not use all eleven characters, select “→” to move to the next space. This method can also be used to enter a blank space in the name. If a mistake was made entering in the name repeat pressing the [BACK] soft key until the wrong character is selected, then press the CH▲/CH▼ key to correct the entry.](https://usermanual.wiki/Yaesu-Musen/30573X30.User-Manual-2/User-Guide-2360589-Page-13.png)
![Page 44HX87010. After the eleventh letter or space has been entered, press the [FINISH] soft key to advance to the MMSI number entry.11. Press the CH▲/CH▼ key to scroll through numbers, 0-9. To enter the desired number and move one space to the right by pressing the [ENTER] soft key. Repeat this procedure until all nine space of the MMSI number are entered.NAME:STANDARD---------987654321MMSI:ENTERINDIVIDUAL DIR.BACKSaved If a mistake was made entering in the MMSI number repeat pressing the [BACK] soft key until the wrong number is selected, then press the CH▲/CH▼ key to correct the entry. 12. To store the data entered, press the [FINISH] soft key.13. To enter another individual address, repeat steps 6 through 12.14. Press the CLR key to return to radio operation.10.5.2 Setting up the Individual Call ReplyThis menu item sets up the radio to automatically (default setting) or manually respond to a DSC individual call requesting you to switch to a working channel for voice communications. When “Manual” is selected the MMSI of the calling vessel is shown allowing you to see who is calling. This function is similar to caller id on a cellular phone.1. Press the MENU key to display “MENU”.DSC SETUPGM SETUPBACKSETUPWAYPOINT SETUPCH SETUPGPS SETUPATIS SETUPSELECTINDIVIDUAL DIR.INDIVIDUAL REPLYINDIVIDUAL ACK.INDIVIDUAL RINGGROUP DIR.POSITION REPLY DSC BEEPDSC SETUPBACK SELECTAUTOBACKDSC SETUPMANUALENTERINDIVIDUAL REPLY2. Press the CH▲/CH▼/◄/► key to select “SETUP”.3. Select “DSC SETUP” menu with the CH▲/CH▼ key.4. Press the [SELECT] soft key, then select “INDIVIDUAL REPLY” with the CH▲/CH▼ key.5. Press the [SELECT] soft key.6. Press the CH▲/CH▼ key to select “AUTO” or “MANUAL”.7. Press the [SELECT] soft key to store the selected setting.8. Press the CLR key to return to radio opera-tion.](https://usermanual.wiki/Yaesu-Musen/30573X30.User-Manual-2/User-Guide-2360589-Page-14.png)
![Page 45HX87010.5.3 Enabling the Individual Call AcknowledgmentThe radio can select either reply message “Able” (default) or “Unable” when the individual reply setting (described in the previous section) is set to “AUTO-MATIC”.1. Press the MENU key to display “MENU”.DSC SETUPGM SETUPBACKSETUPWAYPOINT SETUPCH SETUPGPS SETUPATIS SETUPSELECTINDIVIDUAL DIR.INDIVIDUAL REPLYINDIVIDUAL ACK.INDIVIDUAL RINGGROUP DIR.POSITION REPLY DSC BEEPDSC SETUPBACK SELECTABLEBACKDSC SETUPUNABLEENTERINDIVIDUAL ACK.2. Press the CH▲/CH▼/◄/► key to select “SETUP”.3. Select “DSC SETUP” menu with the CH▲/CH▼ key.4. Press the [SELECT] soft key, then select “INDIVIDUAL ACK.” with the CH▲/CH▼ key.5. Press the [SELECT] soft key.6. Press the CH▲/CH▼ key to select “ABLE” or “UNABLE”.7. Press the [ENTER] soft key to store the selected setting.8. Press the CLR key to return to radio opera-tion.10.5.4 Transmitting an Individual CallThis feature allows the user to contact another vessel with a DSC radio. This feature is similar to calling a vessel on CH16 and requesting to go to another channel.Individual Call using the Individual/Position Directory1. Press the MENU key to display “MENU”, then select “DSC CALL” with the CH▲/CH▼/◄/► key.INDIVIDUALGROUPBACKDSC CALLALL SHIPSPOS REQUESTPOS REPORTDIST ALERT MSGSELECT2. Press the CH▲/CH▼ key to select “INDI-VIDUAL”. (To cancel, press the [BACK] soft key.)3. Press the [SELECT] soft key. The trans-ceiver will beep, and the last individual calls will appear.](https://usermanual.wiki/Yaesu-Musen/30573X30.User-Manual-2/User-Guide-2360589-Page-15.png)
![Page 46HX8704. Press the CH▲/CH▼ key to the category (“HISTORY” or “MEMORY”), then press the [SELECT] soft key.HISTORYMEMORYNEW IDINDIVIDUAL CALLBACK SELECTKARENBOB366901254Horizon-1StandardHorizon-2USCGINDIVIDUAL CALLBACK SELECTHISTORYINDIVIDUAL CALLDo you want totransmit a Call?CATEG: ROUTINEHorizon-1987654321CH: 26YES NOINDIVIDUAL CALLTransmittingCATEG: ROUTINEHorizon-1987654321CH: 26INDIVIDUAL CALLWaiting for ACKCATEG: ROUTINEHorizon-1987654321CH: 26SINCE: 00:05RESEND QUIT5. Press the CH▲/CH▼ key to select an indi-vidual you want to contact.6. Press the [SELECT] soft key, then press the CH▲/CH▼ key to select the operating channel you want to communicate on, then press the [SELECT] soft key. 7. Press the [YES] soft key to transmit the individual DSC signal.8. When an individual call acknowledgment is received, the established channel is auto-matically changed to the channel which is selected on step 6 above and a ringing tone sounds.9. Press the [QUIT] soft key to listen to the channel to make sure it is not busy, then press the PTT button and talk into the micro-phone to the other vessel.Individual Call by Manually Entering a MMSIYou may enter an MMSI number manually to contact without storing it in the individual directory.1. Press the MENU key to display “MENU”, then select “DSC CALL” with the CH▲/CH▼/◄/► key.INDIVIDUALGROUPBACKDSC CALLALL SHIPSPOS REQUESTPOS REPORTDIST ALERT MSGSELECTHISTORYMEMORYNEW IDINDIVIDUAL CALLBACK SELECTBACK SELECTFINISHINDIVIDUAL CALLMMSI-987654321 5 6 7 8 9 02 4Delete32. Press the CH▲/CH▼ key to select “INDI-VIDUAL”. (To cancel, press the [BACK] soft key.)3. Press the [SELECT] soft key. The trans-ceiver will beep, and the last individual calls will appear.4. Press the [NEW ID] soft key, then press the [SELECT] soft key.5. Press the CH▲/CH▼ key to select the rst number of the MMSI which you want to contact, then press the [SELECT] soft key to step to the next number.](https://usermanual.wiki/Yaesu-Musen/30573X30.User-Manual-2/User-Guide-2360589-Page-16.png)
![Page 47HX8706. Repeat step 5 to set the MMSI number (nine digits). If a mistake was made entering in the MMSI number, repeat pressing the [BACK] key until the wrong number is selected, then press the CH▲/CH▼ key to correct the entry.ROUTINEBACKINDIVIDUAL CALLSAFETYURGENCYSELECTCATEGORYCH:06BACKINDIVIDUAL CALLCH:08CH:09CH:10CH:13SELECTINTERSHIP CHINDIVIDUAL CALLDo you want totransmit a Call?CATEG: ROUTINEHorizon-1987654321CH: 67YES NOINDIVIDUAL CALLTransmittingCATEG: ROUTINEHorizon-1987654321CH: 67INDIVIDUAL CALLWaiting for ACKCATEG: ROUTINEHorizon-1987654321CH: 67SINCE: 00:05RESEND QUIT7. When nished entering the MMSI number, press the [FINISH] soft key.8. Select the category (from “ROUTINE”, “SAFETY” or “URGENCY”) to which you want to register the MMSI number, then press the [SELECT] soft key.9. Press the CH▲/CH▼ key to select the oper-ating channel you want to communicate on, then press the [SELECT] soft key.10. Press the [YES] soft key to transmit the individual DSC signal.11. When an individual call acknowledgment is received, the established chan-nel is automatically changed to the channel which is selected on step 9 above and a ringing tone sounds.12. Press the [QUIT] soft key to listen to the channel to make sure it is not busy, then press the PTT button and talk into the microphone to the other vessel.](https://usermanual.wiki/Yaesu-Musen/30573X30.User-Manual-2/User-Guide-2360589-Page-17.png)
![Page 48HX87010.5.5 Receiving an Individual CallWhen an individual DSC call is received, the radio will automatically respond (default setting) to the calling ship, and switch to the requested channel for voice communications. Refer to section “10.5.2 Setting up the Individual Call Reply” to change the reply to manual if you want to see who is calling before replying to the call.Automatic reply:1. When an individual call is received, an individual call ringing alarm sounds. The radio automatically switches to the requested channel. The display shows the MMSI of the vessel calling.RX INDIVIDUALYaesu366901235ConnectedCATEG: ROUTINECH: 06SINCE: 00:15RESEND QUIT2. Press any key to stop the alarm.3. Press the PTT button and talk into the microphone to the other vessel.4. Press the [QUIT] soft key to return to radio operation.Manual reply:1. When an individual call is received, an individual call ringing alarm sounds. The display shows the MMSI of the vessel transmitting the individual call.RX INDIVIDUALYaesu366901235CATEG: ROUTINECH: 06SINCE: 00:15STOP ALARMRX INDIVIDUALYaesu366901235CATEG: ROUTINECH: 06SINCE: 00:15ACCEPT QUITPAUSERX INDIVIDUALYaesu366901235ConnectedCATEG: ROUTINECH: 06SINCE: 00:15RESEND QUIT2. Press any key to stop the alarm.3. Monitor the requested channel until the message is completed. On the display you will notice 3 soft key selections. These selections are described below: [ACCEPT]: Press this key to accept the DSC individual call and to switch to requested channel.](https://usermanual.wiki/Yaesu-Musen/30573X30.User-Manual-2/User-Guide-2360589-Page-18.png)
![Page 49HX870 [PAUSE]: Press this key to temporarily disable automatic switching to the requested channel. Note: In some cases automatically switching to a requested channel might disrupt import ongoing communications. This feature allows commercial users to suspend channel switching and stay on the working channel selected before the all ships call was received. [QUIT]: Press this key to quit the automatic channel switching and revert to the last selected working channel. Note: If a key is not pressed for 30 seconds or longer the radio will auto-matically change to radio operation.4. Press the [QUIT] soft key to return to the channel display.NOTEWhen there is an unread individual call, “ ” icon will appear on the display. You may review the unread individual call from the DSC log, refer to the section “10.13.3 Reviewing Other Logged Calls”.10.5.6 Setting up the Individual Call RingerWhen an individual call is received the radio will produce a ringing sound for 2 minutes. This selection allows the individual call ringer time to be changed.1. Press the MENU key to display “MENU”.DSC SETUPGM SETUPBACKSETUPWAYPOINT SETUPCH SETUPGPS SETUPATIS SETUPSELECTINDIVIDUAL DIR.INDIVIDUAL REPLYINDIVIDUAL ACK.INDIVIDUAL RINGGROUP DIR.POSITION REPLY DSC BEEPDSC SETUPBACK SELECT5 RINGSBACKDSC SETUP10 RINGS15 RINGS20 RINGS2 minENTERINDIVIDUAL RING2. Press the CH▲/CH▼/◄/► key to select “SETUP”.3. Select “DSC SETUP” menu with the CH▲/CH▼ key.4. Press the [SELECT] soft key, then select “INDIVIDUAL RING” with the CH▲/CH▼ key.5. Press the [SELECT] soft key.6. Press the CH▲/CH▼ key to select ringing time of individual calls.7. Press the [SELECT] soft key to store the selected setting.8. Press the CLR key to return to radio opera-tion.](https://usermanual.wiki/Yaesu-Musen/30573X30.User-Manual-2/User-Guide-2360589-Page-19.png)
![Page 50HX870The HX870 has the capability to turn off the individual call ringer.1. Press the MENU key to display “MENU”.DSC SETUPGM SETUPBACKSETUPWAYPOINT SETUPCH SETUPGPS SETUPATIS SETUPSELECTINDIVIDUAL DIR.INDIVIDUAL REPLYINDIVIDUAL ACK.INDIVIDUAL RINGGROUP DIR.POSITION REPLY DSC BEEPDSC SETUPBACK SELECTINDIVIDUALBACKDSC SETUPGROUPALL SHIPSPOS REQUESTPOS REPORTSELECTDSC BEEPONONONONON2. Press the CH▲/CH▼/◄/► key to select “SETUP”.3. Select “DSC SETUP” menu with the CH▲/CH▼ key.4. Press the [SELECT] soft key, then select “DSC BEEP” with the CH▲/CH▼ key.5. Press the [SELECT] soft key.6. Press the CH▲/CH▼ key to select “INDI-VIDUAL”, then press the [SELECT] soft key.7. Press the CH▲/CH▼ key to select “OFF”.8. Press the [SELECT] soft key to store the selected setting.9. Press the CLR key to return to radio opera-tion.To re-enable the ringer tone, repeat the above procedure, pressing the CH▲/CH▼ key to select “ON” in step 7 above.](https://usermanual.wiki/Yaesu-Musen/30573X30.User-Manual-2/User-Guide-2360589-Page-20.png)
![Page 52HX8701. Press the MENU key to display “MENU”.DSC SETUPGM SETUPBACKSETUPWAYPOINT SETUPCH SETUPGPS SETUPATIS SETUPSELECTINDIVIDUAL DIR.INDIVIDUAL REPLYINDIVIDUAL ACK.INDIVIDUAL RINGGROUP DIR.POSITION REPLY DSC BEEPDSC SETUPBACK SELECTADDBACKDSC SETUPEDITDELETESELECTGROUP DIR.GROUP NAME:-----------------0--------MMSI:SELECTGROUP DIR.BACKGROUP NAME:STANDARD---------087654321MMSI:SELECTGROUP DIR.BACKSAVEBACK SELECTFINISHGROUP DIR.GROUP NAMEZY 1 2a&[3 4 5 6 7 8 9 0NM O P Q R ST U V W XBA C D E F G H I J K LDelete---------------S2. Press the CH▲/CH▼/◄/► key to select “SETUP”.3. Select “DSC SETUP” menu with the CH▲/CH▼ key.4. Press the [SELECT] soft key, then select “GROUP DIR.” with the CH▲/CH▼ key.5. Press the [SELECT] soft key, then select “ADD” with the CH▲/CH▼ key.6. Press the [SELECT] soft key.7. Press the CH▲/CH▼ key to scroll through the rst letter of the name of the group you want to reference in the directory.8. Press the [SELECT] soft key to store the rst letter in the name and step to the next letter to the right. 9. Repeat steps 7 and 8 until the name is complete. The name can consist of up to eleven characters, if you do not use all eleven characters, select “→” to move to the next space. This method can also be used to enter a blank space in the name. If a mistake was made entering in the name repeat pressing the [BACK] soft key until the wrong character is selected, then press the CH▲/CH▼ key to correct the entry.10. After the eleventh letter or space has been entered, press the [FINISH] soft key to advance to the group MMSI number entry.11. Press the CH▲/CH▼ key to select the second number of the MMSI (nine digits: rst digit permanently set to “0”) which you want to contact, then press the [SELECT] soft key to step to the next number. Repeat this procedure until all eight spaces of the MMSI number are entered. If a mistake was made entering in the MMSI number repeat pressing the [BACK] soft key until the wrong number is selected, then press the CH▲/CH▼ key to correct the entry. After entering the new ID, press the [FINISH] soft key to conrm.12. To store the data, select “SAVE”, then press the [ENTER] soft key.13. To enter another group address, repeat steps 6 through 12.14. Press the CLR key to return to radio operation.](https://usermanual.wiki/Yaesu-Musen/30573X30.User-Manual-2/User-Guide-2360589-Page-22.png)
![Page 53HX87010.6.2 Transmitting a Group CallGroup Call using the Group Directory1. Press the MENU key to display “MENU”, then select “DSC CALL” with the CH▲/CH▼/◄/► key.INDIVIDUALGROUPBACKDSC CALLALL SHIPSPOS REQUESTPOS REPORTDIST ALERT MSGSELECTHISTORYMEMORYNEW IDGROUP CALLBACK SELECTKARENSTeam BOB066901254Horizon-GroupStandard-GroupHorizon-1GUSCG GroupGROUP CALLBACK SELECTHISTORYGROUP CALLtransmittingCATEG: ROUTINEHorizon-Group087654321CH: 06GROUP CALLDo you want totransmit a Call?CATEG: ROUTINEHorizon-Group087654321CH: 06YES NOGROUP CALLTransmittedCATEG: ROUTINEHorizon-Group087654321CH: 06SINCE: 00:05QUIT2. Press the CH▲/CH▼ key to select “GROUP”. (To cancel, press the [QUIT] soft key.)3. Press the [SELECT] soft key. The trans-ceiver will beep, and the last group calls will appear.4. Press the CH▲/CH▼ key to select a group you want to contact (“HISTORY” or “MEMORY”).5. Press the [SELECT] soft key, press the CH▲/CH▼ key to select the operating channel you want to communicate on, then press the [SELECT] soft key. 6. Press the [YES] soft key to transmit the group call signal.7. When the group call signal is sent, the display will be as shown in the illustration at the right.8. After the group call is transmitted, all the radios in the group will switch to the desig-nated channel.9. Listen to the channel to make sure it is not busy, then press the PTT button and call the other vessel you desire to communicate with.](https://usermanual.wiki/Yaesu-Musen/30573X30.User-Manual-2/User-Guide-2360589-Page-23.png)
![Page 54HX870Group Call by Manually Entering an MMSIThis feature allows you to contact a group of vessels by entering in their group MMSI manually.1. Press the MENU key to display “MENU”, then select “DSC CALL” with the CH▲/CH▼/◄/► key.INDIVIDUALGROUPBACKDSC CALLALL SHIPSPOS REQUESTPOS REPORTDIST ALERT MSGSELECTHISTORYMEMORYNEW IDGROUP CALLBACK SELECT1 5 6 7 8 9 02 4Delete3BACK SELECTFINISHGROUP CALLGROUP MMSI-08765432CH:06BACKGROUP CALLCH:08CH:09CH:10CH:13SELECTINTERSHIP CHGROUP CALLTransmittingCATEG: ROUTINEHorizon-Group087654321CH: 06GROUP CALLDo you want totransmit a Call?CATEG: ROUTINEHorizon-Group087654321CH: 06YES NOGROUP CALLTransmittedCATEG: ROUTINEHorizon-Group087654321CH: 06SINCE: 00:05QUIT2. Press the CH▲/CH▼ key to select “GROUP”. (To cancel, press the [QUIT] soft key.)3. Press the [SELECT] soft key. The trans-ceiver will beep, and the last group calls will appear.4. Select “NEW ID” with the CH▲/CH▼ key.5. Press the [SELECT] soft key.6. Press the CH▲/CH▼ key to select the rst number of the MMSI (nine digits: rst digit permanently set to “0”) which you want to contact, then press the [SELECT] soft key to step to the next number.7. Repeat step 6 to set the MMSI number. If a mistake was made entering in the MMSI number, repeat pressing the [BACK] soft key until the wrong number is selected, then press the CH▲/CH▼ key to correct the entry.8. When nished entering the MMSI number, press the [FINISH] soft key.9. Press the CH▲/CH▼ key to select the operating channel you want to communicate on, then press the [SELECT] soft key.10. Press the [YES] soft key to transmit the group call signal.11. After the group call is transmitted, all the radios in the group will switch to the designated channel.12. Listen to the channel to make sure it is not busy, then press the PTT button and talk into the microphone to the group of vessels.](https://usermanual.wiki/Yaesu-Musen/30573X30.User-Manual-2/User-Guide-2360589-Page-24.png)
![Page 55HX87010.6.3 Receiving a Group Call1. When a group call is received, the HX870 will produce a ringing alarm sound.RX GROUPYaesu036690123HorizonCATEG: ROUTINECH: 06SINCE: 00:15STOP ALARMMMSI: 3669012342. The display shows the group MMSI number.3. Press any key to stop the alarm.4. Monitor the channel for the person calling the group for a message. On the display you will notice 3 soft key selections. These selections are described below: [ACCEPT]: Press this key to accept the group call and to switch to requested channel. [PAUSE]: Press this key to temporarily disable automatic switching to the requested channel. [QUIT]: Press this key to quit the automatic channel switch-ing and revert to the last selected working channel.RX GROUPACCEPT QUITPAUSEYaesu036690123HorizonCATEG: ROUTINECH: 06SINCE: 00:15MMSI: 3669012345. If you want to respond, monitor the channel to make sure it is clear, then press the PTT button and talk into the micro-phone to the group of vessels.6. Press the [QUIT] soft key to return to radio operation. Note: If a key is not pressed for 30 seconds or longer the radio will automatically change to radio operation.RX GROUPYaesu036690123CATEG: ROUTINECH: 06SINCE: 00:15QUITNOTEWhen there is an unread group call, “ ” icon will appear on the display. You may review the unread group call from the DSC log, refer to the section “10.13.3 Reviewing Other Logged Calls”.](https://usermanual.wiki/Yaesu-Musen/30573X30.User-Manual-2/User-Guide-2360589-Page-25.png)
![Page 56HX87010.6.4 Setting up the Group Call RingerThe HX870 has the capability to turn off the group call ringer.1. Press the MENU key to display “MENU”.DSC SETUPGM SETUPBACKSETUPWAYPOINT SETUPCH SETUPGPS SETUPATIS SETUPSELECTINDIVIDUAL DIR.INDIVIDUAL REPLYINDIVIDUAL ACK.INDIVIDUAL RINGGROUP DIR.POSITION REPLY DSC BEEPDSC SETUPBACK SELECTINDIVIDUALBACKDSC SETUPGROUPALL SHIPSPOS REQUESTPOS REPORTSELECTDSC BEEPONONONONON2. Press the CH▲/CH▼/◄/► key to select “SETUP”.3. Select “DSC SETUP” menu with the CH▲/CH▼ key.4. Press the [SELECT] soft key, then select “DSC BEEP” with the CH▲/CH▼ key.5. Press the [SELECT] soft key.6. Press the CH▲/CH▼ key to select “GROUP”, then press the [ENTER] soft key.7. Press the CH▲/CH▼ key to select “OFF”.8. Press the [SELECT] soft key to store the selected setting.9. Press the CLR key to return to radio opera-tion.To re-enable the ringer tone, repeat the above procedure, pressing the CH▲/CH▼ key to select “ON” in step 7 above.](https://usermanual.wiki/Yaesu-Musen/30573X30.User-Manual-2/User-Guide-2360589-Page-26.png)
![Page 57HX87010.7 POSITION REQUESTAdvancements in DSC have made it possible to poll the location of another vessel and show the position of that vessel on the display of the HX870. This is a great feature for anyone wanting to know the position of another vessel. For example your buddy that is catching sh, or nding the location of a person you are cruising with.NOTEThe other vessel must have an operating GPS receiver connected to its DSC radio and must not have its radio set not to deny position requests. (Refer the section “10.5 INDIVIDUAL CALL” to enter information into the individual directory).10.7.1 Setting up a Position Request Reply The HX870 can be set up to automatically (default setting) or manually send your position when requested by another vessel. This selection is important if you are concerned about someone polling the position of your vessel that you may not want to. In the manual mode you will see the MMSI (Maritime Mobile Service Identity Number) or persons name shown on the display allowing you to choose to send your position to the requesting vessel.1. Press the MENU key to display “MENU”.DSC SETUPGM SETUPBACKSETUPWAYPOINT SETUPCH SETUPGPS SETUPATIS SETUPSELECTINDIVIDUAL DIR.INDIVIDUAL REPLYINDIVIDUAL ACK.INDIVIDUAL RINGGROUP DIR.POSITION REPLY DSC BEEPDSC SETUPBACK SELECTAUTOBACKDSC SETUPMANUALENTERPOSITION REPLY 2. Press the CH▲/CH▼/◄/► key to select “SETUP”.3. Select “DSC SETUP” menu with the CH▲/CH▼ key.4. Press the [SELECT] soft key, then select “POSITION REPLY” with the CH▲/CH▼ key.5. Press the [SELECT] soft key, then select “AUTO” or “MANUAL”. In “AUTO” mode, after a DSC POS request is received, the radio will automatically transmit your vessel’s position. In “MANUAL” mode, the display of the HX870 will show who is requesting the position and the [YES] soft key on radio has to be pressed to send your position to the requesting vessel. 6. Press the [SELECT] soft key to store the selected setting.7. Press the CLR key to return to radio operation.](https://usermanual.wiki/Yaesu-Musen/30573X30.User-Manual-2/User-Guide-2360589-Page-27.png)
![Page 58HX87010.7.2 Transmitting a Position Request to Another VesselPosition Request using the Individual/Position Directory1. Press the MENU key to display “MENU”, then select “DSC CALL” with the CH▲/CH▼/◄/► key.INDIVIDUALGROUPBACKDSC CALLALL SHIPSPOS REQUESTPOS REPORTDIST ALERT MSGSELECTHISTORYMEMORYNEW IDPOS REQUESTBACK SELECTKARENBOB366901254Horizon-1StandardHorizon-2USCGPOS REQUESTBACK SELECTHISTORY2. Press the CH▲/CH▼ key to select “POS REQUEST”, then press the [SELECT] soft key.3. Press the CH▲/CH▼ key to select a name that was stored in the individual/position directory (“HISTORY” or “MEMORY”).4. Press the [SELECT] soft key, then press the [YES] soft key to transmit the position request DSC call.5. When the HX870 receives the position from the polled vessel it is shown on the radio display.6. Press the [QUIT] soft key to return to radio operation.NOTEIf the HX870 does not receive a position data from the polled vessel, the display will show “NO POSITION DATA”.](https://usermanual.wiki/Yaesu-Musen/30573X30.User-Manual-2/User-Guide-2360589-Page-28.png)
![Page 59HX870Position Request by Manually Entering an MMSIThis feature allows you to request the position of a vessel by manually entering the MMSI of the ship you want to ask the position.1. Press the MENU key to display “MENU”, then select “DSC CALL” with the CH▲/CH▼/◄/► key.INDIVIDUALGROUPBACKDSC CALLALL SHIPSPOS REQUESTPOS REPORTDIST ALERT MSGSELECTHISTORYMEMORYNEW IDPOS REQUESTBACK SELECTBACK SELECTFINISHPOS REQUESTMMSI-987654321 5 6 7 8 9 02 4Delete32. Press the CH▲/CH▼ key to select “POS REQUEST”, then press the [SELECT] soft key.3. Press the [NEW ID] soft key.4. Press the CH▲/CH▼ key to select “MANU-AL”, then press the [SELECT] soft key.5. Press the CH▲/CH▼ key to select the rst number of the MMSI (nine digits) which you want to contact, then press the [SELECT] soft key to step to the next number.6. Repeat step 5 to set the MMSI number. If a mistake was made entering in the MMSI number, repeatedly press the [BACK] soft key until the wrong number is selected, then press the CH▲/CH▼ key to correct the entry.7. When nished entering the MMSI number, press the [FINISH] soft key.8. Press the [YES] soft key to transmit the position request DSC call.9. When the HX870 receives the position from the polled vessel it is shown on the radio display and also transferred to the GPS chart plotter with NMEA DSC and DSE sentences.10. Press the [QUIT] soft key to return to radio operation.](https://usermanual.wiki/Yaesu-Musen/30573X30.User-Manual-2/User-Guide-2360589-Page-29.png)
![Page 60HX87010.7.3 Receiving a Position RequestWhen a position request call is received from another vessel, a ringing alarm sounds and the requesting vessel’s information will be shown in the display. Operation and transceiver function differs depending on “Position Reply” in the “DSC Setup” menu setting discussed below:Automatic reply:1. When a position request call is received, a calling alarm sounds 4 times. Then requested position coordinates are transmitted automatically to the vessel requesting your vessels position.2. To exit from position request display, press the [QUIT] soft key.Manual reply:1. When a position request call is received from another vessel, the display will be as shown in the illustration at the right.RX POS REQUESTYaesu366901235CATEG: SAFETYSINCE: 00:15ACCEPT QUITPAUSERX POS REQUESTYaesu366901235CATEG: SAFETYSINCE: 00:15REPLY QUITRX POS REQUESTTransmittedCATEG: SAFETYHorizon366901234QUIT2. A ringing alarm sounds 4 times. To send your vessels position to the requesting vessel, press the [REPLY] soft key. Or to exit from position request display, press the [QUIT] soft key.](https://usermanual.wiki/Yaesu-Musen/30573X30.User-Manual-2/User-Guide-2360589-Page-30.png)