Yamaha TSXB15A Desktop Audio System User Manual TSX B15
Yamaha Corporation Desktop Audio System TSX B15
Yamaha >
TempConfidential_TSXB15-User Manual

AB
OWNER'S MANUAL
i En
1 Read these instructions.
2 Keep these instructions.
3 Heed all warnings.
4 Follow all instructions.
5 Do not use this apparatus near water.
6 Clean only with dry cloth.
7 Do not block any ventilation openings. Install in
accordance with the manufacturer’s instructions.
8 Do not install near any heat sources such as radiators,
heat registers, stoves, or other apparatus (including
amplifiers) that produce heat.
9 Do not defeat the safety purpose of the polarized or
grounding-type plug. A polarized plug has two blades
with one wider than the other. A grounding type plug has
two blades and a third grounding prong. The wide blade
or the third prong are provided for your safety. If the
provided plug does not fit into your outlet, consult an
electrician for replacement of the obsolete outlet.
10 Protect the power cord from being walked on or pinched
particularly at plugs, convenience receptacles, and the
point where they exit from the apparatus.
11 Only use attachments/accessories specified by the
manufacturer.
12 Use only with the cart, stand, tripod,
bracket, or table specified by the
manufacturer, or sold with the apparatus.
When a cart is used, use caution when
moving the cart/apparatus combination to
avoid injury from tip-over.
13 Unplug this apparatus during lightning storms or when
unused for long periods of time.
14 Refer all servicing to qualified service personnel.
Servicing is required when the apparatus has been
damaged in any way, such as power-supply cord or plug
is damaged, liquid has been spilled or objects have fallen
into the apparatus, the apparatus has been exposed to rain
or moisture, does not operate normally, or has been
dropped.
Yamaha and the Electronic Industries Association’s Consumer Electronics Group want you to get the most out
of your equipment by playing it at a safe level. One that lets the sound come through loud and clear without
annoying blaring or distortion – and, most importantly, without affecting your sensitive hearing. Since hearing
damage from loud sounds is often undetectable until it is too late, Yamaha and the Electronic Industries
Association’s Consumer Electronics Group recommend you to avoid prolonged exposure from excessive
volume levels.
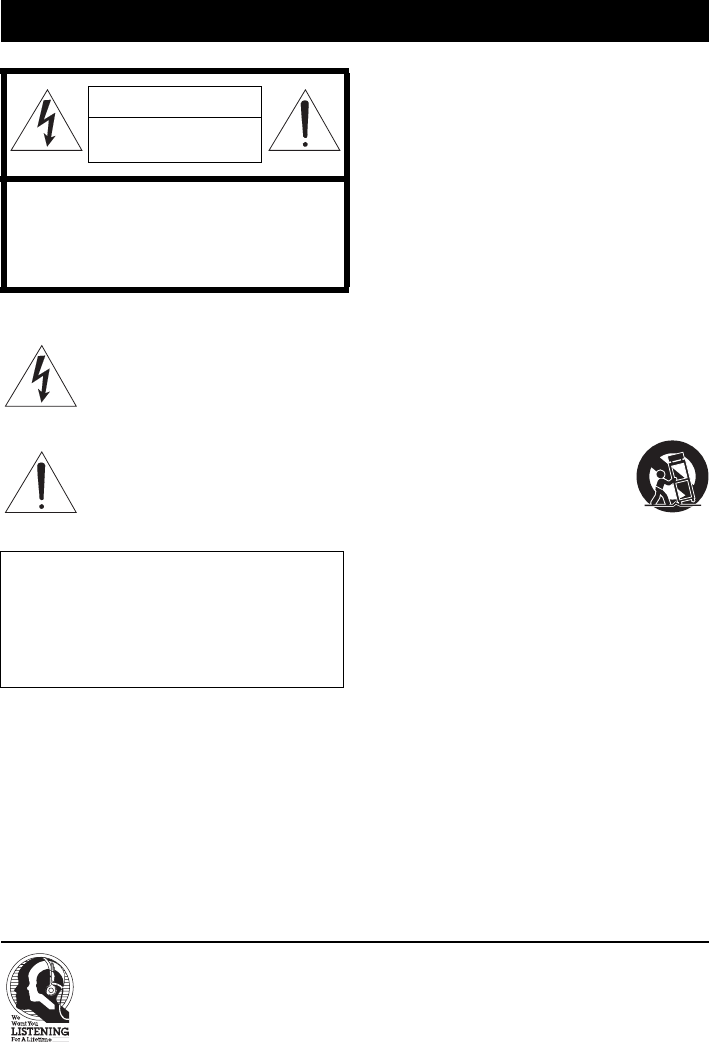
IMPORTANT SAFETY INSTRUCTIONS
CAUTION
RISK OF ELECTRIC SHOCK DO
NOT OPEN
CAUTION: TO REDUCE THE RISK OF
ELECTRIC SHOCK, DO NOT REMOVE
COVER (OR BACK). NO USER-SERVICEABLE
PARTS INSIDE. REFER SERVICING TO
QUALIFIED SERVICE PERSONNEL.
• Explanation of Graphical Symbols
The lightning flash with arrowhead symbol,
within an equilateral triangle, is intended to
alert you to the presence of uninsulated
“dangerous voltage” within the product’s
enclosure that may be of sufficient magnitude
to constitute a risk of electric shock to
persons.
The exclamation point within an equilateral
triangle is intended to alert you to the
presence of important operating and
maintenance (servicing) instructions in the
literature accompanying the appliance.
IMPORTANT
Please record the serial number of this unit in the space
below.
MODEL:
Serial No.:
The serial number is located on the rear of the unit. Retain
this Owner’s Manual in a safe place for future reference.
We Want You Listening For A Lifetime
ii En
IMPORTANT SAFETY INSTRUCTIONS
En
FCC INFORMATION (for US customers)
1IMPORTANT NOTICE: DO NOT MODIFY THIS
UNIT!
This product, when installed as indicated in the
instructions contained in this manual, meets FCC
requirements. Modifications not expressly approved
by Yamaha may void your authority, granted by the
FCC, to use the product.
2IMPORTANT: When connecting this product to
accessories and/or another product use only high
quality shielded cables. Cable/s supplied with this
product MUST be used. Follow all installation
instructions. Failure to follow instructions could void
your FCC authorization to use this product in the
USA.
3NOTE: This product has been tested and found to
comply with the requirements listed in FCC
Regulations, Part 15 for Class “B” digital devices.
Compliance with these requirements provides a
reasonable level of assurance that your use of this
product in a residential environment will not result in
harmful interference with other electronic devices.
This equipment generates/uses radio frequencies and,
if not installed and used according to the instructions
found in the users manual, may cause interference
harmful to the operation of other electronic devices.
Compliance with FCC regulations does not guarantee
that interference will not occur in all installations. If
this product is found to be the source of interference,
which can be determined by turning the unit “OFF”
and “ON”, please try to eliminate the problem by
using one of the following measures:
Relocate either this product or the device that is being
affected by the interference.
Utilize power outlets that are on different branch
(circuit breaker or fuse) circuits or install AC line
filter/s.
In the case of radio or TV interference, relocate/
reorient the antenna. If the antenna lead-in is 300 ohm
ribbon lead, change the lead-in to coaxial type cable.
If these corrective measures do not produce
satisfactory results, please contact the local retailer
authorized to distribute this type of product. If you can
not locate the appropriate retailer, please contact
Yamaha Corporation of America A/V Division, 6600
Orangethorpe Avenue, Buena Park, CA 90620, USA.
The above statements apply ONLY to those products
distributed by Yamaha Corporation of America or its
subsidiaries.
FCC CAUTION
Change or modifications not expressly approved by the
party responsible for compliance could void the user’s
authority to operate the equipment.
FOR CANADIAN CUSTOMERS
To prevent electric shock, match wide blade of plug to
wide slot and fully insert.
CAN ICES-3 (B)/NMB-3(B)
• This device complies with Part 15 of the FCC Rules and RSSGen of IC Rules.
• Operation is subject to the following two conditions: 1) this device may not cause harmful interference, and 2) this device
must accept any interference received including interference that may cause undesired operation of this device.
See the “TROUBLESHOOTING” section at the end of this manual if interference to radio reception is suspected.
NOTICE
This equipment has been tested and found to comply with the limits for a Class B digital device, pursuant to part 15 of the
FCC Rules. These limits are designed to provide reasonable protection against harmful interference in a residential
installation.
This equipment generates, uses and can radiate radio frequency energy and, if not installed and used in accordance with the
instructions, may cause harmful interference to radio communications. However, there is no guarantee that interference will
not occur in a particular installation. If this equipment does cause harmful interference to radio or television reception, which
can be determined by turning the equipment off and on, the user is encouraged to try to correct the interference by one or
more of the following measures:
– Reorient or relocate the receiving antenna.
– Increase the separation between the equipment and receiver.
– Connect the equipment into an outlet on a circuit different from that to which the receiver is connected.
– Consult the dealer or an experienced radio/TV technician for help.
This equipment compiles with FCC/IC radiation exposure limits set forth for uncontrolled equipment and meets the FCC
radio frequency (RF) Exposure Guidelines in Supplement C to OET65 and RSS-102 of the IC radio frequency (RF)
Exposure rules. This equipment has very low levels of RF energy that it deemed to comply without maximum permissive
exposure evaluation (MPE). But it is desirable that it should be installed and operated with at least 20 cm and more between
the radiator and person’s body (excluding extremities: hands, wrists, feet and ankles).
This transmitter must not be co-located or operated in conjunction with any other antenna or transmitter.
ML.book Page ii Thursday, September 12, 2013 3:32 PM
i Fr
1 Lire ces instructions.
2 Conserver ces instructions.
3 Tenir compte de tous les avertissements.
4 Suivre toutes les instructions.
5 Ne pas utiliser cet appareil à proximité de l’eau.
6 Nettoyer cet appareil avec un chiffon sec seulement.
7 Ne pas recouvrir les ailettes de ventilation. Installer
l’appareil selon les instructions du fabricant.
8 Ne pas installer près d’une source de chaleur, comme un
appareil de chauffage, une résistance électrique, un
poêle, ou tout autre appareil (amplificateurs compris)
produisant de la chaleur.
9 Ne pas désamorcer le système de sécurité d’une fiche
polarisée ou d’une fiche avec mise à la terre. Une fiche
polarisée est munie de deux lames, dont l’une est plus
large que l’autre. Une fiche avec mise à la terre est munie
de deux lames et d’une broche de terre. La lame la plus
large ou la troisième broche sont reliées à la terre pour
des raisons de sécurité. Si la fiche fournie ne s’insère pas
dans la prise, s’adresser à un électricien pour faire
remplacer la prise obsolète.
10 Protéger le cordon d’alimentation de sorte qu’il ne risque
pas d’être piétiné ou coincé, surtout au niveau des fiches,
des prises et de sa sortie de l’appareil.
11 Utiliser seulement les fixations et accessoires spécifiés
par le fabricant.
12 Utiliser seulement le chariot, socle,
trépied, support ou meuble spécifié par le
fabricant ou vendu avec l’appareil. Si un
chariot est utilisé, faire attention de ne pas
se blesser ou de le renverser pendant le
transport de l’appareil.
13 Débrancher cet appareil pendant les orages électriques,
ou s’il ne doit pas être utilisé pendant un certain temps.
14 Pour toute inspection s’adresser à un personnel qualifié.
Une inspection est nécessaire en cas de dommage, quel
qu’il soit, par exemple cordon d’alimentation ou fiche
endommagé, liquide répandu ou objet tombé à l’intérieur
de l’appareil, exposition de l’appareil à la pluie ou à
l’humidité, fonctionnement anormal ou chute de
l’appareil.
Yamaha et le Groupe des Entreprises Électroniques Grand Public de l’Association des Industries Électroniques
vous demandent de tirer le meilleur parti de votre équipement tout en écoutant à un niveau non dommageable
pour l’ouïe, c’est-à-dire un niveau où vous pouvez obtenir un son fort et clair, sans hurlement ni distorsion, mais
sans aucun danger pour l’ouïe. Comme les sons trop forts causent des lésions auditives qui ne peuvent être
détectées qu’à long terme, lorsqu’il est trop tard, Yamaha et le Groupe des Entreprises Électroniques Grand
Public de l’Association des Industries Électroniques vous déconseillent l’écoute prolongée à des volumes
excessifs.
PRÉCAUTIONS CONCERNANT LA SÉCURITÉ
CAUTION
RISK OF ELECTRIC SHOCK DO
NOT OPEN
ATTENTION : POUR RÉDUIRE LES RISQUES
D’INCENDIE ET DE DÉCHARGE
ELECTRIQUE, NE PAS RETIRER LE
COUVERCLE (OU LE PANNEAU ARRIÈRE).
AUCUNE PIÈCE INTERNE NE PEUT ÊTRE
CHANGÉE PAR L’UTILISATEUR. POUR
L’ENTRETIEN, S’ADRESSER À UN
PERSONNEL QUALIFIÉ.
• Explication des symboles
L’éclair avec une flèche à l’intérieur d’un
triangle équilatéral est destiné à attirer
l’attention de l’utilisateur sur la présence
d’une « tension dangereuse » non isolée à
l’intérieur du produit, pouvant être
suffisamment élevée pour constituer un
risque d’électrocution.
Le point d’exclamation à l’intérieur d’un
triangle équilatéral est destiné à attirer
l’attention de l’utilisateur sur la présence
d’instructions importantes sur l’emploi ou de
la maintenance (réparation) de l’appareil dans
la documentation fournie.
IMPORTANT
Veuillez enregistrer le numéro de série de cet appareil dans
l’espace réservé à cet effet, ci-dessous.
MODÈLE :
No. de série :
Le numéro de série se trouve à l’arrière de l’appareil. Prière
de conserver le mode d’emploi en lieu sûr pour toute
référence future.
Nous vous souhaitons un plaisir musical durable
ML.book Page i Thursday, September 12, 2013 3:32 PM

ii Fr
PRÉCAUTIONS CONCERNANT LA SÉCURITÉ
Fr
Informations de la FCC (Pour les clients résidents aux États-Unis)
1AVIS IMPORTANT : NE PAS APPORTER DE
MOFIDICATIONS À CET APPAREIL !
Ce produit est conforme aux exigences de la FCC s’il
est installé selon les instructions du mode d’emploi.
Toute modification non approuvée expressément par
Yamaha peut invalider l’autorisation, accordée par la
FCC, d’utiliser ce produit.
2IMPORTANT : N’utiliser que des câbles blindés de
haute qualité pour le raccordement de ce produit à des
accessoires et/ou à un autre produit. Seuls le ou les
câbles fournis avec le produit DOIVENT être utilisés.
Suivre les instructions concernant l’installation. Le
non respect des instructions peut invalider
l’autorisation, accordée par la FCC, d’utiliser ce
produit aux États-Unis.
3
REMARQUE :
Ce produit a été testé et déclaré
conforme aux normes relatives aux appareils
numériques de Classe “B”, telles que fixées dans
l’Article 15 de la Réglementation FCC. Ces normes
sont destinées à assurer une protection suffisante contre
les interférences nuisibles avec d’autres appareils
électroniques dans une installation résidentielle.
Cet équipement génère et utilise des fréquences radio
qui, en cas d’installation et d’utilisation non conformes
aux instructions du mode d’emploi, peuvent être à
l’origine d’interférences empêchant d’autres appareils
de fonctionner.
Cependant, la conformité à la Réglementation FCC ne
garantit pas l’absence d’interférences dans une
installation particulière. Si ce produit devait produire
des interférences, ce qui peut être déterminé en
“ÉTEIGNANT” et en “RALLUMANT” le produit,
l’utilisateur est invité à essayer de corriger le problème
d’une des manières suivantes :
Réorienter ce produit ou le dispositif affecté par les
interférences.
Utiliser des prises d’alimentation branchées sur
différents circuits (avec interrupteur de circuit ou
fusible) ou installer un ou des filtres pour ligne
secteur.
Dans le cas d’interférences radio ou TV, changer de
place l’antenne et la réorienter. Si l’antenne est un
conducteur plat de 300 ohms, remplacer ce câble par
un câble de type coaxial.
Si ces mesures ne donnent pas les résultats escomptés,
prière de contacter le détaillant local autorisé à
commercialiser ce type de produit. Si ce n’est pas
possible, veuillez contacter Yamaha Corporation of
America A/V Division, 6600 Orangethorpe Avenue,
Buena Park, CA 90620, États-Unis.
Les déclarations précédentes NE concernent QUE les
produits commercialisés par Yamaha Corporation of
America ou ses filiales.
PRÉCAUTION FCC
Tout changement ou toute modification non approuvé
expressément par le tiers responsable peut aboutir à
l’interdiction de faire fonctionner cet appareil.
POUR LES CONSOMMATEURS CANADIENS
Pour prévenir tout choc électrique, faites correspondre la
broche large de la fiche à la fente large et insérez
complètement.
CAN ICES-3 (B)/NMB-3(B)
• Cet appareil est conforme à la Partie 15 du Règlement FCC et au RSS-Gen du Règlement IC.
• Le fonctionnement de cet appareil est soumis aux deux conditions suivantes : 1) cet appareil ne doit pas provoquer
d’interférences nuisibles, et 2) cet appareil doit accepter les interférences reçues, notamment celles pouvant entraîner un
dysfonctionnement.
Reportez-vous à la section « GUIDE DE DÉPANNAGE » à la fin de ce manuel si vous soupçonnez que la réception radio
subit des interférences.
REMARQUE
Cet appareil a été testé et il s’est avéré être conforme aux limites déterminées pour un appareil numérique de Classe B,
conformément à la partie 15 du Règlement FCC. Ces limites sont destinées à offrir une protection raisonnable contre les
interférences nuisibles pouvant survenir en cas d’utilisation de ce produit dans un environnement domestique.
Cet appareil produit, utilise et peut émettre de l’énergie radioélectrique et, s’il n’est pas installé conformément aux
instructions, peut provoquer des interférences radio. Il n’est toutefois pas garanti qu’aucune interférence ne se produira dans
le cas d’une installation donnée. Si l’appareil provoque des interférences nuisibles à la réception de programmes radio ou de
télévision, ce qui peut être déterminé en éteignant, puis en allumant l’appareil, l’utilisateur est prié de tenter de corriger le
problème en prenant l’une ou plusieurs des mesures suivantes :
– Réorienter ou déplacer l’antenne réceptrice.
– Éloigner davantage l’appareil du récepteur.
– Raccorder l’appareil à une prise d’un circuit différent de celui du récepteur.
– Consulter le revendeur ou un technicien radio/télé expérimenté.
Cet appareil est conforme aux limites FCC/IC d’exposition aux rayonnements définies pour les appareils non commandés et satisfait
aux directives d’exposition aux fréquences radio (RF) FCC de l’Annexe C des règlements OET65 et RSS-102 d’exposition aux
fréquences radio (RF) IC. Cet appareil possède des niveaux d’énergie RF très bas, considérés conformes aux taux d’exposition
maximum autorisés (MPE) non contrôlés. Mais il est toutefois préférable d’installer et d’utiliser l’appareil en conservant une
distance minimum de 20 cm entre l’émetteur et toute personne (sauf les extrémités : mains, poignets, pieds et chevilles).
Ce émetteur ne peut pas être placé à proximité de ou utilisé conjointement avec tout autre émetteur ou antenne.
ML.book Page ii Thursday, September 12, 2013 3:32 PM
iii Fr
1 Pour utiliser l’appareil au mieux de ses possibilités,
lisez attentivement ce mode d’emploi. Conservez-le
soigneusement pour référence.
2 Installez cet appareil dans un endroit frais, bien aéré,
sec et propre - à l’abri de la lumière du soleil, des
sources de chaleur, des vibrations, des poussières, de
l’humidité et du froid. Pour une aération correcte,
tenez compte des distances minimales suivantes.
Au-dessus : 15 cm
À l’arrière : 10 cm
Sur les côtés : 10 cm
3 Placez l’appareil loin des équipements, moteurs et
transformateurs électriques, pour éviter les
ronflements parasites.
4 N’exposez pas l’appareil à des variations brutales de
température, ne le placez pas dans un environnement
très humide (par exemple dans une pièce contenant
un humidificateur) car cela peut entraîner la
condensation d’humidité à l’intérieur de l’appareil
qui elle-même peut être responsable de décharge
électrique, d’incendie, de dommage à l’appareil ou de
blessure corporelle.
5 Evitez d’installer l’appareil dans un endroit où des
objets peuvent tomber, ainsi que là où l’appareil
pourrait être exposé à des éclaboussures ou des
gouttes d’eau. Sur le dessus de l’appareil, ne placez
pas :
– d’autres appareils qui peuvent endommager la
surface de l’appareil ou provoquer sa
décoloration.
– des objets se consumant (par exemple, une
bougie) qui peuvent être responsables d’incendie,
de dommage à l’appareil ou de blessure
corporelle.
– des récipients contenant des liquides qui peuvent
être à l’origine de décharge électrique ou de
dommage à l’appareil.
6 Ne couvrez pas l’appareil d’un journal, d’une nappe,
d’un rideau, etc. car cela empêcherait l’évacuation de
la chaleur. Toute augmentation de la température
intérieure de l’appareil peut être responsable
d’incendie, de dommage à l’appareil ou de blessure
corporelle.
7 Ne branchez pas la fiche du câble d’alimentation de
l’appareil sur une prise secteur aussi longtemps que
tous les raccordements n’ont pas été effectués.
8 Ne pas faire fonctionner l’appareil à l’envers. Il
risquerait de chauffer et d’être endommagé.
9 N’exercez aucune force excessive sur les
commutateurs, les boutons et les cordons.
10 Pour débrancher la fiche du câble d’alimentation au
niveau de la prise secteur, saisissez la fiche et ne tirez
pas sur le cordon.
11 Ne nettoyez pas l’appareil au moyen d’un solvant
chimique, ce qui pourrait endommager la finition.
Utilisez un chiffon sec et propre.
12 N’alimentez l’appareil qu’à partir de la tension
prescrite. Alimenter l’appareil sous une tension plus
élevée est dangereux et peut être responsable
d’incendie, de dommage à l’appareil ou de blessure
corporelle. Yamaha ne saurait être tenue responsable
des dommages résultant de l’alimentation de
l’appareil sous une tension autre que celle prescrite.
13 Pour empêcher tout dommage causé par les éclairs,
déconnectez la câble d’alimentation et toute antenne
extérieure de la prise murale pendant un orage.
14 Ne tentez pas de modifier ni de réparer l’appareil.
Consultez le service Yamaha compétent pour toute
réparation qui serait requise. Le coffret de l’appareil
ne doit jamais être ouvert, quelle que soit la raison.
15 Si vous envisagez de ne pas vous servir de l’appareil
pendant une longue période (par exemple, pendant
les vacances), débranchez la fiche du câble
d’alimentation au niveau de la prise secteur.
16 Lisez la section intitulée « GUIDE DE
DÉPANNAGE » où figurent une liste d’erreurs de
manipulation communes avant de conclure que
l’appareil présente une anomalie de fonctionnement.
17 Avant de déplacer l’appareil, appuyez sur pour
éteindre le système puis débranchez la fiche du câble
d’alimentation au niveau de la prise secteur.
18 La condensation se forme lorsque la température
ambiante change brusquement. En ce cas, débranchez
la fiche du câble d’alimentation et laissez l’appareil
reposer.
19 La température de l’appareil peut augmenter en
raison d’une utilisation prolongée. En ce cas, coupez
l’alimentation de l’appareil et laissez-le au repos pour
qu’il refroidisse.
20 Installez cet appareil à proximité de la prise secteur et
à un emplacement où la fiche du câble d’alimentation
est facilement accessible.
21 Utilisez l’adaptateur secteur fourni avec cet appareil.
L’emploi de tout autre adaptateur secteur peut causer
un incendie ou endommager l’appareil.
ATTENTION : VEUILLEZ LIRE CE QUI SUIT AVANT D’UTILISER
L’APPAREIL.
Cet appareil n’est pas déconnecté du secteur tant qu’il
reste branché à la prise de courant, même si l’appareil en
soi est éteint par la touche . Dans cet état, l’appareil
consomme une très faible quantité de courant.
AVERTISSEMENT
POUR RÉDUIRE LES RISQUES D’INCENDIE OU DE
DÉCHARGE ÉLECTRIQUE, N’EXPOSEZ PAS CET
APPAREIL À LA PLUIE OU À L’HUMIDITÉ.
Il y a un risque possible de création d’interférences,
visibles sur les images en couleurs si cet appareil est placé
à côté d’un téléviseur à tube cathodique (tube de Braun).
Dans ce cas, éloigner l’unité du téléviseur.
Ne pas utiliser cet appareil à moins de 22 cm de
personnes ayant un stimulateur cardiaque ou un
défibrillateur.
Les ondes radio peuvent avoir une incidence sur les
équipements électroniques médicaux.
N’utilisez pas cet appareil à proximité d’équipements
médicaux ou à l’intérieur d’institutions médicales.
ML.book Page iii Thursday, September 12, 2013 3:32 PM
1 En
En
PREPARATION
■Features
– Playback of Bluetooth devices, FM radio, and external devices with AUX connector.
– Setting alarm using FM radio.
– Supplying power to smartphones, tablets, etc. via USB port on the rear panel.
– Rich sound by 5cm full-range custom speaker and DSP (Digital Signal Processor) made by Yamaha.
– Enhanced treble and thick mid/bass, even when playing compressed audio source, such as MP3, etc.
(Music Enhancer)
• indicates precautions for use of the unit and its feature limitations.
• indicates supplementary explanations for better use.
■Supplied accessories
NAMES OF PARTS AND THEIR FUNCTIONS .................................................................................... 2
BASIC FUNCTIONS................................................................................................................................... 4
LISTENING TO FM STATIONS .............................................................................................................. 6
CHARGING WITH THE USB PORT ......................................................................................................7
LISTENING TO EXTERNAL SOURCES ............................................................................................... 7
LISTENING TO MUSIC FROM YOUR Bluetooth COMPONENT ..................................................... 8
TROUBLESHOOTING ............................................................................................................................ 11
SPECIFICATIONS ................................................................................................................................... 13
Note
y
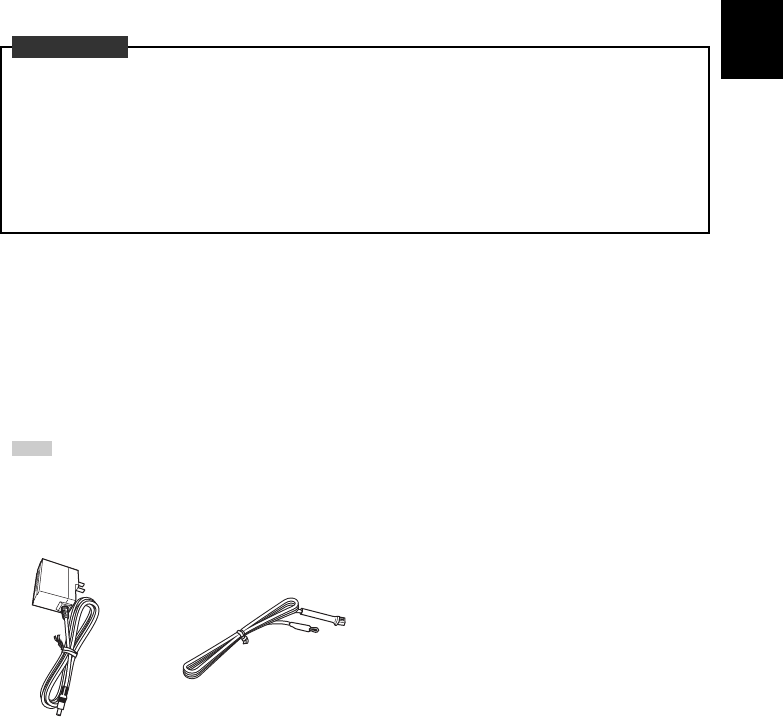
AC adaptor FM antenna
(DC 12 V, 1.5 A,
model number:
MU18-D120150-A1)
CONTENTS
2 En
■Top panel
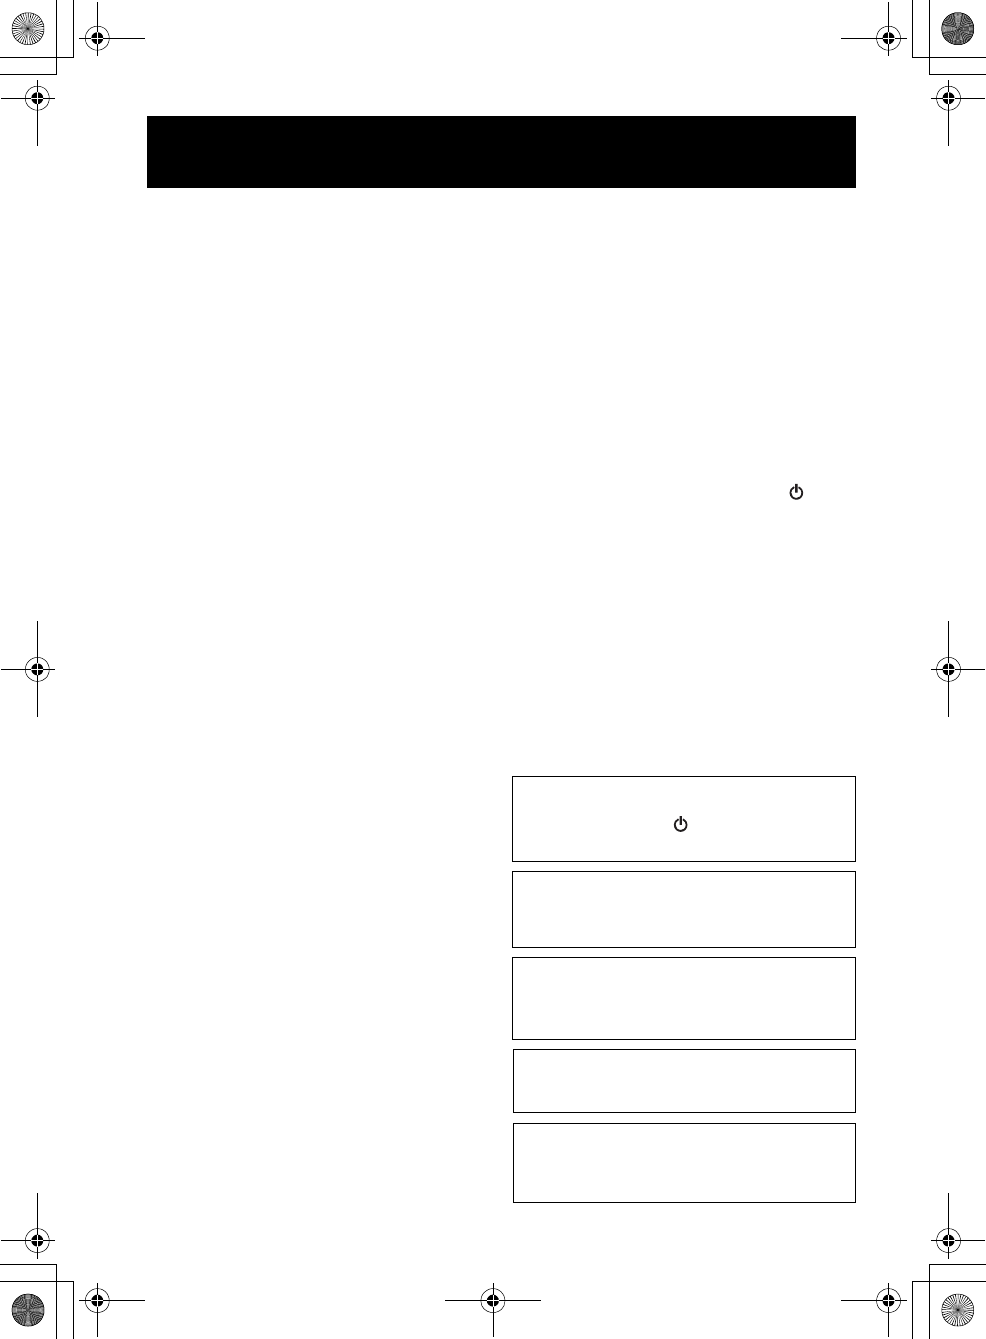
NAMES OF PARTS AND THEIR FUNCTIONS
A
Press to turn the system on/off.
Time is displayed even when the
system is off.
Standby mode
• Press and hold for more than
3 seconds to set the system to
standby mode. All the indicators
and display turn off, and Bluetooth
operation, audio playback, input via
buttons except are disabled. This
can reduce power consumption. To
cancel standby mode, press .
• Even in system off/standby mode,
the alarm function is available.
Auto-power off (☞ P. 5)
• If this unit is not operated for a
certain period of time, the system
will turn off automatically.
BDisplay
CIndicators
:Bluetooth indicator. It lights during Bluetooth
pairing and connection (☞ P. 8, 10).
AUX: AUX indicator. It lights when the INPUT
connector is selected as an AUX input source
(☞ P. 7).
RADIO: Radio indicator. It lights when the radio is
selected as an input source (☞ P. 6).
:Alarm indicator. It lights when the alarm
function is on (☞ P. 4).
DVOLUME
Controls volume. When you control the volume, the
volume level will be displayed on the display.
ECLOCK
Sets the clock (☞ P. 4).
Dimmer function
•Press CLOCK repeatedly to set the brightness of the
display.
3 (brightest) 2 1 (darkest)
FALARM
Sets the alarm (☞ P. 4).
GTUNING
Adjust the time or radio frequency (☞ P. 4, 6).
HPRESET
Stores up to five favorite FM radio stations (☞ P. 6).
ISOURCE (PAIRING)
Selects an input source from Bluetooth ( ), AUX,
or RADIO.
NAMES OF PARTS AND THEIR FUNCTIONS
3 En
En
■Rear panel
Connecting the FM antenna
If you listen to an FM radio station while USB
charging, noise may interfere with the radio
reception. In this case, disconnect the USB
cable from the unit.
AConnect the supplied antenna
to the unit.
BInstall it with a pin where the
unit can obtain good reception.
• Be sure to stretch out the antenna as the
illustration shows.
• If radio reception with the supplied antenna is
not satisfactory, a commercially available
outdoor antenna may improve reception.
JCHARGING
Supplies 5 V/1 A to a
portable device, such
as a smartphone, when
it is connected with a
USB cable. (☞ P. 7)
K12 V
Connect the supplied
AC adaptor. LINPUT
Connect external devices
with AUX connector.
MFM ANT
FM antenna terminal.
A
B
Caution
Notes
4 En
OPERATION
This unit can play back radio and beep sound at the set time.
■Setting the time and sound
BASIC FUNCTIONS
Adjusting the clock
APress and hold CLOCK.
The display flashes.
BAdjust the time with TUNING.
CPress CLOCK.
If you want to cancel alarm setting mode, press .
y
If you press PRESET in step 2, you can select the time
display format (12 hours/24 hours).
The time settings are lost approximately one week after
unplugging the unit.
Alarm setting
APress and hold ALARM for more than
2 seconds.
The alarm indicator ( ) and display flash.
B
Set the alarm time with
TUNING
.
An alarm will sound only once at the specified
time.
Radio will sound from 3 minutes before the
alarm time, and then beep will sound at the alarm
time.
CSet the alarm volume with VOLUME.
The volume level is displayed and the alarm
indicator ( ) lights.
DPress and hold ALARM for more than
2 seconds.
Alarm is set and the alarm indicator ( )
lights.
A / C
B
Note
A / D
CB
Alarm indicator ( )

BASIC FUNCTIONS
5 En
En
■Switching the alarm on/off
At the set time, alarm sound plays back. During playback, operations below are available.
■Stopping the alarm
The system automatically turns off under the following circumstance. When the system is off, all the indicators
turn off, and Bluetooth operation, audio playback, input via button operations except are disabled.
• No components are connected via Bluetooth connection, INPUT connector, or radio source, or no sound is
played back for more than 20 minutes.
• No operation is performed for more than 8 hours while music is being played back.
Press ALARM.
When the alarm is on, the alarm indicator ( )
lights and alarm time is displayed for a while.
Alarm indicator ( )
Operations during playing back alarm sound
Press ALARM or .
y
• Unless you stop the alarm, the alarm stops after
60 minutes automatically.
• When you stop the alarm, the alarm time setting, etc., is
saved for convenient use next time.
• Press any buttons except ALARM and once to stop the
beep sound, and twice to stop the radio source (snooze
function). 4 minutes after the radio source is stopped, it
will start fading in again and after another minutes the
beep sound will resume (double snooze function).
• When the snooze function is activated, the alarm indicator
() and flash.
Alarm indicator ( )
Auto-power off
6 En
You can store up to five favorite FM radio stations with the preset function.
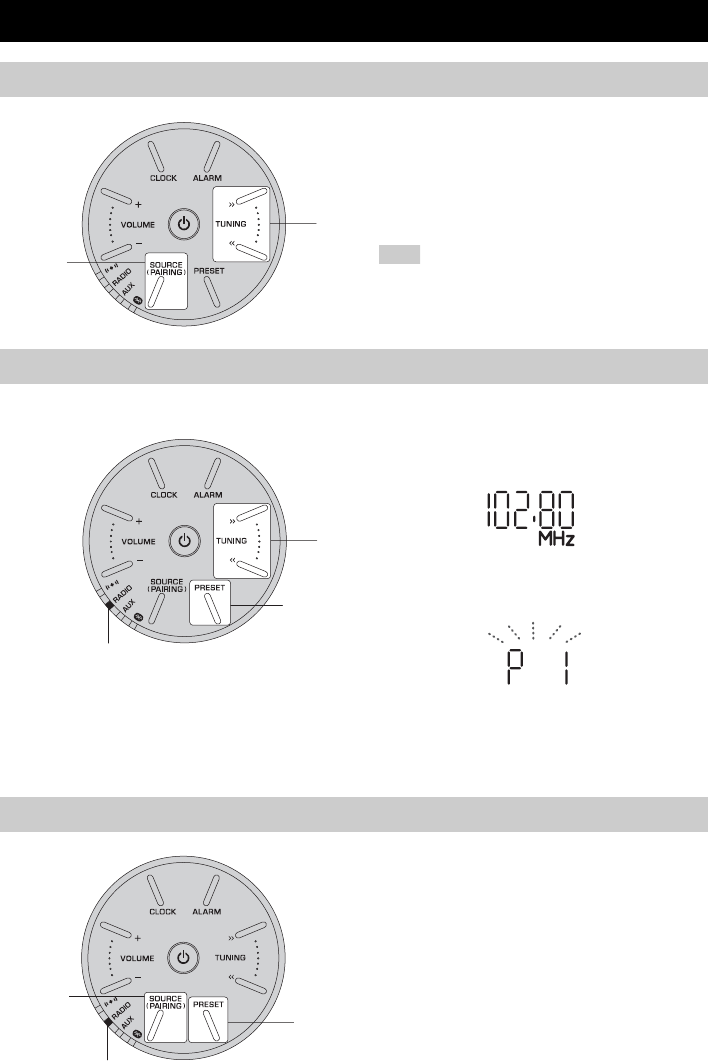
LISTENING TO FM STATIONS
Tuning radio stations
APress SOURCE to select RADIO.
The RADIO indicator lights.
BFor automatic tuning, press and hold
TUNING.
For manual tuning, press TUNING
repeatedly.
If you tune to a station manually, the sound is monaural.
Presetting radio stations
APress TUNING to select a favorite radio
station.
The radio frequency is displayed temporally.
BPress and hold PRESET for 2 seconds.
The preset number is displayed on the display
and flashes.
CPress PRESET to select the preset
number you want to store to.
DPress and hold PRESET for 2 seconds
to complete.
Selecting preset radio stations
APress SOURCE to select RADIO.
The RADIO indicator lights.
BPress PRESET repeatedly to select the
preset radio station.
A
B
Note
A
B~D
RADIO indicator
B
A
RADIO indicator
7 En
En
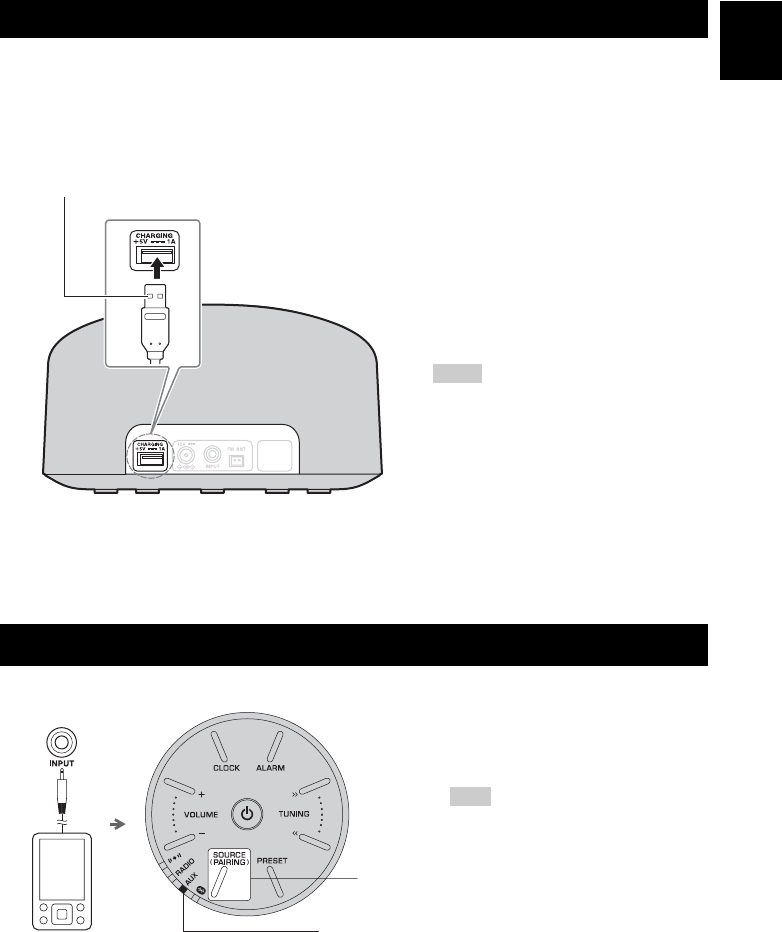
Connecting a portable device such as a smartphone or tablet computer to the USB port on this unit charges the
connected device (power supply of up to 5V/1A is supported).
Prepare a USB cable that is compatible with the portable device and confirm that the device is supported for
charging via USB connection before use. In addition, read the documentation provided with the portable
device.
CHARGING WITH THE USB PORT
A
Connect your portable device
to the USB port on this unit
using a commercially available
USB cable.
Charging automatically starts.
BDisconnect the USB cable
from the unit when charging
completes.
Check the charging status on the
portable device.
• The USB port is for charging use only. The
USB port does not support audio playback.
• Charging may not be possible depending on
the portable device.
• In standby mode, power supply stops, and
charging is not available.
• This unit does not function as memory
storage.
• Yamaha will not be held responsible for any
damage to the portable device or data loss
occurred while using this unit.
• Disconnect the USB cable immediately after
charging completes, since power continues to
be supplied to the connected device.
LISTENING TO EXTERNAL SOURCES
AConnect your portable audio
device to the INPUT connector
using a commercially available
3.5 mm (1/8 in) mini plug cable.
Turn down the volume of this unit and your
portable audio device before connection.
BTurn on the system.
CPress SOURCE to set the
playback source to AUX.
The AUX indicator lights.
D
Start playback on the connected
portable audio device.
USB cable from portable device
Rear panel
Notes
C
Rear panel
AUX indicator
Note

8 En
This unit provides Bluetooth functionality. You can enjoy wireless music playback from your Bluetooth
component (smartphone, digital audio player, etc.). Please also refer to the owner’s manual of your Bluetooth
component.
Install in a stable place, being careful of the following points:
• Do not place on top of steel or other metal plates.
• Do not cover with a cloth, etc.
• Install in the same room as the device with which signals are to be exchanged (Bluetooth profile A2DP
compatible smartphone, digital audio player, etc.) within a direct, line-of-sight distance of 10 m (33 ft).
• Make sure there are no obstacles between this unit and the Bluetooth component.
Pairing is an operation that registers the communicating component (subsequently called “the other
component”) with this unit. You will need to perform the pairing operation the first time you use your
Bluetooth component with this unit, or if the pairing settings have been deleted. Once pairing has been
completed, subsequent reconnection will be easy even after the Bluetooth connection is disconnected. If pairing
is not successful, refer to the item “Bluetooth” in “TROUBLESHOOTING” (☞ P. 12).
y
• This unit can be paired with up to four other components. When pairing with the fifth component has succeeded, pairing data
for the component with the oldest connection date will be deleted.
• If this unit is connected via Bluetooth to another component, press and hold SOURCE to disconnect the Bluetooth
connection before you perform the pairing operation.
LISTENING TO MUSIC FROM YOUR Bluetooth COMPONENT
Installation
Within 10 m (33 ft)
Pairing this unit with your Bluetooth component
LISTENING TO MUSIC FROM YOUR Bluetooth COMPONENT
9 En
En
■If using an iPhone/iPad/iPod touch
■If using other than an iPhone/iPad/iPod touch
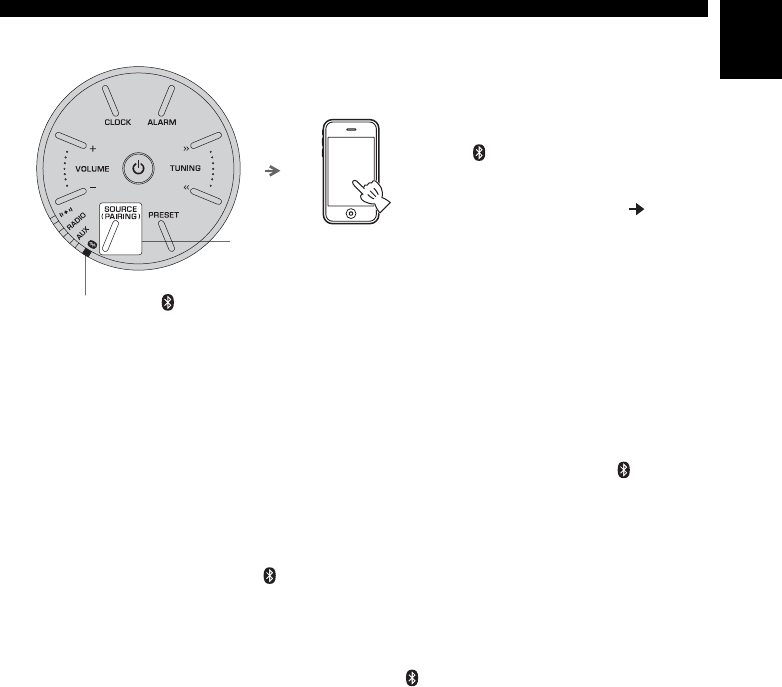
APress and hold SOURCE for more than 2 seconds to enter paring mode.
• Pairing mode lasts for 5 minutes.
• In paring mode, the Bluetooth indicator ( ) will light in orange and blue alternately.
BPerform Bluetooth pairing on the other component.
For details, refer to the owner’s manual of the other component.
CFrom the Bluetooth connection list of the other component, choose this unit (TSX-B15
Yamaha).
When pairing has been completed, the Bluetooth indicator ( ) will light in blue.
y
If you are prompted for a passkey, enter the numerals “0000”.
A
Press and hold
SOURCE
for
more than 2 seconds to enter
paring mode.
• Pairing mode lasts for 5 minutes.
• In paring mode, the Bluetooth indicator
( ) will light in orange and blue
alternately.
BOn your iPhone/iPad/iPod
touch, turn [Settings]
[Bluetooth] on.
The Bluetooth connection list will
appear in [Devices].
(This procedure or display may differ
depending on the type of your iPhone/
iPad/iPod touch.)
CFrom the Bluetooth connection
list of the other component,
choose this unit (TSX-B15
Yamaha).
When pairing has been completed,
your iPhone/iPad/iPod touch will
indicate “Connected”.
The Bluetooth indicator () will light
in blue.
A
Bluetooth indicator ( )
LISTENING TO MUSIC FROM YOUR Bluetooth COMPONENT
10 En
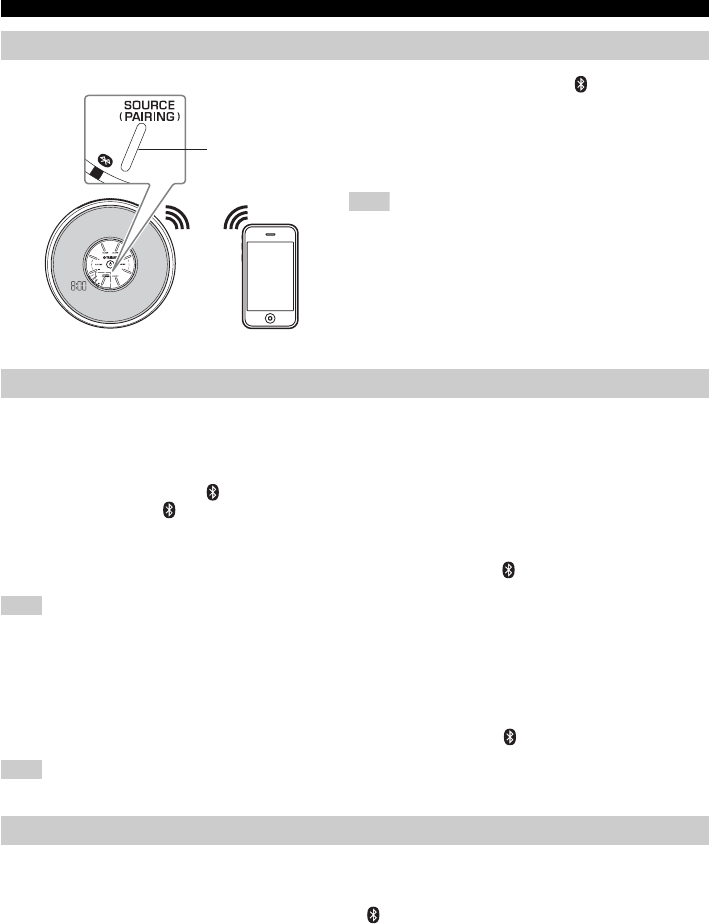
Once pairing with a component has been completed, connecting with that component via Bluetooth will be
easy next time.
■Connecting from this unit
Press SOURCE to select (Bluetooth).
The Bluetooth indicator ( ) will light in blue.
This unit will search for the other component that was most recently connected via Bluetooth, and will then
establish a connection (You must first turn on the Bluetooth setting of the other component).
When the Bluetooth connection has been established, the Bluetooth indicator ( ) will light in blue.
Yamaha does not guarantee all connections between this unit and Bluetooth component.
■Connecting from the other component
AIn the Bluetooth settings of the other component, turn Bluetooth on.
BFrom the Bluetooth connection list of the other component, choose this unit (TSX-B15
Yamaha).
The Bluetooth connection will be established, and the Bluetooth indicator ( ) will light in blue.
Bluetooth connections cannot be established from the other component when this unit is in standby mode. Turn the system on.
If any of the following operations are performed while a Bluetooth connection is being used, the Bluetooth
connection will be disconnected.
• Press and hold SOURCE for more than 2 seconds.
• Press SOURCE to select a playback source other than (Bluetooth).
• Turn the system off.
• Disconnect the Bluetooth connection from the Bluetooth component.
Listening to a Bluetooth component
A
Press
SOURCE
to select (Bluetooth).
BConnect this unit and your other
component via Bluetooth.
CPlay back music from your Bluetooth
component.
Take care that the volume setting of this unit is not too high. We
recommend that you adjust the volume on the other component.
y
• While the system is turned off, if you connect a Bluetooth
component to the unit, the system will automatically turn on.
• If you disconnect the Bluetooth connection from your other
component while the playback source is set to Bluetooth, this
unit will automatically turn off the system.
Connecting an already-paired component via Bluetooth
A
Note
Note
Note
Disconnecting a Bluetooth connection
11 En
En
Refer to the table below if the unit does not operate properly. If the problem you are experiencing is not listed
below, or if the instruction below does not help, turn off the unit, disconnect the power cable, and contact the
nearest authorized Yamaha dealer or service center.
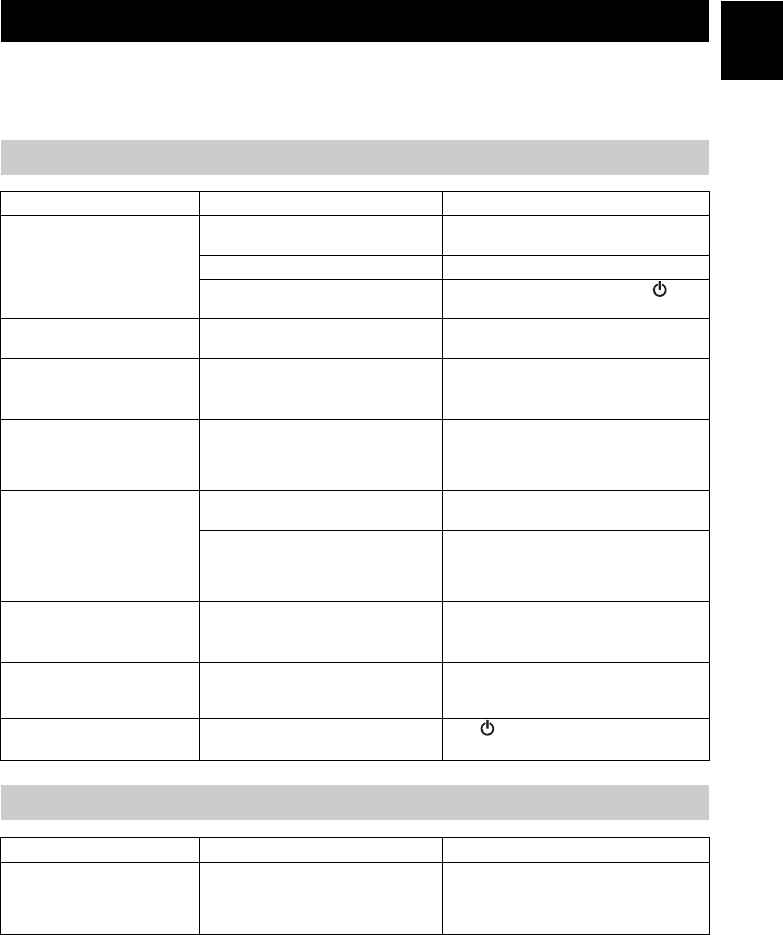
TROUBLESHOOTING
General
Problem Cause Solution
The speakers make no
sound.
The volume may be set to the minimum
level.
Adjust the volume level.
The source may be incorrect. Select the correct source.
The unit is setting the alarm. Complete setting the alarm, or press to
cancel setting the alarm.
Sound suddenly turns off. Auto-power off function is enabled after
8 hours passed with no operation.
Turn on the system and play the source again.
Sound is cracked/
distorted or there is
abnormal noise.
Input source volume is excessive, or
volume of this unit is excessive.
Adjust the volume with VOLUME.
The unit does not operate
properly.
The unit may have received a strong
electrical shock such as lightning or
excessive static electricity, or power
supply may have dropped.
Set the system to off, and disconnect the
power cable. Wait about 30 seconds,
reconnect the power cable, and turn on the
system.
The system turns on but
immediately shuts off.
The power cable may be connected
improperly.
Make sure the power cable is plugged into the
wall outlet firmly.
The unit may have received a strong
electrical shock such as lightning or
excessive static electricity.
Set the system to off, and disconnect the
power cable. Wait about 30 seconds,
reconnect the power cable, and turn on the
system.
A digital or high-frequency
equipment produces
noises.
The unit may be placed too close to the
digital or high-frequency equipment.
Place the unit farther away from the
equipment.
The clock setting has been
cleared.
The unit is left more than one week after
you disconnect the power cable from the
wall outlet.
Plug the power cable into the wall outlet
firmly, and set the clock again (☞ P. 4).
Clock flashes and the unit
cannot be operated.
The unit is setting CLOCK or ALARM. Press to cancel setting CLOCK or
ALARM.
FM radio reception
Problem Cause Solution
Too much noise during
stereo broadcast.
The radio station you selected may be far
from your area, or the radio wave
reception is weak in your area.
Try manual tuning to improve the signal
quality (☞ P. 6) or change the height or
direction of the antenna, or relocate the unit
(☞ P. 2).

TROUBLESHOOTING
12 En
■Resetting the unit
If the unit does not function properly, resetting the unit may solve the problem. To reset the unit, press and hold
for more than 10 seconds.
Bluetooth
Problem Cause Solution
Cannot make this unit
paired with the other
component.
The other component does not support
A2DP.
Perform pairing operations with a component
which supports A2DP.
A Bluetooth adaptor, etc. that you want to
pair with this unit has a password other
than “0000”.
Use a Bluetooth adaptor, etc. whose password
is “0000”.
This unit and the other component are too
far apart.
Move the other component closer to this unit.
There is a device (microwave oven,
wireless LAN, etc.) that outputs signals in
the 2.4 GHz frequency band nearby.
Move this unit away from the device that is
emitting radio-frequency signals.
Cannot establish a
Bluetooth connection.
This unit is not registered on the other
component’s Bluetooth connection list.
Perform pairing operations again (☞ P. 8).
No sound is produced or
the sound is interrupted
during playback.
The Bluetooth connection of this unit with
the other component is disconnected.
Perform Bluetooth connection operations
again (☞ P. 10).
This unit and the other component are too
far apart.
Move the other component closer to this unit.
There is a device (microwave oven,
wireless LAN, etc.) that outputs signals in
the 2.4 GHz frequency band nearby.
Move this unit away from the device that is
emitting radio-frequency signals.
The other component’s Bluetooth
function is off.
Turn on the Bluetooth function of the other
component.
The other component is not set to send
Bluetooth audio signals to this unit.
Check that the Bluetooth function of the other
component is set properly.
The pairing setting of the other
component is not set to this unit.
Set the pairing setting of the other component
to this unit.
The other component’s volume is set to
the minimum.
Increase the volume level.
USB port charging
Problem Cause Solution
Cannot charge the
connected portable USB
device.
An incompatible USB device is connected
to the unit. Or the USB device is not
connected to this unit properly.
Turn off the system and reconnect the USB
device to the unit. If it does not resolve the
problem, the USB device is not chargeable
with the unit.

13 En
En
■PLAYER SECTION
AUX IN
• Input connector
............STEREO L/R: 3.5 mm (1/8 in) STEREO mini Jack
■AMPLIFIER SECTION
• Driver unit .....................5 cm (XX in) full-range driver × 2
■Bluetooth SECTION
•Bluetooth version...........................................Ver. 2.1+EDR
• Supported protocols.................................................... A2DP
• Supported codecs.......................................................... SBC
• Wireless output.........................................Bluetooth Class 2
• Maximum communication distance
...................................... 10 m (33 ft) (without obstructions)
• Supported contents protection .................. SCMS-T method
■TUNER SECTION
• Tuning range (FM) ................................ 87.5 to 108.0 MHz
■CHARGING CONNECTOR SECTION
• Connector type..................................................USB type A
• Output rating............................................................5 V/1 A
■GENERAL
• Power Supply.............................. AC 100-240 V, 50/60 HZ
• Power consumption .....................................................11 W
• System off consumption .............................................1.6 W
• Standby consumption...................................... 0.5 W or less
• Dimensions (W × H × D)....................180 × 100 × 200 mm
(7 1/8 × 3 7/8 × 7 7/8 in)
• Weight......................................................... 0.9 kg (2.0 lbs.)
Bluetooth
•Bluetooth is a technology for wireless communication
between devices within an area of about 10 meters (33 ft)
employing the 2.4 GHz frequency band, a band which can
be used without a license.
•Bluetooth is a registered trademark of the Bluetooth SIG
and is used by Yamaha in accordance with a license
agreement.
Handling Bluetooth communications
• The 2.4 GHz band used by Bluetooth compatible devices
is a radio band shared by many types of equipment. While
Bluetooth compatible devices use a technology
minimizing the influence of other components using the
same radio band, such influence may reduce the speed or
distance of communications and in some cases interrupt
communications.
• The speed of signal transfer and the distance at which
communication is possible differs according to the
distance between the communicating devices, the
presence of obstacles, radio wave conditions and the type
of equipment.
• Yamaha does not guarantee all wireless connections
between this unit and devices compatible with Bluetooth
function.
SPECIFICATIONS

© 2014 Yamaha Corporation Printed in China ZN35280