ZMODO Technology H2401 Tune User Manual 1
ZMODO Technology Shenzhen Corp. Ltd. Tune 1
User Manual
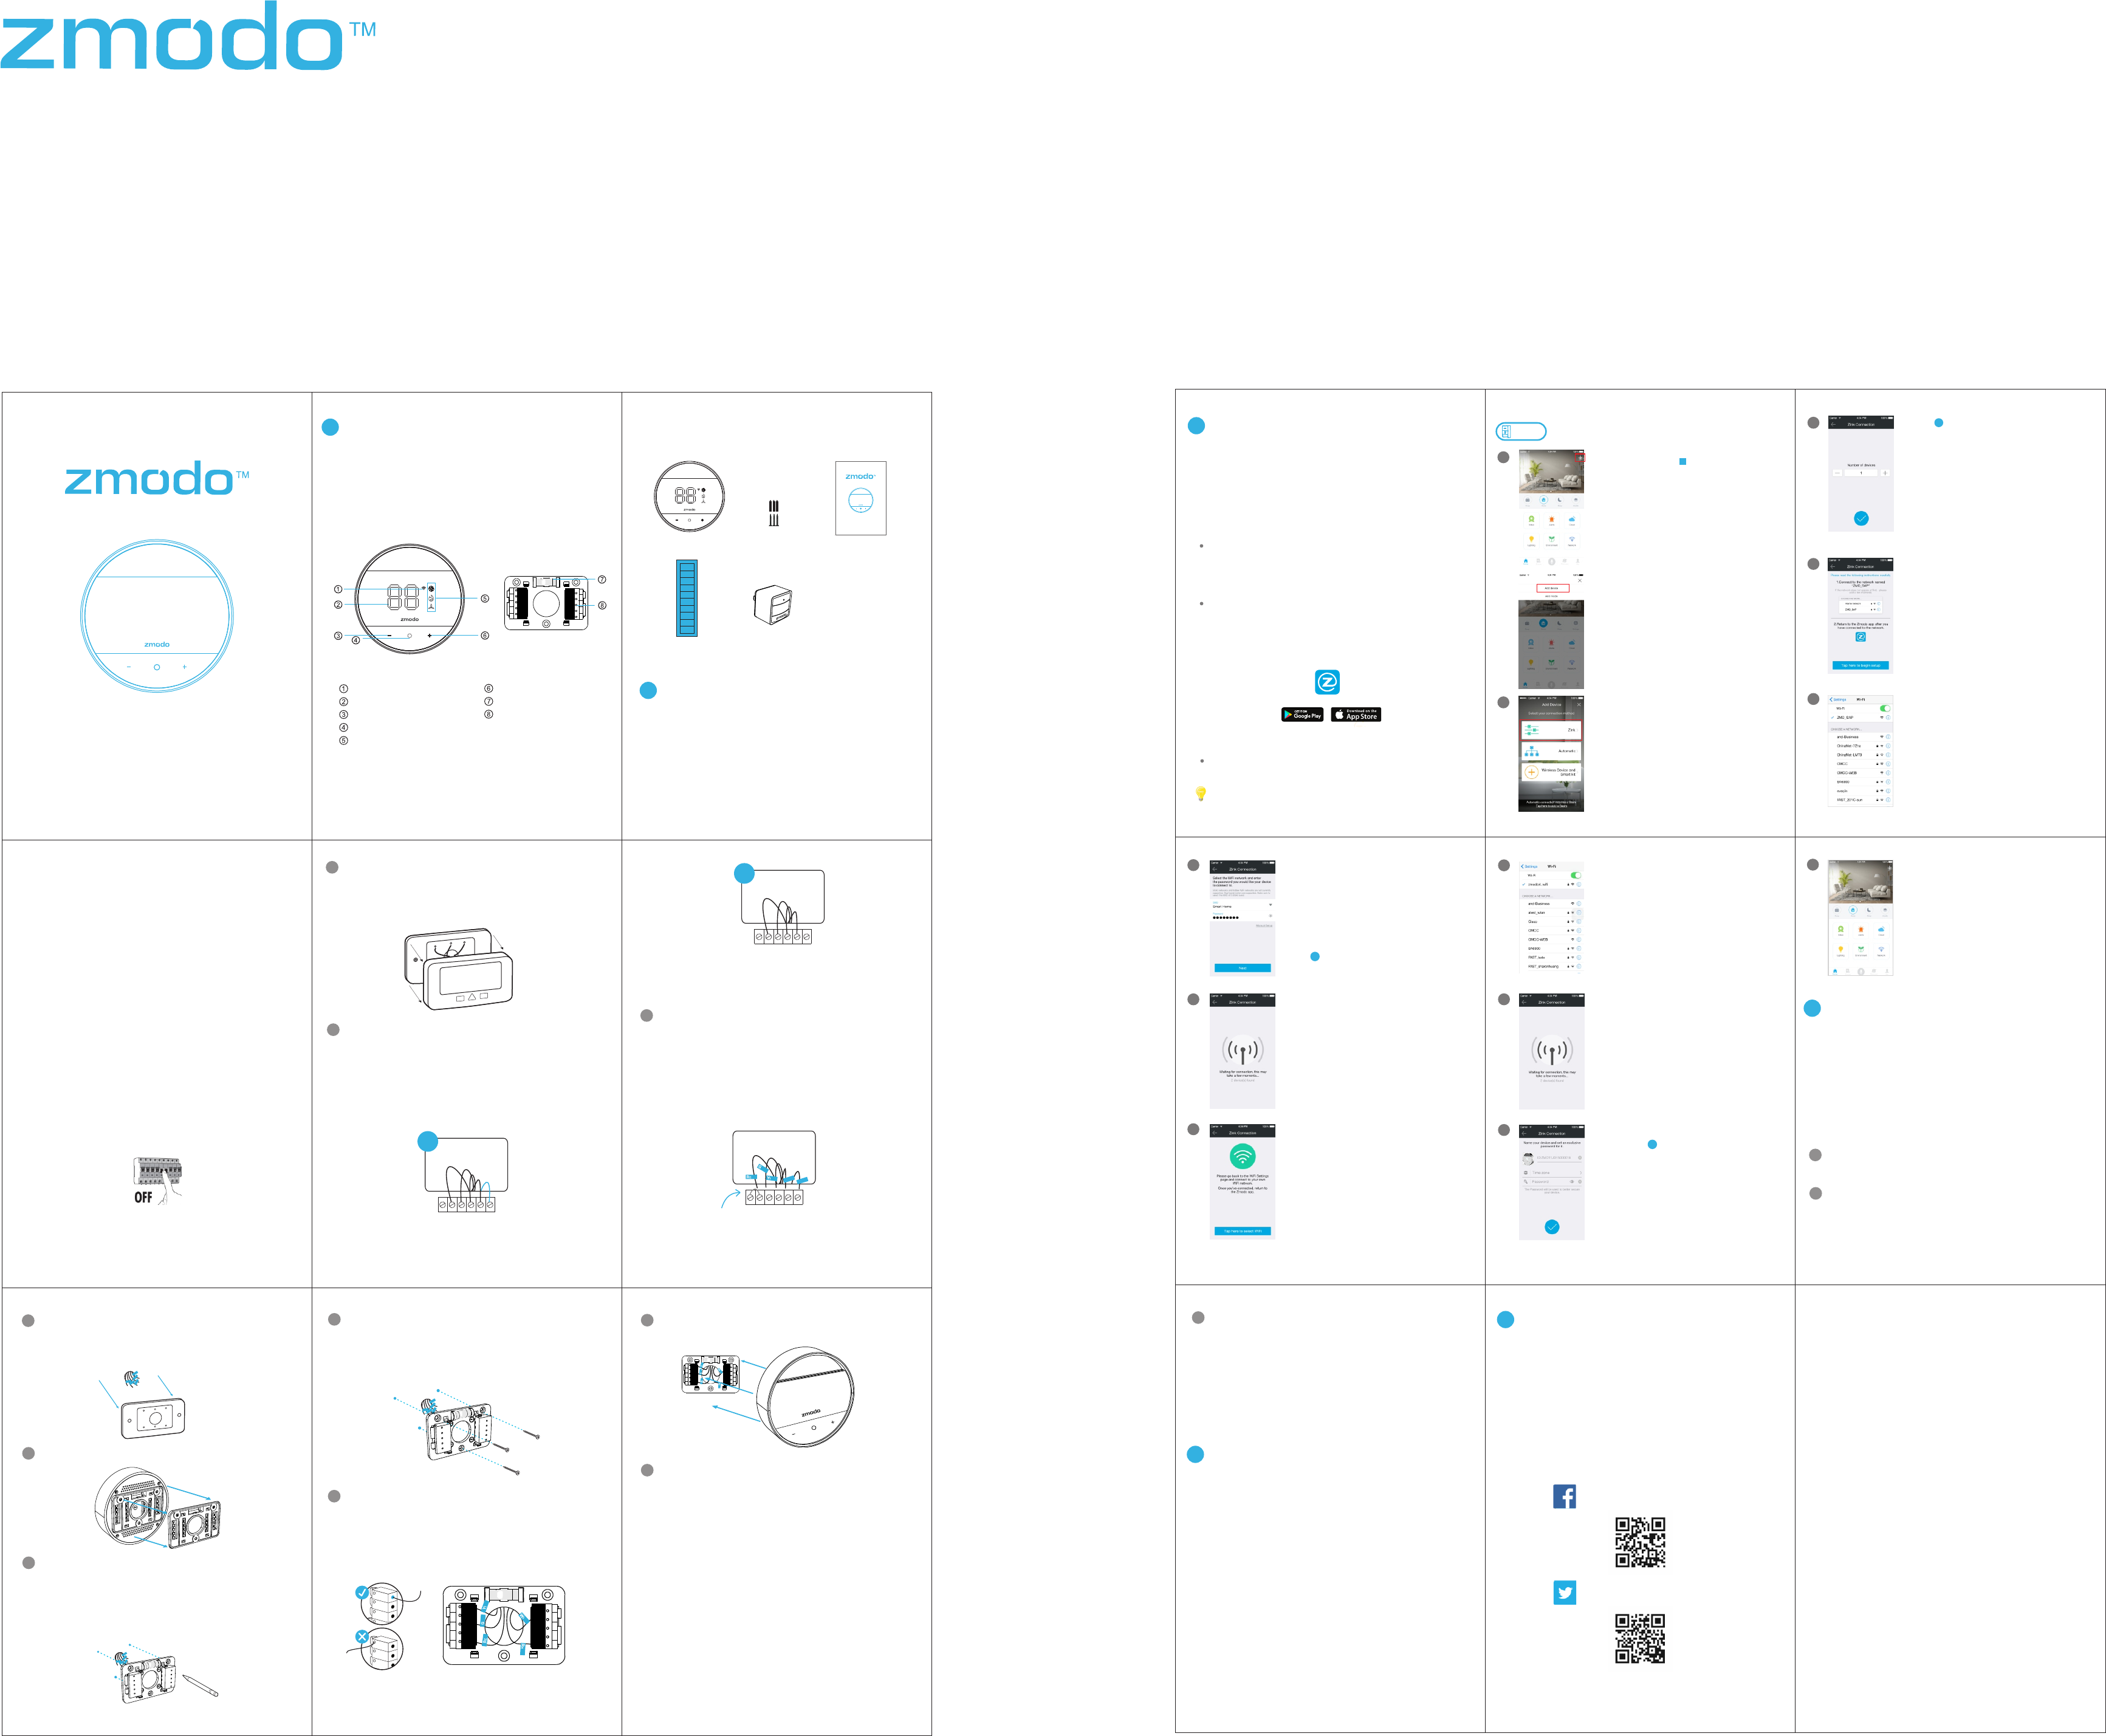
757880306 SD-H2401 快操 REV-A00
尺寸:90*130mm
材质:105g铜版纸 双面印刷4c+1专 折页
4
正面 背面
1
1Getting to know your Tune
*When the WiFi Status Light is solid, it means that Tune is successfully
connected to the WiFi network. When the light is flashing, it means that Tune
is not yet connected to the WiFi network.
**When you are setting the temperature, the display will show the target
temperature. After 5 seconds, it will display the current temperature.
WiFi Status Light*
Current / Target Temperature**
Decrease Temperature
Toggle HVAC Mode
Current HVAC Mode Indicator
(Cooling / Heating / Fan Only)
910 11
12 13 14
15 16
Main Features
Take a picture of the wires and save it for reference,
label the wires using the provided wire labels. Take the
provided wire labels and attach the appropriate labels
to the matching wires on the thermostat.
3
REV-A00
Android is a trademark of Google Inc. Google Play is a trademark of Google
Inc. Apple, the Apple logo, and iPhone are trademarks of Apple Inc.,
registered in the U.S. and other countries. Apple Store is a service mark of
Apple Inc.
Having difficulty?
Follow us on Twitter @Zmodo
Scan the QR-code below!
Like us on Facebook.com/Zmodo
Scan the QR-code below!
www.zmodo.com/support
You can use the Live Chat function in Zmodo app if you
have any technical problems.
Please follow the steps below:
Access the “Me” page in the bottom right corner of the
Zmodo app and select “Zmodo Support”.
For more instructions, troubleshooting, support, and other
resources, please visit:
6Support
There's comfortable, and then there's bliss. Zmodo Tune
is a smart thermostat that controls and fine tunes your
temperature to make sure that your home feels exactly the
way you like it. You can control your Tune from anywhere
with your smartphone or tablet, and program it to adjust
your temperature automatically. It also works with Room
Sensors to make sure that your home is perfectly
configured to your liking.
The following instructions will help you configure your
Tune for initial use. For detailed instructions and
troubleshooting, please visit:
3
Before you begin:
Mobile Setup
Make sure you know the SSID (WiFi network name) and
password of the 2.4GHz WPA-PSK/WPA2-PSK WiFi
network that you want your Tune to connect to. Your
network cannot be hidden.
www.zmodo.com/support
Connecting your Room Sensors (optional)
5Select the network named “ZMD_SAP”
and connect to it.
Note: If you see a "No Internet Connection" error
message, please ignore it and connect anyway.
Follow the on-screen instructions and
select “Tap here to begin setup” to go
to the WiFi settings page on your
smartphone.
4
7If you see this screen, the app will
connect your Tune to your WiFi
network. This may take a few minutes.
Once it’s completed, please skip to
step 11.
If you do not see this screen, please
proceed to step 8.
8If this app interface appears, please
press “Tap here to select WiFi”.
10
11
The app will automatically search for
your Tune and connect it to the WiFi
network. This may take a few
minutes.
Name your Tune and set a password
for it. Tap to proceed.
√
Note: The password provides an additional layer
of security for your devices. You will not need to
use this password when accessing your devices
from the Zmodo app. It is not required, but it is
highly recommended.
Your Tune has been successfully
configured!
9Select the WiFi network that your Tune
will connect to, and connect to it.
Return to the Zmodo app once your
mobile device is connected to the WiFi
network.
Return to the Zmodo app page and
select or enter the SSID and password
of the WiFi network that you want your
Tune to connect to.
Note: The WiFi name and password are case-
sensitive.
Tap to proceed.
√
6
3Tap to proceed.
√
12
Log in and press in the upper
right corner. Select "Add Device".
This device can be set up with a Zmodo Beam. If you own a
Beam, please follow the instructions in your Beam quick guide to
connect your device instead.
2
Connectwith
Beam
+
1
Select the “Zink” connection method
to connect your Tune. Your Tune will
be added to your Zmodo account.
TM
Download and install the "Zmodo" app from Google Play
TM ® TM
or the App Store (Compatibility: iOS 7.0+ or Android
4.0+). Launch the app and sign up for a free Zmodo
account. All of your devices will be bound to this account.
Zmodo
Note: If your package includes Room Sensors, please read the following
before configuring your sensors.
Plug the room sensor into a power outlet in a room that you
frequently visit. Avoid installing in areas exposed to direct
sunlight or near objects that radiate excessive heat.
Open the Zmodo App, access your Tune's Device Settings,
and choose the "Accessories" option. Select the Add
+
Accessory option and follow the on-screen instructions.
When the app prompts you to press a button, wave in front
of the room sensor to pair it with your Tune.
In the app, you will be able to define which rooms are the
most important, and set target temperatures for each
room. For example, you can place a Room Sensor in your
bedroom, set the target temperature to 78°F, and give it
top priority. You have another sensor in your living room,
with a target temperature set to 75°F. If people are
detected both in your bedroom and living room, Tune will
turn on the HVAC until your bedroom is 78°F. If people are
detected in your living room but not your bedroom, Tune
will turn on the the HVAC until your living room is 75°F.
5
Adjust your temperature from anywhere at any time
Tune can be controlled from the Zmodo app on your
smartphone, allowing you to adjust your thermostat
settings whenever you want, no matter where you are.
Learns your habits and automatically adjusts
During the learning period (first week after installation),
Tune will pick up on your preferences. The more you
adjust your temperature, the more Tune learns your
preferences. Over time, Tune will be able to adjust your
temperature automatically, just the way you like it.
Works with Zmodo Smart Vents (not yet available)
Tune will work with the upcoming Zmodo Smart Vents.
When used together with Room Sensors, the Smart Vents
will be able to control the air flow so that each room is set
to the temperature that you want.
Quick Start Guide
Tune
We are constantly working to improve our product and app. Please visit
www.zmodo.com/support for updated instructions, manuals, and more.
1
2
3
4
3
Remove your old thermostat cover. Some thermostats
can be popped off from the base, while others may need
to be unscrewed first.
1
IMPORTANT! Before you begin, make sure that the power
to your thermostat is turned off. Check your circuit breaker
for a switch. To make sure that it's off, try changing the
temperature with your thermostat. Wait a few minutes, and
check the vents. No air should be coming out of the vents.
6
Disconnect the wires and remove your old thermostat's
base. Make sure that the wires do not fall into the hole
in the wall. You can store your old thermostat and base
for safe-keeping.
4
Remove the mounting base from your Zmodo Tune.
5
7
Mark and drill the appropriate holes in the wall for the
mounting base. Line the mounting base against the
surface where you will install your Tune and mark the
wall with three corresponding holes for screws. Use the
level to make sure the mounting base is level. Drill three
holes slightly smaller than the wall anchors.
6
Fasten the mounting base onto the wall. Tap the wall
anchors with a hammer until the anchors are flush
against the wall. Pull the wires through the center hole of
the mounting base, and use the provided screws to
fasten the mounting base to the wall.
7
8
Connect the wires with the matching connectors. Match
the wires with the labels with the corresponding wire
connectors, and connect the wires to the mounting base.
Press the tab down and insert the exposed wire into the
connector. Release until the connector grips the wire.
Once connected, gently tuck each wire into the hole as
shown and make sure that the connections are secure.
8
Attach your Tune to the mounting base.
9
Turn the power to your thermostat back on. To make
sure that your Tune was properly connected, try to
manually adjust the temperature. Wait a few minutes,
and check if any air comes out of your vents.
10
Y1
Y2
G
X
RC
W2
W1
O/B
C
RH
Y1
Y2
G
X
RC
W2
W1
O/ B
C
RH
Tune Thermostat Mounting Base
2
What’s in the box:
2
Before you begin:
Installation
Quick Start Guide
Tune
Tune Quick Guide
Screws & Anchors (3)
Wire Label Stickers
You will need a strong 2.4GHz WPA-PSK/WPA2-PSK WiFi
network near your Tune.
Zmodo Tune is compatible with most of the 24V HVAC
system and not compatible with high voltage (110V, 220V)
systems.
Please check if your old thermostat has a C wire
connected. If it doesn't have a C wire connected, you
will need to buy a Tune Power Accessory in order to
install your Tune. Follow the instructions in your Power
Accessory quick guide to complete the installation.
2
Make sure that your Tune is powered on before
proceeding with the setup.
5
Tune works with most 24V systems, including forced air,
heat pump and radiant systems, as well as common fuel
types such as natural gas, electricity and oil.
It can control:
Heating and cooling: one stage of heating and cooling,
and a second stage of either heating or cooling.
Heat pumps: with auxiliary and emergency heat.
Fans: one speed.
Incompatible wiring and voltage
Stranded wires: Stranded wires aren't compatible with
Tune.
High-voltage wires: If your old thermostat is labelled as
120V or 240V, has thick wires with wire nuts, or as L1 and
L2 terminal blocks, the system is high-voltage and isn't
compatible with Tune.
Y2
G
O
B
O
B
G
W1
C
RHRH
Y2
Y1Y1
W1
C
X X
W2W2
RcRc
RH
RcwY
G C
YES
RH
RcwY
G C
NO
If there is a C wire connected, please continue with
instructions in this guide.
If there is no C wire connected, please purchase a Tune
Power Accessory and follow the instructions on its quick
guide to complete the installation.
Note: → → → →Label your wires: R or Rh Rh, Rc Rc, W/W1 W1, W2 W2,
Y/Y1 Y1, Y2 Y2 → →
If you have a jumper between Rc, Rh, or R, leave it alone. Only label the
wires that run from your wall into a terminal block.
RH
RcwY
G C
c
w1
Y1
Y2
G
X
RC
W2
W1
O/ B
C
RH
Room Sensors (2)
(Only included in select configurations)
Tune Room Sensors can detect whether anyone’s home to
deliver perfect comfort when you’re at home or save
energy when you’re not. Each sensor can read the
temperature and detect when a person is in the room to
deliver the right temperature to the room that matters the
most. For more information on how this works, please visit
the corresponding FAQ at www.zmodo.com/support
Wire Connectors
Increase Temperature
Level
Note: If you were unable to power on your Tune:
Please Turn off the power to your thermostat and remove your Tune from its
mounting base. If your system has both Rh and Rc connected, and you are
connecting the Rh wire to the Rh connector and the Rc wire to the Rc
connector, please swap them and connect the Rh wire to the Rc connector,
and the Rc wire to the Rh connector. Attach your Tune to the mounting base
and restore the power to your thermostat.
For more information on how your Tune, the Room Sensors,
and the Smart Vents work together, visit the corresponding
FAQ on .www.zmodo.com/support
FCC Statement
changes or modifications not expressly approved by the party responsible for
compliance could void the user’s authority to operate the equipment.
This equipment has been tested and found to comply with the limits for a
Class B digital device, pursuant to Part 15 of the FCC Rules. These limits are
designed to provide reasonable protection against harmful interference in a
residential installation. This equipment generates, uses and can radiate radio
frequency energy and, if not installed and used in accordance with the
instructions, may cause harmful interference to radio communications.
However, there is no guarantee that interference will not occur in a particular
installation.If this equipment does cause harmful interference to radio or
television reception, which can be determined by turning the equipment off
and on, the user is encouraged to try to correct the interference by one or
more of the following measures:
– Reorient or relocate the receiving antenna.
– Increase the separation between the equipment and receiver.
– Connect the equipment into an outlet on a circuit different from that to which
the receiver is connected.
– Consult the dealer or an experienced radio/TV technician for help.
This equipment complies with FCC radiation exposure limits set forth for an
uncontrolled environment. This equipment should be installed and operated
with minimum distance 20cm between the radiator and your body. This
transmitter must not be co-located or operating in conjunction with any other
antenna or transmitter.
This device complies with Part 15 of the FCC Rules. Operation is subject to
the following two conditions: (1) this device may not cause harmful
interference, and (2) this device must accept any interference received,
including interference that may cause undesired operation.