Zebex Z-2065S Windows CE.NET Handheld Computer User Manual Z 2065
Zebex Industries Inc Windows CE.NET Handheld Computer Z 2065
Zebex >
Contents
- 1. user manual 1
- 2. user manual 2
- 3. user manual 3
user manual 1
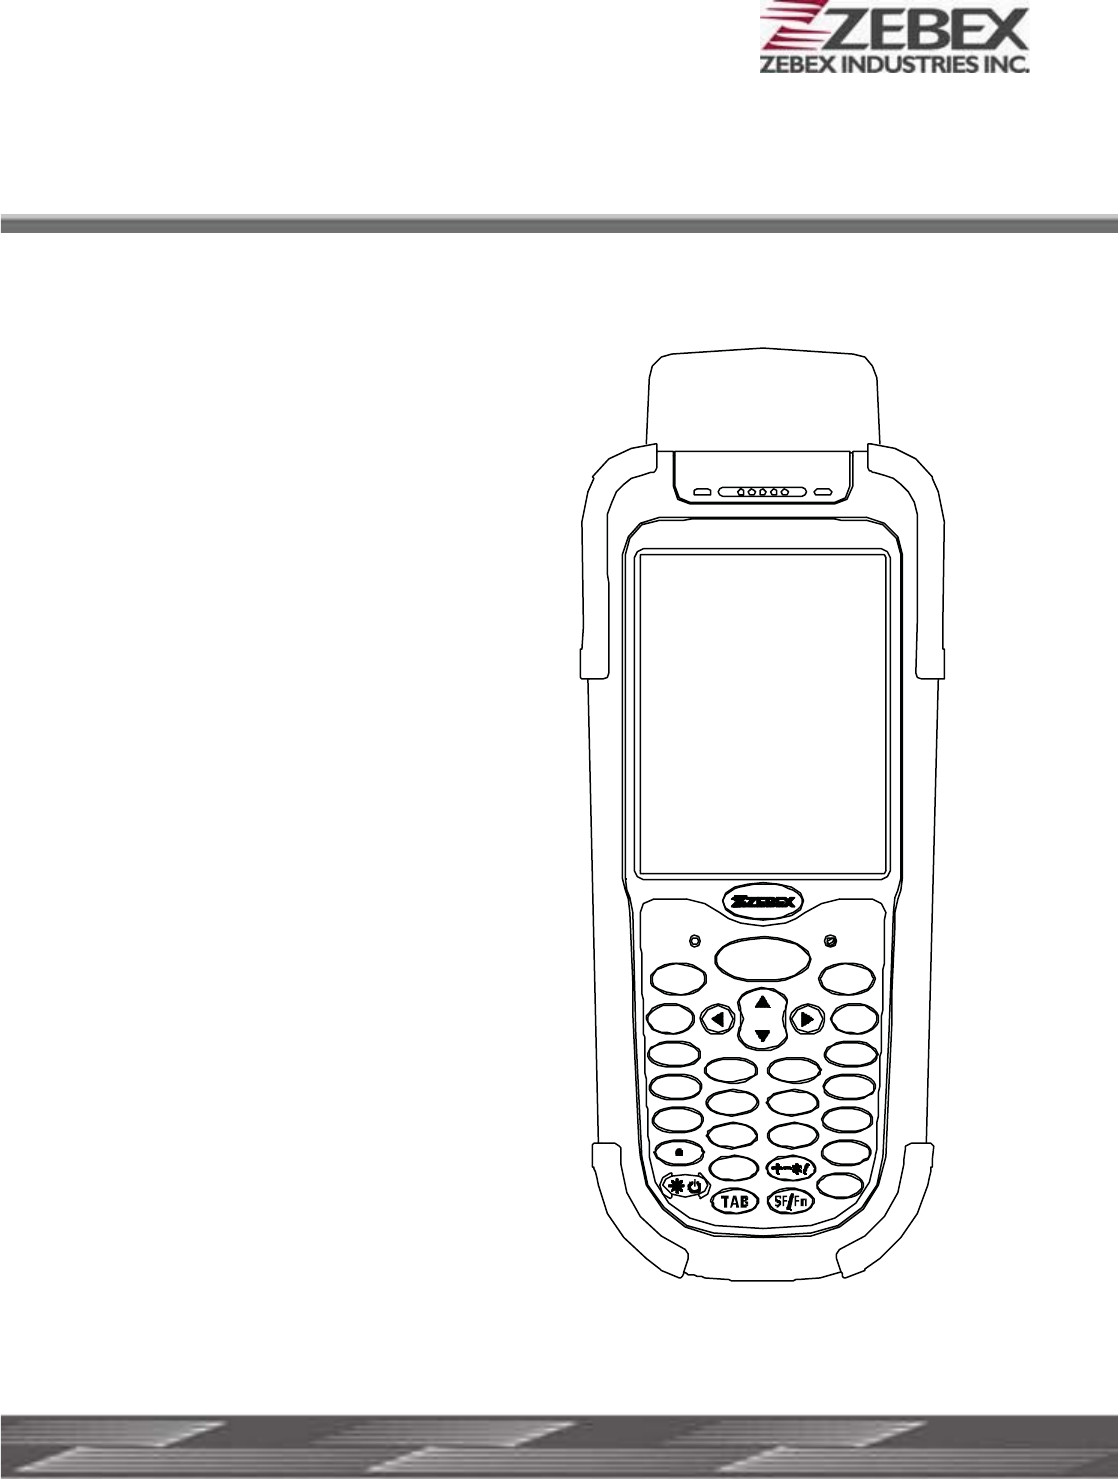
Handheld Computer
Z-2065 series ( Version 3.00 )
User’s Manual
ZEBEX INDUSTRIES INC.
WWW.ZEBEX.COM
jkl4
7stu
1abc
ESC
ENT
SP
F2
F4
F3
9
vwx8yz
65mno pqr
BS
F1
32 def ghi
ENT
SCAN
RESET
0@

ZEBEX INDUSTRIES INC.
Subject Version Date Page
Z-2065 series User’s Manual 3.00 2010/3/19 2 / 69
Editorial Record
Version Date of edited Page Content
Ver 2.00 2009/3/2 9
Revise the picture of Package contents
Ver 2.00 2009/3/2 10
Revise the picture of Cradle Package
Ver 2.00 2009/3/2 11,12
Revise the picture Purchaseable accessories
Ver 2.00 2009/3/2 26~52
Adding the instruction of Using PowerPack
Ver 2.00 2009/3/2 53~56
Adding the picture of How to order
Ver 3.00 2010/1/25 26~49 Updated PowerPack Functions and pictures
Ver 3.00 2010/3/16 30~39 Adding GPRS User Manual
Ver 3.00 2010/3/19 1~26 Adding New Photo for Z-2065

ZEBEX INDUSTRIES INC.
1Subject 4Version =Date &Page
Z-2065 series User’s Manual 3.00 2010/3/19 3 / 69
Table of Contents
Preface
About This Manual ..........................................................................................................5
Symbols used in this manual..............................................................................5
Copyright ...........................................................................................................................6
Safety Information...........................................................................................................6
Laser Safety.............................................................................................................6
Safety Operation ....................................................................................................7
Federal Communication Commission (FCC) Statement..............................8
Unpacking
Package Contents............................................................................................................9
Optional Parts.................................................................................................................10
Cradle package.....................................................................................................10
Purchaseable Accessories................................................................................11
General Guide.................................................................................................................13
Getting Start
Inserting the Battery .....................................................................................................15
Remove the Battery.......................................................................................................15
Charging the Battery.....................................................................................................16
Charging by cable................................................................................................16
Charging by cradle...............................................................................................16
Charging the battery separately in the cradle...............................................17
System Reset..................................................................................................................19
Using the Warm reset function.........................................................................19
Using the Cold reset function...........................................................................19
PC System Requirements............................................................................................20
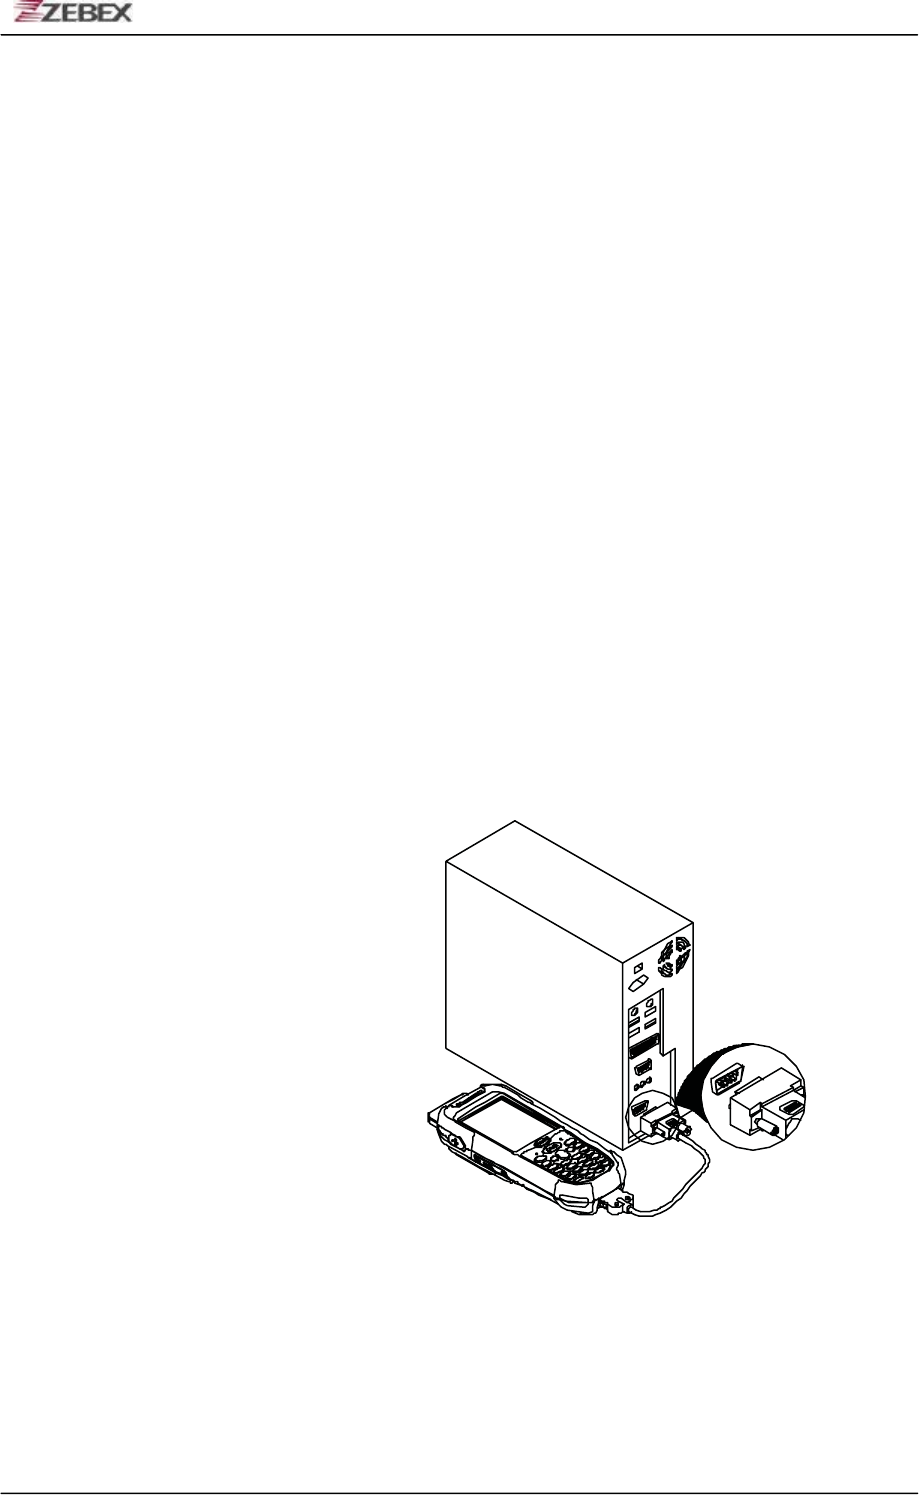
Connecting To a PC.......................................................................................................20
Connecting via the RS232 .................................................................................20
Connecting via USB Cradle...............................................................................21
Inserting SD Card ..........................................................................................................22
Remove the SD Card.....................................................................................................22
About The Product........................................................................................................23
Prerequisites .........................................................................................................23
Specifications .......................................................................................................24
Using Barcode Scanner
Scanning Barcodes.......................................................................................................25
Using RFID Scanner
Scanning RFID................................................................................................................26
ZEBEX Hand-Held Terminal GPRS User’s Guide
Make New Connection..................................................................................................30
Set Connection Properties..........................................................................................32
Phone Number................................................................................................................34
Set Dial Properties.........................................................................................................35

ZEBEX INDUSTRIES INC.
Subject Version Date Page
Z-2065 series User’s Manual 3.00 2010/3/19 4 / 70
Connect to GPRS Service............................................................................................37
Disconnect GPRS Service ...........................................................................................39
Using Zebex Power Pack
Backlight ..........................................................................................................................40
Calculator.........................................................................................................................42
File Transfer ....................................................................................................................43
File Transfer Operation.........................................................................................44
Preload Manager ……………………………………………………………………...46
Preload Operation ................................................................................................47
Switch ...............................................................................................................................50
Scan Manager ….……………………………………………………………………. .52
Backup/Restore..............................................................................................................56
Firmware Information ...................................................................................................58
Function Key Manager .................................................................................................59
How to order………………………………………………………………………………..64
ZEBEX INDUSTRIES INC.
Subject Version Date Page
Z-2065 series User’s Manual 3.00 2010/3/19 5 / 69
Preface
About This Manual
Thank you for your purchase of the ZEBEX Z-2065 series handheld
computer. ZEBEX Z-2065 series product is at the forefront of
handheld computer technology, and this manua l will provide the
necessary information on the many and varied options available to
you.
The Z-2065 series product is a compact, ergonomic and durable
handheld computer. It is designed with an integrated 802.11b/g
wireless communication, 1D/2D barcode scanner, touch screen and
29-keys keypad. The design is complies with IP 64 regulations and
ideal for the mobile worker as it simple and easy to use anywhere
along a supply chain.
Symbols used in this manual
A triangular shape indicates you should exerc ise
caution.
A circle shape indicates something you should not to
do.
A black circle indicates something you must to do.
A note symbol indicates you the information that is
important and you should be observed.

ZEBEX INDUSTRIES INC.
Subject Version Date Page
Z-2065 series User’s Manual 3.00 2010/3/19 6 / 69
Copyright
ZEBEX Industries Inc. makes no warranty of any kind with regard to
this material. Including but not limited to the imply warranties of
merchantability and fitness for a particular purpose. ZEBEX Industries
Inc. shall not be liable for errors contained herein or for incidental
consequential damages in connection with the furnishing,
Performance or use of this product.
ZEBEX Industries Inc. will be under no liability in respect of any defect
arising from fair wear and tear, willful damage, negligence, abnormal
working conditions, failure to follow the instructions and warnings, or
misuse or alteration or repair of the products without written approval.
No part of this document may be reproduced, transmitted, stored in a
retrieval system, transcribed or translated into any language or
computer language in any form or by any means electronic,
mechanical, magnetic, optical, chemical, manual or otherwise, with
express writ- ten consent and authorization.
We reserve the right to make changes in product design without
reservation and witho ut notification. The material in this guide is for
information only and is subject to change without notice.
ZEBEX is a registered trademark of ZEBEX INDUSTRIES INC.
© Copyright 2008 ZEBEX.
Safety Information
Your safety is of the utmost importance so please observe and follow
the following guidelines that allow you to use the scanner in a safe
and responsible wa y.
Laser Safety
The Z-2065 series handheld computer complies with safety standard
IEC825-1(1993) for a Class 2 laser product. It also complies with
U.S.21CFR1040 as applicable to a Class II laser product. Avoid
staring at direct laser light as the laser beam may hurt your eyes.
LASER BEAM
Never look directly into the laser beam. Doing so can cause
serious eye damage.
ZEBEX INDUSTRIES INC.
Subject Version Date Page
Z-2065 series User’s Manual 3.00 2010/3/19 7 / 69
Safety Operation
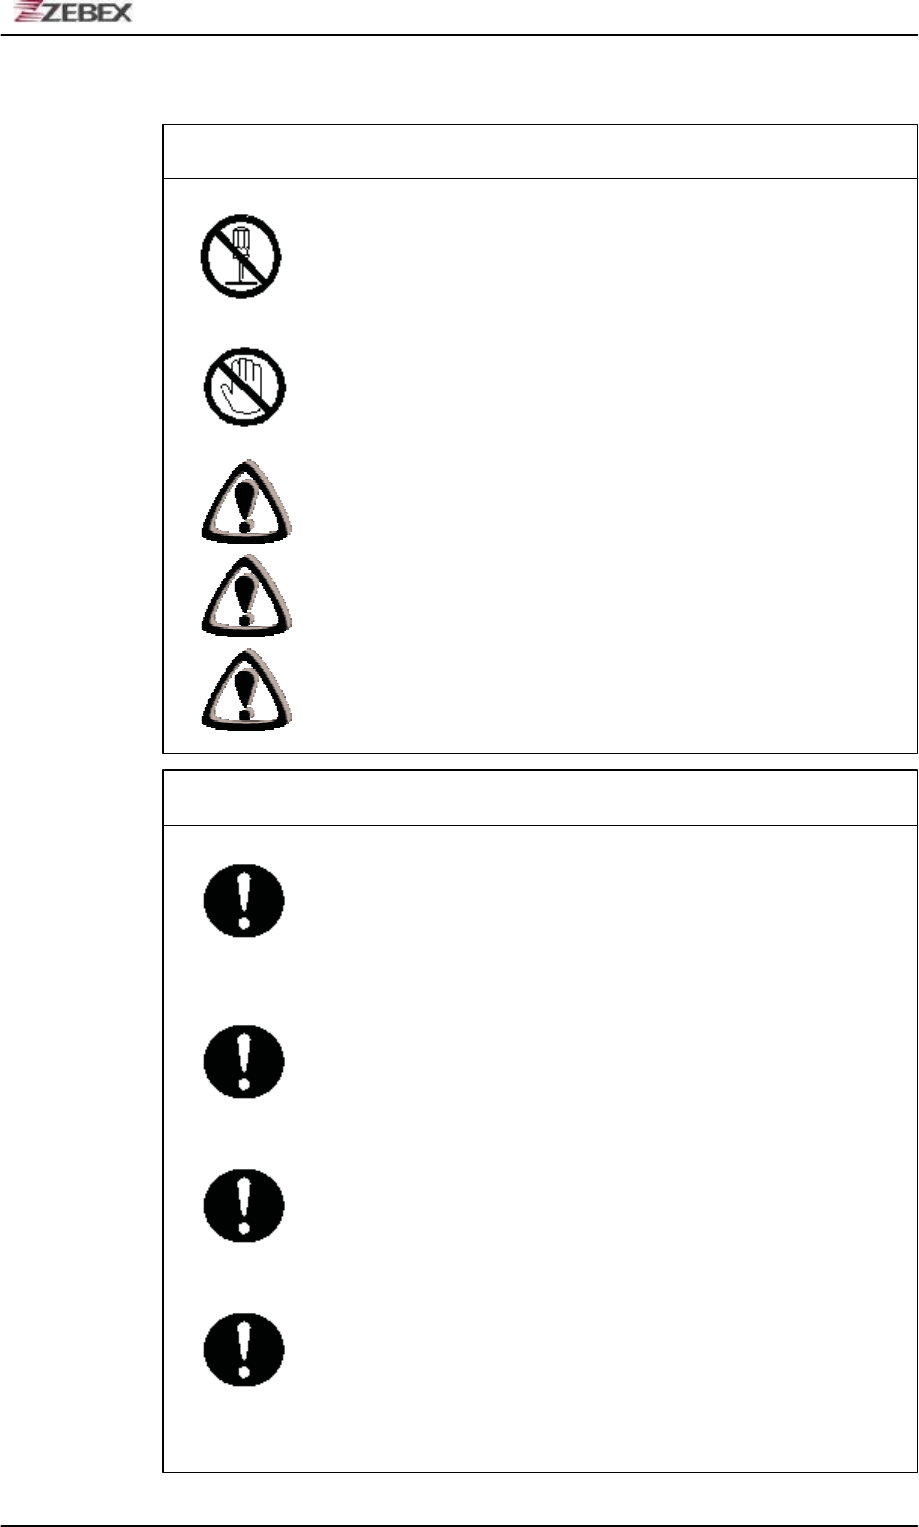
WARNING
Disassembly and Modification
Never try to disassemble or modify the device in any way.
All
servicing should be carried out by qualified Zebex personnel or
Zebex- approved engineers.
Interior Parts and Components
Never touch interior high voltage parts or components. Doing
so creates the danger of electrical shock.
Drop and Knock the Device
Be careful when using the device; do not drop or knock the
device as irreversible damage to the unit may occur.
Extreme temperature
Do not operate the device under extreme temperature.
Battery and Charger
The use of third-party battery or charger may either damage the
device or shorten the life of the device.
CAUTION
Dropping and Damage
Should the drop the devi ce and damage it, immediately turn off
the power and contact your original dealer or an authorized
ZEBEX service provider. Continued use creates the danger of
fire and electrical shock.
Abnormal Conditions
Should the device become hot or start to emit smoke or an
original dealer or an authorized ZEBEX service provider.
Continued use creates the danger of fire and electrical shock.
Foreign Objects
Should any foreign matter ever get into the device, immediately
turn off the power and contact your original dealer or an
authorized ZEBEX service provider. Continued use creates the
danger of fire and electrical shock.
Moisture
Keep the device away from vases, planters, cups, glasses and
other containers of liquid. Also keep it away from metal. Water
and metal getting into the device creates the danger of fire and
electrical shock.

The exposure standard for wireless mobile phones employs a unit of
measurement known as the Specific Absorption Rate, or SAR. The SAR limit
set by the FCC and by the Canadian regulatory authorities is 1.6 W/kg.
ZEBEX INDUSTRIES INC.
Subject Version Date Page
Z-2065 series User’s Manual 3.00 2010/3/19 9 / 69
Unpacking
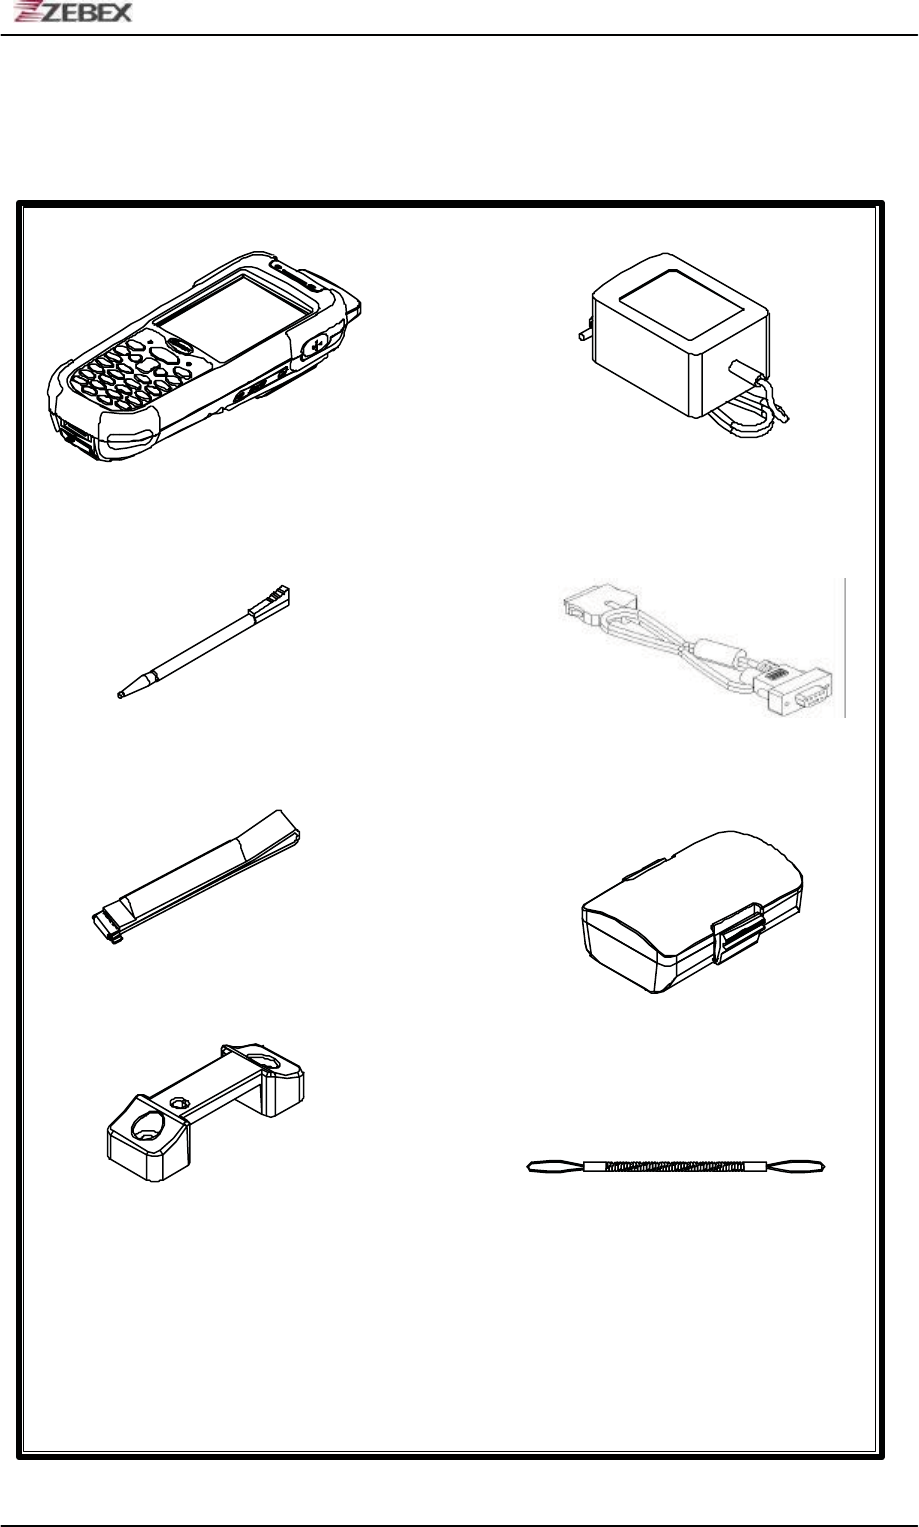
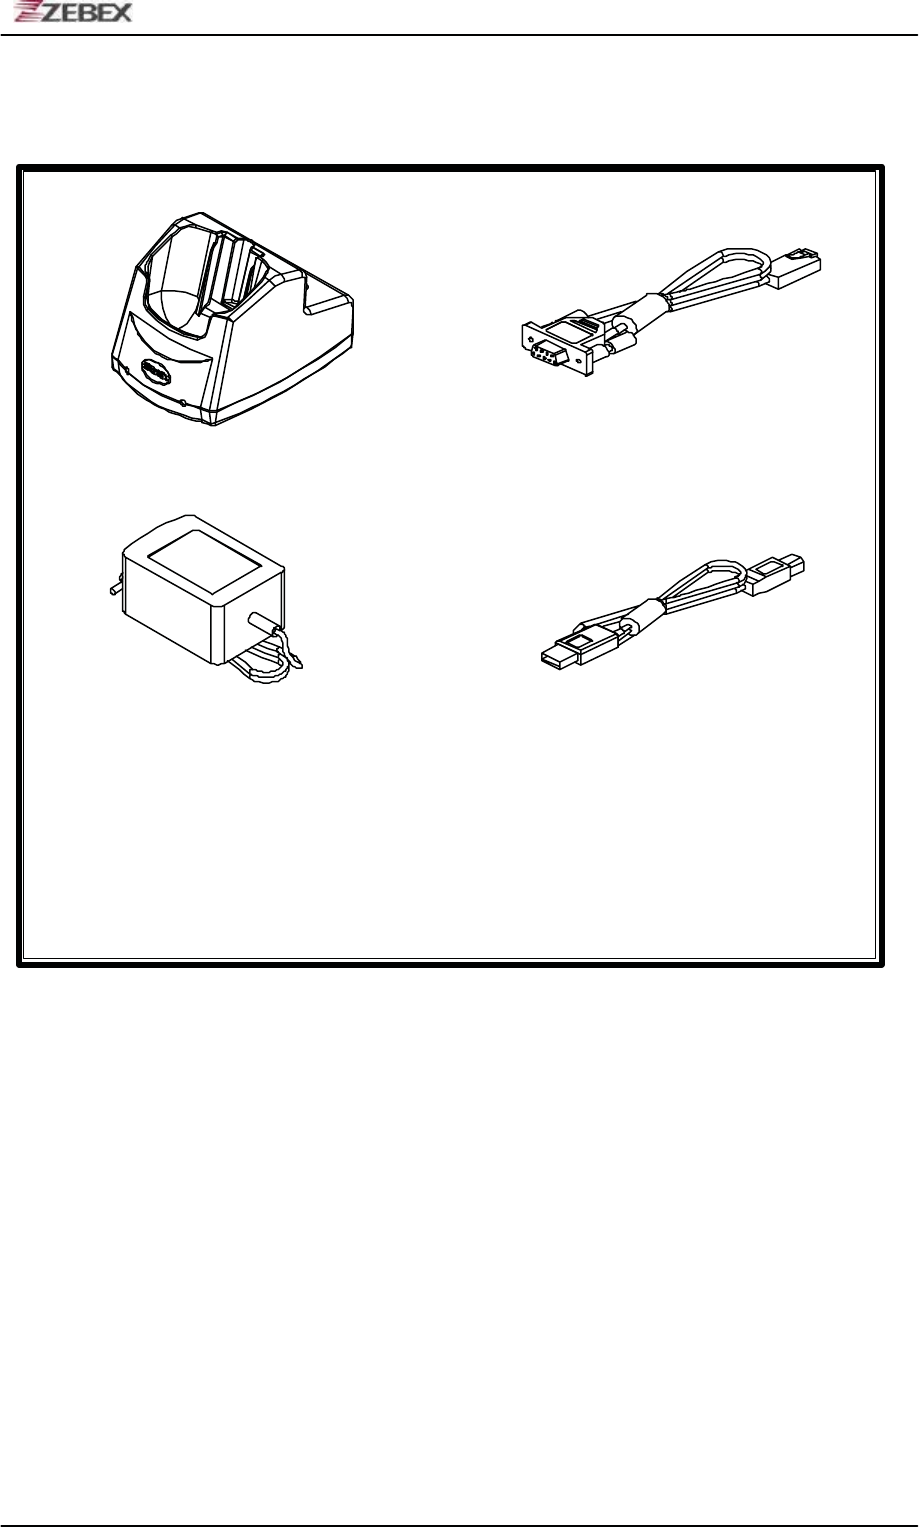
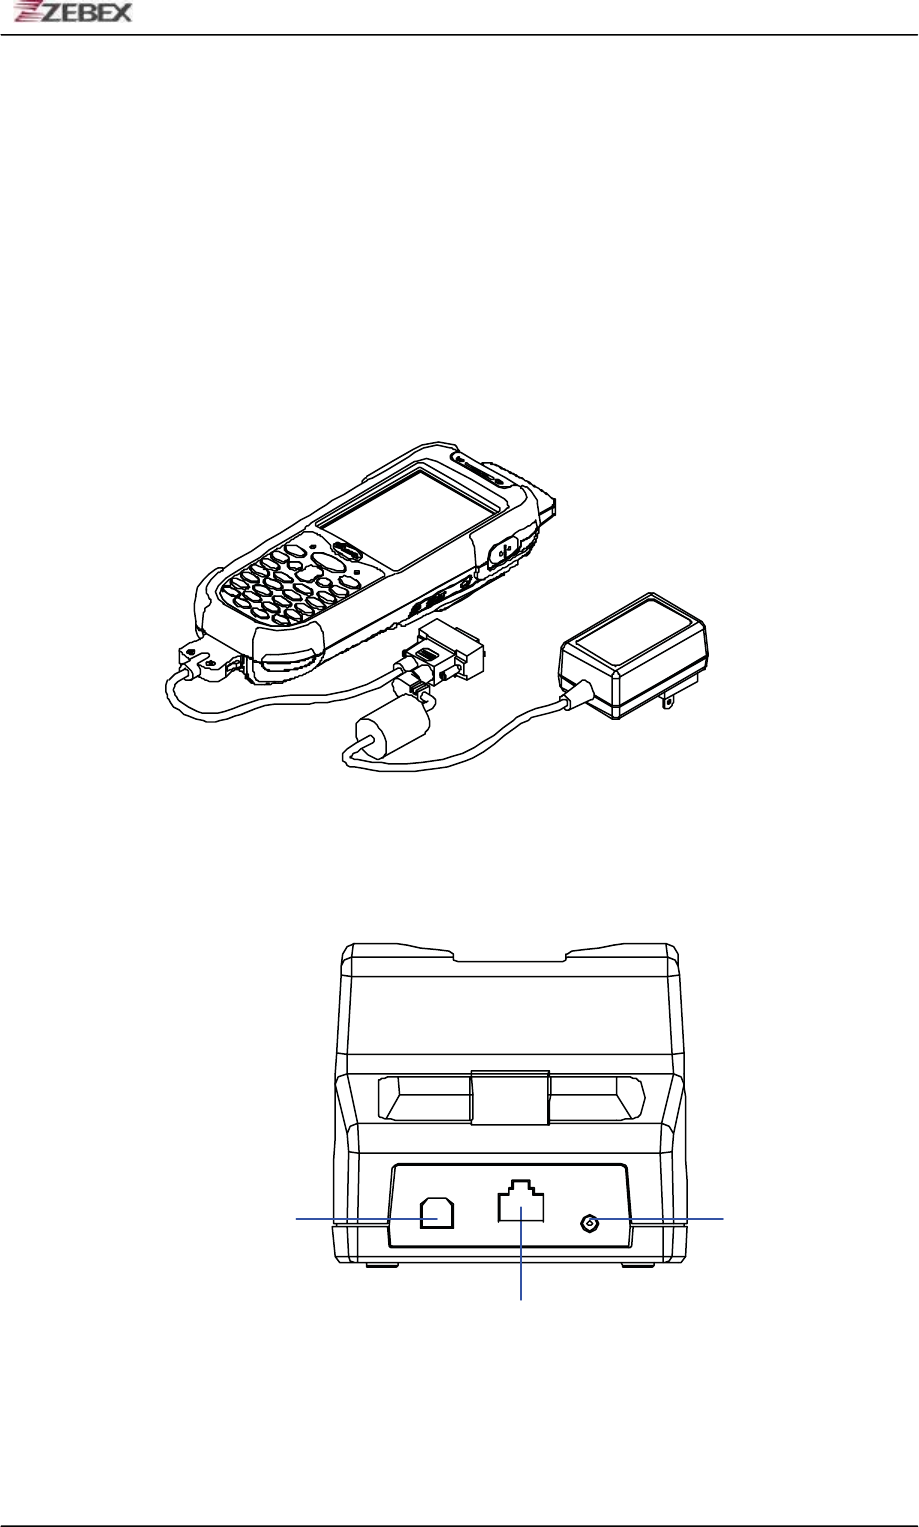
Package Contents
AC Adapter
Z-2065 series
Mobile Data Terminal
Stylus Pen RS-232 DB9 (F) Cable
Hand Strip
Battery Pack
Hand strip Holder Sling for stylus Pen
ZEBEX INDUSTRIES INC.
Subject Version Date Page
Z-2065 series User’s Manual 3.00 2010/3/19 10 / 69
Optional Parts
Cradle package
Docking Cradle RS232 cable
AC Adapter USB cable
(Cradle to USB)
ZEBEX INDUSTRIES INC.
Subject Version Date Page
Z-2065 series User’s Manual 3.00 2010/3/19 11 / 69
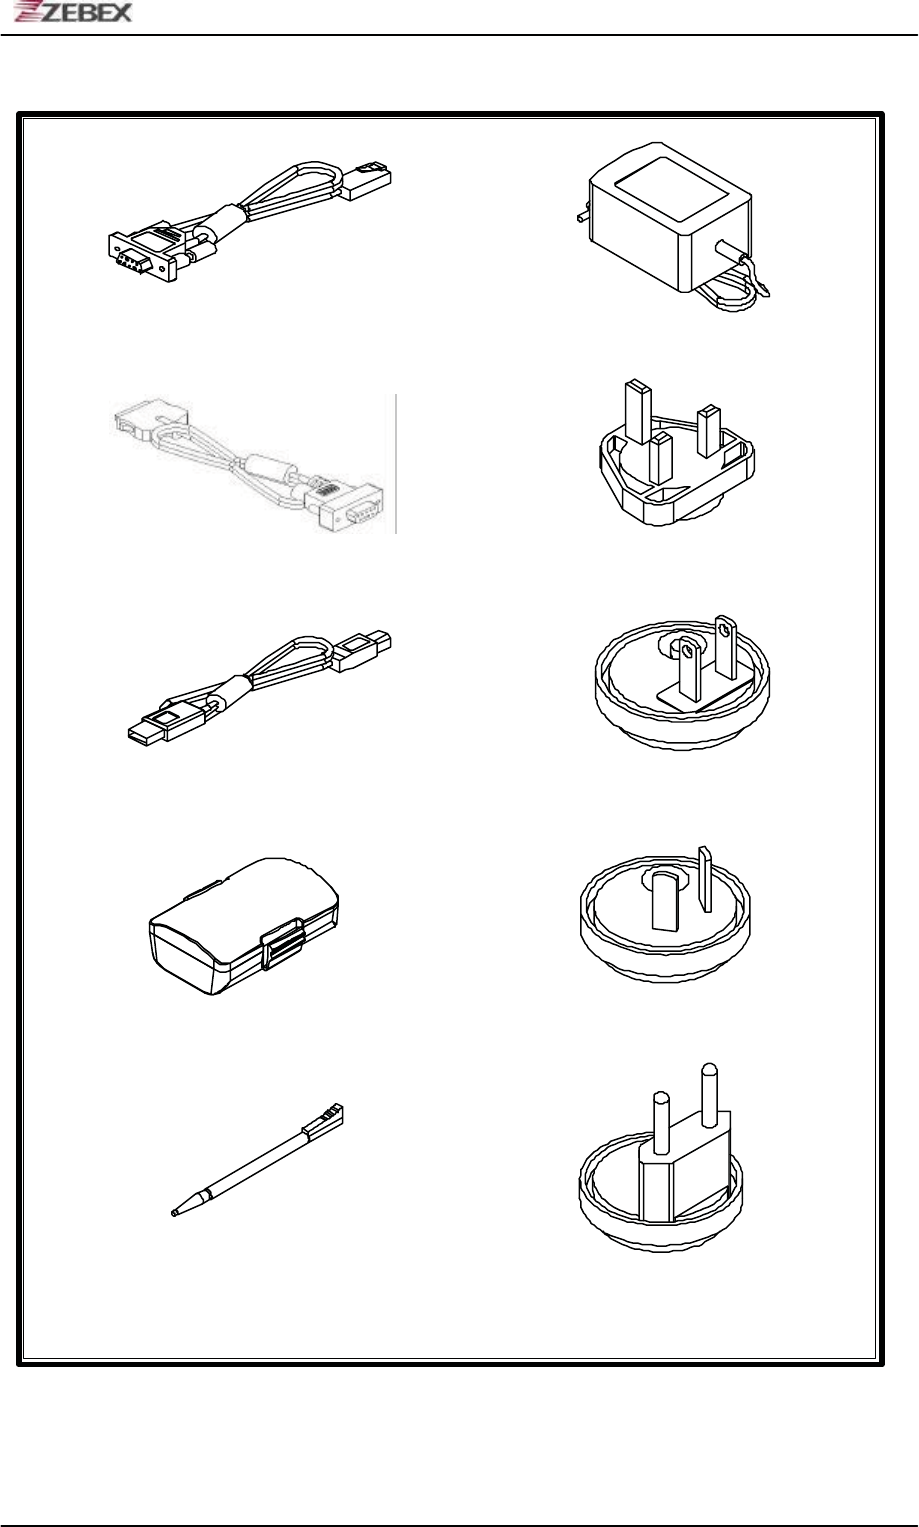
Purchaseable Accessories
RS232 Cable AC Adapter
RS-232 DB9 (F) Cable Britain Plug head
USB cable (Cradle to USB) U.S. Plug head
Battery Pack Australia Plug head
Stylus Pen Europe Plug head

ZEBEX INDUSTRIES INC.
Subject Version Date Page
Z-2065 series User’s Manual 3.00 2010/3/19 12 / 69
Hand Strip for stylus Pen Sling for stylus Pen
Hand strip Holder
ZEBEX INDUSTRIES INC.
Subject Version Date Page
Z-2065 series User’s Manual 3.00 2010/3/19 13 / 69
jkl4
7stu
1abc
ESC
ENT
SP
F2
F4
F3
9
vwx8yz
65mno p q r
BS
F1
32def ghi
ENT
SCAN
RESET
0@
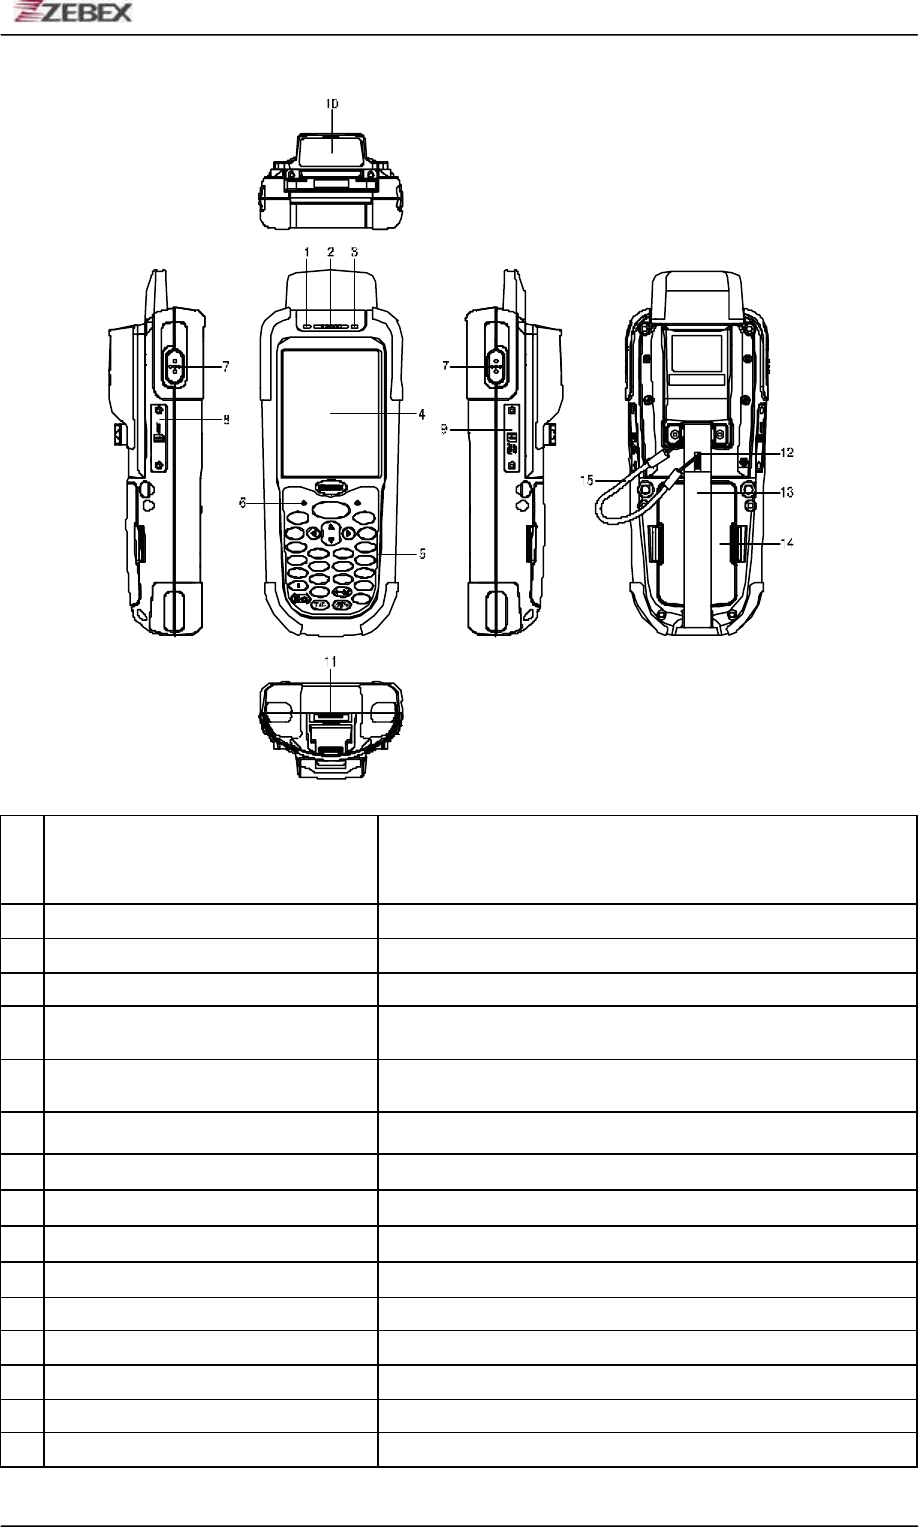
General Guide
1 LED indicator
Indicates the status of read bar code or battery charge :
Green for successful read barcode or full charge of battery.
Red for battery just on charging.
2 Buzzer Outputs operation confirmation tones.
3 LED indicator for WI-FI Flashes in red when operating via WLAN communication
4 LCD screen Display various data when a program is being run.
5 Stroke keys A total of 29 keys are provided to turn power ON or OFF
and other operations.
6 Reset switch (inside the hole) Use reset needle (take off the other side of stylus pen
cover) to press the RESET switch located inside the hole.
7 Scan button For Barcode reading.
8 Mini USB port This port is for USB communication with PC.
9 Ear Jack Listens to the voice.
10 Mini SD I/O card slot Install the Mini SD I/O card
11 Scan windows Emits a laser for bar code reading.
12 RS-232 port This port is for RS-232 communication with PC
13 Stylus pen For touch screen operation and press RESET switch.
14 Hand strip Protects the Handheld Terminal to drop.
15 Battery Main battery
16 Sling Sling for stylus pen

ZEBEX INDUSTRIES INC.
Subject Version Date Page
Z-2065 series User’s Manual 3.00 2010/3/19 14 / 69
4jkl F2
F3
F4
SP
stu7
yz
98vwx
5mno 6pqr
ENT
BS
F1
1abc
ESC
2def 3ghi
ENT
RESET SCAN
0@
Arrow Arrow keys Press these to move around the screen.
ENT Enter key Press to confirm entries or commands.
0-9 Alphanumeric keypad Press to enter
numerical or alphabetical
data.
F1-F4 Function keys Press to access function keys 1-4.
BS Backspace key Press to
move cursor and deletes the previous character
each time.
Power/Backlight on key
1. Press to turn the power on.
2. Press more then 3 seconds for turn the terminal power
off and go into the suspend mode.
3. Press to turn the LCD backlight on when it is off.
ESC Escape key Press to perform a cancel action.
SCAN Scan key Press and hold to scan a barcode.
SF/Fn Shift key
The key is used in combination with other keys to type
special characters or perform other function keys.
1. Press after SF/Fn key and press Up key to turn
the
input method into upper alphabetical.
2. Press after SF/Fn key and press Down key to turn
the
input method into lower alphabetical.
3. Press after SF/Fn key and press Left or Right key to
turn
the input method into numerical.
4. Press after SF/Fn key and press F1-F4 key to perform
F5 - F8 key.
TAB Tab key Press to add a tab indention.
SP Space key Press to add a space character.
ZEBEX INDUSTRIES INC.
Subject Version Date Page
Z-2065 series User’s Manual 3.00 2010/3/19 15 / 69
Getting Started
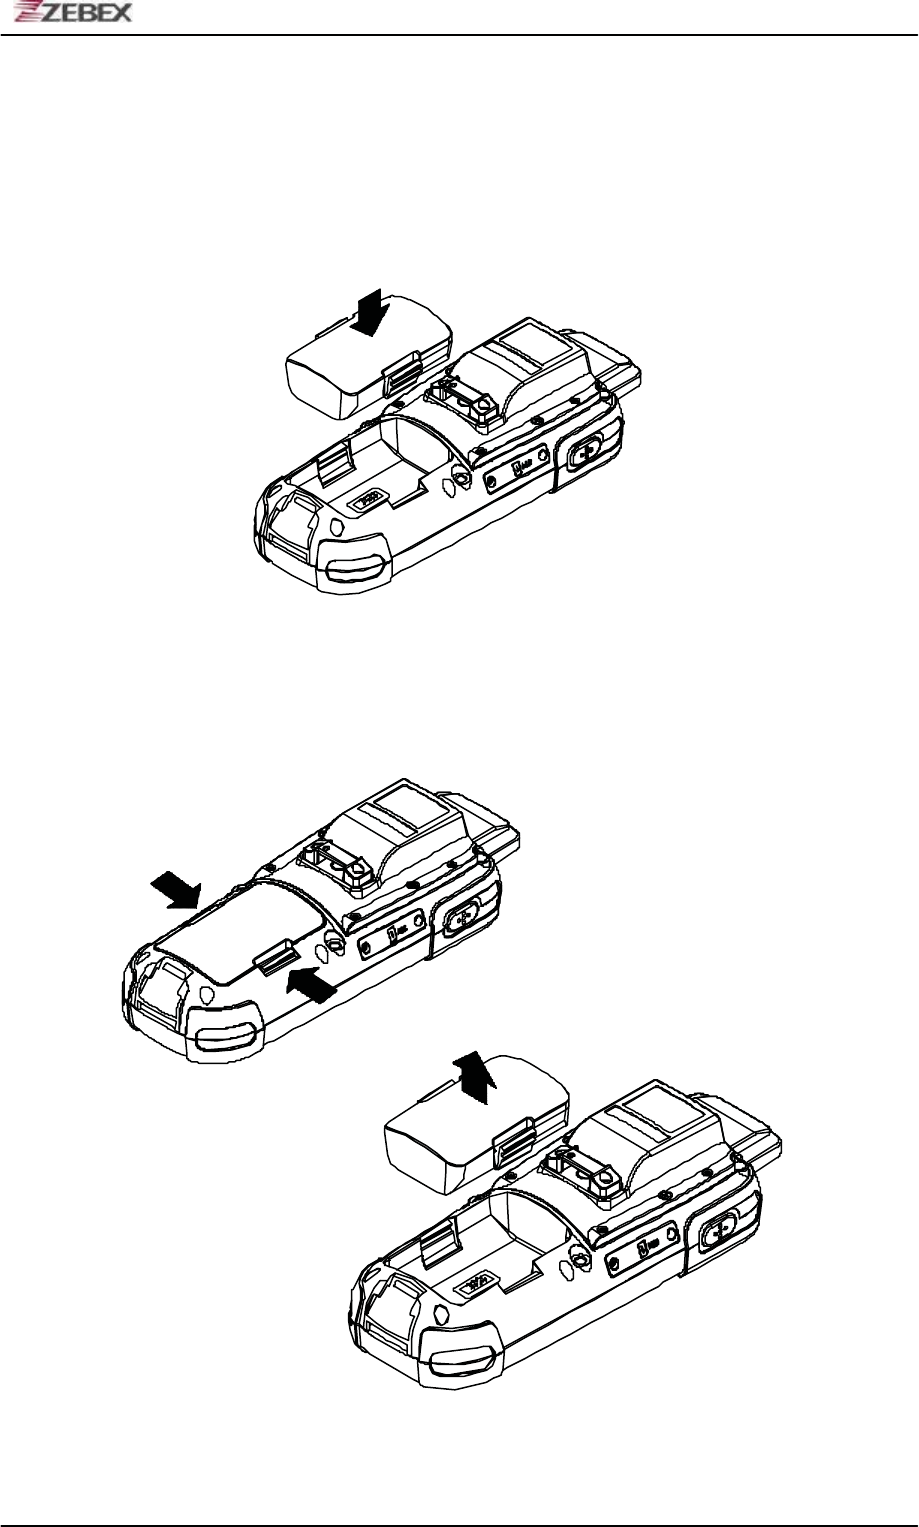
Inserting the Battery
Insert the battery pack as shown and watch the battery direction..
Remove the Battery
Push the side lock to pick up the battery pack.
ZEBEX INDUSTRIES INC.
Subject Version Date Page
Z-2065 series User’s Manual 3.00 2010/3/19 16 / 69
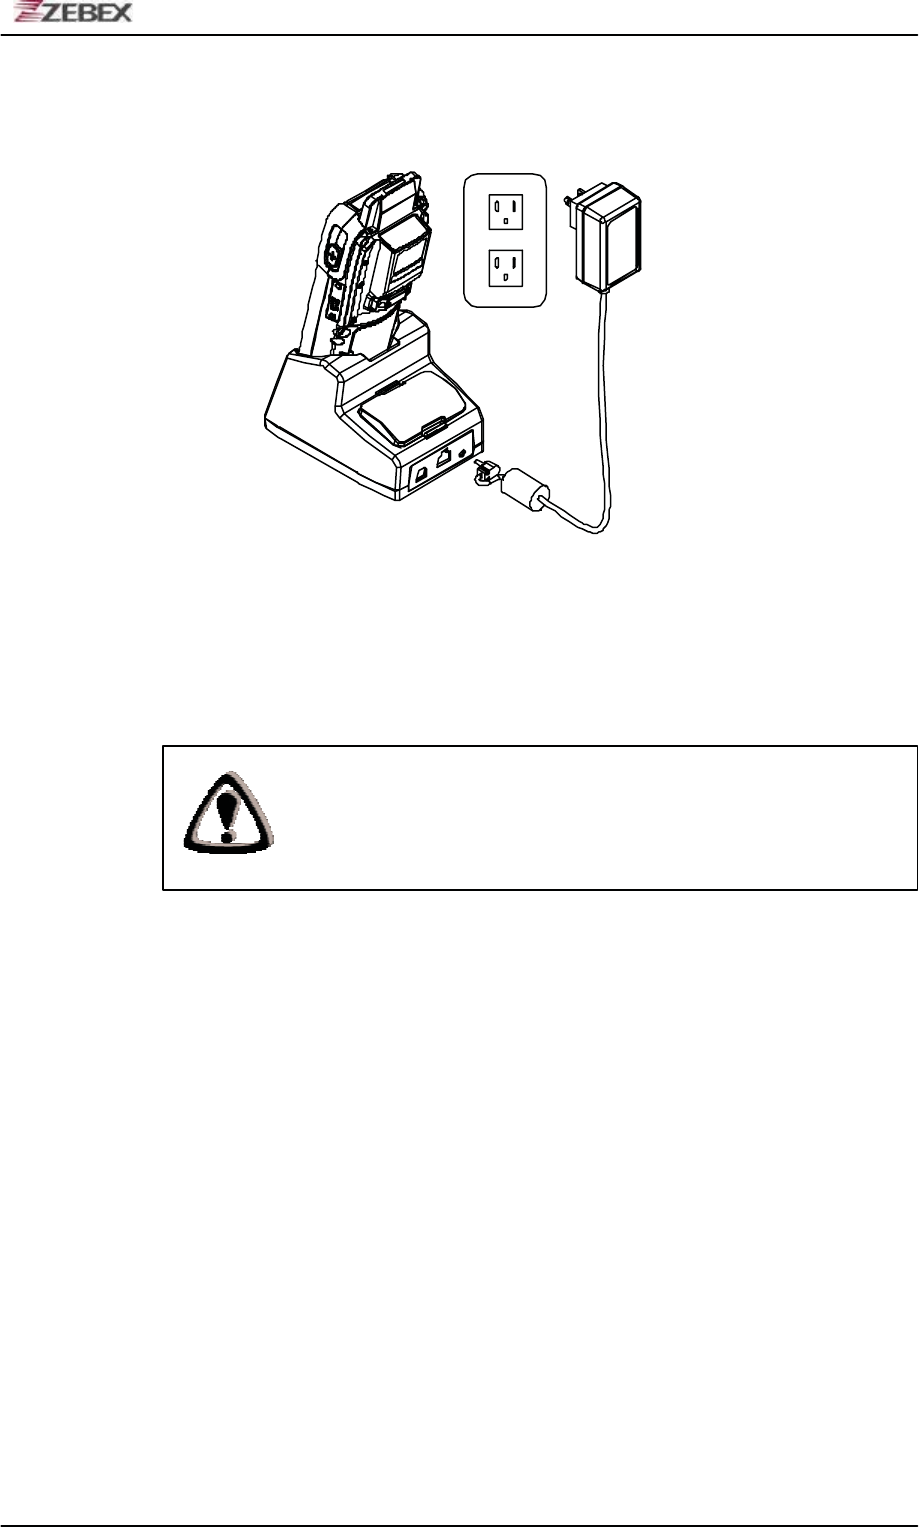
Charging the Battery
The Li-ion rechargeable battery can be charged while inserted in the
device itself or independently via the recharging slot at the back of the
cradle.
Charging by cable
Connect the charging cable and AC adaptor as shown.
Charging by cradle
USB Interface AC Power
Adapter
Jack In
RS232/COM port Interface
Cradle - rear view
ZEBEX INDUSTRIES INC.
Subject Version Date Page
Z-2065 series User’s Manual 3.00 2010/3/19 17 / 69
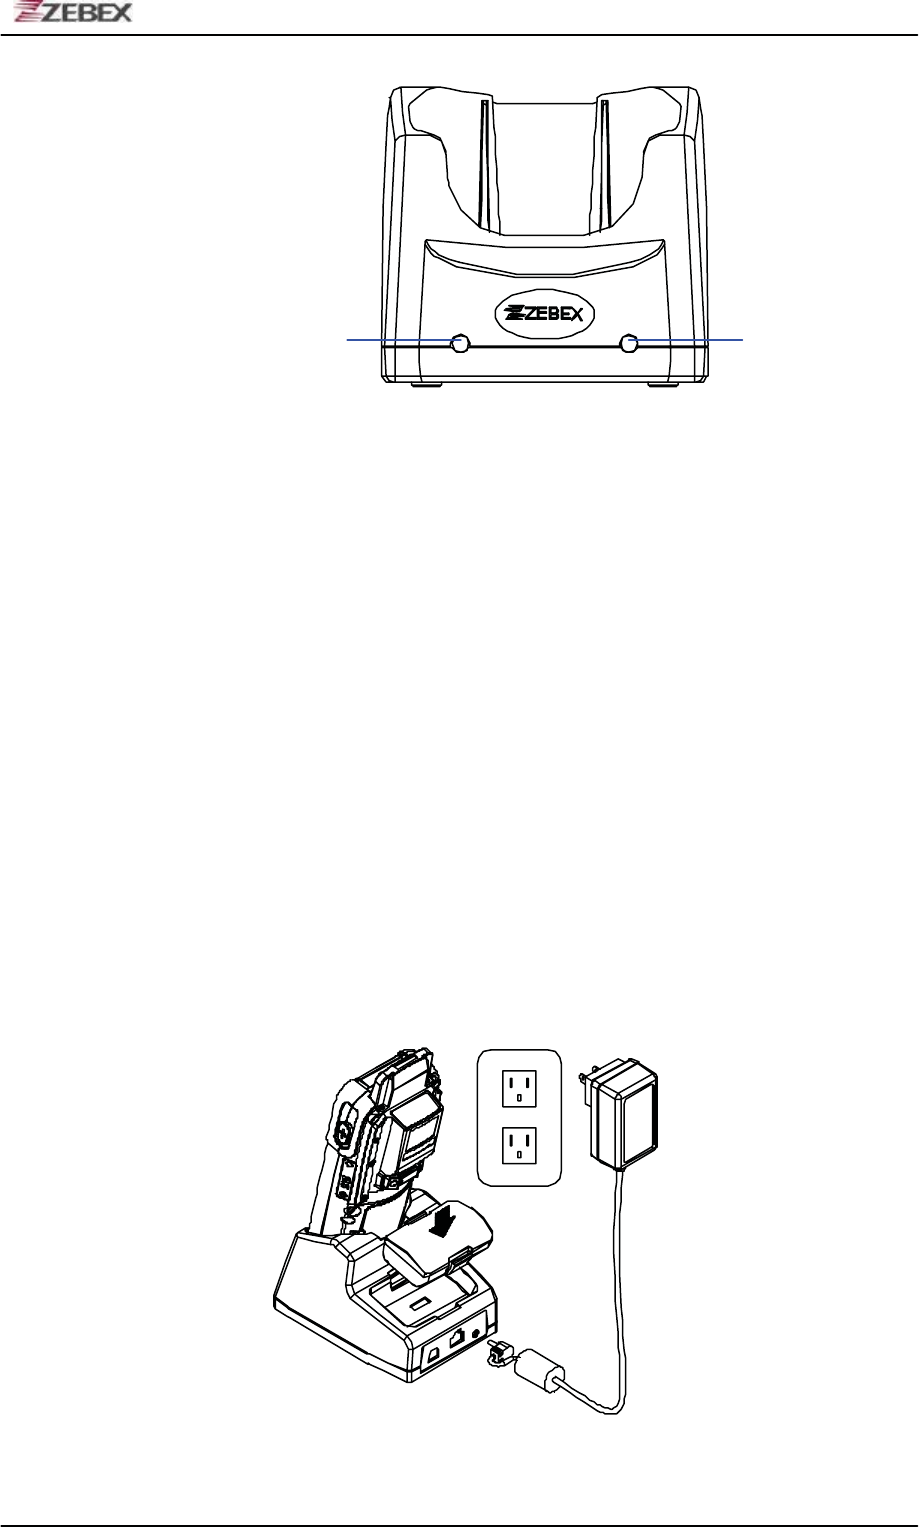
Left LED Right LED
Cradle - front view
Cradle LEDs
Left LED - The LED lit when a battery is inserted into the rear battery
slot of the cradle for recharge. It remains lit until the
charge is complete.
Right LED - The LED lit when the cradle is connected to AC power.
Charging the battery separately in the cradle
Insert the battery into the compartment at the rear of the cradle.
ZEBEX INDUSTRIES INC.
Subject Version Date Page
Z-2065 series User’s Manual 3.00 2010/3/19 18 / 69
Connect the power jack to the cradle and plug AC adapter into the
socket.
NOTES
Whe n charging the battery for the first time, charge for at least
12 hours prior to use.
ZEBEX INDUSTRIES INC.
Subject Version Date Page
Z-2065 series User’s Manual 3.00 2010/3/19 19 / 69
6pqr5mno
0
8vwx
stu
7
SP
yz
9
F4
F3
ENTENT
1
2def
jkl
4
abc
ESC
F1
3ghi
F2
BS
SCAN
RESET
0@
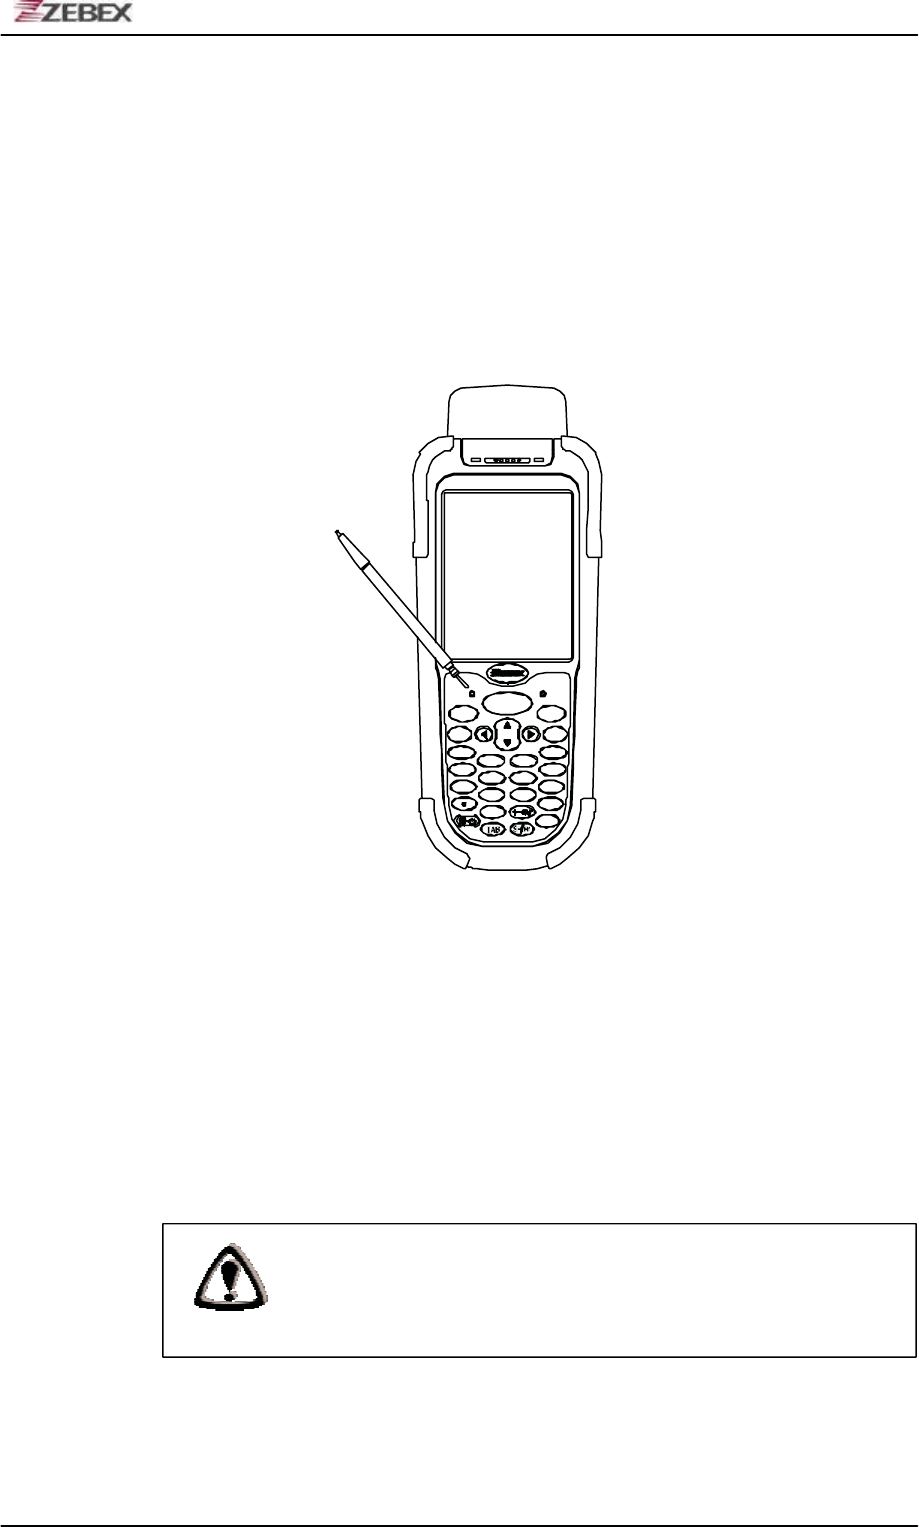
System Reset
Using the Warm reset function
Warm reset function allows you to return the device to the default
settings, wile not wiping all data from the memory.
Insert the needle into the reset hole as shown and press down gently
,to
reset the device.
Using the Cold reset function
Cool reset function allows you to return the device to the factory settings,
wile wiping all data from the memory.
Press down and hold the power key and Insert the needle i nto the reset
hole to cold reset the device.
WARNING
Cold reset will erase ALL pre-configured data on the scanner.
Check carefully to make sure you have uploaded all important
files to your PC before proceeding with the reset.
ZEBEX INDUSTRIES INC.
Subject Version Date Page
Z-2065 series User’s Manual 3.00 2010/3/19 20 / 69
PC System Requirements
Windows XP Operating System
64 MB RAM
50 MB free HDD space
Interface : USB / RS-232 ports
WLAN transmitter (optional)
Bluetooth transmitter/receiver (optional)
Connecting To a PC
In order to use the software supplied with the Z-2065, the mobile data
terminal must be connected to a PC.
Connecting via the RS232
In order for the sync software to work properly, the cradle must be
connected to your computer’s COM port. Attach one end of the RS232
cable to the RS232/COM interface connector on the cradle and the other
to the COM1 port on your PC.
1. Or can use attach one RS-232 cable to connect with your computer’s
COM port directly.

ZEBEX INDUSTRIES INC.
Subject Version Date Page
Z-2065 series User’s Manual 3.00 2010/3/19 21 / 69
Connecting via USB Cradle
The cradle must also be connected via one of your PC’s USB ports.
Attach one end of the cable to the USB interface on the cradle and the
other to your PC.
ZEBEX INDUSTRIES INC.
Subject Version Date Page
Z-2065 series User’s Manual 3.00 2010/3/19 22 / 69
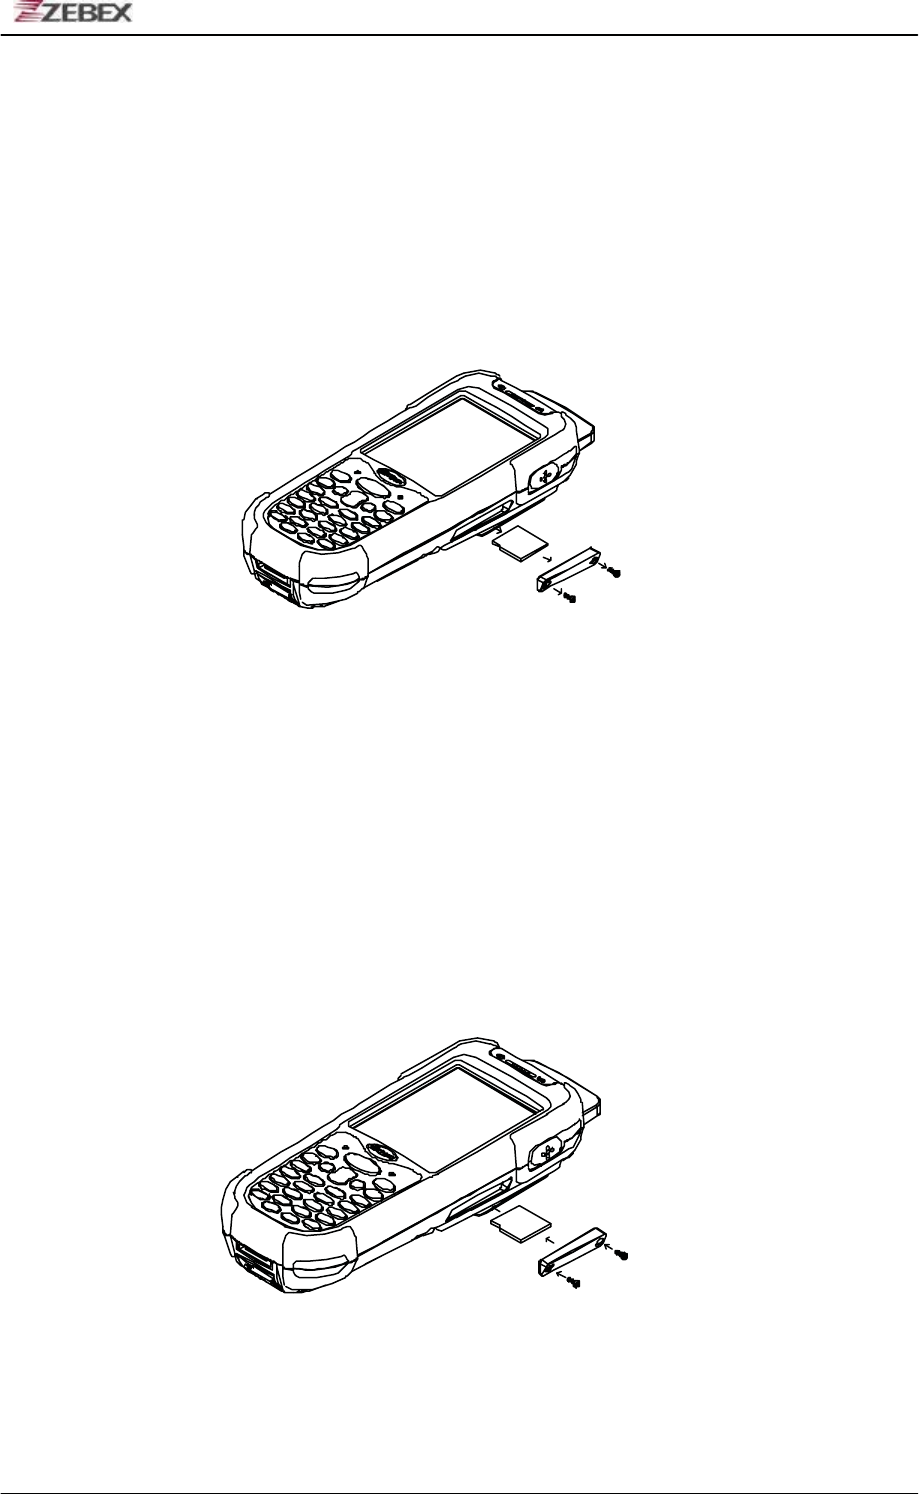
Inserting SD Card
1. Make sure the power is turn off.
2. Open the SD Slot cover as shown, Insert the SD card.
3. Close the SD slot Cover.
Remove the SD Card
1. Make sure the power is turn off.
2. Open the SD Slot cover as shown, Take off the SD card.
3. Closed the SD slot cover.

ZEBEX INDUSTRIES INC.
Subject Version Date Page
Z-2065 series User’s Manual 3.00 2010/3/19 23 / 69
About The Product
ZEBEX Z-2065 WinCE.NET Handheld Computer comes with the one and
only Jacket-module design, and makes most user friendly features to
select as desired. The Jacket-module is a module at the back of device
that is selectable in GPRS, GPS, RFID, WLAN or Bluetooth
communications and 1D or 2D scanning engine, it satisfies all application
from indoor to outdoor and from warehouse to transportation logistics.
Z-2065 qualifies to use in most difficult environments with its rugged
design with IP64 standard.
Further more, its round shape back deisgn allow it to sit in palm fitly for
best operation comfort, and for future expansion, it has a gun grip design
to broaden its application into more categories. Z-2065 has an
unbeatable technology and ergonomic design that upgrades your with
power.
Prerequisites
Skills Required
The following skills are required by developers aiming to develop
application software for the ZEBEX Z-2065 series.
? Windows programming
? Good knowledge of one or more of the following:
* Visual C++
* Visual Basic .NET
* Visual studio .NET
* Visual C#
* Active Server Pages and web programming
The following skills or experiences are also desirable .
? Windows CE devices
? ActiveSync
? Something networking experience.
Hardware Required
The following models of the ZEBEX Z-2065 series and the dedicated
options are available.

ZEBEX INDUSTRIES INC.
Subject Version Date Page
Z-2065 series User’s Manual 3.00 2010/3/19 24 / 69
Available models and the features:
:/$1 *35
6
*
5),
'
+
31GHYLFHRQO\
%7:/
' '6( * +)
=:/
: :
ႷႷ
=:/
:
:
ႷႷ
=:*6
:
*6
:
*6
ႷႷ Ⴗ Ⴗ
=:*6
:*6 :*6
ႷႷႷႷ
=:*6+
*6+ *6+
ႷႷ Ⴗ ႷႷ
=:*6+
*6+ *6+
ႷႷႷႷႷ
=:*
:*
:*
ႷႷ Ⴗ
=:*
:*
:*
ႷႷႷ
=:6
:
6
:
6
ႷႷ Ⴗ
=:6
:
6
:
6
ႷႷ Ⴗ
=:+
:+ :+
ႷႷ Ⴗ
=:+
:+ :+
ႷႷ Ⴗ
0RGHO 31LQFOXGHDFFHVVRU\
%DUFRG
H
*366
Specifications
Model
Z-2065 series
System
CPU Inter PXA 270 processor (Max. 520MHz)
RAM 128 Mbyte
F-ROM 64 Mbyte
LCD Display 3.5”,
QVGA
240 X 320 TFT
color panel
with
t
ouch screen
Operating System
Microsoft Windows CE.NET 5.0
Power Management
Main Battery 3.7V5,000mA H Li-ion rechargeable battery
3.7V 2,200 mAH Li-ion rechargeable 3.7V,
120
mAH, Li-Poly rechargeable battery
Battery Life 8 hours (without wireless communication activated)
Scanning Performance
Scan Engine Symbol SE-955 1D laser engine
Symbol SE-4400
2D image engine (optional)
Light Source 650 nm visible Laser Diode
Scan Rate 100 scans per second
Print Contrast 30% @ UPC/EAN 100%
Decoding Capability
Barcode Symbologies UPC/ EAN/ JAN, Code 128/EAN 128, Code 39, Code 93,
Interleaved 2 of 5, Discrete 2 of 5, Codabar, MSI/Plessey
Card Slots
1x
Mini
SD I/O card
Communications / Interfaces
Bluetooth Bluetooth Class 2
IrDA Standard IrDA 1.3
USB USB 2.0
RS-232 Programmable up to 115,200 bps
WLAN 802.11b/g (optional)
Dimensions
190.5 mm (L) x82..8 mm (W) x
50.5
mm (H)
ZEBEX INDUSTRIES INC.
1Subject 4Version =Date &Page
Z-2065 series User’s Manual 3.00 2010/3/19 25 / 69
Weight
Approx.
480
g
(battery
included)
Environmental
O p e r ating
Te m p .
-30°C
~
5 5 °C
Storage
Temp -10°C ~ 60°C
Operating
Humidity 10%
~
70%
(non-condensing)
Storage
Humidity 5%
~
70%
(non-condensing)
Drop Durability Withstand 1.2m ( 4 feet) drop to concrete
Environmental Sealing IP64 rated sealing
Regulatory
Approval s CE & FCC Part 15B, 15 C,CE RF,LVD,ESD
Cradle Single slot USB / RS-232 charging cradle with spare
battery slot
Software
&Development Microsoft
VC
6.0
development
environment
Supports
SDK
for
program
development
Using Barcode Scanner
Scanning Barcodes
The Z-2065 is a highly versatile tool that can scan a wide range of barcodes but
it is imperative that it is used in the correct manner.
To
scan
a
barcode:
1. Hold the Z-2065 horizontally and point it directly at the barcode you wish to
scan.
2. Once in the correct position, press the SCAN button.
An audible alarm is heard and the barcode digits will appear on the
LCD screen if the scan is successful.
ZEBEX INDUSTRIES INC.
Subject Version Date Page
Z-2065 series User’s Manual 3.00 2010/3/19 26 / 69
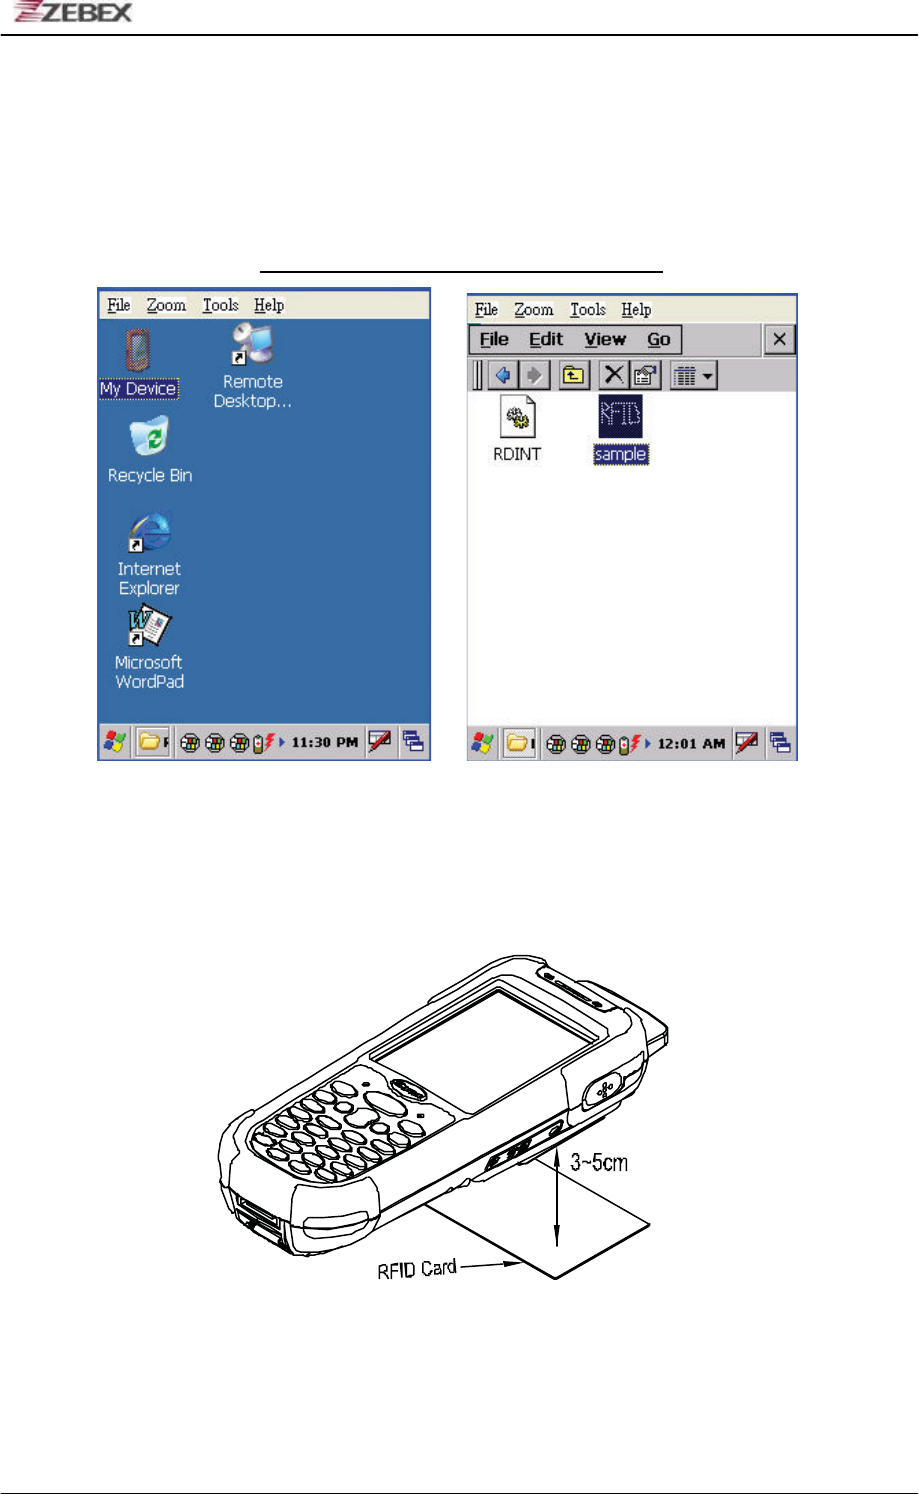
Using RFID Scanner (Optional)
Scanning RFID
To open Zebex RFID demo program, you can find program located on
following path: “My Device\Flash Disk\RFID\RFID_ADJ\”.
RFID Scanning Position
RFID scan module was installed in the back of terminals. The devices
can read from 30 to 50mm distance from the back-side of terminals.
To scan a RFID
After opening Zebex RFID demo program, you will see main menu displayed
as below. There are three main functionalities such as “Read UID”, “RW
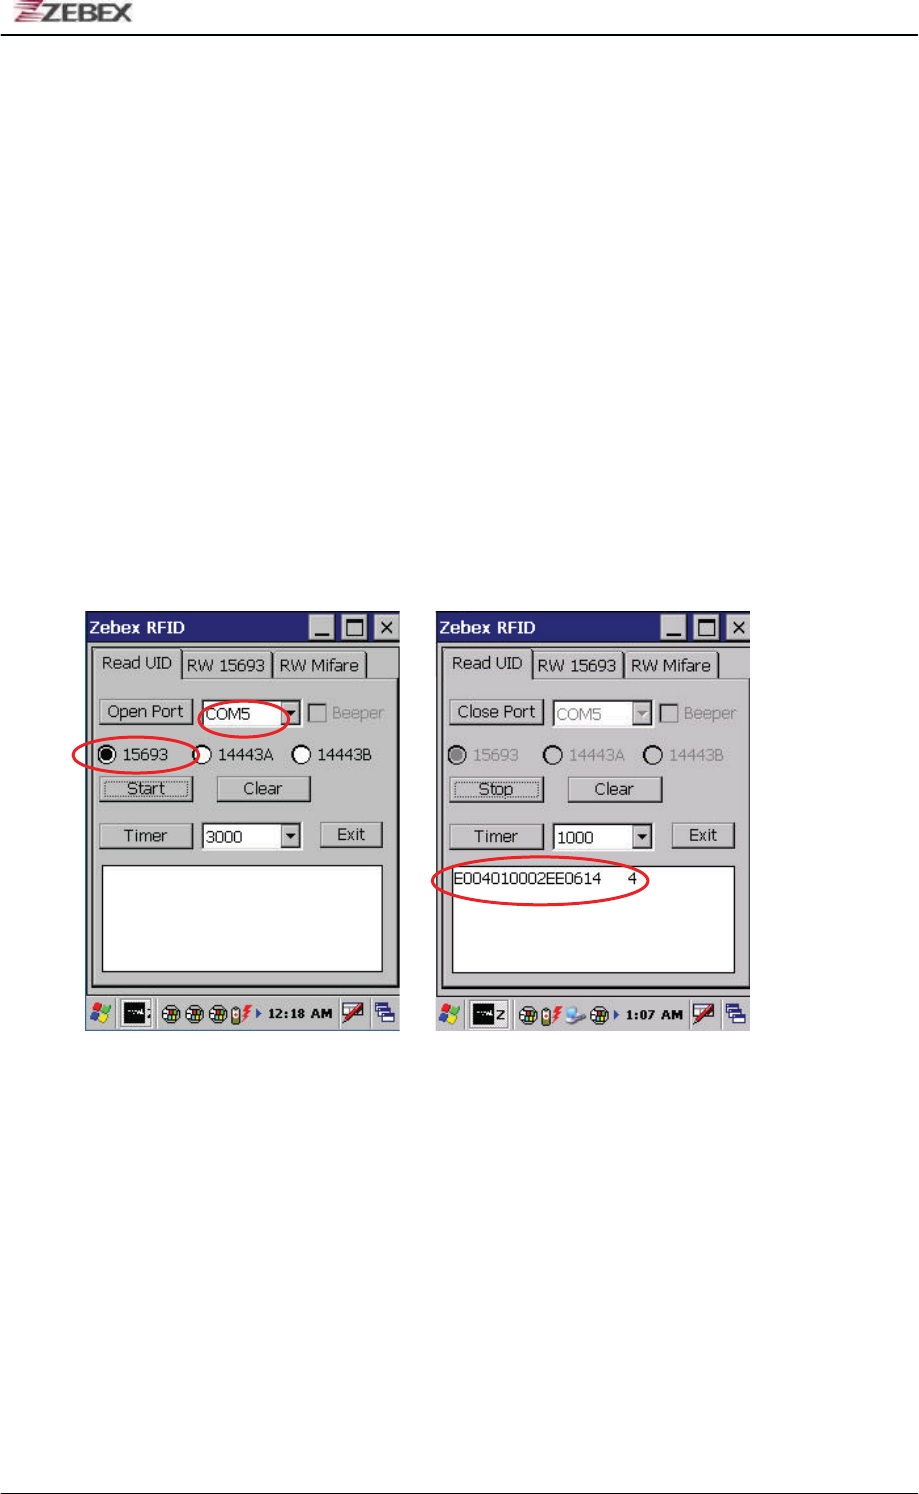
ZEBEX INDUSTRIES INC.
Subject Version Date Page
Z-2065 series User’s Manual 3.00 2010/3/19 27 / 69
15693”, and “RW Mifare”. Please follow below steps to read UID.
Reading UID
1) Select COM port to reading UID, default setting was COM5. Then confirm by pressing
“ Open Port ” button.
2) Select UID type, then confirm by pressing “ Start ” button. Demo program provide three
UID types such as 15693, 14443A, and 14443B.
3) User can also adjust scanning rate by selecting how many msec for scanning once. Then
confirm by clicking “ Timer ” button.
4) After scanning UID, it will be shown on column at the bottom of display. Data in column
can be clear by pressing “ Clear ” button.
5) COM port can be stop by pressing “ Close Port ” button.
6) If user need to switch to another UID type, UID type by can be cancel by pressing
“ Stop ” button. Then user can select another UID type as demand.
RW 15693
On RW 15693 function window, user can read and write information from
RW 15693 UID card:
1) Set up protocol by pressing “ SetProtocol “ button, place UID card within valid range and
press “ CheckUID ”button. The UID will display in the red circle of below diagram.
2) To read data from certain Block, first input the location in column next to Read Block.
Then confirm by pressing “ Read Block ” button. Read Data will appear in column
showed in green circle of below diagram.
3) To write UID from certain Block, first input the location in column next to ” Write
Block ” button, then write the data into the longer column in blue circle. Confirm written
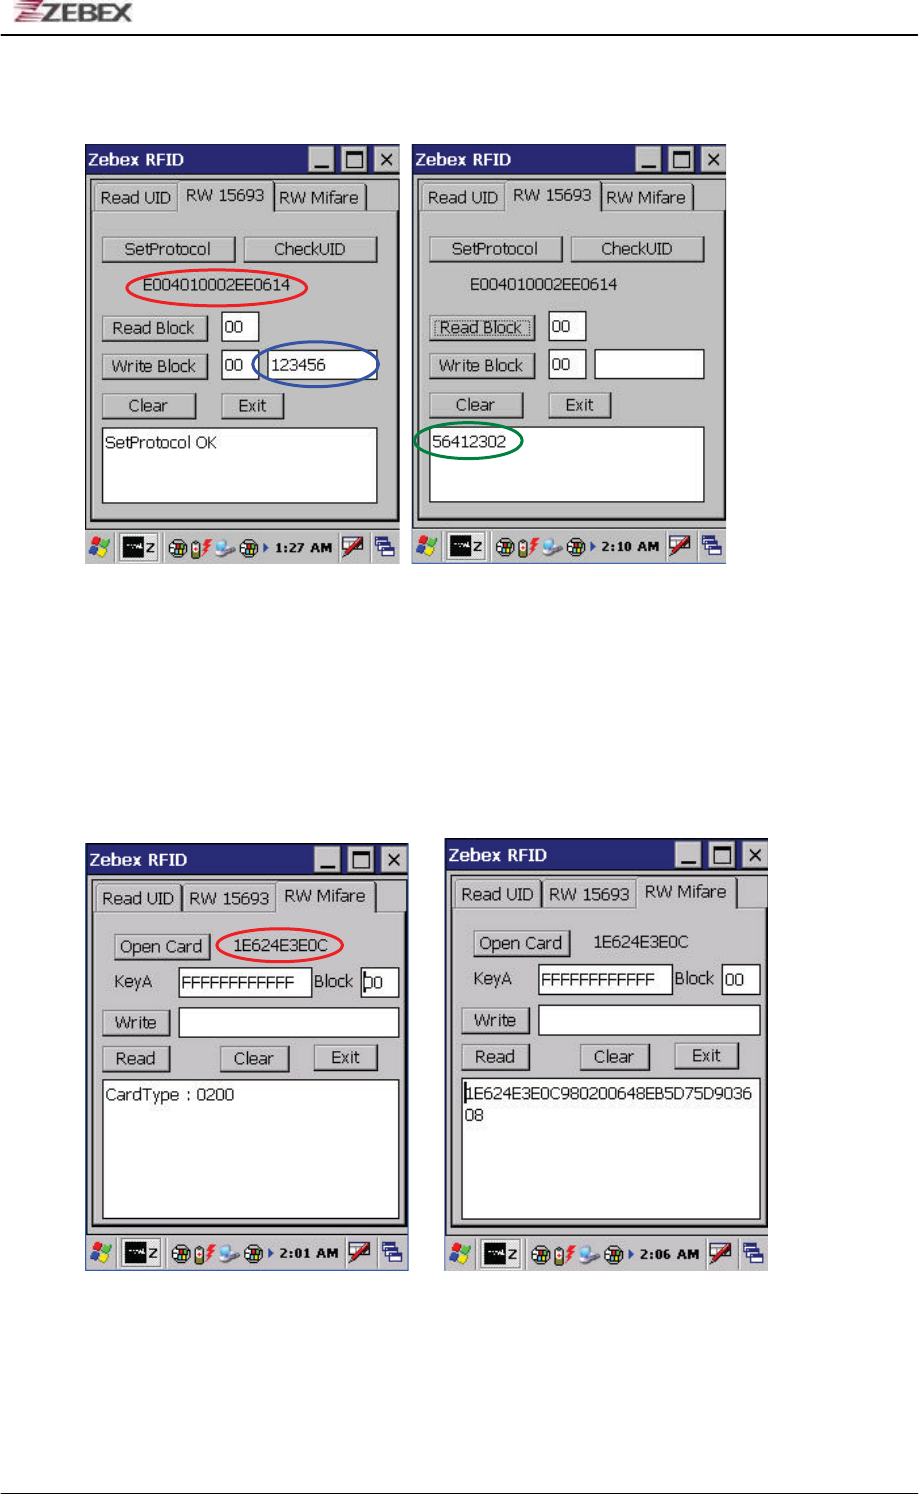
ZEBEX INDUSTRIES INC.
Subject Version Date Page
Z-2065 series User’s Manual 3.00 2010/3/19 28 / 69
data by pressing “ Write Block ” button.
4) Information appear at bottom can be clear by pressing “ Clear ” button.
RW Mifare
On RW 15693 function window, user can read and write information from
Mifare UID card:
1) Place UID card within valid range, check UID by pressing “ Open Card ” button. UID
will display in red circle shown in below diagram.
2) To perform read and write commands, please refer to “RW 15693” sections.
ZEBEX INDUSTRIES INC.
Subject Version Date Page
Z-2065 series User’s Manual 3.00 2010/3/19 29 / 69
ZEBEX Hand-Held Terminal
GPRS User’s Guide
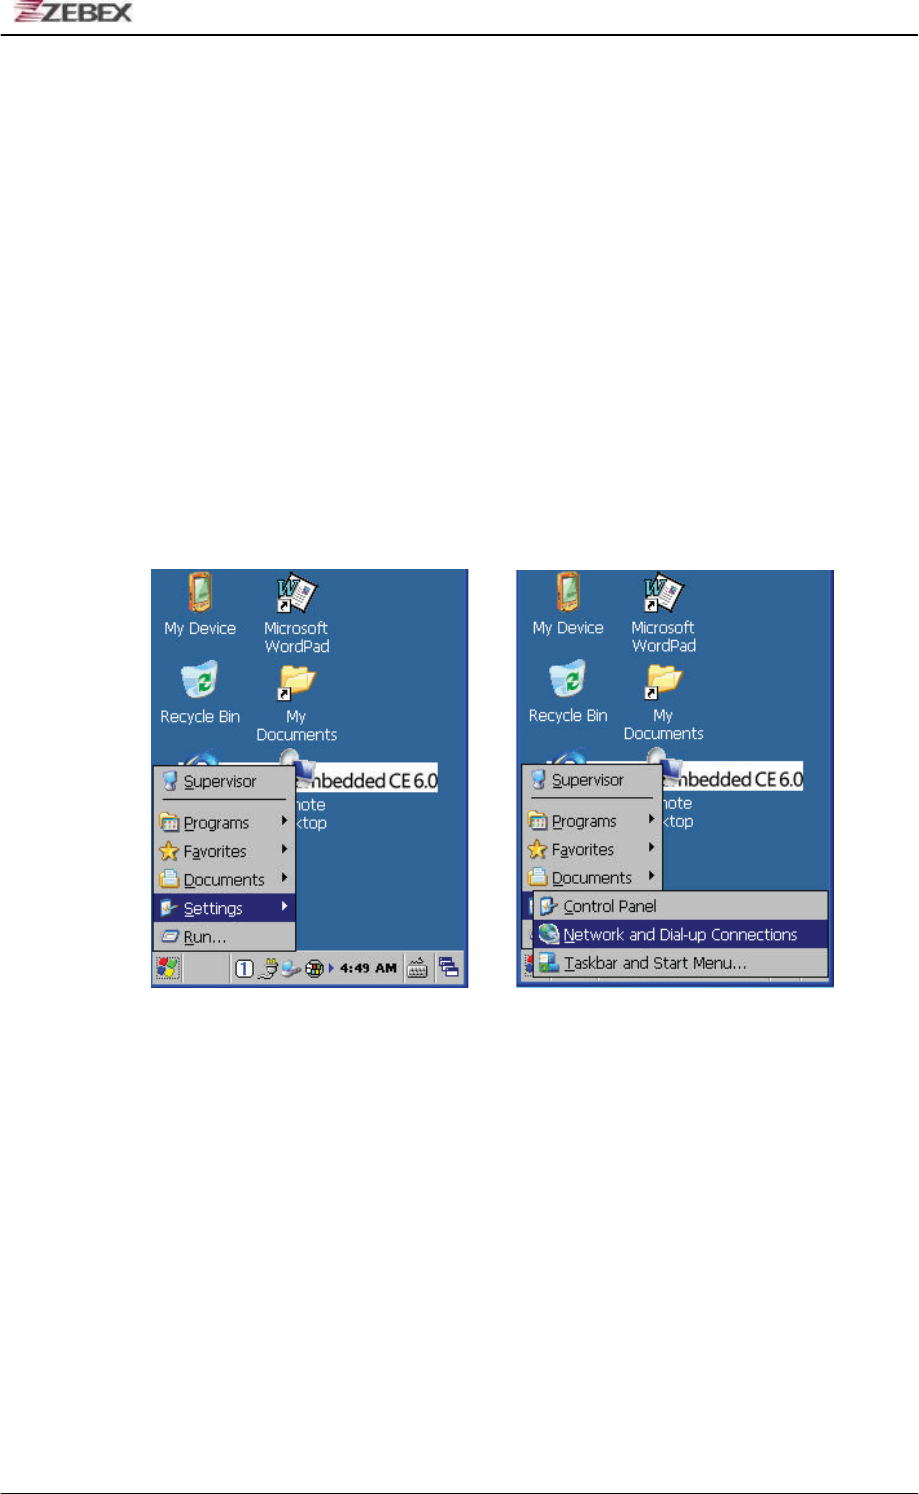
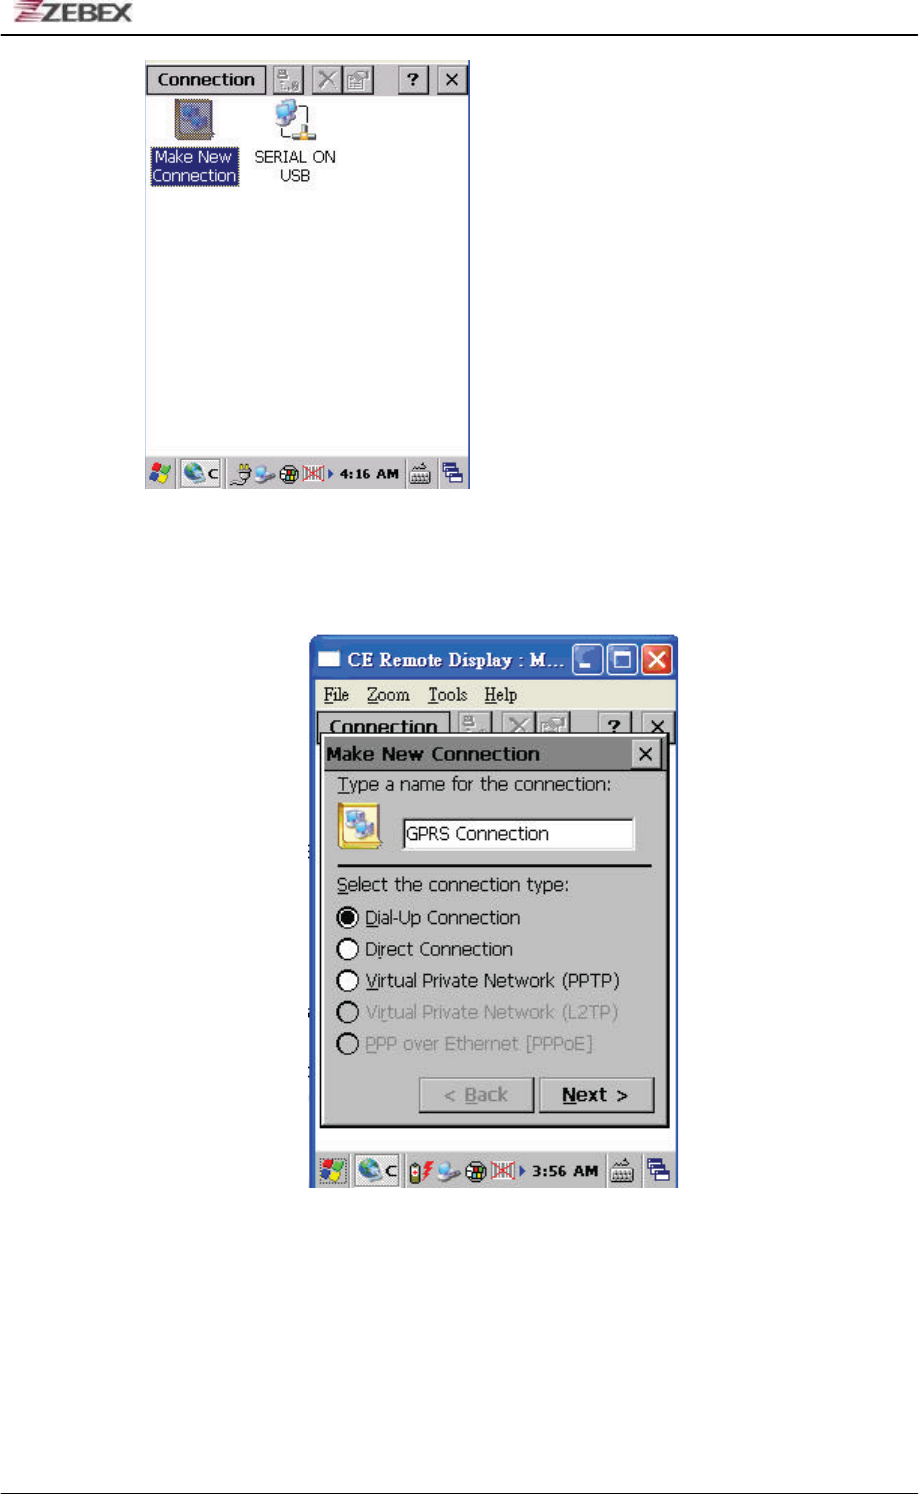
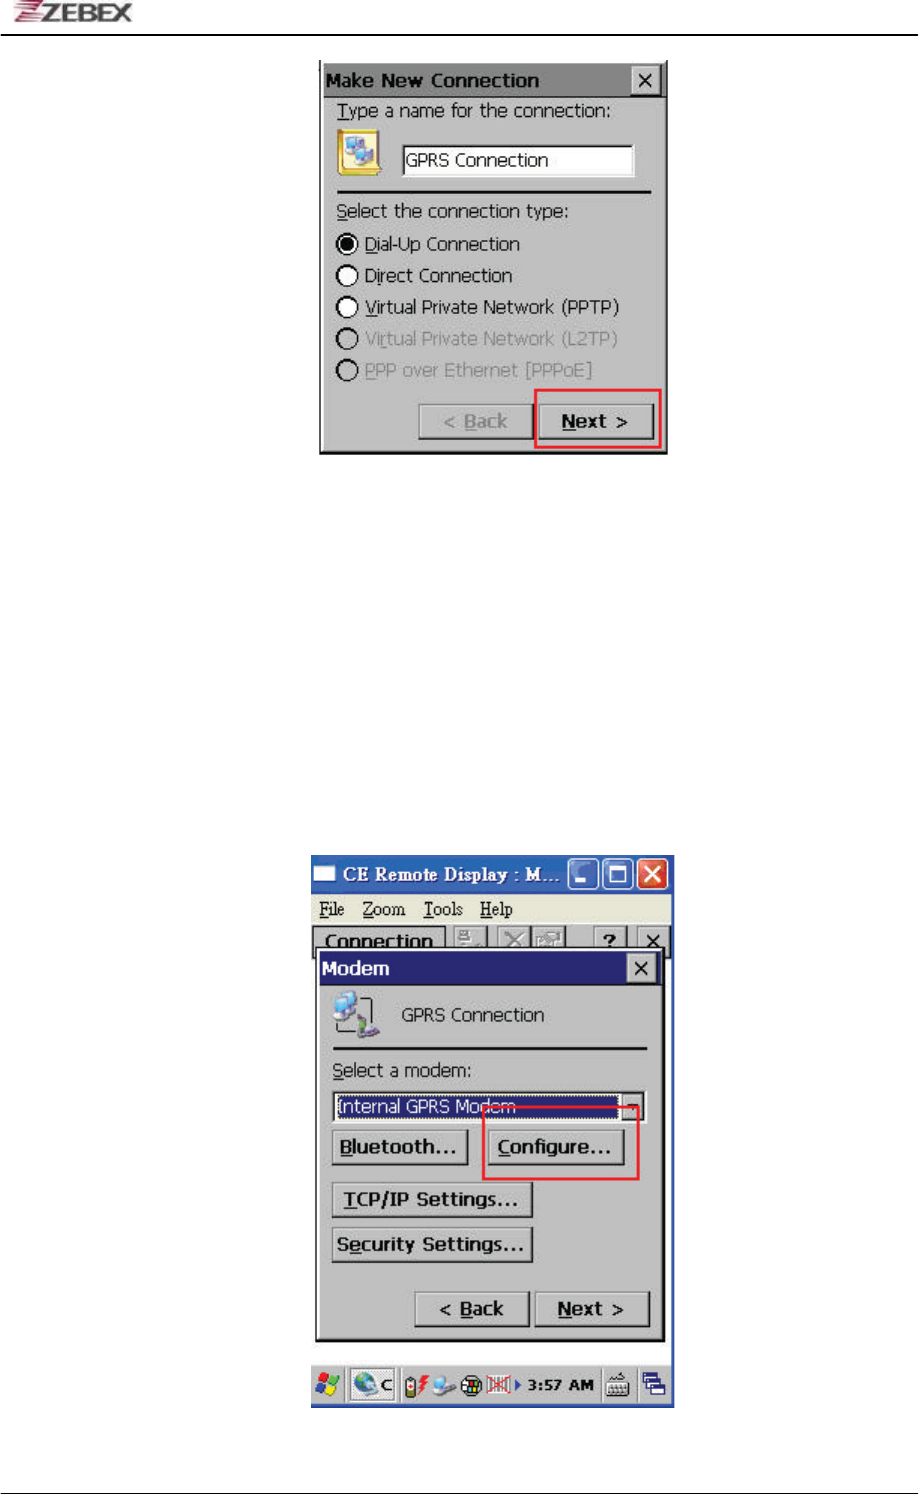
Make New Connection
1. Click Network and Dial-Up Connections in the settings .
Show as below figures.
2. Click Make New Connection to create the new connection.
Show as below figures.
ZEBEX INDUSTRIES INC.
Subject Version Date Page
Z-2065 series User’s Manual 3.00 2010/3/19 30 / 69
3. Select the Dial-Up Connection and press Next button to make new
connection. Show as below figure.
4. Press Next button to select the modem.
ZEBEX INDUSTRIES INC.
Subject Version Date Page
Z-2065 series User’s Manual 3.00 2010/3/19 31 / 69
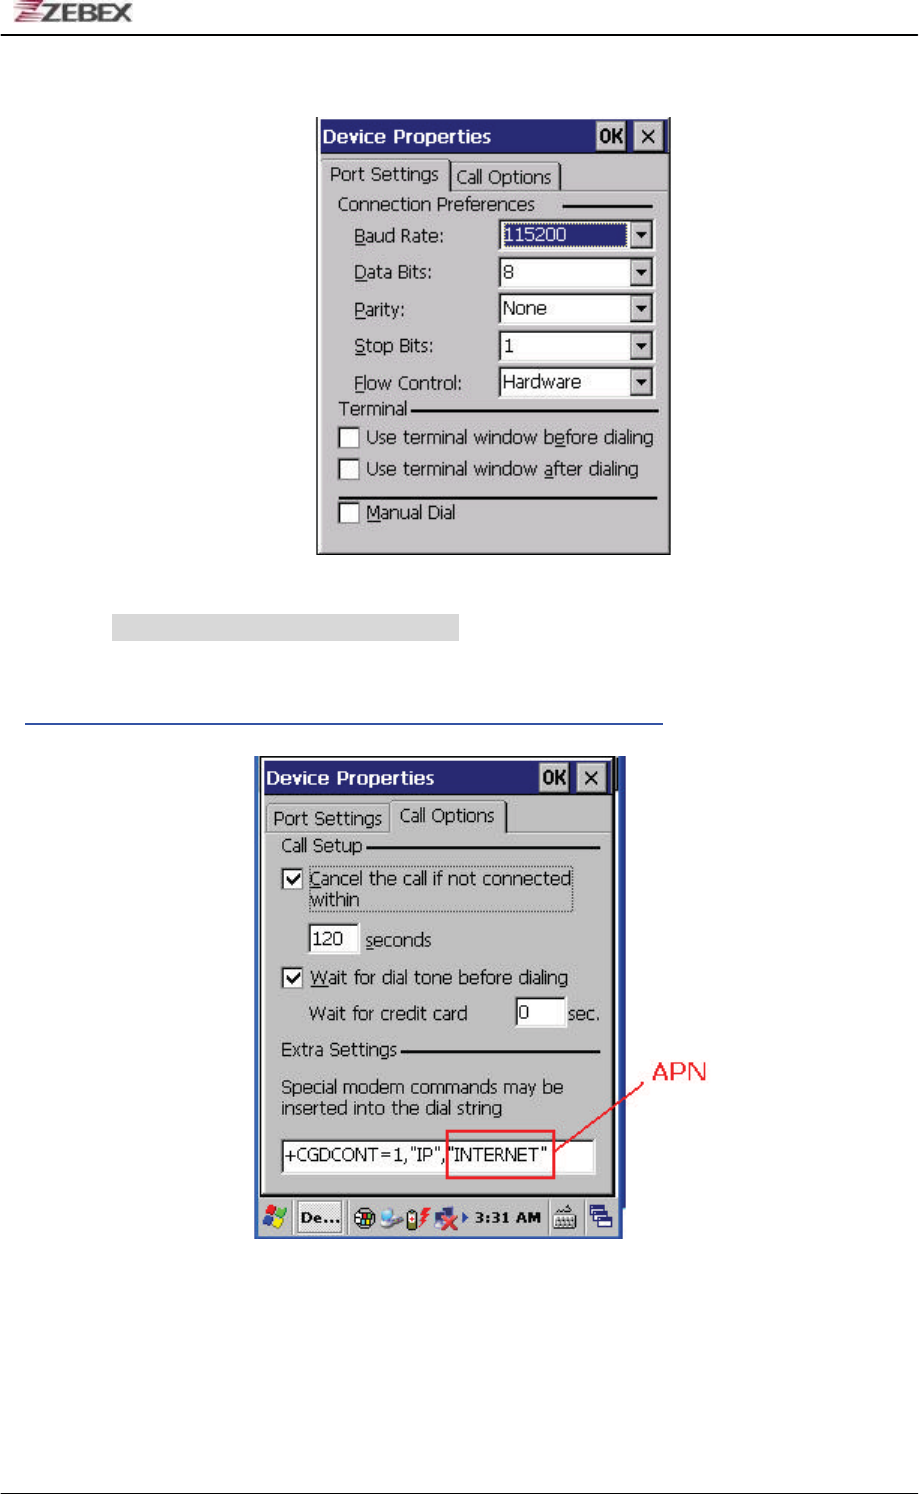
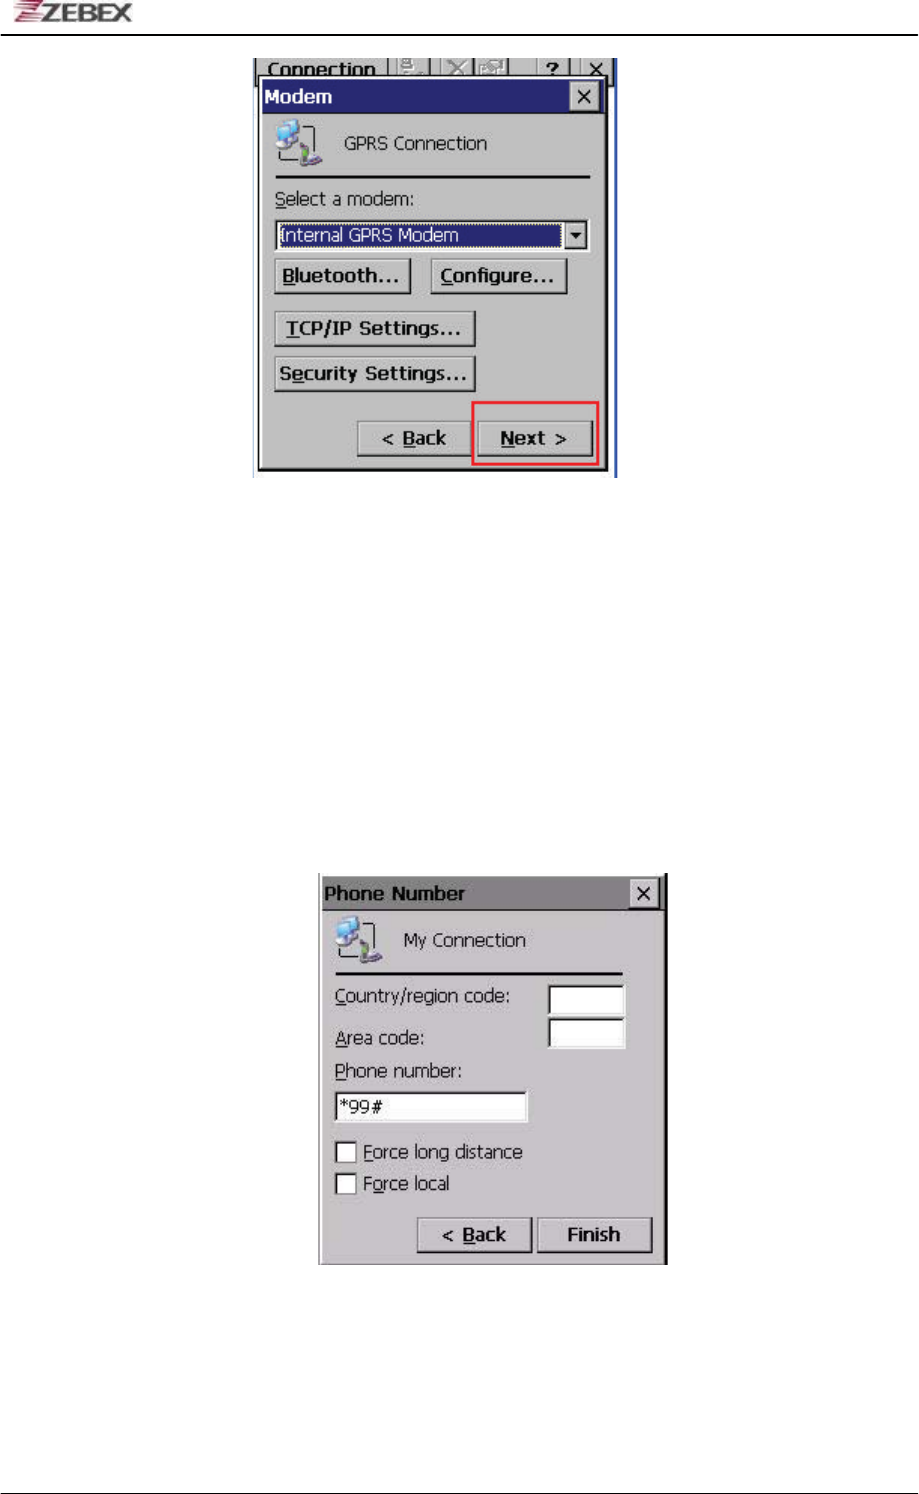
Set Connection Properties
1. Select Internal GPRS Modem and press the Configure button to change the
settings of properties.
2. Change the Baud Rate to 115200 in Port Settings.
ZEBEX INDUSTRIES INC.
Subject Version Date Page
Z-2065 series User’s Manual 3.00 2010/3/19 32 / 69
Show as below figure.
3. Input the dial string in Call Option. Show as below figure.
Input +CGDCONT=1,”IP”,”APN”to set the APN for GPRS connection.
For the setting of known APN around the work, please refer below link:
http://www.quickim.com/support/gprs-settings.html
4. Press OK button to complete the settings.
5. Press Next button to set the phone number
ZEBEX INDUSTRIES INC.
Subject Version Date Page
Z-2065 series User’s Manual 3.00 2010/3/19 33 / 69
Phone Number
1. Set phone number to *99# or *99***1#. This number depends on the service
provider. Show as below figure.
2. Press Finish button to finish the settings of new connection.
ZEBEX INDUSTRIES INC.
Subject Version Date Page
Z-2065 series User’s Manual 3.00 2010/3/19 34 / 69
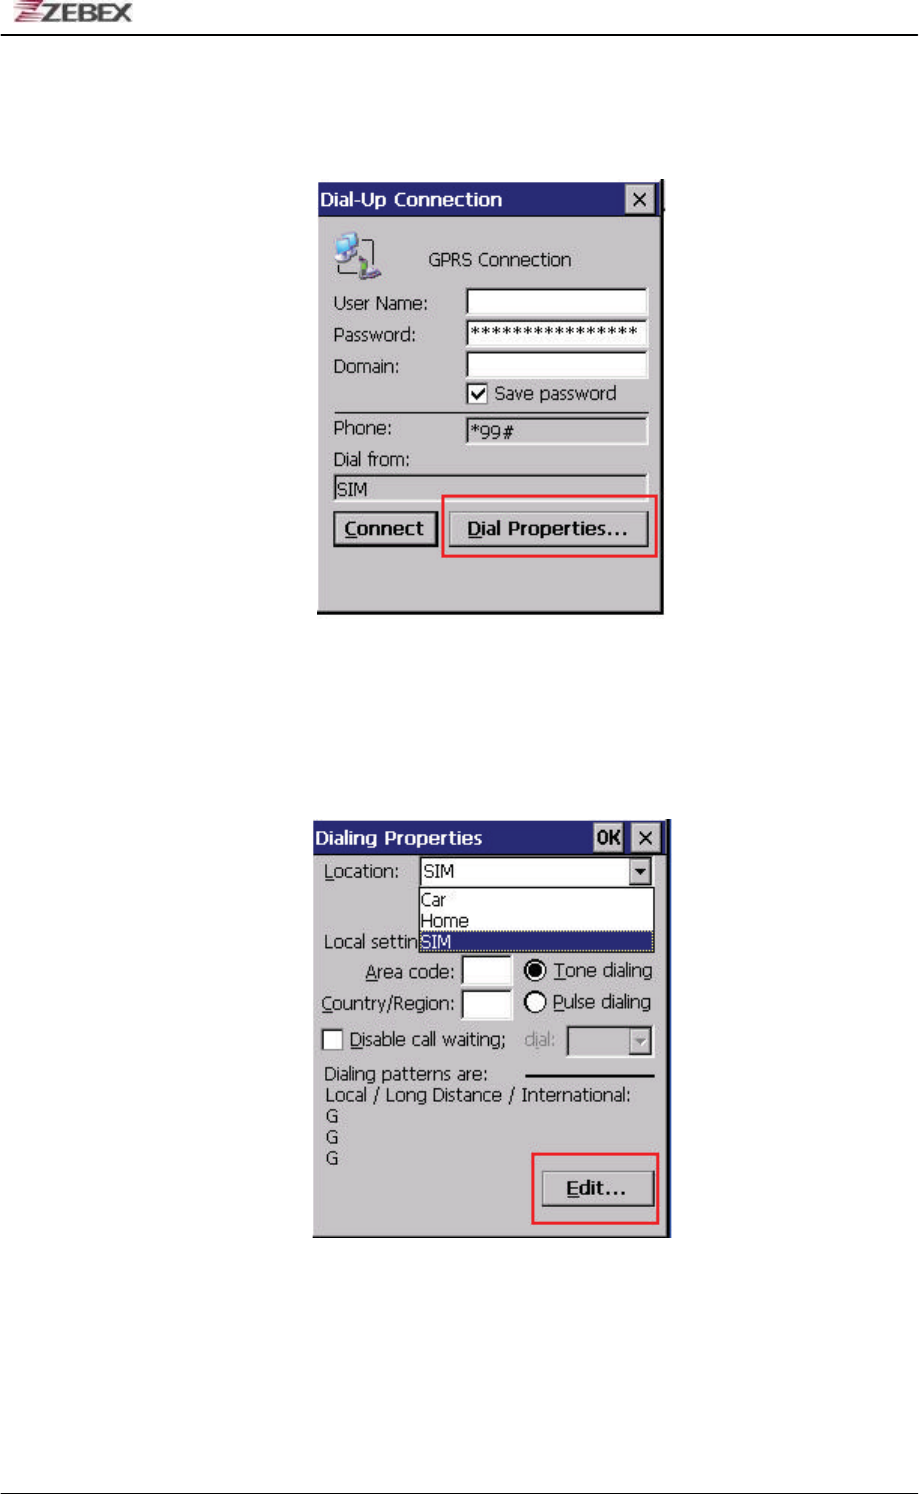
Set Dial Properties
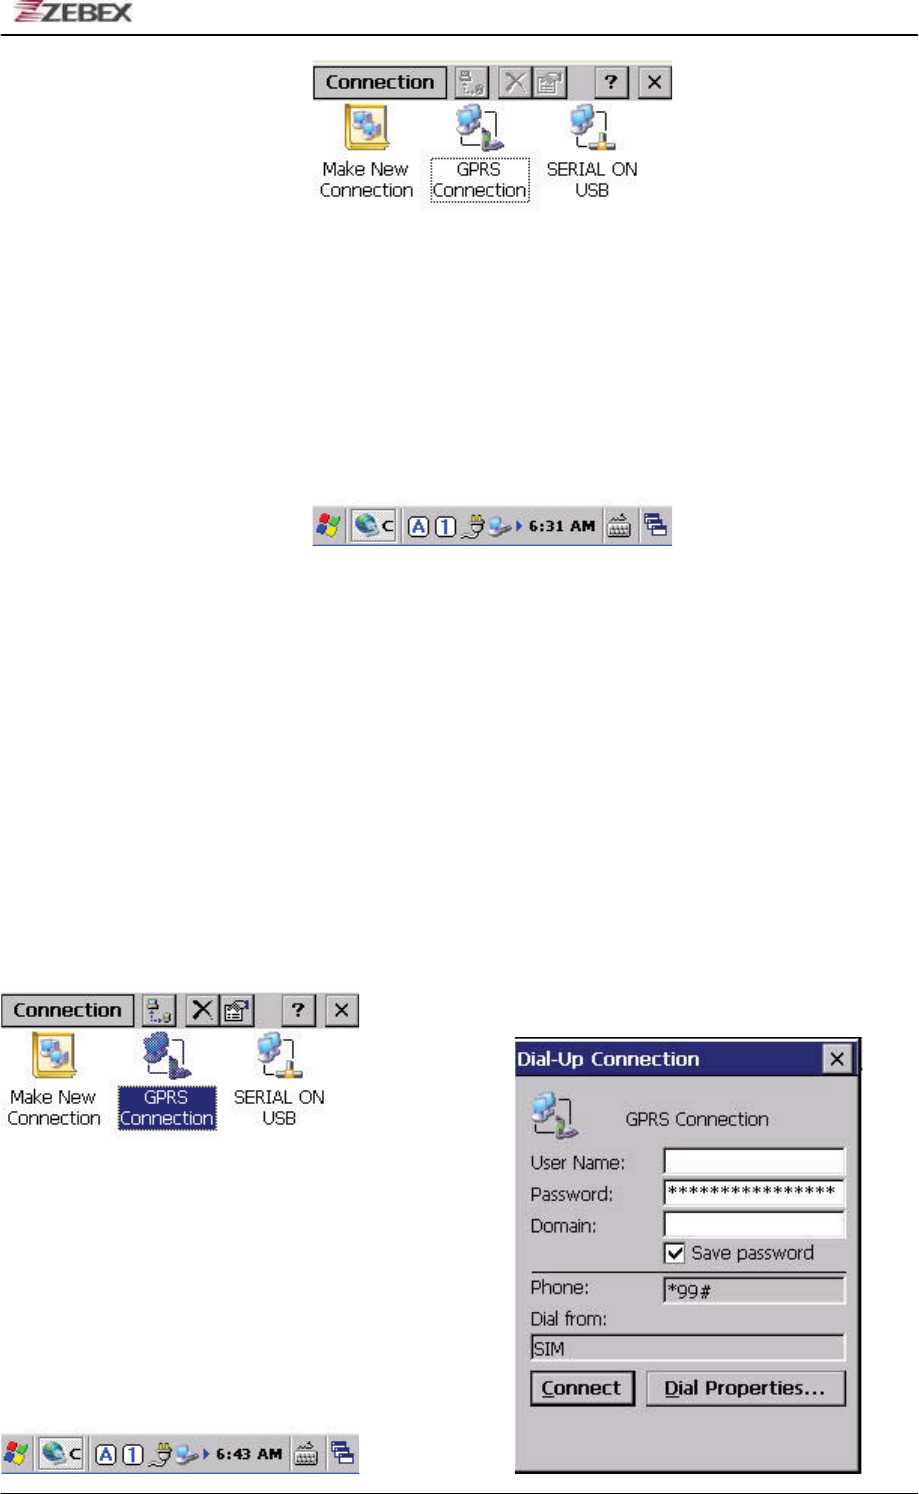
1. Double Click the connection.
ZEBEX INDUSTRIES INC.
Subject Version Date Page
Z-2065 series User’s Manual 3.00 2010/3/19 35 / 69
2. Press the Dial Properties button.
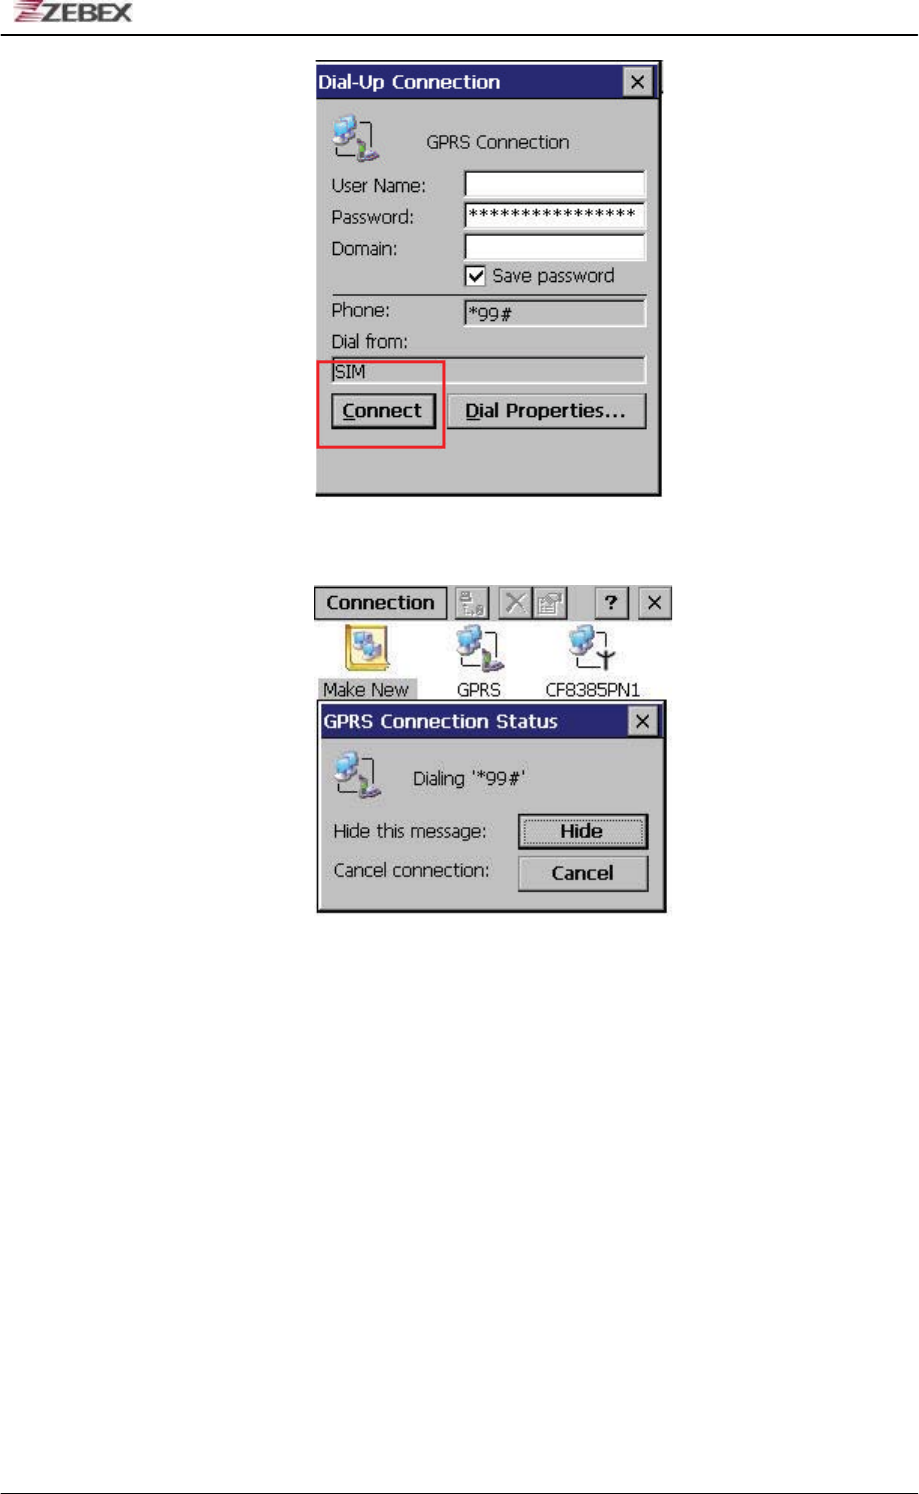
3. Create new one or select one setting in the Location and press the Edit button.
4. Set the Dialing Patterns as below figure.

ZEBEX INDUSTRIES INC.
Subject Version Date Page
Z-2065 series User’s Manual 3.00 2010/3/19 36 / 69
Connect to GPRS Service
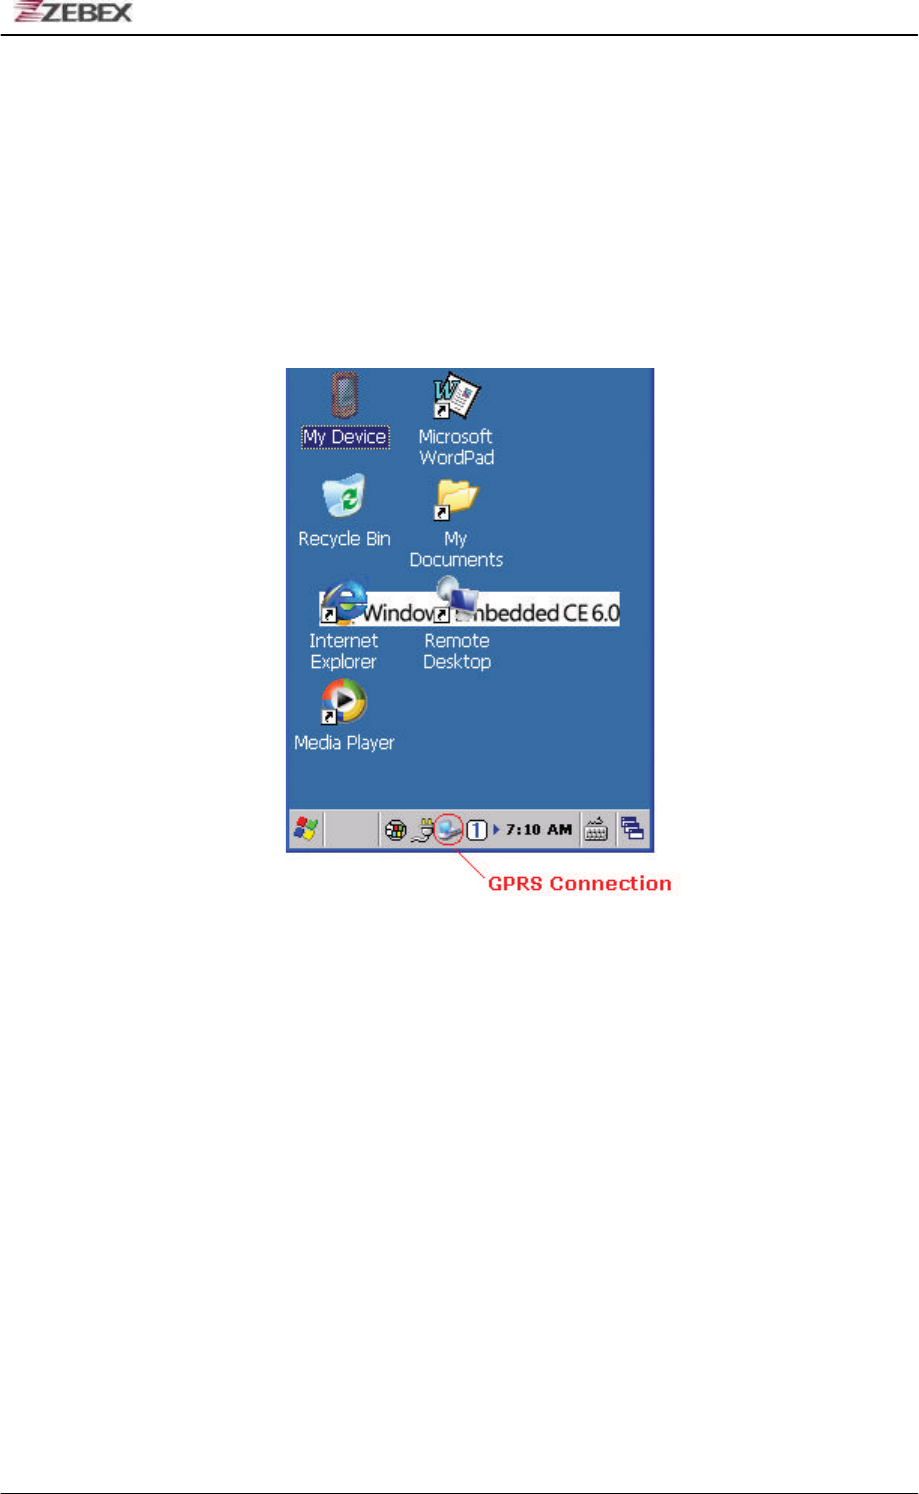
1. Press the Connect button.
ZEBEX INDUSTRIES INC.
Subject Version Date Page
Z-2065 series User’s Manual 3.00 2010/3/19 37 / 69
2. During the Dial-Up. It shows the status as below figure.
3. It shows below figure when connected to GPRS service.

ZEBEX INDUSTRIES INC.
Subject Version Date Page
Z-2065 series User’s Manual 3.00 2010/3/19 38 / 69
ZEBEX INDUSTRIES INC.
Subject Version Date Page
Z-2065 series User’s Manual 3.00 2010/3/19 39 / 69
Disconnect GPRS Service
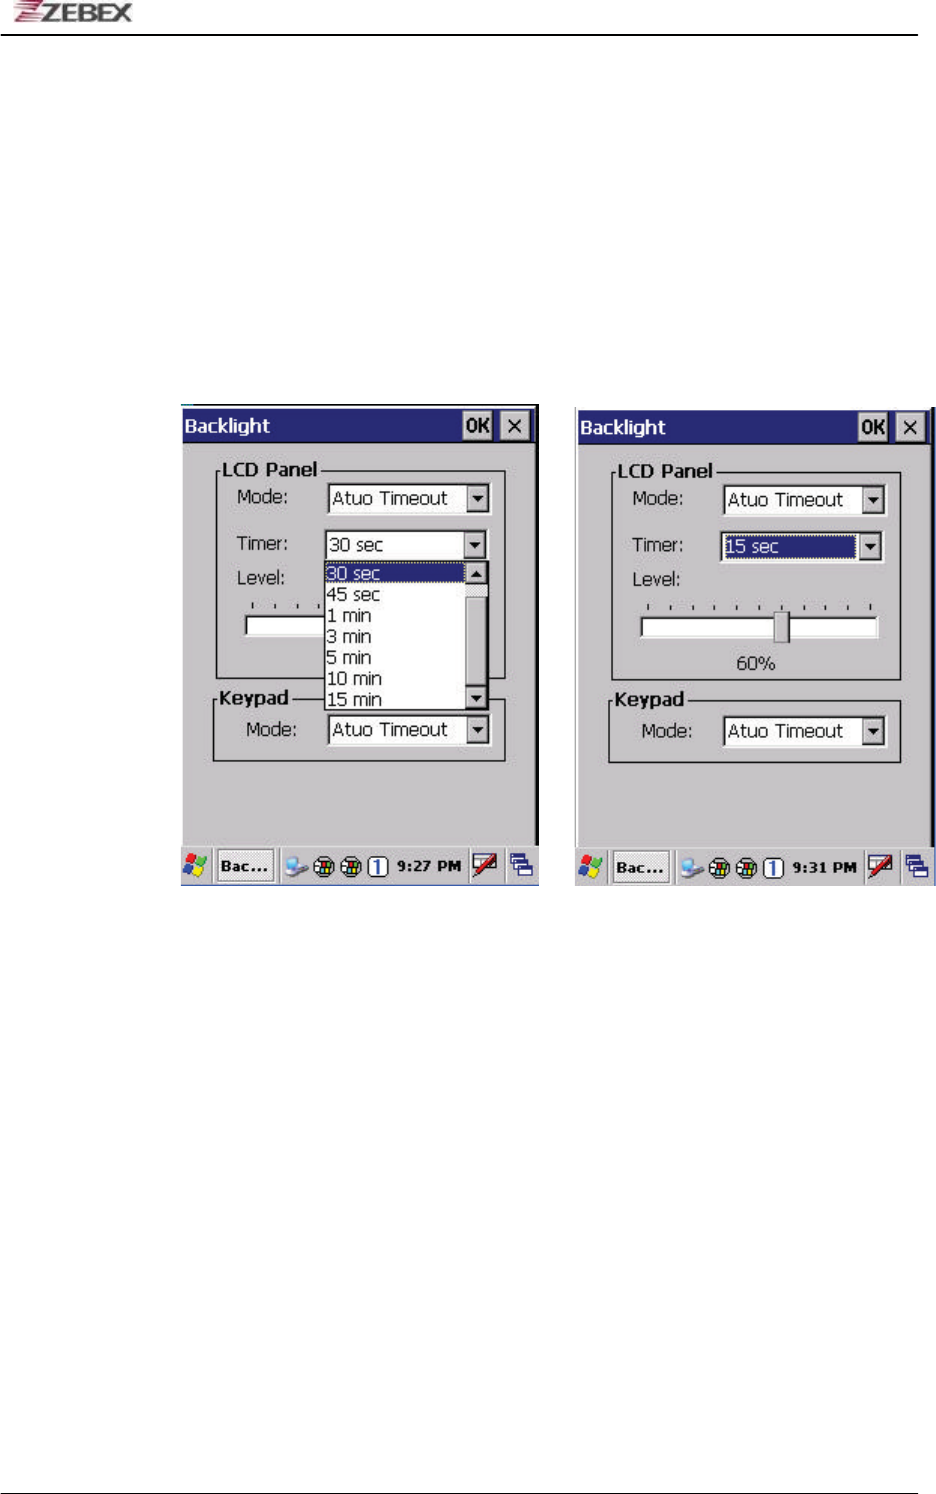
1. Double click the connection icon in taskbar.
2. Press the Disconnect button.

ZEBEX INDUSTRIES INC.
Subject Version Date Page
Z-2065 series User’s Manual 3.00 2010/3/19 40 / 69
Using the Zebex PowerPack
To save your time and effort in developing applications on Z-2070, ZEBEX
provides it’s owndesign system management tool to called “PowerPack” to let
you control it directly.
The PowerPack management tools which installs in each of our WinCE
product. It is free charge for you. We offer several function for let you control
your device without any programming.
Backlight
This application is set up the Backlight of LCD Panel and Key pad. It allows
operators to set backlight duration, and also backlight can be set up as On &
Off.
The Backlight Setting screen including 3 parts:
1. LCD
2. Keypad
3. Brightness Control Bar

ZEBEX INDUSTRIES INC.
Subject Version Date Page
Z-2065 series User’s Manual 3.00 2010/3/19 41 / 69
ZEBEX INDUSTRIES INC.
Subject Version Date Page
Z-2065 series User’s Manual 3.00 2010/3/19 42 / 69
1. LCD
The LCD backlight setting.
Auto Mode: This function can be set up the LCD backlight to be auto off as
Device hasn’t been activated for certain interval.
You can set up the Auto off time from 15 sec to 15 min.
Always ON: This function can set up the backlight to be always on
Until the system into suspend mode.
Always OFF: This function can set up the backlight to be always off.
2. Keypad
The Keypad Backlight setting.
Auto Mode: This function can be set up the keypad backlight to be auto off
as device hasn’t been activated for certain interval.
The interval of the time for a uto off was fixed on 5 seconds.
Always ON: This function can set up the keypad backlight to be
always on until the system into suspend mode.
Always OFF: This function can set up the backlight to be always off.
3. Brightness Control Bar
The brightness of the backlight can be changed via control bar. Put up to
light and put down to dark.
ZEBEX INDUSTRIES INC.
Subject Version Date Page
Z-2065 series User’s Manual 3.00 2010/3/19 43 / 69
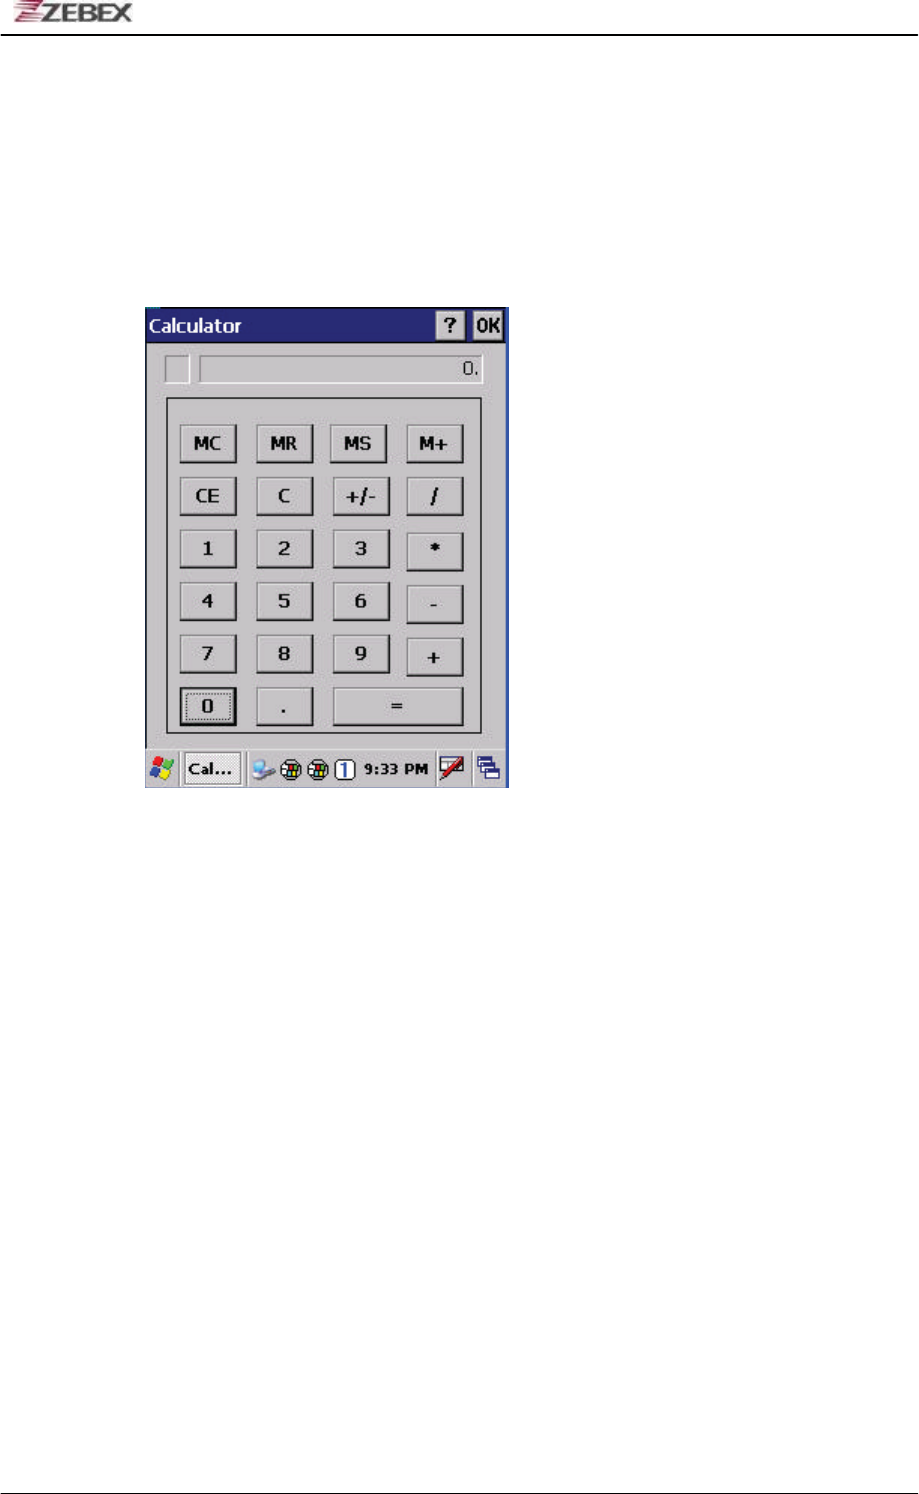
Calculator
This calculator function allows operators to add, subtract, multiply, and divide
that simply provide basic logistic function in our daily basis.
!
The upper zone of the display area displays the memory content, and the
lower zone is key pad.
Button description:
MC : Clear buffer of memory.
MR : Got the value of buffer.
MS : Storage the value to buffer.
M+ : Append the value to the buffer.
CE : Clear the display area to “ 0” , but keep the value in buffer.
C : Clear the display and the buffer of memory.
+/- : Change the value sign form Plus to Minus or Minus to Plus.
0~9 : Numeric key.
/ : Division function.
Ϡ: Multiplication function.
Ё: Subtraction function.
Ѐ: Addition function.
: A decimal point of dot.
:To be equal to, The amount.
ZEBEX INDUSTRIES INC.
Subject Version Date Page
Z-2065 series User’s Manual 3.00 2010/3/19 44 / 69
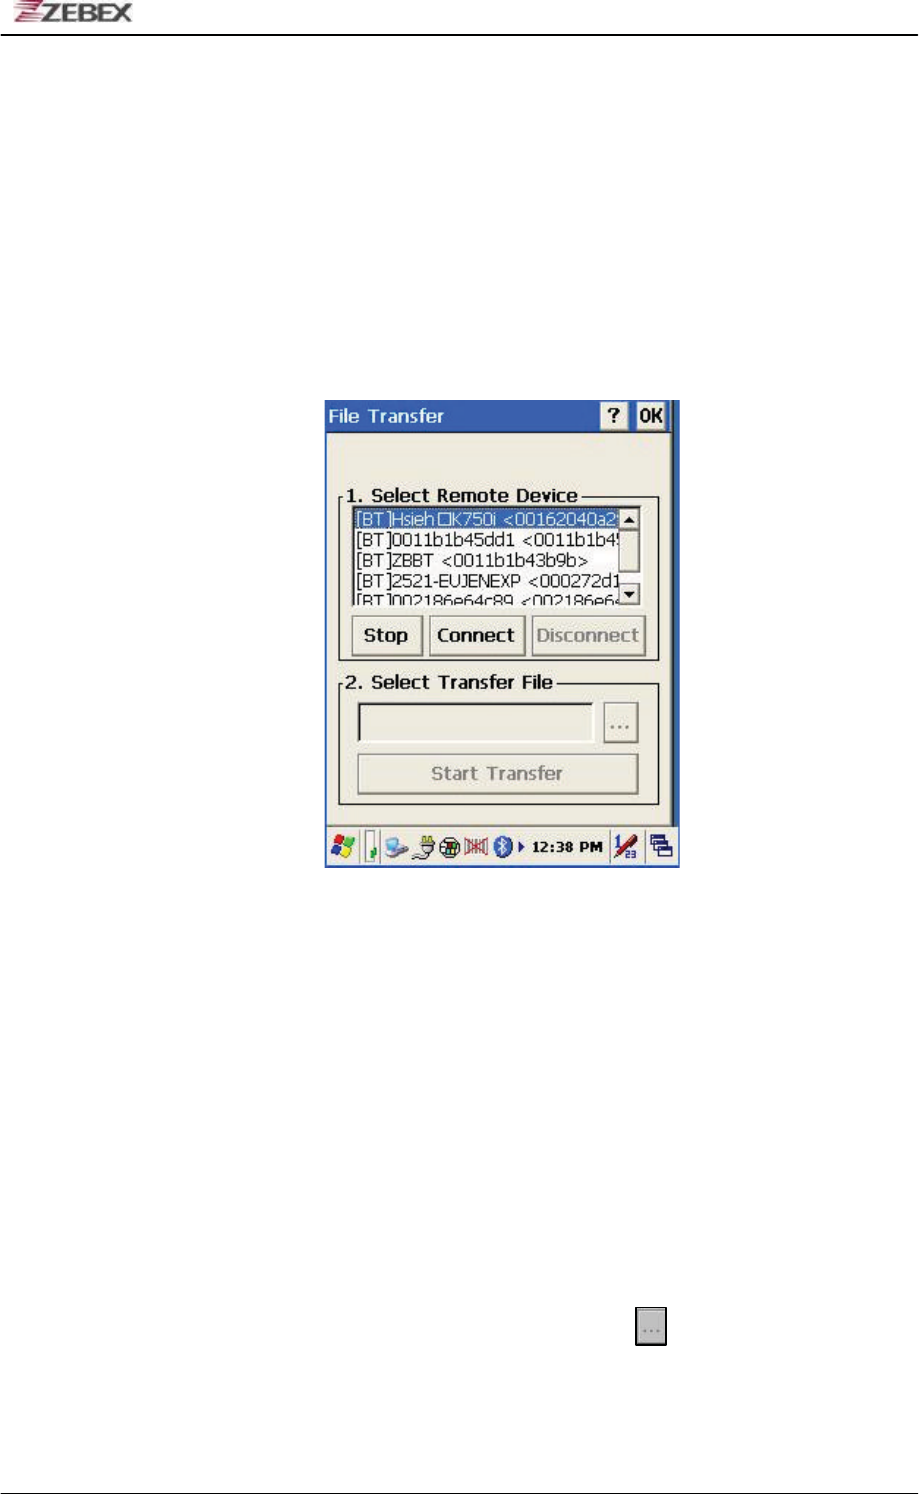
File Transfer
File Transfer is a simple file transferring function tool, the tool can transfer file
to another devices via blue tooth. Communication agreement of file
transferring was adopted with OBEX agreement which shared with cell phone
or Notebook PC. So you can simply use this function to transfer file to cell
phone or Notebook PC, or doing file transferring between two terminals. !
File Transfer is capable to auto-search devices with Bluetooth communication,
so all devices within valid range will be listed in window of “1. Select Remote
Device.”
Function Instructions:
1. Select Remote Device
All devices with Bluetooth Communication functions are listed on the
display.
Query : For searching usable devices.
Stop : Stop searching.
Connect : For connecting with one device.
ʳ
Disconnect : For disconnecting with current devices.
2. Select Transfer File
Select file need to be transferred, press bottom for selecting file.
Start Transfer : Start transferring file to targeted devices.

ZEBEX INDUSTRIES INC.
Subject Version Date Page
Z-2065 series User’s Manual 3.00 2010/3/19 45 / 69
1. File Transferring by using Bluetooth:
Make sure Bluetooth devices was activated, Bluetooth Communication devices
can be activated under Switch Function within PowerPack software utilities.
1.1 Select “Query “ for searching Bluetooth devices, below window will
pop up on display.
1.2 Select Bluetooth devices for receiving file, select “ Connect ” for
connecting with devices, or select “ Disconnect ” to disconnect with
current devices.