Zebra Technologies MC659B ENTERPRISE DIGITAL ASSISTANT (EDA) User Manual MC55 User Guide P N 72E 108859 02 Rev A
Zebra Technologies Corporation ENTERPRISE DIGITAL ASSISTANT (EDA) MC55 User Guide P N 72E 108859 02 Rev A
Contents
- 1. Users Manual 1
- 2. Users Manual 2
- 3. Users Manual 3
- 4. Users Manual 4
Users Manual 2
Using the MC65 2 - 25
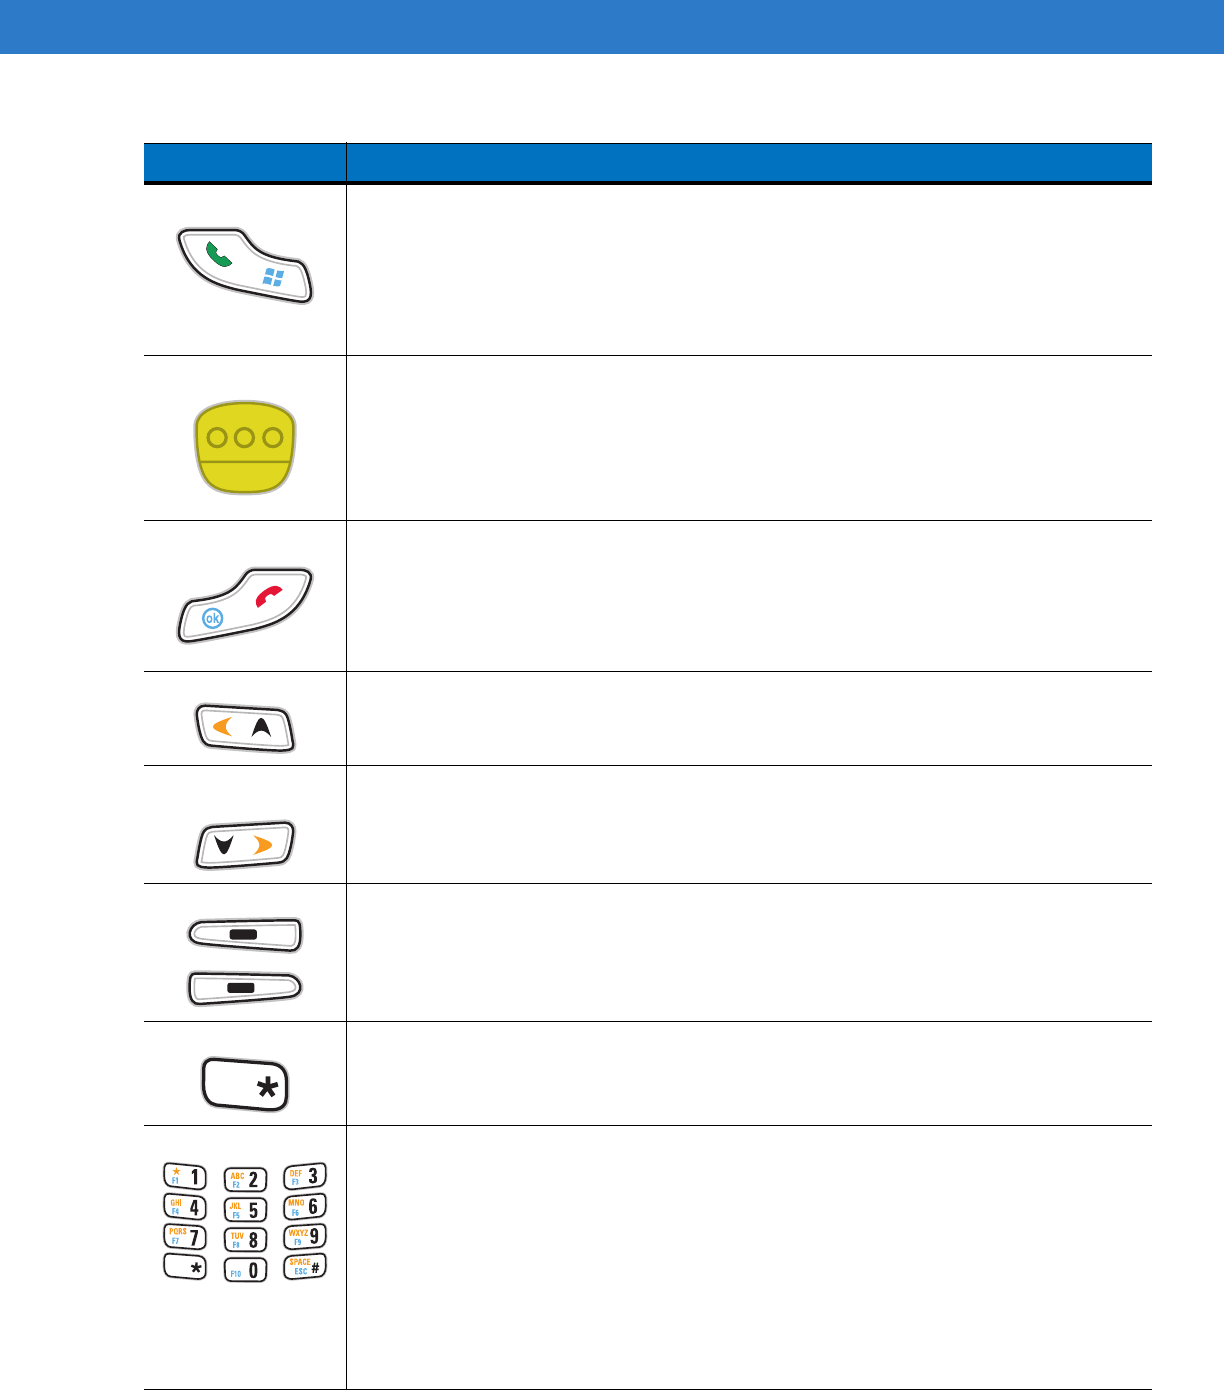
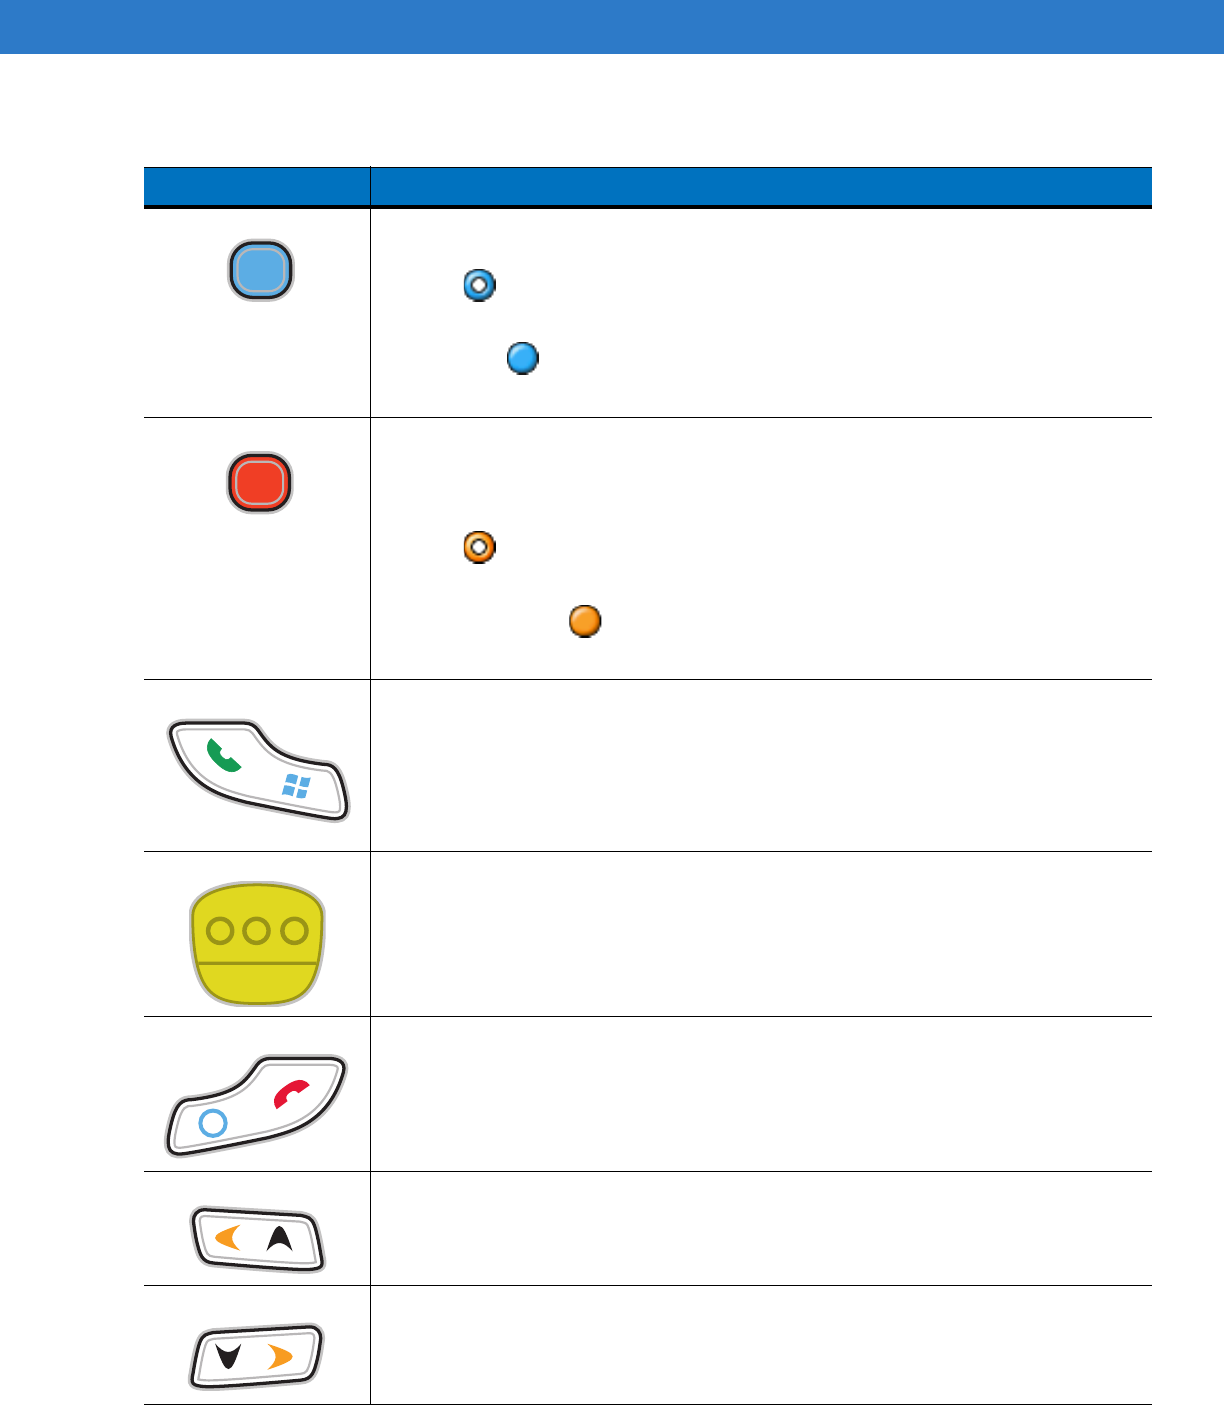
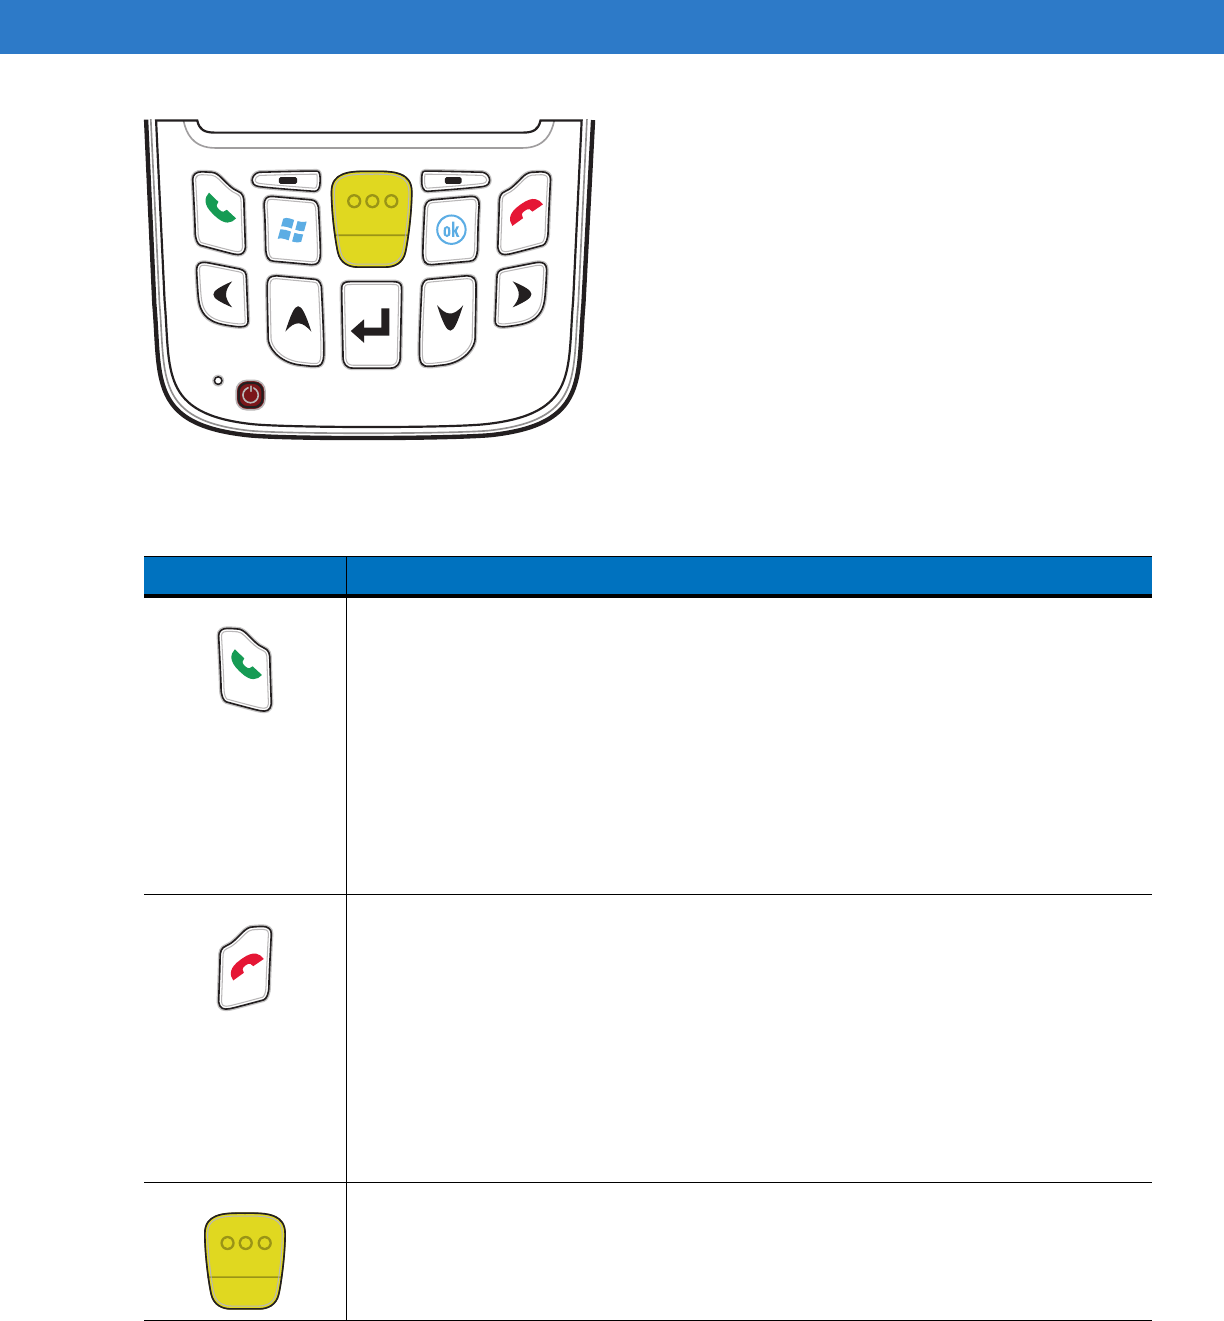
Talk/Start Menu Talk (Green Phone): press to display the phone keypad window or to dial a phone number
(from the phone keypad window).
When on a phone call, press to place the call on hold.
Use this key in conjunction with the Blue key to instantly display the Start menu from any
application without tapping the screen. This function is user programmable.
Scan (yellow)
Activates the scanner/imager in a scan enabled application.
End/OK End (Red Phone): press when the phone keypad window displays to stop dialing or end a
call.
Use this key in conjunction with the Blue key as an OK or close button. This function is user
programmable.
Scroll Up and Left
Moves up one item.
Moves left one item when pressed with the Orange key.
Scroll Down and
Right
Moves down one item.
Moves right one item when pressed with the Orange key.
Soft Keys
Accesses the command or menu above it on the screen.
Star
Produces an asterisk in default state.
Press and release the blue key, then press the Star key to open the Start menu.
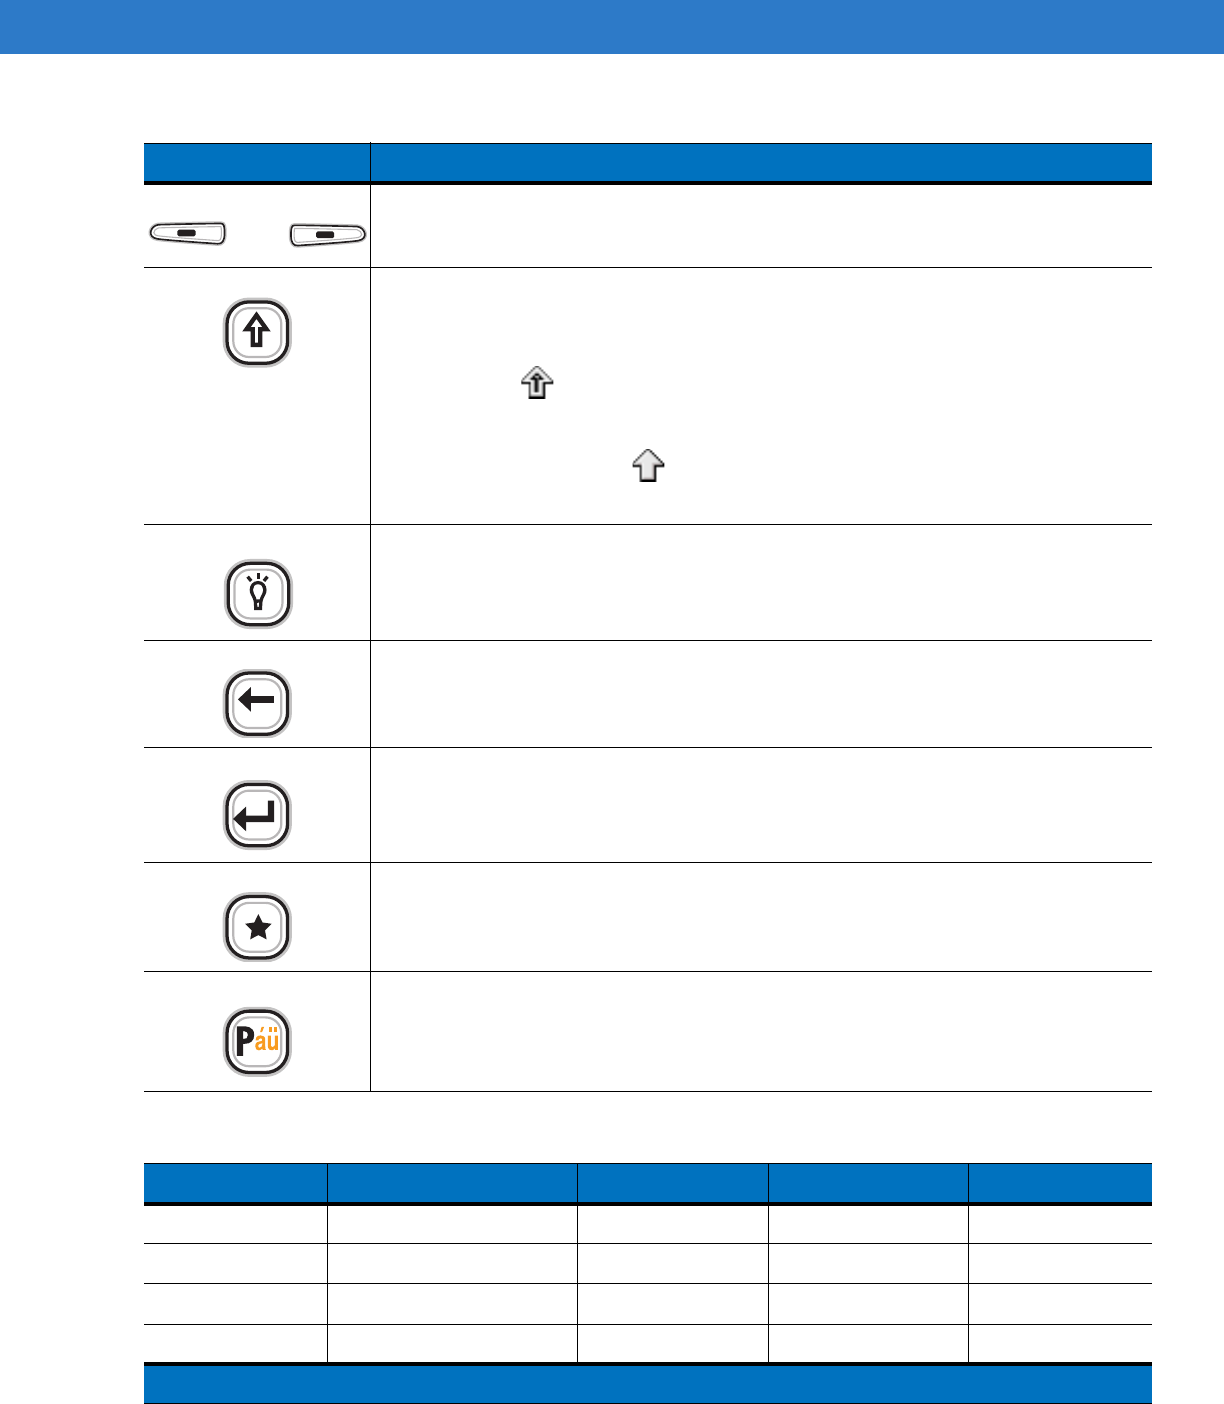
Alphanumeric
In default state, produces the numeric value on the key.
In Alpha state, produces the lower case alphabetic characters on the key. Each key press
produces the next alphabetic character in sequence. For example, press and release the
Orange key and then press the ‘4’ key once to produce the letter ‘g’; press and release the
Orange key and then press the ‘4’ key three times to produce the letter ‘i’.
Press the SHIFT key in Alpha state to produce the upper case alphabetic characters on the
key. For example, press and release the Orange key, press and release the SHIFT key, and
then press the ‘4’ key once to produce the letter ‘G’; press and release the Orange key,
press and release the SHIFT key and then press the ‘4’ key three times to produce the letter
‘I’.
Table 2-6
MC65 Numeric Keypad Descriptions (Continued)
Key Description
Preliminary
2 - 26 MC65 User Guide
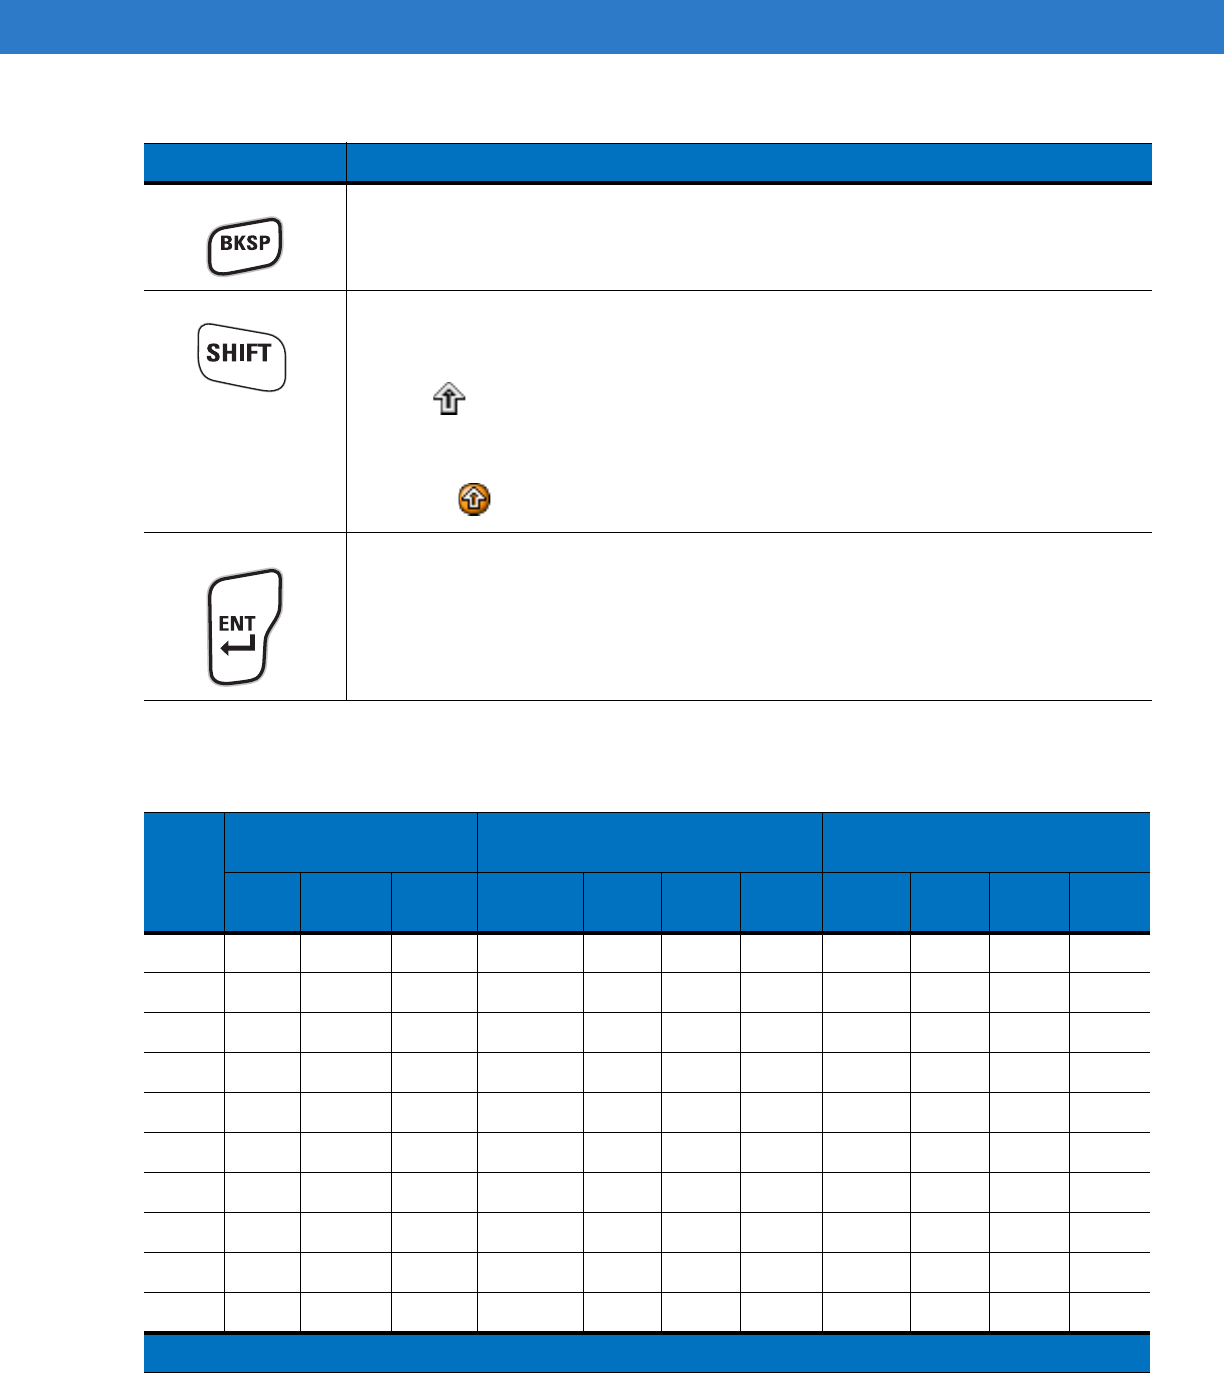
Backspace
Produces a backspace.
SHIFT
Press and release the SHIFT key to activate the keypad alternate SHIFT functions.
A single press displays the following icon at the bottom of the screen, until a second key is
pressed:
Press the Orange key, then the Shift key to add a temporary shift (that applies only to the
next key pressed) to the orange lock state. This displays the following icon at the bottom of
the screen:
Enter
Executes a selected item or function.
Table 2-7
Numeric Keypad Input Modes
Key
Numeric Mode Orange Key
(Alpha Lowercase Mode)
Orange + Shift Keys
(Alpha Uppercase Mode)
Blue+
Key
SHIFT
+ Key
1st
Press
2nd
Press
3rd
Press
4th
Press
1st
Press
2nd
Press
3rd
Press
4th
Press
11F1! * *** * ***
22F2@a bc A BC
33F3# d ef D EF
44F4$ g hi G HI
55F5%j kl J KL
66F6^ m no MNO
77F7& p qr sP QRS
88F8* t uv T UV
99F9( w xyzWXYZ
00F10) . >
Note: An application can change the key functions. The keypad may not function exactly as described.
Table 2-6
MC65 Numeric Keypad Descriptions (Continued)
Key Description
Preliminary
Using the MC65 2 - 27
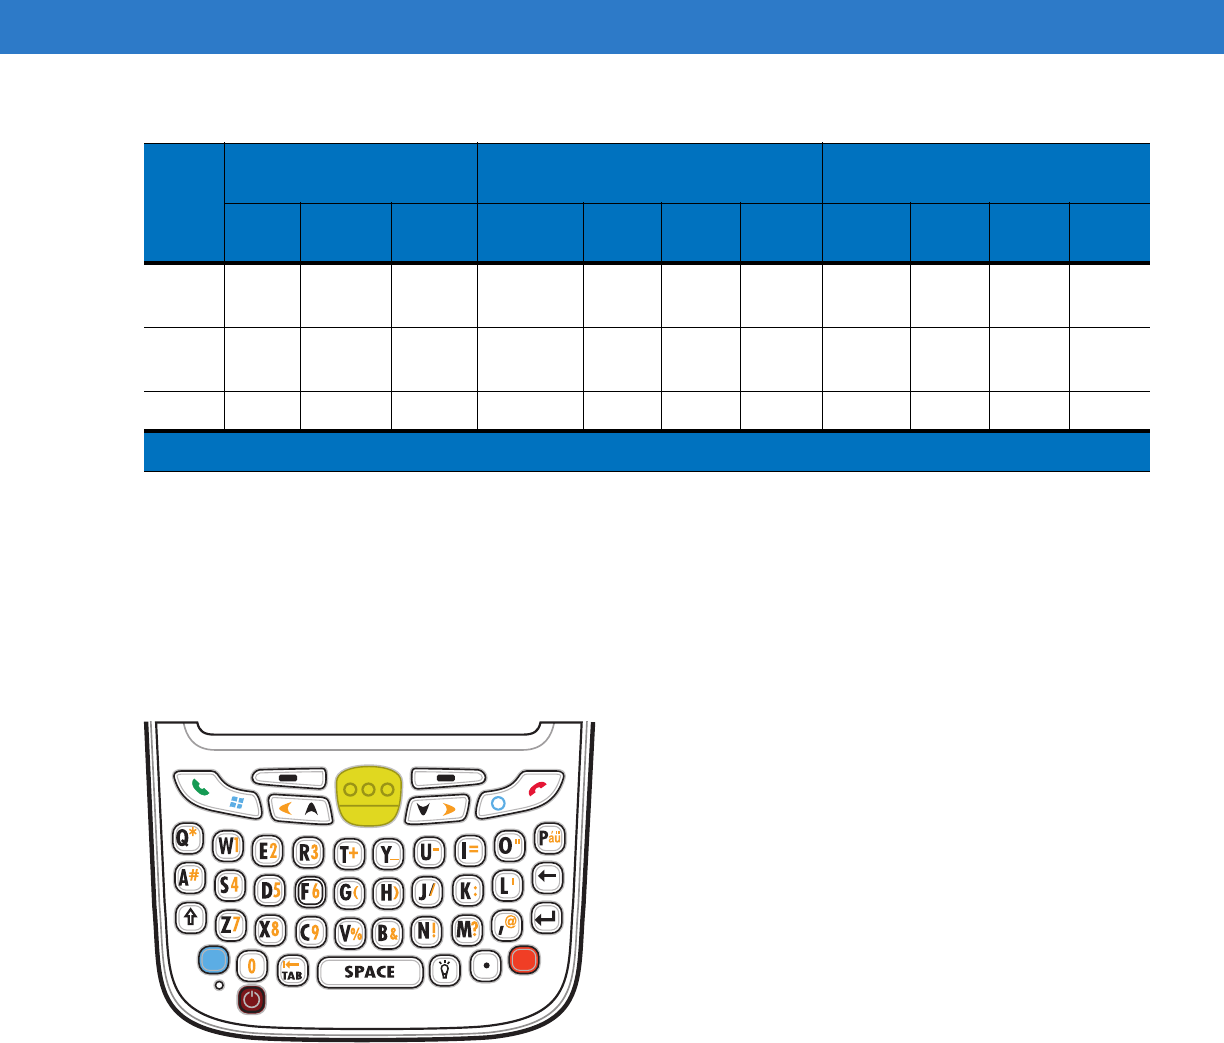
Alpha-numeric Keypad Configurations
The three types of alpha-numeric keypads (QWERTY, AZERTY and QWERTZ) produce the 26-character alphabet
(A-Z, both lowercase and uppercase), numbers (0-9), and assorted characters. The keypad is color-coded to
indicate which modifier key to press to produce a particular character or action. The keypad default is alphabetic,
producing lowercase letters. See Table 2-8 for key and button descriptions and Table 2-9 on page 2-30 for the
keypad’s special functions. AZERTY keypad is used on configurations installed with the French operating system.
QWERTZ keypad is used on configurations installed with the German operating system.
Figure 2-33
QWERTY Keypad Configuration
Up Up Up Hilight
Up Left Left
Down Down Down Hilight
Down Right Right
Enter Action Action Action Action Action
Table 2-7
Numeric Keypad Input Modes (Continued)
Key
Numeric Mode Orange Key
(Alpha Lowercase Mode)
Orange + Shift Keys
(Alpha Uppercase Mode)
Blue+
Key
SHIFT
+ Key
1st
Press
2nd
Press
3rd
Press
4th
Press
1st
Press
2nd
Press
3rd
Press
4th
Press
Note: An application can change the key functions. The keypad may not function exactly as described.
ok
Preliminary
2 - 28 MC65 User Guide
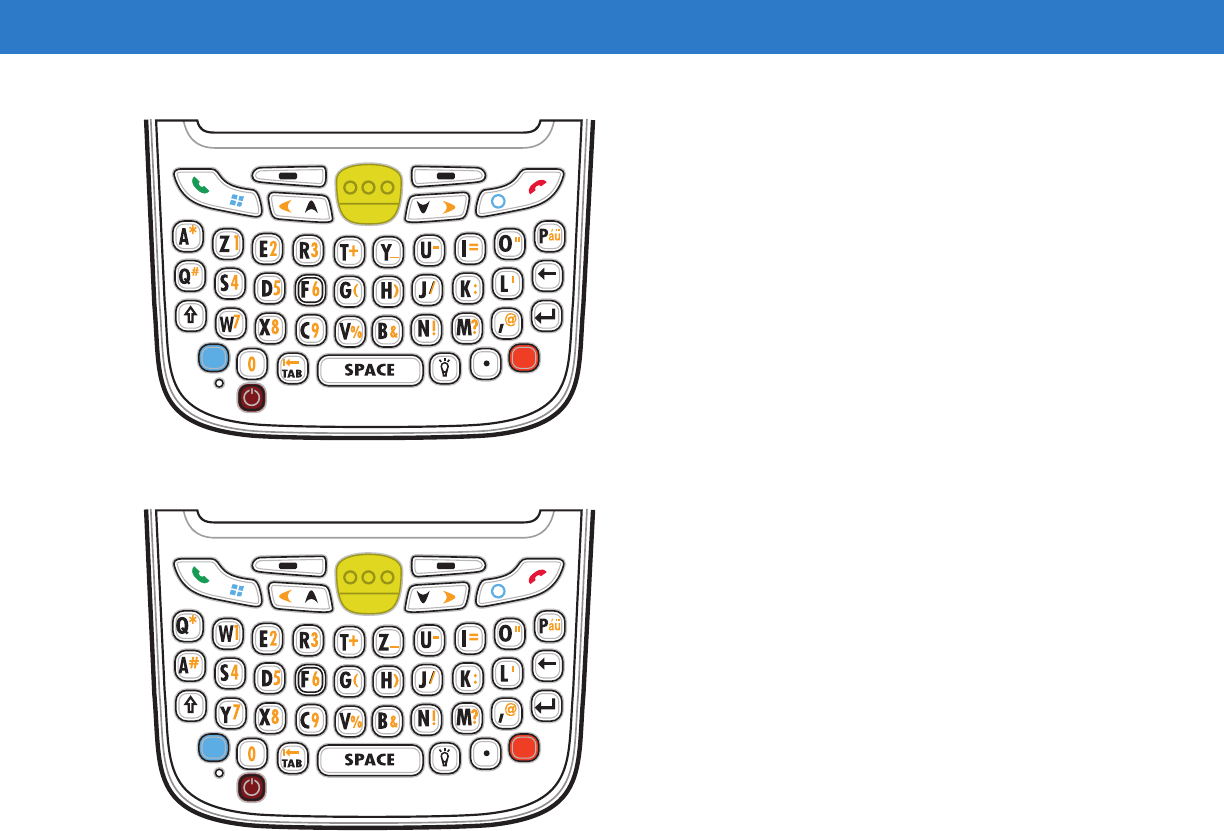
Figure 2-34
AZERTY Keypad Configuration
Figure 2-35
QWERTZ Keypad Configuration
ok
ok
Preliminary
Using the MC65 2 - 29
Table 2-8
Alpha-numeric Keypad Descriptions
Key Action
Blue Key Press the Blue key once to activate this mode temporarily, followed by another key. This
displays the following icon at the bottom of the screen, until a second key is
pressed:
Press the Blue key twice to lock this mode. This displays the following icon at the bottom
of the screen:
Press the Blue key a third time to unlock.
Orange Key Accesses the secondary layer of characters and actions (shown on the keypad in
orange).
Press the Orange key once to activate this mode temporarily, followed by another key.
This displays the following icon at the bottom of the screen, until a second key is
pressed:
Press the Orange key twice to lock this mode. This displays the following icon at the
bottom of the screen:
Press the Orange key a third time to unlock.
Talk/Start Menu Talk (Green Phone): press to display the phone keypad window or to dial a phone number
(from the phone keypad window).
When on a phone call, press to place the call on hold.
Use this key in conjunction with the Blue key to instantly display the Start menu from any
application without tapping the screen. This function is user programmable.
Scan (yellow)
Activates the scanner/imager in a scan enabled application.
End/OK End (Red Phone): press when the phone keypad window displays to stop dialing or end a
call.
Use this key in conjunction with the Blue key as an OK or close button. This function is
user programmable.
Scroll Up and Left Moves up one item.
Moves left one item when pressed with the Orange key.
Scroll Down and Right Moves down one item.
Moves right one item when pressed with the Orange key.
ok
Preliminary
2 - 30 MC65 User Guide
Soft Keys
Accesses the command or menu above it on the screen.
Shift
Changes the state of the alpha characters from lowercase to uppercase.
•
Press the Shift key to activate this mode temporarily, followed by another key.
This displays the following icon at the bottom of the screen, until a second key is
pressed:
•
Press the Shift key twice to lock this mode. This displays the following icon at the
bottom of the screen:
Press the Shift key a third time to unlock.
Backlight Turns the display backlight on and off.
Backspace Produces a backspace.
Enter Executes a selected item or function.
Star Produces an asterisk.
au Creates special characters.
Table 2-9
QWERTY Keypad Input Modes
Key Normal Shift + Key Orange + Key Blue + Key
Qq Q * q
Ww W 1 w
Ee E 2 e
Rr R 3 r
Note: An application can change the key functions. The keypad may not function exactly as described.
Table 2-8
Alpha-numeric Keypad Descriptions (Continued)
Key Action
Preliminary

Using the MC65 2 - 31
Tt T + t
Yy Y _ y
Uu U - u
Ii I = i
Oo O “ o
Pp P áü p
Aa A # a
Ss S 4 s
Dd D 5 d
Ff F 6 f
Gg G ( g
Hh H ) h
Jj J / j
Kk K : k
Ll L ‘ l
Backspace Backspace Backspace Backspace Backspace
Shift Shift Shift-Lock Shift Shift
Zz Z 7 z
Xx X 8 x
Cc C 9 c
Vv V % v
Bb B & b
Nn N ! n
Mm M ? m
,, <@,
ENTER Enter Enter Enter Enter
00 ) 0 0
TAB Tab Tab Back tab Tab
SPACE Space Space Space Space
Table 2-9
QWERTY Keypad Input Modes (Continued)
Key Normal Shift + Key Orange + Key Blue + Key
Note: An application can change the key functions. The keypad may not function exactly as described.
Preliminary
2 - 32 MC65 User Guide
Backlight Backlight Backlight Backlight Backlight
. (Period) . > . .
Table 2-10
AZERTY Keypad Input Modes
Key Normal Shift + Key Orange + Key Blue + Key
Aa A * a
Zz Z 1 z
Ee E 2 e
Rr R 3 r
Tt T + t
Yy Y _ y
Uu U - u
Ii I = i
Oo O “ o
Pp P áü p
Qq Q # q
Ss S 4 s
Dd D 5 d
Ff F 6 f
Gg G ( g
Hh H ) h
Jj J / j
Kk K : k
Ll L ‘ l
Backspace Backspace Backspace Backspace Backspace
Shift Shift Shift-Lock Shift Shift
Ww W 7 w
Xx X 8 x
Cc C 9 c
Note: An application can change the key functions. The keypad may not function exactly as described.
Table 2-9
QWERTY Keypad Input Modes (Continued)
Key Normal Shift + Key Orange + Key Blue + Key
Note: An application can change the key functions. The keypad may not function exactly as described.
Preliminary
Using the MC65 2 - 33
Vv V % v
Bb B & b
Nn N ! n
Mm M ? m
,, <@
Enter Enter Enter Enter Enter
00 ) 0 0
TAB Tab Tab Back tab Tab
SPACE Space Space Space Space
Backlight Backlight Backlight Backlight Backlight
. (Period) . > . .
Table 2-11
QWERTZ Keypad Input Modes
Key Normal Shift + Key Orange + Key Blue + Key
Qq Q * q
Ww W 1 w
Ee E 2 e
Rr R 3 r
Tt T + t
Zz Z _ z
Uu U - u
Ii I = i
Oo O “ o
Pp P áü p
Aa A # a
Ss S 4 s
Dd D 5 d
Ff F 6 f
Gg G ( g
Note: An application can change the key functions. The keypad may not function exactly as described.
Table 2-10
AZERTY Keypad Input Modes (Continued)
Key Normal Shift + Key Orange + Key Blue + Key
Note: An application can change the key functions. The keypad may not function exactly as described.
Preliminary

2 - 34 MC65 User Guide
PIM Keypad Configuration
The PIM keypad contains application keys and scroll keys. Note that an application can change keypad functions
so the MC65’s keypad may not function exactly as described. See Table 2-6 for key and button descriptions and
Table 2-7 on page 2-26 for the keypad’s special functions.
Hh H ) h
Jj J / j
Kk K : k
Ll L ‘ l
Backspace Backspace
Shift Shift
Yy Y 7 y
Xx X 8 x
Cc C 9 c
Vv V % v
Bb B & b
Nn N ! n
Mm M ? m
,, <@,
ENTER Enter ENTER ENTER Enter
00 ) 0 0
TAB Tab Tab Back tab Tab
SPACE Space Space Space Space
Backlight Backlight Backlight Backlight Backlight
. (Period) . > . .
Table 2-11
QWERTZ Keypad Input Modes (Continued)
Key Normal Shift + Key Orange + Key Blue + Key
Note: An application can change the key functions. The keypad may not function exactly as described.
Preliminary
Using the MC65 2 - 35
Figure 2-36
MC65 PIM Keypad
Table 2-12
MC65 PIM Keypad Descriptions
Key Description
Talk (Green Phone)
This key is user programmable.
To use a key as an application key (APP key) on the keyboard, create and install a new
keyboard remap table. However, to remap the green phone key as APP keys through the
registry, create an XML provisioning file that includes the following entry:
<characteristic type=”HKLM\Hardware\DeviceMap\KYBD”>
<parm name=”GreenKeyOverride” value=”xx” datatype=”integer” />
[where xx is the new APP key code]
Provision the file to the MC65 to send an APP key code, instead of the original key code,
upon pressing the green phone key. Refer to the MC65 Integrator Guide for information
on creating XML provisioning files.
End (Red Phone)
This key is user programmable.
To use a key as an application key (APP key) on the keyboard, create and install a new
keyboard remap table. However, to remap the green phone key as APP keys through the
registry, create an XML provisioning file that includes the following entry:
<characteristic type=”HKLM\Hardware\DeviceMap\KYBD”>
<parm name=”RedKeyOverride” value=”yy” datatype=”integer” />
[where yy is the new APP key code]
Provision the file to the MC65 to send an APP key code, instead of the original key code,
upon pressing the red phone key. Refer to the MC65 Integrator Guide for information on
creating XML provisioning files.
Scan (yellow)
Activates the scanner/imager in a scan enabled application.
Preliminary
2 - 36 MC65 User Guide
Special Character Key
To add special characters using the MC65 áü key, type the related character first, then press the Orange twice
followed by the áü (P) key. Continue pressing the áü key until the special character displays. To modify an existing
Scroll Up
Moves up one item.
Scroll Down
Moves up down item.
Scroll Left
Moves left one item.
Scroll Right
Moves right one item.
Soft Keys
Accesses the command or menu above it on the screen.
Enter
Executes a selected item or function.
OK
Use this key as an OK or close button.
Table 2-12
MC65 PIM Keypad Descriptions (Continued)
Key Description
NOTE Special characters are only available on the alpha-numeric keypad configurations.
Preliminary
Using the MC65 2 - 37
character, move the cursor to the right of the character then press the Orange key twice and then press the áü key
until the special character replaces the original character. Table 2-13 lists the special characters you can generate.
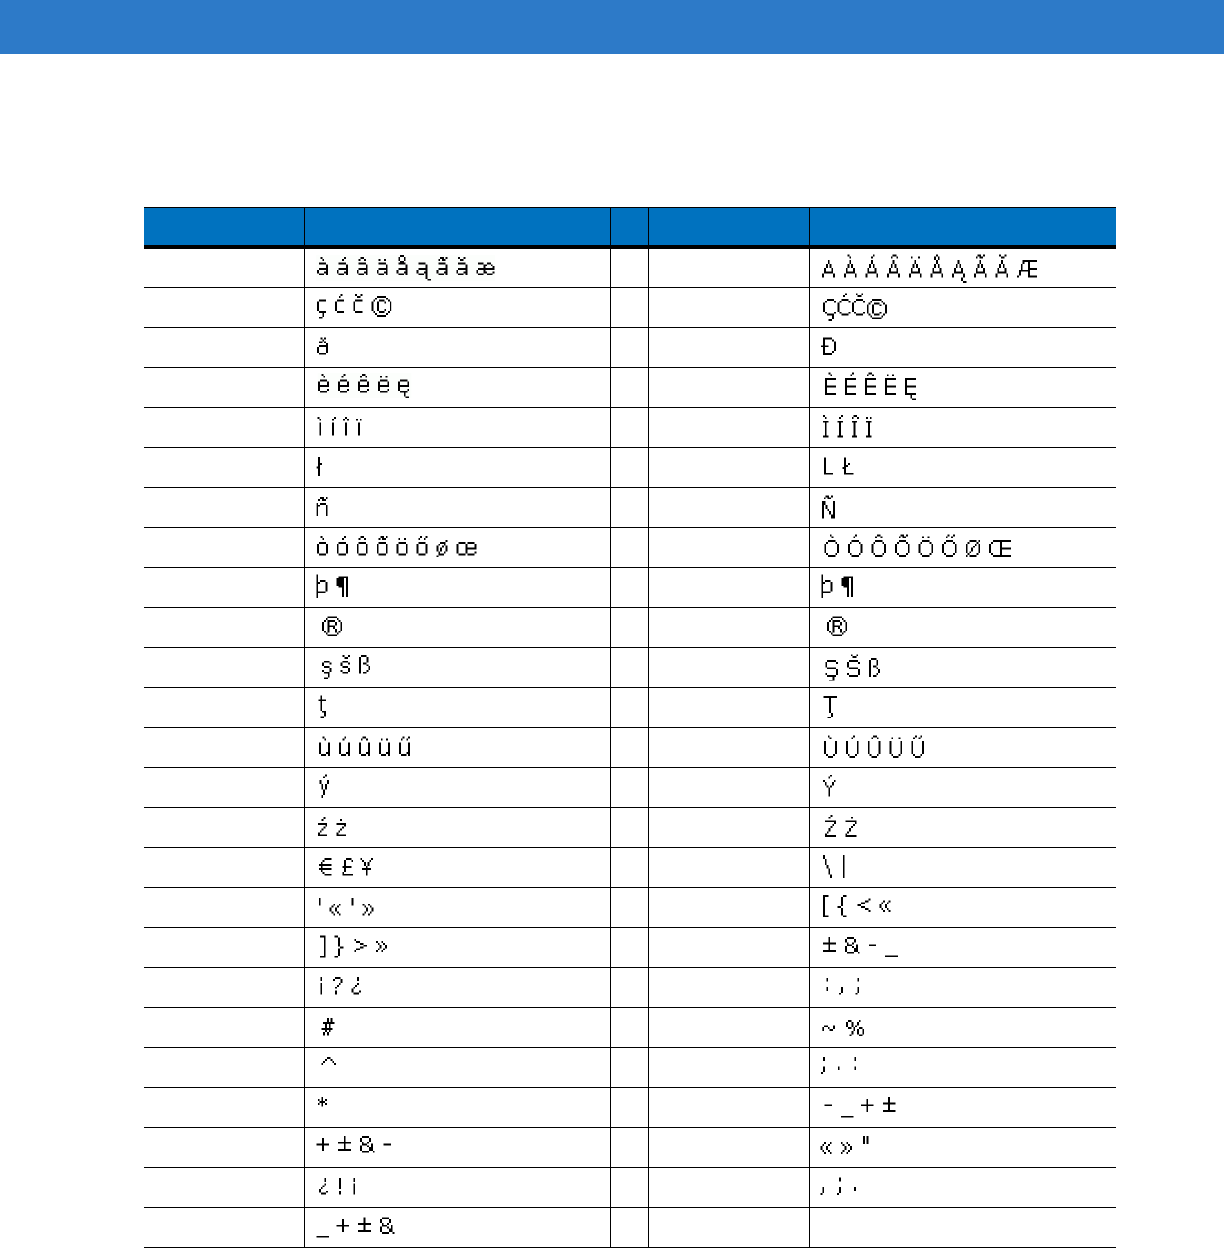
Table 2-13
Special Characters
Key Special Characters Key Special Characters
aA
cC
dD
eE
iI
lL
nN
oO
pP
rR
sS
tT
uU
yY
zZ
$/
“(
)+
!.
*@
%,
#&
_‘
?:
-
Preliminary
2 - 38 MC65 User Guide
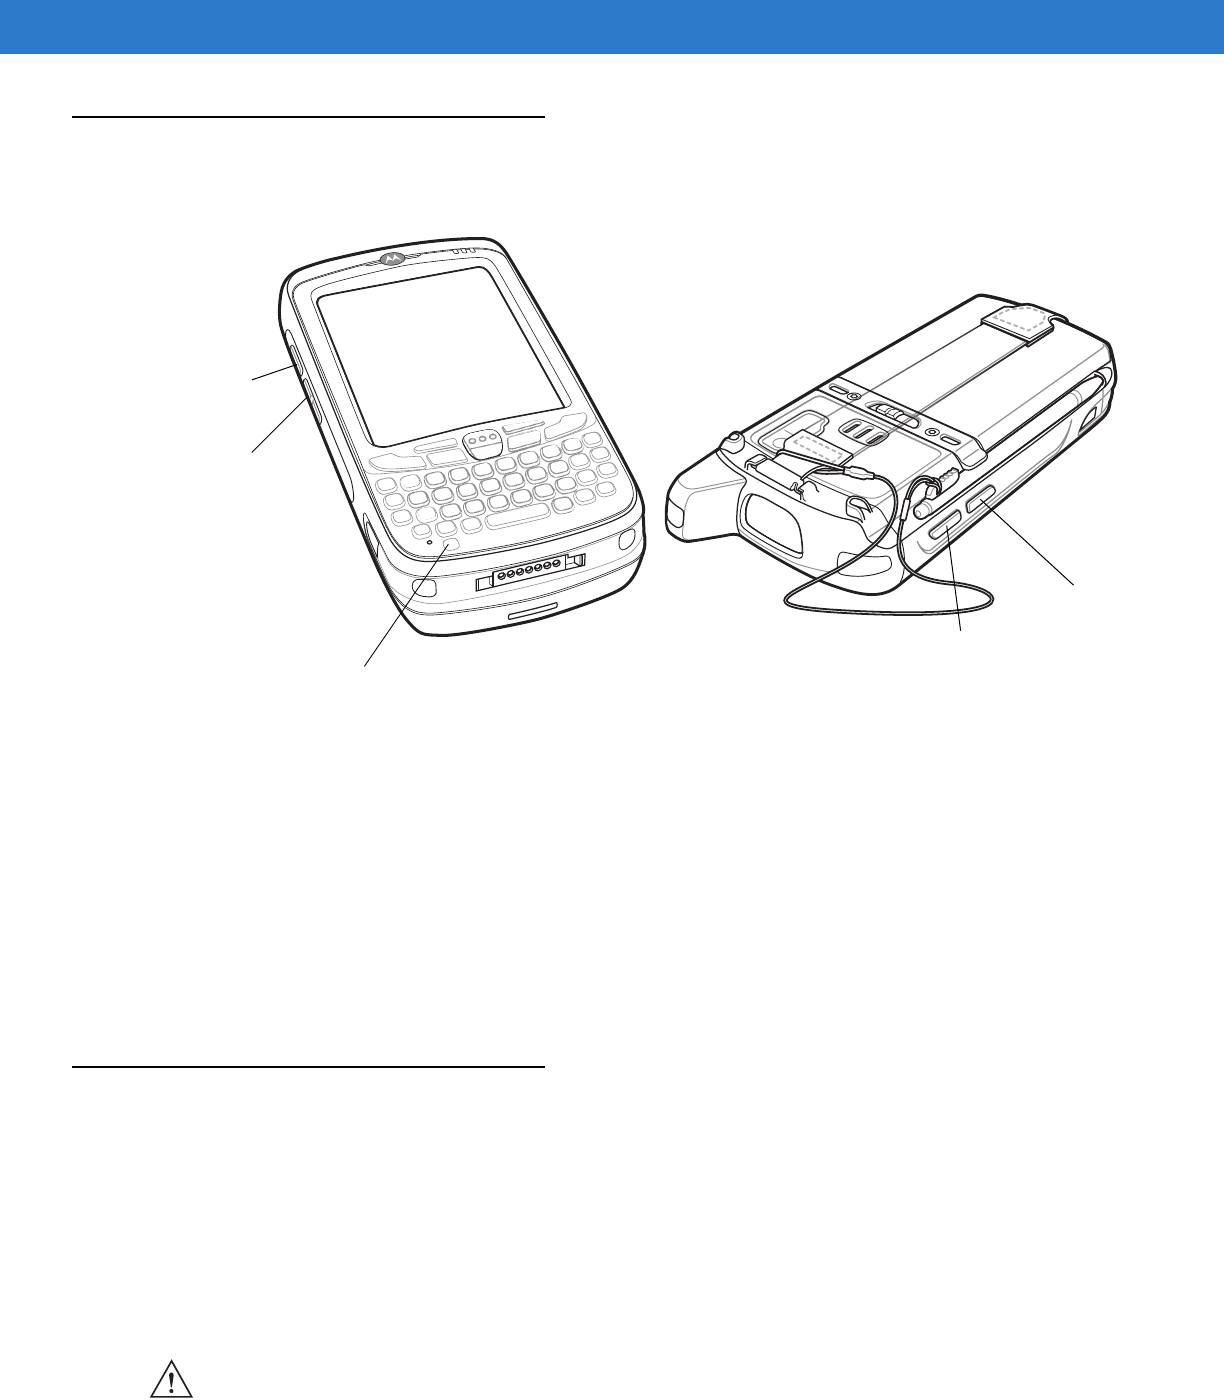
Function Buttons
The MC65’s buttons perform certain functions.
Figure 2-37
Function Buttons
•
Power: Press the red Power button to turn the MC65 screen on and off. The MC65 is in suspend mode when
the screen is off. For more information, see Powering On the MC65 on page 1-8. Also use the Power button
to reset the MC65 by performing a warm or cold boot. See Resetting the MC65 on page 2-16.
•
Scan/Action: Press to scan bar codes or capture images. See Data Capture on page 2-40.
Or, press to open an application or perform a function. See the Microsoft® Applications for Mobile 6 User
Guide to set an application to open.
•
Volume Up/Down: Press to increase or decrease the MC65’s volume.
•
Action: Press to open an application or perform a function. See the Microsoft® Applications for Windows
Mobile 6 User Guide to set an application to open.
Stylus
Use the MC65 stylus to select items and enter information. The stylus functions as a mouse.
•
Tap: Touch the screen once with the stylus to press option buttons and open menu items.
•
Tap and Hold: Tap and hold the stylus on an item to see a list of actions available for that item. On the pop-up
menu that appears, tap the action to perform.
•
Drag: Hold the stylus on the screen and drag across the screen to select text and images. Drag in a list to
select multiple items.
Scan/Action
Button
Power Button
Volume
Up/Down
Button
Action Button
Scan/Action
Button
CAUTION To prevent damage to the screen, do not use any device other than the Motorola-provided stylus.
Preliminary
Using the MC65 2 - 39
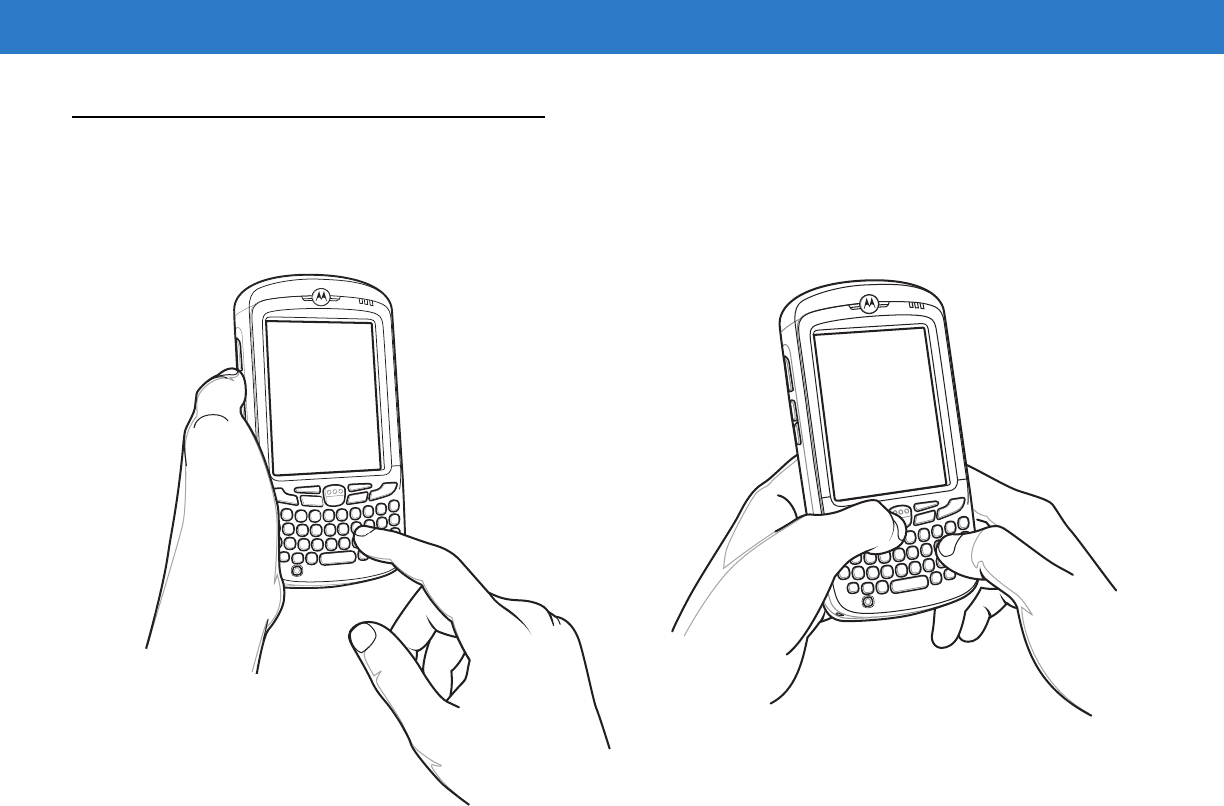
Entering Data
When entering data on the keypad, use either the single-hand method or the two-hand method as shown in Figure
2-38.
Figure 2-38
Entering Data on the Keypad
Single-hand Method Two-hand Method
Preliminary

2 - 40 MC65 User Guide
Data Capture
The MC65 offers three types of data capture options:
•
Imaging
•
Digital camera.
Imaging
MC65 with an integrated imager have the following features:
•
Omnidirectional reading of a variety of bar code symbologies, including the most popular linear, postal,
PDF417, and 2D matrix code types.
•
The ability to capture and download images to a host for a variety of imaging applications.
•
Advanced intuitive laser aiming cross-hair and dot aiming) for easy point-and-shoot operation.
The imager uses digital camera technology to take a digital picture of a bar code, stores the resulting image in its
memory, and executes state-of-the-art software decoding algorithms to extract the data from the image.
Operational Modes
MC65 with an integrated imager support three modes of operation, listed below. Activate each mode by pressing
the Scan button.
•
Decode Mode: In this mode, the MC65 attempts to locate and decode enabled bar codes within its field of
view. The imager remains in this mode as long as you hold the scan button, or until it decodes a bar code.
•
Pick List Mode: This mode allows you to selectively decode a bar code when more than one bar code is in
the MC65’s field of view. To accomplish this, move the aiming crosshair or dot over the required bar code to
decode only this bar code. This feature is ideal for pick lists containing multiple bar codes and manufacturing
or transport labels containing more than one bar code type (either 1D or 2D).
•
Image Capture Mode: Use this mode to capture an image within the MC65’s field of view. This is useful for
capturing signatures or images of items like damaged boxes.
Digital Camera
MC65 with an integrated digital camera have the following features:
•
Omnidirectional reading of a variety of bar code symbologies, including the most popular linear, postal,
PDF417, and 2D matrix code types.
•
Advanced intuitive aiming for easy point-and-shoot operation.
The camera uses digital camera technology to take a digital picture of a bar code, stores the resulting image in its
memory, and executes state-of-the-art software decoding algorithms to extract the data from the image.
NOTE To perform data capture a scanning enabled application must be installed on the MC65. A sample scanning
application can be downloaded from the Motorola Support site at http://support.symbol.com.
NOTE To enable Pick List Mode, download the Control Panel applet from the Support Central web site at
http://support.symbol.com. Pick List can also be set in an application using a API command.
Preliminary
Using the MC65 2 - 41
Scanning Considerations
Typically, scanning is a simple matter of aim, scan, and decode and a few quick trial efforts master it. However,
consider the following to optimize scanning performance:
•
Range
Any scanning device decodes well over a particular working range — minimum and maximum distances from
the bar code. This range varies according to bar code density and scanning device optics.
Scanning within range brings quick and constant decodes; scanning too close or too far away prevents
decodes. Move the scanner closer and further away to find the right working range for the bar codes being
scanned.
•
Angle
Scanning angle is important for promoting quick decodes. When laser beams reflect directly back into the
scanner from the bar code, this specular reflection can “blind” the scanner.
To avoid this, scan the bar code so that the beam does not bounce directly back. But don’t scan at too sharp
an angle; the scanner needs to collect scattered reflections from the scan to make a successful decode.
Practice quickly shows what tolerances to work within.
•
Hold the MC65 farther away for larger symbols.
•
Move the MC65 closer for symbols with bars that are close together.
Imager Scanning
1. Ensure that a scan-enabled application is loaded on the MC65.
2. Aim the scan window at the bar code.
Figure 2-39
Imager Scanning
3. Press the scan button.
The red laser aiming pattern or aiming dot turns on to assist in aiming. Ensure the bar code is within the area
formed by the brackets in the aiming pattern or close to the aiming dot. The aiming dot is used for increased
visibility in bright lighting conditions.
The Scan/Decode LED lights red to indicate that scanning is in process, then lights green and a beep sounds,
by default, to indicate the bar code was decoded successfully. Note that when the MC65 is in Pick List Mode,
the imager does not decode the bar code until the crosshair or aiming dot touches the bar code.
NOTE Scanning procedures depend on the application and MC65 configuration. An application may use different
scanning procedures from the one listed above.
Preliminary
2 - 42 MC65 User Guide
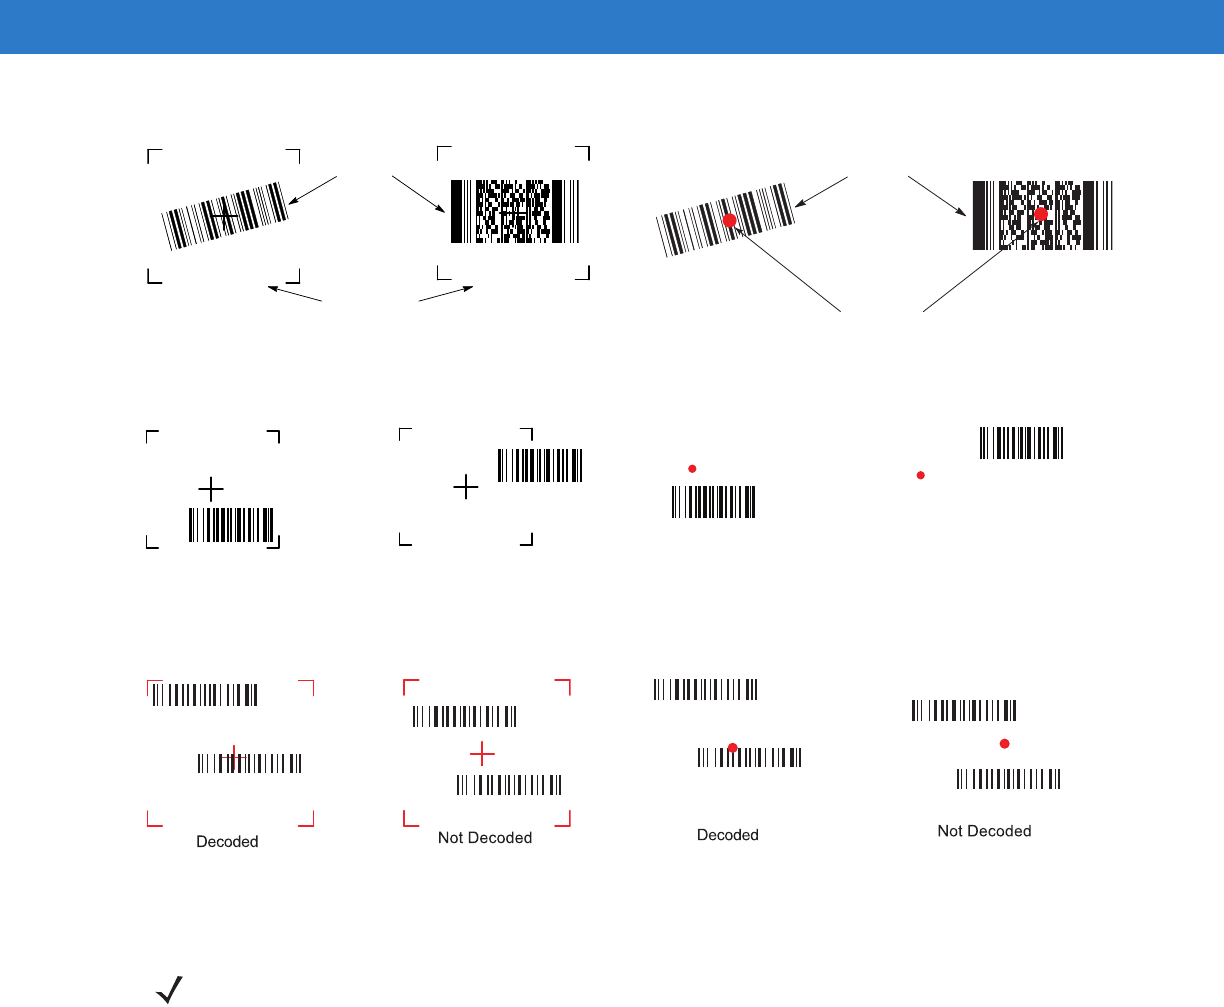
Figure 2-40
Imager Aiming Pattern: Bar Code Centered
Figure 2-41
Imager Aiming Pattern: Bar Code Not Centered
Figure 2-42
Pick List Mode with Multiple Bar Codes in Aiming Pattern
4. Release the scan button.
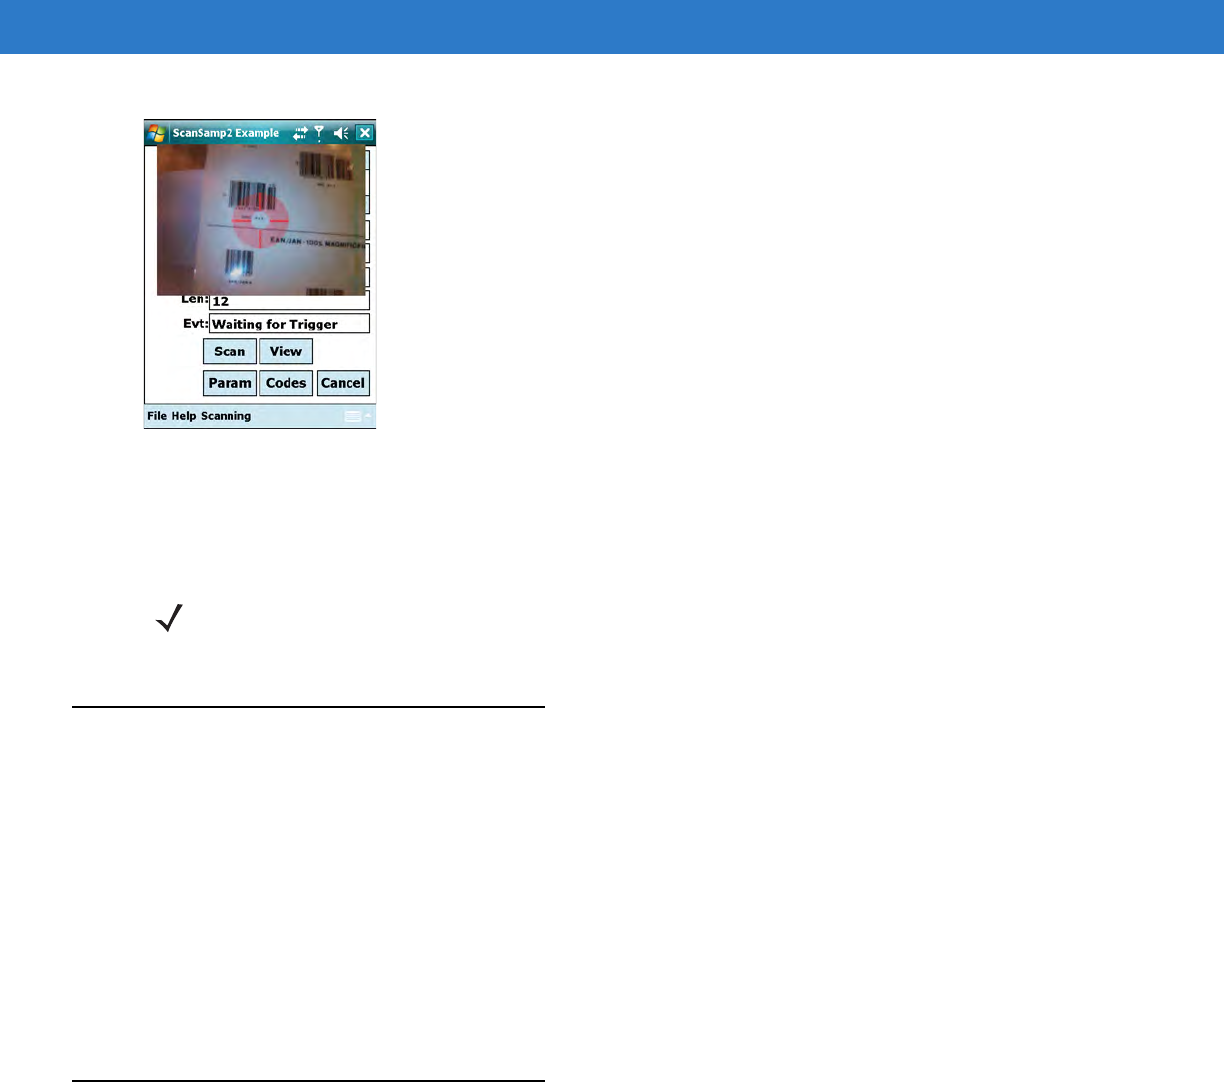
Digital Camera Scanning
1. Ensure that a scan-enabled application is loaded on the MC65.
2. Aim the camera lens on the back of the MC65 at a bar code.
3. Press and hold the scan button. A preview window appears on the display window with a red aiming reticle in
the center. The Scan/Decode LED lights red to indicate that scanning is in process.
Linear bar code PDF417 symbol
Symbol
View Finder
(Aiming Pattern)
Linear bar code PDF417 symbol
Symbol
Aiming Dot
Correct Correct
Correct Incorrect Correct Incorrect
NOTE Imager decoding usually occurs instantaneously. The MC65 repeats the steps required to take a digital
picture (image) of a poor or difficult bar code as long as the scan button remains pressed.
Preliminary
Using the MC65 2 - 43
Figure 2-43
Sample Scan Application with Preview Window
4. Move the MC65 until the red aiming reticle is over the bar code to scan.
5. The Scan/Decode LED lights green and a beep sounds, by default, to indicate the bar code was decoded
successfully.
Using Voice-Over-IP
The MC65 supports Voice over IP over WLAN (VoWLAN) using Motorola or third party voice clients. The MC65 can
communicate using VoIP either using the MC65 supports several audio outputs, including back speaker phone,
front receiver or handset, and Bluetooth headset.
It is recommended that the wireless network use the 802.11a (5 GHz) band for voice applications. Using the 5 GHz
band avoids some noise sources that may occur on the 802.11b/g (2.4 GHz) band due to wireless interference.
When using a Bluetooth headset with the MC65 and VoWLAN, it is required to use the Bluetooth Headset profile
instead of Hands-free profile. Use the buttons on the MC65 to answer and end calls. See Chapter 5, Using
Bluetooth for information on setting up a Bluetooth Headset Profile.
Taking Photos
To take a photo:
1. Tap Start > Programs > Pictures & Videos icon.
2. Tap Camera on the command bar.
3. Check the image on the view finder, adjust if necessary.
4. Press the Enter key to take the picture. Hold the MC65 still until the shutter sound is heard.
NOTE The camera decode feature is set by default to automatically decode the bar code when read. This feature can
be programmed to display a green aiming rectile upon good decode indicating that the bar code has been
successfully decoded and to release the scan button.
Preliminary

2 - 44 MC65 User Guide
Recording Video
To record a video clip:
1. Tap Start > Programs > Pictures & Videos icon.
2. Tap Camera on the command bar.
3. Tap Menu > Video to set shooting mode to video.
The available recording time displays on the screen.
4. Press the Enter key to begin recording.
Recording stops when you press the Enter button again.
Viewing Photos and Videos
To view photos and video clips:
1. Tap Start > Programs > Pictures & Videos icon.
2. Tap the picture or video clip to view.
NOTE By default, the time limit for recording videos is set to 30 seconds.
Preliminary
Chapter 3 Using GPS Navigation
Introduction
The MC65 includes Global Positioning System (GPS) technology using the SiRF III chipset. GPS technology is
based on a worldwide system of GPS satellites orbiting the earth that continuously transmit digital radio signals.
These radio signals contain data on the satellites’ locations and their exact clock time and are used to determine
your location on the earth.
Software Installation
Third-party GPS navigation software is required. Evaluation software is available from various suppliers. For
example; VisualGPS, visit: http://www.visualgps.net/VisualGPSce/
If interested in purchasing GPS navigation software check with the GPS software vendor (before purchasing,
downloading, or installing any software) to determine that the application is compatible with the MC65. Refer to the
application’s user guide for application installation and setup information.
MC65 GPS Setup
The GPS-enabled MC65 uses Microsoft Windows Mobile 6.1, so the operating system automatically manages
access to the GPS receiver to allow multiple programs to simultaneously access GPS data.
By default, the MC65 has the following settings:MC65:
1. Tap Start > Settings > System > External GPS icon.
2. In the Programs tab, the GPS program port is set to None.
3. In the Hardware tab, the GPS hardware port is set to COM8.
WARNING!When using the MC65 in a vehicle, it is the user’s responsibility to place, secure and use in a
manner that will not cause accidents, personal injury or property damage or obstruct their view. It
is the responsibility of the driver to operate the vehicle in a safe manner, maintain observation of
all driving conditions at all times, and not become distracted by the device to the exclusion of safe
driving practices. It is unsafe to operate the controls of the device while driving.
Preliminary
3 - 2 MC65 User Guide
4. Select 57600 from the Baud rate drop-down list.
5. Tap ok to close the Setting window.
Operation
Acquiring satellite signals may take a few minutes. It is best to be outside and have a clear, unobstructed view of
the sky. Without a clear view, acquisition takes much longer and could result in the MC65 being unable to compute
the initial position quickly. When operating the device indoors access to the GPS signals may be limited or
unavailable.
GPS Maps on microSD Cards
GPS navigation software vendors may sell maps on microSD cards. If using a microSD card with the GPS
navigation software install the microSD memory card using procedure in Installing a microSD Card on page 1-4.
Answering a Phone Call While Using GPS
If you receive a phone call while using your GPS navigation software:
1. Answer the phone call by pressing the Answer button.
2. Once you end the phone call, press the End Call button to resume the audio on the GPS software.
Losing the GPS Signal While in a Vehicle
GPS performance on the MC65 may be affected if the vehicle has thermal glass windows and windshields, which
can block the MC65 from receiving a GPS signal from satellites. To improve GPS signal strength, place the MC65
where there is a clear view of the sky. A direct line of sight is required between the MC65 and the GPS satellites to
access information from the satellites.
Assisted GPS
GPS can be used in stand-alone or Assisted GPS (aGPS) modes. A Stand-alone GPS receiver downloads data
directly from GPS satellites. In challenging environments, such as urban canyons and areas where foliage is very
dense, aGPS can be used to improve Time To First Fix (TTTF). By default the MC65 uses the SUPL protocol which
requires the use of third party database/service from a carrier. By using GPS Location servers, A-GPS dramatically
improves the performance of the TTFF of GPS receivers by providing them with data that they would ordinarily
have to download from the GPS satellites. With the aGPS data, GPS receivers can operate faster and more
reliably.
Refer to the EMDK Help file for information on setting up SUPL on the MC65.
NOTE If an application error message appears indicating that the COM port cannot be opened, ensure that a free COM
port is selected in the GPS hardware port drop-down list.
NOTE When using a GPS navigation application, ensure that the MC65 does not go into suspend mode. If the MC65
suspends then the power to the GPS radio is removed. Upon resume the GPS receiver must reacquire a valid GPS
signal, resulting in a a delay of positional information.
NOTE Anytime you are using GPS on the MC65 and you receive a phone call, the audio on the GPS navigation software
is muted until you finish the call.
Preliminary
Chapter 4 Using the Phone
Introduction
Use the MC65 to make phone calls, set up speed dials, keep track of calls, and send text messages. Your wireless
service provider may also provide other services such as voice mail, call forwarding, and caller ID.
Also use the integrated phone to connect to an ISP or work network in order to browse the Web and read e-mail.
Connect to the Internet or work network over High-Speed Downlink Packet Access (HSDPA) or Evolution
Data-Optimized (EvDO) using Cellular Line.
Making a Call
With the MC65, you can make a call from the phone, contacts, speed dial and call history.
Using the Phone Keypad
To make a call using the phone keypad:
1. Press the green Call key.
2. From the Phone keypad, tap the number to call. The number appears in the call line.
3. Tap the green Call key.
4. Press the red End Call key to stop dialing or end the call.
NOTE Use this chapter if your MC65 is configured with the Window Mobile dialer.
NOTE You can make emergency calls even when the MC65 is locked or when a SIM card is not installed. See
Emergency Calling on page 4-5 for more information.
NOTE If you tap a wrong number, tap Delete key to erase each subsequent digit of a number. To erase the entire
number, tap and hold the Delete key.
Preliminary
4 - 2 MC65 User Guide
Smart Dialing
Smart Dialing makes it easy to dial a phone number. When you start entering numbers or characters, Smart Dialing
automatically searches and sorts the contact entries on the SIM card, in Contacts, and the phone numbers in Call
History (including incoming, outgoing, and missed calls). You can then select the desired number or contact from
the filtered list to dial.
Open the Phone screen, then tap the keys on the Phone keypad that correspond to the phone number or contact to
call. The contact panel lists contacts that match the sequence that you entered.
Smart Dialing starts looking for numbers or contacts that match the sequence entered.
To find a phone number:
•
Enter the first one or two digits to find a phone number in Call History.
•
Enter the first three digits or more to find a phone number from the saved Contacts and SIM card.
To find a contact name:
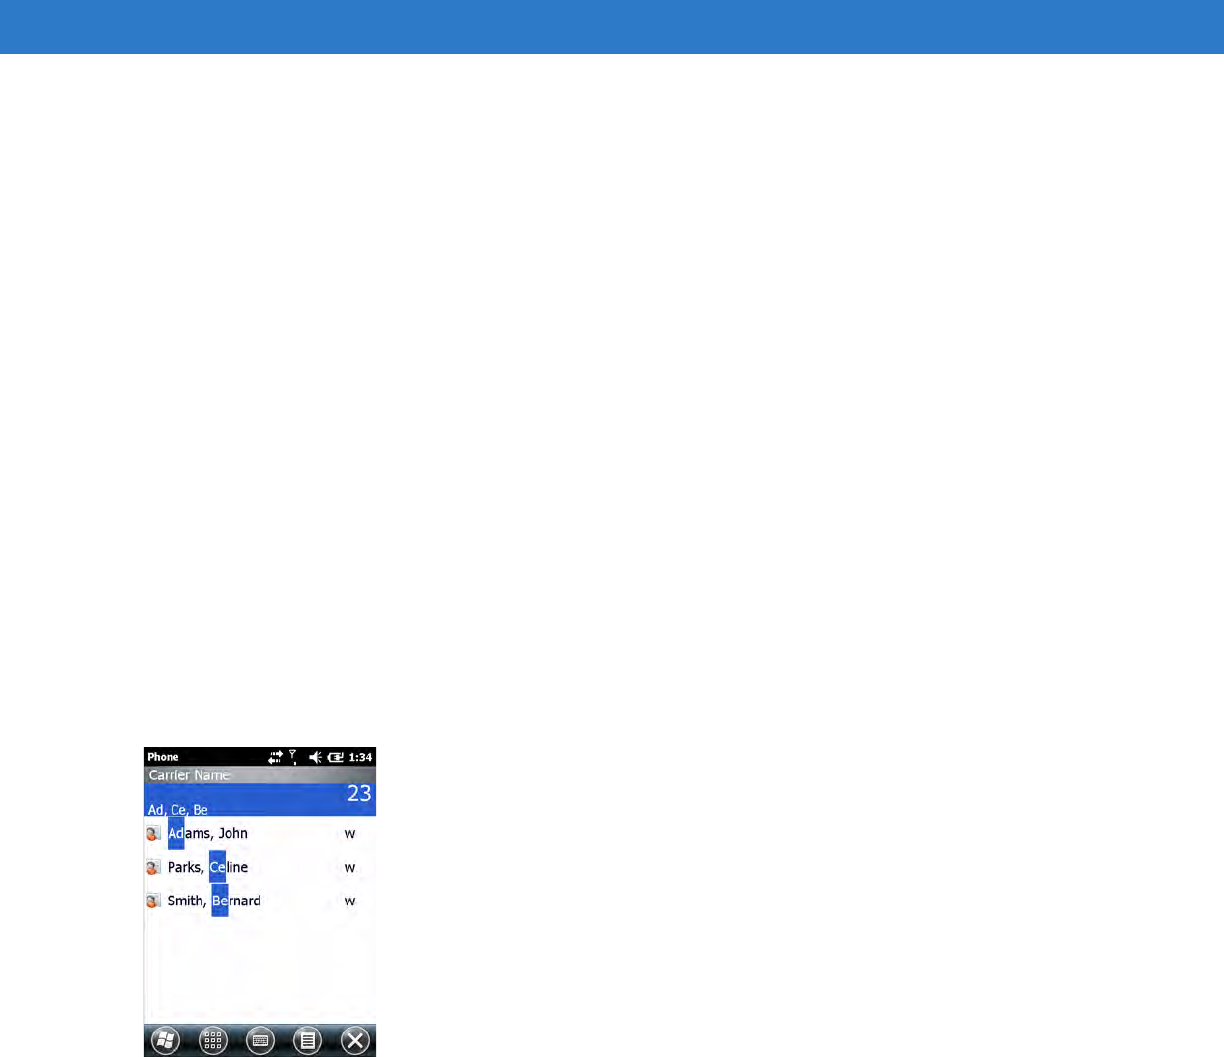
•Enter the first letter of a contact’s first name or last name. Smart Dialing searches for the letter starting
from the first character of a contact name as well as from the character that appears after a space, dash,
or underscore in a contact name. For example, if you tap number “2” which is associated with [a, b, c] on
the Phone keypad, contact names such as the following will be considered matches: “Smith, Bernard”,
“Adams, John”, “Carlson, Eileen”, “Dillon, Albert”, “Childs, Larry”, “Cooper, Robert” and “Parks, Celine”.
•If the matching list is long narrow down the search further by entering another letter. Using the same
example above, tap “3” which is associated with (d, e, f), the matching list is narrowed down to the
following names: “Smith, Bernard”, “Adams, John”, and “Parks, Celine”.
Figure 4-1
Finding a Contact
To make a call or send a text message using Smart Dialing:
1. Begin entering the first few numbers or characters.
2. In the Smart Dialing panel, use the up and down arrows on the keypad to navigate to the desired contact or
phone number.
3. When the correct contact is selected, press TALK to make a voice call.
4. To send a text message to the selected contact, tap Menu > Send Text Message.
5. To call a different phone number associated with the selected contact, tap the contact name and select the
phone number to call.
Preliminary
Using the Phone 4 - 3
Using Contacts
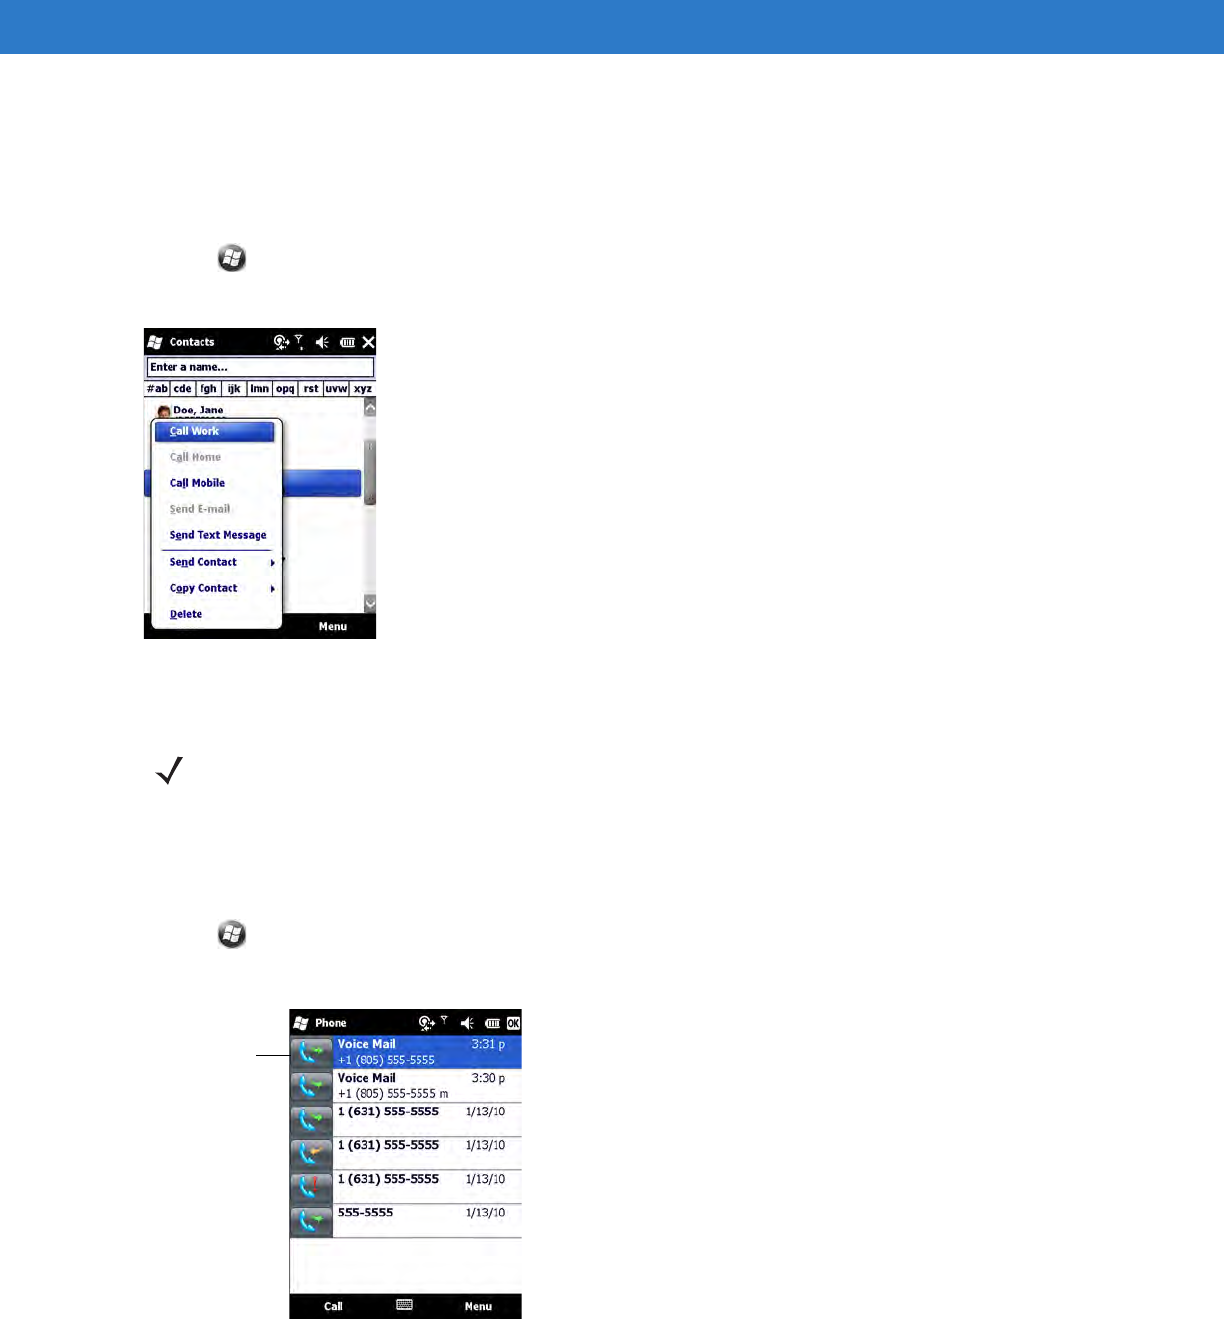
Use Contacts to make a call without looking up or entering the phone number.
To make a call from Contacts:
1. Tap > Contacts.
2. From the contact list, tap and hold the contact name.
Figure 4-2
Contacts Menu
3. Tap Call Work, Call Home or Call Mobile.
Using Call History
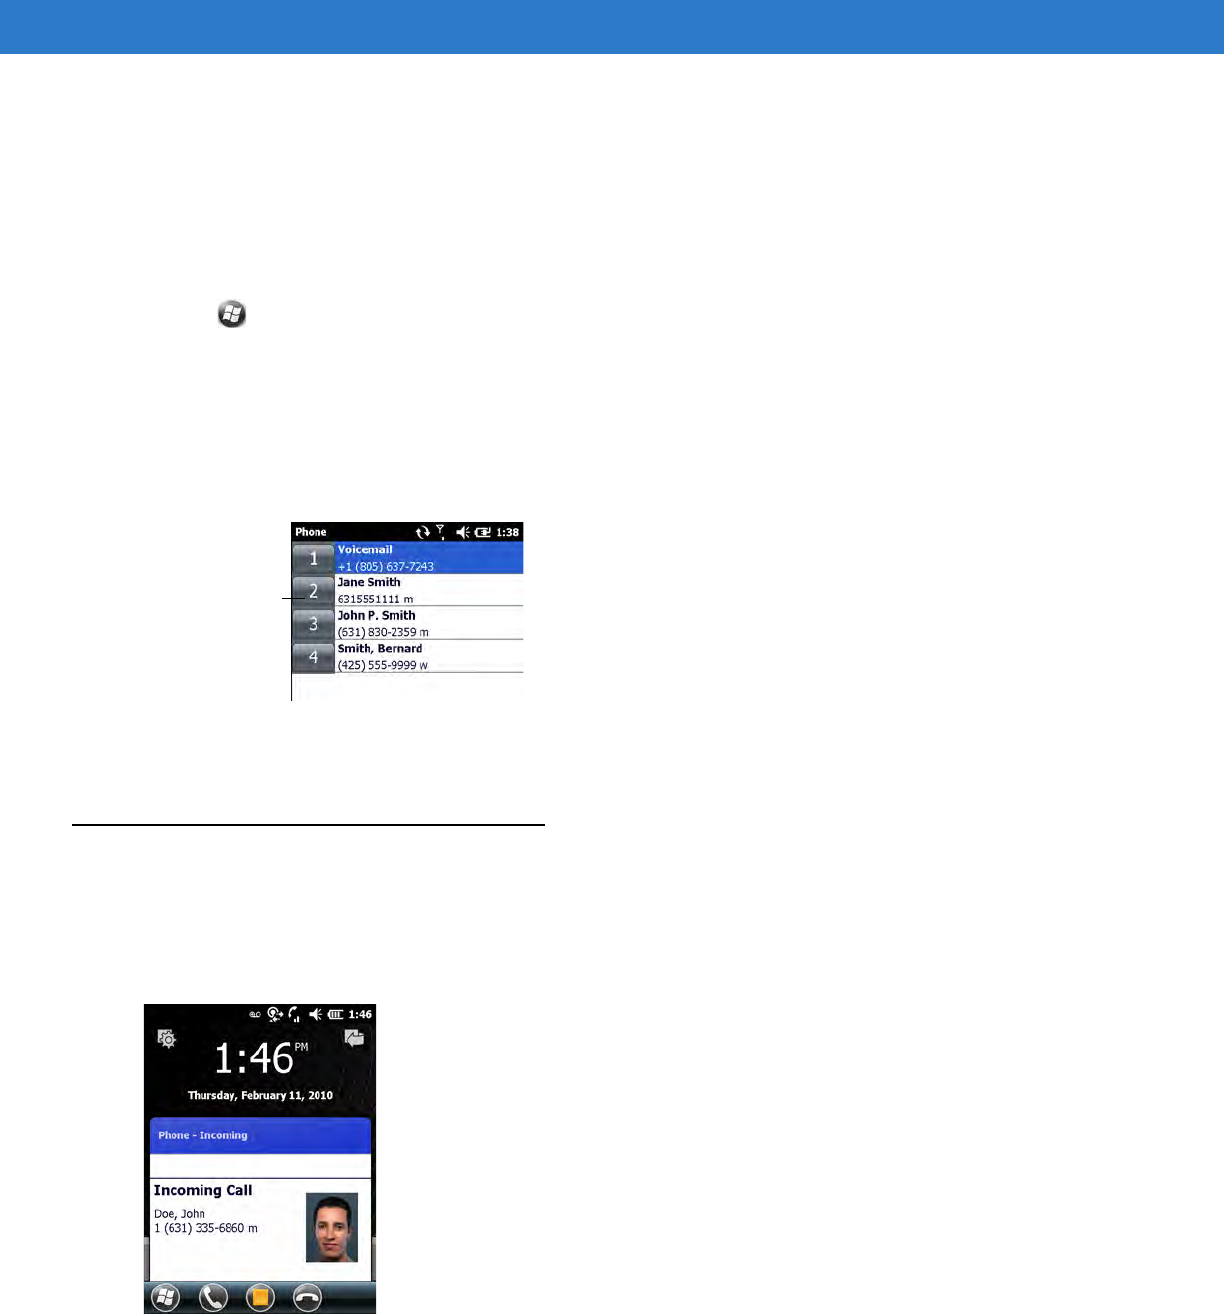
To make a call using Call History:
1. Tap > Phone or press the green phone key on the MC65’s keypad.
2. From the Phone keypad, tap Call History.
Figure 4-3
Call History Window
3. Tap the phone icon next to the number to begin dialing and return to the phone keypad.
NOTE To make a call from an open contact, tap the number to call. See On-Device Help for more information about
Contacts.
Phone icon
Preliminary
4 - 4 MC65 User Guide
4. Tap End or press the red phone key on the MC65 keypad to stop dialing or end the call.
Making a Speed Dial Call
Use Speed Dial to call someone saved in the speed dial directory.
To make a speed dial call:
1. Tap > Phone or press the green key.
2. From the Phone keypad, tap and hold the speed dial location number assigned to a contact. (To dial a one-digit
speed dial location number, tap and hold the speed dial number. To dial a two-digit speed dial location number,
tap the first digit and then tap and hold the second digit.)
or
From the Phone keypad, tap Speed Dial and tap the speed dial location number of the desired contact in the
list.
Figure 4-4
Speed Dial Contact List
3. To stop dialing or end the call, tap End or press the red key.
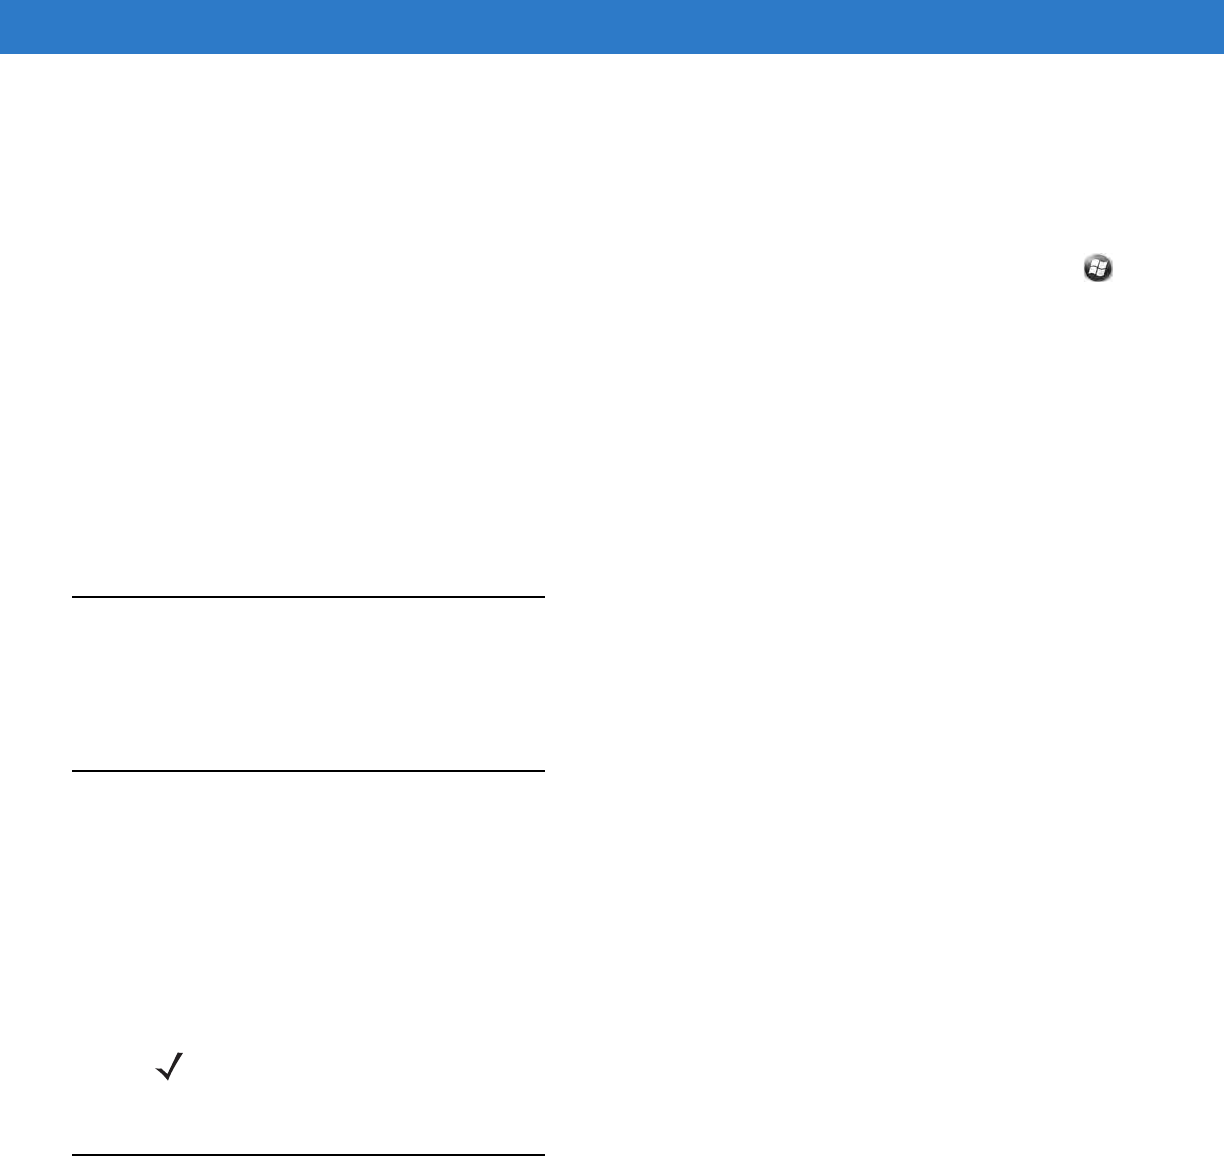
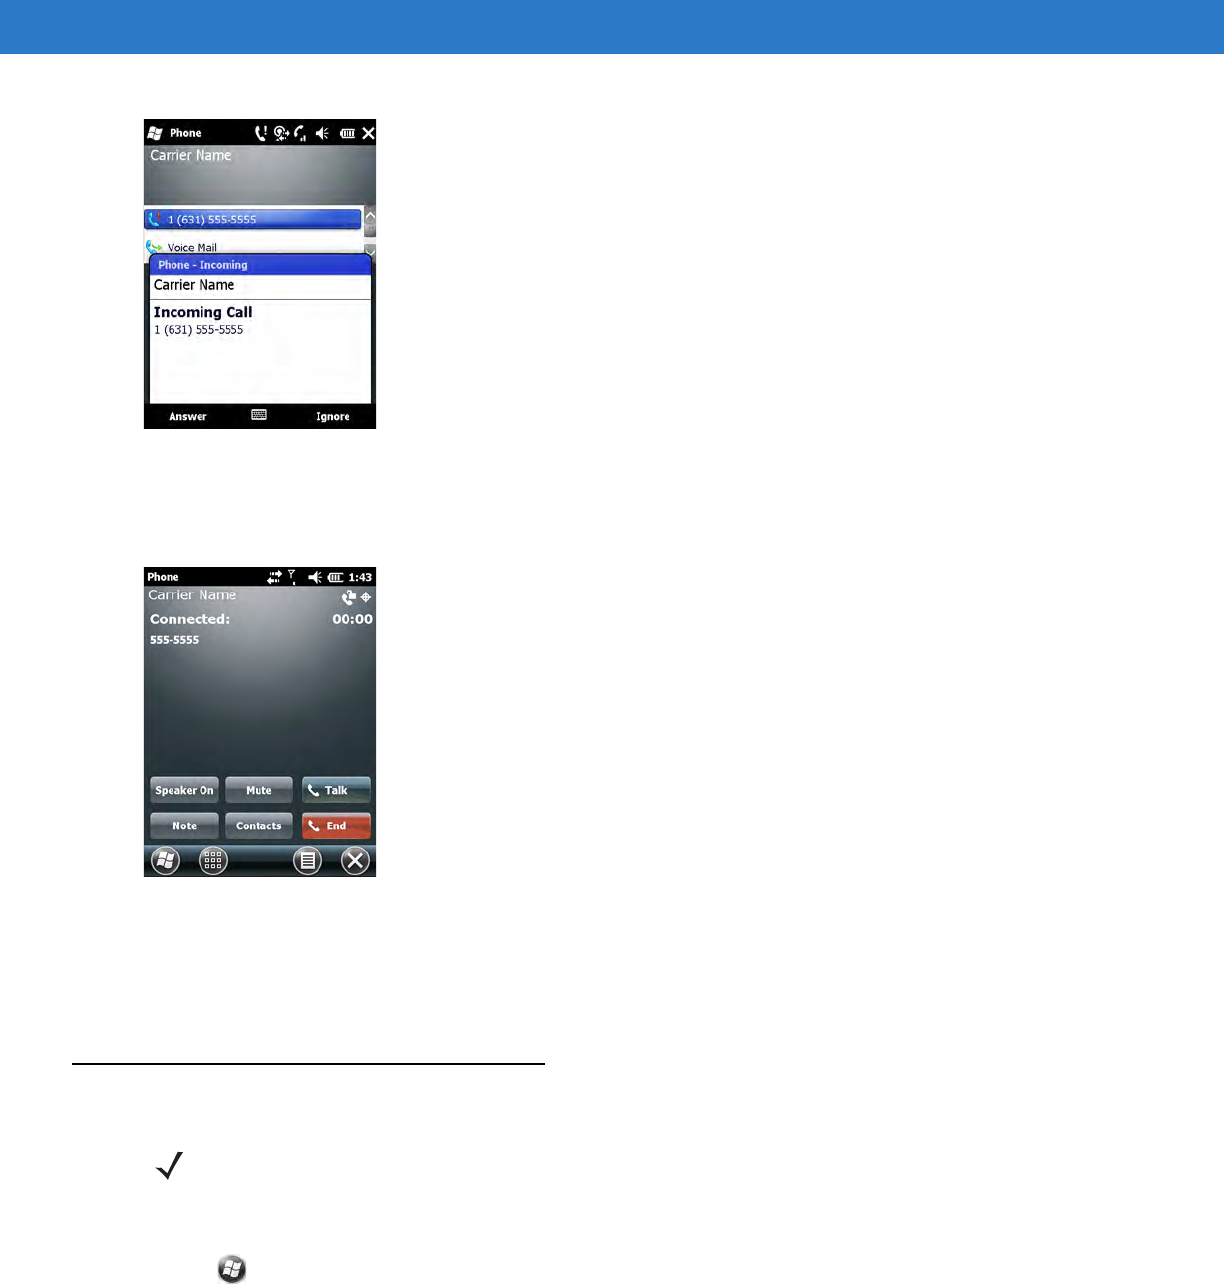
Answering a Call
A dialog box appears on the MC65 when it receives an incoming call. If the phone is set to ring, a ring tone sounds.
Answer or ignore the incoming call.
To answer an incoming call tap Answer on the dialog box or press the green key.
Figure 4-5
Incoming Call
To ignore the incoming call tap Send to voicemail. This sends the caller to voice mail, depending on the service
provider. Otherwise, this presents Busy to the calling party.
Speed Dial
Location Number
Preliminary
Using the Phone 4 - 5
To end the call tap End or press the red key.
Incoming Call Features
•
If you receive a call while in a call, tap Wait to place the call in call waiting.
•
You can use other programs on the MC65 during a call. To switch back to the Phone, tap Talk or tap >
Phone. Tap End to end the call.
•
If a caller isn't in your contact list, create a contact during the call or from Call History by tapping Menu >
Save to Contacts.
•
To terminate a call when a second call comes in and answer the waiting call, tap End on the Phone keypad to
disconnect the active call, then tap Answer or press the Send key to answer the waiting call.
•
To hold the current call and answer a waiting call, tap Answer or press the Send key to place the current call
on hold and answer the incoming call.
•
To put a call on hold to call another number or answer an incoming call, tap Hold. To move from one call to
another, tap Swap.
Missed Call Notification
When you do not answer an incoming call, the Home screen displays a Missed Call indication.
To display a missed call entry tap the Missed Call box on the Home screen.
Emergency Calling
Your service provider programs one or more emergency phone numbers, such as 911 or 999, that you can call
under any circumstances, even when your phone is locked or the SIM card is not inserted. Your service provider
can program additional emergency numbers into your SIM card. However, your SIM card must be inserted in your
phone in order to use the numbers stored on it. See your service provider for additional information.
When the alpha primary keypad is locked, press the Orange key twice to set the keypad to numeric mode and then
enter the emergency number.
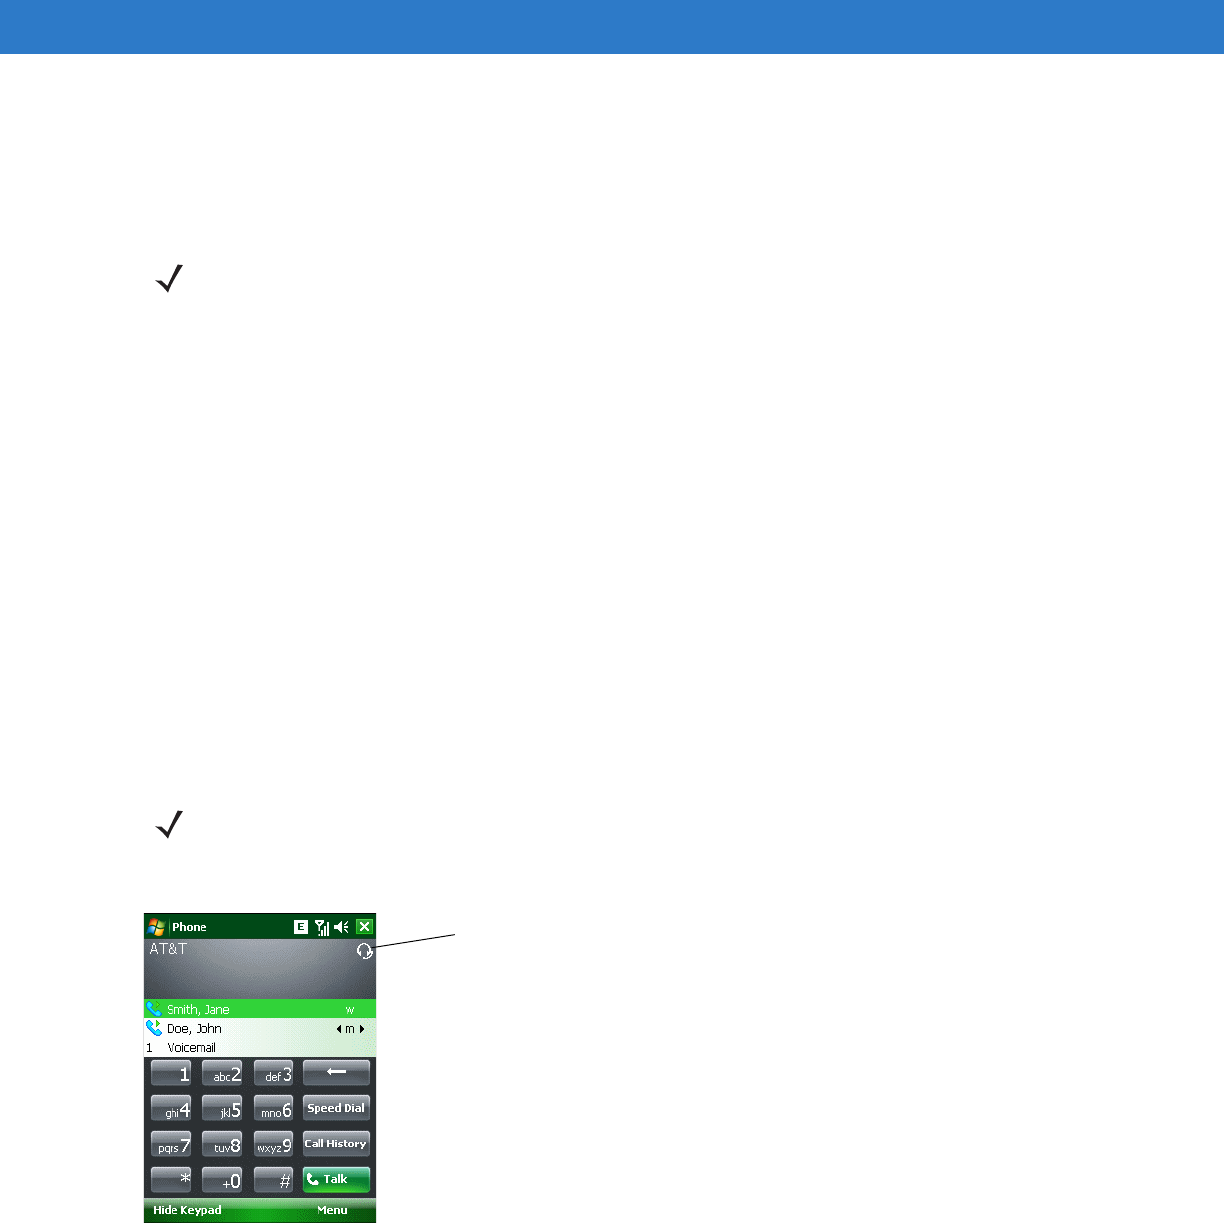
Audio Modes ????
The MC65 offers three audio modes for use during phone calls:
•
Handset Mode: Switches audio to the speaker at the top front of the MC65, so you can use the MC65 as a
handset. This is the default mode.
•
Speaker Mode: Use the MC65 as if on speaker phone. Tap the Speaker On button to activate this mode.
Tap the Speaker Off button to switch back to handset mode.
NOTE Emergency numbers vary by country. Your phone’s pre-programmed emergency number(s) may not work in
all locations, and sometimes an emergency call cannot be placed due to network, environmental, or
interference issues.
Preliminary

4 - 6 MC65 User Guide
•
Headset Mode: Connect a Bluetooth headset or a wired headset to automatically switch audio to the
headset.
The MC65 defaults to handset mode. When a wired headset is plugged into the MC65 headset connector or a
Bluetooth headset is configured for use with the MC65, the earpiece and speakerphone are muted and audio is
heard through the headset.
Using a Wired Headset
You can use a stereo headset for audio communication when using an audio-enabled application. To use a
headset, plug the headset jack of the Headset Adapter Cable into the headset connector on the side of the MC65.
Plug the Headset connector into the connector on the Headset Adapter Cable. Set the MC65’s volume
appropriately before putting the headset on. Plugging a headset into the jack mutes the speaker.
Figure 4-6
Using a Headset
Using a Bluetooth Headset
You can use a Bluetooth headset for audio communication when using an audio-enabled application. See Chapter
7, Using Bluetooth for information on connecting a Bluetooth headset to the MC65. Set the MC65’s volume
appropriately before putting the headset on. When a Bluetooth headset is connected the speakerphone is muted.
It is recommended for phone conversations to use the Bluetooth Hands-free profile instead of the Headset profile.
See Chapter 7, Using Bluetooth for more information.
?????? Does the Bluetooth icon appear ???????
NOTE While using a Bluetooth headset during a call, the MC65 will not go into suspend mode.
NOTE Remove the headset jack plug before connecting the Headset Adapter to the MC65.
Headset Adapter
Cable
Breakaway
Connectors
Headset
Connector
Preliminary
Using the Phone 4 - 7
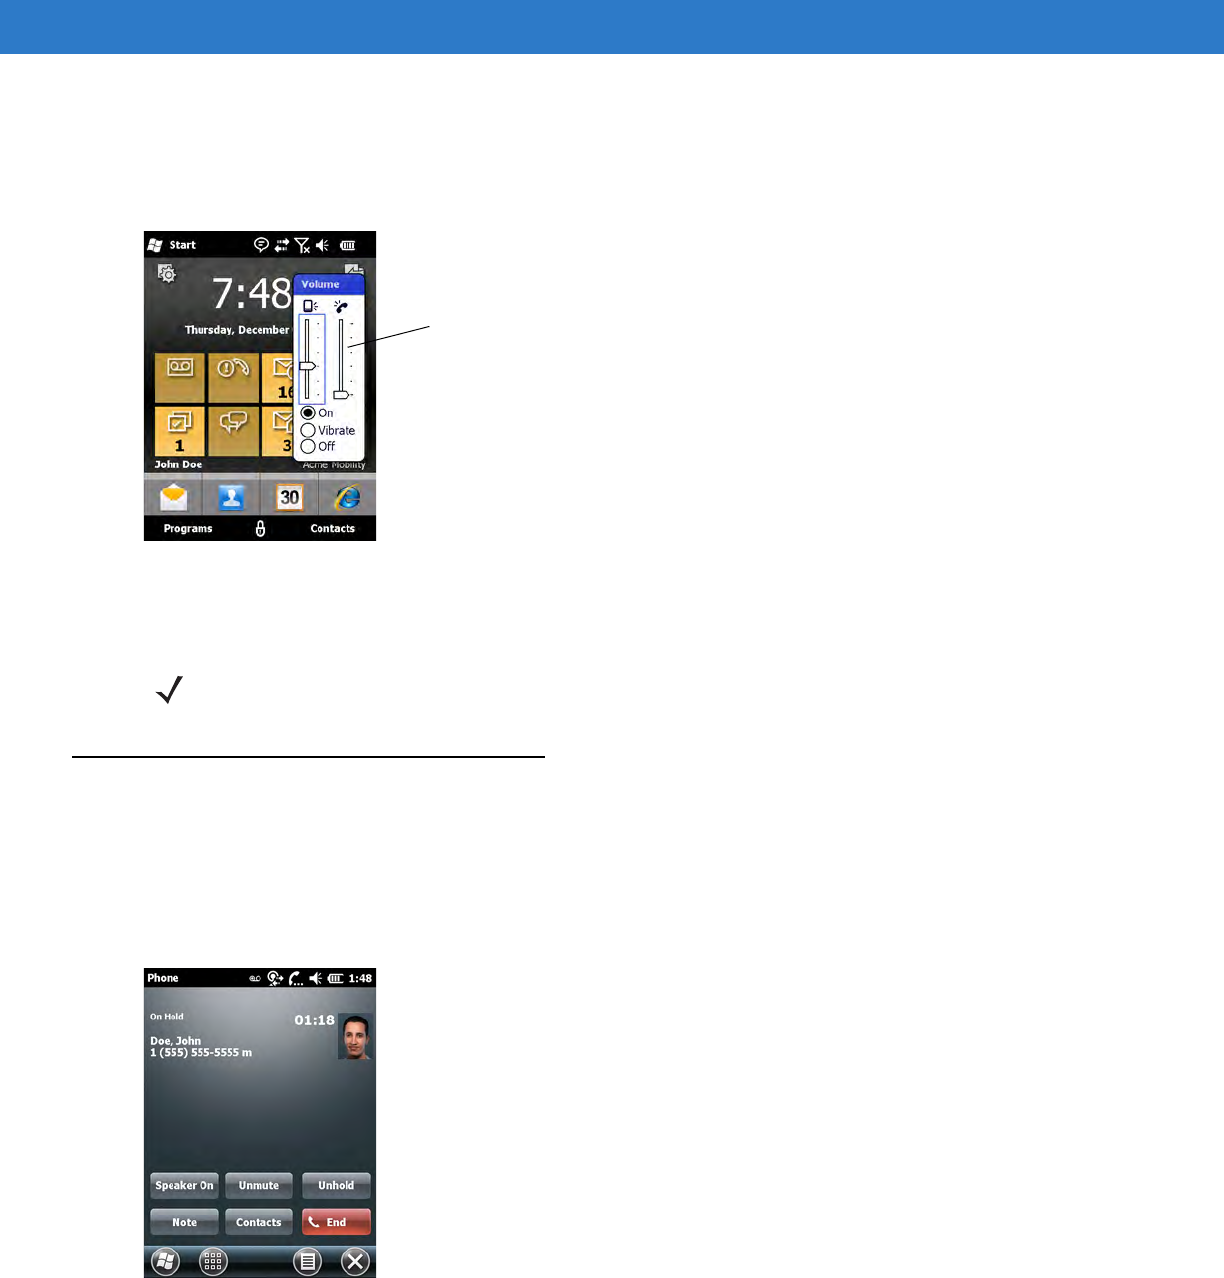
Adjusting Audio Volume
Use the Volume Control Slider or the keypad keys to adjust the volume of the ringer when not in a call and the
audio volume when in a call.
Figure 4-7
Phone Volume Slider
To adjust the volume tap the Speaker icon in the Title bar. Move the slider up or down to adjust the volume.
Muting a Call
During a call, you can mute the microphone so you can hear the person on the line but he or she cannot hear
conversation from the microphone. This is useful when there is conversation or background noise on your end.
To mute or unmute a call:
1. During a call, tap Mute on the dialer to mute the audio. The Mute button become Unmute.
Figure 4-8
Unmute Key
Phone Volume Slider
NOTE Adjust the conversation phone volume during a call. Adjusting the volume while not in a call affects the ring
and notification sound levels.
Preliminary
4 - 8 MC65 User Guide
Using Call History
Use Call History to call someone who was recently called, or recently called in. Call History provides the time and
duration of all incoming, outgoing, and missed calls. It also provides a summary of total calls and easy access to
notes taken during a call. Table 4-1 lists the call history icons that appear in the Call History window.
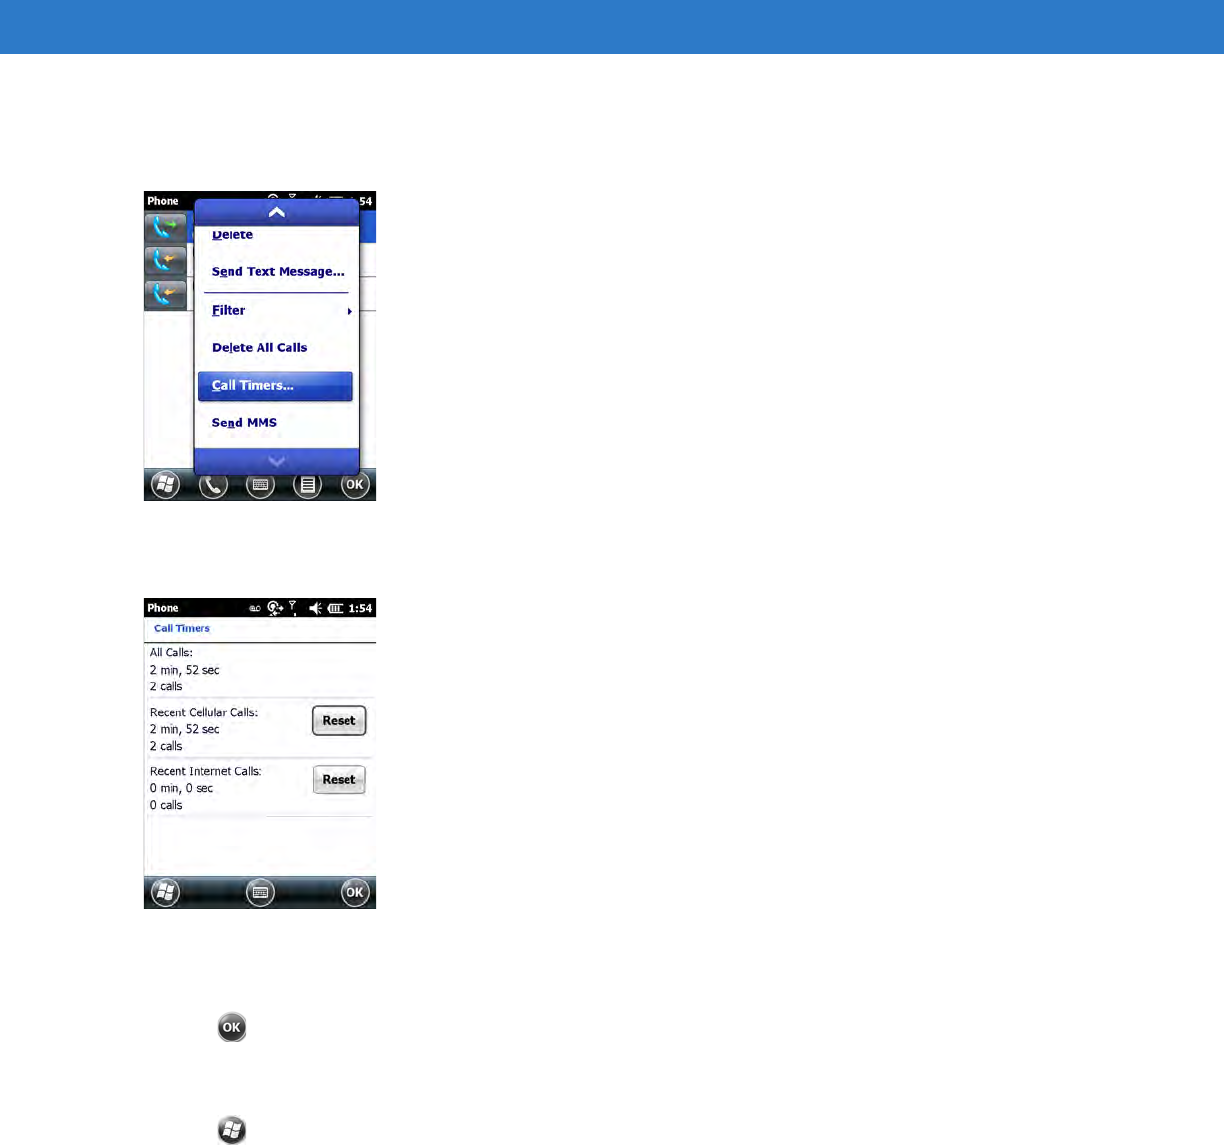
Managing Call History
Change views, reset the call timer, and delete calls to manage the calls stored in Call History.
Changing the Call History View
1. Tap > Phone or press the green phone key to display the Phone keypad.
2. From the Phone keypad, tap Call History.
3. Tap Menu > Filter to show the menu.
Figure 4-9
Call History - All Calls/Show Menu
4. Select a view type from the menu to display only missed calls, outgoing calls, incoming calls, or calls listed
alphabetically by caller name.
5. Tap to exit the Call History window.
Resetting the Recent Calls Counter
1. Tap > Phone or press the green phone key to display the Phone keypad.
Table 4-1
Call History Icons
Icon Description
This icon appears next to the contact information for all outgoing calls.
This icon appears next to the contact information for all incoming calls.
This icon appears next to the contact information for all missed calls.
Preliminary
Using the Phone 4 - 9
2. From the Phone keypad, tap Call History.
3. Tap Menu.
Figure 4-10
Call History - Tools Menu
4. Select Call Timers... .
Figure 4-11
Call History - Call Timers
5. Tap Reset. (The All Calls: counter cannot be reset.)
6. Tap to exit the Call Timers window.
Deleting All Call History Items
1. Tap > Phone or press the green key to display the Phone keypad.
2. From the Phone keypad, tap Call History.
3. Tap Menu.
Preliminary

4 - 10 MC65 User Guide
Figure 4-12
Call History - Tools Menu
4. Select Delete all calls.
Figure 4-13
Call History - Delete All Dialog
5. Tap Yes.
6. Tap ok to exit the Call History window.
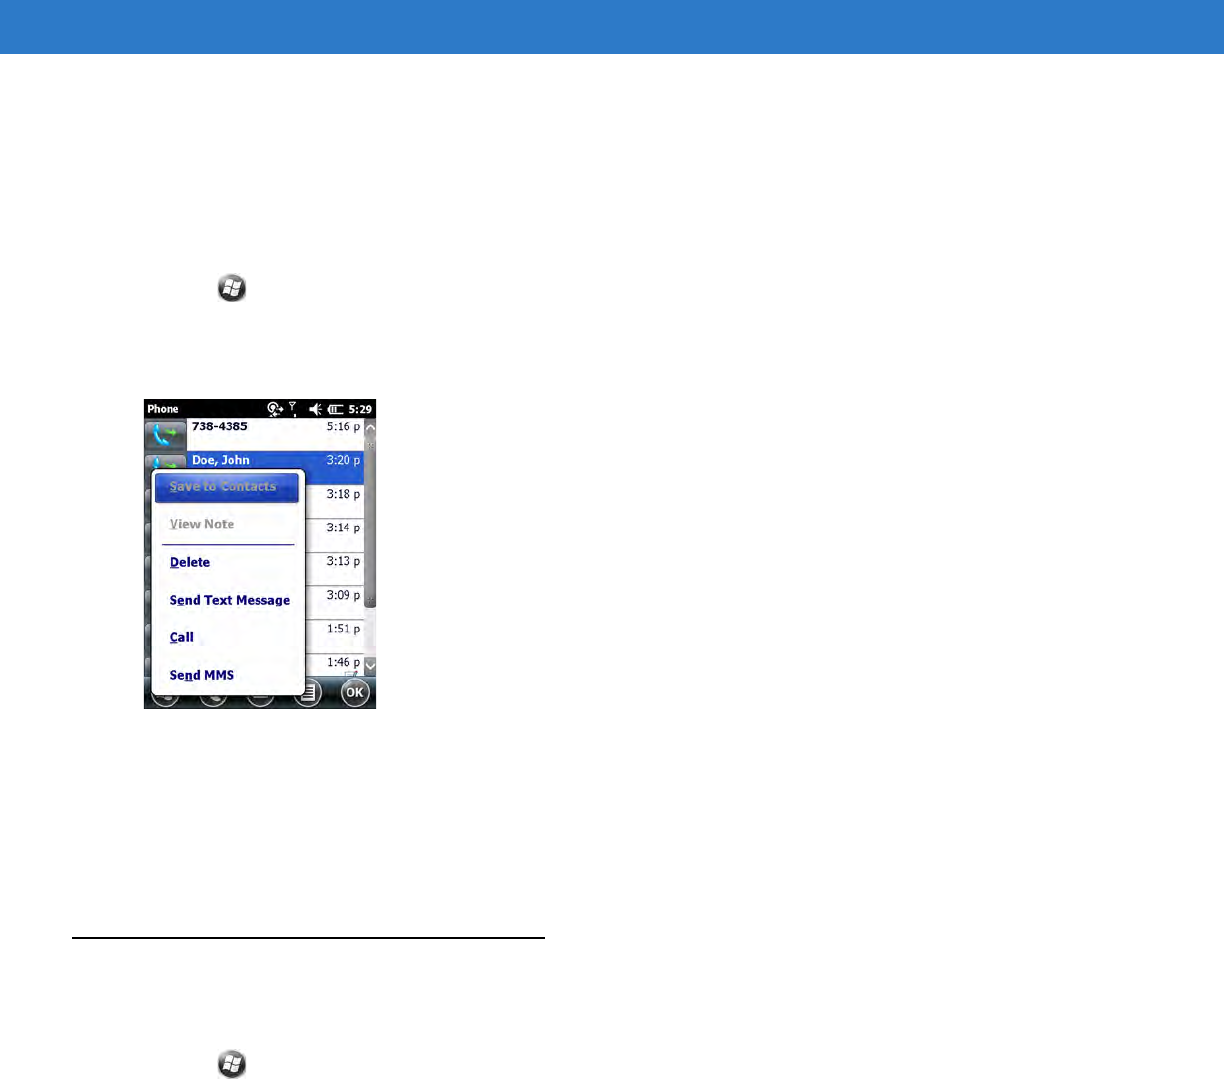
Viewing Call Status
1. Tap > Phone or press the green key to display the Phone keypad.
2. From the Phone keypad, tap Call History.
3. Tap an entry. The Call Status window appears.
Figure 4-14
Call History - Detail
NOTE When more than one call is on the phone line, only the duration of the first call is recorded.
Preliminary
Using the Phone 4 - 11
4. Tap ok and then ok to exit.
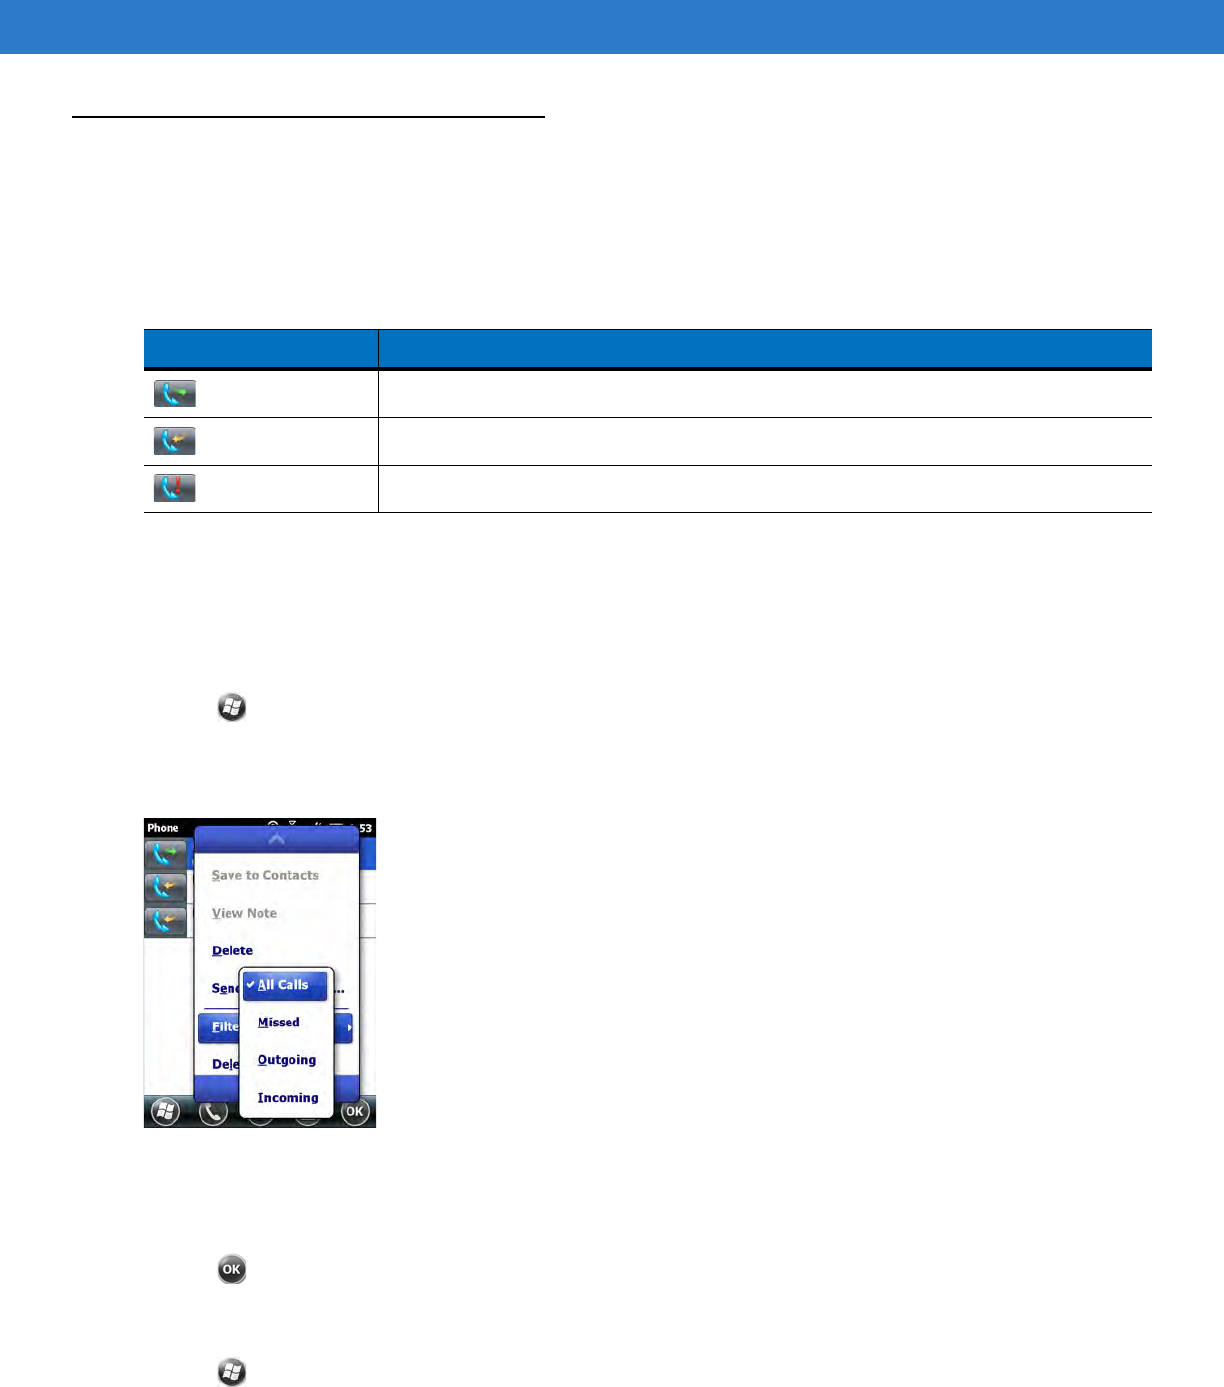
Using the Call History Menu
Use the Call History menu to dial voice mail, access the Activation Wizard, save to contacts, view a note, delete a
listing, send an SMS, and make a call.
1. Tap > Phone or press the green key to display the Phone keypad.
2. From the Phone keypad, tap Call History.
3. Tap and hold an item in the list.
Figure 4-15
Call History - Menu
4. Select an applicable item from the menu, as needed.
5. Depending on the item selected, the appropriate window displays. For example, select Send Text message to
display the Text Messages window.
6. Tap ok to exit the Call History window.
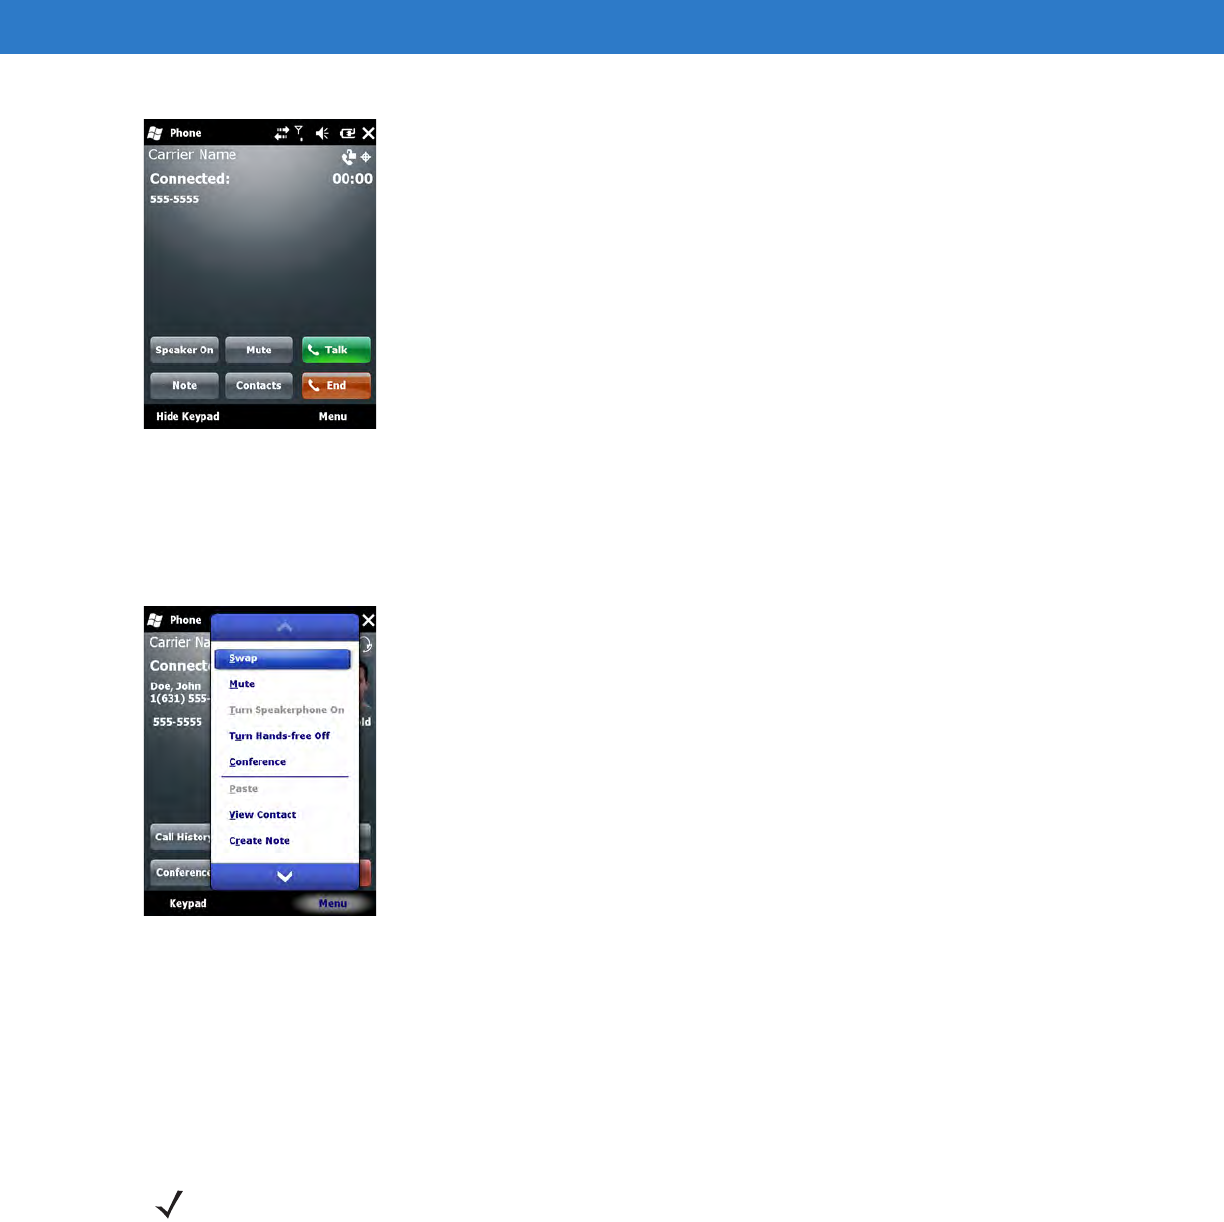
Swapping Calls on GSM
To move between two phone calls:
1. Tap > Phone or press the green phone key on the MC65’s keypad to display the Phone keypad.
2. Enter the first phone number and press Talk. When the call connects, Hold appears on the keypad.
Preliminary
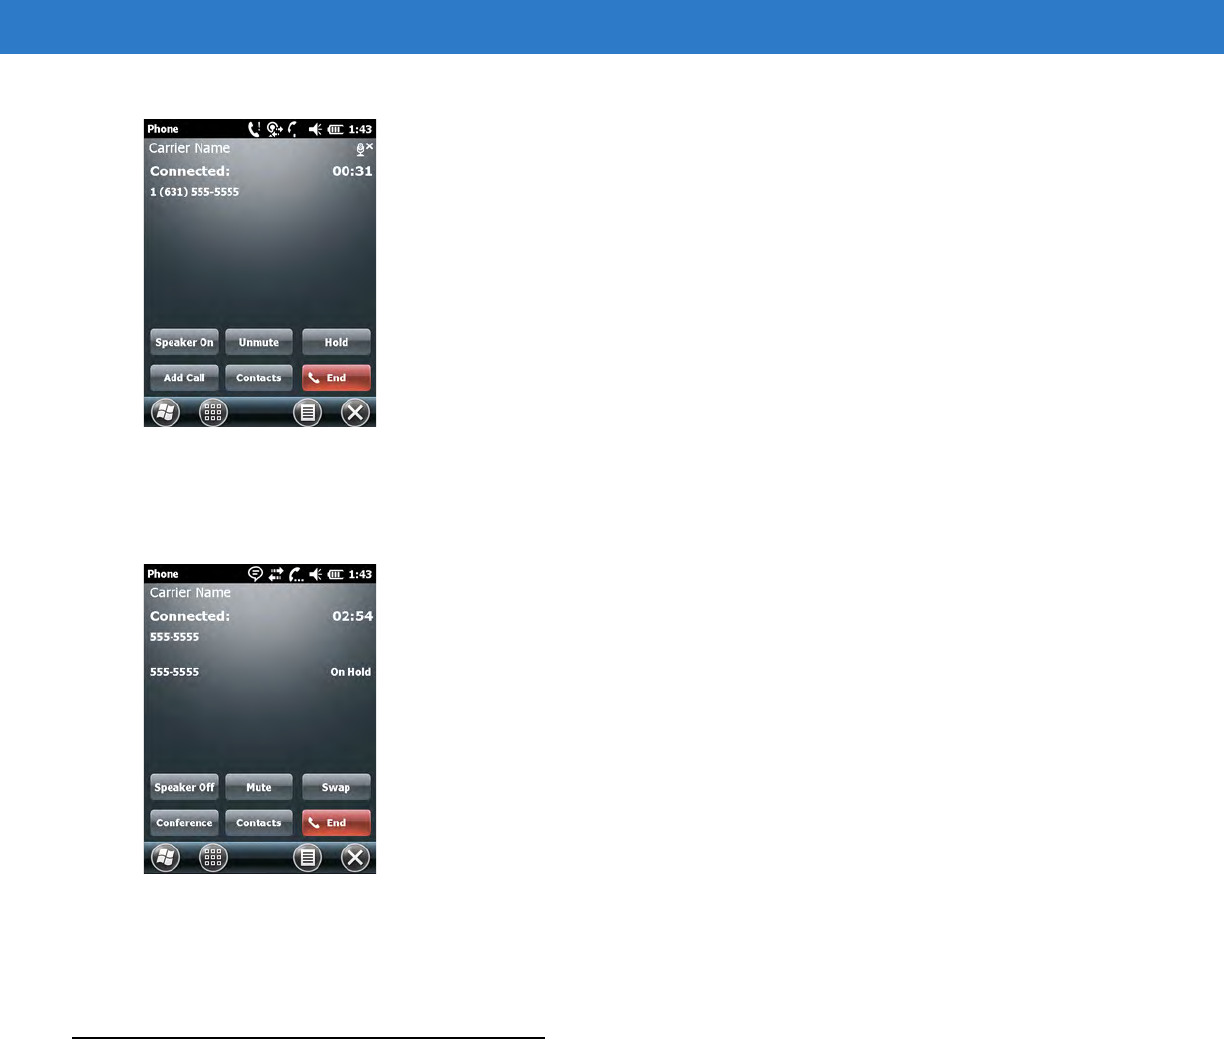
4 - 12 MC65 User Guide
Figure 4-16
Call Swapping - Hold
3. Tap Hold on to place the first number on hold.
4. Enter the second number and tap Talk.
Figure 4-17
Call Conferencing - Conferencing
5. Tap Swap to move from one call to the other.
6. Tap End or press the red phone key on the MC65 keypad to end each call.
Swapping Calls on CDMA
To swap between two incoming phone calls:
1. Tap Answer to connect to the first call.
Preliminary
Using the Phone 4 - 13
Figure 4-18
Answer a Call
2. When a second call arrives, tap Answer. The first call is placed on hold.
3. Tap Talk to swap from one call to the other.
Figure 4-19
Call Swapping
4. Tap End or press the red phone key on the MC65 keypad to end active call. The remaining call re-connects,
tap Answer to connect to the call.
5. Tap End or press the red phone key on the MC65 keypad to end the last call.
Conference Calling on GSM
To create a conference phone session with multiple people:
1. Tap > Phone or press the green phone key on the MC65’s keypad to display the Phone keypad.
2. Enter the first phone number and press Talk. When the call connects, Hold appears on the keypad.
NOTE Conference Calling and the number of conference calls allowed may not be available on all services. Please
check with your service provider for Conference Calling availability.
Preliminary
4 - 14 MC65 User Guide
Figure 4-20
Conference Call - Hold
3. Tap Hold to place the first call on hold.
4. Enter the second phone number and tap Talk.
5. After the call is answered, tap Menu > Conference to place the calls in conference mode.
Figure 4-21
Creating a Conference Call
6. Tap Hold to place the conference on hold.
7. Enter another phone number and tap Talk.
8. After the call is answered, tap Menu > Conference to place all the calls in conference mode.
9. Repeat steps 6 through 8 for up to six phone numbers.
10. Ta p End or press the red phone key on the MC65 keypad to end the conference call.
NOTE To speak privately with one party during a conference call, tap Menu > Private. To include all parties again,
tap Menu > Conference.
Preliminary
Using the Phone 4 - 15
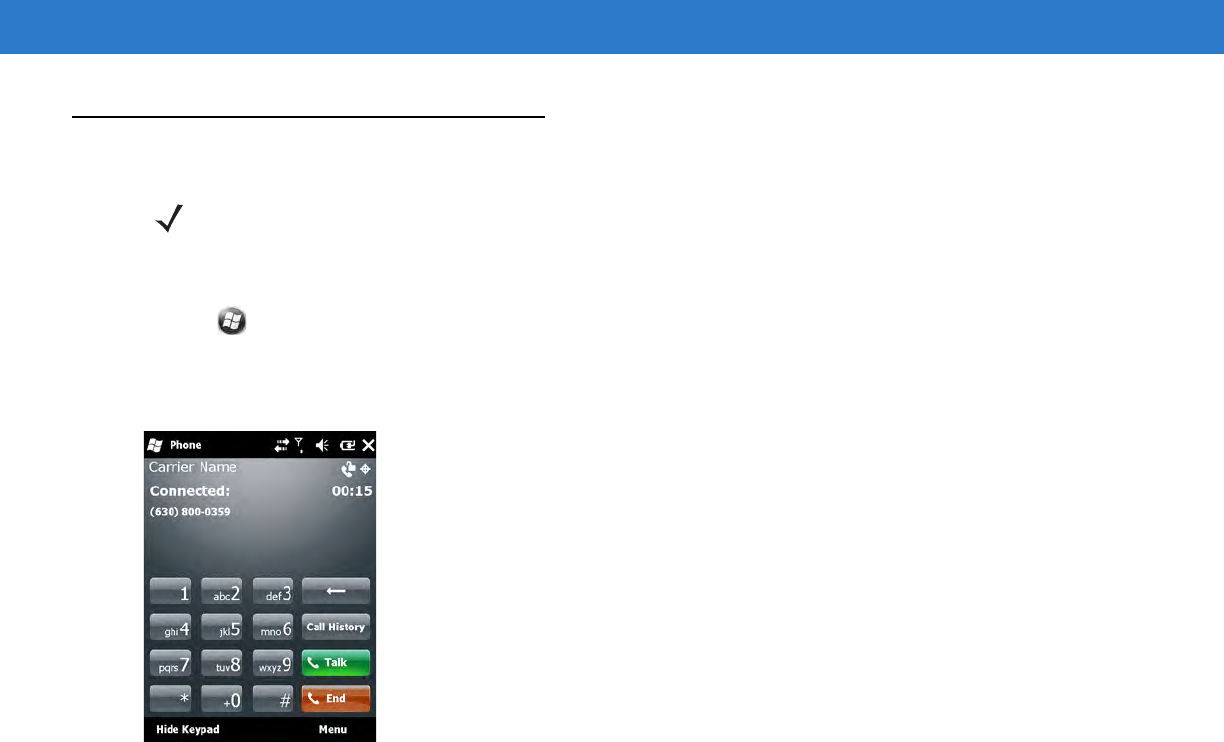
Three-way Calling on CDMA
To create a three-way phone session with two people and you as the initiator:
1. Tap > Phone or press the green phone key on the MC65’s keypad to display the Phone keypad.
2. Enter the first phone number and press Talk.
3. To call a second person, tap Keypad. Enter the second number and tap Talk.
Figure 4-22
Calling Another Person
4. When the second person answers the call, tap Talk to create a three-way calling session.
5. Tap Talk to drop the last call.
6. Tap End to drop the first call.
NOTE Three-way Calling may not be available on all services. Please check with your service provider for availability.
Preliminary
4 - 16 MC65 User Guide
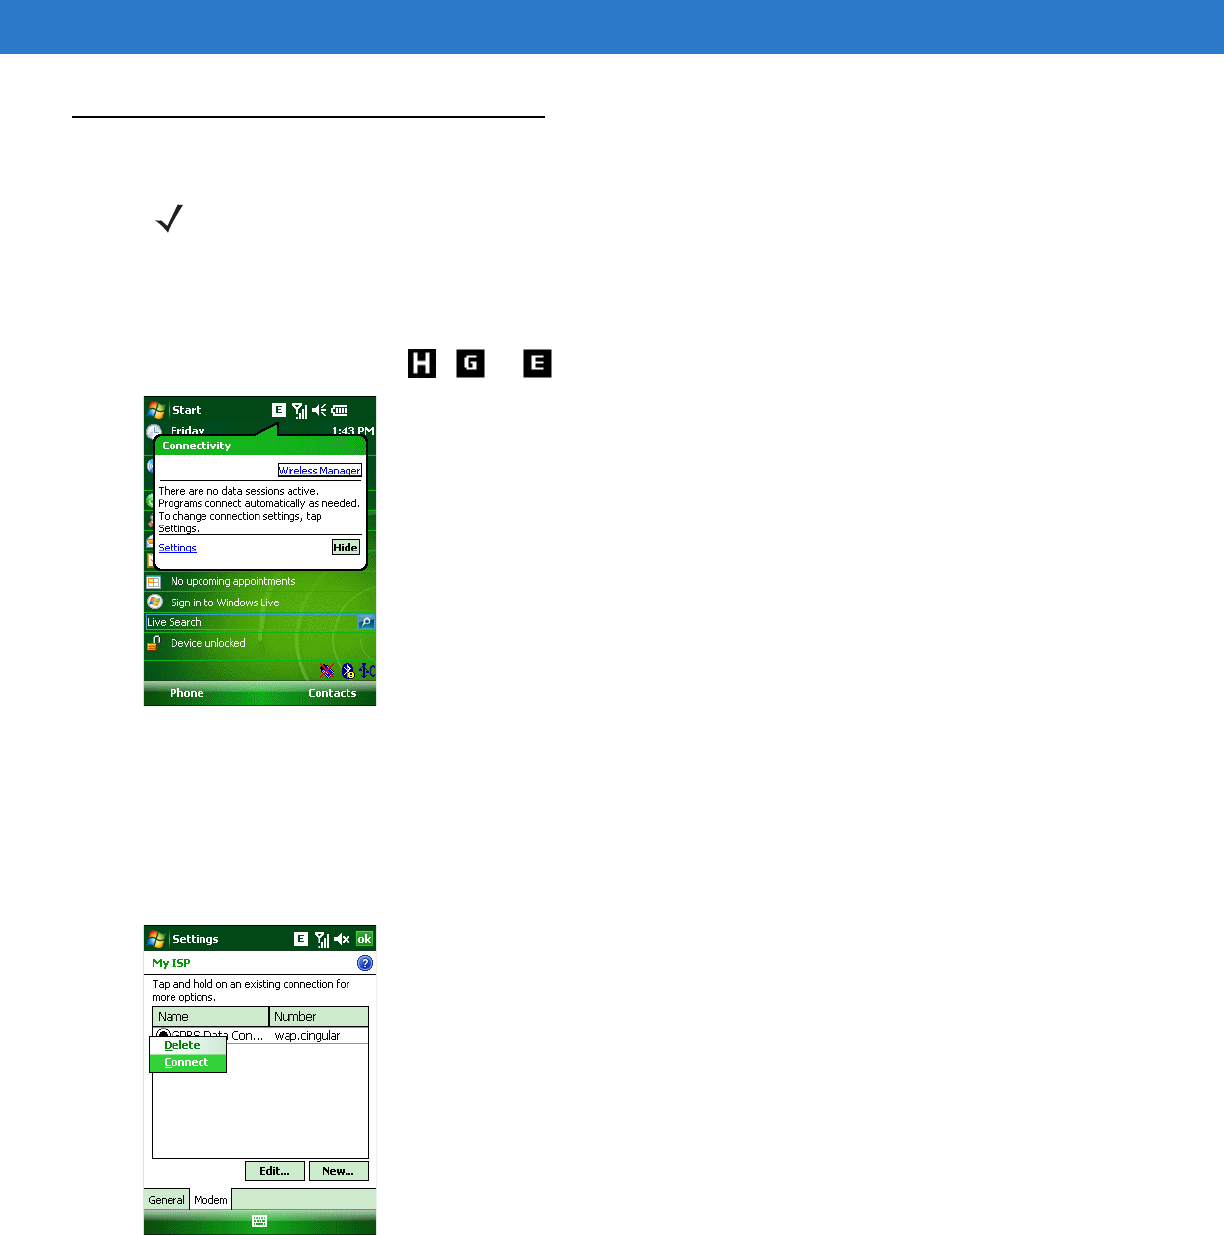
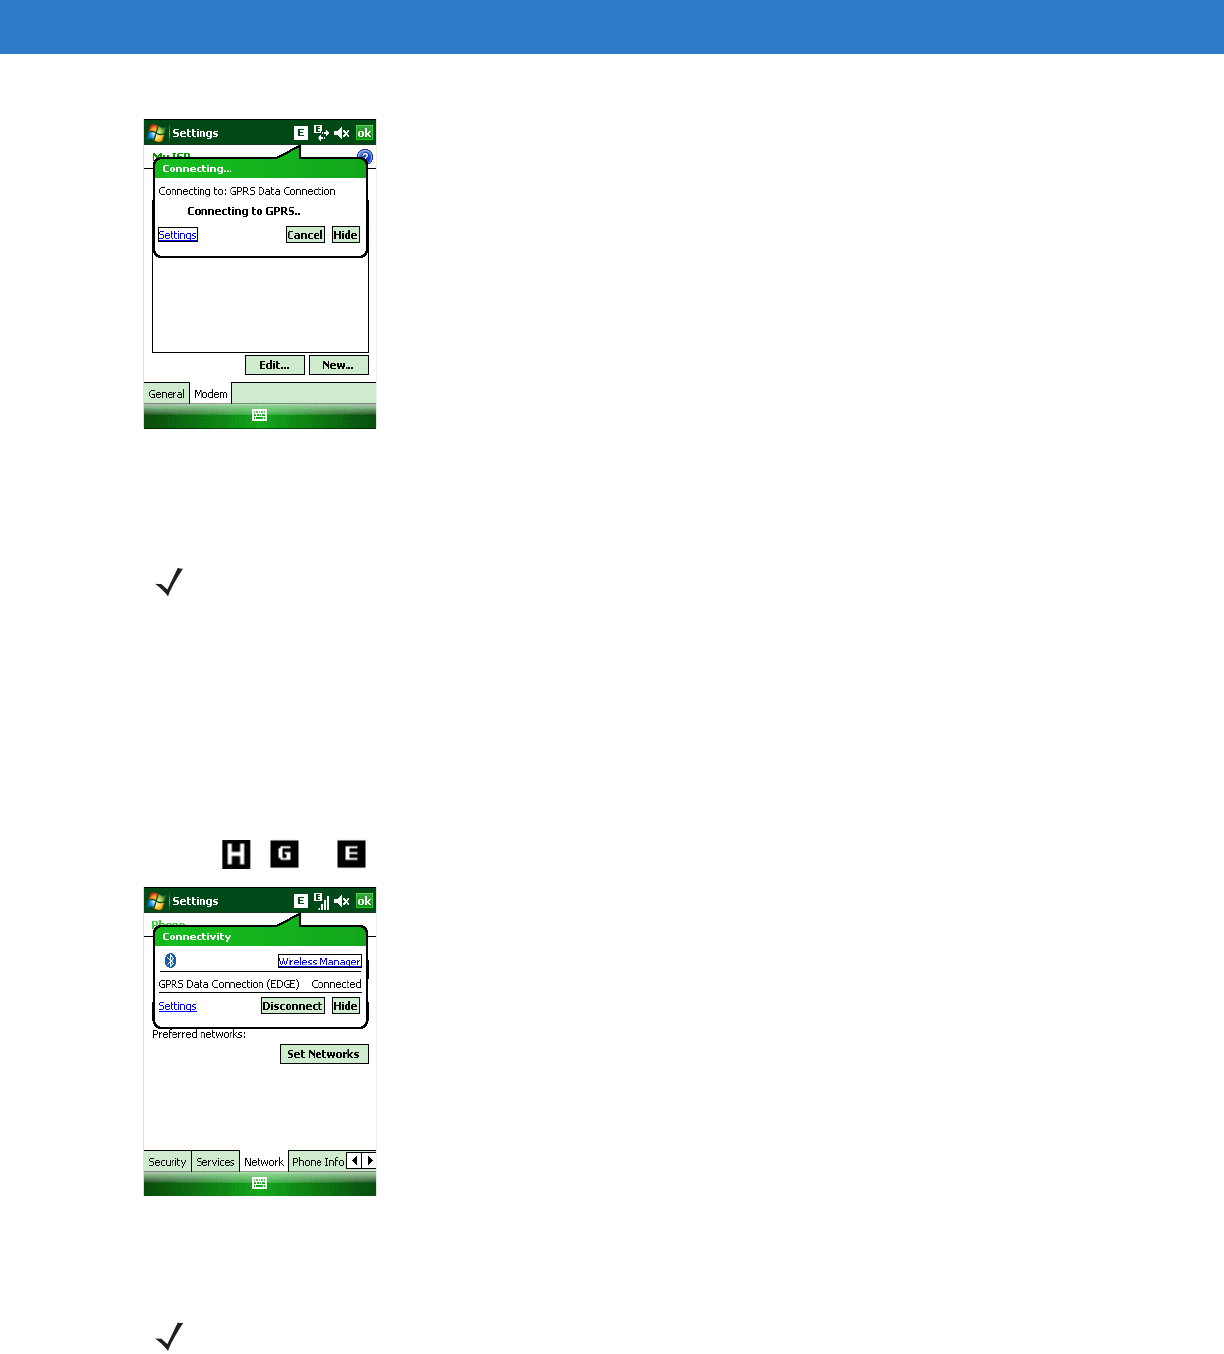
Establishing a GSM Data Connection
7. Ensure a SIM card is installed in the MC65.
8. Configure a GPRS data connection. See MC65 Series Enterprise Smartphone Integrator Guide.
9. Tap the connectivity icon , or at the top of the screen.
Figure 4-23
Connectivity Dialog Box
10. Ta p Settings.
11. Tap Connections icon.
12. Ta p Managing existing connections.
13. Tap and hold on the data connection until a menu appears.
Figure 4-24
Data Connection
14. Select Connect.
NOTE Refer to the MC65 Series Enterprise Smartphone Integrator Guide for information on configuring a data
connection.
Preliminary
Using the Phone 4 - 17
Figure 4-25
Connecting Using GPRS
15. If the SIM card is protected with a Personal Identification Number (PIN), a dialog box pops up requesting the
appropriate PIN to unlock the SIM card. In this case, enter the PIN and tap ok.
16. When a connection is established, launch Internet Explorer to browse the Internet or launch an applicable
application.
Ending a Data Connection
To cancel a data connection in progress, tap Cancel in the Connecting... dialog window.
To end an established data connection:
1. Tap , or to display the Connectivity dialog box.
Figure 4-26
Connectivity Dialog Box
2. Tap Disconnect.
NOTE Place emergency calls at any time, without entering a PIN or a SIM card.
NOTE Tapping Disconnect during an active data transfer (e.g., downloading a web page) automatically reconnects
the connection. You cannot disconnect the connection until the data transfer is complete.
Preliminary
4 - 18 MC65 User Guide
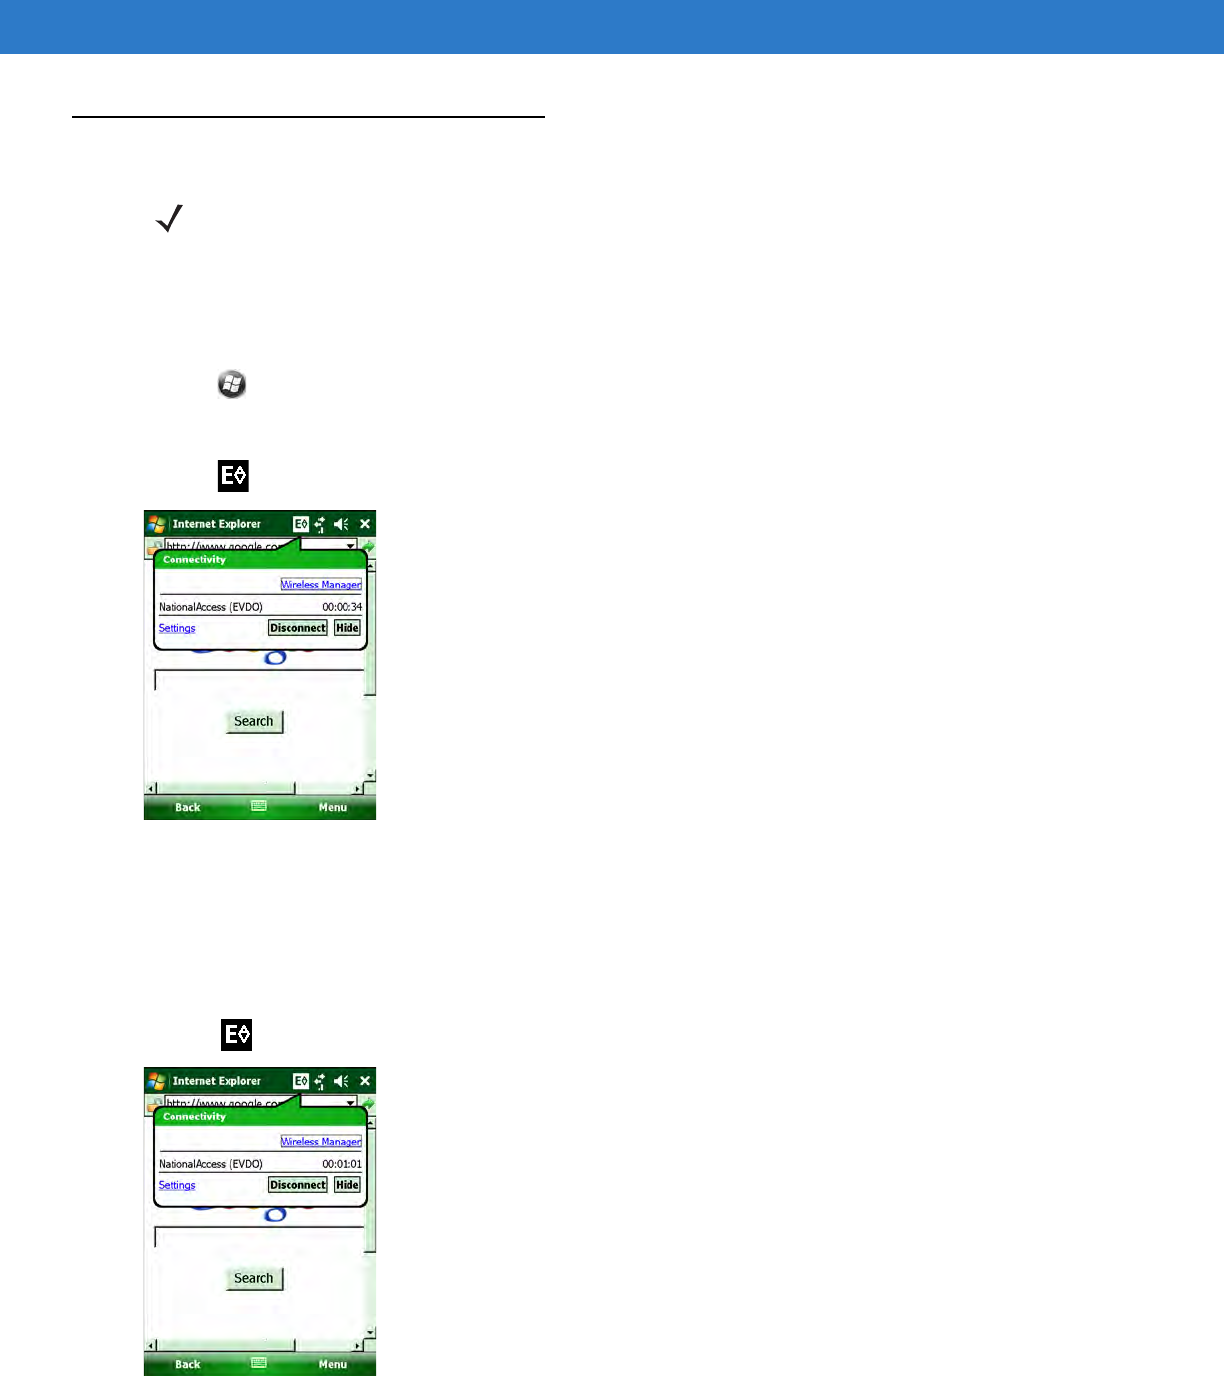
Establishing an CDMA Data Connection
A data connection allows Internet access across a wireless network. Data connection is pre-packaged with service
accounts.
To verify active data service:
1. Tap > Internet Explorer.
2. In the address bar, enter a URL for a web site.
3. Tap to display the Connectivity dialog. The dialog box displays the data connection information.
Figure 4-27
Data Connection
Ending a Data Connection
To cancel a data connection in progress, tap Cancel in the Connecting... dialog window.
To end an established data connection:
1. Tap to display the Connectivity dialog box.
Figure 4-28
Connectivity Dialog Box
NOTE Ensure that you have data service activated with your service provider.
Preliminary
Using the Phone 4 - 19
2. Tap Disconnect.
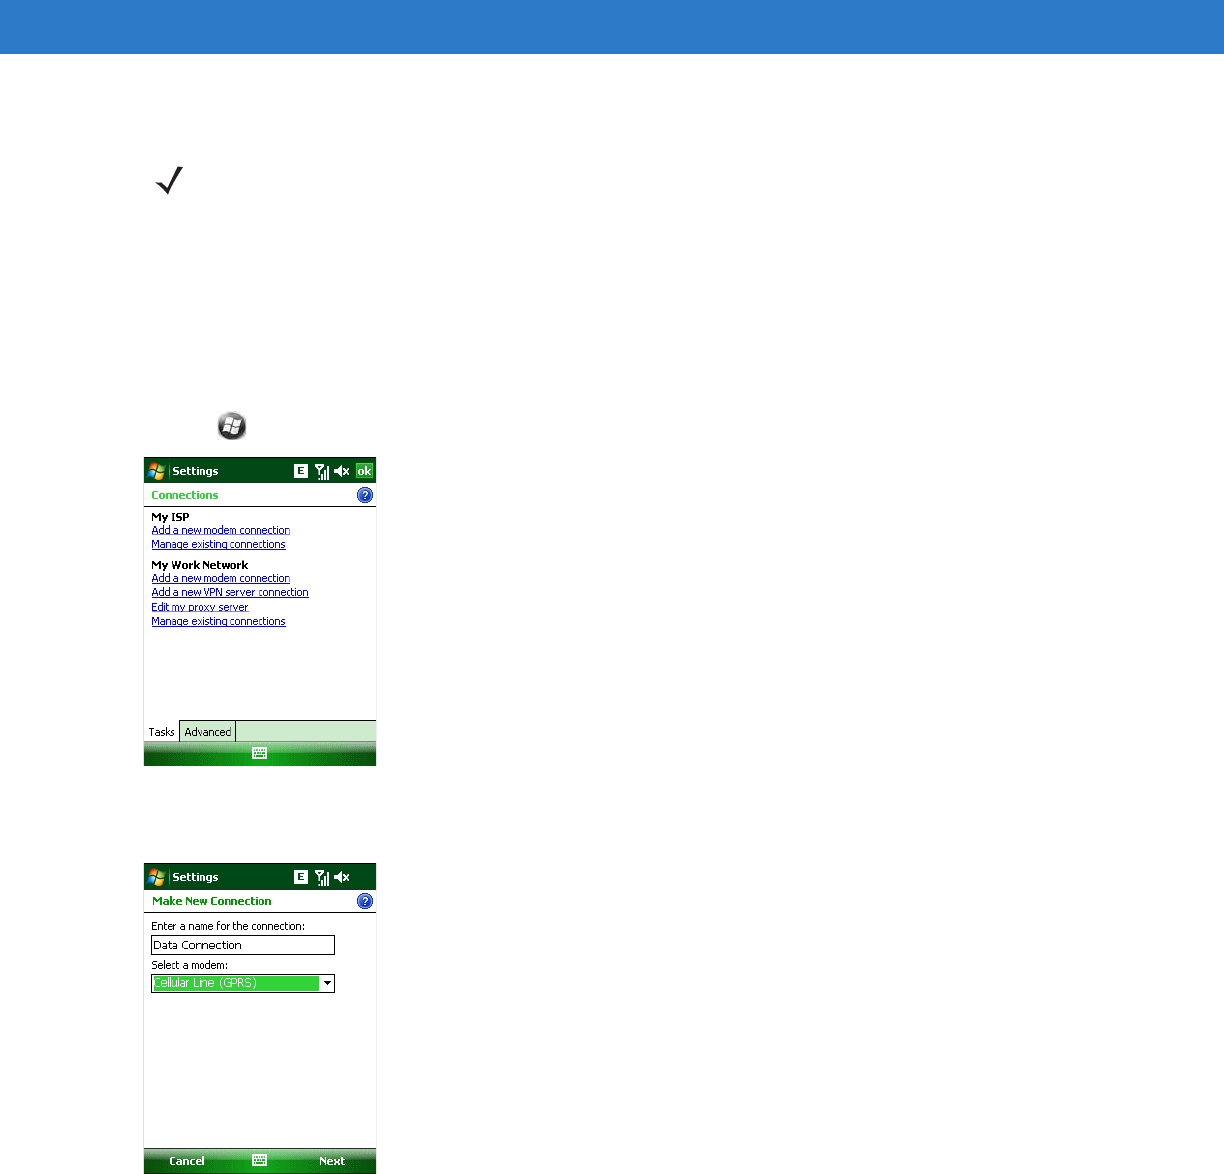
Configuring a GSM Data Connection
A data connection allows Internet access across a wireless network.
To set up a new data connection:
1. Acquire an Access Point Name (APN) from the service provider.
2. Tap > Settings > Connections tab > Connections icon > Tasks tab.
Figure 4-29
Connections Window
3. Under My ISP select Add a new modem connection.
Figure 4-30
Connections Window - Make New Connection
4. Enter a connection name in the Enter a name for the connection: text box.
5. Select Cellular Line (GPRS) from the Select a modem: drop-down list.
6. Tap Next.
NOTE Tapping Disconnect during an active data transfer (e.g., downloading a web page) automatically reconnects
the connection. You cannot disconnect the connection until the data transfer is complete.
Preliminary
4 - 20 MC65 User Guide
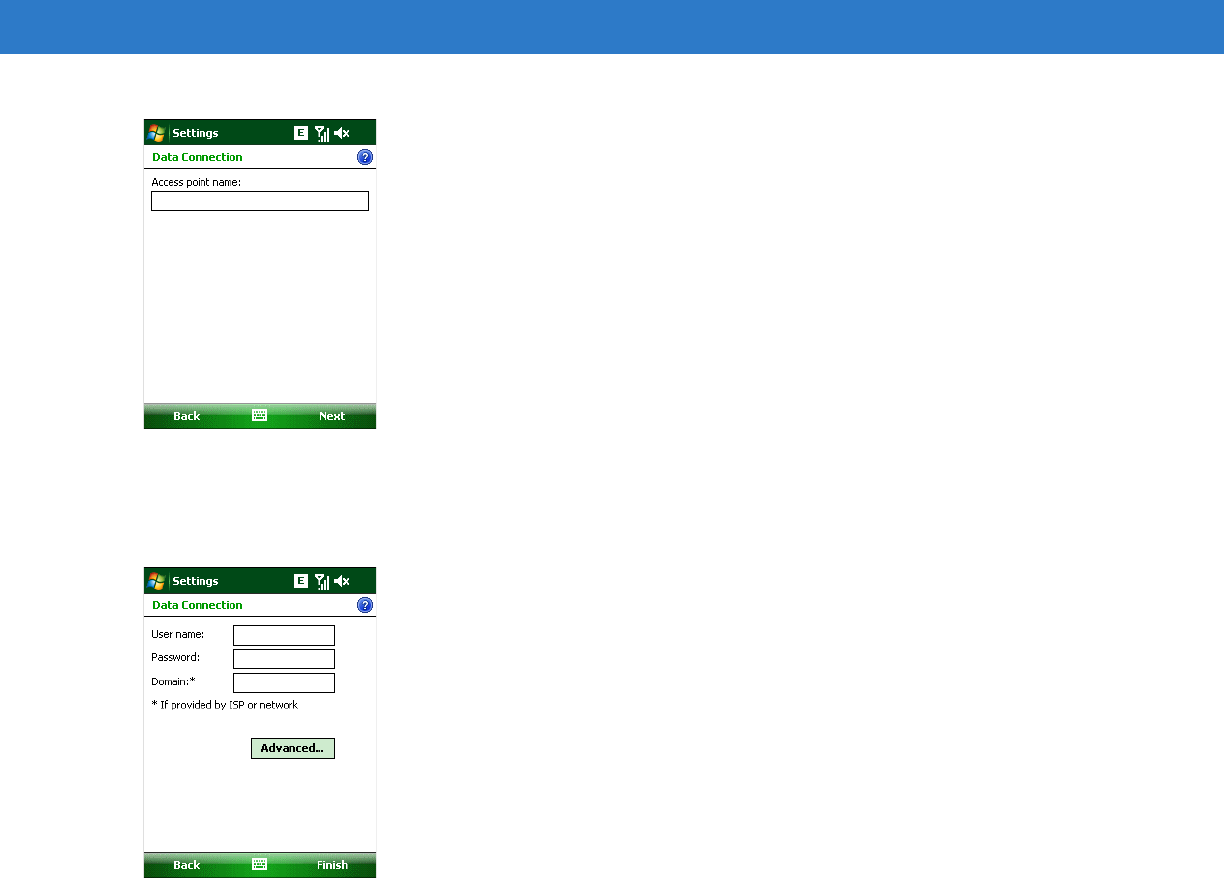
Figure 4-31
Connections Window - Access Point Name
7. Enter the APN from the service provider in the Access point name: text box.
8. Tap Next.
Figure 4-32
Connections Window - User Name & Password
9. Enter a username in the User name text box, if required by the service provider.
10. Enter a password in the Password text box, if required by the service provider.
11. Enter a domain name in the Domain text box, if required by the service provider.
12. Ta p Finish.
13. Ta p ok to exit Connections.
Preliminary
Using the Phone 4 - 21
MC65 Settings
Use the Phone Settings window to customize settings, such as the ring type and ring tone for incoming calls,
security options, and other options depending on the type of service.
Phone
Use the Phone tab to customize ring type, ring tone, keypad tone.
Tap > Settings > Personal tab > Phone icon > Phone tab
or
> Phone > Menu > Options > Phone tab.
Figure 4-33
MC65 Phone Window - Phone Tab
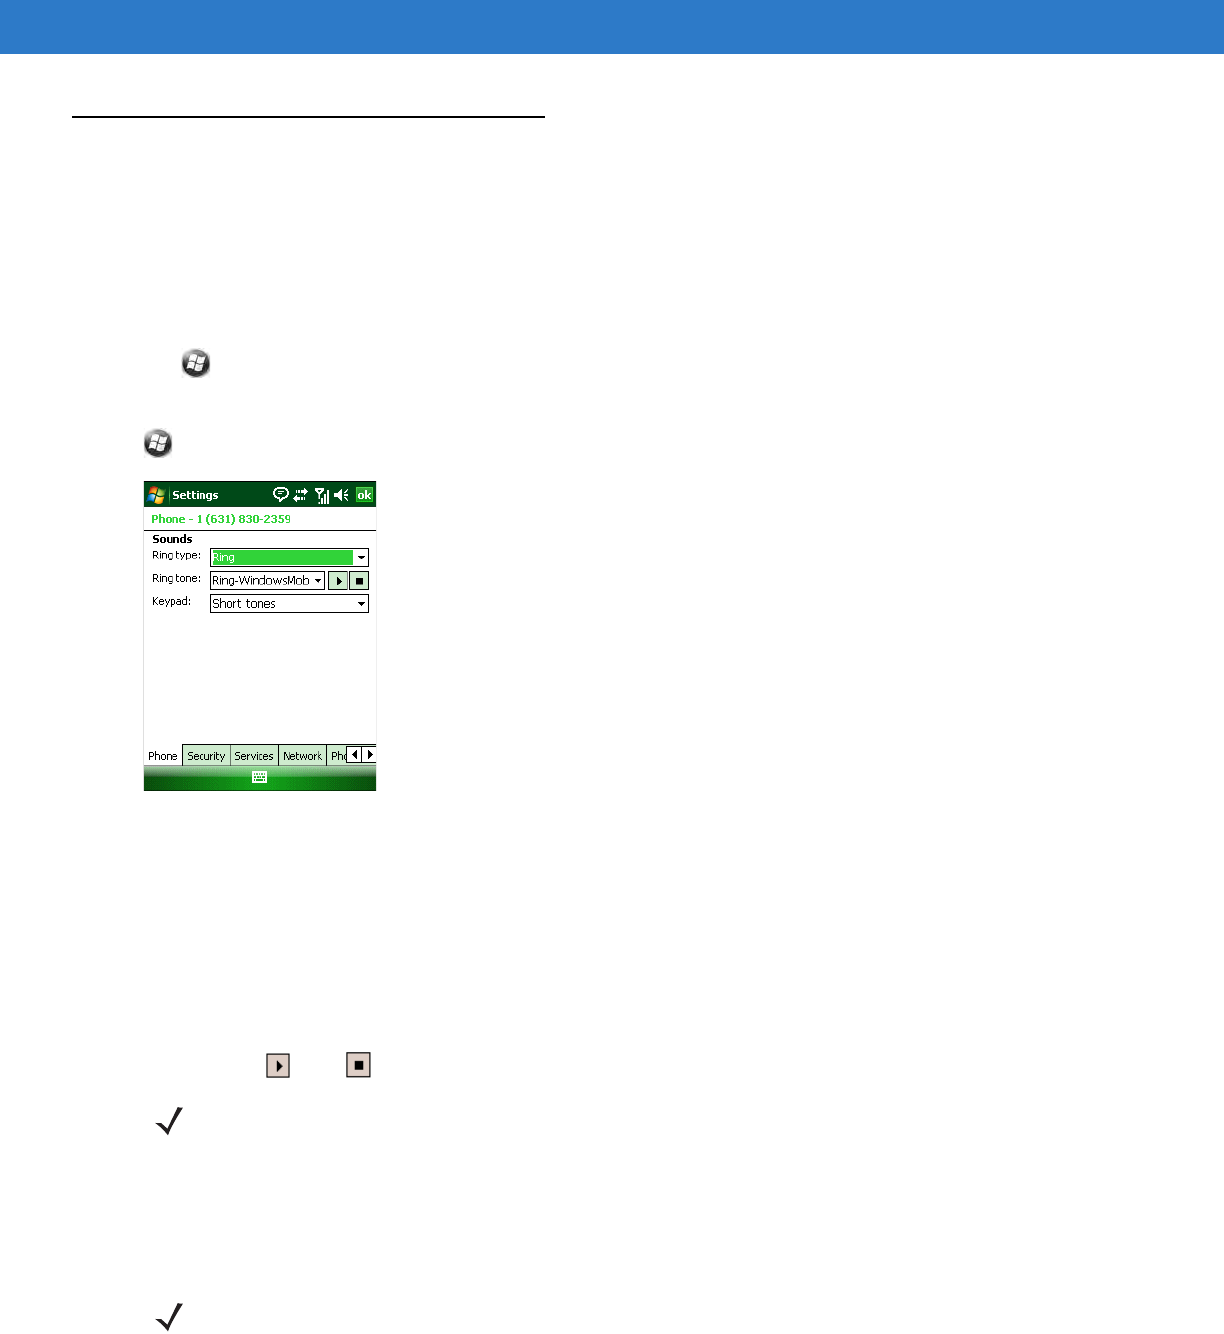
Sounds
1. Phone Number automatically displays on the Phone tab when a live SIM card is installed.
2. Select a ring type from the Ring type: drop-down list. The ring type changes the way the MC65 rings when you
receive an incoming call. Regardless of the ring type selected, a dialog box appears on the MC65’s display for
incoming calls.
3. Select a ring tone for incoming calls from the Ring tone: drop-down list. To hear a sample of the selected ring
tone, tap . Tap to end the ring tone.
4. Select a keypad tone from the Keypad: drop-down list. This selection determines the tone that sounds when
entering a phone number on the keypad.
Select Short tones or Long tones to specify the duration of the sound when you press a number on the keypad.
Select Off to disable tones.
NOTE To use custom .wav, .mid, or .wma files as ring tones, use ActiveSync on the host computer to copy the file to
the /Windows/Rings folder on the MC65. Then select the sound from the ring tone list.
NOTE Turning off sounds saves power and prolongs battery life.
Preliminary
4 - 22 MC65 User Guide
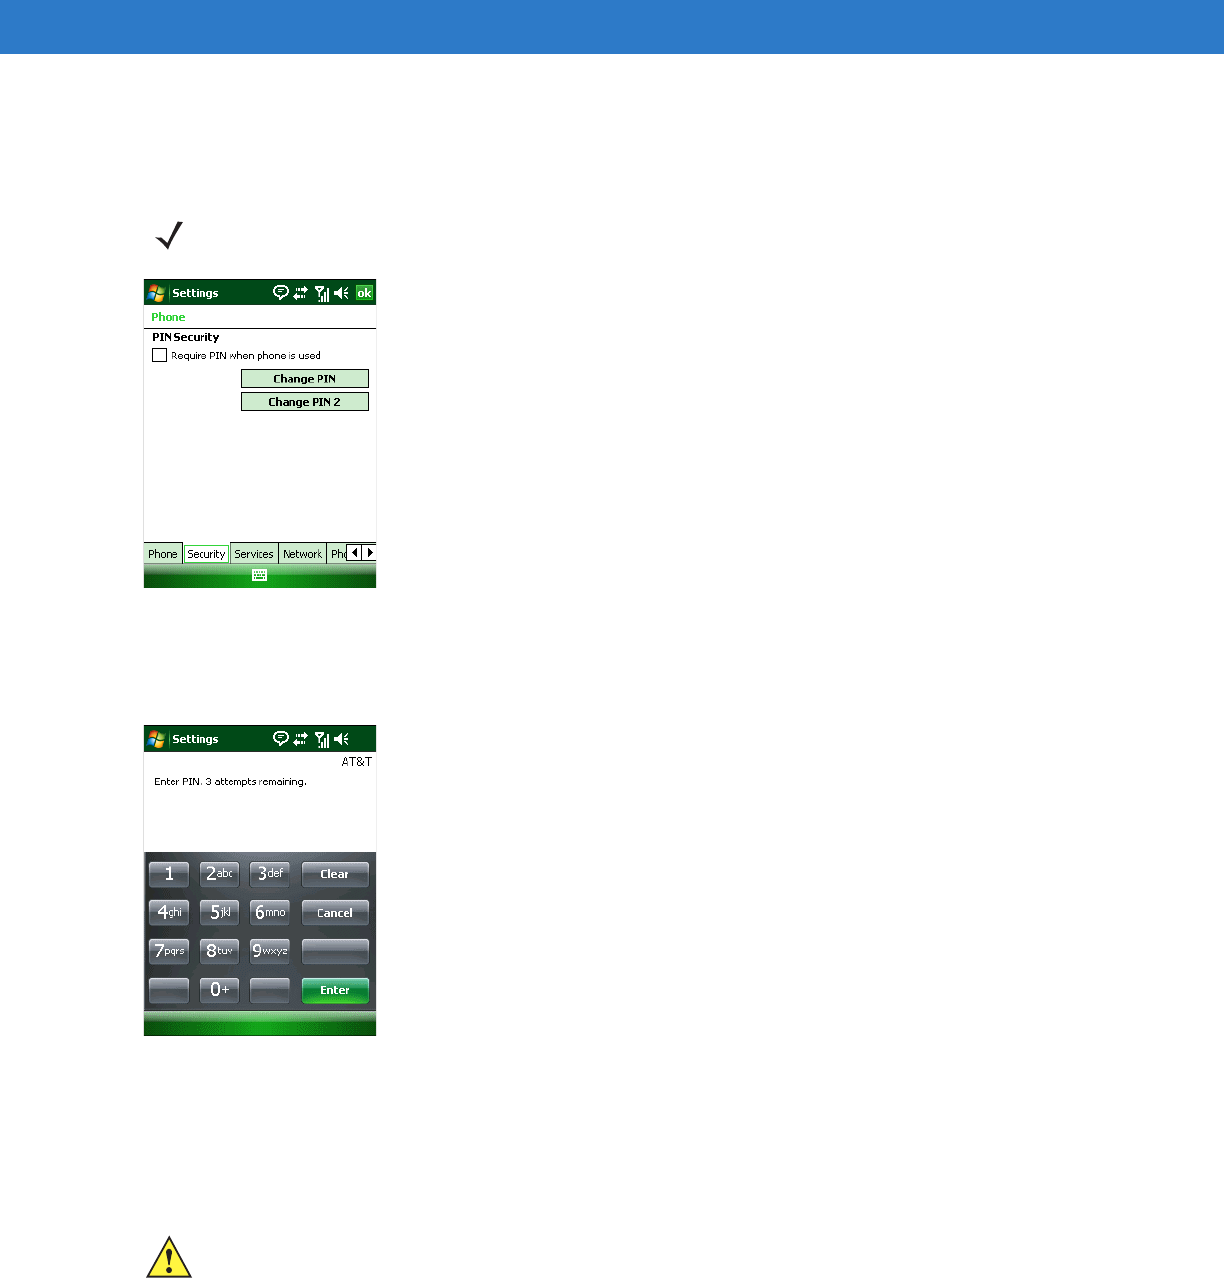
Security
Enabling a PIN
Figure 4-34
Security Tab
To require a PIN when using the phone:
1. From the Security tab (Figure 4-34), select the Require PIN when phone is used check box under Security.
Figure 4-35
Enter PIN
2. Use the touch keypad to enter a four to eight digit PIN.
3. Tap Enter to enable the PIN and return to the Phone tab.
Changing a PIN
1. From the Security tab (Figure 4-34), tap Change PIN.
2. Use the touch keypad to enter the current PIN.
NOTE Place emergency calls at any time, without requiring a PIN or a SIM card.
CAUTION If you enter an incorrect PIN, the message “SIM PIN incorrect: Try again” appears. After three consecutive
incorrect attempts, the SIM card is blocked. The phone does not allow you to attempt to enter your PIN
again and you must obtain a PIN Unblock Key from your service provider.
Preliminary
Using the Phone 4 - 23
3. Tap Enter.
4. Use the touch keypad to enter a new four to eight digit PIN.
5. Tap Enter.
6. Reenter the new PIN for confirmation and tap Enter.
7. Tap ok to confirm the change.
Disabling a PIN
1. From the Security tab (Figure 4-34), deselect the Require PIN when phone is used check box.
2. Use the touch keypad to enter the current PIN.
3. Tap Enter.
4. Tap ok to confirm the change and exit settings.
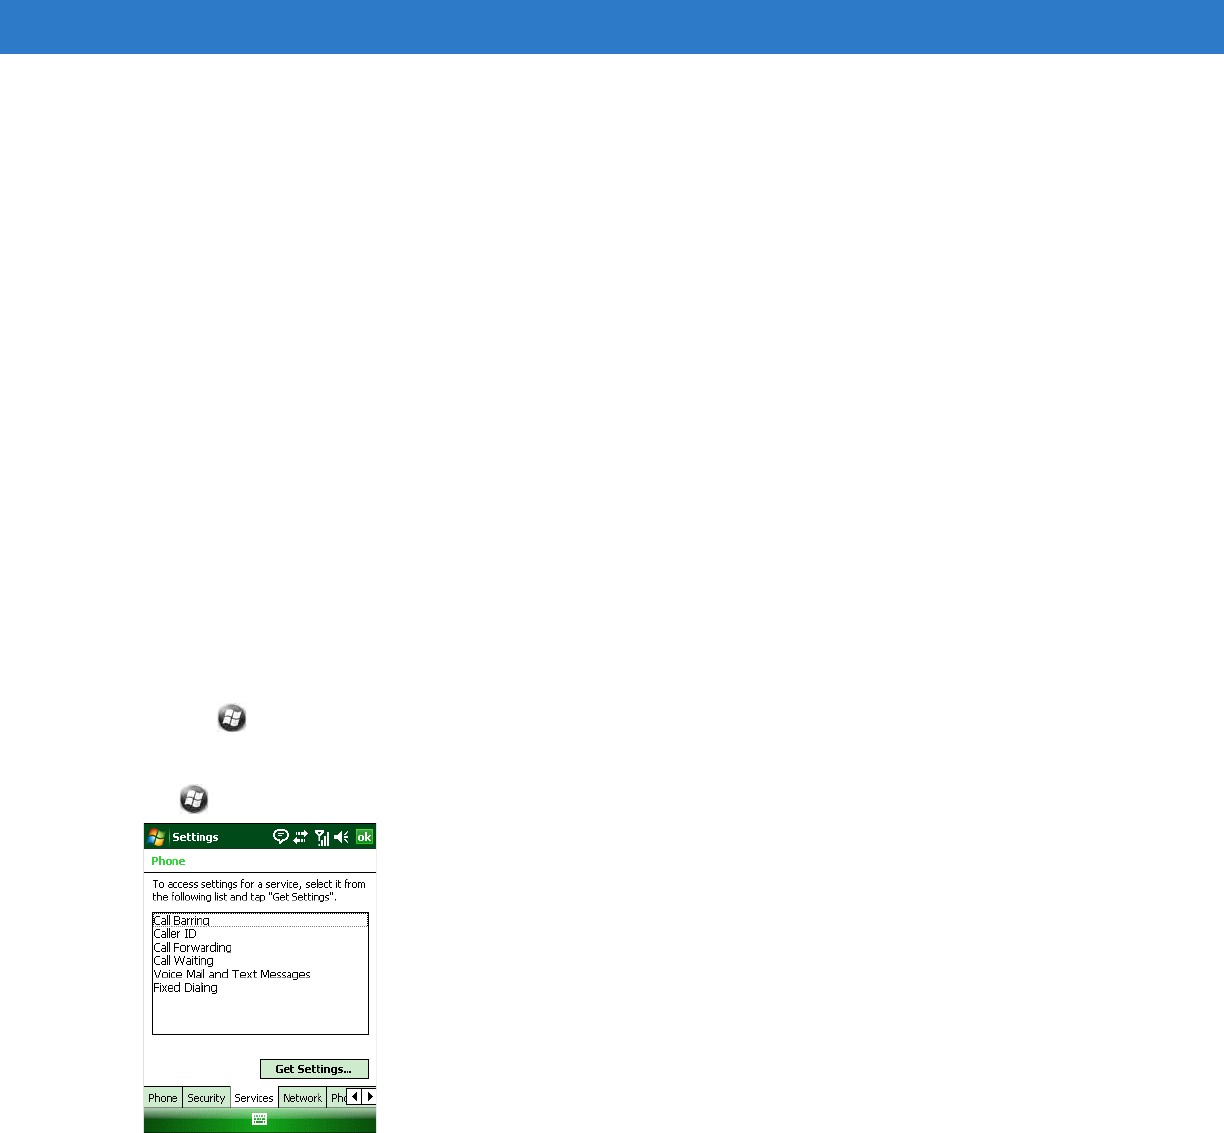
Services
Use the Services tab to configure settings for subscribed phone services. For example, block certain types of
incoming and/or outgoing calls ( page 4-23), disclose the caller’s identity when making outgoing calls ( page 4-24),
forward incoming calls to a different phone number ( page 4-24), receive notification of incoming calls when a
phone session is in use ( page 4-25), and set up voice mail and short message service ( page 4-25).
1. Tap > Settings > Personal tab > Phone icon > Services tab.
or
> Phone > Menu > Options > Services tab.
Figure 4-36
MC65 Phone Window - Services Tab
2. Select a service from the list and tap Get Settings... .
3. Change services settings as follows.
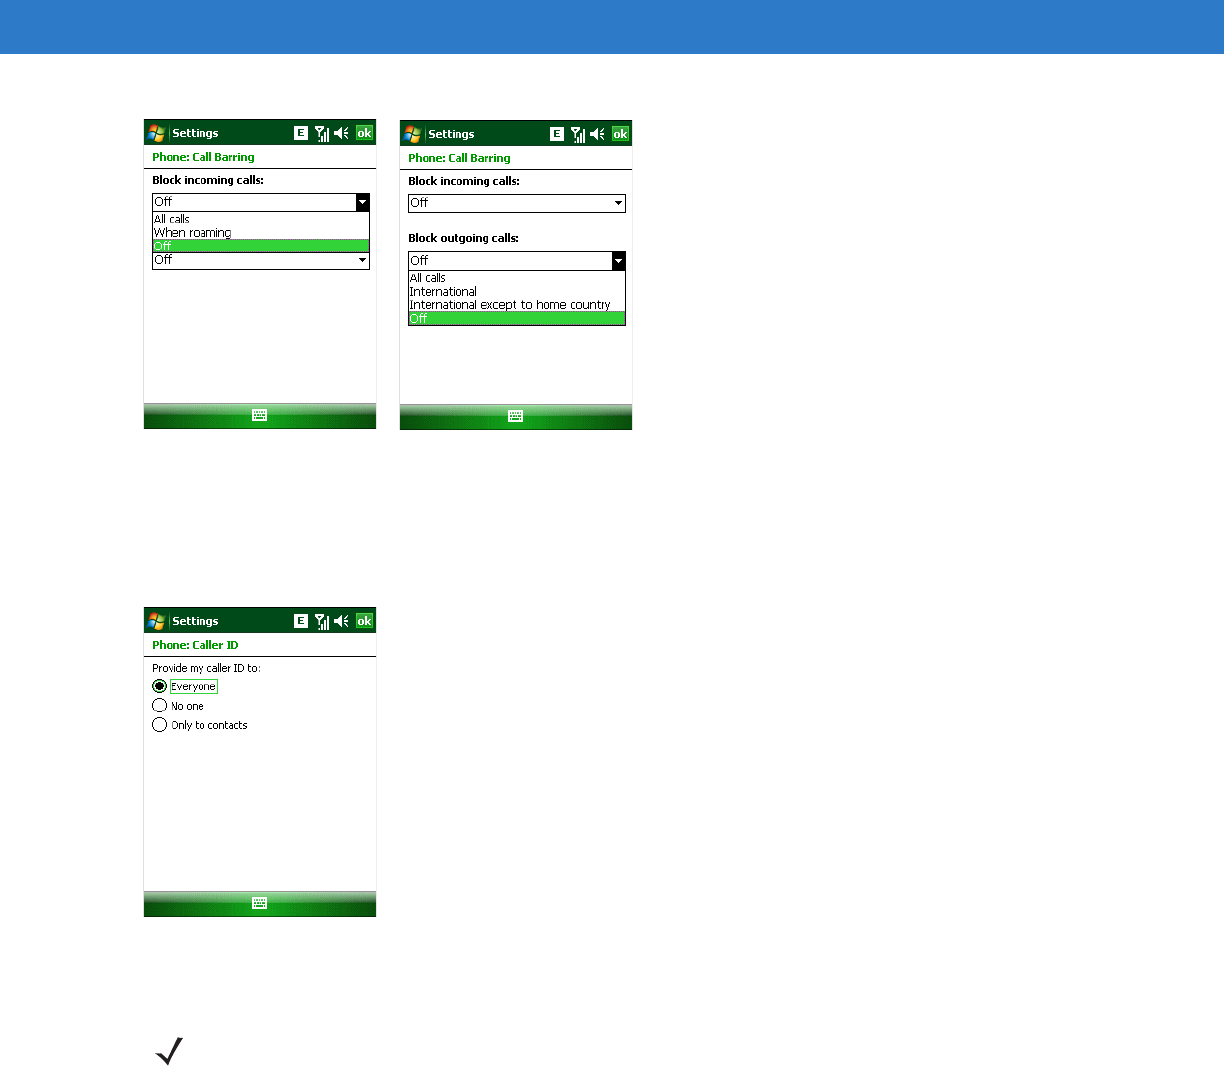
Call Barring (Call Blocking)
Use call barring to block certain types of incoming and/or outgoing calls. Select the type of incoming and/or
outgoing calls to block.
Preliminary
4 - 24 MC65 User Guide
Figure 4-37
Call Barring/Call Blocking
Caller ID
Enable caller ID to reveal the identity of the person making an outgoing call. Select the Everyone radio button to
always display the caller ID. Select the No one radio button to prevent the caller’s identity from appearing to others.
Figure 4-38
Caller ID
Call Forwarding
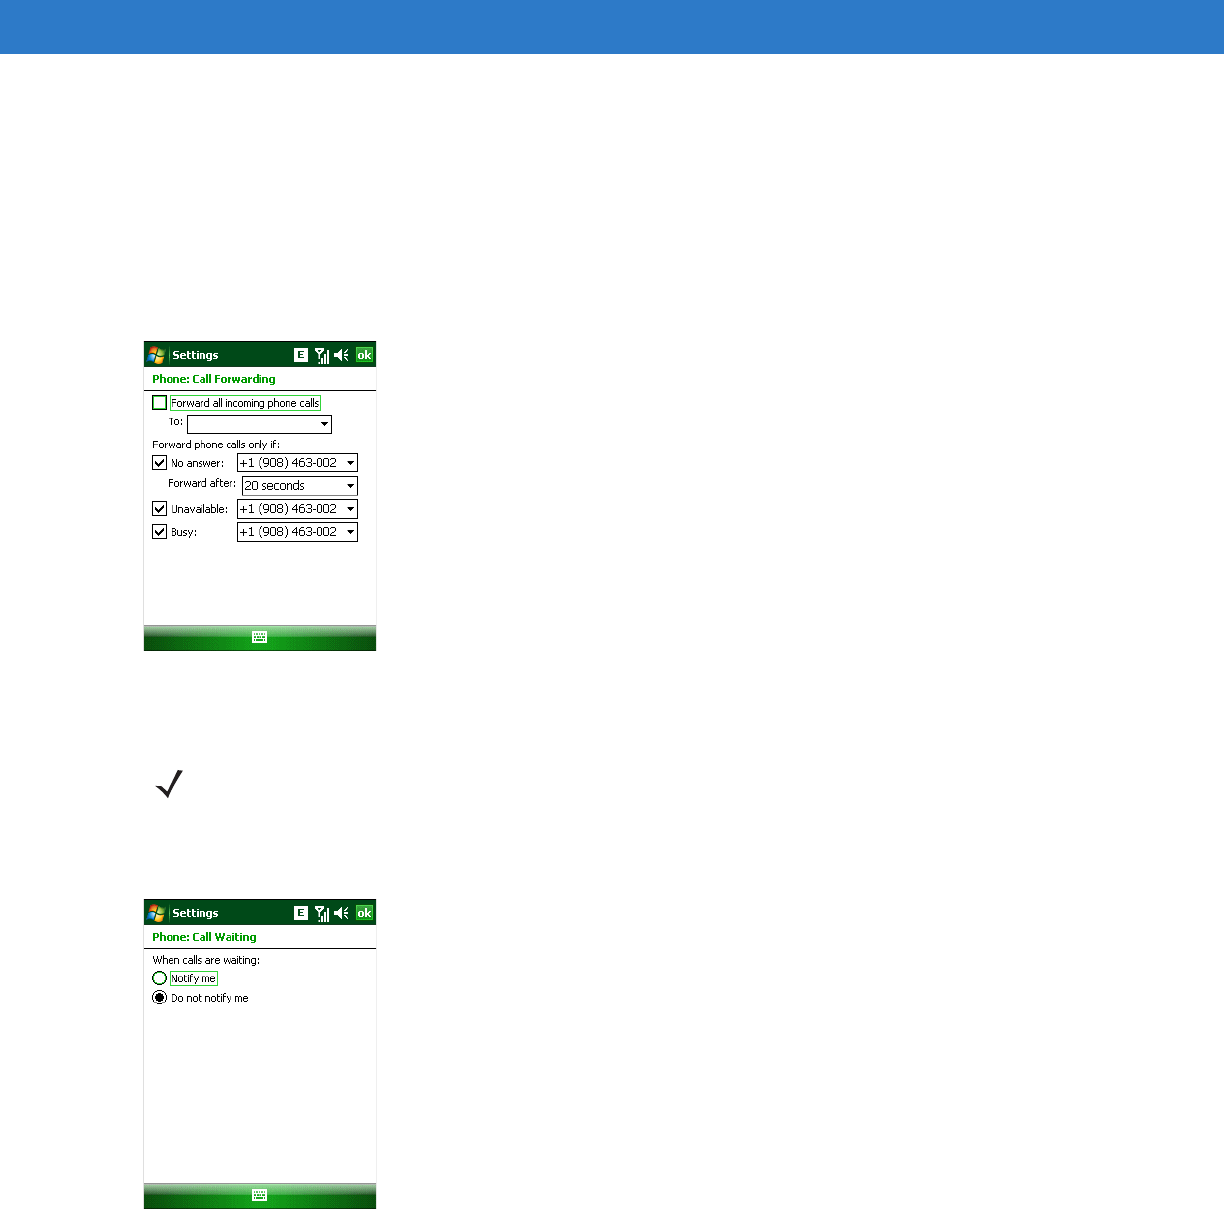
Use call forwarding to forward incoming calls to a different phone number.
•
To forward all calls to a different phone number:
•select the Forward all incoming phone calls check box.
•enter the phone number to receive forwarded calls in the To: text box.
NOTE Call Forwarding may not be available on all networks. Check with your service provider for availability.
Preliminary
Using the Phone 4 - 25
•
To forward incoming calls to a different phone number based on a specific situation, select one or more of the
check boxes under Forward phone calls only if:.
•No answer: enter the phone number to receive forwarded calls only when the phone cannot be answered.
Then select a time period from the Forward after: drop-down list. Options are 5, 10, 15, 20, 25, and 30
seconds.
•Unavailable: enter the phone number to receive forwarded calls only when the phone is turned off or the
user is unreachable.
•Busy: enter the phone number to receive forwarded calls only when the line is busy.
Figure 4-39
Call Forwarding
Call Waiting
Call waiting notifies you of an incoming call when the phone is in a phone session. Select the Notify me radio button
to enable call waiting. Select the Do not notify me radio button to disable call waiting.
Figure 4-40
Call Waiting
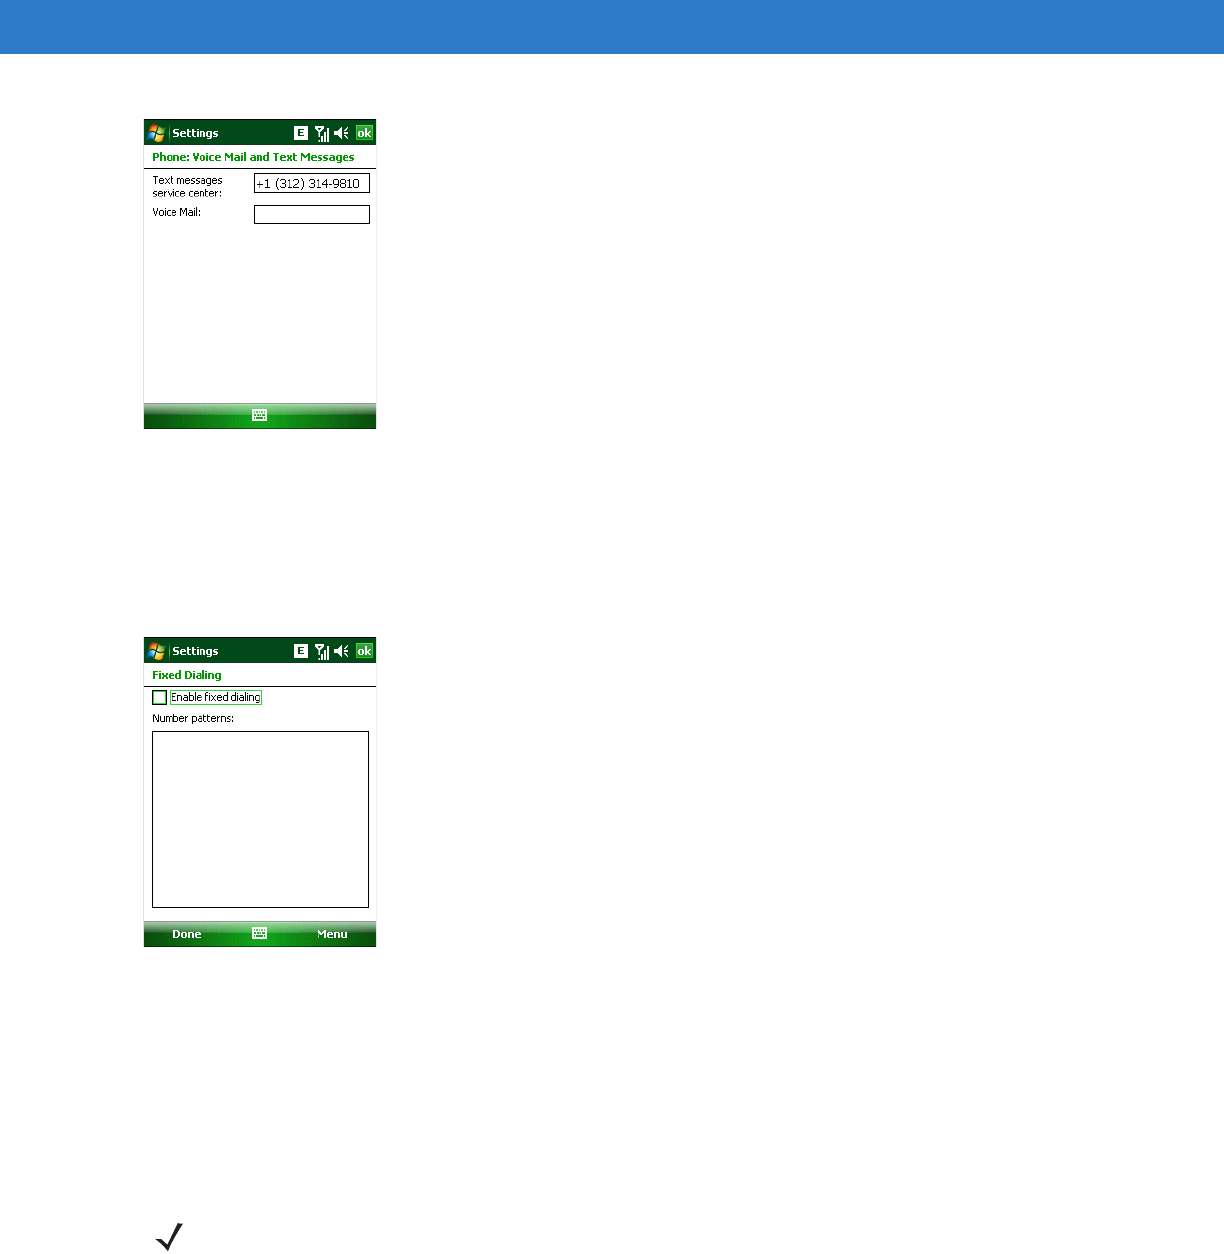
Voice Mail and Text Messages
To use voice mail and send short messages, enter the voice mail and/or text message phone number in the
appropriate text boxes.
NOTE Call Waiting may not be available on all networks. Check with your service provider for availability.
Preliminary
4 - 26 MC65 User Guide
Figure 4-41
Voice Mail and Text Messages
Fixed Dialing
Use Fixed Dialing to restrict the phone to dial only the phone number(s) or area code(s) specified in a Fixed Dialing
list.
1. Select Fixed Dialing and tap Get Settings.
Figure 4-42
Fixed Dialing Window
2. Select the Enable fixed dialing check box.
3. To add a number to the list, tap Menu > Add.
4. Enter the phone number or area code to restrict and tap Done.
5. Repeat steps 3 and 4 to add more numbers, and tap Done twice when complete.
6. Enter PIN2 and tap Done.
Internet Calling
NOTE PIN2 is buffered in the MC65 indefinitely after entry and will not be requested again until a warm boot of the
MC65 has been performed. Should PIN2 be required, then the user must perform a warm boot of the MC65.
Preliminary
Using the Phone 4 - 27
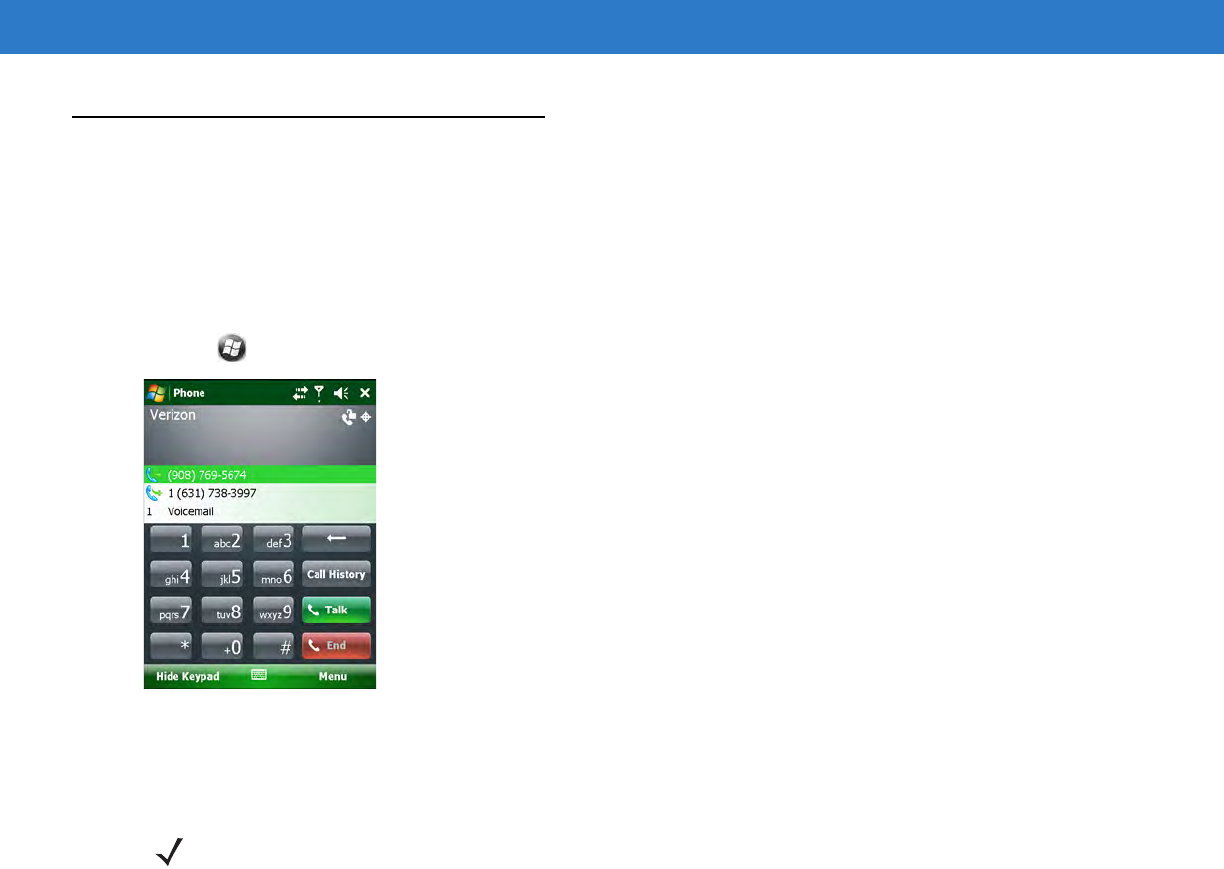
Phone Network Setup
Activation Test
Approximately four hours after activation is completed, test the service.
1. Tap > Phone.
Figure 4-43
Phone Window - Example
2. Ensure the carrier name displays on the window.
3. Make a voice call to ensure activation was successful.
NOTE If activation was not successful, contact the service provider.
Preliminary
4 - 28 MC65 User Guide
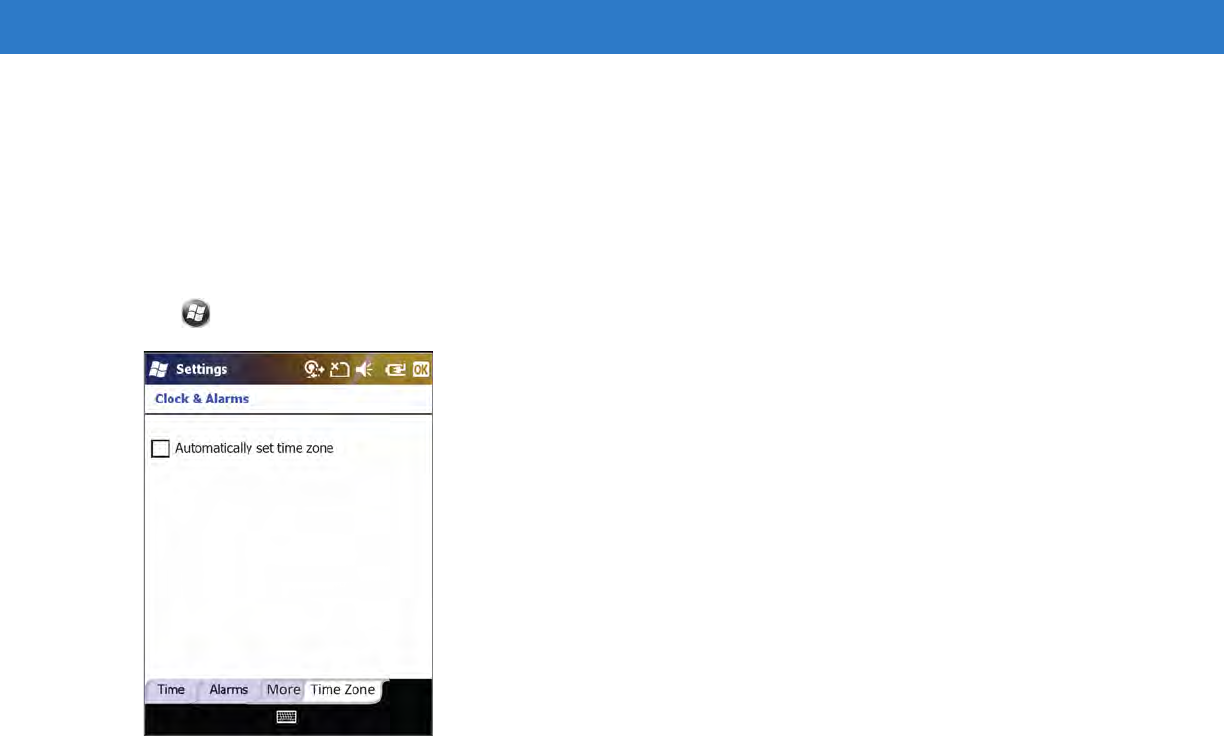
NITZ
The ability to enable/disable network time synchronization provides the user flexibility on time zone changes.
If you enable network time synchronization, users can turn this feature on or turn it off and set up user notifications
for time changes.
This feature is inaccessible by the user.
Tap > Settings > Clock & Alarms > Time Zone tab.
Figure 4-44
Clock & Alarms - Time Zone Tab
Preliminary

Chapter 5 Using Bluetooth
Introduction
Bluetooth-equipped devices can communicate without wires, using frequency-hopping spread spectrum (FHSS)
radio frequency (RF) to transmit and receive data in the 2.4 GHz Industry Scientific and Medical (ISM) band
(802.15.1). Bluetooth wireless technology is specifically designed for short-range (30 feet/10 meters)
communication and low power consumption.
MC65s with Bluetooth capabilities can exchange information (e.g., files, appointments, and tasks) with other
Bluetooth enabled devices such as phones, printers, access points, and other mobile computers. To use the MC65
as a modem, create a dial-up modem connection between a computer and MC65.
MC65Adaptive Frequency Hopping
Adaptive Frequency Hopping (AFH) is a method of avoiding fixed frequency interferers, and can be used with
Bluetooth voice. All devices in the piconet (Bluetooth network) must be AFH-capable in order for AFH to work.
There is no AFH when connecting and discovering devices. Avoid making Bluetooth connections and discoveries
during critical 802.11b communications. AFH for Bluetooth consists of four main sections:
•
Channel Classification - A method of detecting an interference on a channel-by-channel basis, or pre-defined
channel mask.
•
Link Management - Coordinates and distributes the AFH information to the rest of the Bluetooth network.
•
Hop Sequence Modification - Avoids interference by selectively reducing the number of hopping channels.
•
Channel Maintenance - A method for periodically re-evaluating the channels.
When AFH is enabled, the Bluetooth radio “hops around” (instead of through) the 802.11b high-rate channels. AFH
coexistence allows Motorola mobile computers to operate in any infrastructure.
The Bluetooth radio in this MC65 operates as a Class 2 device power class. The maximum output power is 2.5mW
and the expected range is 32.8 feet (10 meters). A definition of ranges based on power class is difficult to obtain
due to power and device differences, and whether one measures open space or closed office space.
NOTE It is not recommended to perform Bluetooth wireless technology inquiry when high rate 802.11b operation is
required.
Preliminary

5 - 2 MC65 User Guide
Security
The current Bluetooth specification defines security at the link level. Application-level security is not specified. This
allows application developers to define security mechanisms tailored to their specific need. Link-level security
occurs between devices, not users, while application-level security can be implemented on a per-user basis. The
Bluetooth specification defines security algorithms and procedures needed to authenticate devices, and if needed,
encrypt the data flowing on the link between the devices. Device authentication is a mandatory feature of Bluetooth
while link encryption is optional.
Pairing of Bluetooth devices is accomplished by creating an initialization key that is used to authenticate the
devices and create a link key for them. Entering a common PIN number in the devices being paired generates the
initialization key. The PIN number is never sent over the air. By default, the Bluetooth stack responds with no key
when a key is requested (it is up to user to respond to the key request event). Authentication of Bluetooth devices
is based-upon a challenge-response transaction. Bluetooth allows for a PIN number or passkey that is used to
create other 128-bit keys used for security and encryption. The encryption key is derived from the link key used to
authenticate the pairing devices. Also worthy of note is the limited range and fast frequency hopping of the
Bluetooth radios that makes long-distance eavesdropping difficult.
Recommendations are:
•
Perform pairing in a secure environment
•
Keep PIN codes private and don't store the PIN codes in the mobile computer
•
Implement application-level security.
The Microsoft stack supports Smart-pairing. For detailed information, refer to the Microsoft MSDN.
Preliminary

Using Bluetooth 5 - 3
Bluetooth Configuration
MC65MC65MC65The services supported by the Microsoft Bluetooth stack.
•
OBEX Object Push Services
•
Hands-Free Audio Gateway Services
•
Serial Port Services
•
Personal Area Networking Services
•
PBAP Services
The COM ports available for the Microsoft Bluetooth stack.
•
COM5
•
COM9
Bluetooth Power States
Cold Boot
Performing a cold boot on the MC65 turns off Bluetooth after initialization (which takes a few moments). It is normal
to see the Bluetooth icon appear and disappear, as well as a wait cursor, when initialization proceeds in all modes.
Warm Boot
Performing a warm boot on the MC65 turns off Bluetooth.
Suspend
Suspending the MC65 turns off Bluetooth.
Resume
When the MC65 resumes, Bluetooth turns on if it was on prior to suspend.
NOTE If there is an active Bluetooth connection between the MC65 and another Bluetooth device, the MC65 will not
timeout. However, if the user presses the Power button on the MC65, the MC65 will suspend and upon
receiving data from a remote Bluetooth device, the MC65 will wake from suspend mode. For example,
headset redial or Bluetooth scanner sending data to the MC65.
Preliminary
5 - 4 MC65 User Guide
Using Microsoft Bluetooth Stack
The following sections provide information on using the Microsoft Bluetooth stack.
Turning the Bluetooth Radio Mode On and Off
Turn off the Bluetooth radio to save power or if entering an area with radio restrictions (e.g., an airplane). When the
radio is off, other Bluetooth devices cannot see or connect to the MC65. Turn on the Bluetooth radio to exchange
information with other Bluetooth devices (within range). Communicate only with Bluetooth radios in close proximity.
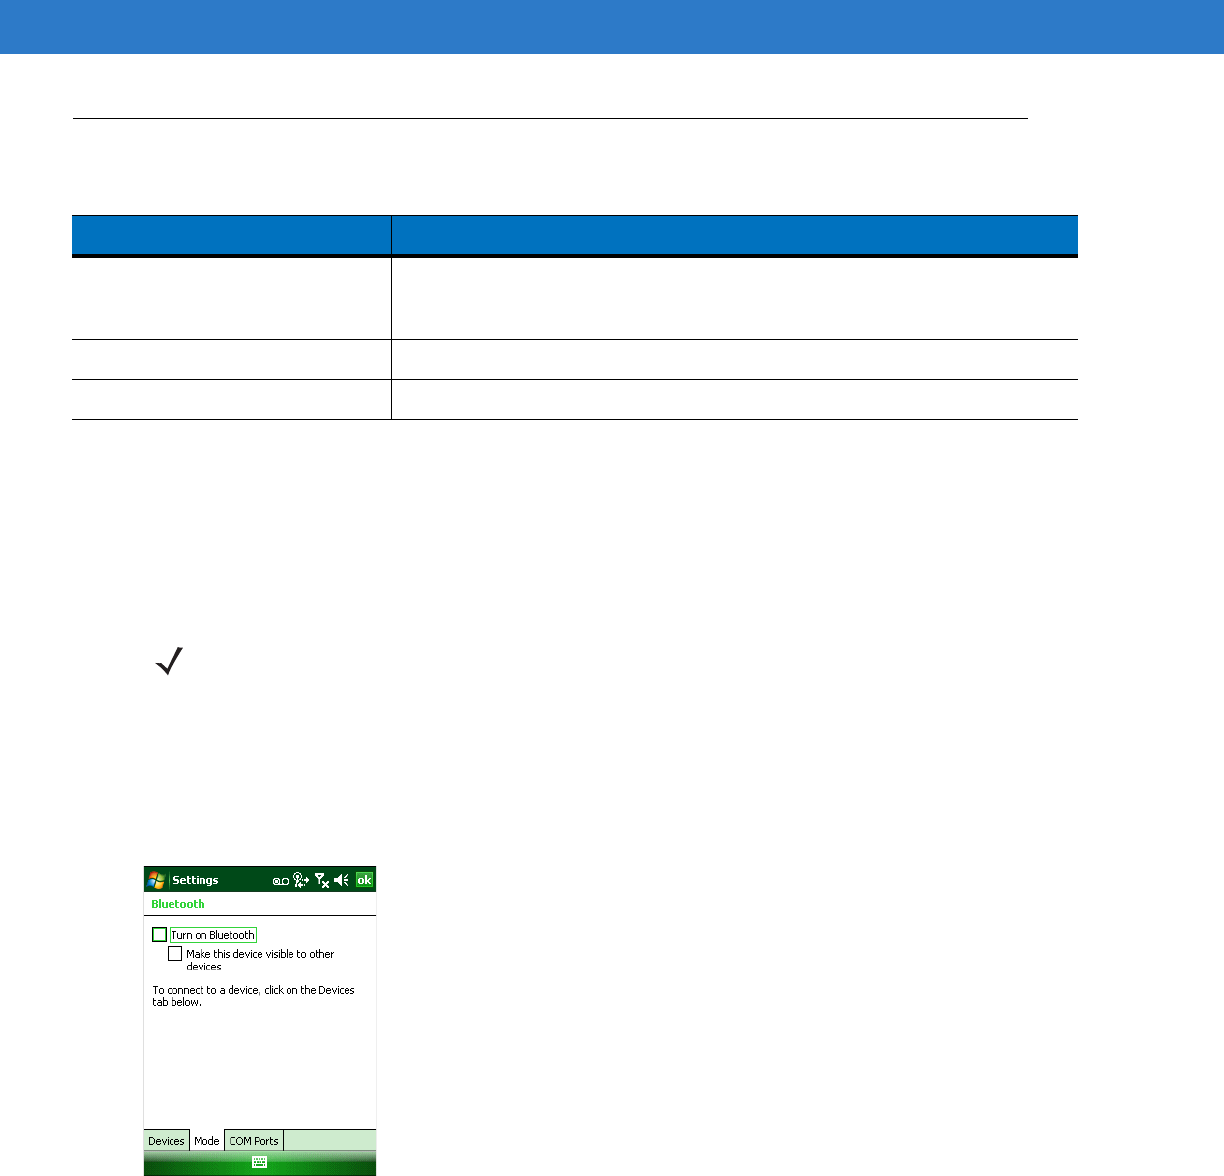
Enabling Bluetooth
To enable Bluetooth:
1. Tap Wireless Manager and then tap the Bluetooth bar or
Tap Start > Setting > Connections > Bluetooth icon > Mode tab.
Figure 5-1
Bluetooth Mode Tab
2. Check the Turn On Bluetooth checkbox.
3. Tap ok.
Disabling Bluetooth
To disable Bluetooth:
Table 5-1
Miscellaneous tab Data
Item Description
Highlight Connections Select the connection type to highlight when connected. In the Wizard Mode,
the only options are Favorites or None. In the Explorer Mode the options are
None, Tree View Only, List View Only, or Tree and List View.
Apply Text Style Select the text style to apply to the connection text.
Apply Text Color Select the text color to apply to the connection text.
NOTE To achieve the best battery life turn off radios not in use.
Preliminary
Using Bluetooth 5 - 5
1. Tap Wireless Manager and then tap the Bluetooth bar or
Tap Start > Setting > Connections > Bluetooth icon > Mode tab.
2. Un-check the Turn On Bluetooth checkbox.
3. Tap ok.
Discovering Bluetooth Device(s)
The MC65 can receive information from discovered devices without bonding. However, once bonded, the MC65
and a bonded device exchange information automatically when you turn the Bluetooth radio on.
To find Bluetooth devices in the area:
1. Ensure that Bluetooth is enabled on both devices.
2. Ensure that the Bluetooth device to discover is in discoverable and connectable modes.
3. Ensure that the two devices are within 30 feet (10 meters) of one another.
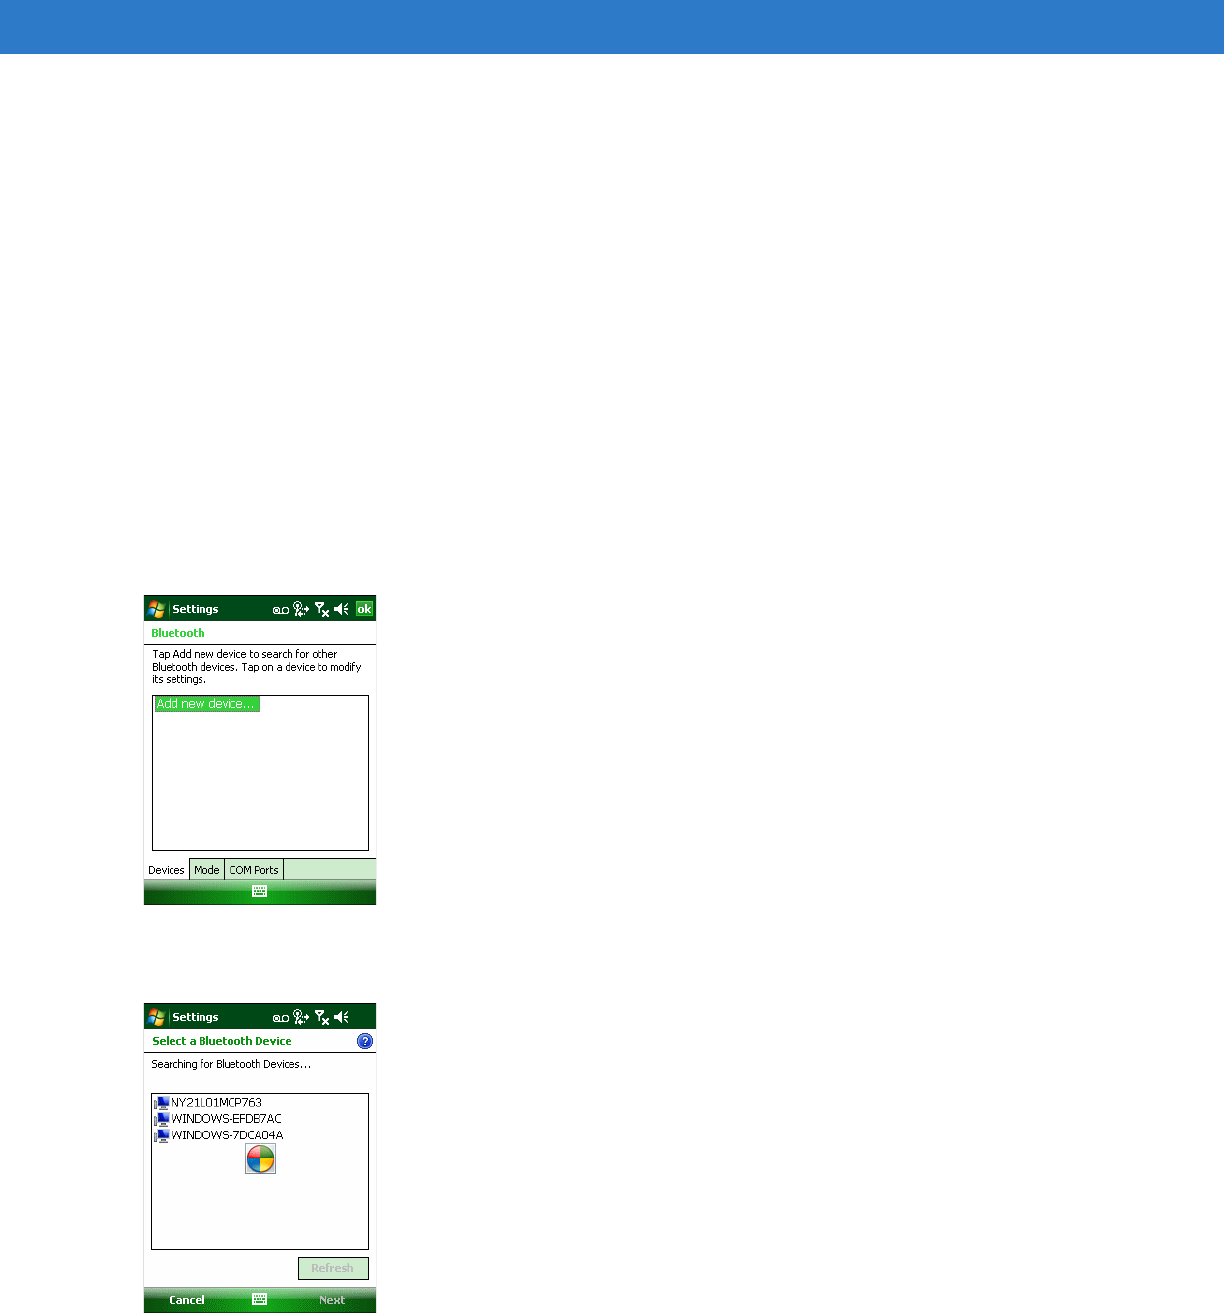
4. Tap Start > Settings > Connections tab > Bluetooth icon > Devices tab.
Figure 5-2
Bluetooth - Devices Tab
5. Tap Add new device. The MC65 begins searching for discoverable Bluetooth devices in the area.
Figure 5-3
Searching for Bluetooth Devices
6. Select a device from the list.
Preliminary
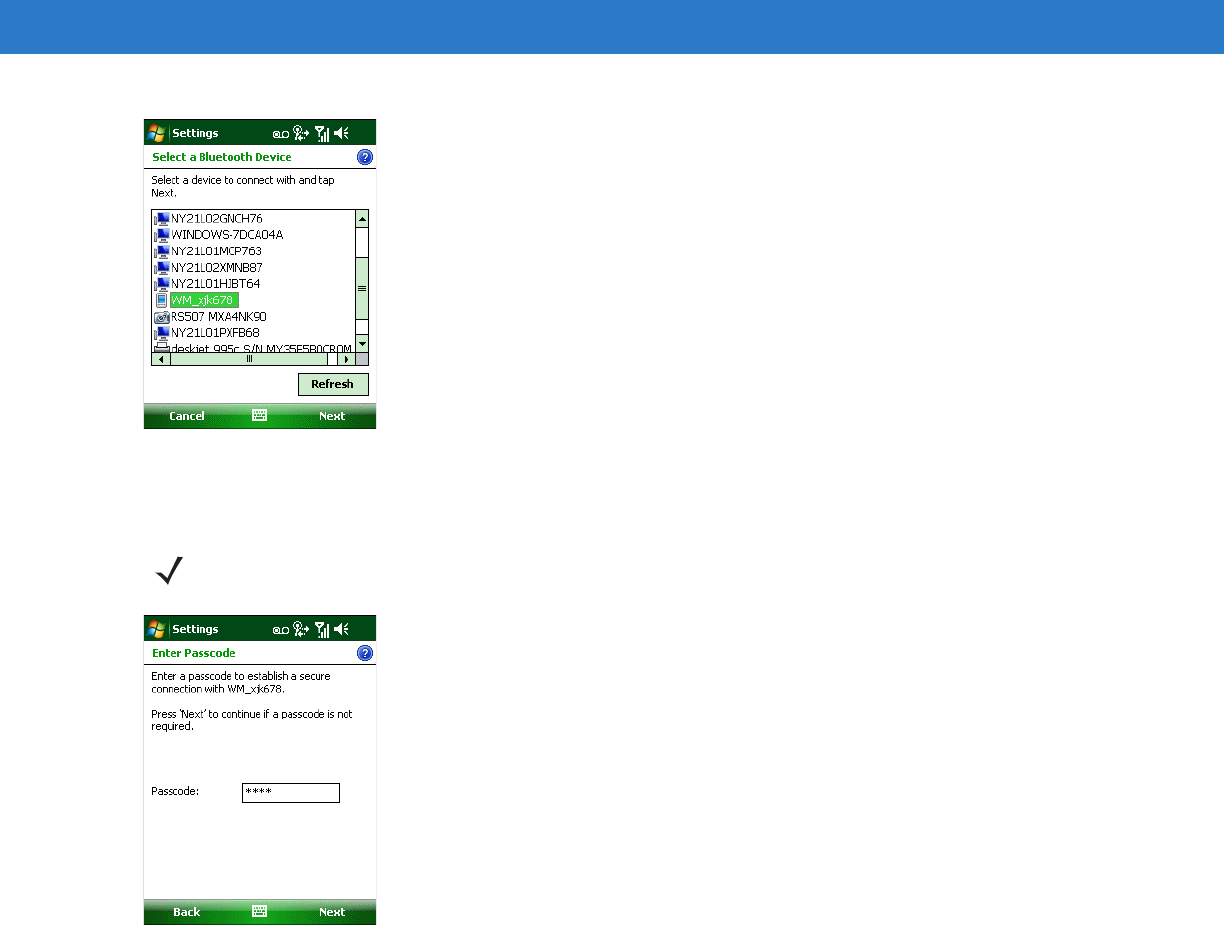
5 - 6 MC65 User Guide
Figure 5-4
Select a Bluetooth Device
7. Tap Next. The Enter Passcode window appears.
Figure 5-5
Enter Passcode
8. Enter the Passcode on the other device. The device is added to the Bluetooth list.
NOTE If Smart-pairing is configured and the device is requesting one of the pre-defined PINs, the Enter
Passcode window does not appear.
Preliminary
Using Bluetooth 5 - 7
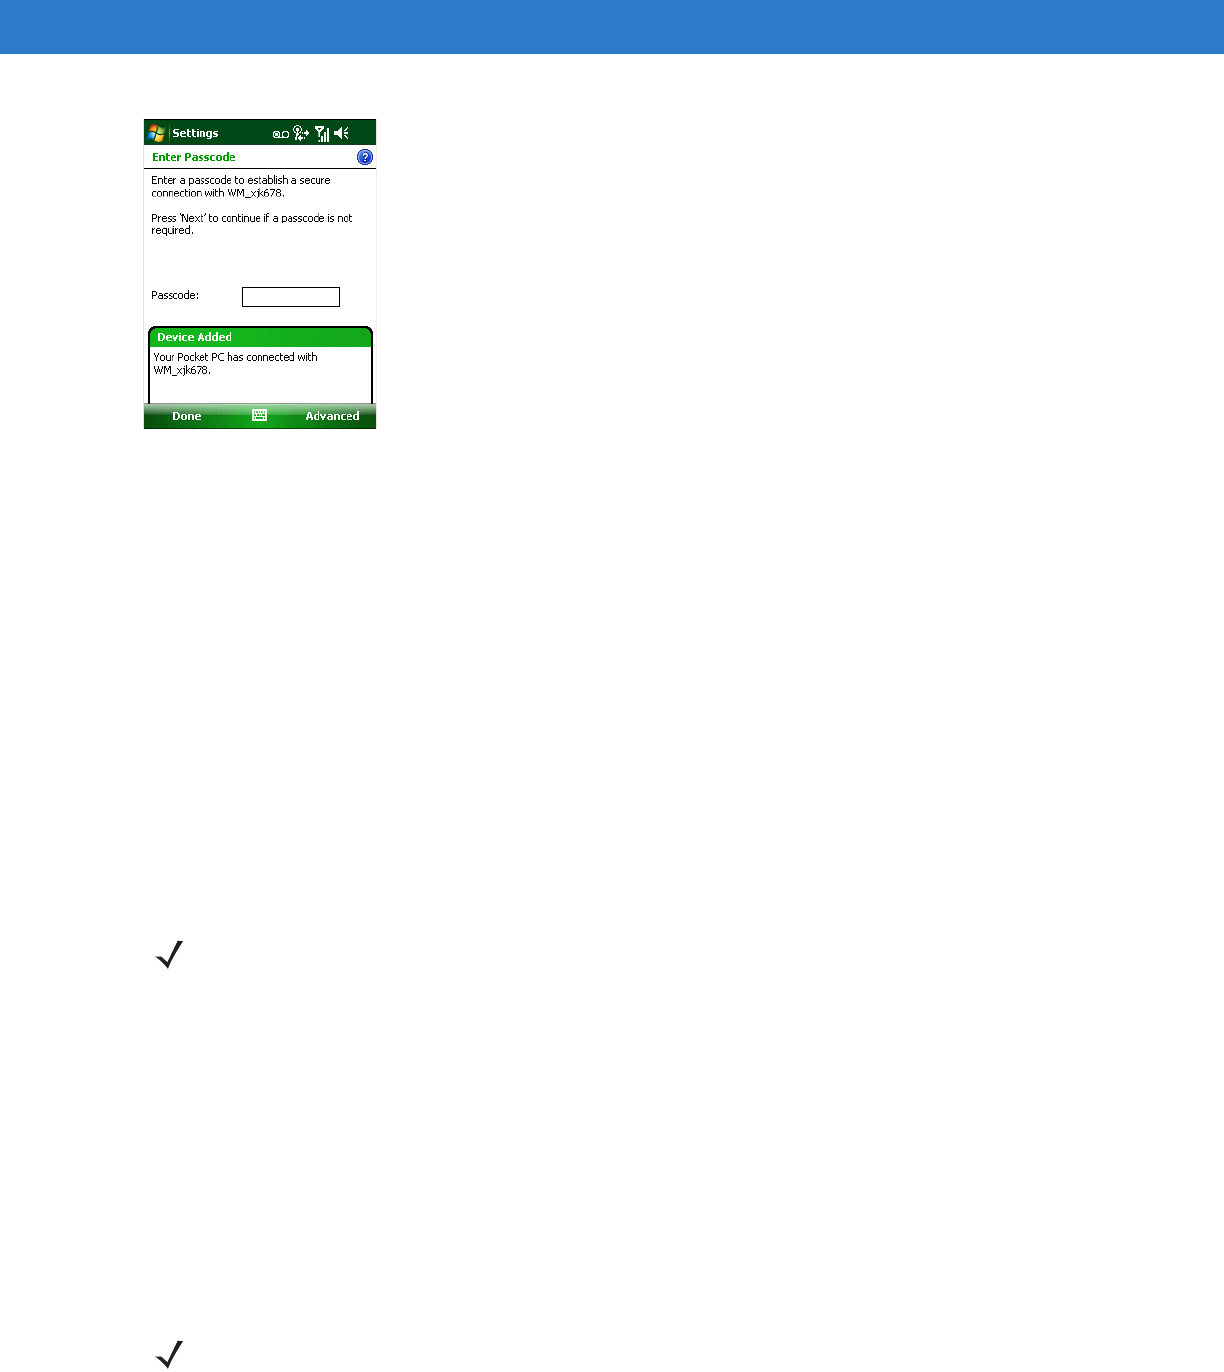
Figure 5-6
Bluetooth Connection Confirmation
You are prompted to enter a passcode. If the device has a specific passcode, enter it in the Passcode field and
tap Next. If the device does not have a specific passcode, enter one in the Passcode field and tap Next. The
Bluetooth radio tries to connect with the device.
9. If you created a passcode, you will be prompted by the other device to enter the same passcode. Enter the
created passcode to establish a paired connection. (If you entered a passcode from the device, you shouldn’t
have to do anything on the other device.)
10. When the connection is complete, a list of matching and supported services on the device appears.
11. Select the services you want to use and tap Finish. The services on the new devices have to be selected or
else the pairing won’t include those services, even though the devices are paired. If services are not selected,
you will be continually reprompted for the passcode from the device.
12. The device appears in the list on the main window.
After the passcodes have been accepted on both sides, you have a trusted (“paired”) connection.
Available Services
The MC65 with Microsoft Bluetooth stack offers the following services:
•
OBEX Object Push Services via Beam
•
Hands-Free Audio Gateway Services
•
Serial Port Services
•
Personal Area Networking Services
•
PBAP Services.
See the following sections for information on these services.
Object Push Services via Beam
NOTE Some devices might not require a PIN. This depends upon the device’s authentication.
NOTE You can only send files to a remote device using the Beam function.
Preliminary
5 - 8 MC65 User Guide
Use the OBEX Push Service to send files and contacts to another Bluetooth device. To transfer files between the
MC65 and another Bluetooth enabled device:
1. Ensure that Bluetooth is enabled and discoverable on both devices.
2. Ensure that the two devices are within 30 feet (10 meters) of one another.
3. Tap Start > Programs > File Explorer.
4. Navigate to the file to transfer.
5. Tap and hold on the filename until the pop-up menu appears.
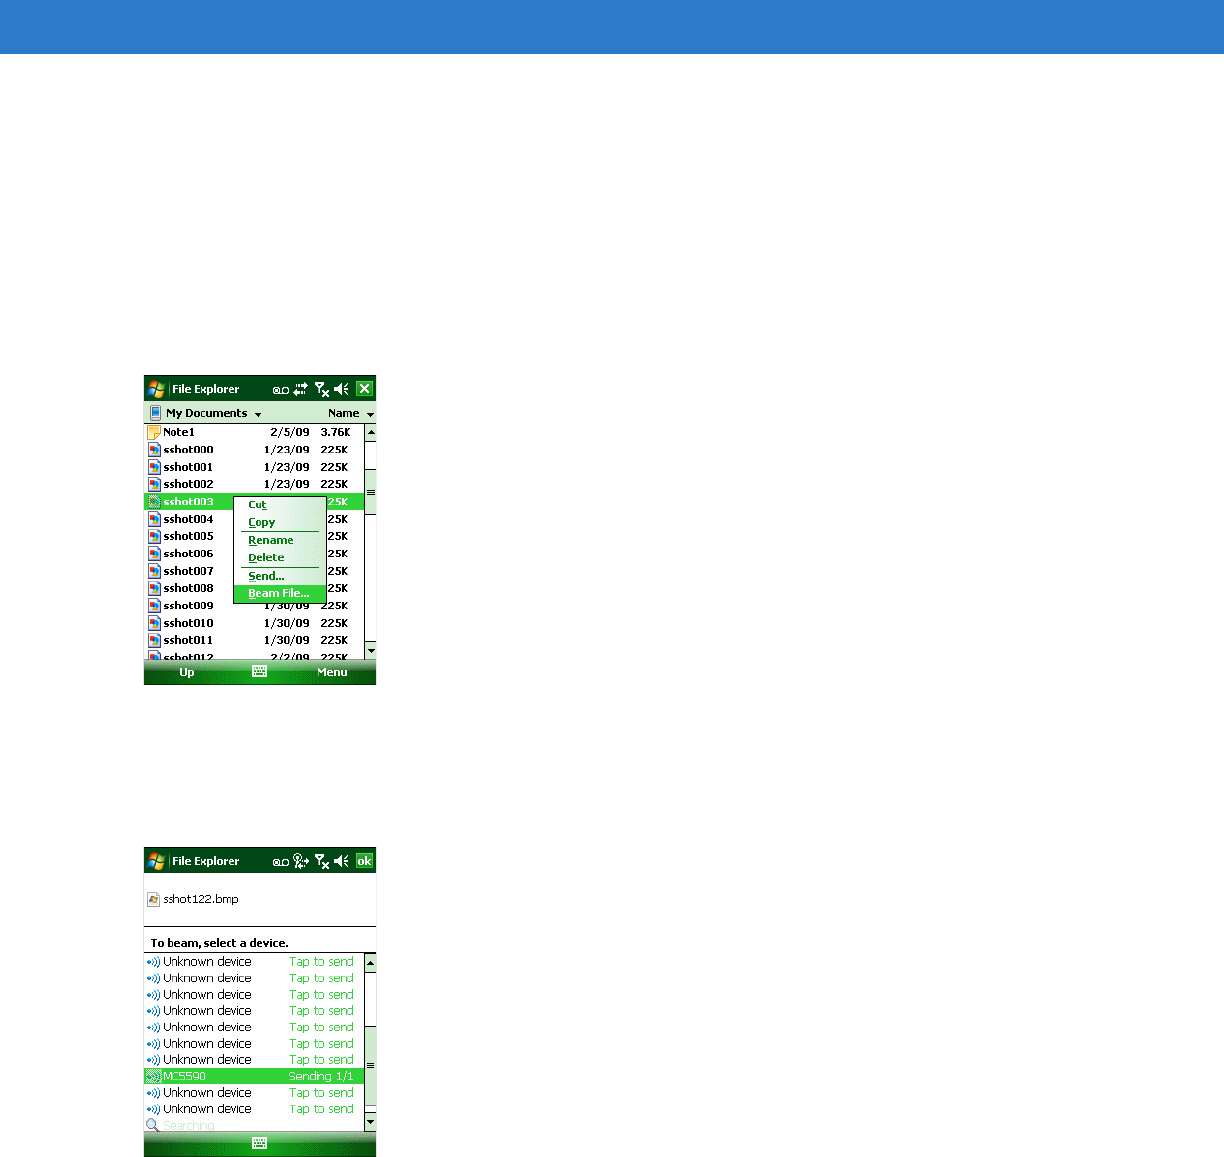
Figure 5-7
File Explorer Window
6. Select Beam File. The MC65 searches for Bluetooth devices in the area.
7. Tap Tap to send next to the Bluetooth device to send the file to. The MC65 communicates with the device and
send the file. When completed, Tap to send changes to Done.
Figure 5-8
Beam File Window
To transfer a contact between the MC65 and another Bluetooth enabled device:
1. Ensure that Bluetooth is enabled and discoverable on both devices.
2. Ensure that the two devices are within 30 feet (10 meters) of one another.
3. Tap Start > Contacts
4. Navigate to the contact to transfer.
Preliminary

Using Bluetooth 5 - 9
5. Tap and hold on the contact until the pop-up menu appears.
Figure 5-9
Contact Window
6. Select Send Contact > Beam. The MC65 searches for Bluetooth devices in the area.
7. Tap Tap to send next to the Bluetooth device to send the file to. The MC65 communicates with the device and
send the contact. When completed, Tap to send changes to Done.
Internet Sharing
Internet Sharing allows the user to connect a computer or laptop to the MC65 and use the MC65 as a modem to
connect to an office network or ISP.
To use MC65 as a modem using Bluetooth:
1. Ensure that the device is not connected to the computer or laptop.
2. On the MC65, ensure that the Phone is on and a data connection is configured.
3. Tap > Programs > Internet Sharing.
4. In the PC Connection list, select Bluetooth PAN.
5. In the Network Connection list, select the connection type.
Select the network connection that the device should use to connect to the Internet.
6. Tap Connect.
7. On the computer or laptop, setup a Bluetooth PAN with your device.
a. Select Start > Control Panel > Network Connections.
b. Under Personal Area Network, select Bluetooth Network Connection.
c. Right-click on Bluetooth Network Connection and select View Bluetooth network devices.
d. In the Bluetooth Personal Area Network Devices window select your device.
e. Click Connect. The computer connects to the device via Bluetooth.
8. To verify, on the PC or laptop, launch Internet Explorer and open a web site.
NOTE If your computer is Bluetooth-enabled and you select Bluetooth as the PC connection, you must initiate and
complete the Bluetooth PAN partnership before Internet Sharing will work. For more information, refer to
Windows Help and Support.
Preliminary
5 - 10 MC65 User Guide
9. To end dial-up networking, on the MC65 tap Disconnect.
Hands-free Services
To connect to a Bluetooth headset:
1. Ensure that Bluetooth is enabled and discoverable on both devices.
2. Ensure that the two devices are within 30 feet (10 meters) of one another.
3. Tap Start > Settings > Connections > Bluetooth icon.
4. Tap New device. The MC65 searches for Bluetooth devices in the area.
5. Select the headset name and tap Next. The Passcode window appears.
6. Enter the headset’s passcode.
7. Tap Next. The MC65 connects to the headset. Refer to the headset user manual for instructions on
communicating with a Bluetooth device.
Figure 5-10
WWAN Bluetooth Audio Notification Dialog Box
Serial Port Services
Use the wireless Bluetooth serial port connection as you would a physical serial cable connection. Configure the
application that will use the connection to the correct serial port.
To establish a serial port connection:
NOTE Newer Bluetooth headsets are device dependant and remember the last device they connected to. If problems
occur while connecting to the headset, place the headset in discovery mode. Refer to the headset user manual
for more information.
Only WAN audio is routed to the headset. System audio is still emitted through the MC65 speaker.
You can accept calls and re-dial using the Hands-free profile.
Hands-free profile does not support 3-way calling.
NOTE During an active connection, the MC65 cannot go into suspend mode when the Power Button is pressed.
A message appears notifying the user.
Once the WAN call is disconnected (with Hands-free profile) the Power button is enabled.
Headset icon
Preliminary

Using Bluetooth 5 - 11
1. Ensure that Bluetooth is enabled and discoverable on both devices.
2. Ensure that the two devices are within 30 feet (10 meters) of one another.
3. Tap Start > Settings > Connections tab > Bluetooth icon > Devices tab.
4. Tap Add new device. The MC65 begins searching for discoverable Bluetooth devices in the area.
5. Select a device from the list.
6. Tap Next. The Enter Passcode window appears.
7. Enter the Passcode and the tap Next. The device is added to the Bluetooth list.
8. In the device list, tap the serial device. The Partnership Settings window displays.
9. Select the Serial Port checkbox.
10. Ta p Save.
11. Tap COM Ports tab.
12. Ta p New Outgoing Port. The add device window appears.
13. Select the serial device in the list and then tap Next.
14. Select a COM port from the drop-down list.
15. Ta p Finish.
ActiveSync Using Serial Port Services
Use the wireless Bluetooth serial port connection for ActiveSync just as you would a physical serial cable
connection. You must configure the application that will use the connection to the correct serial port.
To set up a Bluetooth ActiveSync connection:
Before setting up a Bluetooth ActiveSync connection, configure the Bluetooth function of your device.
1. Ensure that Bluetooth is enabled and discoverable on both devices.
2. Ensure that the two devices are within 30 feet (10 meters) of one another.
3. On the computer, click Start > Settings > Control Panel.
4. Double-click Bluetooth Devices.
5. On the Options tab, select the Turn discovery on and Allow Bluetooth devices to connect to this
computer checkboxes.
NOTE If Smart-pairing is configured and the device is requesting one of the pre-defined PINs, the Enter
Passcode window does not appear.
NOTE No connection is made at this point. An application must open the selected COM port to trigger Microsoft
Bluetooth stack to open the connection.
NOTE For additional security, disable network bridging on the computer (specifically, bridging to a Remote NDIS
adapter) before connecting to the computer to pass though to the Internet or a network. For more information
on network bridging, see Windows Help on your computer.
The instructions below are for computers that support the Windows XP SP2 or later version operating system.
Preliminary