Zebra Technologies MD-ZBR5QLN Zebra Embedded BT radio User Manual 2 of 3
Zebra Technologies Corporation Zebra Embedded BT radio 2 of 3
Contents
- 1. User Manual 1 of 3
- 2. User Manual 2 of 3
- 3. User Manual 3 of 3
User Manual 2 of 3
31
QLn Series User Guide
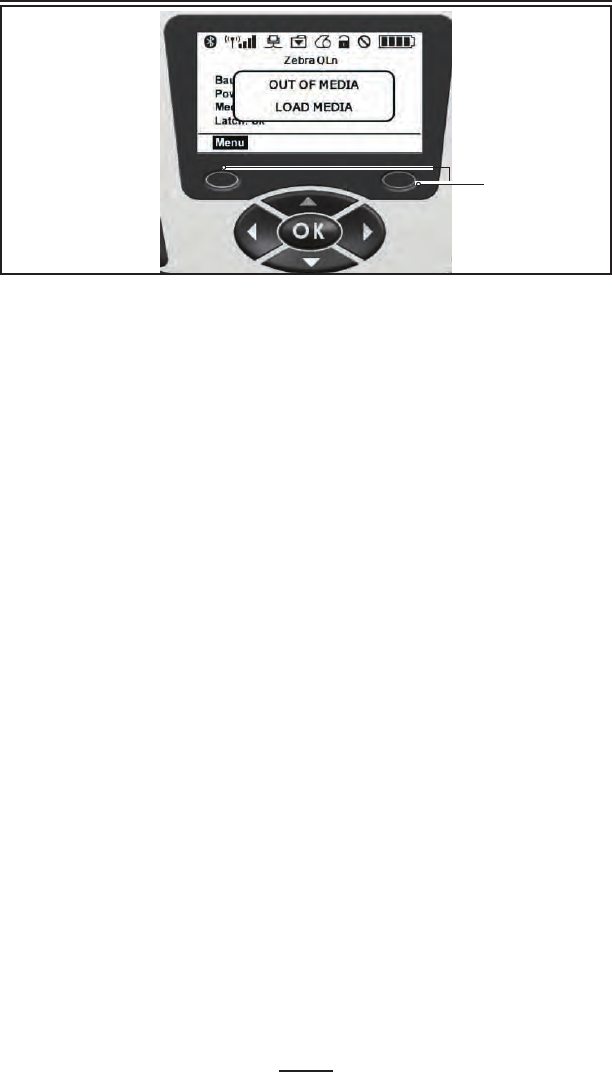
Programmable LCD Settings
In addition to the status icons, the LCD control panel can display
other printer settings and functions as text. Applications can be writ-
ten to allow the user to view and /or modify these settings using the
scroll and select keys on the display. The menu that comes with the
printer provides access to the most commonly used parameters. Refer
to the CPCL Programming Manual for a complete list of the param-
eters, and for details on how to change the front panel display (p/n
PROMAN-CPCL at www.zebra.com/manuals).
The LCD backlighting option allows viewing of the screen in a dark
environment, or provides better contrast in a very bright environ-
ment. The QLn320 can be programmed to enter a low power mode
(Backlight Off) during periods of front panel inactivity. While in low
power mode, the screen is populated with menus and status icons,
data which may or may not be readable depending on ambient light
conditions.
The QLn320 provides a configurable time delay from the time the
backlight is turned on to when it turns off. The time range for this de-
lay is 5 to 1200 seconds with a default time of 10 seconds. The back-
light can be activated within one second after any of the cursor, select,
or soft keys is pressed. (The feed button does not activate the back-
light.) The status bar icons, the user space content, and the navigation
bar will remain on the screen with the backlight off.
Extensive use of the display backlight will decrease the time
the printer can run between charges. Refer to the section
“Extending Battery Life” for more information.
Soft Keys

32
QLn Series User Guide
Verify the Printer Is Working
Before you connect the printer to your computer or portable data
terminal, make sure that the printer is in proper working order. You
can do this by printing a configuration label using the “two key” meth-
od. If you can’t get this label to print, refer to “Troubleshooting”.
Printing a Conguration Label
1. Turn the printer off. Load the media compartment with
journal media (media with no black bars printed on the
back)
2. Press and hold the Feed Button.
3. Press and release the Power button and keep the Feed
button pressed. When printing starts, release the Feed
button.
The unit will print a line of interlocking “x” characters to
ensure all elements of the print head are working, print out the
version of software loaded in the printer and then print two re-
ports.
The report indicates model, serial number, baud rate, and more
detailed information on the printer’s configuration and parameter set-
tings. (See the Troubleshooting Section for sample printouts and a fur-
ther discussion on how to use the configuration label as a diagnostic
tool.)
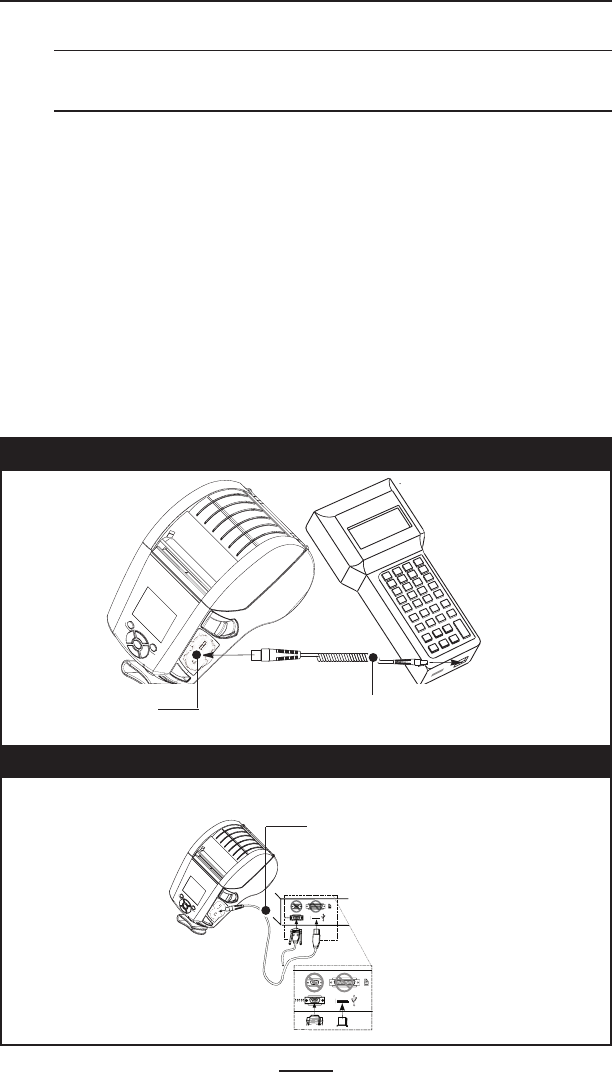
Connecting the Printer
The printer must establish communications with a host ter-
minal which sends the data to be printed. Communications
occur in four basic ways:
• QLn320 printers can communicate by cable via either RS-232C or
USB 2.0 protocols. USB drivers are included in the Zebra Designer
Driver which can be downloaded from www.zebra.com/drivers.
• By means of a Bluetooth™ short range radio frequency link.
(Optional)
• By means of a wireless LAN (Local Area Network) per 802.11 spec-
ifications. (Optional)
• By means of the Ethernet when docked on the Ethernet cradle.
(Optional)
33
QLn Series User Guide
Cable Communication
Caution • The printer should be turned o before connecting or
disconnecting a communications cable.
The QLn320 printer can communicate by cable; the specific
cable supplied with your printer will vary with the host termi-
nal and your model printer.
RS-232C Communications
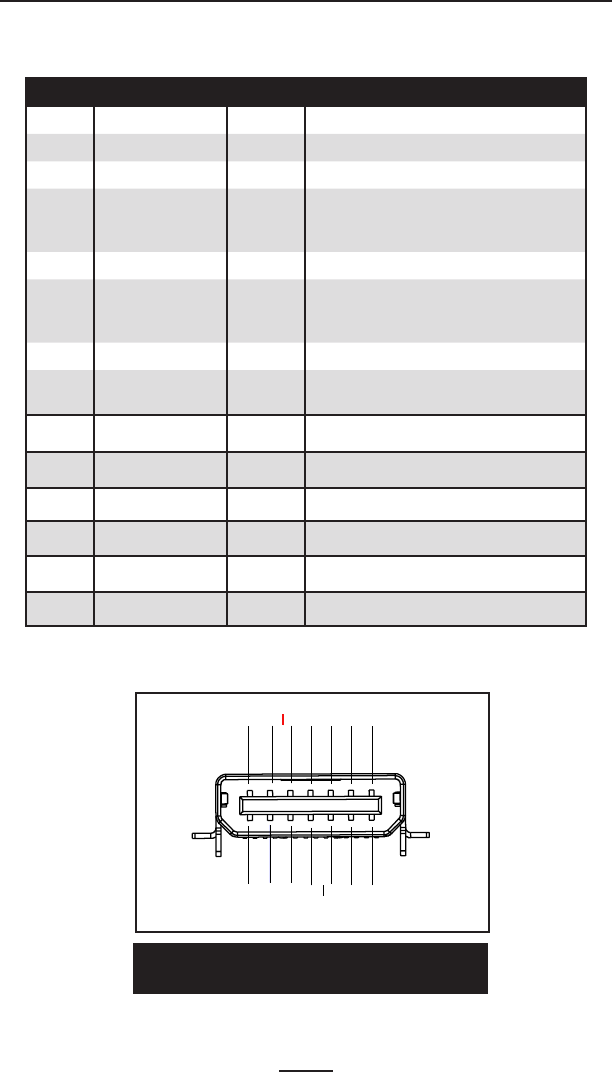
The 14-pin serial connector on your communications cable plugs
into the serial communications port on the side of the printer. QLn320
model printers also have a USB port.
USB Communications
The small 5-pin connector on the USB cable plugs into the
printer. The connectors are keyed to assure correct align-
ment; do not try to force the cable if it does not plug in. The
Communications Cable to Terminal
Part numbers vary. Refer to Appendix A.
RS-232C or USB Communications
Cable to Computer
Refer to Appendix A for part numbers.
Figure 17: Cable Communications
Figure 18: Communications with a P.C.
Communications
Port
34
QLn Series User Guide
other end of the cable must be plugged into the host terminal
as shown in Figure 18, or to a serial or USB port on a comput-
er (Figure 18). The QLn320 series is configured with the USB
Open HCI interface driver allowing it to communicate with
Windows® based devices.
USB drivers are included in the Zebra Designer Driver which can be
downloaded from the Zebra Web site. Other terminals or communica-
tions devices may require the installation of special drivers to use the
USB connection. Consult the factory for further details.
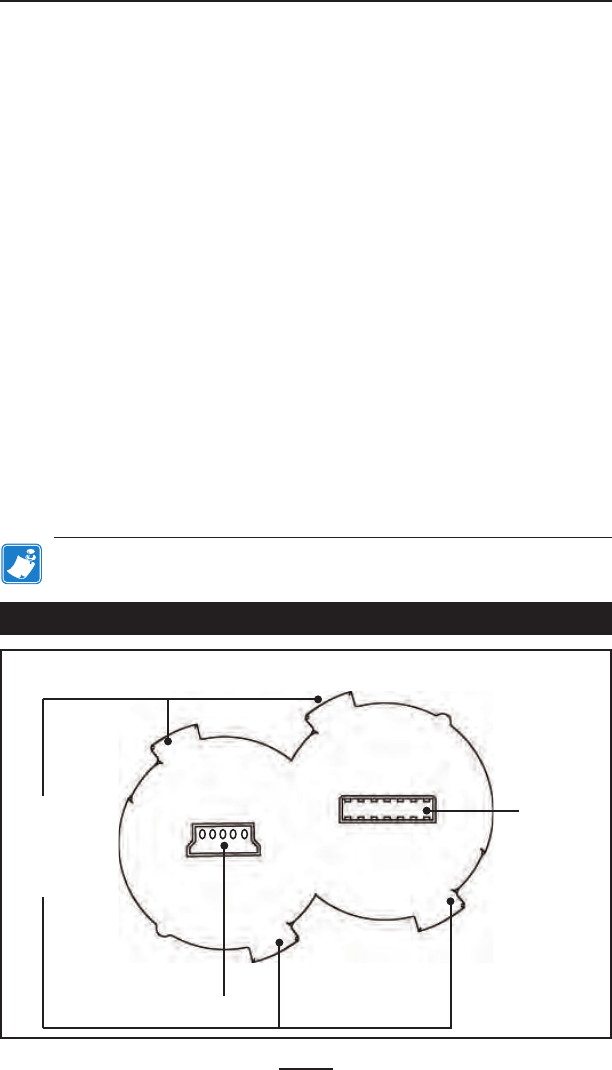
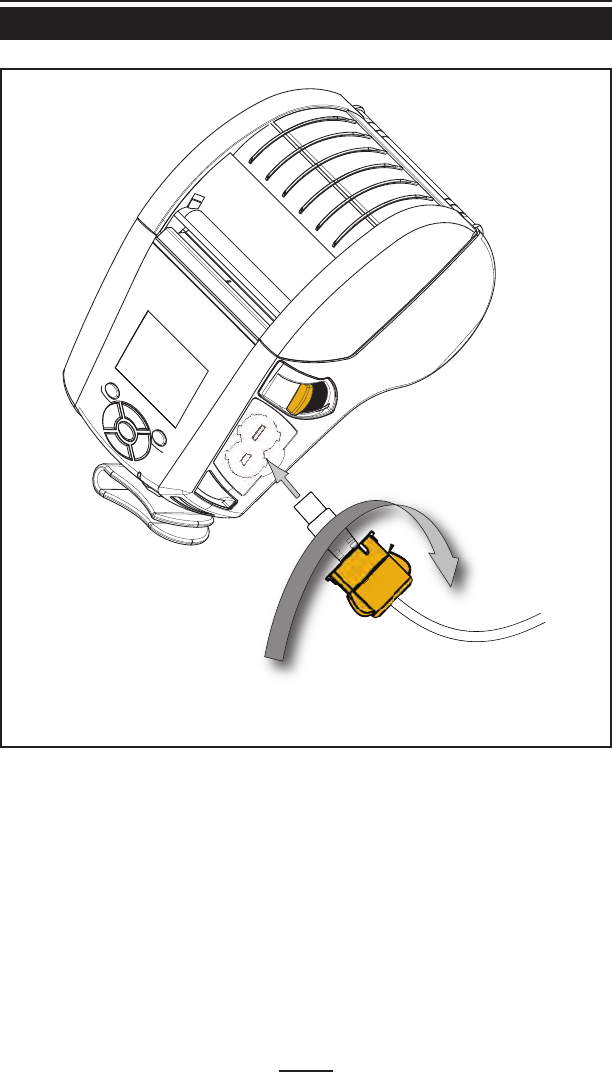
Providing Strain Relief for Communications Cable
If you are connecting either a USB or RS-232 communications cable
to the printer permanently, access the communications port on the
side of the printer next to the latch release lever. Plug the connector
into the appropriate port and align the plastic locking cap with the cut
outs shown below. Rotate the locking cap clockwise to lock the cable
in place. (Turn counterclockwise to unlock the cable.) Once locked in
place, this provides strain relief for the cable and will prevent the cable
from disconnecting from the printer.
Note: Only one cable can be present in the USB/RS-232
USB Port
RS-232 Port
Align locking
connector
with these
cut-outs.
Figure 19: Communications Port
35
QLn Series User Guide
Figure 20: Communications Port Strain Relief
Rotate locking cap in a
clockwise direction to lock
cable in place.

36
QLn Series User Guide
Wireless Communications with Bluetooth™
Bluetooth is a worldwide standard for the exchange of data be-
tween two devices via radio frequencies. Bluetooth radios are
relatively low powered to help prevent interference with other de-
vices running at similar radio frequencies. This limits the range of a
Bluetooth device to about 10 meters (32 feet). Both the printer and
the device it communicates with must follow the Bluetooth standard.
Other than conditions specified elsewhere in this manual, only one of
the radio options can be installed in the printer at one time and the
antenna used for these transmitters must not be co-located or must
not operate in conjunction with any other antenna.
Bluetooth Networking Overview
Each Bluetooth enabled QLn320 printer is identified by a unique
Bluetooth Device Address (BDA). In order to exchange data, two
Bluetooth enabled devices must establish a connection.
Bluetooth software is always running in the background,
ready to respond to connection requests. One device (known
as the master or the client) must request a connection with an-
other. The second device (the slave or the server) then accepts
or rejects the connection. A Bluetooth enabled QLn320 print-
er will normally act as a slave creating a miniature network
with the terminal sometimes referred to as a “piconet”.
For the most part, communications using the Bluetooth pro-
tocol are initiated and processed without any operator inter-
vention.
continued

37
QLn Series User Guide
WLAN Overview
QLn320 printers can be equipped with a radio using the in-
dustry standard 802.11 protocols. They will have the FCC ID
number on the serial number label on the back of the unit.
• QLn320 series Wireless Network Printers with the Zebra 802.11
WLAN radio module can be identified by the text “Wireless
Network Printer” on the serial number label on the back of the
printer.
• These printers allow wireless communication as a node within a
local area network (LAN) and its wireless capabilities allow com-
munications from any point within the LAN’s perimeter. Methods
of establishing communications to the printer will vary with
each LAN application.
General information on establishing WLAN communications can be
found in either the ”CPCL Programming Manual” or the “Quick Start
Guide for Mobile Wireless Printers” both available on-line. More in-
formation and LAN configuration utilities are included in Zebra’s Net
Bridge™ program (version 2.8 and later). Net Bridge may be down-
loaded from the Zebra Web site.
Setting Up the Software
QLn320 printers use Zebra’s CPCL and ZPL Programming languages
which were designed for mobile printing applications. CPCL and ZPL
are fully described in the ”CPCL Programming Manual” and the “ZPL
Programming Guide” available on-line at www.zebra.com/manuals.
You can also use Designer Pro, Zebra’s Windows® based label cre-
ation program which uses a graphical interface to create and edit la-
bels in the CPCL language.
Refer to Appendix F for tips on downloading the Designer Pro appli-
cation from Zebra’s Web site.
38
QLn Series User Guide
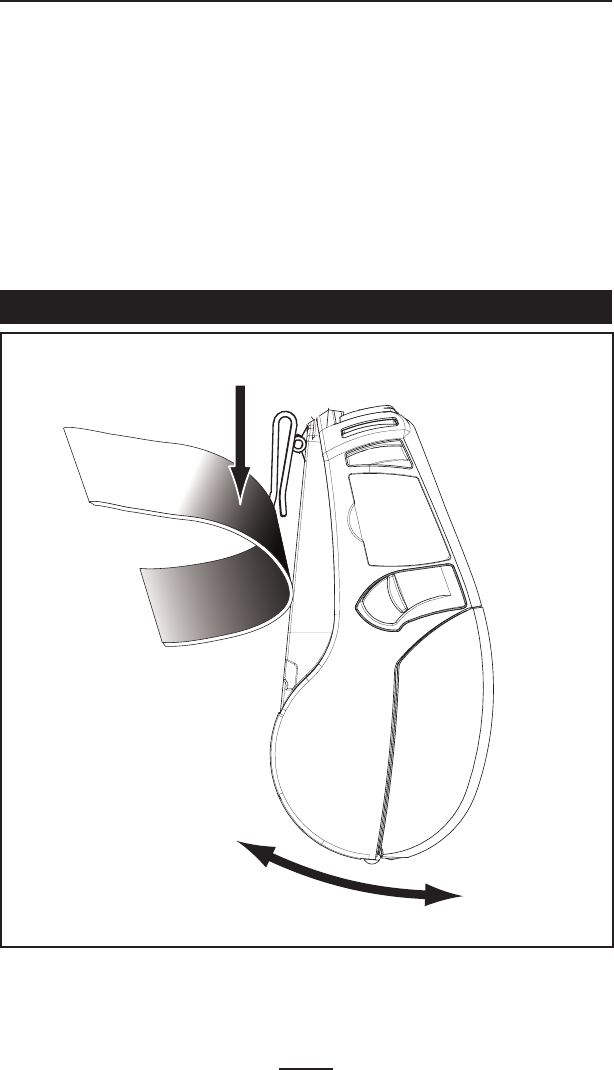
Using the Accessories
Swivel Belt Clip
Refer to Figure 21. Most QLn320 printers have a belt clip
(p/n P1024458) installed as a standard feature. To use: hook
the clip over your belt, and ensure that the clip is securely at-
tached to the belt. The belt clip will pivot to allow you to move
freely while wearing the printer.
In order to install or remove the Belt Clip you will need to remove
the battery pack.
Belt
Printer can
pivot freely
Figure 21: Using the Belt Clip
Clip printer to
belt
39
QLn Series User Guide
continued
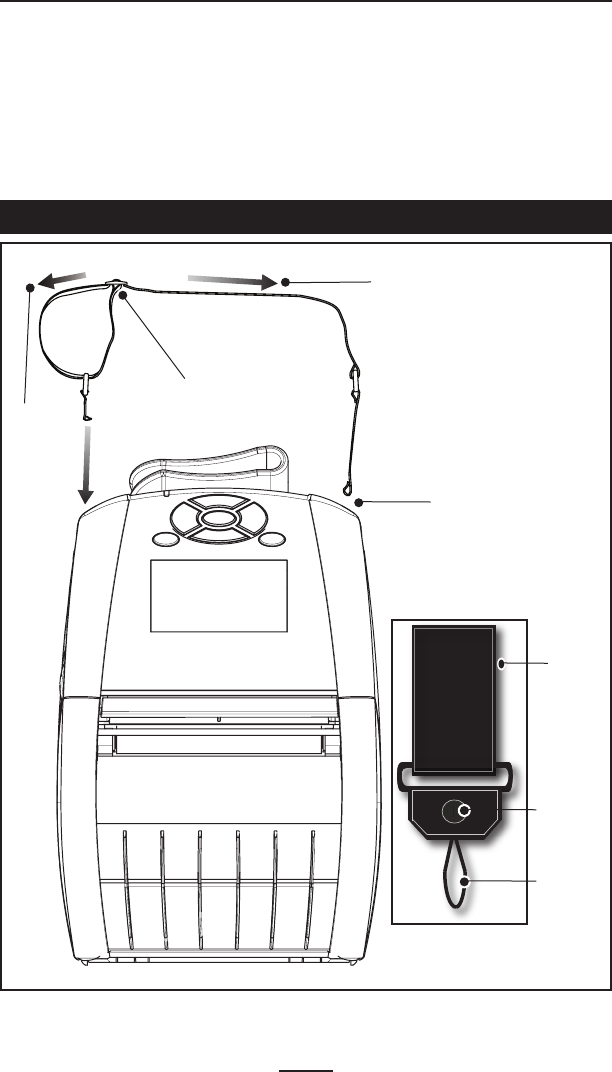
Adjustable Shoulder Strap
Refer to Figure 22 if your printer is equipped with the shoul-
der strap option (p/n P1028227). Insert each end of the shoul-
der strap into the cut-outs in each top corner of the printer and
secure the looped end over the button on the end of the strap
to fasten.
Hold the buckle and pull the strap as shown below until you achieve
End of
strap
Button
Loop
Hold Buckle.
Pull Strap here
to lengthen.
Pull
Strap
here to
shorten. Insert loop into
cut-outs on
printer.
Figure 22: Using the Optional Shoulder Strap
40
QLn Series User Guide
the desired length.
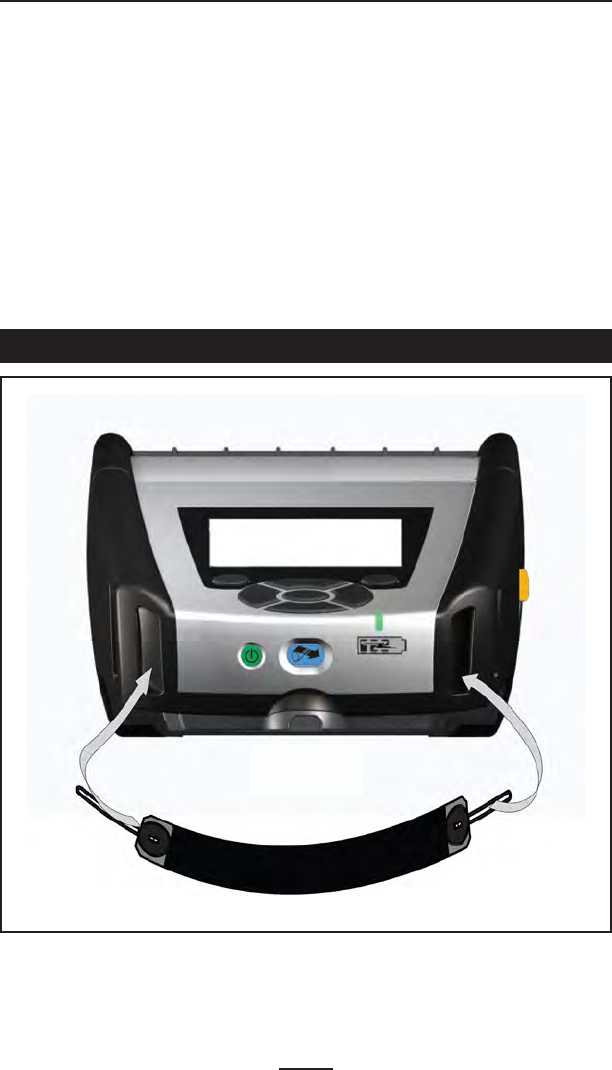
Hand Strap
The QLn320 hand strap accessory (p/n P1028226) attaches to the
printer’s cut-outs as does the shoulder strap to provide the user with
a convenient and secure method of carrying the printer. To attach the
hand strap to the printer:
• Insert the end of the strap through the cut out on the front of the
printer as shown.
• Loop the end of the strap back around the cut out and secure it
over the button.
• Repeat this process for the opposite end of the strap.
The QLn320 printer also features two mounting holes on the
base of the printer to accommodate future mounting options.
Figure 23: Detachable Hand Strap
Loop strap into
cut-outs on
printer.

41
QLn Series User Guide
Preventive Maintenance
Extending Battery Life
• Never expose the battery to direct sunlight or tempera-
tures over 104° F (40° C).
• Always use a Zebra charger designed specifically for Lithium-Ion
batteries. Use of any other kind of charger may damage the bat-
tery.
• Use the correct media for your printing requirements. An
authorized Zebra re-seller can help you determine the op-
timum media for your application.
• If you print the same text or graphic on every label, con-
sider using a pre-printed label.
• Choose the correct print darkness, and print speed for
your media.
• Use software handshaking (XON/XOFF) whenever possi-
ble.
• Remove the battery if the printer won’t be used for a day or more
and you’re not performing a maintenance charge.
• Consider purchasing an extra battery.
• Remember that any rechargeable battery will lose its
ability to maintain a charge over time. It can only be re-
charged a finite number of times before it must be re-
placed. Always dispose of batteries properly. Refer to
Appendix E for more information on battery disposal.
General Cleaning Instructions
Caution • Avoid possible personal injury or damage to the printer: never
insert any pointed or sharp objects into the printer.
Always turn the printer o before performing any cleaning
procedures.
Use care when working near the tear bar. The edges are very sharp.
Caution • The printhead can be very hot after prolonged printing.
Allow it to cool o before attempting any cleaning procedures.
Only use the cleaning pen supplied with the printer or a cotton swab
saturated with alcohol for cleaning the printhead.
Caution • Use only cleaning agents specied in the following tables.
Zebra Technologies Corporation will not be responsible for damage
caused by any other cleaning materials used on this printer.
42
QLn Series User Guide
QLn320 Cleaning
Area Method Interval
Printhead (Figure 24)
Use the supplied cleaning pen or 70%
Isopropyl alcohol on a cotton swab to
clean the print elements from end to
end (the print elements are located in
the thin gray line on the printhead). After every five rolls of
media (or more often, if
needed),
Linerless media requires
more frequent cleaning
Platen Roller (Figure 24)
Rotate the platen roller and clean it
thoroughly with the cleaning pen or
70% Isopropyl alcohol and a cotton
swab.
Platen Roller (Figure 25)
Units with linerless platens: Rotate
platen & clean bearing points only.
Avoid use of alcohol on the surface
of linerless platens
Peel bar (Figure 24) Clean thoroughly with the cleaning pen
or 70% Isopropyl alcohol and a cotton
swab.
As needed
Tear bar (Figure 24) As needed
As needed
Exterior Water-dampened cloth or 70%
Isopropyl alcohol wipe.
Interior (Figure 24)
Brush/air blow. Ensure the Bar
Sensor, Gap Sensor and Label
Present Sensor windows are free
of dust.
Units with linerless platens: Clean inside
surfaces of edge guides & media rollers
with the supplied cleaning pen or 70%
Isopropyl alcohol on a cotton swab.
After every five rolls of
media (or more often, if
needed)
Interior (Figure 25)
43
QLn Series User Guide
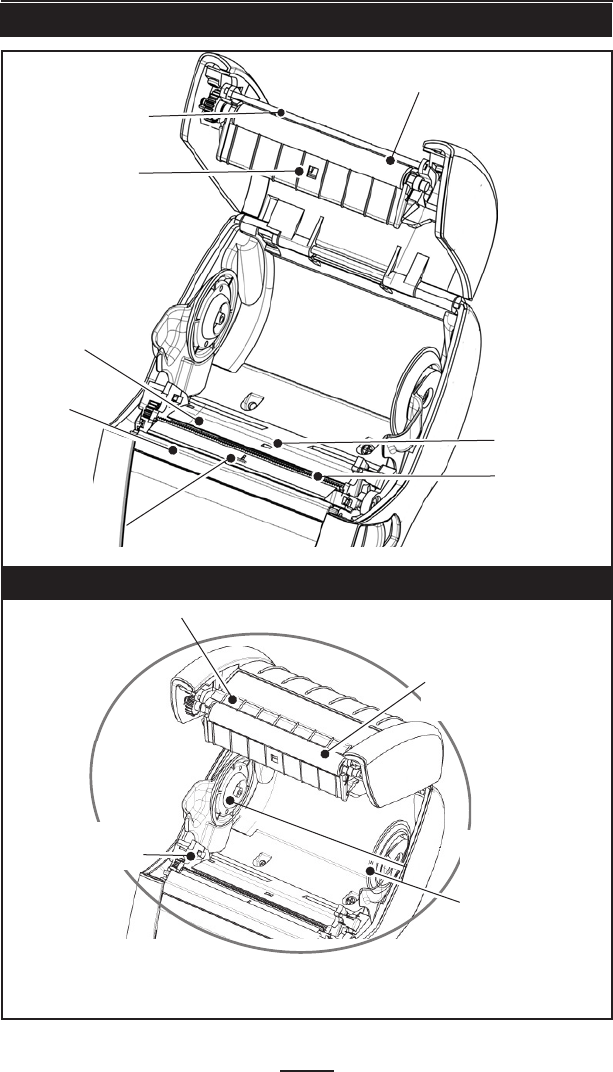
Figure 24: Cleaning the QLn320
Printhead
Elements
Peeler Bar
Platen surface
Avoid using alcohol
on linerless platen
surface.
Tear Bar
Label
Presence
Sensor
Bar Sensor
Gap
Sensor
Media Support
Disks, Inner
surfaces on
both sides.
Linerless units only.
Platen surface
Peeler
Bar
Figure 25: Cleaning the Linerless QLn320
Bearing Points
Linerless Platens only
Scraper
44
QLn Series User Guide
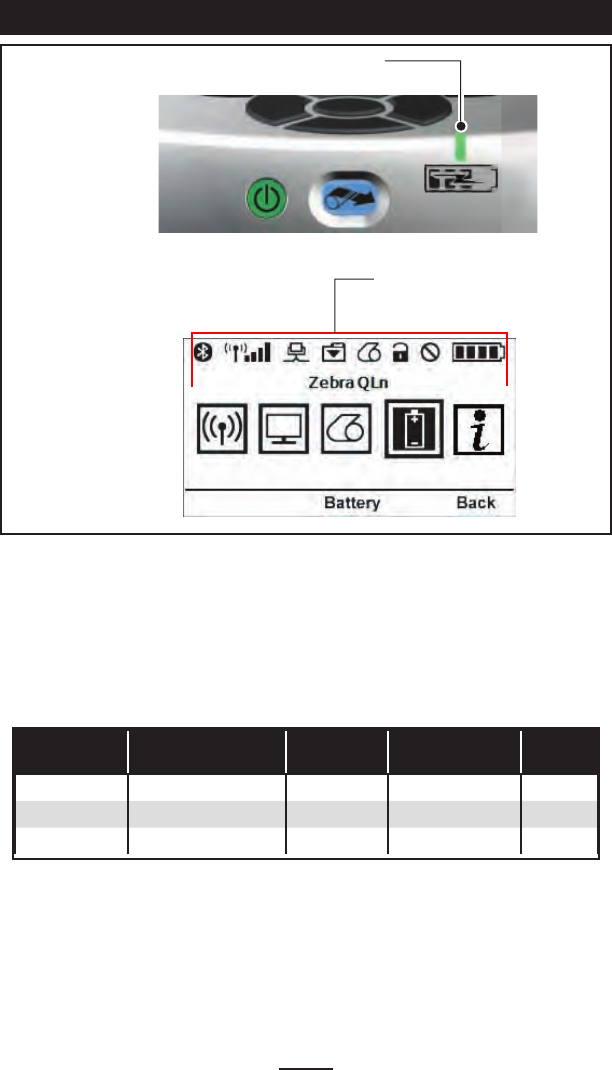
Troubleshooting
Figure 26 QLn320 Control Panels
Front Control Panel
If the printer is not functioning properly, refer to the chart
below to find the state of the LED charge indicator on the
Front Control Panel. Then refer to the Troubleshooting topic
referenced in the chart to resolve the problem.
Green Yellow Amber Indication Ref. to
Topic
Solid Off Off Fully charged n/a
Off Solid Off Charging n/a
Off Off Solid Fault 1, 6, 12
Front Control Panel
LCD Control Panel
Green/Yellow/
Amber LED
Status icons
45
QLn Series User Guide
LCD Control Panel Indicators
The top of the display shows several icons which indicate
the status of various printer functions. Check the indicator sta-
tus, then refer to the Troubleshooting topic referenced in the
chart to resolve the problem.
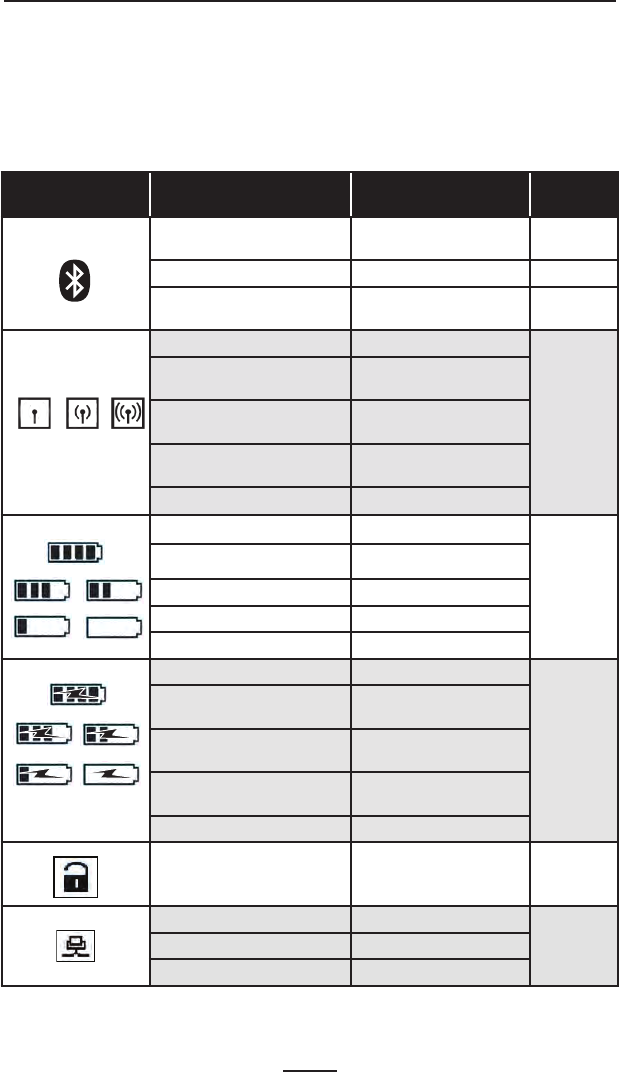
Icon Status Indication Topic
#
On Bluetooth Link estab-
lished n/a
Not Present Bluetooth Link inactive 6
Blinking Connecting or Trans-
mitting Labels
Antenna Blinking Looking for AP
6
Antenna Blinking/1 Parenthe-
sis Solid
WLAN Associated & At-
tempting Authentication
Antenna and 2 Parentheses
Solid
WLAN Associated and
Authenticated
Antenna and 2 Parentheses
Blinking Receiving Data
Not Present No Radio Present
4 Bars >80% Charged
3, 6, 7, 8
3 Bars 60%-80% Charged
2 Bars 40%-60% Charged
1 Bar 20%-40% Charged
0 Bars Low Battery
4 Blinking w/ Lightning Bolt Charging >80% Capacity
8
3 Blinking w/ Lightning Bolt Charging 60-80% Ca-
pacity
2 Blinking w/ Lightning Bolt Charging 40-60% Ca-
pacity
1 Blinking w/ Lightning Bolt Charging 20-40% Ca-
pacity
0 Bars w/ Lightning Bolt Charging <20% Capacity
Blinking Media cover open 10, 12
Blinking Receiving data
n/aSolid Ethernet Connected
Not Present No Ethernet Connection
continued
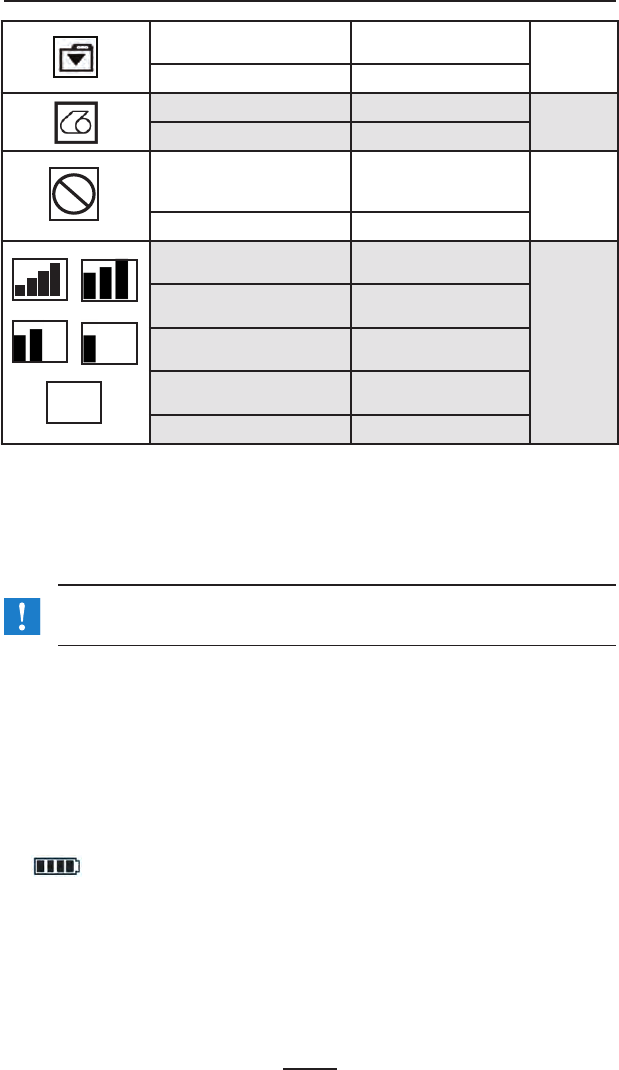
46
QLn Series User Guide
Blinking Data processing in
progress 9
Steady No data being processed
Blinking Out of Media
10,12
Steady Media present
Blinking
Error exists (excluding
Media Out and Head
Latch Open) 3,4,6,12
Not Present No error exists
4 Bars 802.11 signal strength
> 75%
6,12
3 Bars 802.11 signal strength
</= 75%
2 Bars 802.11 signal strength </=
50% but >25%
1 Bar 802.11 signal strength
</= 25%
0 Bars No Signal Strength
Troubleshooting Topics
1. No power
• Check that battery is installed properly.
• Recharge or replace battery as necessary.
Always dispose of batteries properly. Refer to Appendix E for more
information on proper battery disposal.
2. Media does not feed:
• Be sure print head is closed and latched.
• Check spindle holding media for any binding.
• Ensure most recently printed label is removed (only in peel mode).
• Also ensure label sensor is not blocked.
3. Poor or faded print:
• Clean print head.
• Check quality of media.
4. blinking
• Check battery and recharge or replace as necessary. Always
dispose of batteries properly. Refer to Appendix D for more
information on proper battery disposal.
5. Partial or missing print:
• Check media alignment
47
QLn Series User Guide
• Clean print head.
• Ensure printhead is properly closed and latched.
6. Garbled print:
• Check baud rate.
7. No print:
• Check baud rate.
• Replace battery.
• Check cable to terminal.
• Establish RF Link (Wireless units only) and/or restore LAN
associativity (Printers with WLAN radios only).
• Invalid label format or command structure. Place printer in
Communications Diagnostic (Hex Dump) Mode to diagnose
problem.
8. Reduced battery charge life
• Check battery date code — if battery is older than 1 year old, short
charge life may be due to normal aging.
• Check battery health.
• Replace battery.
9. ashing:
• If using wireless communications: flashing indicator is
normal while data is being transmitted or received.
10. or ashing:
• Check that media is loaded and that the media cover is closed and
securely latched.
11. Skips labels:
• Check media for top of form sense mark or label gap.
• Check that the maximum print field has not been exceeded
on label.
• Ensure bar or gap sensor is not blocked or malfunctioning
12. Communication error:
• Check baud rate.
• Replace cable to terminal.
13. Label jam:
• Open head release latch and media cover.
• Generously apply alcohol to printer in area of
jammed label.
14. Blank LCD screen
• No application loaded or application corrupted: reload
program.

48
QLn Series User Guide
Troubleshooting Tests
Printing a Conguration Label
To print out a listing of the printer’s current configuration fol-
low these steps:
1. Turn the printer off. Load the media compartment with
journal media (media with no black bars printed on the
back).
2. Press and hold the Feed Button.
3. Press and release the Power button and keep the Feed
button pressed. When printing starts, release the Feed
button.
Refer to Figures 27a, b, and c for sample configuration print-
outs.
Communications Diagnostics
If there is a problem transferring data between the computer
and the printer, try putting the printer in the Communications
Diagnostics Mode (also referred to as the “DUMP” mode). The
printer will print the ASCII characters and their text represen-
tation (or the period ‘.’, if not a printable character) for any data
received from the host computer.
To enter Communications Diagnostics Mode:
1. Print a configuration label as described above.
2. At the end of the diagnostics report, the printer will print: “Press
FEED key to enter DUMP mode”.
3. Press the FEED key. The printer will print: “Entering
DUMP mode”.
Note • If the FEED key is not pressed within 3 seconds, the printer
will print “DUMP mode not entered” and will resume normal
operation.
4. At this point, the printer is in DUMP mode and will print
the ASCII hex codes of any data sent to it, and their text
representation (or “.” if not a printable character).
Additionally, a file with a “.dmp” extension containing the
ASCII information will be created and stored in the printer’s
memory. It can be viewed, “cloned” or deleted using the Net
Bridge application. (Refer the Net Bridge documentation for

49
QLn Series User Guide
more information.)
To terminate the Communications Diagnostics Mode and re-
turn the printer to normal operations:
1. Turn the printer OFF.
2. Wait 5 seconds.
3. Turn the printer ON.
Contacting Technical Support
If the printer fails to print the configuration label, or you en-
counter problems not covered in the Troubleshooting Guide,
contact Zebra Technical Support. Technical Support ad-
dresses and phone numbers for your area can be found in
Appendix D of this manual. You will need to supply the fol-
lowing information:
• Model number and type (e.g. QLn320)
• Unit serial number (Found on the large label on the back of the
printer, also found in the configuration label printout.
• Product Configuration Code (PCC) (15 digit number found on the
label on the back of the unit)
50
QLn Series User Guide
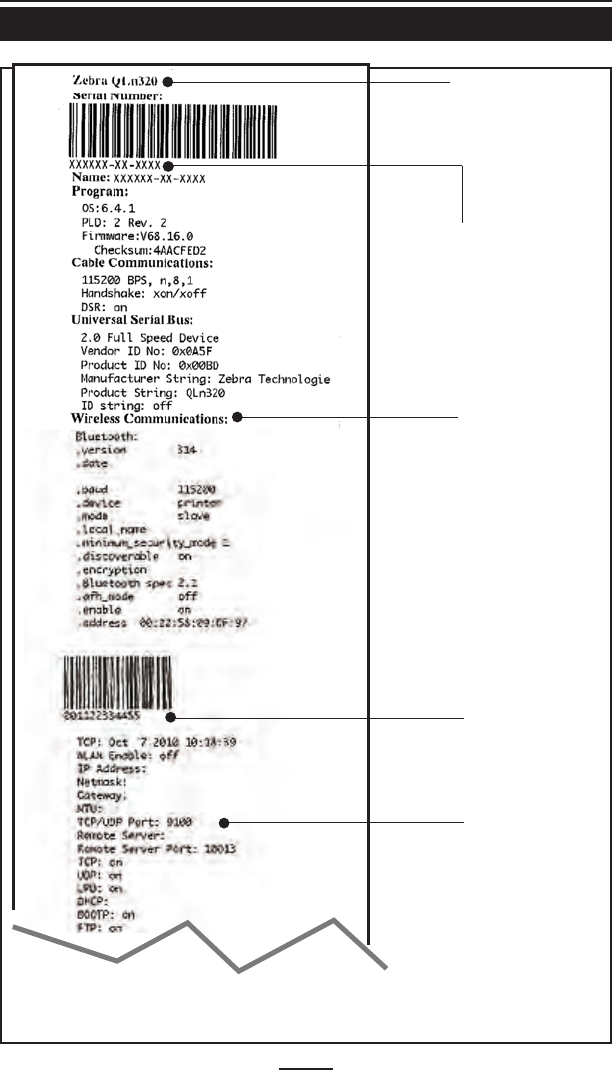
Figure 27a: QLn320 Conguration Label Example
Unit Serial
Number
Application
Number
Report appears
only on units
with wireless
options in-
stalled.
Units with no
wireless options
will print an
empty line and
resume.
Identifies
Printer as a
QLn320 series
This unit has a
802.11b/g radio
option installed.
This section
details the
radio’s network
settings.
51
QLn Series User Guide
continued
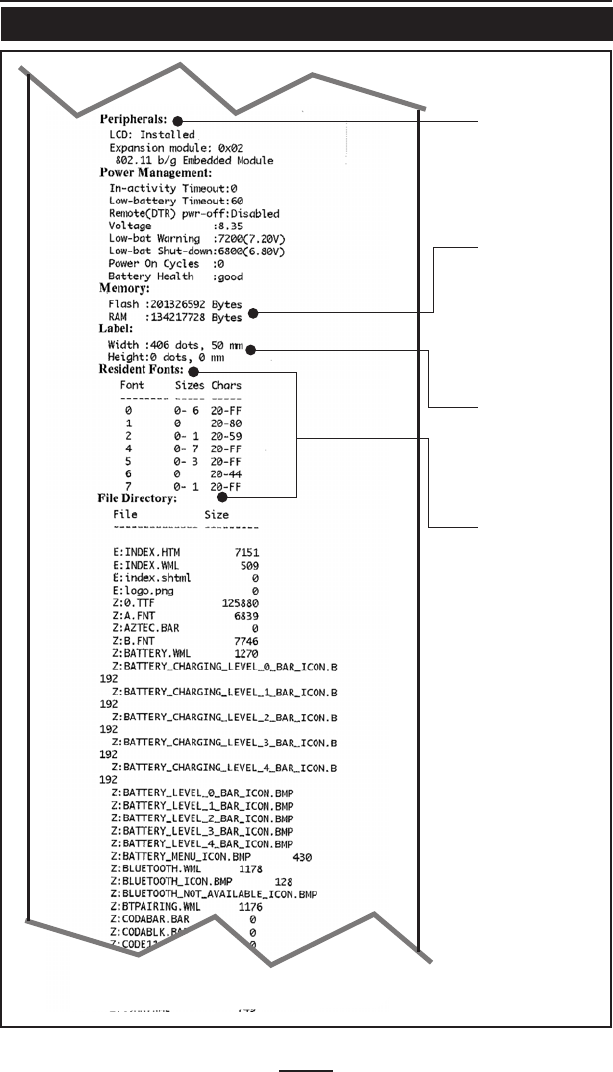
Figure 27b: QLn320 Conguration Label Example (continued)
Flash
and RAM
Memory
Installed
Maximum
Label Size
Resident
Human
Readable
fonts
installed.
Peripherals
installed: In
this example
the 802.11
option is
installed.
52
QLn Series User Guide
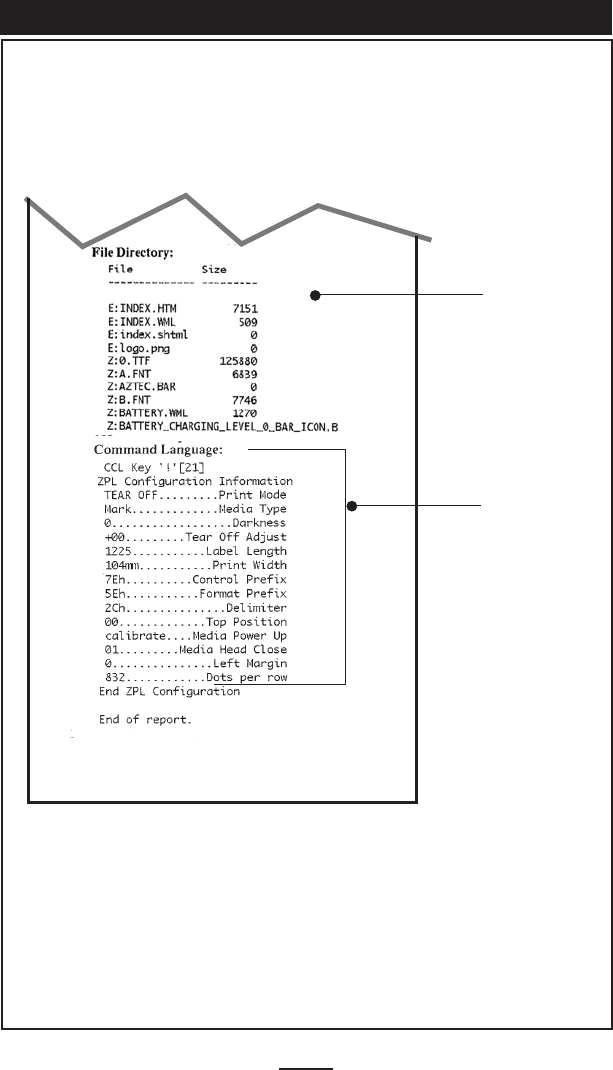
Figure 27c: QLn320 Conguration Label Example (continued)
Files Loaded
in Printer
Memory
(will include
Pre-scaled
or Scalable
Fonts).
ZPL is
standard
on QLn320
series.
53
QLn Series User Guide
Specifications
Note.- Printer specications are subject to change without notice.
Printing Specications
Pa
Parameter QLn320
Print Width Up to 2.91 in. (73,9 mm)
Print Speed 4 in./second (101,6 mm/second) without peeler
2 in./second (50,8 mm/second) with peeler
Distance from Print Element
to Top of Form 0.571 in. (14,5 mm) 116 dots
Print Head Life, calculated 1 million inches of paper fed
Print Density 203 dots/in.
Memory and Communications Specications
Flash Memory 256 MB Flash 1
RAM Memory 128 MB RAM 1
Standard
Communications
RS-232 serial port (14 Pin serial connector)
Configurable Baud rate (from 9600 to 115.2 Kbps),
parity and data bits.
Software (X-ON/X-OFF) or hardware (DTR/
STR) communication handshake protocols.
USB 2.0 Full Speed Interface (12 Mbps)
Optional Wireless
Communications
Bluetooth v2.1 compatible 2.4 GHz SRRF link
Optional wireless LAN capabilities comply
with802.11b/g protocols
Real Time Clock (RTC)
Time and date under application control. Refer to
CPCL and ZPL Programming Manuals, available at
www.zebra.com/manuals for RTC commands.
Ethernet 10 or 100 mps Ethernet auto detect when docked in
cradle.
1. Memory configuration on your printer may be ascertained by printing a configuration
label as detailed on pages 48.
54
QLn Series User Guide
Label Specications
Parameter QLn320
Media Width 1.0 in. to 3.125 in. (38,1 to 78,4 mm)
Max/Min Label Length 0.5 in. minimum to 32 in. maximum
Inter-label Gap. 0.08 in. to 0.16 in. (.12 in. preferred)
(2 mm to 4 mm, 3 mm preferred)
Label Thickness 0.0023 in to 0.0065 in (0.058 mm to 0.165 mm)
Tag Thickness 0.0060 in. (0.152 mm) maximum
Max. Label Roll dia. 2.63 in. (66,8 mm) O.D.
Label Inner Core** 0.75 in. (19 mm) or 1.38 in (35,05 mm) minimum dia. for linered
1.38 in. (35,05 mm) minimum dia. for linerless media
Black Mark Dimensions The reflective media black marks should be centered
on the media roll.
Media Requirements
Minimum mark width: 0.5 in. (12,7 mm) perpendicular
to inside edge of media, centered within the width of
the roll.
Mark length: 0.12 in. to 0.43 in. (3-11 mm) parallel to
inside edge of media
Use Zebra brand direct thermal media that is outside wound. Media
may be reective (black mark) sensing, or transmissive (gap) sensing,
die-cut, continuous, or linerless.
For die-cut labels, use only full auto dies.
** QLn320 supports coreless media which is 0.75 in. (19 mm) in diameter.
55
QLn Series User Guide
CPCL Font and Bar Code Specications and Commands
Standard Fonts
25 bit-mapped fonts; 1 scalable font (CG Trimvirate Bold
Condensed*) *Contains UFST from Agfa Monotype Corporation
Downloadable optional bit-mapped & scalable fonts via Net
Bridge software.
Available Optional Fonts
Optional International character sets: Chinese 16 x 16 (trad), 16
x 16 (simplified),24 x 24 (simplified); Japanese 16 x 16, 24 x 24;
Hebrew/Arabic
Linear Bar Codes Available
Barcode (CPCL Command)
Aztec (AZTEC)
Codabar (CODABAR, CODABAR 16)
UCC/EAN 128 (UCCEAN128)
Code 39 (39, 39C, F39, F39C)
Code 93 (93)
Code 128 (128)
EAN 8, 13, 2 and 5 digit extensions (EAN8, EAN82, EAN85, EAN13,
EAN132, and EAN135)
EAN-8 Composite (EAN8)
EAN-13 Composite (EAN13)
Plessey (PLESSEY)
lnterleaved 2 of 5 (I2OF5)
MSI (MSI, MSI10, MSI1110)
FIM/POSTNET (FIM)
TLC39 (TLC39)
UCC Composite A/B/C (128(Auto))
UPCA, 2 and 5 digit extensions (UPCA2 and UPCA5)
UPCA Composite (UPCA)
UPCE, 2 and 5 digit extensions (UPCE2 and UPCE5)
UPCE Composite (UPCE)
2-D Bar Codes Available
MaxiCode (MAXICODE)
PDF 417 (PDF-417)
Datamatrix (using ZPL emulation) (DATAMATRIX)
QR Code (QR)
RSS:
RSS-14 (RSS-Subtype 1)
RSS-14 Truncated (RSS-Subtype 2)
RSS-14 Stacked (RSS-Subtype 3)
RSS-14 Stacked Omnidirectional (RSS-Subtype 4)
RSS Limited (RSS-Subtype 5)
RSS Expanded (RSS-Subtype 6)
Rotation Angles 0°, 90°, 180°, and 270°
56
QLn Series User Guide
ZPL Font and Bar Code Specications and Commands
Standard Fonts
15 bit-mapped fonts; 1 scalable font (CG Trimvirate Bold
Condensed*)
Downloadable optional bit-mapped & scalable fonts via
Net Bridge software.
Available Optional Fonts
Zebra offers font kits covering multiple languages including
Simplified and Traditional Chinese, Japanese, Korean,
Hebrew/Arabic, and others.
Linear Bar Codes Available
2-D Bar Codes Available
Barcode (ZPL Command)
Aztec (^B0)
Codabar (^BK)
Codablock (^BB)
Code 11 (^B1)
Code 39 (^B3)
Code 49 (B4)
Code 93 (^BA)
Code 128 (^BC)
DataMatrix (^BX)
EAN-8 (^B8)
EAN-13 (^BE)
GS1 DataBar Omnidirectional (^BR)
Industrial 2 of 5 (^BI)
lnterleaved 2 of 5 (^B2)
ISBT-128 (^BC)
LOGMARS (^BL)
Micro-PDF417 (^BF)
MSI (^BM)
PDF-417 (^B7)
Planet Code (^B5)
Plessey (^BP)
Postnet (^BZ)
Standard 2 of 5 (^BJ)
TLC39 (^BT)
UPC/EAN extensions (^BS)
UPC-A (^BU)
UPC-E (^B9)
Maxi Code (^BD)
QR Code (^BQ)
Rotation Angles 0°, 90°, 180°, and 270°
*Contains UFST from Agfa Monotype Corporation
57
QLn Series User Guide
Communications Ports
RS-232C
Pin# Signal Name Type Description
1CTS input Clear To Send from host
2 TXD output Transmit Data
3RXD input Receive Data
4DSR input Data Set Ready: low to high transition
turns printer on, high to low transition
turns printer off (if enabled)
5 GND Ground
6DTR output Data Terminal Ready: set high when
printer is on.
Switched 5V (300mA max)
7N/A Do Not Use
8RTS output Request To Send set high when printer is
ready to accept a command or data
9 N/A Do Not Use
10 N/A Do Not Use
11 N/A Do Not Use
12 N/A Do Not Use
13 N/A Do Not Use
14 N/A Do Not Use
8
2
5
3
1
4
10
12
14 13
11
9
7
6
Figure 28: RS-232C Communications Port
58
QLn Series User Guide
Physical, Environmental and Electrical Specications
Parameter QLn320
Weight w/
battery,excluding
media & wireless
options.
1.60 lbs. (0.75 kg.)
Temperature
Operating : -4° to 122° F (-20° to 50° C)
Storage: -13° to 149° F (-25° to 65° C) Range
Charging: 32° to 104° F (0° to 40° C)
Relative Humidity Operating: 10% to 80% (non-condensing)
Storage: 10% to 90% (non-condensing)
Battery Lithium-Ion, 7.4 VDC (nominal); 2.45 AHr min.
Intrusion
Protection (IP)
Rating
IP14 (without optional environmental case)
IP54 (with case)
USB
Pin
Pin # Signal Name Type Description
1 VBUS - USB Bus Power
2 USB - bi-directional I/O signals
3 USB + bi-directional I/O signals
4 USB_ID - Identifies A/B connector
5 Return Ground
Figure 29: USB Communications Port
51

59
QLn Series User Guide
OK
ZEBRAQLn320
Figure 30: QLn320 Overall Dimensions
3.15 in.
(76,9 mm)
4.65 in.
(117,9 mm)
6.85 in.
(173,7 mm)
Depth
Width Height

60
QLn Series User Guide
QLn320 Accessories
Description
Adjustable shoulder strap (p/n P1028227)
Hand Strap (p/n P1028226)
Protective soft case (p/n P1029820)
Extra battery packs (p/n P1023901)
Ethernet Cradle
Quad Ethernet Cradle
SC2 Smart Single Battery Charger
AC Power Adapter (p/n P1031365-024)
Model UCLI72-4 Quad Battery Charger
(100-240 VAC input)
Refer to Appendix A for information on Data I/O Cables
For more accessory kit details and order numbers, contact the factory
or your authorized Zebra re-seller.
61
QLn Series User Guide
Appendix A
Interface Cables
RS232 Cables
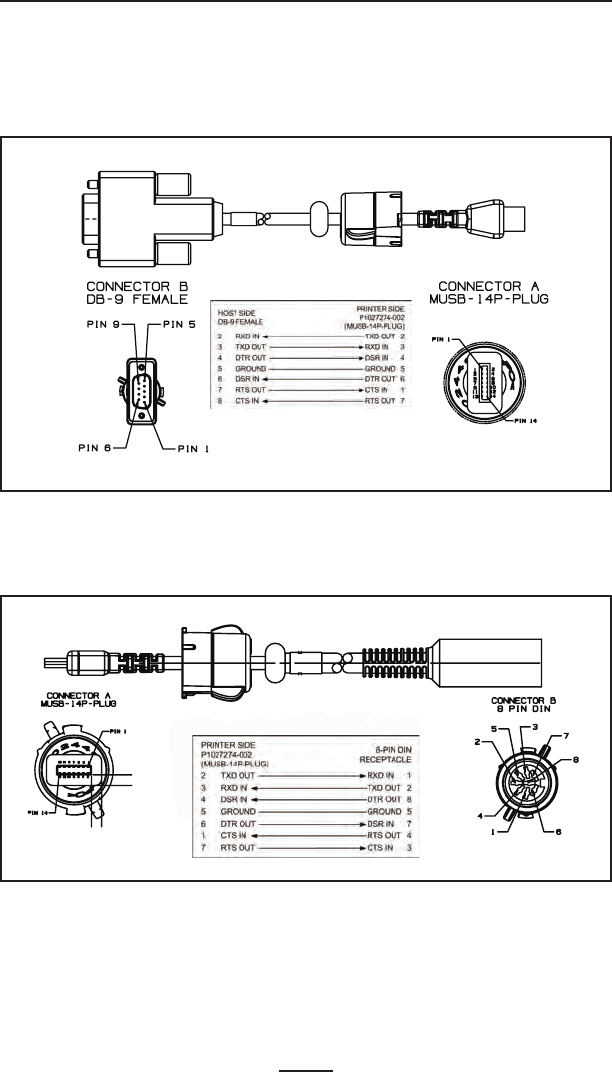
Part Number P1027474; DB-9 to 14-Pin Serial
Part Number P1024467; 8-Pin DIN to 14-Pin Serial Cable (QL Adapter Cable)
62
QLn Series User Guide
Contact the Factory or your Zebra Sales Representative for more
information on interface cables to most major manufacturer’s data
terminals.
You may also vist the Zebra Web site at:
www.zebra.com/accessories for a listing of interface cables
for all series of Zebra mobile printers
More Interface Cables
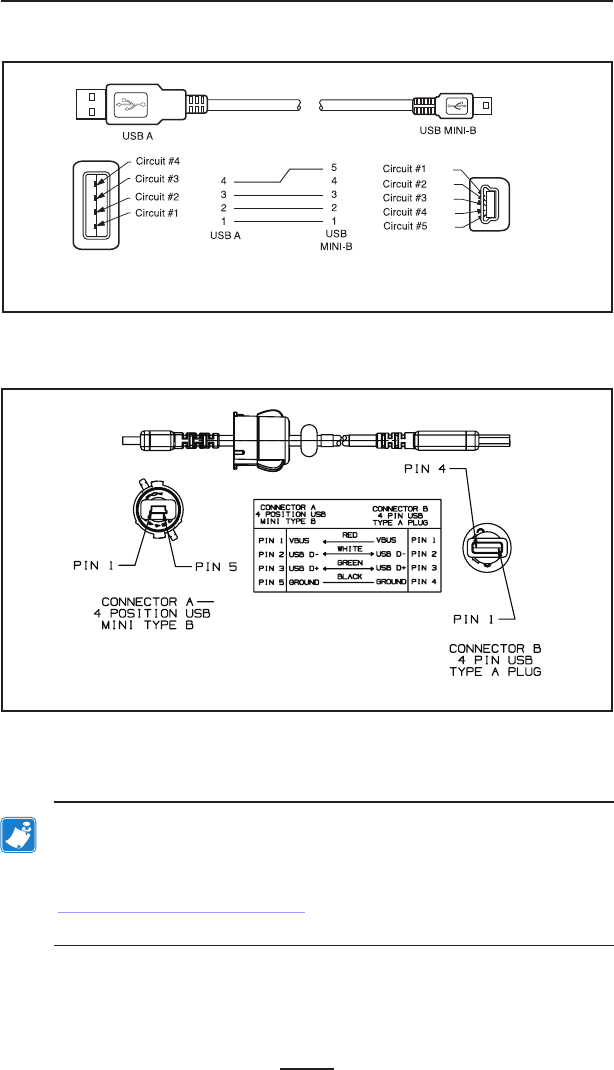
USB Cable
Part Number AT17010-1; USB A to USB Mini B Cable
- GND
- D+
- D-
- VBUS
- VBUS
- D-
- D+
- NC
- GND
Part Number P1028669; 4 Position USB Mini to 4-Pin USB (w/ Strain Relief)

63
QLn Series User Guide
Appendix B
Media Supplies
To insure maximum printer life and consistent print qual-
ity and performance for your individual application, it is rec-
ommended that only media produced by Zebra be used.
Advantages include:
• Consistent quality and reliability of media products.
• Large range of stocked and standard formats.
• In-house custom format design service.
• Large production capacity which services the needs of
many large and small media consumers including major
retail chains world wide.
• Media products that meet or exceed industry standards.
For more information go the Zebra website (www.zebra.com) and
select the Products tab, or refer to the CD included with the printer.
Appendix C
Maintenance Supplies
In addition to using quality media provided by Zebra, it is
recommended that the printer be cleaned as prescribed in the
maintenance section. The following items are available for
this purpose:
• Cleaning Pen (10 pack), Reorder No. AN11209-1
64
QLn Series User Guide
Appendix D
Product Support
When calling with a specific problem regarding your printer,
please have the following information on hand:
• Model number/type (e.g. QLn320)
• Unit serial number (refer to figure on opposite page)
• Product Configuration Code (PCC) (refer to figure on fol-
lowing page))
In the Americas contact
Regional Headquarters Technical Support Customer Service
Dept.
Zebra Technologies Corporation
475 Half Day Road, Suite 500
Lincolnshire, Illinois 60069 U.S.A
T: +1 847 634 6700
Toll-free +1 866 230 9494
F: +1 847 913 8766
T: +1 877 275 9327
F: +1 847 913 2578
Hardware:
ts1@zebra.com
Software:
ts3@zebra.com
For printers, parts, media,
and ribbon, please call your
distributor, or contact us.
T: +1 877 275 9327
E: clientcare@zebra.com
In Europe, Africa, the Middle East, and India contact
Regional Headquarters Technical Support Internal Sales Dept.
Zebra Technologies Europe Limited
Dukes Meadow
Millboard Road
Bourne End
Buckinghamshire SL8 5XF, UK
T: +44 (0)1628 556000
F: +44 (0)1628 556001
T: +44 (0) 1628 556039
F: +44 (0) 1628 556003
E: Tseurope@zebra.com
For printers, parts, media,
and ribbon, please call
yo ur dist ri bu to r, or
contact us.
T: +44 (0) 1628 556032
F: +44 (0) 1628 556001
E: cseurope@zebra.com
In the Asia Pacic region contact
Regional Headquarters Technical Support Customer Service
Zebra Technologies Asia Pacic
Pte. Ltd.
120 Robinson Road
#06-01 Parakou Building
Singapore 068913
T: +65 6858 0722
F: +65 6885 0838
T: +65 6858 0722
F: +65 6885 0838
E: (China)
tschina@zebra.com
All other areas:
tsasiapacic@zebra.com
For printers, parts, media,
and ribbon, please call your
distributor, or contact us.
T: +65 6858 0722
F: +65 6885 0836
E: (China) order-csr@zebra.com
All other areas:
csasiapacic@zebra.com
continued
65
QLn Series User Guide
XXXXSYYWWNNNNN
PLACE BAR CODE HERE
S/N:
PLACE BAR CODE HERE
XXX-XXXXXXXX-XXPCC:
QLn320
7,4V 15A
中
Made In China This product is covered by one or more Zebra US patents.
Appendix D (continued)
Serial and PCC Number Locations for QLn320 Printers
Serial Number
Barcode PCC
Barcode
QLn320 (Bottom View)
66
QLn Series User Guide
Appendix E
Battery Disposal
The EPA certified RBRC® Battery Recycling Seal on
the Lithium-Ion (Li-Ion) battery supplied with your
printer indicates Zebra Technologies Corporation is
voluntarily participating in an industry program to
collect and recycle these batteries at the end of their
useful life, when taken out of service in the United
States or Canada. The RBRC program provides a convenient alterna-
tive to placing used Li-Ion batteries into the trash or the municipal
waste stream, which may be illegal in your area.
Important • When the battery is depleted, insulate the terminals with
tape before disposal
Please call 1-800-8-BATTERY for information on Li-Ion bat-
tery recycling and disposal bans/restrictions in your area.
Zebra Technologies Corporation’s involvement in this program
is part of our commitment to preserving our environment and
conserving our natural resources.
Outside North America, please follow local battery recycling
guidelines.
Product Disposal
The majority of this printer’s components are recyclable.
Do not dispose of any printer components in un-
sorted municipal waste. Please dispose of the bat-
tery according to your local regulations, and recycle
the other printer components according to your local
standards.
For more information, please see our web site at:
http://www.zebra.com/environment
67
QLn Series User Guide
Appendix F
Using zebra.com
The following examples use the search functions on Zebra’s
Web site for finding specific documents .
Example1: Find the Mobile Printer WIreless Conguration Guide.
Go to www.zebra.com/manuals.
Select as a manual type “Networking Manual” then click on “Submit”.
At the resulting screen, select Wireless Mobile as the networking type. Then select
the desired language. (Best choices are “All” or “English”)
At the resulting screen, select “Zebra Mobile Printers - Wireless Configuration Guide”
then click on “Download” to begin the download process.
Select
manual
type
Select language
Click on
“SUBMIT”
Select networking
type (Wireless
Mobile in this
example)
Click on
“SUBMIT”
68
QLn Series User Guide
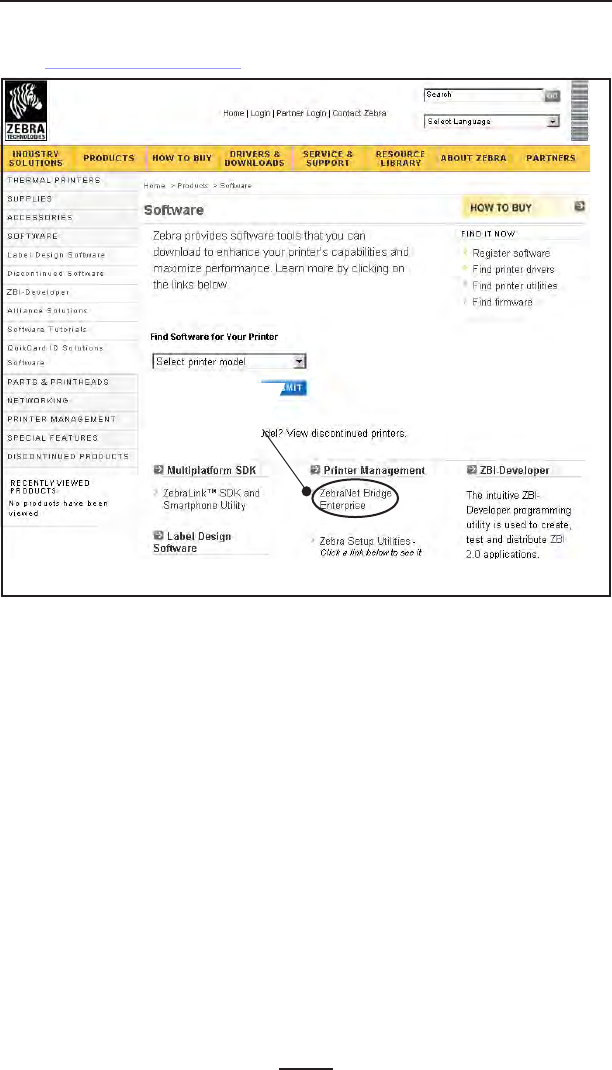
Example 2: Find the Net Bridge Download page:
Go to www.zebra.com/software and access the screen below.
At the resulting window select “Download Current Release“
Select the
“ZebraNet
Bridge
Enterprise

69
QLn Series User Guide
A
Accessories
Belt clip 38
Hand Strap 40
list of 60
Shoulder Strap 39
using 38
B
Battery, charging 13
Battery, installing 12
Battery life, tips for extending 41
Battery disposal 66
Battery Safety Guidelines 16
Bluetooth™ Networking Overview 36
Bluetooth Device Address (BDA) 36
C
Charger, battery
SC2 Single Battery Charger 13
UCLI72-4 Quad Charger 15
charging times 16
front panel indicators 16
QLn-EC Ethernet Cradle 18
4 Bay 19
1 Bay 20
Charger Safety Guidelines 16
Cleaning
general instructions 41
QLn320 42, 43
Communications
cable
strain relief for 35
RS232
Connector signals 57
with a cable 61
USB
Connector signals 58
with a cable 62
Communications diagnostics 48
Configuration label, printing 50
D
Damage, shipping 7
Dimensions 59
L
Net Bridge 27,34
use in troubleshooting 64
M
Manual
CPCL Programming 7,31
ZPL II Programming 31
Media, loading 22
peel-o mode 24
tear-o mode 22
O
Operator Controls 25
Standard Control Panel 26
error indicator 26
power-on indicator 26
LCD Control Panel 27
functions displayed 27
status bar icons 28
P
Platen
linerless 43
Programming language
CPCL 7
ZPL II 7
Q
QLn320 Overview 10,11
R
Radio options See Wireless communi-
cations
S
Software 7,37
Specifications 53
Font/bar Code 55,56
Label 54
Memory/communications 57
Physical 58
printing 53
T
Troubleshooting 44
Communications Diagnostics Mode 49
Keypad control panel indicators 44
LCD control panel indicators 45
Troubleshooting tests 48
printing a conguration label 48
QLn320 conguration label example 50
Troubleshooting Topics 46
Troubleshooting Tests 47
W
Wireless communications
Bluetooth™ radio 36
WLAN Overview 37
Index

70
QLn Series User Guide
D 275,286
D 347,021
D 389,178
D 430,199
D 433,702
D 549,768
3,964,673
4,019,676
4,044,946
4,360,798
4,369,361
4,387,297
4,460,120
4,496,831
4,593,186
4,607,156
4,673,805
4,736,095
4,758,717
4,816,660
4,845,350
4,896,026
4,897,532
4,923,281
4,933,538
4,992,717
5,015,833
5,017,765
5,021,641
5,029,183
5,047,617
5,103,461
5,113,445
5,140,144
5,132,709
5,142,550
5,149,950
5,157,687
5,168,148
5,168,149
5,180,904
5,229,591
5,230,088
5,235,167
5,243,655
5,247,162
5,250,791
5,250,792
5,262,627
5,267,800
5,280,163
5,280,164
5,280,498
5,304,786
5,304,788
5,321,246
5,335,170
5,364,133
5,367,151
5,372,439
5,373,148
5,378,882
5,396,053
5,396,055
5,399,846
5,408,081
5,410,139
5,410,140
5,412,198
5,415,482
5,418,812
5,420,411
5,436,440
5,444,231
5,449,891
5,449,893
5,468,949
5,479,000
5,479,002
5,479,441
5,486,057
5,503,483
5,504,322
5.519,381
5,528,621
5,532,469
5,543,610
5,545,889
5,552,592
5,570,123
5,578,810
5,589,680
5,612,531
5,642,666
5,657,066
5,680,459
5,726,630
5,768,991
5,790,162
5,791,796
5,806,993
5,813,343
5,816,718
5,820,279
5,848,848
5,860,753
5,872,585
5,874,980
5,909,233
5,
976,720
5,978,004
5,995,128
5,997,193
6,004,053
6,010,257
6,020,906
6,034,708
6,036,383
6,057,870
6,068,415
6,068,415
6,095,704
6,109,801
6,123,471
6,147,767
6,151,037
6,201,255 B1
6,231,253 B1
6,261,009
6,261,013
6,267,521
6,270,072 B1
6,285,845 B1
6,292,595
6,296,032
6,364,550
6,379,058 B1
6,409,401 B1
6,411,397 B1
6,428,227 B2
6,480,143
6,530,705
6,540,122
6,540,142
6,607,316
6,609,844
6,655,593
6,784,787
6,874,958
6,899,477
6,908,034
7,126,716
7,137,000
7,172,122
7,190,270
This product and/or its use m ay be covered by one or m ore of t
he
follow ing U S patents and corresponding international patent
s
w orldw ide
Patent Numbers

71
QLn Series User Guide