Zebra Technologies P430I Plastic Card Printer User Manual P430i UM
Zebra Technologies Corporation Plastic Card Printer P430i UM
Contents
- 1. Users Manual part 1
- 2. Users Manual part 2
- 3. Users Manual part 3
Users Manual part 1
User’s Manual
Zebra® P430i
Card Printer
Dual-Sided Color

980471-001 Rev. 01 P430
i
User’s Manual 1
Foreword
This manual contains installation and operation information for the Zebra P430i Card Printers
manufactured by Zebra Technologies Corporation, Camarillo, California.
Return Materials Authorization
Before returning any equipment to Zebra Technologies Corporation for in-warranty or out-of-
warranty repair, contact Repair Administration for a Return Materials Authorization (RMA)
number. Repack the equipment in the original packing material and mark the RMA number
clearly on the outside. Ship the equipment, freight prepaid, to the address listed below:
• For USA, Latin America, and Asia / Pacific:
Zebra Technologies Corporation
Zebra Card Printer Solutions
1001 Flynn Road
Camarillo, CA. 93012-8706.USA
Phone: +1 (805) 578-5001
FAX: +1 (805) 579-1808
• For Europe and Middle East:
Zebra Technologies Corporation
Zebra Card Printer Solutions
Pittman Way, Fulwood
Preston, PR2 9ZD
Lancashire, U.K.
Phone: +44 - 1 - 772 - 797555
FAX: +44 - 1 - 772 - 693000

2P430
i
User’s Manual 980471-001 Rev. 01
Foreword
Copyright Notice
© 2005 ZIH Corp.
This document contains information proprietary to Zebra Technologies Corporation. This
document and the information contained within is Copyrighted by Zebra Technologies
Corporation and may not be duplicated in full or in part by any person without written
approval from Zebra. While every effort has been made to keep the information contained
within current and accurate as of the date of publication, no guarantee is given that the
document is error-free or that it is accurate with regard to any specification. Zebra reserves the
right to make changes, for the purpose of product improvement, at any time.
Trademarks
P430i is a trademark and Zebra is a registered trademark of Zebra Technologies Corporation.
Windows and MS.DOS are registered trademarks of Microsoft Corp. All other trademarks or
registered trademarks are marks of their respective holders.
Warranty Information
Printers:
All Zebra Card Printers are warranted against defects in material or workmanship for twelve
(12) months from the purchase date.
Proof of purchase or shipment date is required to validate the warranty period. The warranty
becomes void if the equipment is modified, improperly installed or used, damaged by accident
or neglect, or if any parts are improperly installed by the user.
Printheads:
Since printhead wear is part of normal operation, the original printhead is covered by a twelve
(12) month date. Warranty period begins on purchase date.
Note • Products returned must be packaged in the original or comparable packing and
shipping container. In the event equipment is not so packaged, or if shipping damage is
evident, it will not be accepted for service under warranty. Surface Transportation charges
for return to customers in the continental United States is paid by Zebra. Otherwise, Zebra
pays CPT (carriage paid to) nearest airport, customer pays customs, duties, taxes, and freight
from airport to destination. If Zebra determines that the product returned for warranty service
or replacement is not defective as herein defined, the customer will pay all handling and
transportation costs.

Foreword
980471-001 Rev. 01 P430
i
User’s Manual 3
To qualify for this warranty, the printer must be returned to the factory or to an authorized
service center. Customers are not required to purchase Zebra supplies (media and/or ribbons)
for warranty qualification. If the use of other manufacturer supplies has caused any defect in
the printhead for which a warranty claim is made, the user is responsible for Zebra's labor and
material charges required to repair the defect. The warranty becomes void if the printhead is
damaged; also if it is determined that failure to follow the preventive maintenance schedule
listed in the User's Guide has caused defect in the thermal printhead for which a warranty
claim is made.
Spare Parts:
All parts, print heads, maintenance kits, options kits, and accessories are warranted to be free
of defects in material and workmanship for 90 days (except where otherwise denoted) from
date of purchase. This warranty becomes void if the item is modified, improperly installed or
used, or damaged by accident or neglect.
Product Disposal
Declarations of Conformity
For a formal certificate, please contact the Compliance Office at Zebra’s Camarillo facility.
Product Disposal Information • Do not dispose of this product in unsorted municipal
waste. This product is recyclable, and should be recycled according to your local
standards. For more information, please see our web site at:
http://www.zebra.com/environment
89/336/EEC
modified by
92/31/EEC and
93/68/EEC
EMC Directive EN 55022 (1998) RF Emissions control
EMC Directive EN 301489-3 V1.4.1 RF Emissions and Immunity for radio
equipment
EMC Directive EN55024 (2001) Immunity to Electro-Magnetic
Disturbances
73/23/EEC modified
by 93/68/EEC
Low voltage
Directive
EN 60950-1 (2001) Product safety
1999/5/CE R&TTE Directive EN300330-2 V1.1.1 Radio Frequency Interferences

4 P430i User’s Manual 980471-001 Rev. 01
Foreword
EUROPE: Norway Only: This product is also designed for IT power system with phase to phase
voltage 230V. Earth grounding is via the polarized, 3-wire power cord.
FI: “Laite on liitettävä suojamaadoitus koskettimilla varustettuun pistorasiaan”
SE: “Apparaten skall anslutas till jordat uttag”
NO: “Apparatet må tilkoples jordet stikkontakt”
Supplemental Information:
This equipment has been tested and found to comply with the limits for a Class A digital
device, pursuant to part 15 of the FCC Rules. These limits are designed to provide
reasonable protection against harmful interference in a residential installation. This
equipment generates, uses, and can radiate radio frequency energy and, if not installed and
used in accordance with the instructions, may cause interference to radio communications.
Operation of this equipment in a residential area is likely to cause interference, in which
case the user will be required to correct the interference at his own expense.
If this equipment does cause harmful interference to radio or television reception, which
can be determined by turning the equipment off and on, the user is encouraged to try to
correct the interference’s by one or more of the following measures:
Reorient or relocate the receiving antenna.
Increase the separation between the equipment and the receiver.
Connect the equipment into an outlet on a circuit different from that to which the receiver
is connected.
Consult the dealer or an experienced radio/TV technician for help.
It is suggested that the user use only shielded and grounded cables to ensure compliance
with FCC Rules.
The user may find the following booklet, prepared by the Federal Communications
Commission, helpful:
How to identify and resolve Radio/TV Interference Problems. This booklet is available
from the U.S. Government printing Office, Washington, D.C. 20402, Stock No. 004-000-
00345-4. Use of a shielded cable is required to comply within Class B limits of Part 15 of
FCC Rules. Pursuant to Part 15.21 of the FCC Rules, any changes or modifications to this
equipment not expressly approved by Zebra may cause, harmful interference and void the
FCC authorization to operate this equipment.
Industry Canada Notice
This device complies with Industry Canada ICES-003 class A requirements.
Cet equipement est conforme a l’ICES-003 classe A de la norm Industrielle Canadian.
Model P430i conforms to the following specification: FCC Part 15, Subpart B, Section
15.107(a) and Section 15.109(a) Class A digital device.

Foreword
980471-001 Rev. 01 P430
i
User’s Manual 5
P430
i
Printer Model
The Zebra Product Number tells a story:
Here is a quick review of the Zebra Card Printer Series numbering and lettering system to help
you.
Model numbers include identifiers that specify options using the following lettering
conventions:
Part Number Description
P4 3 0 i - _ _ _ _ _ - _ _ _ Base Printer
P430
i
Color Card Printer
_ _ _ _ _ - 0 _ _ _ _ - _ _ _
_ _ _ _ _ - A _ _ _ _ - _ _ _
_ _ _ _ _ - B _ _ _ _ - _ _ _
_ _ _ _ _ - C _ _ _ _ - _ _ _
_ _ _ _ _ - D _ _ _ _ - _ _ _
_ _ _ _ _ - E _ _ _ _ - _ _ _
_ _ _ _ _ - F _ _ _ _ - _ _ _
_ _ _ _ _ - G _ _ _ _ - _ _ _
_ _ _ _ _ - H _ _ _ _ - _ _ _
Smart Card Options
None
Contact encoder & MIFARE contactless & HID
i
CLASS
Contact Encoder
Contact encoder & HID
i
CLASS
Contact encoder & MIFARE contactless
Contact station
HID
i
CLASS
MIFARE contactless & HID
i
CLASS
MIFARE contactless
_ _ _ _ _ - _ 0 _ _ _ - _ _ _
_ _ _ _ _ - _ M _ _ _ - _ _ _
Magnetic Encoder
None
Yes (select defaults below)
_ _ _ _ _ - _ _ 0 _ _ - _ _ _
_ _ _ _ _ - _ _ 1_ _ _ - _ _ _
_ _ _ _ _ - _ _ 3 _ _ - _ _ _
Magnetic Encoder Defaults
None
Stripe Down, HiCo
Stripe Up, HiCo
_ _ _ _ _ - _ _ _ 0 _ - _ _ _
Memory Expansion
None
_ _ _ _ _ - _ _ _ _ A - _ _ _
_ _ _ _ _ - _ _ _ _ C - _ _ _
Interface
USB Only
USB and Ethernet
_ _ _ _ _ - _ _ _ _ _ - I _ _
_ _ _ _ _ - _ _ _ _ _ - U _ _
Power Cords
U. S. and Europe
U. K. and Australia
_ _ _ _ _ - _ _ _ _ _ - _ D 0
_ _ _ _ _ - _ _ _ _ _ - _ A 0
Windows Drivers and User Documentation / Training CD
Windows Drivers and User Documentation / Training
included on one CD (Software & Documentation Package)
which contains Multi-language documentation
Windows Drivers and User Documentation / Training
included on one CD (Software & Documentation Package)
which contains Multi-language documentation and free
demo application software
6P430
i
User’s Manual 980471-001 Rev. 01
Foreword
Icons
Throughout this manual, different icons highlight important information, as follows:
Note • Indicates information that emphasizes or supplements important points of the main
text.
Important • Advises you of information that is essential to complete a task, or points out the
importance of specific information in the text.
Provides an example or scenario to demonstrate or clarify a section of text.
Electrostatic Discharge Caution • Warns you of the potential for electrostatic
discharge.
Electric Shock Caution • Warns you of a potential electric shock situation.
Caution • Warns you of a situation where excessive heat could cause a burn.
Caution • Advises you that failure to take or avoid a specific action could result in
physical harm to you, or could result in physical damage to the hardware.
980471-001 Rev. 01 P430
i
User’s Manual 1
1
Introduction
Thank you for choosing the Zebra P430i Card Printer. This manual guides you to efficient start
up and operation of your new Card Printer.
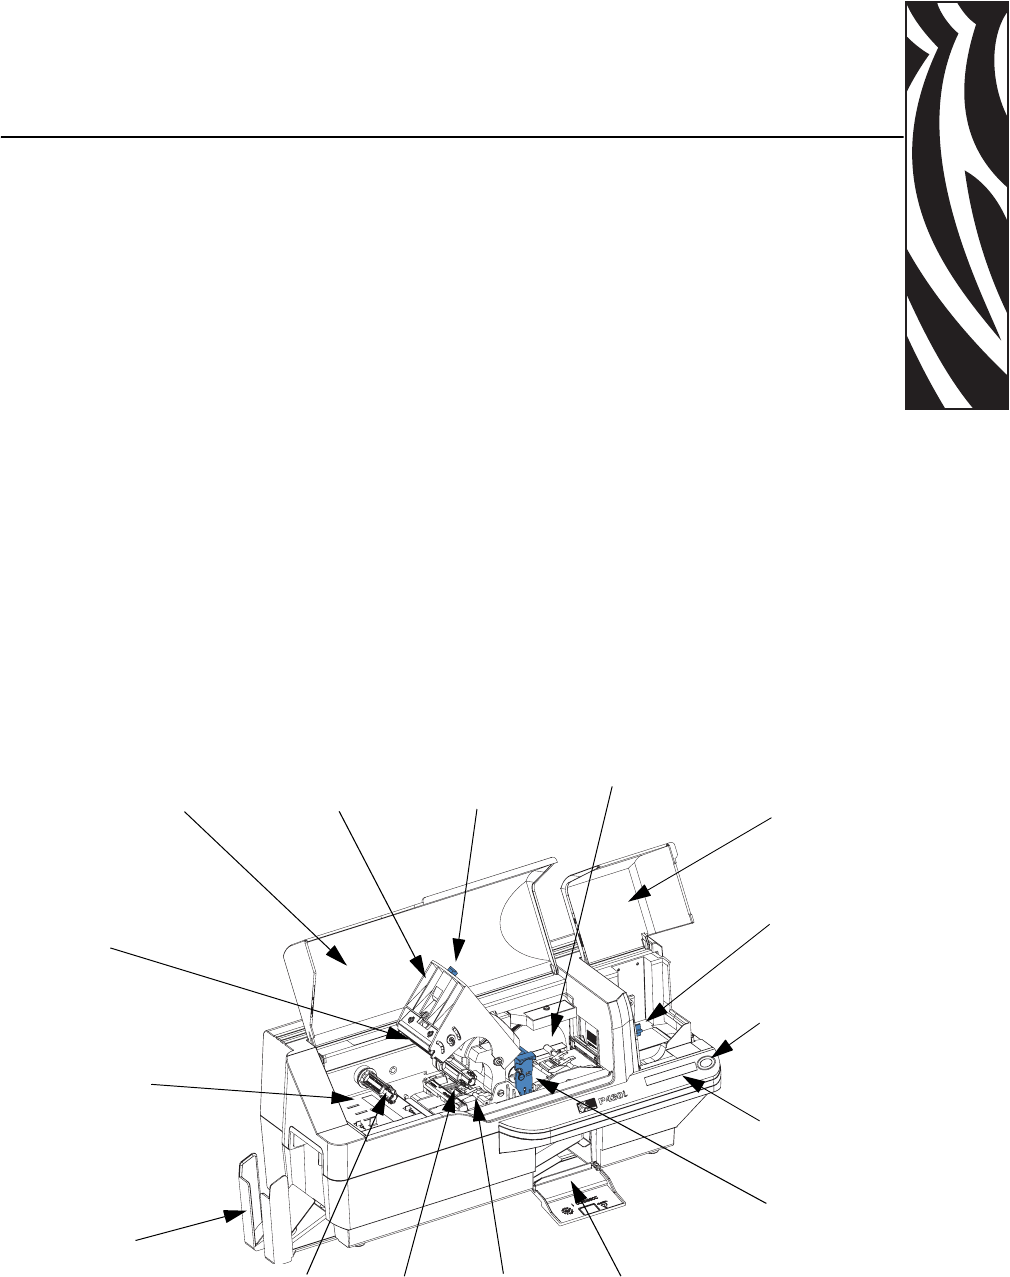
Printer Features
The following shows the main functional features found on your P430i Printer.
Dual-Sided Color
Panel
Button
Print
Head
(Optional)
Smart Card
Contact Station
Output
Hopper
(shown in
open
position)
Card
Feeder
Cover
(shown
open)
Card
Thickness
Control
Card
Cleaning
Cartridge
LCD
Display
Panel
Print Head
Carriage Latch
Print Head Carriage
(shown in open
position)
Main Cover
(shown open)
(Optional)
Magnetic
Encoding
Station
Ribbon
Supply
Spindle
Ribbon
Take - U p
Spindle
Card Flipper
Reject
Card
Access
2P430
i
User’s Manual 980471-001 Rev. 01
Introduction
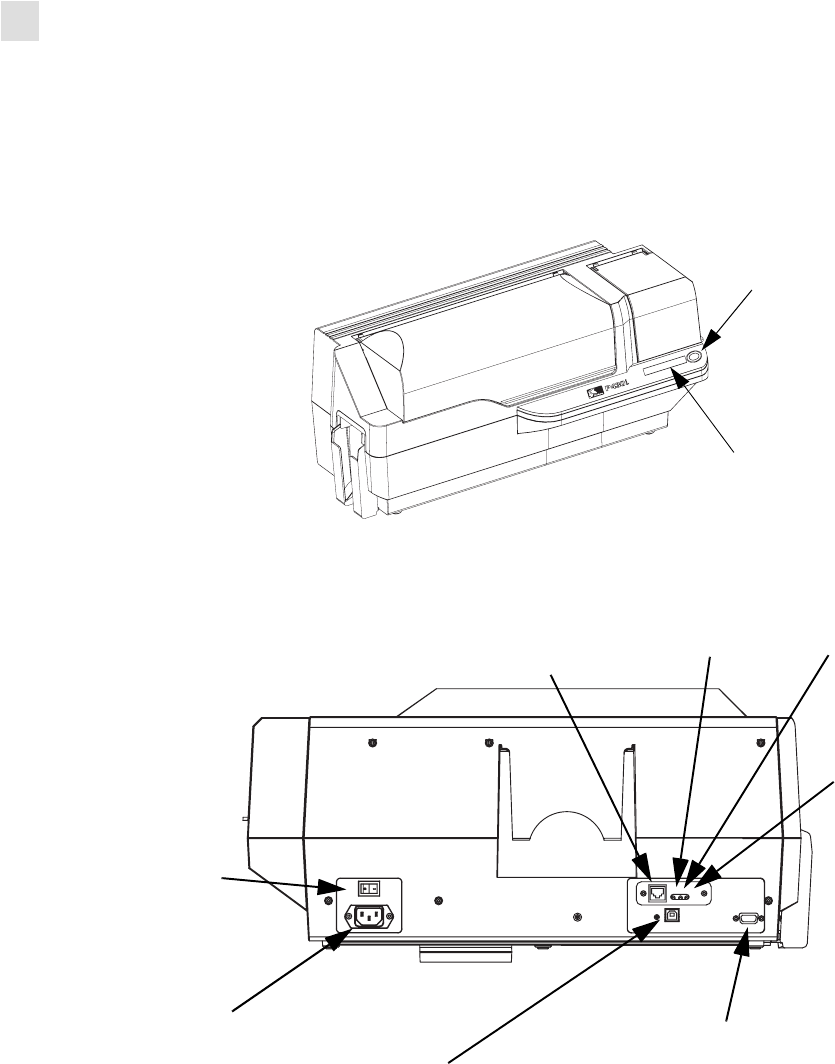
Controls, Connectors, and Indicators
Controls, Connectors, and Indicators
Your P430i Printer has an LCD Display Panel and a Panel Button on the front and a power
connector, power switch, and interface connector(s) on the rear panel.
Dual-Sided Color
LCD Display
Panel
Panel Button
Power
Switch
Power
Connector
Network
Status /
Activity
LED *
Ethernet
Adapter
Status
LED *
10/100base-T
Connector *
Ethernet Switch *
USB Connector
* These
are on the
optional
Ethernet
Adapter.
Optional DB-9
Connector location
for Smart Card
Contact Station

Introduction
Controls, Connectors, and Indicators
980471-001 Rev. 01 P430
i
User’s Manual 3
LCD Panel
The LCD Panel can display the following messages:
Message Mode
Operational
INITIALIZING Scrolling
READY Fixed
DOWNLOADING DATA Fixed
PRINTING MONO Fixed
MAG ENCODING Fixed
CONTACT ENCODING Fixed
PRINTING CYAN Fixed
PRINTING YELLOW Fixed
PRINTING MAGENTA Fixed
PRINTING BLACK Fixed
PRINTING OVERLAY Fixed
DOWNLOADING FW Fixed
CLEANING PRINTER Fixed
Warnings
CLEAN PRINTER Scrolling
REMOVE RIBBON THEN CLOSE HEAD Scrolling
EMPTY FEEDER & PRESS BUTTON Scrolling
LOAD CLEANING CARD IN FEEDER Scrolling
PRESS BUTTON TO CONTINUE Scrolling
FEED LONG CLEANING CARD IN EXIT Scrolling
CLEANING PRINTER Scrolling
ENCODING ERROR (printing stops) Blinking
INVALID MAGNETIC DATA
(encoding stops)
Scrolling
REMOVE RIBBON Fixed
Errors (Printer will not operate)
OUT OF RIBBON Blinking
MECHANICAL ERROR Blinking
OUT OF CARDS Blinking
PRINT HEAD OPEN Blinking

4P430
i
User’s Manual 980471-001 Rev. 01
Introduction
Controls, Connectors, and Indicators
Dual-Sided Color

980471-001 Rev. 01 P430
i
User’s Manual 5
2
Installation and Setup
General Information
This section will guide you through the installation and setup of your P430i Card Printer. This
consists of the following procedures, which should be performed in the order presented.
• Unpacking the Printer
• Installing the Print Driver Software and Setting Driver Options
• Loading a Ribbon
• Installing the Card Cleaning Cartridge
• Setting the Card Thickness Control
• Loading Cards
• Connecting the Printer to your Computer
• Connecting Power
• Printing a Test Card to verify printer operation
The procedure to be followed for Packing the Printer for Shipment is given at the end of this
section.
The printer should be placed in a location that allows easy access to all sides. The printer
should never be operated while resting on its side or upside down.
6P430
i
User’s Manual 980471-001 Rev. 01
Installation and Setup
Unpacking the Printer
Unpacking the Printer
Your P430i Card Printer ships in a carton and protective anti-static bag. Keep all packaging
material in case you need to move or re-ship the printer.
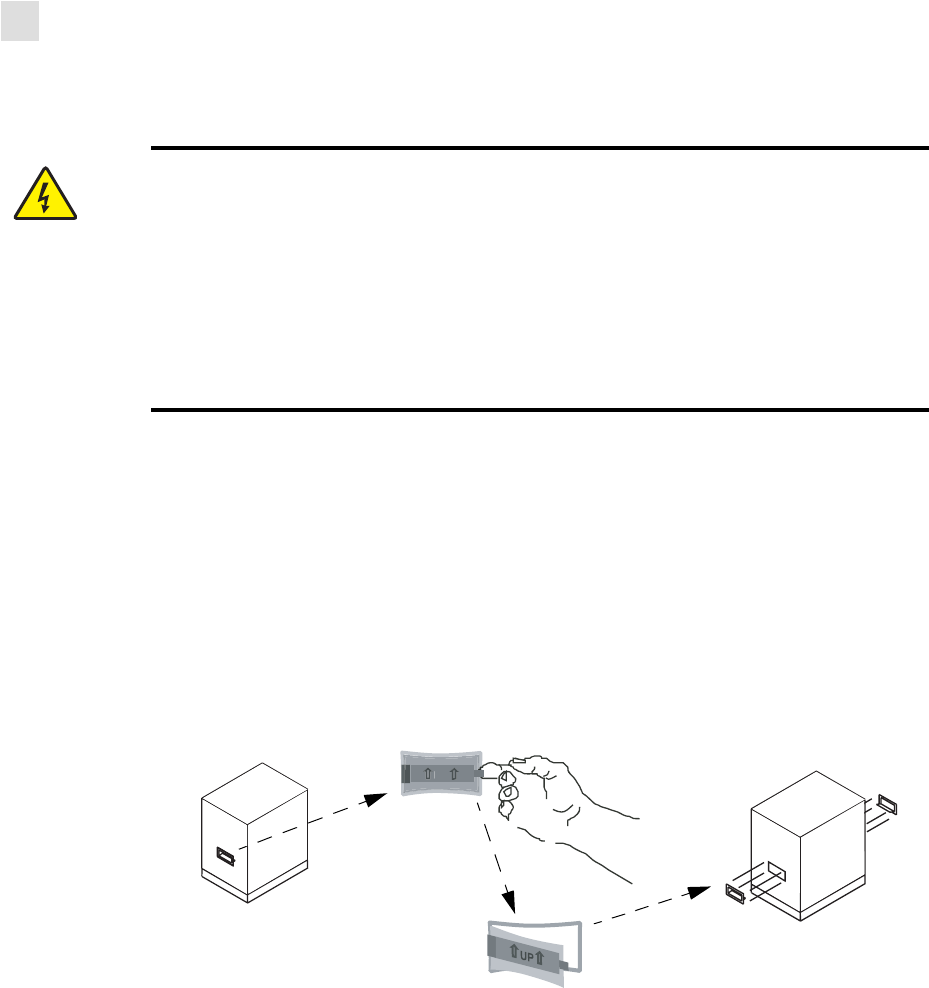
1. Inspect the shipping container to ensure that no damage has occurred during shipment. If
any damage is apparent, file a claim with the shipper.
2. Unlatch and remove the handles on either end of the shipping container, as shown in the
figure below.
3. (See the figure on the next page as you perform the following steps.) Lift the upper part of
the shipping container off of the lower part (which will still hold the printer and its
packing material).
4. Remove the packing material around the top of the printer.
Electric Shock Caution • Limit AC power supplied to the P430
i
Printer to 110 ~ 230
volts, 60 ~ 50 Hertz. Limit excess current draw to 16 amps or less, using an associated
circuit breaker or other such device. Never operate the printer in a location where
operator, computer, or printer can get wet. Personal injury could result. The printer must
be connected to an earthed electrical power source and properly protected against
electrical surges and grounding faults; the electrical reliability of the printer is based on
the reliability of the mains power source and with the earth connection.
The printer’s power supply is an internal unit that can only be serviced or replaced by
trained and authorized personnel.
U
P
Installation and Setup
Unpacking the Printer
980471-001 Rev. 01 P430
i
User’s Manual 7
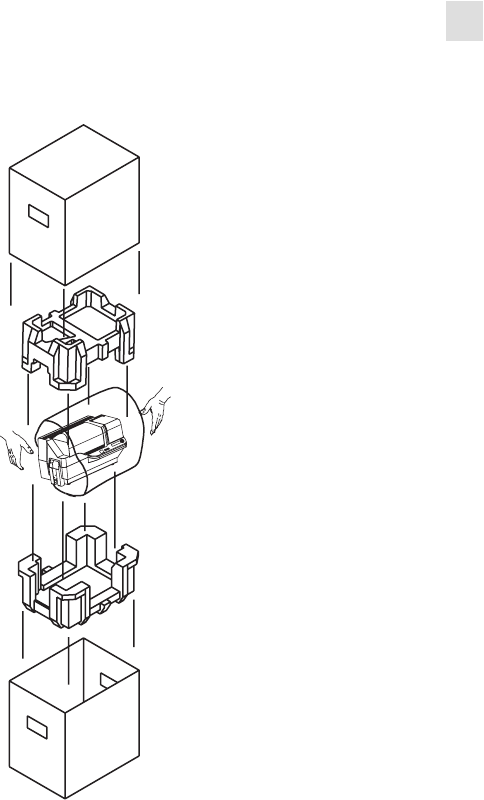
5. Lift the printer out of the carton by holding it with both hands.
6. Please ensure that you have a clean and nearly dust free environment for proper operation
and storage of the printer.
7. Make sure the following items are included with your P430i printer:

8P430
i
User’s Manual 980471-001 Rev. 01
Installation and Setup
Unpacking the Printer
If any items are missing, please contact your dealer. To reorder, please refer to
Appendix D of this manual.
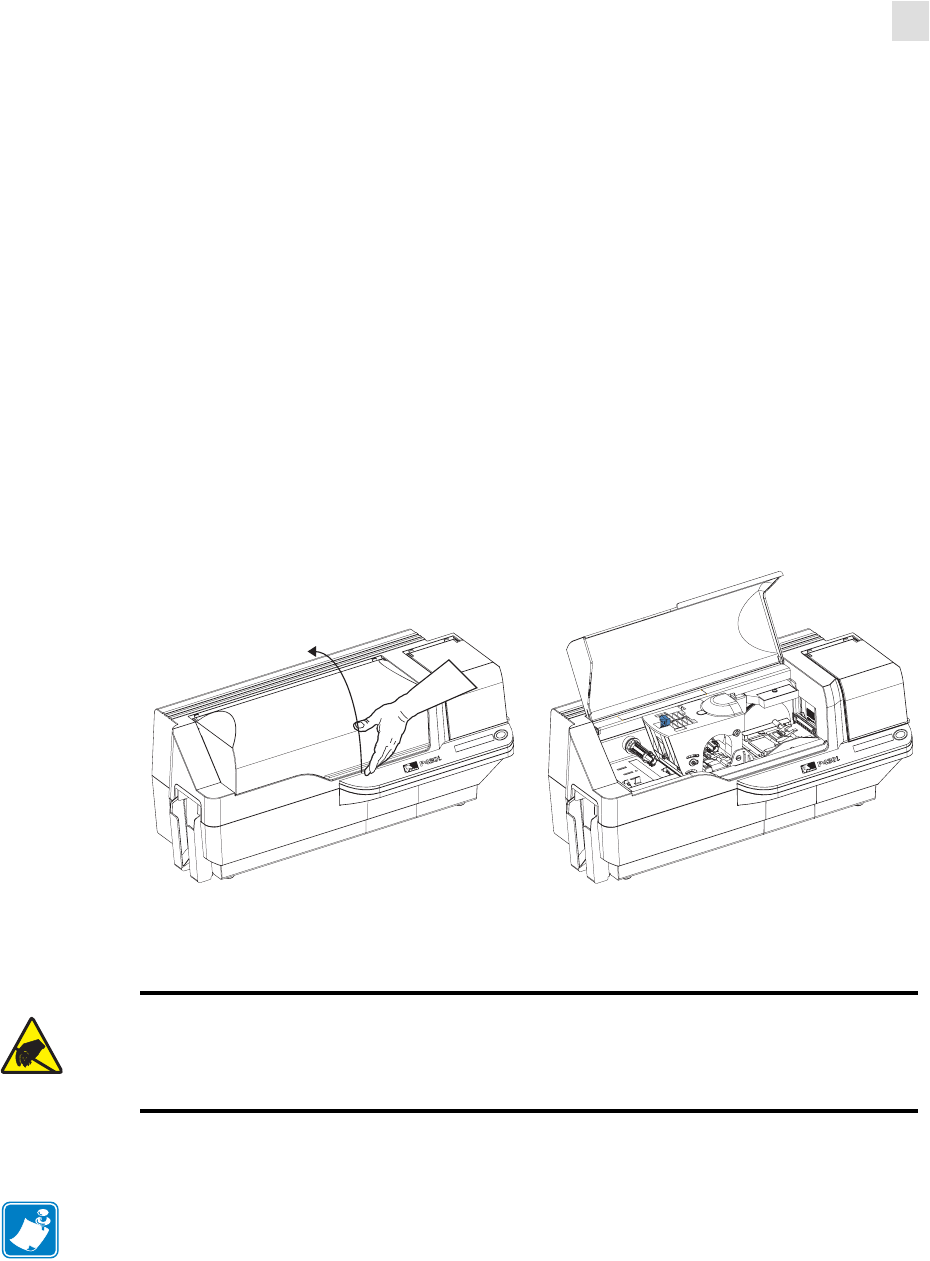
8. Remove packing tape securing the printer’s Main Cover and Card Feeder Cover.
9. Your P430i Printer ships with warning tape where the Card Cleaning Cartridge will be
installed, and a pad that protects the print head from possible damage in shipment. To
remove the tape and pad, follow the following steps:
a. Open the printer’s main cover by lifting at its lower front lip.
Power Cables (2)
Cleaning Kit
CD-ROM with Driver Wizard
and User’s Manual
Card Cleaning Cartridge
USB Cable
Dual-Sided Color
Installation and Setup
Unpacking the Printer
980471-001 Rev. 01 P430
i
User’s Manual 9
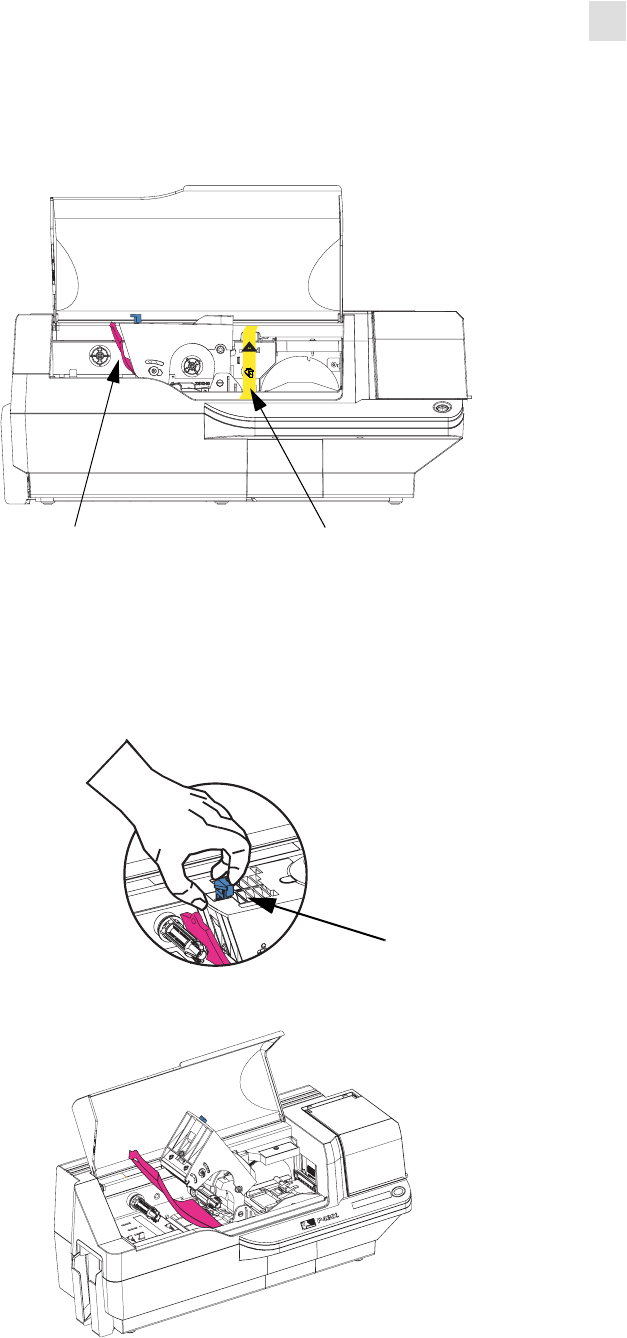
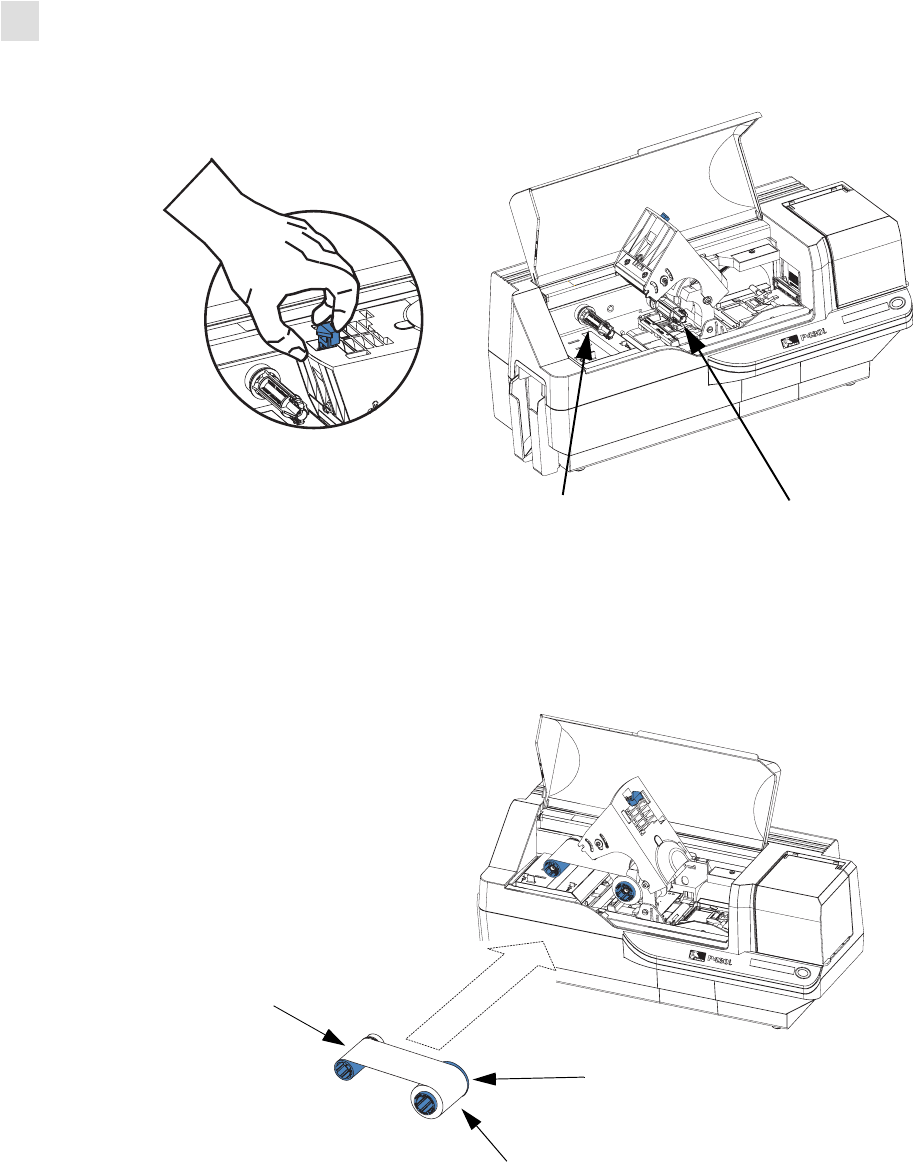
b. Locate the Print Head protection pad and the Card Cleaning Cartridge location tape
(see below). Remove the tape.
c. Release the Print Head Carriage by pushing the Print Head Carriage Latch to the left,
and raise the Print Head Carriage. It will remain open at about a 45° angle.
I
N
S
T
A
L
L
Remove me
Print Head
Protection Pad
Card Cleaning Cartridge
Location Tape
Print Head
Carriage
Latch
Dual-Sided Color
10 P430
i
User’s Manual 980471-001 Rev. 01
Installation and Setup
Installing the Print Driver Software and Setting Driver Options
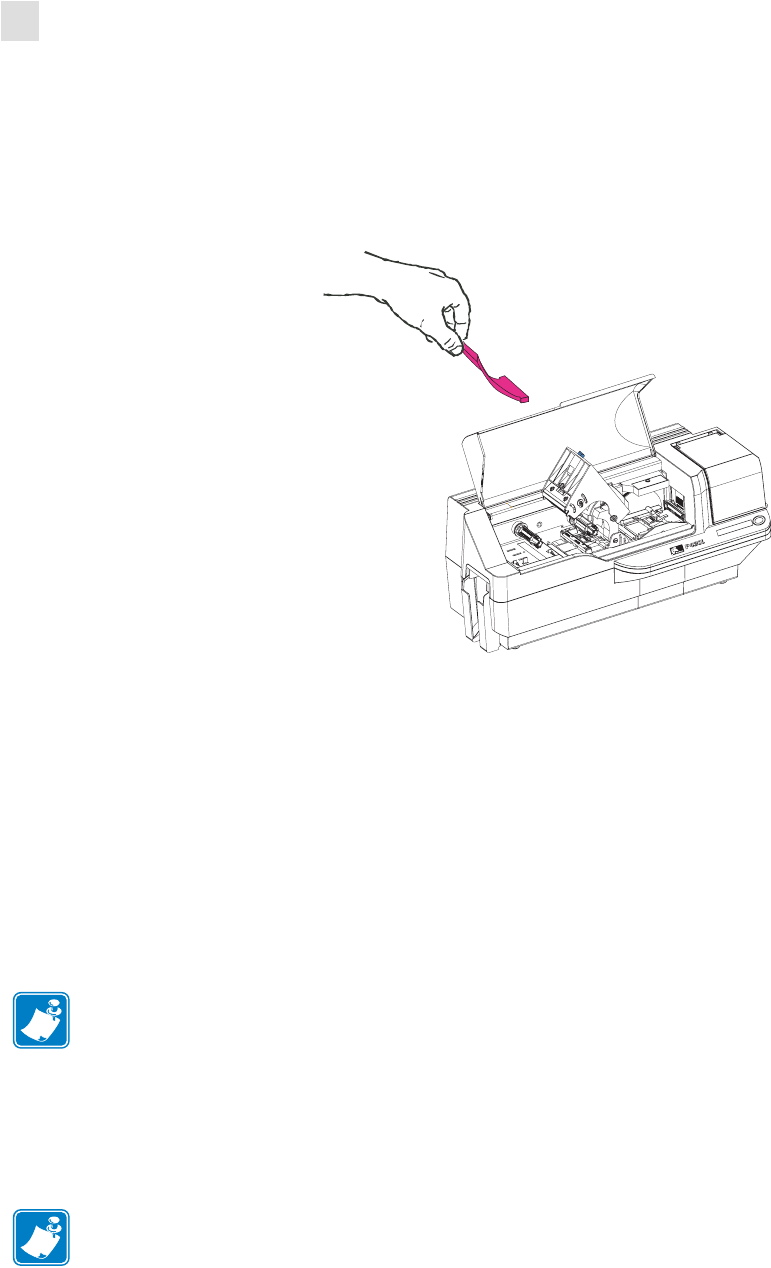
d. Remove the print head protection pad. Keep the pad, as well as the other packing
material and the shipping carton, in case the printer is shipped or moved. If the
original material is lost, a replacement Shipping Kit can be ordered from Zebra;
please refer to the Media List on the Windows Drivers and User Documentation CD
supplied with this printer.
Installing the Print Driver Software and Setting Driver
Options
Printing with the P430i Printer requires the Windows Printer Driver and your card design/
issuing software or printer command level programming through the printer interface.
The P430i Card Printer can be used with any Windows 2000 or Windows XP computer, using
the drivers provided on CD with the printer.
This section contains information on the printing of a sample card in color (using the 5-panel
color ribbon YMCKO and the Windows Printer Driver).
Installing the P430
i
Print Driver
To install the P430i Printer Driver automatically on all Operating Systems, use the Zebra
Install Wizard.
The Install Wizard will walk you through the appropriate installation steps. The Wizard will:
• Automatically launch when the driver CD is inserted.
Dual-Sided Color
Note • If updating the printer driver from a previous version, before installing the updated
printer driver version, always delete the existing version from your computer.
Note • Ensure that you have administrative privileges to perform this installation, or contact
your IT department.
Installation and Setup
Loading a Ribbon
980471-001 Rev. 01 P430
i
User’s Manual 11
• From the main menu of your documentation CD, select your desired language and then
select “DRIVERS” from the subsequent menu. The Install Wizard will walk you through
the appropriate steps.
• Delete previous versions of the driver and clean up any necessary Registry entries. You
must select “Remove” from the install options to remove any previous driver versions.
Loading a Ribbon
i Series Printers require the use of i Series ribbons for full color printing. The Resin Thermal
Transfer and Dye Sublimination ribbons for P430i are specifically designed for your P430i
Printer.
1. Place the printer power switch in the OFF (0) position.
2. If the printer’s Main Cover is closed:
a. Open the printer’s Main Cover; lift it by the lip at the bottom front as shown in the
figure below left.
b. Raise the Print Head Carriage by pressing the release latch to the left (toward the
output hopper) and lifting as shown below to about a 45° angle. The Print Head
Carriage will stay in that position, as shown at the right below.
Dual-Sided Color
Dual-Sided Color
Electrostatic Discharge Caution • DO NOT TOUCH the Print Head or the electronic
components on the Print Head Carriage. Discharges of electro-static energy that
accumulate on the human body or other surfaces can damage the Print Head or other
electronic components used in the printer.
Note • Avoid any direct contact with the print head to prevent transfer of oils or
contamination. Outside of normal operation, only the Zebra-approved cleaning materials
should come in contact with the print head.
12 P430
i
User’s Manual 980471-001 Rev. 01
Installation and Setup
Loading a Ribbon
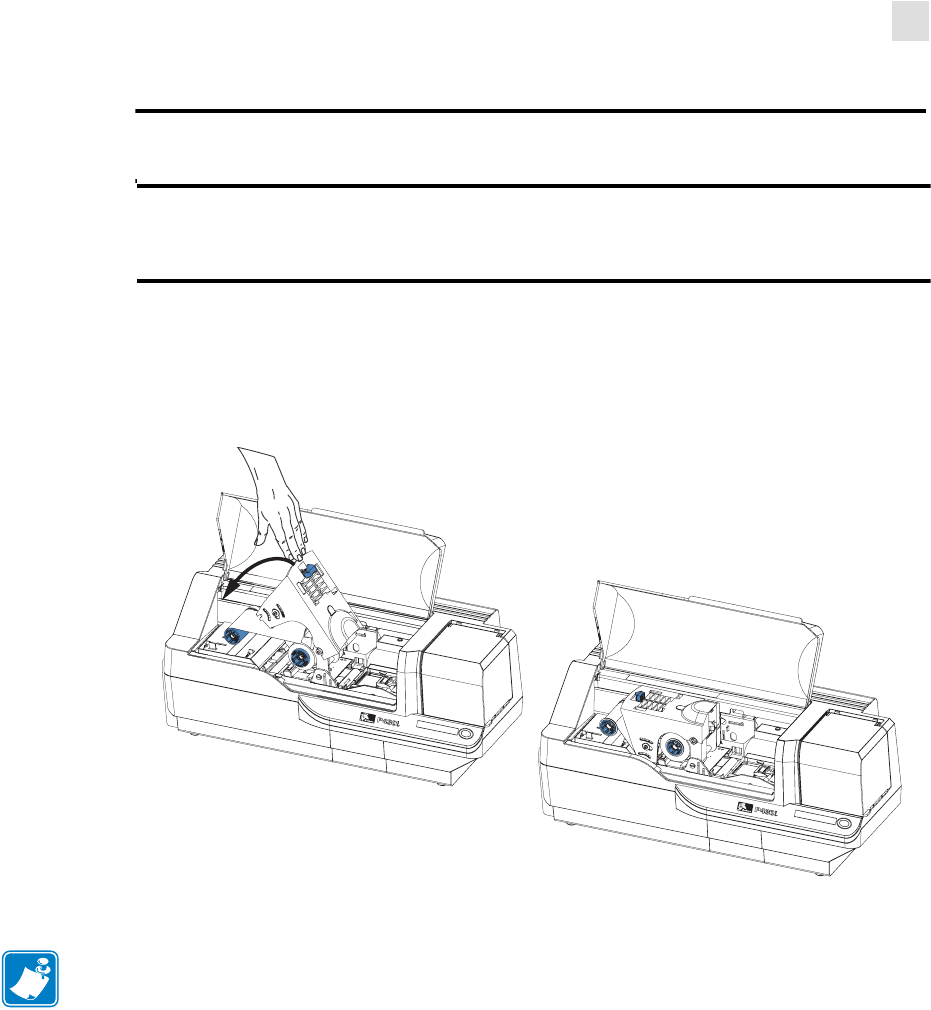
3. Locate the Ribbon Supply Spindle and the Ribbon Take-up Spindle (see above). Load
ribbon onto the supply spindle (under the print head carriage) flange side in, and load the
empty core (with tape attached) onto the take-up spindle. Make sure the ribbon comes off
the top of the supply spindle and feeds to the top of the take-up spindle.
Dual-Sided Color
Ribbon Supply
Spindle
Ribbon Take-up
Spindle
Dual-Sided Color
Flange
Supply Spool
Ta k e -u p
Spool
Installation and Setup
Loading a Ribbon
980471-001 Rev. 01 P430
i
User’s Manual 13
4. Gently press the print head carriage down until it is fully lowered, as shown below. Very
little force is neccessary to perform this step.
Caution • Do not touch the print head if the printer has been in service within the last 10
minutes. It could be very hot and cause a burn.
Electrostatic Discharge Caution • A static discharge is possible if you touch any
exposed metal parts. Use of an anti-static wrist strap or comparable anti-static protection is
required.
Dual-Sided Color
Dual-Sided Color
Note • During normal operation (with power connected and turned on), the ribbon would
automatically synchronize when the Print Head is restored to its fully-down position. The
ribbon would be identified and the corresponding parameters sent to the driver.
Since power is not connected at this point in the Installation and Setup Procedure, nothing
will happen when the Print Head Carriage is closed. The ribbon will synchronize when
power is turned on.