Zebra Technologies RS507X Hands Free Imager User Manual RS507 Product Reference Guide en
Zebra Technologies Corporation Hands Free Imager RS507 Product Reference Guide en
Contents
- 1. User Manual 1
- 2. User Manual 2
- 3. User Manual Regulatory
User Manual 2


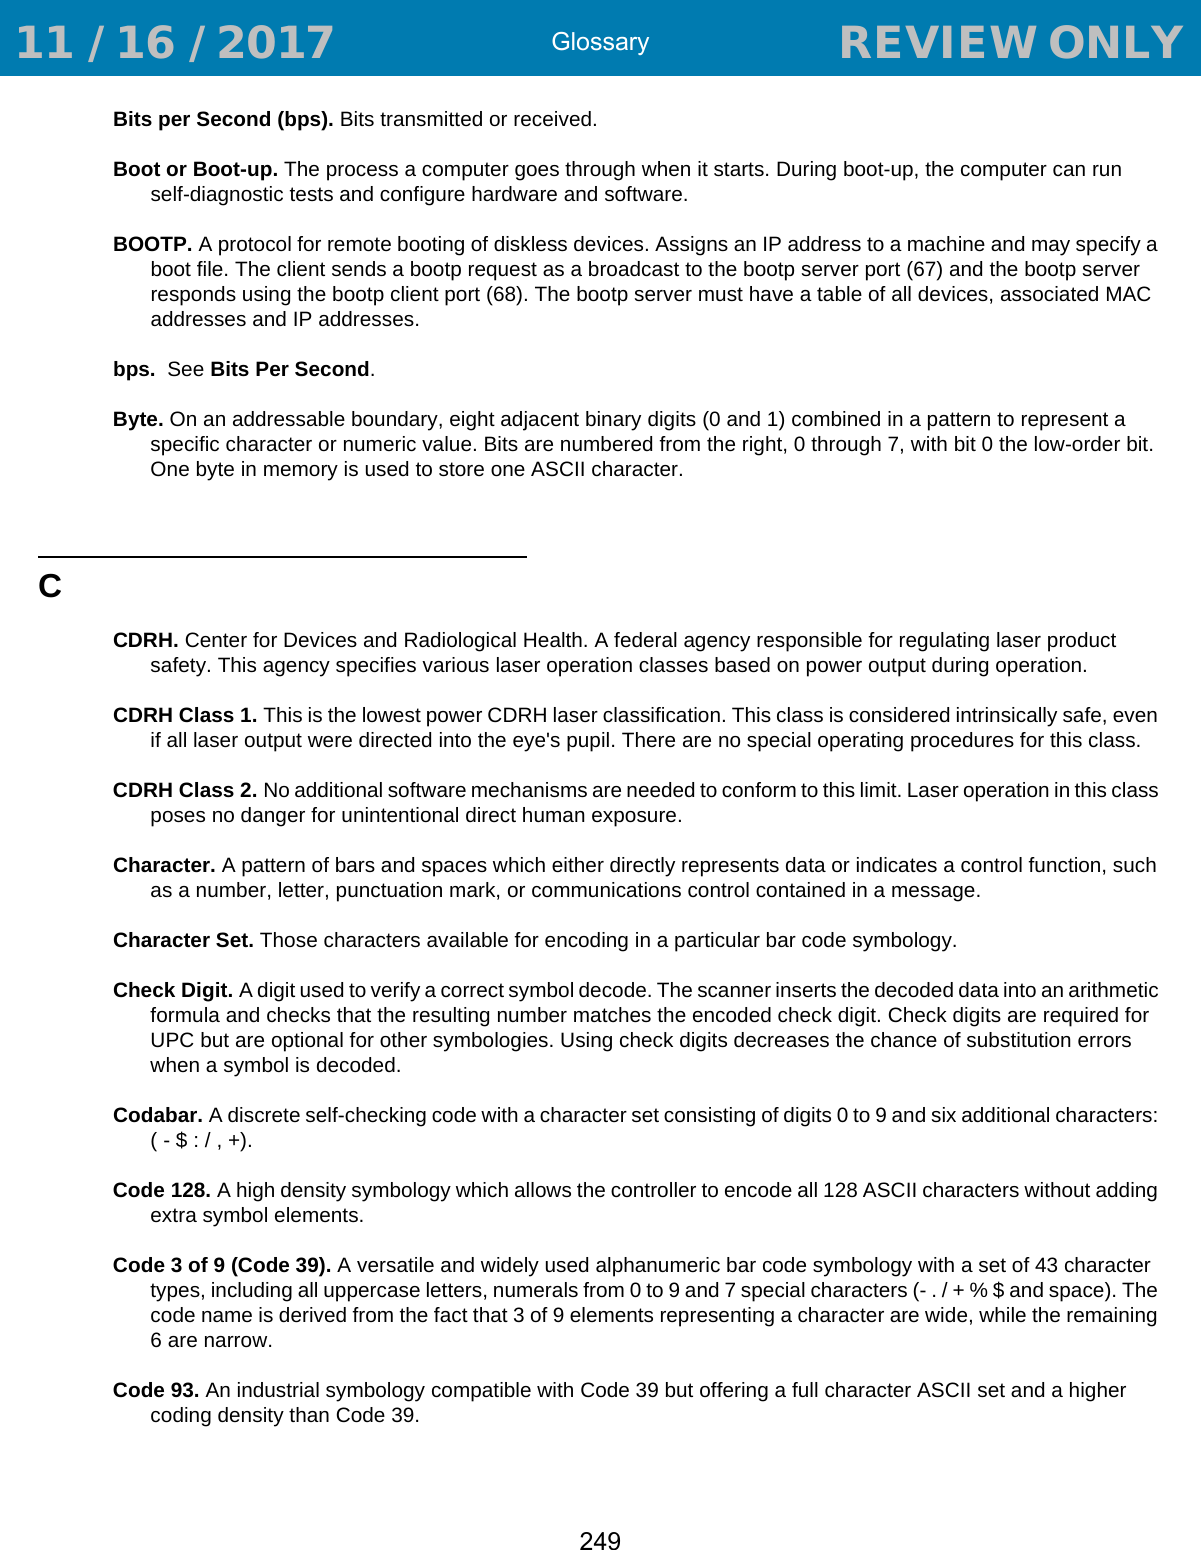
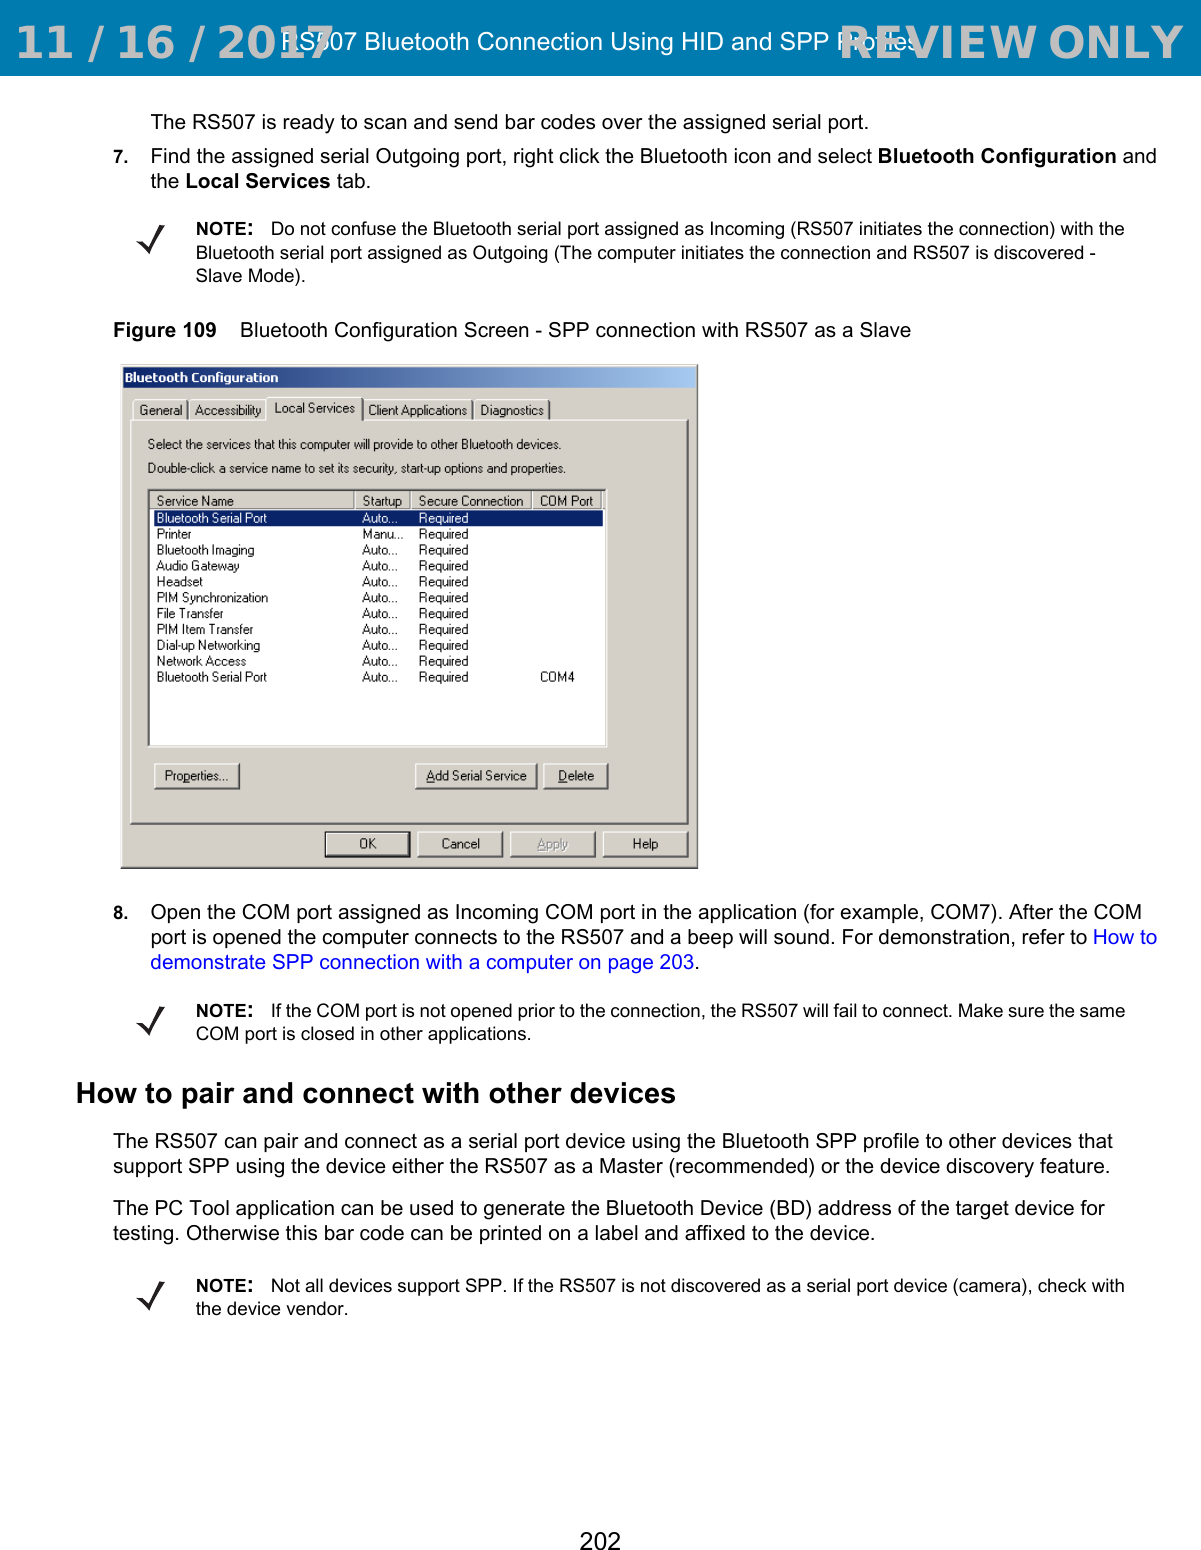
![Symbologies106UPC/EAN/JAN Supplemental AIM ID FormatParameter # F1h A0hSelect an output format when reporting UPC/EAN/JAN bar codes with supplementals with AIM ID enabled:•Separate - UPC/EAN with supplementals transmit as]E<0 or 4><data>]E<1 or 2>[supp data]•Combined - EAN-8 with supplementals transmit as ]E4<data>]E<1 or 2>[supp data]All other UPC/EAN with supplementals transmit as ]E3<data+supps>Transmit UPC-A Check DigitParameter # 28hThe check digit is the last character of the symbol used to verify the integrity of the data. Scan the appropriate bar code below to transmit the bar code data with or without the UPC-A check digit. It is always verified to guarantee the integrity of the data. Separate(00h)*Combined(01h)*Transmit UPC-A Check Digit(01h)Do Not Transmit UPC-A Check Digit(00h) 11 / 16 / 2017 REVIEW ONLY REVIEW ONLY - REVIEW ONLY - REVIEW ONLY](https://usermanual.wiki/Zebra-Technologies/RS507X.User-Manual-2/User-Guide-3647187-Page-36.png)


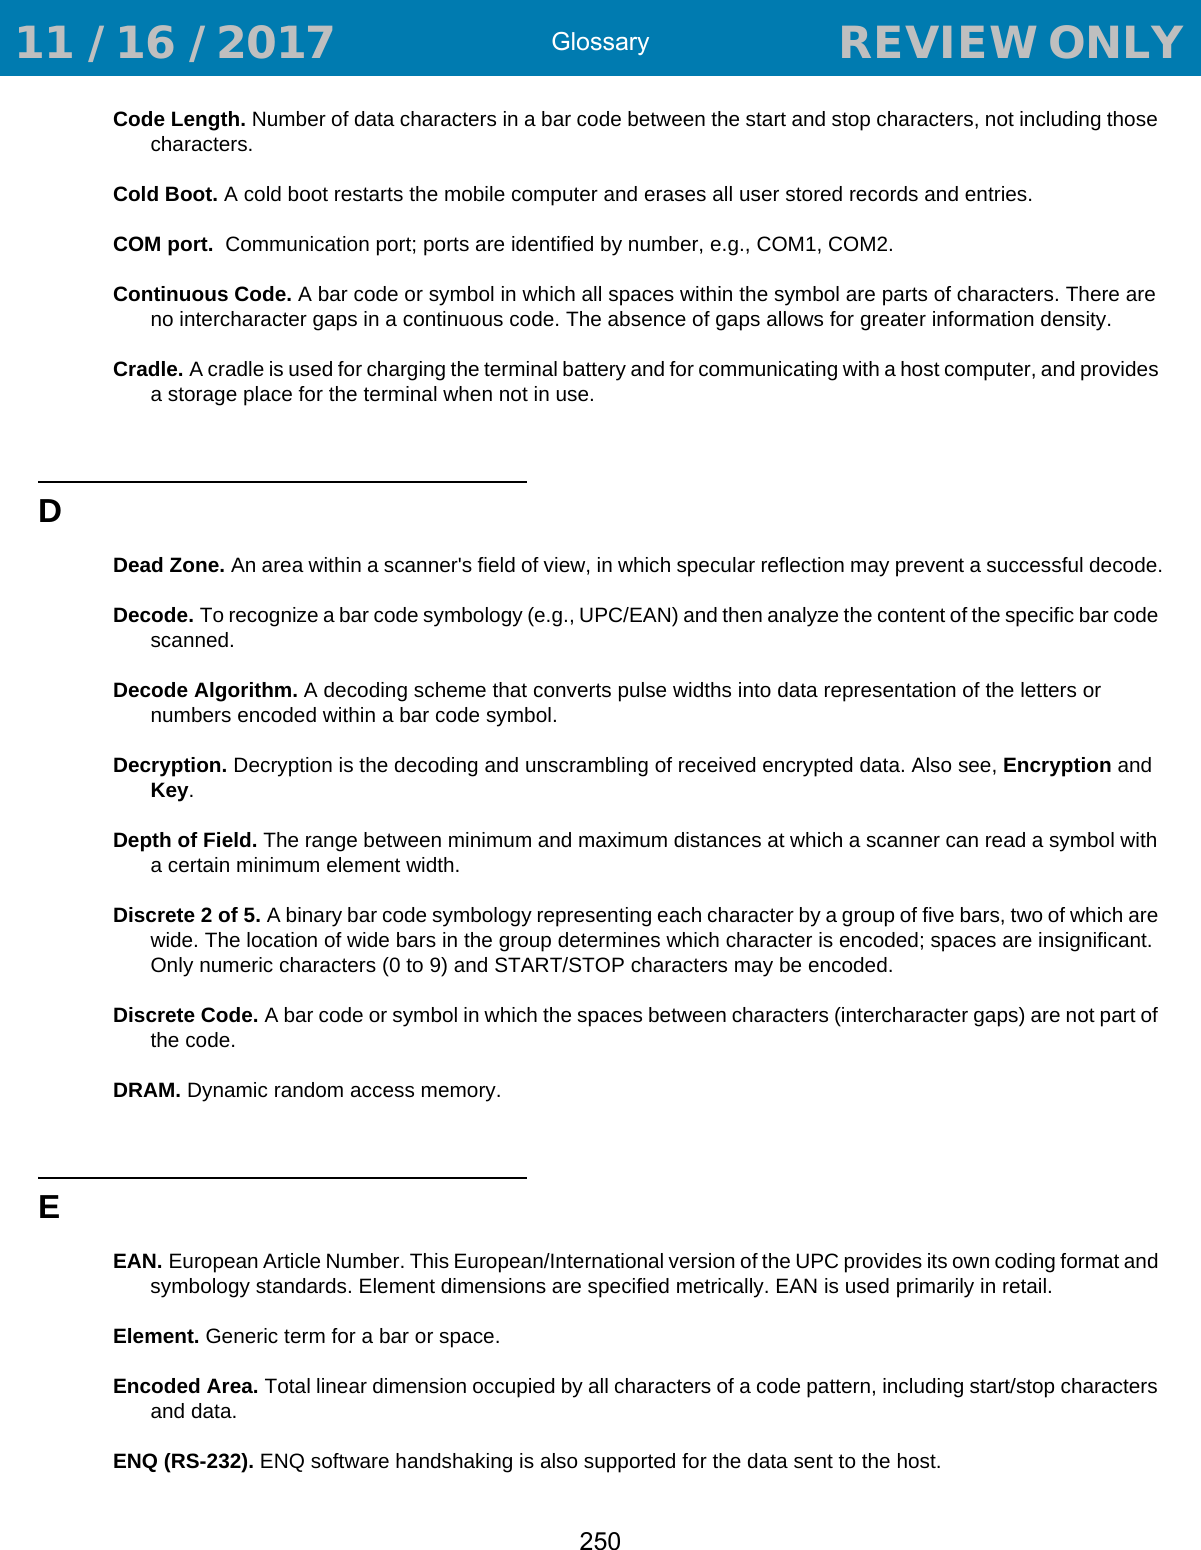
![Symbologies162Enable Code 128 Emulation to transmit these MicroPDF417 symbols with one of the following prefixes:]C1if the first codeword is 903-905]C2if the first codeword is 908 or 909]C0if the first codeword is 910 or 911Disable Code 128 Emulation to transmit these MicroPDF417 symbols with one of the following prefixes:]L3if the first codeword is 903-905]L4if the first codeword is 908 or 909]L5if the first codeword is 910 or 911Scan a bar code below to enable or disable Code 128 Emulation.NOTE:Linked MicroPDF codewords 906, 907, 912, 914, and 915 are not supported. Use GS1 Composites instead.Enable Code 128 Emulation(01h)*Disable Code 128 Emulation(00h) 11 / 16 / 2017 REVIEW ONLY REVIEW ONLY - REVIEW ONLY - REVIEW ONLY](https://usermanual.wiki/Zebra-Technologies/RS507X.User-Manual-2/User-Guide-3647187-Page-92.png)


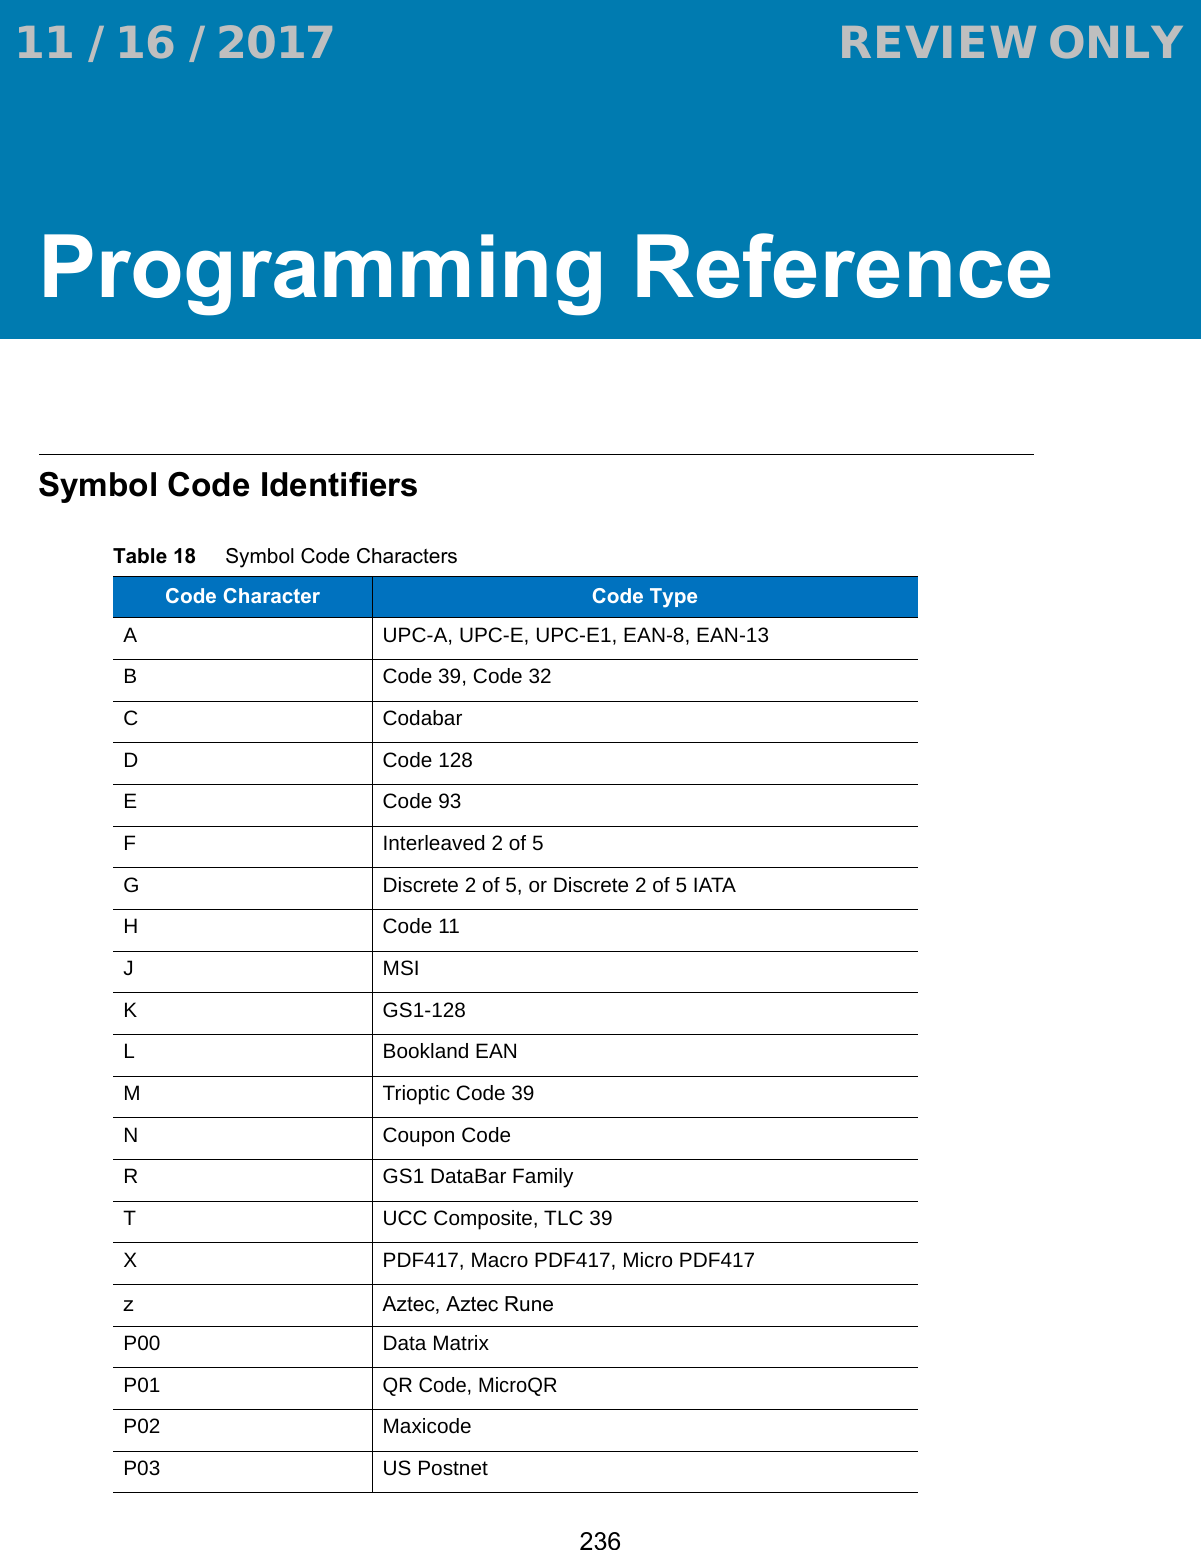
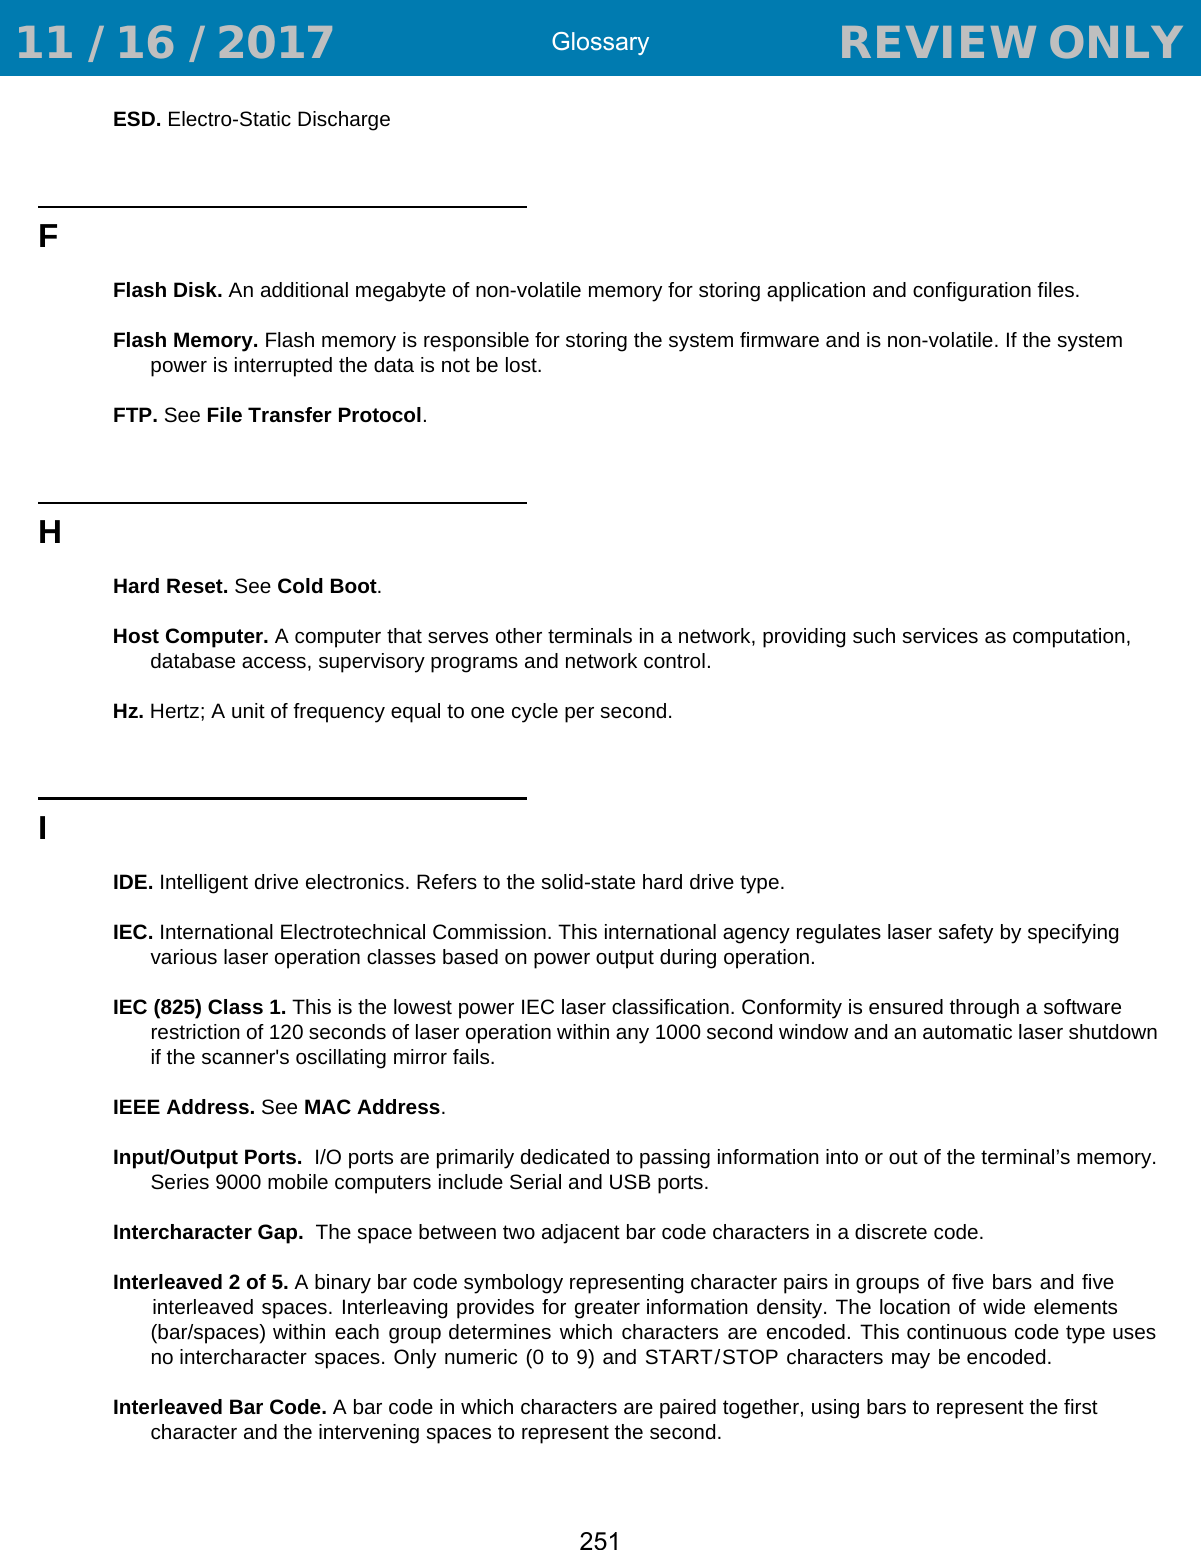
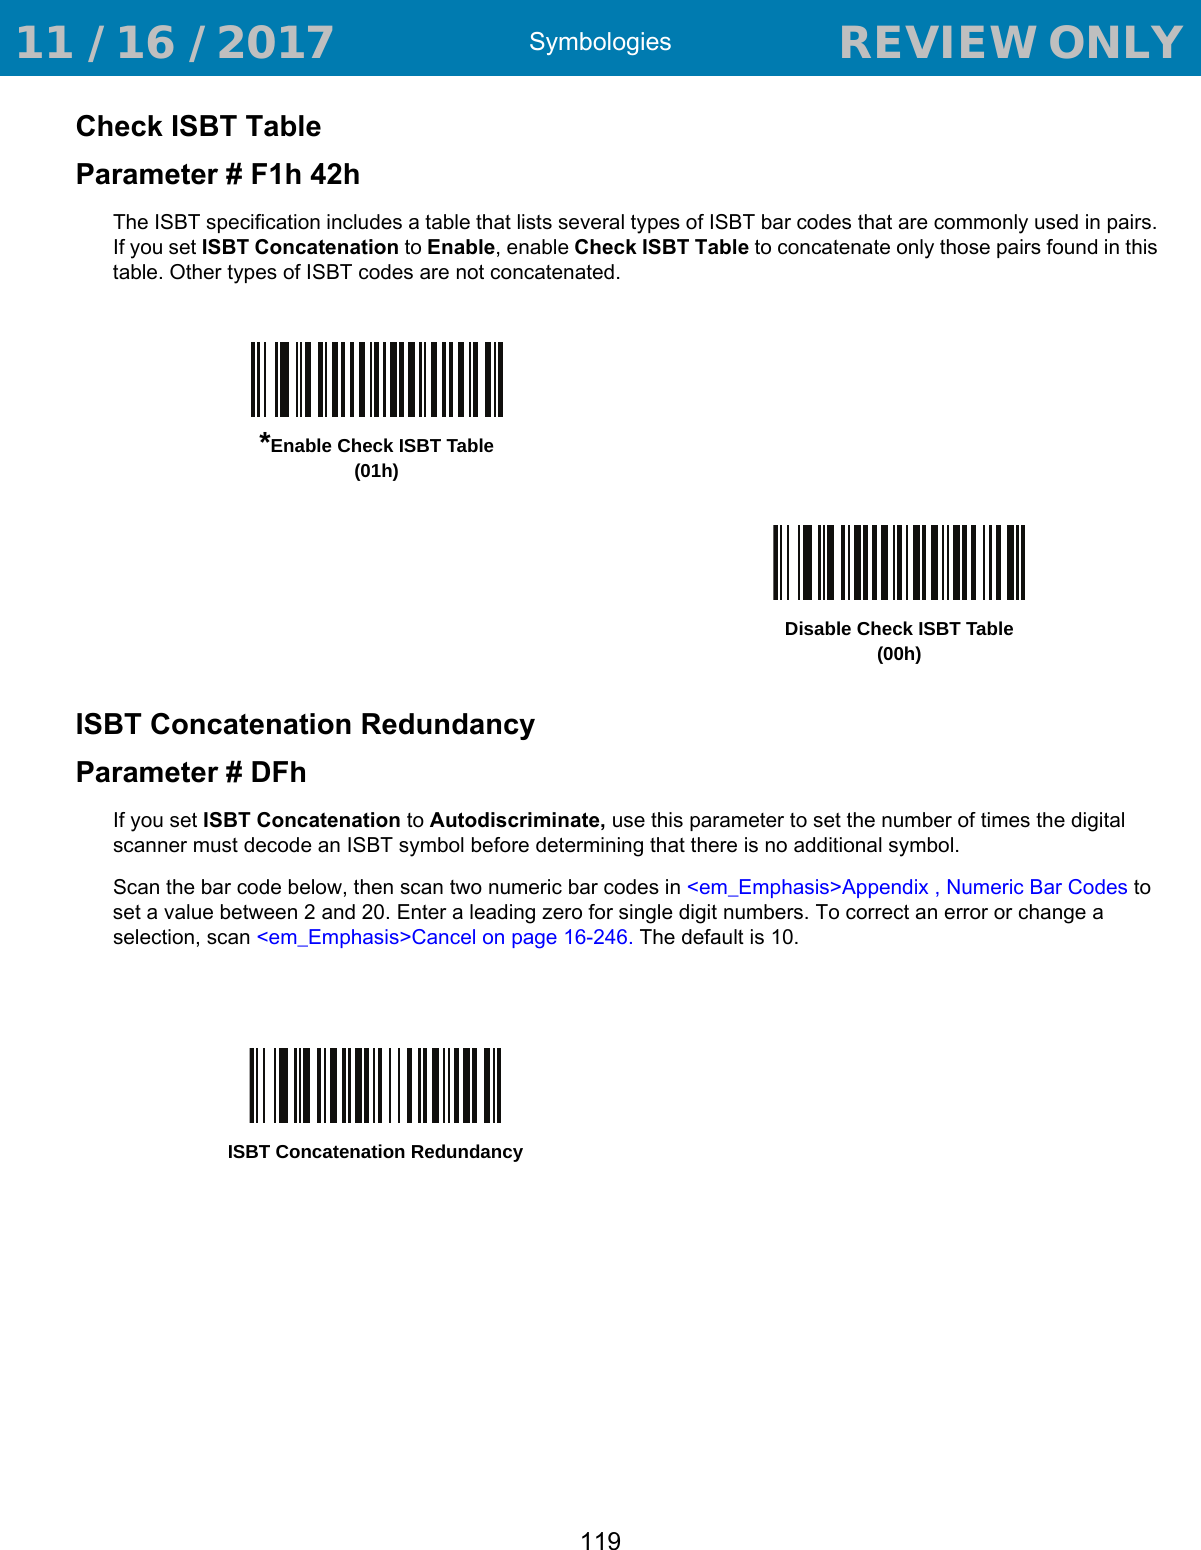
![Programming Reference237AIM Code IdentifiersEach AIM Code Identifier contains the three-character string ]cm where:] = Flag Character (ASCII 93)c = Code Character (see Table 19)m = Modifier Character (see Table 20)P04 US PlanetP05 Japan PostalP06 UK PostalP08 Netherlands KIX CodeP09 Australian PostalP0A USPS 4CB/One Code/Intelligent MailP0B UPU FICS PostalTable 18 Symbol Code Characters (Continued)Code Character Code TypeTable 19 Aim Code CharactersCode Character Code TypeA Code 39, Code 39 Full ASCII, Code 32C Code 128, Coupon (Code 128 portion)d Data MatrixE UPC/EAN, Coupon (UPC portion)e GS1 DataBar FamilyF CodabarG Code 93H Code 11I Interleaved 2 of 5L PDF417, Macro PDF417, Micro PDF417MMSIQQR Code, MicroQRS Discrete 2 of 5, IATA 2 of 5U Maxicode 11 / 16 / 2017 REVIEW ONLY REVIEW ONLY - REVIEW ONLY - REVIEW ONLY](https://usermanual.wiki/Zebra-Technologies/RS507X.User-Manual-2/User-Guide-3647187-Page-167.png)
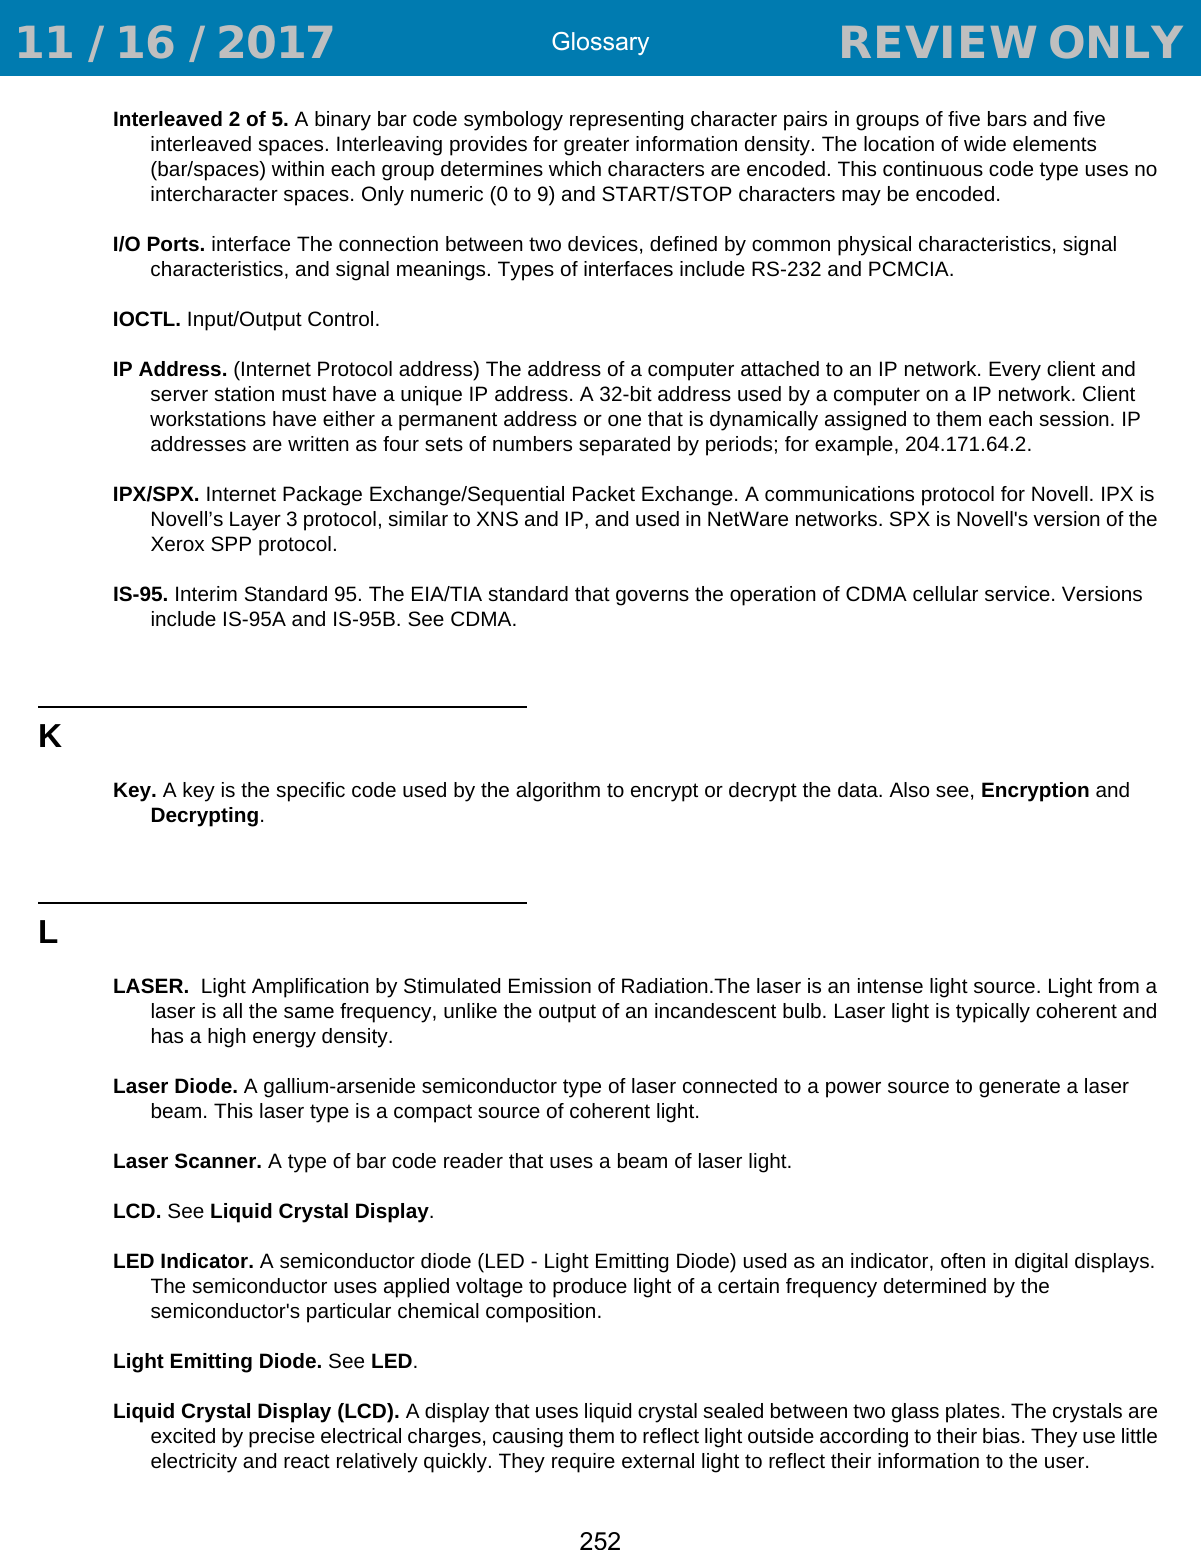
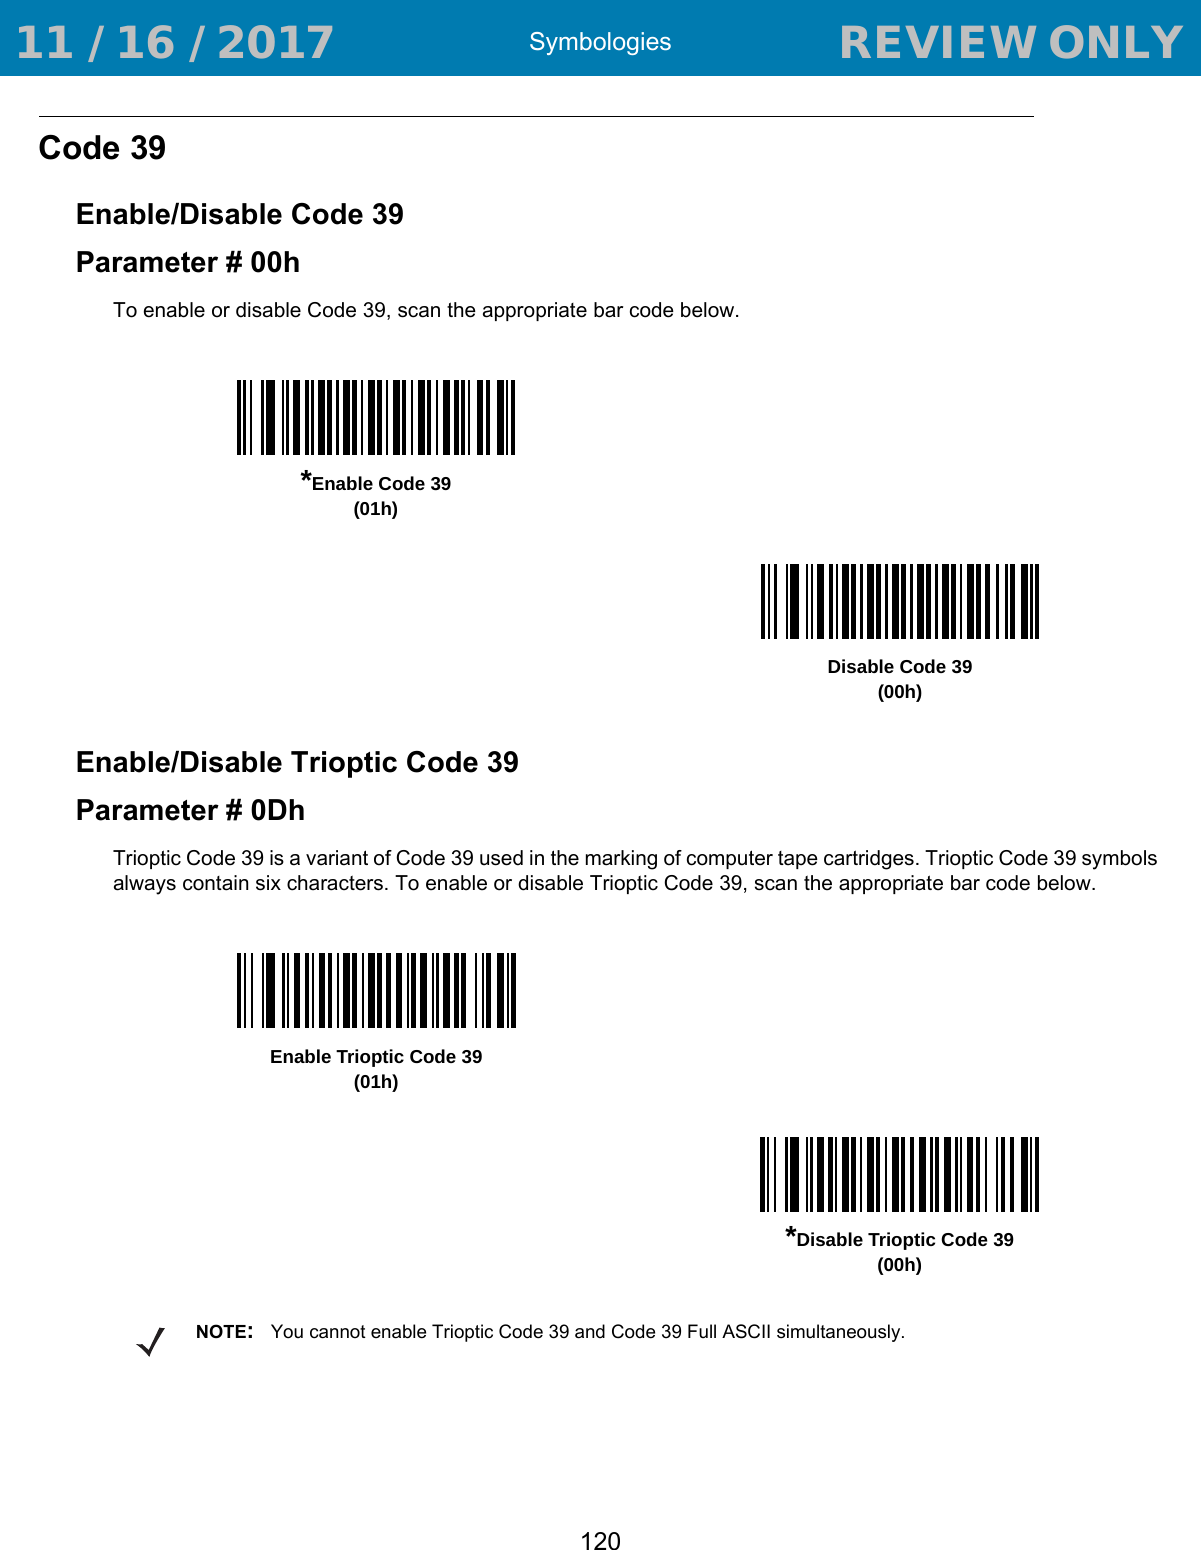
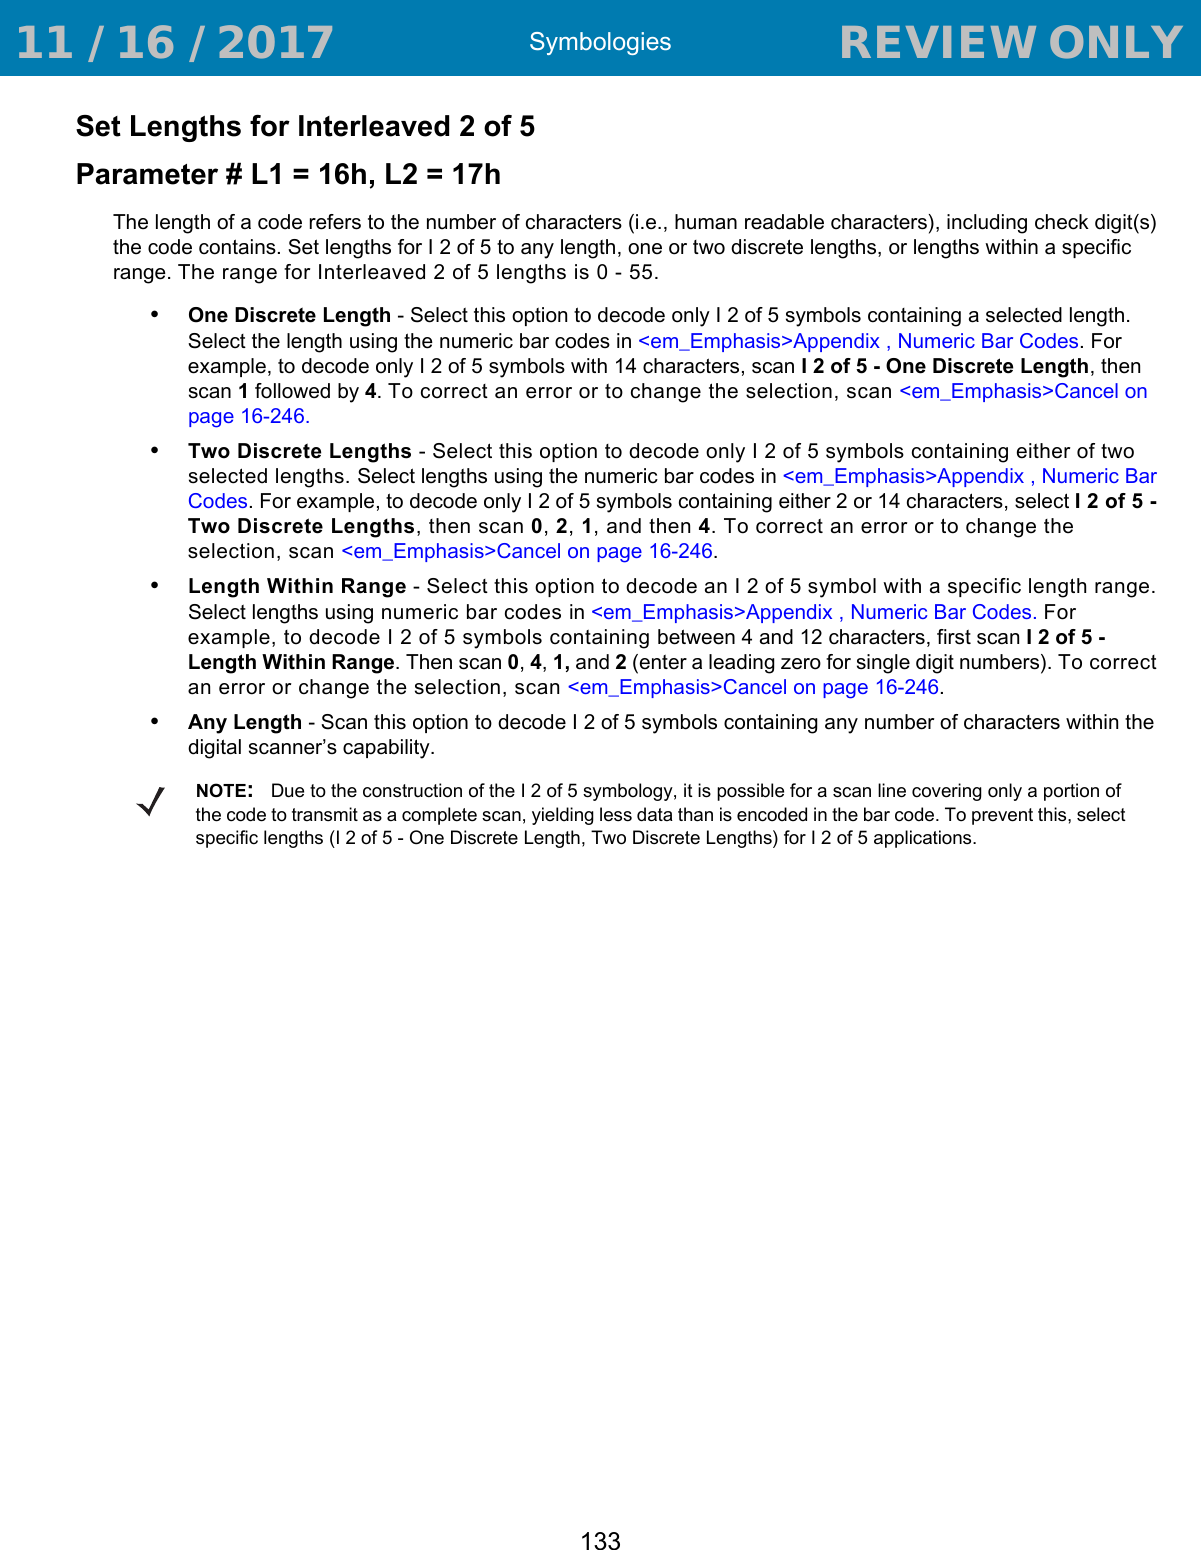
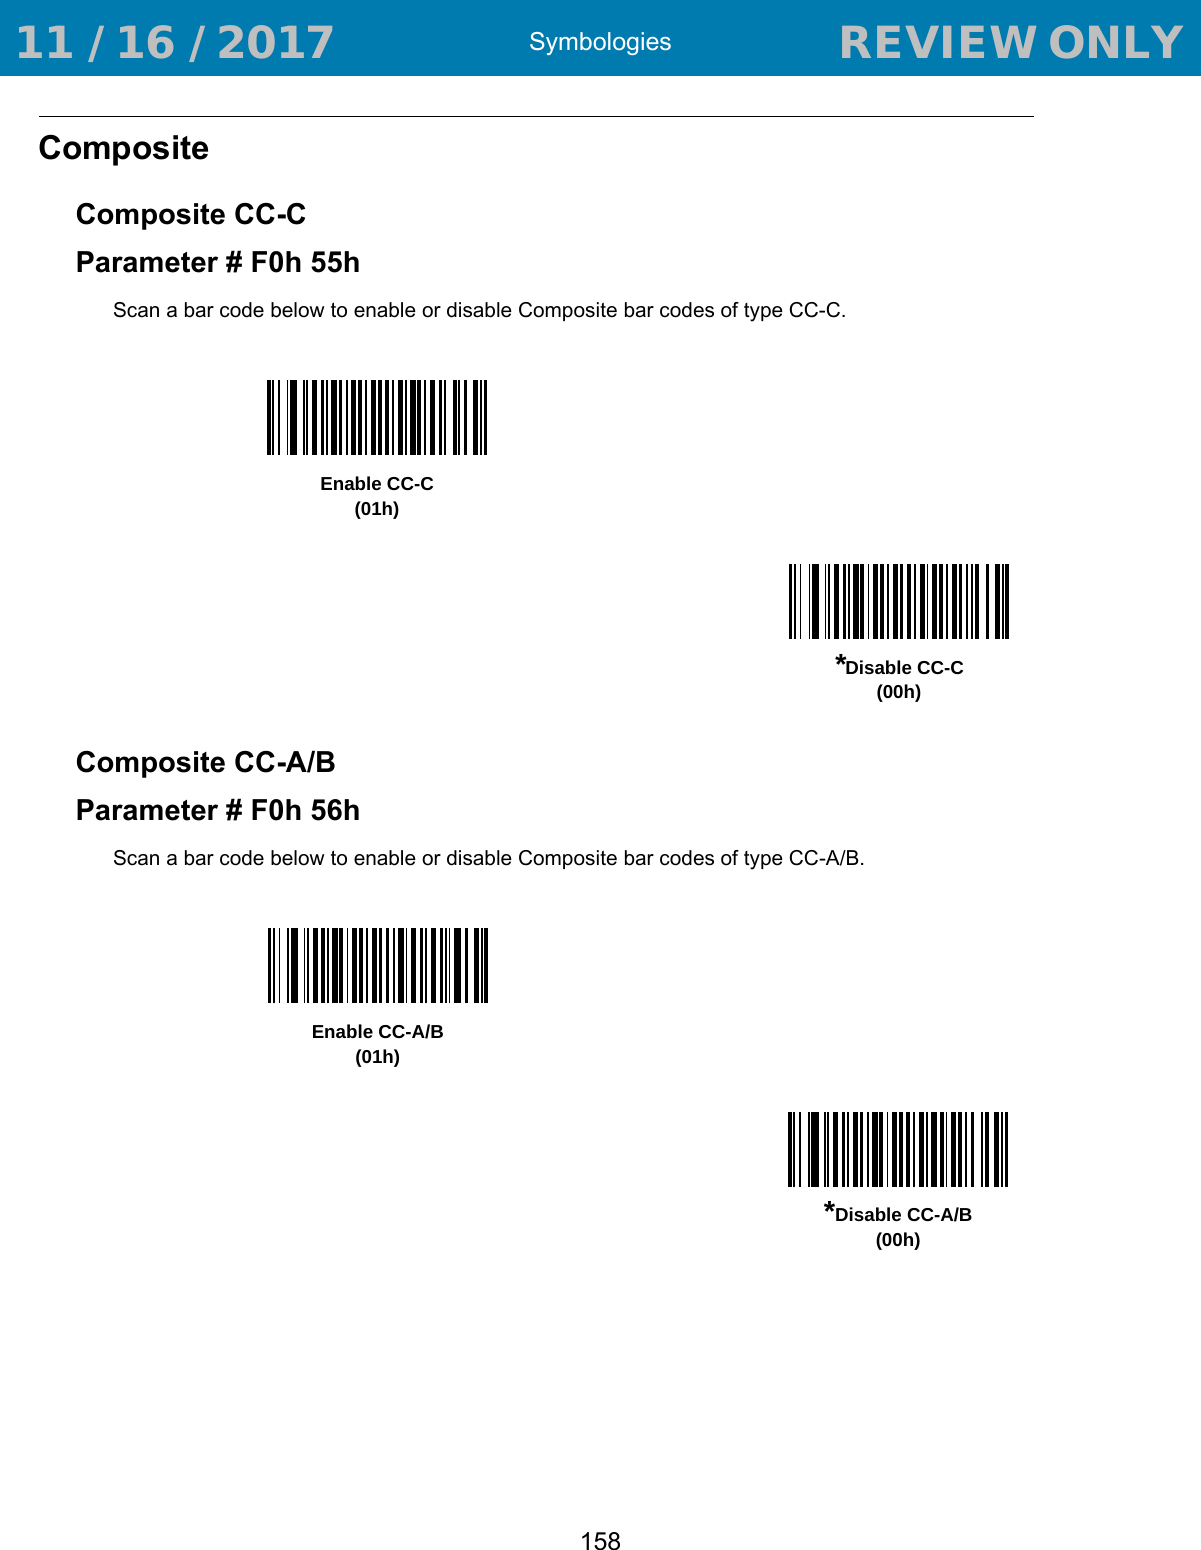
![Programming Reference238The modifier character is the sum of the applicable option values based on Table 20. z Aztec, Aztec RuneX Bookland EAN, Trioptic Code 39, US Postnet, US Planet, UK Postal, Japan Postal, Australian Postal, Netherlands KIX Code, USPS 4CB/One Code/Intelligent Mail, UPU FICS PostalTable 20 Modifier Characters Code Type Option Value OptionCode 39 0 No check character or Full ASCII processing.1 Reader has checked one check character.3 Reader has checked and stripped check character.4 Reader has performed Full ASCII character conversion.5 Reader has performed Full ASCII character conversion and checked one check character.7 Reader has performed Full ASCII character conversion and checked and stripped check character.Example: A Full ASCII bar code with check character W, A+I+MI+DW, is transmitted as ]A7AIMID where 7 = (3+4).Trioptic Code 39 0 No option specified at this time. Always transmit 0.Example: A Trioptic bar code 412356 is transmitted as ]X0412356Code 128 0 Standard data packet, no Function code 1 in first symbol position.1 Function code 1 in first symbol character position.2 Function code 1 in second symbol character position.Example: A Code (EAN) 128 bar code with Function 1 character FNC1 in the first position, AIMID is transmitted as ]C1AIMIDI 2 of 5 0 No check digit processing.1 Reader has validated check digit.3 Reader has validated and stripped check digit.Example: An I 2 of 5 bar code without check digit, 4123, is transmitted as ]I04123Codabar 0 No check digit processing.1 Reader has checked check digit.3 Reader has stripped check digit before transmission.Example: A Codabar bar code without check digit, 4123, is transmitted as ]F04123Code 93 0 No options specified at this time. Always transmit 0.Example: A Code 93 bar code 012345678905 is transmitted as ]G0012345678905Table 19 Aim Code Characters (Continued)Code Character Code Type 11 / 16 / 2017 REVIEW ONLY REVIEW ONLY - REVIEW ONLY - REVIEW ONLY](https://usermanual.wiki/Zebra-Technologies/RS507X.User-Manual-2/User-Guide-3647187-Page-168.png)
![Programming Reference239MSI 0 Check digits are sent.1 No check digit is sent.Example: An MSI bar code 4123, with a single check digit checked, is transmitted as ]M14123D 2 of 5 0 No options specified at this time. Always transmit 0.Example: A D 2 of 5 bar code 4123, is transmitted as ]S04123UPC/EAN 0 Standard data packet in full EAN format, i.e. 13 digits for UPC-A, UPC-E, and EAN-13 (not including supplemental data).1 Two digit supplemental data only.2 Five digit supplemental data only.3 Combined data packet comprising 13 digits from EAN-13, UPC-A or UPC-E symbol and 2 or 5 digits from supplemental symbol.4 EAN-8 data packet.Example: A UPC-A bar code 012345678905 is transmitted as ]E00012345678905Bookland EAN 0 No options specified at this time. Always transmit 0.Example: A Bookland EAN bar code 123456789X is transmitted as ]X0123456789XCode 11 0 Single check digit1 Two check digits3 Check characters validated but not transmitted.GS1 DataBar Family No option specified at this time. Always transmit 0. GS1 DataBar-14 and GS1 DataBar Limited transmit with an Application Identifier “01”.Note: In GS1-128 emulation mode, GS1 DataBar is transmitted using Code 128 rules (i.e., ]C1).Example: A GS1 DataBar-14 bar code 100123456788902 is transmitted as ]e001100123456788902.Table 20 Modifier Characters (Continued)Code Type Option Value Option 11 / 16 / 2017 REVIEW ONLY REVIEW ONLY - REVIEW ONLY - REVIEW ONLY](https://usermanual.wiki/Zebra-Technologies/RS507X.User-Manual-2/User-Guide-3647187-Page-169.png)
![Programming Reference240EAN.UCC Composites (GS1 DataBar, GS1-128, 2D portion of UPC composite)Native mode transmission.Note: UPC portion of composite is transmitted using UPC rules.0 Standard data packet.1 Data packet containing the data following an encoded symbol separator character.2 Data packet containing the data following an escape mechanism character. The data packet does not support the ECI protocol.3 Data packet containing the data following an escape mechanism character. The data packet supports the ECI protocol.GS1-128 emulationNote: UPC portion of composite is transmitted using UPC rules.1 Data packet is a GS1-128 symbol (i.e., data is preceded with ]JC1).PDF417, Micro PDF417 0 Reader set to conform to protocol defined in 1994 PDF417 symbology specifications. Note: When this option is transmitted, the receiver cannot reliably determine whether ECIs have been invoked or whether data byte 92DEC has been doubled in transmission.1 Reader set to follow the ECI protocol (Extended Channel Interpretation). All data characters 92DEC are doubled. 2 Reader set for Basic Channel operation (no escape character transmission protocol). Data characters 92DEC are not doubled. Note: When decoders are set to this mode, unbuffered Macro symbols and symbols requiring the decoder to convey ECI escape sequences cannot be transmitted. 3 The bar code contains a GS1-128 symbol, and the first codeword is 903-907, 912, 914, 915.4 The bar code contains a GS1-128 symbol, and the first codeword is in the range 908-909.5 The bar code contains a GS1-128 symbol, and the first codeword is in the range 910-911.Example: A PDF417 bar code ABCD, with no transmission protocol enabled, is transmitted as ]L2ABCD.Data Matrix 0 ECC 000-140, not supported.1 ECC 200.2 ECC 200, FNC1 in first or fifth position.3 ECC 200, FNC1 in second or sixth position.4 ECC 200, ECI protocol implemented.5 ECC 200, FNC1 in first or fifth position, ECI protocol implemented.6 ECC 200, FNC1 in second or sixth position, ECI protocol implemented.Table 20 Modifier Characters (Continued)Code Type Option Value Option 11 / 16 / 2017 REVIEW ONLY REVIEW ONLY - REVIEW ONLY - REVIEW ONLY](https://usermanual.wiki/Zebra-Technologies/RS507X.User-Manual-2/User-Guide-3647187-Page-170.png)