Zinwell ZW-2000-22 2.4G OutDoor Device User Manual ZW 2000 Manual 0727
Zinwell Corporation 2.4G OutDoor Device ZW 2000 Manual 0727
Zinwell >
Contents
- 1. Users Manual 1
- 2. Users Manual 2
- 3. Users Manual 3
Users Manual 2
21
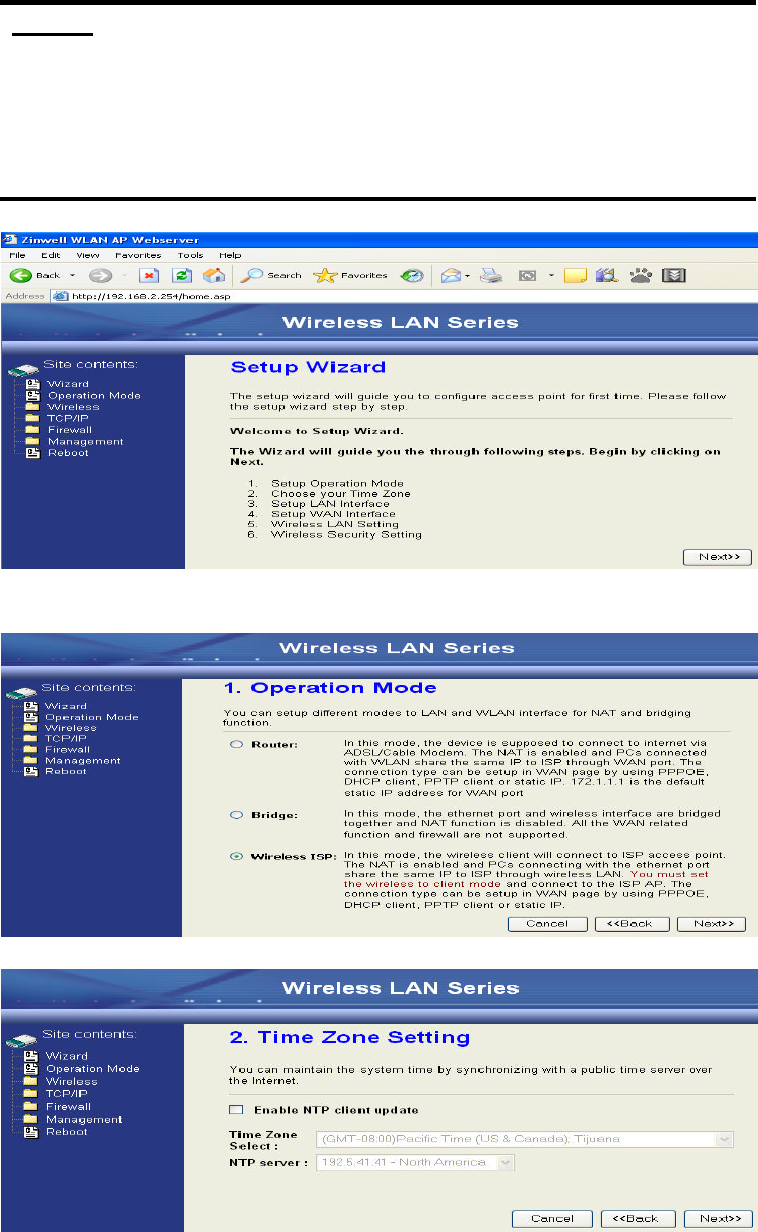
Configure DEV4:
1. Access the web server (http://192.168.2.254) of device from the Ethernet port.
Caution
If you configure multiple devices in the same PC, since the devices have the
same default IP address but different MAC addresses, it may cause you
unable to access the web server of device. If the situation happens, please
try to clean the ARP table of your PC by DOS command “arp –d” then you
can access the web server of device using the default IP address.
2. Use Wizard page to setup device.
3. Press “Next>>” button then set the “Operation Mode” to “Wireless ISP”
mode.
4. Press “Next>>” button then disable “Time Zone” function.
22
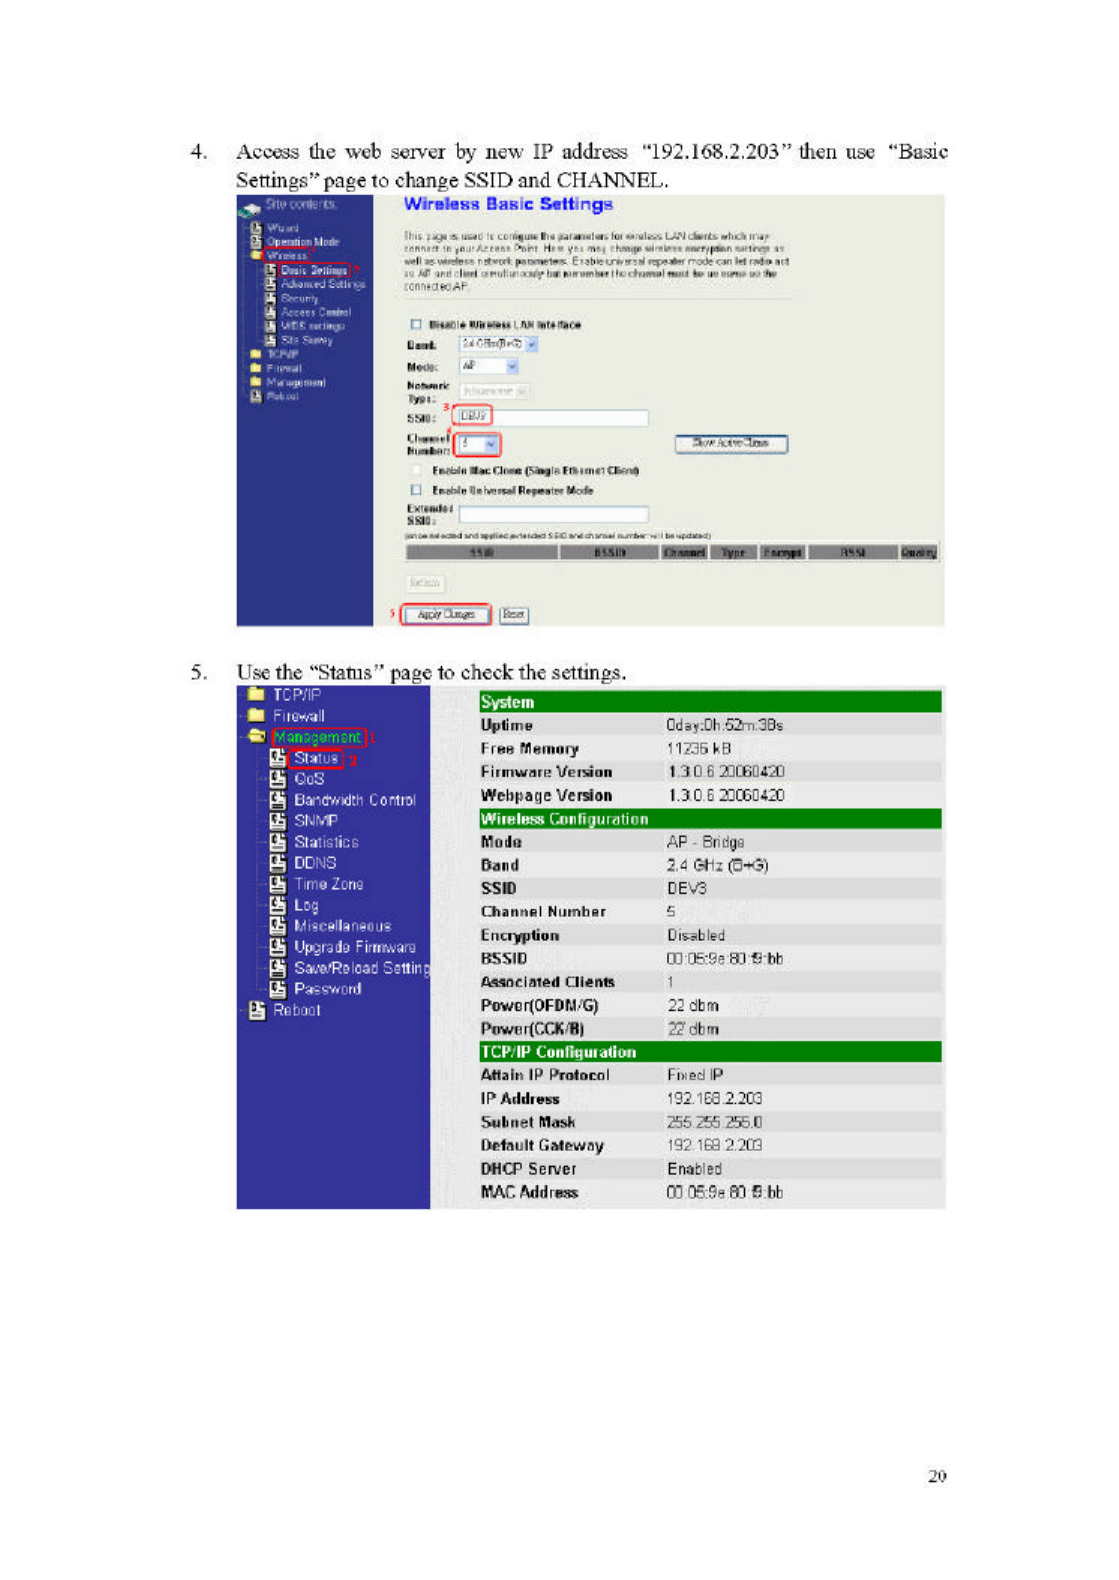
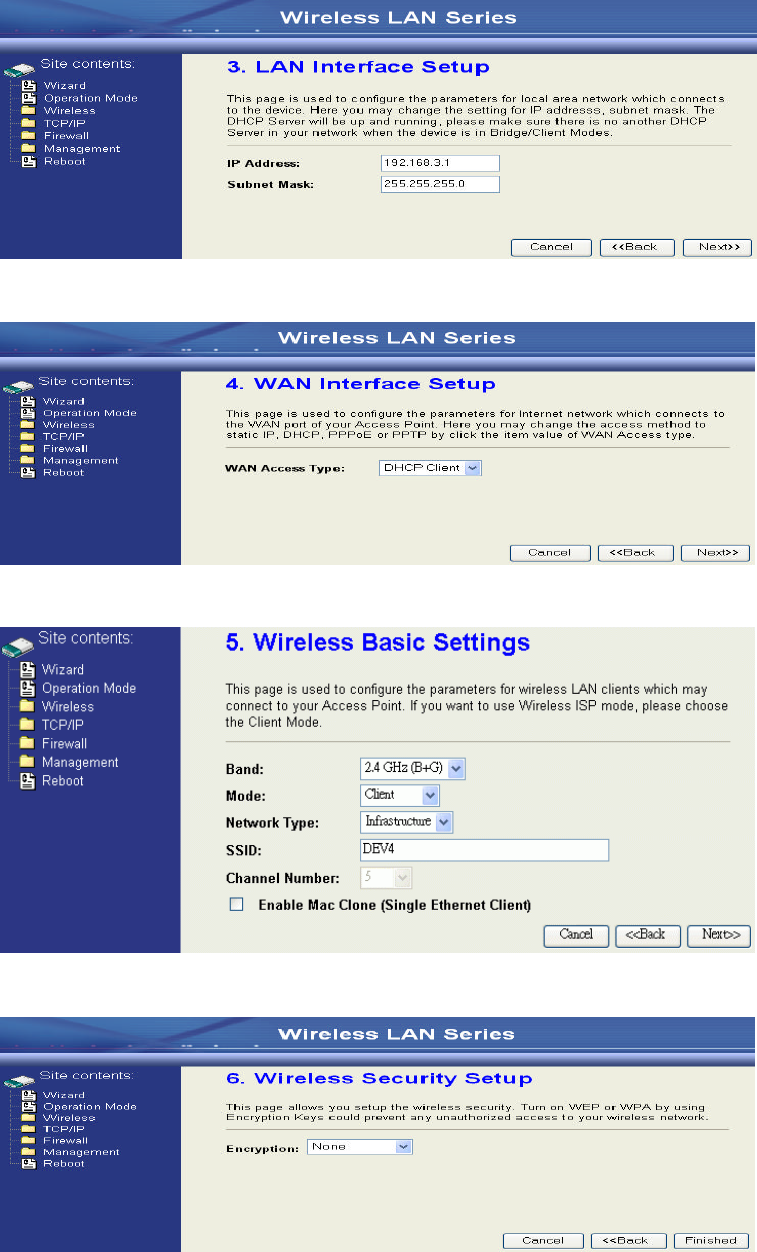
5. Press “Next>>” button then set the IP address of LAN interface.
6. Press “Next>>” button then select the “DHCP Client” for “WAN Access
Type”.
7. Press “Next>>” button then select the “Client” for “mode” and change the
SSID to “DEV4”.
8. Press “Next>>” button then select “None” for “Encryption” then press
“Finished” button.

23
9. Wait for refreshing web page.
10. Change the IP address of your PC to 192.168.3.x then access the web server
by the new IP address “192.168.3.1” and use “Status” page check the setting.
11. If the “State” of “Wireless Configuration” is not “Connected” or you want to
refresh the “RSSI “, please use “Site Survey” page to re-connect a AP.
24
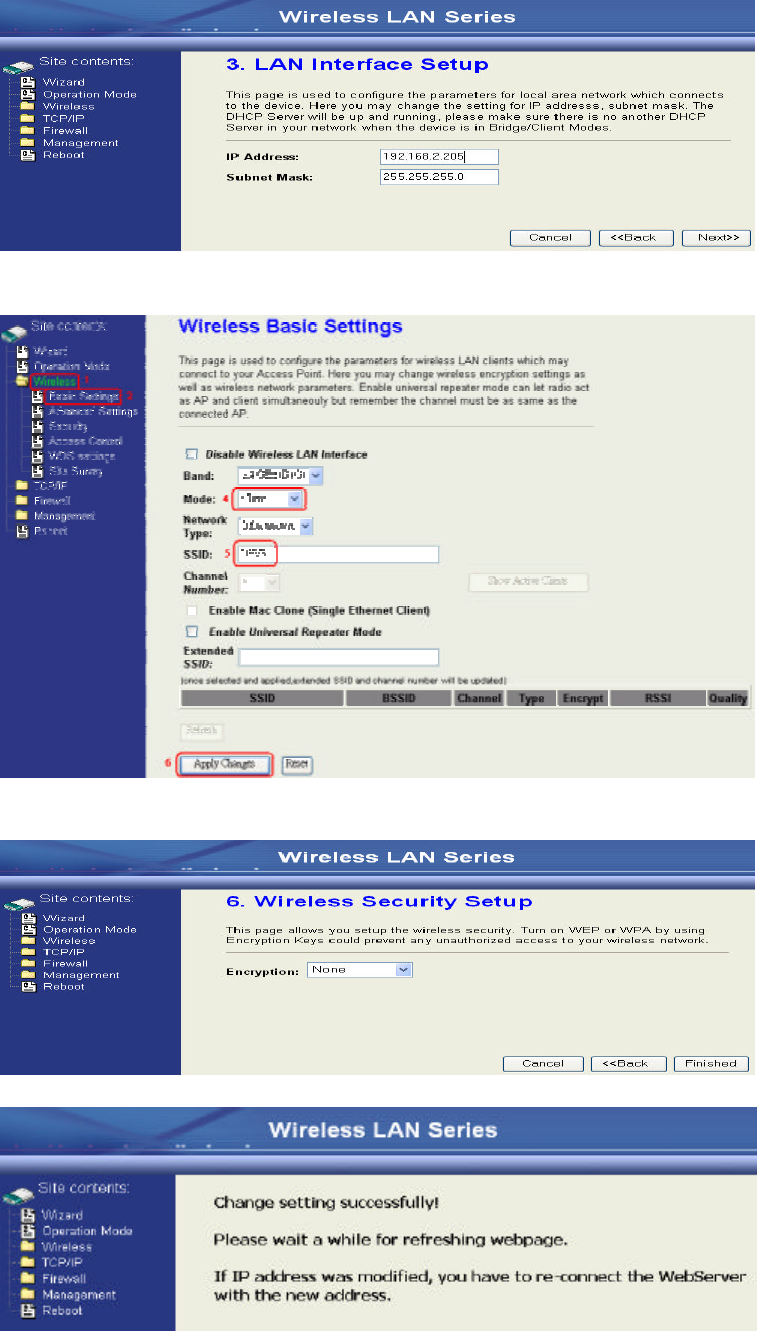
Configure DEV5:
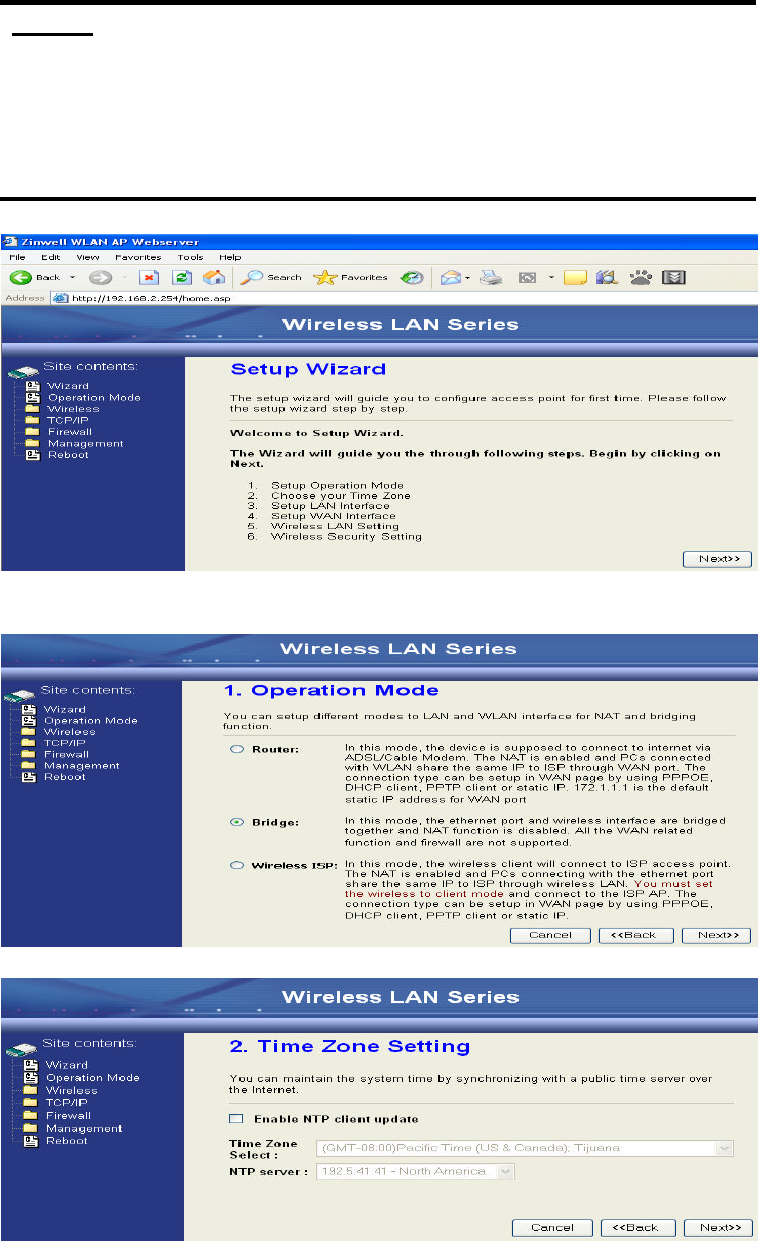
1. Access the web server (http://192.168.2.254) of device from the Ethernet port.
Caution
If you configure multiple devices in the same PC, since the devices have the
same default IP address but different MAC addresses, it may cause you
unable to access the web server of device. If the situation happens, please
try to clean the ARP table of your PC by DOS command “arp –d” then you
can access the web server of device using the default IP address.
2. Use Wizard page to setup device.
3. Press “Next>>” button then set the “Operation Mode” to “Wireless ISP”
mode.
4. Press “Next>>” button then disable “Time Zone” function.
25
5. Press “Next>>” button then set the IP address of LAN interface.
6. Press “Next>>” button then select the “Client” for “mode” and change the
SSID to “DEV5”.
7. Press “Next>>” button then select “None” for “Encryption” then press
“Finished” button.
8. Wait for refreshing web page.

26
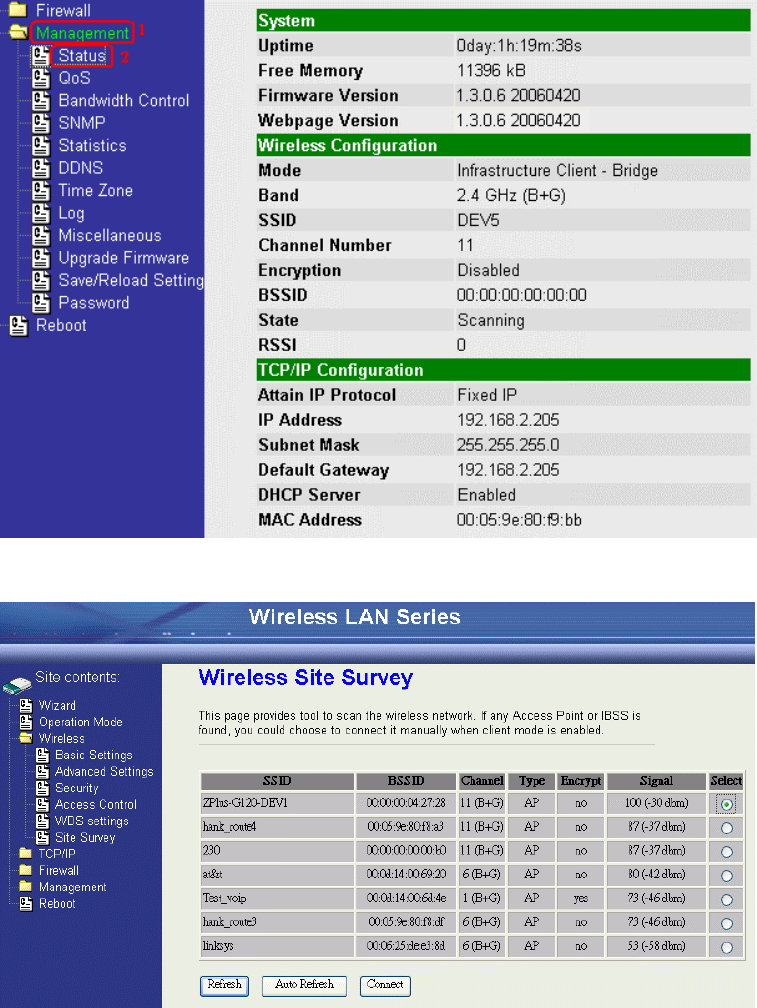
9. Access the web server by the new IP address “192.168.2.205” and use “LAN
Interface” page to disable DHCP Server.
10. Wait for refreshing webpage.
11. Use “State” page to check setting.
27
12. If the “State” of “Wireless Configuration” is not “Connected” or you want to
refresh the “RSSI “, please use “Site Survey” page to re-connect a AP.
28
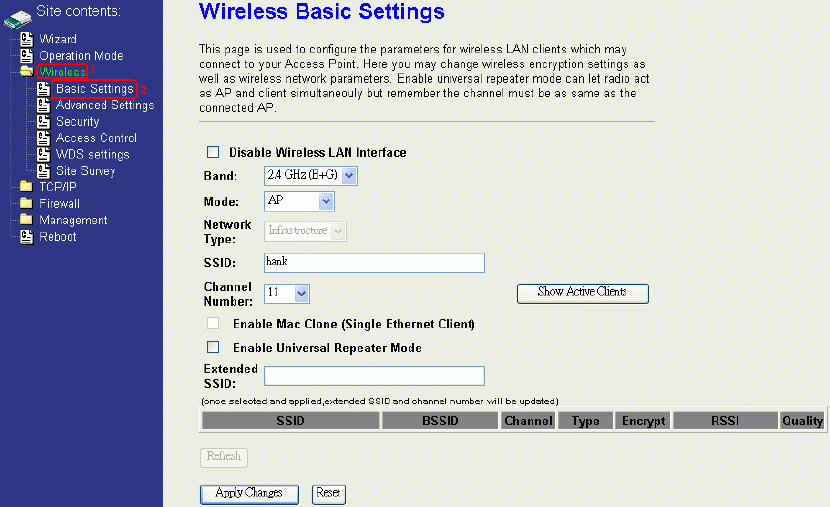
Basic Settings
Disable Wireless LAN Interface
Disable the wireless interface of device
Band:
The device supports 2.4GHz(B), 2.4GHz(G) and 2.4GHz(B+G) mixed modes.
Mode:
The radio of device supports different modes as following:
1. AP
The radio of device acts as an Access Point to serves all wireless clients
to join a wireless local network.
2. Client
Support Infrastructure and Ad-hoc network types to act as a wireless
adapter.
3. WDS
Wireless Distribution System, this mode serves as a wireless repeater,
only devices with WDS function supported can connect to it, all the
wireless clients can’t survey and connect the device when the mode is
selected.
4. AP+WDS
Support both AP and WDS functions, the wireless clients and devices
with WDS function supported can survey and connect to it.
29
l Infrastructure:
This type requires the presence of 802.11b/g Access Point. All
communication is done via the Access Point.
Ethernet
AP
AP Client #2
AP Client #1
l Ad Hoc:
This type provides a peer-to-peer communication between wireless
stations. All the communication is done from Client to Client without any
Access Point involved. Ad Hoc networking must use the same SSID and
channel for establishing the wireless connection.
PC #3 PC #2
AP Client #1
AP Client #2AP Client #3
PC #1
In client mode, the device can’t support the Router mode function
including Firewall and WAN settings.
SSID:
The SSID is a unique identifier that wireless networking devices use to
establish and maintain wireless connectivity. Multiple access point/bridges on
a network or sub-network can use the same SSID. SSIDs are case sensitive
and can contain up to 32 alphanumeric characters. Do not include spaces in
your SSID.
Channel Number

30
The following table is the available frequencies (in MHz) for the 2.4-GHz radio:
Channel No. Frequency Country Domain
1 2412 Americas, EMEA, Japan, and China
2 2417 Americas, EMEA, Japan, and China
3 2422 Americas, EMEA, Japan, Israel, and China
4 2427 Americas, EMEA, Japan, Israel, and China
5 2432 Americas, EMEA, Japan, Israel, and China
6 2437 Americas, EMEA, Japan, Israel, and China
7 2442 Americas, EMEA, Japan, Israel, and China
8 2447 Americas, EMEA, Japan, Israel, and China
9 2452 Americas, EMEA, Japan, Israel, and China
10 2457 Americas, EMEA, Japan, and China
11 2462 Americas, EMEA, Japan, and China
12 2467 EMEA and Japan only
13 2472 EMEA and Japan only
14 2484 Japan only
When set to “Auto”, the device will find the least-congested channel for use.
Associated Client
Show the information of active wireless client stations that connected to the
device.
REMARK
This device operation of this product in the U.S.A. is firmware-limited to channels 1-11.
31
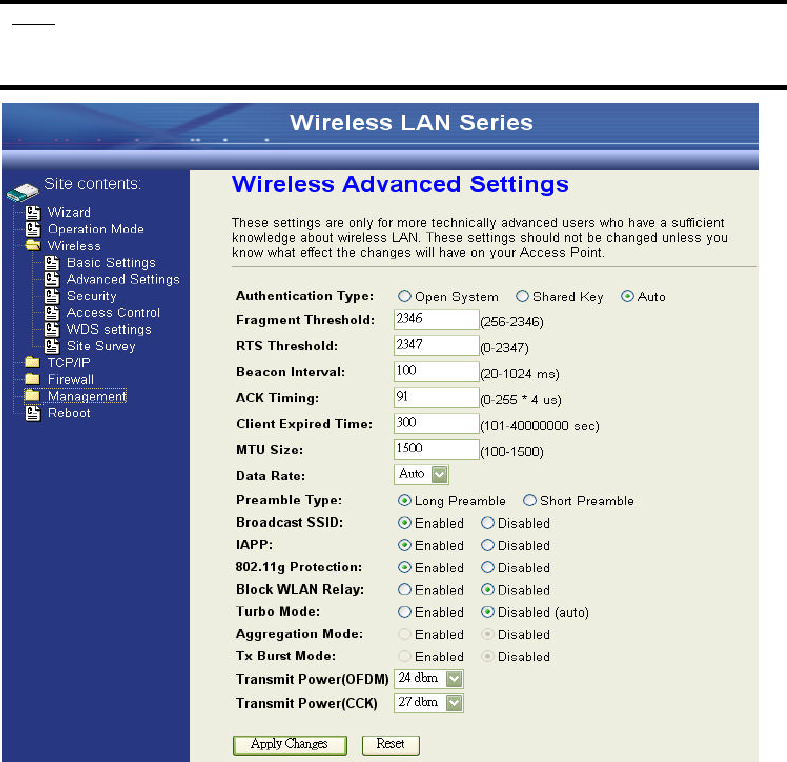
Advanced Settings
These settings are only for more technically advanced users who have sufficient
knowledge about wireless LAN. These settings should not be changed unless
you know what effect the changes will have on your device. The default setting is
optimized for the normal operation. For specific application, setting configuration
will required highly attention to reach optimistic condition.
Note:
Any unreasonable value change to default setting will reduce the
throughput of the device.
Authentication Type
The device supports two Authentication Types “Open system” and “Shared
Key”. When you select “Share Key”, you need to setup “WEP” key in “Security”
page (See the next section). The default setting is “Auto”. The wireless client
can associate with the device by using one of the two types.
Fragment Threshold
The fragmentation threshold determines the size at which packets are
fragmented (sent as several pieces instead of as one block). Use a low setting
in areas where communication is poor or where there is a great deal of radio
interference. This function will help you to improve the network performance.
32
RTS Threshold
The RTS threshold determines the packet size at which the radio issues a
request to send (RTS) before sending the packet. A low RTS Threshold setting
can be useful in areas where many client devices are associating with the
device, or in areas where the clients are far apart and can detect only the
device and not each other. You can enter a setting ranging from 0 to 2347
bytes.
Beacon Interval
The beacon interval is the amount of time between access point beacons in
mini-seconds. The default beacon interval is 100.
ACK Timing
Acknowledgement Character Timing, is the amount of time that device wait
client’s response. If the device does not receive the response from client after
the time interval, it will resend the data and wait client’s response. The default
ACK timing is 91*4us. You may need to change this value due to the
environment or distance. Bad environment or long distance needs more time
to wait client’s response.
Client Expired Time
The client expired time determines time interval the client need to re-associate
with the device while client is idle. The default client expired time is 300 sec.
MTU Size
Maximum Transmission Unit, the default MTU size is 1500. You may need to
change the MTU for optimal performance of your wireless LAN traffic.
Data Rate
The standard IEEE 802.11b/11g supports 1, 2, 5.5, 11 / 6, 9, 12, 18, 24, 36, 48
and 54 Mbps data rates. You can choose the rate that the device uses for data
transmission. The default value is “auto”. The device will use the highest
possible selected transmission rate.
Broadcast SSID
Broadcasting the SSID will let your wireless clients find the device
automatically. If you are building a public Wireless Network, disable this
function can provide better security. Every wireless stations located within the
coverage of the device must connect this device by manually configure the
SSID in your client settings.
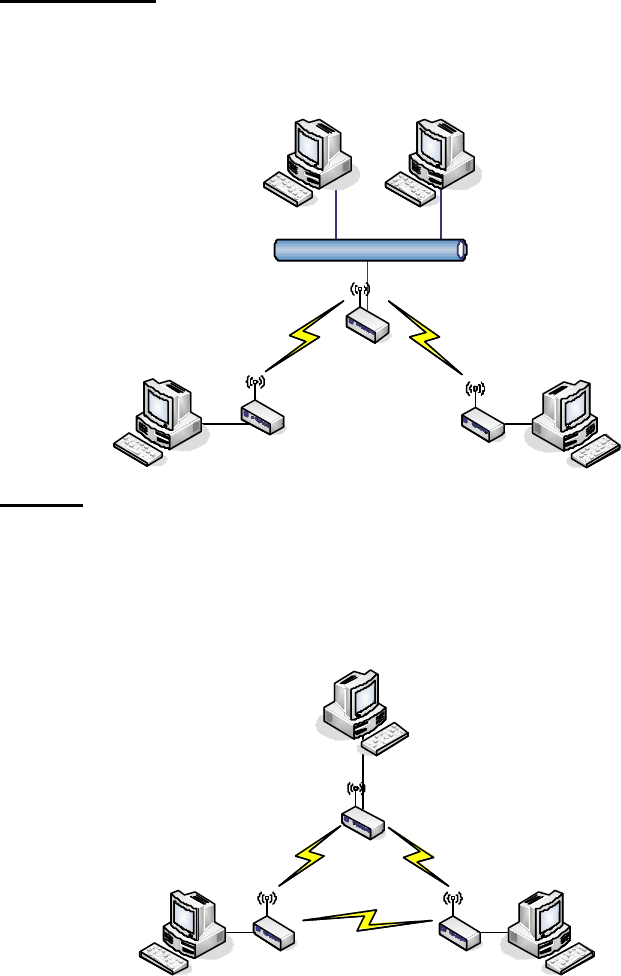
IAPP
This function will let Wireless Stations roam among a network environment
with multiple devices. Wireless Stations are able to switch from one device to
another as they move between the coverage areas. Users can have more
wireless working range. An example is as the following figure.
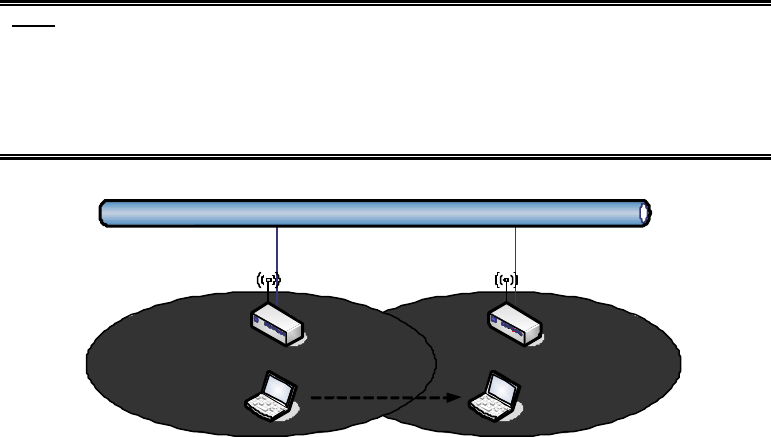
33
You should comply with the following instructions to roam among the wireless
coverage areas.
Note: For implementing the roaming function, the setting MUST comply the
following two items.
l All the devices must be in the same subnet network and the SSID must
be the same.
l If you use the 802.1x authentication, you need to have the user profile
in these devices for the roaming station.
Ethernet
Wireless Station moves
between the coverage areas
DEV1DEV2
Block WLAN Relay (Isolate Client)
The device supports isolation function. If you are building a public Wireless
Network, enable this function can provide better security. The device will block
packets between wireless clients (relay). All the wireless clients connected to
the device can’t see each other.
Transmit Power
The device supports eleven transmission output power levels from 17 to
22dBm for CCK (802.11b) mode and eight transmission output power levels
from 17 to 22dBm for OFDM (802.11g) mode. User can adjust the power level
to change the coverage of the device. Every wireless stations located within
the coverage of the device also needs to have the high power radio. Otherwise
the wireless stations only can survey the device, but can’t establish connection
with device.
34
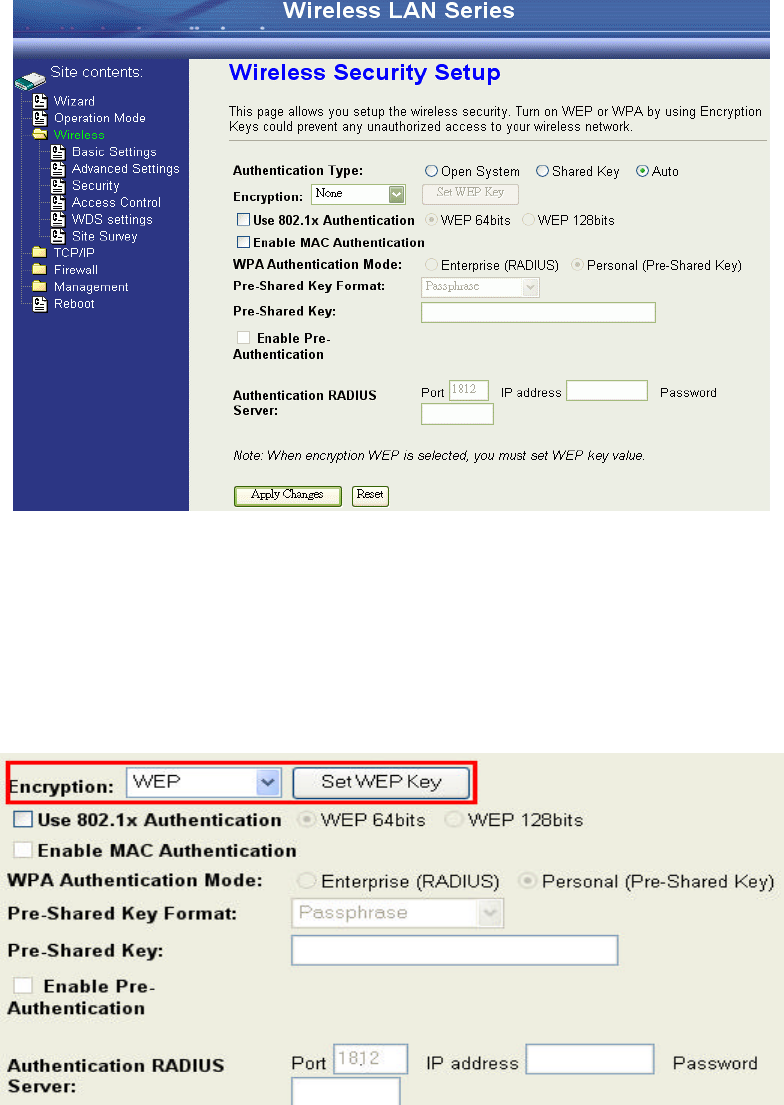
Configuring Wireless Security
This device provides complete wireless security function include WEP, 802.1x,
WPA-TKIP, WPA2-AES and WPA2-Mixed in different mode (see the Security
Support Table).
The default security setting of the encryption function is disabled. Choose your
preferred security setting depending on what security function you need.
WEP Encryption Setting
Wired Equivalent Privacy (WEP) is implemented in this device to prevent
unauthorized access to your wireless network. The WEP setting must be as
same as each client in your wireless network. For more secure data
transmission, you can change encryption type to “WEP” and click the “Set
WEP Key” button to open the “Wireless WEP Key setup” page.