ZyXEL Communications EMG2881-T20A Dual-Band Wireless AC1300 Gigabit Ethernet Gateway User Manual Part 1

ZyXEL Communications Corporation Dual-Band Wireless AC1300 Gigabit Ethernet Gateway Users Manual Part 1

Contents

Users Manual Part 1.pdf
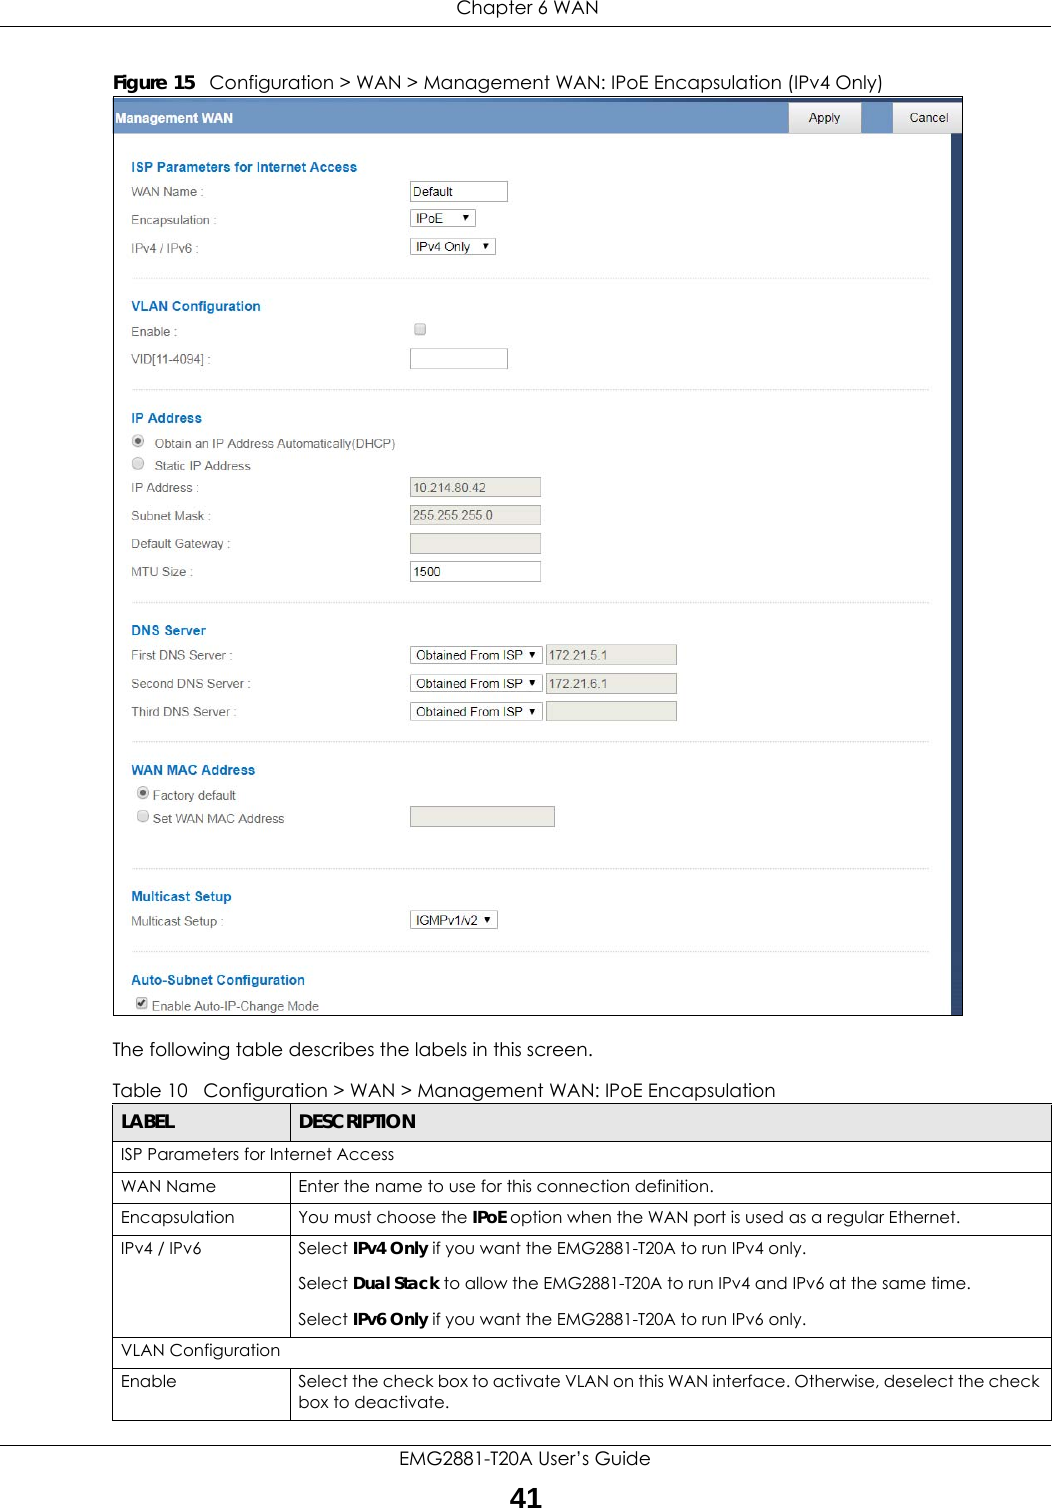
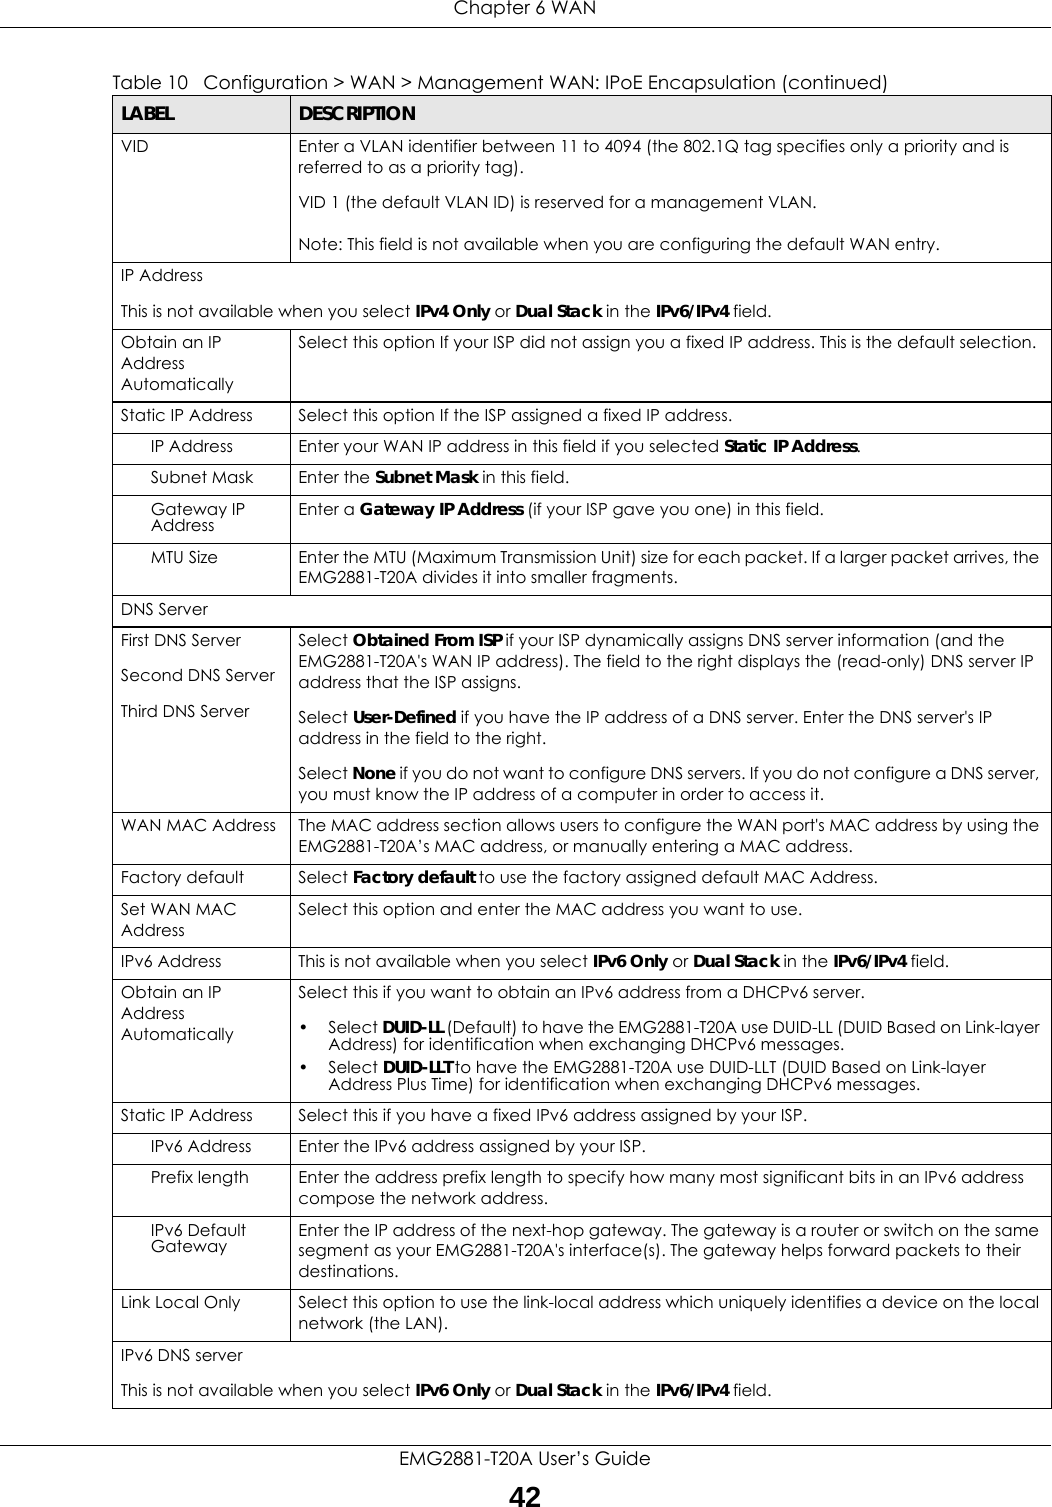
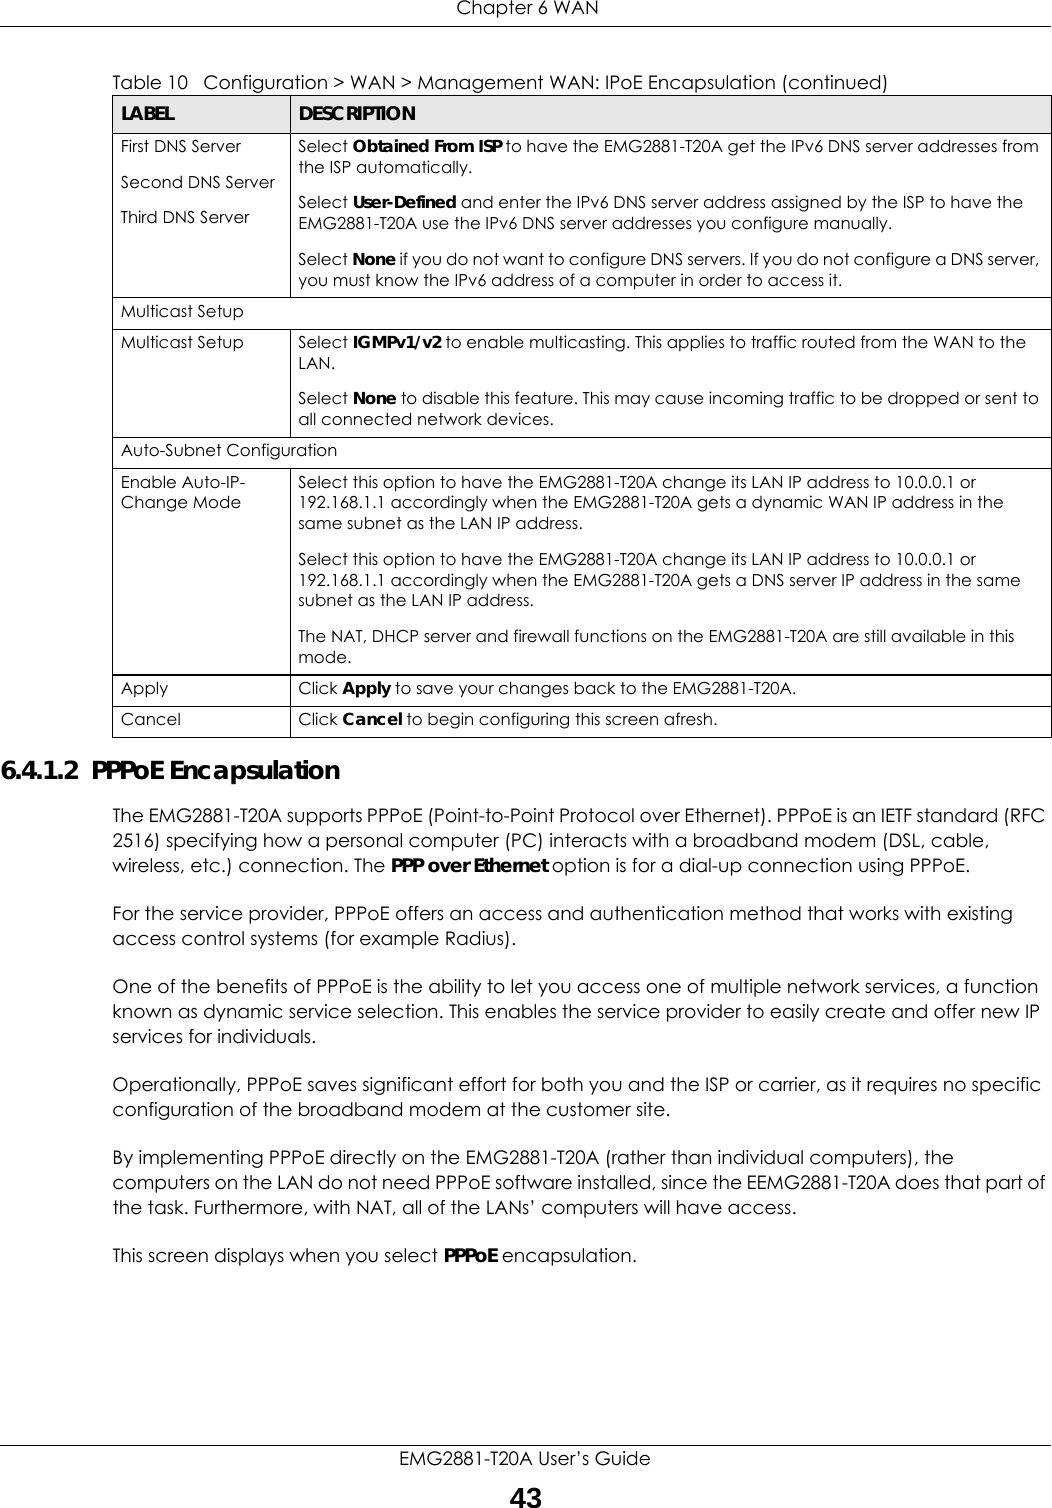
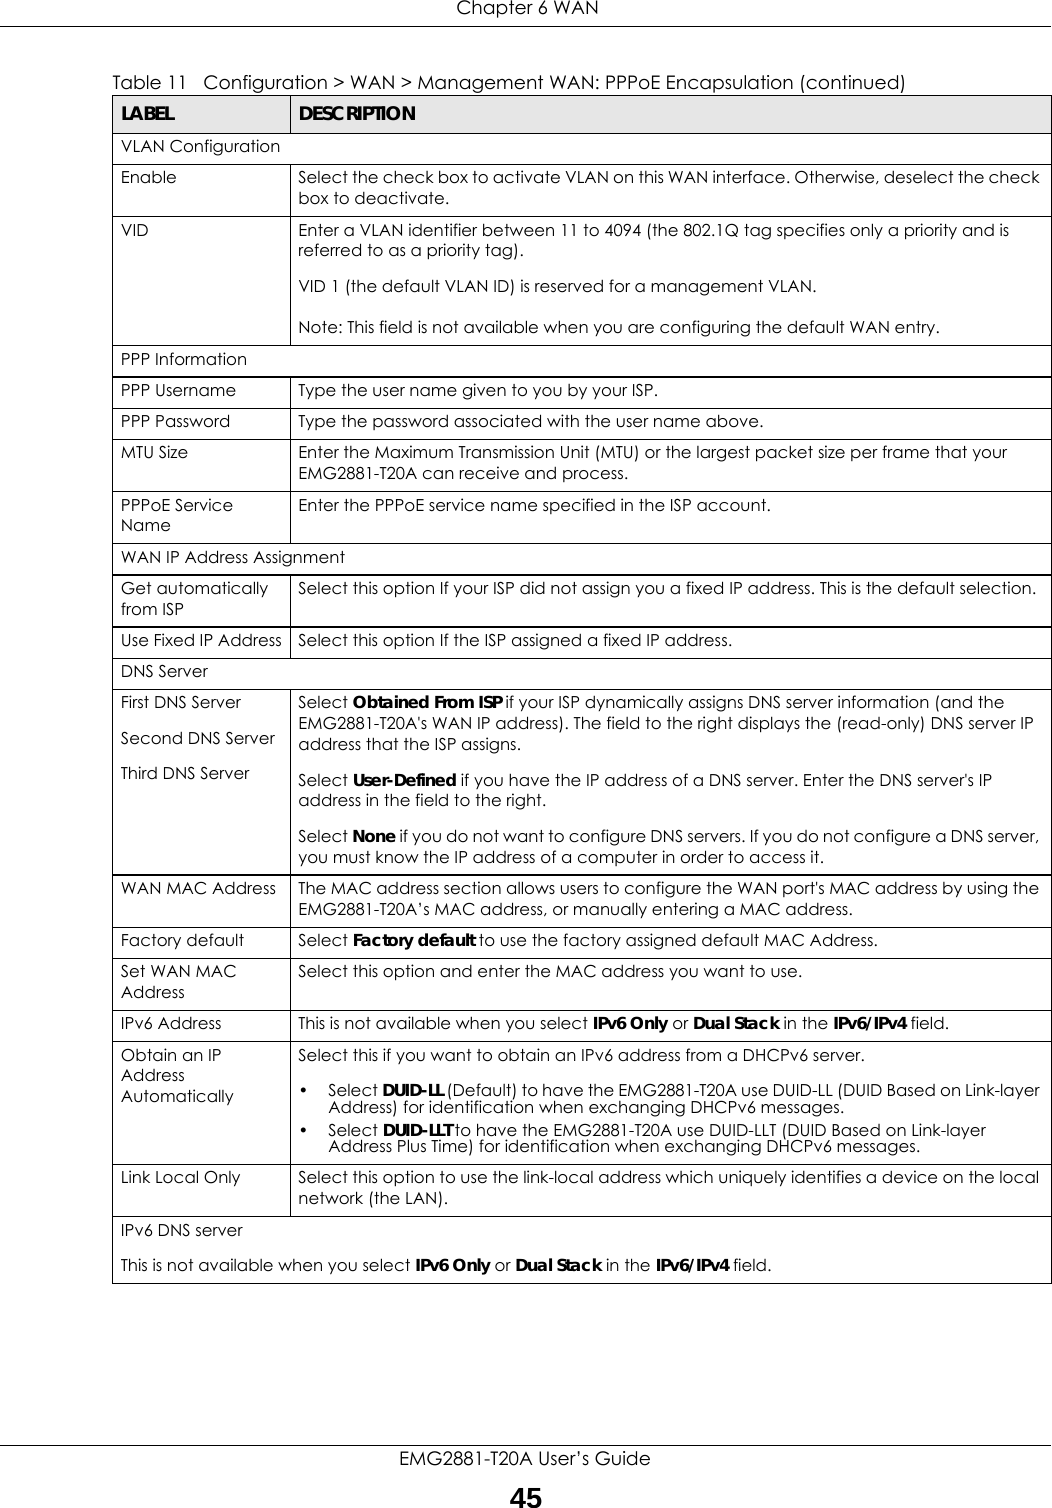
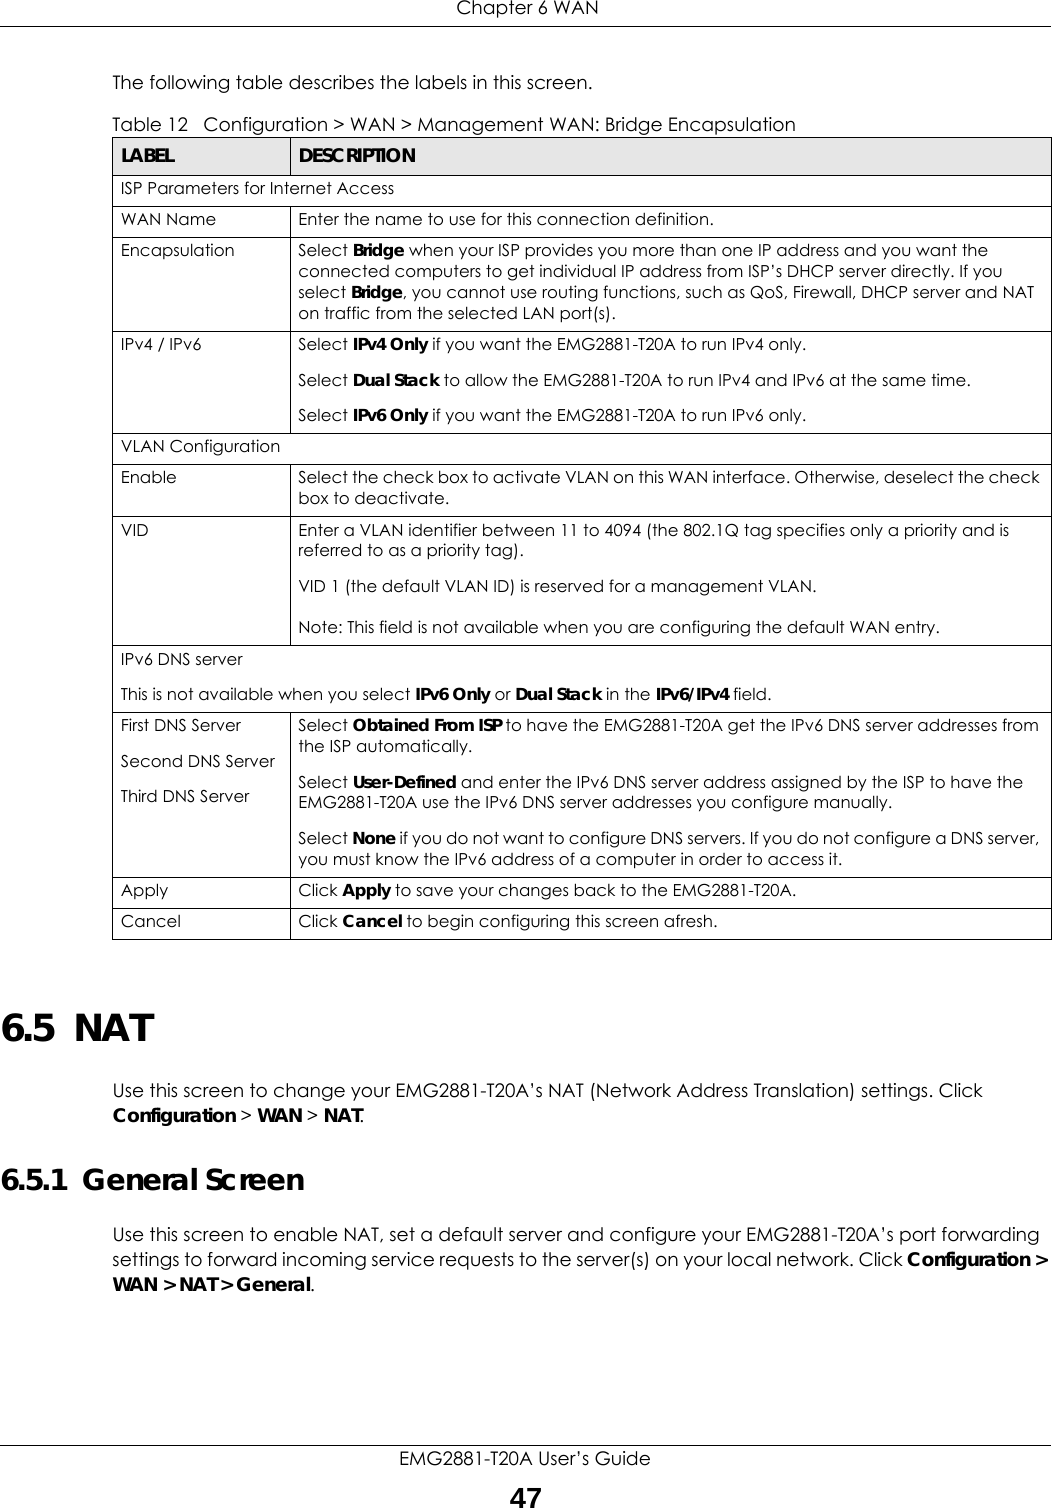
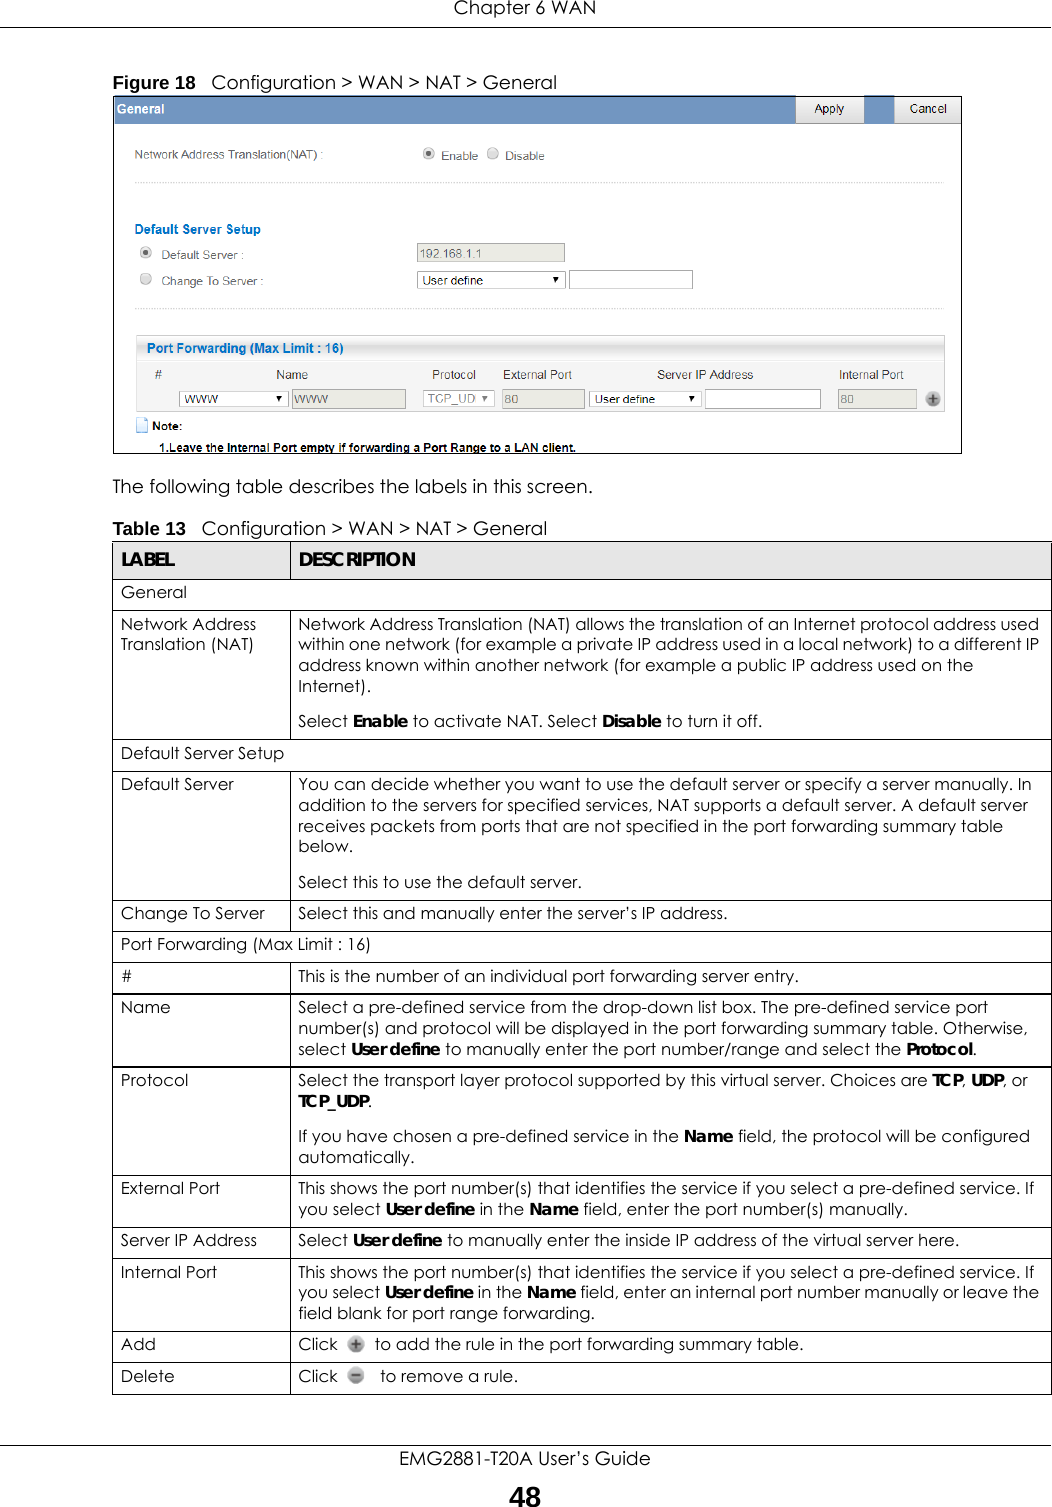
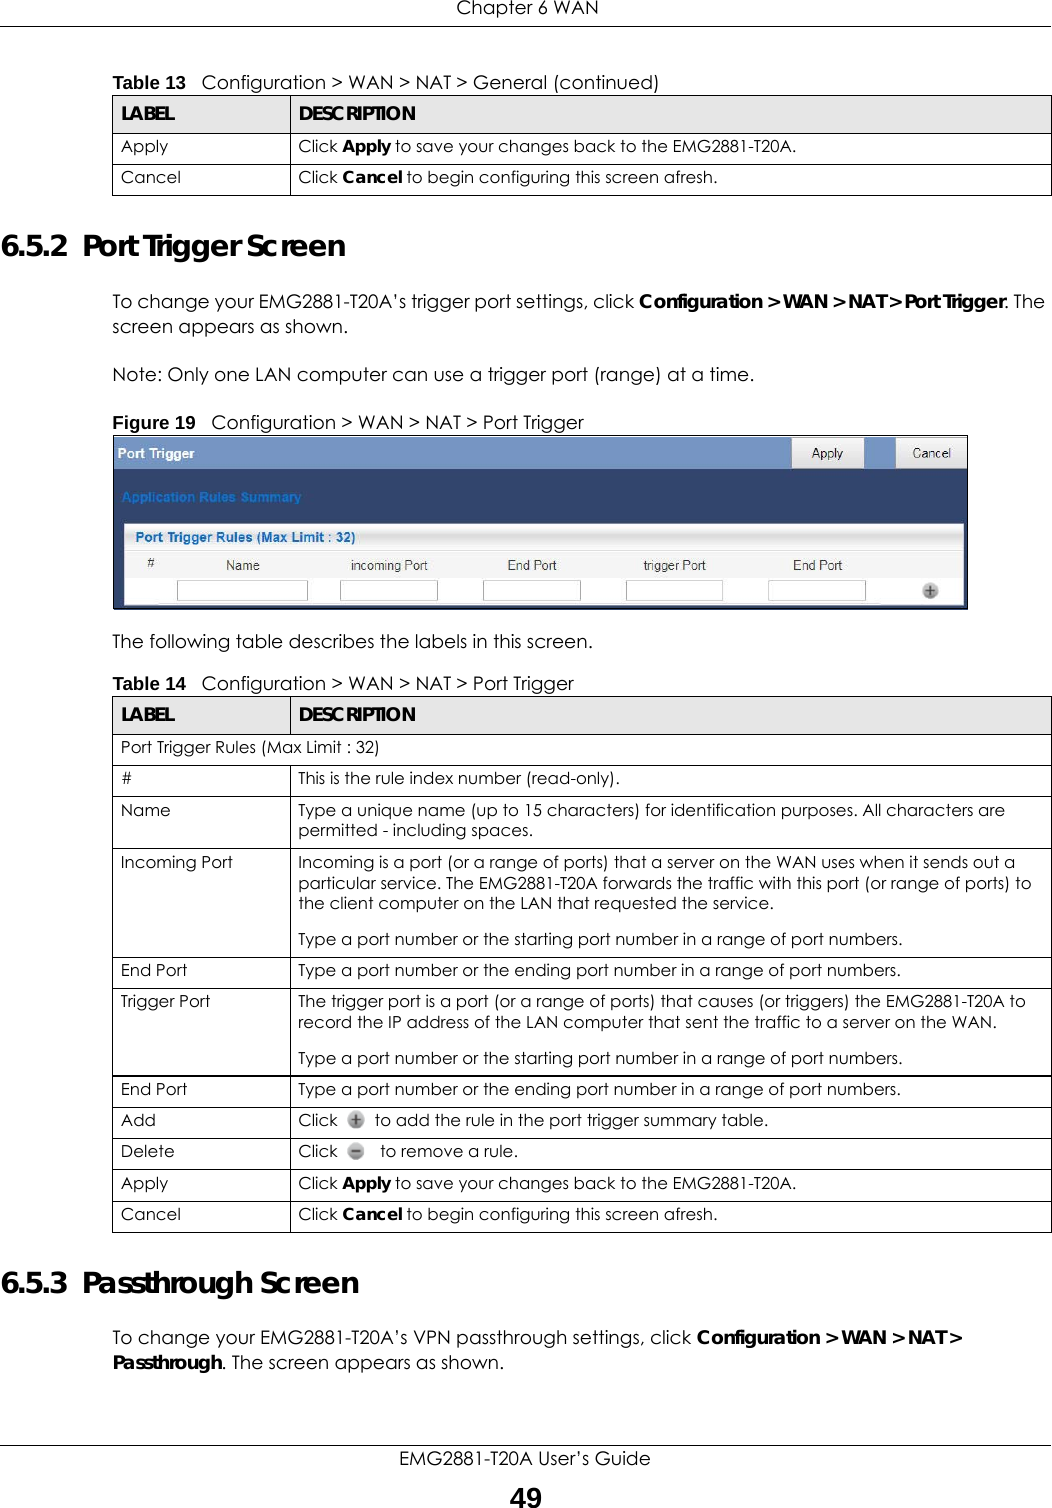
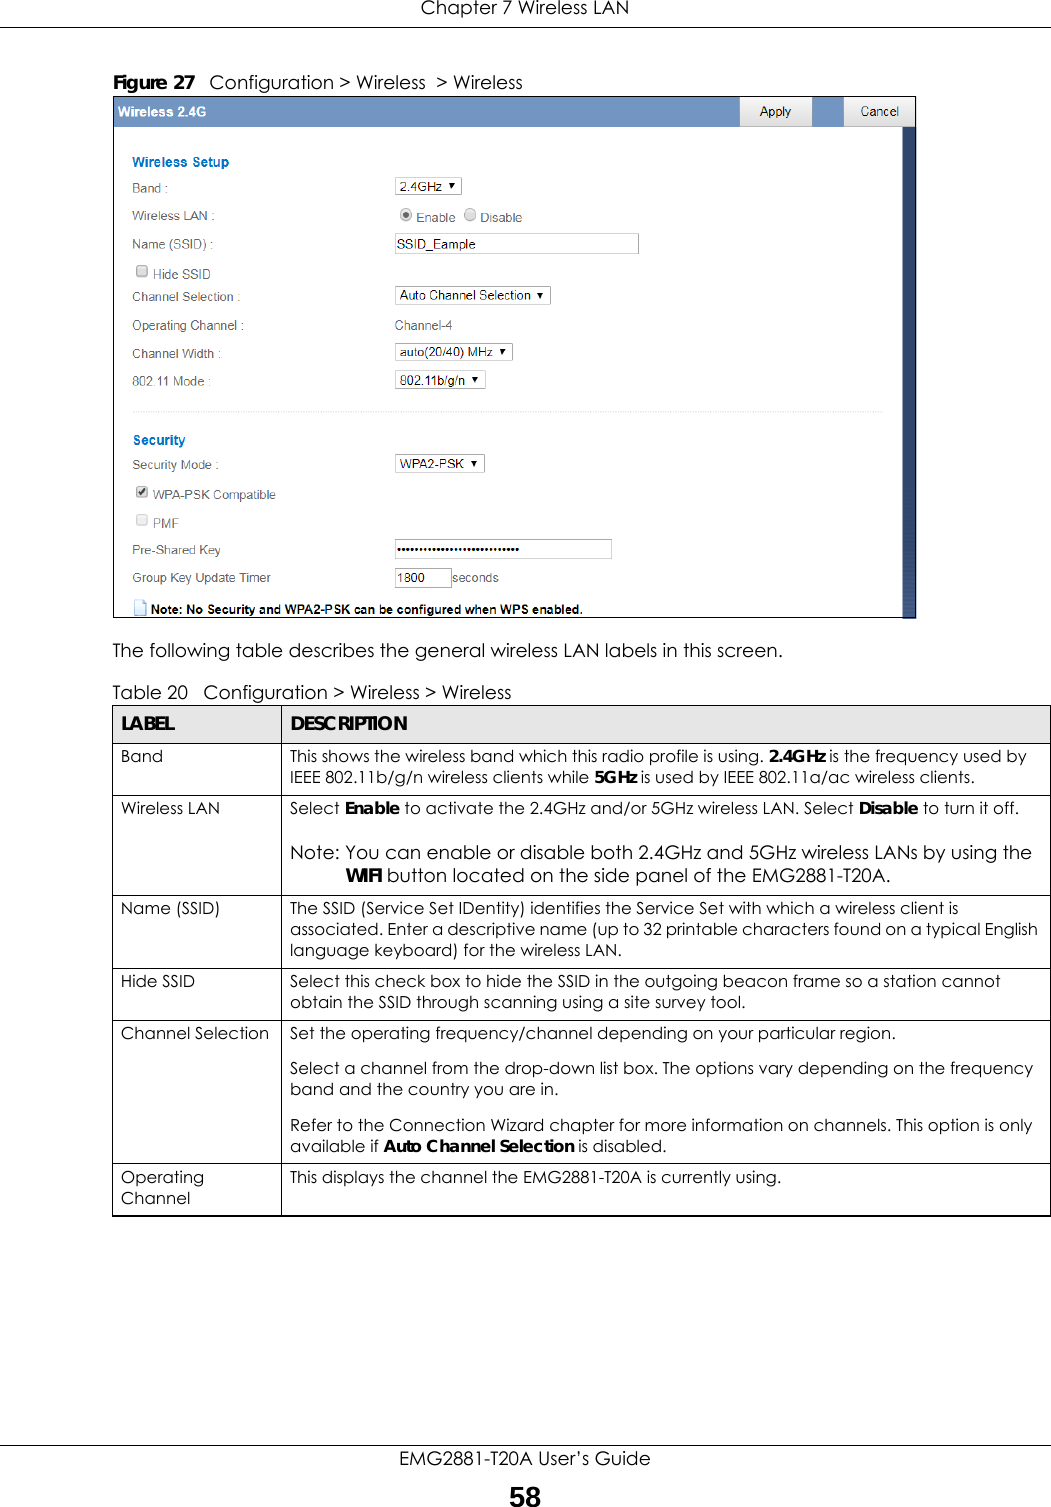
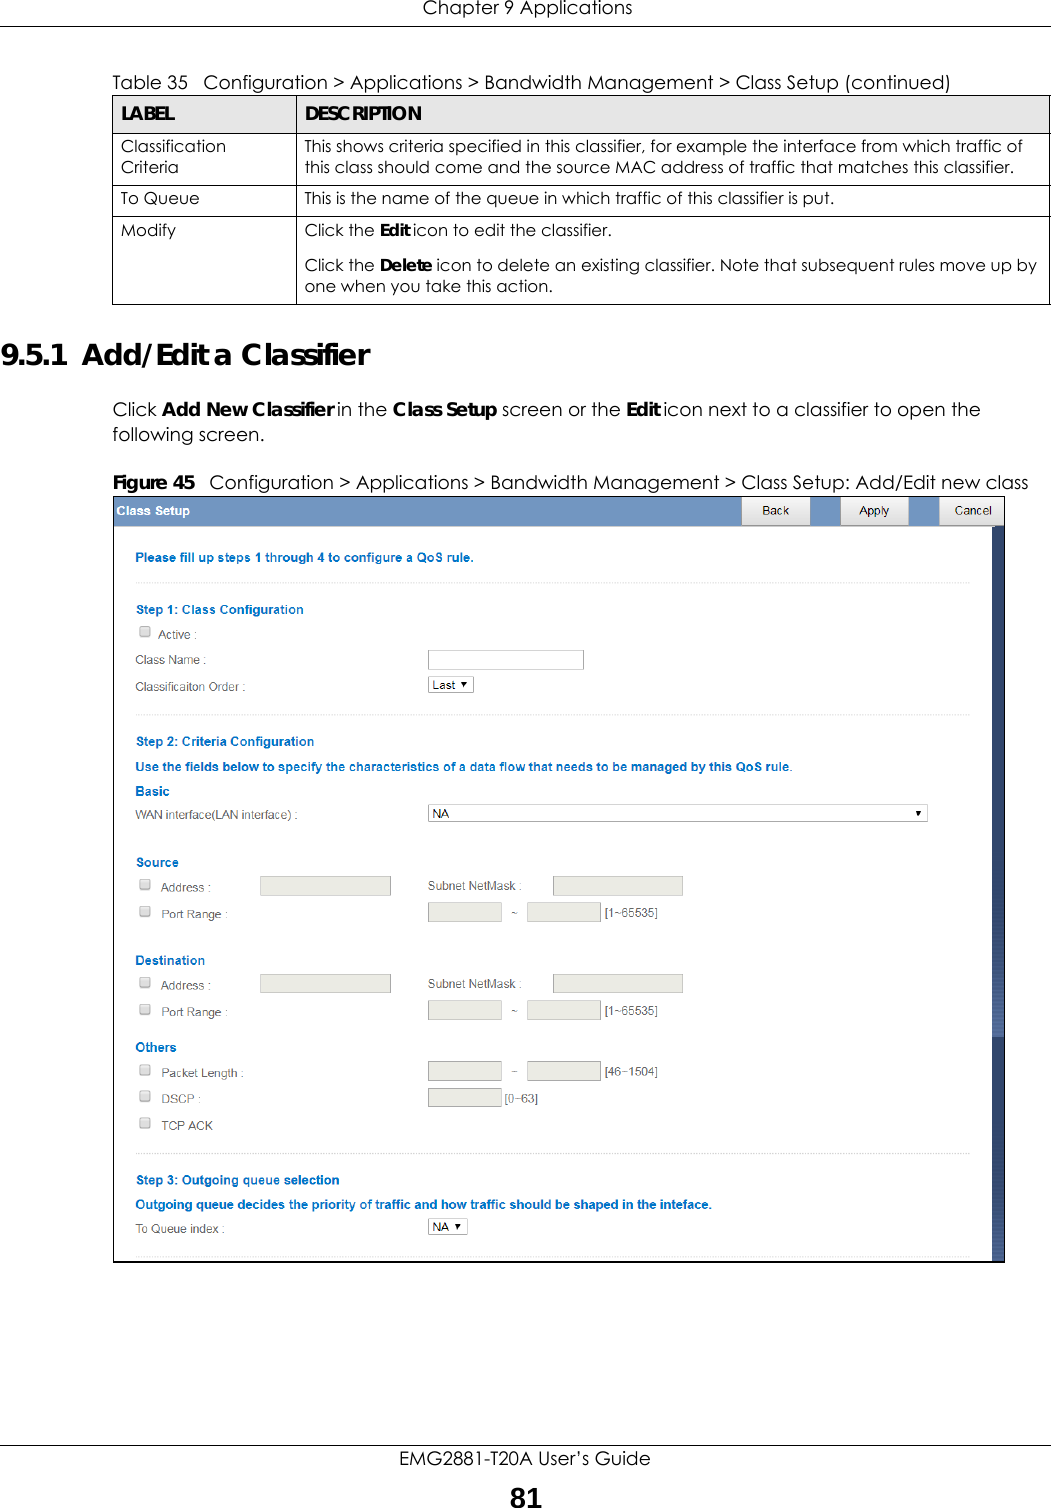
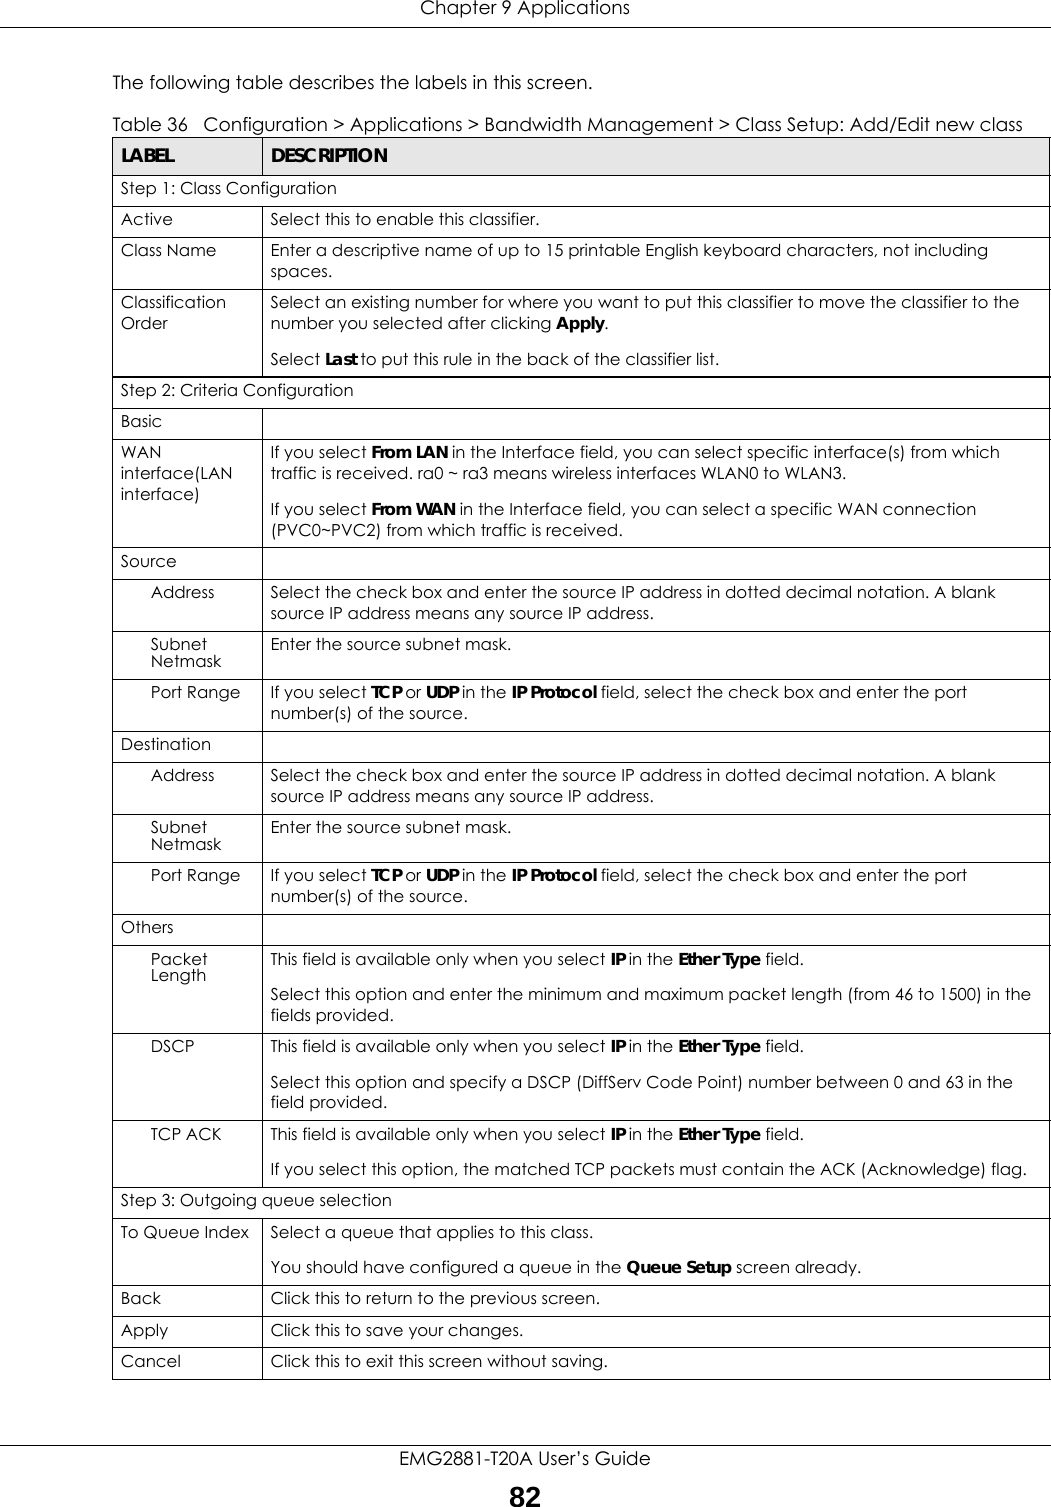
 Default Login DetailsUser’s GuideEMG2881-T20ADual-Band Wireless AC1300 Gigabit Ethernet Gateway Copyright © 2018 Zyxel Communications CorporationLAN IP Address http://192.168.1.1User Name adminPassword See the device labelVersion 1.00 Edition 1, 01/2018
EMG2881-T20A User’s Guide2IMPORTANT!READ CAREFULLY BEFORE USE.KEEP THIS GUIDE FOR FUTURE REFERENCE.Screenshots and graphics in this book may differ slightly from your product due to differences in your product firmware or your computer operating system. Every effort has been made to ensure that the information in this manual is accurate.Related Documentation•Quick Start Guide The Quick Start Guide shows how to connect the EMG2881-T20A and access the Web Configurator.•More InformationGo to support.zyxel.com to find other information on the EMG2881-T20A.
EMG2881-T20A User’s Guide3Document ConventionsWarnings and NotesThese are how warnings and notes are shown in this guide. Warnings tell you about things that could harm you or your device.Note: Notes tell you other important information (for example, other things you may need to configure or helpful tips) or recommendations.Syntax Conventions• The EMG2881-T20A may be referred to as the “EMG2881-T20A” in this guide.• Product labels, screen names, field labels and field choices are all in bold font.• A right angle bracket ( > ) within a screen name denotes a mouse click. For example, Configuration > Log / Report > Log Settings means you first click Maintenance in the navigation panel, then the Log sub menu and finally the Log Setting tab to get to that screen.Icons Used in FiguresFigures in this user guide may use the following generic icons. The EMG2881-T20A icon is not an exact representation of your device. EMG2881-T20A Generic Router  Wireless Router / Access PointSwitch  Firewall ModemServer  Cell Tower Printer
Contents OverviewEMG2881-T20A User’s Guide4Contents OverviewUser’s Guide  ........................................................................................................................................9Introduction ........................................................................................................................................... 10Introducing the Web Configurator ..................................................................................................... 16Router Mode  ......................................................................................................................................... 18Tutorials .................................................................................................................................................. 24Technical Reference  ........................................................................................................................34Monitor ................................................................................................................................................... 35WAN ....................................................................................................................................................... 37Wireless LAN  .......................................................................................................................................... 53LAN ......................................................................................................................................................... 70Applications .......................................................................................................................................... 75Security .................................................................................................................................................. 92Maintenance ........................................................................................................................................ 98Troubleshooting .................................................................................................................................. 106
 Table of ContentsEMG2881-T20A User’s Guide5Table of ContentsDocument Conventions ......................................................................................................................3Contents Overview .............................................................................................................................4Table of Contents.................................................................................................................................5Part I: User’s Guide............................................................................................9Chapter 1Introduction ........................................................................................................................................101.1 Overview  ......................................................................................................................................... 101.1.1 Ethernet WAN  ........................................................................................................................ 101.1.2 Wireless Access ...................................................................................................................... 101.2 Applications  .................................................................................................................................... 111.3 Ways to Manage the EMG2881-T20A  .......................................................................................... 111.4 Good Habits for Managing the EMG2881-T20A .......................................................................... 111.5 Hardware ......................................................................................................................................... 121.5.1 Front Panel  ............................................................................................................................. 121.5.2 Front Panel LEDs (Lights)  ....................................................................................................... 121.5.3 Rear Panel .............................................................................................................................. 131.5.4 Rear Panel LEDs (Lights) ........................................................................................................ 141.5.5 Using the WLAN and WPS Buttons ....................................................................................... 141.5.6 Resetting the EMG2881-T20A ...............................................................................................14Chapter 2Introducing the Web Configurator ...................................................................................................162.1 Overview  ......................................................................................................................................... 162.2 Accessing the Web Configurator ................................................................................................. 162.2.1 Login Screen  .......................................................................................................................... 16Chapter 3Router Mode.......................................................................................................................................183.1 Overview  ......................................................................................................................................... 183.2 Router Mode Status Screen ........................................................................................................... 183.2.1 Navigation Panel  .................................................................................................................. 21Chapter 4Tutorials...............................................................................................................................................24
Table of ContentsEMG2881-T20A User’s Guide64.1 Overview  ......................................................................................................................................... 244.2 Set Up a Wireless Network Using WPS ........................................................................................... 244.2.1 Push Button Configuration (PBC)  ........................................................................................ 244.2.2 PIN Configuration .................................................................................................................. 254.3 Connect to the EMG2881-T20A’s WiFi Network Manually (No WPS)  ........................................ 264.3.1 Configuring Wireless Security on the EMG2881-T20A ........................................................ 274.3.2 Configure Your Notebook .................................................................................................... 284.4 Using Multiple SSIDs on the EMG2881-T20A .................................................................................. 304.4.1 Configuring Security Settings of Multiple SSIDs  .................................................................. 31Part II: Technical Reference...........................................................................34Chapter 5Monitor................................................................................................................................................355.1 Overview  ......................................................................................................................................... 355.2 What You Can Do  .......................................................................................................................... 355.3 Client Tables    ................................................................................................................................. 35Chapter 6WAN ....................................................................................................................................................376.1 Overview  ......................................................................................................................................... 376.2 What You Can Do  .......................................................................................................................... 376.3 What You Need To Know  .............................................................................................................. 376.3.1 Configuring Your Internet Connection ............................................................................... 386.4 Management WAN ........................................................................................................................ 396.4.1 Edit WAN Connection  .......................................................................................................... 406.5 NAT  ................................................................................................................................................... 476.5.1 General Screen  ..................................................................................................................... 476.5.2 Port Trigger Screen ................................................................................................................ 496.5.3 Passthrough Screen  .............................................................................................................. 496.6 Dynamic DNS Screen  ..................................................................................................................... 506.7 Interface Group Screen ................................................................................................................. 516.7.1 Add Interface Group ............................................................................................................ 51Chapter 7Wireless LAN .......................................................................................................................................537.1 Overview  ......................................................................................................................................... 537.1.1 What You Can Do ................................................................................................................. 547.1.2 What You Should Know  ........................................................................................................ 547.2 Wireless LAN Screen   ...................................................................................................................... 577.3 Wireless Security .............................................................................................................................. 59
 Table of ContentsEMG2881-T20A User’s Guide77.3.1 No Security ............................................................................................................................. 607.3.2 WPA2-PSK ............................................................................................................................... 607.4 More AP Screen  .............................................................................................................................. 617.4.1 More AP Edit  .......................................................................................................................... 627.5 MAC Filter Screen   .......................................................................................................................... 647.6 Advanced Screen .......................................................................................................................... 657.7 WPS Screen  ..................................................................................................................................... 667.8 Scheduling Screen  ......................................................................................................................... 68Chapter 8LAN......................................................................................................................................................708.1 Overview  ......................................................................................................................................... 708.2 What You Can Do  .......................................................................................................................... 708.3 What You Need To Know  .............................................................................................................. 708.4 LAN IP Screen .................................................................................................................................. 718.5 Static DHCP Screen ........................................................................................................................ 728.6 IPv6 LAN Screen .............................................................................................................................. 73Chapter 9Applications .......................................................................................................................................759.1 Overview   ........................................................................................................................................ 759.1.1 What You Can Do in this Chapter ....................................................................................... 759.2 What You Need to Know ............................................................................................................... 769.3 The QoS General Screen   .............................................................................................................. 789.4 The Queue Setup Screen ............................................................................................................... 799.4.1  Add/Edit a Queue   .............................................................................................................. 799.5 The Class Setup Screen .................................................................................................................. 809.5.1 Add/Edit a Classifier  ............................................................................................................. 819.6 UPnP Screen  .................................................................................................................................... 839.7 Technical Reference ...................................................................................................................... 839.7.1 Using UPnP in Windows XP Example .................................................................................... 879.7.2 Web Configurator Easy Access ........................................................................................... 89Chapter 10Security ...............................................................................................................................................9210.1 Overview    ..................................................................................................................................... 9210.1.1 What You Can Do ............................................................................................................... 9210.1.2 What You Need To Know  ...................................................................................................9210.2 IPv4 Firewall Screen   ..................................................................................................................... 9310.3 IPv6 Firewall Screen  ...................................................................................................................... 95Chapter 11Maintenance......................................................................................................................................98
Table of ContentsEMG2881-T20A User’s Guide811.1 Overview  ....................................................................................................................................... 9811.2 What You Can Do  ........................................................................................................................ 9811.3 General Screen  ............................................................................................................................ 9811.4 Password Screen ........................................................................................................................... 9911.5 Time Screen ................................................................................................................................. 10011.6 Firmware Upgrade Screen  ........................................................................................................ 10111.7 Configuration Backup/Restore Screen  .................................................................................... 10211.8 Restart Screen ............................................................................................................................. 10411.9 Log Screen  .................................................................................................................................. 10411.10 The ROMD Screen  .................................................................................................................... 104Chapter 12Troubleshooting................................................................................................................................10612.1 Overview  ..................................................................................................................................... 10612.2 Power, Hardware Connections, and LEDs ............................................................................... 10612.3 EMG2881-T20A Access and Login  ............................................................................................ 10712.4 Internet Access  ........................................................................................................................... 10812.5 Resetting the EMG2881-T20A to Its Factory Defaults .............................................................. 10912.6 Wireless Connections  ................................................................................................................. 110Appendix A  Pop-up Windows, JavaScript and Java Permissions ............................................. 112Appendix B  Setting Up Your Computer’s IP Address................................................................... 121Appendix C  Common Services .....................................................................................................148Appendix D  Customer Support ..................................................................................................... 151Appendix E  Legal Information ....................................................................................................... 157Index.................................................................................................................................................164
9PART IUser’s Guide
EMG2881-T20A User’s Guide10CHAPTER 1Introduction1.1  OverviewThis chapter introduces the main features and applications of the EMG2881-T20A.The EMG2881-T20A extends the range of your existing wired network without additional wiring, providing easy network access to mobile users. You can set up a wireless network with other IEEE 802.11a/ac/b/g/n compatible devices. A firewall is also available for secure Internet computing. 1.1.1  Ethernet WANIf you have another broadband modem or router (such as ADSL) available, you can use the Ethernet WAN port and then connect it to the broadband modem or router. This way, you can access the Internet via an Ethernet connection and still use the QoS, Firewall and parental control functions on the EMG2881-T20A. Figure 1   EMG2881-T20A’s Internet Access Application: Ethernet WAN 1.1.2  Wireless AccessThe EMG2881-T20A is a wireless Access Point (AP) for IEEE 802.11b/g/n/a/ac wireless clients, such as notebook computers, iPads, smartphones, etc. These devices can connect to the EMG2881-T20A to access network resources and the Internet.Your EMG2881-T20A supports Wi-Fi Protected Setup (WPS), which allows you to quickly set up a wireless network with strong security.You can configure your wireless network using the built-in Web Configurator.See Chapter 4 on page 24 for more information about how to set up a wireless network.
 Chapter 1 IntroductionEMG2881-T20A User’s Guide11Figure 2   Wireless Access Example1.2  ApplicationsYou can have the following networks with the EMG2881-T20A:•Wired. You can connect network devices via the Ethernet ports of the EMG2881-T20A so that they can communicate with each other and access the Internet.•Wireless. Wireless clients can connect to the EMG2881-T20A to access network resources. You can use WPS (Wi-Fi Protected Setup) to create an instant network connection with another WPS-compatible device.•WAN. Connect to a broadband modem/router for Internet access.1.3  Ways to Manage the EMG2881-T20AUse any of the following methods to manage the EMG2881-T20A.• WPS (Wi-Fi Protected Setup). You can use the WPS button or the WPS section of the Web Configurator to set up a wireless network with your EMG2881-T20A.• Web Configurator. This is recommended for everyday management of the EMG2881-T20A using a (supported) web browser.1.4  Good Habits for Managing the EMG2881-T20ADo the following things regularly to make the EMG2881-T20A more secure and to manage the EMG2881-T20A more effectively.• Change the password. Use a password that’s not easy to guess and that consists of different types of characters, such as numbers and letters.• Write down the password and put it in a safe place.• Back up the configuration (and make sure you know how to restore it). Restoring an earlier working configuration may be useful if the device becomes unstable or even crashes. If you forget your password, you will have to reset the EMG2881-T20A to its factory default settings. If you backed up an earlier configuration file, you would not have to totally re-configure the EMG2881-T20A. You could simply restore your last configuration.
Chapter 1 IntroductionEMG2881-T20A User’s Guide121.5  Hardware1.5.1  Front PanelThe following graphic displays the front panel of the EMG2881-T20A.Figure 3   LEDs on the EMG2881-T20A1.5.2  Front Panel LEDs (Lights)The following table describes the front panel LEDs.Table 1   Front panel LEDsLED COLOR STATUS DESCRIPTIONPower White On The EMG2881-T20A is receiving power and functioning properly. Off The EMG2881-T20A is not receiving power.Internet White On The EMG2881-T20A has an IP connection but no traffic.Your device has a WAN IP address (either static or assigned by a DHCP server), PPP negotiation was successfully completed (if used) and the connection is up.Blinking  The EMG2881-T20A is sending or receiving IP traffic.Off The EMG2881-T20A does not have an IP connection.WLAN 2.4/5G White On The 2.4 GHz/5 GHz wireless network is activated.Blinking The EMG2881-T20A is communicating with 2.4 GHz/5 GHz wireless clients.Amber Blinking The EMG2881-T20A is setting up a WPS connection with a 2.4 GHz/5 GHz wireless client.Off The wireless LAN is not ready or has failed.
 Chapter 1 IntroductionEMG2881-T20A User’s Guide131.5.3  Rear PanelThe following graphic displays the rear panel of the EMG2881-T20A.Figure 4   EMG2881-T20A Rear PanelThe following table describes the items on the rear panel.Table 2   Rear Panel PortsLABEL DESCRIPTIONWPS Press the WPS button for more than one second to quickly set up a secure wireless connection between the EMG2881-T20A and a WPS-compatible client.Reset Press the button to return the EMG2881-T20A to the factory defaults. LAN1 ~ LAN4 Connect computers or other Ethernet devices to Ethernet ports for Internet access.WAN Connect an Ethernet cable to the Ethernet WAN port for Internet access.Power Connect the power cable and press the power button to start the EMG2881-T20A.Power ButtonPress the power button after the power cable is connected to start the EMG2881-T20A.
Chapter 1 IntroductionEMG2881-T20A User’s Guide141.5.4  Rear Panel LEDs (Lights)The following table describes the rear panel LEDs.1.5.5  Using the WLAN and WPS ButtonsIf the wireless network is turned off, go to the Wireless screen to turn it on. Once the 2.4G WLAN/WPS or 5G WLAN/WPS LED turns white, the wireless network is active.You can also use the WPS button to quickly set up a secure wireless connection between the EMG2881-T20A and a WPS-compatible client by adding one device at a time.To activate WPS:1Make sure the POWER LED is on and not blinking.2Press the WPS button for more than one second and release it.3Press the WPS button on another WPS-enabled device within range of the EMG2881-T20A. The WLAN 2.4G and WLAN 5G LEDs flash amber while the EMG2881-T20A sets up a WPS connection with the other wireless device. 4Once the connection is successfully made, the WLAN 2.4G and WLAN 5G LEDs shine white.1.5.6  Resetting the EMG2881-T20AIf you forget your password or IP address, or you cannot access the Web Configurator, you will need to use the RESET button at the back of the EMG2881-T20A to reload the factory-default configuration file. This means that you will lose all configurations that you had previously saved, the user name will be reset to “admin”, the password will be reset to the factory default (see the device label), and the IP address will be reset to “192.168.1.1” (router mode).1.5.6.1  How to Use the RESET Button1Make sure the POWER LED is on.2Press the RESET button for one to four seconds to restart/reboot the EMG2881-T20A.Table 3   Rear panel LEDsLED COLOR STATUS DESCRIPTIONLAN 1-4 Green On The EMG2881-T20A recognizes an Ethernet cable through the LAN port.Blinking The EMG2881-T20A is sending/receiving data through the LAN.Off The EMG2881-T20A does not detect an Ethernet cable through the LAN port.WAN Green On The EMG2881-T20A recognizes an Ethernet cable through the WAN port.Blinking The EMG2881-T20A is sending/receiving data through the WAN.Off The EMG2881-T20A does not detect an Ethernet cable through the WAN port.
 Chapter 1 IntroductionEMG2881-T20A User’s Guide153Press the RESET button for longer than five seconds to set the EMG2881-T20A back to its factory-default configurations.
EMG2881-T20A User’s Guide16CHAPTER 2Introducing the WebConfigurator2.1  OverviewThis chapter describes how to access the EMG2881-T20A Web Configurator and provides an overview of its screens.The Web Configurator is an HTML-based management interface that allows easy setup and management of the EMG2881-T20A via Internet browser. Use Internet Explorer 9.0 and later versions, Mozilla Firefox 21 and later versions, Safari 6.0 and later versions or Google Chrome 26.0 and later versions. The recommended screen resolution is 1024 by 768 pixels.In order to use the Web Configurator you need to allow:• Web browser pop-up windows from your device. Web pop-up blocking is enabled by default in Windows XP SP (Service Pack) 2.• JavaScript (enabled by default).• Java permissions (enabled by default).Refer to the Troubleshooting chapter (Chapter 12 on page 106) to see how to make sure these functions are allowed in Internet Explorer.2.2  Accessing the Web Configurator1Make sure your EMG2881-T20A hardware is properly connected and prepare your computer or computer network to connect to the EMG2881-T20A (refer to the Quick Start Guide).2Launch your web browser.3The EMG2881-T20A is in router mode by default. Type "http://192.168.1.1" as the website address.Your computer must be in the same subnet in order to access this website address.2.2.1  Login ScreenThe Web Configurator initially displays the following login screen.Type the default Username admin and randomly assigned default password (see the device label) in the Login screen and click Login.
 Chapter 2 Introducing the Web ConfiguratorEMG2881-T20A User’s Guide17Figure 5   Login screenThe following table describes the labels in this screen.Table 4   Login screenLABEL DESCRIPTIONUsername Type "admin" (default) as the user name.Password Type the default password (on the device label). Click Login.
EMG2881-T20A User’s Guide18CHAPTER 3Router Mode3.1  OverviewThe EMG2881-T20A is set to router mode by default. Routers are used to connect the local network to another network (for example, the Internet). In the figure below, the EMG2881-T20A connects the local network (LAN1 ~ LAN4) to the Internet.Figure 6   EMG2881-T20A Network3.2  Router Mode Status ScreenClick   to open the status screen. Modem
EMG2881-T20A User’s Guide19Figure 7   Status Screen: Router Mode The following table describes the icons shown in the Status screen.The following table describes the labels shown in the Status screen.Table 5   Status Screen Icon KeyICON DESCRIPTIONLogout Click this at any time to exit the Web Configurator.Click this icon to see the Status page. The information in this screen depends on the device mode you select. Click this icon to see the Monitor navigation menu. Click this icon to see the Configuration navigation menu. Click this icon to see the Maintenance navigation menu. Table 6   Status Screen: Router Mode  LABEL DESCRIPTIONDevice InformationHost Name This is the System Name you enter in the Maintenance > General screen. It is for identification purposes.Model Number This is the model name of your device.Firmware Version This is the firmware version and the date created. Sys OP Mode This is the device mode to which the EMG2881-T20A is set - Router Mode.
Chapter 3 Router ModeEMG2881-T20A User’s Guide20WAN/WAN 1/WAN 2 InformationMAC Address This shows the WAN Ethernet adapter MAC Address of your device.IP Address This shows the WAN port’s IP address.IP Subnet Mask This shows the WAN port’s subnet mask.Default Gateway This shows the WAN port’s gateway IP address.IPv6 Address This shows the IPv6 address of the EMG2881-T20A on the WAN.LAN InformationMAC Address This shows the LAN Ethernet adapter MAC Address of your device.IP Address This shows the LAN port’s IP address.IP Subnet Mask This shows the LAN port’s subnet mask.DHCP This shows the LAN port’s DHCP role - Server or Disable.IPv6 Address This shows the IPv6 address of the EMG2881-T20A on the LAN.WLAN 2.4G InformationWLAN OP Mode This is the device mode to which the EMG2881-T20A’s wireless LAN is set - Access Point Mode.MAC Address This shows the 2.4GHz wireless adapter MAC Address of your device.SSID This shows a descriptive name used to identify the EMG2881-T20A in the 2.4GHz wireless LAN. Channel This shows the channel number which you select manually.Security This shows the level of wireless security the EMG2881-T20A is using.WLAN 5G InformationWLAN OP Mode This is the device mode to which the EMG2881-T20A’s wireless LAN is set - Access Point Mode.MAC Address This shows the 5GHz wireless adapter MAC Address of your device.SSID This shows a descriptive name used to identify the EMG2881-T20A in the 5GHz wireless LAN. Channel This shows the channel number which you select manually.Security This shows the level of wireless security the EMG2881-T20A is using.Firewall This shows whether the firewall is enabled or not.System StatusItem This column shows the type of data the EMG2881-T20A is recording.Data This column shows the actual data recorded by the EMG2881-T20A.System Up Time This is the total time the EMG2881-T20A has been on.Current Date/Time This field displays your EMG2881-T20A’s present date and time.System Resource- CPU Usage This displays what percentage of the EMG2881-T20A’s processing ability is currently used. When this percentage is close to 100%, the EMG2881-T20A is running at full load, and the throughput is not going to improve anymore. If you want some applications to have more throughput, you should turn off other applications (for example, using bandwidth management.)- Memory Usage This shows what percentage of the heap memory the EMG2881-T20A is using. Interface StatusInterface This displays the EMG2881-T20A port types. The port types are: WAN, LAN and WLAN.Table 6   Status Screen: Router Mode (continued) LABEL DESCRIPTION
 Chapter 3 Router ModeEMG2881-T20A User’s Guide213.2.1  Navigation PanelUse the sub-menus on the navigation panel to configure EMG2881-T20A features. Figure 8   Navigation Panel: Router Mode The following table describes the sub-menus.Status For the LAN and WAN ports, this field displays Down (line is down) or Up (line is up or connected).For the 2.4GHz/5GHz WLAN, it displays Up when the 2.4GHz/5GHz WLAN is enabled or Down when the 2.4G/5G WLAN is disabled.Rate For the LAN ports, this displays the port speed or N/A when the line is disconnected.For the WAN port, it displays the port speed and duplex setting if you’re using Ethernet encapsulation. This field displays N/A when the line is disconnected.For the 2.4GHz/5GHz WLAN, it displays the maximum transmission rate when the 2.4GHz/5GHz WLAN is enabled and N/A when the WLAN is disabled.Table 6   Status Screen: Router Mode (continued) LABEL DESCRIPTIONTable 7   Navigation Panel: Router ModeLINK TAB FUNCTIONStatus This screen shows the EMG2881-T20A’s general device, system and interface status information. Use this screen to access the wizard, and summary statistics tables.MONITORClient Tables Use this screen to view current DHCP client information.
Chapter 3 Router ModeEMG2881-T20A User’s Guide22CONFIGURATIONWANManagement WANManagement WANThis screen allows you to configure ISP parameters, WAN IP address assignment, DNS servers, the WAN MAC address, and VLAN settings.NAT General Use this screen to enable NAT.Port Trigger Use this screen to change your EMG2881-T20A’s port triggering settings.Passthrough Use this screen to enable or disable the VPN passthrough feature.Dynamic DNS Dynamic DNS Use this screen to set up dynamic DNS.Interface Group Interface GroupUse this screen to add a LAN interface or a VLAN ID to a new group.WirelessWireless Wireless Use this screen to enable the wireless LAN and configure wireless LAN and wireless security settings.More AP Use this screen to configure multiple BSSs on the EMG2881-T20A.MAC Filter Use the MAC filter screen to configure the EMG2881-T20A to block access to devices or block the devices from accessing the EMG2881-T20A.Advanced This screen allows you to configure advanced wireless settings.WPS Use this screen to configure WPS.Scheduling Use this screen to schedule the times the Wireless LAN is enabled.LAN LAN IP Use this screen to configure LAN IP address and subnet mask.Use this screen to enable the EMG2881-T20A’s DHCP server.Static DHCP This screen allows you to assign IP addresses on the LAN to specific individual computers based on their MAC addresses.IPv6 LAN Use this screen to configure the IPv6 address for the EMG2881-T20A on the LAN.ApplicationBandwidth MGMT QoS General Use this screen to enable or disable QoS and set the upstream bandwidth.Queue Setup Use this screen to configure QoS queue assignment.Class Setup Use this screen to configure QoS classifiers.UPnP UPnP Use this screen to enable UPnP on the EMG2881-T20A. SecurityIPv4 Firewall Use this screen to configure IPv4 firewall rules.IPv6 firewall Use this screen to configure IPv6 firewall rules.MAINTENANCEGeneral General Use this screen to view and change administrative settings such as system and domain names.Password Password Use this screen to change the password of your EMG2881-T20A.Time Time Setting Use this screen to change your EMG2881-T20A’s time and date.Firmware Upgrade Firmware UpgradeUse this screen to upload firmware to your EMG2881-T20A.Backup/Restore Backup/RestoreUse this screen to backup and restore the configuration or reset the factory defaults to your EMG2881-T20A. Table 7   Navigation Panel: Router Mode (continued)LINK TAB FUNCTION
 Chapter 3 Router ModeEMG2881-T20A User’s Guide23Restart System Restart This screen allows you to reboot the EMG2881-T20A without turning the power off.Log Log Use this screen to view the list of activities recorded by your EMG2881-T20A.ROMD ROMD Use this screen to save and/or clean the configuration to/from the ROMD file which can store customized default settings.Table 7   Navigation Panel: Router Mode (continued)LINK TAB FUNCTION
EMG2881-T20A User’s Guide24CHAPTER 4Tutorials4.1  OverviewThis chapter provides tutorials for setting up your EMG2881-T20A.•Set Up a Wireless Network Using WPS•Connect to the EMG2881-T20A’s WiFi Network Manually (No WPS)•Using Multiple SSIDs on the EMG2881-T20A4.2  Set Up a Wireless Network Using WPSThis section gives you an example of how to set up a wireless network using WPS. This example uses the EMG2881-T20A as the AP and a WPS-enabled Android 4.4.2 smartphone as the wireless client. There are two WPS methods for creating a secure connection via the web configurator or utility. This tutorial shows you how to do both.•Push Button Configuration (PBC) - create a secure wireless network simply by pressing a button. See Section 4.2.1 on page 24. This is the easier method.•PIN Configuration - create a secure wireless network simply by entering a wireless client's PIN (Personal Identification Number) in the EMG2881-T20A’s interface. See Section 4.2.2 on page 25. This is the more secure method, since one device can authenticate the other.4.2.1  Push Button Configuration (PBC)1Make sure that your EMG2881-T20A is turned on and that the device is placed within range of your Android 4.42 smartphone. 2WPS is enabled by default on the EMG2881-T20A. If not, log into EMG2881-T20A’s Web Configurator and turn it on in the Configuration > Wireless > WPS screen. You can either press the WPS button on the EMG2881-T20A’s panel or press the Push Button button in the Configuration > Wireless > WPS screen3Go to your phone settings and turn on Wi-Fi. Open the Wi-Fi networks list and tap WPS Push Button or the WPS icon ( ). Note: It doesn’t matter which button is pressed first. You must press the second button within two minutes of pressing the first one. The EMG2881-T20A sends the proper configuration settings to the wireless client. This may take up to two minutes. Then the wireless client is able to communicate with the EMG2881-T20A securely.
 Chapter 4 TutorialsEMG2881-T20A User’s Guide25The following figure shows you an example to set up wireless network and security by pressing a button on both EMG2881-T20A and wireless client (the Android 4.4.2 phone in this example).Figure 9   Example WPS Process: PBC Method4.2.2  PIN ConfigurationWhen you use the PIN configuration method, you need to check the client’s PIN number and use the EMG2881-T20A’s configuration interface.1Go to your phone settings and turn on Wi-Fi. Open the Wi-Fi networks list and tap WPS PIN Entry to get a PIN number.2Enter the client’s PIN number to the PIN field in the Configuration > Wireless > WPS screen on the EMG2881-T20A.3Click the Start button (or button next to the PIN field) on the EMG2881-T20A’s WPS screen within two minutes.The EMG2881-T20A authenticates the wireless client and sends the proper configuration settings to the wireless client. This may take up to two minutes. Then the wireless client is able to communicate with the EMG2881-T20A securely. The following figure shows you the example to set up wireless network and security on EMG2881-T20A and wireless client (Android 4.4.2 smartphone in this example) by using PIN method. Wireless ClientSECURITY INFOCOMMUNICATIONWITHIN 2 MINUTESEMGWPSPress and hold for  more than 1 second
Chapter 4 TutorialsEMG2881-T20A User’s Guide26Figure 10   Example WPS Process: PIN Method4.3  Connect to the EMG2881-T20A’s WiFi Network Manually (No WPS)In this example, we change the EMG2881-T20A’s wireless settings, and then manually select the EMG2881-T20A’s new SSID and enter the Wi-Fi key to connect a wireless client to the EMG2881-T20A.Authentication by PINSECURITY INFOCOMMUNICATIONWITHIN 2 MINUTESEnter WPS PIN  WPSfrom other device: WPSSTARTWireless Client EMG
 Chapter 4 TutorialsEMG2881-T20A User’s Guide274.3.1  Configuring Wireless Security on the EMG2881-T20AThis section shows you how to configure wireless security settings with the following parameters on your EMG2881-T20A.Follow the steps below to configure the wireless settings on your EMG2881-T20A.The instructions require that your hardware is connected (see the Quick Start Guide) and you are logged into the Web Configurator through your LAN connection (see Section 2.2 on page 16).1Go to the Configuration > Wireless > Wireless screen to enable the 2.4 GHz wireless network.2Enter SSID_Example as the SSID and select Auto Channel Selection to have the EMG2881-T20A scans for and select an available channel automatically. 3Set security mode to WPA2-PSK and enter ThisismyWPA-PSKpre-sharedkey in the Pre-Shared Key field. Select WPA-PSK Compatible to allow wireless devices using WPA-PSK security mode to connect to the EMG2881-T20A. Click Apply.Frequency Band 2.4 GHzSSID SSID_ExampleChannel AutoSecurity  WPA2-PSK(Pre-Shared Key: ThisismyWPA-PSKpre-sharedkey)
Chapter 4 TutorialsEMG2881-T20A User’s Guide284Open the Status screen. Verify your wireless and wireless security settings under Device Information and check if the WLAN connection is up under Interface Status.4.3.2  Configure Your NotebookNote: In this example, we use a Windows 7 laptop that has a built-in wireless adapter as the wireless client.1The EMG2881-T20A supports IEEE 802.11a, IEEE 802.11b, IEEE 802.11g, IEEE 802.11n, IEEE 802.11a, IEEE 802.11an, and IEEE 802.11ac wireless clients. Make sure that your notebook or computer’s wireless adapter supports one of these standards.2Click the Wi-Fi icon in your computer’s system tray3The Wireless Network Connection screen displays. Click the refresh button to update the list of available wireless APs within range.
 Chapter 4 TutorialsEMG2881-T20A User’s Guide294Select SSID_Example and click Connect.  5The following screen displays if WPS is enabled on the EMG2881-T20A but you didn’t press the WPS button. Click Connect using as security key instead. 6Type the security key in the following screen. Click OK.
Chapter 4 TutorialsEMG2881-T20A User’s Guide307Check the status of your wireless connection in the screen below.  8If the wireless client keeps trying to connect to or acquiring an IP address from the EMG2881-T20A, make sure you entered the correct security key.If the connection has limited or no connectivity, make sure the EMG2881-T20A is connected to a router with the DHCP server enabled.If your connection is successful, open your Internet browser and enter http://www.zyxel.com or the URL of any other web site in the address bar. If you are able to access the web site, your wireless connection is successfully configured.4.4  Using Multiple SSIDs on the EMG2881-T20AYou can configure more than one SSID on a EMG2881-T20A. See Section 7.4 on page 61. This allows you to configure multiple independent wireless networks on the EMG2881-T20A as if there were multiple APs (virtual APs). Each virtual AP has its own SSID, wireless security type and MAC filtering settings. That is, each SSID on the EMG2881-T20A represents a different access point/wireless network to wireless clients in the network. Clients can associate only with the SSIDs for which they have the correct security settings. Clients using different SSIDs can access the Internet and the wired network behind the EMG2881-T20A (such as a printer).
 Chapter 4 TutorialsEMG2881-T20A User’s Guide31For example, you may set up three wireless networks (A, B and C) in your office. A is for workers, B is for guests and C is specific to a VoIP device in the meeting room. 4.4.1  Configuring Security Settings of Multiple SSIDsThe EMG2881-T20A is in router mode by default.This example shows you how to configure the SSIDs with the following parameters on your EMG2881-T20A (in router mode).1Connect your computer to the LAN port of the EMG2881-T20A using an Ethernet cable. 2The default IP address of the EMG2881-T20A in router mode is “192.168.1.1”. In this case, your computer must have an IP address in the range between “192.168.1.2” and “192.168.1.254”.3Click Start > Run on your computer in Windows. Type “cmd” in the dialog box. Enter “ipconfig” to show your computer’s IP address. If your computer’s IP address is not in the correct range then see Appendix B on page 121 for information on changing your computer’s IP address.4After you’ve set your computer’s IP address, open a web browser such as Internet Explorer and type “http://192.168.1.1” as the web address in your web browser.5Enter the default password (on the device label) as the password and click Login.SSID SECURITY TYPE KEY INTRA-BSS TRAFFIC BLOCKING MAC FILTERINGSSID_Worker WPA2-PSKWPA Compatible DoNotStealMyWirelessNetwork No DisableSSID_VoIP WPA-PSKWPA Compatible VoIPOnly12345678 Yes Allow00:A0:C5:01:23:45SSID_Guest WPA-PSKWPA Compatible keyexample123 No Disable
Chapter 4 TutorialsEMG2881-T20A User’s Guide326Type a new password and retype it to confirm, then click Apply. Otherwise, click Ignore.7Go to Configuration > Wireless > More AP. Click the Edit icon of the first entry to configure wireless and security settings for SSID_Worker.8Configure the screen as follows. In this example, you disable Intra-BSS Traffic for SSID_Worker. Click Apply.9Click the Edit icon of the second entry to configure wireless and security settings for SSID_VoIP.10 Configure the screen as follows. You enable Intra-BSS Traffic for SSID_VoIP to allow wireless clients in the same wireless network to communicate with each other. Click Apply.
 Chapter 4 TutorialsEMG2881-T20A User’s Guide3311 Click the Edit icon of the third entry to configure wireless and security settings for SSID_Guest.12 Configure the screen as follows. In this example, you disable Intra-BSS Traffic for SSID_Guest. Click Apply.
34PART IITechnical Reference
EMG2881-T20A User’s Guide35CHAPTER 5Monitor5.1  OverviewThis chapter discusses read-only information related to the device state of the EMG2881-T20A. To access the Monitor screens, click  .  5.2  What You Can Do• Use the Client Tables screen to view information related to your DHCP status (Section 5.3 on page 35).5.3  Client Tables    DHCP (Dynamic Host Configuration Protocol, RFC 2131 and RFC 2132) allows individual clients to obtain TCP/IP configuration at start-up from a server. You can configure the EMG2881-T20A’s LAN as a DHCP server or disable it. When configured as a server, the EMG2881-T20A provides the TCP/IP configuration for the clients. If DHCP service is disabled, you must have another DHCP server on that network, or else the computer must be manually configured.Click Monitor > Client Tables. Read-only information here relates to your DHCP status. The DHCP table shows current DHCP client information (including MAC Address, and IP Address) of all network clients using the EMG2881-T20A’s DHCP server. Figure 11   Monitor > Client Tables
Chapter 5 MonitorEMG2881-T20A User’s Guide36The following table describes the labels in this screen.Table 8   Monitor > Client TablesLABEL  DESCRIPTIONInterface Select the interface from the drop-down list box to display current DHCP client information.#  This is the index number of the host computer.Online This field displays whether the connection to the host computer is up (a yellow bulb) or down (a gray bulb).IP Address This field displays the IP address relative to the # field listed above.MAC Address Every Ethernet device has a unique MAC (Media Access Control) address which uniquely identifies a device. The MAC address is assigned at the factory and consists of six pairs of hexadecimal characters, for example, 00:A0:C5:00:00:02.Interface/Rssi This field displays the device’s interface type or received signal strength indicator (RSSI) that is currently connected to the EMG2881-T20A.Reserve Select this if you want to reserve the IP address for this specific MAC address.Apply Click Apply to save your changes back to the EMG2881-T20A.Cancel Click Cancel to reload the previous configuration for this screen.
EMG2881-T20A User’s Guide37CHAPTER 6WAN6.1  OverviewThis chapter discusses the EMG2881-T20A’s WAN screens. Use these screens to configure your EMG2881-T20A for Internet access.A WAN (Wide Area Network) connection is an outside connection to another network or the Internet. It connects your private networks such as a LAN (Local Area Network) and other networks, so that a computer in one location can communicate with computers in other locations.Figure 12   LAN and WAN6.2  What You Can Do• Use the Management WAN screen to enter your ISP information and set how the computer acquires its IP, DNS and WAN MAC addresses (Section 6.4 on page 39).• Use the NAT > General screen to enable NAT, set a default server and change your EMG2881-T20A’s port forwarding settings (Section 6.5.1 on page 47).• Use the NAT > Port Trigger screen to configure your EMG2881-T20A’s trigger port settings (Section 6.5.2 on page 49).• Use the NAT > Passthrough screen to configure your EMG2881-T20A’s ALGs and VPN pass-through settings (Section 6.5.3 on page 49).• Use the Dynamic DNS screen to change your EMG2881-T20A’s DDNS settings (Section 6.6 on page 50).• Use the Interface Group screen to manually add a LAN and/or WLAN interface to a new group (Section 6.7 on page 51).6.3  What You Need To KnowThe information in this section can help you configure the screens for your WAN connection, as well as enable/disable some advanced features of your EMG2881-T20A.
Chapter 6 WANEMG2881-T20A User’s Guide386.3.1  Configuring Your Internet ConnectionEncapsulation MethodEncapsulation is used to include data from an upper layer protocol into a lower layer protocol. To set up a WAN connection to the Internet, you need to use the same encapsulation method used by your ISP (Internet Service Provider). If your ISP offers a dial-up Internet connection using PPPoE (PPP over Ethernet) or PPTP (Point-to-Point Tunneling Protocol), they should also provide a username and password (and service name) for user authentication.WAN IP AddressThe WAN IP address is an IP address for the EMG2881-T20A, which makes it accessible from an outside network. It is used by the EMG2881-T20A to communicate with other devices in other networks. It can be static (fixed) or dynamically assigned by the ISP each time the EMG2881-T20A tries to access the Internet.If your ISP assigns you a static WAN IP address, they should also assign you the subnet mask and DNS server IP address(es) (and a gateway IP address if you use the Ethernet or ENET ENCAP encapsulation method).DNS Server Address AssignmentUse Domain Name System (DNS) to map a domain name to its corresponding IP address and vice versa, for instance, the IP address of www.zyxel.com is 204.217.0.2. The DNS server is extremely important because without it, you must know the IP address of a computer before you can access it. The EMG2881-T20A can get the DNS server addresses in the following ways.1The ISP tells you the DNS server addresses, usually in the form of an information sheet, when you sign up. If your ISP gives you DNS server addresses, manually enter them in the DNS server fields.2If your ISP dynamically assigns the DNS server IP addresses (along with the EMG2881-T20A’s WAN IP address), set the DNS server fields to get the DNS server address from the ISP. WAN MAC AddressThe MAC address screen allows users to configure the WAN port's MAC address by either using the factory default or cloning the MAC address from a computer on your LAN. Choose Factory Default to select the factory assigned default MAC Address.Otherwise, click Clone the computer's MAC address - IP Address and enter the IP address of the computer on the LAN whose MAC you are cloning. Once it is successfully configured, the address will be copied to configuration file. It is recommended that you clone the MAC address prior to hooking up the WAN Port.
 Chapter 6 WANEMG2881-T20A User’s Guide39MulticastTraditionally, IP packets are transmitted in one of either two ways - Unicast (1 sender - 1 recipient) or Broadcast (1 sender - everybody on the network). Multicast delivers IP packets to a group of hosts on the network - not everybody and not just 1. Figure 13   Multicast ExampleIn the multicast example above, systems A and D comprise one multicast group. In multicasting, the server only needs to send one data stream and this is delivered to systems A and D. IGMP (Internet Group Multicast Protocol) is a network-layer protocol used to establish membership in a multicast group - it is not used to carry user data. The EMG2881-T20A supports both IGMP version 1 (IGMP-v1) and IGMP version 2 (IGMP-v2). At start up, the EMG2881-T20A queries all directly connected networks to gather group membership. After that, the EMG2881-T20A periodically updates this information. IP multicasting can be enabled/disabled on the EMG2881-T20A WAN interface in the Web Configurator (WAN). Select None to disable IP multicasting on these interfaces.6.4  Management WANUse this screen to view, change, or add your EMG2881-T20A’s Internet access settings. Click Configuration > WAN > Management WAN. The following screen opens.Figure 14   Configuration > WAN > Management WAN
Chapter 6 WANEMG2881-T20A User’s Guide40The following table describes the labels in this screen.6.4.1  Edit WAN ConnectionClick the Edit icon next to the connection you want to configure. Use this screen to configure a WAN connection. The screen varies depending on the encapsulation you select. 6.4.1.1  IPoE EncapsulationThis screen displays when you select IPoE encapsulation.Table 9   Configuration > WAN > Management WANLABEL DESCRIPTION#This is the index number of the connection.Name This is the service name of the connection.Interface This is the interface of the connection.Type This shows the type of interface used by this connection.VLAN ID This indicates the VLAN ID number assigned to traffic sent through this connection.IP Address This is the WAN IP address used by this connection.Status This shows the status of the connection.Modify Click the Edit icon to configure the connection.Click the Delete icon to delete this connection from the EMG2881-T20A. A window displays asking you to confirm that you want to delete the connection.
 Chapter 6 WANEMG2881-T20A User’s Guide41Figure 15   Configuration > WAN > Management WAN: IPoE Encapsulation (IPv4 Only) The following table describes the labels in this screen.Table 10   Configuration > WAN > Management WAN: IPoE EncapsulationLABEL DESCRIPTIONISP Parameters for Internet AccessWAN Name Enter the name to use for this connection definition.Encapsulation You must choose the IPoE option when the WAN port is used as a regular Ethernet.IPv4 / IPv6 Select IPv4 Only if you want the EMG2881-T20A to run IPv4 only. Select Dual Stack to allow the EMG2881-T20A to run IPv4 and IPv6 at the same time.Select IPv6 Only if you want the EMG2881-T20A to run IPv6 only.VLAN ConfigurationEnable Select the check box to activate VLAN on this WAN interface. Otherwise, deselect the check box to deactivate.
Chapter 6 WANEMG2881-T20A User’s Guide42VID Enter a VLAN identifier between 11 to 4094 (the 802.1Q tag specifies only a priority and is referred to as a priority tag).VID 1 (the default VLAN ID) is reserved for a management VLAN.Note: This field is not available when you are configuring the default WAN entry.IP AddressThis is not available when you select IPv4 Only or Dual Stack in the IPv6/IPv4 field.Obtain an IP Address AutomaticallySelect this option If your ISP did not assign you a fixed IP address. This is the default selection.Static IP Address Select this option If the ISP assigned a fixed IP address.IP Address Enter your WAN IP address in this field if you selected Static IP Address.Subnet Mask Enter the Subnet Mask in this field.Gateway IPAddress Enter a Gateway IP Address (if your ISP gave you one) in this field.MTU Size Enter the MTU (Maximum Transmission Unit) size for each packet. If a larger packet arrives, the EMG2881-T20A divides it into smaller fragments.DNS ServerFirst DNS ServerSecond DNS ServerThird DNS Server Select Obtained From ISP if your ISP dynamically assigns DNS server information (and the EMG2881-T20A's WAN IP address). The field to the right displays the (read-only) DNS server IP address that the ISP assigns. Select User-Defined if you have the IP address of a DNS server. Enter the DNS server's IP address in the field to the right.Select None if you do not want to configure DNS servers. If you do not configure a DNS server, you must know the IP address of a computer in order to access it.WAN MAC Address The MAC address section allows users to configure the WAN port's MAC address by using the EMG2881-T20A’s MAC address, or manually entering a MAC address. Factory default Select Factory default to use the factory assigned default MAC Address.Set WAN MAC AddressSelect this option and enter the MAC address you want to use.IPv6 Address This is not available when you select IPv6 Only or Dual Stack in the IPv6/IPv4 field.Obtain an IP Address AutomaticallySelect this if you want to obtain an IPv6 address from a DHCPv6 server.• Select DUID-LL (Default) to have the EMG2881-T20A use DUID-LL (DUID Based on Link-layer Address) for identification when exchanging DHCPv6 messages.• Select DUID-LLT to have the EMG2881-T20A use DUID-LLT (DUID Based on Link-layer Address Plus Time) for identification when exchanging DHCPv6 messages.Static IP Address Select this if you have a fixed IPv6 address assigned by your ISP.IPv6 Address Enter the IPv6 address assigned by your ISP.Prefix length Enter the address prefix length to specify how many most significant bits in an IPv6 address compose the network address.IPv6 DefaultGateway Enter the IP address of the next-hop gateway. The gateway is a router or switch on the same segment as your EMG2881-T20A's interface(s). The gateway helps forward packets to their destinations.Link Local Only Select this option to use the link-local address which uniquely identifies a device on the local network (the LAN).IPv6 DNS serverThis is not available when you select IPv6 Only or Dual Stack in the IPv6/IPv4 field.Table 10   Configuration > WAN > Management WAN: IPoE Encapsulation (continued)LABEL DESCRIPTION
 Chapter 6 WANEMG2881-T20A User’s Guide436.4.1.2  PPPoE EncapsulationThe EMG2881-T20A supports PPPoE (Point-to-Point Protocol over Ethernet). PPPoE is an IETF standard (RFC 2516) specifying how a personal computer (PC) interacts with a broadband modem (DSL, cable, wireless, etc.) connection. The PPP over Ethernet option is for a dial-up connection using PPPoE.For the service provider, PPPoE offers an access and authentication method that works with existing access control systems (for example Radius).One of the benefits of PPPoE is the ability to let you access one of multiple network services, a function known as dynamic service selection. This enables the service provider to easily create and offer new IP services for individuals.Operationally, PPPoE saves significant effort for both you and the ISP or carrier, as it requires no specific configuration of the broadband modem at the customer site.By implementing PPPoE directly on the EMG2881-T20A (rather than individual computers), the computers on the LAN do not need PPPoE software installed, since the EEMG2881-T20A does that part of the task. Furthermore, with NAT, all of the LANs’ computers will have access.This screen displays when you select PPPoE encapsulation.First DNS ServerSecond DNS ServerThird DNS ServerSelect Obtained From ISP to have the EMG2881-T20A get the IPv6 DNS server addresses from the ISP automatically.Select User-Defined and enter the IPv6 DNS server address assigned by the ISP to have the EMG2881-T20A use the IPv6 DNS server addresses you configure manually.Select None if you do not want to configure DNS servers. If you do not configure a DNS server, you must know the IPv6 address of a computer in order to access it.Multicast SetupMulticast Setup Select IGMPv1/v2 to enable multicasting. This applies to traffic routed from the WAN to the LAN.Select None to disable this feature. This may cause incoming traffic to be dropped or sent to all connected network devices.Auto-Subnet ConfigurationEnable Auto-IP-Change ModeSelect this option to have the EMG2881-T20A change its LAN IP address to 10.0.0.1 or 192.168.1.1 accordingly when the EMG2881-T20A gets a dynamic WAN IP address in the same subnet as the LAN IP address.Select this option to have the EMG2881-T20A change its LAN IP address to 10.0.0.1 or 192.168.1.1 accordingly when the EMG2881-T20A gets a DNS server IP address in the same subnet as the LAN IP address.The NAT, DHCP server and firewall functions on the EMG2881-T20A are still available in this mode.Apply Click Apply to save your changes back to the EMG2881-T20A.Cancel Click Cancel to begin configuring this screen afresh.Table 10   Configuration > WAN > Management WAN: IPoE Encapsulation (continued)LABEL DESCRIPTION
Chapter 6 WANEMG2881-T20A User’s Guide44Figure 16   Configuration > WAN > Management WAN: PPPoE Encapsulation (IPv4 Only) The following table describes the labels in this screen. Table 11   Configuration > WAN > Management WAN: PPPoE EncapsulationLABEL DESCRIPTIONISP Parameters for Internet AccessWAN Name Enter the name to use for this connection definition.Encapsulation You must choose the PPPoE option when the WAN port is used as a regular Ethernet.IPv4 / IPv6 Select IPv4 Only if you want the EMG2881-T20A to run IPv4 only. Select Dual Stack to allow the EMG2881-T20A to run IPv4 and IPv6 at the same time.Select IPv6 Only if you want the EMG2881-T20A to run IPv6 only.
 Chapter 6 WANEMG2881-T20A User’s Guide45VLAN ConfigurationEnable Select the check box to activate VLAN on this WAN interface. Otherwise, deselect the check box to deactivate.VID Enter a VLAN identifier between 11 to 4094 (the 802.1Q tag specifies only a priority and is referred to as a priority tag).VID 1 (the default VLAN ID) is reserved for a management VLAN.Note: This field is not available when you are configuring the default WAN entry.PPP InformationPPP Username Type the user name given to you by your ISP.PPP Password Type the password associated with the user name above.MTU Size Enter the Maximum Transmission Unit (MTU) or the largest packet size per frame that your EMG2881-T20A can receive and process.PPPoE Service Name Enter the PPPoE service name specified in the ISP account.WAN IP Address Assignment Get automatically from ISP Select this option If your ISP did not assign you a fixed IP address. This is the default selection. Use Fixed IP Address Select this option If the ISP assigned a fixed IP address. DNS ServerFirst DNS ServerSecond DNS ServerThird DNS Server Select Obtained From ISP if your ISP dynamically assigns DNS server information (and the EMG2881-T20A's WAN IP address). The field to the right displays the (read-only) DNS server IP address that the ISP assigns. Select User-Defined if you have the IP address of a DNS server. Enter the DNS server's IP address in the field to the right.Select None if you do not want to configure DNS servers. If you do not configure a DNS server, you must know the IP address of a computer in order to access it.WAN MAC Address The MAC address section allows users to configure the WAN port's MAC address by using the EMG2881-T20A’s MAC address, or manually entering a MAC address. Factory default Select Factory default to use the factory assigned default MAC Address.Set WAN MAC AddressSelect this option and enter the MAC address you want to use.IPv6 Address This is not available when you select IPv6 Only or Dual Stack in the IPv6/IPv4 field.Obtain an IP Address AutomaticallySelect this if you want to obtain an IPv6 address from a DHCPv6 server.• Select DUID-LL (Default) to have the EMG2881-T20A use DUID-LL (DUID Based on Link-layer Address) for identification when exchanging DHCPv6 messages.• Select DUID-LLT to have the EMG2881-T20A use DUID-LLT (DUID Based on Link-layer Address Plus Time) for identification when exchanging DHCPv6 messages.Link Local Only Select this option to use the link-local address which uniquely identifies a device on the local network (the LAN).IPv6 DNS serverThis is not available when you select IPv6 Only or Dual Stack in the IPv6/IPv4 field.Table 11   Configuration > WAN > Management WAN: PPPoE Encapsulation (continued)LABEL DESCRIPTION
Chapter 6 WANEMG2881-T20A User’s Guide466.4.1.3  Bridge EncapsulationSelect Bridge as the encapsulation mode. The screen varies depending on the item you select in the IPv4 / IPv6 field.If you select IPv4, the following screen appears.Figure 17   Configuration > WAN > Management WAN: Bridge Encapsulation (IPv4 Only) First DNS ServerSecond DNS ServerThird DNS ServerSelect Obtained From ISP to have the EMG2881-T20A get the IPv6 DNS server addresses from the ISP automatically.Select User-Defined and enter the IPv6 DNS server address assigned by the ISP to have the EMG2881-T20A use the IPv6 DNS server addresses you configure manually.Select None if you do not want to configure DNS servers. If you do not configure a DNS server, you must know the IPv6 address of a computer in order to access it.Multicast SetupMulticast Setup Select IGMPv1/v2 to enable multicasting. This applies to traffic routed from the WAN to the LAN.Select None to disable this feature. This may cause incoming traffic to be dropped or sent to all connected network devices.Auto-Subnet ConfigurationEnable Auto-IP-Change ModeSelect this option to have the EMG2881-T20A change its LAN IP address to 10.0.0.1 or 192.168.1.1 accordingly when the EMG2881-T20A gets a dynamic WAN IP address in the same subnet as the LAN IP address.Select this option to have the EMG2881-T20A change its LAN IP address to 10.0.0.1 or 192.168.1.1 accordingly when the EMG2881-T20A gets a DNS server IP address in the same subnet as the LAN IP address.The NAT, DHCP server and firewall functions on the EMG2881-T20A are still available in this mode.Apply Click Apply to save your changes back to the EMG2881-T20A.Cancel Click Cancel to begin configuring this screen afresh.Table 11   Configuration > WAN > Management WAN: PPPoE Encapsulation (continued)LABEL DESCRIPTION
 Chapter 6 WANEMG2881-T20A User’s Guide47The following table describes the labels in this screen. 6.5  NATUse this screen to change your EMG2881-T20A’s NAT (Network Address Translation) settings. Click Configuration > WAN > NAT. 6.5.1  General ScreenUse this screen to enable NAT, set a default server and configure your EMG2881-T20A’s port forwarding settings to forward incoming service requests to the server(s) on your local network. Click Configuration > WAN > NAT > General.Table 12   Configuration > WAN > Management WAN: Bridge EncapsulationLABEL DESCRIPTIONISP Parameters for Internet AccessWAN Name Enter the name to use for this connection definition.Encapsulation Select Bridge when your ISP provides you more than one IP address and you want the connected computers to get individual IP address from ISP’s DHCP server directly. If you select Bridge, you cannot use routing functions, such as QoS, Firewall, DHCP server and NAT on traffic from the selected LAN port(s).IPv4 / IPv6 Select IPv4 Only if you want the EMG2881-T20A to run IPv4 only. Select Dual Stack to allow the EMG2881-T20A to run IPv4 and IPv6 at the same time.Select IPv6 Only if you want the EMG2881-T20A to run IPv6 only.VLAN ConfigurationEnable Select the check box to activate VLAN on this WAN interface. Otherwise, deselect the check box to deactivate.VID Enter a VLAN identifier between 11 to 4094 (the 802.1Q tag specifies only a priority and is referred to as a priority tag).VID 1 (the default VLAN ID) is reserved for a management VLAN.Note: This field is not available when you are configuring the default WAN entry.IPv6 DNS serverThis is not available when you select IPv6 Only or Dual Stack in the IPv6/IPv4 field.First DNS ServerSecond DNS ServerThird DNS ServerSelect Obtained From ISP to have the EMG2881-T20A get the IPv6 DNS server addresses from the ISP automatically.Select User-Defined and enter the IPv6 DNS server address assigned by the ISP to have the EMG2881-T20A use the IPv6 DNS server addresses you configure manually.Select None if you do not want to configure DNS servers. If you do not configure a DNS server, you must know the IPv6 address of a computer in order to access it.Apply Click Apply to save your changes back to the EMG2881-T20A.Cancel Click Cancel to begin configuring this screen afresh.
Chapter 6 WANEMG2881-T20A User’s Guide48Figure 18   Configuration > WAN > NAT > General The following table describes the labels in this screen.Table 13   Configuration > WAN > NAT > GeneralLABEL DESCRIPTIONGeneralNetwork Address Translation (NAT)Network Address Translation (NAT) allows the translation of an Internet protocol address used within one network (for example a private IP address used in a local network) to a different IP address known within another network (for example a public IP address used on the Internet). Select Enable to activate NAT. Select Disable to turn it off.Default Server SetupDefault Server You can decide whether you want to use the default server or specify a server manually. In addition to the servers for specified services, NAT supports a default server. A default server receives packets from ports that are not specified in the port forwarding summary table below. Select this to use the default server. Change To Server  Select this and manually enter the server’s IP address.Port Forwarding (Max Limit : 16)#This is the number of an individual port forwarding server entry.Name Select a pre-defined service from the drop-down list box. The pre-defined service port number(s) and protocol will be displayed in the port forwarding summary table. Otherwise, select User define to manually enter the port number/range and select the Protocol.Protocol Select the transport layer protocol supported by this virtual server. Choices are TCP, UDP, or TCP_UDP. If you have chosen a pre-defined service in the Name field, the protocol will be configured automatically.External Port This shows the port number(s) that identifies the service if you select a pre-defined service. If you select User define in the Name field, enter the port number(s) manually.Server IP Address Select User define to manually enter the inside IP address of the virtual server here.Internal Port This shows the port number(s) that identifies the service if you select a pre-defined service. If you select User define in the Name field, enter an internal port number manually or leave the field blank for port range forwarding. Add Click   to add the rule in the port forwarding summary table.Delete Click   to remove a rule.
 Chapter 6 WANEMG2881-T20A User’s Guide496.5.2  Port Trigger ScreenTo change your EMG2881-T20A’s trigger port settings, click Configuration > WAN > NAT > Port Trigger. The screen appears as shown.Note: Only one LAN computer can use a trigger port (range) at a time.Figure 19   Configuration > WAN > NAT > Port TriggerThe following table describes the labels in this screen.6.5.3  Passthrough ScreenTo change your EMG2881-T20A’s VPN passthrough settings, click Configuration > WAN > NAT > Passthrough. The screen appears as shown.Apply Click Apply to save your changes back to the EMG2881-T20A.Cancel Click Cancel to begin configuring this screen afresh.Table 13   Configuration > WAN > NAT > General (continued)LABEL DESCRIPTIONTable 14   Configuration > WAN > NAT > Port TriggerLABEL DESCRIPTIONPort Trigger Rules (Max Limit : 32)#This is the rule index number (read-only).Name Type a unique name (up to 15 characters) for identification purposes. All characters are permitted - including spaces.Incoming Port Incoming is a port (or a range of ports) that a server on the WAN uses when it sends out a particular service. The EMG2881-T20A forwards the traffic with this port (or range of ports) to the client computer on the LAN that requested the service. Type a port number or the starting port number in a range of port numbers.End Port Type a port number or the ending port number in a range of port numbers.Trigger Port The trigger port is a port (or a range of ports) that causes (or triggers) the EMG2881-T20A to record the IP address of the LAN computer that sent the traffic to a server on the WAN.Type a port number or the starting port number in a range of port numbers.End Port Type a port number or the ending port number in a range of port numbers.Add Click   to add the rule in the port trigger summary table.Delete Click   to remove a rule.Apply Click Apply to save your changes back to the EMG2881-T20A.Cancel Click Cancel to begin configuring this screen afresh.
Chapter 6 WANEMG2881-T20A User’s Guide50Figure 20   Configuration > WAN > NAT > PassthroughThe following table describes the labels in this screen.6.6  Dynamic DNS ScreenTo change your EMG2881-T20A’s DDNS, click Configuration > WAN > Dynamic DNS. The screen appears as shown.Figure 21   Configuration > WAN > Dynamic DNS Table 15   Configuration > WAN > NAT > PassthroughLABEL DESCRIPTIONVPN Passthrough PPTP Select Enable to allow VPN clients to make outbound PPTP connections. It is required in order to connect to a PPTP VPN account. If PPTP is disabled, then when a client sends a request to a VPN server, the server will reply to the EMG2881-T20A and the EMG2881-T20A will drop the request. When PPTP is enabled, the EMG2881-T20A will forward the reply from the VPN server to the client that initiated the request, and the connection will establish successfully.L2TP Select Enable to allow VPN clients to make outbound L2TP connections. It is required in order to connect to a L2TP VPN account. If L2TP is disabled, then when a client sends a request to a VPN server, the server will reply to the EMG2881-T20A and the EMG2881-T20A will drop the request. When L2TP is enabled, the EMG2881-T20A will forward the reply from the VPN server to the client that initiated the request, and the connection will establish successfully.IPSEC Select Enable to allow VPN clients to make outbound IPSec connections. It is required in order to connect to a IPSec VPN account. If IPSEC is disabled, then when a client sends a request to a VPN server, the server will reply to the EMG2881-T20A and the EMG2881-T20A will drop the request. When IPSEC is enabled, the EMG2881-T20A will forward the reply from the VPN server to the client that initiated the request, and the connection will establish successfully.Apply Click Apply to save your changes back to the EMG2881-T20A.Cancel Click Cancel to begin configuring this screen afresh.
 Chapter 6 WANEMG2881-T20A User’s Guide51The following table describes the labels in this screen.6.7  Interface Group ScreenYou can manually add a LAN and/or WLAN interface to a new group. Click Configuration > WAN > Interface Group to open the following screen. Figure 22   Configuration > WAN > Interface Group The following table describes the fields in this screen. 6.7.1  Add Interface GroupClick the Add button in the Interface Group screen to open the following screen. Use this screen to create a new interface group. Table 16   Configuration > WAN > Dynamic DNSLABEL DESCRIPTIONDynamic DNS SetupDynamic DNS Select Enable to use dynamic DNS. Select Disable to turn this feature off.Service Provider Select the name of your Dynamic DNS service provider.Host Name Enter a host names in the field provided.Username Enter your user name.Password Enter the password assigned to you.Apply Click Apply to save your changes back to the EMG2881-T20A.Cancel Click Cancel to begin configuring this screen afresh.Table 17   Configuration > WAN > Interface GroupLABEL DESCRIPTIONAdd Click this to add a new interface grouping rule. You must configure a WAN connection before you can add a new interface grouping rule. See Chapter 6 on page 37 for more information. Interface Grouping Rules#This is the rule index number (read-only).Name This shows the descriptive name of the group.WAN Interface This shows the WAN interfaces in the group.LAN Interfaces This shows the LAN and/or WLAN interfaces in the group.Delete Click the Delete icon to remove the group.
Chapter 6 WANEMG2881-T20A User’s Guide52Note: An interface can belong to a group only.Figure 23   Configuration > WAN > Interface Group > Add New Group The following table describes the fields in this screen. Table 18   Configuration > WAN > Interface Group > Add New GroupLABEL DESCRIPTIONGroup Name Enter a name to identify this group.WAN Interfaces used in the groupSelect a WAN interface to be used in this group.Select None to not add a WAN interface to this group.Grouped LAN InterfacesAvailable LAN InterfacesSelect a LAN or wireless LAN interface in the Available LAN Interfaces and use the left-facing arrow to move it to the Grouped LAN Interfaces to add the interface to this group.To remove a LAN or wireless LAN interface from the Grouped LAN Interfaces, use the righ-facing arrow.Apply Click this button to save your settings back to the EMG2881-T20A.Cancel Click Cancel to begin configuring this screen afresh.
EMG2881-T20A User’s Guide53CHAPTER 7Wireless LAN7.1  OverviewThis chapter discusses how to configure the wireless network settings in your EMG2881-T20A. The EMG2881-T20A is able to function both 2.4GHz and 5GHz network at the same time. You can have different wireless and wireless security settings for 2.4GHz and 5GHz wireless LANs. Click Configuration > Wireless to configure to do so.See the appendices for more detailed information about wireless networks.The following figure provides an example of a wireless network.Figure 24   Example of a Wireless NetworkThe wireless network is the part in the blue circle. In this wireless network, devices A and B are called wireless clients. The wireless clients use the access point (AP) to interact with other devices (such as the printer) or with the Internet. Your EMG2881-T20A is the AP.
Chapter 7 Wireless LANEMG2881-T20A User’s Guide547.1.1  What You Can Do• Use the Wireless screen to turn the wireless connection on or off, set up wireless security between the EMG2881-T20A and the wireless clients, and make other basic configuration changes (Section 7.2 on page 57).• Use the More AP screen to set up multiple wireless networks on your EMG2881-T20A (Section 7.4 on page 61). • Use the MAC Filter screen to allow or deny wireless stations based on their MAC addresses from connecting to the EMG2881-T20A (Section 7.5 on page 64).• Use the Advanced screen to allow intra-BSS networking and set the RTS/CTS Threshold (Section 7.6 on page 65).• Use the WPS screen to quickly set up a wireless network with strong security, without having to configure security settings manually (Section 7.7 on page 66).• Use the Scheduling screen to set the times your wireless LAN is turned on and off (Section 7.8 on page 68).7.1.2  What You Should KnowEvery wireless network must follow these basic guidelines.• Every wireless client in the same wireless network must use the same SSID.The SSID is the name of the wireless network. It stands for Service Set IDentity.• If two wireless networks overlap, they should use different channels.Like radio stations or television channels, each wireless network uses a specific channel, or frequency, to send and receive information.• Every wireless client in the same wireless network must use security compatible with the AP.Security stops unauthorized devices from using the wireless network. It can also protect the information that is sent in the wireless network.Wireless Security OverviewThe following sections introduce different types of wireless security you can set up in the wireless network.SSIDNormally, the AP acts like a beacon and regularly broadcasts the SSID in the area. You can hide the SSID instead, in which case the AP does not broadcast the SSID. In addition, you should change the default SSID to something that is difficult to guess.This type of security is fairly weak, however, because there are ways for unauthorized devices to get the SSID. In addition, unauthorized devices can still see the information that is sent in the wireless network.MAC Address FilterEvery wireless client has a unique identification number, called a MAC address.1 A MAC address is usually written using twelve hexadecimal characters2; for example, 00A0C5000002 or 00:A0:C5:00:00:02. 1. Some wireless devices, such as scanners, can detect wireless networks but cannot use wireless networks. These kinds of wireless devices might not have MAC addresses.
 Chapter 7 Wireless LANEMG2881-T20A User’s Guide55To get the MAC address for each wireless client, see the appropriate User’s Guide or other documentation.You can use the MAC address filter to tell the AP which wireless clients are allowed or not allowed to use the wireless network. If a wireless client is allowed to use the wireless network, it still has to have the correct settings (SSID, channel, and security). If a wireless client is not allowed to use the wireless network, it does not matter if it has the correct settings.This type of security does not protect the information that is sent in the wireless network. Furthermore, there are ways for unauthorized devices to get the MAC address of an authorized wireless client. Then, they can use that MAC address to use the wireless network.User AuthenticationYou can make every user log in to the wireless network before they can use it. This is called user authentication. However, every wireless client in the wireless network has to support IEEE 802.1x to do this.For wireless networks, there are two typical places to store the user names and passwords for each user.• In the AP: this feature is called a local user database or a local database.• In a RADIUS server: this is a server used in businesses more than in homes.If your AP does not provide a local user database and if you do not have a RADIUS server, you cannot set up user names and passwords for your users.Unauthorized devices can still see the information that is sent in the wireless network, even if they cannot use the wireless network. Furthermore, there are ways for unauthorized wireless users to get a valid user name and password. Then, they can use that user name and password to use the wireless network.Local user databases also have an additional limitation that is explained in the next section.EncryptionWireless networks can use encryption to protect the information that is sent in the wireless network. Encryption is like a secret code. If you do not know the secret code, you cannot understand the message.The types of encryption you can choose depend on the type of user authentication. (See page 55 for information about this.)For example, if the wireless network has a RADIUS server, you can choose WPA or WPA2. If users do not log in to the wireless network, you can choose no encryption, Static WEP, WPA-PSK, or WPA2-PSK.2. Hexadecimal characters are 0, 1, 2, 3, 4, 5, 6, 7, 8, 9, A, B, C, D, E, and F.Table 19   Types of Encryption for Each Type of AuthenticationNO AUTHENTICATION RADIUS SERVERWeakest No Security WPAStatic WEPWPA-PSKStrongest WPA2-PSK WPA2
Chapter 7 Wireless LANEMG2881-T20A User’s Guide56Usually, you should set up the strongest encryption that every wireless client in the wireless network supports. For example, suppose the AP does not have a local user database, and you do not have a RADIUS server. Therefore, there is no user authentication. Suppose the wireless network has two wireless clients. Device A only supports WEP, and device B supports WEP and WPA. Therefore, you should set up Static WEP in the wireless network.Note: It is recommended that wireless networks use WPA-PSK, WPA, or stronger encryption. IEEE 802.1x and WEP encryption are better than none at all, but it is still possible for unauthorized devices to figure out the original information pretty quickly.Note: It is not possible to use WPA-PSK, WPA or stronger encryption with a local user database. In this case, it is better to set up stronger encryption with no authentication than to set up weaker encryption with the local user database.When you select WPA2 or WPA2-PSK in your EMG2881-T20A, you can also select an option (WPA/WPA-PSK Compatible) to support WPA/WPA-PSK as well. In this case, if some wireless clients support WPA and some support WPA2, you should set up WPA2-PSK or WPA2 (depending on the type of wireless network login) and select the WPA/WPA-PSK Compatible option in the EMG2881-T20A.Many types of encryption use a key to protect the information in the wireless network. The longer the key, the stronger the encryption. Every wireless client in the wireless network must have the same key.Guest WLANGuest WLAN allows you to set up a wireless network where users can access to Internet via the EMG2881-T20A (Z), but not other networks connected to the Z. In the following figure, a guest user can access the Internet from the guest wireless network A via Z but not the home or company network N.Note: The home or company network N and Guest WLAN network are independent networks.Figure 25   Guest Wireless LAN NetworkGuest WLAN BandwidthThe Guest WLAN Bandwidth function allows you to restrict the maximum bandwidth for the guest wireless network. Additionally, you can also define bandwidth for your home or office network. An NAZ
 Chapter 7 Wireless LANEMG2881-T20A User’s Guide57example is shown next to define maximum bandwidth for your networks (A is Guest WLAN and N is home or company network.)Figure 26   Example: Bandwidth for Different NetworksWPSWiFi Protected Setup (WPS) is an industry standard specification, defined by the WiFi Alliance. WPS allows you to quickly set up a wireless network with strong security, without having to configure security settings manually. Depending on the devices in your network, you can either press a button (on the device itself, or in its configuration utility) or enter a PIN (Personal Identification Number) in the devices. Then, they connect and set up a secure network by themselves. See how to set up a secure wireless network using WPS in the Section 4.2 on page 24. 7.2  Wireless LAN Screen Use this screen to configure the SSID and wireless security of the wireless LAN.Note: If you are configuring the EMG2881-T20A from a computer connected to the wireless LAN and you change the EMG2881-T20A’s SSID, channel or security settings, you will lose your wireless connection when you press Apply to confirm. You must then change the wireless settings of your computer to match the EMG2881-T20A’s new settings.Click Configuration > Wireless to open the Wireless screen.600 kbps100 kbps300 kbpsNA
Chapter 7 Wireless LANEMG2881-T20A User’s Guide58Figure 27   Configuration > Wireless  > Wireless The following table describes the general wireless LAN labels in this screen.Table 20   Configuration > Wireless > WirelessLABEL DESCRIPTIONBand This shows the wireless band which this radio profile is using. 2.4GHz is the frequency used by IEEE 802.11b/g/n wireless clients while 5GHz is used by IEEE 802.11a/ac wireless clients.Wireless LAN Select Enable to activate the 2.4GHz and/or 5GHz wireless LAN. Select Disable to turn it off. Note: You can enable or disable both 2.4GHz and 5GHz wireless LANs by using the WIFI button located on the side panel of the EMG2881-T20A.Name (SSID)  The SSID (Service Set IDentity) identifies the Service Set with which a wireless client is associated. Enter a descriptive name (up to 32 printable characters found on a typical English language keyboard) for the wireless LAN. Hide SSID Select this check box to hide the SSID in the outgoing beacon frame so a station cannot obtain the SSID through scanning using a site survey tool.Channel Selection Set the operating frequency/channel depending on your particular region. Select a channel from the drop-down list box. The options vary depending on the frequency band and the country you are in.Refer to the Connection Wizard chapter for more information on channels. This option is only available if Auto Channel Selection is disabled.Operating Channel This displays the channel the EMG2881-T20A is currently using.
 Chapter 7 Wireless LANEMG2881-T20A User’s Guide59See the rest of this chapter for information on the other labels in this screen. 7.3  Wireless SecurityThe screen varies depending on what you select in the Security Mode field.Channel Width Select the wireless channel width used by EMG2881-T20A.A standard 20 MHz channel offers transfer speeds of up to 144Mbps (2.4GHz) or 217Mbps (5GHZ) whereas a 40MHz channel uses two standard channels and offers speeds of up to 300Mbps (2.4GHz) or 450Mbps (5GHZ). An IEEE 802.11ac-specific 80MHz channel offers speeds of up to 1.3Gbps.Because not all devices support 40 MHz and/or 80 MHz channels, select Auto 20/40 MHz or Auto 20/40/80 MHz to allow the EMG2881-T20A to adjust the channel bandwidth automatically.Select 20 MHz if you want to lessen radio interference with other wireless devices in your neighborhood or the wireless clients do not support channel bonding.802.11 Mode If you are in the Wireless LAN 2.4G > General screen, you can select from the following:•802.11b: allows either IEEE 802.11b or IEEE 802.11g compliant WLAN devices to associate with the EMG2881-T20A. In this mode, all wireless devices can only transmit at the data rates supported by IEEE 802.11b.•802.11g: allows IEEE 802.11g compliant WLAN devices to associate with the Device. IEEE 802.11b compliant WLAN devices can associate with the EMG2881-T20A only when they use the short preamble type.•802.11bg: allows either IEEE 802.11b or IEEE 802.11g compliant WLAN devices to associate with the EMG2881-T20A. The EMG2881-T20A adjusts the transmission rate automatically according to the wireless standard supported by the wireless devices.•802.11n: allows IEEE 802.11n compliant WLAN devices to associate with the EMG2881-T20A. This can increase transmission rates, although IEEE 802.11b or IEEE 802.11g clients will not be able to connect to the EMG2881-T20A. •802.11gn: allows either IEEE 802.11g or IEEE 802.11n compliant WLAN devices to associate with the EMG2881-T20A. The transmission rate of your EMG2881-T20A might be reduced.•802.11 bgn: allows IEEE802.11b, IEEE802.11g and IEEE802.11n compliant WLAN devices to associate with the EMG2881-T20A. The transmission rate of your EMG2881-T20A might be reduced.If you are in the Wireless LAN 5G > General screen, you can select from the following:•802.11a: allows only IEEE 802.11a compliant WLAN devices to associate with the EMG2881-T20A.•802.11a/an: allows both IEEE802.11n and IEEE802.11a compliant WLAN devices to associate with the EMG2881-T20A. The transmission rate of your EMG2881-T20A might be reduced.•802.11a/an/ac: allows both IEEE802.11a, IEEE802.11n and IEEE802.11ac compliant WLAN devices to associate with the EMG2881-T20A. The transmission rate of your EMG2881-T20A might be reduced.Security Mode Select WPA2-PSK to add security on this wireless network. The wireless clients which want to associate to this network must have same wireless security settings as this device. After you select to use a security, additional options appears in this screen. See Section 7.3 on page 59 for detailed information on different security modes. Or you can select No Security to allow any client to associate this network without authentication.Note: Apply Click Apply to save your changes back to the EMG2881-T20A.Cancel Click Cancel to reload the previous configuration for this screen.Table 20   Configuration > Wireless > WirelessLABEL DESCRIPTION
Chapter 7 Wireless LANEMG2881-T20A User’s Guide607.3.1  No SecuritySelect No Security to allow wireless clients to communicate with the access points without any data encryption.Note: If you do not enable any wireless security on your EMG2881-T20A, your network is accessible to any wireless networking device that is within range.Figure 28   Configuration > Wireless > Wireless: No SecurityThe following table describes the labels in this screen.7.3.2  WPA2-PSKSelect WPA2-PSK from the Security Mode list.Table 21   Configuration > Wireless > Wireless: No SecurityLABEL DESCRIPTIONSecurity Mode Choose No Security from the drop-down list box.Apply Click Apply to save your changes back to the EMG2881-T20A.Cancel Click Cancel to reload the previous configuration for this screen.
 Chapter 7 Wireless LANEMG2881-T20A User’s Guide61Figure 29   Configuration > Wireless > Wireless: WPA2-PSKThe following table describes the labels in this screen.7.4  More AP Screen This screen allows you to enable and configure multiple wireless networks and guest wireless network settings on the EMG2881-T20A.Table 22   Configuration > Wireless > Wireless: WPA-PSK/WPA2-PSKLABEL DESCRIPTIONSecurity Mode Select WPA2-PSK to enable data encryption.WPA-PSK CompatibleThis field appears when you choose WPA2-PSK as the Security Mode.Check this field to allow wireless devices using WPA-PSK security mode to connect to your EMG2881-T20A.PMF Protected Management Frames (PMF) is a protection mechanism of action management frames.Check this field to allow wireless devices using the PMF protection mechanism to connect to your EMG2881-T20A.Pre-Shared Key  WPA-PSK/WPA2-PSK uses a simple common password for authentication.Type a pre-shared key from 8 to 63 case-sensitive keyboard characters.Group Key Update TimerThe Group Key Update Timer is the rate at which the AP sends a new group key out to all clients. The default is 3600 seconds (60 minutes).Apply Click Apply to save your changes back to the EMG2881-T20A.Cancel Click Cancel to reload the previous configuration for this screen.
Chapter 7 Wireless LANEMG2881-T20A User’s Guide62You can configure up to four SSIDs to enable multiple BSSs (Basic Service Sets) on the EMG2881-T20A. This allows you to use one access point to provide several BSSs simultaneously. You can then assign varying security types to different SSIDs. Wireless clients can use different SSIDs to associate with the same access point.Click Configuration > Wireless > More AP. The following screen displays.Figure 30   Configuration > Wireless > More AP The following table describes the labels in this screen.7.4.1  More AP EditUse this screen to edit an SSID profile. Click the Edit icon next to an SSID in the More AP screen. The following screen displays.Table 23   Configuration > Wireless > More APLABEL DESCRIPTIONBand Use 2.4GHz or 5GHz to set up the EMG2881-T20A’s guest WiFi network.#This is the index number of each SSID profile. Status This shows whether the SSID profile is active (a yellow bulb) or not (a gray bulb).SSID An SSID profile is the set of parameters relating to one of the EMG2881-T20A’s BSSs. The SSID (Service Set IDentifier) identifies the Service Set with which a wireless device is associated. This field displays the name of the wireless profile on the network. When a wireless client scans for an AP to associate with, this is the name that is broadcast and seen in the wireless client utility.Security This field indicates the security mode of the SSID profile.Remaining Time If the user is currently not permitted to access the Internet, you can click Set to allow access for a specified period of time. A screen then displays allowing you to set how long (in hours) the user is allowed to access the Internet.This field displays the amount of Internet access time that remains for each user before the EMG2881-T20A blocks the user from accessing the Internet.0:0:0 means there is no extra Internet access time.Edit Click the Edit icon to configure the SSID profile.
 Chapter 7 Wireless LANEMG2881-T20A User’s Guide63Figure 31   Configuration > Wireless > More AP: Edit The following table describes the labels in this screen.Table 24   Configuration > Wireless > More AP: EditLABEL DESCRIPTIONActive Select this to activate the SSID profile.Name (SSID)  The SSID (Service Set IDentity) identifies the Service Set with which a wireless client is associated. Enter a descriptive name (up to 32 printable characters found on a typical English language keyboard) for the wireless LAN. Hide SSID Select this check box to hide the SSID in the outgoing beacon frame so a station cannot obtain the SSID through scanning using a site survey tool.Intra-BSS Traffic A Basic Service Set (BSS) exists when all communications between wireless clients or between a wireless client and a wired network client go through one access point (AP). Intra-BSS traffic is traffic between wireless clients in the BSS. When Intra-BSS is enabled, wireless clients can access the wired network and communicate with each other. When Intra-BSS is disabled, wireless clients can still access the wired network but cannot communicate with each other.WMM QoS Check this to have the EMG2881-T20A automatically give a service a priority level according to the ToS value in the IP header of packets it sends. WMM QoS (Wifi MultiMedia Quality of Service) gives high priority to voice and video, which makes them run more smoothly.Security Mode Select WPA2-PSK to add security on this wireless network. The wireless clients which want to associate to this network must have same wireless security settings as this device. After you select to use a security, additional options appears in this screen. See Section 7.3 on page 59 for detailed information on different security modes. Or you can select No Security to allow any client to associate this network without authentication.Note: WPA-PSK CompatibleThis field appears when you choose WPA2-PSK as the Security Mode.Check this field to allow wireless devices using WPA-PSK security mode to connect to your EMG2881-T20A.PMF Protected Management Frames (PMF) is a protection mechanism of action management frames.Check this field to allow wireless devices using the PMF protection mechanism to connect to your EMG2881-T20A.Pre-Shared Key  WPA2-PSK uses a simple common password for authentication.Type a pre-shared key from 8 to 63 case-sensitive keyboard characters.Group Key Update TimerThe Group Key Update Timer is the rate at which the AP sends a new group key out to all clients. The default is 3600 seconds (60 minutes).
Chapter 7 Wireless LANEMG2881-T20A User’s Guide647.5  MAC Filter Screen The MAC filter screen allows you to configure the EMG2881-T20A to give exclusive access to devices (Allow) or exclude devices from accessing the EMG2881-T20A (Deny). Every Ethernet device has a unique MAC (Media Access Control) address. The MAC address is assigned at the factory and consists of six pairs of hexadecimal characters, for example, 00:A0:C5:00:00:02. You need to know the MAC address of the devices to configure this screen.To change your EMG2881-T20A’s MAC filter settings, click Configuration > Wireless  > MAC Filter. The screen appears as shown.Figure 32   Configuration > Wireless > MAC FilterThe following table describes the labels in this menu.Apply Click Apply to save your changes back to the EMG2881-T20A.Cancel Click Cancel to reload the previous configuration for this screen.Table 24   Configuration > Wireless > More AP: Edit (continued)LABEL DESCRIPTIONTable 25   Configuration > Wireless > MAC FilterLABEL DESCRIPTIONBand Select the frequency band to set whether you want to apply the wireless and security settings to the default 2.4GHz or 5GHz wireless LAN. MAC Address FilterSelect to turn on (Enable) or off (Disable) MAC address filtering.Filter Action Define the filter action for the list of MAC addresses in the MAC Filter Summary table.Select Allow to permit access to the EMG2881-T20A, MAC addresses not listed will be denied access to the EMG2881-T20A. Select Deny to block access to the EMG2881-T20A, MAC addresses not listed will be allowed to access the EMG2881-T20A. MAC Filter Summary#This is the index number of the MAC address.MAC Address Enter the MAC address of the wireless station that are allowed or denied access to the EMG2881-T20A.Add/Delete Click   to add the rule in the MAC filter summary table.Click   to remove a rule.
 Chapter 7 Wireless LANEMG2881-T20A User’s Guide657.6  Advanced ScreenUse this screen to allow wireless advanced features, such as the output power, RTS/CTS Threshold settings.Click Configuration > Wireless > Advanced. The screen appears as shown.Figure 33   Configuration > Wireless > AdvancedThe following table describes the labels in this screen. Apply Click Apply to save your changes back to the EMG2881-T20A.Cancel Click Cancel to reload the previous configuration for this screen.Table 25   Configuration > Wireless > MAC Filter (continued)LABEL DESCRIPTIONTable 26   Configuration > Wireless > AdvancedLABEL DESCRIPTIONBand Select the frequency band to set whether you want to apply the wireless and security settings to the default 2.4GHz or 5GHz wireless LAN. RTS/CTS Threshold Data with its frame size larger than this value will perform the RTS (Request To Send)/CTS (Clear To Send) handshake. This field is not configurable and the EMG2881-T20A automatically changes to use the maximum value if you select 802.11a/an, 802.11a/an/ac, 802.11n, 802.11gn or 802.11bgn in the Wireless LAN 2.4G/5G > General screen.Fragmentation ThresholdThe threshold (number of bytes) for the fragmentation boundary for directed messages. It is the maximum data fragment size that can be sent. This field is not configurable and the EMG2881-T20A automatically changes to use the maximum value if you select 802.11a/an, 802.11a/an/ac, 802.11n, 802.11gn or 802.11bgn in the Wireless LAN 2.4G/5G > General screen.
Chapter 7 Wireless LANEMG2881-T20A User’s Guide667.7  WPS ScreenUse this screen to enable/disable WPS, view or generate a new PIN number and check current WPS status. To open this screen, click Configuration > Wireless > WPS.Note: With WPS, wireless clients can only connect to the wireless network using the first SSID on the EMG2881-T20A.Intra-BSS Traffic BlockingA Basic Service Set (BSS) exists when all communications between wireless clients or between a wireless client and a wired network client go through one access point (AP). Intra-BSS traffic is traffic between wireless clients in the BSS. When Intra-BSS is enabled, wireless clients can access the wired network and communicate with each other. When Intra-BSS is disabled, wireless clients can still access the wired network but cannot communicate with each other.Tx Power Set the output power of the EMG2881-T20A in this field. If there is a high density of APs in an area, decrease the output power of the EMG2881-T20A to reduce interference with other APs. Select one of the following 100%, 90%, 75%, 50%, 25% or 10%. QoS SetupWMM QoS Select Enable to have the EMG2881-T20A automatically give a service a priority level according to the ToS value in the IP header of packets it sends. WMM QoS (Wifi MultiMedia Quality of Service) gives high priority to voice and video, which makes them run more smoothly.This field is not configurable and the EMG2881-T20A automatically enables WMM QoS if you select 802.11n, 802.11an, 802.11gn or 802.11bgn in the Expert > Wireless screen.Apply Click Apply to save your changes back to the EMG2881-T20A.Cancel Click Cancel to reload the previous configuration for this screen.Table 26   Configuration > Wireless > Advanced (continued)LABEL DESCRIPTION
 Chapter 7 Wireless LANEMG2881-T20A User’s Guide67Figure 34   Network > Wireless LAN 2.4G/5G > WPSThe following table describes the labels in this screen.Table 27   Network > Wireless LAN 2.4G/5G > WPSLABEL DESCRIPTIONWPS SetupBand Select the frequency band to set whether you want to apply the wireless and security settings to the default 2.4GHz or 5GHz wireless LAN. WPS Select Enable to turn on the WPS feature. Otherwise, select Disable.PIN Code Select Enable and click Apply to allow the PIN Configuration method. If you select Disable, you cannot create a new PIN number.PIN Number This is the WPS PIN (Personal Identification Number) of the EMG2881-T20A. Enter this PIN in the configuration utility of the device you want to connect to the EMG2881-T20A using WPS.The PIN is not necessary when you use WPS push-button method.Click Generate to generate a new PIN number.Push Button Use this button when you use the PBC (Push Button Configuration) method to configure wireless stations’s wireless settings. Click this to start WPS-aware wireless station scanning and the wireless security information synchronization. Or input station’s PIN numberUse this button when you use the PIN Configuration method to configure wireless station’s wireless settings. Type the same PIN number generated in the wireless station’s utility. Then click Start to associate to each other and perform the wireless security information synchronization. WPS Status
Chapter 7 Wireless LANEMG2881-T20A User’s Guide687.8  Scheduling ScreenUse this screen to set the times your wireless LAN is turned on and off. Wireless LAN scheduling is disabled by default. The wireless LAN can be scheduled to turn on or off on certain days and at certain times. To open this screen, click Configuration > Wireless > Scheduling tab.Figure 35   Configuration > Wireless > SchedulingThe following table describes the labels in this screen.Status This displays Configured when the EMG2881-T20A has connected to a wireless network using WPS or when WPS Enable is selected and wireless or wireless security settings have been changed. The current wireless and wireless security settings also appear in the screen.This displays Unconfigured if WPS is disabled and there are no wireless or wireless security changes on the EMG2881-T20A or you click Release Configuration to remove the configured wireless and wireless security settings.Release ConfigurationThis button is only available when the WPS status displays Configured.Click this button to remove all configured wireless and wireless security settings for WPS connections on the EMG2881-T20A.802.11 Mode This is the 802.11 mode used. Only compliant WLAN devices can associate with the EMG2881-T20A.SSID This is the name of the wireless network (the EMG2881-T20A’s first SSID).Security This is the type of wireless security employed by the network.Apply Click Apply to save your changes back to the EMG2881-T20A.Cancel Click Cancel to reload the previous configuration for this screen.Table 27   Network > Wireless LAN 2.4G/5G > WPS (continued)LABEL DESCRIPTIONTable 28   Configuration > Wireless > SchedulingLABEL DESCRIPTIONBand Select the frequency band to set whether you want to apply the wireless and security settings to the default 2.4GHz or 5GHz wireless LAN. Wireless LAN SchedulingSelect Enable to activate the wireless LAN scheduling feature. Select Disable to turn it off.
 Chapter 7 Wireless LANEMG2881-T20A User’s Guide69Internet Access ScheduleThe y-axis shows the time period in days. The x-axis shows the time period in hours.Click Select All or click gray blocks to specify days and times to turn the Wireless LAN on or off. If you click Select All you can not select any specific days and times. Click Clean All to remove all the wireless LAN scheduling.Apply Click Apply to save your changes back to the EMG2881-T20A.Cancel Click Cancel to reload the previous configuration for this screen.Table 28   Configuration > Wireless > SchedulingLABEL DESCRIPTION
EMG2881-T20A User’s Guide70CHAPTER 8LAN8.1  OverviewThis chapter describes how to configure LAN settings.A Local Area Network (LAN) is a shared communication system to which many computers are attached. A LAN is a computer network limited to the immediate area, usually the same building or floor of a building. Figure 36   LAN ExampleThe LAN screens can help you configure a manage IP address, and partition your physical network into logical networks.8.2  What You Can Do• Use the LAN IP screen to configure the IPv4 and IPv6 addresses for your EMG2881-T20A on the LAN (Section 8.4 on page 71).• Use the Static DHCP screen to assign IP addresses on the LAN to specific individual computers based on their MAC Addresses (Section 8.5 on page 72).• Use the IPv6 LAN screen to configure the IPv6 address for your EMG2881-T20A on the LAN (Section 8.6 on page 73).8.3  What You Need To KnowThe actual physical connection determines whether the EMG2881-T20A ports are LAN or WAN ports. There are two separate IP networks, one inside the LAN network and the other outside the WAN network as shown next.
 Chapter 8 LANEMG2881-T20A User’s Guide71Figure 37   LAN and WAN IP AddressesThe LAN parameters of the EMG2881-T20A are preset in the factory with the following values:• IPv4 address of 192.168.1.1 with subnet mask of 255.255.255.0 (24 bits)• DHCP server enabled with 128 client IPv4 addresses starting from 192.168.1.33. These parameters should work for the majority of installations.8.4  LAN IP ScreenUse this screen to change the IP address for your EMG2881-T20A. Click Configuration > LAN > LAN IP.Figure 38   Configuration > LAN > LAN IP The following table describes the labels in this screen.Table 29   Configuration > LAN > LAN IPLABEL DESCRIPTIONIP Address Type the IP address of your EMG2881-T20A in dotted decimal notation.IP Subnet Mask The subnet mask specifies the network number portion of an IP address. Your EMG2881-T20A will automatically calculate the subnet mask based on the IP address that you assign. Unless you are implementing subnetting, use the subnet mask computed by the EMG2881-T20A.
Chapter 8 LANEMG2881-T20A User’s Guide728.5  Static DHCP ScreenThis screen allows you to assign IP addresses on the LAN to specific individual computers based on their MAC addresses. To change your EMG2881-T20A’s static DHCP settings, click Configuration > LAN > Static DHCP.Figure 39   Configuration > LAN > Static DHCP The following table describes the labels on this screen.DHCP Server Select Enable to activate DHCP for LAN.DHCP (Dynamic Host Configuration Protocol, RFC 2131 and RFC 2132) allows individual clients (computers) to obtain TCP/IP configuration at startup from a server. Enable the DHCP server unless your ISP instructs you to do otherwise. Select Disable to stop the EMG2881-T20A acting as a DHCP server. When configured as a server, the EMG2881-T20A provides TCP/IP configuration for the clients. If not, DHCP service is disabled and you must have another DHCP server on your LAN, or else the computers must be manually configured. When set as a server, fill in the following four fields.IP Pool Starting AddressThis field specifies the first of the contiguous addresses in the IP address pool for LAN.Pool Size This field specifies the size, or count of the IP address pool for LAN.Lease Time This is the period of time DHCP-assigned addresses is used. DHCP automatically assigns IP addresses to clients when they log in. DHCP centralizes IP address management on central computers that run the DHCP server program. DHCP leases addresses, for a period of time, which means that past addresses are “recycled” and made available for future reassignment to other systems.Apply Click Apply to save your changes back to the EMG2881-T20A.Cancel Click Cancel to begin configuring this screen afresh.Table 29   Configuration > LAN > LAN IP (continued)LABEL DESCRIPTIONTable 30   Configuration > LAN > Static DHCP LABEL DESCRIPTION#This is the index number of the static IP table entry (row). Select Auto Detection to automatically detect the MAC address of a computer on your LAN. Otherwise, select User define to enter the MAC address of a computer on your LAN in the MAC Address field.MAC Address This field displays the MAC address of a computer on your LAN. If you select User define in the # field, enter the MAC address(es) manually.IP Address This field displays the LAN IP address of a computer on your LAN. If you select User define in the # field, enter the IP address(es) manually.Add/Delete Click   to add the rule in the MAC filter summary table.Click   to remove a rule.
 Chapter 8 LANEMG2881-T20A User’s Guide738.6  IPv6 LAN ScreenUse this screen to configure the IP address for your EMG2881-T20A on the LAN. Click Configuration > LAN > IPv6 LAN.Figure 40   Configuration > LAN > IPv6 LAN The following table describes the labels in this screen.Apply Click Apply to save your changes with the EMG2881-T20A.Cancel Click Cancel to begin configuring this screen afresh.Table 30   Configuration > LAN > Static DHCP  (continued)LABEL DESCRIPTIONTable 31   Configuration > LAN > IPv6 LANLABEL DESCRIPTIONLAN IPv6 Address AssignmentEnable_DHCPv6-PD Select this option to use DHCPv6 prefix delegation. The EMG2881-T20A will obtain an IPv6 prefix from the ISP or a connected uplink router for the LAN.Autoconfiguration TypeSelect SLAAC + RDNSS to enable IPv6 stateless auto-configuration on this interface. The interface will generate an IPv6 IP address itself from a prefix obtained from an IPv6 router in the network.Select SLAAC + Stateless DHCPv6 to enable IPv6 stateless auto-configuration on this interface. The interface will get an IPv6 address from an IPv6 router and the DHCP server. The IP address information gets through DHCPv6.Select Stateful DHCPv6 to allow a DHCP server to assign and pass IPv6 network addresses, prefixes and other configuration information to DHCP clients.IPv6 Address range (Start)Enter the beginning of the range of IP addresses that this address object represents.IPv6 Address range (End) Enter the end of the range of IP address that this address object represents.IPv6 Lifetime Enter the IPv6 lifetime in the LAN.Static IP AddressSelect this option to manually enter an IPv6 address if you want to use a static IP address.
Chapter 8 LANEMG2881-T20A User’s Guide74LAN IPv6 Address Enter the LAN IPv6 address you want to assign to your EMG2881-T20A in hexadecimal notation.LAN IPv6 Prefix Length (48~64)Enter the 48 to 64 address prefix length to specify in an IPv6 address compose the network address.Prefix Preferred LifetimeEnter the preferred lifetime for the prefix.Prefix Valid Lifetime Enter the valid lifetime for the prefix.Link Local Only   Select this option to only use the link local address on the EMG2881-T20A interfaces in the LAN.ULASelect this option to identify a unique local address of the EMG2881-T20A in the LAN.     RA periodMinimum RA period Enter the minimum time in seconds between router advertisement messages.Apply Click Apply to save your changes back to the EMG2881-T20A.Cancel Click Cancel to begin configuring this screen afresh.Table 31   Configuration > LAN > IPv6 LAN (continued)LABEL DESCRIPTION
EMG2881-T20A User’s Guide75CHAPTER 9Applications9.1  Overview This chapter shows you how to configure bandwidth management and UPnP.Quality of Service (QoS)Quality of Service (QoS) refers to both a network’s ability to deliver data with minimum delay, and the networking methods used to control the use of bandwidth. Without QoS, all traffic data is equally likely to be dropped when the network is congested. This can cause a reduction in network performance and make the network inadequate for time-critical application such as video-on-demand.Configure QoS on the EMG2881-T20A to group and prioritize application traffic and fine-tune network performance. Setting up QoS involves these steps:1Configure classifiers to sort traffic into different flows. 2Assign priority and define actions to be performed for a classified traffic flow. The EMG2881-T20A assigns each packet a priority and then queues the packet accordingly. Packets assigned a high priority are processed more quickly than those with low priority if there is congestion, allowing time-sensitive applications to flow more smoothly. Time-sensitive applications include both those that require a low level of latency (delay) and a low level of jitter (variations in delay) such as Voice over IP (VoIP) or Internet gaming, and those for which jitter alone is a problem such as Internet radio or streaming video.This chapter contains information about configuring QoS and editing classifiers.Universal Plug-and-Play (UPnP)UPnP hardware is identified as an icon in the Network Connections folder (Windows XP). Each UPnP compatible device installed on your network will appear as a separate icon. Selecting the icon of a UPnP device will allow you to access the information and properties of that device. 9.1.1  What You Can Do in this Chapter• The QoS General screen lets you enable or disable QoS and set the upstream bandwidth (Section 9.3 on page 78).• The Queue Setup screen lets you configure QoS queue assignment (Section 9.4 on page 79).• The Class Setup screen lets you add, edit or delete QoS classifiers (Section 9.5 on page 80).• Use the UPnP screen to enable UPnP on your EMG2881-T20A (Section 9.6 on page 83).
Chapter 9 ApplicationsEMG2881-T20A User’s Guide769.2  What You Need to KnowThe following terms and concepts may help as you read through this chapter.QoS versus CoSQoS is used to prioritize source-to-destination traffic flows. All packets in the same flow are given the same priority. CoS (class of service) is a way of managing traffic in a network by grouping similar types of traffic together and treating each type as a class. You can use CoS to give different priorities to different packet types. CoS technologies include IEEE 802.1p layer 2 tagging and DiffServ (Differentiated Services or DS). IEEE 802.1p tagging makes use of three bits in the packet header, while DiffServ is a new protocol and defines a new DS field, which replaces the eight-bit ToS (Type of Service) field in the IP header. Tagging and MarkingIn a QoS class, you can configure whether to add or change the DSCP (DiffServ Code Point) value, IEEE 802.1p priority level and VLAN ID number in a matched packet. When the packet passes through a compatible network, the networking device, such as a backbone switch, can provide specific treatment or service based on the tag or marker.Traffic ShapingBursty traffic may cause network congestion. Traffic shaping regulates packets to be transmitted with a pre-configured data transmission rate using buffers (or queues). Your EMG2881-T20A uses the Token Bucket algorithm to allow a certain amount of large bursts while keeping a limit at the average rate. TrafficTimeTraffic RateTrafficTimeTraffic Rate(Before Traffic Shaping) (After Traffic Shaping)
 Chapter 9 ApplicationsEMG2881-T20A User’s Guide77Traffic PolicingTraffic policing is the limiting of the input or output transmission rate of a class of traffic on the basis of user-defined criteria. Traffic policing methods measure traffic flows against user-defined criteria and identify it as either conforming, exceeding or violating the criteria.The EMG2881-T20A supports three incoming traffic metering algorithms: Token Bucket Filter (TBF), Single Rate Two Color Maker (srTCM), and Two Rate Two Color Marker (trTCM). You can specify actions which are performed on the colored packets. See Section 9.7 on page 83 for more information on each metering algorithm.NAT TraversalUPnP NAT traversal automates the process of allowing an application to operate through NAT. UPnP network devices can automatically configure network addressing, announce their presence in the network to other UPnP devices and enable exchange of simple product and service descriptions. NAT traversal allows the following:• Dynamic port mapping• Learning public IP addresses• Assigning lease times to mappingsWindows Messenger is an example of an application that supports NAT traversal and UPnP. See the NAT chapter for more information on NAT.Cautions with UPnPThe automated nature of NAT traversal applications in establishing their own services and opening firewall ports may present network security issues. Network information and configuration may also be obtained and modified by users in some network environments. When a UPnP device joins a network, it announces its presence with a multicast message. For security reasons, the EMG2881-T20A allows multicast messages on the LAN only.All UPnP-enabled devices may communicate freely with each other without additional configuration. Disable UPnP if this is not your intention. TrafficTimeTraffic RateTrafficTimeTraffic Rate(Before Traffic Policing) (After Traffic Policing)
Chapter 9 ApplicationsEMG2881-T20A User’s Guide789.3  The QoS General Screen Click Configuration > Applications > Bandwidth Management > QoS General to open the screen as shown next. Use this screen to enable or disable QoS and set the upstream bandwidth. See Section 9.1 on page 75 for more information.Figure 41   Configuration > Applications > Bandwidth Management > QoS GeneralThe following table describes the labels in this screen. Table 32   Management > Bandwidth MGMT > GeneralLABEL DESCRIPTIONQoS State Select the Enable check box to turn on QoS to improve your network performance. WAN Managed Upstream Bandwidth Enter the amount of upstream bandwidth for the WAN interfaces that you want to allocate using QoS. The recommendation is to set this speed to match the interfaces’ actual transmission speed. For example, set the WAN interfaces’ speed to 100000 kbps if your Internet connection has an upstream transmission speed of 100 Mbps.        You can set this number higher than the interfaces’ actual transmission speed. The EMG2881-T20A uses up to 95% of the DSL port’s actual upstream transmission speed even if you set this number higher than the DSL port’s actual transmission speed.You can also set this number lower than the interfaces’ actual transmission speed. This will cause the EMG2881-T20A to not use some of the interfaces’ available bandwidth.If you leave this field blank, the EMG2881-T20A automatically sets this number to be 95% of the WAN interfaces’ actual upstream transmission speed.LAN Managed Downstream Bandwidth Enter the amount of downstream bandwidth for the LAN interfaces (including WLAN) that you want to allocate using QoS. The recommendation is to set this speed to match the WAN interfaces’ actual transmission speed. For example, set the LAN managed downstream bandwidth to 100000 kbps if you use a 100 Mbps wired Ethernet WAN connection.        You can also set this number lower than the WAN interfaces’ actual transmission speed. This will cause the EMG2881-T20A to not use some of the interfaces’ available bandwidth.If you leave this field blank, the EMG2881-T20A automatically sets this to the LAN interfaces’ maximum supported connection speed.Apply Click Apply to save your changes.Cancel Click Cancel to restore your previously saved settings.
 Chapter 9 ApplicationsEMG2881-T20A User’s Guide799.4  The Queue Setup ScreenUse this screen to configure QoS queue assignment. Click Configuration > Applications > Bandwidth Management > Queue Setup to open the screen as shown next. Figure 42   Configuration > Applications > Bandwidth Management > Queue SetupThe following table describes the labels in this screen. 9.4.1   Add/Edit a Queue Click Add New Queue or the Edit icon in the Queue Setup screen to configure a queue. Figure 43   Configuration > Applications > Bandwidth Management > Queue Setup: Add/Edit new queue  Table 33   Management > Bandwidth MGMT > Queue SetupLABEL DESCRIPTIONAdd new QueueClick this button to create a new queue entry.#This is the index number of the entry.Status This field displays whether the queue is active or not. A yellow bulb signifies that this queue is active. A gray bulb signifies that this queue is not active.Name This shows the descriptive name of this queue.Interface This shows the name of the EMG2881-T20A’s interface through which traffic in this queue passes.Priority This shows the priority of this queue.Modify Click the Edit icon to edit the queue.Click the Delete icon to delete an existing queue. Note that subsequent rules move up by one when you take this action.
Chapter 9 ApplicationsEMG2881-T20A User’s Guide80The following table describes the labels in this screen.  9.5  The Class Setup Screen Use this screen to add, edit or delete QoS classifiers. A classifier groups traffic into data flows according to specific criteria such as the source address, destination address, source port number, destination port number or incoming interface. For example, you can configure a classifier to select traffic from the same protocol port (such as Telnet) to form a flow.You can give different priorities to traffic that the EMG2881-T20A forwards out through the WAN interface. Give high priority to voice and video to make them run more smoothly. Similarly, give low priority to many large file downloads so that they do not reduce the quality of other applications. Click Configuration > Applications > Bandwidth Management > Class Setup to open the following screen.Figure 44   Configuration > Applicatioin > Bandwidth Management > Class SetupThe following table describes the labels in this screen.  Table 34   Management > Bandwidth MGMT > Queue Setup: Add/Edit new queueLABEL DESCRIPTIONActive Select to enable or disable this queue.Name Enter the descriptive name of this queue. Note that \"<>%\\^[]`\+\$\,='#&@.:() are not allowed.To Interface Select the interface to which this queue is applied.Priority Select the priority level (from 1 to 7) of this queue.The smaller the number, the higher the priority level. Traffic assigned to higher priority queues gets through faster while traffic in lower priority queues is dropped if the network is congested.Back Click this to return to the previous screen.Apply Click this to save your changes.Cancel Click this to exit this screen without saving.Table 35   Configuration > Applications > Bandwidth Management > Class SetupLABEL DESCRIPTIONAdd new Classifier Click this to create a new classifier.#This is the index number of the entry.Status This field displays whether the classifier is active or not. A yellow bulb signifies that this classifier is active. A gray bulb signifies that this classifier is not active.Class Name This is the name of the classifier.
 Chapter 9 ApplicationsEMG2881-T20A User’s Guide819.5.1  Add/Edit a Classifier Click Add New Classifier in the Class Setup screen or the Edit icon next to a classifier to open the following screen. Figure 45   Configuration > Applications > Bandwidth Management > Class Setup: Add/Edit new classClassification CriteriaThis shows criteria specified in this classifier, for example the interface from which traffic of this class should come and the source MAC address of traffic that matches this classifier.To Queue This is the name of the queue in which traffic of this classifier is put.Modify Click the Edit icon to edit the classifier.Click the Delete icon to delete an existing classifier. Note that subsequent rules move up by one when you take this action.Table 35   Configuration > Applications > Bandwidth Management > Class Setup (continued)LABEL DESCRIPTION
Chapter 9 ApplicationsEMG2881-T20A User’s Guide82The following table describes the labels in this screen.  Table 36   Configuration > Applications > Bandwidth Management > Class Setup: Add/Edit new classLABEL DESCRIPTIONStep 1: Class ConfigurationActive Select this to enable this classifier.Class Name Enter a descriptive name of up to 15 printable English keyboard characters, not including spaces.Classification OrderSelect an existing number for where you want to put this classifier to move the classifier to the number you selected after clicking Apply.Select Last to put this rule in the back of the classifier list.Step 2: Criteria ConfigurationBasicWAN interface(LAN interface)If you select From LAN in the Interface field, you can select specific interface(s) from which traffic is received. ra0 ~ ra3 means wireless interfaces WLAN0 to WLAN3.If you select From WAN in the Interface field, you can select a specific WAN connection (PVC0~PVC2) from which traffic is received.SourceAddress Select the check box and enter the source IP address in dotted decimal notation. A blank source IP address means any source IP address. Subnet Netmask Enter the source subnet mask.Port Range If you select TCP or UDP in the IP Protocol field, select the check box and enter the port number(s) of the source. DestinationAddress Select the check box and enter the source IP address in dotted decimal notation. A blank source IP address means any source IP address. Subnet Netmask Enter the source subnet mask.Port Range If you select TCP or UDP in the IP Protocol field, select the check box and enter the port number(s) of the source. OthersPacket Length This field is available only when you select IP in the Ether Type field.Select this option and enter the minimum and maximum packet length (from 46 to 1500) in the fields provided.DSCP This field is available only when you select IP in the Ether Type field.Select this option and specify a DSCP (DiffServ Code Point) number between 0 and 63 in the field provided.TCP ACK This field is available only when you select IP in the Ether Type field.If you select this option, the matched TCP packets must contain the ACK (Acknowledge) flag.Step 3: Outgoing queue selectionTo Queue Index Select a queue that applies to this class.You should have configured a queue in the Queue Setup screen already.Back Click this to return to the previous screen.Apply Click this to save your changes.Cancel Click this to exit this screen without saving.

Navigation menu