ZyXEL Communications MAX200M1 WiMAX IEEE802.16e Indoor Basic CPE-2.5GHz User Manual ZyBook
ZyXEL Communications Corporation WiMAX IEEE802.16e Indoor Basic CPE-2.5GHz ZyBook
Contents
- 1. User manual1
- 2. User manual2
- 3. User manual3
- 4. User manual4
User manual3
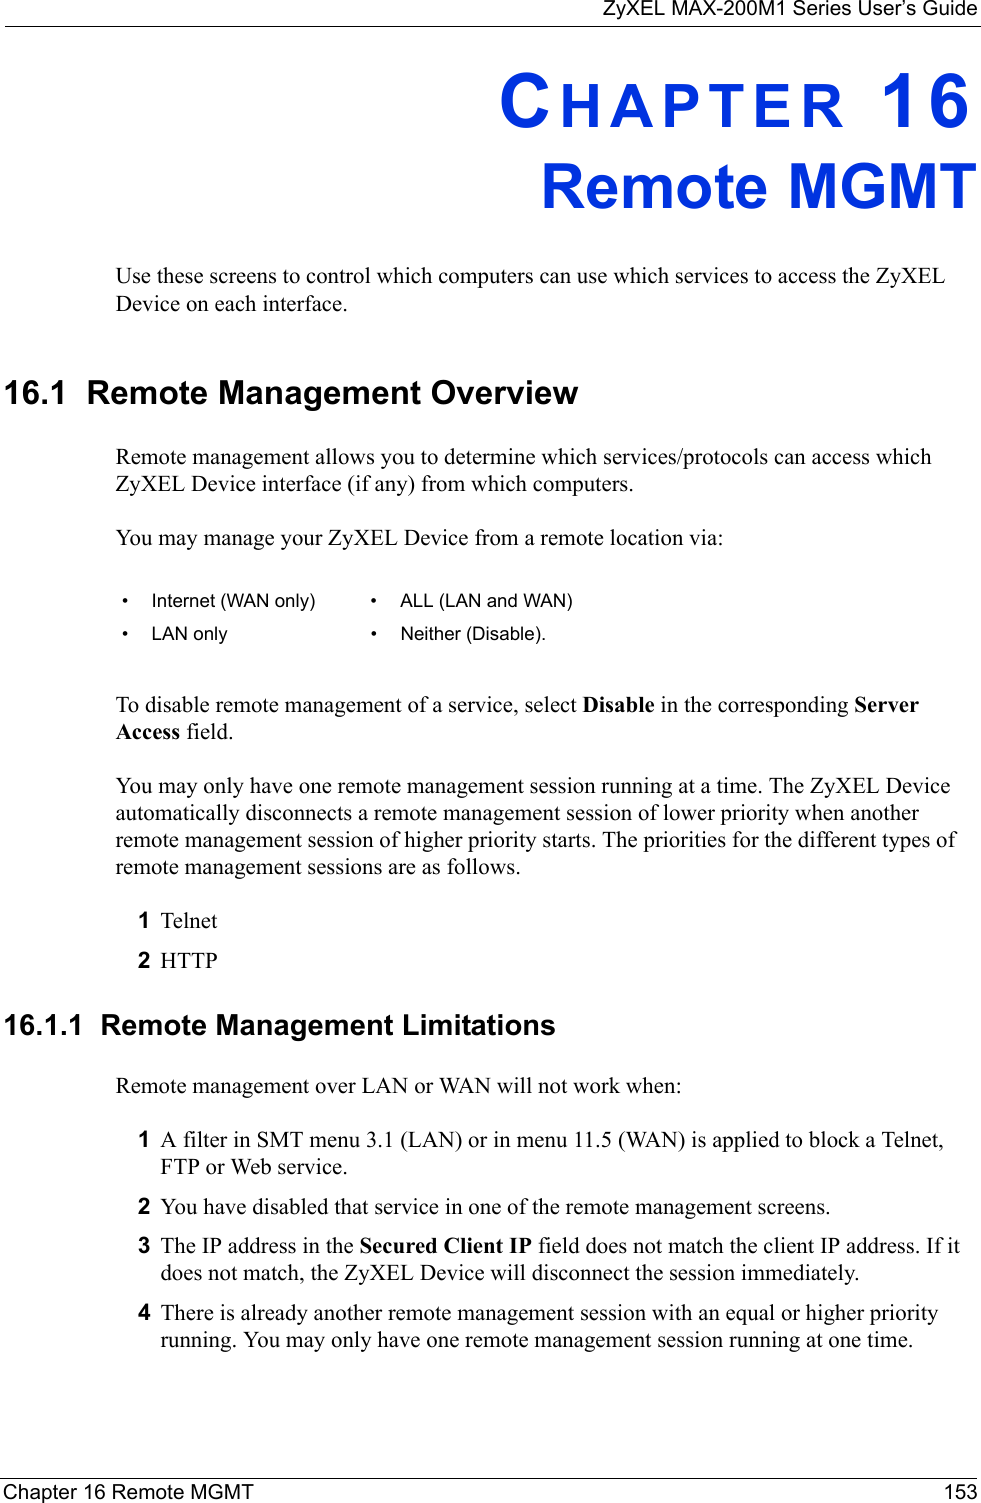
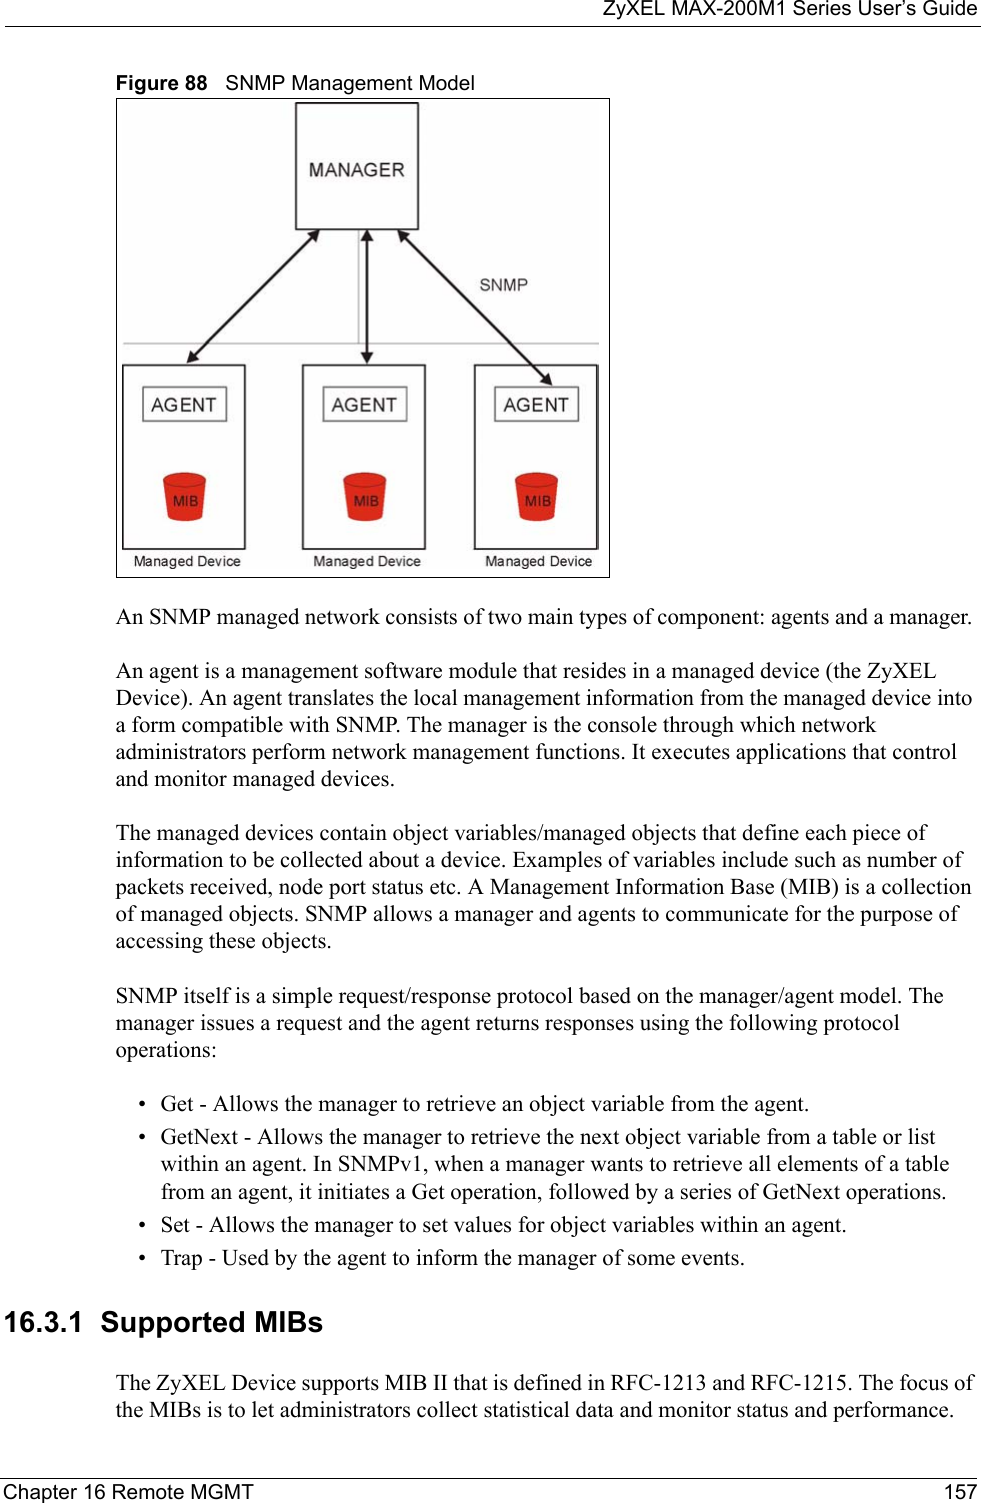
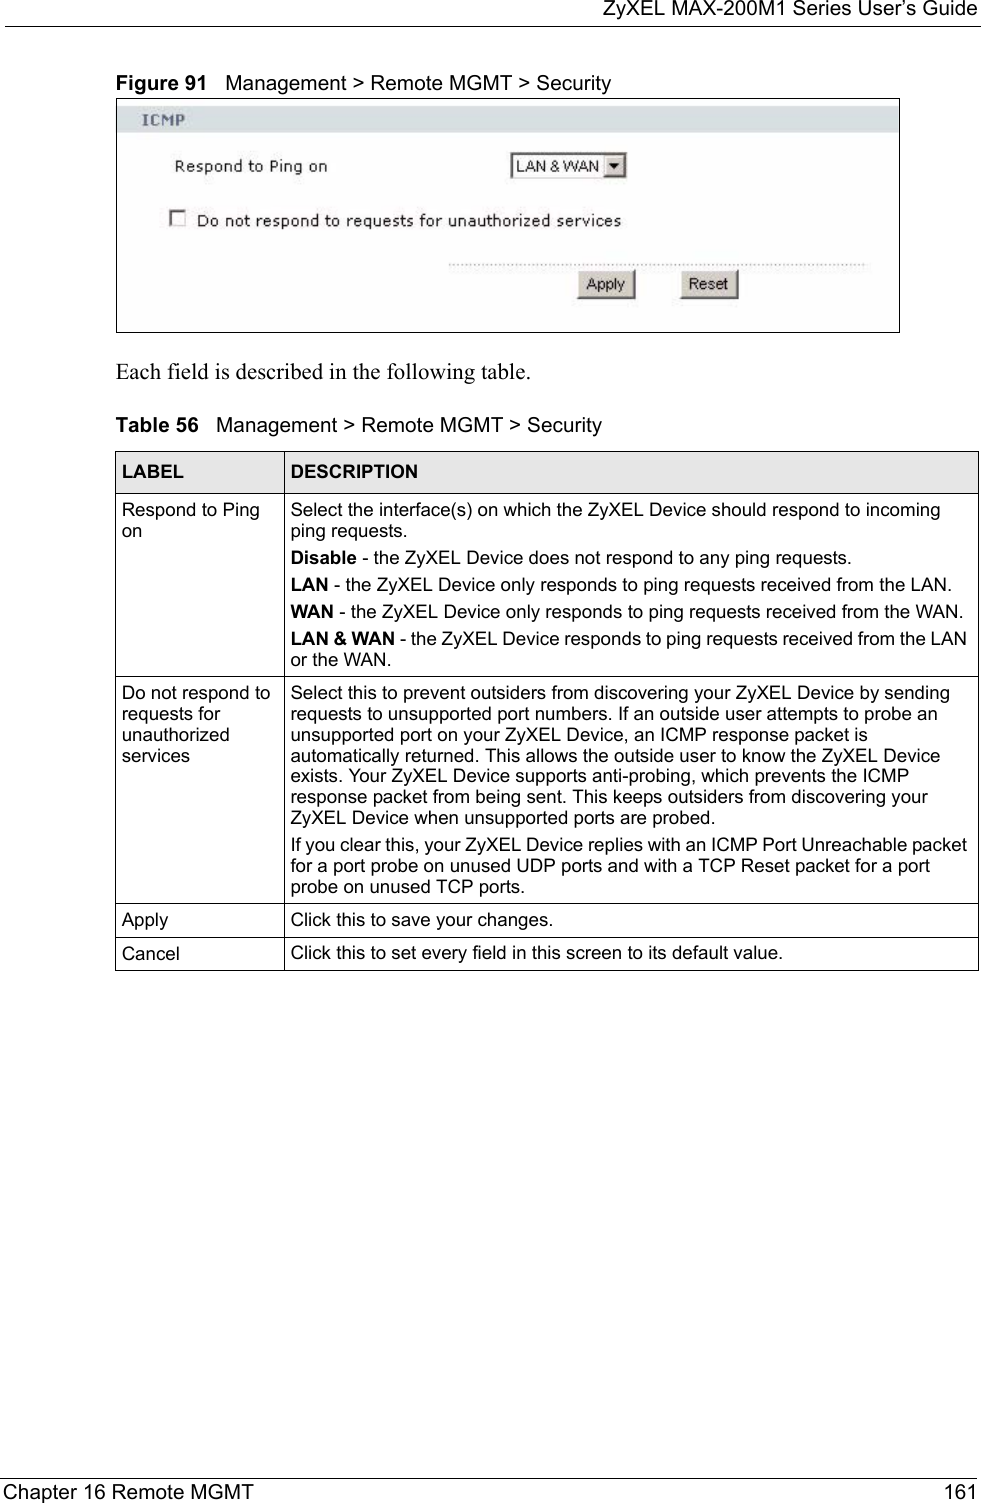


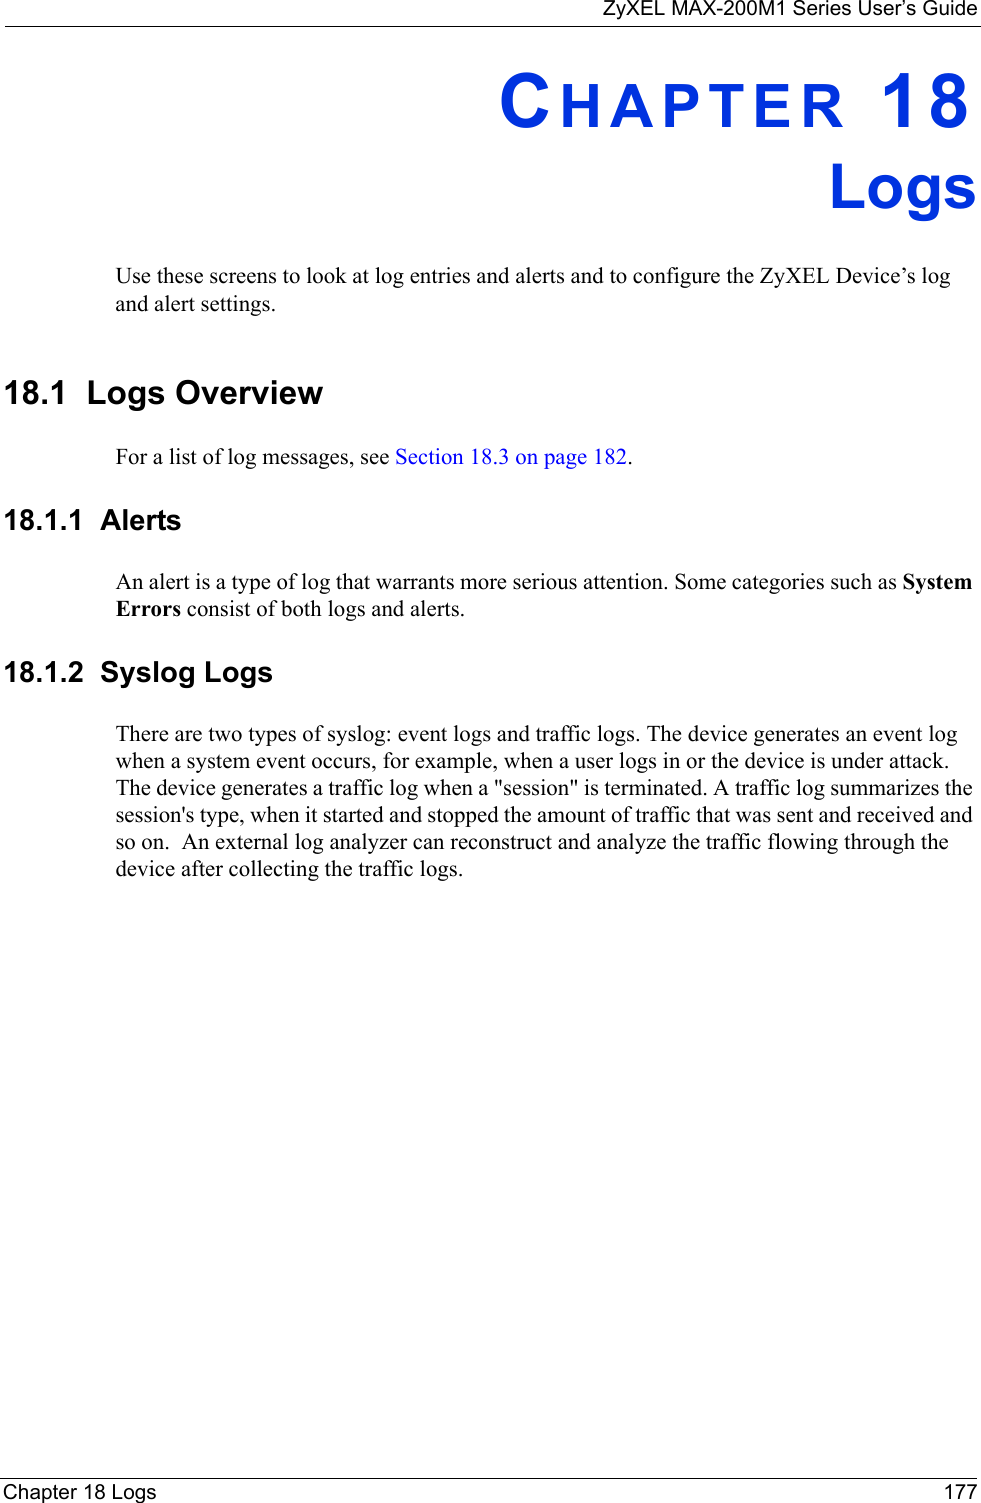
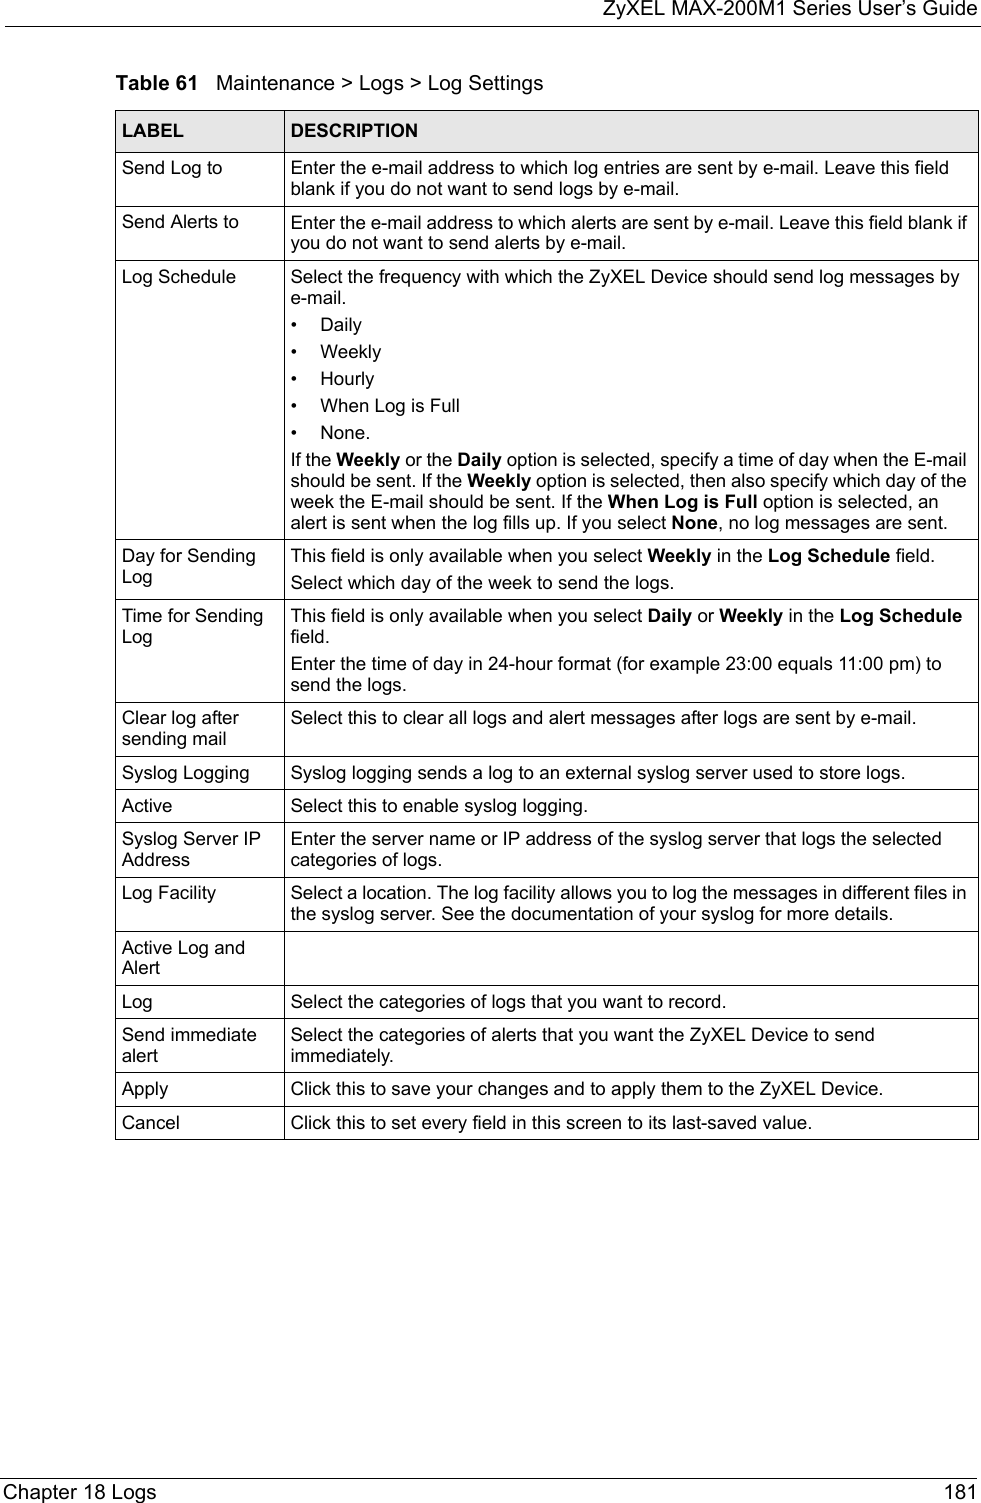
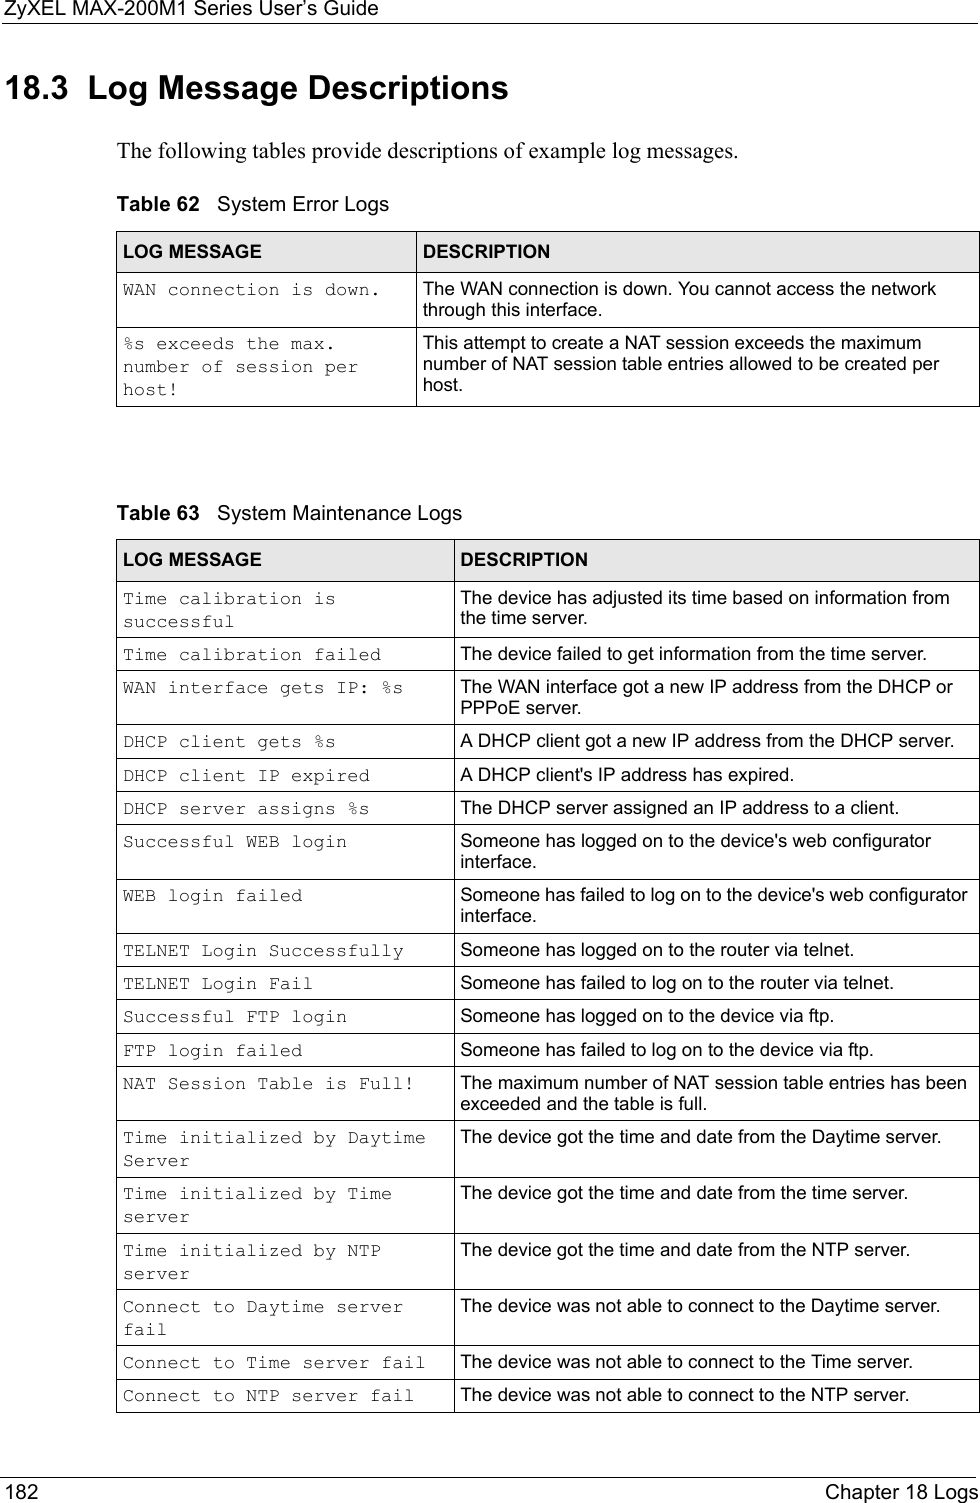
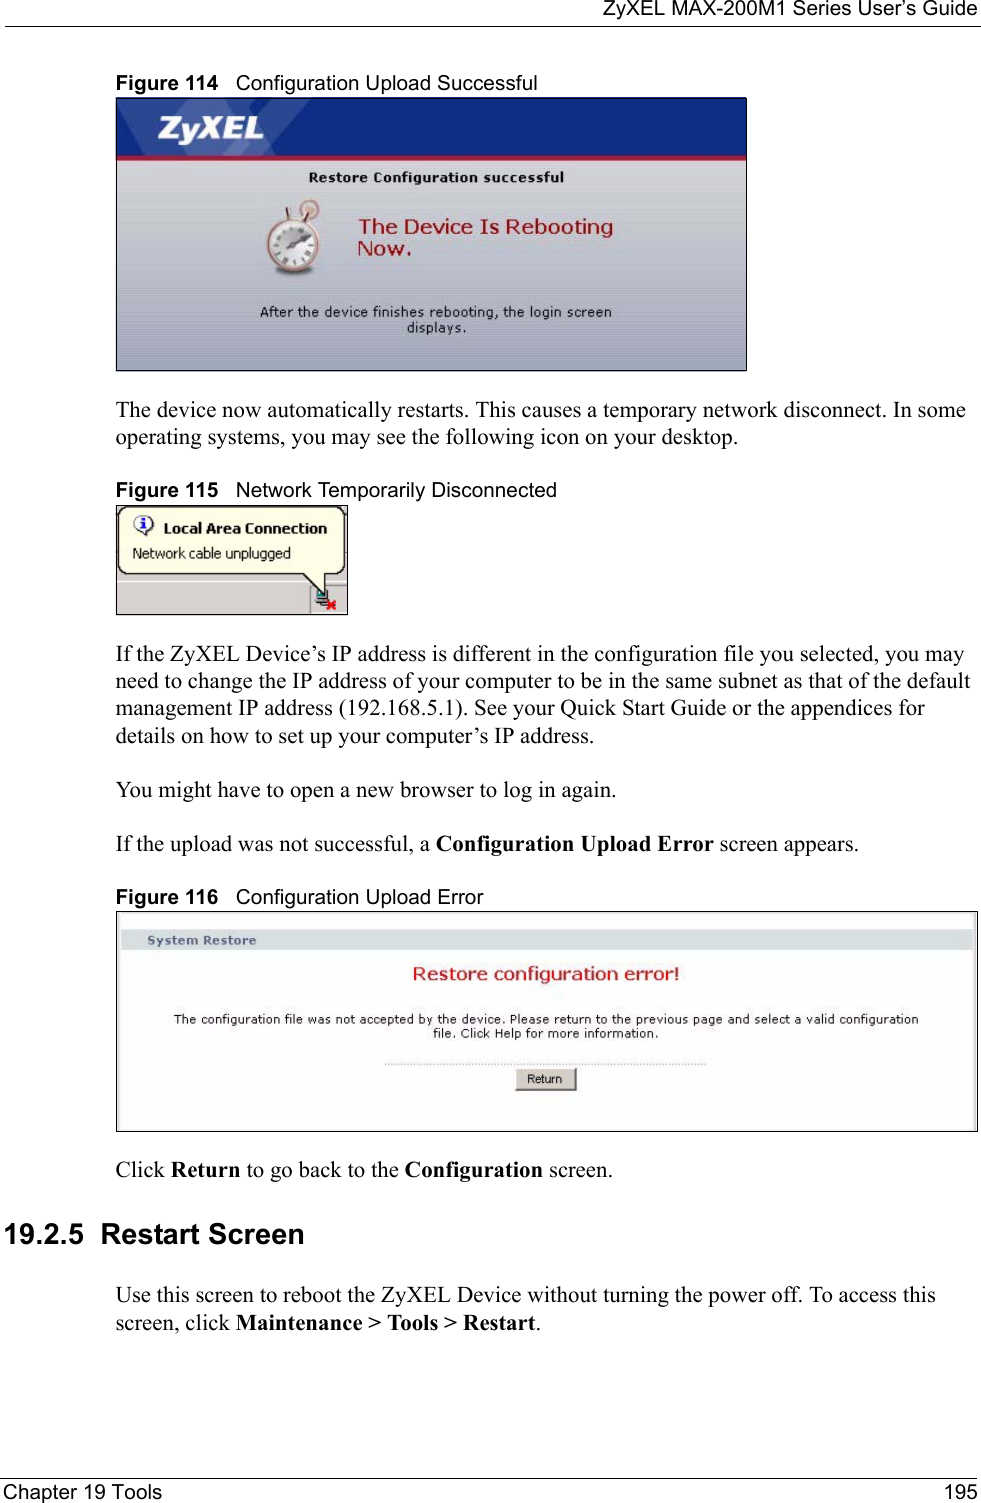
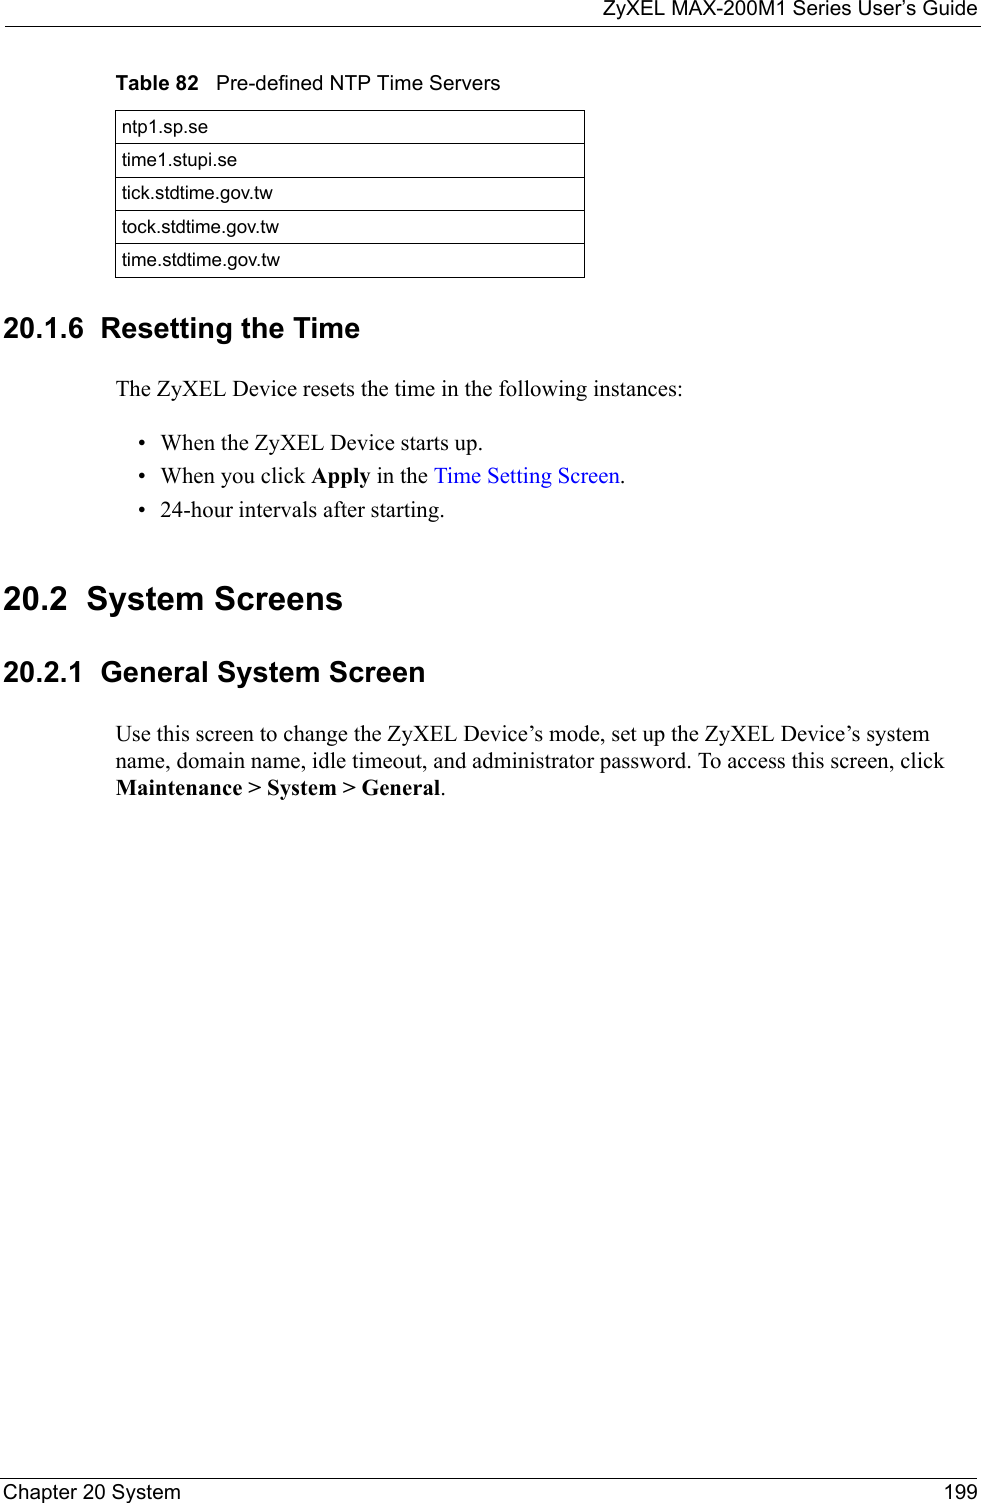
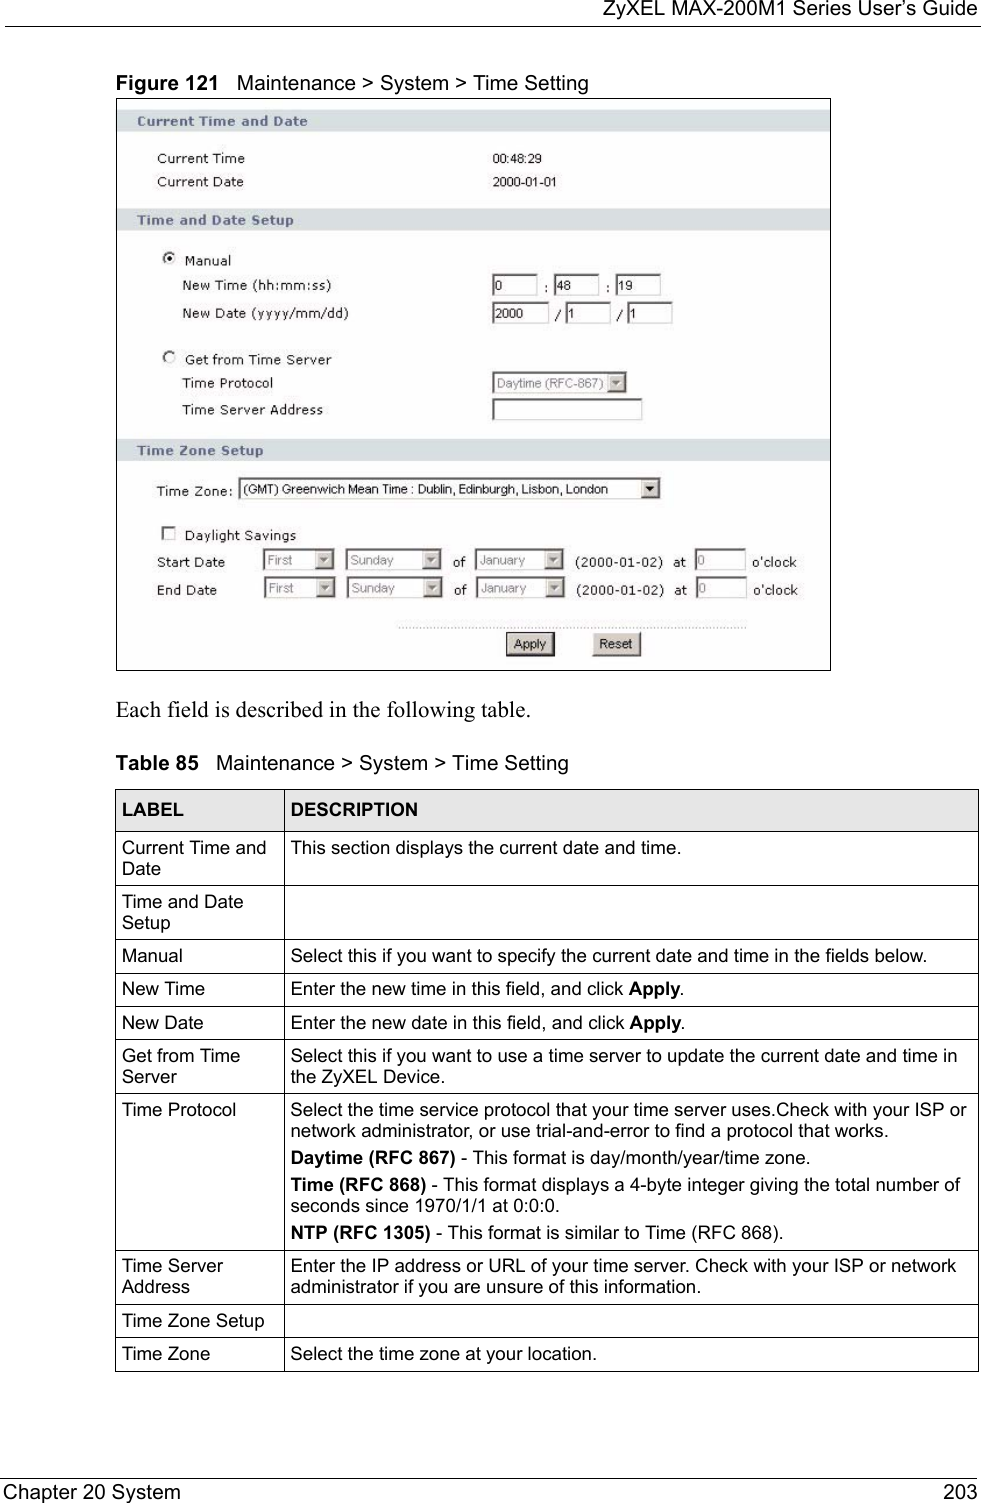
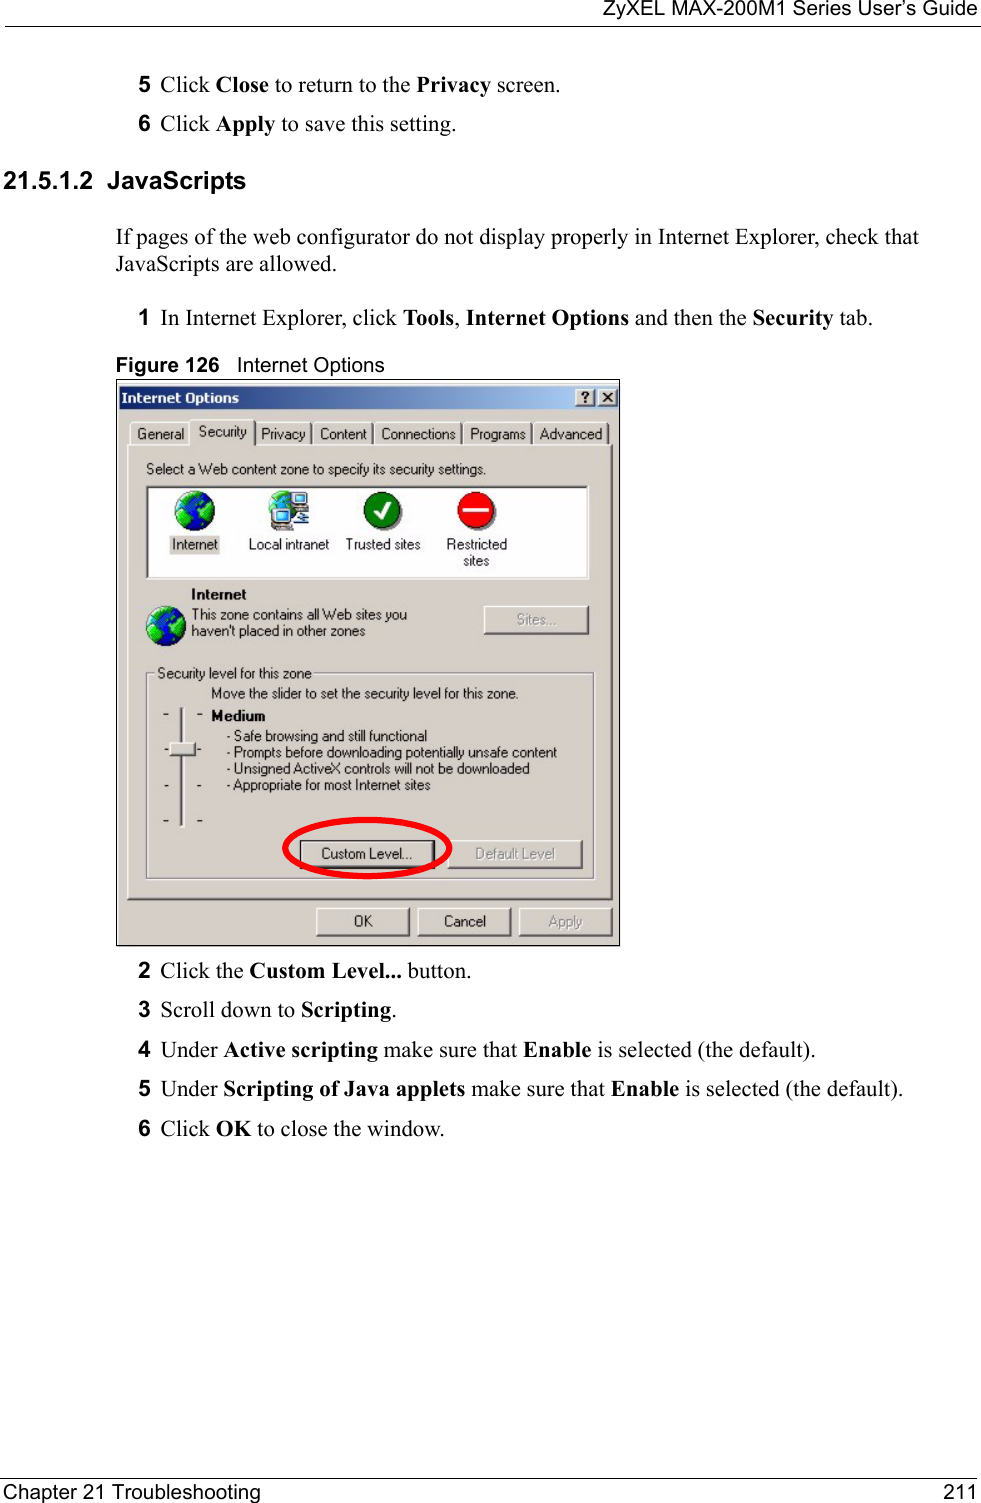
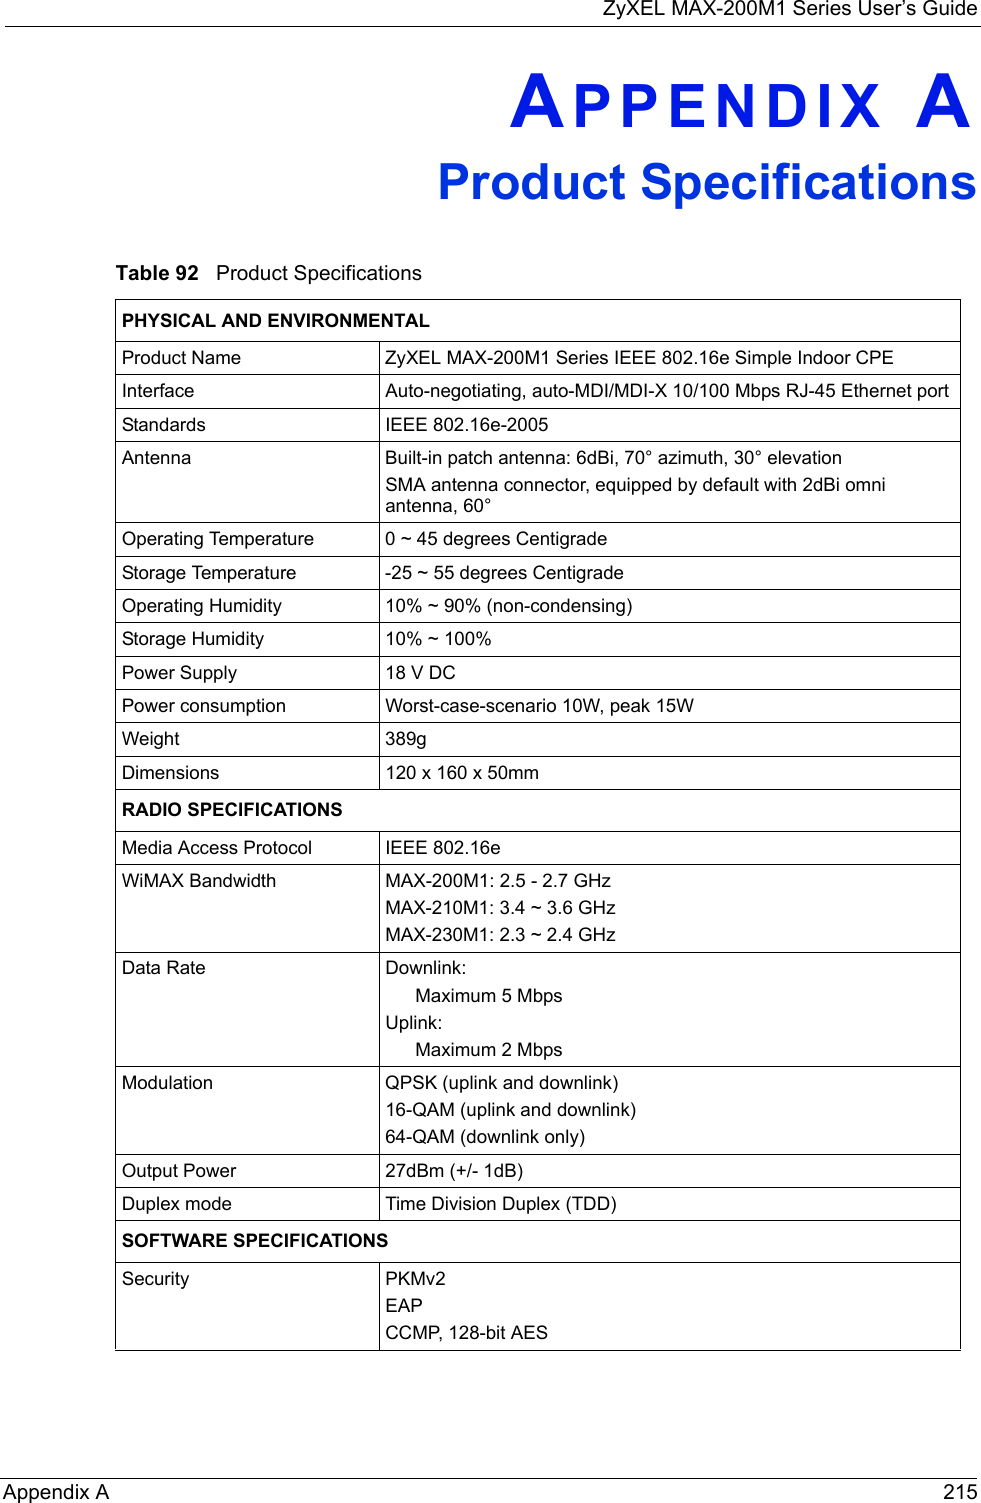
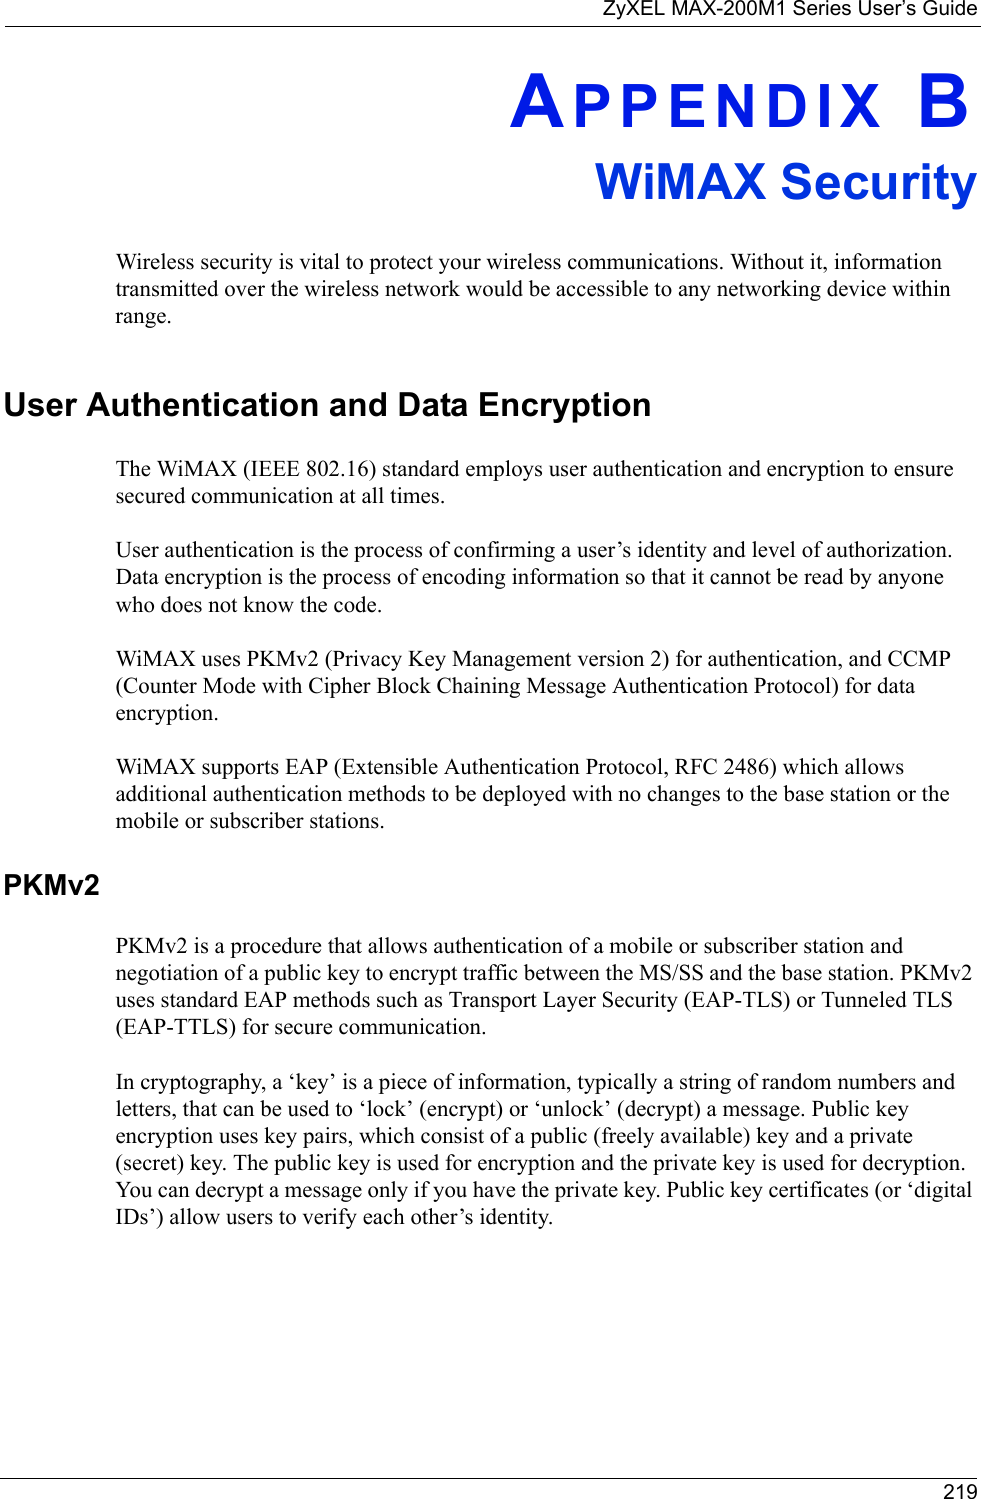
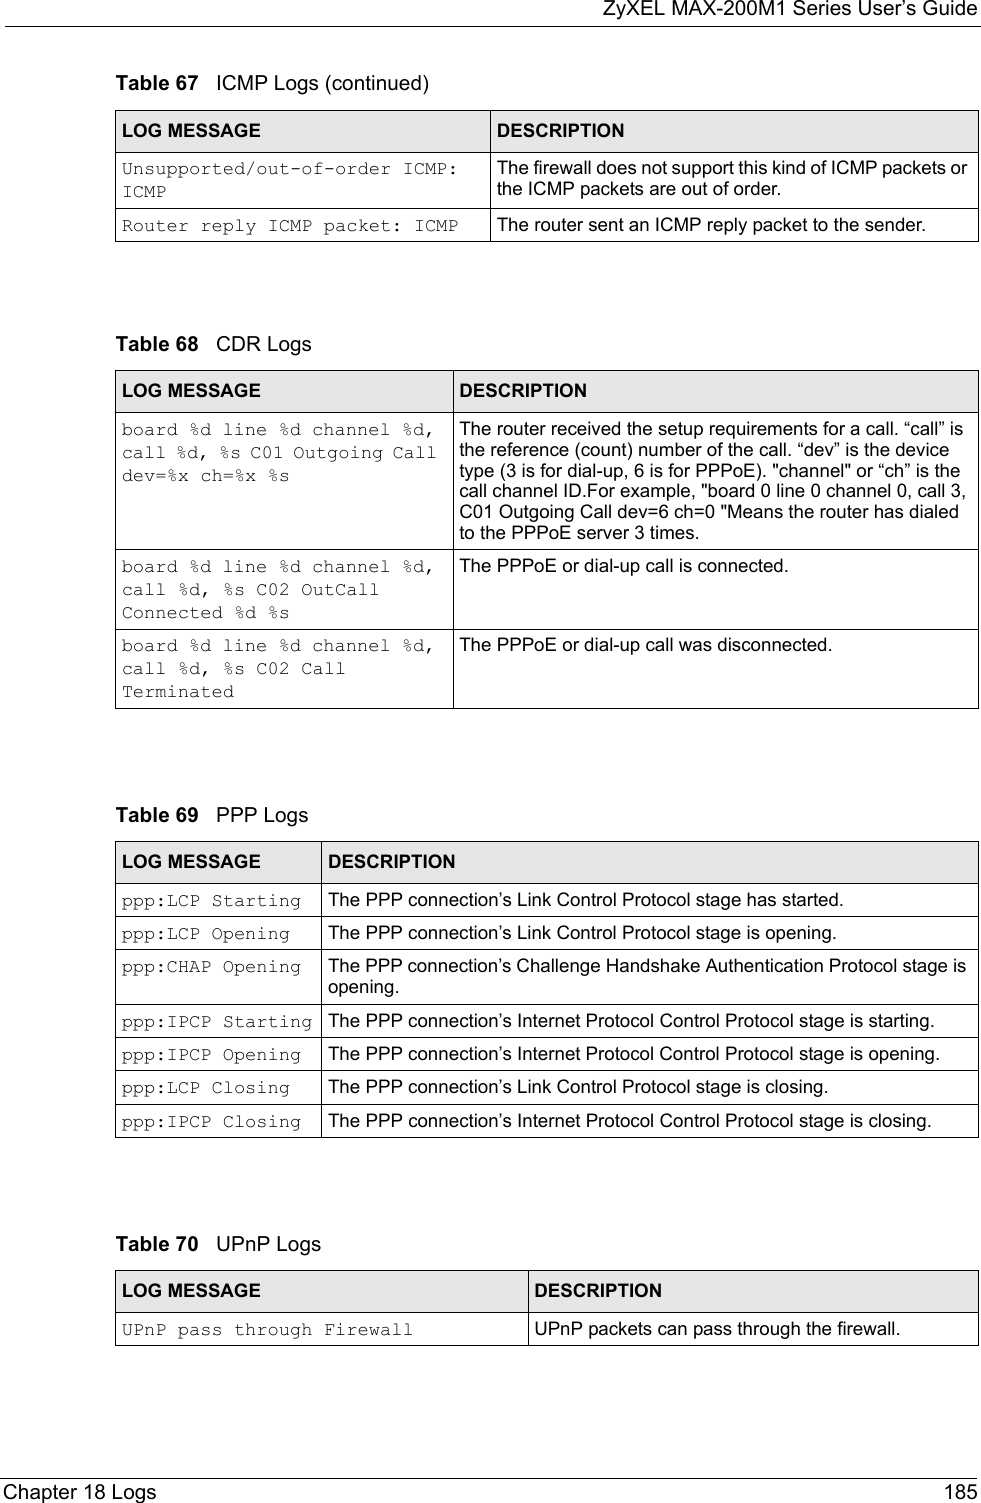
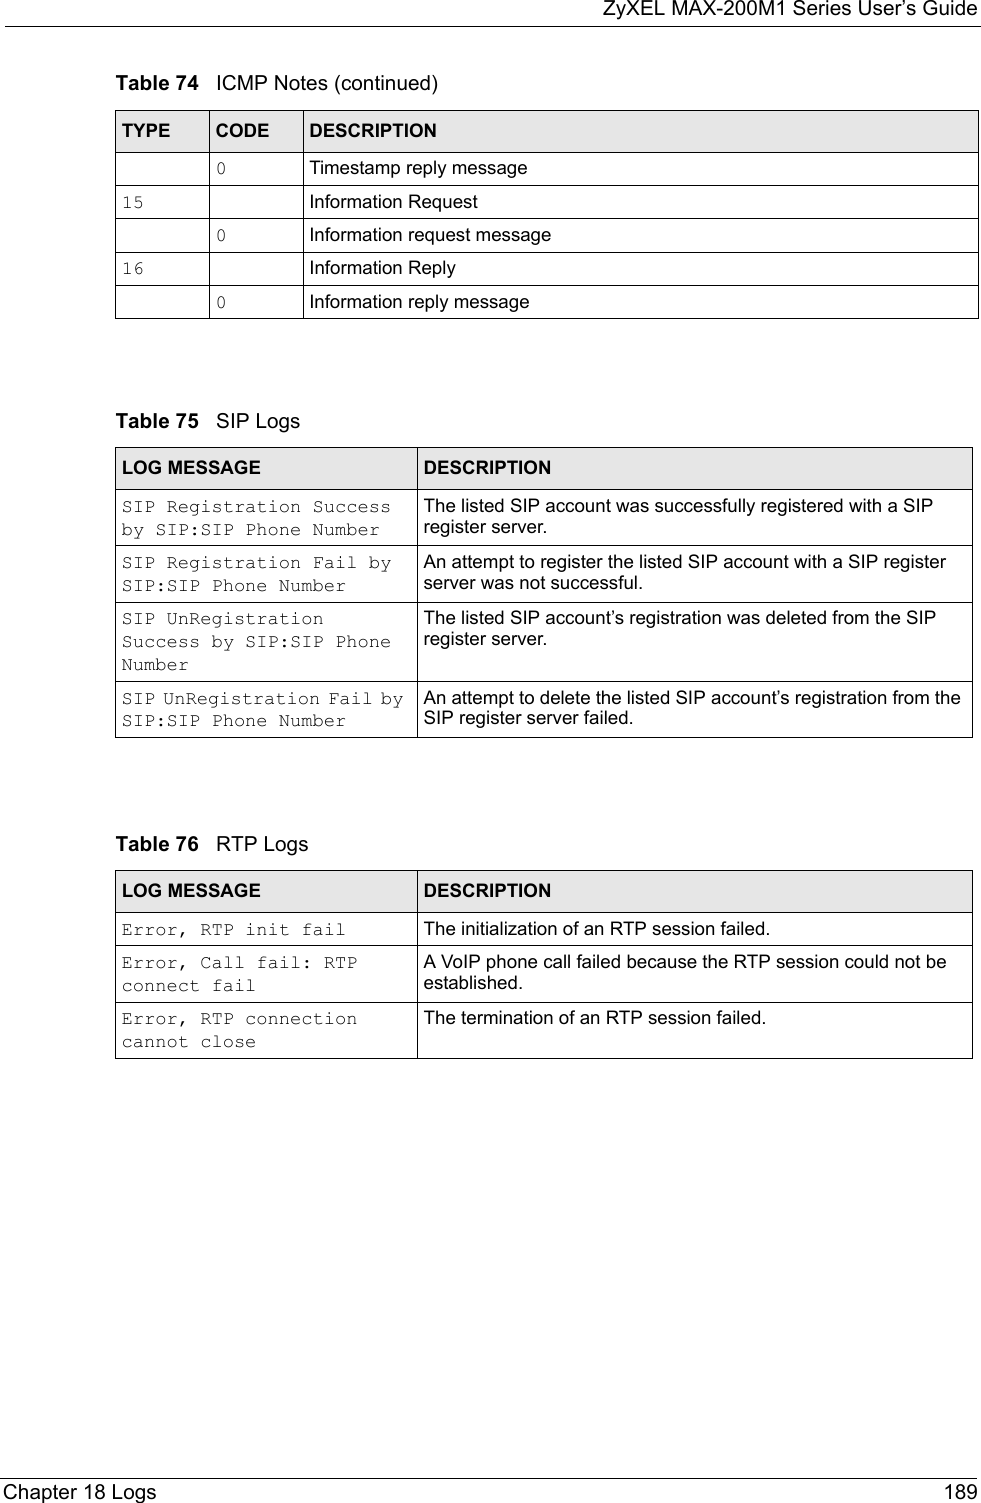
![ZyXEL MAX-200M1 Series User’s GuideChapter 18 Logs 183 Too large ICMP packet has been droppedThe device dropped an ICMP packet that was too large.Configuration Change: PC = 0x%x, Task ID = 0x%xThe device is saving configuration changes.Table 64 Access Control LogsLOG MESSAGE DESCRIPTIONFirewall default policy: [ TCP | UDP | IGMP | ESP | GRE | OSPF ] <Packet Direction>Attempted TCP/UDP/IGMP/ESP/GRE/OSPF access matched the default policy and was blocked or forwarded according to the default policy’s setting.Firewall rule [NOT] match:[ TCP | UDP | IGMP | ESP | GRE | OSPF ] <Packet Direction>, <rule:%d>Attempted TCP/UDP/IGMP/ESP/GRE/OSPF access matched (or did not match) a configured firewall rule (denoted by its number) and was blocked or forwarded according to the rule. Triangle route packet forwarded: [ TCP | UDP | IGMP | ESP | GRE | OSPF ]The firewall allowed a triangle route session to pass through.Packet without a NAT table entry blocked: [ TCP | UDP | IGMP | ESP | GRE | OSPF ]The router blocked a packet that didn't have a corresponding NAT table entry.Router sent blocked web site message: TCPThe router sent a message to notify a user that the router blocked access to a web site that the user requested.Exceed maximum sessions per host (%d). The device blocked a session because the host's connections exceeded the maximum sessions per host.Firewall allowed a packet that matched a NAT session: [ TCP | UDP ]A packet from the WAN (TCP or UDP) matched a cone NAT session and the device forwarded it to the LAN.Table 65 TCP Reset LogsLOG MESSAGE DESCRIPTIONUnder SYN flood attack, sent TCP RSTThe router sent a TCP reset packet when a host was under a SYN flood attack (the TCP incomplete count is per destination host.) Exceed TCP MAX incomplete, sent TCP RSTThe router sent a TCP reset packet when the number of TCP incomplete connections exceeded the user configured threshold. (the TCP incomplete count is per destination host.) Peer TCP state out of order, sent TCP RSTThe router sent a TCP reset packet when a TCP connection state was out of order.Note: The firewall refers to RFC793 Figure 6 to check the TCP state.Table 63 System Maintenance Logs (continued)LOG MESSAGE DESCRIPTION](https://usermanual.wiki/ZyXEL-Communications/MAX200M1.User-manual3/User-Guide-903014-Page-33.png)
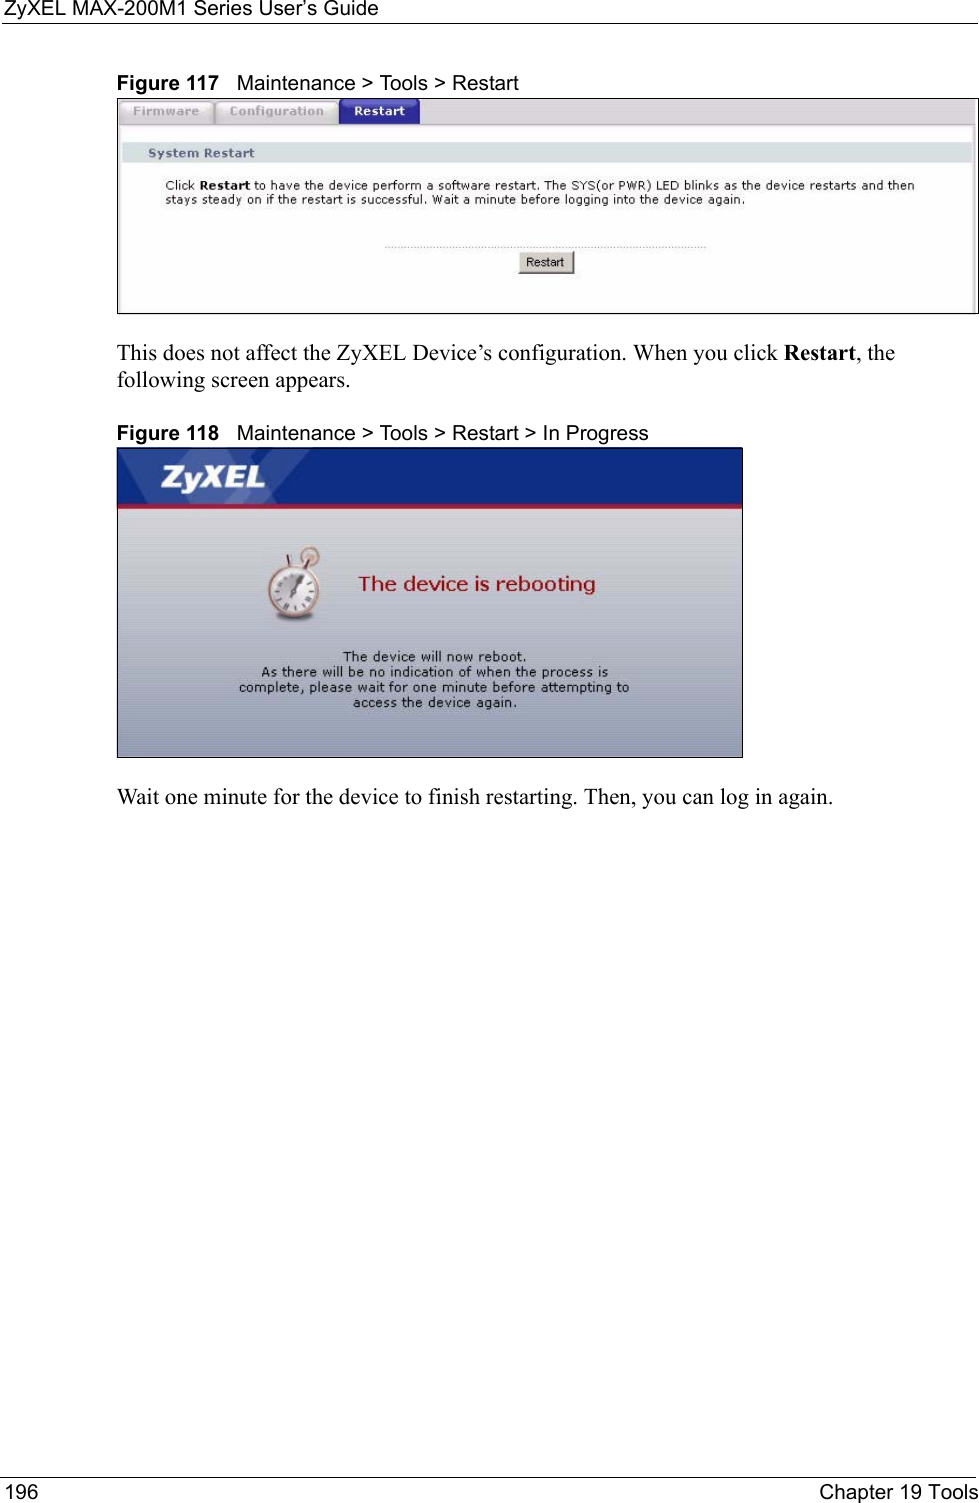
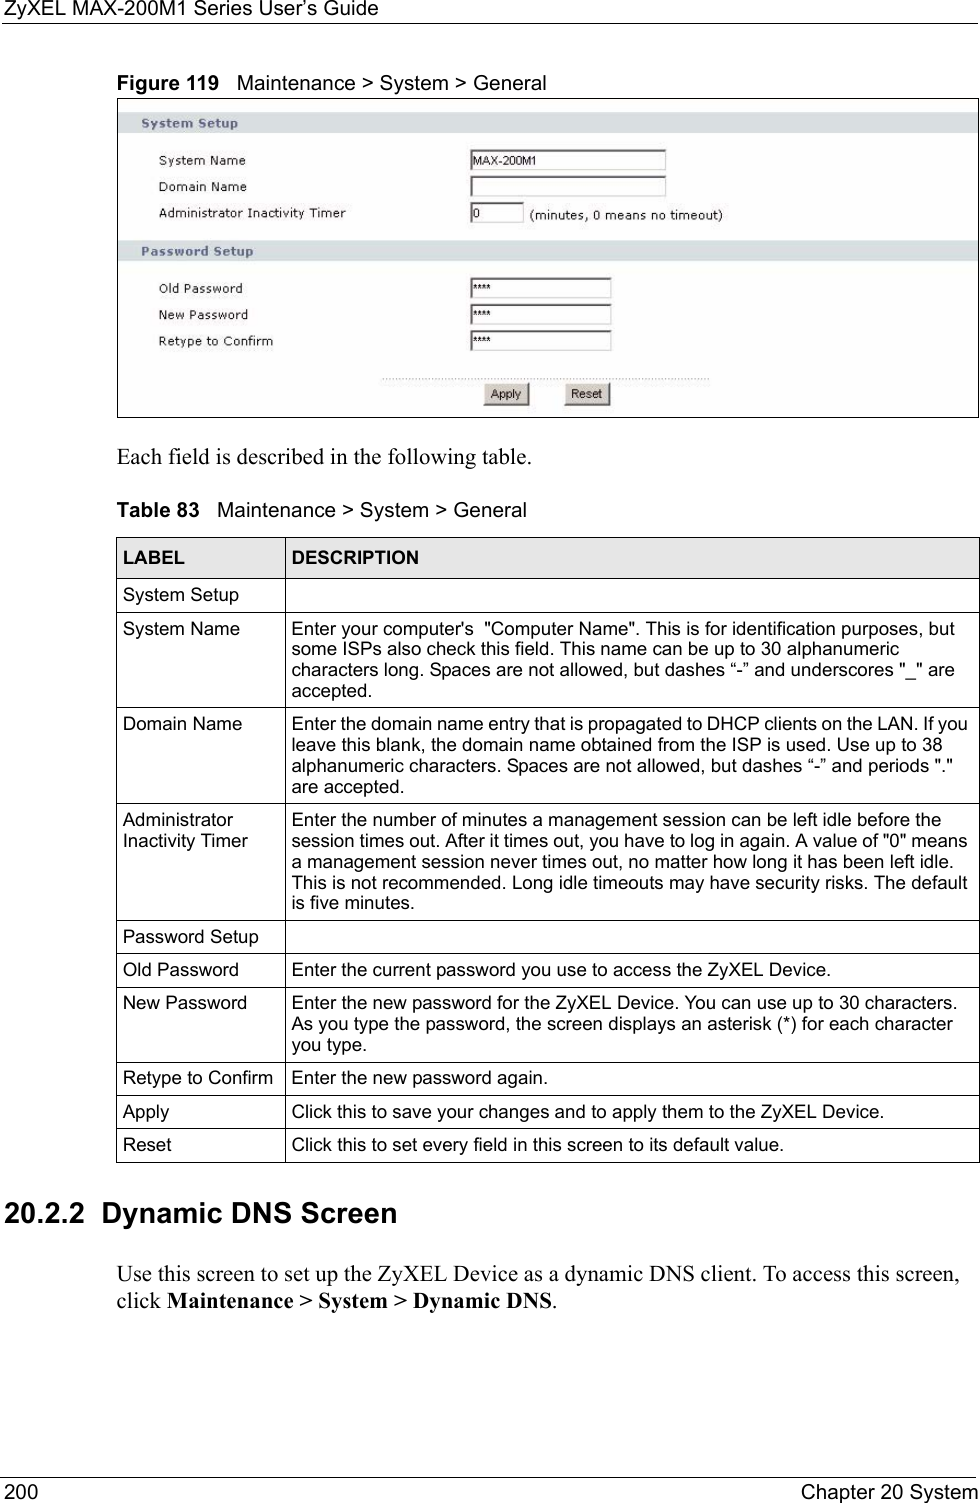
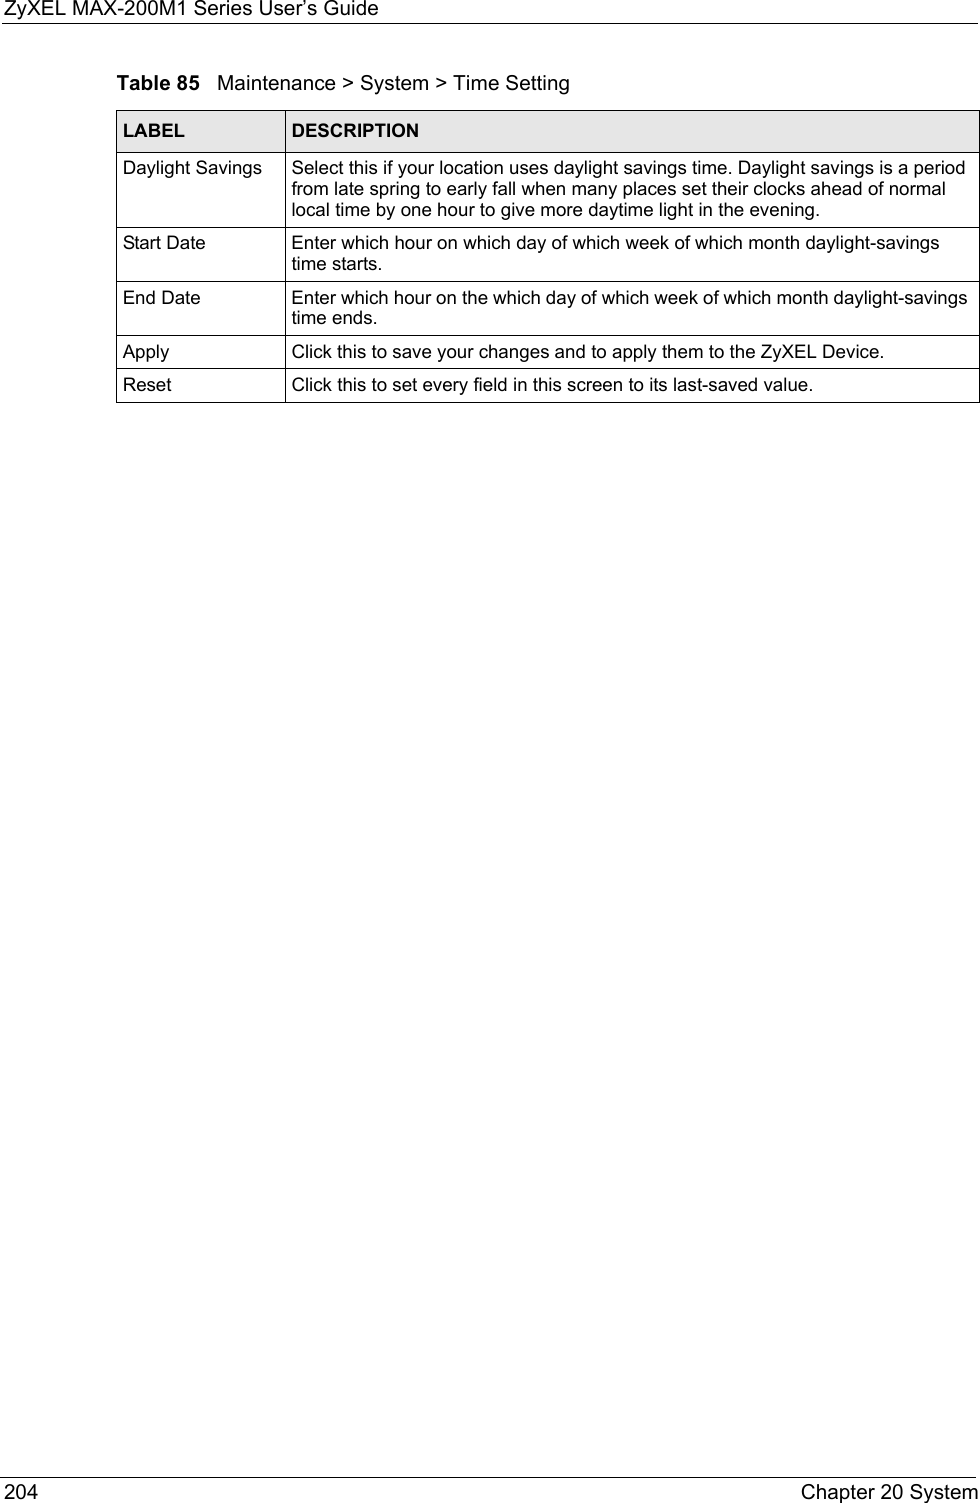
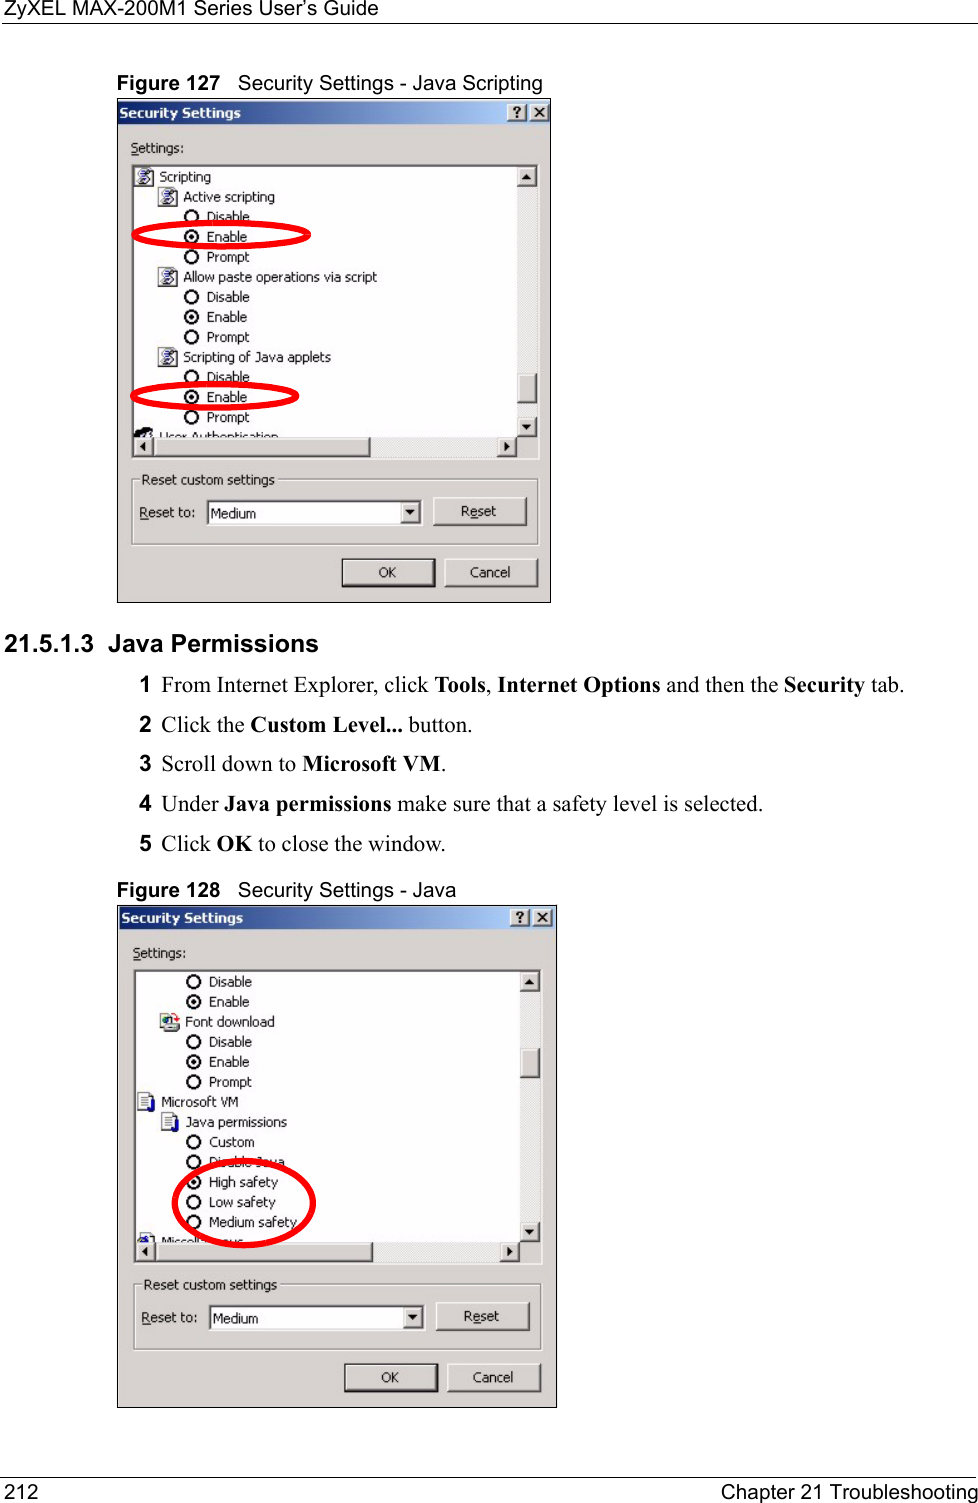
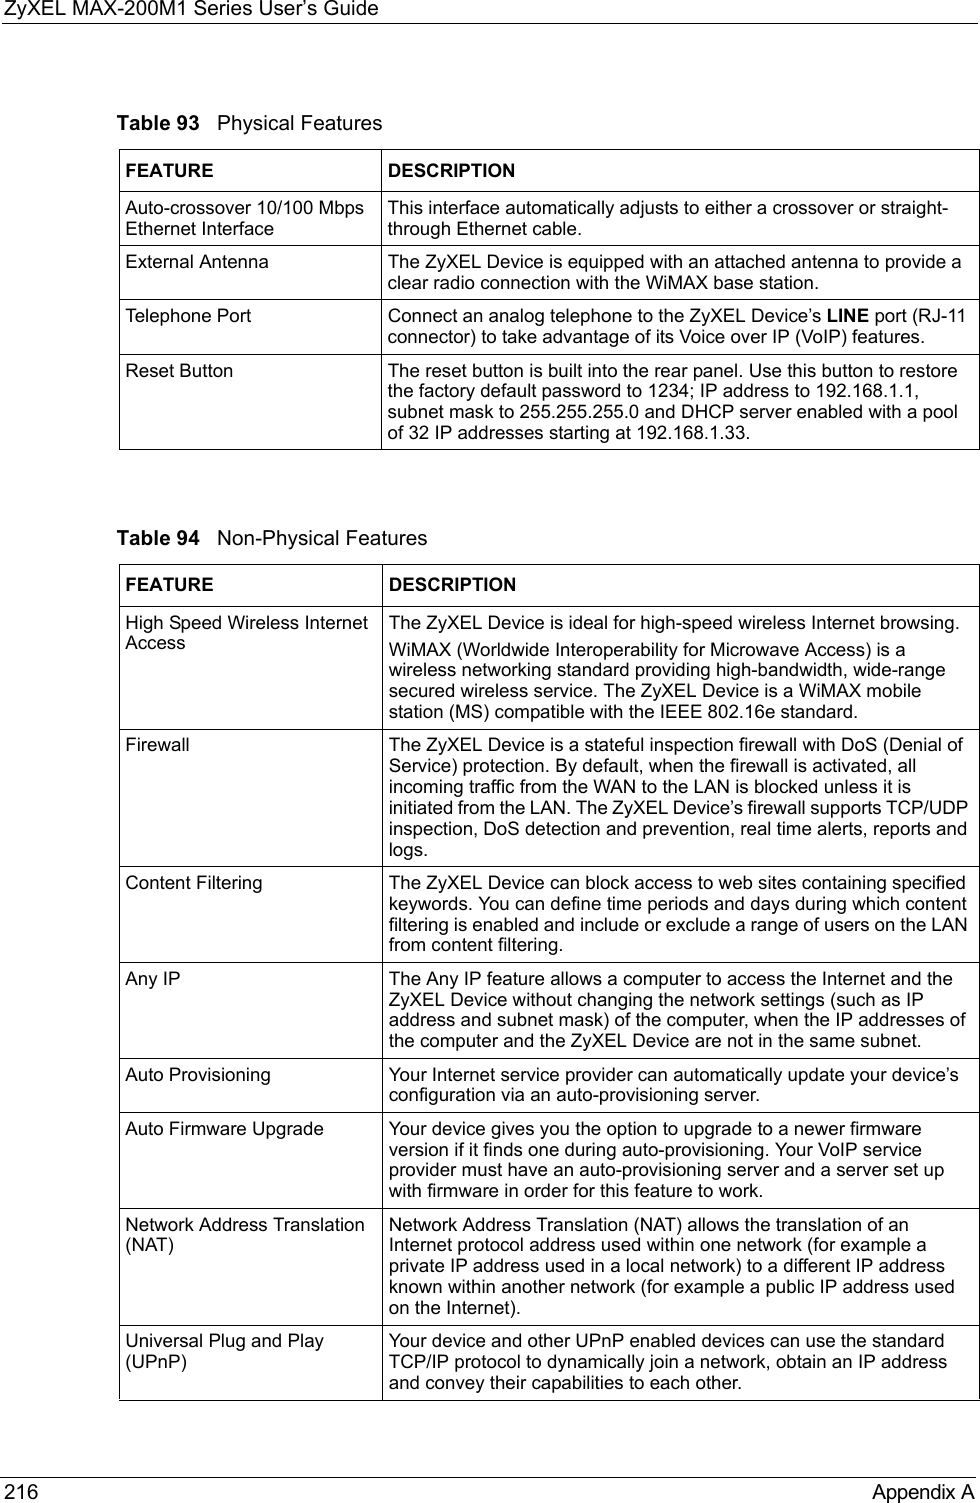
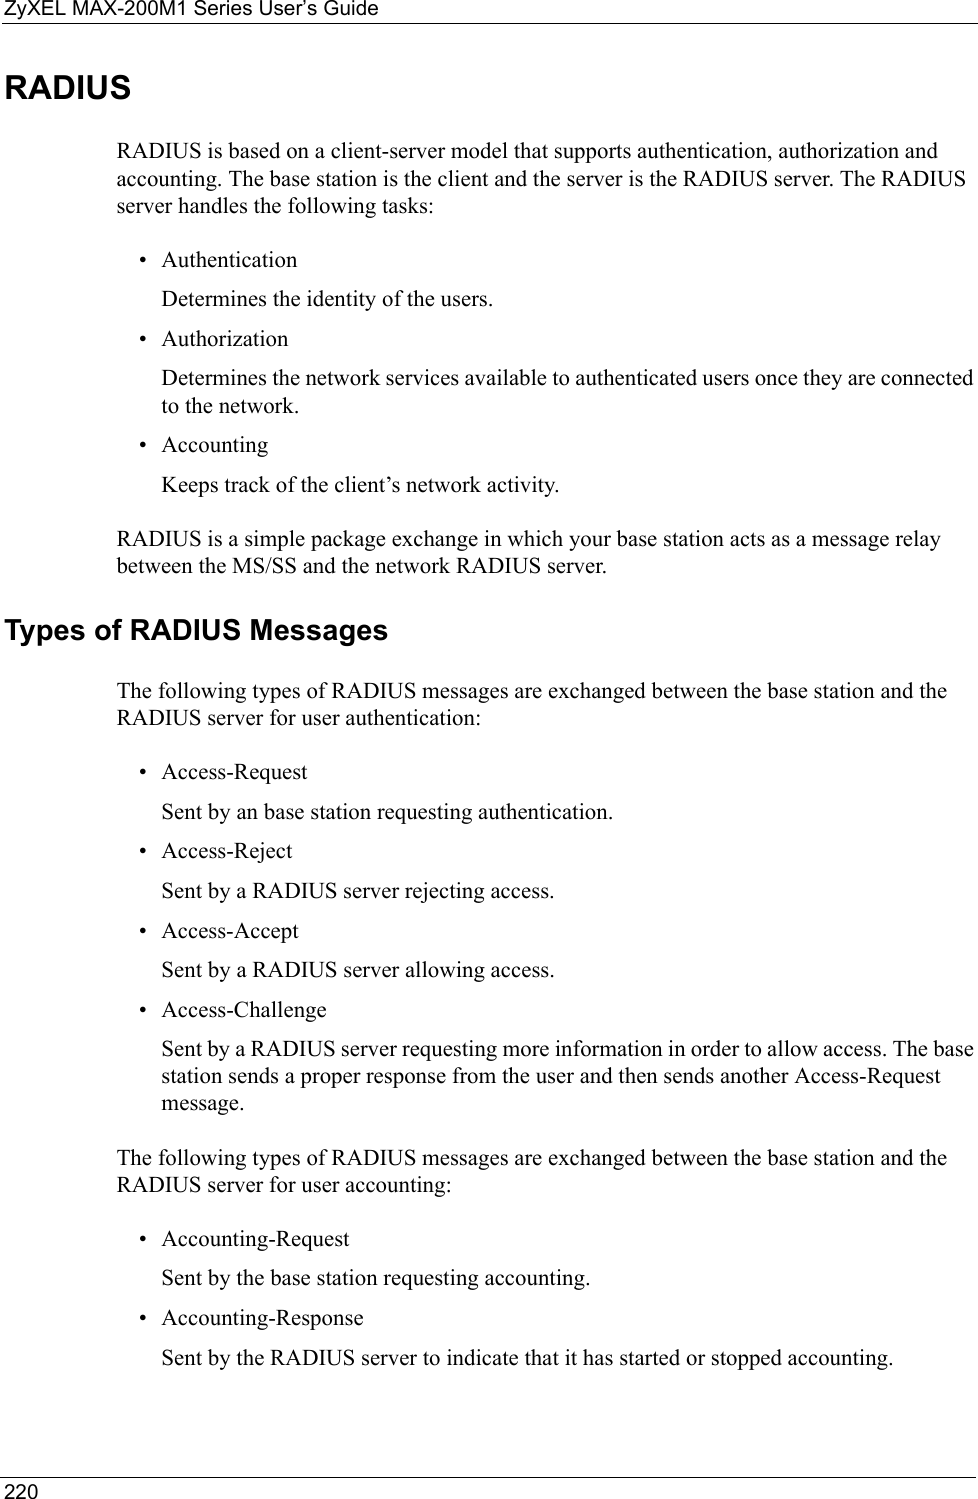
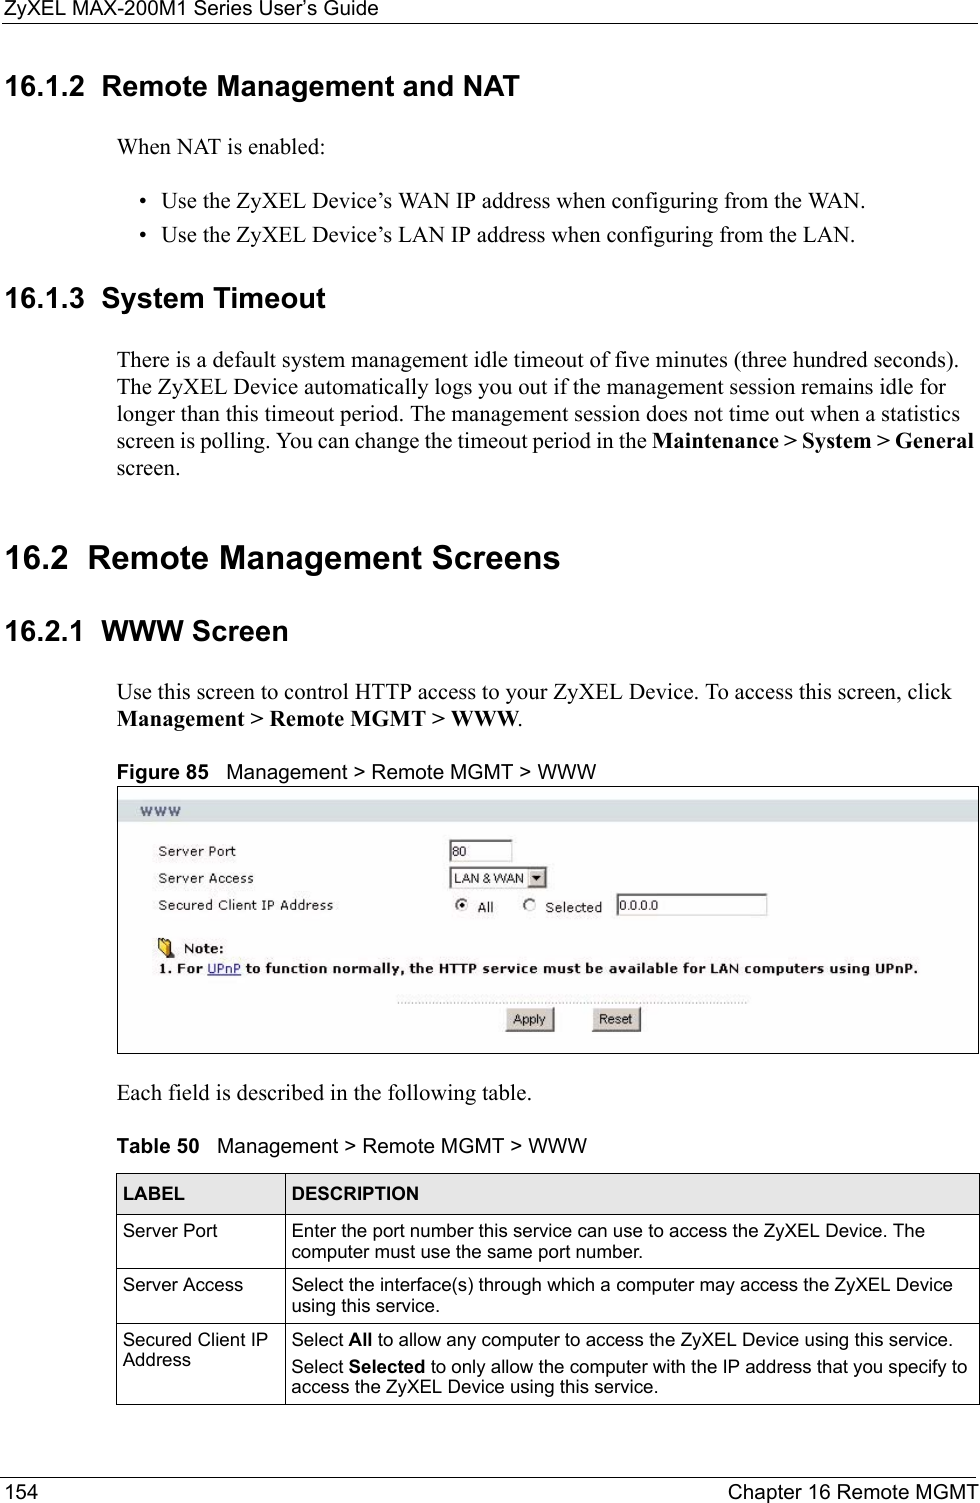
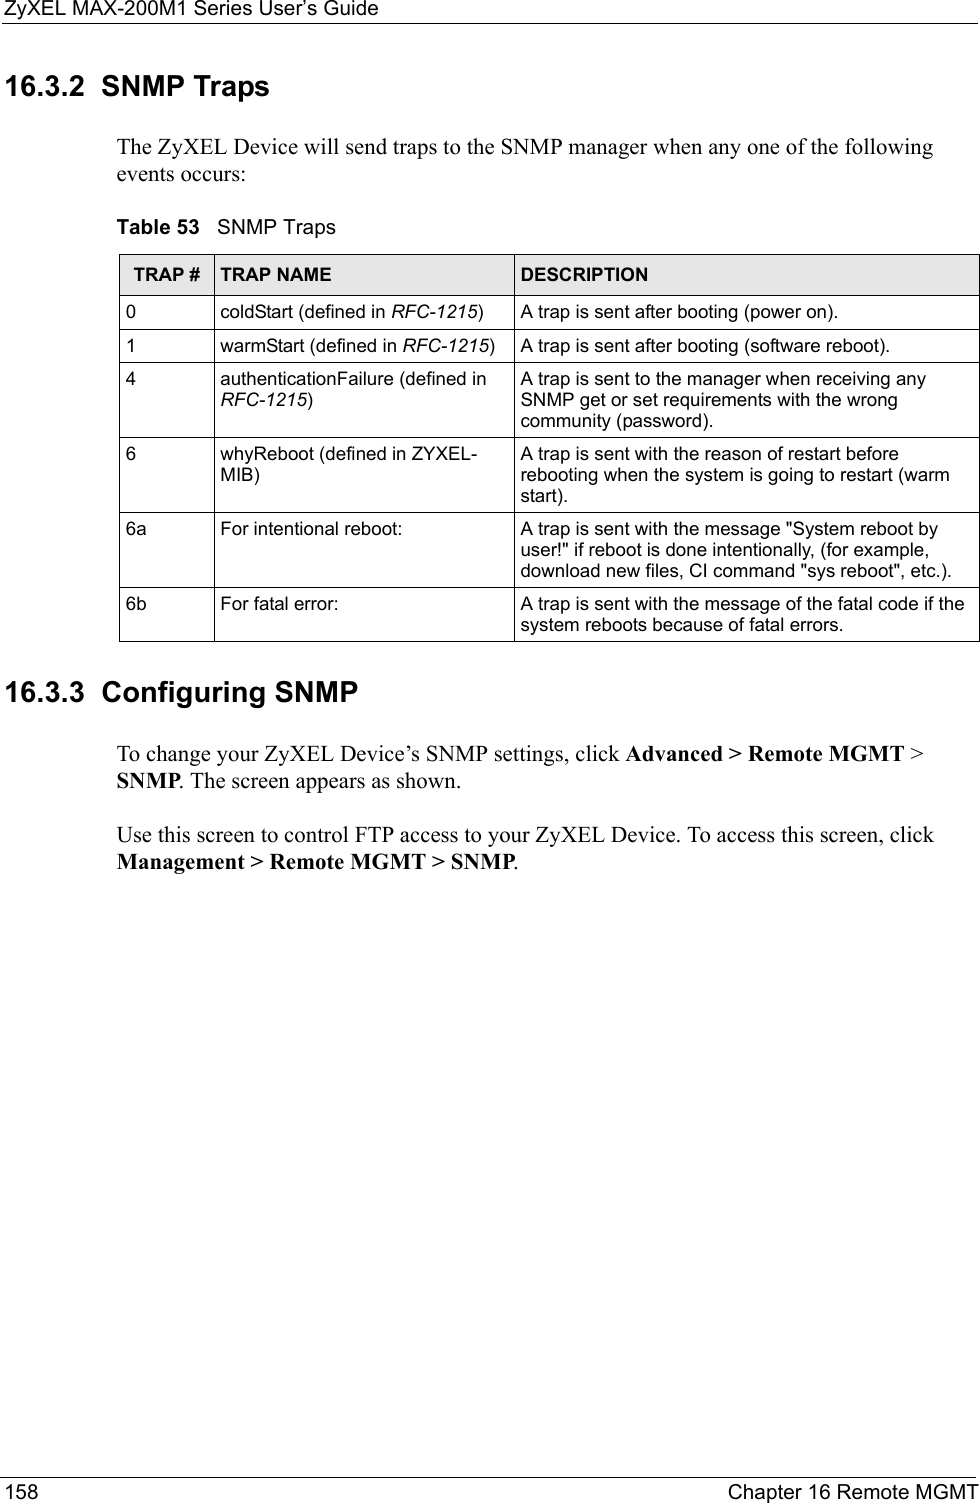
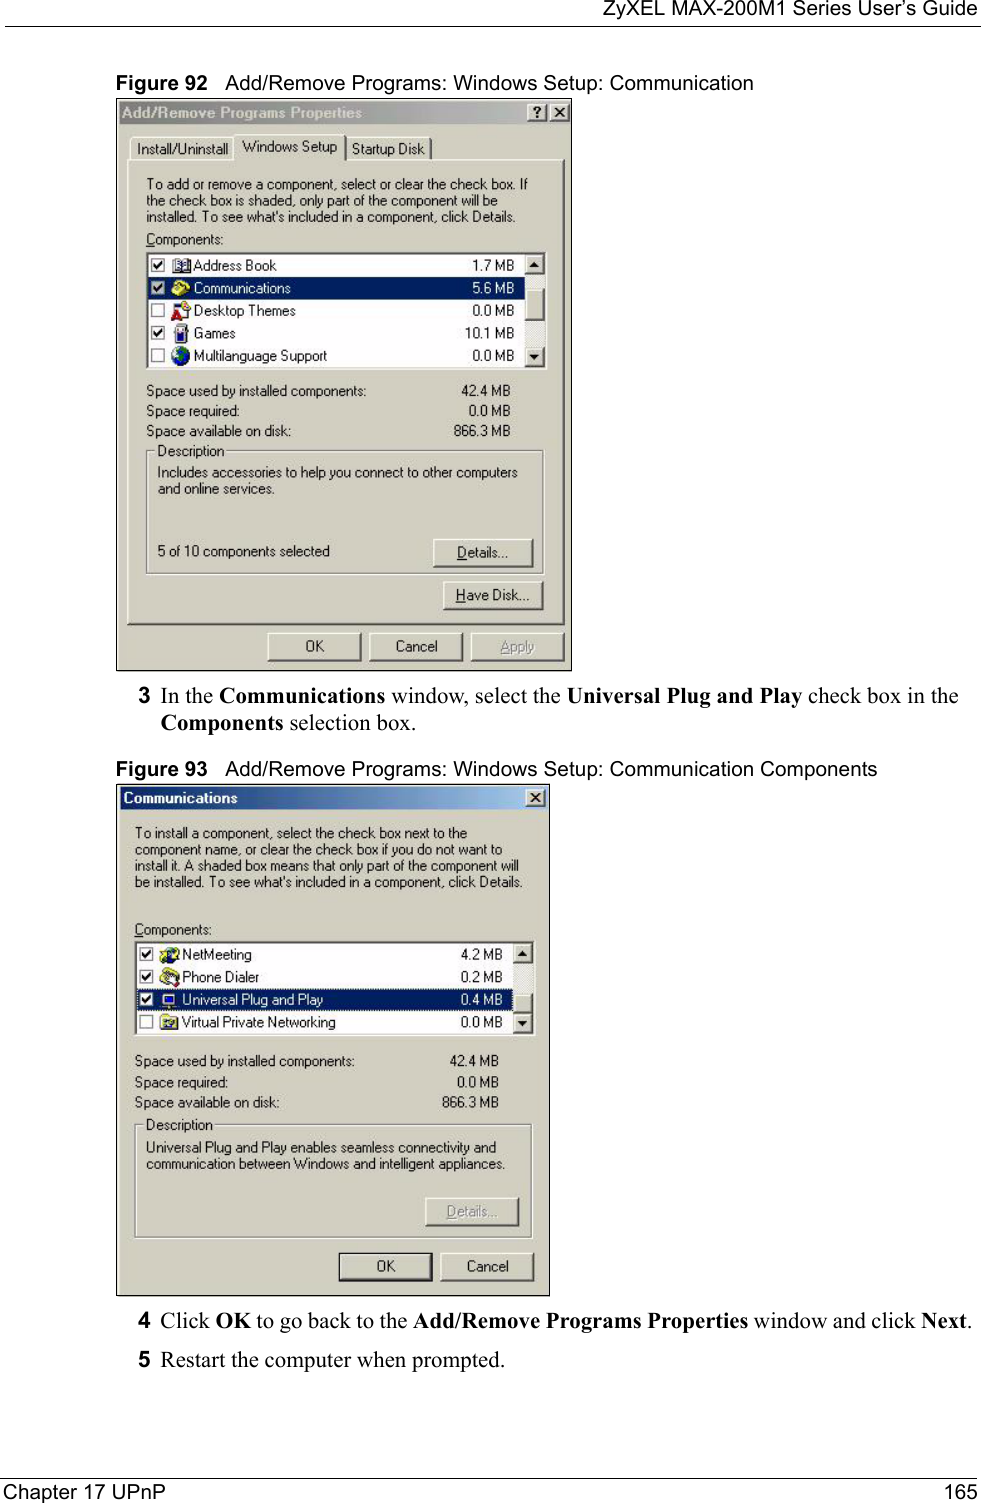
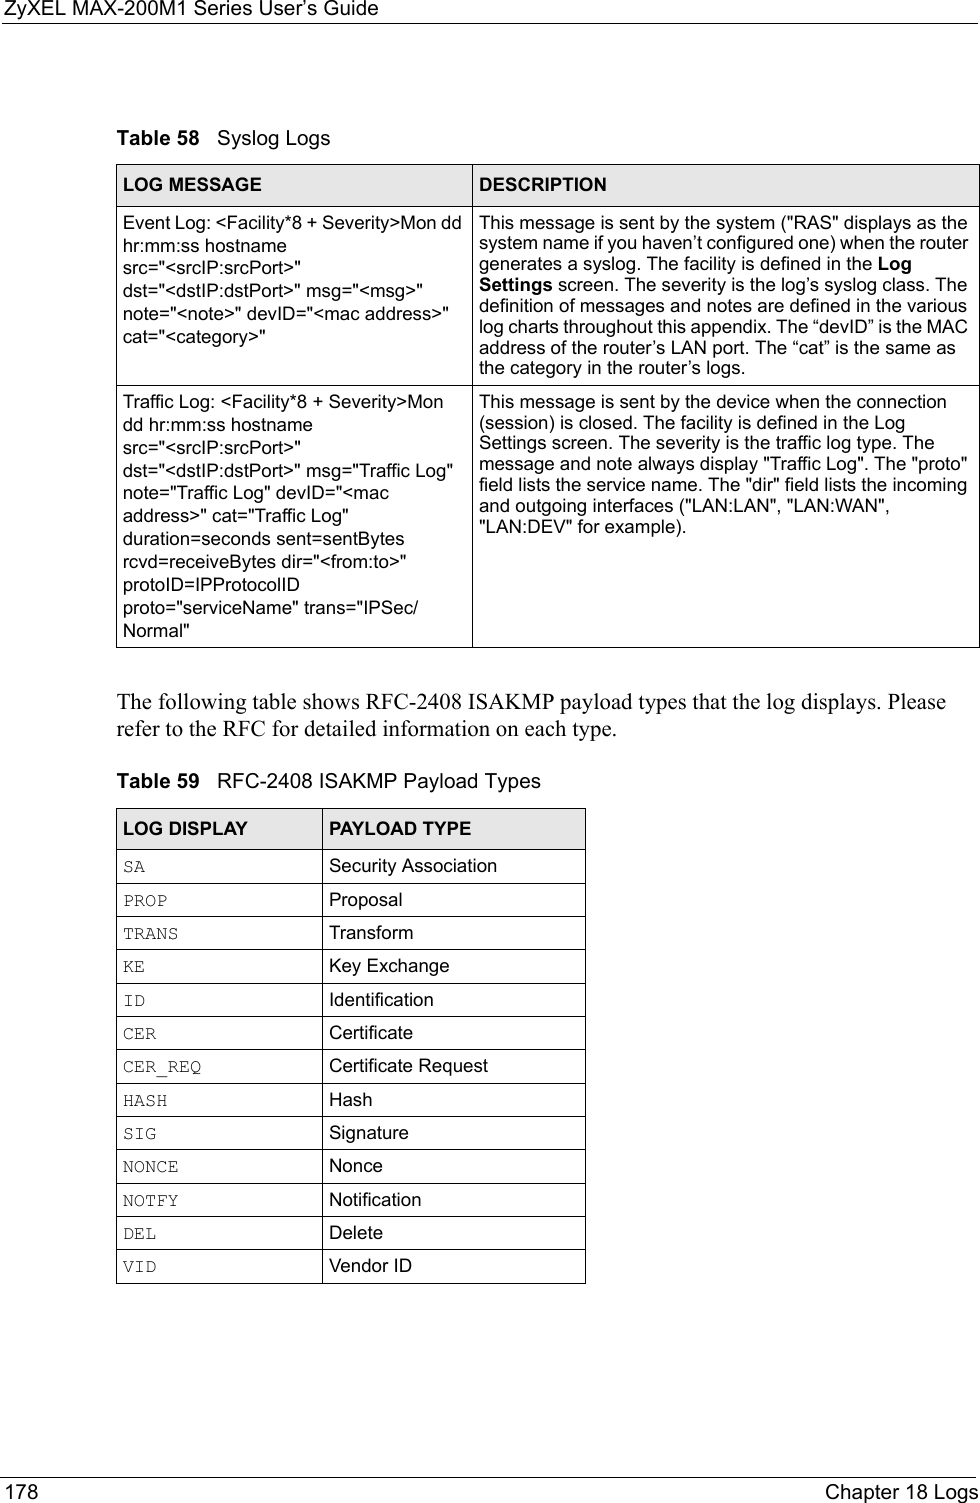
![ZyXEL MAX-200M1 Series User’s Guide184 Chapter 18 Logs For type and code details, see Table 74 on page 188.Firewall session time out, sent TCP RSTThe router sent a TCP reset packet when a dynamic firewall session timed out.The default timeout values are as follows:ICMP idle timeout: 3 minutesUDP idle timeout: 3 minutesTCP connection (three way handshaking) timeout: 270 secondsTCP FIN-wait timeout: 2 MSL (Maximum Segment Lifetime set in the TCP header).TCP idle (established) timeout (s): 150 minutesTCP reset timeout: 10 secondsExceed MAX incomplete, sent TCP RSTThe router sent a TCP reset packet when the number of incomplete connections (TCP and UDP) exceeded the user-configured threshold. (Incomplete count is for all TCP and UDP connections through the firewall.)Note: When the number of incomplete connections (TCP + UDP) > “Maximum Incomplete High”, the router sends TCP RST packets for TCP connections and destroys TOS (firewall dynamic sessions) until incomplete connections < “Maximum Incomplete Low”.Access block, sent TCP RSTThe router sends a TCP RST packet and generates this log if you turn on the firewall TCP reset mechanism (via CI command: sys firewall tcprst).Table 66 Packet Filter LogsLOG MESSAGE DESCRIPTION[ TCP | UDP | ICMP | IGMP | Generic ] packet filter matched (set: %d, rule: %d)Attempted access matched a configured filter rule (denoted by its set and rule number) and was blocked or forwarded according to the rule.Table 67 ICMP LogsLOG MESSAGE DESCRIPTIONFirewall default policy: ICMP <Packet Direction>, <type:%d>, <code:%d>ICMP access matched the default policy and was blocked or forwarded according to the user's setting.Firewall rule [NOT] match: ICMP <Packet Direction>, <rule:%d>, <type:%d>, <code:%d>ICMP access matched (or didn’t match) a firewall rule (denoted by its number) and was blocked or forwarded according to the rule. Triangle route packet forwarded: ICMPThe firewall allowed a triangle route session to pass through.Packet without a NAT table entry blocked: ICMPThe router blocked a packet that didn’t have a corresponding NAT table entry.Table 65 TCP Reset Logs (continued)LOG MESSAGE DESCRIPTION](https://usermanual.wiki/ZyXEL-Communications/MAX200M1.User-manual3/User-Guide-903014-Page-34.png)
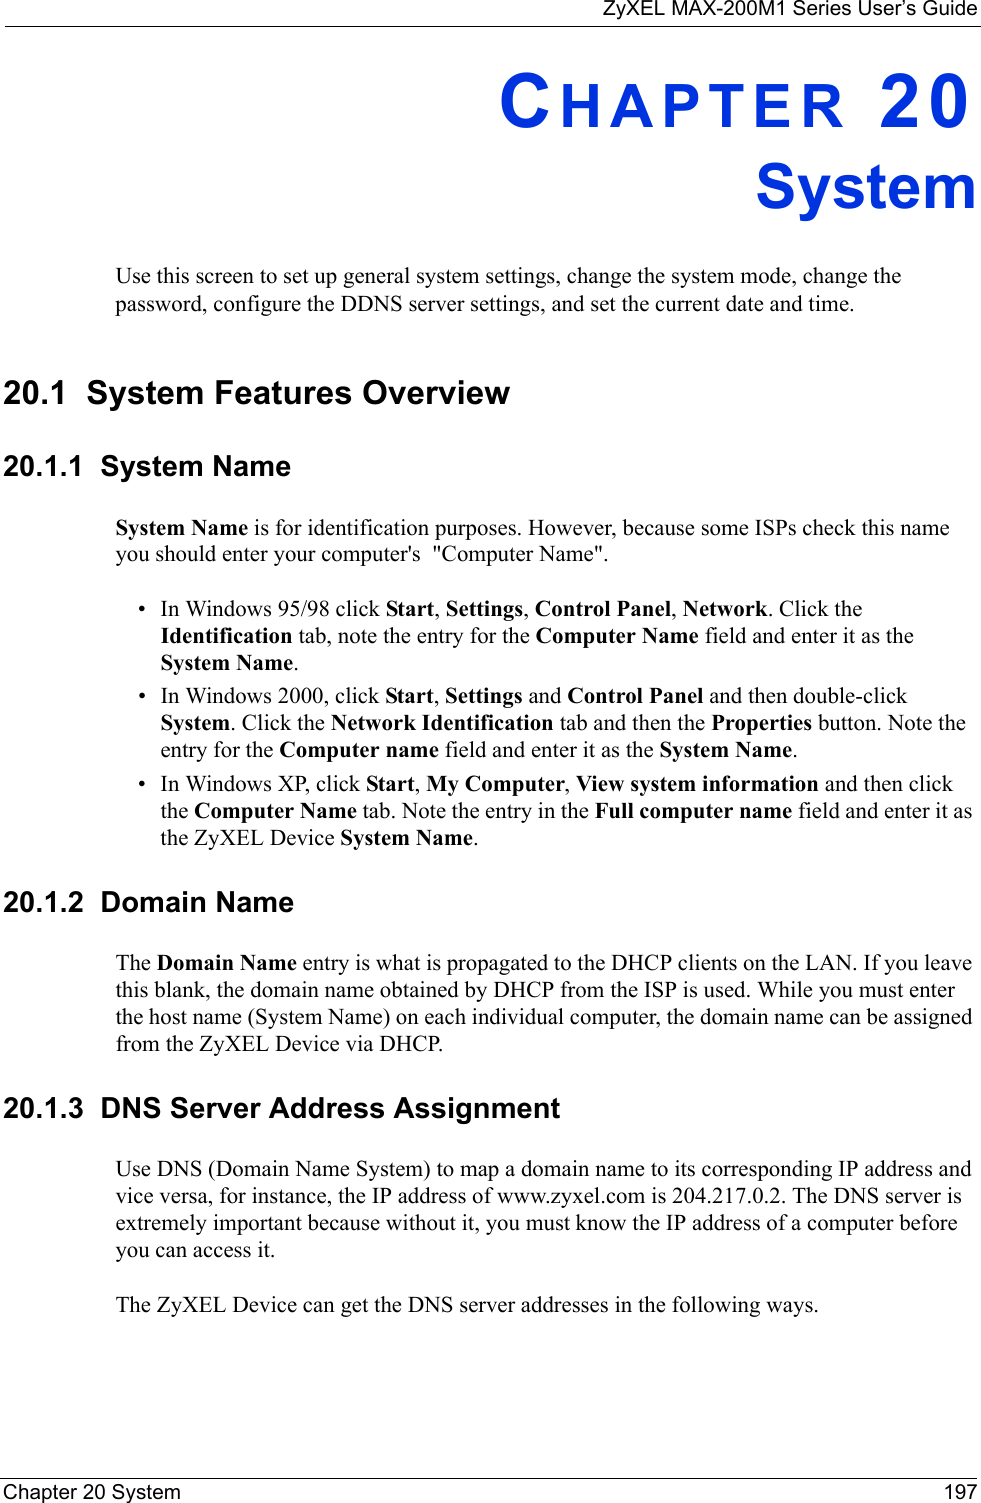
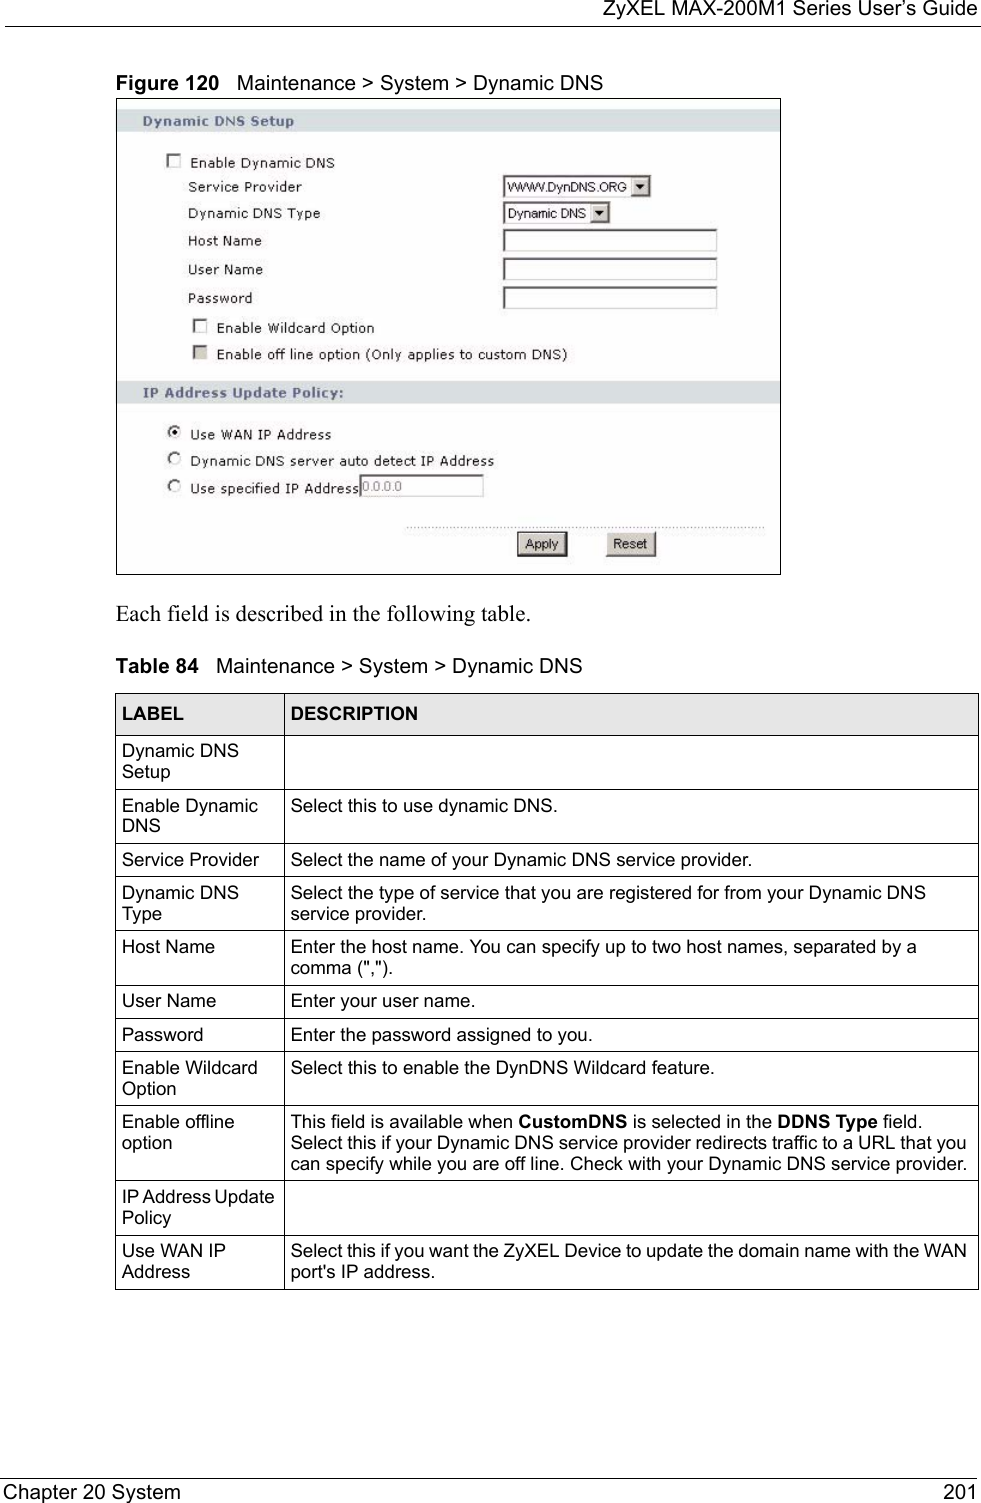
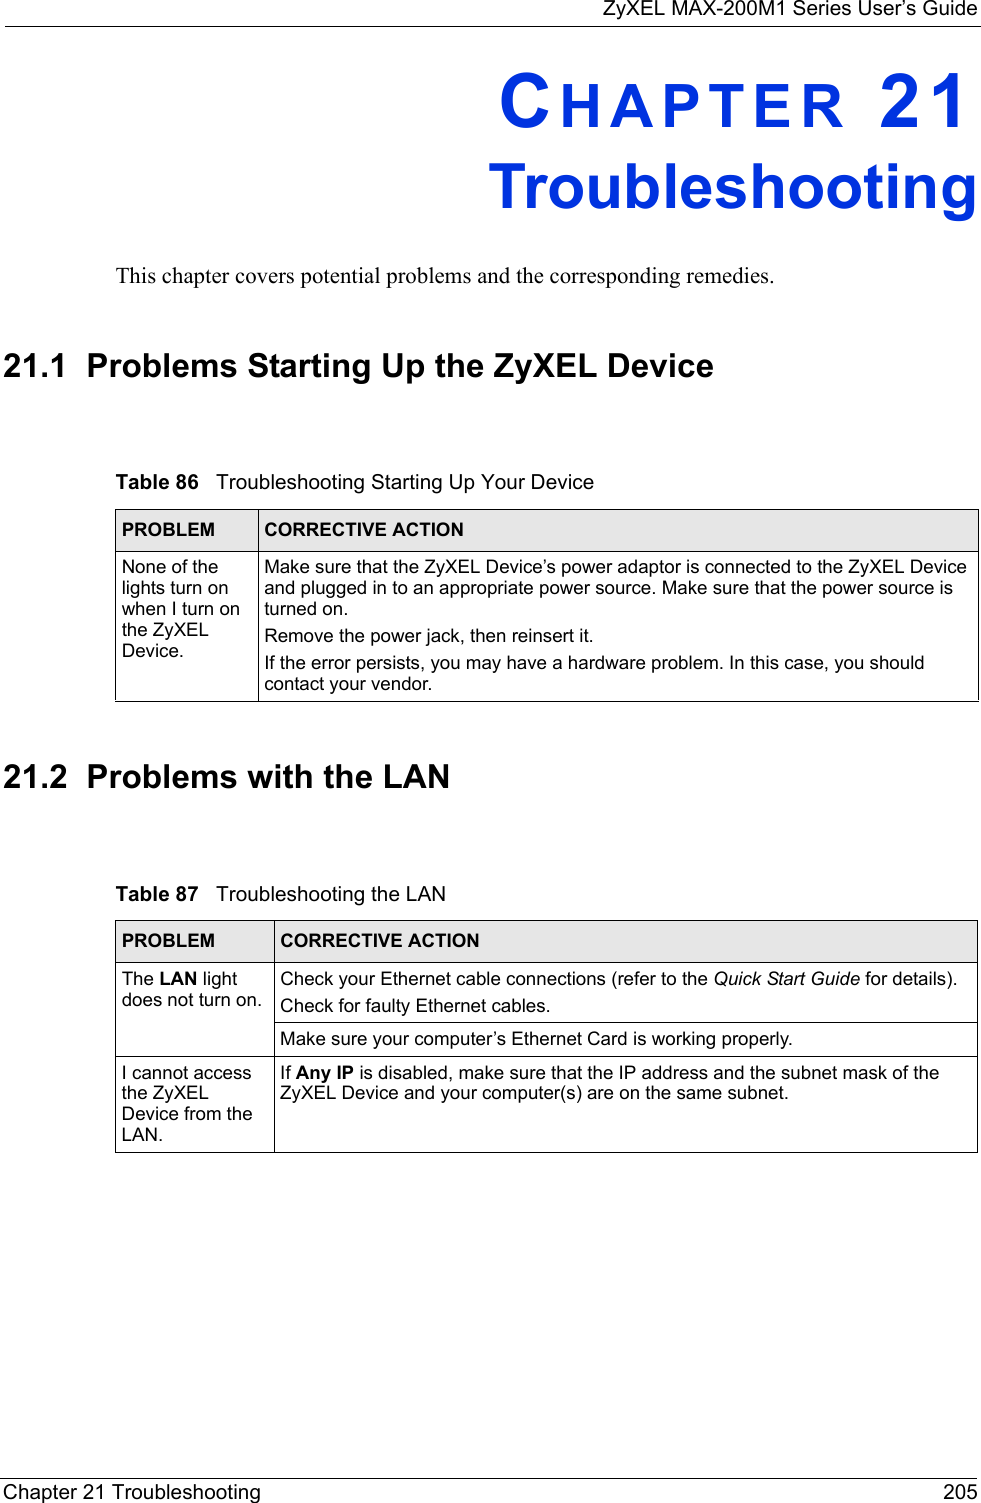
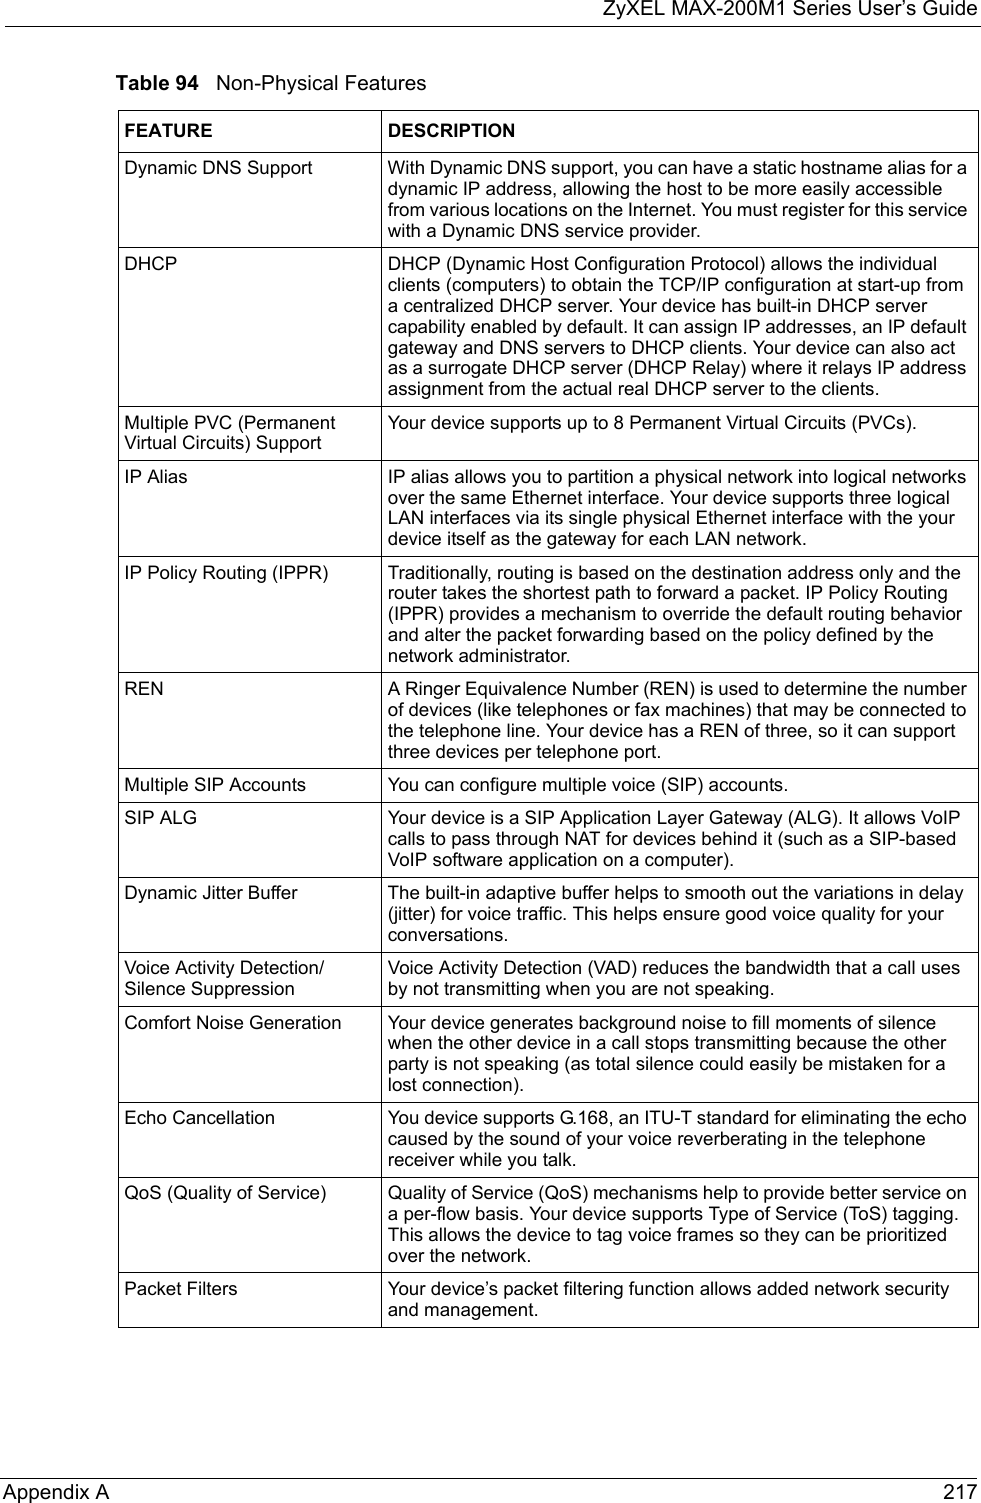
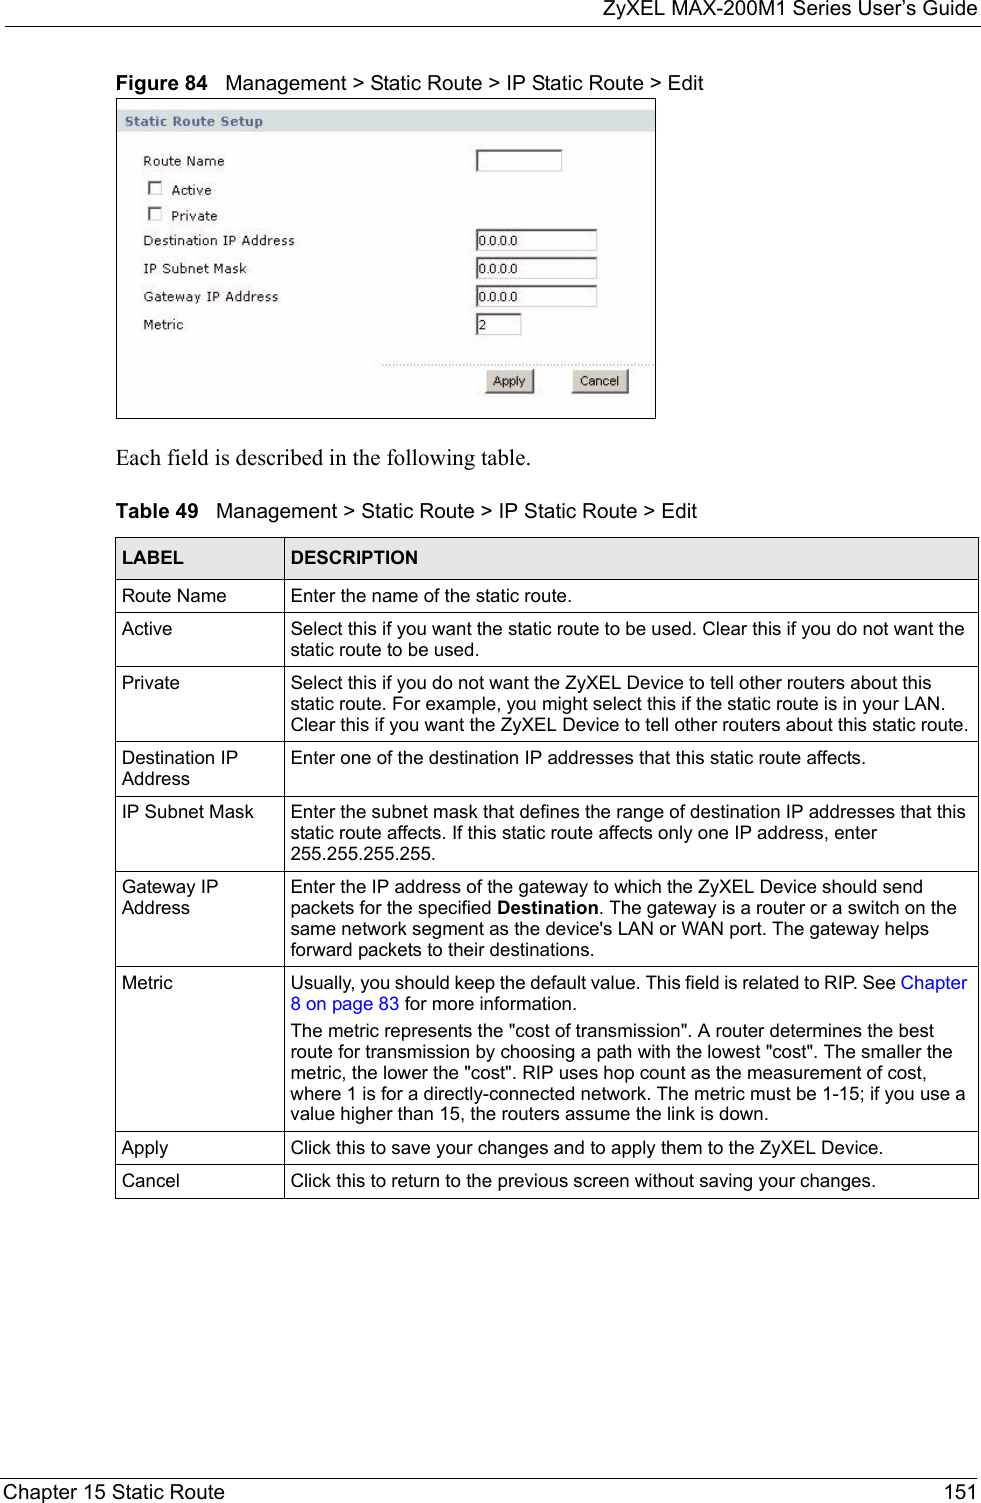
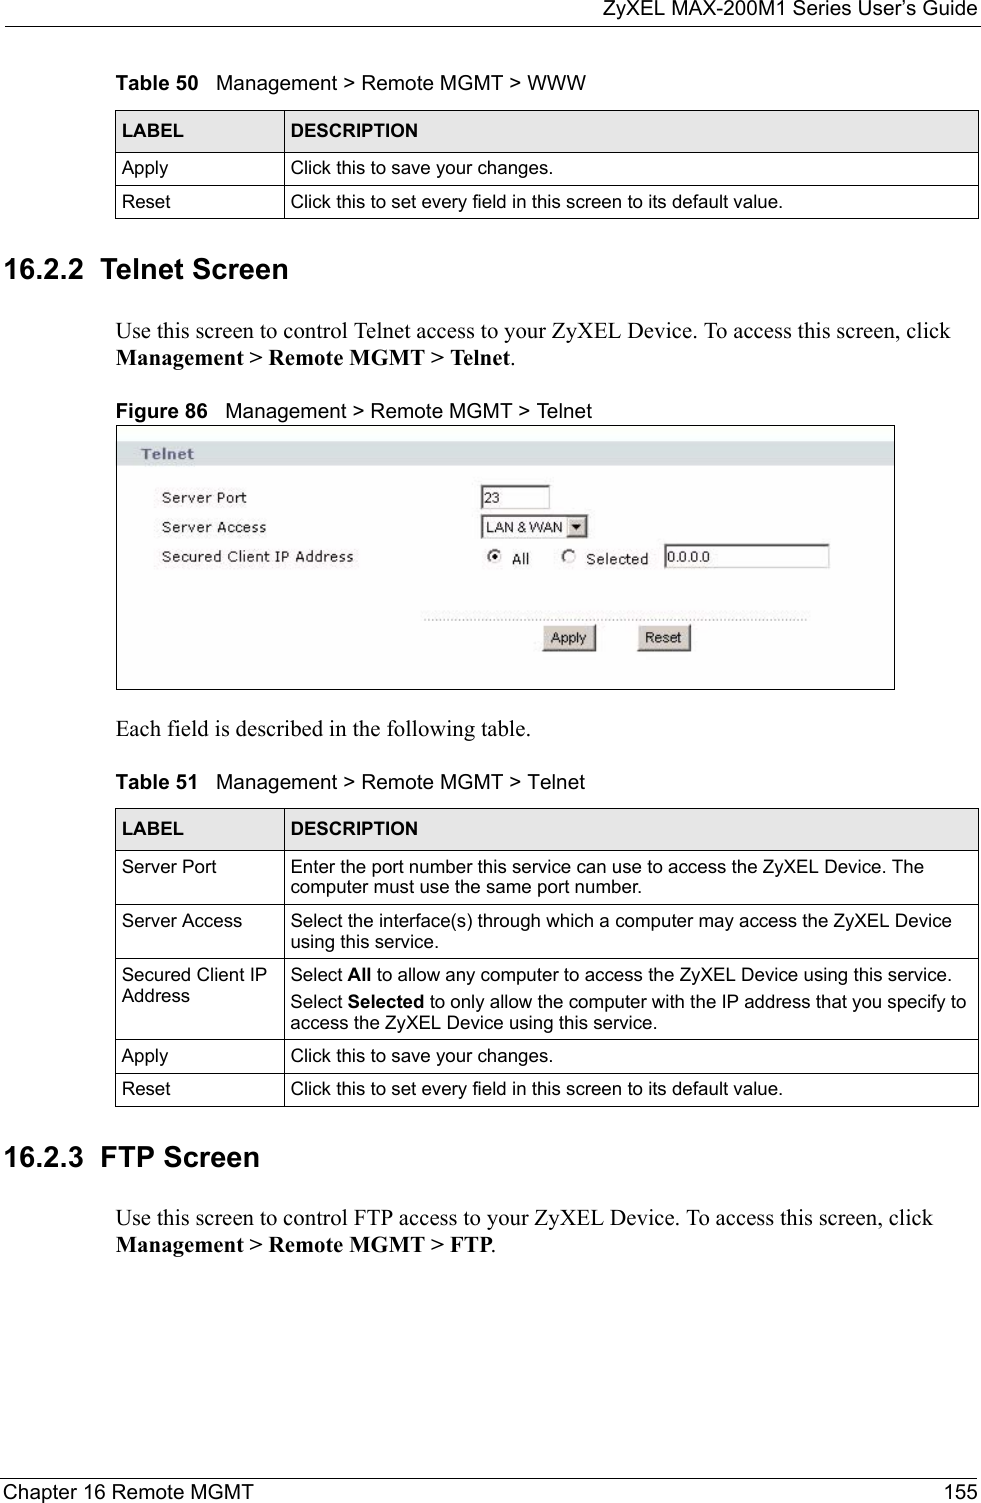
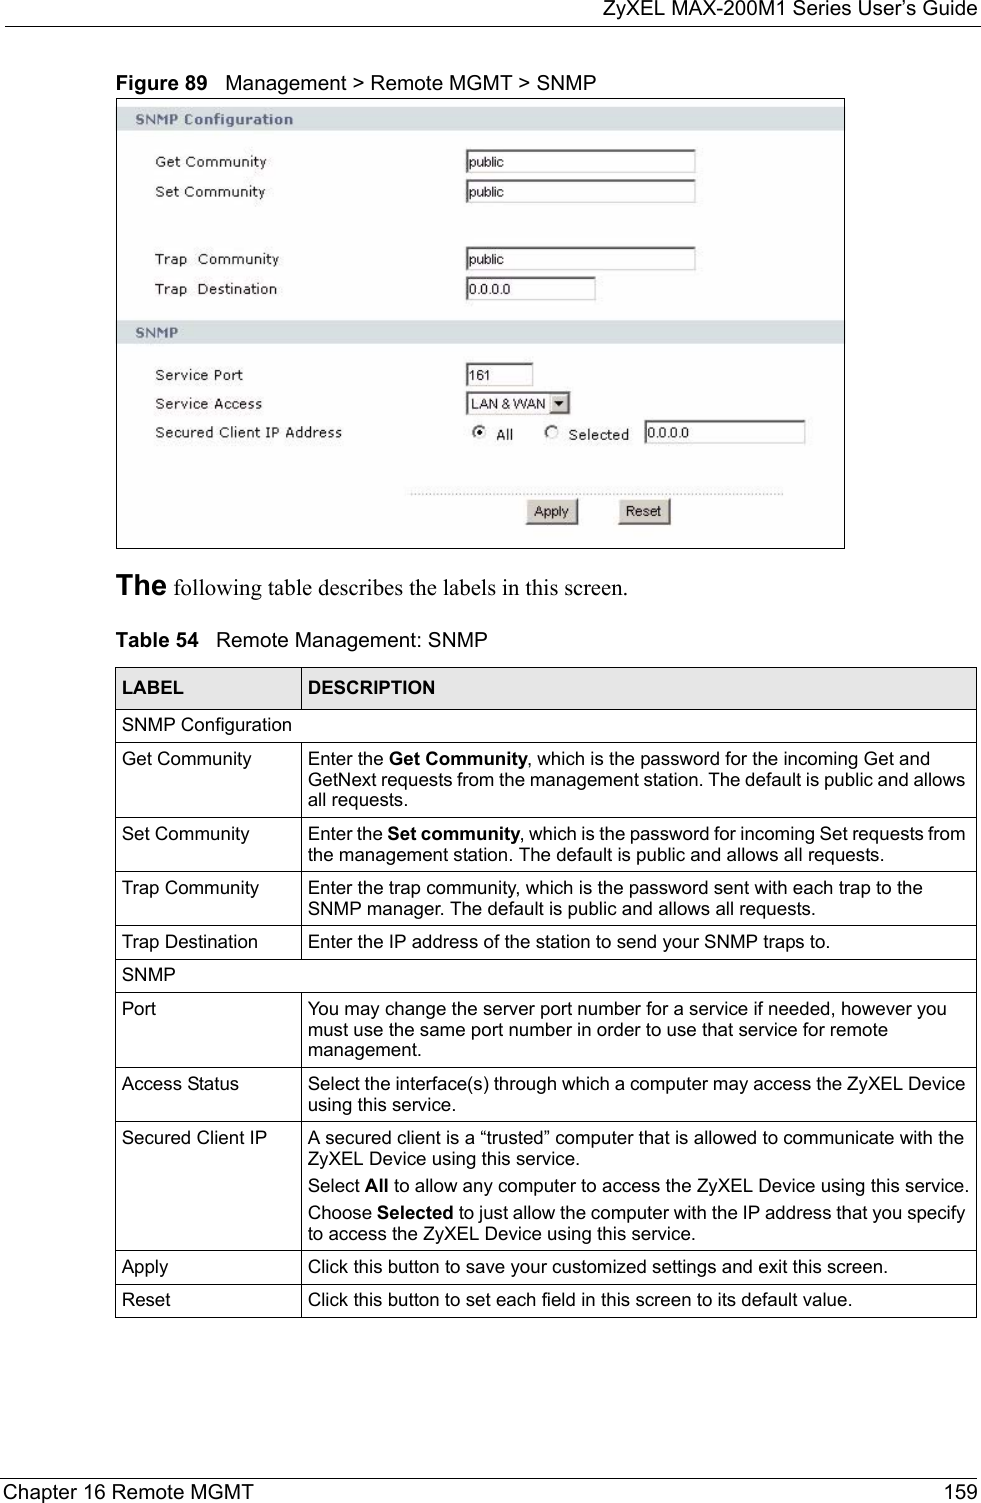
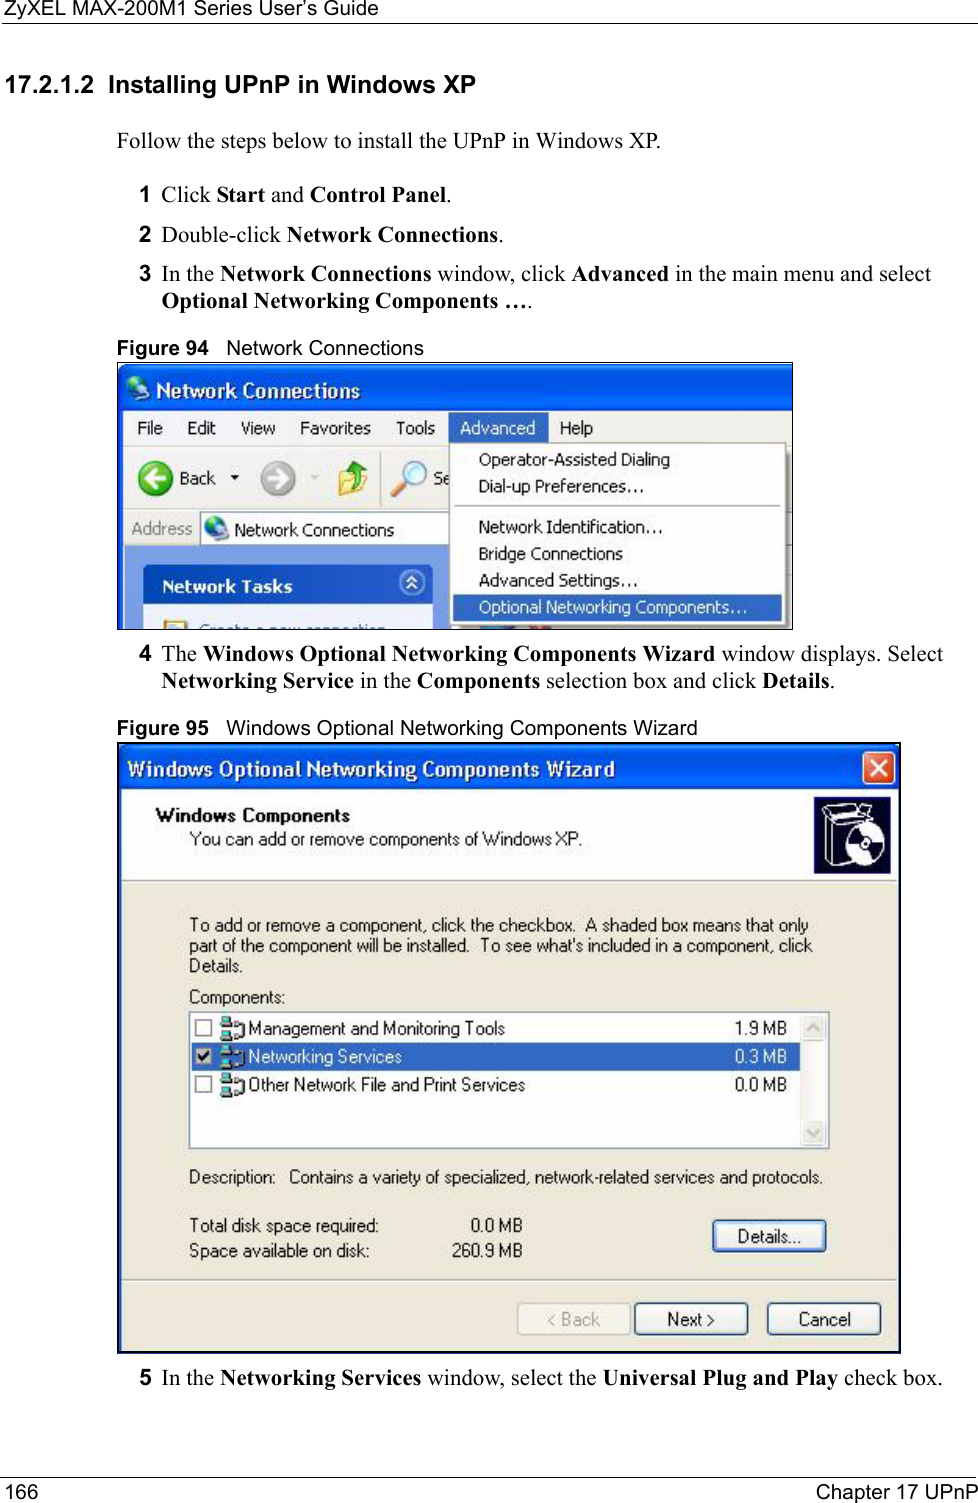
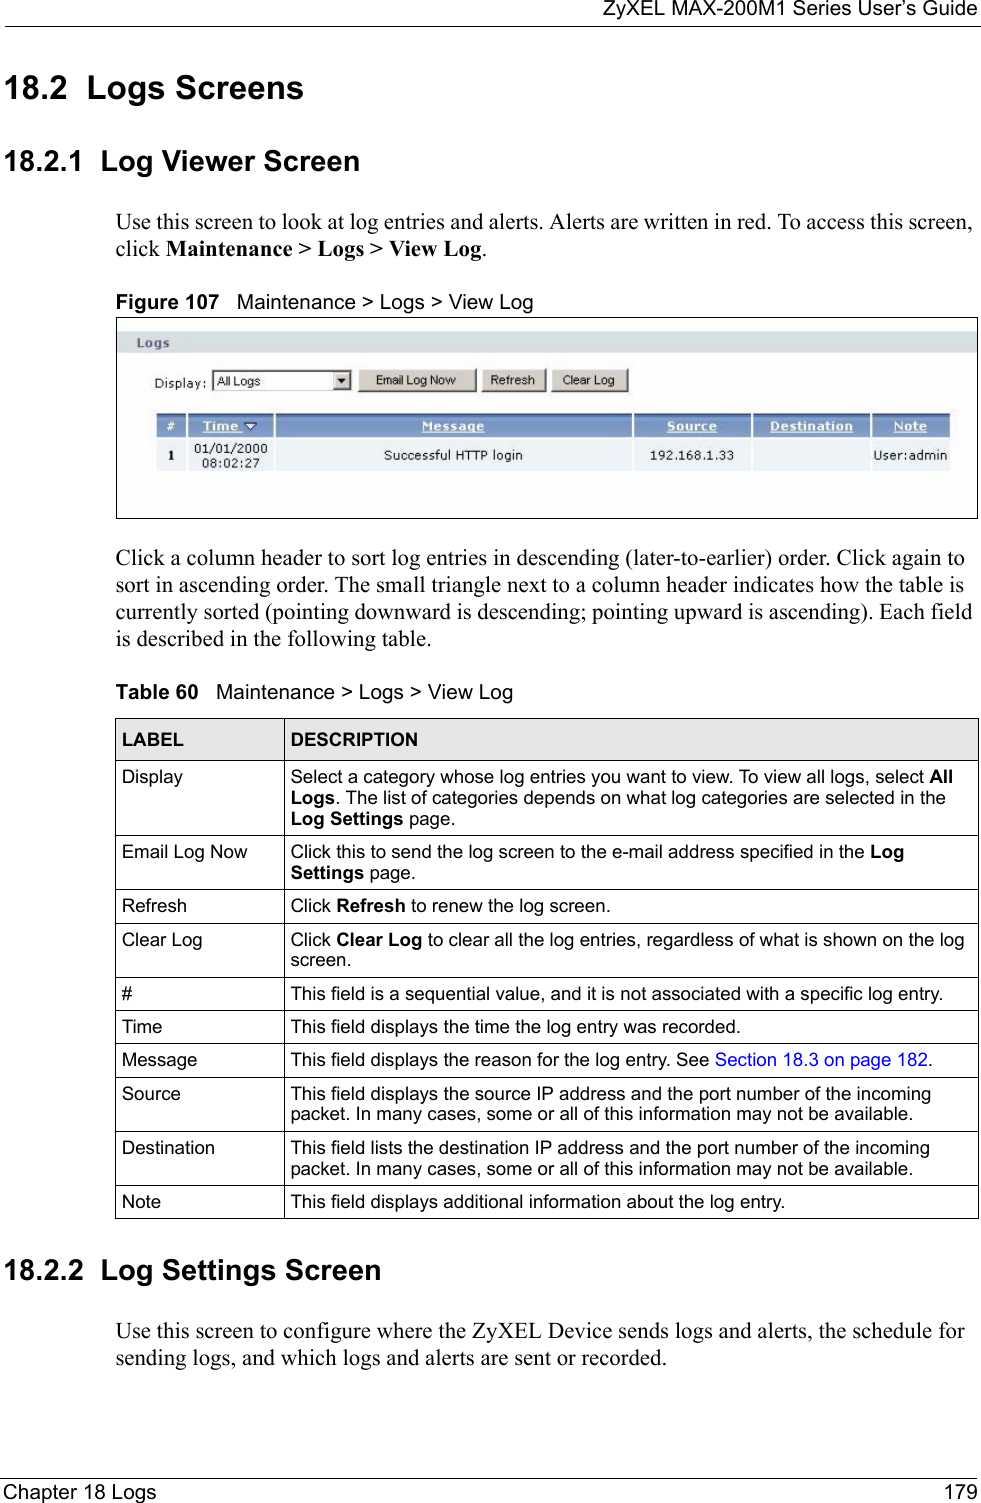
![ZyXEL MAX-200M1 Series User’s Guide186 Chapter 18 Logs For type and code details, see Table 74 on page 188.Table 71 Content Filtering LogsLOG MESSAGE DESCRIPTION%s: Keyword blocking The content of a requested web page matched a user defined keyword.%s: Not in trusted web listThe web site is not in a trusted domain, and the router blocks all traffic except trusted domain sites.%s: Forbidden Web site The web site is in the forbidden web site list.%s: Contains ActiveX The web site contains ActiveX.%s: Contains Java appletThe web site contains a Java applet.%s: Contains cookie The web site contains a cookie.%s: Proxy mode detectedThe router detected proxy mode in the packet.%s: Trusted Web site The web site is in a trusted domain.%s When the content filter is not on according to the time schedule.Waiting content filter server timeoutThe external content filtering server did not respond within the timeout period.DNS resolving failed The ZyXEL Device cannot get the IP address of the external content filtering via DNS query.Creating socket failed The ZyXEL Device cannot issue a query because TCP/IP socket creation failed, port:port number.Connecting to content filter server failThe connection to the external content filtering server failed.License key is invalid The external content filtering license key is invalid.Table 72 Attack LogsLOG MESSAGE DESCRIPTIONattack [ TCP | UDP | IGMP | ESP | GRE | OSPF ]The firewall detected a TCP/UDP/IGMP/ESP/GRE/OSPF attack.attack ICMP (type:%d, code:%d)The firewall detected an ICMP attack. land [ TCP | UDP | IGMP | ESP | GRE | OSPF ]The firewall detected a TCP/UDP/IGMP/ESP/GRE/OSPF land attack.land ICMP (type:%d, code:%d)The firewall detected an ICMP land attack. ip spoofing - WAN [ TCP | UDP | IGMP | ESP | GRE | OSPF ]The firewall detected an IP spoofing attack on the WAN port.ip spoofing - WAN ICMP (type:%d, code:%d)The firewall detected an ICMP IP spoofing attack on the WAN port. icmp echo : ICMP (type:%d, code:%d)The firewall detected an ICMP echo attack.](https://usermanual.wiki/ZyXEL-Communications/MAX200M1.User-manual3/User-Guide-903014-Page-36.png)
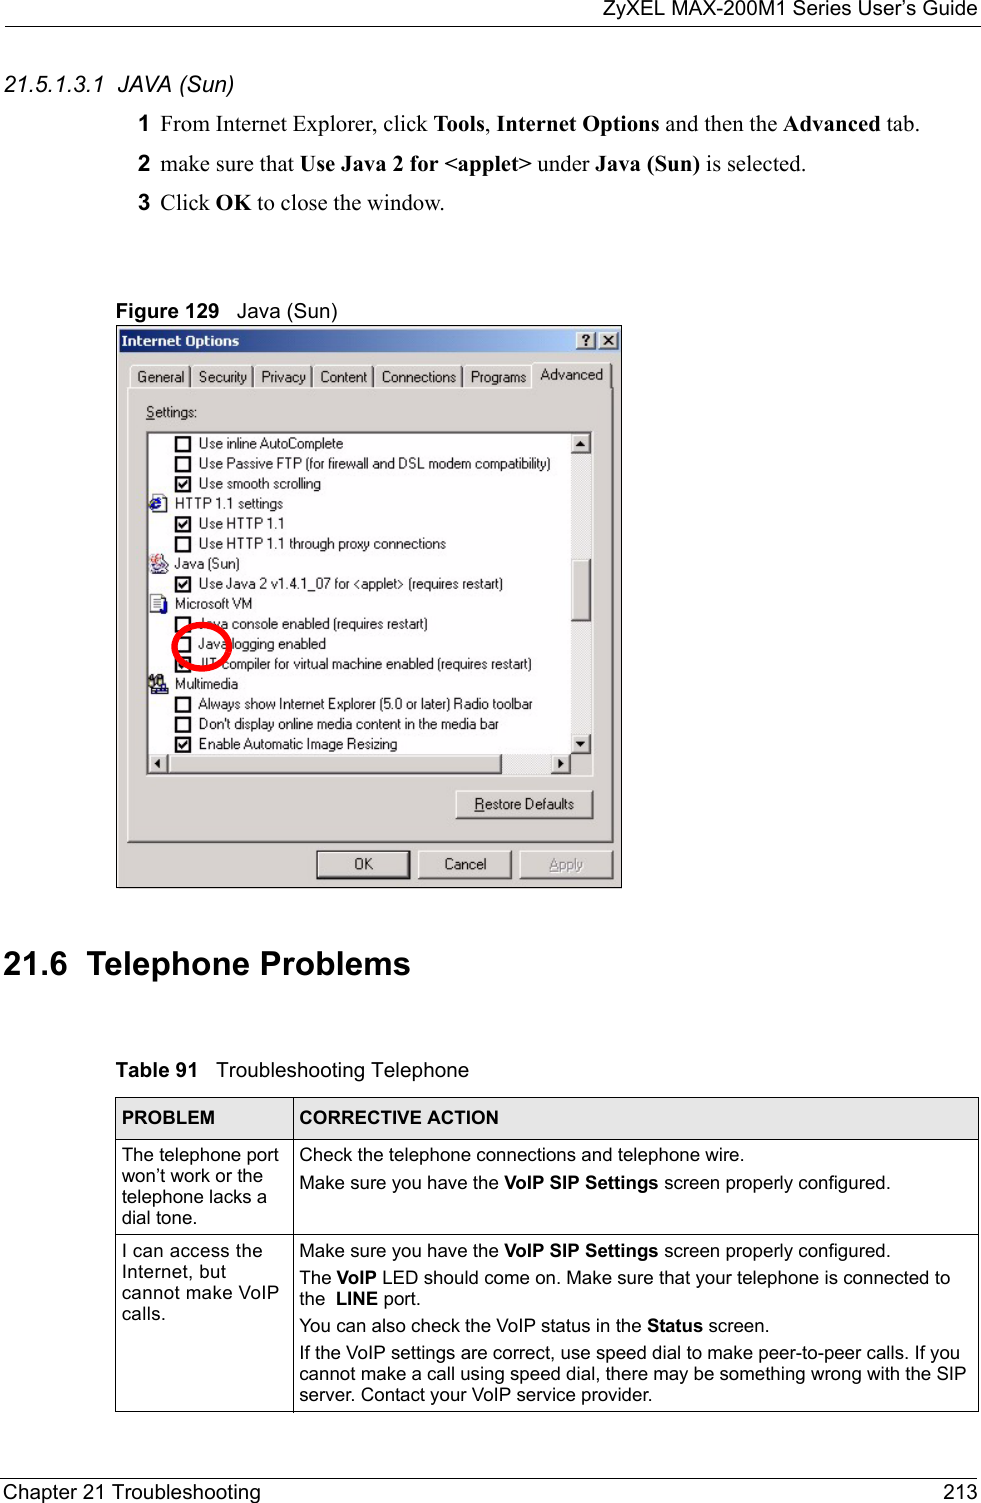
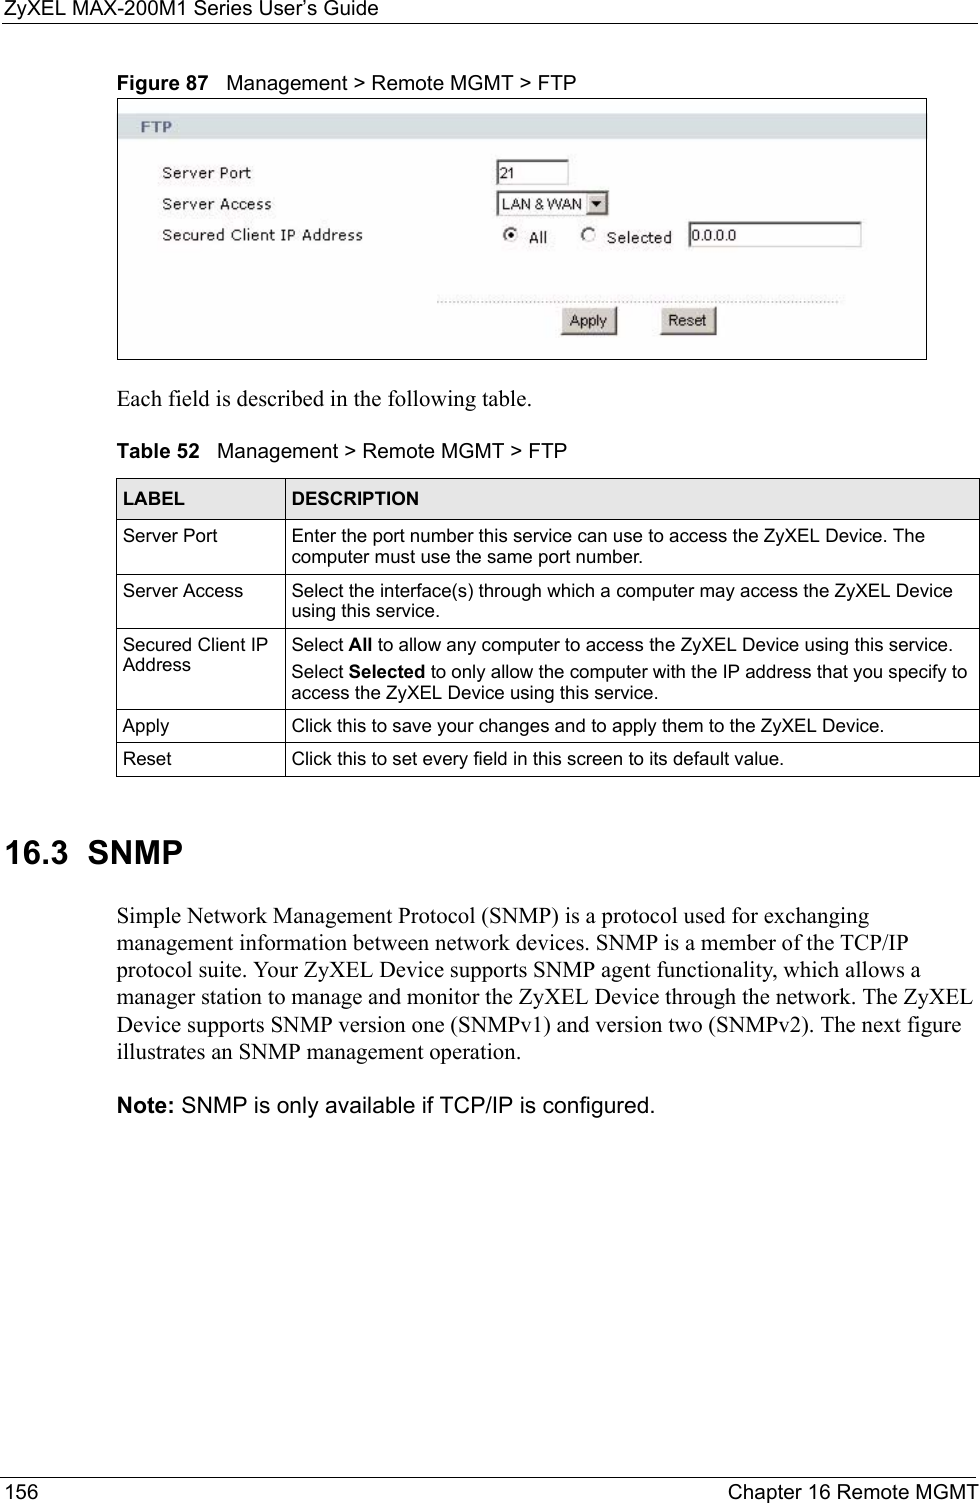
![ZyXEL MAX-200M1 Series User’s GuideChapter 18 Logs 187syn flood TCP The firewall detected a TCP syn flood attack.ports scan TCP The firewall detected a TCP port scan attack.teardrop TCP The firewall detected a TCP teardrop attack.teardrop UDP The firewall detected an UDP teardrop attack.teardrop ICMP (type:%d, code:%d)The firewall detected an ICMP teardrop attack. illegal command TCP The firewall detected a TCP illegal command attack.NetBIOS TCP The firewall detected a TCP NetBIOS attack.ip spoofing - no routing entry [ TCP | UDP | IGMP | ESP | GRE | OSPF ]The firewall classified a packet with no source routing entry as an IP spoofing attack.ip spoofing - no routing entry ICMP (type:%d, code:%d)The firewall classified an ICMP packet with no source routing entry as an IP spoofing attack.vulnerability ICMP (type:%d, code:%d)The firewall detected an ICMP vulnerability attack. traceroute ICMP (type:%d, code:%d)The firewall detected an ICMP traceroute attack. ports scan UDP The firewall detected a UDP port scan attack.Firewall sent TCP packet in response to DoS attack TCPThe firewall sent TCP packet in response to a DoS attackICMP Source Quench ICMP The firewall detected an ICMP Source Quench attack.ICMP Time Exceed ICMP The firewall detected an ICMP Time Exceed attack.ICMP Destination Unreachable ICMPThe firewall detected an ICMP Destination Unreachable attack.ping of death. ICMP The firewall detected an ICMP ping of death attack.smurf ICMP The firewall detected an ICMP smurf attack.Table 73 Remote Management LogsLOG MESSAGE DESCRIPTIONRemote Management: FTP denied Attempted use of FTP service was blocked according to remote management settings.Remote Management: TELNET denied Attempted use of TELNET service was blocked according to remote management settings.Remote Management: HTTP or UPnP deniedAttempted use of HTTP or UPnP service was blocked according to remote management settings.Remote Management: WWW denied Attempted use of WWW service was blocked according to remote management settings.Remote Management: HTTPS denied Attempted use of HTTPS service was blocked according to remote management settings.Table 72 Attack Logs (continued)LOG MESSAGE DESCRIPTION](https://usermanual.wiki/ZyXEL-Communications/MAX200M1.User-manual3/User-Guide-903014-Page-37.png)

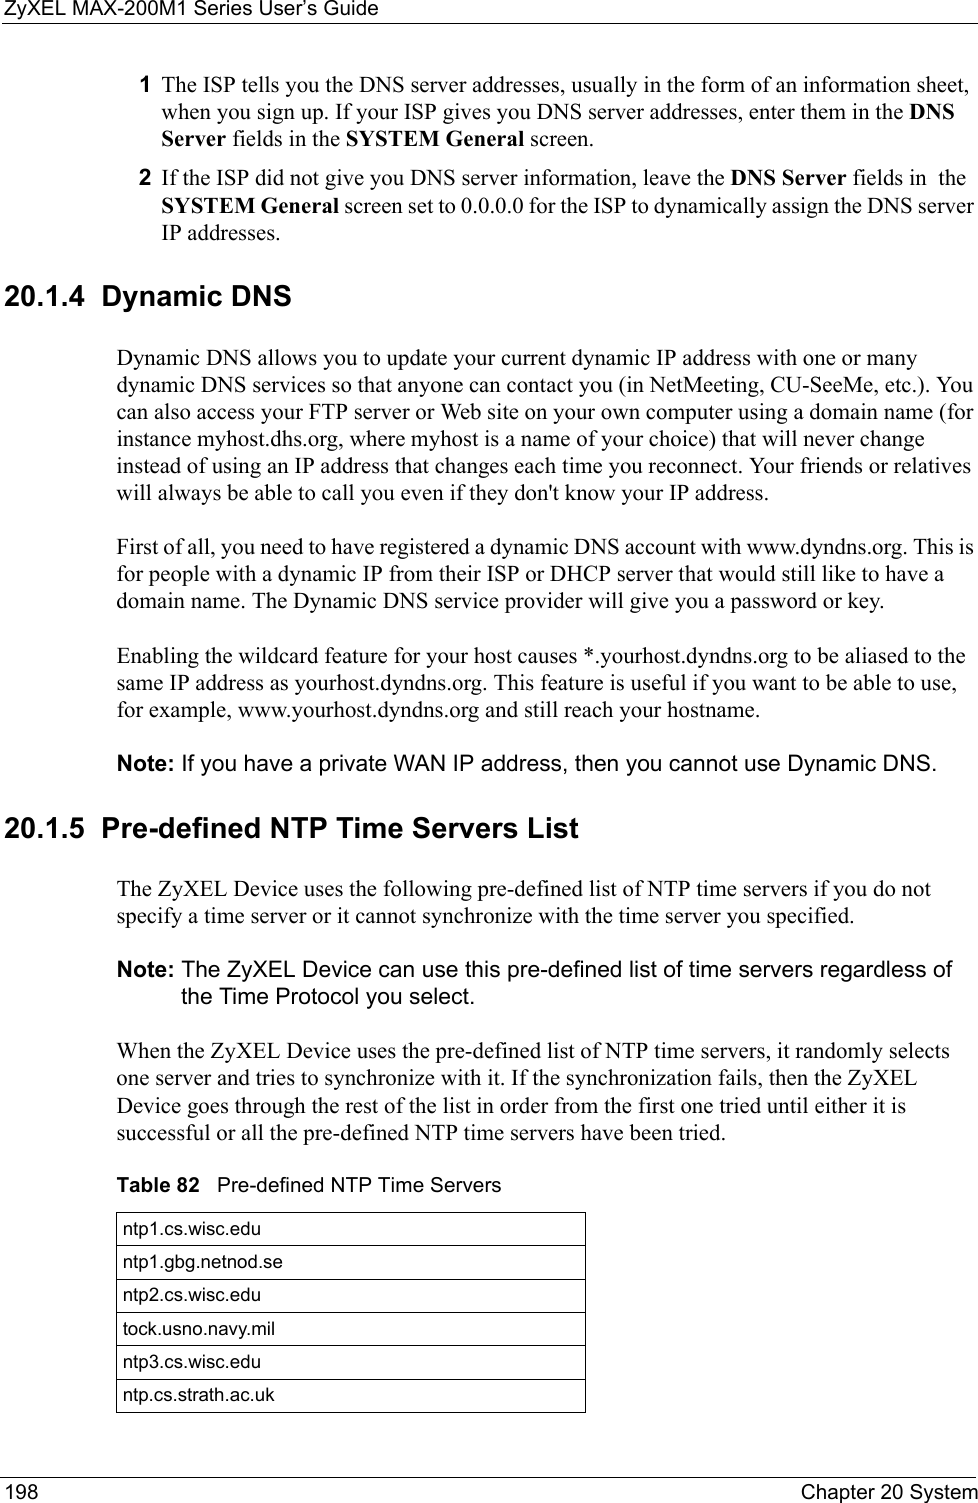
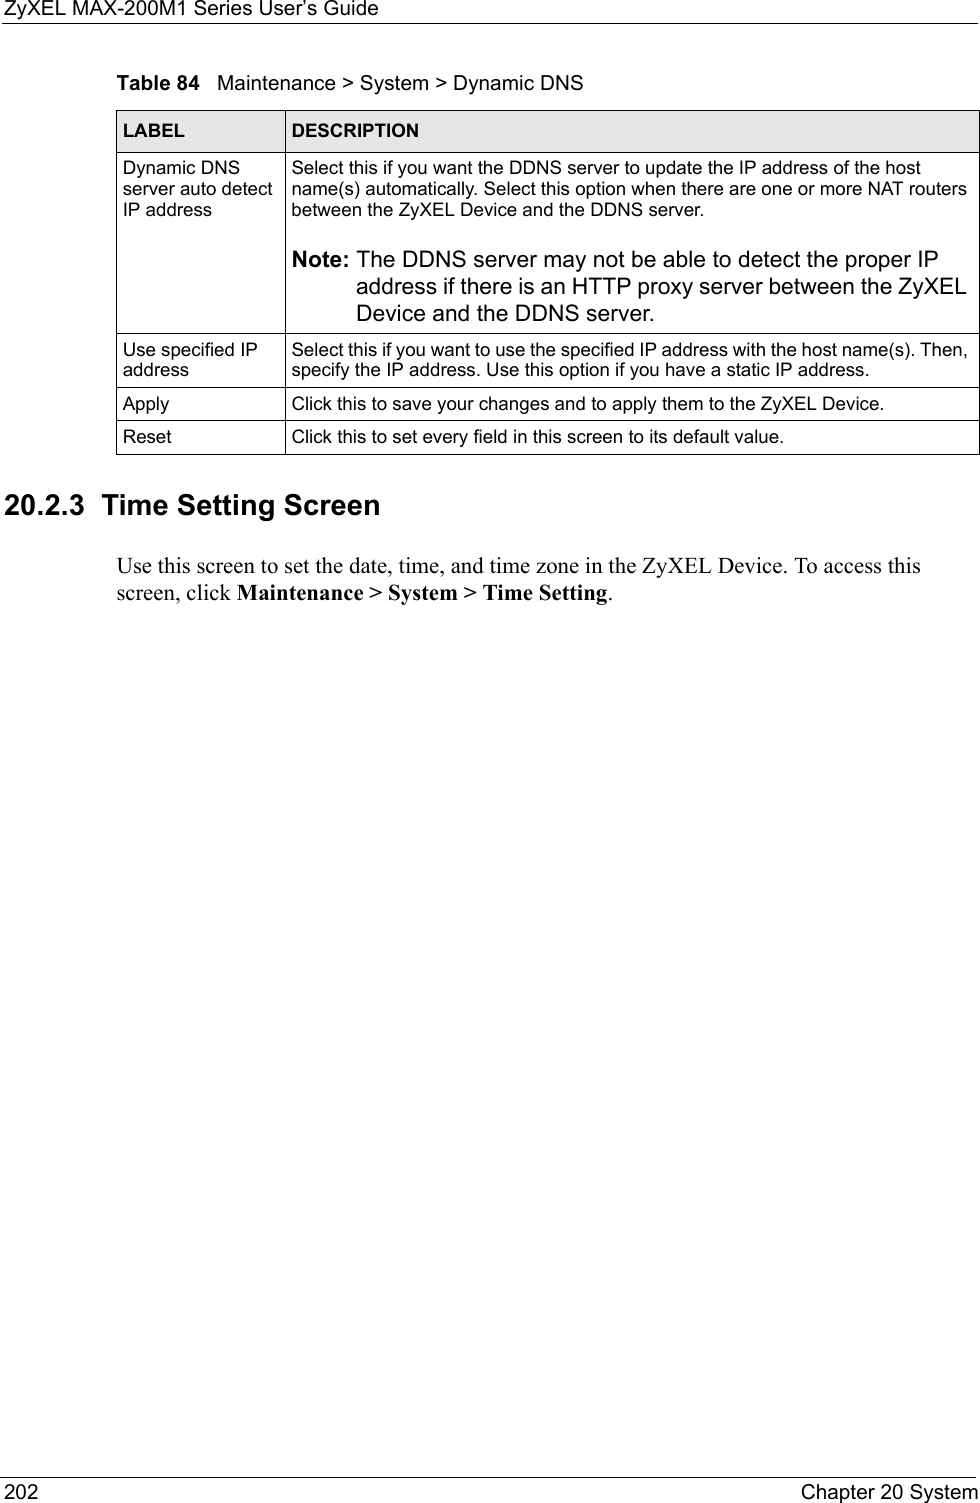
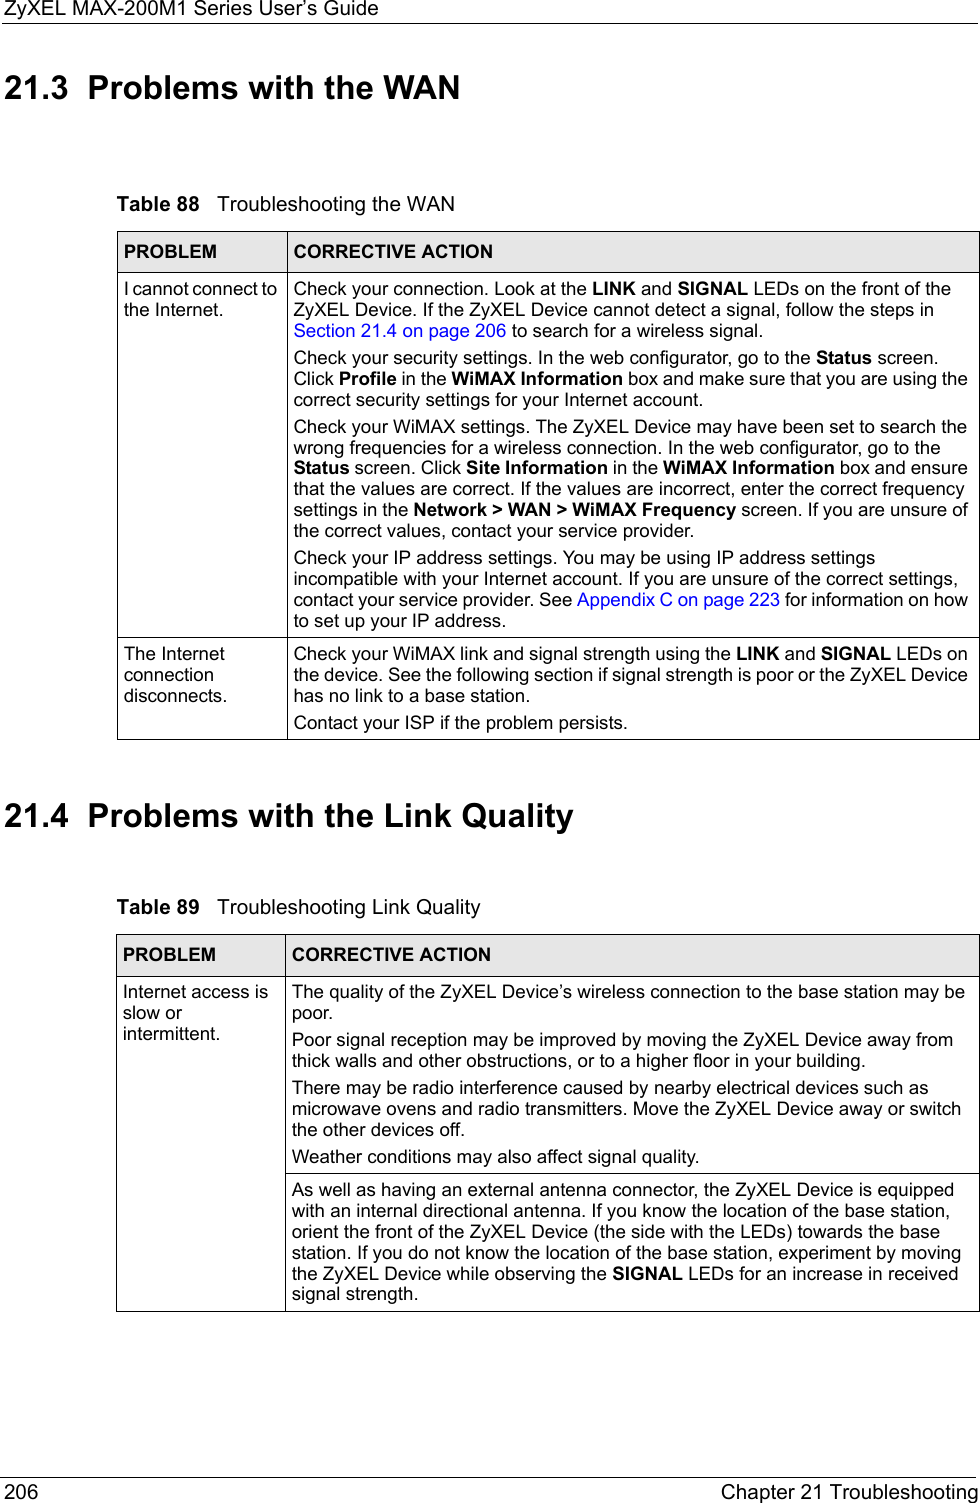
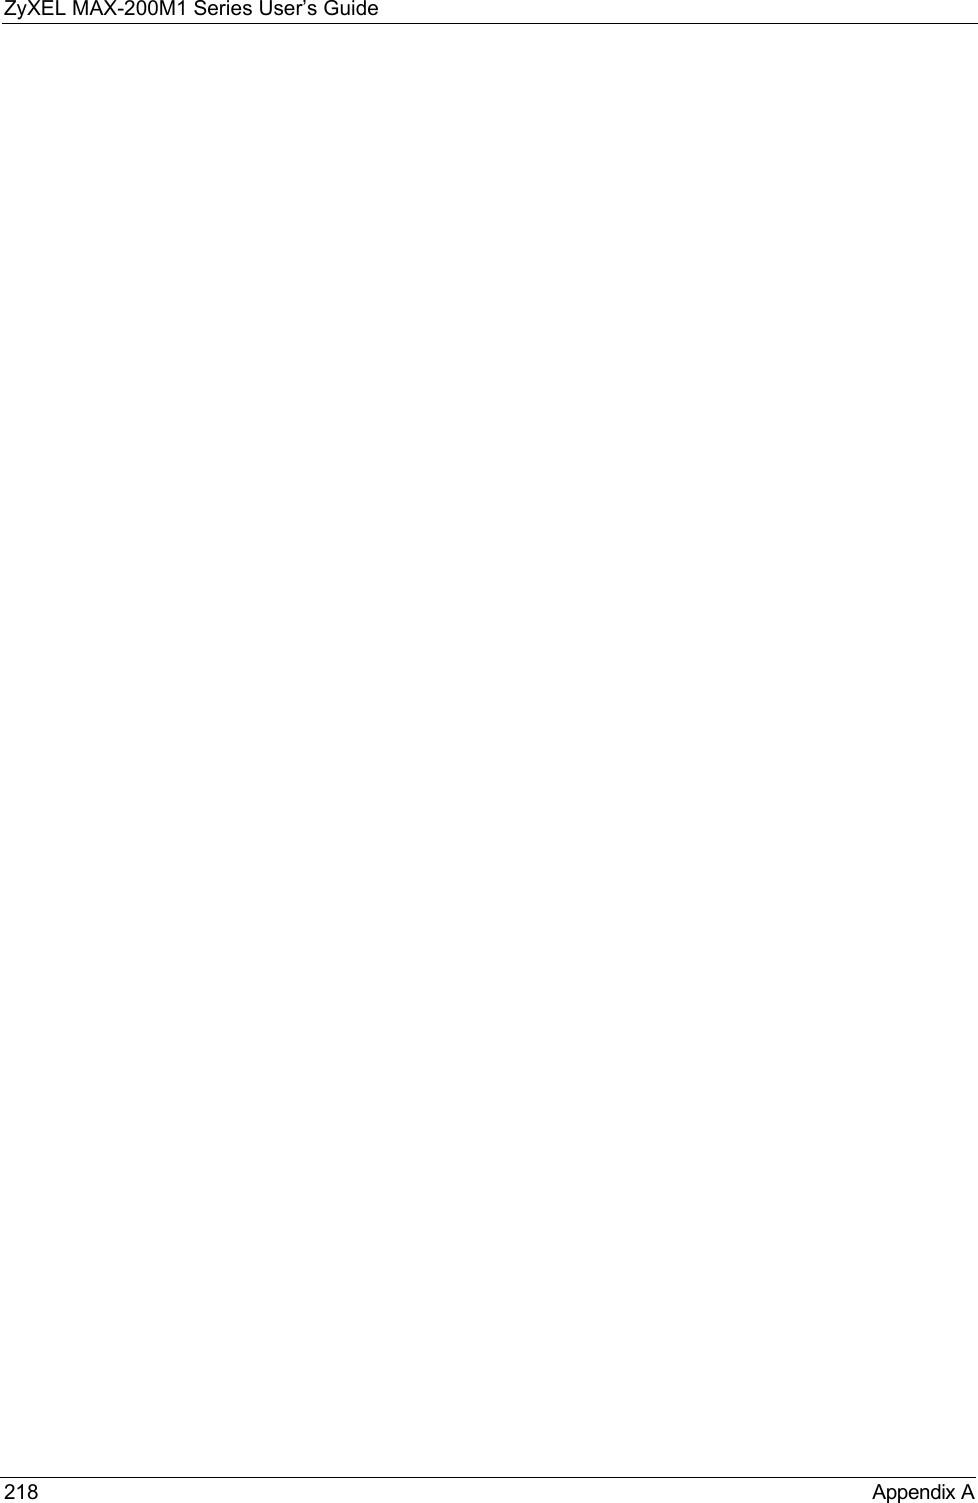
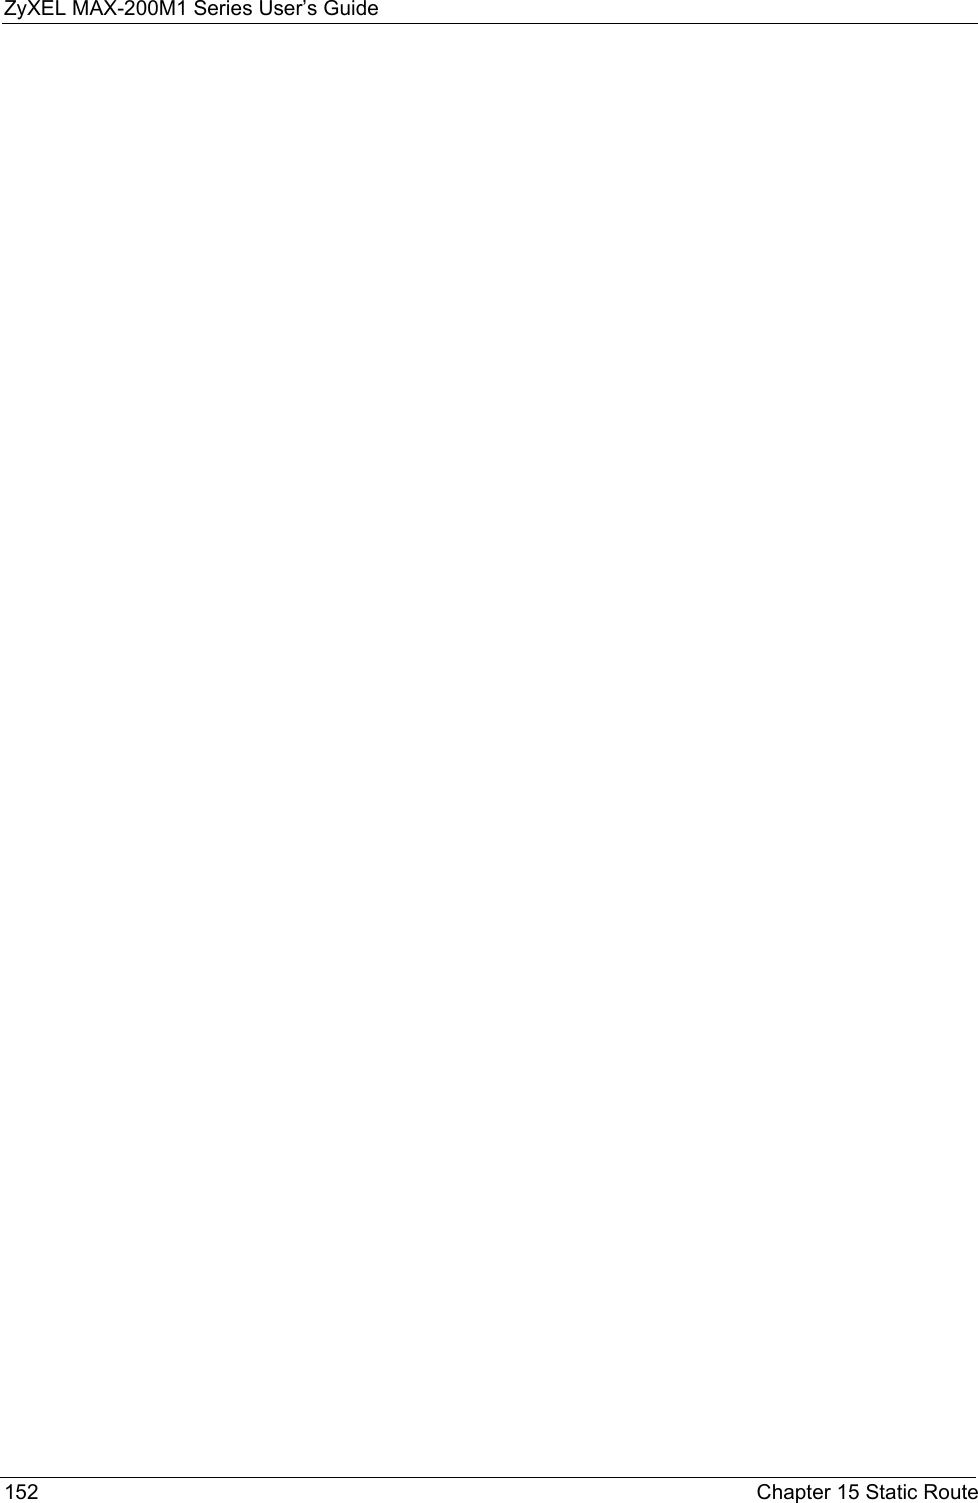
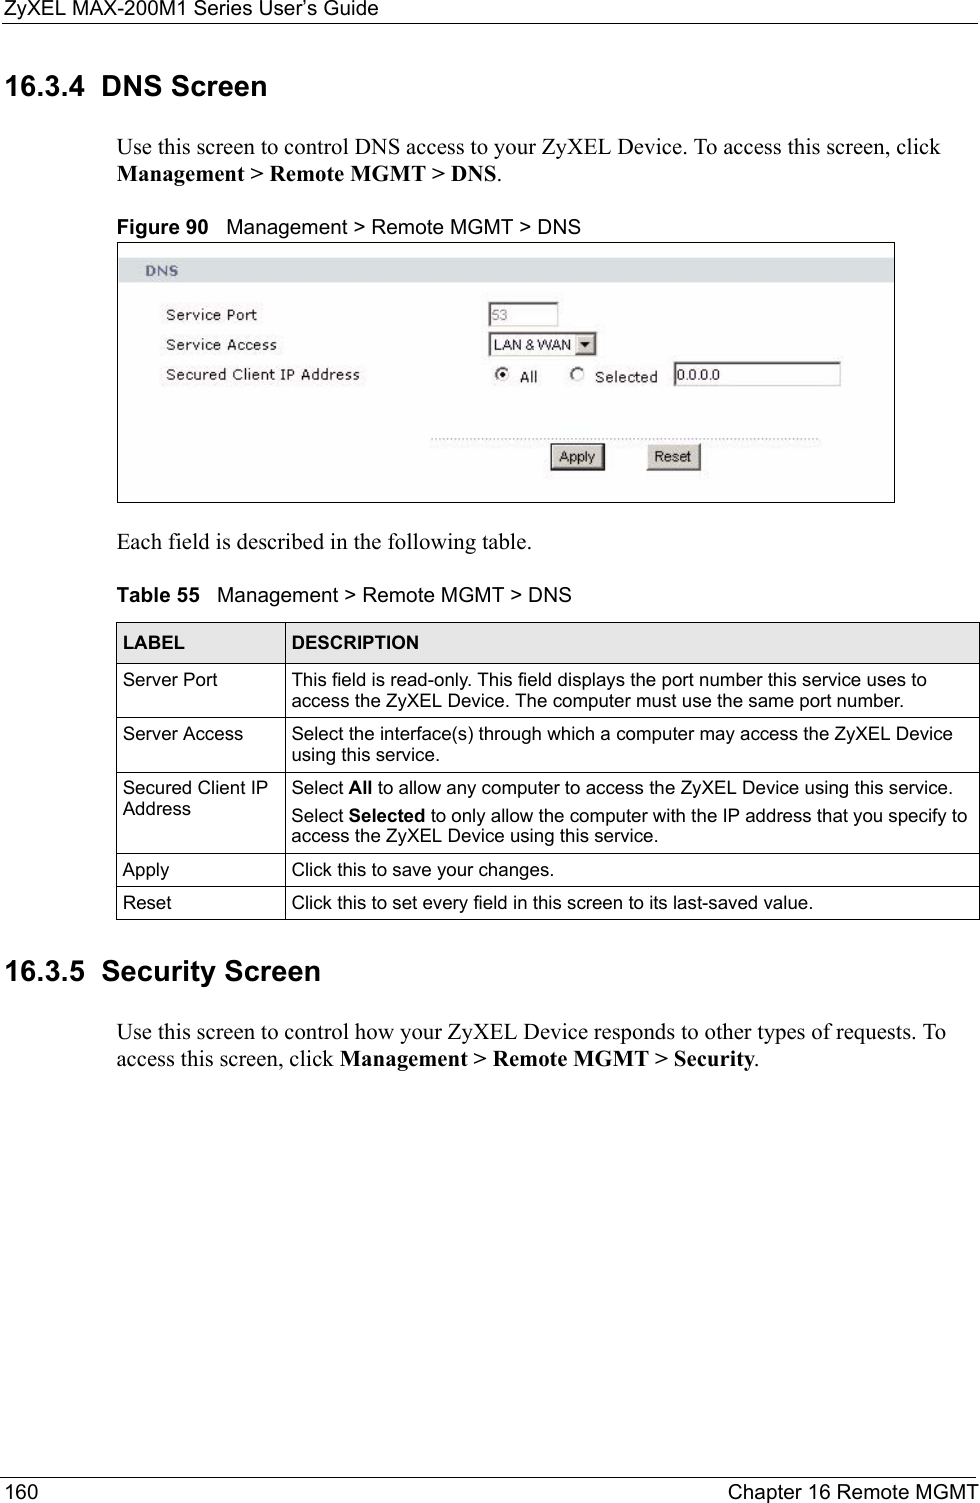
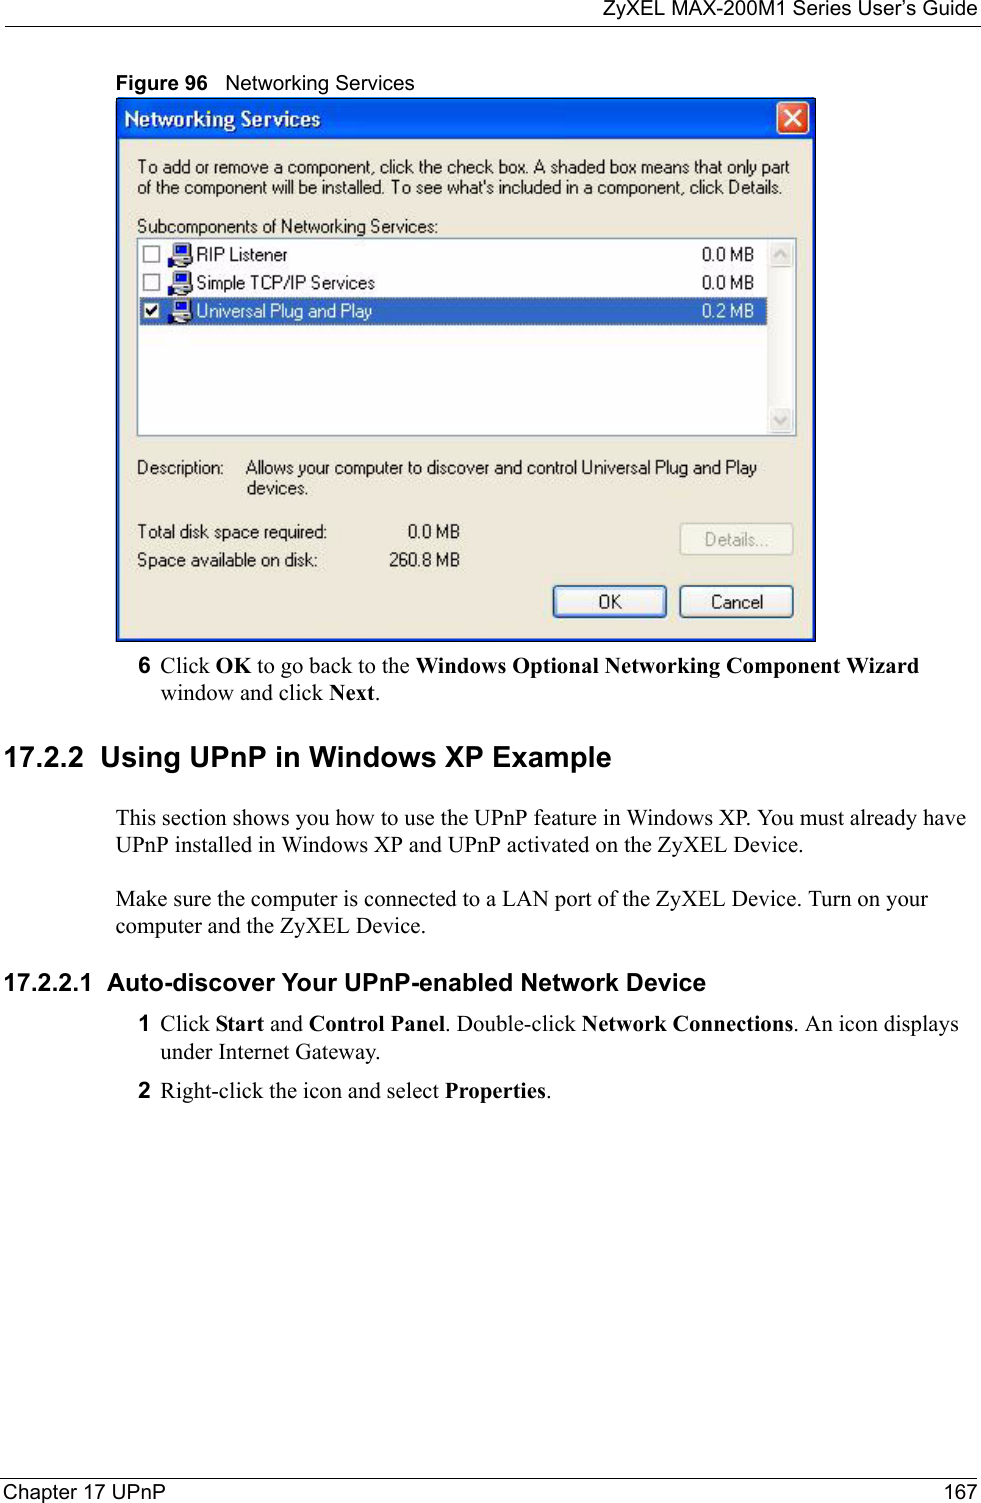
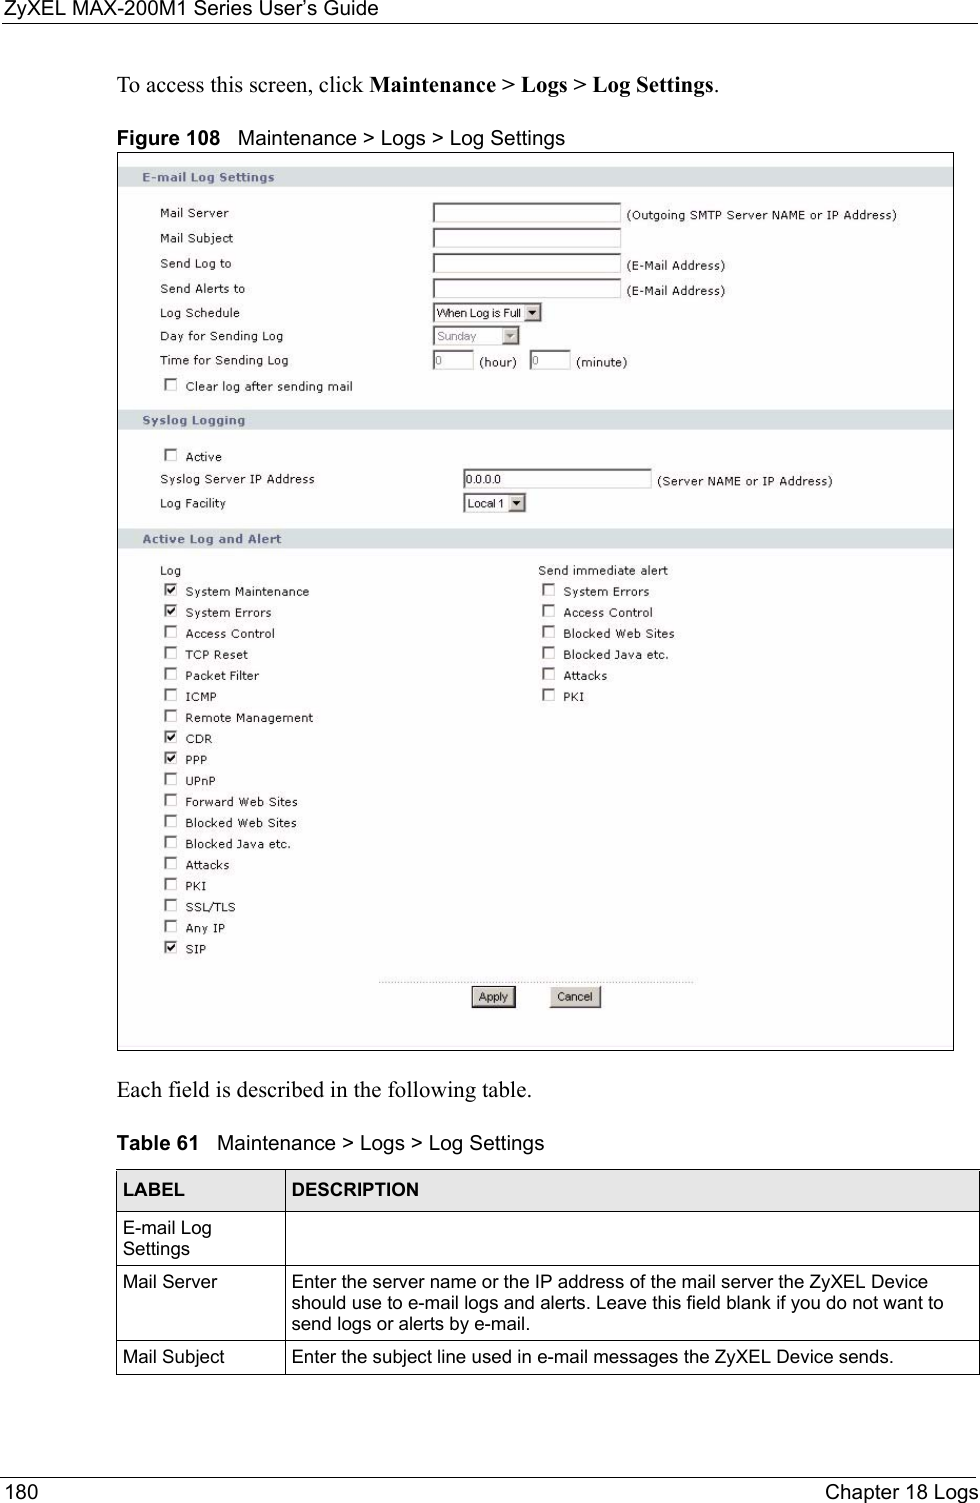
![ZyXEL MAX-200M1 Series User’s Guide190 Chapter 18 LogsTable 77 FSM Logs: Caller SideLOG MESSAGE DESCRIPTIONVoIP Call Start Ph[Phone Port Number] <- Outgoing Call NumberSomeone used a phone connected to the listed phone port to initiate a VoIP call to the listed destination.VoIP Call Established Ph[Phone Port] -> Outgoing Call NumberSomeone used a phone connected to the listed phone port to make a VoIP call to the listed destination.VoIP Call End Phone[Phone Port]A VoIP phone call made from a phone connected to the listed phone port has terminated.Table 78 FSM Logs: Callee SideLOG MESSAGE DESCRIPTIONVoIP Call Start from SIP[SIP Port Number]A VoIP phone call came to the ZyXEL Device from the listed SIP number.VoIP Call Established Ph[Phone Port] <- Outgoing Call NumberA VoIP phone call was set up from the listed SIP number to the ZyXEL Device.VoIP Call End Phone[Phone Port]A VoIP phone call that came into the ZyXEL Device has terminated.Table 79 Lifeline LogsLOG MESSAGE DESCRIPTIONPSTN Call Start A PSTN call has been initiated.PSTN Call End A PSTN call has terminated.PSTN Call Established A PSTN call has been set up.](https://usermanual.wiki/ZyXEL-Communications/MAX200M1.User-manual3/User-Guide-903014-Page-40.png)