ZyXEL Communications NWD210N Wireless N USB Adapter User Manual SMG 700 User s Guide V1 00 Nov 2004
ZyXEL Communications Corporation Wireless N USB Adapter SMG 700 User s Guide V1 00 Nov 2004
Part 1

www.zyxel.com
NWD210N
Wireless N USB Adapter
User’s Guide
Version 1.0
11/2007
Edition 1

About This User's Guide
NWD210N User’s Guide 3
About This User's Guide
Intended Audience
This manual is intended for people who want to configure the NWD210N using the ZyXEL
utility. You should have at least a basic knowledge of TCP/IP networking concepts and
topology.
Related Documentation
• Quick Start Guide
The Quick Start Guide is designed to help you get up and running right away. It contains
information on setting up your network and configuring for Internet access.
• Online Help
Embedded web help for descriptions of individual screens and supplementary
information.
• Supporting Disk
Refer to the included CD for support documents.
• ZyXEL Web Site
Please refer to www.zyxel.com for additional support documentation and product
certifications.
User’s Guide Feedback
Help us help you. Send all User’s Guide-related comments, questions or suggestions for
improvement to the following address, or use e-mail instead. Thank you!
The Technical Writing Team,
ZyXEL Communications Corp.,
6 Innovation Road II,
Science-Based Industrial Park,
Hsinchu, 300, Taiwan.
E-mail: techwriters@zyxel.com.tw

Document Conventions
NWD210N User’s Guide
4
Document Conventions
Warnings and Notes
These are how warnings and notes are shown in this User’s Guide.
1Warnings tell you about things that could harm you or your NWD210N.
"Notes tell you other important information (for example, other things you may
need to configure or helpful tips) or recommendations.
Syntax Conventions
• The NWD210N may be referred to as the “NWD210N”, the “device”, the “system” or the
“product” in this User’s Guide.
• Product labels, screen names, field labels and field choices are all in bold font.
• A key stroke is denoted by square brackets and uppercase text, for example, [ENTER]
means the “enter” or “return” key on your keyboard.
• “Enter” means for you to type one or more characters and then press the [ENTER] key.
“Select” or “choose” means for you to use one of the predefined choices.
• A right angle bracket ( > ) within a screen name denotes a mouse click. For example,
Maintenance > Log > Log Setting means you first click Maintenance in the navigation
panel, then the Log sub menu and finally the Log Setting tab to get to that screen.
• Units of measurement may denote the “metric” value or the “scientific” value. For
example, “k” for kilo may denote “1000” or “1024”, “M” for mega may denote “1000000”
or “1048576” and so on.
• “e.g.,” is a shorthand for “for instance”, and “i.e.,” means “that is” or “in other words”.
Document Conventions
NWD210N User’s Guide 5
Icons Used in Figures
Figures in this User’s Guide may use the following generic icons.
Wireless Access Point Computer Notebook computer
Server Modem Telephone
Internet Wireless Signal
Safety Warnings
NWD210N User’s Guide
6
Safety Warnings
1For your safety, be sure to read and follow all warning notices and instructions.
• Do NOT use this product near water, for example, in a wet basement or near a swimming
pool.
• Do NOT expose your device to dampness, dust or corrosive liquids.
• Do NOT store things on the device.
• Do NOT install, use, or service this device during a thunderstorm. There is a remote risk
of electric shock from lightning.
• Connect ONLY suitable accessories to the device.
• Ground yourself (by properly using an anti-static wrist strap, for example) whenever
working with the device’s hardware or connections.
• ONLY qualified service personnel should service or disassemble this device.
• Antenna Warning! This device meets ETSI and FCC certification requirements when
using the included antenna(s). Only use the included antenna(s).
This product is recyclable. Dispose of it properly.

Contents Overview
NWD210N User’s Guide 7
Contents Overview
Introduction and Configuration ............................................................................................19
Getting Started ........................................................................................................................... 21
Tutorial ....................................................................................................................................... 27
Wireless LANs ........................................................................................................................... 37
Wireless Configuration .............................................................................................................. 47
Maintenance .............................................................................................................................. 67
Troubleshooting and Specifications ....................................................................................71
Troubleshooting ......................................................................................................................... 73
Product Specifications ............................................................................................................... 77
Appendices and Index ...........................................................................................................79

Contents Overview
NWD210N User’s Guide
8

Table of Contents
NWD210N User’s Guide 9
Table of Contents
About This User's Guide ..........................................................................................................3
Document Conventions............................................................................................................4
Safety Warnings........................................................................................................................ 6
Contents Overview ................................................................................................................... 7
Table of Contents...................................................................................................................... 9
List of Figures ......................................................................................................................... 13
List of Tables........................................................................................................................... 17
Part I: Introduction and Configuration................................................. 19
Chapter 1
Getting Started ........................................................................................................................ 21
1.1 About Your NWD210N .......................................................................................................21
1.1.1 Hardware .................................................................................................................... 21
1.2 Application Overview ........................................................................................................... 22
1.2.1 Infrastructure .............................................................................................................. 22
1.2.2 Ad-Hoc ....................................................................................................................... 23
1.3 Hardware and Utility Installation ..........................................................................................24
1.3.1 ZyXEL Utility Icon .......................................................................................................24
1.4 Configuration Methods ....................................................................................................... 24
1.4.1 Enabling Windows Wireless Configuration ................................................................ 25
1.4.2 Accessing the ZyXEL Utility ...................................................................................... 25
Chapter 2
Tutorial ..................................................................................................................................... 27
2.1 Connecting to an AP using Wi-Fi Protected Setup (WPS) .................................................. 27
2.1.1 Push Button Configuration (PBC) .............................................................................. 27
2.1.2 PIN Configuration ....................................................................................................... 29
2.2 Connecting to an AP Without Using WPS ........................................................................... 32
2.2.1 Manually Connecting to a Wireless LAN ................................................................... 32
2.2.2 Creating and Using a Profile ...................................................................................... 34
Chapter 3
Wireless LANs......................................................................................................................... 37

Table of Contents
NWD210N User’s Guide
10
3.1 Wireless LAN Overview ...................................................................................................... 37
3.2 Wireless LAN Security ........................................................................................................ 38
3.2.1 User Authentication and Encryption ........................................................................... 38
3.3 WiFi Protected Setup ........................................................................................................... 40
3.3.1 Push Button Configuration ......................................................................................... 40
3.3.2 PIN Configuration ....................................................................................................... 41
3.3.3 How WPS Works ........................................................................................................ 42
3.3.4 Limitations of WPS ..................................................................................................... 45
Chapter 4
Wireless Configuration........................................................................................................... 47
4.1 ZyXEL Utility Screen Summary .......................................................................................... 47
4.2 The Link Info Screen ........................................................................................................... 47
4.2.1 Trend Chart ................................................................................................................ 49
4.3 The Site Survey Screen ...................................................................................................... 49
4.3.1 Security Settings .......................................................................................................51
4.3.2 Server Certificate Setting Screen ............................................................................... 55
4.3.3 Summary Screen ....................................................................................................... 55
4.4 The Profile Screen ............................................................................................................... 56
4.4.1 Adding a New Profile .................................................................................................. 58
4.5 The Adapter Screen ............................................................................................................ 61
4.5.1 WPS: PBC (Push Button Configuration) .................................................................... 62
4.5.2 WPS: PIN - Use this Device’s PIN ............................................................................. 63
4.5.3 WPS: PIN - Use the PIN from the AP or Wireless Router .......................................... 63
4.6 Security Settings in Windows Vista ..................................................................................... 64
4.6.1 Using PEAP in Vista ................................................................................................... 64
4.6.2 Using TLS in Vista ..................................................................................................... 65
Chapter 5
Maintenance ............................................................................................................................ 67
5.1 The About Screen ............................................................................................................... 67
5.2 Uninstalling the ZyXEL Utility .............................................................................................. 68
5.3 Upgrading the ZyXEL Utility ................................................................................................68
Part II: Troubleshooting and Specifications........................................ 71
Chapter 6
Troubleshooting...................................................................................................................... 73
6.1 Power, Hardware Connections, and LEDs .......................................................................... 73
6.2 Accessing the Utility ............................................................................................................ 73
6.3 Link Quality .......................................................................................................................... 74

Table of Contents
NWD210N User’s Guide 11
6.4 Problems Communicating with Other Computers ............................................................... 74
Chapter 7
Product Specifications ........................................................................................................... 77
Part III: Appendices and Index.............................................................. 79
Appendix A Setting up Your Computer’s IP Address.............................................................. 81
Appendix B Wireless LANs .................................................................................................. 103
Appendix C Windows Wireless Management ...................................................................... 117
Appendix D Legal Information ..............................................................................................139
Appendix E Customer Support.............................................................................................143
Index....................................................................................................................................... 149

Table of Contents
NWD210N User’s Guide
12

List of Figures
NWD210N User’s Guide 13
List of Figures
Figure 1 The NWD210N ......................................................................................................................... 21
Figure 2 Application: Infrastructure ........................................................................................................ 23
Figure 3 Application: Ad-Hoc ................................................................................................................. 23
Figure 4 ZyXEL Utility: System Tray Icon .............................................................................................. 24
Figure 5 Enable WZC ............................................................................................................................. 25
Figure 6 Infrastructure Network .............................................................................................................. 27
Figure 7 Example WPS Process: PBC Method ...................................................................................... 29
Figure 8 Example WPS Process: PIN Method .......................................................................................31
Figure 9 ZyXEL Utility: Site Survey ........................................................................................................ 32
Figure 10 ZyXEL Utility: Security Settings ............................................................................................. 33
Figure 11 ZyXEL Utility: Summary .......................................................................................................... 33
Figure 12 ZyXEL Utility: Link Info .......................................................................................................... 33
Figure 13 ZyXEL Utility: Profile ............................................................................................................... 34
Figure 14 ZyXEL Utility: Add New Profile ............................................................................................... 34
Figure 15 ZyXEL Utility: Profile Security ................................................................................................. 35
Figure 16 ZyXEL Utility: Profile Encryption ............................................................................................. 35
Figure 17 ZyXEL Utility: Profile Summary .............................................................................................. 35
Figure 18 ZyXEL Utility: Profile Activate ................................................................................................. 36
Figure 19 Example of a Wireless Network ............................................................................................. 37
Figure 20 Example WPS Process: PIN Method ..................................................................................... 42
Figure 21 How WPS works ..................................................................................................................... 43
Figure 22 WPS: Example Network Step 1 .............................................................................................. 44
Figure 23 WPS: Example Network Step 2 .............................................................................................. 44
Figure 24 WPS: Example Network Step 3 .............................................................................................. 45
Figure 25 ZyXEL Utility Menu Summary ............................................................................................... 47
Figure 26 Link Info ................................................................................................................................. 48
Figure 27 Link Info: Trend Chart ............................................................................................................ 49
Figure 28 Site Survey ............................................................................................................................ 50
Figure 29 Security Setting: WEP .......................................................................................................... 51
Figure 30 Security Setting: WPA-PSK/WPA2-PSK ................................................................................. 52
Figure 31 Security Settings: WPA/WPA2 ................................................................................................ 53
Figure 32 Security Setting: 802.1x ........................................................................................................ 54
Figure 33 Server Certificate Setting Screen ........................................................................................... 55
Figure 34 Summary Screen ................................................................................................................... 56
Figure 35 Profile ................................................................................................................................... 57
Figure 36 Profile: Add a New Profile ..................................................................................................... 58
Figure 37 Profile: Wireless Settings ...................................................................................................... 59
Figure 38 Profile: Wireless Settings ...................................................................................................... 60

List of Figures
NWD210N User’s Guide
14
Figure 39 Profile: Security Settings ....................................................................................................... 60
Figure 40 Profile: Confirm New Settings ............................................................................................... 60
Figure 41 Profile: Activate the Profile .................................................................................................... 61
Figure 42 Adapter .................................................................................................................................. 61
Figure 43 WPS: PBC (Push Button Configuration) ................................................................................ 62
Figure 44 WPS: PIN - Use this Device’s PIN ......................................................................................... 63
Figure 45 WPS: PIN - Use the PIN from the AP or Wireless Router ...................................................... 64
Figure 46 Vista Security: Additional Information Required ..................................................................... 65
Figure 47 Vista Security: Enter Credentials ............................................................................................ 65
Figure 48 Vista Security: Additional Information Required ..................................................................... 66
Figure 49 Vista Security: Select Certificate ............................................................................................ 66
Figure 50 About ..................................................................................................................................... 67
Figure 51 Uninstall: Confirm ................................................................................................................. 68
Figure 52 Uninstall: Finish ..................................................................................................................... 68
Figure 53 WIndows 95/98/Me: Network: Configuration .......................................................................... 82
Figure 54 Windows 95/98/Me: TCP/IP Properties: IP Address .............................................................. 83
Figure 55 Windows 95/98/Me: TCP/IP Properties: DNS Configuration .................................................. 84
Figure 56 Windows XP: Start Menu ........................................................................................................ 85
Figure 57 Windows XP: Control Panel ................................................................................................... 85
Figure 58 Windows XP: Control Panel: Network Connections: Properties ............................................. 86
Figure 59 Windows XP: Local Area Connection Properties ................................................................... 86
Figure 60 Windows XP: Internet Protocol (TCP/IP) Properties .............................................................. 87
Figure 61 Windows XP: Advanced TCP/IP Properties ........................................................................... 88
Figure 62 Windows XP: Internet Protocol (TCP/IP) Properties .............................................................. 89
Figure 63 Windows Vista: Start Menu ..................................................................................................... 90
Figure 64 Windows Vista: Control Panel ................................................................................................ 90
Figure 65 Windows Vista: Network And Internet .................................................................................... 90
Figure 66 Windows Vista: Network and Sharing Center ......................................................................... 90
Figure 67 Windows Vista: Network and Sharing Center ......................................................................... 91
Figure 68 Windows Vista: Local Area Connection Properties ................................................................ 91
Figure 69 Windows Vista: Internet Protocol Version 4 (TCP/IPv4) Properties ....................................... 92
Figure 70 Windows Vista: Advanced TCP/IP Properties ........................................................................ 93
Figure 71 Windows Vista: Internet Protocol Version 4 (TCP/IPv4) Properties ....................................... 94
Figure 72 Macintosh OS 8/9: Apple Menu .............................................................................................. 95
Figure 73 Macintosh OS 8/9: TCP/IP ..................................................................................................... 95
Figure 74 Macintosh OS X: Apple Menu ................................................................................................ 96
Figure 75 Macintosh OS X: Network ...................................................................................................... 97
Figure 76 Red Hat 9.0: KDE: Network Configuration: Devices ............................................................. 98
Figure 77 Red Hat 9.0: KDE: Ethernet Device: General ...................................................................... 98
Figure 78 Red Hat 9.0: KDE: Network Configuration: DNS ................................................................... 99
Figure 79 Red Hat 9.0: KDE: Network Configuration: Activate ............................................................ 99
Figure 80 Red Hat 9.0: Dynamic IP Address Setting in ifconfig-eth0 ................................................. 100
Figure 81 Red Hat 9.0: Static IP Address Setting in ifconfig-eth0 ..................................................... 100

List of Figures
NWD210N User’s Guide 15
Figure 82 Red Hat 9.0: DNS Settings in resolv.conf ..........................................................................100
Figure 83 Red Hat 9.0: Restart Ethernet Card ................................................................................... 100
Figure 84 Red Hat 9.0: Checking TCP/IP Properties ......................................................................... 101
Figure 85 Peer-to-Peer Communication in an Ad-hoc Network ........................................................... 103
Figure 86 Basic Service Set ................................................................................................................. 104
Figure 87 Infrastructure WLAN ............................................................................................................. 105
Figure 88 RTS/CTS ............................................................................................................................. 106
Figure 89 WPA(2) with RADIUS Application Example ..........................................................................113
Figure 90 WPA(2)-PSK Authentication ..................................................................................................114
Figure 91 Vista: Start Menu ...................................................................................................................117
Figure 92 Vista: The Connect To Window .............................................................................................118
Figure 93 Vista: Additional Information ..................................................................................................118
Figure 94 Vista: Enter Security Key .......................................................................................................119
Figure 95 Vista: Connecting ..................................................................................................................119
Figure 96 Vista: Successful Connection ............................................................................................... 120
Figure 97 Vista: Choose a Connection Option ..................................................................................... 121
Figure 98 Vista: Connect Manually ....................................................................................................... 121
Figure 99 Vista: Successfully Added Network ...................................................................................... 122
Figure 100 Vista: Set Up An Ad-hoc Network ....................................................................................... 123
Figure 101 Vista: Ad-hoc Options ........................................................................................................ 123
Figure 102 Vista: Ad-hoc Network Ready ............................................................................................ 124
Figure 103 Windows XP SP1: Wireless Network Connection Status ................................................... 125
Figure 104 Windows XP SP2: Wireless Network Connection Status ................................................... 125
Figure 105 Windows XP SP1: Wireless Network Connection Properties ............................................. 126
Figure 106 Windows XP SP2: Wireless Network Connection Properties ............................................. 126
Figure 107 Windows XP SP2: WZC Not Available ............................................................................... 127
Figure 108 Windows XP SP2: System Tray Icon ................................................................................. 127
Figure 109 Windows XP SP2: Wireless Network Connection Status ................................................... 128
Figure 110 Windows XP SP1: Wireless Network Connection Status ................................................... 128
Figure 111 Windows XP SP2: Wireless Network Connection ............................................................... 129
Figure 112 Windows XP SP1: Wireless Network Connection Properties ............................................. 130
Figure 113 Windows XP SP2: Wireless Network Connection: WEP or WPA-PSK ............................... 130
Figure 114 Windows XP SP2: Wireless Network Connection: No Security ......................................... 131
Figure 115 Windows XP: Wireless (network) properties: Association .................................................. 131
Figure 116 Windows XP: Wireless (network) properties: Authentication .............................................. 133
Figure 117 Windows XP: Protected EAP Properties ............................................................................ 134
Figure 118 Windows XP: Smart Card or other Certificate Properties ................................................... 135
Figure 119 Windows XP SP2: Wireless Networks: Preferred Networks ............................................... 136
Figure 120 Windows XP SP1: Wireless Networks: Preferred Networks .............................................. 136

List of Figures
NWD210N User’s Guide
16

List of Tables
NWD210N User’s Guide 17
List of Tables
Table 1 NWD210N External View .......................................................................................................... 21
Table 2 NWD210N LEDs ....................................................................................................................... 22
Table 3 ZyXEL Utility: System Tray Icon ................................................................................................ 24
Table 4 ZyXEL Utility Menu Summary ................................................................................................... 47
Table 5 Link Info .................................................................................................................................... 48
Table 6 Link Info: Trend Chart ............................................................................................................... 49
Table 7 Site Survey ................................................................................................................................ 50
Table 8 Security Setting: WEP ............................................................................................................... 51
Table 9 Security Setting: WPA-PSK/WPA2-PSK ................................................................................... 52
Table 10 Security Setting: WPA/WPA2 .................................................................................................. 53
Table 11 Security Settings: IEEE 802.1x ............................................................................................... 54
Table 12 Server Certificate Setting ........................................................................................................ 55
Table 13 Summary Screen .................................................................................................................... 56
Table 14 Profile ...................................................................................................................................... 57
Table 15 Profile: Add a New Profile ....................................................................................................... 58
Table 16 Profile: Wireless Settings ........................................................................................................ 59
Table 17 Adapter ................................................................................................................................... 61
Table 18 WPS: PIN - Use this Device’s PIN .......................................................................................... 63
Table 19 WPS: PIN - Use the PIN from the AP or Wireless Router ...................................................... 64
Table 20 About ....................................................................................................................................... 67
Table 21 Product Specifications ............................................................................................................. 77
Table 22 IEEE 802.11g ........................................................................................................................ 107
Table 23 Wireless Security Levels ....................................................................................................... 108
Table 24 Comparison of EAP Authentication Types .............................................................................111
Table 25 Wireless Security Relational Matrix .......................................................................................114
Table 26 Vista: Connect Manually ....................................................................................................... 121
Table 27 Windows XP SP2: System Tray Icon .................................................................................... 127
Table 28 Windows XP SP2: Wireless Network Connection ................................................................. 129
Table 29 Windows XP: Wireless Networks .......................................................................................... 131
Table 30 Windows XP: Wireless (network) properties: Association .................................................... 132
Table 31 Windows XP: Wireless (network) properties: Authentication ................................................ 133
Table 32 Windows XP: Protected EAP Properties ............................................................................... 134
Table 33 Windows XP: Smart Card or other Certificate Properties ..................................................... 135

List of Tables
NWD210N User’s Guide
18

19
PART I
Introduction and
Configuration
Getting Started (21)
Tutorial (27)
Wireless LANs (37)
Wireless Configuration (47)
Maintenance (67)

20
NWD210N User’s Guide 21
CHAPTER 1
Getting Started
This chapter introduces the NWD210N and prepares you to use the ZyXEL utility. The
ZyXEL utility is a tool that helps you configure your NWD210N.
1.1 About Your NWD210N
Your NWD210N is an IEEE 802.11n draft 2.0 compliant wireless LAN adapter. It can also
connect to IEEE 802.11b/g wireless networks. The NWD210N is WPS (Wi-Fi Protected
Setup) compliant. WPS allows you to easily connect to another WPS-enabled device.
The NWD210N is a USB adapter which connects to an empty USB port on your computer.
See your NWD210N’s Quick Start Guide for installation instructions, and see the chapter on
product specifications for detailed information.
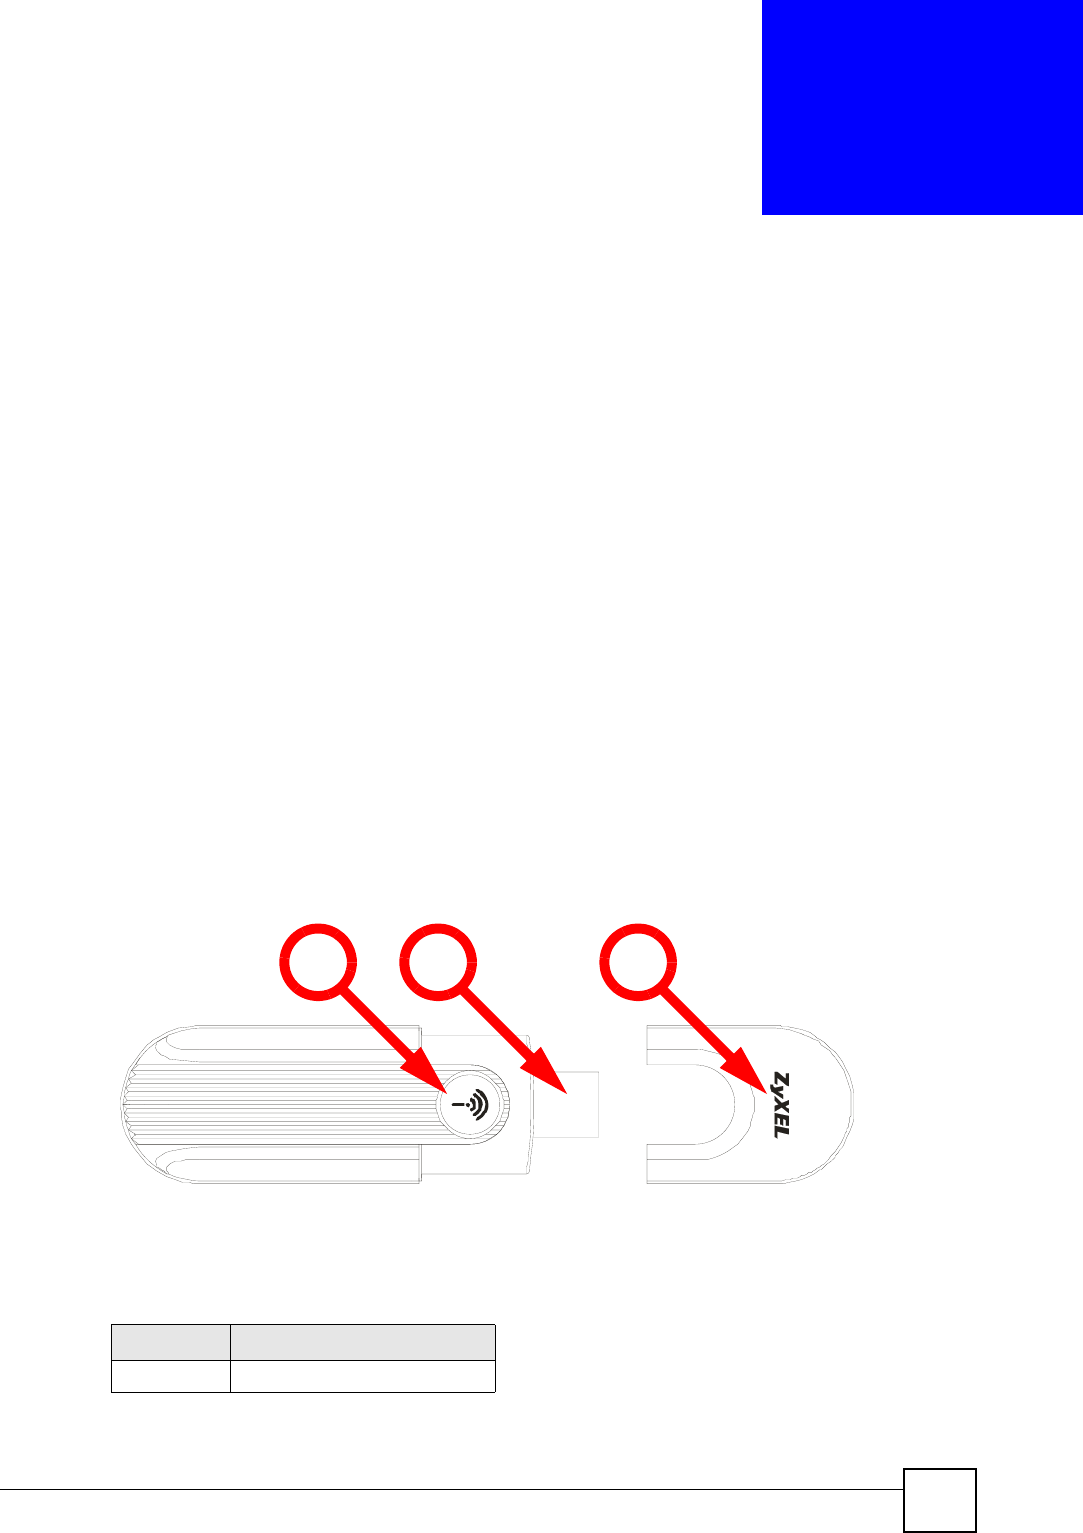
1.1.1 Hardware
This section describes the NWD210N’s physical appearance.
Figure 1 The NWD210N
The following table describes the NWD210N.
Table 1 NWD210N External View
LABEL DESCRIPTION
ALED
A B C
Chapter 1 Getting Started
NWD210N User’s Guide
22
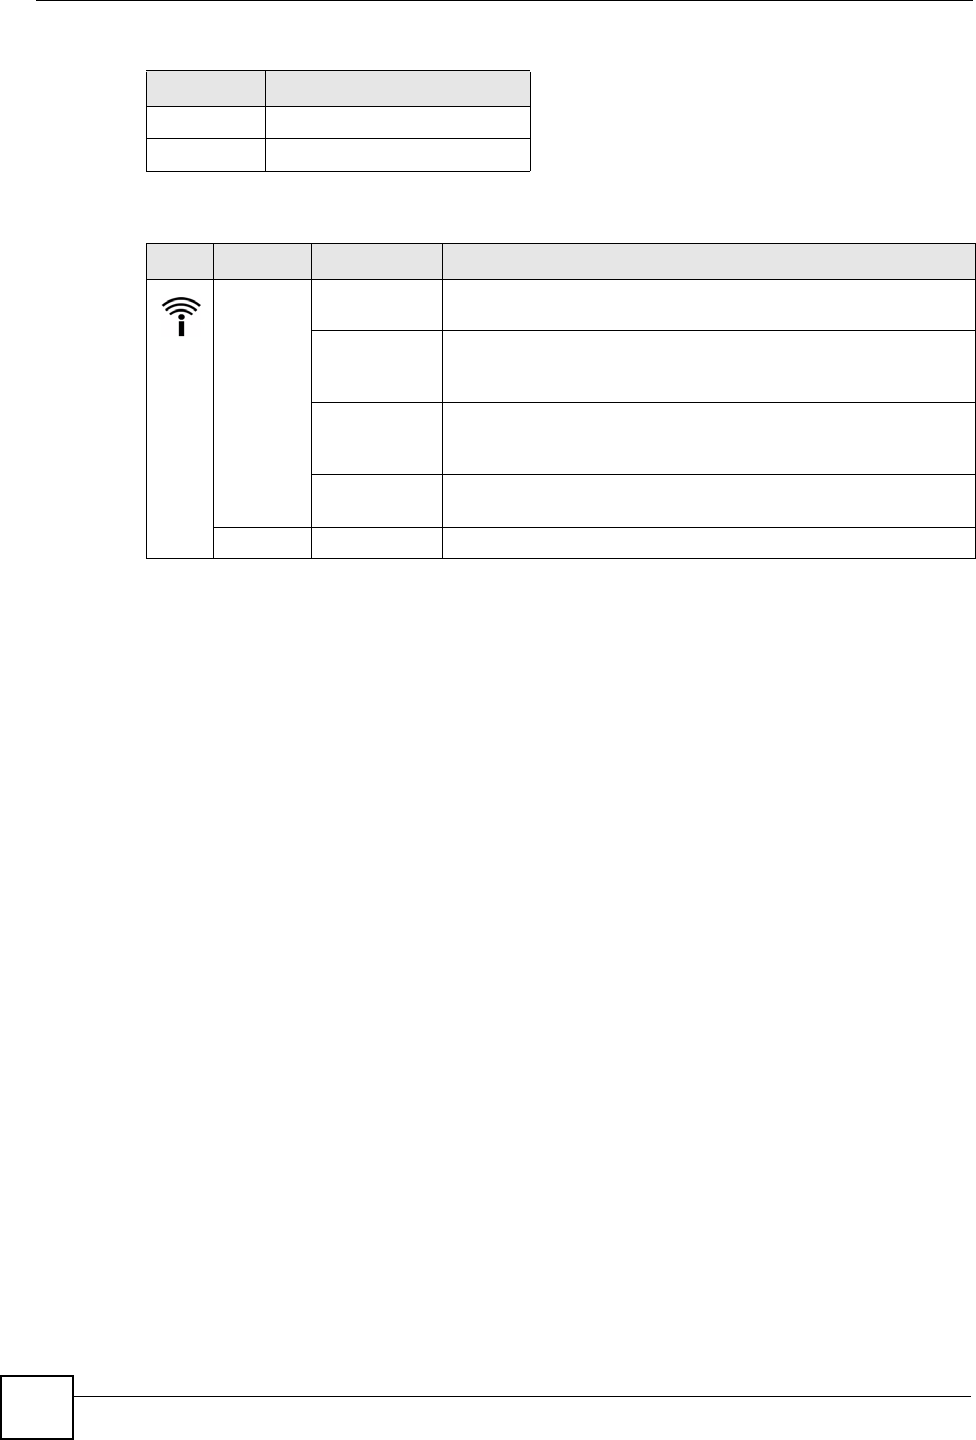
The following table describes the operation of the NWD210N’s LEDs.
1.2 Application Overview
This section describes some network applications for the NWD210N. You can either set the
network type to Infrastructure and connect to an AP or use Ad-Hoc mode and connect to a
peer computer (another wireless device in Ad-Hoc mode).
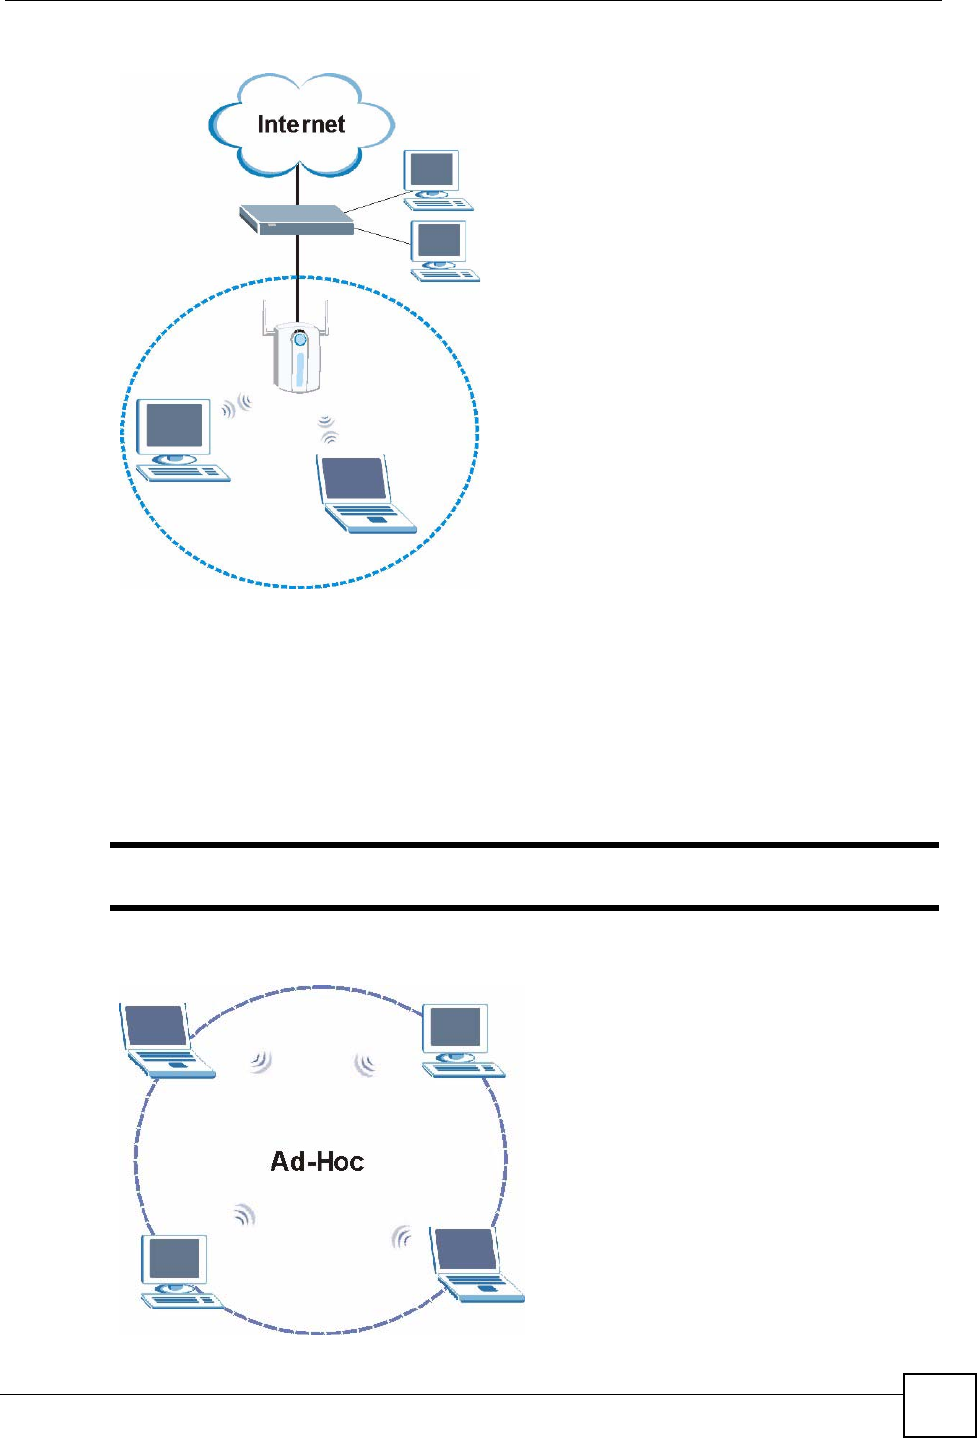
1.2.1 Infrastructure
To connect to a network via an access point (AP), set the NWD210N network type to
Infrastructure (see Chapter 4 on page 56). Through the AP, you can access the Internet or the
wired network behind the AP.
B USB connector
C USB connector cap.
Table 2 NWD210N LEDs
LED COLOR STATUS DESCRIPTION
Blue On The NWD210N is turned on, connected to an AP, and is not
transmitting or receiving data.
Blinking
regularly and
rapidly
The NWD210N is turned on, but is not connected to a wireless
network.
Blinking
regularly and
slowly
The NWD210N is turned on, connected to a wireless network,
and is not transmitting or receiving data.
Blinking
Irregularly
The NWD210N is turned on, connected to a wireless network and
is transmitting or receiving data.
Off The NWD210N is turned off.
Table 1 NWD210N External View
LABEL DESCRIPTION
Chapter 1 Getting Started
NWD210N User’s Guide 23
Figure 2 Application: Infrastructure
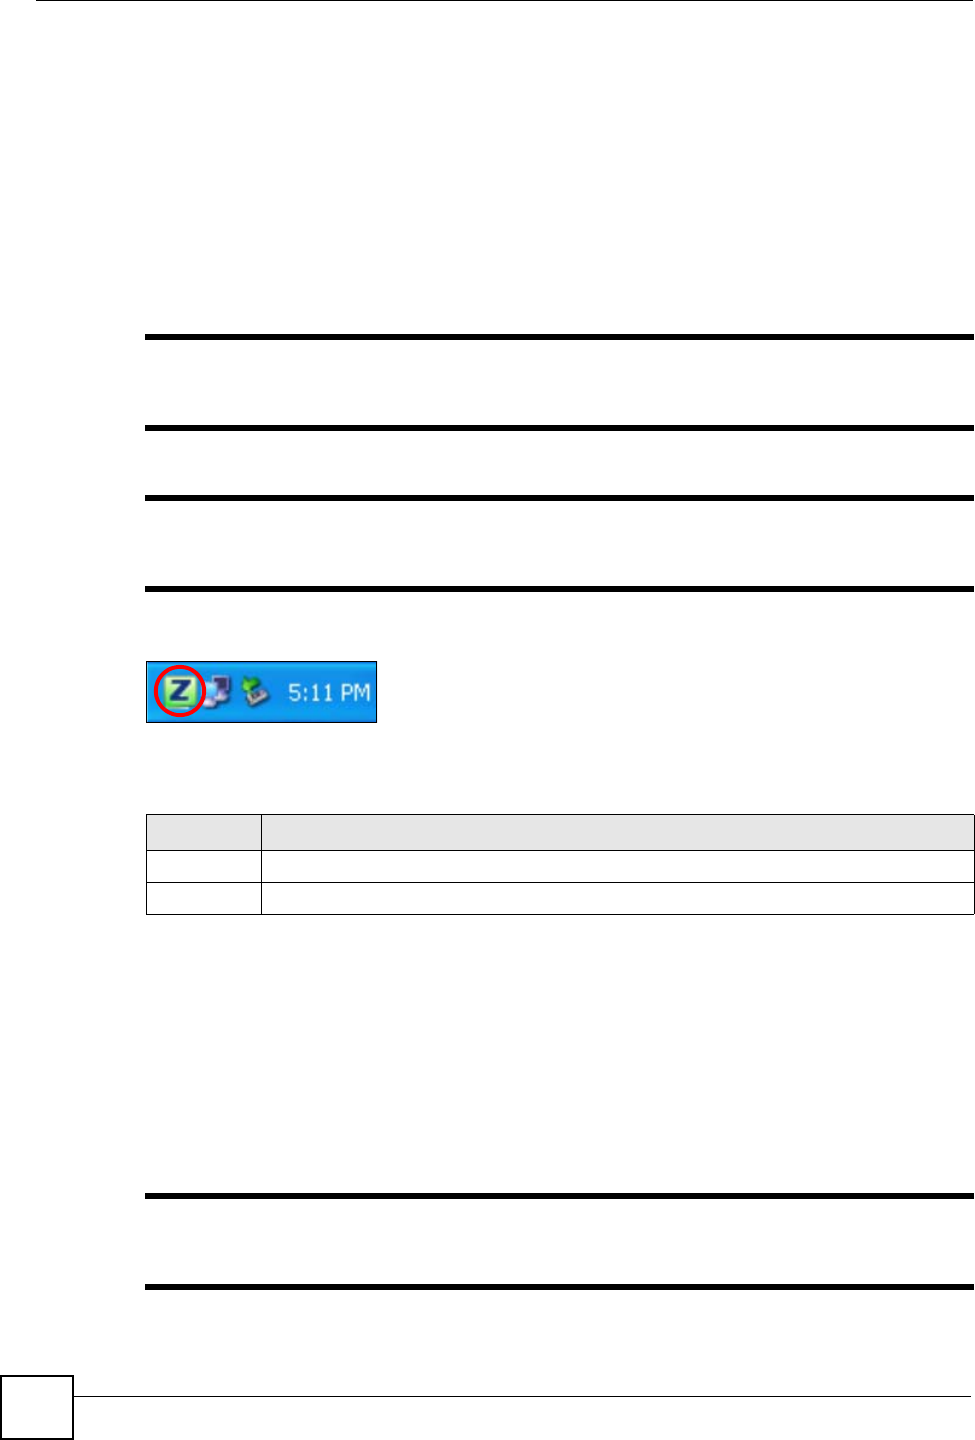
1.2.2 Ad-Hoc
To set up a small independent wireless workgroup without an AP, use Ad-Hoc (see Chapter 4
on page 56).
Ad-Hoc does not require an AP or a wired network. Two or more wireless clients
communicate directly with each other.
"Wi-Fi Protected Setup (WPS) is not available in ad-hoc mode.
Figure 3 Application: Ad-Hoc
Chapter 1 Getting Started
NWD210N User’s Guide
24
1.3 Hardware and Utility Installation
Follow the instructions in the Quick Start Guide to install the ZyXEL utility and make
hardware connections.
1.3.1 ZyXEL Utility Icon
After you install and start the ZyXEL utility, an icon for the ZyXEL utility appears in the
system tray.
"The ZyXEL utility system tray icon displays only when the NWD210N is
installed properly.
"When you use the ZyXEL utility, it automatically disables Wireless Zero
Configuration (WZC) in Windows XP.
Figure 4 ZyXEL Utility: System Tray Icon
The color of the ZyXEL utility system tray icon indicates the status of the NWD210N. Refer
to the following table for details.
1.4 Configuration Methods
To configure your NWD210N, use one of the following applications:
• Wireless Zero Configuration (WZC, the Windows XP wireless configuration tool) or
WLAN AutoConfig (the Windows Vista wireless configuration tool).
• The ZyXEL utility.
"Do NOT use Windows XP’s Wireless Zero Configuration tool at the same time
you use the ZyXEL utility.
Table 3 ZyXEL Utility: System Tray Icon
COLOR DESCRIPTION
Red The NWD210N is not connected to a wireless network.
Green The NWD210N is connected to a wireless network.

Chapter 1 Getting Started
NWD210N User’s Guide 25
1.4.1 Enabling Windows Wireless Configuration
"When you use the ZyXEL utility, it automatically disables Windows XP’s
wireless configuration tool.
If you want to use the Windows XP wireless configuration tool to configure the NWD210N,
you need to disable the ZyXEL utility. Right-click the utility icon ( ) in the system tray and
select Exit.
Figure 5 Enable WZC
Refer to the appendices for information on how to use the Windows wireless configuration
tool to manage the NWD210N.
To reactivate the ZyXEL utility, double-click the ( ) icon on your desktop or click Start,
(All) Programs, ZyXEL Wireless N USB Adapter Utility, ZyXEL Wireless N USB
Adapter Utility.
1.4.2 Accessing the ZyXEL Utility
Double-click on the ZyXEL wireless LAN utility icon in the system tray to open the ZyXEL
utility.
The ZyXEL utility screens are similar in all Microsoft Windows versions. Screens for
Windows XP are shown in this User’s Guide.
"Click the icon (located in the top right corner) to display the online help
window.

Chapter 1 Getting Started
NWD210N User’s Guide
26
NWD210N User’s Guide 27
CHAPTER 2
Tutorial
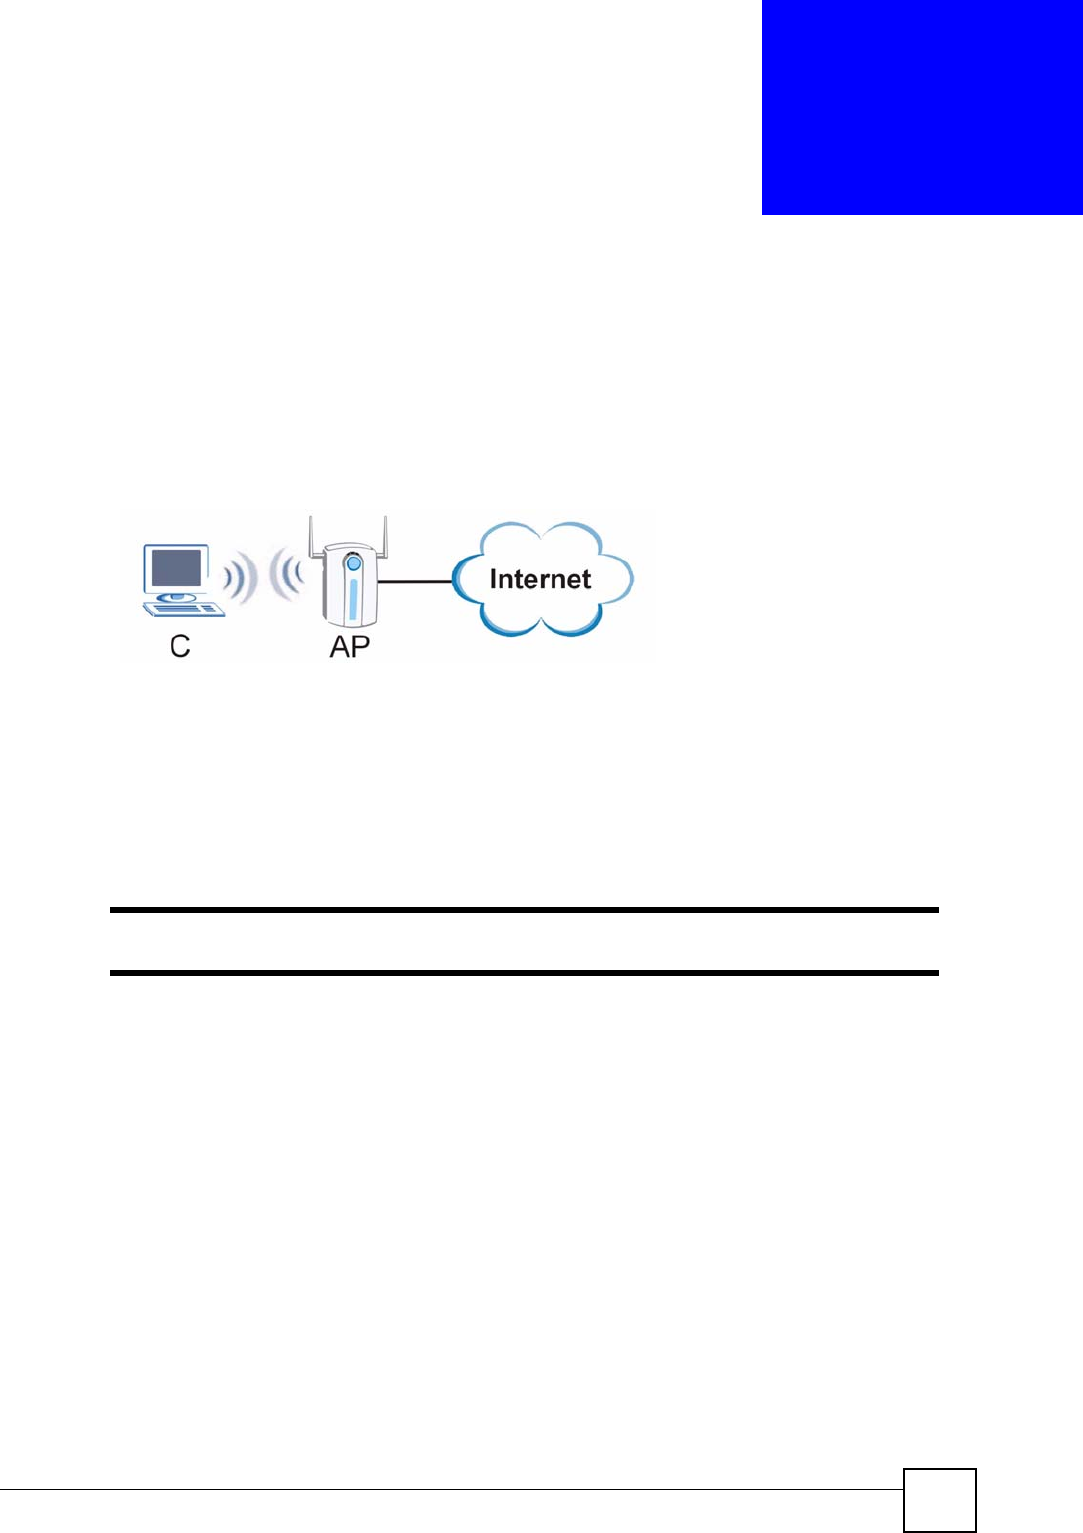
The following sections show you how to join a wireless network using the ZyXEL utility, as in
the following diagram. The wireless client is labeled C and the access point is labeled AP.
Figure 6 Infrastructure Network
2.1 Connecting to an AP using Wi-Fi Protected Setup (WPS)
This section gives you an example of how to set up your wireless network using WPS. This
example uses the NWD210N as the wireless client, and ZyXEL’s NBG334W as the Access
Point (AP).
"The Access Point must be a WPS-aware device.
There are two WPS methods for creating a secure connection. This tutorial shows you both.
•Push Button Configuration (PBC) - create a secure wireless network simply by pressing
a button. See Section 2.1.1 on page 27.This is the easier method.
•PIN Configuration - create a secure wireless network simply by entering a wireless
client's PIN (Personal Identification Number) in the NWD210N’s interface. See Section
2.1.2 on page 29. This is the more secure method, since one device can authenticate the
other.
2.1.1 Push Button Configuration (PBC)
1Make sure that your access point is turned on and that it is within range of the computer
with the NWD210N installed.
2Make sure that you have installed the NWD210N’s driver and utility on your computer.

Chapter 2 Tutorial
NWD210N User’s Guide
28
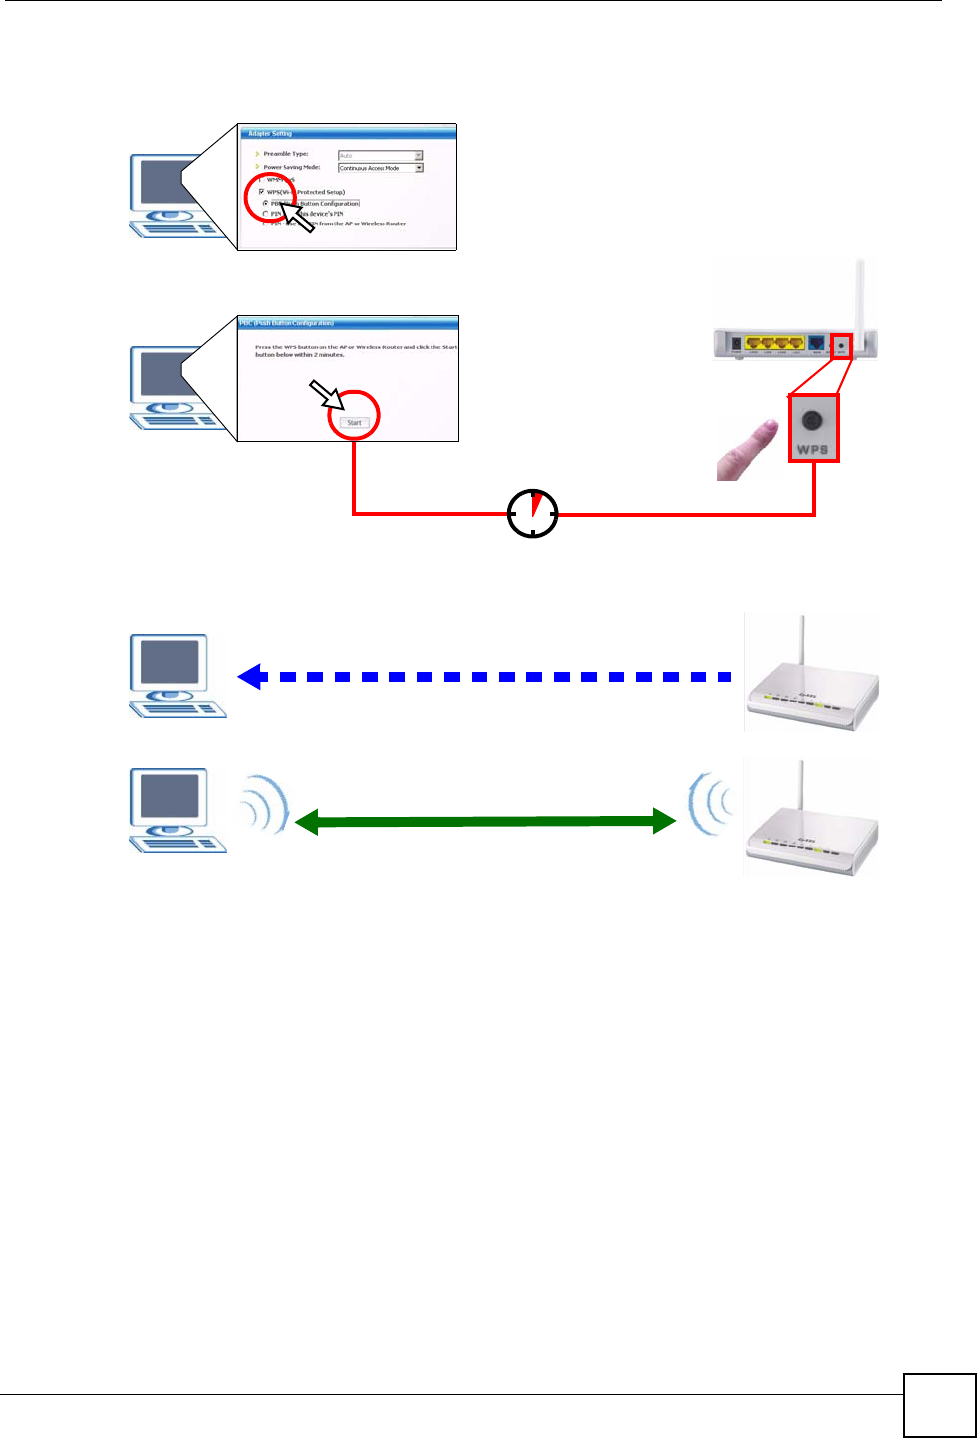
3In the NWD210N’s utility, click the Adapter tab, enable WPS and select PBC (Push
Button Configuration). In the screen that appears, click Start.
4Log into the AP’s web configurator and locate its WPS settings section. On the
NBG334W, press the Push Button button in the Network > Wireless Client > WPS
Station screen.
"It doesn’t matter which button is pressed first. You must press the second
button within two minutes of pressing the first one.
The AP sends the proper configuration settings to the NWD210N. This may take up to two
minutes. Then the NWD210N is able to communicate with the AP securely.
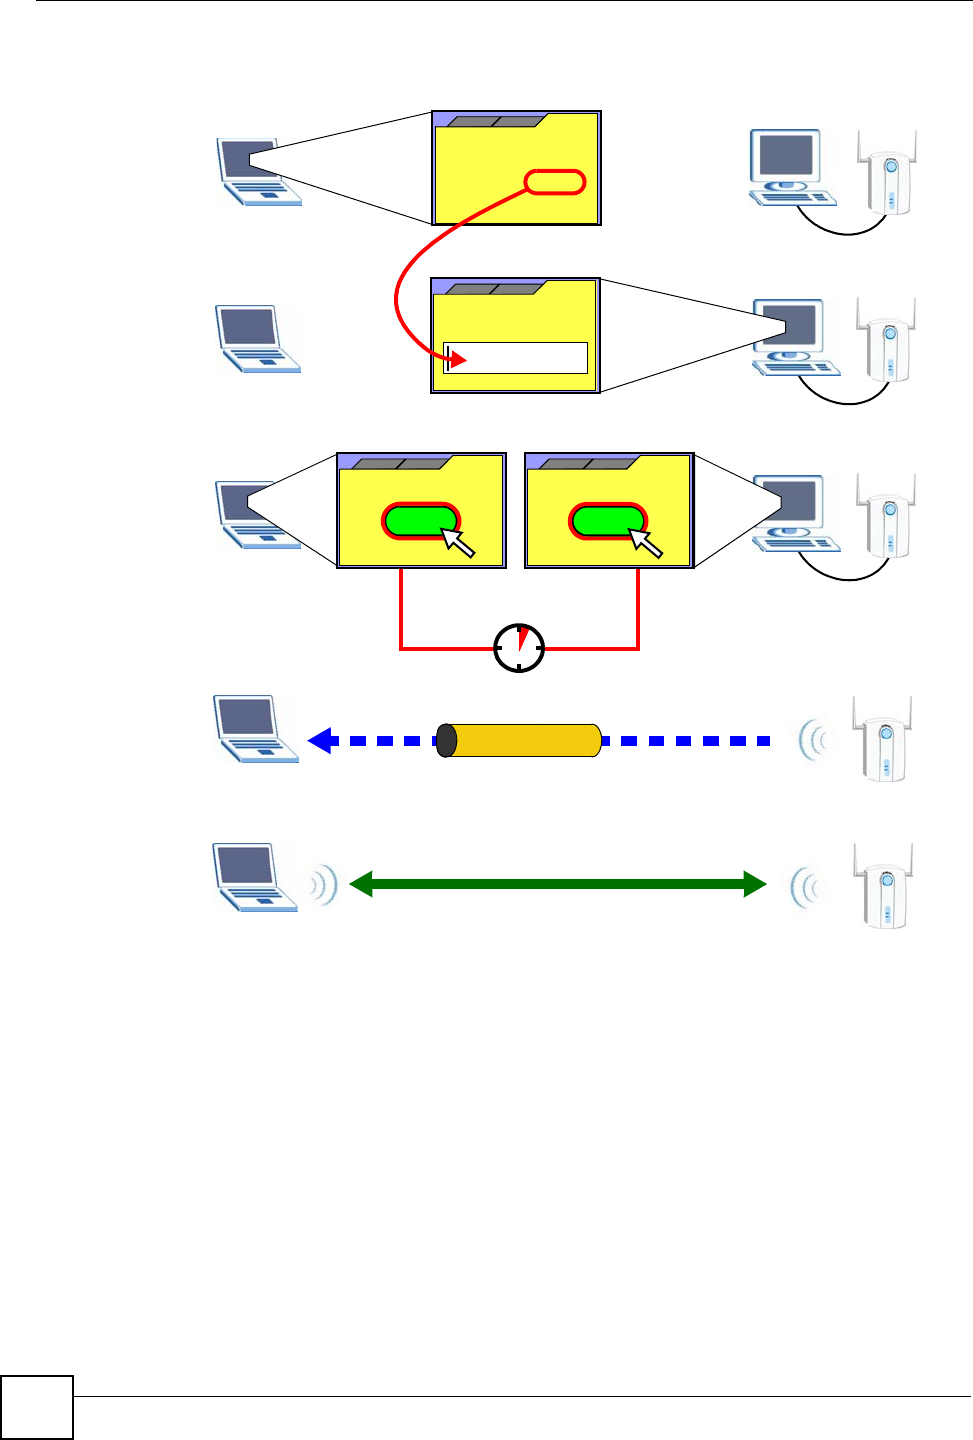
The following figure shows you an example to set up wireless network and security by
pressing a button on both the AP (the NBG334W in this example) and the NWD210N.
Chapter 2 Tutorial
NWD210N User’s Guide 29
Figure 7 Example WPS Process: PBC Method
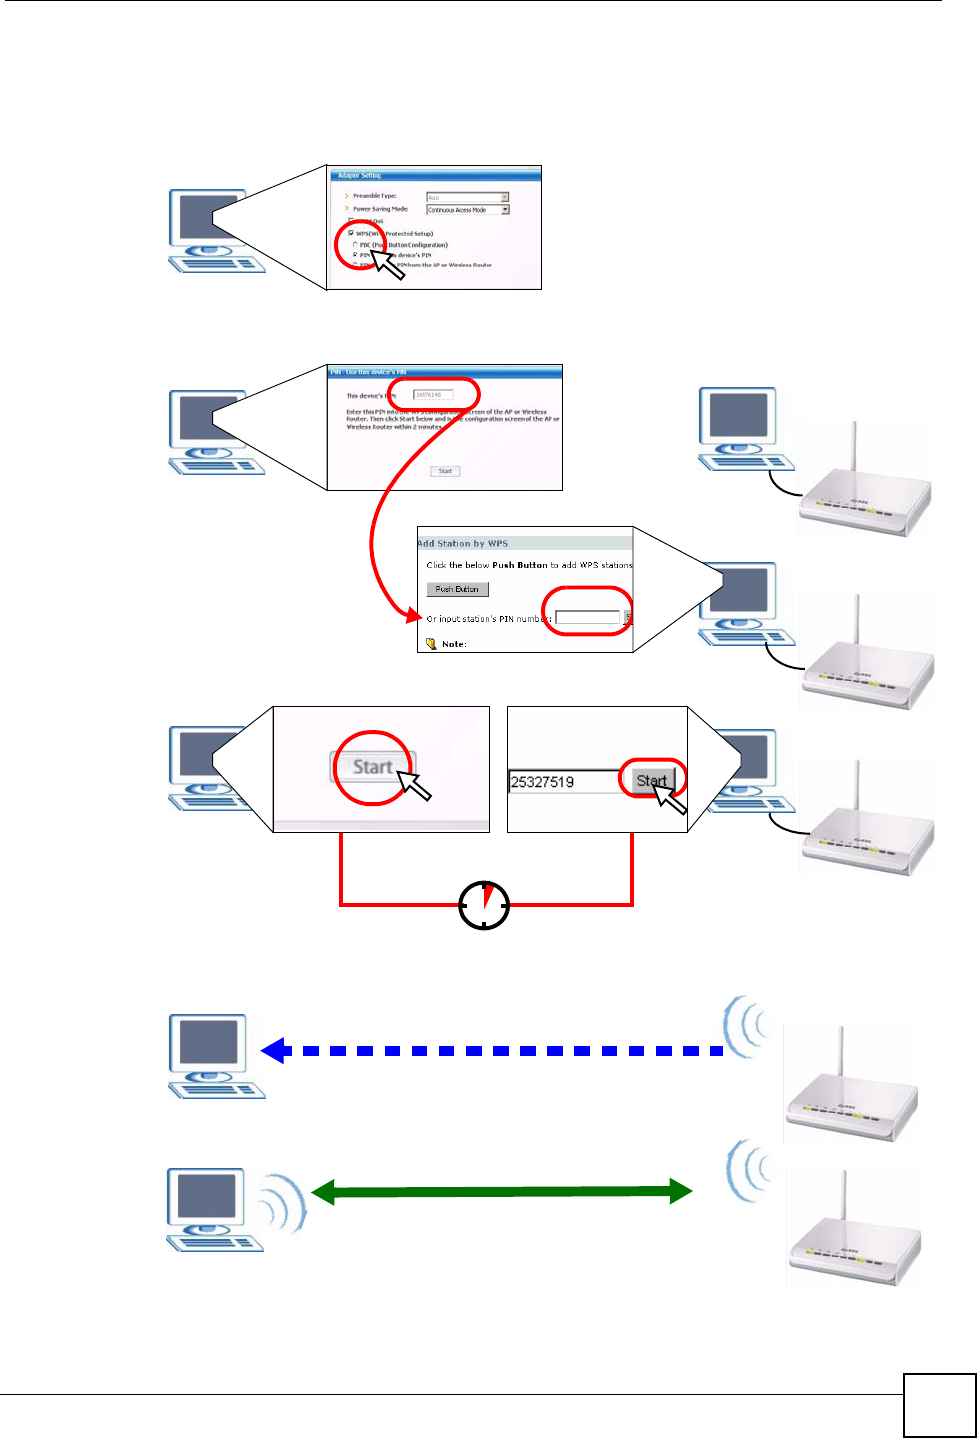
2.1.2 PIN Configuration
When you use the PIN configuration method, you need to use both the NWD210N’s utility and
the AP’s configuration interface.
1In the NWD210N’s Adaptor tab, select WPS and PIN - Use this Device’s PIN. Note
down the PIN in the screen that appears.
2Enter the PIN number in the AP’s configuration interface. In the NBG334W, use the PIN
field in the Network > Wireless LAN > WPS Station screen.
3Click the Start buttons on both the NWD210N utility screen and the AP’s configuration
utility (the WPS Station screen on the NBG334W) within two minutes.
The NWD210N authenticates the wireless client and sends the proper configuration settings to
the wireless client. This may take up to two minutes. Then the wireless client is able to
communicate with the NWD210N securely.
NWD210N AP
SECURITY INFO
COMMUNICATION
WITHIN 2 MINUTES

Chapter 2 Tutorial
NWD210N User’s Guide
30
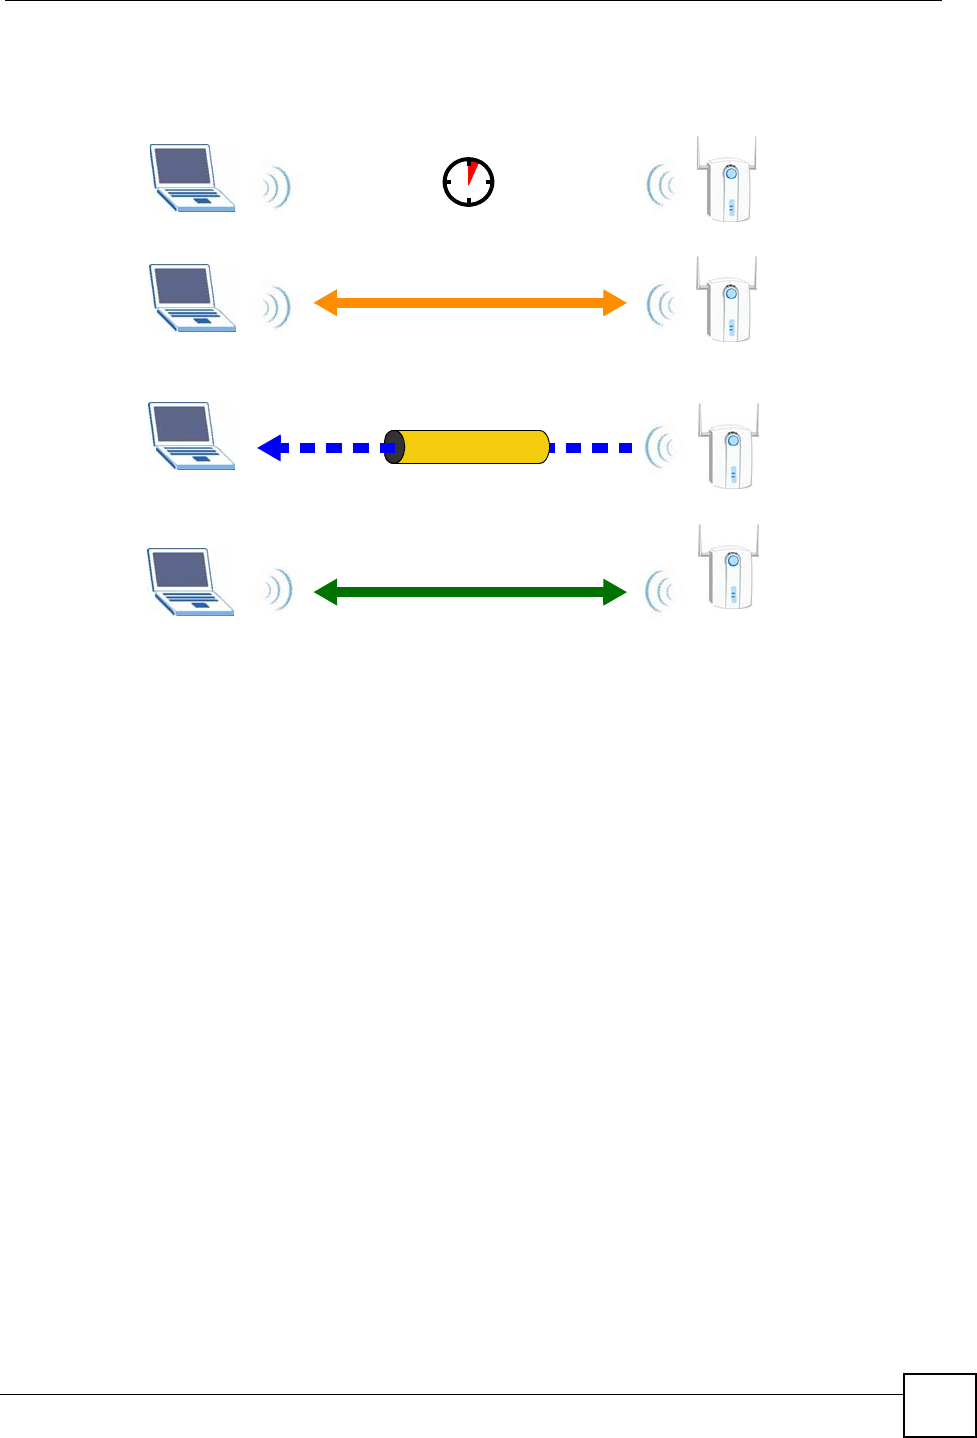
The following figure shows you the example of configuring the wireless network and security
on the NWD210N and the AP (ZyXEL’s NBG334W in this example) by using the PIN
method.
Chapter 2 Tutorial
NWD210N User’s Guide 31
Figure 8 Example WPS Process: PIN Method
Authentication by PIN
SECURITY INFO
WITHIN 2 MINUTES
COMMUNICATION
NWD210N AP
Chapter 2 Tutorial
NWD210N User’s Guide
32
2.2 Connecting to an AP Without Using WPS
There are three ways to connect the wireless client (the NWD210N) to a network without
using WPS.
• Configure nothing and leave the wireless client to automatically scan for and connect to
any available network that has no wireless security configured.
• Manually connect to a network (see Section 2.2.1 on page 32).
• Configure a profile to have the wireless client automatically connect to a specific network
or peer computer (see Section 2.2.2 on page 34).
2.2.1 Manually Connecting to a Wireless LAN
This example illustrates how to manually connect your wireless client to an access point (AP)
configured for WPA-PSK security and connected to the Internet. Before you connect to the
access point, you must know its Service Set IDentity (SSID) and WPA-PSK pre-shared key. In
this example, the AP’s SSID is “SSID_Example3” and its pre-shared key is “ThisismyWPA-
PSKpre-sharedkey”.
After you install the ZyXEL utility and then insert the wireless client, follow the steps below
to connect to a network using the Site Survey screen.
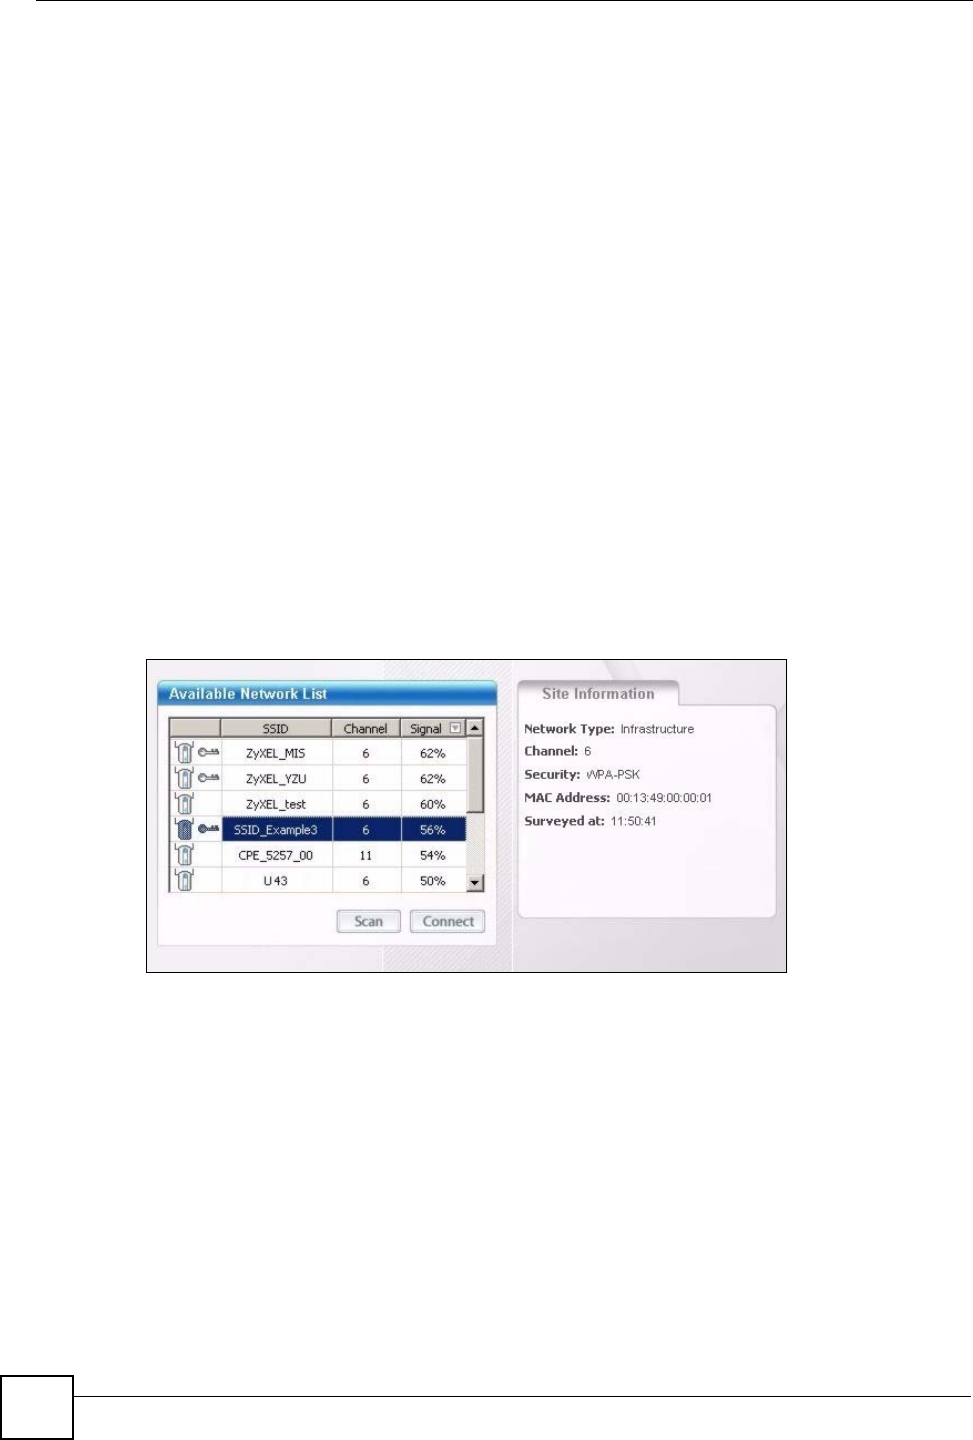
1Open the ZyXEL utility and click the Site Survey tab to open the screen shown next.
Figure 9 ZyXEL Utility: Site Survey
2The wireless client automatically searches for available wireless networks. Click Scan if
you want to search again. If no entry displays in the Available Network List, that means
there is no wireless network available within range. Make sure the AP or peer computer
is turned on, or move the wireless client closer to the AP or peer computer. See Table 4.3
on page 49 for detailed field descriptions.
3To connect to an AP or peer computer, either click an entry in the list and then click
Connect or double-click an entry (SSID_Example3 in this example).
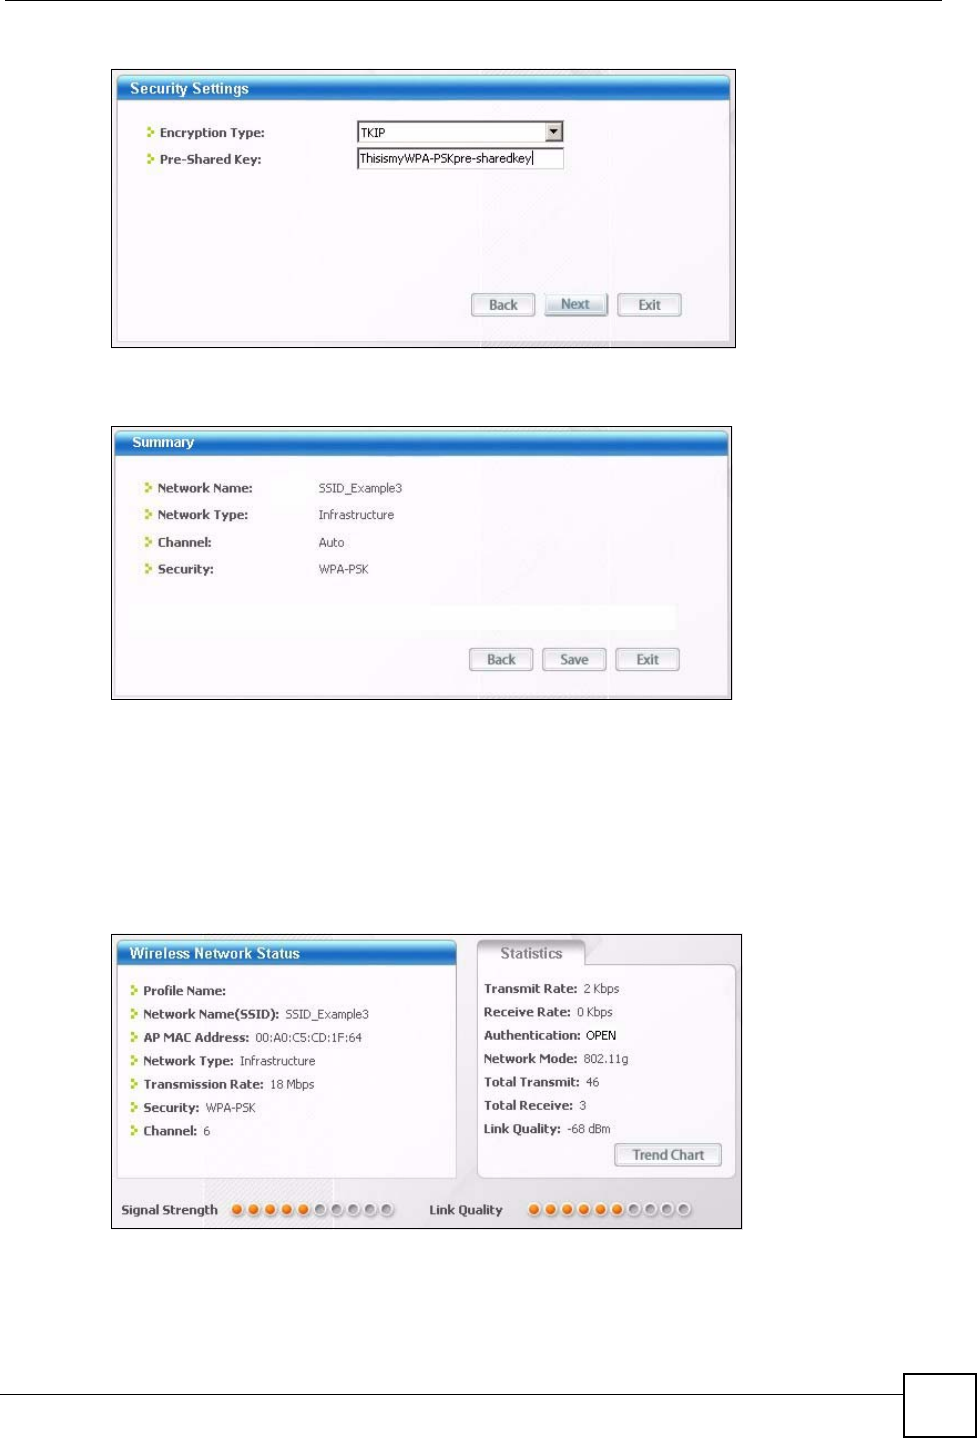
4When you try to connect to an AP with security configured, a window will pop up
prompting you to specify the security settings. Enter the pre-shared key and leave the
encryption type at the default setting.
Use the Next button to move on to the next screen. You can use the Back button at any
time to return to the previous screen, or the Exit button to return to the Site Survey
screen.
Chapter 2 Tutorial
NWD210N User’s Guide 33
Figure 10 ZyXEL Utility: Security Settings
5The Summary window appears. Check your settings and click Save to continue.
Figure 11 ZyXEL Utility: Summary
6The ZyXEL utility returns to the Link Info screen while it connects to the wireless
network using your settings. When the wireless link is established, the ZyXEL utility
icon in the system tray turns green and the Link Info screen displays details of the active
connection. Check the network information in the Link Info screen to verify that you
have successfully connected to the selected network. If the wireless client is not
connected to a network, the fields in this screen remain blank. See Table 4.2 on page 47
for detailed field descriptions.
Figure 12 ZyXEL Utility: Link Info
7Open your Internet browser and enter http://www.zyxel.com or the URL of any other
web site in the address bar. If you are able to access the web site, your wireless
connection is successfully configured. If you cannot access the web site, check the

Chapter 2 Tutorial
NWD210N User’s Guide
34
Troubleshooting section of this User's Guide or contact your network administrator if
necessary.
2.2.2 Creating and Using a Profile
A profile lets you automatically connect to the same wireless network every time you use the
ZyXEL utility. You can also configure different profiles for different networks, for example if
you connect a notebook computer to wireless networks at home and at work.
This example illustrates how to set up a profile and connect the wireless client to an access
point configured for WPA-PSK security. In this example, the AP’s SSID is “SSID_Example3”
and its pre-shared key is “ThisismyWPA-PSKpre-sharedkey”. You have chosen the profile
name “PN_Example3”.
1Open the ZyXEL utility and click the Profile tab to open the screen as shown. Click Add
to configure a new profile.
Figure 13 ZyXEL Utility: Profile
2The Add New Profile screen appears. The wireless client automatically searches for
available wireless networks, which are displayed in the Scan Info box. You can also
configure your profile for a wireless network that is not in the list.
Figure 14 ZyXEL Utility: Add New Profile
3Give the profile a descriptive name (of up to 32 printable ASCII characters). Select
Infrastructure and either manually enter or select the AP's SSID in the Scan Info table
and click Select.
4Choose the same encryption method as the AP to which you want to connect (In this
example, WPA-PSK).

Chapter 2 Tutorial
NWD210N User’s Guide 35
Figure 15 ZyXEL Utility: Profile Security
5This screen varies depending on the encryption method you selected in the previous
screen. In this example, enter the pre-shared key and leave the encryption type at the
default setting.
Figure 16 ZyXEL Utility: Profile Encryption
6Verify the profile settings in the ready-only screen. Click Save to save and go to the next
screen.
Figure 17 ZyXEL Utility: Profile Summary
7Click Activate Now to use the new profile immediately. Otherwise, click the Activate
Later button to go back to the Profile List screen.
If you clicked Activate Later you can select the profile from the list in the Profile
screen and click Connect to activate it.

Chapter 2 Tutorial
NWD210N User’s Guide
36
"Only one profile can be activated and used at any given time.
Figure 18 ZyXEL Utility: Profile Activate
8When you activate the new profile, the ZyXEL utility goes to the Link Info screen while
it connects to the AP using your settings. When the wireless link is established, the
ZyXEL utility icon in the system tray turns green and the Link Info screen displays
details of the active connection.
9Make sure the selected AP in the active profile is on and connected to the Internet. Open
your Internet browser, enter http://www.zyxel.com or the URL of any other web site in
the address bar and press ENTER. If you are able to access the web site, your new profile
is successfully configured.
10 If you cannot access the Internet, go back to the Profile screen. Select the profile you are
using and click Edit. Check the details you entered previously. Also, refer to the
Troubleshooting section of this User's Guide or contact your network administrator if
necessary.
NWD210N User’s Guide 37
CHAPTER 3
Wireless LANs
This chapter provides background information on wireless Local Area Networks.
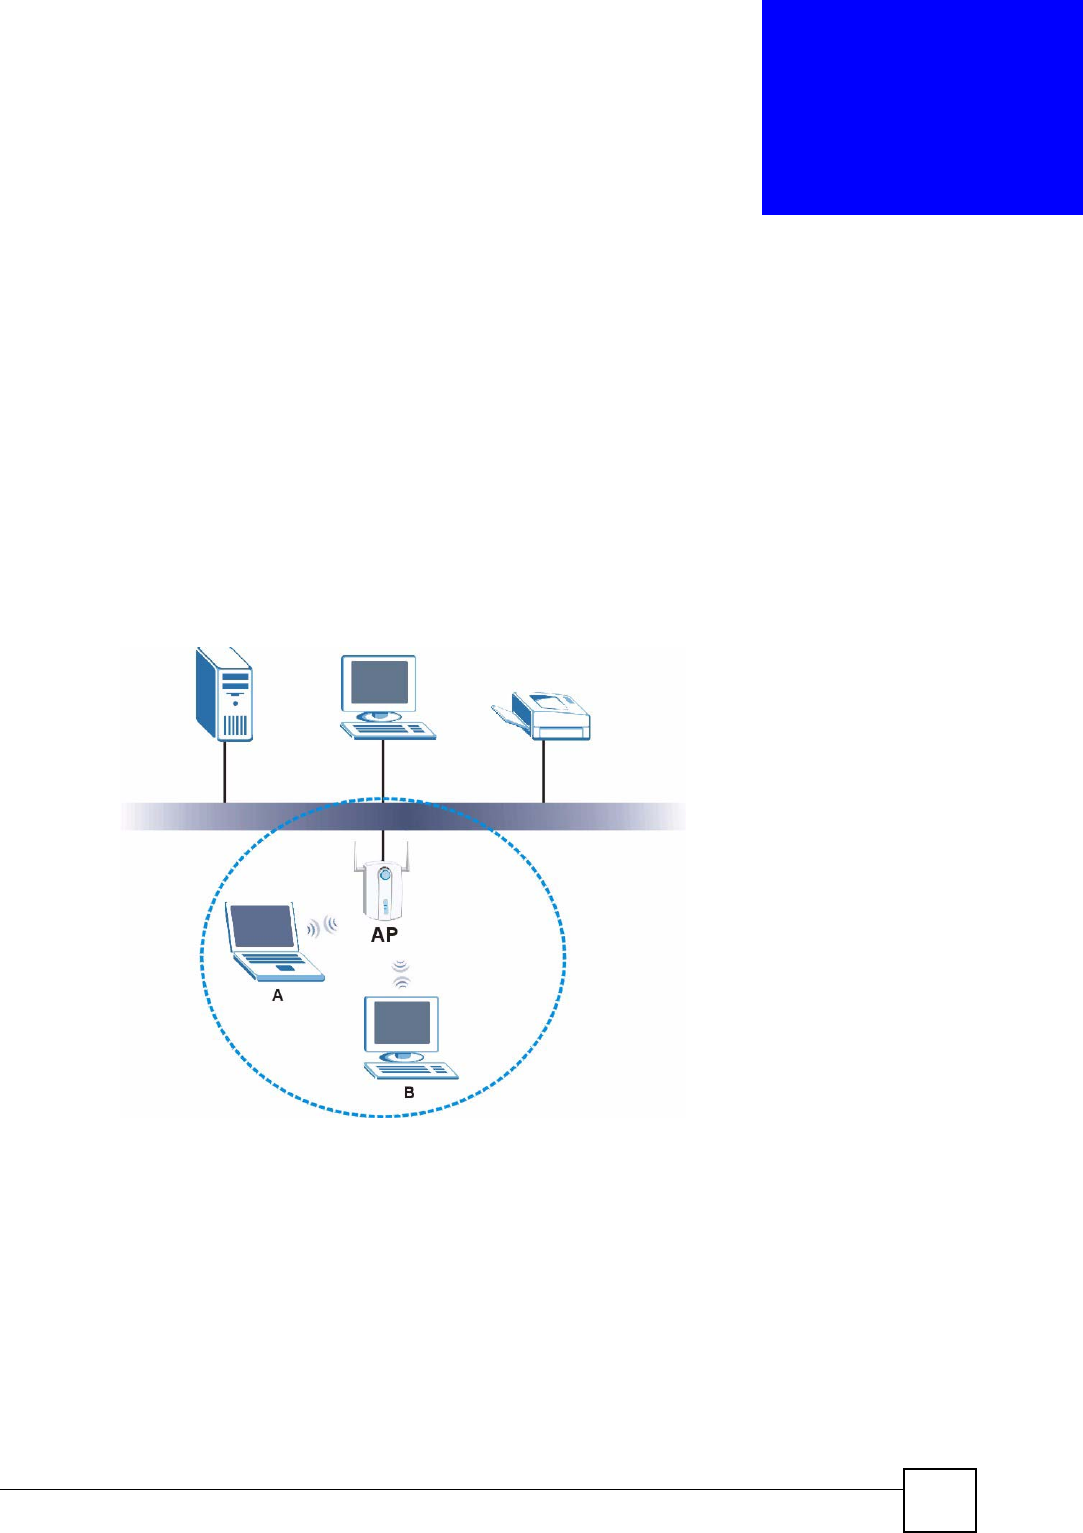
3.1 Wireless LAN Overview
The following figure provides an example of a wireless network with an AP. See Figure 3 on
page 23 for an Ad Hoc network example.
Figure 19 Example of a Wireless Network
The wireless network is the part in the blue circle. In this wireless network, devices A and B
are called wireless clients. The wireless clients use the access point (AP) to interact with other
devices (such as the printer) or with the Internet
Every wireless network must follow these basic guidelines.
• Every device in the same wireless network must use the same SSID.
The SSID is the name of the wireless network. It stands for Service Set IDentity.
• If two wireless networks overlap, they should use a different channel.

Chapter 3 Wireless LANs
NWD210N User’s Guide
38
Like radio stations or television channels, each wireless network uses a specific channel,
or frequency, to send and receive information.
• Every device in the same wireless network must use security compatible with the AP or
peer computer.
Security stops unauthorized devices from using the wireless network. It can also protect
the information that is sent in the wireless network.
3.2 Wireless LAN Security
Wireless LAN security is vital to your network to protect wireless communications.
If you do not enable any wireless security on your NWD210N, the NWD210N’s wireless
communications are accessible to any wireless networking device that is in the coverage area.
"You can use only WEP encryption if you set the NWD210N to Ad-hoc mode.
See the appendices for more detailed information about wireless security.
3.2.1 User Authentication and Encryption
You can make every user log in to the wireless network before they can use it. This is called
user authentication. However, every wireless client in the wireless network has to support
IEEE 802.1x to do this.
Wireless networks can use encryption to protect the information that is sent in the wireless
network. Encryption is like a secret code. If you do not know the secret code, you cannot
understand the message.
3.2.1.1 WEP
3.2.1.1.1 Data Encryption
WEP (Wired Equivalent Privacy) encryption scrambles all data packets transmitted between
the NWD210N and the AP or other wireless stations to keep network communications private.
Both the wireless stations and the access points must use the same WEP key for data
encryption and decryption.
There are two ways to create WEP keys in your NWD210N.
• Automatic WEP key generation based on a “password phrase” called a passphrase. The
passphrase is case sensitive. You must use the same passphrase for all WLAN adapters
with this feature in the same WLAN.
For WLAN adapters without the passphrase feature, you can still take advantage of this
feature by writing down the four automatically generated WEP keys from the Security
Settings screen of the ZyXEL utility and entering them manually as the WEP keys in the
other WLAN adapter(s).
• Enter the WEP keys manually.

Chapter 3 Wireless LANs
NWD210N User’s Guide 39
Your NWD210N allows you to configure up to four 64-bit, 128-bit or 152-bit WEP keys.
Only one key is used as the default key at any one time.
3.2.1.1.2 Authentication Type
The IEEE 802.11b/g standard describes a simple authentication method between the wireless
stations and AP. Three authentication types are defined: Auto, Open and Shared.
• Open mode is implemented for ease-of-use and when security is not an issue. The
wireless station and the AP or peer computer do not share a secret key. Thus the wireless
stations can associate with any AP or peer computer and listen to any transmitted data that
is not encrypted.
• Shared mode involves a shared secret key to authenticate the wireless station to the AP or
peer computer. This requires you to enable the wireless LAN security and use same
settings on both the wireless station and the AP or peer computer.
• Auto authentication mode allows the NWD210N to switch between the open system and
shared key modes automatically. Use the auto mode if you do not know the authentication
mode of the other wireless stations.
3.2.1.2 IEEE 802.1x
The IEEE 802.1x standard outlines enhanced security methods for both the authentication of
wireless stations and encryption key management. Authentication can be done using an
external RADIUS server.
3.2.1.2.1 EAP Authentication
EAP (Extensible Authentication Protocol) is an authentication protocol that runs on top of the
IEEE 802.1x transport mechanism in order to support multiple types of user authentication. By
using EAP to interact with an EAP-compatible RADIUS server, an access point helps a
wireless station and a RADIUS server perform authentication.
The type of authentication you use depends on the RADIUS server and an intermediary AP(s)
that supports IEEE 802.1x. The NWD210N supports EAP-TLS, EAP-TTLS (at the time of
writing, TTLS is not available in Windows Vista) and EAP-PEAP. Refer to Appendix B on
page 103 for descriptions.
For EAP-TLS authentication type, you must first have a wired connection to the network and
obtain the certificate(s) from a certificate authority (CA). Certificates (also called digital IDs)
can be used to authenticate users and a CA issues certificates and guarantees the identity of
each certificate owner.
3.2.1.3 WPA and WPA2
Wi-Fi Protected Access (WPA) is a subset of the IEEE 802.11i standard. WPA2 (IEEE
802.11i) is a wireless security standard that defines stronger encryption, authentication and
key management than WPA.
Key differences between WPA(2) and WEP are improved data encryption and user
authentication.
Both WPA and WPA2 improve data encryption by using Temporal Key Integrity Protocol
(TKIP), Message Integrity Check (MIC) and IEEE 802.1x. WPA and WPA2 use Advanced
Encryption Standard (AES) in the Counter mode with Cipher block chaining Message
authentication code Protocol (CCMP) to offer stronger encryption than TKIP.

Chapter 3 Wireless LANs
NWD210N User’s Guide
40
If both an AP and the wireless clients support WPA2 and you have an external RADIUS
server, use WPA2 for stronger data encryption. If you don't have an external RADIUS server,
you should use WPA2-PSK (WPA2-Pre-Shared Key) that only requires a single (identical)
password entered into each access point, wireless gateway and wireless client. As long as the
passwords match, a wireless client will be granted access to a WLAN.
If the AP or the wireless clients do not support WPA2, just use WPA or WPA-PSK depending
on whether you have an external RADIUS server or not.
Select WEP only when the AP and/or wireless clients do not support WPA or WPA2. WEP is
less secure than WPA or WPA2.
3.3 WiFi Protected Setup
Your NWD210N supports WiFi Protected Setup (WPS), which is an easy way to set up a
secure wireless network. WPS is an industry standard specification, defined by the WiFi
Alliance.
WPS allows you to quickly set up a wireless network with strong security, without having to
configure security settings manually. Each WPS connection works between two devices. Both
devices must support WPS (check each device’s documentation to make sure).
Depending on the devices you have, you can either press a button (on the device itself, or in its
configuration utility) or enter a PIN (a unique Personal Identification Number that allows one
device to authenticate the other) in each of the two devices. When WPS is activated on a
device, it has two minutes to find another device that also has WPS activated. Then, the two
devices connect and set up a secure network by themselves.
3.3.1 Push Button Configuration
WPS Push Button Configuration (PBC) is initiated by pressing a button on each WPS-enabled
device, and allowing them to connect automatically. You do not need to enter any information.
Not every WPS-enabled device has a physical WPS button. Some may have a WPS PBC
button in their configuration utilities instead of or in addition to the physical button.
Take the following steps to set up WPS using the button.
1Ensure that the two devices you want to set up are within wireless range of one another.
2Look for a WPS button on each device. If the device does not have one, log into its
configuration utility and locate the button (see the device’s User’s Guide for how to do
this - for the NWD210N, see Section 4.5.1 on page 62).
3Press the button on one of the devices (it doesn’t matter which).
4Within two minutes, press the button on the other device. The registrar sends the network
name (SSID) and security key through an secure connection to the enrollee.
If you need to make sure that WPS worked, check the list of associated wireless clients in the
AP’s configuration utility. If you see the wireless client in the list, WPS was successful.

Chapter 3 Wireless LANs
NWD210N User’s Guide 41
3.3.2 PIN Configuration
Each WPS-enabled device has its own PIN (Personal Identification Number). This may either
be static (it cannot be changed) or dynamic (in some devices you can generate a new PIN by
clicking on a button in the configuration interface).
Use the PIN method instead of the push-button configuration (PBC) method if you want to
ensure that the connection is established between the devices you specify, not just the first two
devices to activate WPS in range of each other. However, you need to log into the
configuration interfaces of both devices to use the PIN method.
When you use the PIN method, you must enter the PIN from one device (usually the wireless
client) into the second device (usually the Access Point or wireless router). Then, when WPS
is activated on the first device, it presents its PIN to the second device. If the PIN matches, one
device sends the network and security information to the other, allowing it to join the network.
Take the following steps to set up a WPS connection between an access point or wireless
router (referred to here as the AP) and a client device using the PIN method.
1Ensure WPS is enabled on both devices.
2Access the WPS section of the AP’s configuration interface. See the device’s User’s
Guide for how to do this.
3Look for the client’s WPS PIN; it will be displayed either on the device, or in the WPS
section of the client’s configuration interface (see the device’s User’s Guide for how to
find the WPS PIN - for the NWD210N, see Section 4.5 on page 61).
4Enter the client’s PIN in the AP’s configuration interface.
"If the client device’s configuration interface has an area for entering another
device’s PIN, you can either enter the client’s PIN in the AP, or enter the AP’s
PIN in the client - it does not matter which.
5Start WPS on both devices within two minutes.
"Use the configuration utility to activate WPS, not the push-button on the device
itself.
6On a computer connected to the wireless client, try to connect to the Internet. If you can
connect, WPS was successful.
If you cannot connect, check the list of associated wireless clients in the AP’s
configuration utility. If you see the wireless client in the list, WPS was successful.
The following figure shows a WPS-enabled wireless client (installed in a notebook computer)
connecting to the WPS-enabled AP via the PIN method.
Chapter 3 Wireless LANs
NWD210N User’s Guide
42
Figure 20 Example WPS Process: PIN Method
3.3.3 How WPS Works
When two WPS-enabled devices connect, each device must assume a specific role. One device
acts as the registrar (the device that supplies network and security settings) and the other
device acts as the enrollee (the device that receives network and security settings. The registrar
creates a secure EAP (Extensible Authentication Protocol) tunnel and sends the network name
(SSID) and the WPA-PSK or WPA2-PSK pre-shared key to the enrollee. Whether WPA-PSK
or WPA2-PSK is used depends on the standards supported by the devices. If the registrar is
already part of a network, it sends the existing information. If not, it generates the SSID and
WPA(2)-PSK randomly.
The following figure shows a WPS-enabled client (installed in a notebook computer)
connecting to a WPS-enabled access point.
ENROLLEE
SECURE EAP TUNNEL
SSID
WPA(2)-PSK
WITHIN 2 MINUTES
COMMUNICATION
This device’s
WPS
Enter WPS PIN
WPS
from other device:
WPS PIN: 123456
WPS
START
WPS
START
REGISTRAR
Chapter 3 Wireless LANs
NWD210N User’s Guide 43
Figure 21 How WPS works
The roles of registrar and enrollee last only as long as the WPS setup process is active (two
minutes). The next time you use WPS, a different device can be the registrar if necessary.
The WPS connection process is like a handshake; only two devices participate in each WPS
transaction. If you want to add more devices you should repeat the process with one of the
existing networked devices and the new device.
Note that the access point (AP) is not always the registrar, and the wireless client is not always
the enrollee. All WPS-certified APs can be a registrar, and so can some WPS-enabled wireless
clients.
By default, a WPS devices is “unconfigured”. This means that it is not part of an existing
network and can act as either enrollee or registrar (if it supports both functions). If the registrar
is unconfigured, the security settings it transmits to the enrollee are randomly-generated. Once
a WPS-enabled device has connected to another device using WPS, it becomes “configured”.
A configured wireless client can still act as enrollee or registrar in subsequent WPS
connections, but a configured access point can no longer act as enrollee. It will be the registrar
in all subsequent WPS connections in which it is involved. If you want a configured AP to act
as an enrollee, you must reset it to its factory defaults.
3.3.3.1 Example WPS Network Setup
This section shows how security settings are distributed in an example WPS setup.
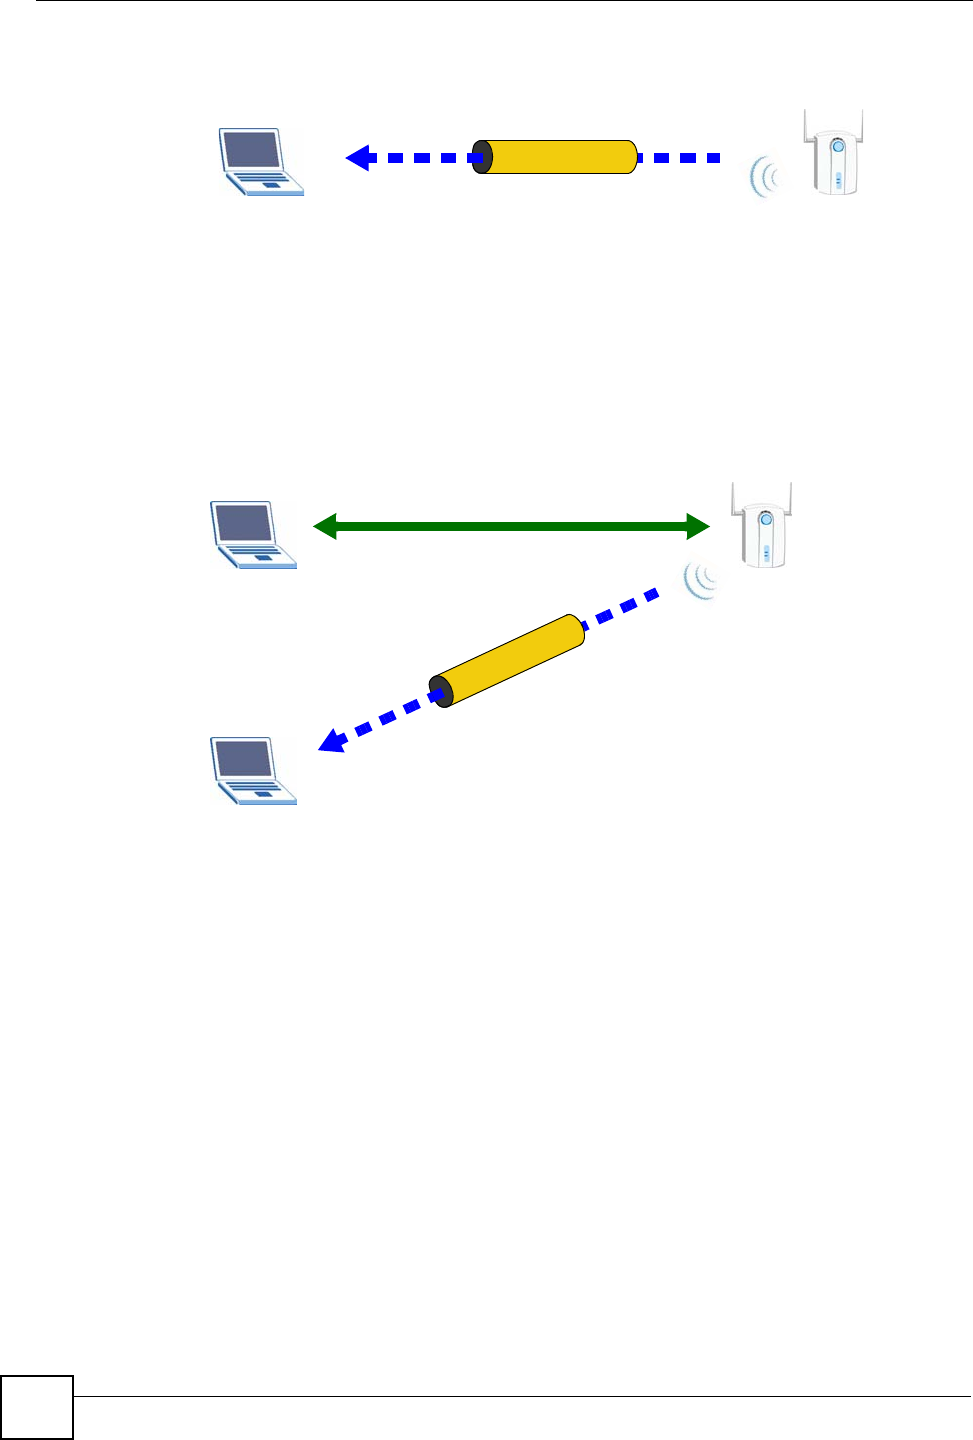
The following figure shows an example network. In step 1, both AP1 and Client 1 are
unconfigured. When WPS is activated on both, they perform the handshake. In this example,
AP1 is the registrar, and Client 1 is the enrollee. The registrar randomly generates the security
information to set up the network, since it is unconfigured and has no existing information.
SECURE TUNNEL
SECURITY INFO
WITHIN 2 MINUTES
COMMUNICATION
ACTIVATE
WPS
ACTIVATE
WPS
WPS HANDSHAKE
REGISTRARENROLLEE
Chapter 3 Wireless LANs
NWD210N User’s Guide
44
Figure 22 WPS: Example Network Step 1
In step 2, you add another wireless client to the network. You know that Client 1 supports
registrar mode, but it is better to use AP1 for the WPS handshake with the new client since
you must connect to the access point anyway in order to use the network. In this case, AP1
must be the registrar, since it is configured (it already has security information for the
network). AP1 supplies the existing security information to Client 2.
Figure 23 WPS: Example Network Step 2
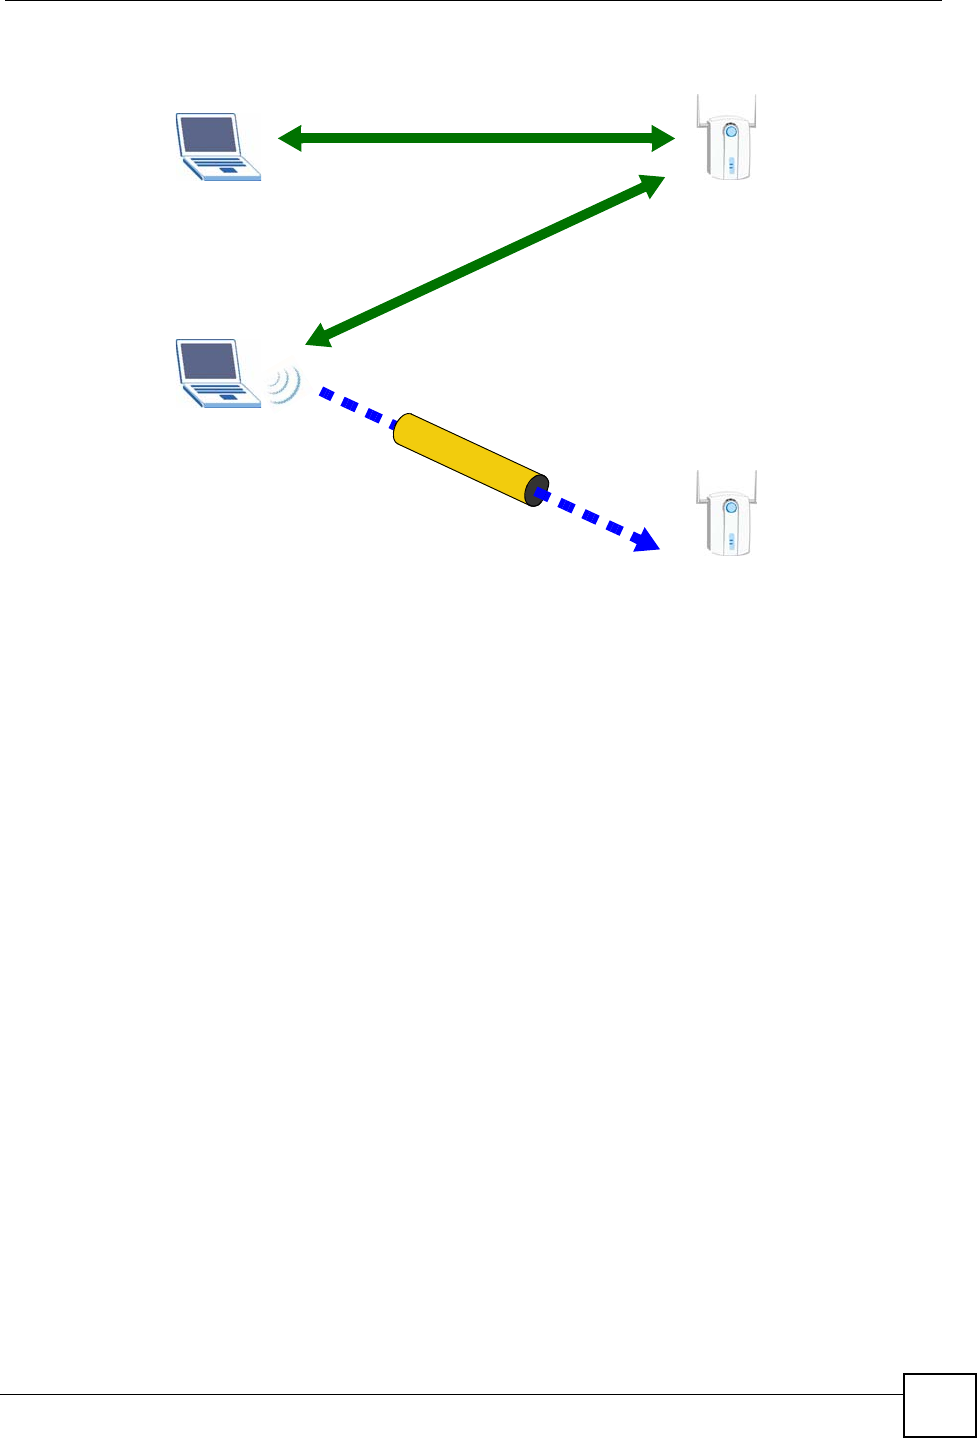
In step 3, you add another access point (AP2) to your network. AP2 is out of range of AP1, so
you cannot use AP1 for the WPS handshake with the new access point. However, you know
that Client 2 supports the registrar function, so you use it to perform the WPS handshake
instead.
REGISTRARENROLLEE
SECURITY INFO
CLIENT 1 AP1
REGISTRAR
CLIENT 1 AP1
ENROLLEE
CLIENT 2
EXISTING CONNECTION
SECURITY INFO
Chapter 3 Wireless LANs
NWD210N User’s Guide 45
Figure 24 WPS: Example Network Step 3
3.3.4 Limitations of WPS
WPS has some limitations of which you should be aware.
• WPS works in Infrastructure networks only (where an AP and a wireless client
communicate). It does not work in Ad-Hoc networks (where there is no AP).
• When you use WPS, it works between two devices only. You cannot enroll multiple
devices simultaneously, you must enroll one after the other.
For instance, if you have two enrollees and one registrar you must set up the first enrollee
(by pressing the WPS button on the registrar and the first enrollee, for example), then
check that it successfully enrolled, then set up the second device in the same way.
• WPS works only with other WPS-enabled devices. However, you can still add non-WPS
devices to a network you already set up using WPS.
WPS works by automatically issuing a randomly-generated WPA-PSK or WPA2-PSK
pre-shared key from the registrar device to the enrollee devices (see Section 4.3.1.2 on
page 52 for information on pre-shared keys). Whether the network uses WPA-PSK or
WPA2-PSK depends on the device. You can check the configuration interface of the
registrar device to discover the key the network is using (if the device supports this
feature). Then, you can enter the key into the non-WPS device and join the network as
normal (the non-WPS device must also support WPA-PSK or WPA2-PSK).
• When you use the PBC method, there is a short period (from the moment you press the
button on one device to the moment you press the button on the other device) when any
WPS-enabled device could join the network. This is because the registrar has no way of
identifying the “correct” enrollee, and cannot differentiate between your enrollee and a
rogue device. This is a possible way for a hacker to gain access to a network.
CLIENT 1 AP1
REGISTRAR
CLIENT 2
EXISTING CONNECTION
SECURITY INFO
ENROLLEE
AP1
EXISTING CONNECTION

Chapter 3 Wireless LANs
NWD210N User’s Guide
46
You can easily check to see if this has happened. WPS works between only two devices
simultaneously, so if another device has enrolled your device will be unable to enroll, and
will not have access to the network. If this happens, open the access point’s configuration
interface and look at the list of associated clients (usually displayed by MAC address). It
does not matter if the access point is the WPS registrar, the enrollee, or was not involved
in the WPS handshake; a rogue device must still associate with the access point to gain
access to the network. Check the MAC addresses of your wireless clients (usually printed
on a label on the bottom of the device). If there is an unknown MAC address you can
remove it or reset the AP.
NWD210N User’s Guide 47
CHAPTER 4
Wireless Configuration
This chapter shows you how to configure your NWD210N.
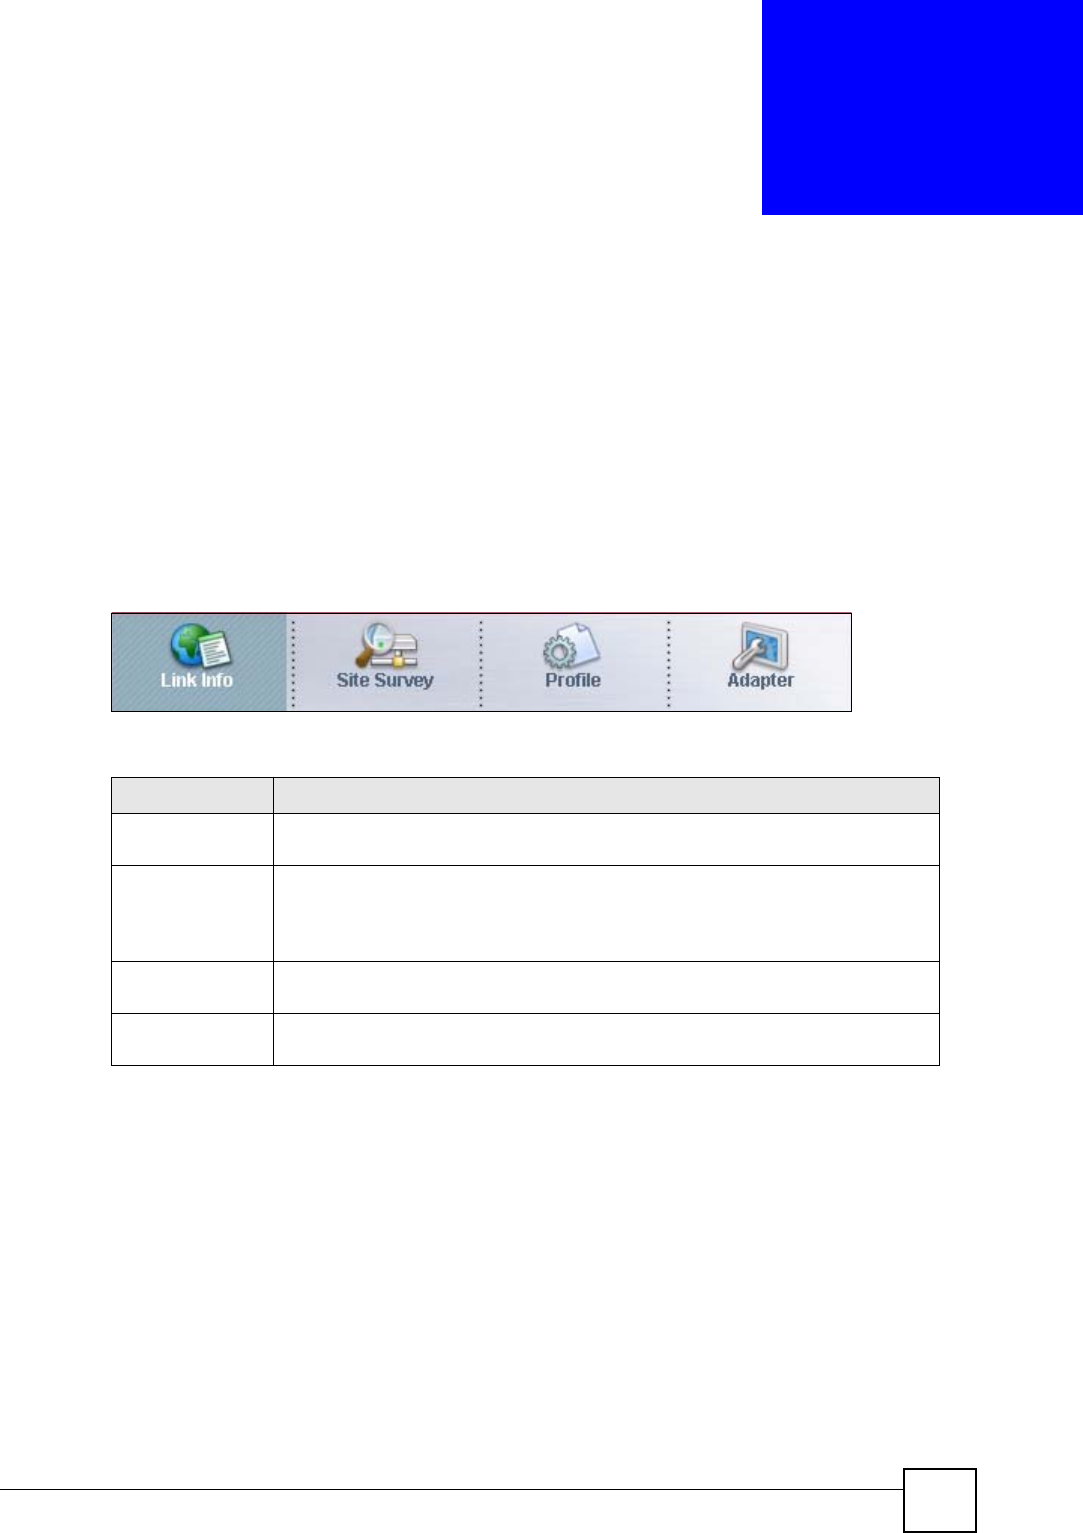
4.1 ZyXEL Utility Screen Summary
This section describes the ZyXEL utility screens.
Figure 25 ZyXEL Utility Menu Summary
The following table describes the menus.
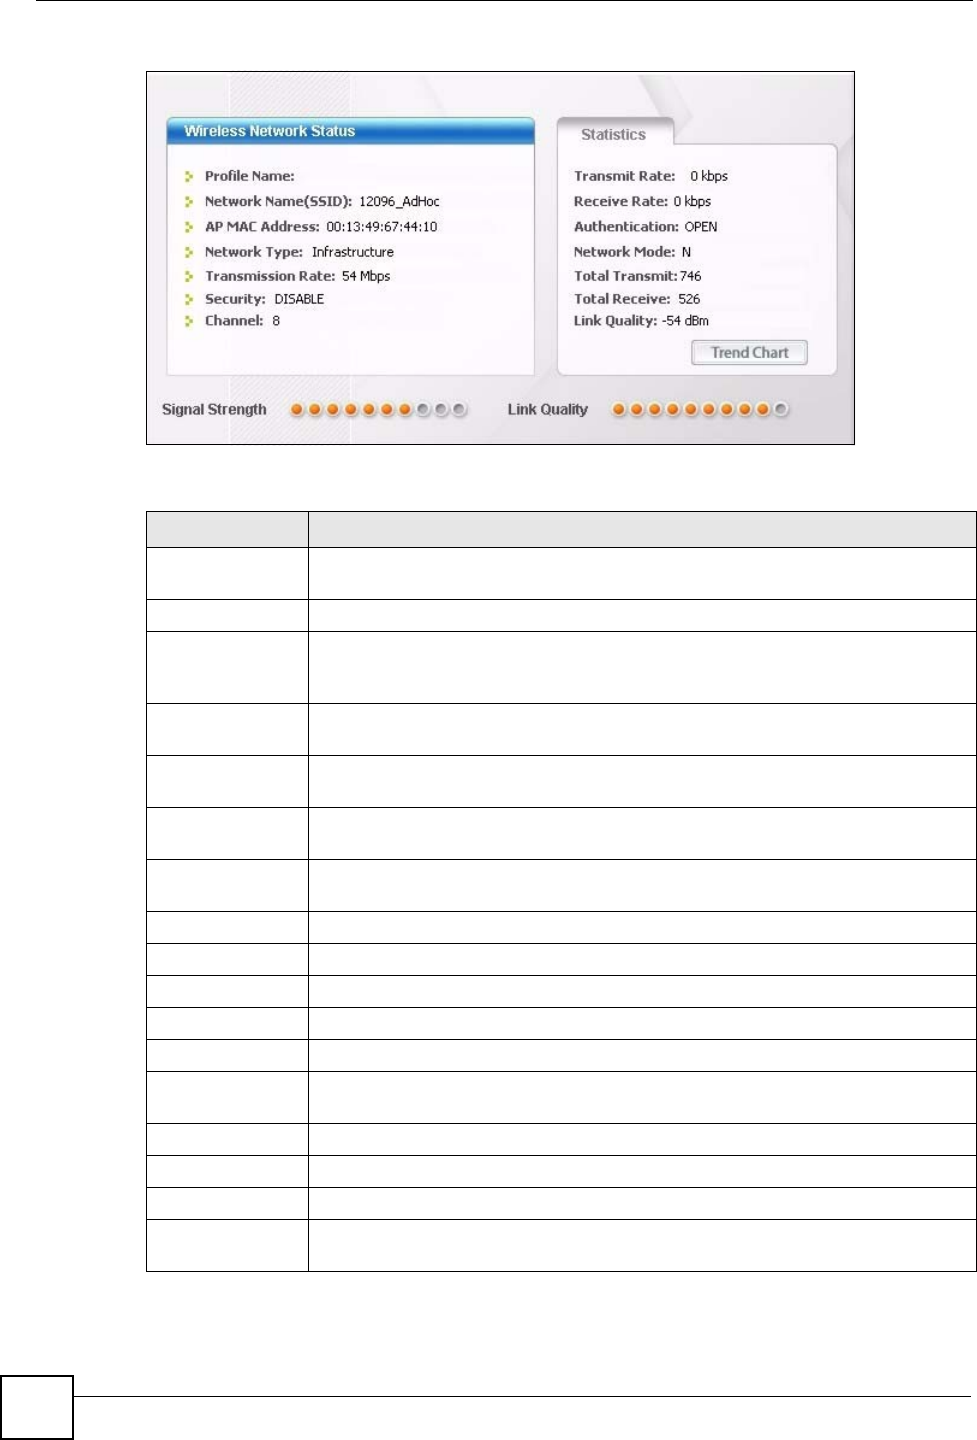
4.2 The Link Info Screen
When the ZyXEL utility starts, the Link Info screen displays, showing the current
configuration and connection status of your NWD210N.
Table 4 ZyXEL Utility Menu Summary
TAB DESCRIPTION
Link Info Use this screen to see your current connection status, configuration and data rate
statistics.
Site Survey Use this screen to
• scan for a wireless network
• configure wireless security (if activated on the selected network).
• connect to a wireless network.
Profile Use this screen to add, delete, edit or activate a profile with a set of wireless and
security settings.
Adapter Use this screen to configure preamble type, enable power saving and use WiFi
Protected Setup (WPS).
Chapter 4 Wireless Configuration
NWD210N User’s Guide
48
Figure 26 Link Info
The following table describes the labels in this screen.
Table 5 Link Info
LABEL DESCRIPTION
Wireless Network
Status
Profile Name This is the name of the profile you are currently using.
Network
Name (SSID)
The SSID identifies the wireless network to which a wireless station is associated.
This field displays the name of the wireless device to which the NWD210N is
associated.
AP MAC
Address
This field displays the MAC address of the AP or peer computer to which the
NWD210N is associated.
Network Type This field displays the network type (Infrastructure or Ad-Hoc) of the wireless
network.
Transmission
Rate
This field displays the current transmission rate of the NWD210N in megabits per
second (Mbps).
Security This field displays whether data encryption is activated (WEP / 802.1x / WPA /
WPA-PSK / WPA2 / WPA2-PSK) or inactive (DISABLE).
Channel This field displays the radio channel the NWD210N is currently using.
Statistics
Transmit Rate This field displays the current data transmission rate in kilobits per second (Kbps).
Receive Rate This field displays the current data receiving rate in kilobits per second (Kbps).
Authentication This field displays the authentication method of the NWD210N.
Network Mode This field displays the wireless standard (802.11b, 802.11g or 802.11n) of the AP
or peer computer.
Total Transmit This field displays the total number of data frames transmitted.
Total Receive This field displays the total number of data frames received.
Link Quality This field displays the signal strength of the NWD210N.
Trend Chart Click this button to display the real-time statistics of the data rate in kilobits per
second (Kbps).
Chapter 4 Wireless Configuration
NWD210N User’s Guide 49
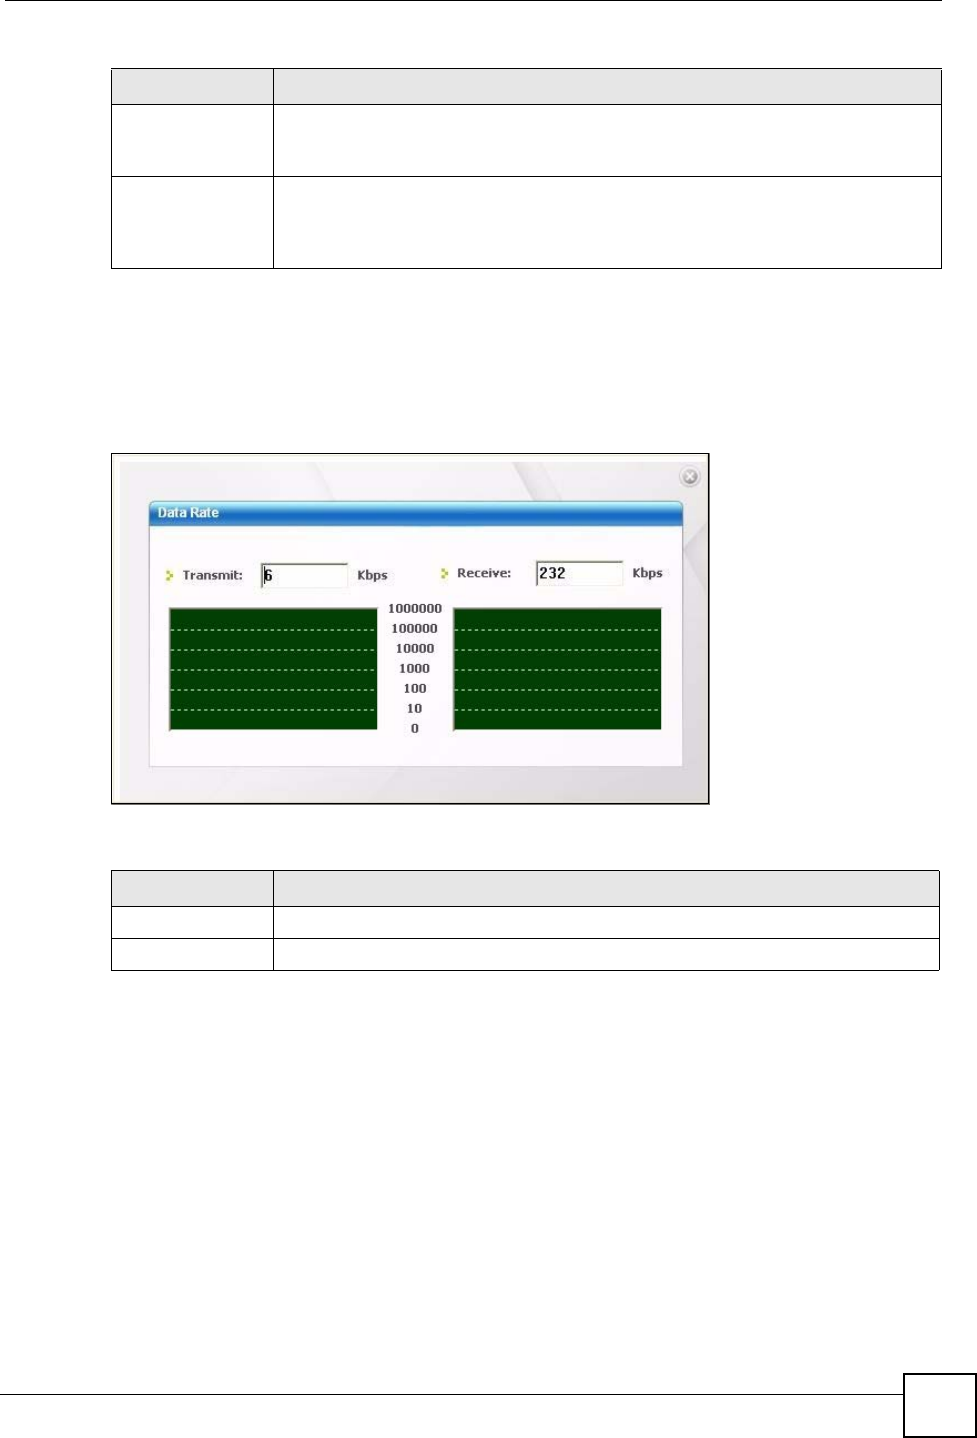
4.2.1 Trend Chart
Click Trend Chart in the Link Info screen to display a screen as shown below. Use this
screen to view real-time data traffic statistics.
Figure 27 Link Info: Trend Chart
The following table describes the labels in this screen.
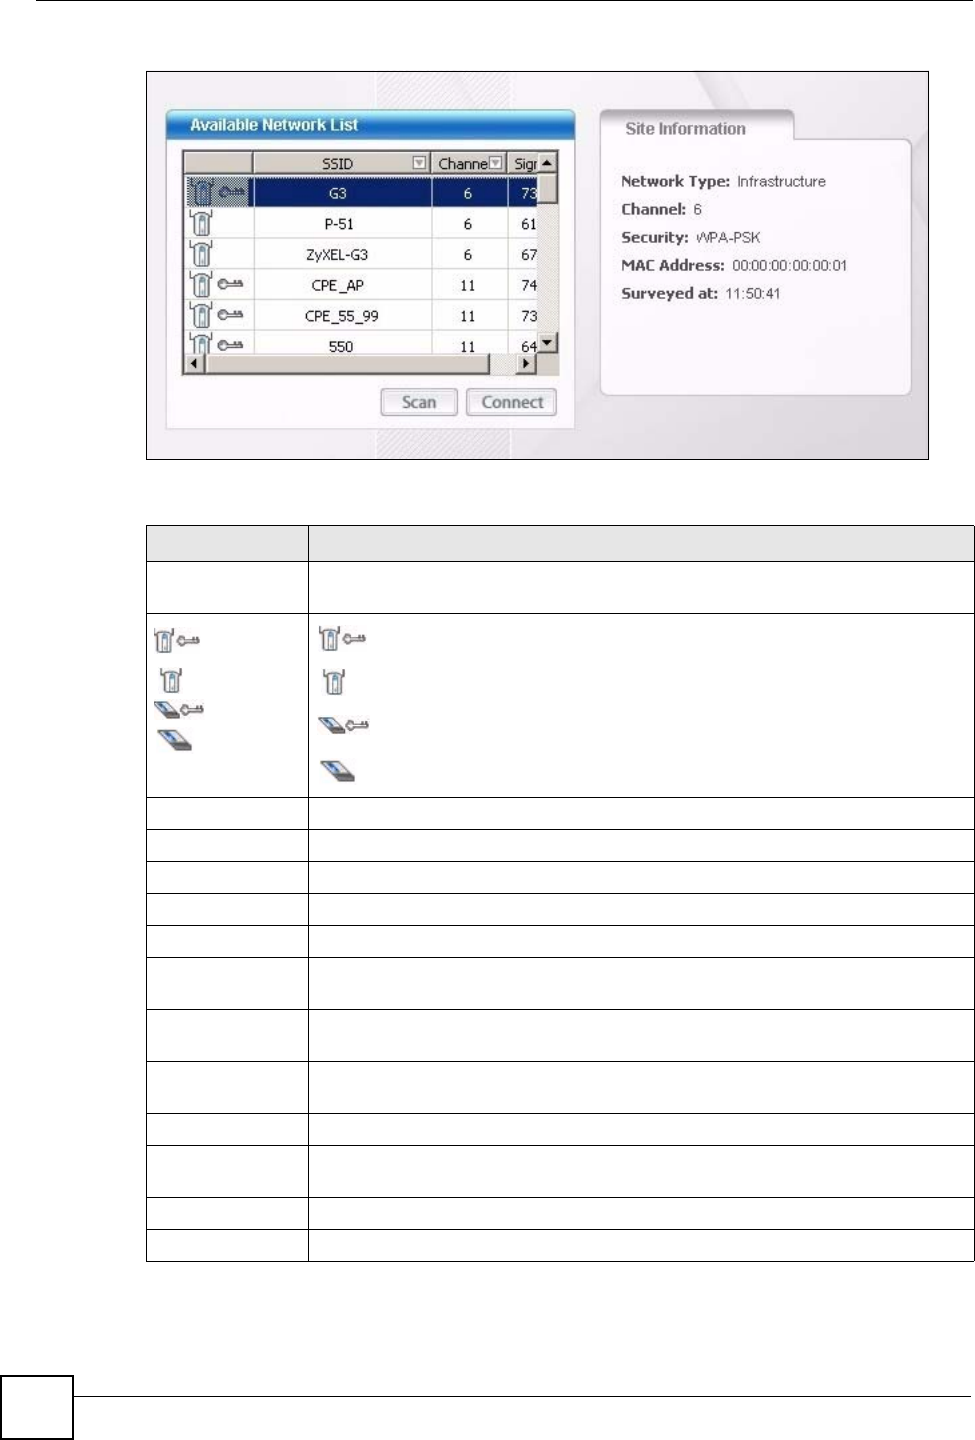
4.3 The Site Survey Screen
Use the Site Survey screen to scan for and connect to a wireless network automatically.
Signal Strength The status bar shows the strength of the signal. The signal strength mainly
depends on the antenna output power and the distance between your NWD210N
and the AP or peer computer.
Link Quality The status bar shows the quality of wireless connection. This refers to the
percentage of packets transmitted successfully. If there are too many wireless
stations in a wireless network, collisions may occur which could result in a loss of
messages even though you have high signal strength.
Table 5 Link Info (continued)
LABEL DESCRIPTION
Table 6 Link Info: Trend Chart
LABEL DESCRIPTION
Transmit This field displays the current data transmission rate in kilobits per second (Kbps).
Receive This field displays the current data reception rate in kilobits per second (Kbps).
Chapter 4 Wireless Configuration
NWD210N User’s Guide
50
Figure 28 Site Survey
The following table describes the labels in this screen.
Table 7 Site Survey
LABEL DESCRIPTION
Available Network
List
Click a column heading to sort the entries.
,
,
or
denotes that the wireless device is in infrastructure mode and the wireless
security is activated.
denotes that the wireless device is in infrastructure mode but the wireless
security is deactivated.
denotes that the wireless device is in Ad-Hoc mode and the wireless
security is activated.
denotes that the wireless device is in Ad-Hoc mode but the wireless
security is deactivated.
SSID This field displays the SSID (Service Set IDentifier) of each wireless device.
Channel This field displays the channel number used by each wireless device.
Signal This field displays the signal strength of each wireless device.
Scan Click Scan to search for available wireless devices within transmission range.
Connect Click Connect to associate to the selected wireless device.
Site Information Click an entry in the Available Network List table to display the information of the
selected wireless device.
Network Type This field displays the network type (Infrastructure or Ad Hoc) of the wireless
device.
Network Mode This field displays the wireless standard (802.11b, 802.11g or 802.11n) used by
the selected wireless device.
Channel This field displays the channel number used by each wireless device.
Security This field shows whether data encryption is activated (WEP, WPA, WPA-PSK,
WPA2, WPA2-PSK or 802.1x) or inactive (DISABLE).
MAC address This field displays the MAC address of the wireless device.
Surveyed at This field displays the time when the wireless device was scanned.
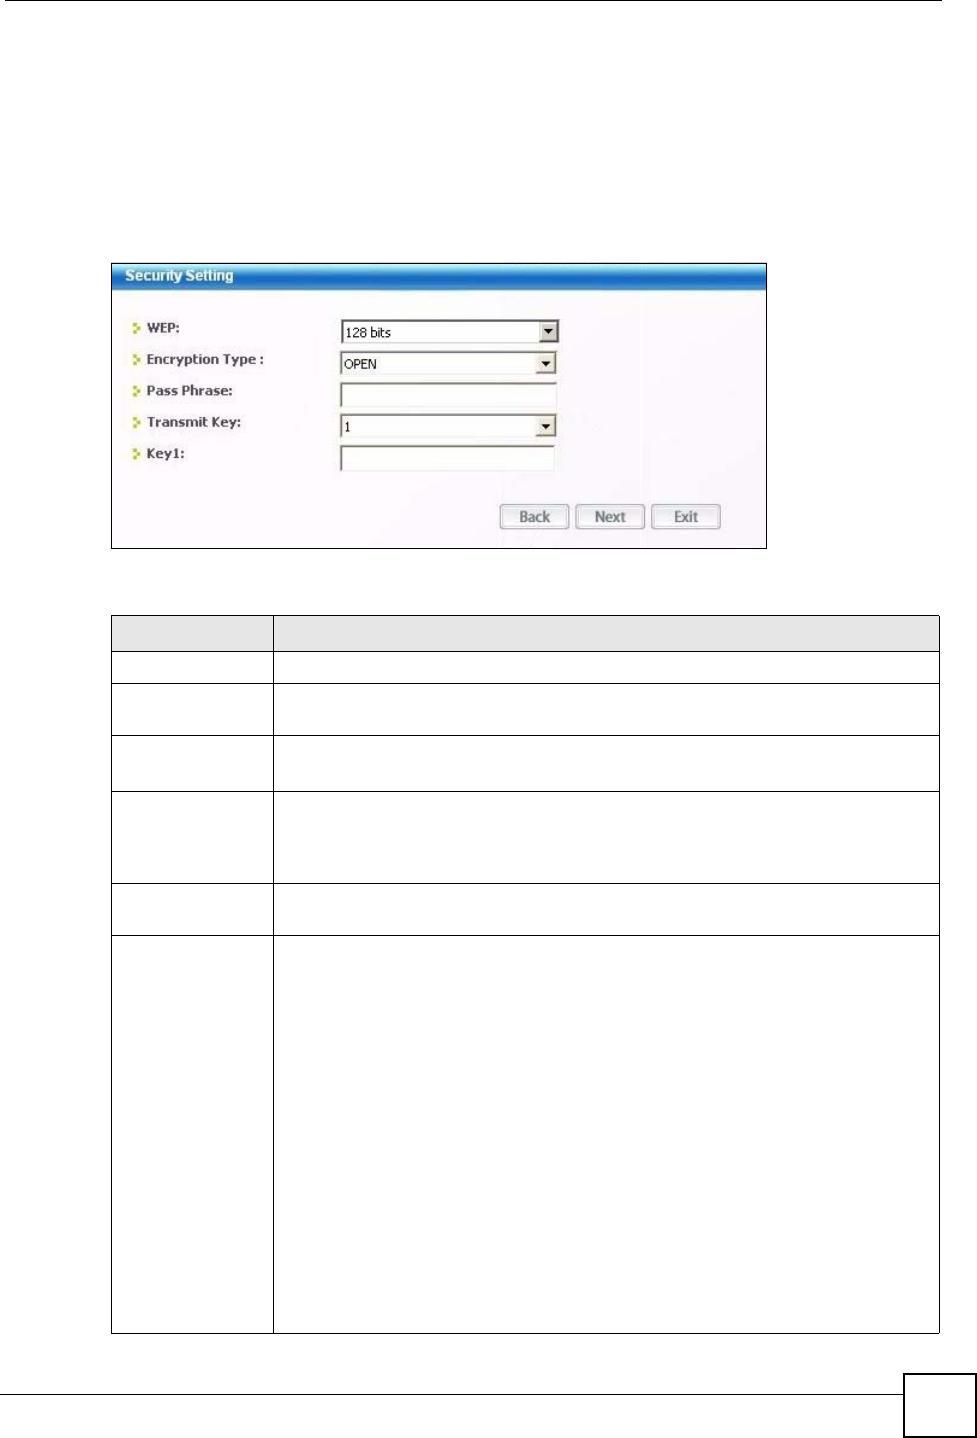
Chapter 4 Wireless Configuration
NWD210N User’s Guide 51
4.3.1 Security Settings
When you configure the NWD210N to connect to a network with wireless security activated
and the security settings are disabled on the NWD210N, the screen varies according to the
encryption method used by the selected network.
4.3.1.1 WEP Encryption
Figure 29 Security Setting: WEP
The following table describes the labels in this screen.
Table 8 Security Setting: WEP
LABEL DESCRIPTION
Security Settings
WEP Select 64 Bits or 128 Bits to activate WEP encryption and then fill in the related
fields.
Encryption Type Select an authentication method. Choices are Open and Shared.
Refer to Section 3.2.1.1.2 on page 39 for more information.
Pass Phrase Enter a passphrase of up to 32 case-sensitive printable characters. As you enter
the passphrase, the NWD210N automatically generates four different WEP keys
and displays the first in the key field below. Refer to Section 3.2.1.1.1 on page 38
for more information.
Transmit Key Select a default WEP key to use for data encryption. The key displays in the
adjacent field.
Key x (where x is
a number
between 1 and 4)
Select this option if you want to manually enter the WEP keys. Enter the WEP key
in the field provided.
If you select 64 Bits in the WEP field.
Enter either 10 hexadecimal digits in the range of “A-F”, “a-f” and “0-9” (for
example, 11AA22BB33) for HEX key type.
or
Enter 5 ASCII characters (case sensitive) ranging from “a-z”, “A-Z” and “0-9”
(for example, MyKey) for ASCII key type.
If you select 128 Bits in the WEP field,
Enter either 26 hexadecimal digits in the range of “A-F”, “a-f” and “0-9” (for
example, 00112233445566778899AABBCC) for HEX key type
or
Enter 13 ASCII characters (case sensitive) ranging from “a-z”, “A-Z” and “0-9”
(for example, MyKey12345678) for ASCII key type.
Note: The values for the WEP keys must be set up exactly the
same on all wireless devices in the same wireless LAN.
ASCII WEP keys are case sensitive.

Chapter 4 Wireless Configuration
NWD210N User’s Guide
52
4.3.1.2 WPA-PSK/WPA2-PSK
Figure 30 Security Setting: WPA-PSK/WPA2-PSK
The following table describes the labels in this screen.
4.3.1.3 WPA/WPA2
The screen that displays when you select WPA or WPA2 differs, depending on the EAP Type
you select (TLS, PEAP or TTLS).
"The procedure to configure WPA or WPA2 is different in Windows Vista. See
Section 4.6 on page 64 for information on setting up your NWD210N to use
WPA or WPA2 in Vista.
Back Click Back to go to the Site Survey screen to select and connect to another
network.
Next Click Next to confirm your selections and advance to the Summary screen. Refer
to Section 4.3.3 on page 55.
Exit Click Exit to return to the Site Survey screen without saving.
Table 8 Security Setting: WEP (continued)
LABEL DESCRIPTION
Table 9 Security Setting: WPA-PSK/WPA2-PSK
LABEL DESCRIPTION
Encryption Type The encryption mechanisms used for WPA/WPA2 and WPA-PSK/WPA2-PSK are
the same. The only difference between the two is that WPA-PSK/WPA2-PSK uses
a simple common password, instead of user-specific credentials.
Select the encryption type (TKIP or AES) for data encryption.
Refer to Section 3.2.1.3 on page 39 for more information.
Pre-Shared Key Type a pre-shared key (same as the AP or peer device) of between 8 and 63
case-sensitive ASCII characters (including spaces and symbols) or 64
hexadecimal characters.
Back Click Back to go to the Site Survey screen to select and connect to another
network.
Next Click Next to confirm your selections and advance to the Summary screen. Refer
to Section 4.3.3 on page 55.
Exit Click Exit to return to the Site Survey screen without saving.
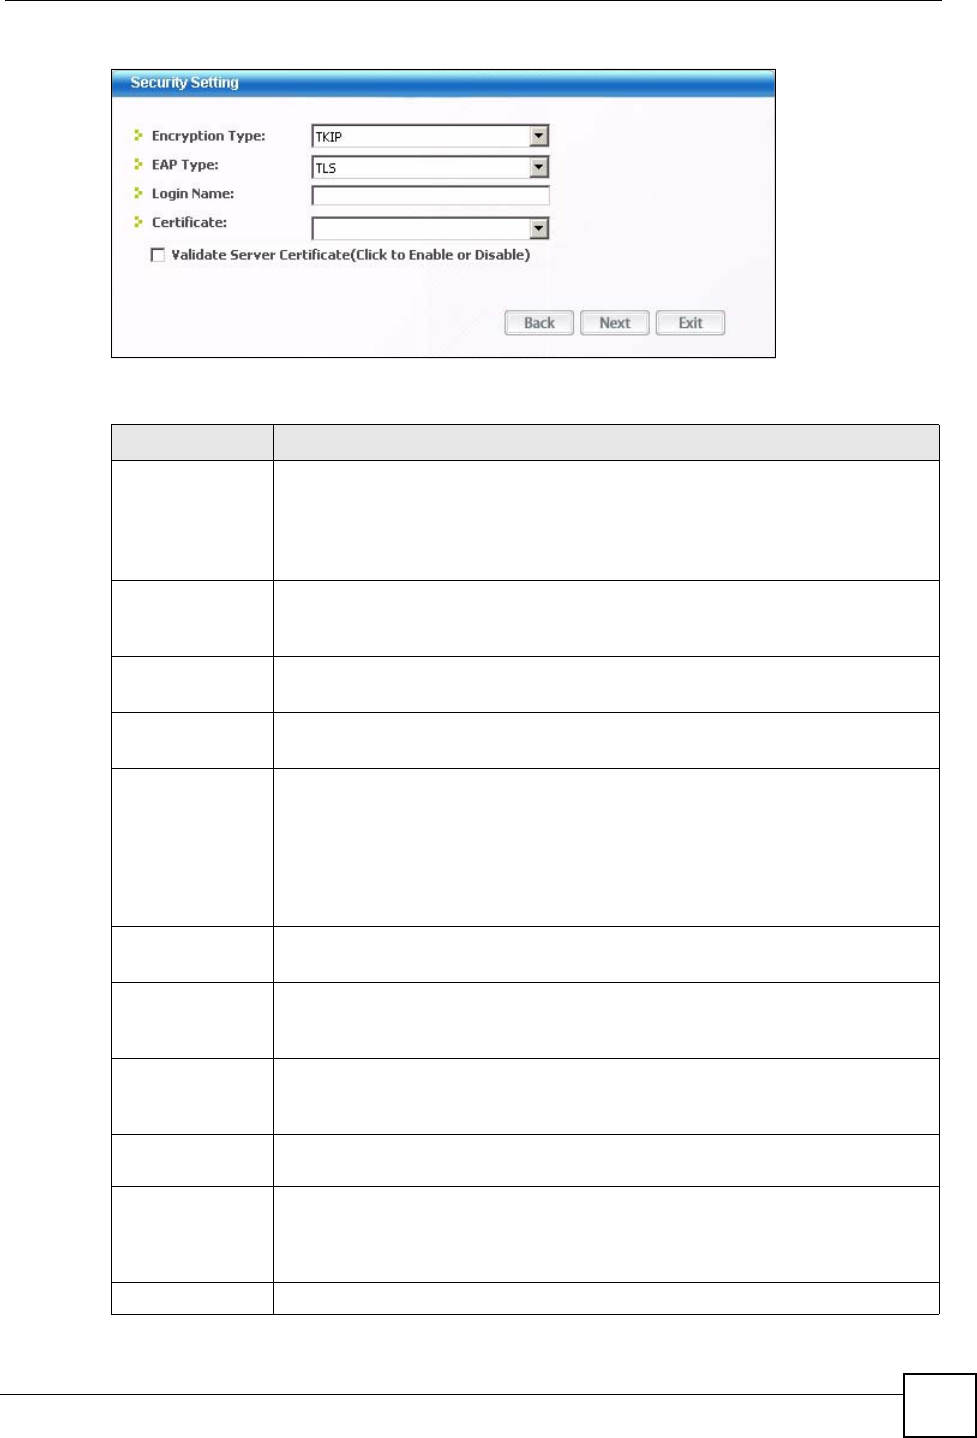
Chapter 4 Wireless Configuration
NWD210N User’s Guide 53
Figure 31 Security Settings: WPA/WPA2
The following table describes the labels in this screen.
Table 10 Security Setting: WPA/WPA2
LABEL DESCRIPTION
Encryption Type The encryption mechanisms used for WPA/WPA2 and WPA-PSK/WPA2-PSK are
the same. The only difference between the two is that WPA-PSK/WPA2-PSK uses
a simple common password, instead of user-specific credentials.
Select the encryption type (TKIP or AES) for data encryption.
Refer to Section 3.2.1.3 on page 39 for more information.
EAP Type The type of authentication you use depends on the RADIUS server or AP.
Select an authentication method from the drop down list. Options are TLS, PEAP
and TTLS (at the time of writing, TTLS is not available in Windows Vista).
Login Name Enter a user name.
This is the user name that you or an administrator set up on a RADIUS server.
Password This field is not available when you select TLS in the EAP Type field.
Enter the password associated with the user name above.
Certificate This field is only available when you select TLS in the EAP Type field.
Click Browse to select a certificate.
Note: You must first have a wired connection to a network and
obtain the certificate(s) from a certificate authority (CA).
Consult your network administrator for more information.
Validate Server
Certificate
Select this to verify the certificate of the authentication server.
If you select this and click Next, the Server Certificate Setting screen displays.
PEAP Inner EAP This field is only available when you select PEAP in the EAP Type field.
The PEAP method used by the RADIUS server or AP for client authentication is
MS CHAP v2.
TTLS Protocol This field is available only when you select TTLS in the EAP Type field.
Select a TTLS protocol that the RADIUS server uses. Options are CHAP, MS-
CHAP, MS-CHAP-V2 and PAP.
Back Click Back to go to the Site Survey screen to select and connect to another
network.
Next Click Next to confirm your selections and advance to the Summary screen (refer
to Section 4.3.3 on page 55.)
If you selected Validate Server Certificate, the Server Certificate Setting
screen displays (refer to Section 4.3.2 on page 55).
Exit Click Exit to return to the Site Survey screen without saving.
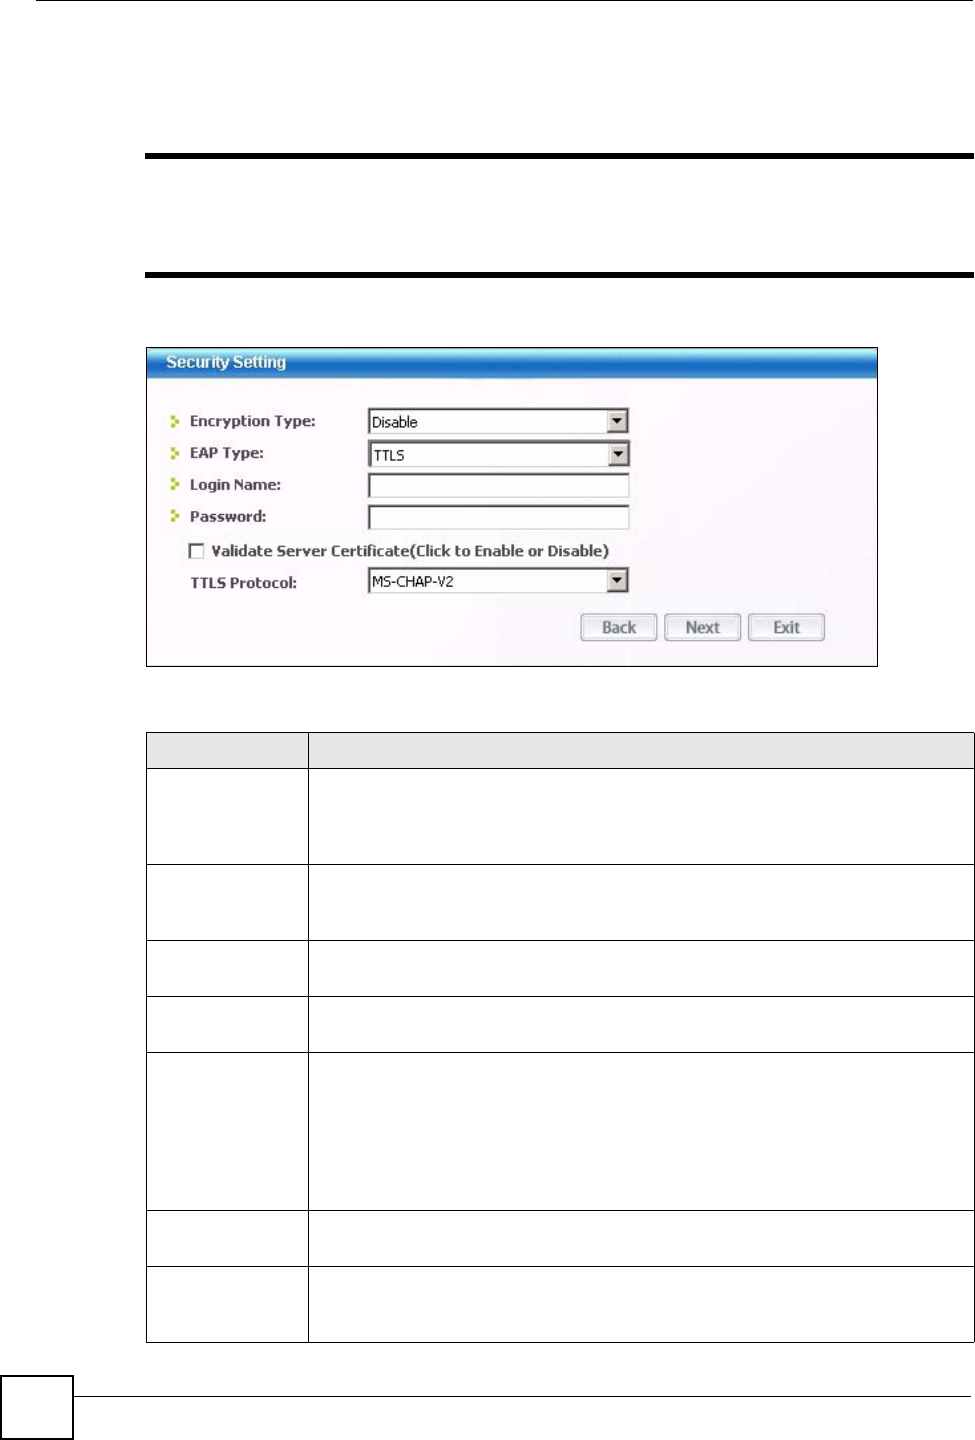
Chapter 4 Wireless Configuration
NWD210N User’s Guide
54
4.3.1.4 IEEE 802.1x
Configure IEEE 802.1x security with various authentication methods in this screen.
"The procedure to configure 802.1x is different in Windows Vista. See Section
4.6 on page 64 for information on setting up your NWD210N to use 802.1x in
Vista.
Figure 32 Security Setting: 802.1x
The following table describes the labels in this screen.
Table 11 Security Settings: IEEE 802.1x
LABEL DESCRIPTION
Encryption Type Select WEP if the access point is configured to use 802.1x with WEP encryption.
A dynamic WEP key is generated automatically.
Otherwise, select Disable (at the time of writing, this is not available in Windows
Vista).
EAP Type The type of authentication you use depends on the RADIUS server or AP.
Select an authentication method from the drop down list. Options are TLS, PEAP
and TTLS (at the time of writing, TTLS is not available in Windows Vista).
Login Name Enter a user name.
This is the user name that you or an administrator set up on a RADIUS server.
Password This field is not available when you select TLS in the EAP Type field.
Enter the password associated with the user name above.
Certificate This field is only available when you select TLS in the EAP Type field.
Click Browse to select a certificate.
Note: You must first have a wired connection to a network and
obtain the certificate(s) from a certificate authority (CA).
Consult your network administrator for more information.
Validate Server
Certificate
Select this to verify the certificate of the authentication server.
If you select this and click Next, the Server Certificate Setting screen displays.
PEAP Inner EAP This field is only available when you select PEAP in the EAP Type field.
The PEAP method used by the RADIUS server or AP for client authentication is
MS CHAP v2.
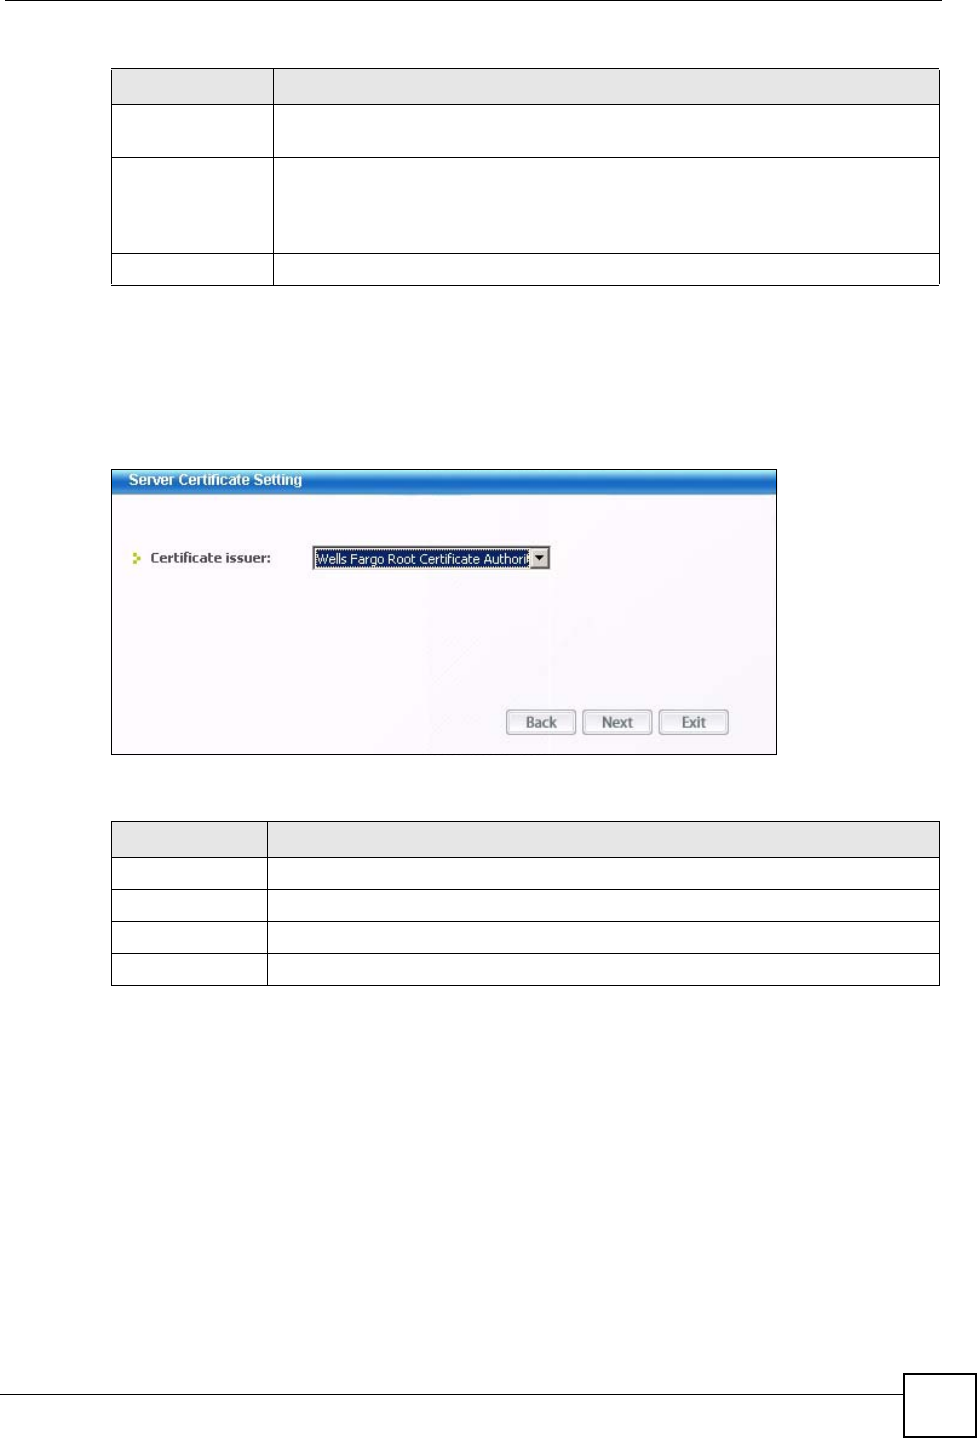
Chapter 4 Wireless Configuration
NWD210N User’s Guide 55
4.3.2 Server Certificate Setting Screen
This screen displays if you selected Validate Server Certificate in the WPA, WPA2 or
802.1x screens.
Figure 33 Server Certificate Setting Screen
The following table describes the labels in this screen.
4.3.3 Summary Screen
Use this screen to confirm and save the security settings.
Back Click Back to go to the Site Survey screen to select and connect to another
network.
Next Click Next to confirm your selections and advance to the Summary screen (refer
to Section 4.3.3 on page 55.)
If you selected Validate Server Certificate, the Server Certificate Setting
screen displays (refer to Section 4.3.2 on page 55).
Exit Click Exit to return to the Site Survey screen without saving.
Table 11 Security Settings: IEEE 802.1x
LABEL DESCRIPTION
Table 12 Server Certificate Setting
LABEL DESCRIPTION
Certificate Issuer Select the name of the certificate authority from the list.
Back Click Back to return to the previous screen.
Next Click Next to continue to the Summary screen.
Exit Click Exit to return to the Site Survey screen without saving.
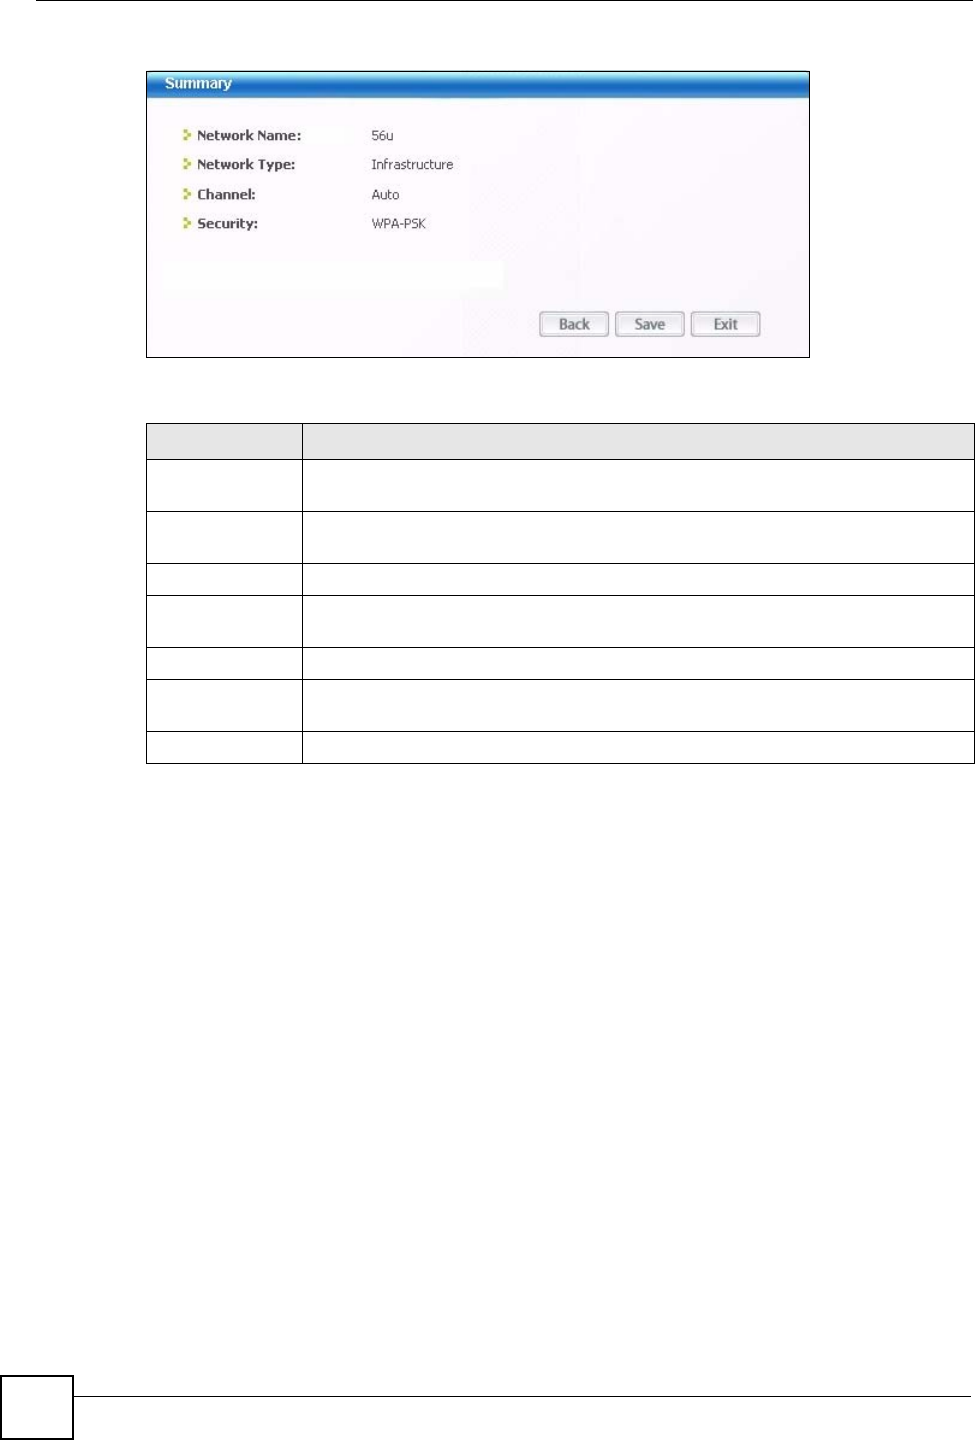
Chapter 4 Wireless Configuration
NWD210N User’s Guide
56
Figure 34 Summary Screen
The following table describes the labels in this screen.
4.4 The Profile Screen
A profile is a set of wireless parameters that you need to connect to a wireless network. With a
profile activated, each time you start the NWD210N, it automatically scans for the specific
SSID and joins that network with the pre-defined wireless security settings. If the specified
network is not available, the NWD210N cannot connect to a network.
If you do not configure and activate a profile, each time you start the NWD210N, the
NWD210N uses the default profile to connect to any available network that has no security
enabled.
The default profile is a profile that allows you to connect to any SSID that has no security
enabled.
Click the Profile tab in the ZyXEL utility program to display the Profile screen as shown next.
The profile function allows you to save the wireless network settings in this screen, or use one
of the pre-configured network profiles.
Table 13 Summary Screen
LABEL DESCRIPTION
Network Name
(SSID)
This field displays the SSID previously entered.
Network Type This field displays the network type (Infrastructure or Ad-Hoc) of the wireless
device.
Channel This field displays the channel number used by the profile.
Security This field shows whether data encryption is activated (WEP, WPA, WPA-PSK,
WPA2, WPA2-PSK, 802.1x) or inactive (DISABLE).
Back Click Back to return to the previous screen.
Save Click Save to save the changes back to the NWD210N and display the Link Info
screen.
Exit Click Exit to discard changes and return to the Site Survey screen.
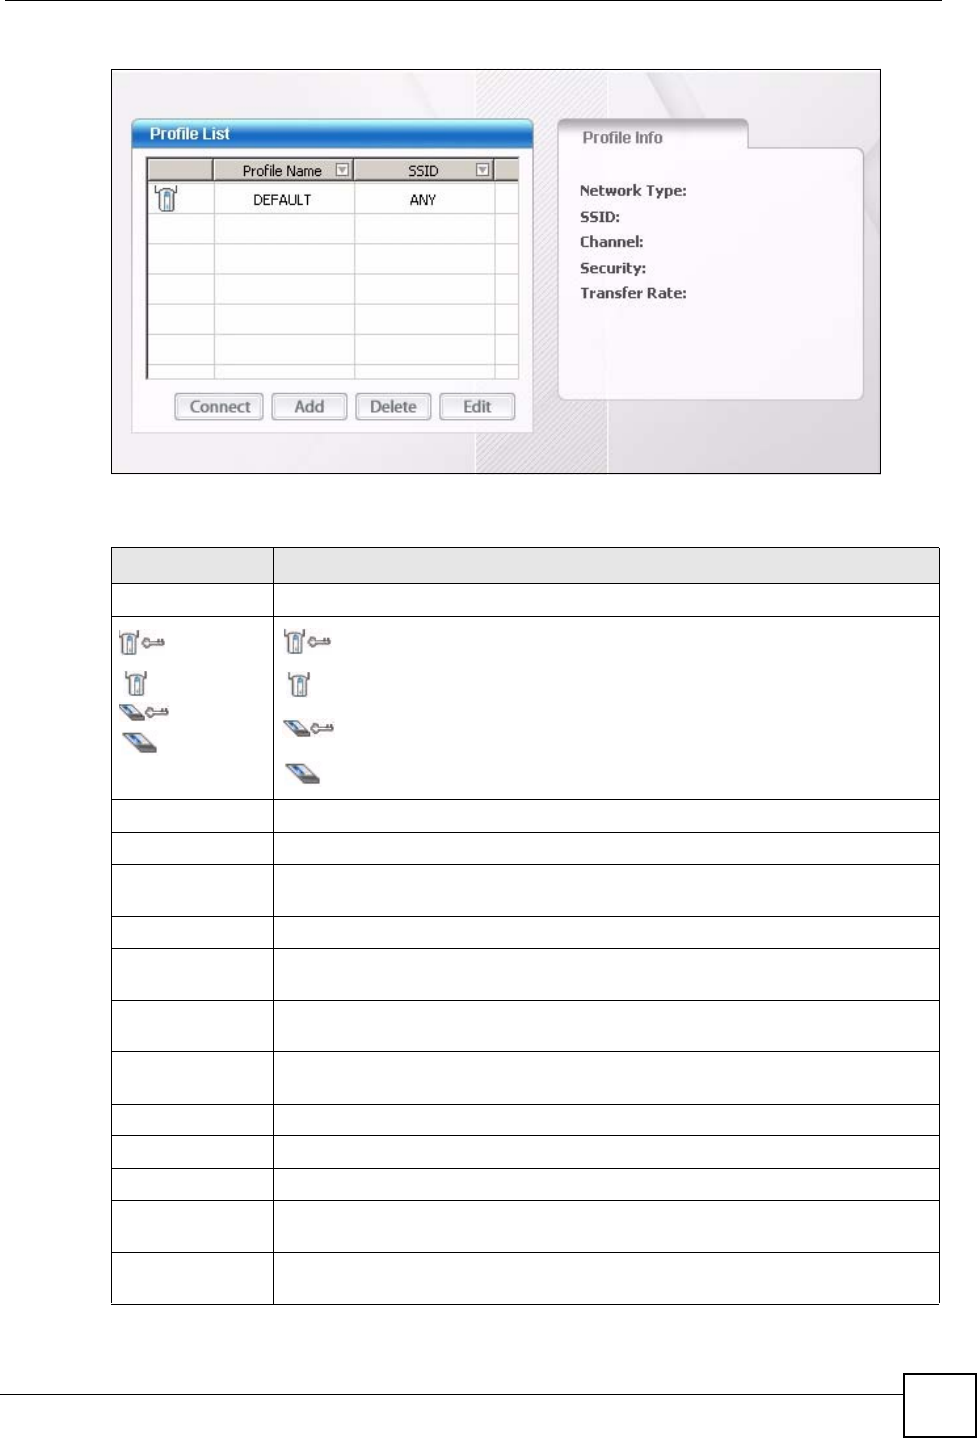
Chapter 4 Wireless Configuration
NWD210N User’s Guide 57
Figure 35 Profile
The following table describes the labels in this screen.
Table 14 Profile
LABEL DESCRIPTION
Profile List Click a column heading to sort the entries.
,
,
or
denotes that the wireless device is in infrastructure mode and the wireless
security is activated.
denotes that the wireless device is in infrastructure mode but the wireless
security is deactivated.
denotes that the wireless device is in Ad-Hoc mode and the wireless
security is activated.
denotes that the wireless device is in Ad-Hoc mode but the wireless
security is deactivated.
Profile Name This is the name of the pre-configured profile.
SSID This is the SSID of the wireless network to which the selected profile associate.
Connect To use and activate a previously saved network profile, select a pre-configured
profile name in the table and click Connect.
Add To add a new profile into the table, click Add.
Delete To delete an existing wireless network configuration, select a profile in the table
and click Delete.
Edit To edit an existing wireless network configuration, select a profile in the table and
click Edit.
Profile Info The following fields display detailed information of the selected profile in the
Profile List table.
Network Type This field displays the network type (Infrastructure or Ad-Hoc) of the profile.
SSID This field displays the network’s Service Set IDentity (the name of the network).
Channel This field displays the channel number used by the profile.
Security This field shows whether data encryption is activated (WEP, WPA, WPA-PSK,
WPA2, WPA2-PSK or 802.1x) or inactive (DISABLE).
Transfer Rate This field displays the transmission speed of the selected profile in megabits per
second (Mbps).
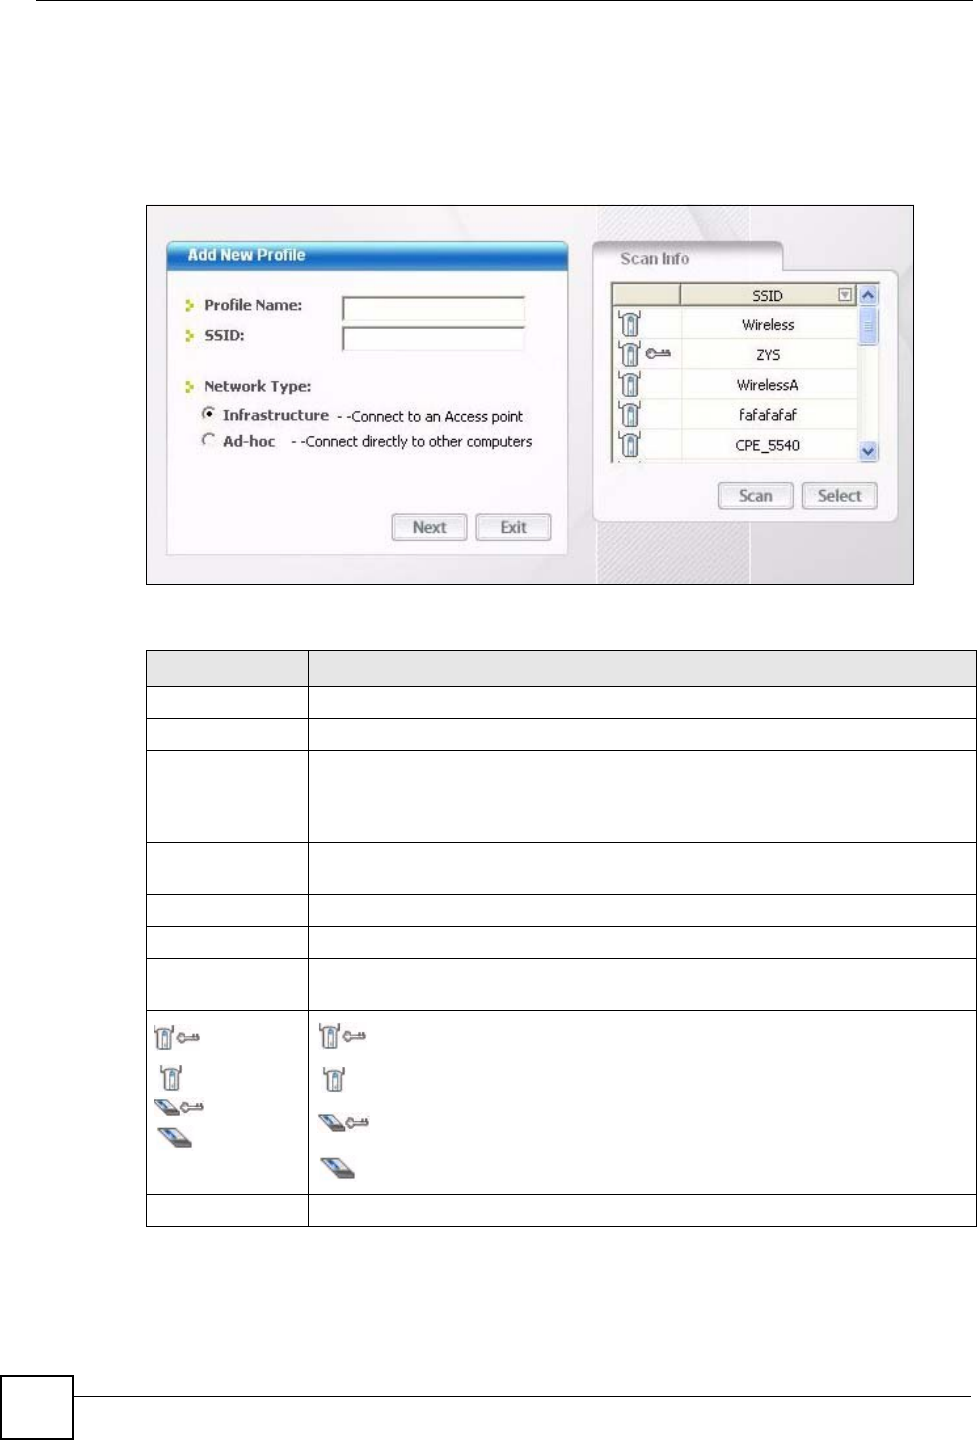
Chapter 4 Wireless Configuration
NWD210N User’s Guide
58
4.4.1 Adding a New Profile
Follow the steps below to add a new profile.
1Click Add in the Profile screen. An Add New Profile screen displays as shown next.
Figure 36 Profile: Add a New Profile
The following table describes the labels in this screen.
Table 15 Profile: Add a New Profile
LABEL DESCRIPTION
Add New Profile
Profile Name Enter a descriptive name in this field.
SSID Select an available wireless device in the Scan Info table and click Select, or
enter the SSID of the wireless device to which you want to associate in this field
manually. Otherwise, enter Any to have the NWD210N associate to any AP or
roam between any infrastructure wireless networks.
Network Type Select Infrastructure to associate to an AP. Select Ad-Hoc to associate to a peer
computer.
Next Click Next to go to the next screen.
Exit Click Exit to go back to the previous screen without saving.
Scan Info This table displays the information of the available wireless networks within the
transmission range.
,
,
or
denotes that the wireless device is in infrastructure mode and the wireless
security is activated.
denotes that the wireless device is in infrastructure mode but the wireless
security is deactivated.
denotes that the wireless device is in Ad-Hoc mode and the wireless
security is activated.
denotes that the wireless device is in Ad-Hoc mode but the wireless
security is deactivated.
SSID This field displays the SSID (Service Set IDentifier) of each AP or peer device.
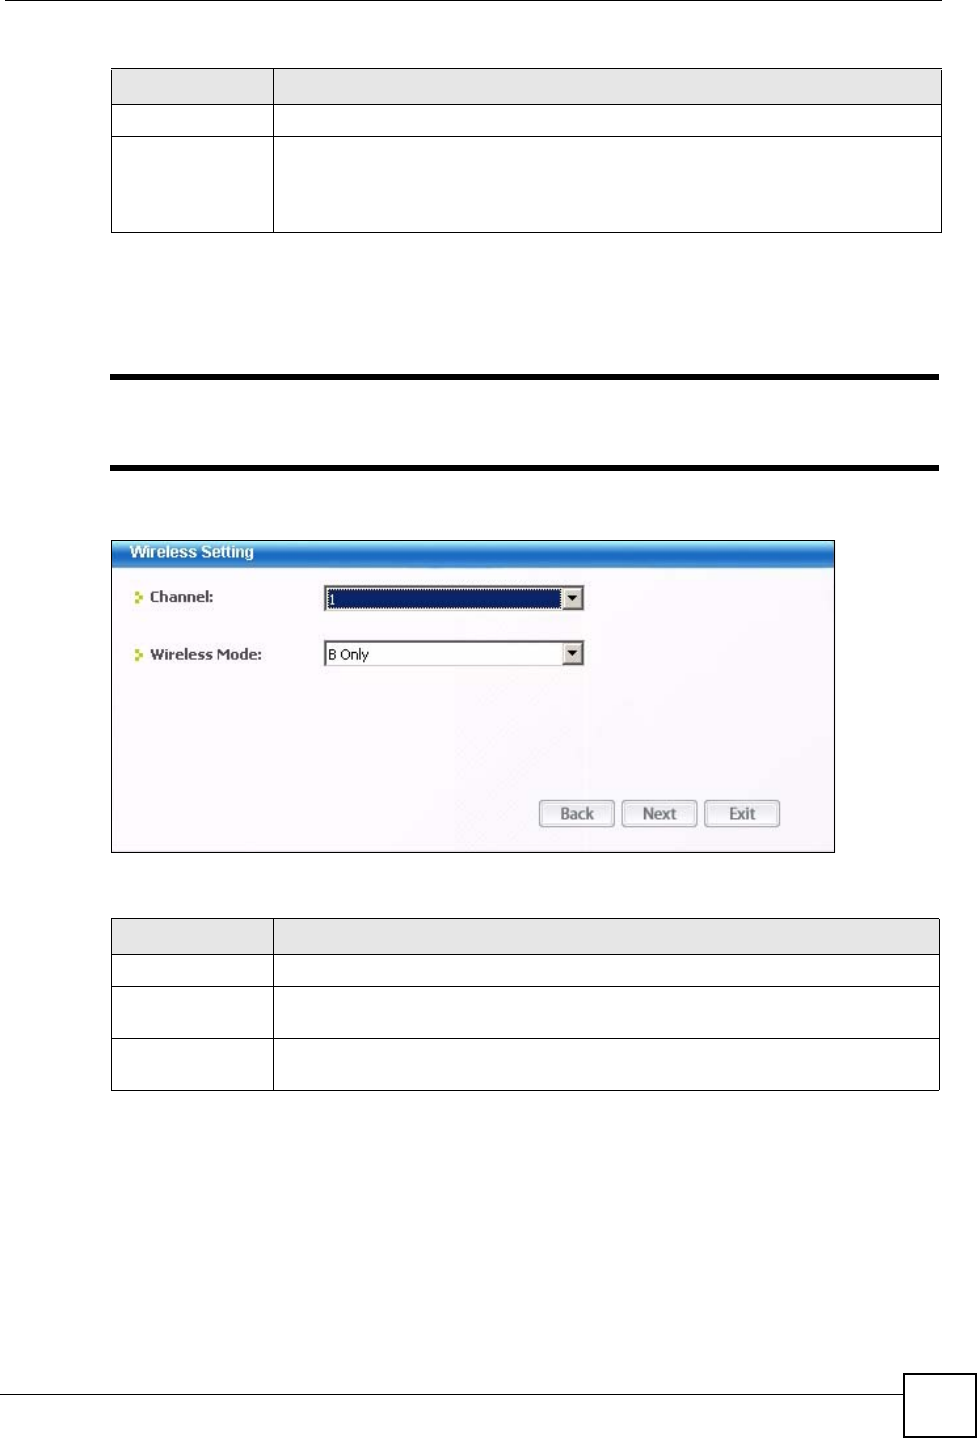
Chapter 4 Wireless Configuration
NWD210N User’s Guide 59
2If you select the Infrastructure network type in the previous screen, skip to step 3. If
you select the Ad-Hoc network type in the previous screen, a screen displays as follows.
Select a Channel number and Wireless Mode and click Next to continue.
"To associate to an ad-hoc network, you must use the same channel as the
peer computer.
Figure 37 Profile: Wireless Settings
The following table describes the labels in this screen.
3If you selected Infrastructure network type in the first screen, select WEP, WPA,
WPA2, WPA-PSK, WPA2-PSK or 802.1x from the drop-down list box to enable data
encryption. If you selected Ad-Hoc network type in the first screen, you can use only
WEP encryption method. Otherwise, select DISABLE to allow the NWD210N to
communicate with the access points or other peer wireless computers without any data
encryption, and skip to step 5.
Scan Click Scan to search for available wireless devices within transmission range.
Select Select an available wireless device in the table and click Select to add it to this
profile.
Whenever you activate this profile, the NWD210N associates to the selected
wireless network only.
Table 15 Profile: Add a New Profile (continued)
LABEL DESCRIPTION
Table 16 Profile: Wireless Settings
LABEL DESCRIPTION
Wireless Settings
Channel Select a channel number from the drop-down list box. To associate to an ad-hoc
network, you must use the same channel as the peer computer.
Wireless Mode This is the wireless standard the NWD210N uses. In Ad-Hoc mode, you can use
only 802.11b or 802.11g.

Chapter 4 Wireless Configuration
NWD210N User’s Guide
60
Figure 38 Profile: Wireless Settings
4The screen varies depending on the encryption method you select in the previous screen.
The settings must be exactly the same on the AP or other peer wireless computers as they
are on the NWD210N. Refer to Section 4.3.1 on page 51 for detailed information on
wireless security configuration.
Figure 39 Profile: Security Settings
5This read-only screen shows a summary of the new profile settings. Verify that the
settings are correct. Click Save to save and go to the next screen. Click Back to return to
the previous screen. Otherwise, click Exit to go back to the Profile screen without
saving.
Figure 40 Profile: Confirm New Settings
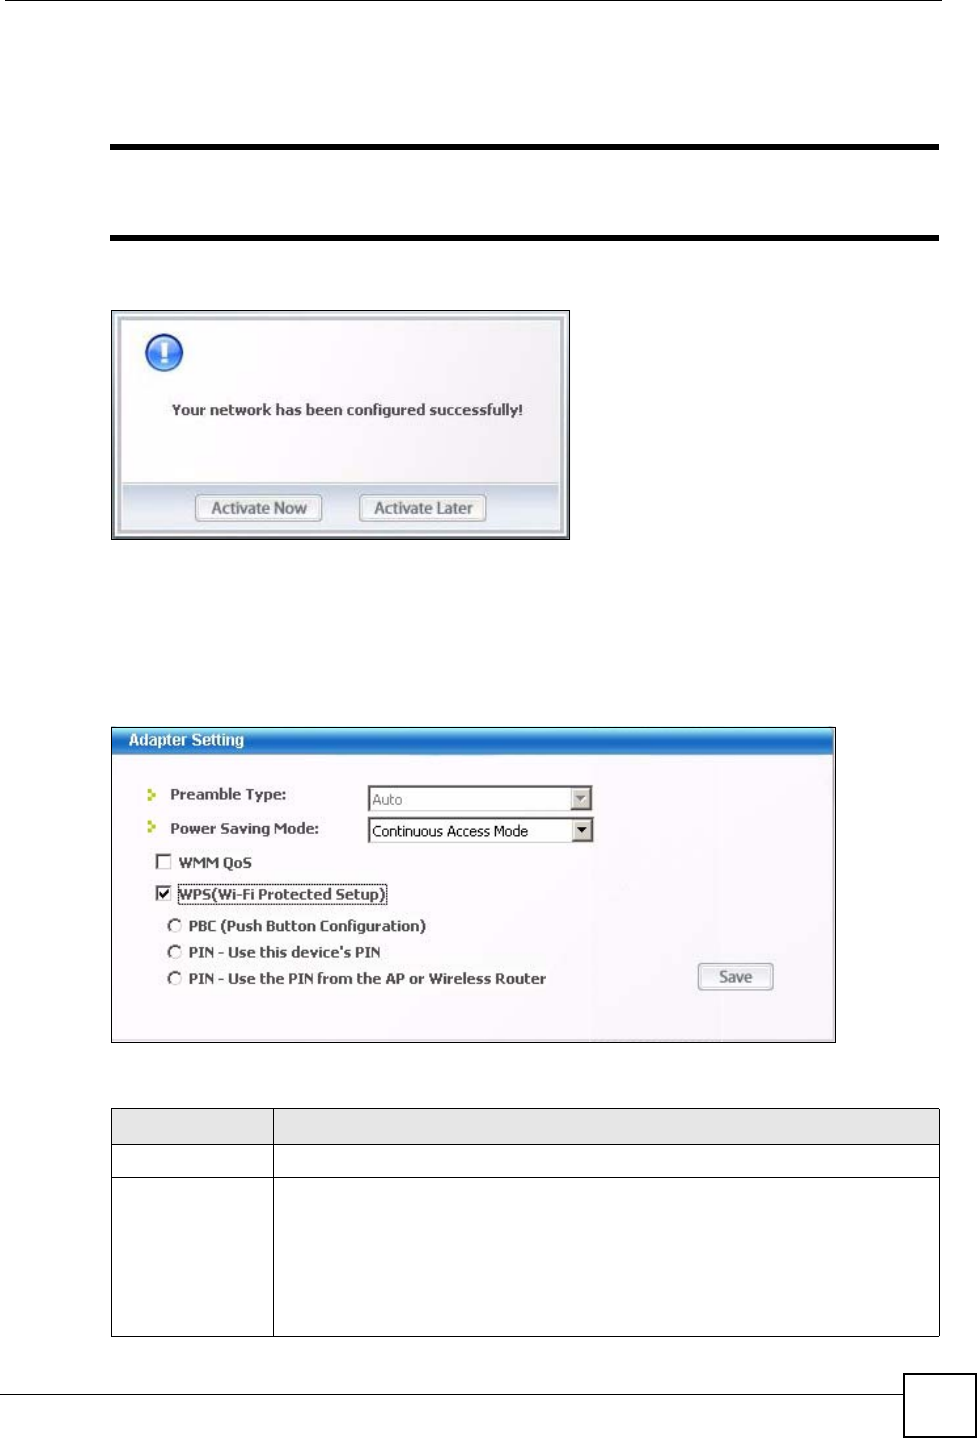
Chapter 4 Wireless Configuration
NWD210N User’s Guide 61
6To use this network profile, click the Activate Now button. Otherwise, click the
Activate Later button. You can activate only one profile at a time.
"Once you activate a profile, the ZyXEL utility will use that profile the next time it
is started.
Figure 41 Profile: Activate the Profile
4.5 The Adapter Screen
To set the other advanced features on the NWD210N, click the Adapter tab.
Figure 42 Adapter
The following table describes the labels in this screen.
Table 17 Adapter
LABEL DESCRIPTION
Adapter Setting
Preamble Type Preamble is used to signal that data is coming to the receiver. Short preamble
increases performance as less time sending preamble means more time for
sending data. All IEEE 802.11b/g compliant wireless adapters support long
preamble, but not all support short preamble.
The NWD210N automatically uses short preamble when the access point
supports it; otherwise the NWD210N uses long preamble.
At the time of writing, this field is not available in Windows Vista.
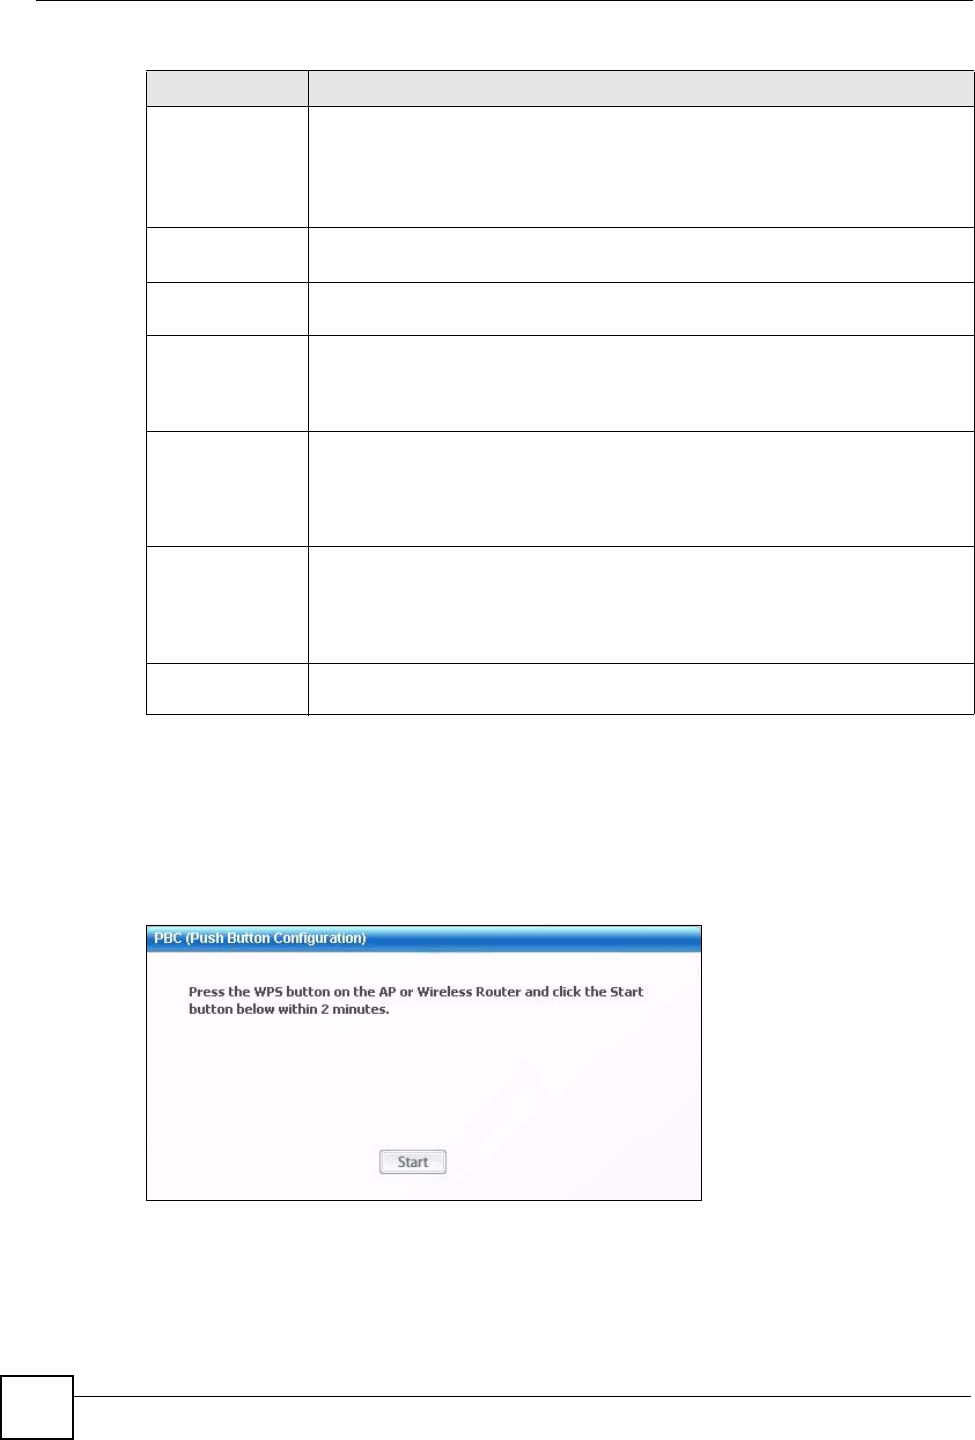
Chapter 4 Wireless Configuration
NWD210N User’s Guide
62
4.5.1 WPS: PBC (Push Button Configuration)
This screen allows you to use the WPS Push Button Configuration mode. See Section 3.3.1 on
page 40 for more information. Select WPS and PBC (Push Button Configuration) in the
Adapter screen. The following screen displays.
Figure 43 WPS: PBC (Push Button Configuration)
Press Start when you want to begin the WPS process. You must also press the button on the
other device within two minutes.
Power Saving
Mode
Select Fast Power Save to save power. This forces the NWD210N to go to sleep
mode when it is not transmitting data.
When you select Continuous Access Mode, the NWD210N will never go to
sleep mode.
At the time of writing, this field is not available in Windows Vista.
WMM QoS Select this to enable Wi-fi MultiMedia Quality of Service on the NWD210N.
At the time of writing, this field is not available in Windows Vista.
WPS (WiFi
Protected Setup)
Select this to enable Wi-fi Protected Setup on the NWD210N.
PBC (Push Button
Configuration)
Select this to use the PBC (Push-Button Configuration) WPS mode. When you
use the PBC mode you do not use a PIN.
When you select this, the PBC (Push Button Configuration screen appears (see
Section 4.5.1 on page 62).
PIN - Use This
Device’s PIN
Select this to use the PIN (Personal Identification Number) WPS mode. Use this
option when you want to enter the NWD210N’s PIN in another WPS-enabled
device.
When you select this, the PIN - Use this Device’s PIN screen appears (see
Section 4.5.2 on page 63).
PIN - Use the PIN
From the AP or
Wireless Router
Select this to use the PIN (Personal Identification Number) WPS mode. Use this
option when you want to enter the PIN from another WPS-enabled device in the
NWD210N.
When you select this, the PIN - Use the PIN From the AP or Wireless Router
screen appears (see Section 4.5.3 on page 63).
Save Click Save to save the changes to the NWD210N and return to the Link Info
screen.
Table 17 Adapter (continued)
LABEL DESCRIPTION

Chapter 4 Wireless Configuration
NWD210N User’s Guide 63
4.5.2 WPS: PIN - Use this Device’s PIN
This screen allows you to use the WPS Personal Identification Number mode, by entering the
NWD210N’s unique PIN in the configuration utility of the other WPS-enabled device. See
Section 3.3.2 on page 41 for more information. Select WPS and PIN - Use this Device’s PIN
in the Adapter screen. The following screen displays.
Figure 44 WPS: PIN - Use this Device’s PIN
The following table describes the labels in this screen.
4.5.3 WPS: PIN - Use the PIN from the AP or Wireless Router
This screen allows you to use the WPS Personal Identification Number mode, by entering the
PIN from another WPS-enabled device into the NWD210N’s utility. See Section 3.3.2 on page
41 for more information. Select WPS and PIN - Use the PIN from the AP or Wireless
Router in the Adapter screen. The following screen displays.
Table 18 WPS: PIN - Use this Device’s PIN
LABEL DESCRIPTION
This device’s PIN This is the NWD210N’s Personal Identification Number (PIN). This
field is read-only. Enter the number that displays in this field into the
configuration interface of the other WPS-enabled device.
Note: Each time this screen displays, the PIN is
different. The PIN is valid for only one WPS
transaction.
Start Click this to start WPS. You must start WPS on the other WPS-
enabled device within two minutes.
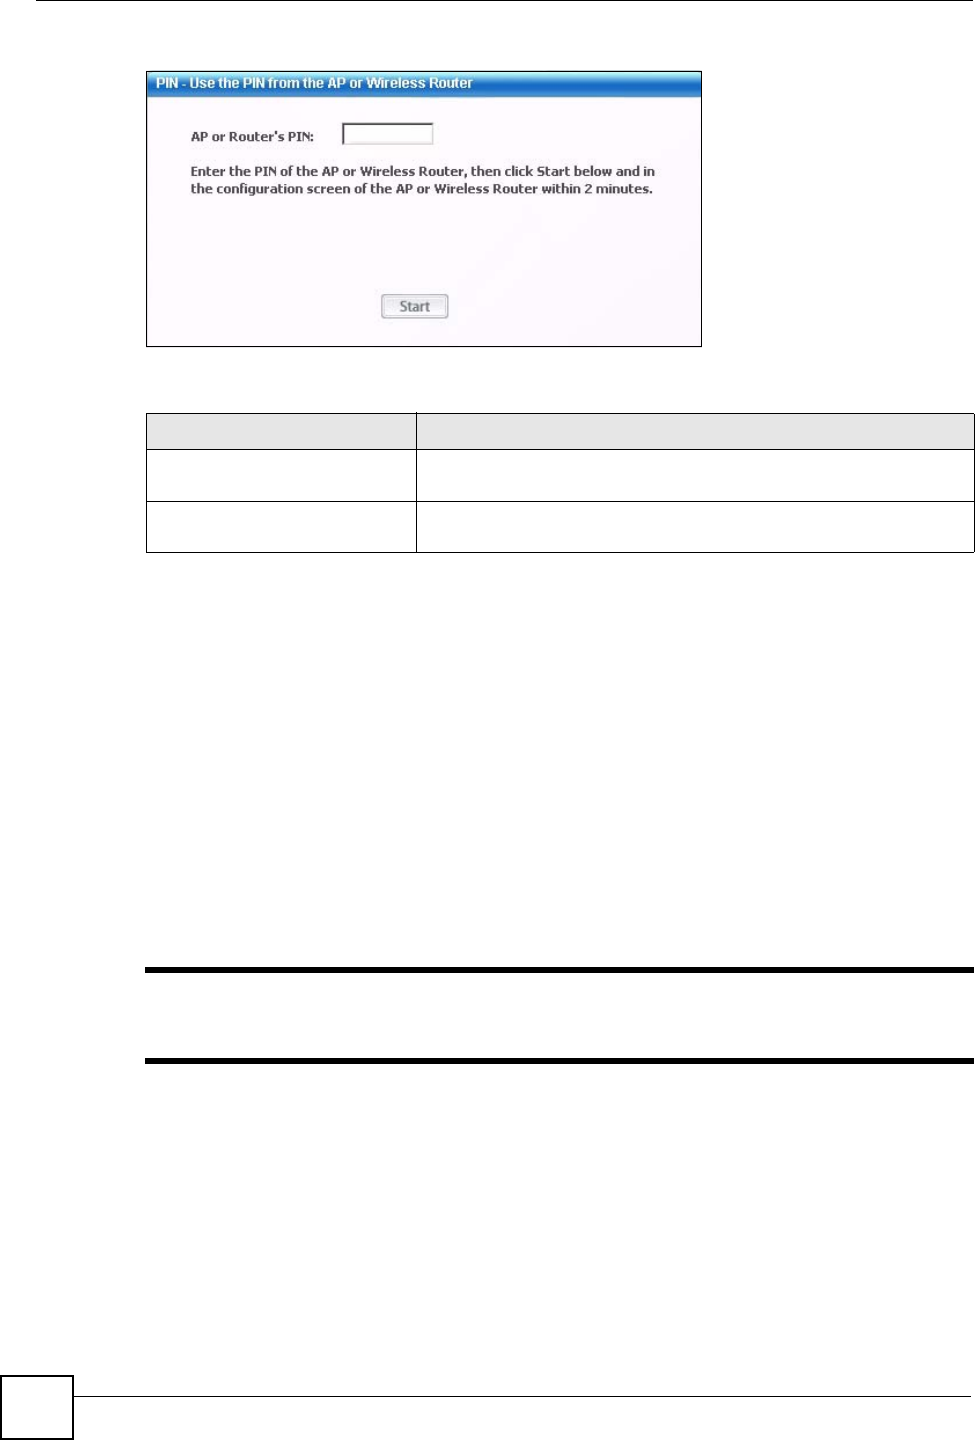
Chapter 4 Wireless Configuration
NWD210N User’s Guide
64
Figure 45 WPS: PIN - Use the PIN from the AP or Wireless Router
The following table describes the labels in this screen.
4.6 Security Settings in Windows Vista
When you use the NWD210N in Windows Vista, the procedure for setting up WPA, WPA2
and 802.1x security settings is different from that of other operating systems (other security
types are not affected).
The procedures for setting up WPA, WPA2 or 802.1x in Vista are the same. However, the
procedure differs depending on whether you use PEAP (Protected Extensible Authentication
Protocol) or TLS (Transport Layer Security) encryption. Consult your network administrator
if you are unsure which type of encryption to use.
See section Section 4.6.1 on page 64 to use PEAP, or see section Section 4.6.2 on page 65 to
use TLS.
"TTLS (Tunneled TLS) is not available when using Windows Vista, at the time
of writing.
4.6.1 Using PEAP in Vista
Take the following steps to set up WPA, WPA2 or 802.1x security using PEAP in Windows
Vista.
1Either select the AP to which you want to connect in the Site Survey screen (see Section
4.3 on page 49), or configure a profile in the normal way (see Section 4.4 on page 56).
Table 19 WPS: PIN - Use the PIN from the AP or Wireless Router
LABEL DESCRIPTION
AP or Router’s PIN Enter the PIN from your AP or wireless router in this field before you
click Start.
Start Click this to start WPS. You must start WPS on the other WPS-
enabled device within two minutes.
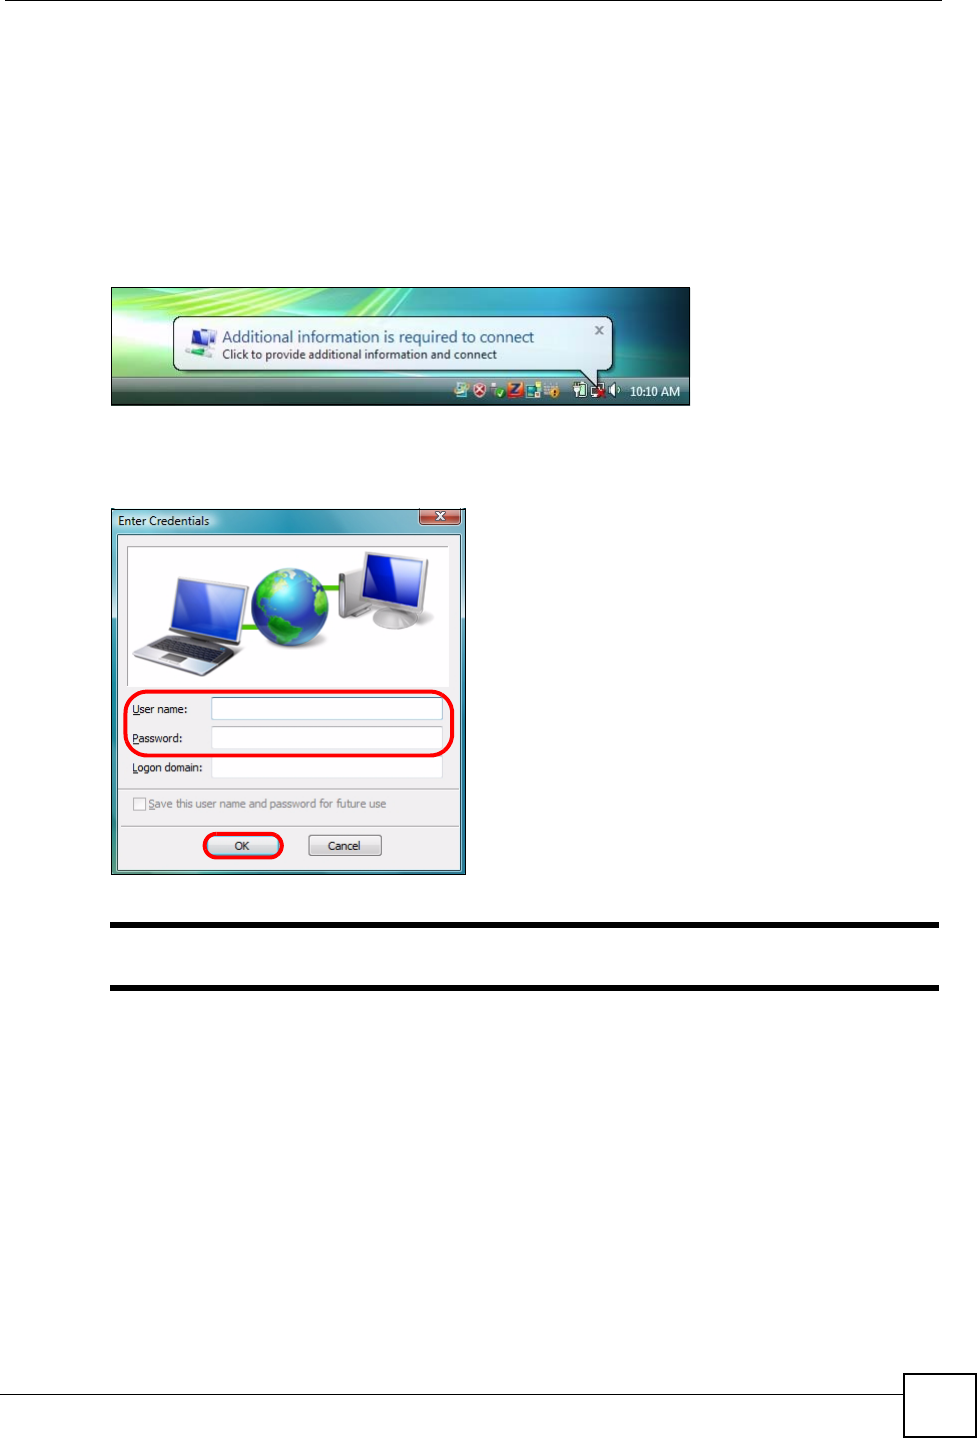
Chapter 4 Wireless Configuration
NWD210N User’s Guide 65
2In the WPA, WPA2 or 802.1x security screen (see Section 4.3.1.3 on page 52 and
Section 4.3.1.4 on page 54), select PEAP as the EAP Type. Note that the Login Name
and Password fields are greyed-out (not available).
3Click Next.
4In the Summary screen that appears, click Save.
5A message similar to the following appears in the bottom-right of your screen. Click the
message.
Figure 46 Vista Security: Additional Information Required
6The Enter Credentials screen displays. Enter your User name and Password for the
network to which you want to connect.
Figure 47 Vista Security: Enter Credentials
"If you are not sure what to enter, contact your network administrator.
7Click OK. The Enter Credentials screen disappears and the NWD210N tries to connect
to the network. The ZyXEL utility’s Link Info screen displays, showing the connection
status (see Section 4.2 on page 47). If the Link Info screen displays an active
connection, you have successfully completed the procedure.
4.6.2 Using TLS in Vista
Take the following steps to set up WPA, WPA2 or 802.1x security using TLS in Windows
Vista.
1Either select the AP to which you want to connect in the Site Survey screen (see Section
4.3 on page 49), or configure a profile (see Section 4.4 on page 56) in the normal way.
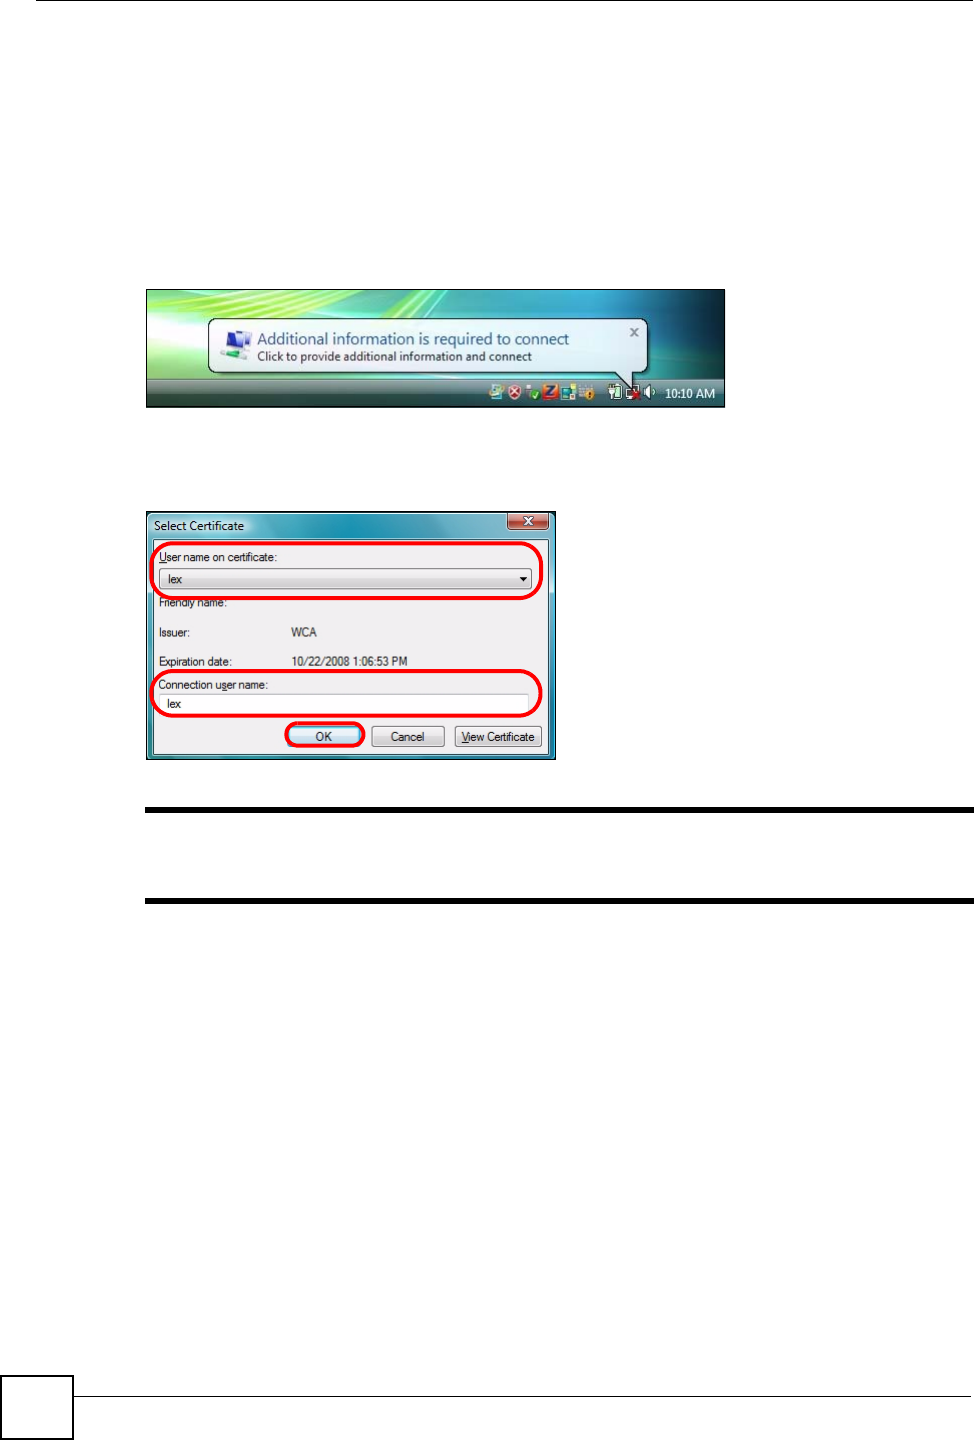
Chapter 4 Wireless Configuration
NWD210N User’s Guide
66
2In the WPA, WPA2 or 802.1x security screen, select TLS as the EAP Type. Note that
the Login Name, Certificate and Validate Server Certificate fields are greyed-out (not
available).
3Click Next.
4In the Summary screen, click Save.
5A message similar to the following appears in the bottom-right of your screen. Click the
message.
Figure 48 Vista Security: Additional Information Required
6The Select Certificate screen displays. Select the certificate you want to use in order to
authenticate with the server, and enter your username.
Figure 49 Vista Security: Select Certificate
"If you do not have the right certificate, or are not sure which certificate you
should use, contact your network administrator.
7Click OK. The Select Certificate screen disappears and the NWD210N tries to connect
to the network. The ZyXEL utility’s Link Info screen displays, showing the connection
status (see Section 4.2 on page 47). If the Link Info screen displays an active
connection, you have successfully completed the procedure.
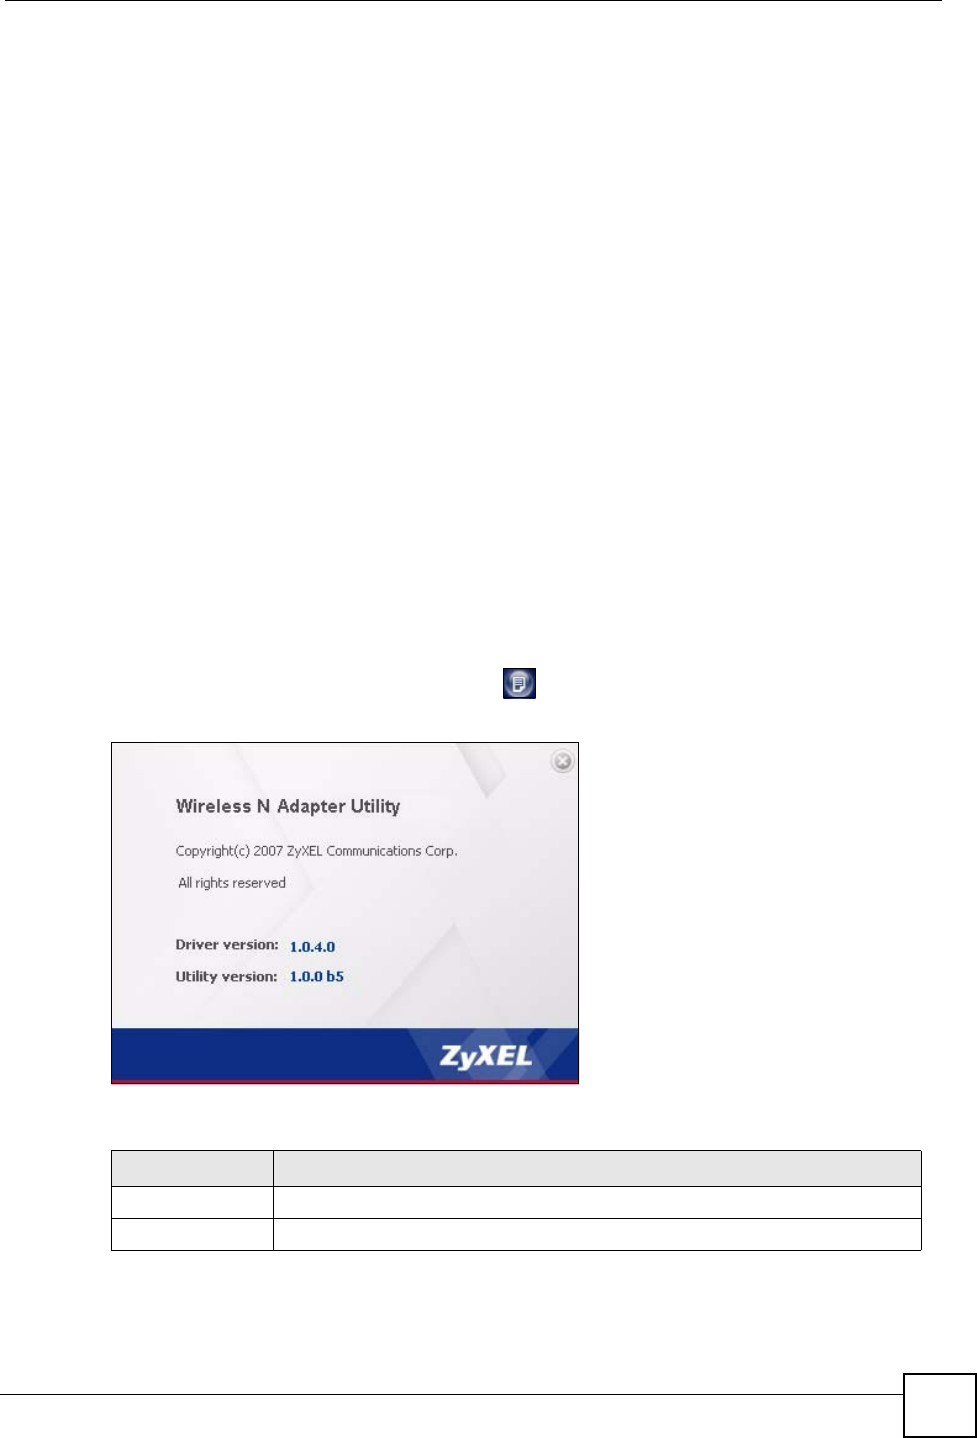
Chapter 5 Maintenance
NWD210N User’s Guide 67
CHAPTER 5
Maintenance
This chapter describes how to uninstall or upgrade the ZyXEL utility.
5.1 The About Screen
The About screen displays driver and utility version numbers of the NWD210N. To display
the screen as shown below, click the about ( ) button.
Figure 50 About
The following table describes the read-only fields in this screen.
Table 20 About
LABEL DESCRIPTION
Driver Version This field displays the version number of the NWD210N driver.
Utility Version This field displays the version number of the ZyXEL utility.

Chapter 5 Maintenance
NWD210N User’s Guide
68
5.2 Uninstalling the ZyXEL Utility
Follow the steps below to remove (or uninstall) the ZyXEL utility from your computer.
"Before you uninstall the ZyXEL utility, take note of your current wireless
configurations.
1Click Start, (All) Programs, ZyXEL Wireless N USB Utility, Uninstall ZyXEL
Wireless N USB Adapter Utility.
2When prompted, click OK or Ye s to remove the driver and the utility software.
Figure 51 Uninstall: Confirm
3Click Finish to complete uninstalling the software and restart the computer when
prompted.
Figure 52 Uninstall: Finish
5.3 Upgrading the ZyXEL Utility
"Before you uninstall the ZyXEL utility, take note of your current wireless
configurations.

Chapter 5 Maintenance
NWD210N User’s Guide 69
To perform the upgrade, follow the steps below.
1Download the latest version of the utility from the ZyXEL web site and save the file on
your computer.
2Follow the steps in Section 5.2 on page 68 to remove the current ZyXEL utility from
your computer.
3Restart your computer when prompted.
4Disconnect the NWD210N from your computer.
5Double-click on the setup program for the new utility to start the ZyXEL utility
installation.
6Insert the NWD210N and check the version numbers in the About screen to make sure
the new utility is installed properly.

Chapter 5 Maintenance
NWD210N User’s Guide
70