e DATA TT1000 Badge Reader User Manual configuration
e-DATA GmbH Badge Reader configuration
e DATA >
Contents
- 1. installation user manual
- 2. configuration user manual
configuration user manual
Terminal Configuration Manual TT1000 Series
06.2009 Version 1.1 1-1
Terminal Configuration Man
ual
TT1000 Series
Version 1.1
e-DATA GmbH

Terminal Configuration Manual TT1000 Series
1-2 06.2009 Version 1.1
e-DATA GmbH
Mollenbachstrasse 19
D-71229 Leonberg
Germany
www.e-data.com
Phone +49 7152 93979-0
Fax +49 7152 93979-50
Terminal Configuration Manual
TT1000 Series
Version 1.1
Copyright 2009 e-DATA GmbH
This manual is protected. Reproduction or translation of the
manual or its transmission on other electronic media, even in
extract form, is only allowed with the express written permis
sion
of e-DATA GmbH.
e-DATA GmbH reserves the right to make changes to the In-
stallation and Maintenance manual without prior notice.
e-DATA GmbH does not accept any liability whatever for direct
and indirect damage, espe
cially loss of data, that result from the
usage of the TT1000 Series terminal, the software or the man-
ual!

Terminal Configuration Manual TT1000 Series
06.2009 Version 1.1 1-3

Terminal Configuration Manual TT1000 Series
1-4 06.2009 Version 1.1
1 Content
1Content 1-4
2Terminal specification 2-6
2.1 Feature overview .................................................................. 2-6
3Setting up the TT1000 Series terminal 3-8
4Keyboard assignment 4-10
4.1 Key assignment - reduced keyboard (11 keys).................... 4-10
5Terminal start-up 5-11
5.1 Using the start-up prompts.................................................. 5-11
5.2 Changing the start-up prompts............................................ 5-13
6Parameter description 6-15
6.1 General parameter description............................................ 6-15
6.1.1 How to display the web interface......................................... 6-15
6.1.2 Configuration parameters.................................................... 6-16
6.1.3 Configuration parameter groups – overview........................ 6-17
6.2 Detailed parameter description ........................................... 6-17
6.2.1 System configuration........................................................... 6-18
6.2.2 Linux parameters ................................................................ 6-26
6.2.3 Network parameters............................................................ 6-28
6.2.4 Readers.............................................................................. 6-30
6.2.5 Peripheral devices .............................................................. 6-33
6.2.6 Communications parameters .............................................. 6-36
6.3 Application parameters ....................................................... 6-42
6.3.1 Application parameter groups - overview ............................ 6-42
6.3.2 Resend bookings parameters ............................................. 6-43
6.3.3 Reports parameters ............................................................ 6-44

Terminal Configuration Manual TT1000 Series
06.2009 Version 1.1 1-5
7Fingerprint terminals in practice 7-46
7.1 Introduction..........................................................................7-46
7.2 Enrollment process..............................................................7-46
7.2.1 Calling the main menu .........................................................7-46
7.2.2 Enroll...................................................................................7-47
7.2.3 Delete user ..........................................................................7-47
7.2.4 Delete all..............................................................................7-47
8Appendix for Developers 8-48
8.1 Linux commands..................................................................8-48
8.1.1 Connecting to the terminal...................................................8-48
8.1.2 Basic Linux commands........................................................8-48
8.2 Web interface page Database..............................................8-53
8.3 Web interface page Java Statistics ......................................8-55

Terminal Configuration Manual TT1000 Series
2-6 06.2009 Version 1.1
2 Terminal specification
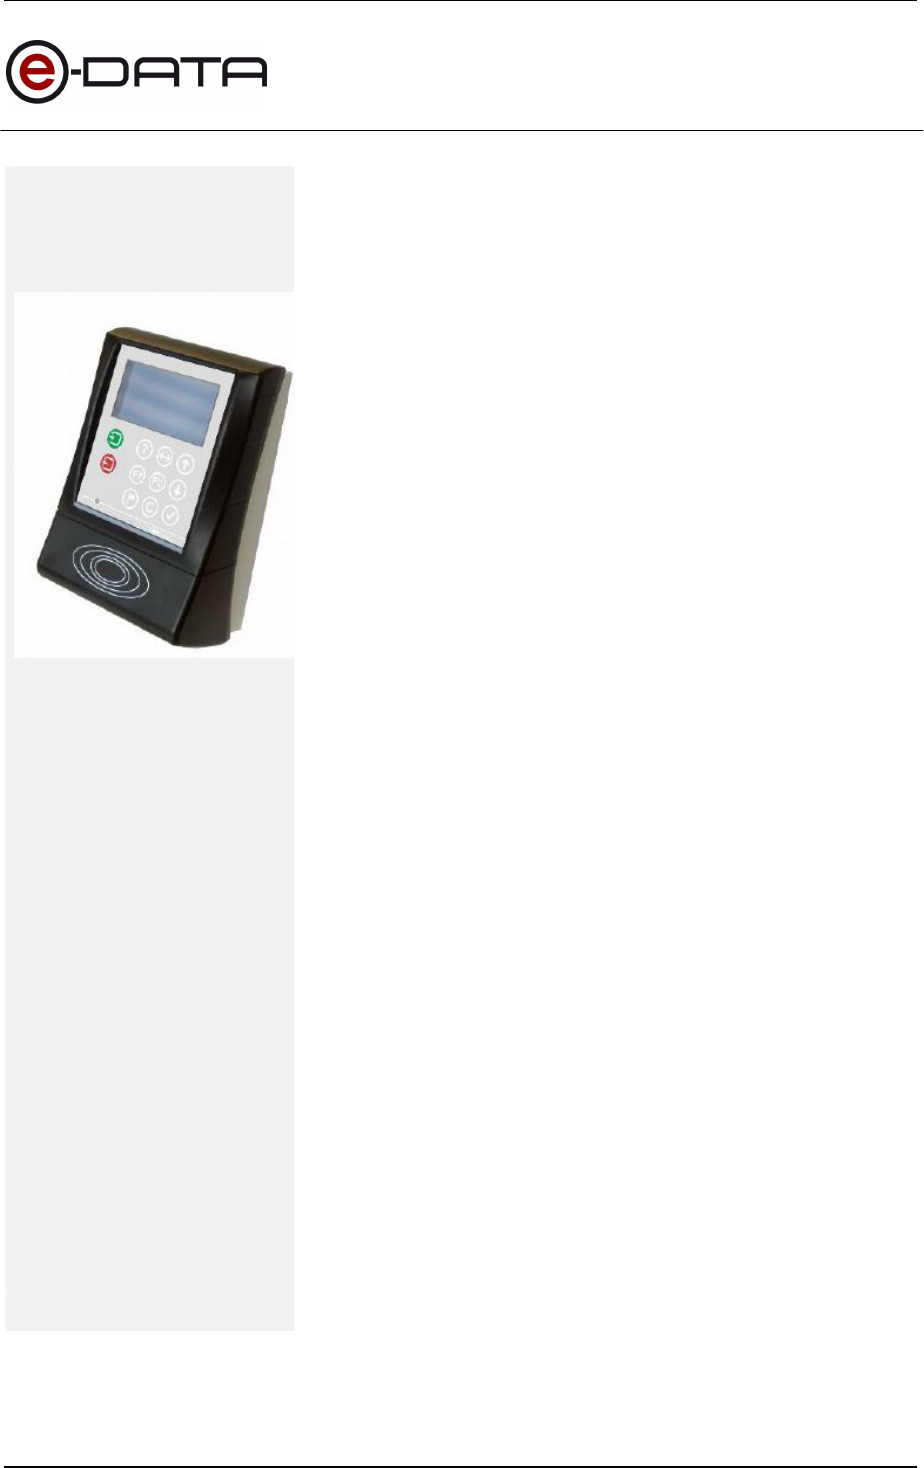
2.1 Feature overview
400 / 600 MHz Xscale CPU with Linux OS and JAVA VM
Monochrome graphics LCD with 128x64 pixels / 8x20 char-
acters, adjustable brightness
Custom keyboard layout with 11 keys
3kHz / 94dB Buzzer for acoustic feedback, two volumes
Light bar with 6 RGB-LEDs, eight base colors, adjustable
brightness
Power-supply: mains operated 100 to 230 VAC. Optionally
available PoE 802.3af or 10 to 26 VDC socket
Ethernet (TCP/IP) 100 Mbps
Optional integrated modem
Support of all leading reader technologies (Legic, HID, Mi-
fare, I-
Code, EM, Hitag and ISO 15693, Magnetic stripe and
Barcode, Fingerprint)
Two optical sensors for sabotage detection
Passive Infrared (PIR) motion sensor
USB 1.1 Full speed

Terminal Configuration Manual TT1000 Series
06.2009 Version 1.1 2-7
FCC Notes
This equipment complies with Part 15 of the FCC rules.
Any changes ormodifications not expressly approved by the manufacturer
could void the user's authority to operate the equipment.
This device complies with Part 15 of the FCC rules subject to the
following two conditions:
This device may not cause harmful interference
This device must accept all interference received, including
interference that may cause undesired operation.
NOTE:
This equipment has been tested and found to comply with the limits for a Class A digital
device, pursuant to part 15 of the FCC Rules. These limits are designed to provide
reasonable protection against harmful interference when the equipment is operated
in a commercial environment.
This equipment generates, uses, and can radiate radio frequency energy and, if not installed
and used in accordance with the instruction manual, may cause harmful interference to radio
communications. Operation of this equipment in a residential area is likely to cause harmful
interference in which case the user will be required to correct the interference at his own ex-
pense.
Terminal Configuration Manual TT1000 Series
3-8 06.2009 Version 1.1
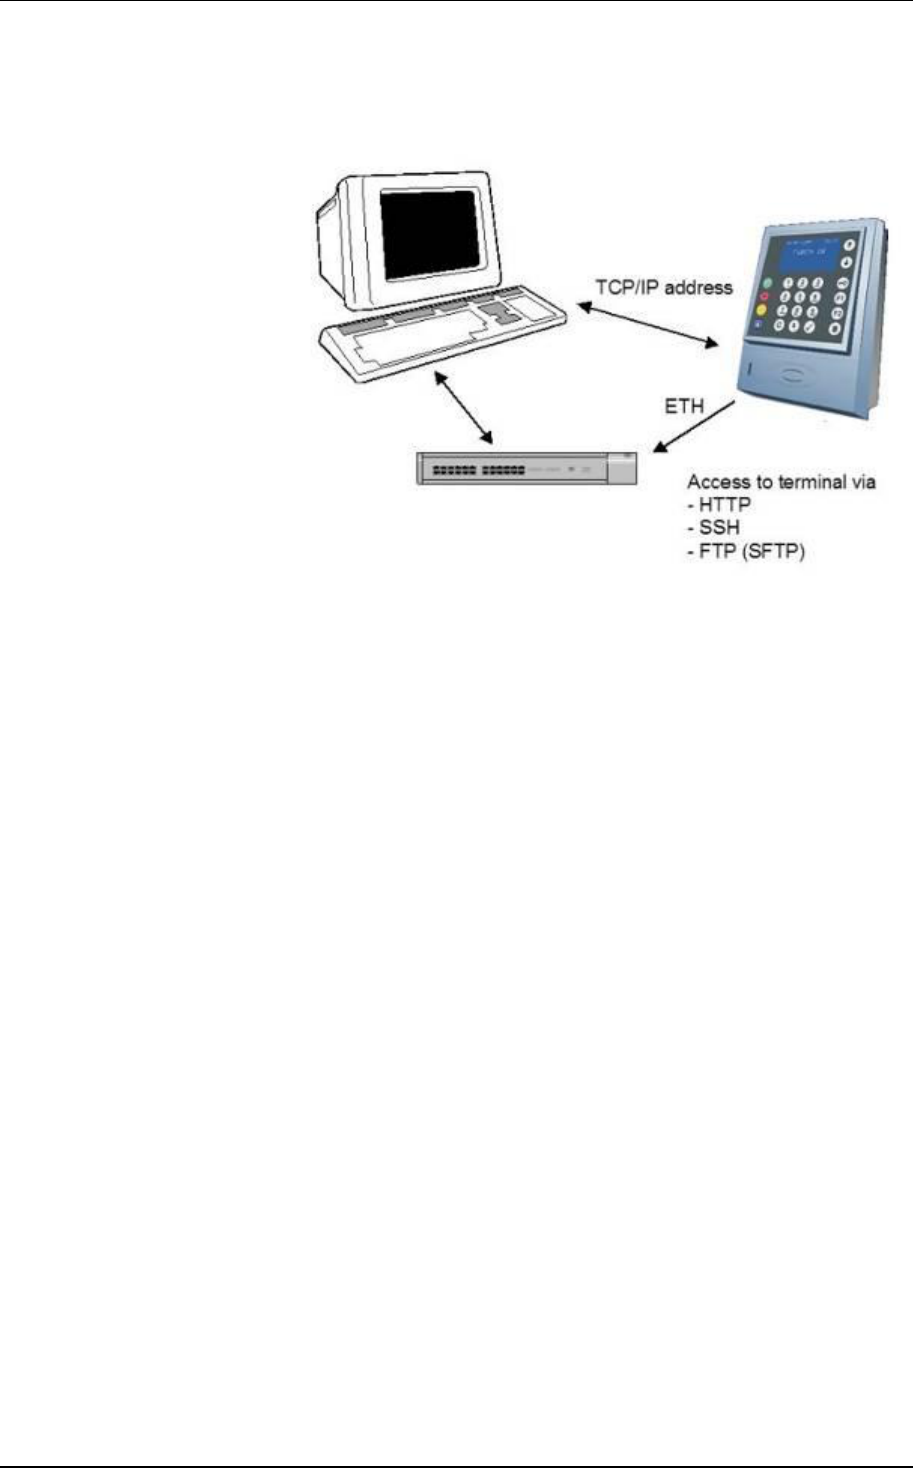
3 Setting up the TT1000 Series terminal
Connecting Connect the terminal to the power supply and (if using Ether
net)
to a networking switch. The access from a PC to the terminal is
then possible via HTTP, SSH and FTP (SFTP).
Accessing •HTTP
Accessing the web server on the terminal via HTTP is nec-
essary if the administrator wants to change the configu
ration
data.
•SSH
For remote administration using an SSH client.
•FTP/SFTP
For transferring data to an FTP client (also SFTP possible).
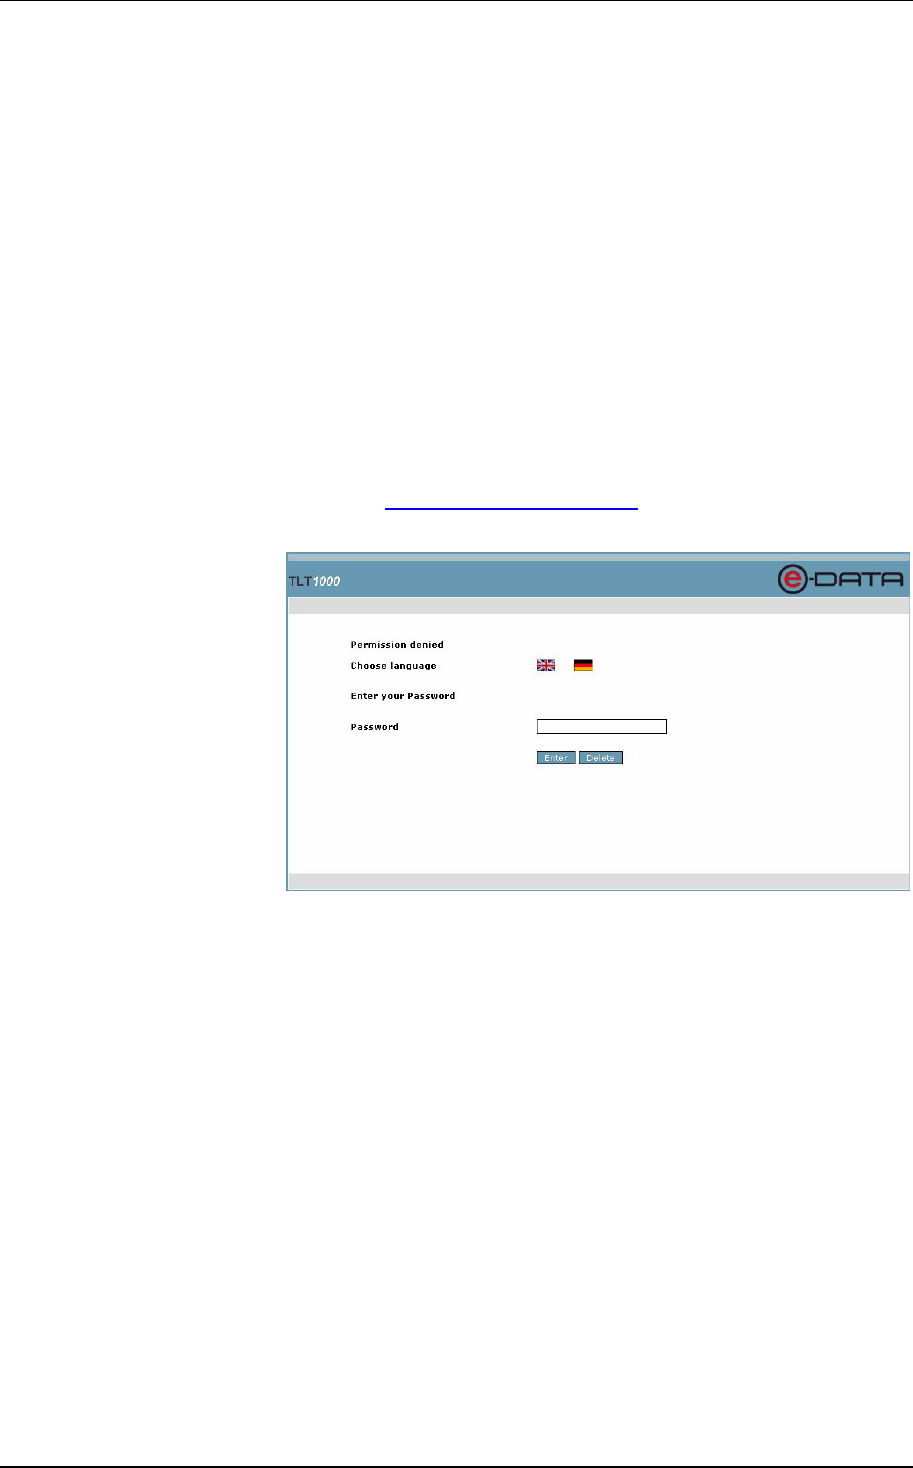
HTTP Open a browser of your choice and enter the following URL:
http://terminal-ip-address:9999
Example: http://192.168.50.77:9999
The terminal web interface is displayed. Login with the pass-
word admin. From here you can change the configura
tion data.
Terminal Configuration Manual TT1000 Series
06.2009 Version 1.1 3-9
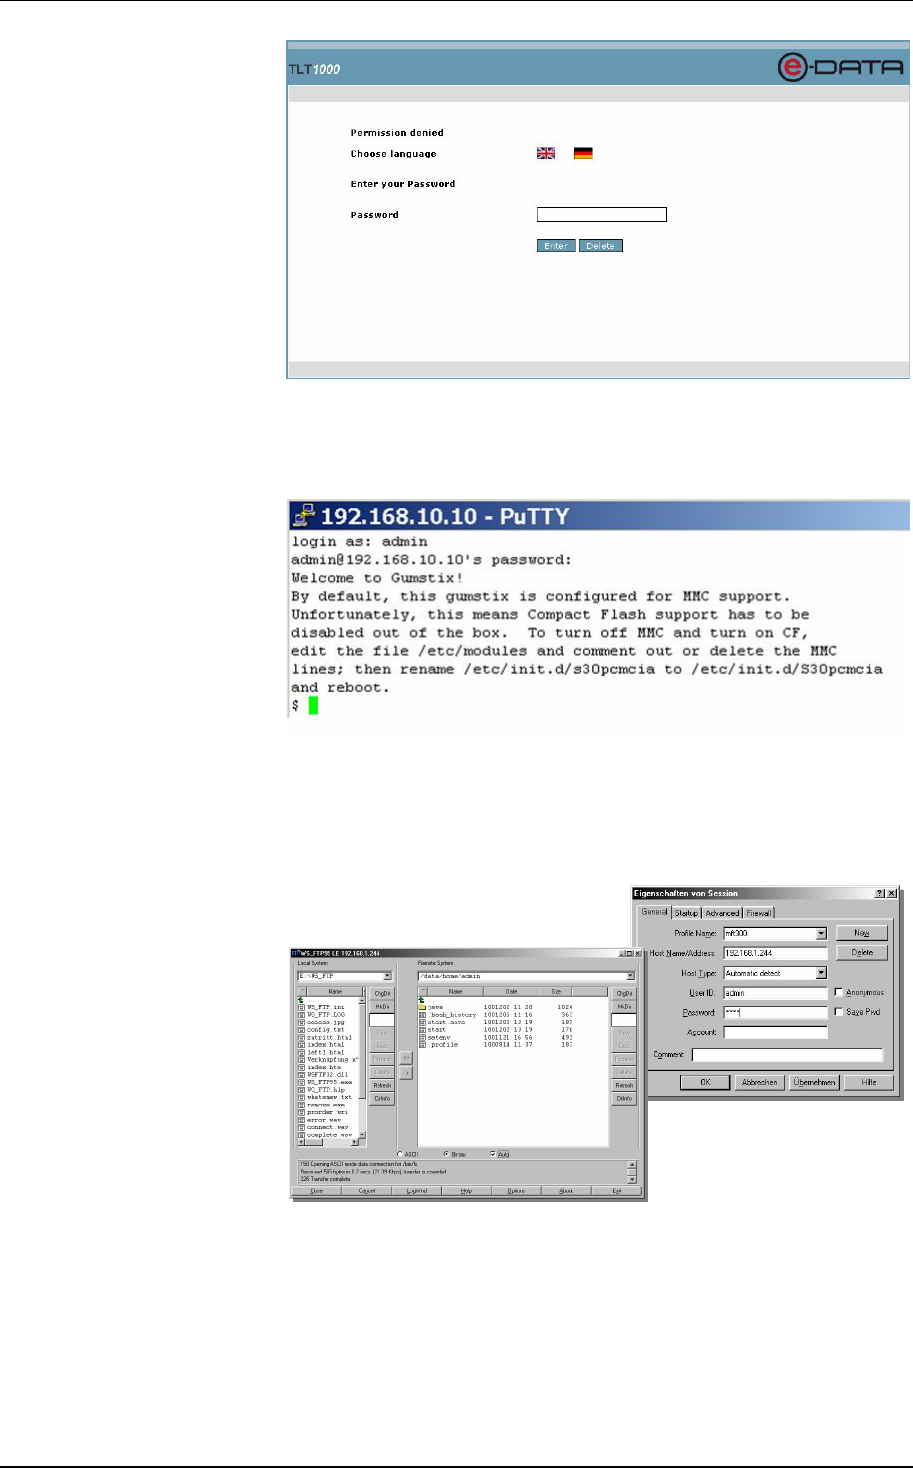
SSH Start an SSH client and open a session to the terminal’s as-
signed IP address. Log in as the user admin with the password
admin (default).
FTP Start an FTP client, e. g. WS_FTP.
In the field Hostname/Address enter the terminal IP address.
Log in with the User ID admin and the Password admin and
press OK.
The initial directory displayed is /mnt/hda1/admin.
Terminal Configuration Manual TT1000 Series
4-10 06.2009 Version 1.1
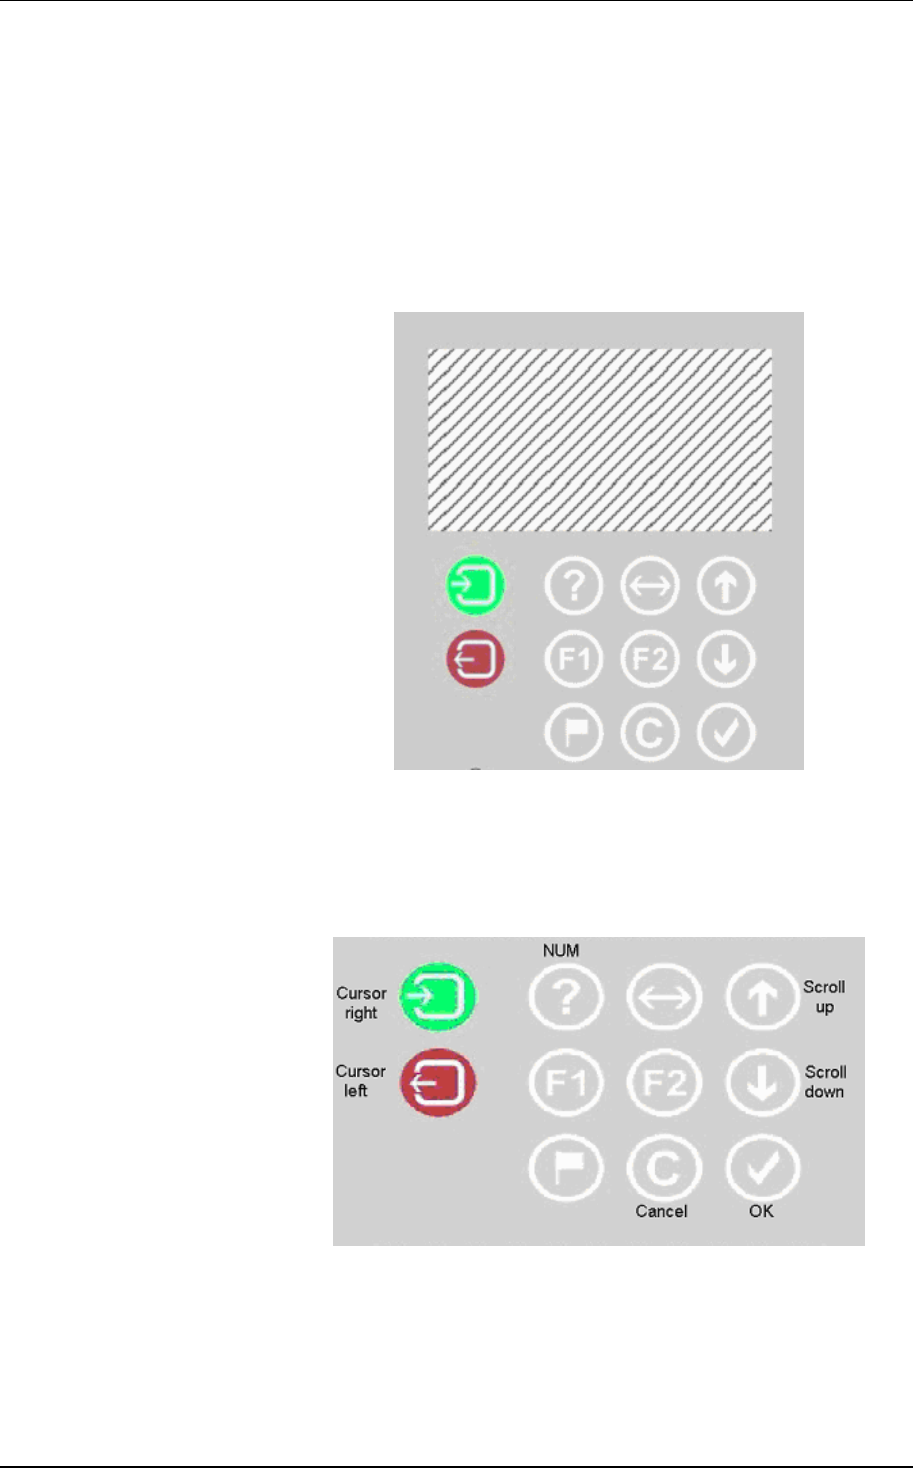
4 Keyboard assignment
4.1 Key assignment - reduced keyboard (11 keys)
The TT1000
series does not provide a numeric keypad, but only
11 keys.
For reduced keyboards 7 keys are assigned for the terminal
start-up dialogs (for defining the IP address and different
modes) OK, Cancel, Cursor left, Cursor right, NUM and both
scroll keys. The terminal is being delivered with the following
assignment:

Terminal Configuration Manual TT1000 Series
06.2009 Version 1.1 5-11
5 Terminal start-up
5.1 Using the start-up prompts
With the key configuration shown above, the following se-
quence applies for the terminal start-up, if you e. g. want to
change the IP address of the terminal manually (i. e. without a
DHCP server):
The terminal beeps five times and prompts for the PIN code.
Press four times the key assigned as the NUM key (the default
PIN), usually .
Then press the key assigned as OK key, usually .
For the following prompts „Define keyboard“, „Activate Ser-
vicemode“, „Activate Test“ und „Interface“ always press the
OK key to keep the settings.
To change a set
ting, it is possible to toggle between the choices
using one of the scroll keys or and to con-
firm a choice with the OK key.
You can then change the logical terminal ID
The current ID is displayed, by default 01FF.
Using the cursor right key you can position the cursor
at the digit to be changed.
To change the value press the NUM key , thus
changing the digit to 0 (Null). Then press the NUM key as often
as necessary to change the digit to the desired value. Note that
the cursor might be moved to the right when the timeout occurs.

Terminal Configuration Manual TT1000 Series
5-12 06.2009 Version 1.1
With the cursor left key
you can move the cursor to the
left at any time.
Confirm the value with the OK key.
After that the prompt „Interface“ is displayed where you would
press the OK key to confirm the value „eth0“.
If for the prompt „Use DHCP“ the setting „YES “is active, the
terminal requests its IP address, router address and gateway
through a DHCP server.
If you want to change the IP address manually, the value for
„Use DHCP” should be set to „NO“.
Then you can change the terminal IP address:
The current IP address is shown.
Using the cursor right key you can position the cursor
at the digit to be changed.
To change the value press the NUM key , thus
changing the digit to 0 (Null). Then press the NUM key as often
as necessary to change the digit to the desired value. Note that
the cursor might be moved to the right when the timeout occurs.
With the cursor left key
you can move the cursor to the
left at any time.
Define the IP address and confirm the value with the OK key.
Define the gateway and subnet mask the same way. To finally
store the values you have to confirm the following prompt with
all three values with the OK key.
If you terminate the IP configuration dialog with the Cancel key
any value you changed will not be saved.

Terminal Configuration Manual TT1000 Series
06.2009 Version 1.1 5-13
5.2 Changing the start-up prompts
You can configure which prompts will appear in the start-up
dialog and in which sequence they appear.
On the terminal, in the directory /java/vm/vame there is a sys-
tem.prop file. The entries starting with “ipconf” are responsible
for the start-up dialog. For example the entry ip-
conf10=serviceMode determines that the prompt “Activate
Servicemode” is displayed with the scroll list options “Yes” and
“No”. If you put an # sign in front of an entry it is inactivated.
With the number following ifpconfig you define the order number
of the entry. The start-up dialog will start with the entry with the
lowest number.

Terminal Configuration Manual TT1000 Series
5-14 06.2009 Version 1.1
Following is a list of possible ipconf terms:
ipconfn=keyboard – for the dialog “Define keyboard”
ipconfn=serviceMode – for the dialog “Activate service
mode”
ipconfn=test – for the dialog “Activate test”
ipconfn=deviceId – for the dialog “Logical device ID”
ipconfn=networkIF – for the dialog “Interface” with the
choices “eth0” and “wlan”
ipconfn=dhcp – for the dialog “Use DHCP”
ipconfn=ipAddress – for the dialog “TCP/IP address”
ipconfn=gateway – for the dialog “Gateway address”
ipconfn=subnetMask – for the dialog “Subnet mask”
ipconfn=dns1 – for the dialog “DNS 1”
ipconfn=dns2 – for the dialog “DNS 2”
ipconfn=proxy – for the dialog “Proxy Server”
ipconfn=proxyPort – for the dialog “Proxy Port”
ipconfn=hostAddress – for the dialog “Host Address”
ipconfn=hostPort – for the dialog “Host Port”
ipconfn=rasHW – for the dialog “RAS Hardware” wi
th the
choices “Modem” and “ISDN”
ipconfn=rasNumber – for the dialog “RAS Number”
ipconfn=rasUser – for the dialog “RAS User”
ipconfn=rasPwd – for the dialog “RAS Password”
ipconfn=rasDomain – for the dialog “RAS Domain”
ipconfn=rasOption – for the dialog “RAS Option”
ipconfn=rasTest – for the dialog “Test RAS Connection”
ipconfn=timeSync – for the dialog “Time Sync Mode”
ipconfn=timeZone – for the Time zone dialogs
ipconfn=com.timelink.biometrics.fingerprint.IpSettings
TemplatesErasure – for the dialog “Erase all templates?”
ipconfn=com.timelink.connection.webservice.ssl.
GetCertificate – for the dialog „Use HTTPS?“ and if yes
is chosen starting the certificate request.
Terminal Configuration Manual TT1000 Series
06.2009 Version 1.1 6-15
6 Parameter description
6.1 General parameter description
All general framework parameters can be defined through the
web interface supported by the terminal.
6.1.1 How to display the web interface
To connect to the web interface on an TT1000 Series terminal
you must enter the terminal URL in a standard web browser:
Example: http://terminal_ip_address where the “terminal ip ad-
dress” is that of your TT1000 Series terminal.
Enter the password admin and click on Enter.
Terminal Configuration Manual TT1000 Series
6-16 06.2009 Version 1.1
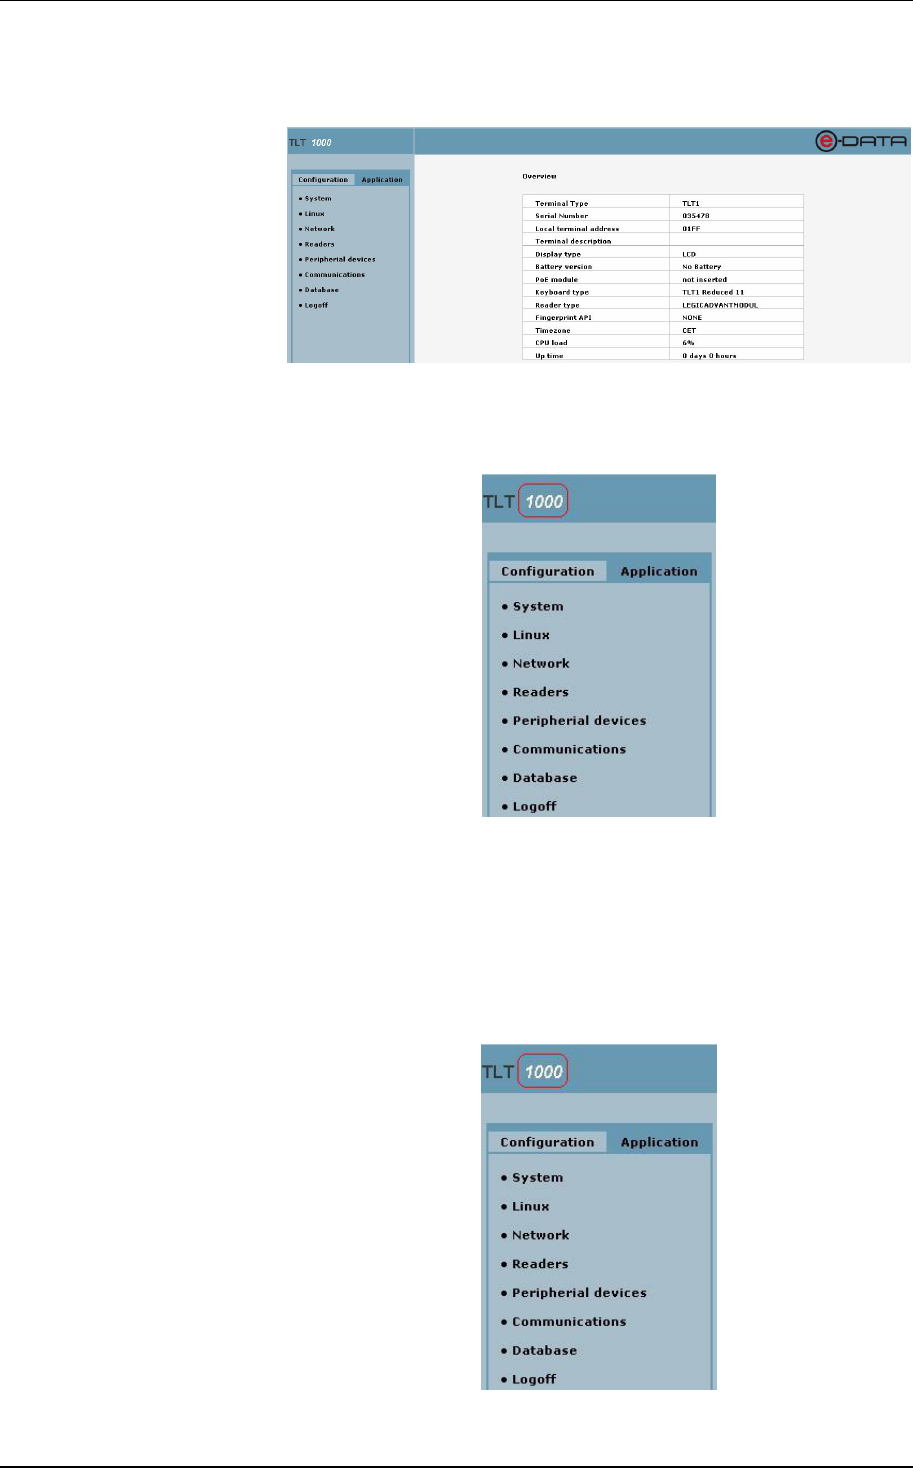
The Overview page is opened.
With a click on 1000 next to TLT in the upper left corner
you can
return to the Overview page any time.
6.1.2 Configuration parameters
To open the configuration parameter group list, click on Con-
figuration in the left frame.

Terminal Configuration Manual TT1000 Series
06.2009 Version 1.1 6-17
6.1.3 Configuration parameter groups – overview
System Terminal, Date/Time, Trace, Status, Java Statistics, Firmware.
(See chapter 6.2.1)
Linux Parameters for the Linux operating system.
(See chapter 6.2.2)
Network TCP/IP, DHCP/BOOTP and RAS parameters.
(See chapter 6.2.3 )
Readers Parameters for the available readers, barcode scanner and
fingerprint reader
(See chapter 6.2.4)
Peripheral devices Display, Keyboard
(See chapter 6.2.5)
Communications Upload, download
(See chapter 6.2.5.4)
Database (See chapter 8.2)
Logoff No matter what parameter page is opened in the right frame
you can always log off by clicking on Logoff in the left frame.
6.2 Detailed parameter description
To display the individual parameter group pages click on the
text link in the menu bar in the upper part of the right frame.
On all the parameter pages you will find the buttons Save and
Help.
Save This button will store your changes on the terminal.
Help This button will display basic help text displayed in the right col-
umn. The button text changes to Help off when selected.
Terminal Configuration Manual TT1000 Series
6-18 06.2009 Version 1.1
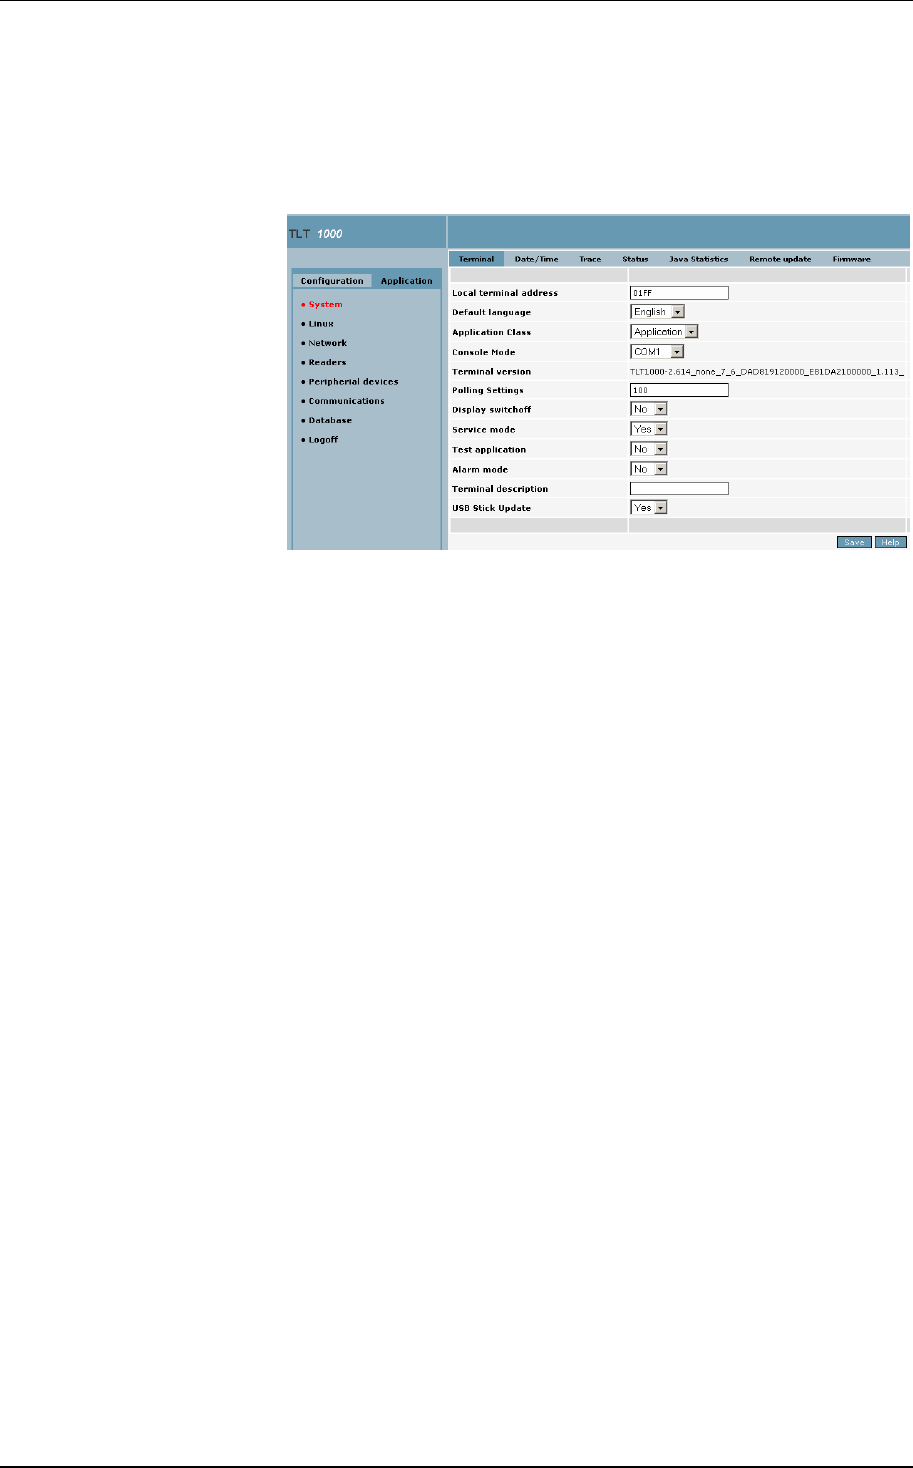
6.2.1 System configuration
To open the System configuration pages click on System
in the
Configuration menu in the left frame.
Terminal Configuration Manual TT1000 Series
06.2009 Version 1.1 6-19
6.2.1.1 Terminal parameters
The terminal parameter page is the default page in the system
parameter group.
Local terminal address The terminal address (logical ID) that is s
ent to the host system.
(Default 01FF).
Default language The preferred language for the web interface. English and Ger-
man are available, default English.
Application Class The application to be started on the terminal. There has to be a
value defined for proper terminal operation.
Console Mode The definition of the console mode. Choices are COM1, COM4
or Unused, default COM1.
Terminal version Read-only field for the terminal board version information.
Polling settings Sleep time (ms) setting for the internal polling of the Main
board
and Power-supply Board, default 100.
Display switch-off
If this mode is active, the display is turned off automatically if for
30 seconds no motion has been detected by the motion sensor.
If after that a motion is sensed the display is turned on again.
Default No.
Service mode If this mode is active the terminal is not automatically switched
off in case of sabotage alarm (case opened). Default No.
Test application If this mode is active the test application will be invoked and the
original one will be saved. With the help of the test application
you can test the communication between the hardware and the
software: keys, display, acoustic signal, LEDs, badge reader.
Default No.
Alarm mode If this mode is active, CBM alarm messages are being sent to
the host system. Also these messages are stored in a protocol
file, if defined in the application.xml file. Default No.

Terminal Configuration Manual TT1000 Series
6-20 06.2009 Version 1.1
Terminal description Input field for a description for the terminal, e. g. the location.
USB Stick Update If this mode is active, updates can be performed via USB stick,
e. g. a new application.xml file, or
parameter changes through a
systemParameters.xml file. Default No.
Terminal Configuration Manual TT1000 Series
06.2009 Version 1.1 6-21
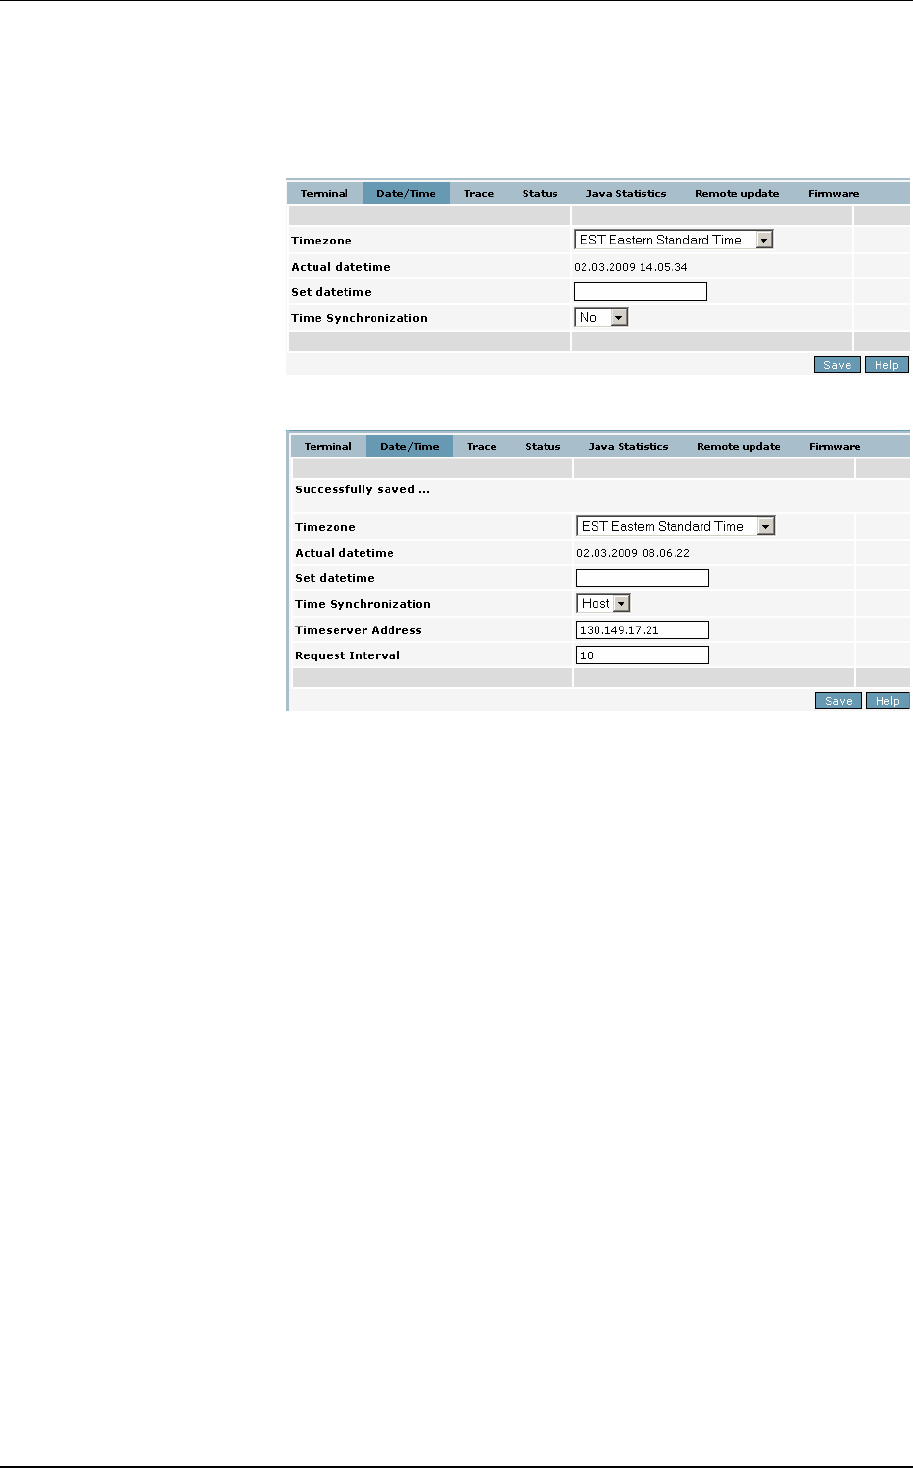
6.2.1.2 Date/Time
To open the Date/Time parameter page click on Date/Time in
the menu bar in the upper part of the right frame.
or
Time zone The time zone definition of the terminal. Available choices are
the standard time zones of America and Europe plus several
explicit towns in America and Europe. (Default CET Central
European Time.)
Actual datetime Read-only field of the actual date and time of the terminal in the
time zone defined on the terminal.
Set datetime Here you can set the new date and time for the terminal. Follow
the syntax shown in the Actual datetime field.
Time synchronization Time synchronization mode. Choices are No,Interval,Host.
(Default No.) Interval mode uses an NTP Server for the time
synchronization, Host mode uses the data connection server.
Time Server Address If Interval mode is used, the TCP/IP address of the NTP server.
Request Interval Interval of time requests in minutes, minimum 10 minutes, de-
fault 60.
Terminal Configuration Manual TT1000 Series
6-22 06.2009 Version 1.1
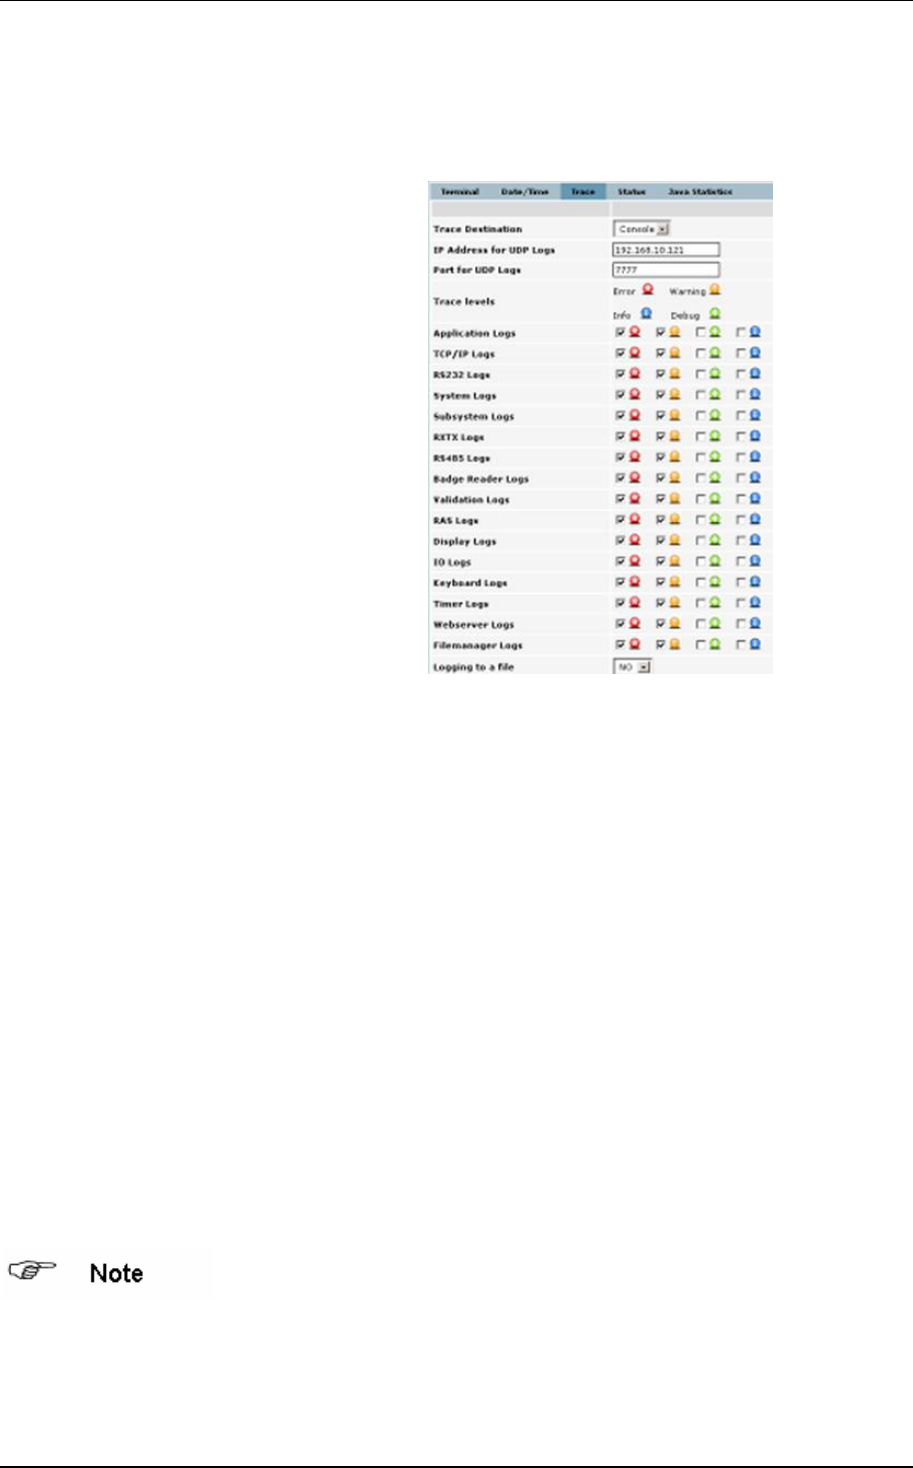
6.2.1.3 Trace parameters
To open the Trace parameter page click on Trace in the menu
bar in the upper part of the right frame.
Trace destination Destination for trace messages. Choices are Console or UDP
(default Console).
IP address for UDP logs If UDP is used, the host TCP/IP address for the UDP logs.
Port for UDP logs If UDP is used, the port number for the UDP logs.
Trace levels The symbols for the different trace levels used in the list below.
Red for Error, yellow for Warning, green for Debug, and blue
for Info.
For Application logs, TCP/IP logs, RS232 logs, System logs,
Subsystem logs, RXTX logs, RS485 logs, Badge Reader logs,
Validation logs, RAS logs, Display logs, I/O logs, Keyboard
logs, Timer logs, Webserver logs, and FileManager logs you
can define the level of logs to be sent to the trace destination.
Choices are Error,Warning,Debug, and Info. Default Error,
Warning.
Logging to a file If this value is set to Yes, trace messages are written into a file
named terminal.log on the terminal. Default No.
The file terminal.log might become quite big depending on the
log levels chosen. A file that requires almost all flash disk
space available might prevent the terminal from running. There-
fore there is a limit of 10 MB for this file. If this limit is being
reached the file will be re-written.

Terminal Configuration Manual TT1000 Series
06.2009 Version 1.1 6-23
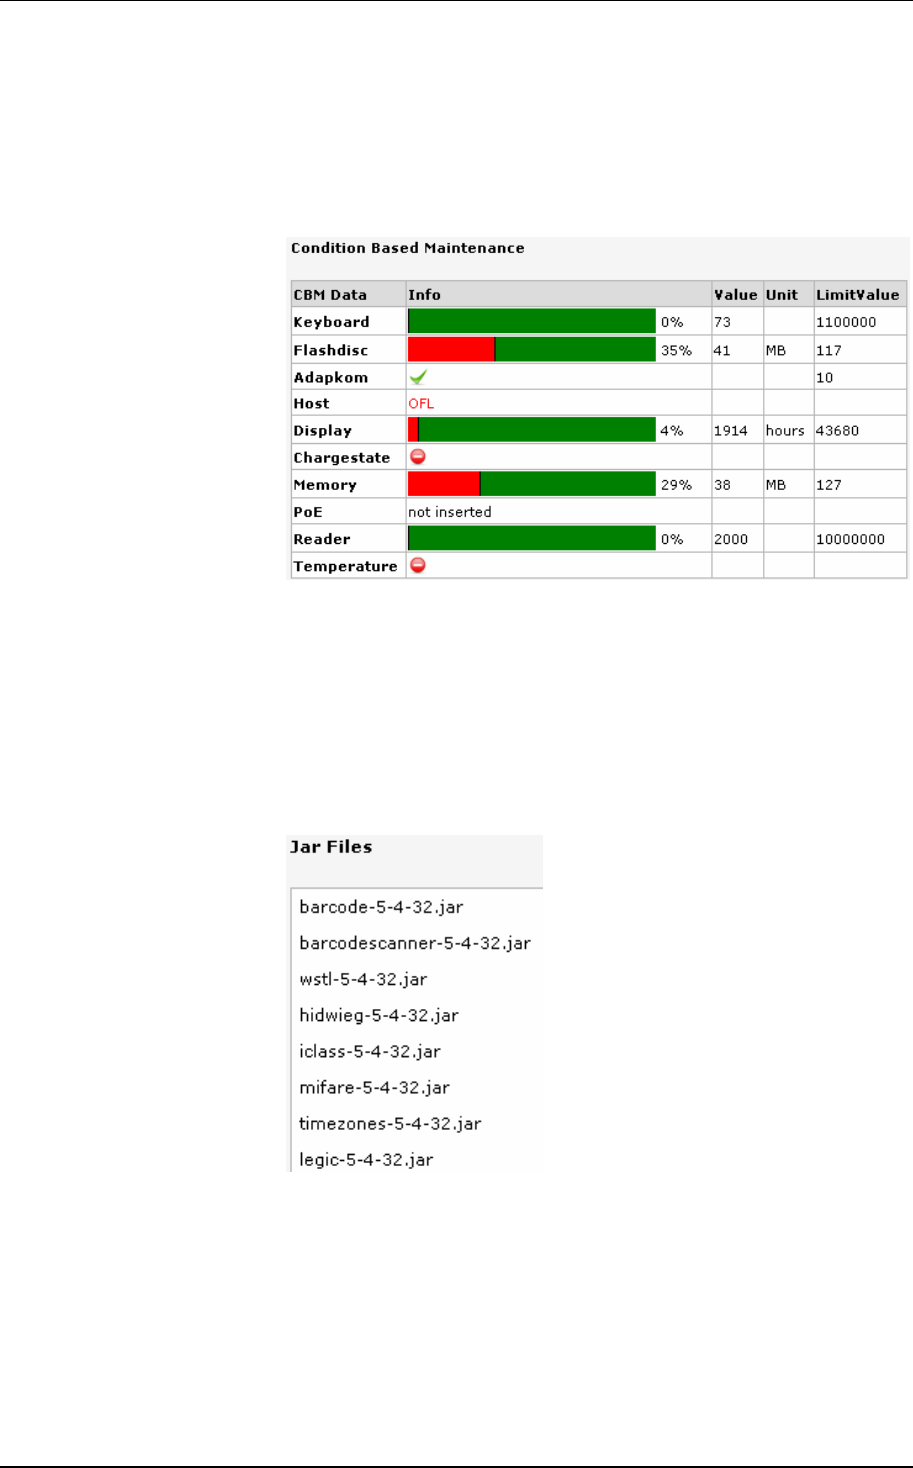
6.2.1.4 Status
To display the Status page of the terminal click on Status in
the
menu bar in the upper part of the right frame
General information
In the upper part of the page you will find general information
about the terminal, like Linux version, display, rechargeable
battery, keyboard and reader type.
Terminal Configuration Manual TT1000 Series
6-24 06.2009 Version 1.1
Condition based Maintenance
The terminal provides Condition Based Maintenance Services,
i. e. different subsystem components are being monitored and if
a state is reached where the intervention of a service technician
is required, this is shown in the Info column.
Jar Files
On the Status page you also find a summary of the software
installed, with all the jar files and their version numbers
Terminal Configuration Manual TT1000 Series
06.2009 Version 1.1 6-25
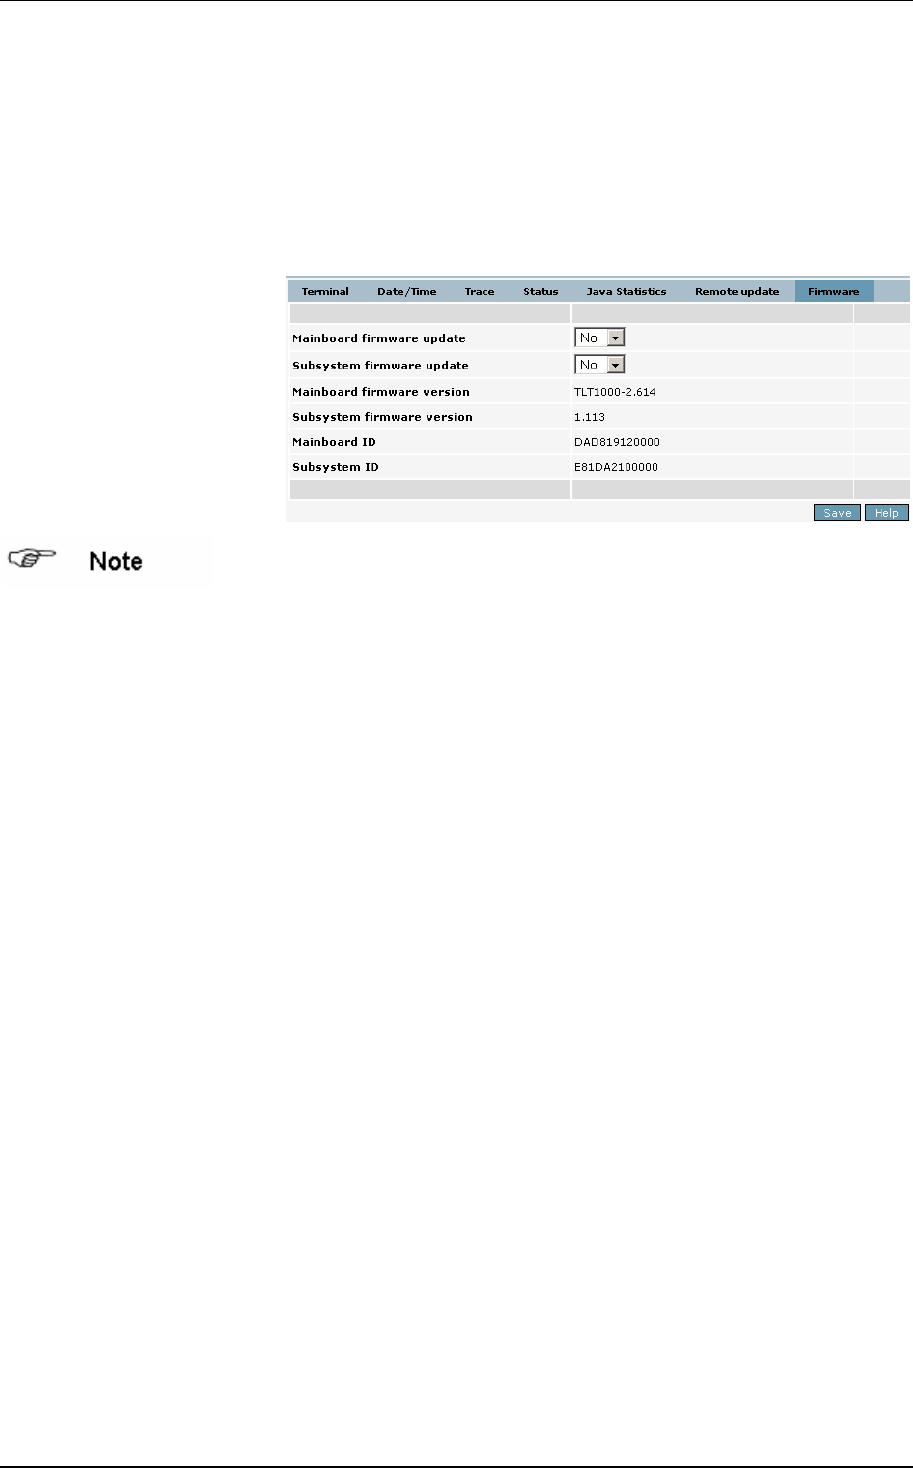
6.2.1.5 Firmware
The PIC software (firmware) on the motherboards (main board
and subsystem) may now be updated through the web inter-
face.
To open the Firmware Update parameter page click on Firm-
ware in the menu bar in the upper part of the right frame.
The loadable firmware file has to be in the terminal directory
/home/admin. The following names are fix:
V_bt_us_01.hex for the main board firmware
Vbt+us.hex for the subsystem firmware
Main board firmware
update If you set this parameter to YES, the terminal checks whether a
loadable update file for the main board firmware exists (see
note above) and if this is the case it reboots. During the reboot
the new firmware is installed and activated by a further reboot.
Subsystem firmware
update If you set this parameter to YES, the terminal checks whether a
loadable update file for the subsystem firmware ex
ists (see note
above) and if this is the case it reboots. During the reboot the
new firmware is installed and activated by a further reboot.
Main board firmware
version Read-only field for the current firmware version of the main
board.
Subsystem firmware
version Read-only field for the current firmware version of the subsys-
tem.
Mainboard ID Read-only field for the unique ID of the main board. For better
tracking all boards have a unique ID which is also part of the
version string (terminal parameter page)
Subsystem ID Read-only field for the unique ID of the subsystem For better
tracking all boards have a unique ID which is also part of the
version string (terminal parameter page).
Terminal Configuration Manual TT1000 Series
6-26 06.2009 Version 1.1
6.2.2 Linux parameters
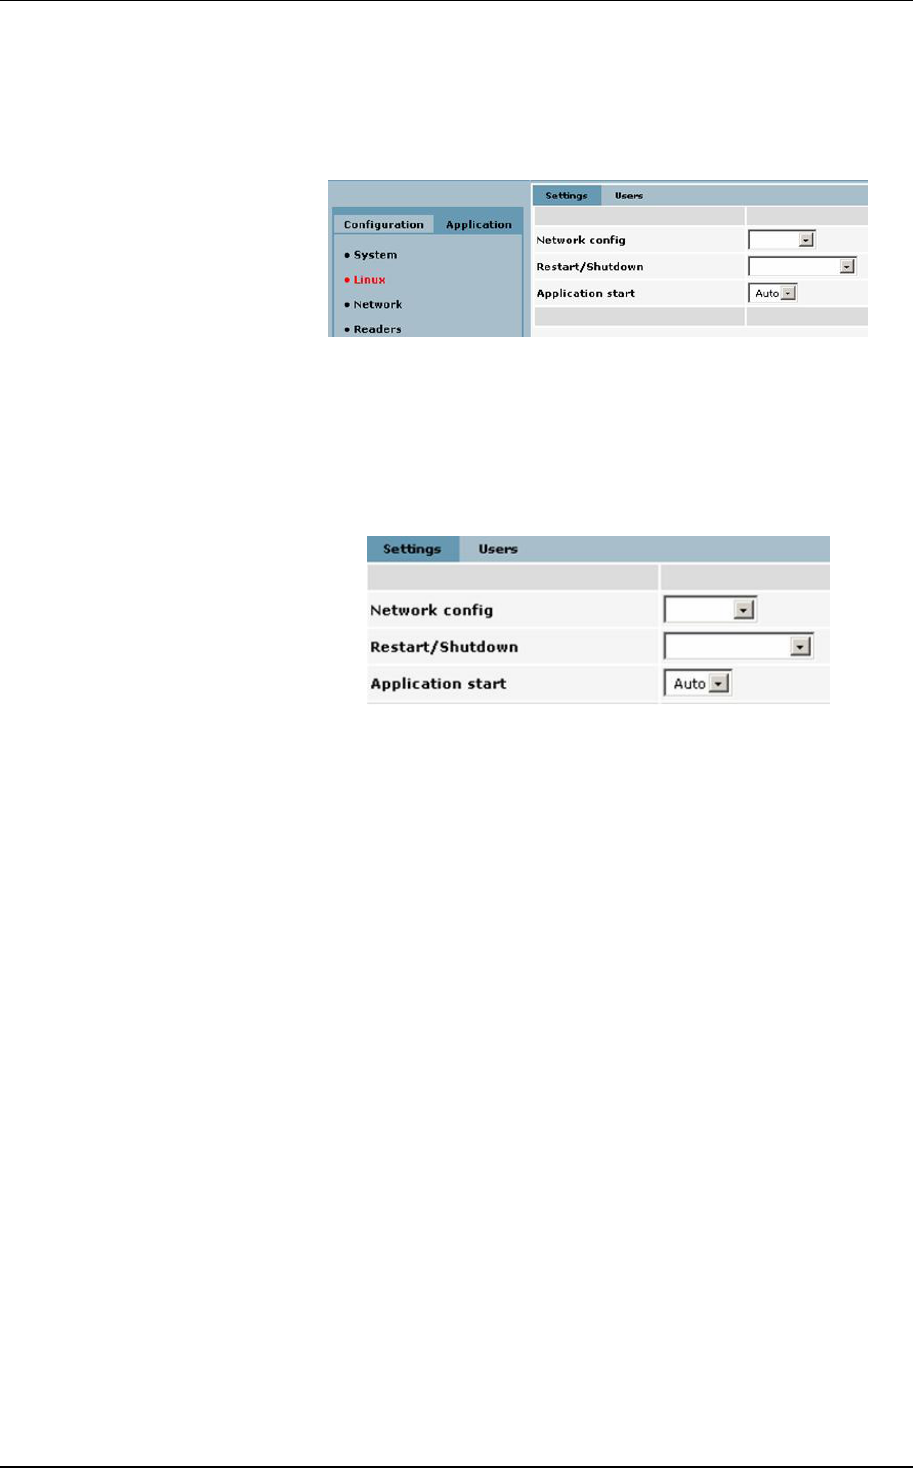
To open the Linux configuration pages click on Linux in the
Configuration menu in the left frame.
6.2.2.1 Settings
Network config By selecting Activate, the network configuration in the operat-
ing system is activated. This is required after changing a net-
work parameter.
Restart/Shutdown By selecting Shutdown linux,Reboot linux or Stop applica-
tion, the operating system or the application is restarted or
stopped.
Application start Value Auto, can not be changed. The application will be auto-
matically started at system startup.
Terminal Configuration Manual TT1000 Series
06.2009 Version 1.1 6-27
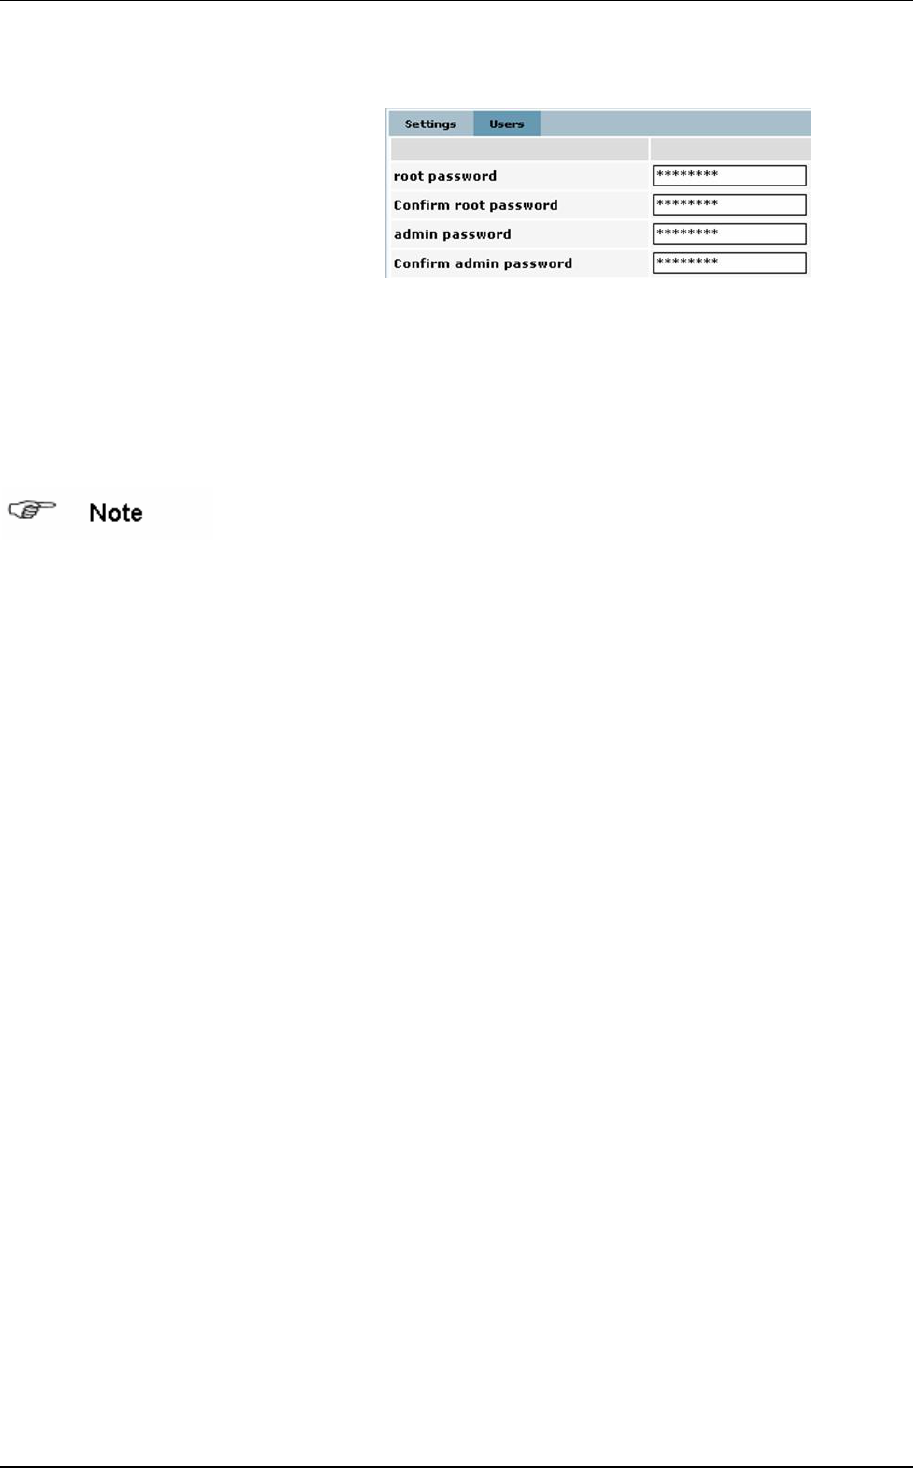
6.2.2.2 Users
root password The password of the user 'root' (default: root).
Confirm root password Re-enter the new root password.
admin password The password of the user ‘admin’ (default admin).
Confirm admin pass-
word
Re-enter the new admin password.
When you are logged in with the admin password, you are only
authorized to change the admin password. To be able to
change the root password, you have to log in with the root
password.
Terminal Configuration Manual TT1000 Series
6-28 06.2009 Version 1.1
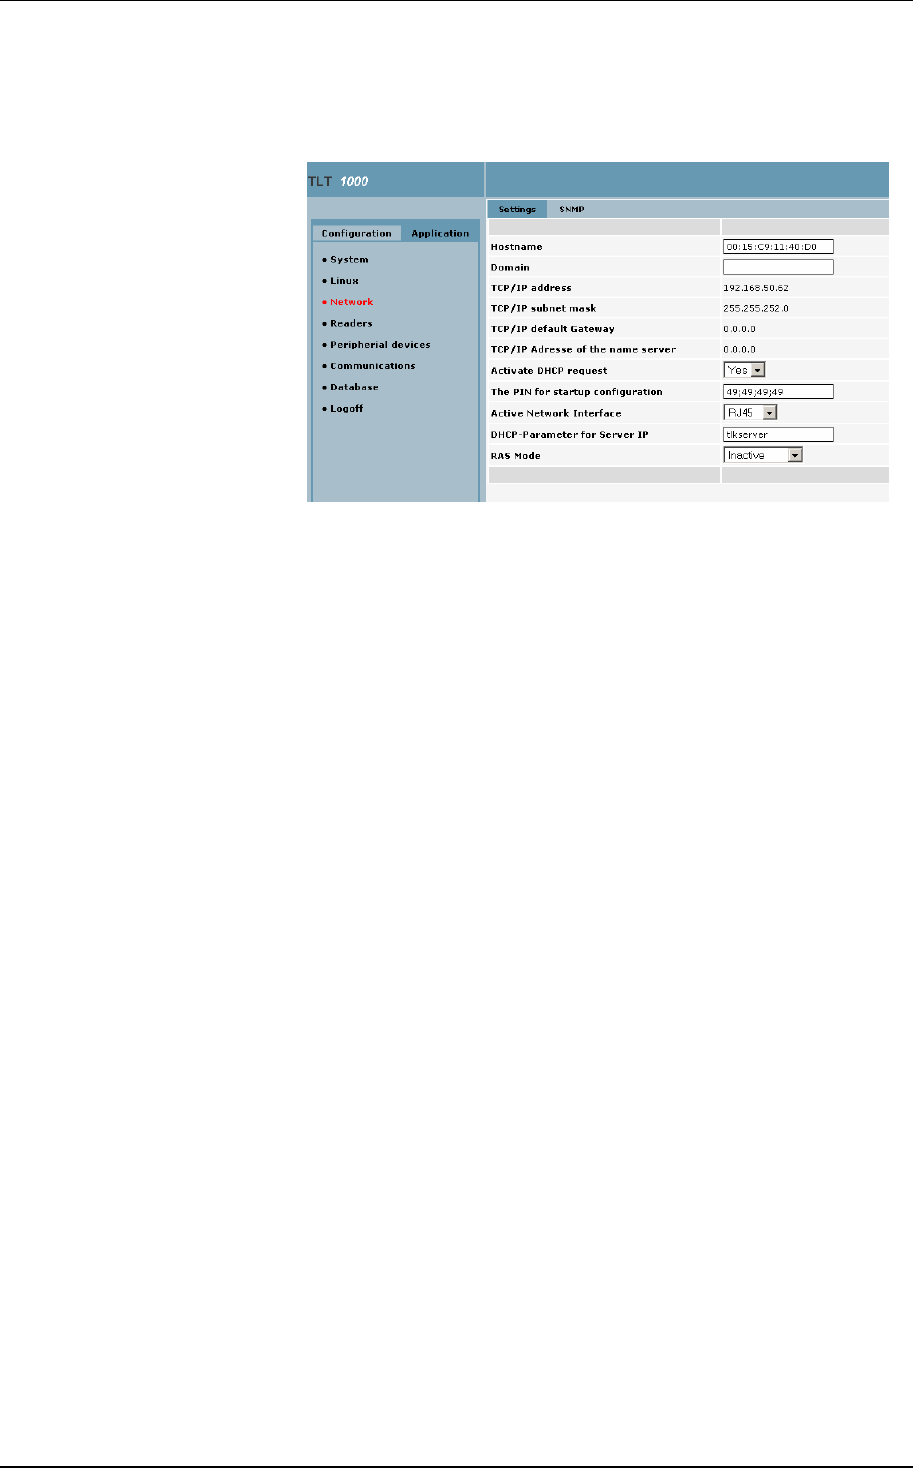
6.2.3 Network parameters
To open the Network configuration page click on Network
in the
Configuration menu in the left frame.
Hostname The host name for the terminal. (Default is the MAC address.)
Domain The domain name for the terminal.
TCP/IP address The TCP/IP address of the terminal.
TCP/IP subnet mask The TCP/IP subnet mask of the terminal
(default is 255.255.255.0).
TCP/IP default Gateway The TCP/IP address of the default gateway. With the value
set
to NO, the default route to eth0 is used.
TCP/IP address of the
name server The TCP/IP address of the name server, if used.
Activate DHCP/BOOTP
request Allow or disallow the use of a DHCP/BOOTP Server for IP con-
figuration. If this parameter is set to Yes, the four parameters
above are disabled.
The PIN for startup IP
configuration The PIN to be entered at terminal startup to change the IP con-
figuration for the terminal. The default for this terminal’s
reduced
keyboard is four times the NUM key, i. e. 49;49;49;49) Leave
blank to disable the start-up dialog.
Activate Network Inter-
face
The network interface to be used, currently RJ45 only.
Terminal Configuration Manual TT1000 Series
06.2009 Version 1.1 6-29
DHCP parameter for
Server IP In the DHCP configuration the DHCP parameter containing the
host IP address which was sent by the DHCP server.
RAS mode Activate or deactivate a pppd deamon as a client or in server
mode. Default Inactive.
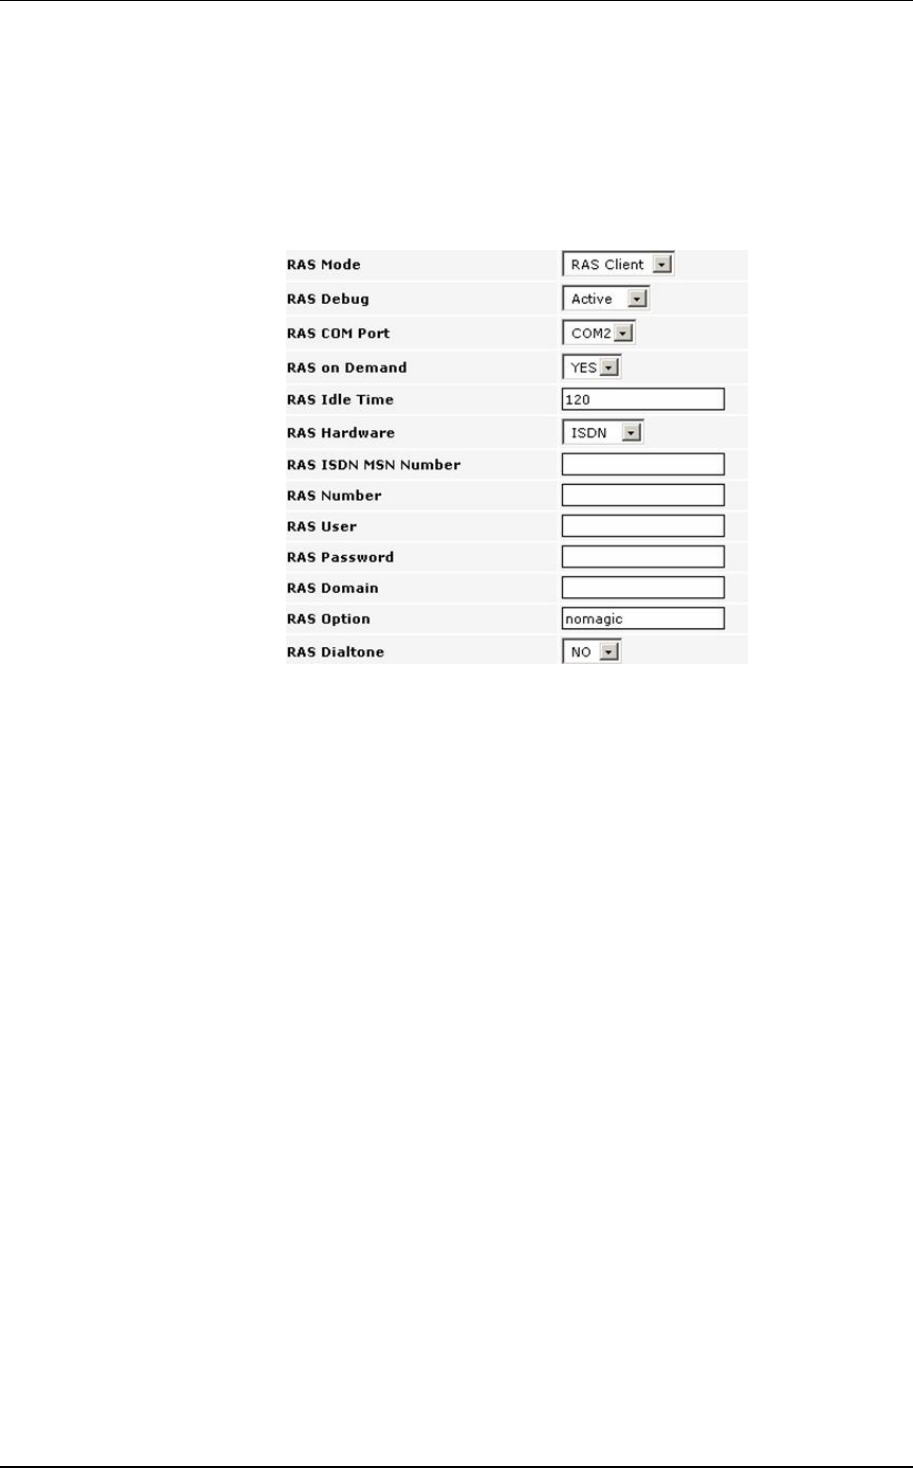
If you change the setting of the RAS mode parameter to RAS
Client, further parameters become visible:
RAS Debug Activate or deactivate the pppd daemon debug. Default Active.
RAS COM port Sets the port the modem or ISDN device is connected to. De-
fault COM4.
RAS on demand Activates automatic dial-in (option Yes) or manual usage
(option
No). Default No.
RAS idle time Defines the time (in seconds) to disconnect, when data traffic is
idle. Default 120.
RAS Hardware Defines whether you have an ISDN or a Modem
device. Default
ISDN.
RAS ISDN MSN Number Define your ISDN MSN Number.
RAS Number The number that has to be dialed for the RAS connection.
RAS User The authorized user for the RAS connection.
RAS Password The password for the RAS User.
RAS Domain
The domain name to be used as prefix for the login user name.
RAS Option Optional field for the RAS connection.
RAS Dialtone If the telephone system does not send a dial tone, set this pa-
rameter to Yes to send ATX1 to the modem.
(Thus “busy” is not
treated as error, as it would be the case when sending ATX3.)
Default No (ATX4 = no carrier, no dialtone,busy lead to an er-
ror).
Terminal Configuration Manual TT1000 Series
6-30 06.2009 Version 1.1
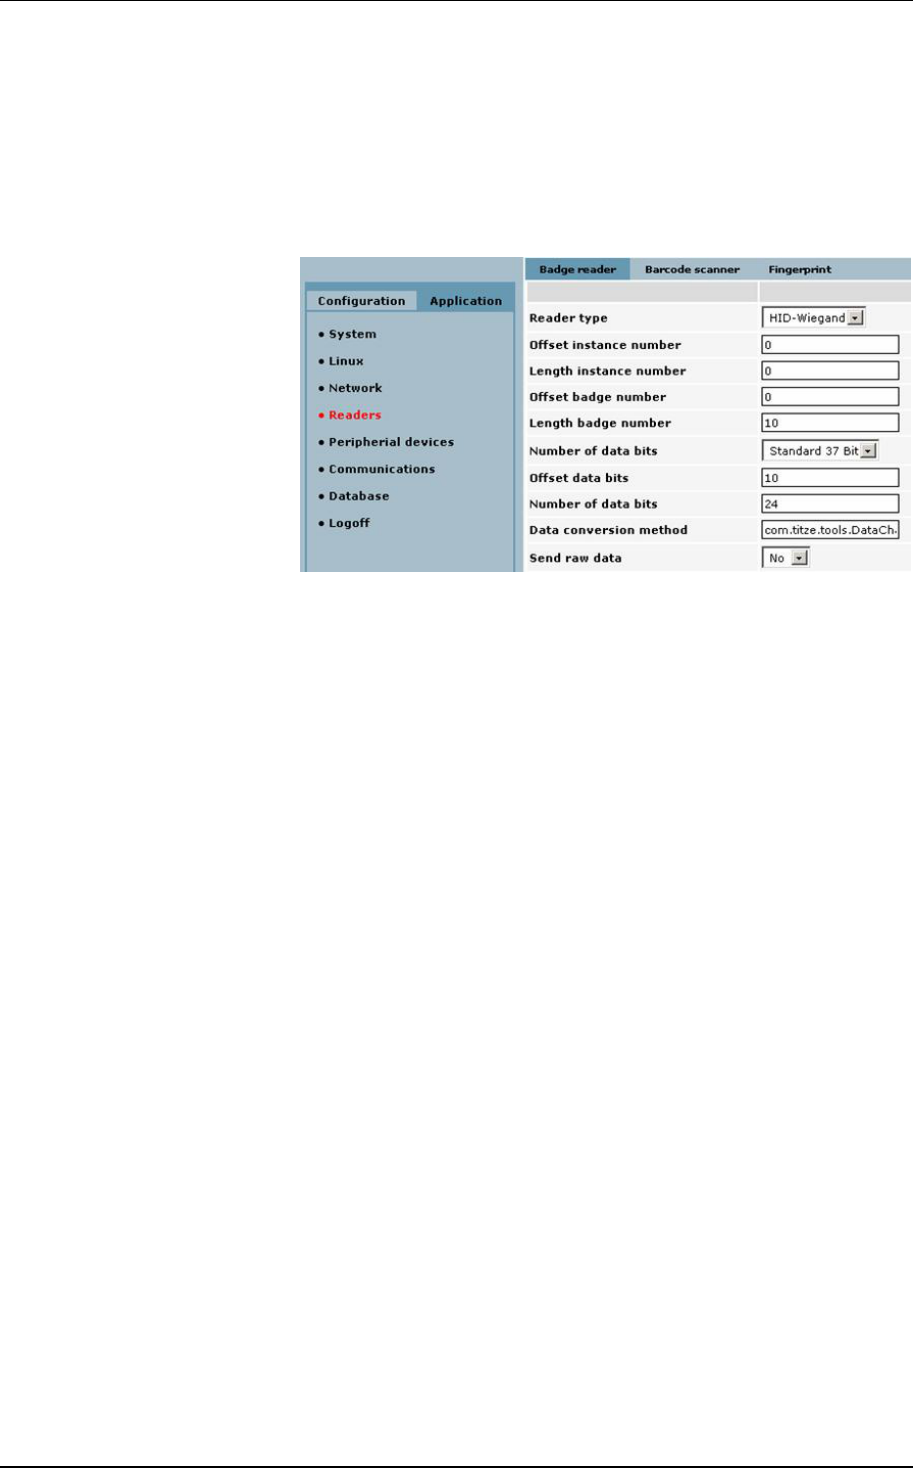
6.2.4 Readers
To open the Reader configuration pages click on Readers in
the Configuration menu in the left frame.
6.2.4.1 Badge reader
The Badge reader parameter page is the default page in the
reader’s parameter group.

Terminal Configuration Manual TT1000 Series
06.2009 Version 1.1 6-31
Reader type Type of badge reader installed in the terminal. Choices for the
reader type:
Offset instance number The offset of the instance number in the instance data string.
Length instance number The length of the instance number.
Offset badge number The offset of the badge number in the badge data string.
Length badge number The length of the badge number.
Terminal Configuration Manual TT1000 Series
6-32 06.2009 Version 1.1
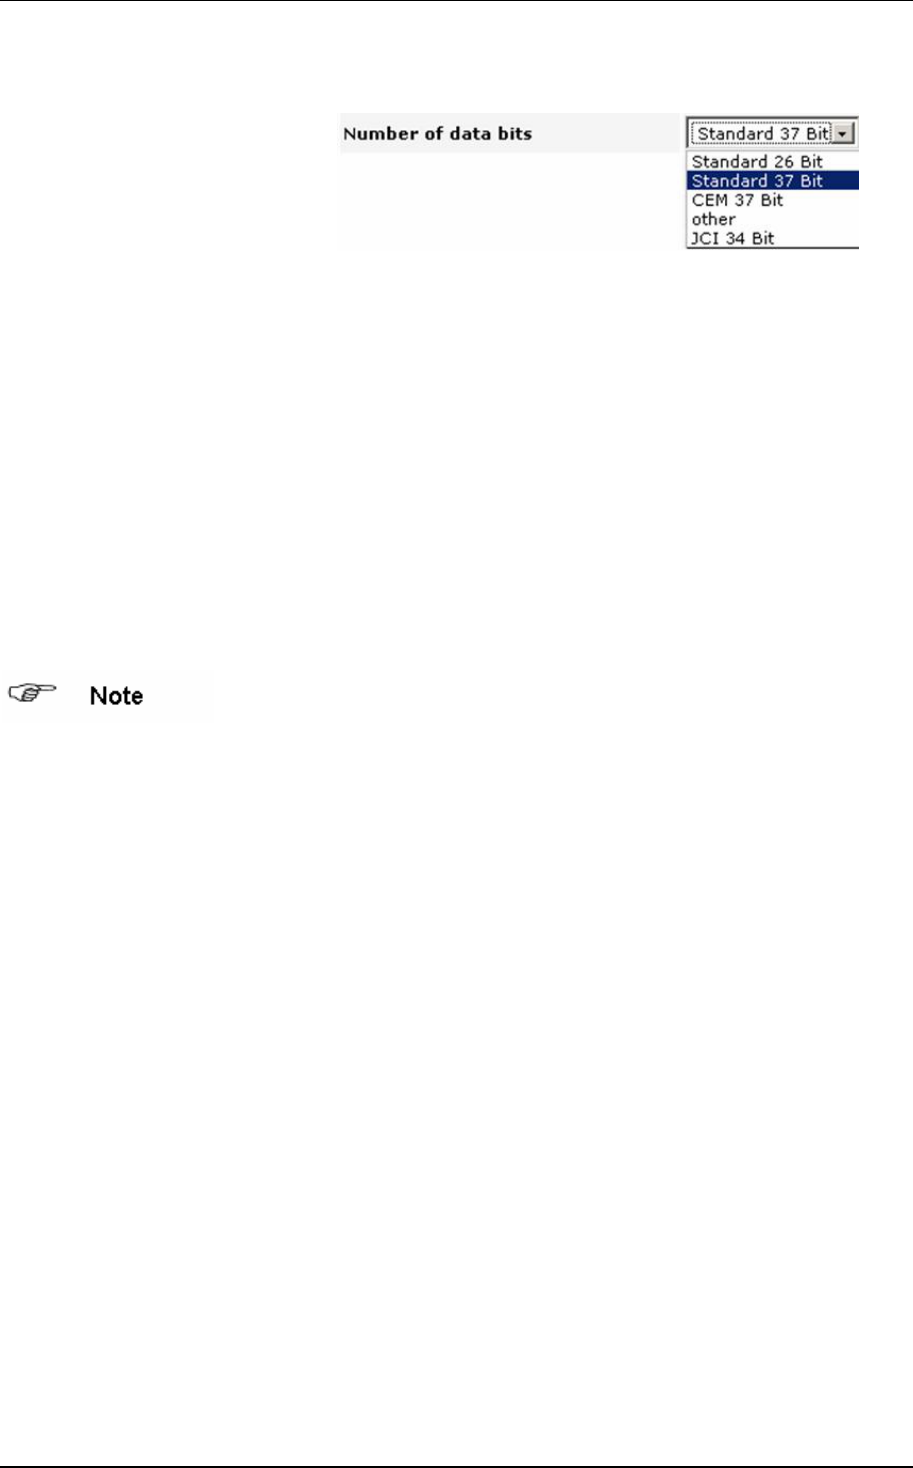
Number of data bits (HID-Wiegand only) Number of data bits on the badge. Avail-
able choices:
Offset data bits The index of the first valid data bit, starting with 0.
Number of data bits The number of valid data bits.
Data conversion
method The method to convert the data received (format: pack-
age.class.method).
Offset number (Casi-Rusco only) The value to manipulate the badge number
will be subtracted from the fetched number.
Activate parity check (Casi-Rusco only) Activate the standard Parity Check (Length
Parity of 40 Bit). Choices: Yes and No (default Yes).
Send raw data (HID and Barcode only) Sends the data received from the
reader as raw data. Default No.
There are additional parameters for the reader type Legic-
Advant-Module, which are self-explanatory
after clicking on the
Help button.
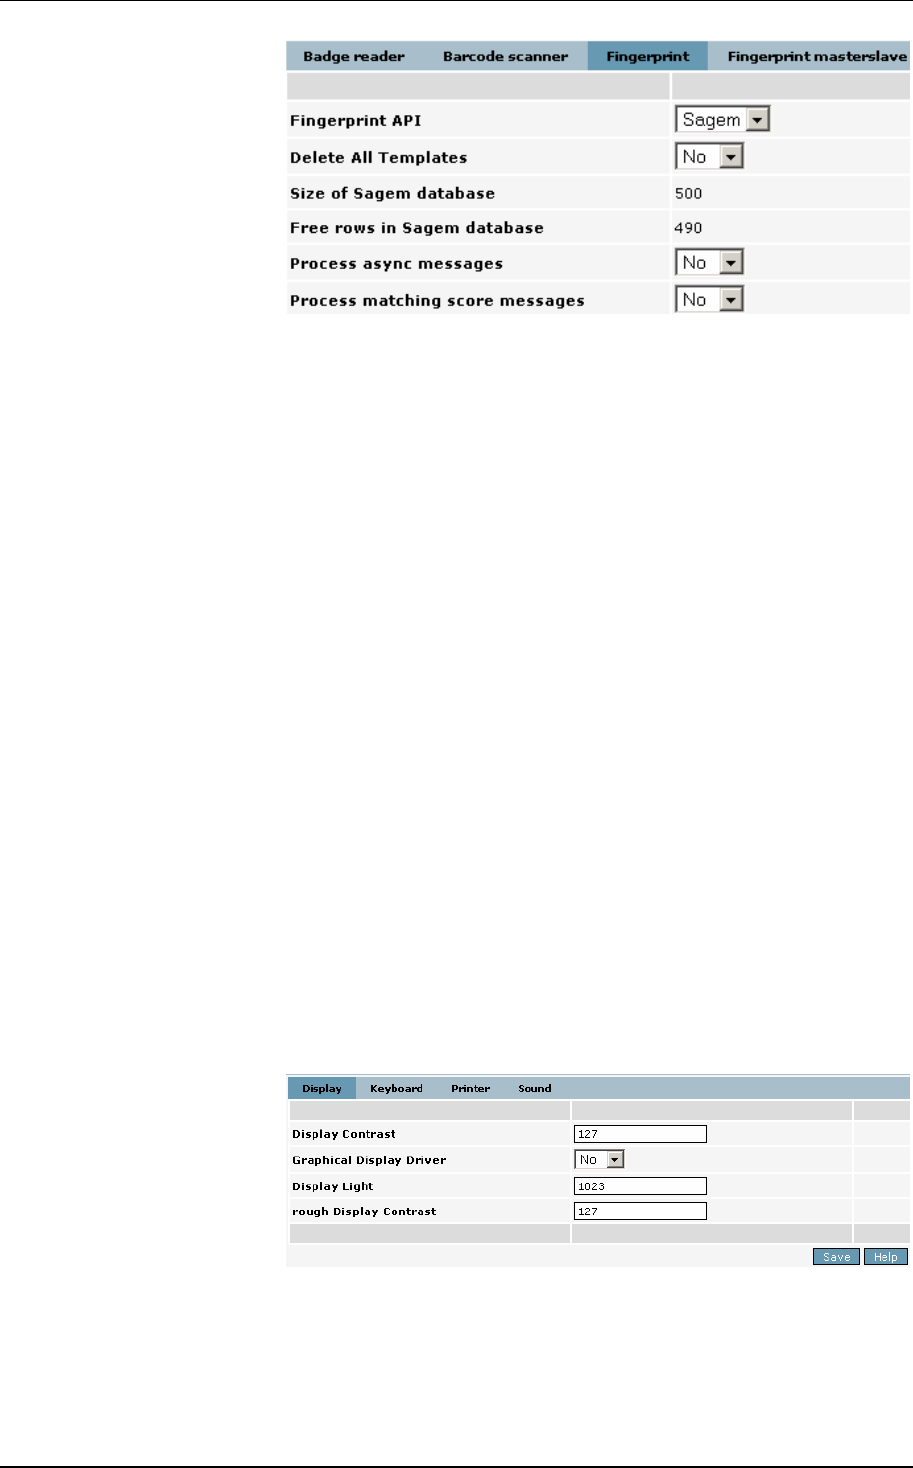
6.2.4.2 Fingerprint parameters
To open the Fingerprint parameter page click on Fingerprint in
the menu bar in the upper part of the right frame.
Terminal Configuration Manual TT1000 Series
06.2009 Version 1.1 6-33
Fingerprint API The choice of Fingerprint APIs may vary, depending on the fin-
gerprint.jar files on the terminal. If there are no fingerprint.jar
files on the terminal, only the choice none is available.
Delete all Templates (Sagem only) With this parameter you can delete all existing
templates in the Sagem internal database.
Size of Sagem data-
base (Sagem only) The current size of the internal database on the
Sagem module. If this size is changed, all existing templates will
be deleted.
Free rows in Sagem
database (Sagem only) Shows the number of free datasets in the Sagem
internal database.
Process async mes-
sages If this parameter is set to NO, the dialog messages from the
Sagem module such as “Press harder”, “Finger up” etc. are
suppressed. The default is Yes.
Process matching
score messages If you need the matching score for the finger as a return value
for your application, you can set this parameter to Yes. The
default is No.
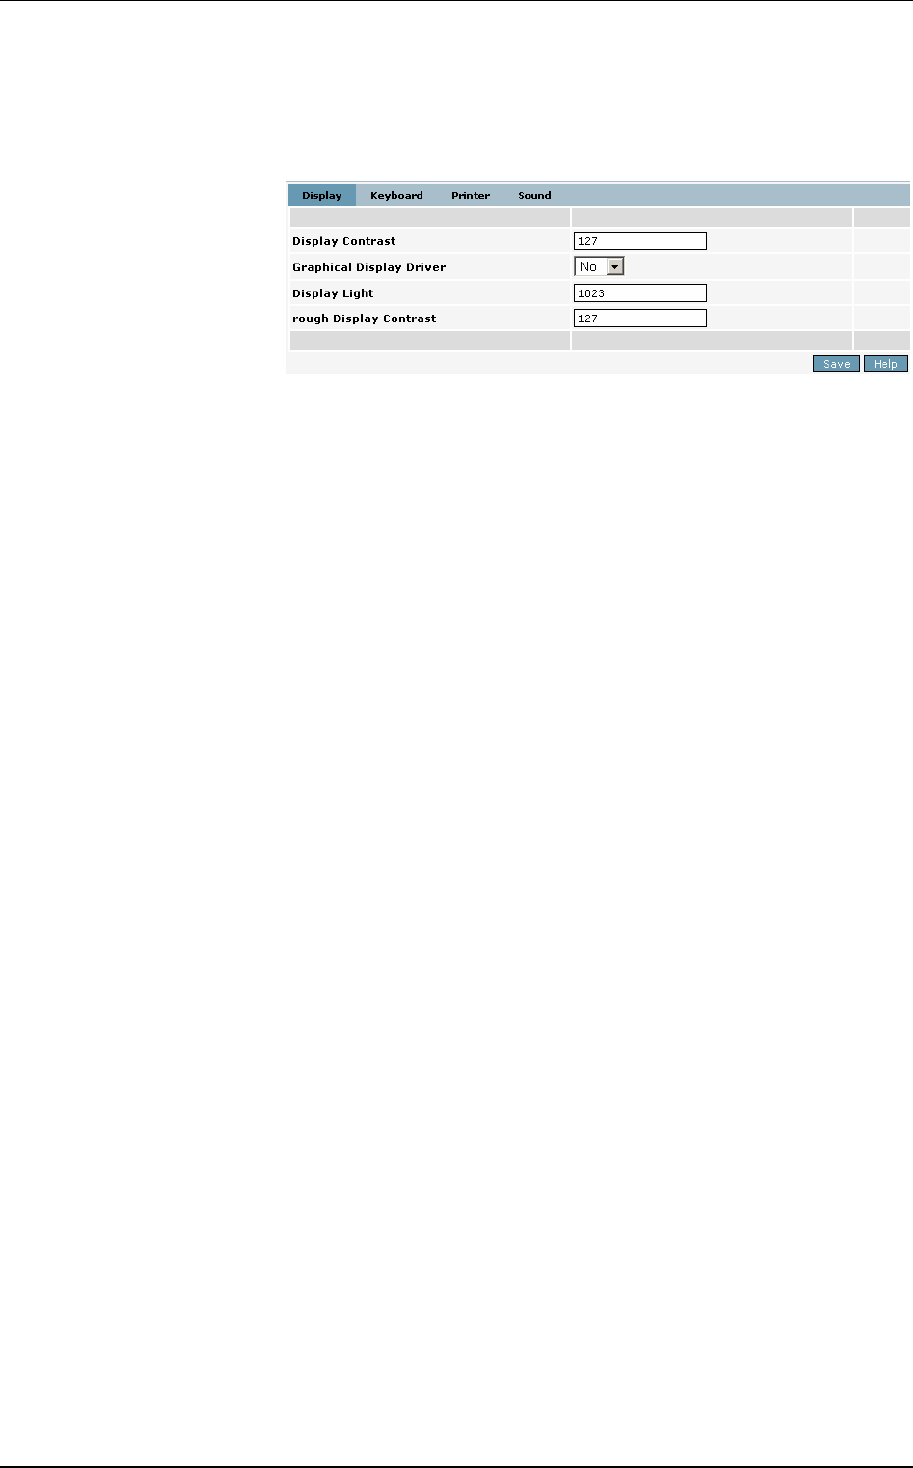
6.2.5 Peripheral devices
To open the configuration pages for peripheral devices click on
Peripheral devices in the Configuration menu in the left frame.
Terminal Configuration Manual TT1000 Series
6-34 06.2009 Version 1.1
6.2.5.1 Display
The Display parameter page is the default page in the parame-
ter group for peripheral devices.
Display Contrast With this parameter you can change the display contrast of the
terminal’s display.
Graphical Display
Driver If you want to use Unicode characters for your display texts you
have to switch to the graphical display driver. If you change this
parameter to Yes, the terminal first verifies if the required librar-
ies are installed. You have to reboot in order to load these li-
braries.
6.2.5.2 Keyboard parameters
To open the Keyboard parameter page click on Keyboard in
the menu bar in the upper part of the right frame.
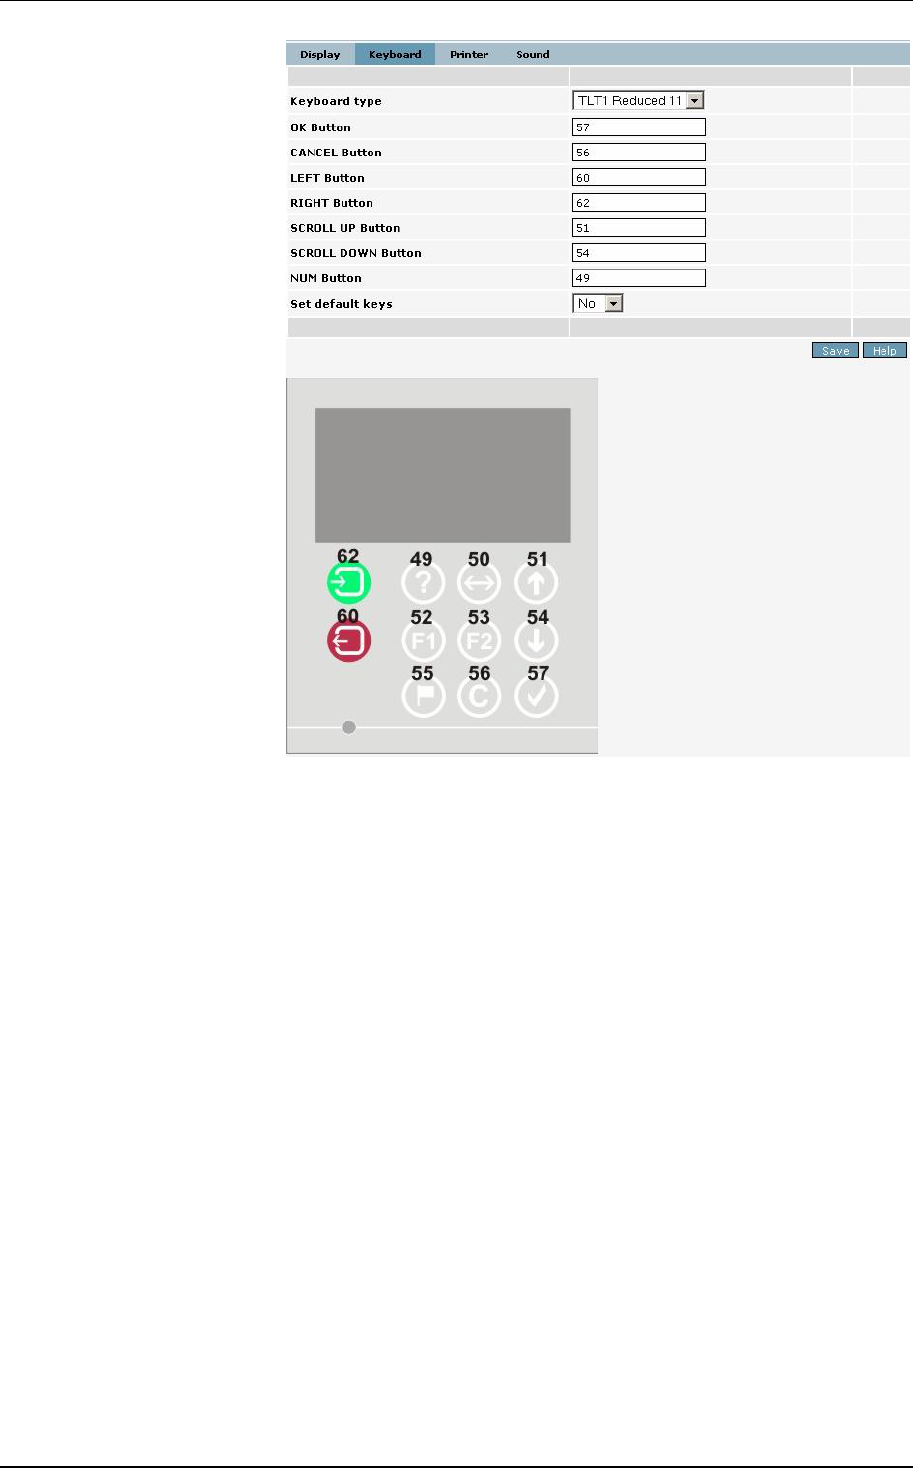
Terminal Configuration Manual TT1000 Series
06.2009 Version 1.1 6-35
Terminal Configuration Manual TT1000 Series
6-36 06.2009 Version 1.1
Keyboard type The type of keyboard used on the terminal.
For the TT1000 with 11 keys only TLT1 Reduced 11 is a valid
choice.
OK button … SCROLL
DOWN button With the keyboard type Reduced you have to define at least 5
keys valid for the start-up procedure: OK, CANCEL, LEFT,
NUMBER, and one of the SCROLL keys. Since your keyboard
has more than 5 keys you can also define the RIGHT key and
the second SCROLL key.
NUM button By default this button is used as the reduced keyboard PIN but-
ton for entering the start-up dialog. Instead of pressing the nu-
meric buttons 1234 on a full keyboard you have to press 4 times
the NUM button defined here.
Set default keys
If set to YES, the keys defined on this page are set, in particular
the NUM button is set as PIN code (compare with Network pa-
rameter page).
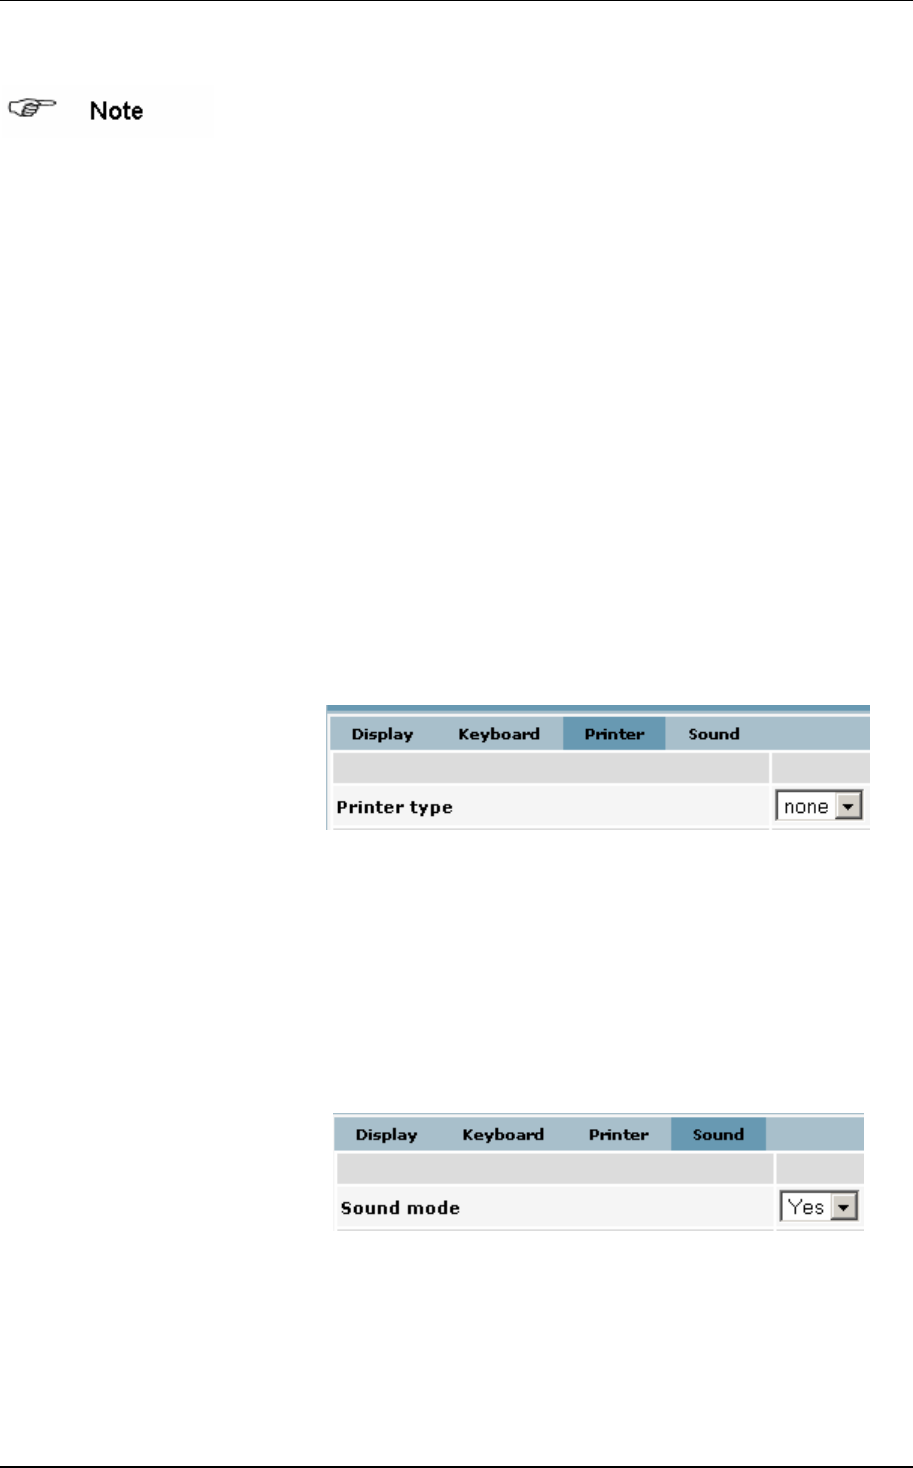
6.2.5.3 Printer
To open the Printer parameter page click on Printer in the menu
bar in the upper part of the right frame.
You may connect a printer to the COM1 port of the terminal.
The choice of Printer types may vary. If there is no printer.jar f
ile
on the terminal, only the choice none is available.
6.2.5.4 Sound
To open the Sound parameter page click on Sound
in the menu
bar in the upper part of the right frame.
Sound mode If you want to deactivate all acoustic signals, set the sound
mode to NO (default YES).
6.2.6 Communications parameters
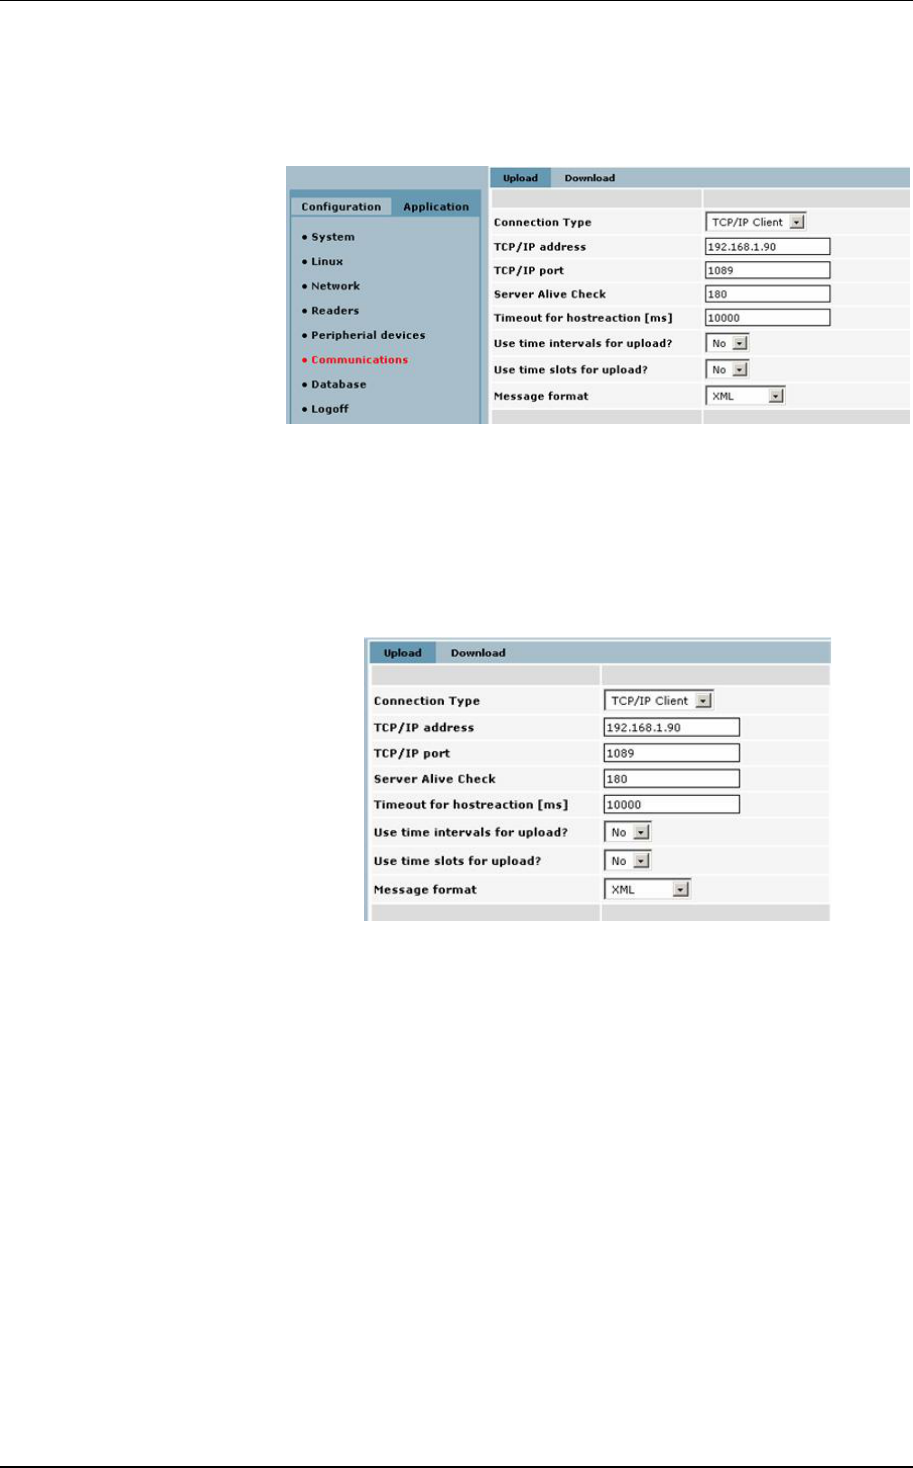
Terminal Configuration Manual TT1000 Series
06.2009 Version 1.1 6-37
To open the Communications configuration pages click on
Communications in the Configuration menu in the left frame.
With the Communications parameters you configure your host
connection.
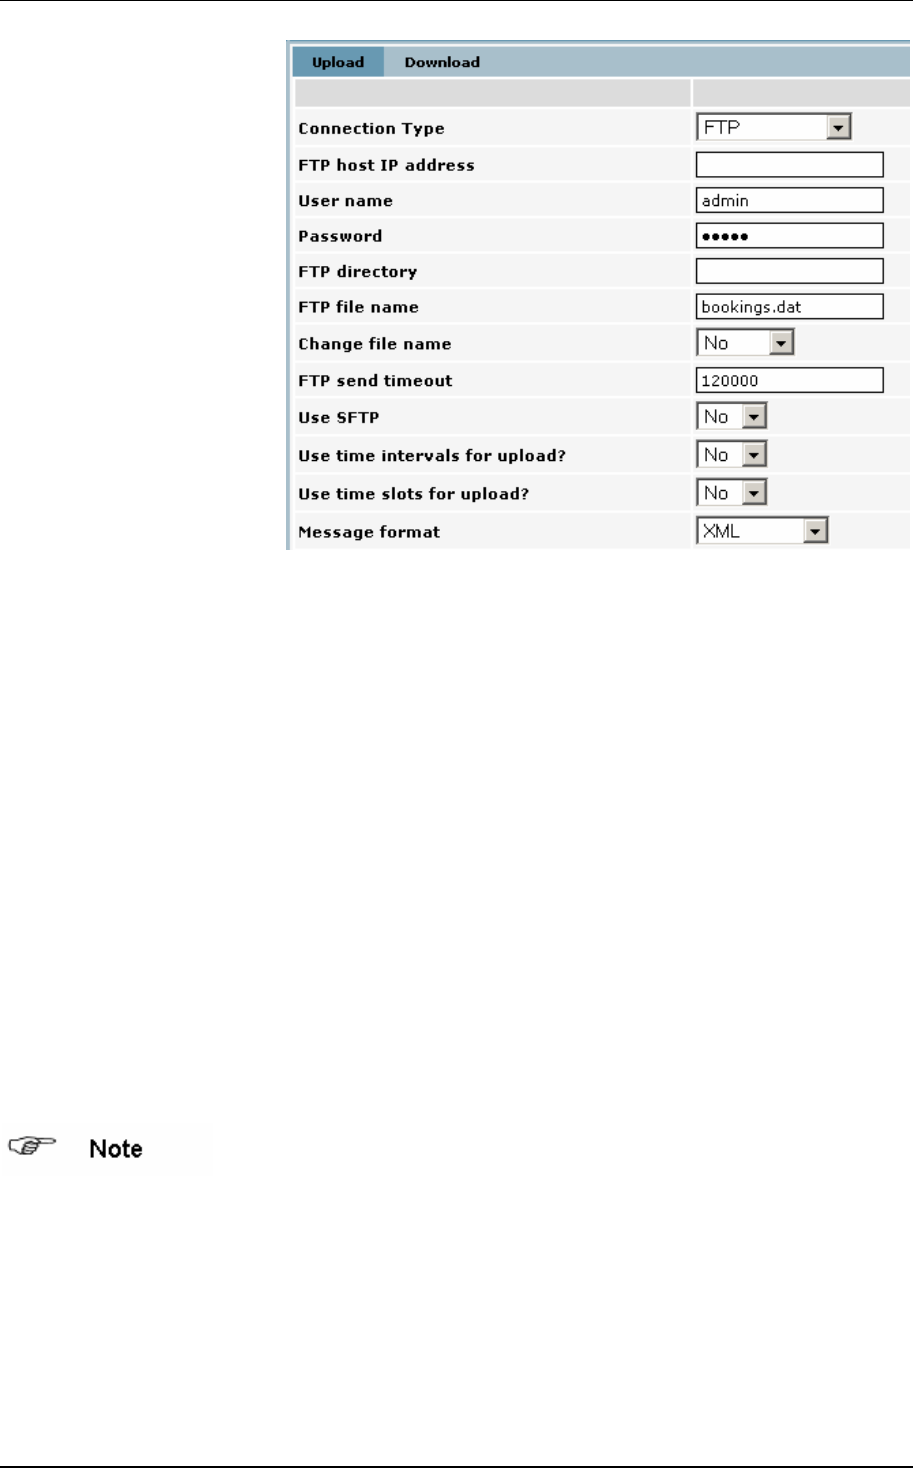
6.2.6.1 Upload
The Upload parameter page is the default page in Communica-
tions parameter group. It describes the communication from the
terminal to the host.
Terminal Configuration Manual TT1000 Series
6-38 06.2009 Version 1.1
Connection type The protocol to be used for sending messages to the host.
Choices are FTP,TCP-Client,TCP-Server, TN3270 and Web
Service. (A TCP-Server is waiting for a connection request and
a TCP-Client is trying to open the connection.) Default TCP-
Client.
TCP/IP address The TCP/IP address used for the host data connection.
TCP/IP port The TCP/IP port used for the host data connection, default
1089.
Server alive check The interval in seconds between the server alive check, default
180.
Time-out for host reac-
tion [ms] Time-out interval for a confirmation message from the host
(ms). Default 10000.
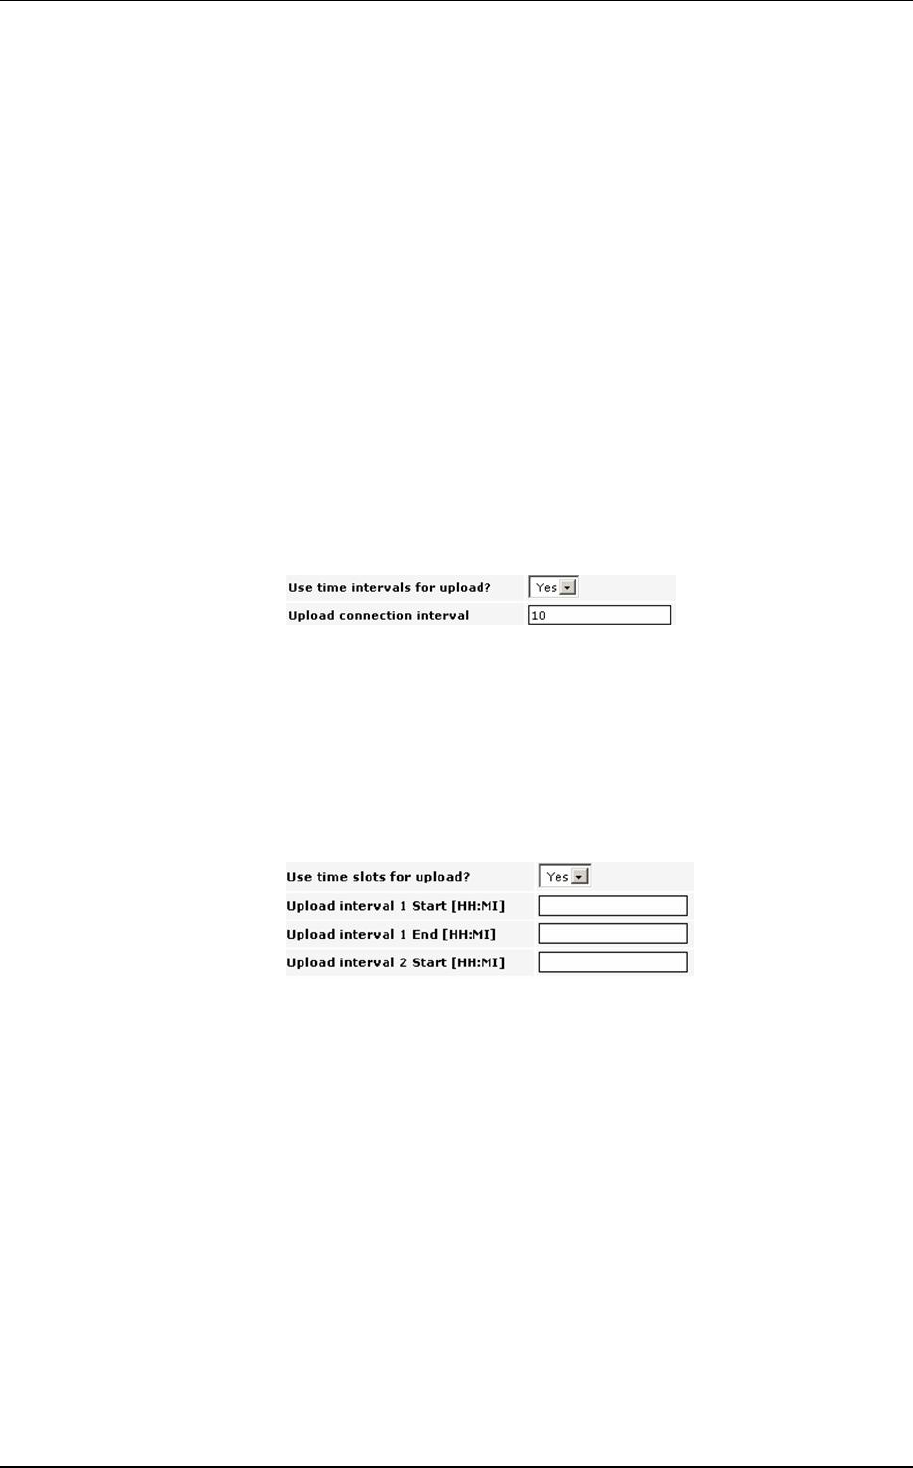
Use time intervals for
upload? Currently only for the connection type FTP. If this option is set
to Yes, the connection to the FTP server will be established
every nminutes, where n is the connection interval you specify
in the next field. Default No.
Upload connection in-
terval
The time interval in minutes you want the connection to the FTP
server to be established. Choose an interval not less than 10.
Use time slots for up-
load? By using online time slots you can restrict the permanent host
connection to the specified periods of time. If you set this pa-
rameter to Yes you have to at least define one start-end-pair,
during which the connection to the host is to be established.
You can define up to 10 time slots. Default No.
Interval n Start [HH:MI] The time to go online in the format hh:mi.
Interval n End [HH:MI] The time to go offline in the format hh:mi. If lower than the start
time, the next day is assumed.
Note that for the connection type
FTP only the start time applies.
Message format Defines the format in which the messages are to be sent to the
host. Default XML.
After choosing and saving the Connection Type option FTP
, the
following parameters are added to the page:
Terminal Configuration Manual TT1000 Series
06.2009 Version 1.1 6-39
FTP host IP address The IP address of the FTP server.
FTP user name The name of the authorized user on the FTP server. Default
admin.
FTP password The password for the FTP user. Default admin.
FTP directory The directory on the FTP server to which the fil
e transfer should
take place. If this parameter is left empty, the connection will be
established to the default directory set up for the user.
FTP file name The name of the FTP file. Default bookings.dat.
Change file name
The rule for changing the file name on the FTP server. Either no
change or change by adding a timestamp to the file name. De-
fault No.
FTP send timeout The waiting time in case the previous version of the specified
file has not been removed from the server. During this time the
file will be resent. Default 120000 (ms).
Use SFTP If you set this parameter to Yes, all transfers are executed with
Secure FTP. Default No.
In order to activate the FTP connection either the parameter
Use time intervals? or Use time slots? has to be set to Yes.
When using time slots only the start time is considered, not the
end time.
Terminal Configuration Manual TT1000 Series
6-40 06.2009 Version 1.1
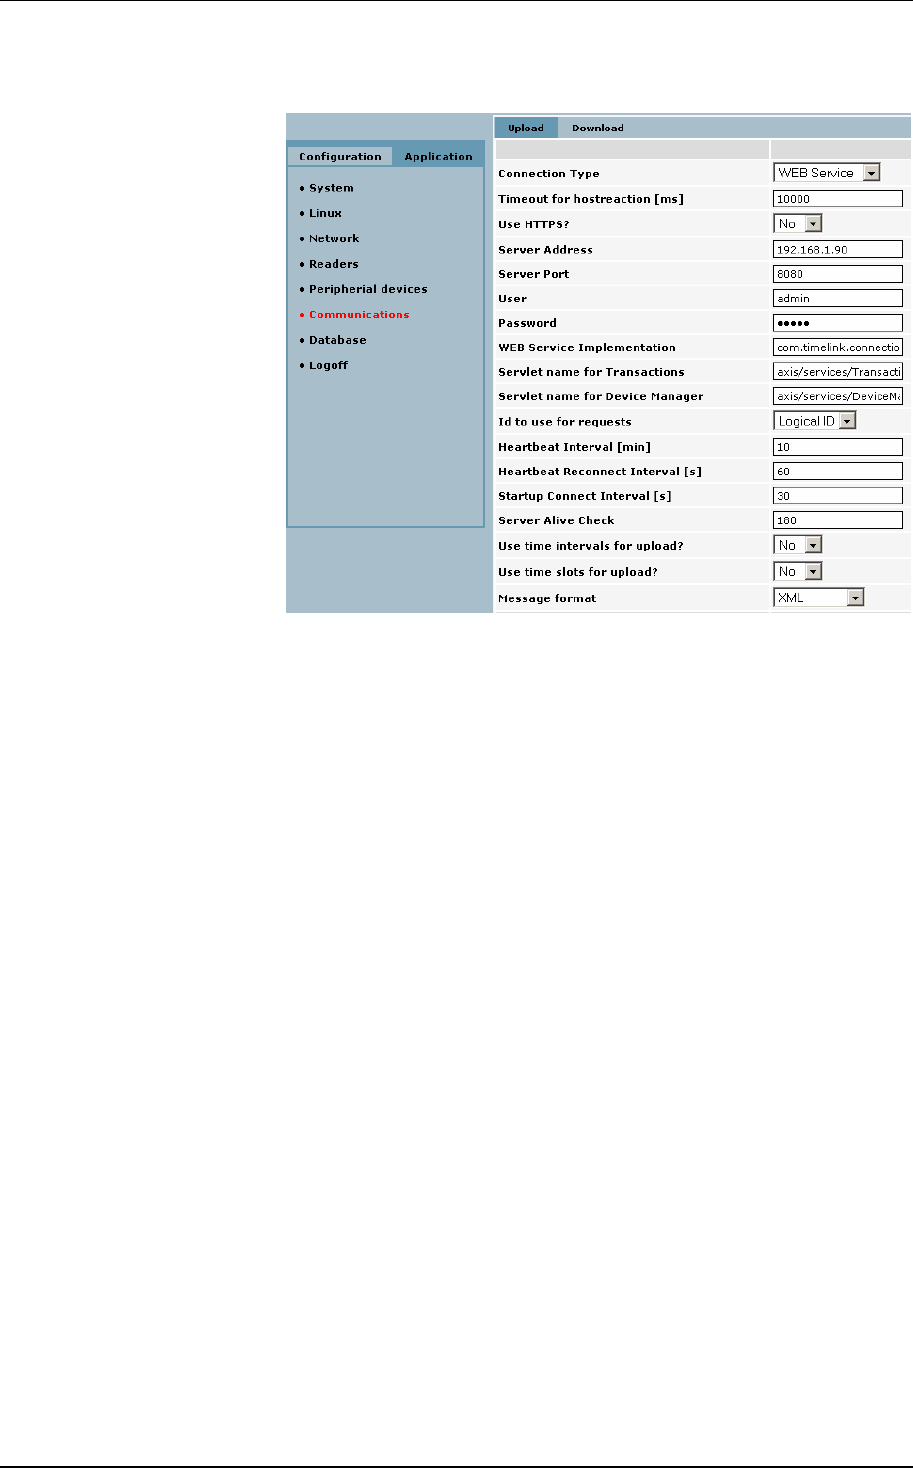
After choosing and saving the Connection Type option Web
Service, the page content changes to the following:
Special web service parameters:
Use HTTPS? If this mode is active, a secure communication is used. The
terminal first has to request a certificate from the web server
though. Default No.
Server Address The IP address or the hostname of the server.
Server Port The port of the server to connect to. Default 8080 for http.
User The authenticated user for the web service.
Password The password of the web service user.
Web Service Implemen-
tation The class name of the web service implementation, default
com.timelink.connection.webservice.WSServerConnectionTL.
(For USA more often used: …WSServerConnectionTLUS)
Servlet name for
Transactions The servlet (complete path) for receiving the transactions.
Servlet name for Device
Manager The servlet (complete path) for processes other device mes-
sages such as the heart beat.
Id to use for requests The ID used for server requests. This can be either the logical
ID (the field Local terminal address on the terminal parameter
page) or the name (the field Hostname on the network parame-
ter page, by default the MAC address).
Heartbeat Interval The interval between heart beat messages in minutes, m
inimum

Terminal Configuration Manual TT1000 Series
06.2009 Version 1.1 6-41
5 minutes, default 10 minutes.
Heartbeat Reconnect
Interval For the offline case: the interval between reconnection tries in
seconds, minimum 10 seconds, default 60 seconds.
Startup Connect Inter-
val For the offline case at startup: the interval between reconnec-
tion tries in seconds, minimum 10 seconds, default 30 seconds.
It is recommended to set the parameter Timeout for host reac-
tion to 45 seconds (value 45000).
Also it is recommended to set the parameter Server alive
check to 0, because the alive check with Web service is done
by heartbeats.

Terminal Configuration Manual TT1000 Series
6-42 06.2009 Version 1.1
6.3 Application parameters
To open the application parameter group list, click on Applica-
tion in the left frame.
6.3.1 Application parameter groups - overview
Bookings If you want to resend bookings to the host system, that have
already been transferred before.
Reports To show certain transaction according to your selection criteria.
Terminal Configuration Manual TT1000 Series
06.2009 Version 1.1 6-43
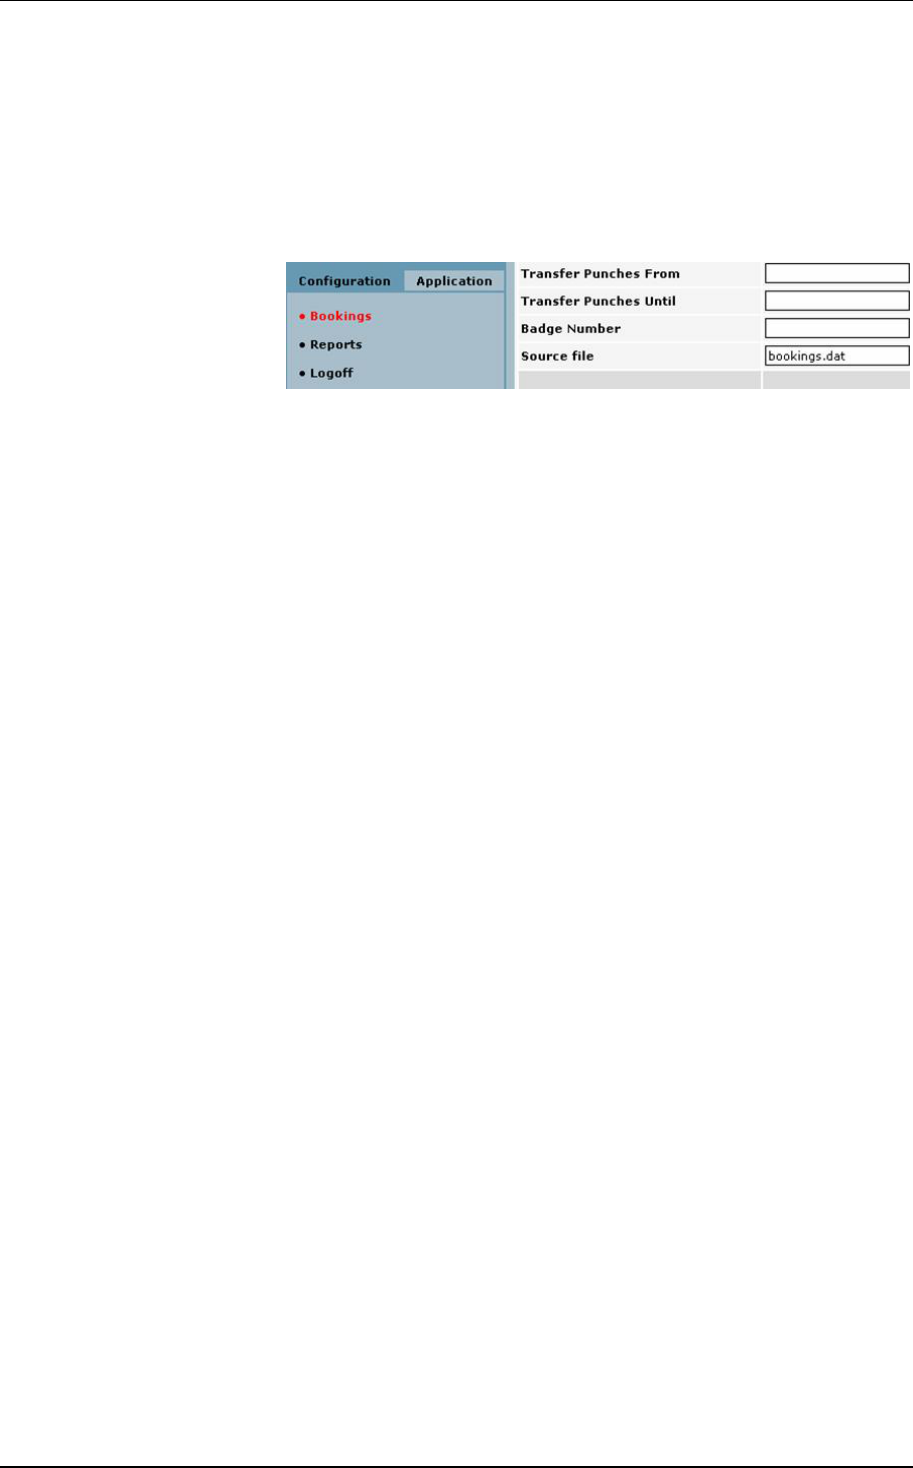
6.3.2 Resend bookings parameters
If the transactions that are stored in the transaction booking file
on the terminal are to be sent again to the host system, the de-
sired period of time and/or the badge number can be specified.
According to this value the transactions are extracted from the
bookings files and resent to the host.
Transfer Punches From The start date/time for the retransmission of bookings. The for-
mat is DDMMYYYYHHMISS, e. g. 15052005120000.
Transfer Punches Until The end date/time for the retransmission of bookings. The for-
mat is DDMMYYYYHHMISS, e. g. 15052005235959.
Source file The name of the file, from which the punches should be se-
lected and sent again (as defined in the application.xml file, e.g.
bookings.dat). Default bookings.dat.
Badge Number The badge number for which the bookings should be resent. If
no badge number is entered, the transactions for all badge
numbers are resent.

Terminal Configuration Manual TT1000 Series
6-44 06.2009 Version 1.1
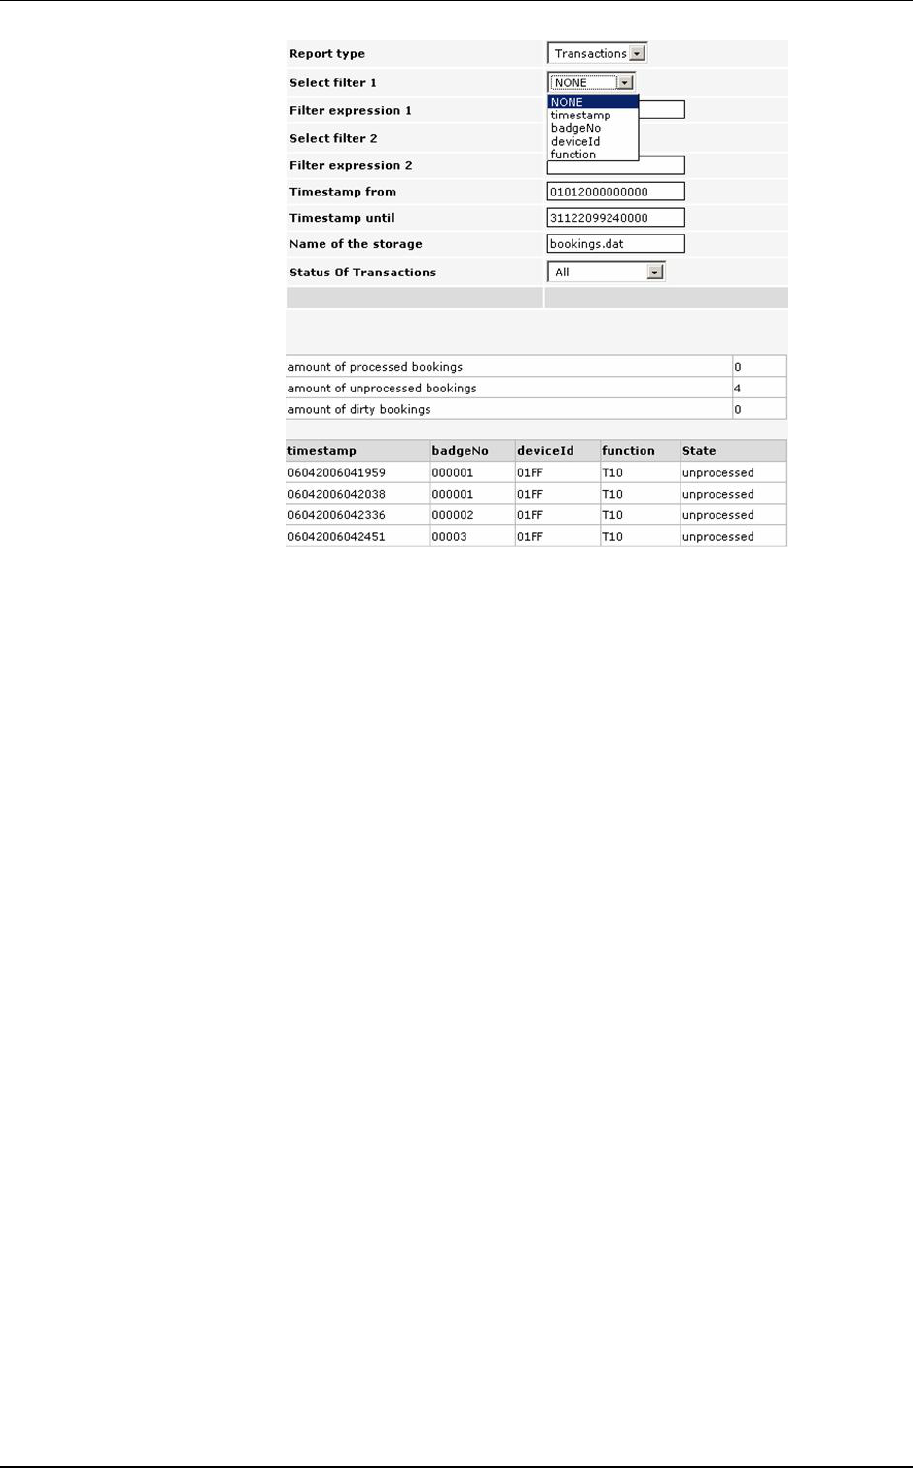
6.3.3 Reports parameters
To open the Reports parameter page click on Reports in the
Application menu in the left frame.
Report type Currently Transactions only.
Select filter 1 | 2 The field in the transaction record by which the records will be
filtered. The fields depend on the definition in the applica-
tion.xml file. By default the fields timestamp (format DDMMY-
YYYHHSS), badgeNo (badge number), deviceId (local terminal
address), function (booking type) are defined.
Filter expression 1 | 2 The value for the filter 1 | 2.
Timestamp from The start date for the list of transactions (format DDMMYYY-
YHHMISS).
Timestamp until The end date for the list of transactions (format DDMMYYY-
YHHMISS).
Name of storage The name of the transaction storage file (as defined in the ap-
plication.xml file, e.g. bookings.dat). Default bookings.dat.
Status of Transactions The status of the transactions to be selected.
After clicking on Save the report will be shown in the bottom
part of the page:
Terminal Configuration Manual TT1000 Series
06.2009 Version 1.1 6-45
In the general part of the report the total amounts of processed,
unprocessed and dirty bookings is listed, no matter what status
of transaction has been chosen.
In the lower part the transactions meeting the selection criteria
are shown.

Terminal Configuration Manual TT1000 Series
7-46 06.2009 Version 1.1
7 Fingerprint terminals in practice
7.1 Introduction
Before performing transactions with a fingerprint terminal you have to collect (enroll) the
templates of all users. The templates are stored in the Sagem fingerprint module.
If the internal data base of the module is empty and a user presses the key for e.g. Clock In,
immediately the message “Invalid ID” is displayed. This is no error but a hint, that so far no
user has been enrolled.
7.2 Enrollment process
The exact flow of the enrollment process is defined in the application.xml configuration file. In
any case it is required to read 2 finger prints three times each, of which the best one for each
finger is stored. Also it is required to specify an ID, under which the templates are stored and
which is provided as the answer to a successful identify.
The dialog for the enrollment process is protected by a PIN code and should only be called
by an administrator. Typically the key with the flag is assigned for calling this dialog.
7.2.1 Calling the main menu
After pressing the key with the flag symbol you are requested to enter the PIN code. It is the
same PIN code as for the startup dialog, by default press 4 times the key with the question
mark. (For information how to change this PIN code, see below.) After entering the correct
PIN code and pressing the OK button the main menu is displayed:
Please select option:
(flag) Enroll admin
?Enroll user
F1 Delete user
F2 Delete ALL
For selecting an option press the key listed in the left column.
With the options Enroll admin and Enroll user new user are enrolled (depending on the
application there may be an admin user with more privileges.). With the option Delete user
you delete the templates for a single user ID, with the option Delete ALL the whole data base
of the Sagem module, i. e. all templates enrolled.

Terminal Configuration Manual TT1000 Series
06.2009 Version 1.1 7-47
7.2.2 Enroll
After pressing the key for Enroll admin or Enroll user you are requested to enter the ID for
the enrollment. Press the key with the question mark to change the first digit to 0. Then press
the ? key as often as necessary to change the digit to the desired value. The cursor is auto-
matically moved right by a timeout. Furthermore you can control the cursor with the green
and red button. Confirm the ID by pressing the OK button.
The fingerprint module is being activated; i. e. shows the red light. The user has to follow the
dialog that instructs him to place one finger three times on the reader and afterwards a sec-
ond finger three times. In doing so the red light turns off for a short time after each successful
read. In case of a successful enroll a message is displayed. Otherwise an error message is
displayed and the enrollment step must be repeated.
7.2.3 Delete user
After pressing the key for Delete user the administrator can delete the templates for a cer-
tain user, more precisely for a certain ID.
After entering the ID (again with the ? key) a confirmation screen is displayed. When confirm-
ing this screen with OK the templates for this ID are deleted from the Sagem module.
7.2.4 Delete all
With the option Delete all the administrator can delete all templates in the Sagem module.
Use this option with care because after that all users have to re-enroll. Therefore the admin-
istrator is asked twice to confirm the delete request, before the templates are really deleted.
Terminal Configuration Manual TT1000 Series
8-48 06.2009 Version 1.1
8 Appendix for Developers
8.1 Linux commands
8.1.1 Connecting to the terminal
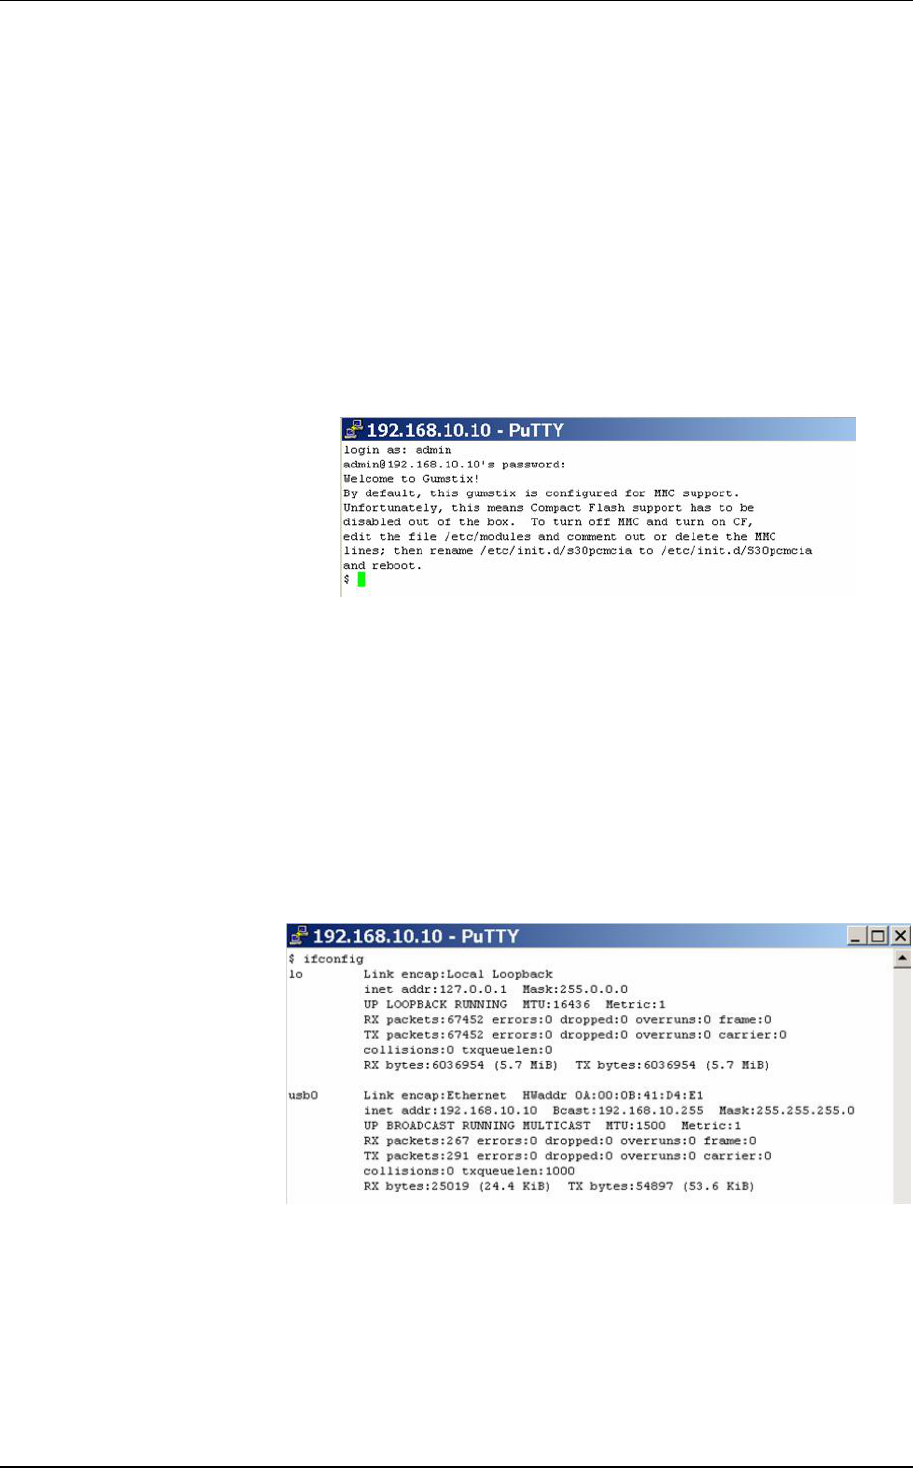
SSH Start an SSH client (e. g. putty) and log in as the user admin
with the password admin (default).
At this prompt you can enter basic Linux commands as de-
scribed in the following. Note that different from other standard
Linux distributions you can not call any help for the commands.
8.1.2 Basic Linux commands
Display the network
configuration
Command ifconfig. Shows the IP address, the MAC address
and the subnet mask.
Output:
Command route. Shows routing information. Output:
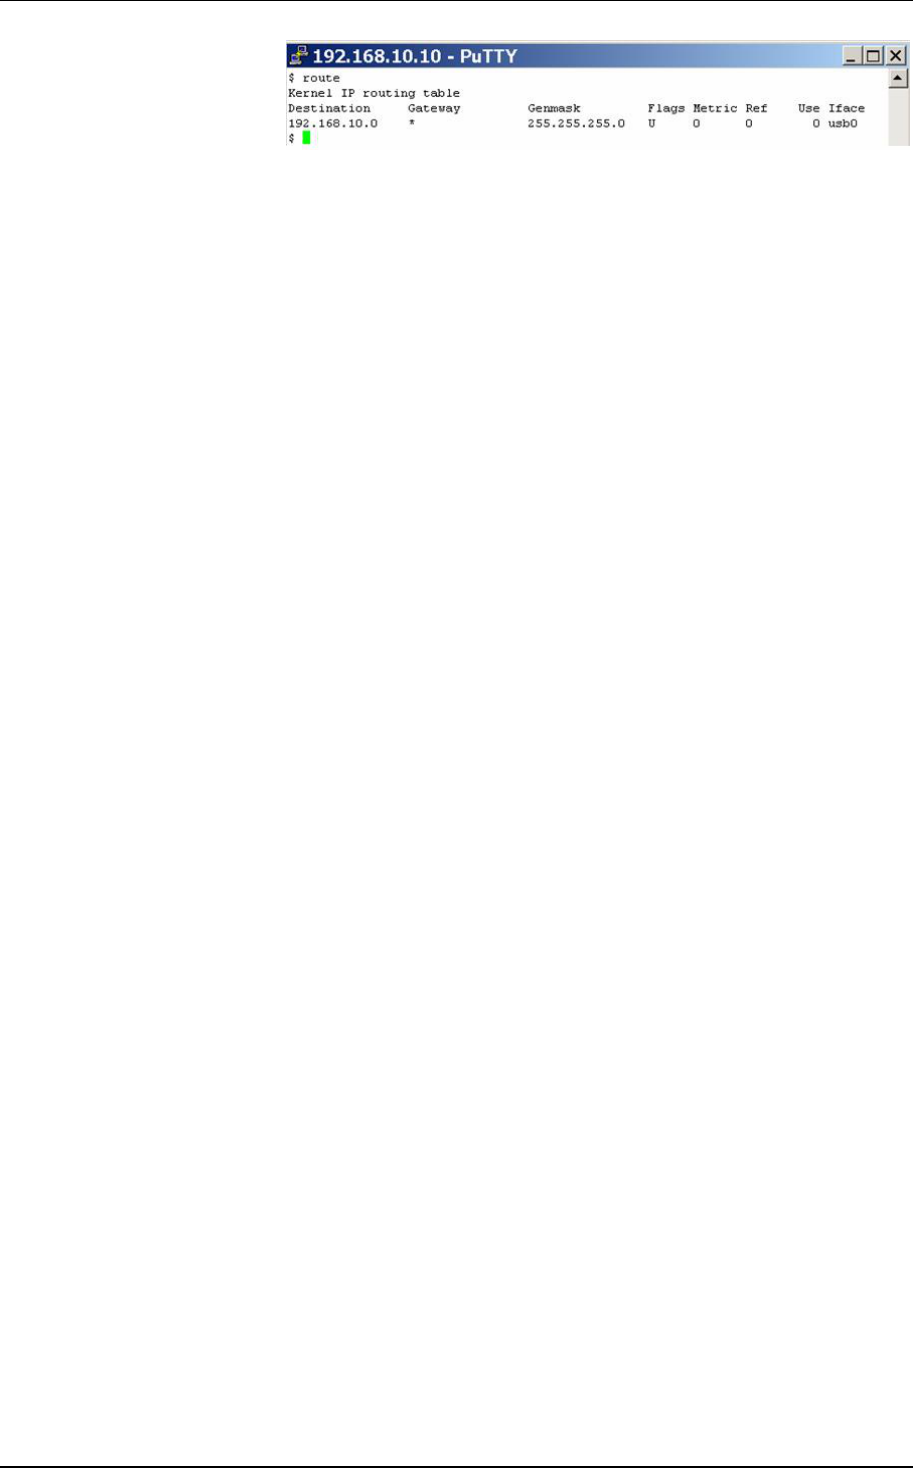
Terminal Configuration Manual TT1000 Series
06.2009 Version 1.1 8-49
Terminal Configuration Manual TT1000 Series
8-50 06.2009 Version 1.1
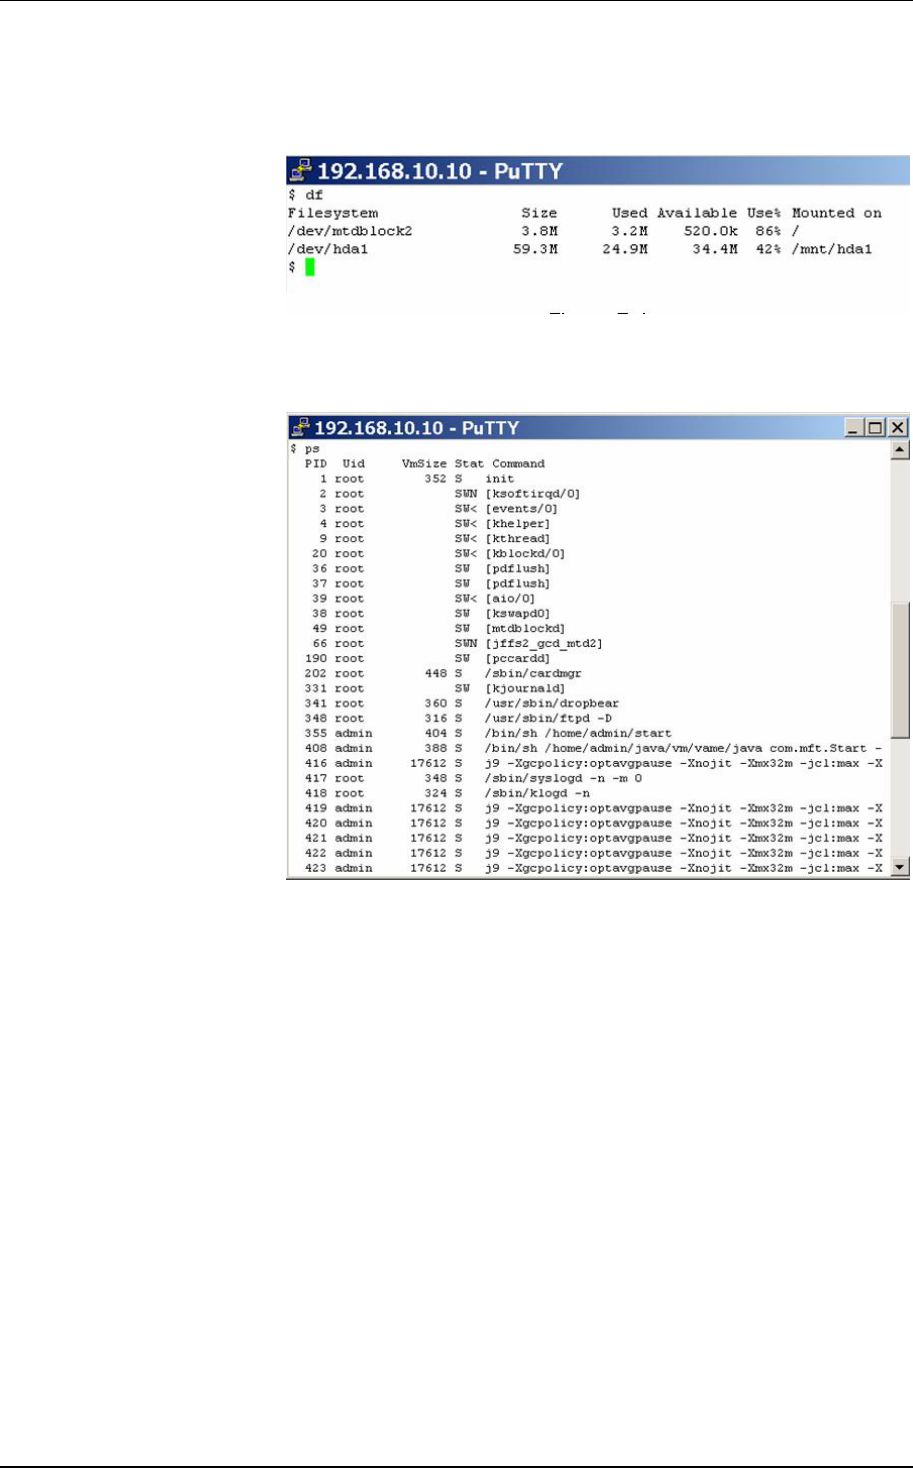
Display free disk space Command df. Shows the partitions on the “Filesystem”
and their
usage.
Output:
Display active proc-
esses Command ps. Shows all active processes.
Output:
Relevant for the terminal application are the start process and
the j9 processes.
Stop application proc-
esses Command killall start start2 j9. Stops all processes with the
name start, start2, and j9. After that e. g. the software can be
updated and the terminal can be restarted with the command
reboot.
Terminal Configuration Manual TT1000 Series
06.2009 Version 1.1 8-51
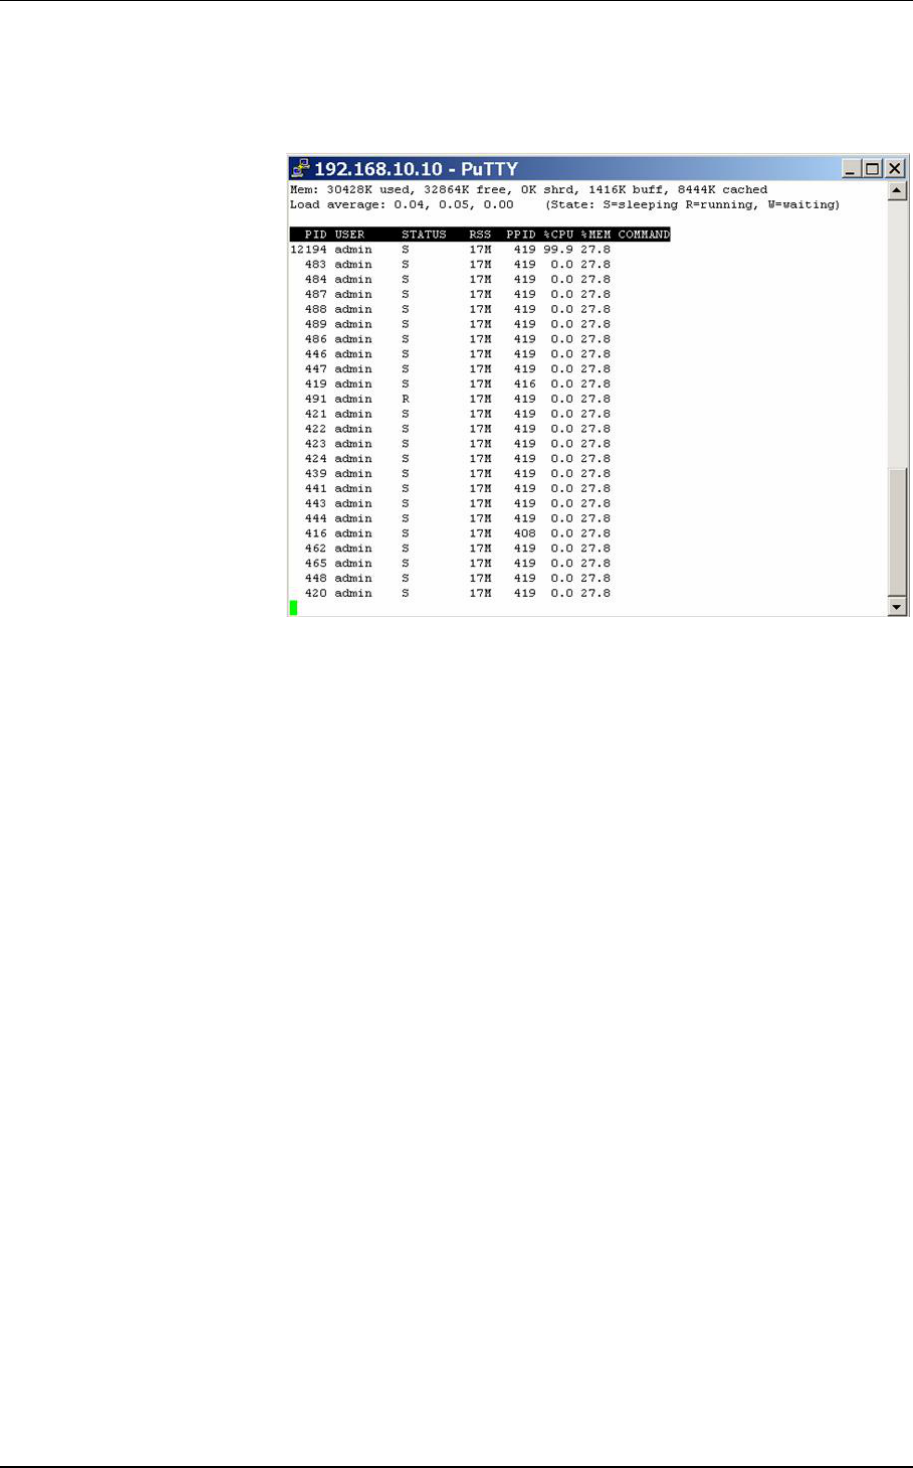
Display the current
process activities
Command top.
Shows the processes at runtime and the system
load.
Output:
The command top will continue until you terminate it with
Ctrl+C.
Restart the terminal Command reboot. The running application will be terminated
and then restarted.
Halt the Linux system Command halt.
With this command the operating system will be
stopped. The terminal can then be switched off. In contrast to
stopping the application processes (kill) you can not access the
terminal (via ftp or ssh) after issuing this command.
Delete files and directo-
ries
Command rm. Deletes (with the option–rf even recursively
) files
and directories.
Example for deleting the database with terminal parameters.
Enter these commands from the directory /java/apps:
rm –rf database*
rm –rf http*
rm –rf rxtx*
Terminal Configuration Manual TT1000 Series
8-52 06.2009 Version 1.1
Check the Compact
Flash for errors
First use the command df to get the partition names. Then log in
as user root with the correct password (default root).
After stopping the application issue the command badblocks
for the existing partitions.
Example: badblocks /dev/hda1 and
badblocks /dev/mtdblock2
Important: This command does not return any message if no
bad blocks are found.
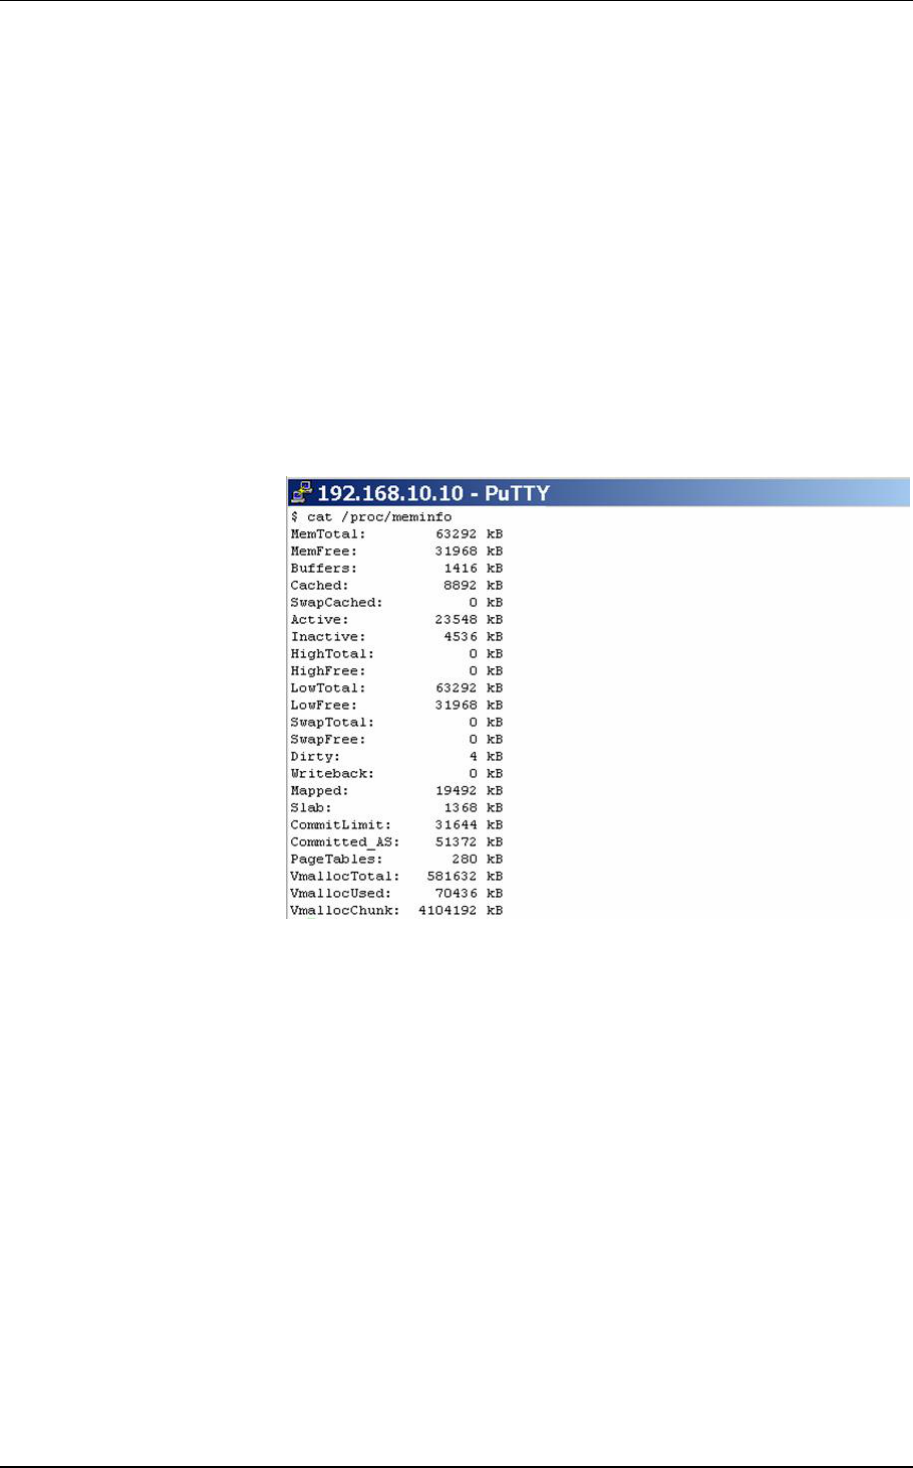
Check the memory
usage A simple way to query the memory usage, is to show the con-
tent of the file meminfo, entering the command
cat/proc/meminfo
Terminal Configuration Manual TT1000 Series
06.2009 Version 1.1 8-53
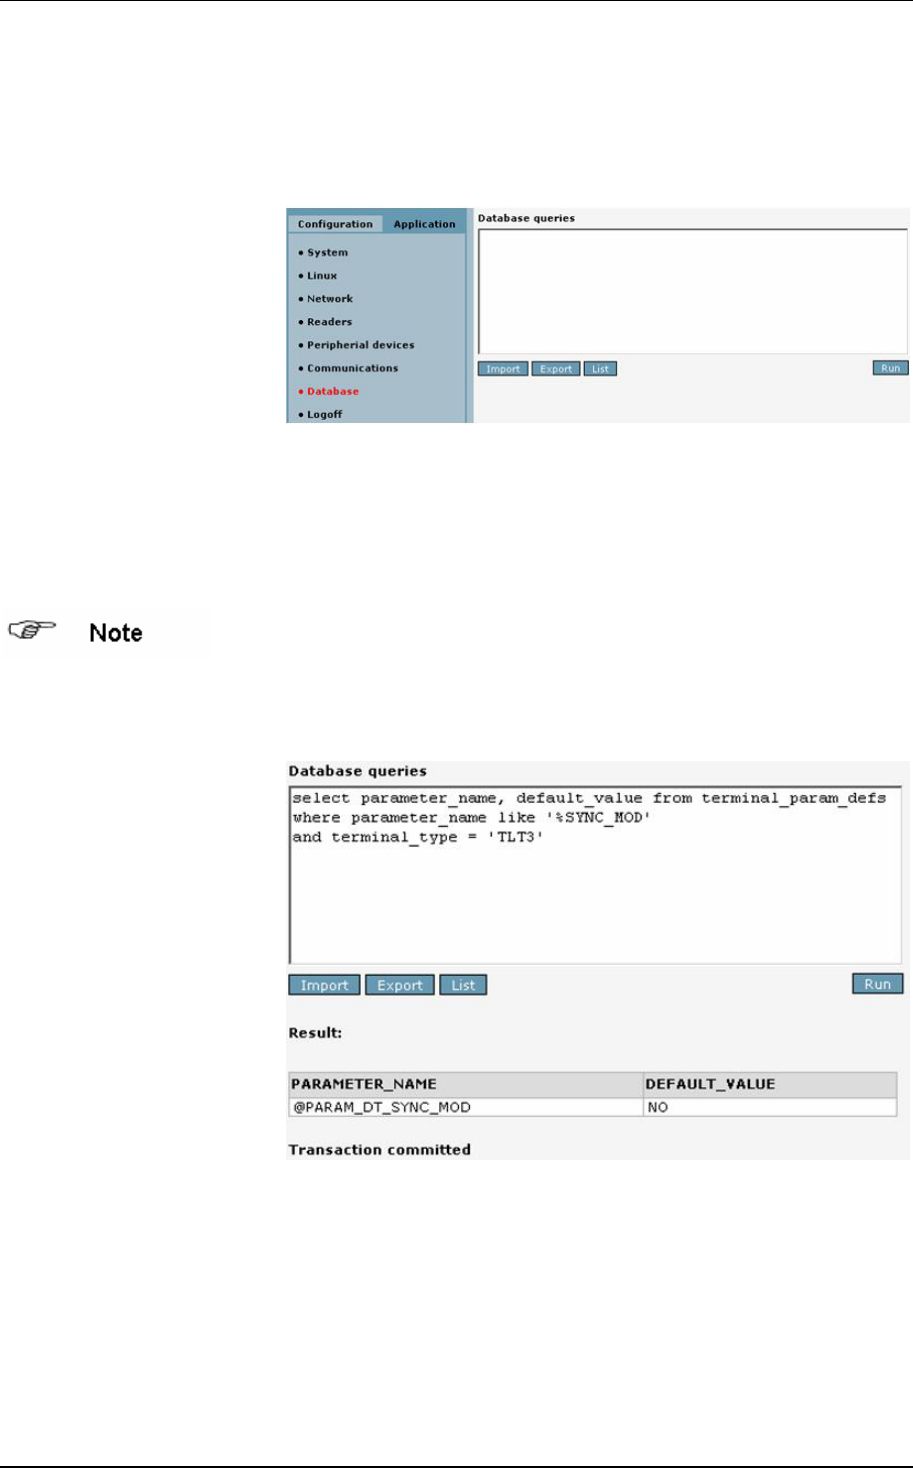
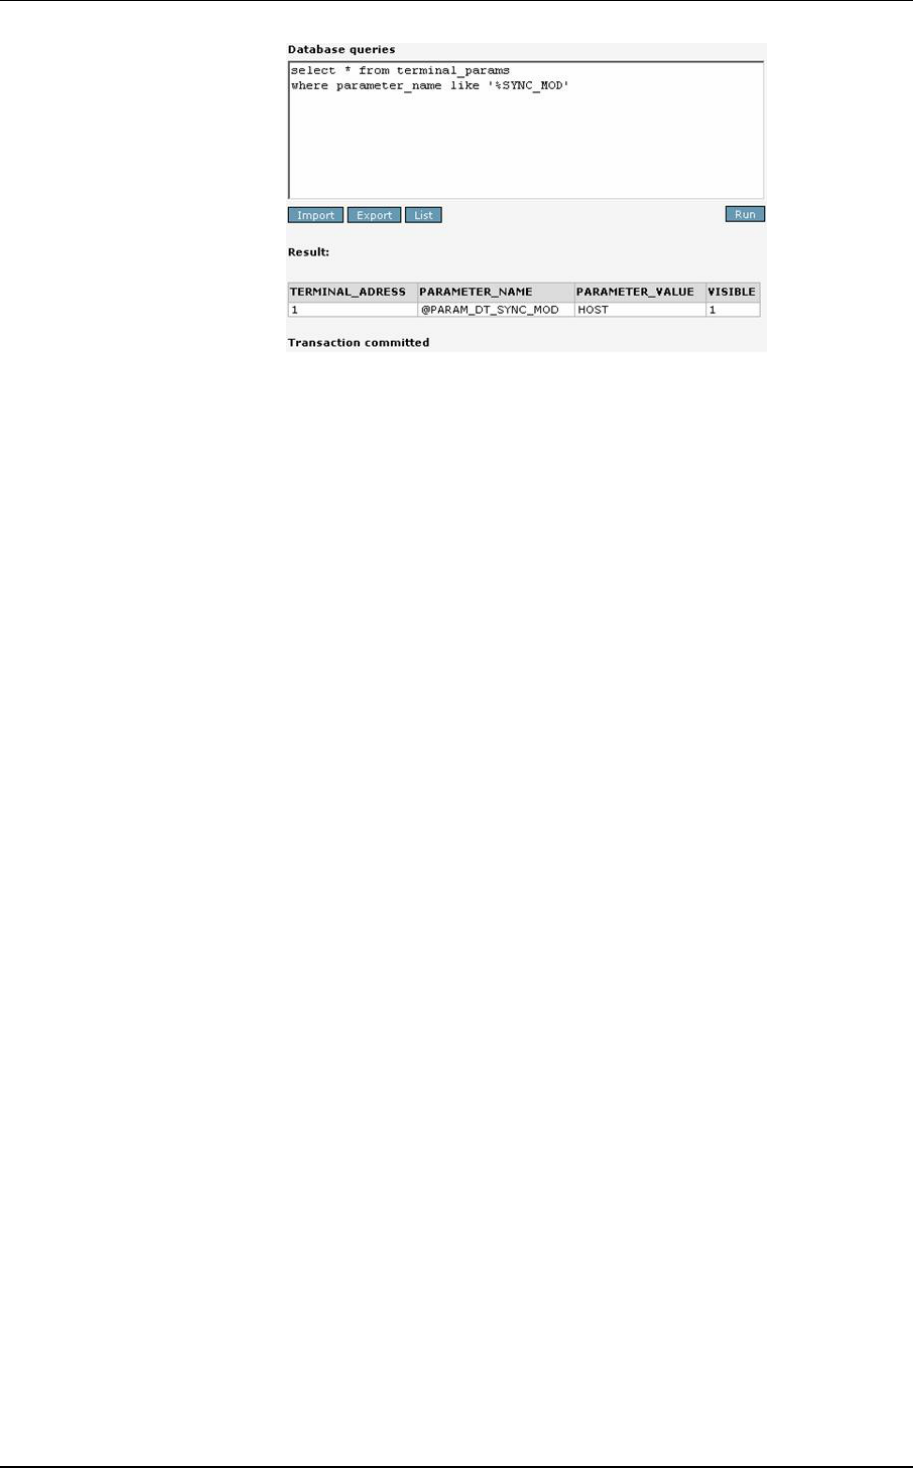
8.2 Web interface page Database
With the option Database of the Configuration menu you can
open a window in which SQL command can be passed directly
to the terminal database.
The table TERMINAL_PARAM_DEFS contains default
parameter definitions depending on the terminal type, here the
terminal type is TLT3.
The table TERMINAL_PARAMS contains the actual values for
the terminal-type-based parameters.
Use the percentage sign (%) as a wildcard instead of the aster-
isk (*) in your queries.
Example Select the default value for the Date/Time parameter Time
Synchronisation.
Select the actual value for the Date/Time parameter Time Syn-
chronisation.
Terminal Configuration Manual TT1000 Series
8-54 06.2009 Version 1.1
Note that the default value is NO, whereas the actual value is
HOST.
Terminal Configuration Manual TT1000 Series
06.2009 Version 1.1 8-55
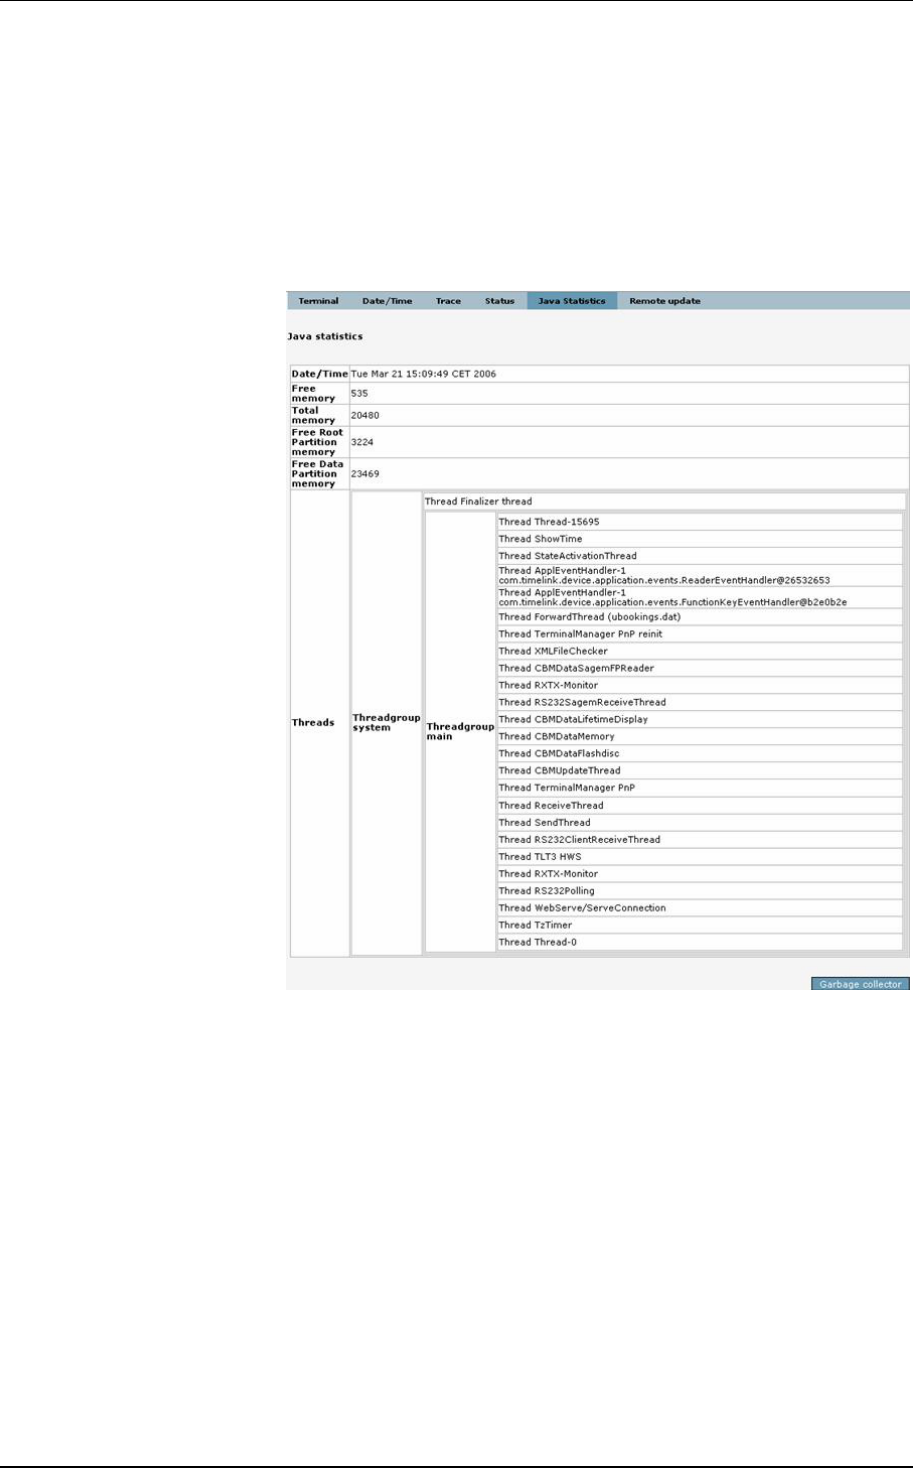
8.3 Web interface page Java Statistics
With the menu option Java statistics in the System menu bar
in the upper part of the right frame you can open a window in
which the status of the virtual machine is displayed. All the
active threads as well as the memory values are shown. The
Garbage Collector can be activated manually using the button
at the bottom.