eResearchTechnology SPS001 SpiroSphere is a diagnostic compact device to measure inspiratory and expiratory lung function parameters User Manual
eResearchTechnology GmbH SpiroSphere is a diagnostic compact device to measure inspiratory and expiratory lung function parameters
2AAUFSPS001 UserMan
781235
Version 00.16
Instructions for Use
SpiroSphere®
SpiroSphere® Instructions for Use
Page 2/84 9HUVLRQ0$<
Product names or services are trademarks of their respective companies.
All rights, including those of translations, are reserved. Written permission of
eResearchTechnology (ERT) shall be obtained for the reproduction of this manual or any excerpt
WKHUHRIE\DQ\PHDQVLQFOXGLQJSULQWLQJSKRWRVWDWLFGXSOLFDWLRQPLFUR¿OPVRUDQ\RWKHU
processes.
eResearchTechnology GmbH
Sieboldstrasse 3
97230 Estenfeld, Germany
Tel: +49 9305 720-9891
Fax: +49 9305 720-7891
www.ert.com
© 2017 eResearchTechnology GmbH. All rights reserved.
The SpiroSphere is a diagnostic compact device to measure inspiratory and expiratory lung
function parameters in adults and children. In addition the SpiroSphere can collect, store and
transfer vital data from other external devices.
,WFDQEHXVHGE\SK\VLFLDQVLQWKHRI¿FHRUKRVSLWDODQGLQRFFXSDWLRQDOPHGLFLQH
Indications for Use
Federal U.S. law restricts this device to sale by or on the order of a
physician. (Rx only)

SpiroSphere® Instructions for Use
Page 3/84
9HUVLRQ0$<
Table of Contents
Indications for Use ...........................................................................................................2
Notes on Safety in this Instruction Manual ......................................................................4
Declaration of Conformity ................................................................................................4
Device Description...........................................................................................................5
Unpacking and Starting Operation ..................................................................................5
The SpiroSphere ............................................................................................................6
Start-Up ...........................................................................................................................7
Troubleshooting ...............................................................................................................9
LED Status SpiroSphere .................................................................................................9
LED Status SpiroSphere Sensor .....................................................................................9
Sensor insert .................................................................................................................10
Setup ..........................................................................................................................11
The Home Screen .........................................................................................................13
Sensor Check ...............................................................................................................14
Calibration Check ..........................................................................................................14
Linearity Check ..............................................................................................................16
Add Patient ....................................................................................................................17
Search Patient ...............................................................................................................19
Actions ..........................................................................................................................21
Preparing a Measurement .............................................................................................22
Perform a Forced Spirometry Measurement .................................................................23
Perform a Slow Spirometry Measurement.....................................................................28
Dosing ..........................................................................................................................31
Perform a Post Spirometry Measurement .....................................................................32
Adhoc Test .....................................................................................................................34
Perform an Adhoc Test ..................................................................................................34
Assign Adhoc Test now ..................................................................................................35
Assign Adhoc Test later .................................................................................................36
Show, Edit, Delete and Print Tests ................................................................................37
Print Recorded Results..................................................................................................40
Settings and Tools .........................................................................................................41
User Management .........................................................................................................54
Update ..........................................................................................................................69
About Device .................................................................................................................69
Restore Default Settings................................................................................................69
Factory reset..................................................................................................................69
Cleaning/Hygiene ..........................................................................................................70
General Safety Precautions...........................................................................................72
Graphical Symbols ........................................................................................................77
Notes on EMC according to EN60601-1-2 ..................................................................80
Technical Data ...............................................................................................................81
Item Numbers of Disposables and Accessories ............................................................83
SpiroSphere® Instructions for Use
Page 4/84 9HUVLRQ0$<
Declaration of Conformity
Notes on Safety in this Instruction Manual
Following the ANSI (American National Standards Institute) recommendations for safety notes,
VSHFL¿FSDVVDJHVRIWKLVLQVWUXFWLRQPDQXDODUHFOHDUO\PDUNHGDVVDIHW\QRWHV
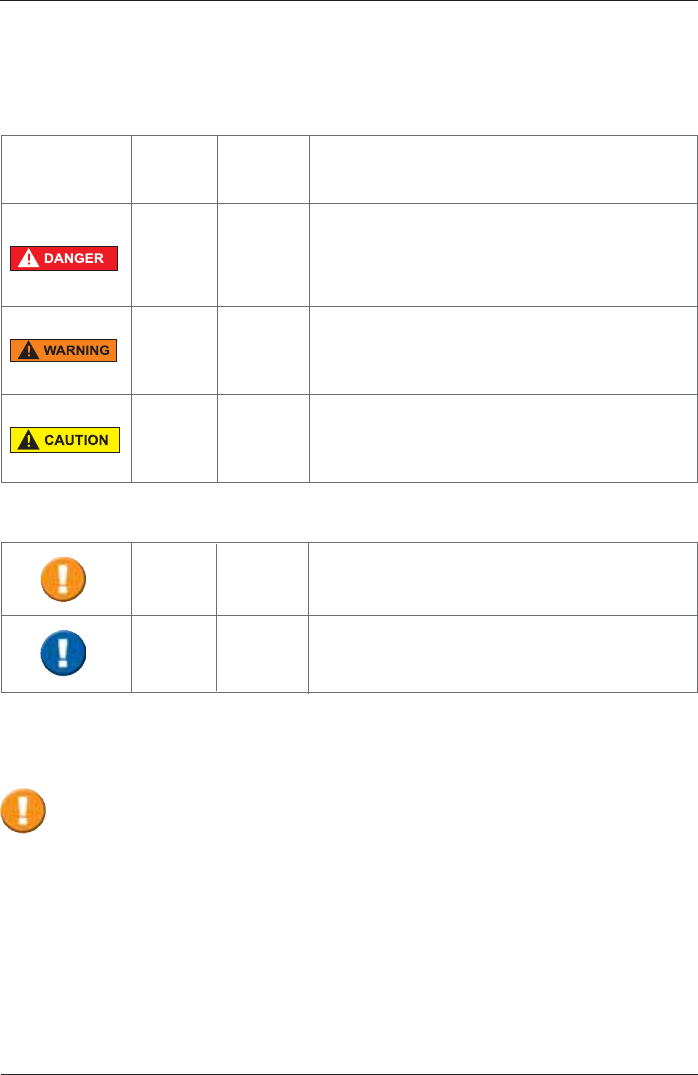
Degree of
Danger Meaning of Indicator
Injury
to
persons
Damages
to
property
X
(X)
DANGER indicates an immediate hazardous
situation, which, if not avoided, may result in
serious injury or death. Limited to extremely
dangerous situations.
WARNING indicates a potential hazardous
situation, which, if not avoided, may result in
serious injury or death.
Caution indicates a potential hazardous situation,
which, if not avoided, may result in minor or slight
injury. Also used to indicate precarious procedures.
Additional icons used in this manual:
X
X
Important information on operation and other
useful information. Does not warn of dangerous or
harmful situations.
Tips, general information and information on
operation.
The original Declaration of Conformity document can be obtained from ERT.
SpiroSphere® Instructions for Use
Page 5/84
9HUVLRQ0$<
Device Description
The SpiroSphere is a compact spirometry device. Its Sensor Unit is battery-powered. The Main
Unit can be powered by battery or power supply. The SpiroSphere is used to measure inspiratory
and expiratory lung function parameters in adults and children. The measured data is saved into
the device and can be read out at any time.
The disposable easy-to-exchange, high-quality pneumotach guarantees a high degree of patient
safety and provides precise recording results.
The Main Unit is equipped with a graphical LCD touch display, providing a state of the art solution
for selection of menu functions and the navigation throughout the menu.
The SpiroSphere Sensor is paired via Bluetooth with the Main Unit.
A printer can be connected with the SpiroSphere and all needed data can be printed. Moreover, it
is possible to transfer data via USB, WiFi, 3G and Ethernet.
7KHGHYLFHFDQEHXVHGE\SK\VLFLDQVLQWKHRI¿FHRUKRVSLWDODVZHOODVLQRFFXSDWLRQDOPHGLFLQH
Unpacking and Starting Operation
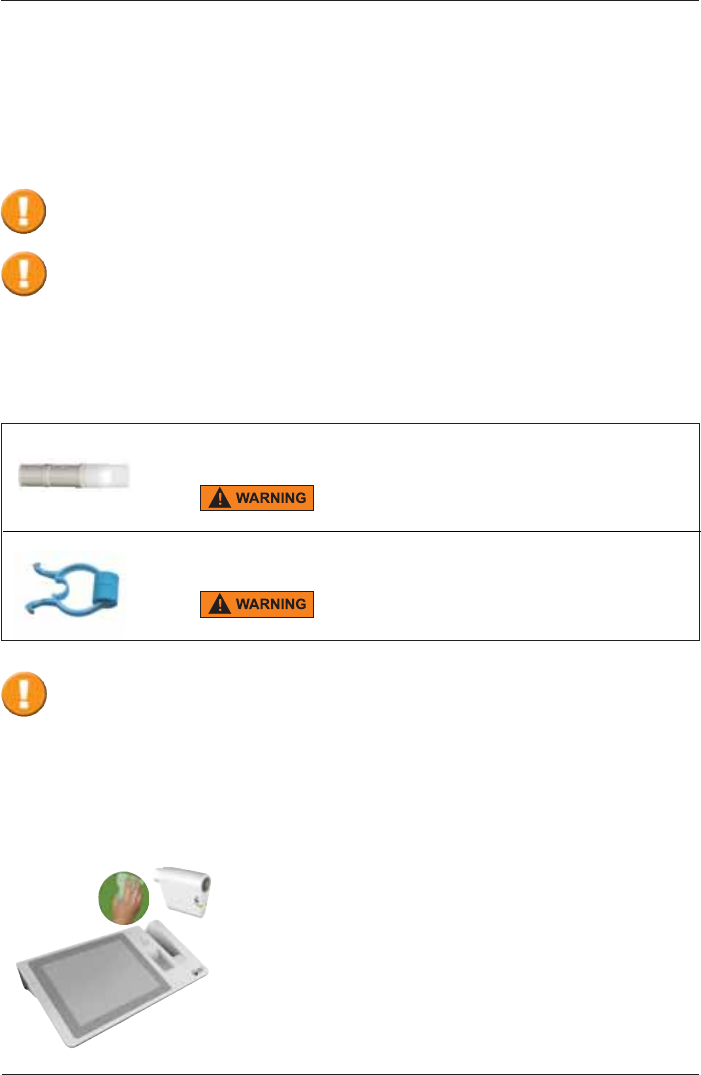
SpiroSphere is delivered with the
following accessories*:
1 Main Unit
1 SpiroSphere Sensor
1 Power Supply
4 ERT PT with Mouthpiece
2 Nose clips and Pads
1 Instruction manual
* Depending on the type of equipment either included in the delivery or available as an option
Death due to suffocation may occur if packing material is swallowed.
Store packing material out of reach of children and dispose of properly!
Use only ERT approved accessories and spare parts for this medical device.
7KH5HWXUQRI*RRGVLQ0HGLFDO,QVWLWXWLRQ&HUWL¿FDWHRI+\JLHQHLVSURYLGHGDVDVHSDUDWH
GRFXPHQWÀ\HU
SpiroSphere® Instructions for Use
Page 6/84 9HUVLRQ0$<
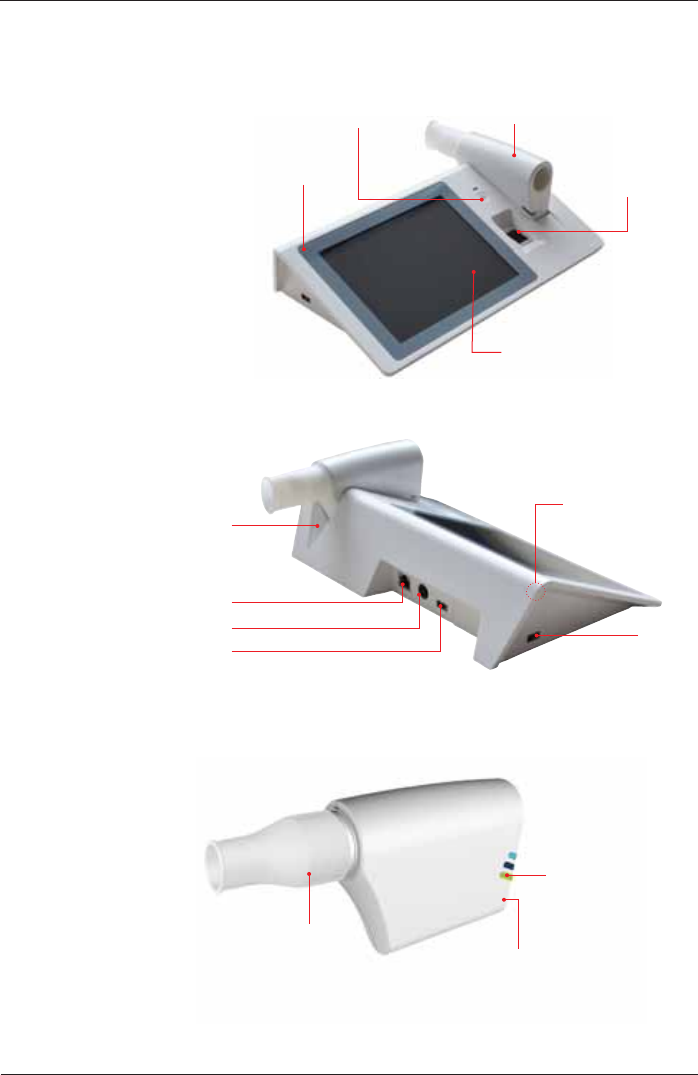
The SpiroSphere
Main Unit:
Main Unit
SpiroSphere Sensor
LCD touch display
Fingerprint
Sensor
Power On/Off
Power
USB
Speaker
USB
LAN
Power On/Off
LED Status Indicator
ERT PT with
Mouthpiece
SpiroSphere Sensor:
Charging Cradle
Front view:
Rear view:
SpiroSphere® Instructions for Use
Page 7/84
9HUVLRQ0$<
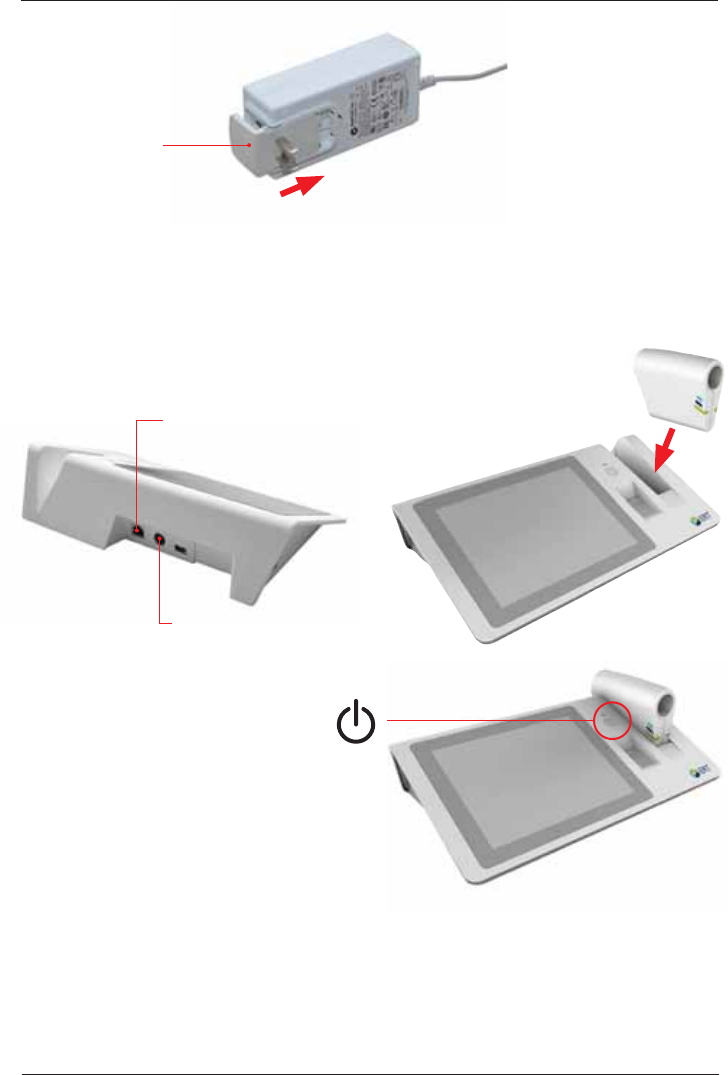
Start-Up
1. Connect the SpiroSphere to a power
source complying with local regulations.
3. Use the Power On switch located at
the front of the main unit to switch on
the SpiroSphere Main Unit.
LAN
Power Supply
Connection
2. Put the SpiroSphere
Sensor into the slot of
the main unit as shown
below.
Power supply:
The operating status of the device is indicated via an LED on the main unit and on the
SpiroSphere Sensor.
Mains adapter
SpiroSphere® Instructions for Use
Page 8/84 9HUVLRQ0$<
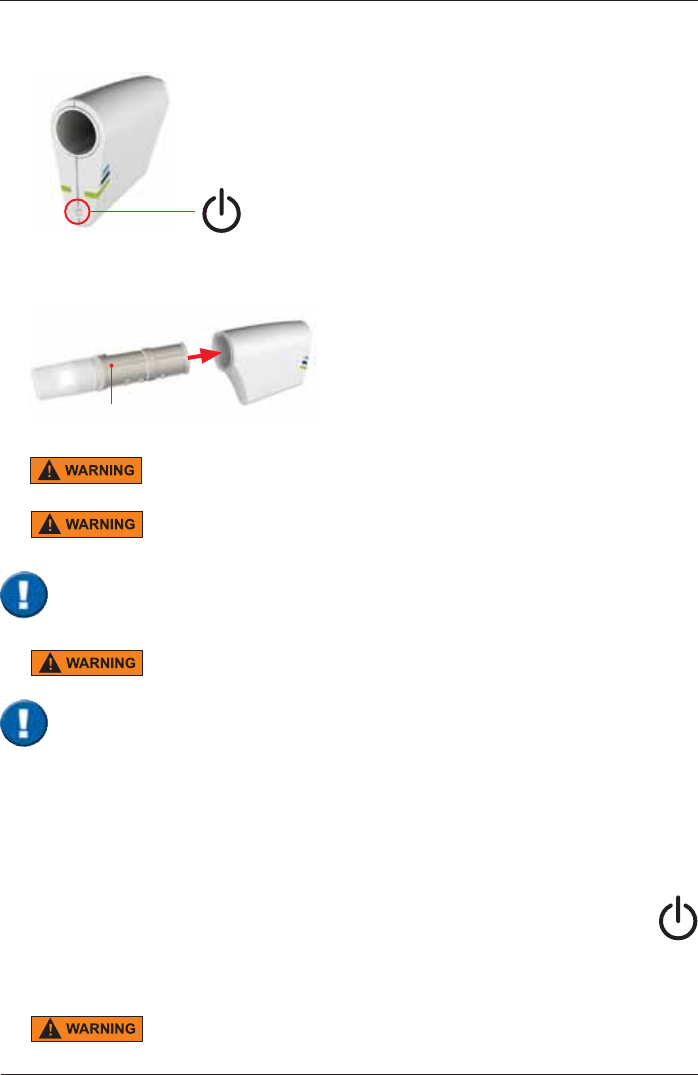
3ULRUWRWKH¿UVWXVDJHVZLWFKRQWKH6SLUR6SKHUH6HQVRUE\SUHVVLQJWKHPower On" switch
located at the back side of the SpiroSphere Sensor.
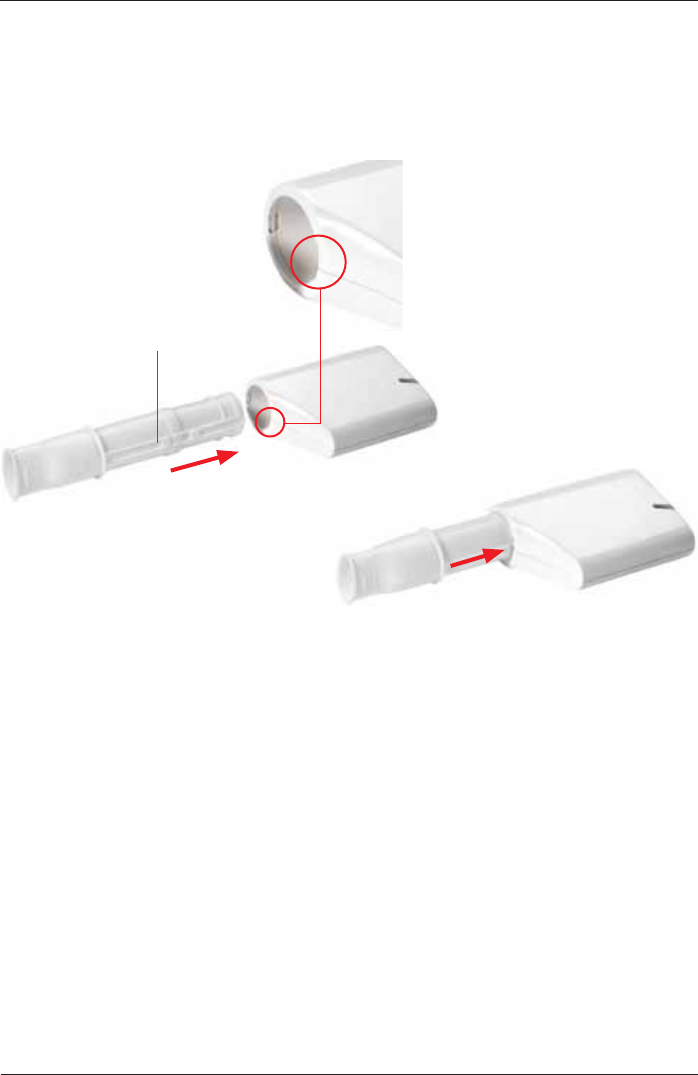
ERT PT with mouthpiece
ERT PT is only for single use. Do not reuse the ERT PT due to risk of cross
contamination.
Do not remove the mouthpiece from the ERT PT. Only use the ERT PT with
connected mouthpiece.
3ULRUWRWKH¿UVWXVHPDNHVXUHWKDWWKH6SLUR6SKHUH6HQVRULVIXOO\FKDUJHG
5. Ensure an ERT PT is inserted into the SpiroSphere Sensor.
The maximum temperature of the SpiroSphere Sensor Unit can get up to
47°C.
Spirometry should only be performed by patients who can cooperate in the performance.
Shut down
1. To switch off the SpiroSphere Main Unit, press the Power On/Off switch located
at the front of the main unit. Disconnect the main unit from the power source.
2. Switch on the SpiroSphere Sensor by pressing the "Power Off" switch located
at the back side of the SpiroSphere Sensor. Disconnect the SpiroSphere Sensor
from the main unit.
'RQRWSRVLWLRQWKH3RZHU6XSSO\DQGWKH6SLUR6SKHUHVRWKDWLWLVGLI¿FXOW
to operate the disconnection of the device from the mains supply.

SpiroSphere® Instructions for Use
Page 9/84
9HUVLRQ0$<
LED Status SpiroSphere Sensor
Only the highest priority LED at a time is turned on (LED priority: Orange - Blue).
Orange LED On Charging in cradle
Orange LED Off No charging/ charging complete
in cradle
Orange LED
blinking slowly Low battery Put the SpiroSphere Sensor
into the cradle of the Main Unit
Orange LED
blinking fast Indicates an error in the
SpiroSphere Sensor
Blue LED blinking
slowly SpiroSphere Sensor is actively
transferring data to the Main Unit
Blue LED Off Device in sleep mode Put the device into the
charging dock or press the
Power On switch
Blue LED blinking
fast Device powered on and paired
with Main Unit
LED Status SpiroSphere
Blue LED On Main Unit powered on N/A
Blue LED Off Main Unit powered off N/A
Blue LED Pulse Main Unit Standby N/A
Orange LED On Charging
Orange LED Off Not charging/ charging complete
Orange LED
blinking Low battery Connect Main Unit to a
power socket
To do:
Troubleshooting
Error Messages
SpiroSphere® Instructions for Use
Page 10/84 9HUVLRQ0$<
Sensor insert
Take care that you have aligned the rail with the sensor holes of the PT tube with the grooved
edge of the SpiroSphere Sensor (as below) when inserting the ERT PT into the SpiroSphere
Sensor:
The ERT PT should be inserted fully without force.
rail with sensor holes
SpiroSphere® Instructions for Use
Page 11/84
9HUVLRQ0$<
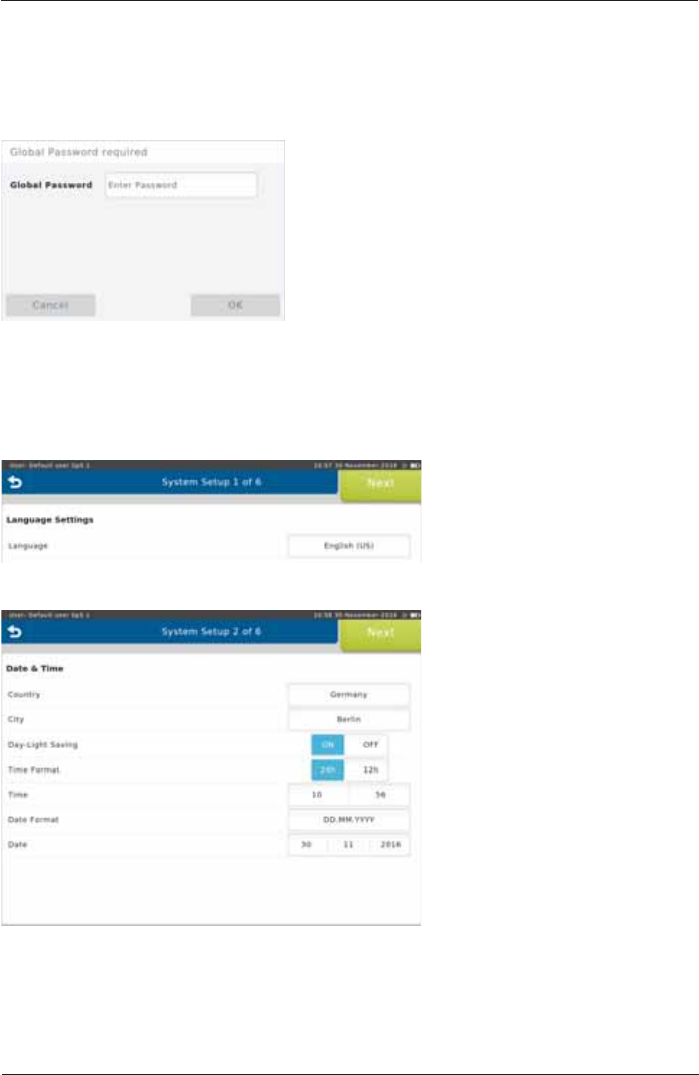
3ULRUWRWKH¿UVWXVHDV\VWHPVHWXSQHHGVWREHSHUIRUPHG
$IWHUVZLWFKLQJRQWKH6SLUR6SKHUHIRUWKH¿UVWWLPHIROORZLQJVFUHHQDSSHDUV
Enter the Global Password and
press <OK>. (The preset global
password is "691982".)
The System Setup wizard starts automatically.
1. Language Settings
Select the appropriate language
DQGFRQ¿UPZLWKNext>.
2. Date & Time Settings
Select the appropriate settings
DQGFRQ¿UPZLWKNext>.
Follow the system setup steps (step 1 - 6) and enter or select the appropriate settings. Tap on
<Next!WRFRQ¿UPWKHUHVSHFWLYHVHWWLQJVDQGWRFRQWLQXHZLWKWKHQH[WVWHS
Setup
SpiroSphere® Instructions for Use
Page 12/84 9HUVLRQ0$<
3. Sensor Settings
Tap on <Scan> to scan for
available sensors. Tap on the
sensor you want to pair the
SpiroSphere with and select
<Pair> from the dropdown menu.
&RQ¿UPZLWKNext>.
4. Ethernet Settings
Choose the appropriate settings
DQGFRQ¿UPZLWKNext>. (Refer
to chapter "Communication".)
5. WiFi Settings
Choose the appropriate settings
DQGFRQ¿UPZLWKNext>. (Refer
to chapter "Communication".)
6. User Management Settings
Choose the appropriate settings
DQGFRQ¿UPZLWKNext>.
Complete the initial setup of the device by tapping
on <Yes>.

SpiroSphere® Instructions for Use
Page 13/84
9HUVLRQ0$<
The Home Screen
After the SpiroSphere has been set up, upon powering on the device the following screen appears:
Here, you can select the submenus "Add Patient", "Search Patient", "Sensor Check", "Adhoc
Test" as well as "Settings and Tools" by tapping on the respective button.
Add Patient Enter patient data for a new patient into your patient directory and start a
test.
Search Patient 6HDUFKIRUDVSHFL¿FSDWLHQWLQ\RXUSDWLHQWGLUHFWRU\6HOHFWDVSHFL¿F
patient from the list to perform a test or to edit his/her data.
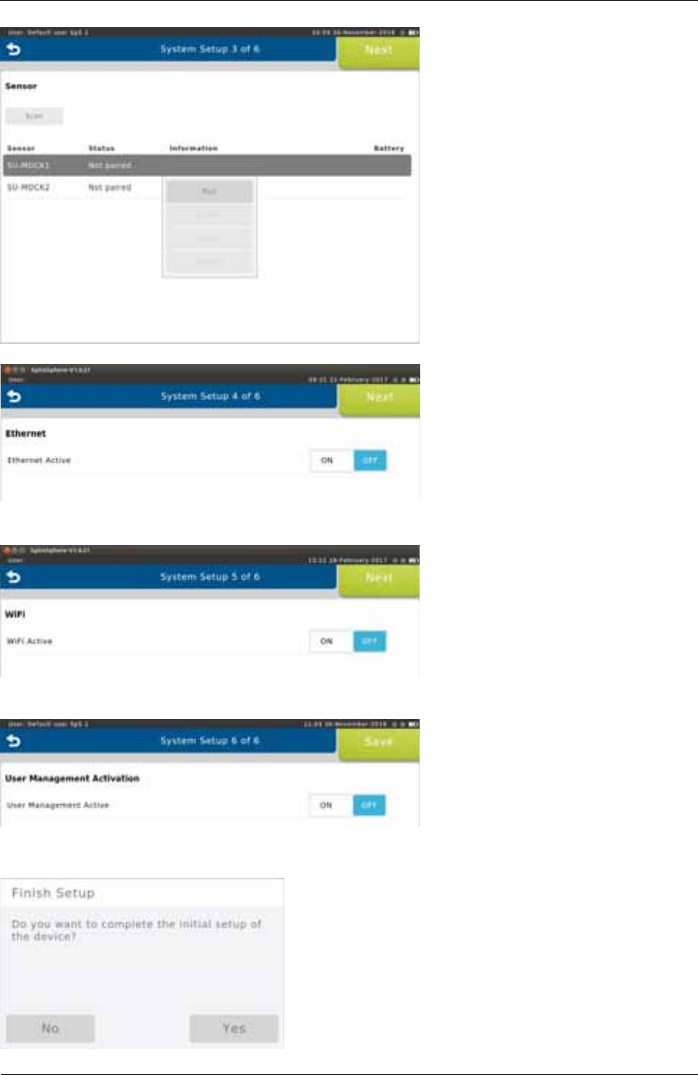
Sensor Check Perform a volume or linearity check.
Adhoc Test Immediately perform a test without entering patient data or searching for a
VSHFL¿FSDWLHQW¿UVW
Settings & Tools Change settings.
SpiroSphere® Instructions for Use
Page 14/84 9HUVLRQ0$<
Calibration Check
The sensor check consists of a calibration check as well as a linearity check.
In order to perform a calibration check, tap on <Calibration Check>.
Following screen appears:
Ensure a new ERT PT (with mouthpiece removed) is connected to the 3 L calibration syringe via
an adapter (as shown).
Proceed by tapping <OK>. A zero adjustment of the connected SpiroSphere
Sensor will be performed automatically.
Tapping on the "i"- symbol
will display information on the
respectively selected check
type.
Tap <Sensor Check> to perform a sensor check.
Sensor Check
The ERT PTs included with the delivery are pre-calibrated as part of manufacture.
$VHQVRUFKHFNFDQEHSHUIRUPHGWRFRQ¿UPDFFXUDWHPHDVXUHPHQWGDWD
SpiroSphere® Instructions for Use
Page 15/84
9HUVLRQ0$<
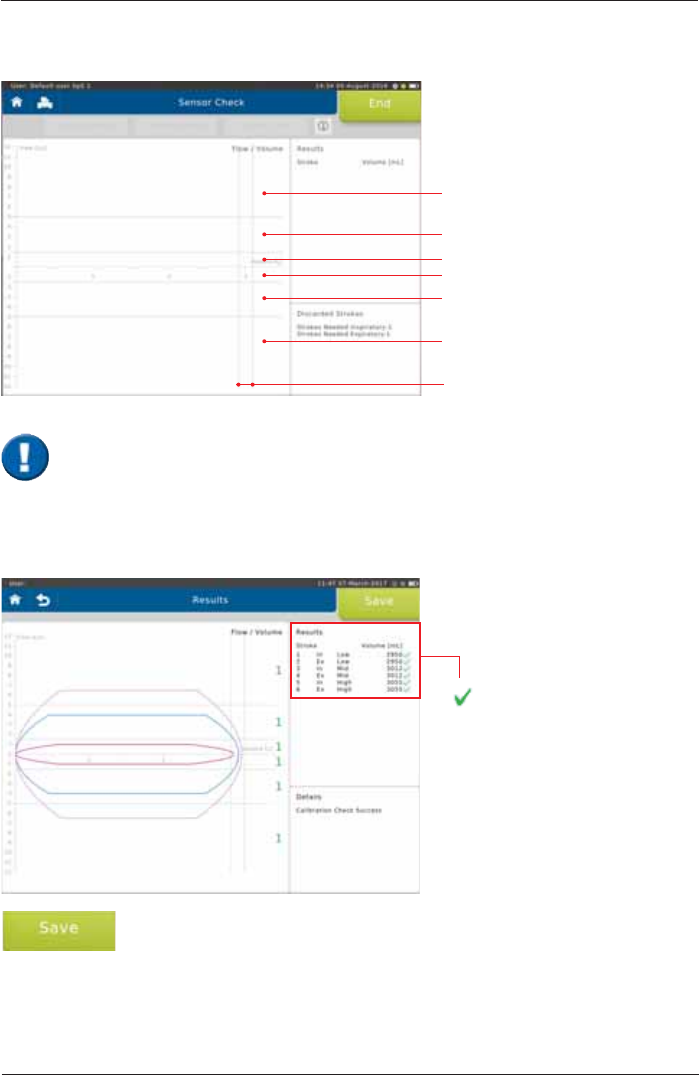
The calibration checkLVXVHGWRFKHFNWKHYROXPHDFFXUDF\ZLWKLQGLIIHUHQWÀRZUDQJHV
With each syringe stroke, the volume accuracy should be within ± 3 %.
High Ex
Mid Ex
Low Ex
Low In
Mid In
High In
± 3 %
End the calibration check by tapping on <Save>.
better than ± 3 %
X
worse than ± 3 %
Screen display after a total of three syringe strokes:
,WLVLPSRUWDQWWRSXPSZLWKRXWLQWHUUXSWLRQIURPLPSDFWWRLPSDFW7KH¿UVWSXPSVWURNH
is not relevant and will be discarded. There should be one pump stroke in each of the
IROORZLQJÀRZUDQJHVORZPLGDQGKLJKUDQJH
1 syringe stroke = pump twice, i.e. from impact to impact.
SpiroSphere® Instructions for Use
Page 16/84 9HUVLRQ0$<
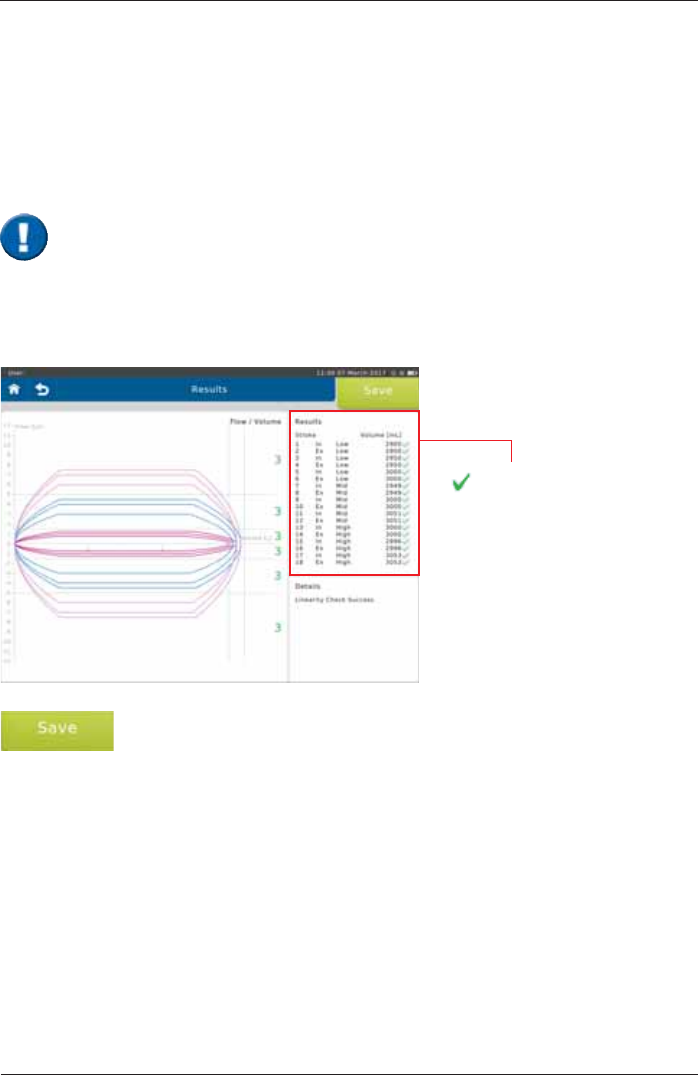
End the linearity check by tapping on <Save>.
Screen display after a total of 9 syringe strokes:
better than ± 3 %
X
worse than ± 3 %
In order to perform a linearity check, tap on <Linearity Check>.
Proceed as described in the "Calibration Check" section.
'XULQJDOLQHDULW\FKHFNYROXPHDFFXUDF\DWGLIIHUHQWÀRZVLVWHVWHG7KUHHV\ULQJHVWURNHVDWD
ORZWKUHHDWDPLGUDQJHÀRZDQGWKUHHDWDKLJKÀRZDUHUHTXLUHG
With each syringe stroke, the volume accuracy should be within ± 3 %.
Linearity Check
,WLVLPSRUWDQWWRSXPSZLWKRXWLQWHUUXSWLRQIURPLPSDFWWRLPSDFW7KH¿UVWSXPSVWURNH
is not relevant and will be discarded. Three pump strokes are required in each of the
IROORZLQJÀRZOHYHOVORZPLGDQGKLJKUDQJH
1 syringe stroke = pump twice, i.e. from impact to impact.
SpiroSphere® Instructions for Use
Page 17/84
9HUVLRQ0$<
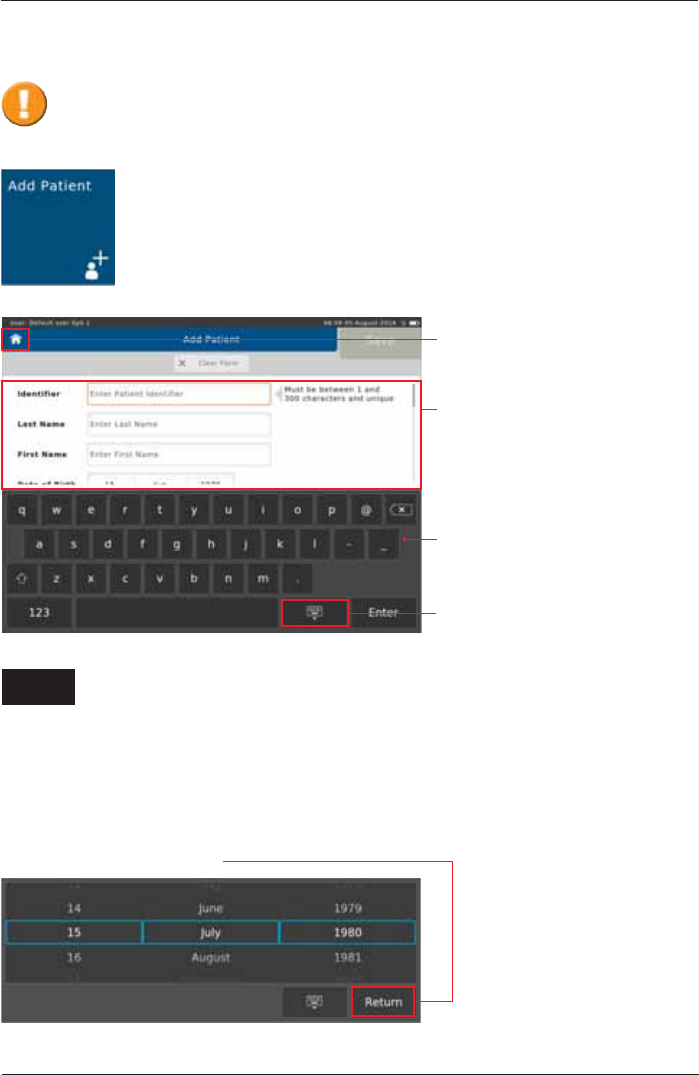
To add a new patient to your patient directory, tap on the "Add Patient" button
on the Home Screen. The following screen appears:
(QWU\¿HOGVZLWK
instructions on
entering
Touchscreen
Keyboard
Hide Keyboard
Return to the
Home Screen
(QWHUWKHDSSURSULDWHSDWLHQWGDWDXVLQJWKHWRXFKVFUHHQNH\ERDUGDQGFRQ¿UPZLWK
<Enter!7KHFXUVRUDXWRPDWLFDOO\MXPSVWRWKHQH[WHQWU\¿HOG
Add Patient
The following data must be entered:
,GHQWL¿HU (QWHUWKH3DWLHQW,GHQWL¿HU
Last Name: Enter the Patient's last name
First Name: (QWHUWKH3DWLHQWV¿UVWQDPH
Date of Birth: Select appropriate Day, Month and Year of Birth and continue by tapping on
<Return>.
%HIRUHPHDVXULQJDSDWLHQWIRUWKH¿UVWWLPHWKHSDWLHQWVSHUVRQDOGDWDKDVWREH
entered. Predicted values are calculated from patient data, so verify that the entered data
are correct. Incorrect patient data produces incorrect predicted values!
Enter
SpiroSphere® Instructions for Use
Page 18/84 9HUVLRQ0$<
Age: The Patient's age will be calculated automatically from the entered date of birth
Gender: Select appropriate gender
Height: Enter the Patient's height
Weight: Enter the Patient's weight
Ethnicity: Select the appropriate ethnicity
Additionally, there is an option to enter:
Technician: Enter the Technician's name
Physician: Enter the Physician's name
Set A Name 1:
Set A Name 2:
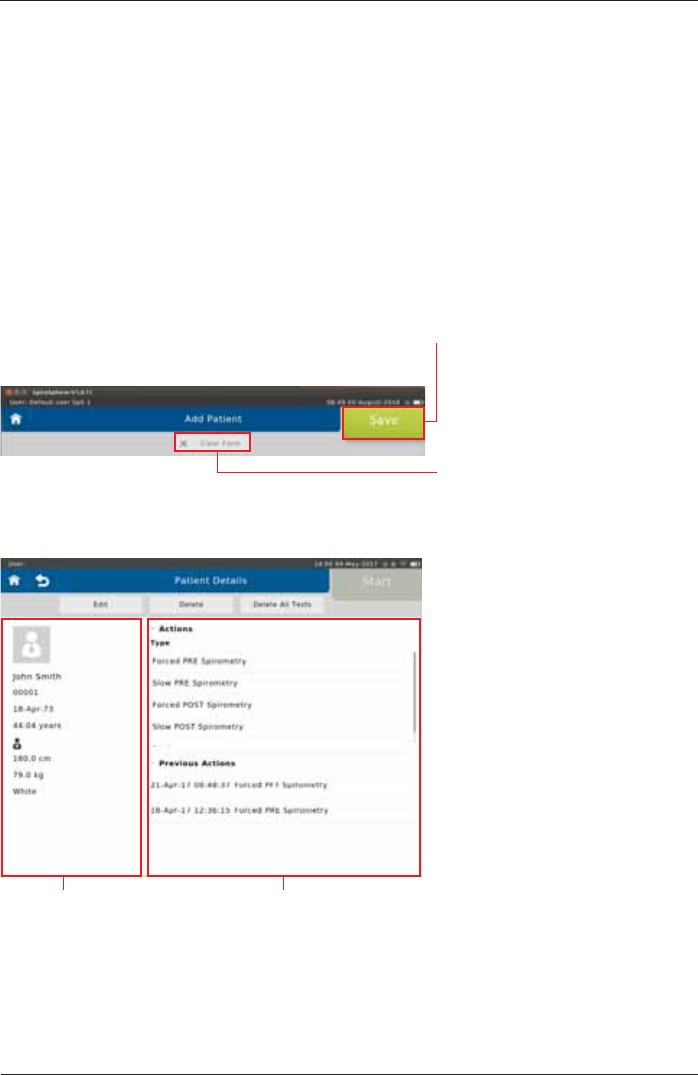
As soon as all required patient data is entered, tap on <Save> to save the patient to your patient
directory.
If you want to discard all data just
entered, tap on <Clear Form>. All
ENTRYlELDSWILLBECLEARED
Screen display after patient data input:
Patient data Available Actions (Type), and list of
tests already performed (Previous
Tests)
SpiroSphere® Instructions for Use
Page 19/84
9HUVLRQ0$<
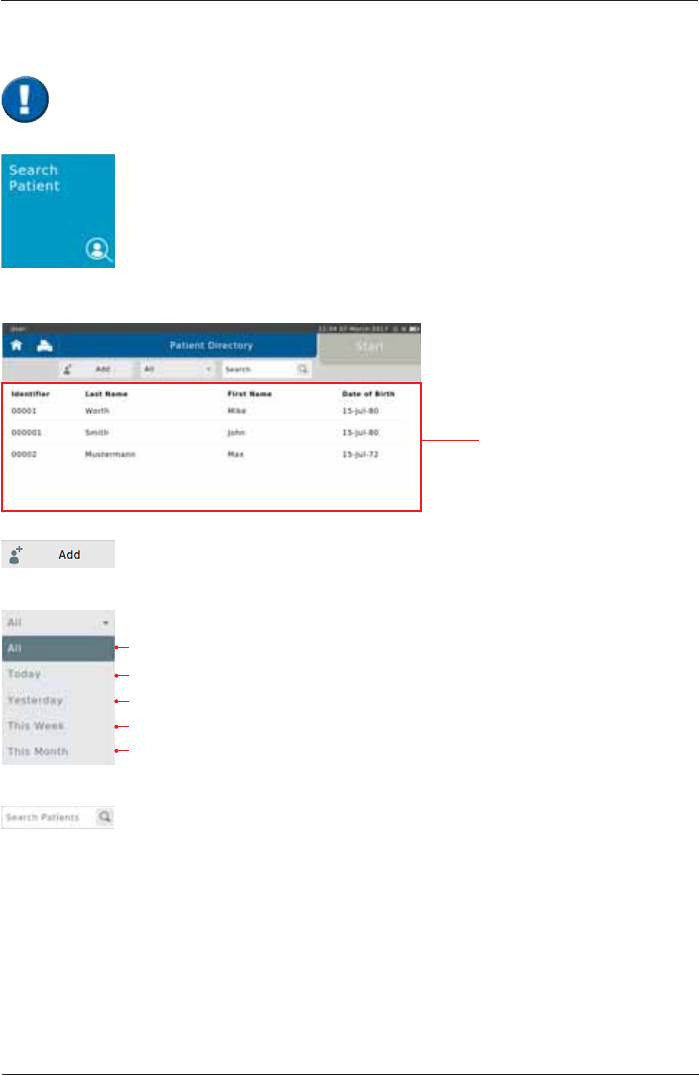
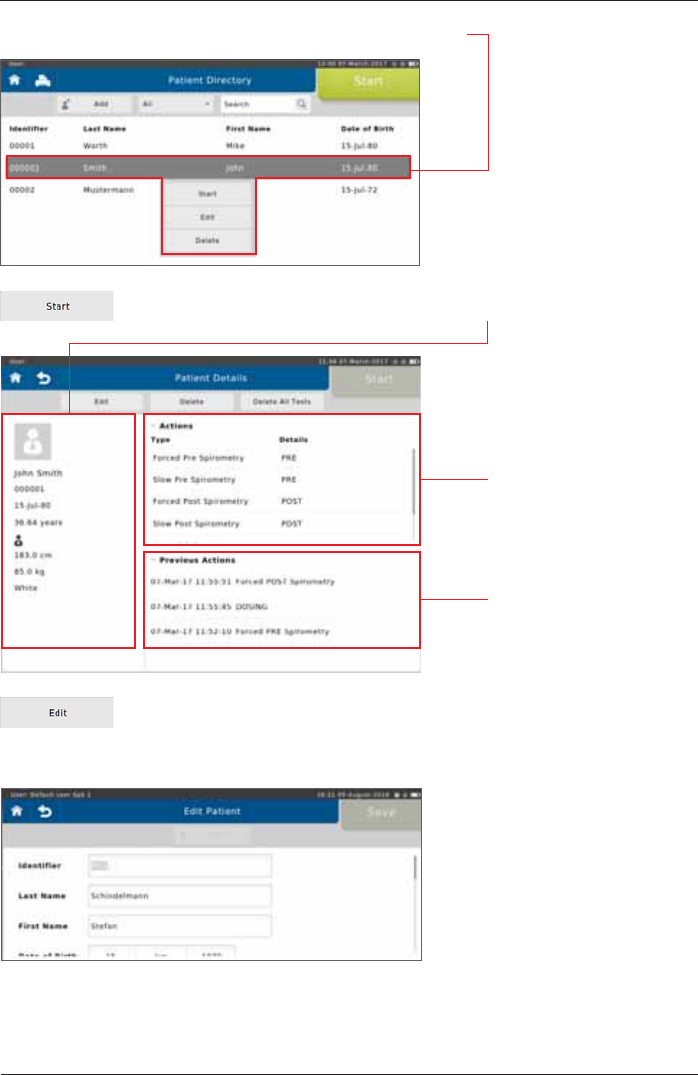
Tap on the "Search Patient" button on the Home Screen to open the list of all
patient data saved in the database.
data of a new Patient can be entered
Display all tested patients
Display all Patients tested today
Display all Patients tested yesterday
Display all Patients tested this week
Display all Patients tested this month
6HDUFKIRUVSHFL¿F3DWLHQWVE\HQWHULQJKLVKHUODVWQDPHRU,'(QWHULQJWKH
¿UVWOHWWHURUWKH¿UVWFKDUDFWHURIWKHSDWLHQWV,'LVVXI¿FLHQWDVZHOO,IHJ6
is entered, all patients whose last names start with "S" are displayed.
Search Patient
The following screen appears:
List of all patients
When a patient whose data is already stored in the database comes for another visit,
you can reload his/her data from the patient directory. You do not have to enter the data
again.
SpiroSphere® Instructions for Use
Page 20/84 9HUVLRQ0$<
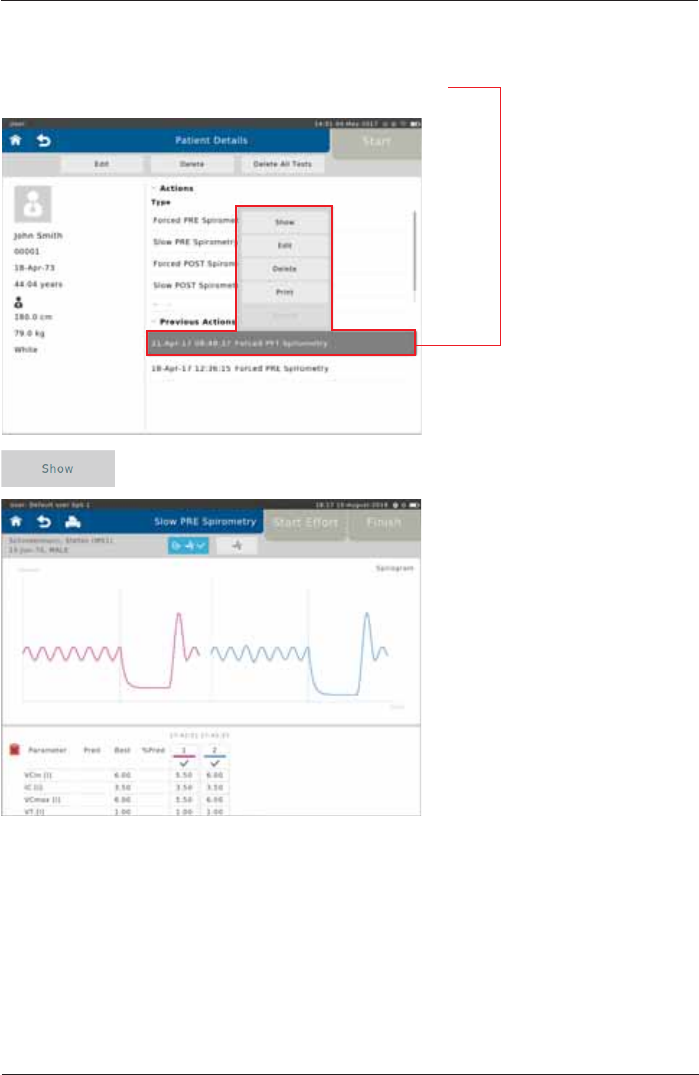
,IDOLVWHGSDWLHQWLVVHOHFWHGWKHIROORZLQJÀ\RXWPHQXDSSHDUV
Tap on <Start> to display the patient's personal data on the left.
The "Previous Actions"
section shows the actions
already performed for the
VSHFL¿FSDWLHQW
Tap on <Edit> to display the patient's demographic information. If incorrect
patient data was entered or if the patient data need to be updated (e.g. due to
weight or height change in children), the respective data can be edited and will
be used for future tests.
In the "Actions"section,
all conductable actions are
listed.

SpiroSphere® Instructions for Use
Page 21/84
9HUVLRQ0$<
Each patient can be completely deleted from the patient directory by tapping
<Delete>.
Actions
SpiroSphere is capable of performing different types of measurements.
Forced Pre Spirometry Forced Spirometry (Flow/Volume loop) pre bronchospasmolysis
Forced Post Spirometry Forced Spirometry (Flow/Volume loop) post bronchospasmolysis
Slow Pre Spirometry Slow Spirometry pre bronchospasmolysis
Slow Post Spirometry Slow Spirometry post bronchospasmolysis
Dosing Input Medication, Medication time and Technican
Tapping on "Yes" will irrevocably delete the selected patient including all saved
measurements performed for that patient!
A "Warning" appears:
The different options are
displayed on the screen.
SpiroSphere® Instructions for Use
Page 22/84 9HUVLRQ0$<
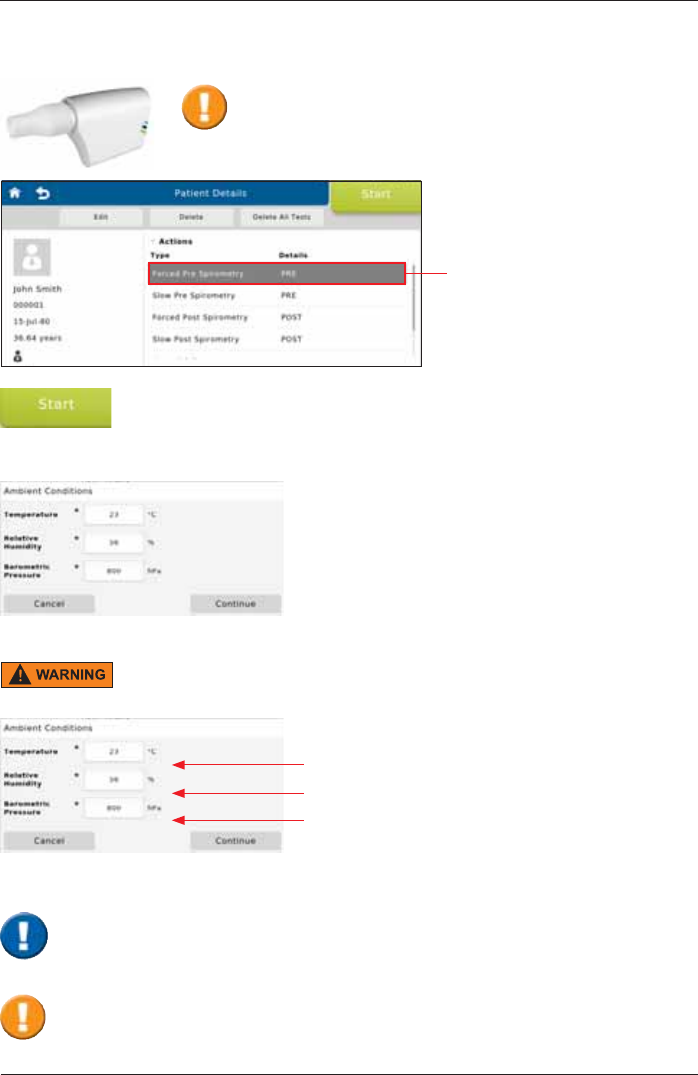
Preparing a Measurement
Select a measurement
(e.g. <Forced Pre Spirometry>)
via tapping.
The measurement is started by tapping on <Start>.
The "Ambient Conditions" window appears:
Current room temperature (°C)
Current relative humidity (%)
Current barometric pressure (hPa)
Please observe the instructions for hygiene of your
system. Verify that a new ERT PT with mouthpiece is
attached in the SpiroSphere Sensor.
The patient must not interact with the SpiroSphere Main Unit.
As soon as the zero adjustment is completed, the patient should close his/her nose with
the nose-clip, take the mouthpiece between his/her teeth and seal his/her lips tightly
around the mouthpiece. Check the correct position of the mouthpiece!
When the test is started, an automatic zero adjustment of the connected ERT PT is
performed. Hold the SpiroSphere Sensor still and wait for the zero adjustment to be
completed before approaching the mouthpiece.
SpiroSphere® Instructions for Use
Page 23/84
9HUVLRQ0$<
The SpiroSphere must not be exposed to direct sunlight nor positioned immediately near heating
elements.
The current ambient conditions are to be entered manually. In this case, the ambient data should
be updated if the room temperature changed by more than 2°C or if relative humidity changed by
more than 10%.
Tap on <Continue> to apply the ambient data entered.
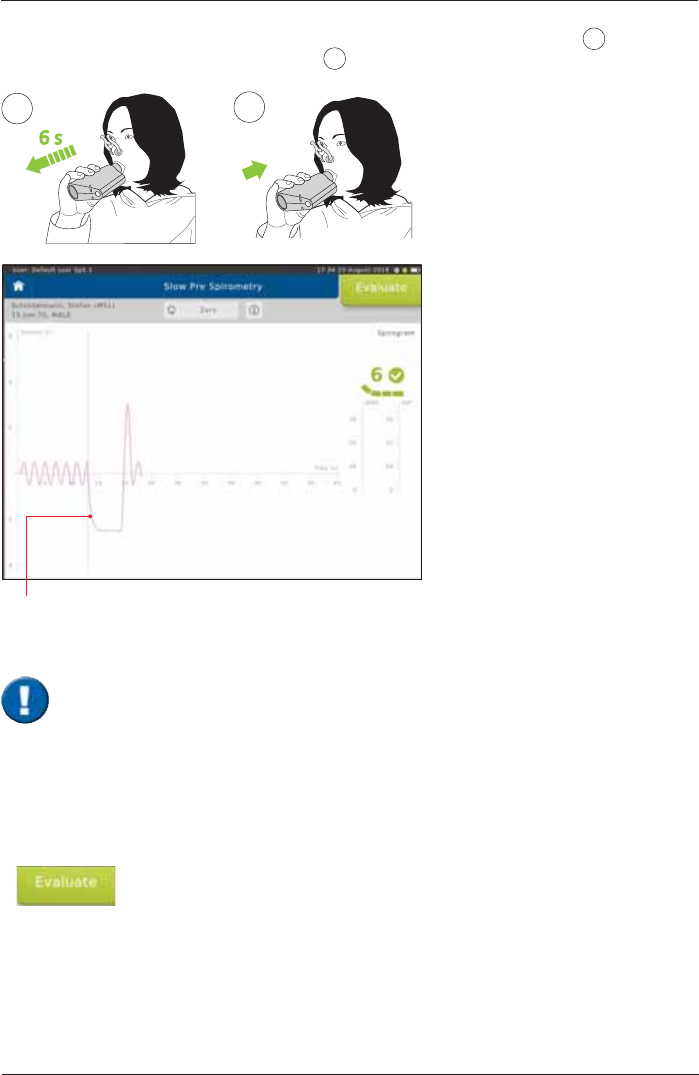
Perform a Forced Spirometry Measurement
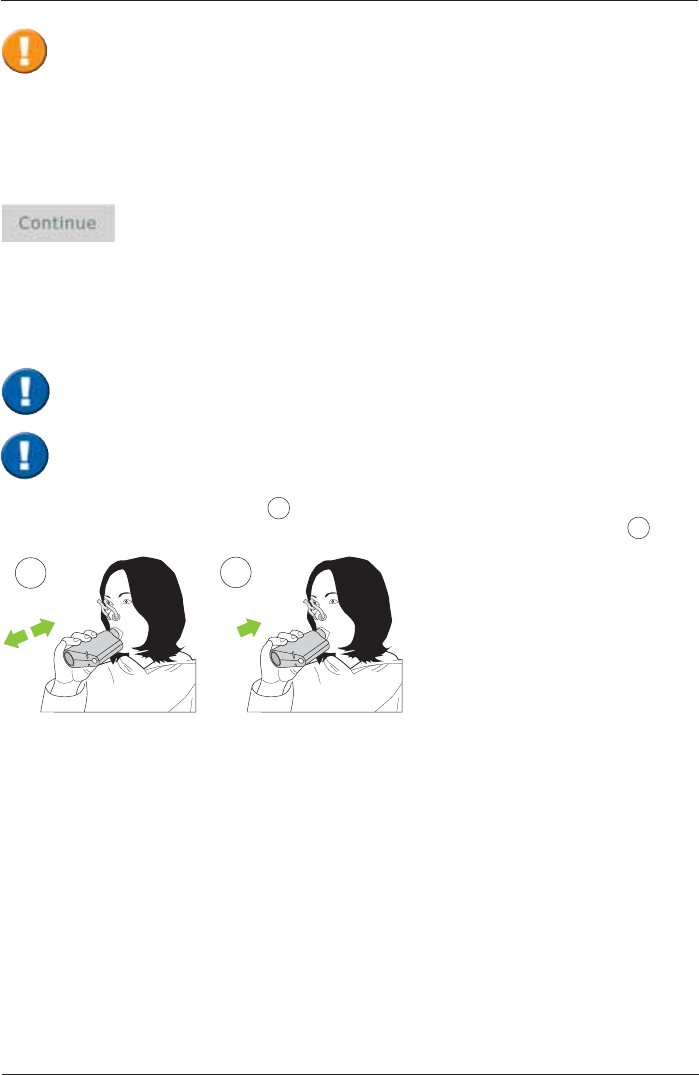
7KHSDWLHQWEUHDWKHVQRUPDOO\¿JXUH 1) until a steady tidal breathing is shown. From tidal
EUHDWKLQJWKHSDWLHQWLVLQVWUXFWHGWRLQKDOHDVGHHSO\DVSRVVLEOHLQKDOHWR7/&¿JXUH 2).
12
7KH$73%736FRUUHFWLRQIDFWRUVIRULQVSLUDWRU\DQGH[SLUDWRU\ÀRZVDQGYROXPHVZLOOEH
determined from the ambient data. Therefore, ambient data must be updated at regular
intervals. Incorrect or imprecise ambient data will result in incorrect measurement results.
Make the proper preparations according to ATS/ERS guidance.
Please note: During the whole examination the patient must stay on the mouthpiece.
to TLC
SpiroSphere® Instructions for Use
Page 24/84 9HUVLRQ0$<
Screen display:
Tapping on the "i"-symbol will
display information on the
measurement procedure.
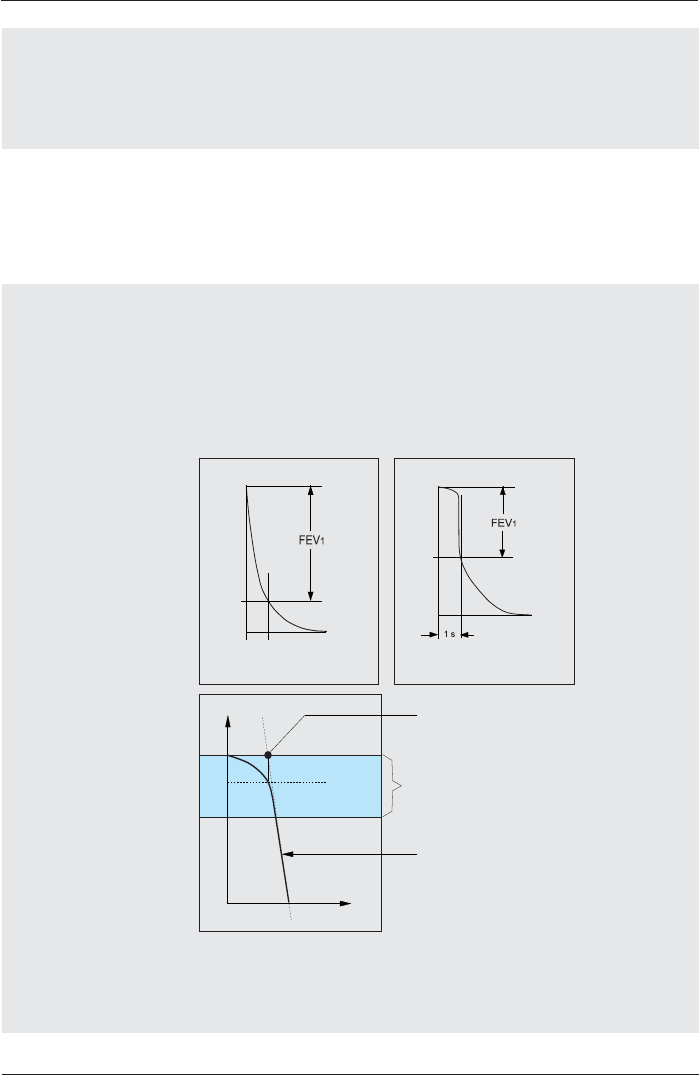
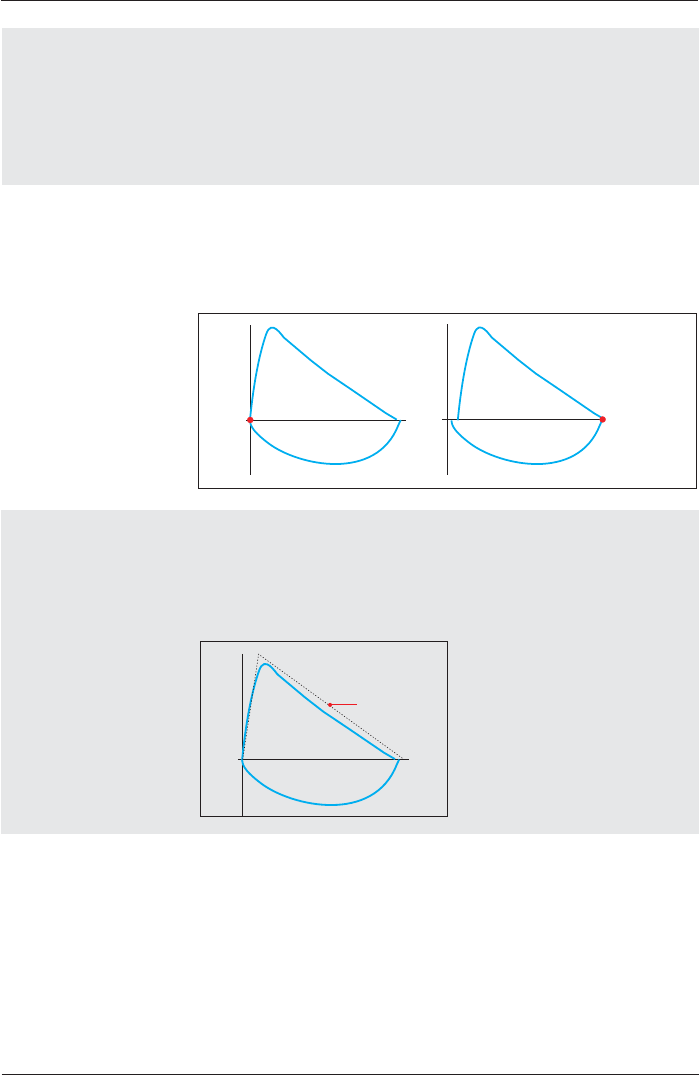
Flow-Volume curve Volume-Time tracing
Without interruption, the patient
should immediately exhale as
fast and as much (FEV1) and as
ORQJ)9&DVSRVVLEOH¿JXUH
3). According to the ATS/ERS
guidelines, exhalation should
be for a minimum of 6 sec for
adults, and 3 sec for children.
The maneuver is usually
completed by an inhalation
¿JXUH 4).
6 s
FEV1/FVC
FVCin
34
Screen display:
Tap <Evaluate!WRHQGWKH¿UVW
effort.
End of Test criteria is displayed
as dynamic icon (time of
exhalation and plateau).
Small tick indicates 6 seconds
reached.
Large tick indicates 6 seconds
reached and plateau.
SpiroSphere® Instructions for Use
Page 25/84
9HUVLRQ0$<
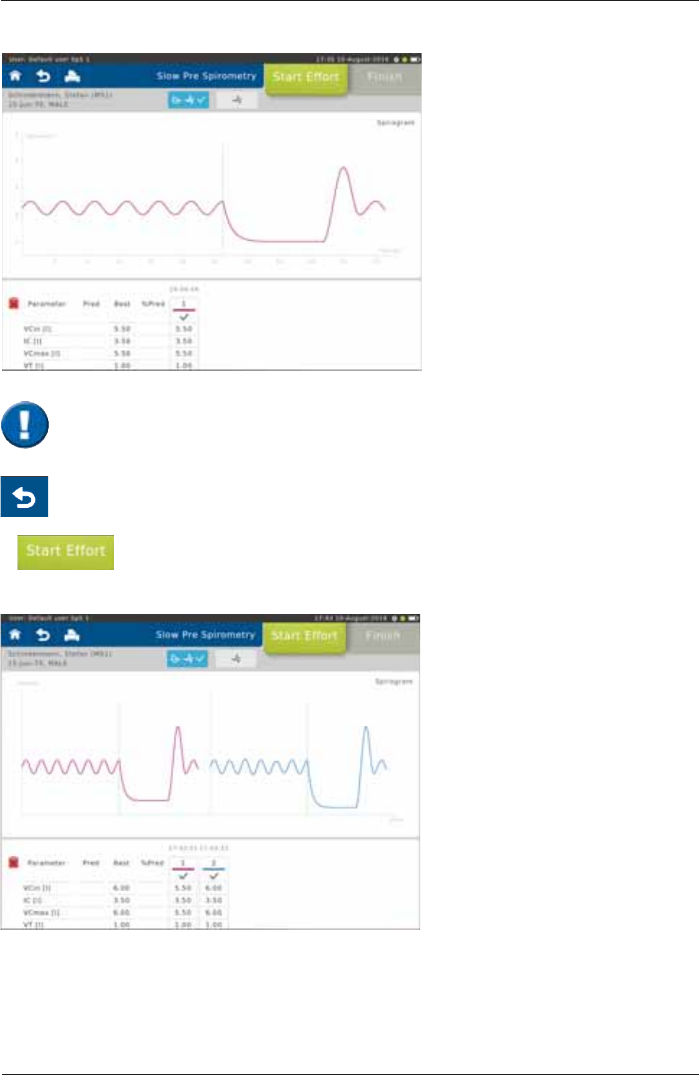
6FUHHQGLVSOD\DIWHUWKH¿UVWHIIRUW
Start the next effort by tapping on <Start Effort>.
If necessary, it is possible to terminate the test prematurely.
In this case, a warning message is displayed.
* Literature:
MR Miller et al. Series “ATS/ERS Task Force: Standardisation of Lung Function Testing“,
StandardisationRI6SLURPHWU\(XU5HVSLU-&RS\ULJKW(56-RXUQDOV/WG
Scroll down to display further parameters
(if applicable)
The upper left part of the chart
section shows the recording of the
ÀRZYROXPHORRS7KHXSSHUULJKW
part shows the volume-time tracing.
The lower section of the screen
displays the predicted values
calculated from the patient data and
the actual values measured from
¿UVWHIIRUW
Pred = Predicted value
Best = Best value of all
valid efforts.
%Pred = Best value in % of
predicted values
Screen display after three efforts:
The "Best" column displays the
best value out of all valid efforts.
'H¿QLWLRQRIWKHEHVWHIIRUWGHSHQGV
on the Settings selected
(see: >Settings Spirometry >Forced
Spirometry >Measurement).
7KHTXDOLW\RIWKHÀRZYROXPHORRSGHSHQGVRQWKHSDWLHQWµVFRRSHUDWLRQ In
order to assess repeatability and quality, it is recommended to perform at least 3 efforts
according to ATS/ERS guidelines.
The results of the best and the second best effort for FEV1 and FVC may differ by
P/RU)RU)9&/DGLIIHUHQFHRIP/LVYDOLG
SpiroSphere® Instructions for Use
Page 26/84 9HUVLRQ0$<
The lower section displays the
quality assessment according to
ATS/ERS 2005 guidelines:
= no acceptability errors
= minor errors present
= major errors present
6FUHHQGLVSOD\ÀRZYROXPHDQG
tiffaneau curve: Screen display volume-time
curve:
Change View:
Curves superimposed:
Tap on the curve you want to be
displayed.
Print Report
Return to Patient Details
Return to Home Screen
Overall Repeatability
= Not enough effort performed
= Enough efforts, but one or more repeatability criteria are not met
= Enough efforts and all repeatability criteria are met
Individual parameter Repeatability
= Parameter repeatability criteria not met
= Parameter repeatability criteria met
SpiroSphere® Instructions for Use
Page 27/84
9HUVLRQ0$<
End and save the test by tapping on <Finish>.
Deactivate/reactivate efforts
,IVHYHUDOHIIRUWVZHUHSHUIRUPHGLQGLYLGXDOHIIRUWVHJHIIRUWVZLWKLQVXI¿FLHQWSDWLHQWFRRSHUDWLRQ
can be deactivated. The system can also automatically deactivate efforts as a result of system
detected ATS/ERS acceptability errors. Behaviour FDQEHFRQ¿JXUHGLQ6HWWLQJV
Procedure:
Mark the effort to be deactivated (in our example Effort 4). Following window appears:
Tap on <Deactivate>. Tapping on <OK> will deactivate the selected effort.
Successfully deactivated efforts will appear as a dashed line at the top of the column.
Deactivated
trial
An effort deactivated by mistake can be reactivated again by tapping on the respective effort
again. Tap on"Reactivate"in the following window to reactivate the effort.
Deactivated efforts will not be taken into consideration when calculating the Best Effort
and Predicted Calculations.
SpiroSphere® Instructions for Use
Page 28/84 9HUVLRQ0$<
Tidal breathing
The two columns displayed show how constantly the patient is
EUHDWKLQJRYHUWKHODVW¿YHEUHDWKLQJF\FOHV
G97 YDULDWLRQFRHI¿FLHQWRIYDULDWLRQRIWKHWLGDOYROXPH
dFRC = variation of the breathing baseline
The lower the variation the more regular the breathing.
As soon as the display changes from "red" to "green",
a stable breathing baseline has been reached.
1Performance of an "ERV Maneuver":
Tidal breathing should be continued for a longer period of time
¿JXUH 1). A stable breathing baseline is absolutely required to
determine the lung volumes ERV and IC correctly.
Tapping on the "i"-symbol
will display information
on the measurement
procedure.
Perform a Slow Spirometry Measurement
As soon as the zero adjustment is completed, the patient should close his/her nose with
the nose-clip, take the mouthpiece between his/her teeth and seal his/her lips tightly
around the mouthpiece. Check the correct position of the mouthpiece!
When the test is started, an automatic zero adjustment of the connected ERT PT is
performed. Hold the SpiroSphere Sensor still and wait for the zero adjustment to be
completed before approaching the mouthpiece.
Make the proper preparations according to ATS/ERS guidance.
SpiroSphere® Instructions for Use
Page 29/84
9HUVLRQ0$<
ERV/VCin
7KHSDWLHQWVKRXOGH[KDOHVORZO\VHH1RWHEHORZDQGFRPSOHWHO\(59¿JXUH 2) followed by
DVORZDQGFRPSOHWHLQKDODWLRQ9&LQ¿JXUH 3). Then, continue to breathe normally.
ERV
6 s
2
VCin
3
Tap on <Evaluate!WRHQGWKH¿UVWHIIRUW
In order to reach the end-expiratory level the following two criteria must be complied with
according to ATS/ERS.
1. Duration of expiration (ERV)
Patients must exhale for at least 6 seconds.
2. End of Test Criteria (ERV)
Towards the end of the expiration it is important to motivate the patient to try hard. Within
the last second of expiration the exhaled volume must not exceed 25 mL.
SpiroSphere® Instructions for Use
Page 30/84 9HUVLRQ0$<
The upper section of the chart
section shows the recording of the
volume-time curve.
The lower section of the screen
displays the predicted values
calculated from the patient data and
the actual values measured from
¿UVWHIIRUW
If necessary, it is possible to terminate the test prematurely. In this case, a warning
PHVVDJHLVGLVSOD\HGWRFRQ¿UPWKDWWKHWHVWVKRXOGEHHQGHG
Tap on <Start Effort> to start the next maneuver.
6FUHHQGLVSOD\DIWHUWKH¿UVWHIIRUW
Screen display after two efforts:
Scroll down to display further parameters
(if applicable)
The lower section of the screen
displays the predicted values
calculated from the patient data
and the actual values measured
during the test.
Pred = Predicted value
Best = Best values from all
efforts
%Pred = Best value in % of
predicted values
The "Best" column displays the best value out of all valid efforts.
'H¿QLWLRQRIWKHEHVWHIIRUW KLJKHVW9&PD[
(see: >Settings Spirometry >Slow Spirometry> Measurement)
According to ATS/ERS criteria, at least three efforts should be performed. If the difference
between the best and second best effort is greater than 0.150 L, further efforts should be
performed.
SpiroSphere® Instructions for Use
Page 31/84
9HUVLRQ0$<
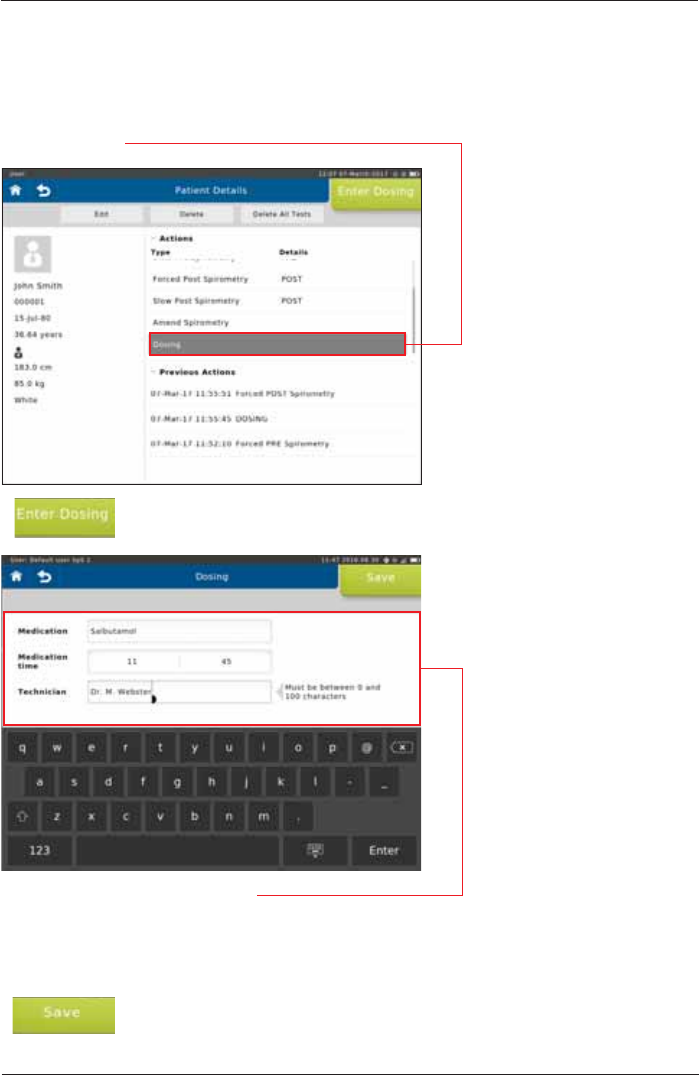
Before the post-measurement is started you can input Medication, the Medication time and the
Technician name.
Tap on <Enter Dosing>
Tap <Dosing>.
The following data can be entered:
Medication: Enter the Medication, e. g. Albuterol/Salbutamol
Medication time: Enter the time the Medication was given, hh:mm
Technician: Enter the Technician name
Tap on <Save> to save the dosing to your patient directory.
Dosing
SpiroSphere® Instructions for Use
Page 32/84 9HUVLRQ0$<
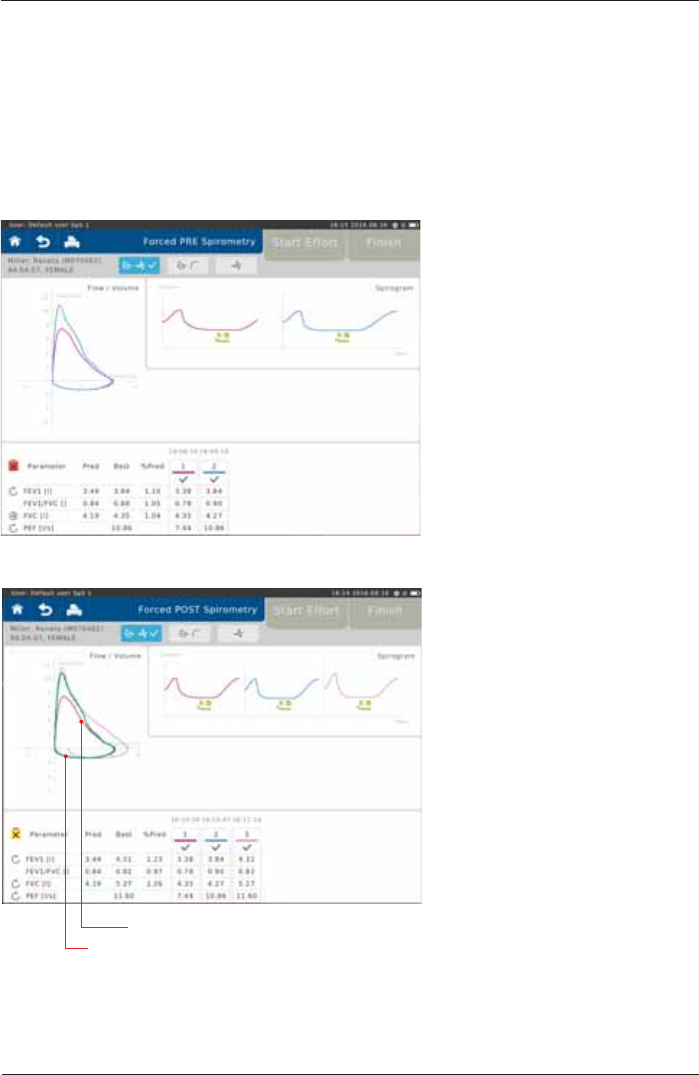
Screen display after the "Pre Measurement":
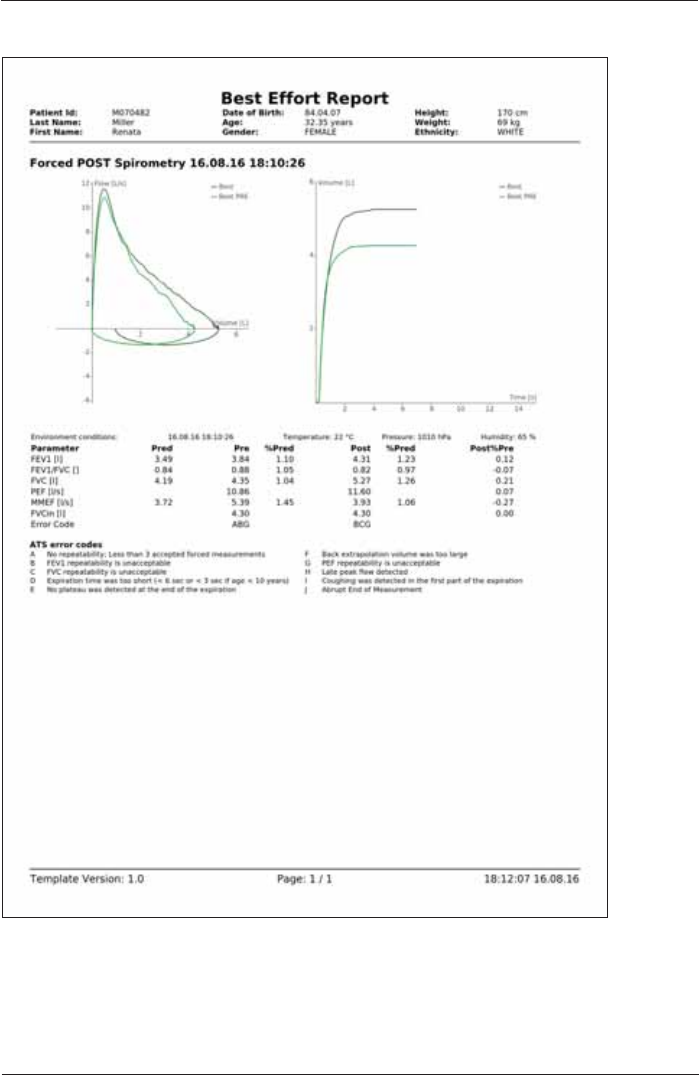
Perform a Post Spirometry Measurement
The Flow-Volume curve shows the immediate
bronchospasmolytic effect. The expiratory portion of the Flow-
9ROXPHFXUYHDQGFRQVHTXHQWO\PD[LPDOSHDNÀRZ3()
forced expiratory volume after 1 sec (FEV1) as well as forced
vital capacity (FVC) changes.
Screen display after the "Post Measurement":
Pre Measurement (green)
Post Measurement (purple)
SpiroSphere® Instructions for Use
Page 33/84
9HUVLRQ0$<
3UH3RVW Report:
SpiroSphere® Instructions for Use
Page 34/84 9HUVLRQ0$<
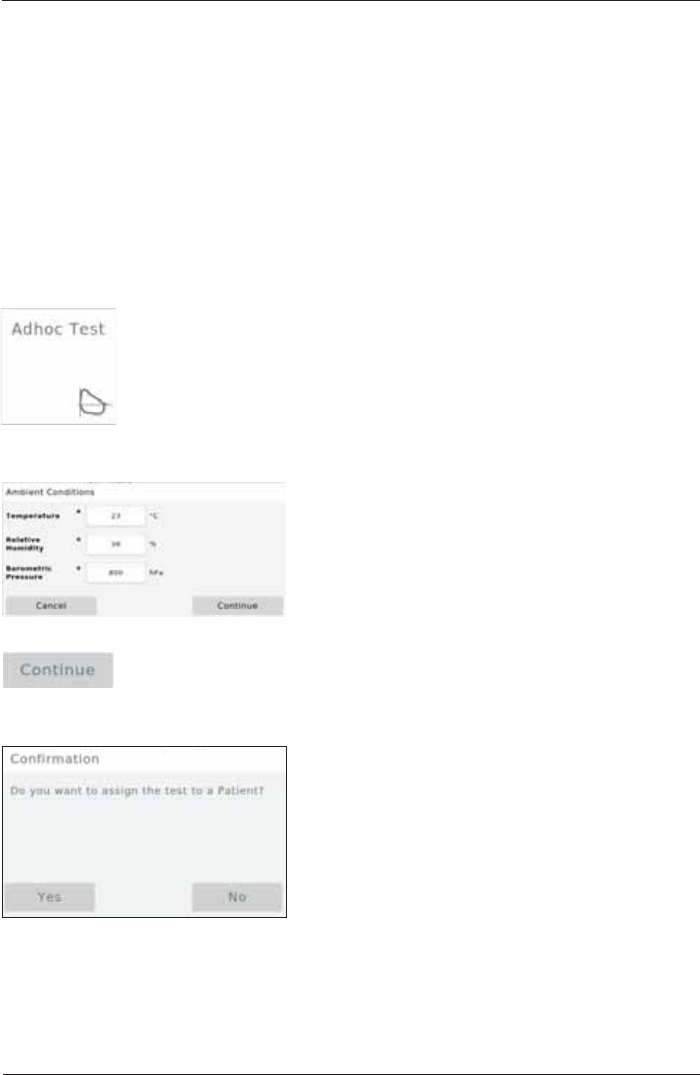
Adhoc Test
With the Adhoc Test application it is possible to perform a Spirometry measurement without
having to register the patient beforehand.
For example: An Adhoc test can be performed if a prompt measurement of a patient is urgently
required (e.g. in an emergency situation).
It is possible to assign the measurements performed to a patient after the measurement has been
completed or at some point later.
Perform an Adhoc Test
Tap on the "Adhoc Test¿HOGRQWKH+RPH6FUHHQ
The "Ambient Conditions" window appears and zeroing occurs:
Tap on <Continue> to apply the ambient data entered and perform three
successive "Forced Spirometry" maneuvers as described. Once the test is
completed, the following window appears:
SpiroSphere® Instructions for Use
Page 35/84
9HUVLRQ0$<
Tap on <Yes>. The "Patient Directory" is displayed:
Assign Adhoc Test now
Tap on <Add> and enter the
respective patient data (see
chapter "Add Patient" for
details).
Following window appears:
Finish by tapping <OK>.
SpiroSphere® Instructions for Use
Page 36/84 9HUVLRQ0$<
Assign Adhoc Test later
Tap on <No>.
Tap on <Add> to enter the appropriate patient data.
The patient which is not registered yet will appear as "Adhoc Patient" in the "Patient Directory".
In order to assign a patient to the Adhoc test performed, tap on "Adhoc Patient".
SpiroSphere® Instructions for Use
Page 37/84
9HUVLRQ0$<
6HOHFWDFRPSOHWHGWHVW7KHIROORZLQJÀ\RXWPHQXDSSHDUV
Tap on <Show> to display the results of the selected test on the screen:
Show, Edit, Delete and Print Tests
SpiroSphere® Instructions for Use
Page 38/84 9HUVLRQ0$<
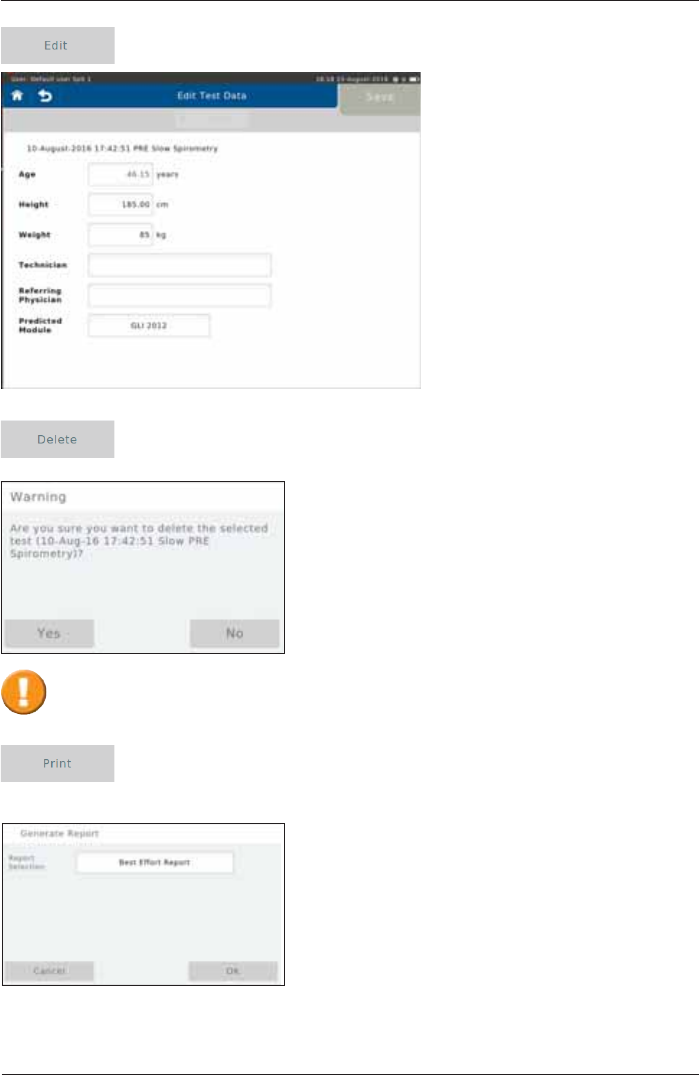
Existing patient data can be edited (if e.g. the patient's body weight or height
(e.g. in children) has changed in the meantime) by tapping on <Edit>.
The selected test can be deleted with <Delete>:
Tap on <Print> to print the selected test or send a PDF-report to a designated
e-mail address.
For more detailed information, see chapter "Print Recorded Results".
Tapping on <Yes> will irrevocably delete the selected test!
SpiroSphere® Instructions for Use
Page 39/84
9HUVLRQ0$<
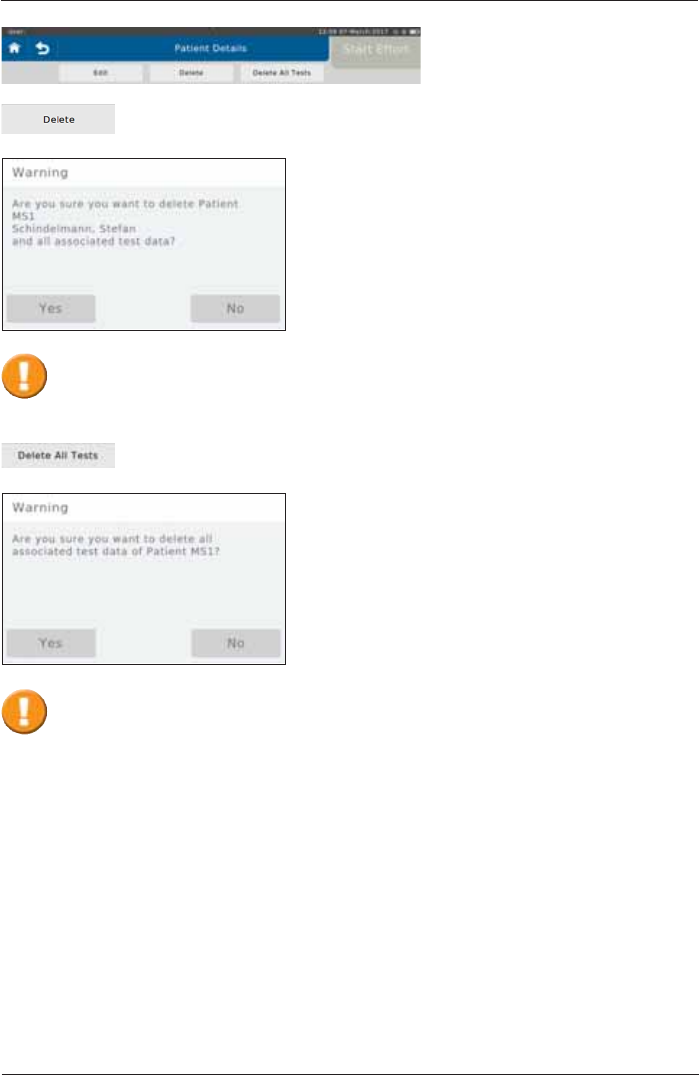
The selected patient including all measurements performed with the respective
patient can be deleted by tapping on <Delete Patient>:
Tap on <Delete All Tests> to delete all measurements performed with the
selected patient:
Tapping on <Yes> will irrevocably delete the selected patient and all respective
tests!
Tapping on <Yes> will irrevocably delete all tests assigned to the selected patient!

SpiroSphere® Instructions for Use
Page 40/84 9HUVLRQ0$<
As soon as a measurement is completed, the results can be printed by means of a connected
USB*1 SULQWHU,WLVDOVRSRVVLEOHWRFUHDWHD3')¿OHZKLFKFDQEHVHQWWRDSUHGH¿QHGHPDLO
address*2 or saved to an USB stick.
Preset: send PDF to an e-mail address (see >Setting Report & Printing)
*1 For this option, an USB printer needs to be connected to the SpiroSphere
*2 For this option, the SpiroSphere needs to be connected to the network
*3 See chapter "Settings and Tools > Report & Printing"
Tap on the Printer icon.
7DSRQWKH5HSRUW6HOHFWLRQ¿HOG
Print Recorded Results
Tap on <Return> to create the report. The "Print Result" window appears:
Tap on <OK> to send the report to
WKHSUHGH¿QHGHPDLODGGUHVV
Best Effort Report
a report displaying the best effort is
created
All Effort Report
a report displaying all efforts is
created
Screen Capture Report
a screen capture report is created
7KHUHSRUWZLOOEHVHQWWRWKHHPDLODGGUHVVGH¿QHGRQ\RXU6SLUR6SKHUH7KHUHSRUW
ODEHOZLOOLQFOXGHWKHGDWHDQGLGHQWL¿FDWLRQQXPEHU7KH¿OHZLOOEHSDVVZRUGSURWHFWHG
DVGH¿QHG
SpiroSphere Report: BestEffortReport_20160815_155247+0200.zip
SpiroSphere® Instructions for Use
Page 41/84
9HUVLRQ0$<
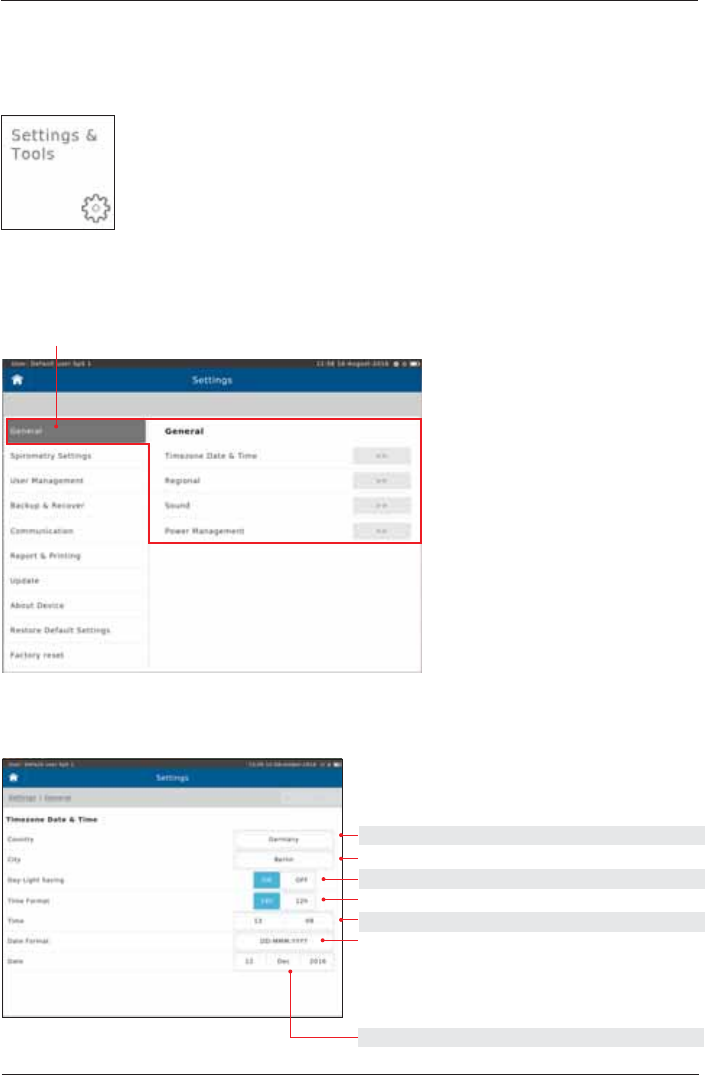
The following includes a short description of settings which are not required for daily routine work.
Tap on the "Settings & Tools" button on the Home Screen.
The following will appear:
Timezone Date & Time
2SWLRQV 'H¿QLWLRQ &KRRVH3UHVHW
select actual Country
select timezone City
ON/OFF ON
24h/12h 24h
set actual Time
YYYY.MM.DD 2016.08.16
DD.MM.YYYY 16.08.2016 DD-MM-YYYY
DD-MMM-YYYY 16-AUG-2016
MM/DD/YYYY 08/16/2018
set actual Date
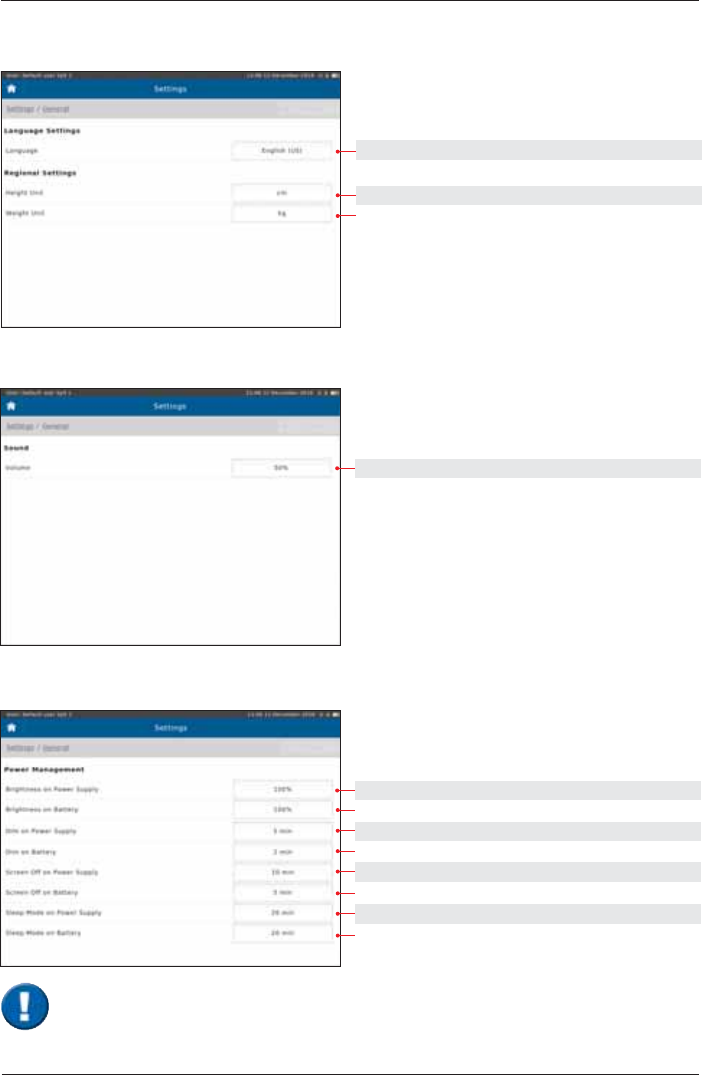
General
Tap on "General"
Settings and Tools
SpiroSphere® Instructions for Use
Page 42/84 9HUVLRQ0$<
Regional
Setting options: Preset:
English (US), German English (US)
cm. in cm
kg. lb kg
Sound
Setting options: Preset:
select 50%
Power Management
Preset:
select 100%
select 100%
select 5 min
select 2 min
select 10 min
select 5 min
select 20 min
select 20 min
7KHVHVHWWLQJVLQÀXHQFHWKHEDWWHU\OLIHRIWKH6SLUR6SKHUH
SpiroSphere® Instructions for Use
Page 43/84
9HUVLRQ0$<
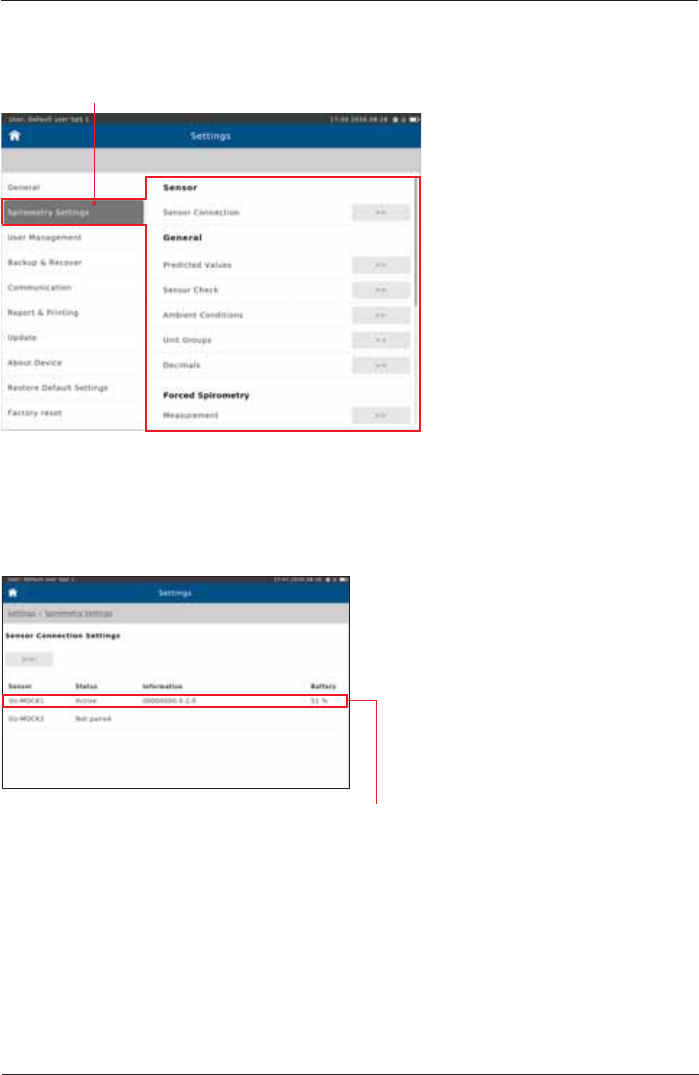
Spirometry Settings
Tap on "Spirometry Settings"
Spirometry Settings - Sensor
Sensor Connection
Active: The SpiroSphere Sensor is connected to the SpiroSphere via Bluetooth
Not paired: The SpiroSphere Sensor is not connected to the SpiroSphere
Battery: Indicates the battery status of the SpiroSphere Sensor
SpiroSphere® Instructions for Use
Page 44/84 9HUVLRQ0$<
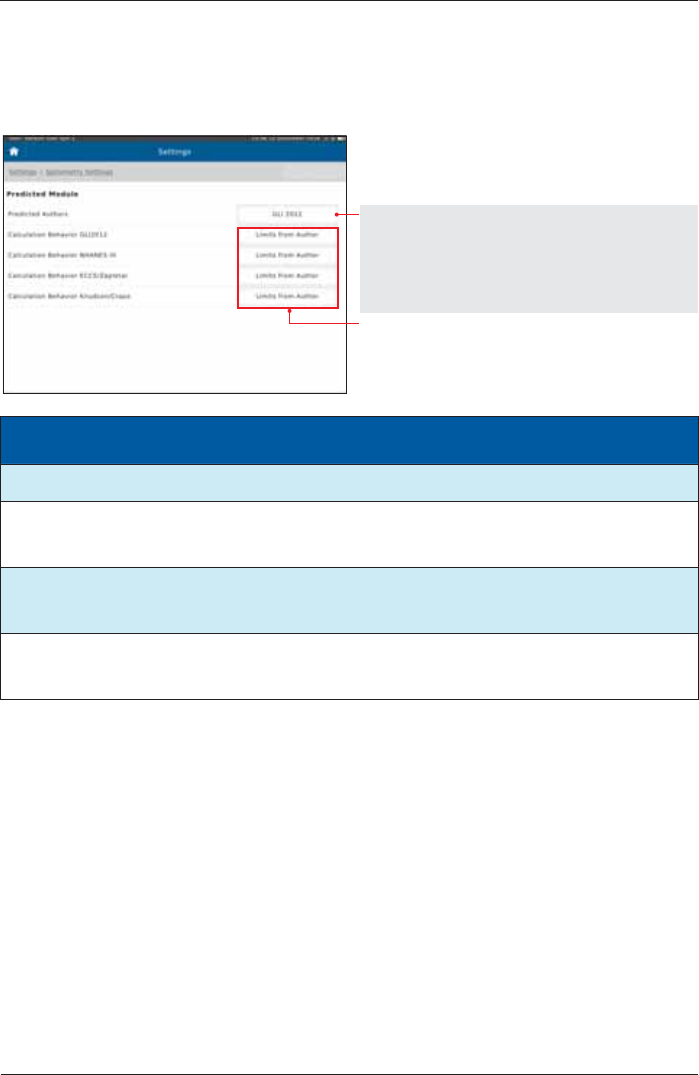
Predicted Values
Setting options: Preset:
None GLI 2012
GLI 2012
NHANES III
ECCS/Zapletal
Knudson/Crapo
Extrapolate
Limits from Author Limits from Author
No calculation outside limits
Module Age range
Height range Differentiation acc. to Race
GLI 2012 3-95 years no limitation Ethnicity
NHANES III 8-80 years 110-200 cm African-Descent
Mexican-American
all other groups
ECCS/Zapletal 5-17 years (Zapletal)
18-70 years (ECCS
93)
107-182 cm
(for Zapletal only) African-Descent
0.87 for volume (18 - )
Knudson/Grapo 6-90 years no limitation African-Descent
0.88 for volume
all other groups
1 For an age between 19 and 25, the calculation is based on the age of 25
Spirometry Settings - General
SpiroSphere® Instructions for Use
Page 45/84
9HUVLRQ0$<
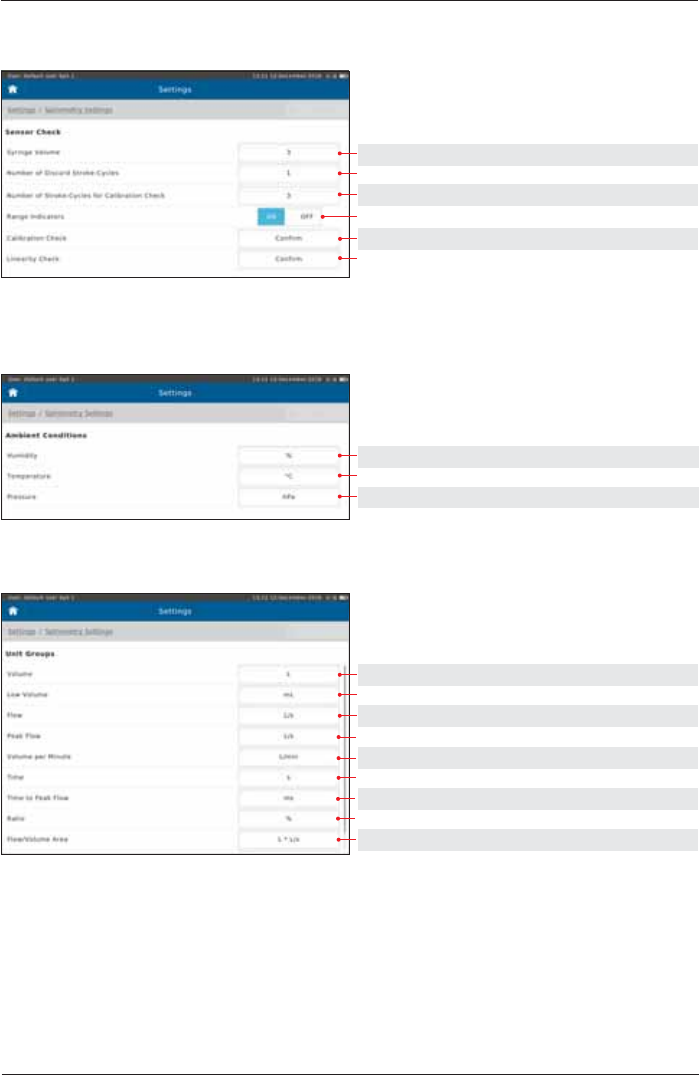
Sensor Check
Setting options: Preset:
1, 2, 3 3
1, 2, 3, 4 1
2, 3, 4, 5, 6, 7, 8 3
ON, OFF ON
2))&RQ¿UP(QIRUFH &RQ¿UP
2))&RQ¿UP(QIRUFH &RQ¿UP
Ambient Conditions
Setting options: Preset:
% %
°C, °F °C
hPa, mmHg hPa
Unit Groups
Setting options: Preset:
mL, L L
mL, L mL
L/s, mL/s, L/min L/s
L/s, mL/s, L/min L/s
L/min L/min
s, ms s
s, ms ms
1, % %
L*L/s, mL*L/s L*L/s
SpiroSphere® Instructions for Use
Page 46/84 9HUVLRQ0$<
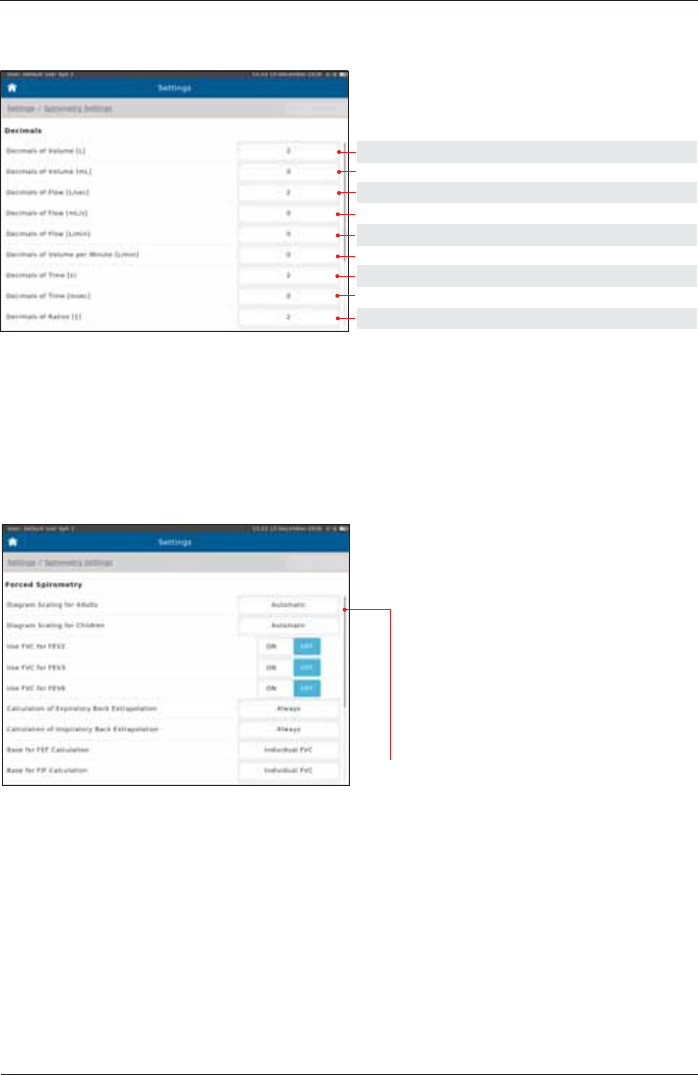
Decimals
Setting options: Preset:
0, 1, 2, 3, 4 2
0, 1, 2, 3, 4 0
0, 1, 2, 3, 4 2
0, 1, 2, 3, 4 0
0, 1, 2, 3, 4 0
0, 1, 2, 3, 4 0
0, 1, 2, 3, 4 2
0, 1, 2, 3, 4 0
0, 1, 2, 3, 4 2
Measurement
Spirometry Settings - Forced Spirometry
Example: Preset 0: Preset 1: Preset 2:
FVC [L] 5 5,1 5,10
Scroll down to display further settings
(if applicable)
SpiroSphere® Instructions for Use
Page 47/84
9HUVLRQ0$<
Diagram Scaling Adult
Diagram Scaling Child
If “Automatic³LVVHOHFWHGDQGWKHEUHDWKLQJÀRZLVJUHDWHURUOHVV
WKDQWKHSUHVHWÀRZD[LVWKLVD[LVZLOOEHUHVFDOHGDXWRPDWLFDOO\
Setting options: Preset:
Automatic Automatic
16 L/s, 12 L/s, 8 L/s , 4 L/s
FVC as FEV2
FVC as FEV3
FVC as FEV6
&KRRVH 3UHVHW
ON, OFF OFF
ON, OFF OFF
ON, OFF OFF
If “ON“ is selected, the value for the respective parameter is used as
the FVC value.
Expiratory Back
Extrapolation
Inspiratory Back
Extrapolation
Setting options: Preset:
Always, Never Always
correct incorrect
Example: 4.6 liters Example: 3.8 liters
Why Back Extrapolation?
A delayed start of the expiration in the forced expiration breathing
maneuver provides incorrect results for various parameters.
Back extrapolation means that in case of a delayed expiration the
system determines the correct start of expiration.
Criterion 5% of FVC
Start of expiration calculated by
extrapolation
Expiration curve
Time
Volume
Why inspiratory back extrapolation?
In case of a delayed inspiration during the FIV1 breathing maneuver
and if “always“ is preset, the computer determines the correct start of
inspiration.

SpiroSphere® Instructions for Use
Page 48/84 9HUVLRQ0$<
FEF calculation Base
FIF calculation Base
Setting options: Preset:
individual FVC individual FVC
VC max
If “individual FVC“ is selected, the FEF or the FIF values will be
calculated based on FVC.
If several breathing maneuvers are performed within one test cycle,
the software determines the best breathing maneuver within this trial
according to preset criteria.
Best Expiration
Setting options: Preset:
FEV1 + FVC FEV1 + FVC
FEV1
FVC
FVC + FERV1 + 1/3*PEF
FEV0.5 + FVC
FEV0.5
Best Inspiration Setting options: Preset:
FVCin + PIF FVCin + PIF
FVCin + 0.1*PIF
FVCin + FIV1
FVCin
FIV1
Use best EX
Summary default View
Setting options: Preset:
Flow/Volume Flow/Volume
Tiffenau
Spirogram
If “Flow/Volume³LVVHOHFWHGWKHUHVXOWVFUHHQZLOOGLVSOD\WKHÀRZ
volume curve. If "Tiffeneau" is selected, the tiffenau curve will be
displayed.
SpiroSphere® Instructions for Use
Page 49/84
9HUVLRQ0$<
Display Inspiratory
Setting options: Preset:
ON, OFF ON
ON means: the inspiratory portion of the Flow-Volume curve is
displayed.
OFF means: the inspiratory portion of the curve will not be displayed.
The setting can be changed during the measurement.
Inspiratory Position
Setting options: Preset:
TLC, RV TLC
The inspiratory and expiratory phase of the Flow-Volume curve can be
referred to TLC or RV.
TLC RV
Display Predicted
Curve
Setting options: Preset:
ON, OFF ON
If activated (ON), a predicted curve will be displayed in the diagram as
reference.
Pred
SpiroSphere® Instructions for Use
Page 50/84 9HUVLRQ0$<
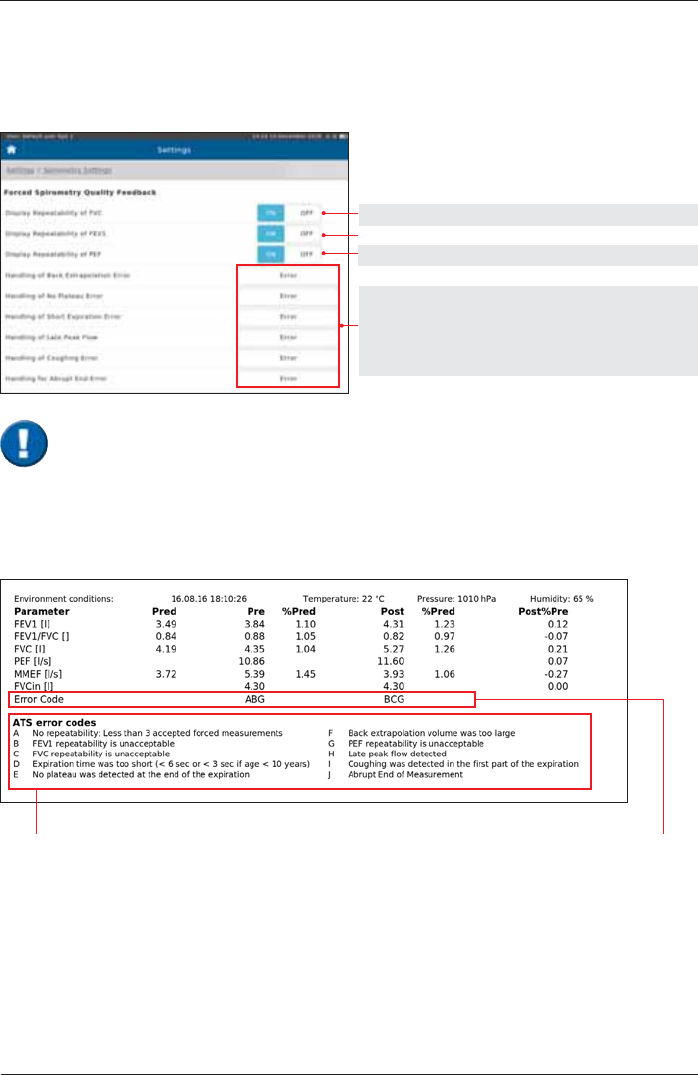
Quality Feedback
Spirometry Settings - Forced Spirometry
Setting options: Preset:
ON, OFF ON
ON, OFF
ON, OFF
Error Error
OFF
Warning
&RQ¿UPDWLRQ
Quality Feedback documented in an "Example" report:
ABG means: errors A, B, G are
present
ATS error codes
As the quality of a spirometry measurement strongly depends on the patient's
FRRSHUDWLRQWKHFULWHULDGH¿QHGE\WKH$76PXVWEHPHW,IWKHUHVSHFWLYHFULWHULDDUHQRW
PHWWKH\ZLOOEHGLVSOD\HGLQWKHUHVXOWVVFUHHQDQG¿QDOO\GRFXPHQWHGLQWKHUHSRUW
SpiroSphere® Instructions for Use
Page 51/84
9HUVLRQ0$<
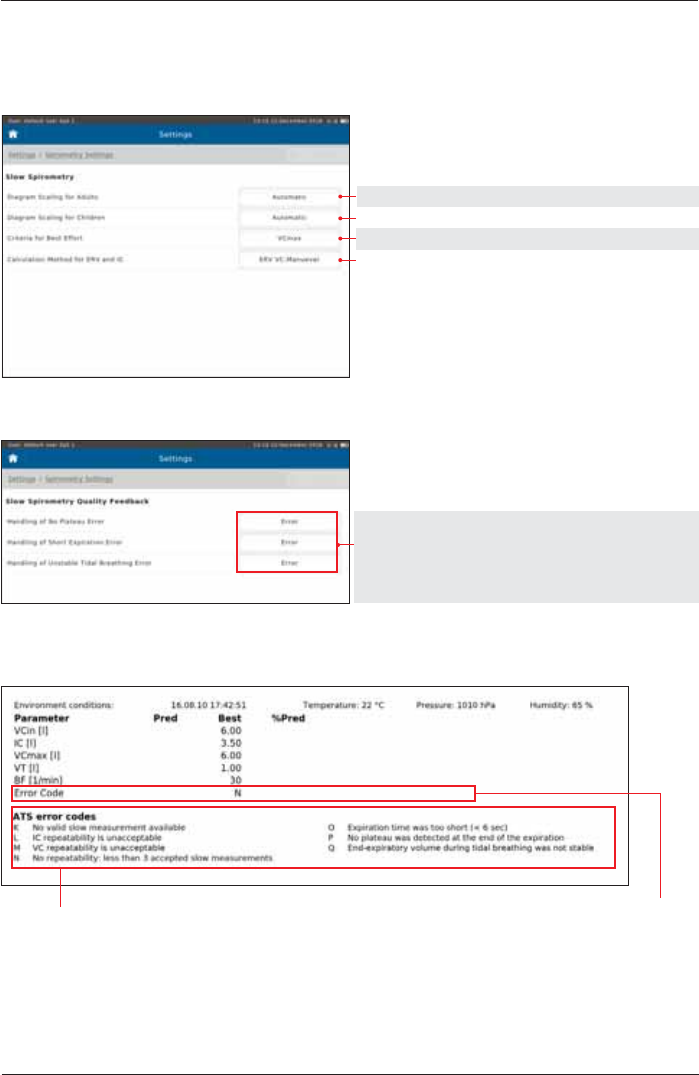
Spirometry Settings - Slow Spirometry
Setting options: Preset:
Automatic, 12, 9, 6, 4 L Automatic
Automatic, 12, 9, 6, 4 L Automatic
VCin, VCex, VCmax, IC, ERV VCmax
ERV VC-, IC VC-Maneuver ERV VC-Maneuver
Measurement
Quality Feedback
Setting options: Preset:
Error Error
OFF
Warning
&RQ¿UPDWLRQ
Quality Feedback documented in an "Example" report:
N means: the criteria N are not metATS error codes
SpiroSphere® Instructions for Use
Page 52/84 9HUVLRQ0$<
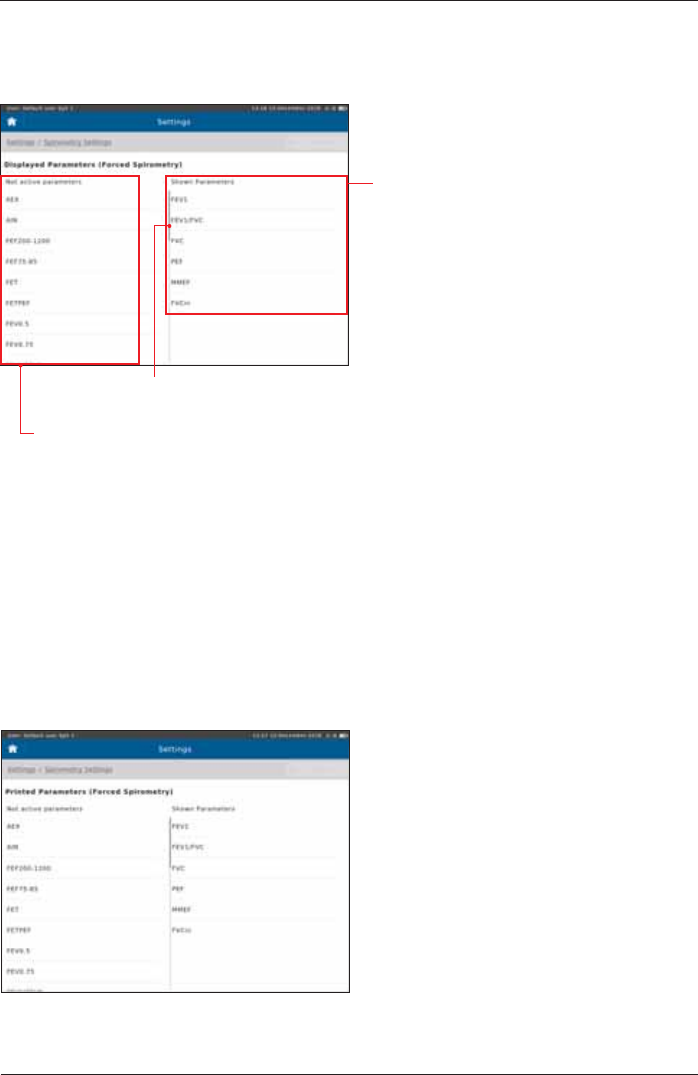
Forced Spirometry - Displayed Parameters
The"Not active parameters" column displays all parameters which
can be selected to be shown during a measurement.
Scroll down to display further parameters
(if applicable)
The"Shown Parameters" column
displays the parameters shown in the
result screen of the forced spirometry
measurement.
Preset:
FEV1
FEV1/FVC
FVC
MMEF
FVCin
Parameter Selection
Add a parameter to the "Shown Parameters" column:
Double-tap on the required parameter in the "Not active parameters" column. The parameter will
immediately be added to the "Shown Parameter" list.
Remove a parameter from the "Shown Parameters" column:
Double-tap on the parameter you want to delete.
Tap on <Undo> in order to undo the recent changes.
Forced Spirometry - Printed Parameters
"see above"
SpiroSphere® Instructions for Use
Page 53/84
9HUVLRQ0$<
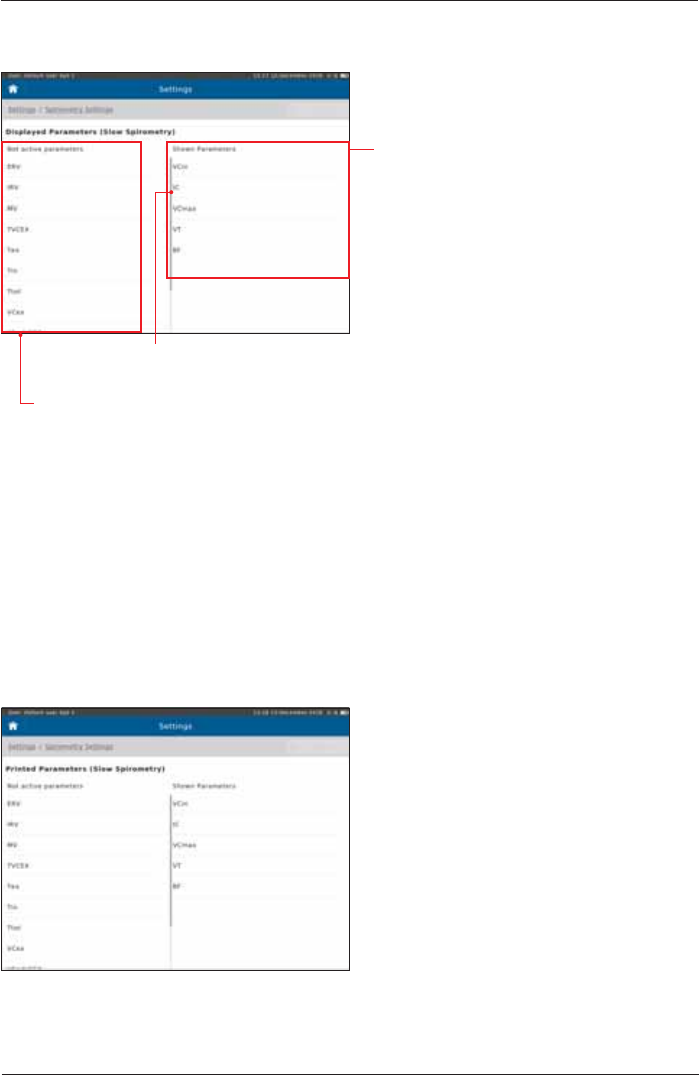
Slow Spirometry - Displayed Parameters
The "Shown Parameters" column
displays the parameters shown in the
result screen of the slow spirometry
measurement.
Preset:
VCin
IC
VCmax
VT
BF
Scroll down to display further parameters
(if applicable)
The "Not active parameters" column displays all parameters which
can be selected to be shown during a measurement.
Slow Spirometry - Printed Parameters
"see above"
Add a parameter to the "Shown Parameters" column:
Double-tap on the required parameter in the "Not active parameters" column. The parameter will
immediately be added to the "Shown Parameter" list.
Remove a parameter from the "Shown Parameters" column:
Double-tap on the parameter you want to delete.
Tap on <Undo> in order to undo the recent changes.
SpiroSphere® Instructions for Use
Page 54/84 9HUVLRQ0$<
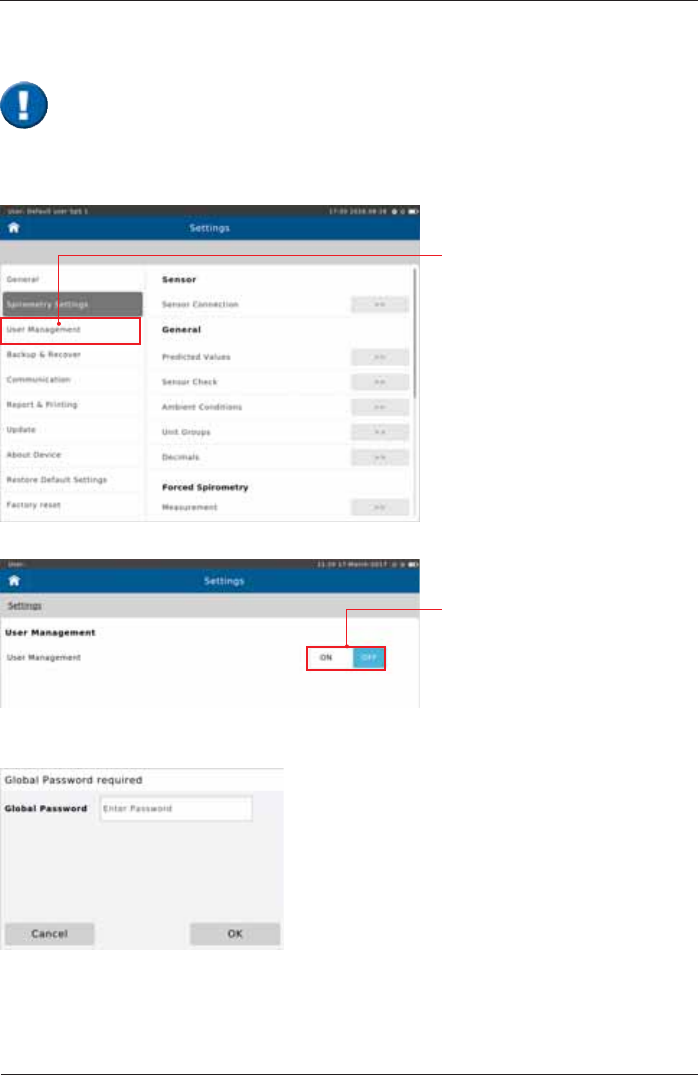
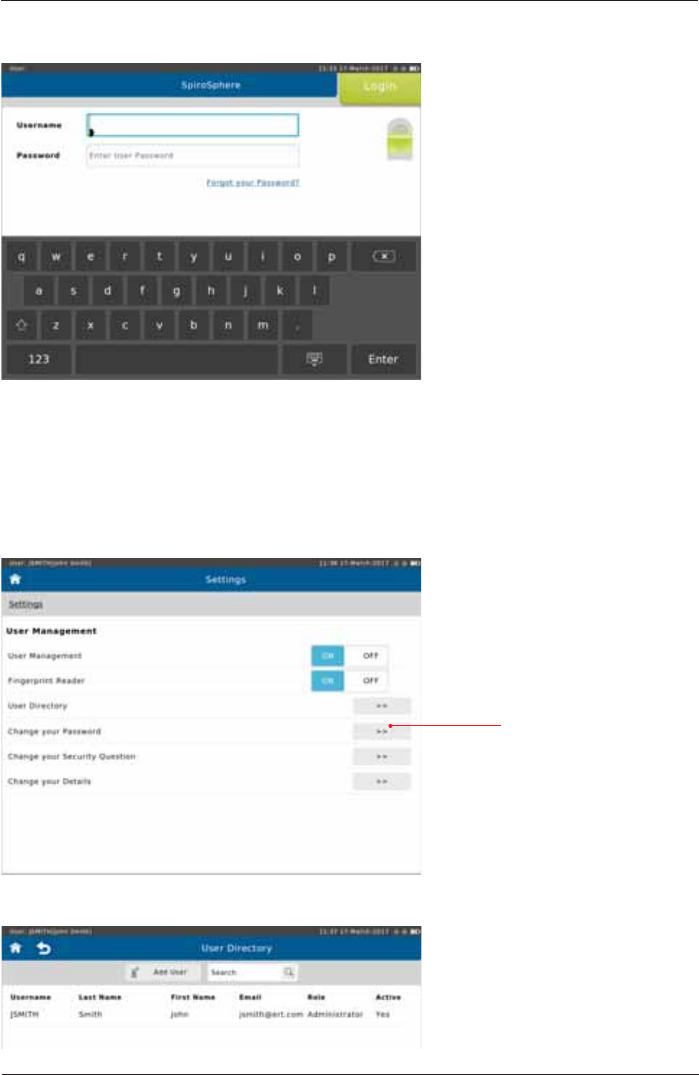
From "Settings" select
"User Management"
This tool enables an authorized person to create an Administrator account. The newly
created administrator will then be able to create additional accounts for individuals
authorized to work with the SpiroSphere. Additionally, it is possible to register your
¿QJHUSULQWVLQRUGHUWRXWLOLVHWKH¿QJHUSULQWUHDGHUIRUV\VWHPDFFHVV
Tap the switch to activate
User Management
The following screen appears:
Enter the Global Password (“691982”) and tap <OK>.
User Management
SpiroSphere® Instructions for Use
Page 55/84
9HUVLRQ0$<
The following screen appears:
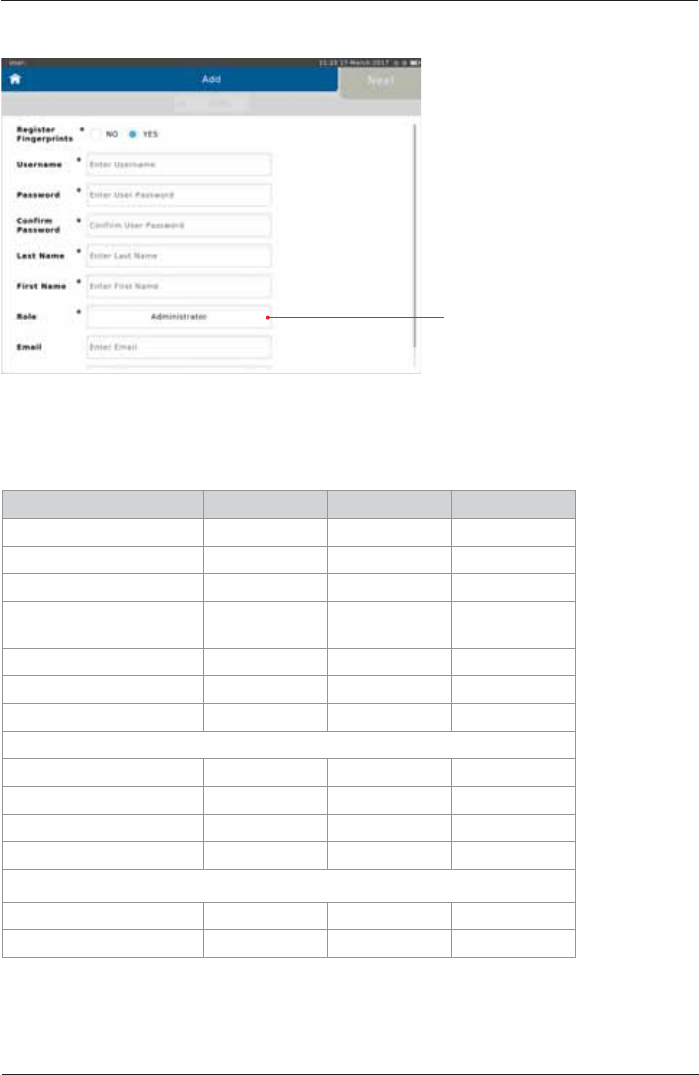
(QWHUWKHGHWDLOVIRUWKHXVHUIRU¿UVWXVHUWKLVPXVWEH$GPLQLVWUDWRUUROH
2SWLRQDOO\\RXFDQFKRRVHWRUHJLVWHU\RXU¿QJHUSULQWVLQRUGHUWRXWLOLVHWKH¿QJHUSULQWUHDGHUIRU
system access.
Patients Administrator User Support
New patient X X
Search patient X X X
View patient details X X X
Change patient
demographics XX
View measurements X X X
Perform measurements X X
Print reports X X X
Sensor Check
Calibration Check X X X
Linearity Check X X X
Calibration CheckLog X X X
Linearity CheckLog X X X
Tools
Create backup X X X
View system info X X X
Options for role type:
Administator
User
Support
SpiroSphere® Instructions for Use
Page 56/84 9HUVLRQ0$<
System Administration
Add or change user X X X
Deactivate/activate user X X
Recover X X X
Change date and time
settings XXX
Update software X X X
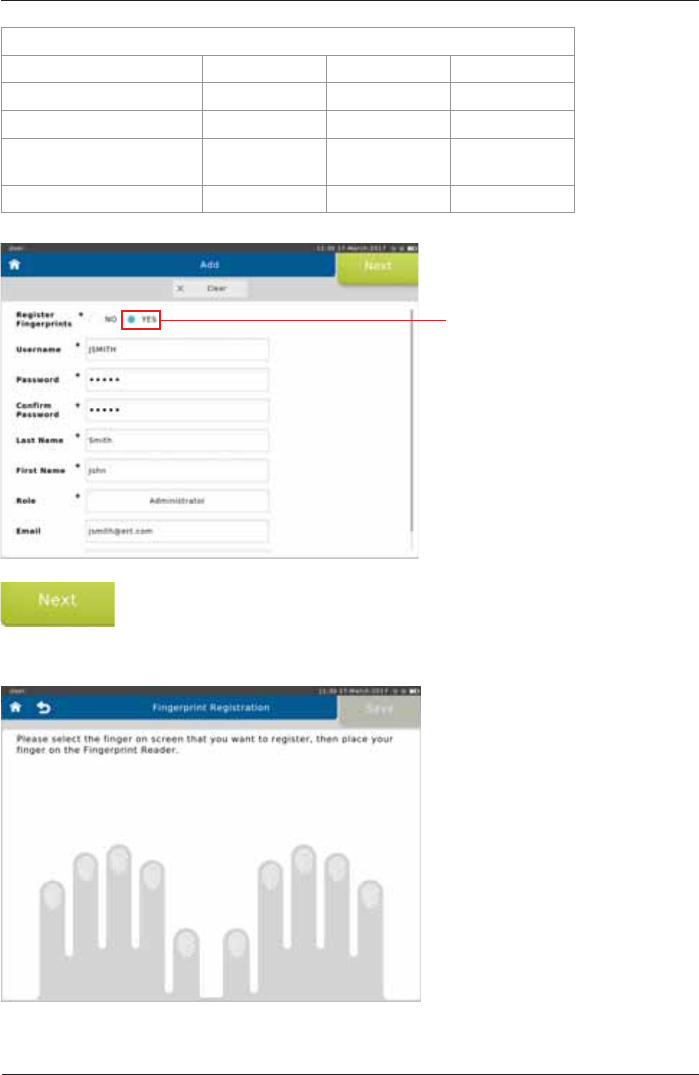
Select <YES> to register
¿QJHUSULQWV
Tap <Next!WRPRYHWRWKH¿QJHUSULQWUHJLVWUDWLRQ
,I\RXFKRRVHQRWWRUHJLVWHU¿QJHUSULQWVWKLVEXWWRQLVODEHOOHG³Save”.)
The following screen appears:
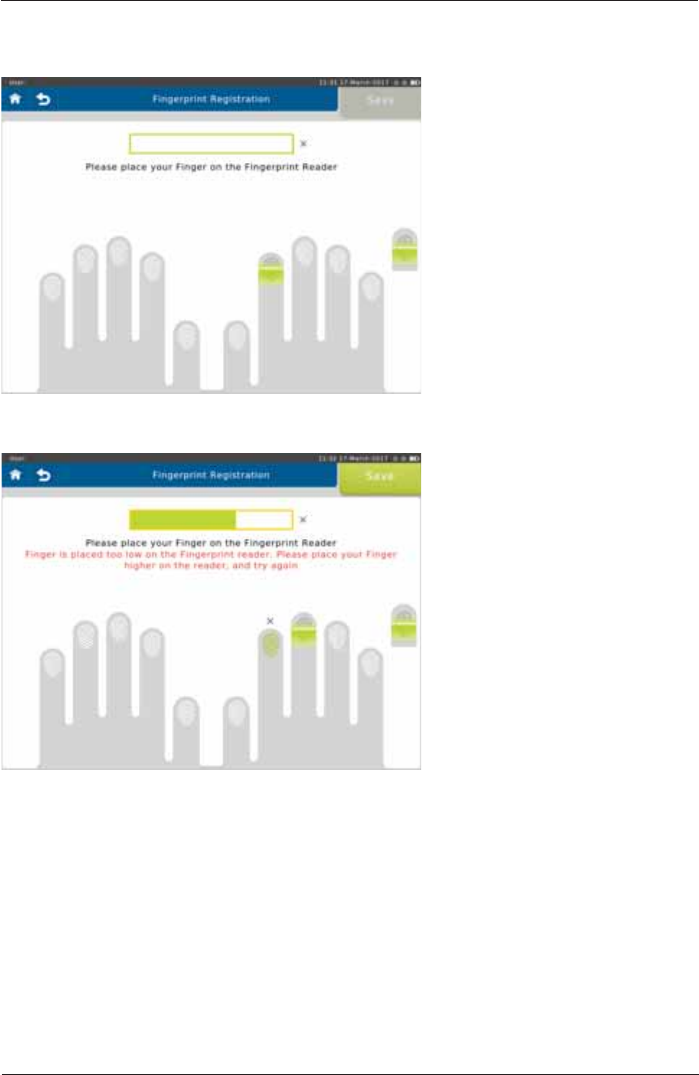
7DSWKHLPDJHRIWKH¿QJHU\RXZLVKWRUHJLVWHU
SpiroSphere® Instructions for Use
Page 57/84
9HUVLRQ0$<
3ODFH\RXU¿QJHURQDQGRIIWKH¿QJHUSULQWUHDGHUDVSHURQVFUHHQLQVWUXFWLRQVDSSUR[WLPHV
LQRUGHUWRUHJLVWHU\RXU¿QJHUSULQW
,IWKH¿QJHULVQRWSODFHGFRUUHFWO\IHHGEDFNLVSURYLGHG
SpiroSphere® Instructions for Use
Page 58/84 9HUVLRQ0$<
<RXPD\UHJLVWHUDVPDQ\¿QJHUVDV\RXOLNH
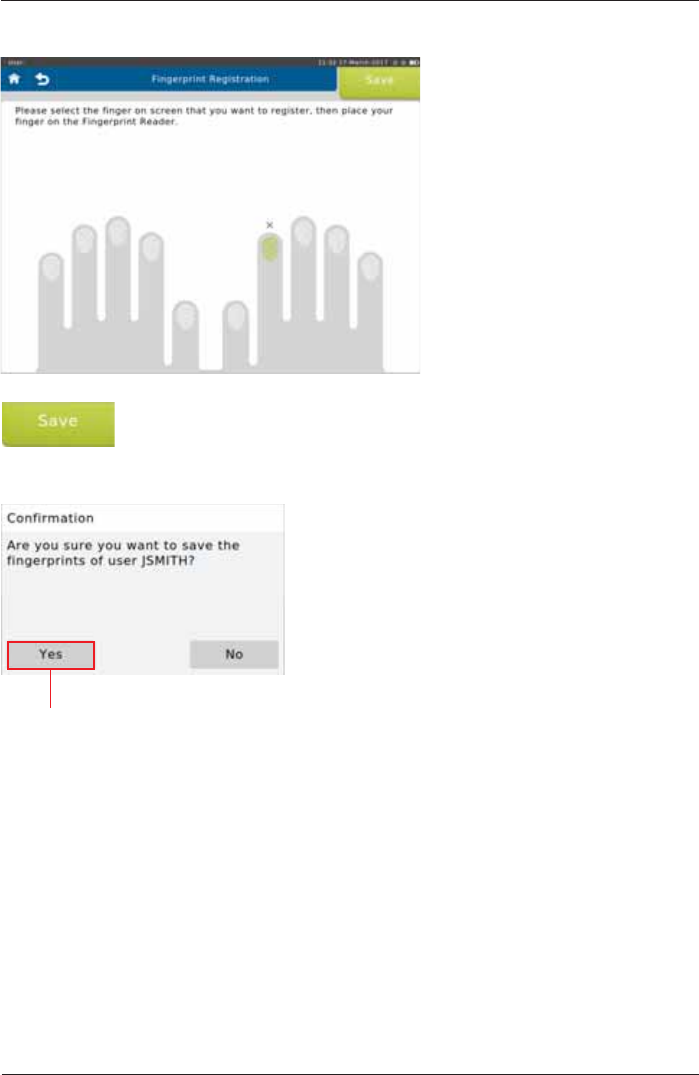
:KHQ¿QLVKHGWDSSave>.
The following screen appears:
Tap <Yes!WRVDYHWKH¿QJHUSULQWVRI
the respective user.
SpiroSphere® Instructions for Use
Page 59/84
9HUVLRQ0$<
$IWHUVDYLQJWKH¿UVWXVHU\RXZLOOEHVHQWWRWKH/RJLQSDJH
You can login via entry of Username and Password.
,I\RXUHJLVWHUHG\RXU¿QJHUSULQW\RXFDQXVHWKH¿QJHUSULQWUHDGHU7ZRWRXFKHVDUHUHTXLUHGWKH
¿UVWWRXFKLGHQWL¿HVWKHXVHUWKHVHFRQGYHUL¿HVWKHXVHU
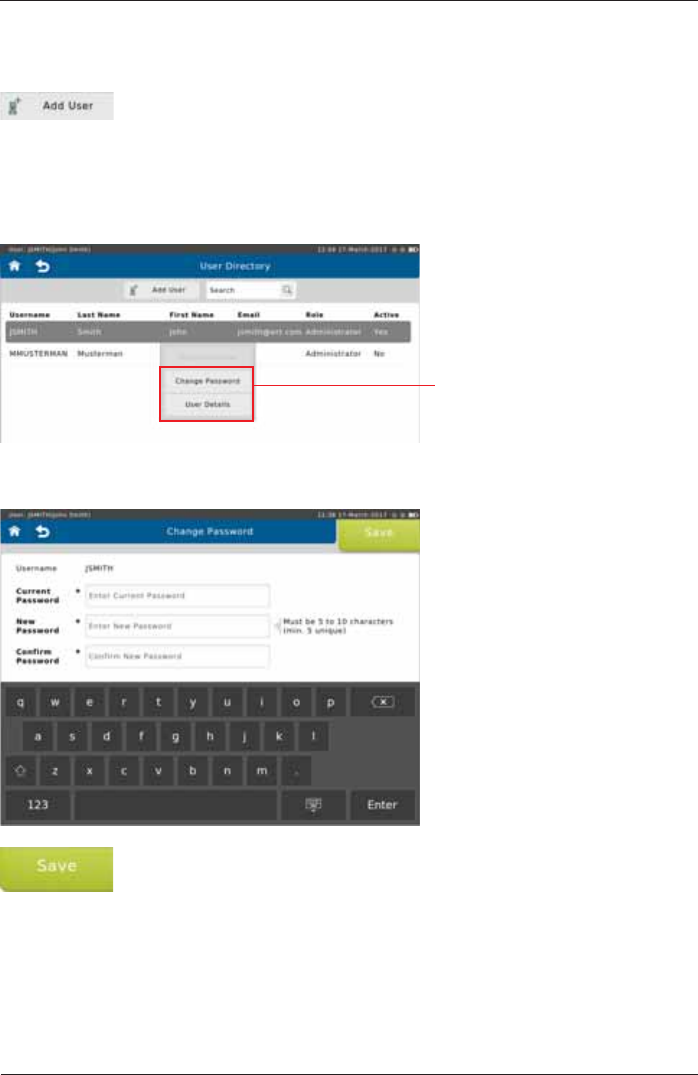
When User Management is active, additional items appear in the Settings screen:
The User Directory is displayed:
User Directory
Select "User Directory"
SpiroSphere® Instructions for Use
Page 60/84 9HUVLRQ0$<
7DSSLQJWKHFXUUHQWO\ORJJHGLQXVHULQWKHGLUHFWRU\ZLOORSHQDÀ\RXWPHQX
Access to the User details, and
Change password function is
available
To set a new password, tap <Change Password>. The following screen appears:
Make the appropriate entries and tap <Save> to save the new password.
Add User
It is possible to add a new user from the User Directory.
To add a new user, tap <Add User>. Make the appropriate entries and, if
GHVLUHGUHJLVWHU¿QJHUSULQWVVHHDERYH
Change Password

SpiroSphere® Instructions for Use
Page 61/84
9HUVLRQ0$<
To edit the currently selected user, tap <User Details!LQWKHÀ\RXWPHQX7KHIROORZLQJVFUHHQ
appears:
Make the appropriate changes and tap <Next!WRPRYHWRWKH¿QJHUSULQW
registration (see above).
,I\RXFKRRVHQRWWRUHJLVWHU¿QJHUSULQWVWKLVEXWWRQLVODEHOOHG³Save”.)
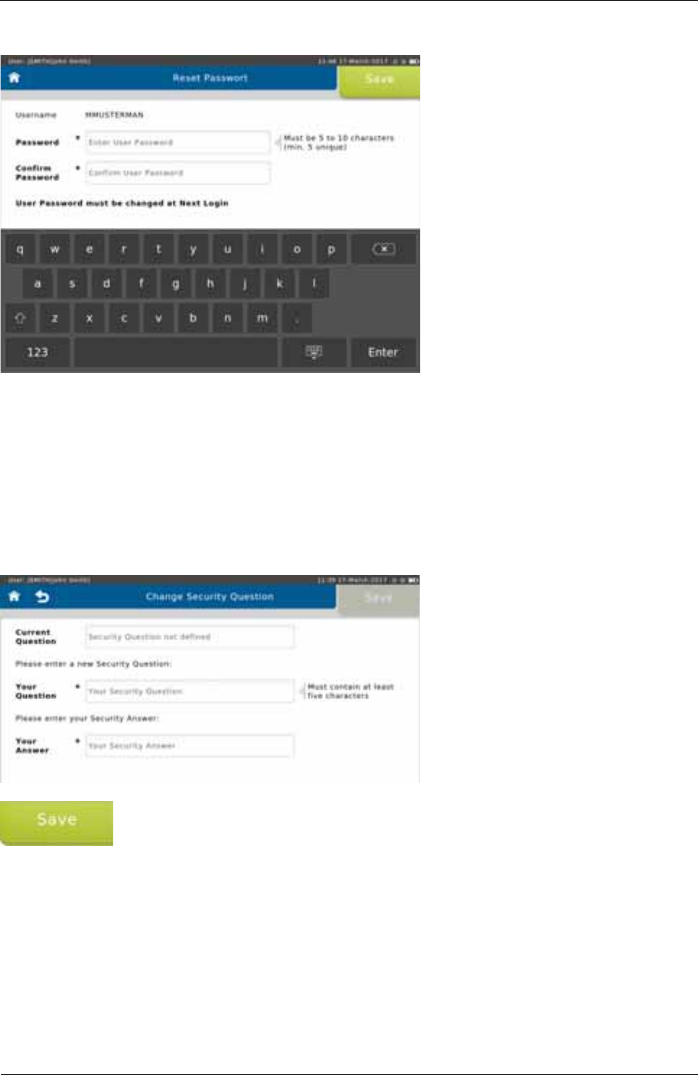
An Administrator is able to activate/ deactivate a user and to reset the password (with a temporary
SDVVZRUGIRUDQRWKHUXVHUIURPWKHÀ\RXWPHQXLQWKH8VHU'LUHFWRU\
Edit User
Deactivate User /Reset Password
Tap <Deactivate User> to
deactivate the selected user.
SpiroSphere® Instructions for Use
Page 62/84 9HUVLRQ0$<
From "User Management SettingsD6HFXULW\4XHVWLRQDQG$QVZHUFDQEHGH¿QHGIRUWKH
current user.
To reset the password for another user, tap <Reset Password>. The following screen appears:
The user will be required to change their password upon their login.
Change Security Question
Make the appropriate entries and tap <Save> to save the Security Question.
SpiroSphere® Instructions for Use
Page 63/84
9HUVLRQ0$<
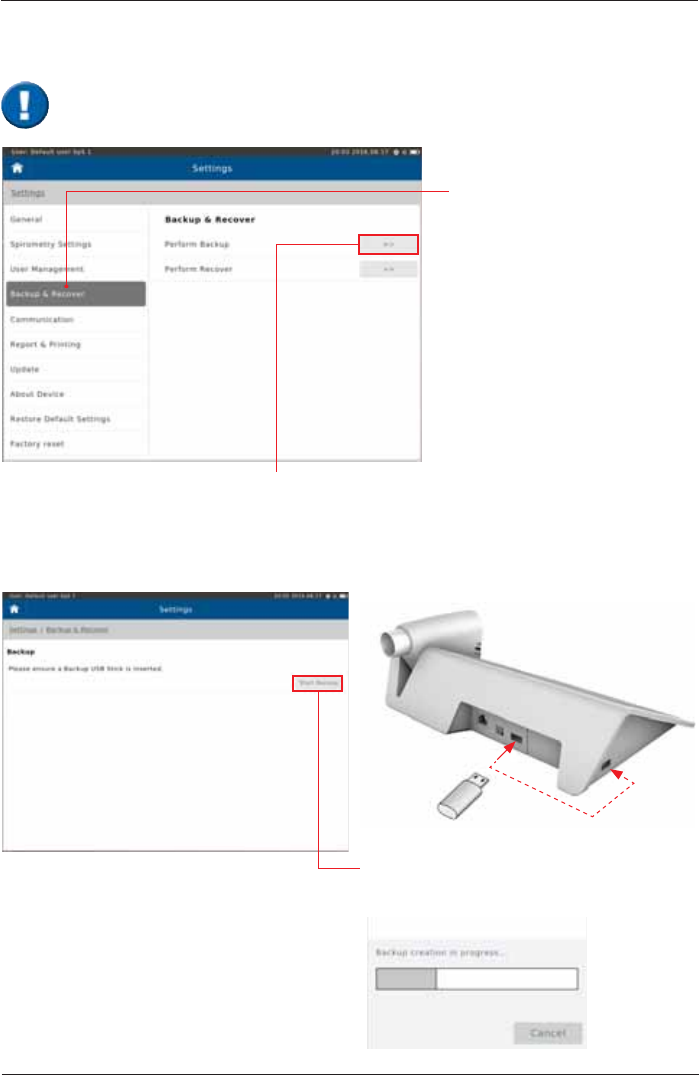
Backup & Recover
Backup
Tap on "Backup & Recover".
Alternatively, tap on the "No
backup performed¿HOGRQWKH
Home Screen.
If “Perform Backup“ is selected, the message
"Please ensure a Backup USB Stick is Inserted" appears.
Tap on “Start Backup³WRFUHDWHDEDFNXS¿OH
and save it to the USB stick!
Insert USB stick
A backup of all saved patient- and test data should be performed and saved to a USB-
Stick on a regular basis.

SpiroSphere® Instructions for Use
Page 64/84 9HUVLRQ0$<
Recover
If “Perform Recover“ is selected, the
message "Please ensure USB Stick for
Recover is Inserted" appears.
Tap on “All Data“ to reload all data into the
patient directory of your SpiroSphere.
Insert Backup USB stick
SpiroSphere® Instructions for Use
Page 65/84
9HUVLRQ0$<
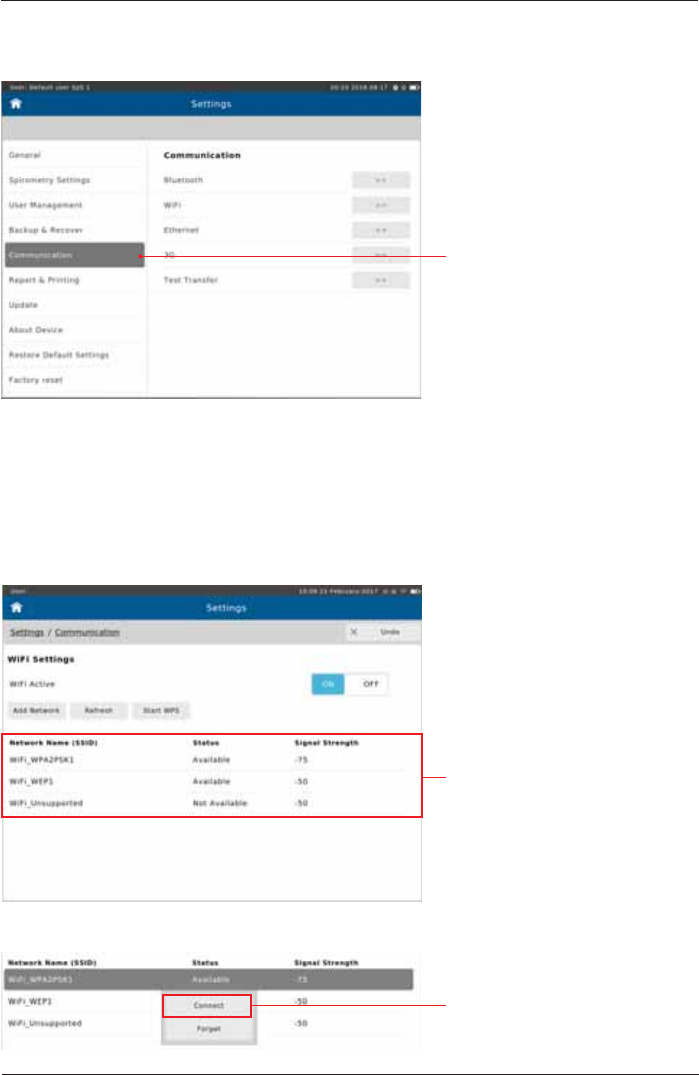
Communication
Tap on "Communication"
Network Requirements
WiFi
,WLVSRVVLEOHWRFRQ¿JXUHWKH&RPPXQLFDWLRQVHWWLQJVIURPWKH&RPPXQLFDWLRQPHQXZLWKLQ
Settings.
6HOHFWWKH&RPPXQLFDWLRQPHWKRGWRRSHQWKHUHVSHFWLYHFRQ¿JXUDWLRQVHWWLQJV
Tap on the desired WiFi network.
Tap <Connect> to initiate the
connection.
7KHIROORZLQJÀ\RXWPHQXDSSHDUV
SpiroSphere® Instructions for Use
Page 66/84 9HUVLRQ0$<
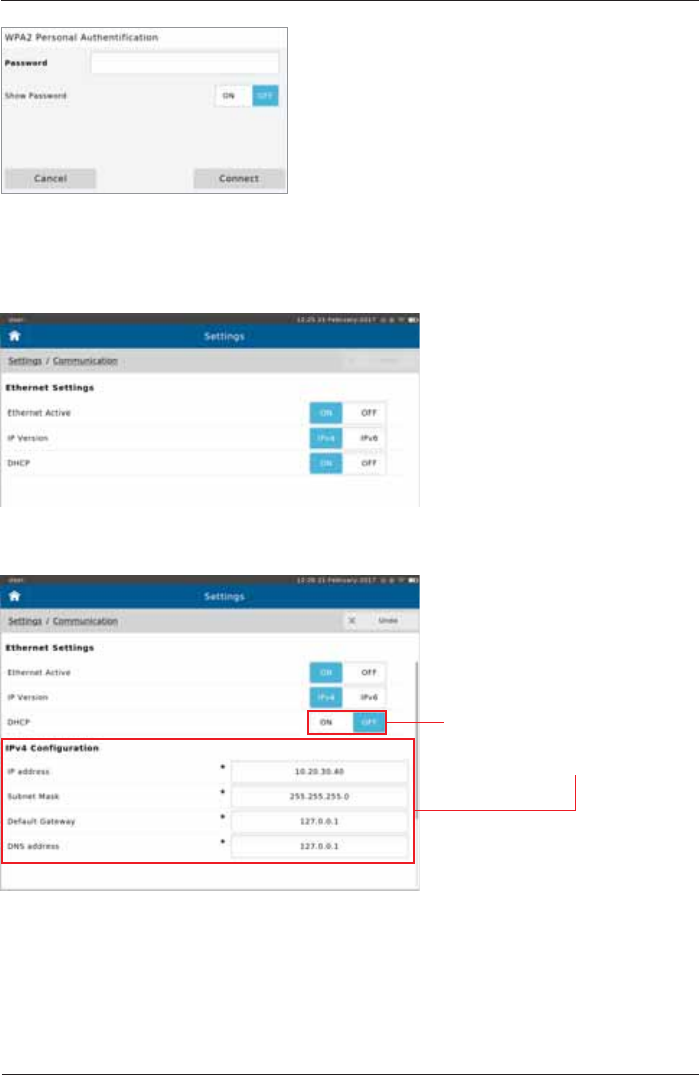
Enter the password as applicable and tap <Connect>.
Ethernet
If DHCP is set on "Off", then
you can manually enter the
appropriate settings.
Choose the appropriate settings.
SpiroSphere® Instructions for Use
Page 67/84
9HUVLRQ0$<
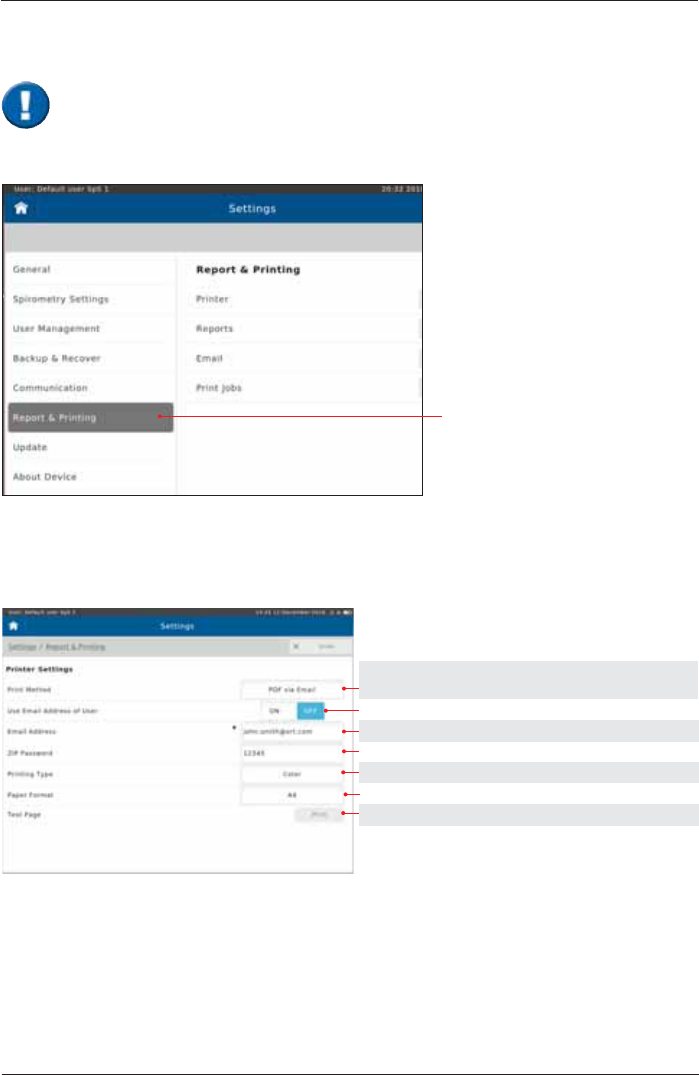
Report & Printing
Tap on "Report & Printing"
Printer
Setting options: Preset:
Printer, PDF via Email,
PDF via USB PDF via Email
ON, OFF OFF
see below
see below
Color, Black & White Color
A4, Letter A4
Send test page to Default Printer
Email Address: Enter the Email address of the person the reports should be sent to.
Zip File Password: Set the password the recipient is required to enter in order to open the "zip"
folder.
See chapter "Print Recorded Results".
SpiroSphere allows for reports to be printed with an external printer. In addition,
6SLUR6SKHUHZLOODOORZWKHXVHUWRJHQHUDWHUHSRUWVDVD3')¿OHZKLFKFDQEH
WUDQVIHUUHGWRDQH[WHUQDOGHYLFHLHYLDD86%VWLFNRUHPDLOHGWRDVSHFL¿HG
recipient.
SpiroSphere® Instructions for Use
Page 68/84 9HUVLRQ0$<
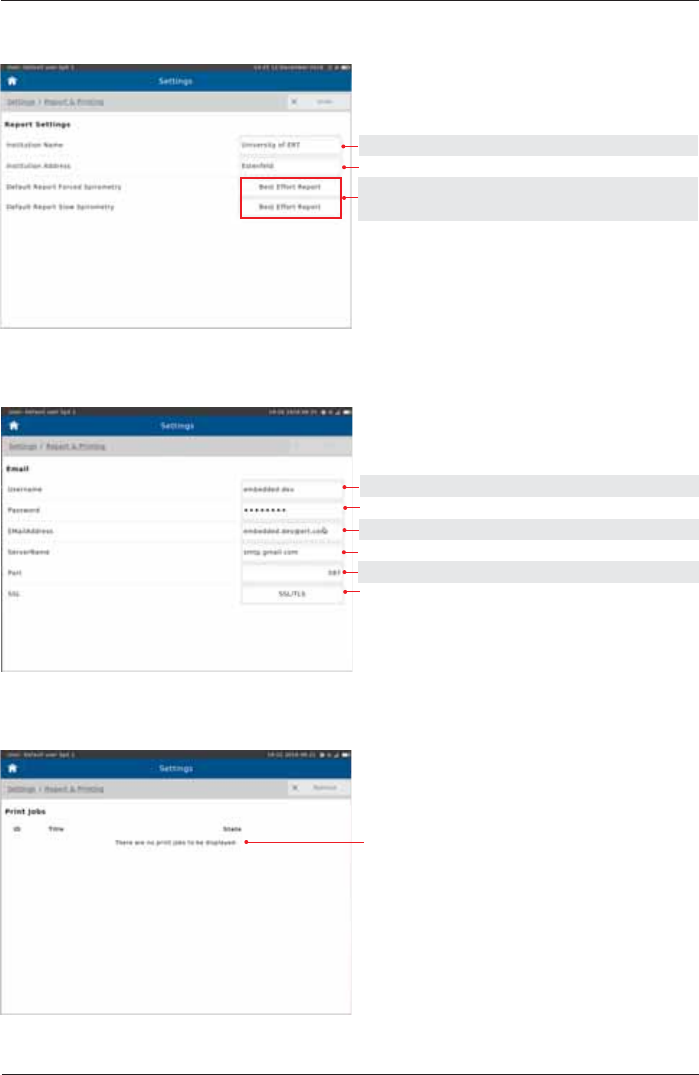
Reports
Setting options: Preset:
Input Customer Name
Input Customer Address
Best Effort Report Best Effort Report
All Efforts Report
Email
Print Job
Print jobs state
Input Username
Input Password
Input Email Address
Input Server Name
Input Port
Input SSL

SpiroSphere® Instructions for Use
Page 69/84
9HUVLRQ0$<
A detailed description of this tool is not part of this Instructions for Use.
Update
Tap on <Search for
Update>. The device will
search for updates on the
connected USB stick.
Tap on <Start Update> to
begin the update process.
List of available updates
About Device
Restore Default Settings
Factory reset
SpiroSphere® Instructions for Use
Page 70/84 9HUVLRQ0$<
In the course of lung function testing, certain parts of the equipment can be contaminated by
germs, which creates the risk that these germs can be transferred to the next test subject.
For cross-contamination to occur, the test subject would need to be in direct contact with the
contaminated object or transport media such as droplets or aerosols. Contaminated aerosols may
EHWUDQVSRUWHGWKURXJKWKHUHVSLUDWRU\ÀRZDQGPD\DIIHFWWKHQH[WWHVWVXEMHFW
6LQJOH8VH(5737ZLWKPRXWKSLHFH
Dispose after every patient
How often should contaminated parts be exchanged?
Reuse may lead to patient infections.
Wiping
disinfection
Surface Cleaning and Disinfection
The surface disinfection of the Main unit and other
contaminated surfaces, such as the SpiroSphere Sensor,
must be performed on a regular basis (e.g. Main Unit daily).
If there has been direct contact with the skin or if the
case history/diagnosis of the patient requires it, a surface
disinfection has to be performed directly after the application.
Cleaning/Hygiene
6LQJOHSDWLHQWXVH1RVHFOLS
Dispose nose clips after every patient
Reuse may lead to patient infections.
The possible risk of infection can only be avoided if all of the contaminated parts are
thoroughly disinfected!
Hygiene Regulations:
In case of normal contamination all single-use items can be disposed of with the regular
waste. In case of dangerous infectious diseases (e.g. tuberculosis, blood...) single-use
items must be disposed of through hazardous waste.
ERT PT and mouthpiece are parts for single use only. These parts must be
disposed after each single use. If reused, infection may occur.
Reprocessing may deteriorate the part, resulting in reduced stability and
leakage through micro cracks or releasing micro particles that could be inhaled.
Should any of these parts be recycled and misused intentionally, ERT takes no
responsibility nor can be made liable for the consequences arising from reusing
these parts.
Always be sure to disconnect the devices/systems from the mains power before cleaning
or disinfecting.

SpiroSphere® Instructions for Use
Page 71/84
9HUVLRQ0$<
If the patient's history shows a dangerous infectious disease
(e.g. tuberculosis), all parts which had been in direct or indirect contact
with the patients must be disinfected.
Precleaning and Disinfection
$WKRURXJKSUHWUHDWPHQWFOHDQLQJLVDSUHFRQGLWLRQIRUDQHI¿FLHQWGLVLQIHFWLRQRIFRQWDPLQDWHG
parts. Protein residue on these parts might prevent an effective disinfection.
ERT recommends the following disinfectants:
Precleaning and Disinfection:
Product Manufacturer Concentration/Reaction time
mikrozid®sensitive
wipes Schuelke & Mayr GmbH 1 minute
CaviWipes Metrex 1 minute
3URFHGXUH8VHWKH¿UVWFOHDQLQJZLSHWRFRYHUDOOVXUIDFHVZLWKWKHGHWHUJHQW5HSHDWWKH
procedure with a second wipe for disinfection. Let the surface dry.
Disposal of single use items / damaged reusable items
Take precautions to avoid contaminating yourself (e.g. use gloves). All single patient use items
can be disposed of as domestic waste if there is a normal degree of contamination. In case of
dangerous infectious diseases (e.g. tuberculosis) it is necessary to dispose of the single patient
use items in special designated containers.
,QDGGLWLRQSOHDVHQRWHFRXQWU\VSHFL¿FGLVSRVDOUHJXODWLRQV.
Do not clean or disinfect the Main Unit or the SpiroSphere Sensor while
the devices are in operation.
Please observe the instructions with regard to concentration and reaction time!
If a different substance is used, please follow the manufacturer's instructions.
The use of detergents and disinfectants which have not been recommended by the
manufacturer might damage the products.
The manufacturer's information on the cleaning of accessories provided separately
must be observed!
With suspected tuberculosis or other resistant germs, the use of an appropriate
disinfectant (CaviWipes, Reaction time >3 minutes) is required.
Protein residue on parts which are to be disinfected prevents effective disinfection.
Therefore all protein residue must be removed prior to disinfection. In case of persistent
residues please use an appropriate tool (e.g. soft brush) to remove the residues.
$YRLGFRQWDPLQDWHGÀXLGVHJEORRGWRJHWLQWRWKH6HQVRU8QLW,QFDVHRI
LQJUHVVRIFRQWDPLQDWHGÀXLGVGRQRWXVHWKH6HQVRU8QLW

SpiroSphere® Instructions for Use
Page 72/84 9HUVLRQ0$<
General Safety Precautions
The Instructions for Use describes the present state of the device/system,
including software and accessories, with regard to the fundamental requirements of the
MDD 93/42/EEC.
Exact adherence to the instructions issued is a prerequisite for perfect and intended
functioning of ERT instruments.
The Instructions for Use is regarded as part of the instrument, and should always be kept
on hand.
Deviation from Intended Use
Any non-observance of the procedures (such as preparation for a measurement
and methods, disinfection procedures, use of accessories and replacement
parts etc.) described in the Instructions for Use results in a deviation from
intended use.
In case of a deviation from intended use, the operator/user has to supply proof
of meeting all corresponding fundamental requirements.
The operator/user is responsible for performing the conformity assessment
correctly and is also completely liable for defective products - i.e. the operator/
XVHULVOLDEOHIRUKLVKHUPRGL¿FDWLRQRIWKHPHGLFDOSURGXFW
ERT only guarantees for the safety, reliability and functionality of the instrument if
LQVWDOODWLRQH[WHQVLRQPRGL¿FDWLRQVDQGUHSDLUVDUHH[FOXVLYHO\FDUULHGRXWE\
personnel authorized for these tasks by ERT.
WKHURRPLQZKLFKWKHHTXLSPHQWLVRSHUDWHGFRPSOLHVZLWKWKHFRXQWU\VSHFL¿F
installation standard.
- the unit can be plugged into a socket with protective conductor system.
- the ambient conditions at the place of installation are suitable for the unit.
- the unit is used according to the Instructions for Use.
Unpack your medical device. Please check if the unit is damaged. If so, do not use it and
return it for a replacement.
3DWLHQW6DIHW\DFFRUGLQJWR(1
This medical device safely insulates the subject from the mains power supply as required in
the safety regulations on leakage current according to EN 60601-1, Type BF. Nevertheless, a
VXEMHFWHQYLURQPHQWPXVWEHGH¿QHG7KHVXEMHFWKDVWRNHHSDGLVWDQFHRIDWOHDVWPIURPDOO
open interfaces and connectors of the SpiroSphere Main Unit to avoid any contact with electrical
voltage.
The physician/operator must not touch any voltage-carrying parts (e.g. USB Plug, Ethernet Plug)
and the subject at the same time.
SpiroSphere® Instructions for Use
Page 73/84
9HUVLRQ0$<
The connection of further power-operated units to your ERT unit may cause all
the leakage currents to add-up and the safety of the subject is reduced. Due to
this, the connection of further units may only be carried out on consultation with
the ERT Customer Care.
$FFHVVRU\HTXLSPHQWFRQQHFWHGWRWKHLQWHUIDFHVPXVWEHFHUWL¿HGDFFRUGLQJWR
the respective EN standards (e.g. EN 60950 or EN 60601-1).
Everybody who connects additional equipment to the signal input part or signal
RXWSXWSDUWFRQ¿JXUHVDPHGLFDOV\VWHPDQGLVWKHUHIRUHUHVSRQVLEOHWKDW
the system complies with the requirements of the valid version of the system
standard (IEC 60601-1). If in doubt, consult the technical service department or
your local representative.
8VHRI0XOWL3OXJ6RFNHWV
Medical devices/systems must only be connected to multi-plug sockets if all
regulatory requirements are met.
- Additional mobile multi-plug sockets must not be connected to power
sockets of medical devices/systems.
- Mobile multi-plug sockets of medical devices/systems must not be placed
RQWKHÀRRU
- Equipment (for example vacuum cleaner, radio, etc.) and devices which are
not part of the medical device/system must not be connected to the multi-
plug sockets.
Radiated Interference
The ERT device meets the regulations according to EN 60601-1-2 (CISPR
11 Group 1 class B) regarding the interference radiated and received. The
device should not be installed in the vicinity of high-frequency devices, X-ray
equipment, motors or transformers with high installed power rating since electric
RUPDJQHWLFLQWHUIHUHQFH¿HOGVPD\IDOVLI\WKHUHVXOWRIPHDVXUHPHQWVRUPDNH
taking measurements impossible. Due to this, the vicinity of power lines is to be
avoided as well. Existing environmental interferences may cause deviations of
the measurement values without impairing the device’s function. Therefore, it is
recommended to keep a distance of about 2 meters from possible error sources
when using the device.
This device should not be operated in immediate vicinity to or stacked with other
devices since this could lead to an incorrect operation. However, if an operation
in the described manner is necessary, this device as well as the other devices
should be carefully observed to ascertain a proper operation.
Using other accessories, other transformers and other cables than those
VSHFL¿HGRUSURYLGHGE\WKHGHYLFHVPDQXIDFWXUHUFDQUHVXOWLQLQFUHDVHG
electromagnetic radiation or reduced electromagnetic immunity of the device
and can lead to an incorrect operation.
Portable RF communications equipment (transmitters) (including appropriate
accessories such as aerial wires and external antennas) should be operated
with a minimum distance of 30 cm (21 inch) to the SpiroSphere's components
DQGFDEOHVVSHFL¿HGE\WKHPDQXIDFWXUHU1RQREVHUYDQFHPD\OHDGWRD
reduction of the device's performance.
SpiroSphere® Instructions for Use
Page 74/84 9HUVLRQ0$<
Ambient Conditions
The medical device must not be operated in rooms with the presence of
ÀDPPDEOHDQDHVWKHWLFPL[WXUHZLWKDLURUÀDPPDEOHDQDHVWKHWLFPL[WXUH
with oxygen or nitrous oxide. The medical device must be operated in rooms
ZKHUHRQO\QRQFRQGXFWLYHSROOXWLRQRFFXUVKRZHYHURFFDVLRQDOWHPSRUDU\
conductivity due to condensation is to be expected. The medical device is
designed for operation in medically used rooms.
The medical device has to be effectively protected against moisture. Ventilation
slots must be kept free of obstructions in order to enable air circulation.
Putting the Unit into Operation
Temperature changes may give rise to condensation in the device. Consequently,
the device has to adapt to the ambient temperature before putting it into
operation.
Always consult the nameplate on the device/system for compliance of the unit’s
own data with those of the local power supply system (mains voltage and mains
frequency) before actually connecting the unit.
Connect only if all data comply!
Inspect the mains connection cable, plug, and receptacle for visible damages
prior to establishing the connection. Damaged cables or plugs must be replaced
immediately. Installation and assembly of the device must be done only in
compliance with this Instructions for Use.
$IWHUWKH¿UVWVHWXSRULIWKHVHWXSKDVEHHQFKDQJHGHJH[FKDQJLQJRIWKH
SpiroSphere Sensor), a function test (e.g. calibration check) has to be performed.
The Main Unit must be placed outside the patient environment during
measurement.
Medical Supervision
'XULQJWKHPHDVXUHPHQWWKHSDWLHQWPXVWQRWEHXQDWWHQGHG$TXDOL¿HG
physician must reassess all measurements. An interpretation by the medical
GHYLFHLVVLJQL¿FDQWRQO\ZKHQFRQVLGHUHGWRJHWKHUZLWKRWKHUFOLQLFDO¿QGLQJV
The performance of the spirometer can be affected by the patient spitting or
coughing into the spirometer during expiration or by extremes of temperature,
humidity and altitude.
Contraindications
According to ‘‘ATS/ERS TASK FORCE: STANDARDISATION OF LUNG
FUNCTION TESTING’’ (ERS Journals Ltd 2005) performing lung function tests
can be physically demanding for a minority of patients. It is recommended that
patients should not be tested within 1 month of a myocardial infarction. In rare
cases spirometry testing can lead to syncope due to extensive exhalation.
In the S2 guideline "Spirometry" (German Airway League, German Respiratory
Society and German Society of Occupational and Environmental Medicine,
2015), contraindications of spirometry are divided into absolute and relative
contraindications:
Absolute contraindications for Forced Maneuvers
Acute, life threatening diseases of every description, e.g.
$FXWH0\RFDUGLDO,QIDUFWLRQ
$FXWH)XOPLQDQW3XOPRQDU\(PEROLVP
SpiroSphere® Instructions for Use
Page 75/84
9HUVLRQ0$<
Cleaning and Hygiene
Prior to every application, all parts which come in contact with the patient and
which are intended for reuse must be cleaned or disinfected (unless otherwise
instructed).
Prior to taking measurements of a patient, his/her medical history is to be
checked in order to avoid a contamination of the device and a resulting cross-
contamination of the next patient.
While performing a calibration check, a new disposable Pneumotach must be
used to prevent cross-contamination between the calibration syringe and the
parts. This will prevent contamination of the syringe and allow for its reuse.
Always be sure to disconnect the devices/systems from the mains power before
cleaning or disinfecting. The Main Unit corresponds to protection class IP21, the
SpiroSphere Sensor to class IP20.
The device may not be soaked in liquid of any kind. Liquid inside the device/
system may lead to harm of the user and can destroy the device.
The device can be cleaned with a damp (but not soaked) cloth, which does not
produce lint. More detailed information can be found under “Hygiene“ in this
Instructions for Use.
Detergents and chemicals required for cleaning and disinfection must always be
stored in specially marked containers to prevent any accidental improper use.
/DUJH$VFHQGLQJ$RUWLF$QHXU\VP
7HQVLRQ3QHXPRWKRUD[
Relative contraindications for Forced Maneuvers
0DVVLYH3QHXPRWKRUD[ZLWKLQWKH¿UVWZHHNV
$EGRPLQDORU7KRUDFLF6XUJHU\GHSHQGLQJRQWKH¿QGLQJVWRZHHNV
post-operatively)
6XUJHU\RIWKH(\HV%UDLQRU(DUVYDULDEOHFRQVXOWDWLRQZLWKWKH
surgeon)
6SHFLDOFDUHPXVWEHWDNHQZKHQGHDOLQJZLWK+HPRSW\VLVRIXQNQRZQ
origin
Biocompatibility
Component Material
Mouth piece Styrolution PS 454N HIPS
Biocompatibility of the material has
EHHQFRQ¿UPHG
Housing parts of the sensor unit and
the main unit Cycoloy CX2244ME
Biocompatibility of the material has
EHHQFRQ¿UPHG
PT-tube Styrolution PS 454N HIPS
SpiroSphere® Instructions for Use
Page 76/84 9HUVLRQ0$<
Recurrent Test
Medical Electrical equipment needs a recurrent testing after repair of the
equipment according to IEC 62353.
The calibration syringe itself has to be calibrated at regular intervals as
determined by the manufacturer and as indicated on the syringe. The calibration
syringe must be checked for an accuracy of ± 12 mL.
Recycling
Adhere to the national law of the country when disposing the medical device
and its accessories.
Improper disposal of the device and/or its accessories can result in serious
environmental hazards.
Maintenance
No part of the medical device may be replaced by the customer.
Use only ERT approved accessories and spare parts for this medical device.
If applied parts (e.g. SpiroSphere Sensor) have been exposed to extreme
mechanical stress, a function test (e.g. volume calibration check) has to be
performed. If function is lost, the defective part is to be replaced. Damaged
parts, e.g. frayed plugs, receptacles, a damaged handle, and defective cables
should be replaced immediately by an authorized specialist or engineers from
ERT Customer Care. The device must not be opened. If it is opened without
authorization the guarantee entitlement expires. ERT Customer Care is always
at your disposal with help and assistance in case of problems.
Before turning on the device/system you should always check whether the
power cable, power plug, outlet and power input of the device are free from
defects.
Before turning on the device/ system the following issues have to be checked
visually on a daily basis:
- the display glass is undamaged
- the unit has not been mechanically stressed in the extreme (e.g. damage
to the housing, the cable is made defective by running over it with a heavy
object or dragging it)
- no liquid got inside the unit
- the SpiroSphere Sensor is not damaged
- cables and/or multiple connectors are not defective
- coverings are not broken
An unattended child should not get into contact with disposables, accessories
and packing material as well as cleaning and disinfection substances.
SpiroSphere® Instructions for Use
Page 77/84
9HUVLRQ0$<
Graphical Symbols
Alternating current
Attention!
ON/OFF (device connected to/disconnected from the
power supply system)
Follow the instructions for Use!
Year of Production
Manufacturer
Applied part of Type BF
Single use
Disposal of electronic devices in compliance with WEEE
Barometric pressure limits
CAUTION:
FEDERAL U.S. LAW RESTRICTS THIS DEVICE TO SALE BY OR ON THE ORDER OF A
PHYSICIAN.
Packaging can be recycled
Temperature limit
Serial number
Reference number
3URWHFWLRQDJDLQVWLQWUXVLRQRIVROLGVPPGLDPHWHUQRSURWHFWLRQDJDLQVWLQJUHVVRIOLTXLGV
3URWHFWLRQDJDLQVWLQWUXVLRQRIVROLGVPPGLDPHWHUSURWHFWLRQDJDLQVWFRQGHQVDWLRQ
&(VLJQZLWKFRGHQXPEHURIWKH1RWL¿HG%RG\
7KHFHUWL¿HGTXDOLW\PDQDJHPHQWV\VWHPRIeResearchTechnology GmbH corresponds to the
international standard of ISO 13485.
Possible source of interference
Rx only
IP20
IP21
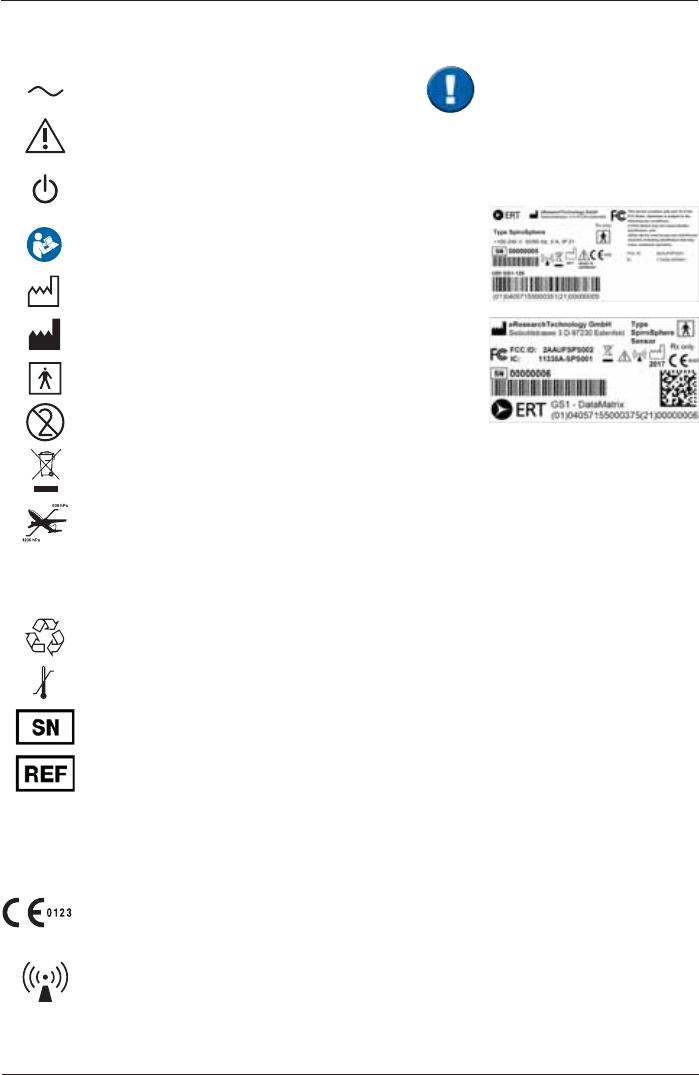
The typeplate can be found
at the rear side of the Main
Unit.
The typeplate on the
SpiroSphere sensor is
positioned at the left side.

SpiroSphere® Instructions for Use
Page 78/84 9HUVLRQ0$<
Parts of the software are developed under the GPL software license. The source code of these
parts can be obtained from ERT.
The conditions and a copy of the GPL can be obtained at: "http://www.fsf.org/licenses/gpl.html" or
from: Free Software Foundation, Inc., 51 Franklin Street, Fifth Floor, Boston, MA 02110-1301, USA
This product is based in part on Evas, Copyright© 2000 - 2005 by Carsten Haitzler and various
contributors, and on the work of the FreeType team.
Safety Precautions for Lithium Ion Rechargeable Batteries
The SpiroSphere Sensor is powered by an internal Lithium-Ion Polymer battery.
The SpiroSphere Main Unit can also be powered by an internal Litihium-Ion Polymer battery.
The following safety precautions are valid for Lithium-Ion batteries:
- Dispose of Lithium-Ion batteries according to local regulations.
- Do not shortcut the battery.
- Protect the battery against excessive heat!
- Protect the battery against direct sun light!
3URWHFWWKHEDWWHU\DJDLQVW¿UH
- Do not dismantle or manipulate the battery.
'RQRWUHSODFHWKHEDWWHU\,PSURSHUUHSODFHPHQWFDQOHDGWR¿UHH[FHVVLYHKHDWRUH[SORVLRQ
7KHÀXLGLQWKHEDWWHU\LVWR[LFDQGÀDPPDEOHOHDN\EDWWHULHVRUEDWWHULHVZLWKGHQWVPXVWQRW
be used any longer!
'RQRWFRPHLQFRQWDFWZLWKWKHÀXLGLQWKHEDWWHU\,IWKHÀXLGFRPHVLQFRQWDFWZLWK\RXUVNLQ
immediately rinse the affected part with water and contact a doctor!
- To charge the SpiroSphere Sensor, use only the Main Unit Cradle and observe the instructions
in the manual!
- To charge the Main Unit, use only the provided power supply.
The safety precautions and operational procedures indicated in this chapter refer to
Germany. Different regulations and standards may apply to other countries.

SpiroSphere® Instructions for Use
Page 79/84
9HUVLRQ0$<
Canada
This device complies with Industry Canada licence-exempt RSS standard(s). Operation is subject
to the following two conditions: (1) this device may not cause interference, and (2) this device must
accept any interference, including interference that may cause undesired operation of the device.
Le présent appareil est conforme aux CNR d’Industrie Canada applicables aux appareils radio
exempts de licence. L’exploitation est autorisée aux deux conditions suivantes : (1) l’appareil
ne doit pas produire de brouillage, et (2) l’utilisateur de l’appareil doit accepter tout brouillage
radioélectrique subi, même si le brouillage est susceptible d’en compromettre le fonctionnement.
SpiroSphere - Main Unit: IC: 11335A-SPS001
SpiroSphere - Sensor Unit: IC: 11335A-SPS002
“This device complies with Part 15 of the FCC Rules. Operation is subjected to the following two
conditions: (1) this device may not cause harmful interference, and (2) this device must accept any
interference received, including that may cause undesired operation.“
SpiroSphere - Main Unit: FCC-ID: 2AAUFSPS001
SpiroSphere - Sensor Unit: FCC-ID: 2AAUFSPS002
USA
Frequency
Band Transmission Frequency
Range Maximum Output Power Gain
UMTS B1 1922 to 1978 MHz 23 dBm (+/- 2dBm) Class 3bis -1.74 dBi
UMTS B2 1852 to 1908 MHz 23 dBm (+/- 2dBm) Class 3bis -1.1 dBi
UMTS B5 826 to 847 MHz 23 dBm (+/- 2 dBm) Class 3bis
-3.31 dBi
UMTS B6 832 to 838 MHz 23 dBm (+/- 2 dBm) Class 3bis
UMTS B8 882 to 913 MHz 23 dBm (+/- 2 dBm) Class 3bis
UMTS B19 832.4 to 842.6 MHz 23 dBm (+/- 2 dBm) Class 3bis
GSM 850 824 to 849 MHz 2 Watts GSM, GPRS and EDGE
E-GSM 900 880 to 915 MHz 2 Watts GSM, GPRS and EDGE
DCS 1800 1710 to 1785 MHz 1 Watt GSM, GPRS and EDGE -1.1dBi
PCS 1900 1850 to 1910 MHz 1 Watt GSM, GPRS and EDGE
ERT complies with EMC guidelines according to EN60601-1-2.
ERT can provide further information on EMC properties on request.

SpiroSphere® Instructions for Use
Page 80/84 9HUVLRQ0$<
Notes on EMC according to EN60601-1-2
The use of accessories not recommended by ERT may result in an increased electromagentic
radiation or a reduced interference immunity of the SpiroSphere.
*XLGDQFHDQG0DQXIDFWXUHUµV'HFODUDWLRQ±(OHFWURPDJQHWLF(PLVVLRQVDQG,PPXQLW\
The SpiroSphere uses RF energy for internal function. Therefore, its RF emissions are very low
and are not likely to cause any interference to nearby electronic equipment. The SpiroSphere
is suitable for use in all establishments including domestic and those directly connected to the
public low-voltage power supply network that supplies buildings used for domestic purposes.
IEC 60601 directive Compliance level
RF emissions CISPR 11 Group 1 Class B
Electrostatic discharge (ESD)
IEC 61000-4-2 ± 8 kV indirect contact
± 15 kV direct air
direct contact not possible
Radiated RF
IEC 61000-4-3 10 V/m from 80 MHz to 2700 MHz applied to
4 devices orientations each with vertical and
horizontal antenna polarisation
Electrical fast transient/burst
IEC 61000-4-4 ± 2 kV for power supply lines
± 1 kV for input/output lines
Surge
IEC 61000-4-5 0.5 kV differential mode
1 kV differential mode
Conducted RF
IEC 61000-4-6 3 V(rms) from 150 kHz to 80 MHz
6 V(rms) in ISM bands
Voltage dips
IEC 61000-4-11 tested at 100 and 240 V power supply input lines
< 5% @ 0.5 cycles and 45 degree sync angle steps
< 5% @ 1 cycle
<70% @ 25 cycles and 50 Hz
<70% @ 30 cycles and 60 Hz
Short interruptions and voltage variations
IEC 61000-4-11 tested at 100 and 240 V power supply input lines
< 5% @ 250 cycles and 50 Hz
< 5% @ 300 cycles and 60 Hz

SpiroSphere® Instructions for Use
Page 81/84
9HUVLRQ0$<
Technical Data
Dimension 31.5 x 19.5 cm x 7.5 (L x W x H )
Weight 1.5 kg
Screen Display 16.2 x 12.2 cm
Medical Model: GTM91099-3009-4.0-T2
Power Supply Input: 100 - 240 Vac, 50/60 Hz, 1.5 A
Output: 5 V, 6 A
Cable length: 1200 mm
Frequency 50 - 60 Hz
Battery Main Unit Built-in rechargeable lithium-ion battery 3.7 V,
5000 mAh. Battery will last under standard
operating conditions for about 3 h.
Full charging: 2 h
Cycle life: 70% of rated capacity after 350 cycles
SpiroSphere Sensor Built-in rechargeable lithium-ion battery 3.7 V,
640 mAh. Battery will last under standard
operating conditions for about 3 days in standby
and 2.5 h operation.
Full charging: 2 h
Cycle life: 70% of rated capacity after 500 cycles
Protection class Power Supply Class II
SpiroSphere Sensor Internally powered
Mode of operation continuous
Moisture protection Power Supply IP42
Main unit IP21
SpiroSphere Sensor IP20
Applied parts ERT PT, SpiroSphere Sensor Type BF
Application Measuring Pulmonary Function
Interface USB Data transfer
Bluetooth Data transfer
WiFi Data transfer
Ethernet Data Transfer
3G Data transfer
Measuring Principle high-quality pneumotach
Operating Ambient Temperature: +10 °C to +35 °C
Relative humidity: 15 % to 90 %
Barometric pressure: 700 to 1070 hPa

SpiroSphere® Instructions for Use
Page 82/84 9HUVLRQ0$<
Technical Data Flow Sensor
Measuring range: PEF: 0.1 to ± 16 L/s
FEV1 and FVC: 0.1 to 8 L
Resolution: PEF: < 5 mL/s
FEV1 and FVC: 1 mL
Accuracy: PEF: 0.1 to 16 L/s: ± 10% of reading or ± 0.3 L/s
FEV1 and FVC: 0.1 to 8 L: ± 3% of reading or ± 0.050 L
Resistance
Spirometer max. 135 Pa/L/s at 14 L/s
Instantaneous
Flow 0.1 – 14 L/s: +/- 5% or 0.2 L/s
The expected operational lifetime of the SpiroSphere is 7 years.
Transport/Storage Temperature: -10 °C to +50 °C
Relative humidity: 0 % to 90 %
Barometric pressure: 600 to 1200 hPa
Ambient unit Measuring range Accuracy
Barometric pressure: 500 to 1100 hPa ± 2.5 hPa at 700 - 1060 hPa

SpiroSphere® Instructions for Use
Page 83/84
9HUVLRQ0$<
Item Numbers of Disposables and Accessories
720254 Manual calibration syringe, 3 L
852740 Syringe Adapter D 28 mm, L 60 mm
892120 Plastic nose clip
892121 Nose clip pad "foam material", disposable,
100 pieces per pack
706000 ERT PT, incl. mouthpiece
706002 ERT PT, incl. mouthpiece (box of 10)
706002 ERT PT, incl. mouthpiece (box of 10)
706003 ERT PT, incl. mouthpiece (box of 50)
eResearchTechnology GmbH
Sieboldstrasse 3
97230 Estenfeld, Germany
Tel. +49 9305 720-9891
Fax +49 9305 720-7891
CustomerCare@ert.com
Use ERT accessories and spare parts only!

H5HVHDUFK7HFKQRORJ\*PE+RURQHRILWVDI¿OLDWHV
All rights reserved
eResearchTechnology GmbH
Sieboldstrasse 3
97230 Estenfeld, Germany
+49 9305 720-9891 tel
+49 9305 720-7891 fax