elero Antriebstechnik 2826X09X Low power transceiver for screen market User Manual TempoTel2 BA 182020002 EN 0715 indd
elero GmbH Antriebstechnik Low power transceiver for screen market TempoTel2 BA 182020002 EN 0715 indd
User Manual
182020002_EN_0715
Operating instructions (translation)
TempoTel 2 867/868/915 MHz
28265.0002, 28266.0002,
28267.0002, 28265.0902,
28266.0902, 28267.0902

Ⓒ elero GmbH 2 | EN Ⓒ elero GmbH EN | 3
Contents
Safety instructions . . . . . . . . . . . . . . . . . . . . . . . . . . . 4
Safety instructions for radio operation . . . . . . . . . . . 5
Intended use . . . . . . . . . . . . . . . . . . . . . . . . . . . . . . . . 6
Exclusion of liability . . . . . . . . . . . . . . . . . . . . . . . . . . 6
Scope of supply . . . . . . . . . . . . . . . . . . . . . . . . . . . . . 6
Technical Data . . . . . . . . . . . . . . . . . . . . . . . . . . . . . . . 6
Mounting of wall bracket . . . . . . . . . . . . . . . . . . . . . . 7
Description of the device . . . . . . . . . . . . . . . . . . . . . . 8
Explanation of functions . . . . . . . . . . . . . . . . . . . . . . . 9
Bidirectional radio system . . . . . . . . . . . . . . . . . . . . . 9
Unidirectional radio system . . . . . . . . . . . . . . . . . . . . 9
Initial operation . . . . . . . . . . . . . . . . . . . . . . . . . . . . . 9
Factory settings . . . . . . . . . . . . . . . . . . . . . . . . . . . . 10
Operating mode . . . . . . . . . . . . . . . . . . . . . . . . . . . 14
Menu structure . . . . . . . . . . . . . . . . . . . . . . . . . . . . 16
Menu mode . . . . . . . . . . . . . . . . . . . . . . . . . . . . . . . 17
DATE / TIME menu . . . . . . . . . . . . . . . . . . . . . . . . 17
PROGRAM menu . . . . . . . . . . . . . . . . . . . . . . . . . . 18
ADMINISTRATION menu . . . . . . . . . . . . . . . . . . . . 19
SETTINGS Menu . . . . . . . . . . . . . . . . . . . . . . . . . . 20
FUNCTION menu . . . . . . . . . . . . . . . . . . . . . . . . . . 24
Programming the transmitter . . . . . . . . . . . . . . . . . 26
Programming additional transmitters . . . . . . . . . . . 27
Synchronized programming mode . . . . . . . . . . . . . 28
Stopping programming mode (bidirectional) in
the transmitter . . . . . . . . . . . . . . . . . . . . . . . . . . . . 29
Approaching limit positions of
roller shutter / awning / Venetian blind . . . . . . . . . . 29
Operation of the transmitter using
Combio JA Pulse . . . . . . . . . . . . . . . . . . . . . . . . . . 32
Deleting positions/deleting transmitters . . . . . . . . . 32
Replacing the battery . . . . . . . . . . . . . . . . . . . . . . . . 33
Cleaning . . . . . . . . . . . . . . . . . . . . . . . . . . . . . . . . . . 34
Towns for the selection . . . . . . . . . . . . . . . . . . . . . . 34
EC declaration of conformity . . . . . . . . . . . . . . . . . 35
Certifi cation FCC / IC . . . . . . . . . . . . . . . . . . . . . . . . 35
Troubleshooting . . . . . . . . . . . . . . . . . . . . . . . . . . . . 36
Repair . . . . . . . . . . . . . . . . . . . . . . . . . . . . . . . . . . . . . 37
Manufacturer's address . . . . . . . . . . . . . . . . . . . . . . 38
Disposal /
notes on environmental protection . . . . . . . . . . . . 38
Contents
Contents
Ⓒ elero GmbH 4 | EN Ⓒ elero GmbH EN | 5
Safety instructions
Observance of these instructions is a
precondition for safe and fault-free operation and
for the product performing as intended.
• The operator/user shall have read the instructions fully and
understand them.
• The operator shall ensure that the instructions are available to
the user in a legible form.
• The operator shall ensure that all safety measures are observed
and complied with.
• The following safety and installation instructions relate to the
device and not to its accessories or the drive.
CAUTION!
Failure to observe these instructions may lead to
injury"
Observe all safety instructions.
• Never install or use damaged products.
• Only use unmodifi ed and compatible original parts.
• If the device is opened without permission or used in an improper
manner, or if it is incorrectly installed or operated, there is a risk
of damage to persons and property.
• The unit contains small parts which can be swallowed.
Transport
• The device may not be used should you have received the
device damaged, despite proper packaging. Complain about any
damage to the transport company immediately.
Installation
• Observe all regulations for installation.
Operation
• Use only in dry rooms.
• It must be possible to observe the equipment while it is
in operation if the equipment is controlled by one or more
transmitters.
• Keep control systems out of the reach of children and the
disabled.
• Dispose of used batteries properly.
Safety instructions for radio operation
Observe all safety instructions for radio operation.
Only use radio systems which are approved and can be operated
without interference.
• Radio systems must not be operated in areas where there is an
increased risk of interference (e.g. hospitals, airports).
• Remote control is permitted only for devices and equipment for
which a malfunction of the transmitter or receiver does not give
rise to a hazard to persons, animals or objects or where this
safety risk is covered by other safety equipment.
• The operator has no protection whatsoever against interference
by other telecommunication installations and local terminals (e.g.
also from radio installations which are operated properly in the
same frequency range).
• The range of the radio signal is limited by the government and
the structural conditions.
Safety instructions
Safety instructions for radio operation
Ⓒ elero GmbH 6 | EN Ⓒ elero GmbH EN | 7
Intended use
The TempoTel 2 is a multi-channel transmitter. This can be used
unidirectionally (compatible with the existing ProLine program)
or bidirectionally. The hand-held transmitter should only be used
for controlling roller shutters, Venetian blinds and sun protection
systems which are fi tted with elero radio receivers. Other uses or
use going beyond this is considered to be contrary to the intended
use.
The handheld transmitter is referred to in these instructions as the
“device”.
Exclusion of liability
elero GmbH accepts no liability for injury, damage or fi nancial
losses arising from modifi cations to the device, improper use or a
failure to observe the operating instructions. Liability for material
defects is excluded in such cases.
Scope of supply
TempoTel 2 (batteries contained in the device),
wall bracket, 2 wall plugs, 2 screws.
Technical Data
Name of device TempoTel 2
Operating voltage 3 V DC
Battery type 2 x LR06 (AA mignon)
Protection type IP20
Temperature range 0 to +55 °C
Radio frequency 867/868 MHz band
Dimensions in mm (handheld trans-
mitter)
L 150 x W 51 x H 26
Weight in grams (including battery) 140
Conformity
In a deviation, the following applies for the USA, Canada, Australia
and some nations in South America:
Radio frequency 915 MHz band
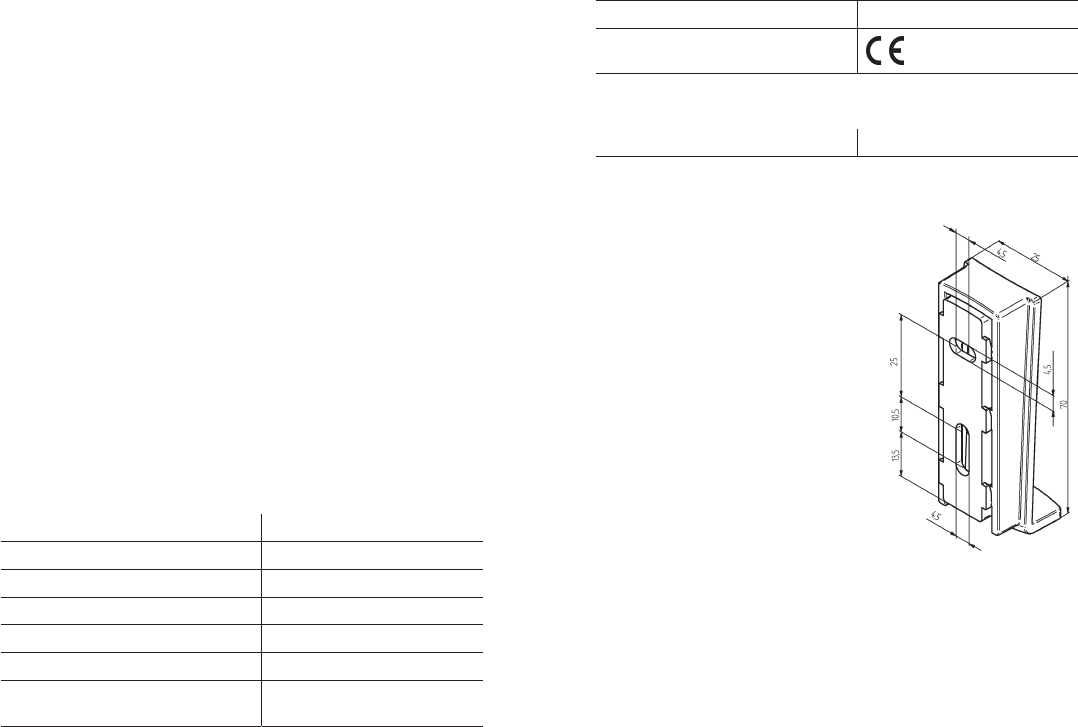
Mounting of wall bracket
The wall holder is made of a bottom
and a top.
• Make sure that the holes are not
drilled into electric cables when
fi tting the wall bracket!
• Before installing the unit in the
required position, check that
the transmitter and receiver are
functioning perfectly.
• Attach the bracket to the wall
with the wall plugs and screws
provided.
The top part of the wall bracket can be
moved.
Intended use
Mounting of wall bracket
Ⓒ elero GmbH 8 | EN Ⓒ elero GmbH EN | 9
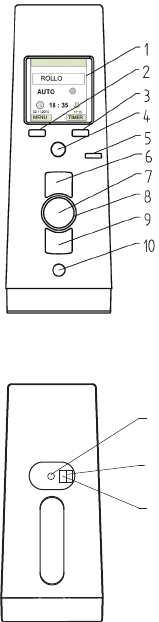
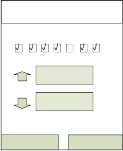
Description of the device
Front side of the device
1 Display
2 Left menu button
3 Right menu button
4 Joystick
5 Operating mode indicator
6 UP button
7 STOP button
8 Status indicator
9 DOWN button
10 Select button
Rear of the device
11 Programming button P
Only for experts:
12 DIP switch 1
13 DIP switch 2
Explanation of functions
Bidirectional radio system
A bidirectional radio system transmits radio signals to a radio
receiver and enables feedback from the radio receiver to the
transmitter. The radio signal can be sent directly to the target
receiver. If this is not possible then the radio signal is forwarded via
other bidirectional participants until the signal reaches the target
receiver. The target receiver carries out the command and sends a
confi rmation back to the transmitter.
Bidirectional radio operation is only possible if all participants are
bidirectional. Otherwise, the system is only unidirectional.
Unidirectional radio system
A unidirectional radio system transmits radio signals to radio
receivers. However, unlike in a bidirectional radio system, the radio
receiver cannot send any message back to the transmitter. It is also
not possible to transmit radio signals from radio receiver to radio
receiver.
Initial operation
Press a button to switch on the hand-held transmitter and illuminate
the display, status display and operating mode display. The
handheld transmitter is in automatic mode when fi rst switched on.
Note
Do not press the P button until the receivers are in
programming mode. The active channel selects a radio system
during programming. If the receivers are not in programming
mode, the transmitter channel changes to unidirectional mode.
Press the STOP and P buttons simultaneously for 6 seconds
until the status display lights to restore the initial condition.
Select the required language by navigating the menu during
initial operation.
Description of the device
Explanation of functions

Ⓒ elero GmbH 10 | EN Ⓒ elero GmbH EN | 11
Factory settings
Program
Individual
Off
Open 07:00 / Sat + Sun 08:00
Close 20:00
Astro
On
Lock time opening 06:30 / Sat + Sun 08:00
Lock time closing --:-- (off)
Astro evening
Off
Open 07:00 / Sat + Sun 08:00
Lock time closing --:-- (off)
Settings
Holiday Off
Astro offset In the morning +0:00 min
In the evening +0:30 min
Language German
Lighting (display) On
SU/WI time Automatic changeover ON
Intermediate position --- (without specifying run time)
Ventilation position --- (without specifying run time)
Program position ↓ End position (for timed switching
command
DOWN
)
Program position ↑ End position (for timed switching
command
UP
)
Priority Off (automatic switching commands
not prioritised)
Shading Off (automatic shading system not
deactivated with automatic timed
switching command
DOWN
)
Product selection Roller shutter
Note
Settings according to channels are only available if at least one
channel has been programmed.
Notice: Confi rming “Factory settings” in the menu FUNCTION
restores all the internal settings of the hand-held transmitter to
the factory settings (“Settings”, “Program”) except the setting for
deleting the channel.
Status indicator
A radio signal is indicated by the status display (LED ring around
the STOP button) lighting up. The various colours of the status
display mean:
Explanation of functions
Explanation of functions

Ⓒ elero GmbH 12 | EN Ⓒ elero GmbH EN | 13
Status indicator Meaning
Flashing orange Channel (sender) not taught-in into any receiver
Flashing orange
rapidly
Channel (transmitter) in bidirectional program-
ming mode. Operation of already programmed
receivers is not possible.
In group teach-in mode every 3 seconds (even
without button pressing)
Orange then green Channel (transmitter) is operating bidirectionally
and receiver has received the signal
Orange then fl ashing
red
Channel (transmitter) is operating bidirectionally
and one of the receivers has not received the
signal
Red then green Channel (transmitter) is operating bidirectionally
and receiver has received the signal, batteries
weak
Red then fl ashing red Channel (transmitter) is operating bidirectionally
and one of the receivers has not received the
signal, batteries weak
Green Channel (transmitter) is operating unidirection-
ally:
Transmit signal is being sent
Green with repeat,
then red (unidirec-
tional)
Channel (transmitter) is deleted
Alternating orange
and green (or red),
then red (bidirec-
tional)
Channel (transmitter) is deleted
Flashing red Batteries weak
The transmitting power or radio range will be reduced by declining
battery output. The display shows weak batteries with BAT. No
more functions are executed and there is no display if the voltage
drops below 2 V.
Group control unit
A group is understood to mean the control of several receivers
at the same time. The selected group is controlled by a travel
command. All 10 channels (transmitter) can be used for the group
control.
Any number of receivers can be programmed and controlled in each
channel.
Joystick
Pressing the joystick briefl y up and down enables you to select
from 10 channels. The channels are shown in the display with the
channel number or with the name input by the user.
An additional channel is reserved for the central channel (All) which
is automatically assigned to all individual channels. You can select
the central channel by moving the joystick briefl y to the left. When
the central channel is selected, this controls all radio channels
simultaneously.
If the hand-held transmitter has two or more bidirectional individual
channels, you can confi gure and select two group control systems
by moving the joystick briefl y to the right. The bidirectional channels
can be allocated for a group via the “Administration” menu.
Selection button
Pressing the selection button briefl y allows you to query the
current mode (automatic/manual) of the programmed receivers
(bidirectional receivers only) and the handheld transmitter channel.
Pressing the selection button for longer (approximately 1 second)
switches off automatic mode of the current bidirectional channel or
all unidirectional channels. The operating mode display lights red
and changes to MANUAL mode in the display. → The receiver now
only carries out manual travel commands and does not respond to
automatic travel commands.
Explanation of functions
Explanation of functions

Ⓒ elero GmbH 14 | EN Ⓒ elero GmbH EN | 15
Note
In unidirectional channels, only the automatic system for
timed switching functions in the transmitter is switched off
when these are in manual mode. The automatic shading
system stays switched on in unidirectional receivers.
In the case of bidirectional channels all the automatic
functions in the receivers are switched off in manual mode.
This means the receivers do not respond to automatic
timed switching commands and shading commands from
programmed sensors.
Upward travel of the receiver is initiated when the automatic
system is activated.
Pressing the selection button for longer (approximately 1 second)
switches off automatic mode of the current bidirectional channel or
all unidirectional channels. The operating mode display lights green
and the operating mode in the display changes to AUTO. → The
receivers now execute automatic and manual travel commands.
Pressing the selection button in the central channel for longer
(approx. 1 second at the most) changes the AUTO or MANUAL
operating mode for all the individual channels. Switching all the
channels to AUTO operating mode sets a different operating mode
for individual channels (AUTO and MANUAL),as indicated by the
orange operating mode display and the letters A+M in the display.
Operating mode
Each time a button is pressed, the following are shown in the
display: the currently selected channel, the current operating
mode (AUTO or MANUAL) and the symbol for the control status.
Activating a switching time function for a channel displays the type
of switching time function and the next automatic switching time.
Room allocation is also shown in the display if the channel is
allocated to a room in the editing menu.
Display in operating mode
0HQX 7LPHU
$872
.LWFKHQ
6KXWWHU
'67 %$7 36
ļ
Room allocation (optional)
Function bar:
↔ = Bidirectional
→ = Unidirectional
Channel number or name of the
channel
Operating mode, status symbol
Switching time type, next switching
time
Pressing the menu button “Timer” can activate or deactivate the
automatic timed switching function for the channel.
The display switches off after 2 minutes if no buttons have been
pressed.
Function bar abbreviations and display symbols
DST Daylight saving time activated
BAT Low battery charge
P Channel-related priority for timed switching command activated
S Channel-related activation or deactivation of the automatic shad-
ing system when automatic timed switching command is activated
Open
Down
Top end position
Bottom end position
Stop status
Wind interlock
Individual switching time ON
Astro switching time ON
Explanation of functions
Explanation of functions

Ⓒ elero GmbH 16 | EN Ⓒ elero GmbH EN | 17
Menu structure
Date/Time
Program
Administration
Settings
Function
Holiday
Factory setting
Lighting
Intermediate position or
Intermediate position 1 (in secs)
Ventilation/tilting position
or intermediate position 2
or fabric tensioning position
(in 0.1 seconds)
Program – Position ↓
Language
Astro
Astro
Individual
Version
Channels
Rooms
Groups
Reset
Summer/winter time
Channel selection
Product selection Product-specific transmitter configuration
(not for groups and central channel)
Priority Priority automatic commands On/Off
Astro evening Astro mode closing
Menu structure
Shading Activate auto shading for clock UP On/Off
Channel settings
Select town
Latitude / longitude
Program – Position ↑ Setting travel on time switching
command UP
Town selection by geographic data
with continental assignment for astro function
Freely selectable input of geographic data
Latitude, longitude and UTC for astro function
Switching time off All day switching times switched off in the channel
Astro offset Shift astro time for opening and closing
Individual switching times
Astro mode switching times
Channel-specific allocations
Room-specific allocations
Group allocations
Reset all allocations and names
Holiday mode On/Off
Setting a travel time to intermediate position
Setting a travel time to desired position
Setting travel on time switching
command DOWN
Language selection
Display lighting On/Off
Set summer/winter time changeover to automatic,
manual or changeover disabled
Reset all settings to factory settings
(without changing channel assignment)
Version details
ExpertAll on / off
Info on / off
Total reset
SRV
Menu mode
Pressing the “MENU” button opens the menu mode for setting the
time, date, switching times and function parameters.
You can make selections and changes in the menu using the left
and right menu buttons and the joystick. The keyboard layout is
specifi ed in the text above the menu button.
Joystick functions
Movement down Downward scrolling function or value change
(-)
In the Time Change menu: Selection of the
days
Movement up Upward scrolling function or value change (+)
In the Time Change menu: Selection of the
days
Movement to the left/
right
Changes the setting ranges or activates the
fi eld.
Note
If the hand-held transmitter is in the menu mode and the buttons are
not pressed for longer than 90 seconds, the menu is automatically
changed back to operating mode without saving the changes.
DATE / TIME menu
Setting the date and time. Using the automatic switching commands
requires a current setting.
When changing the battery, the settings of date and time are
retained.
Explanation of functions
Explanation of functions
Ⓒ elero GmbH 18 | EN Ⓒ elero GmbH EN | 19
PROGRAM menu
Once you have selected the channel, you
can set different switching times:
• Individual (each day can be selected)
• Astro (each day can be selected), set ON
at the factory
• Astro evening (each day can be selected)
The selection of the switching or lock times
assigned to days is performed using the
activation of the days of the week using the
joystick (up/down).
Switching time
example:
All switching times can additionally be switched off for all days per
channel, display "–:–" for deactivated switching times.
Note
It is not possible to select different switching times for specifi c
channels for several unidirectional function channels (switching time
applies to all unidirectional channels).
Individual
Automatic up and down movement at the set times and days.
Astro
Controls the up and down according to Astro function in accordance
with the sunrise and sunset times. Programmable lock times
prevent up and down movement occurring too soon.
A switching time adapted to the local conditions for the up and down
can be achieved using input of the geographic data by selection of a
town or inputting longitude and latitude. This can be supplemented
with an individual Astro offset (see settings).
Astro evening
This controls movement up according to the set switching time and
movement down according to Astro function. The programmable
lock time prevents movement down in accordance with the Astro
function occurring too soon.
&KDQJH %DFN
6ZLWFKLQJWLPHVFKDQQHO
0R7X:H7K)U6D6X
Lock time
This prevents movement up or down in accordance with the Astro
function occurring too soon. Changing lock times: "Program" menu,
select channel, Astro evening (or Astro), select "Change", select
days by moving joystick completely to the right, change lock times,
save.
ADMINISTRATION menu
You can select channels, rooms and groups and set their names
and assignments.
Channels
You can allocate a selected channel to a room or group
(bidirectional channels only). You can change the designation
individually for the selected channel. You can move the channel's
position in the list for the operating mode.
Rooms
Once you have designated individual rooms, you can allocate
channels to the selected room and change room designations.
However, no functions can be assigned.
Groups
You can select two groups, allocate individual channels to them and
change their group designation.
Note
Group allocation is only available if at least 2 bidirectional
radio channels exist. Group allocation is not possible for
unidirectional channels.
Reset
Selecting the menu item “Reset” resets all designations to the
factory settings (rooms, channel and group assignments, room
assignments). List items from channels are retained.
Explanation of functions
Explanation of functions
Ⓒ elero GmbH 20 | EN Ⓒ elero GmbH EN | 21
SETTINGS Menu
Adjusting the functions as required.
Settings for holidays, Astro, language, lighting and Summer/ Winter
time apply to all channels.
Submenu holiday
The holiday function simulates an occupied house while you are on
holiday. If this function is active, all the programmed switching times
are delayed by 0 to 30 minutes at random.
Submenu Astro
When the Astro menu is selected, the input of a town or the direct
input of longitude and latitude with time zone are available for
adapting the Astro switching times according to geographic data or
individual requirements.
Select town
Select a town using the geographic data. The towns are sorted
by continent. The continents are selected by moving the joystick
sideways; a town is selected by moving the joystick up or down.
The town of Kassel for Germany is set at the factory. See the
"Towns for selection" chapter for selectable towns.
Longitude / latitude
The direct input of geographic data for the Astro function is possible
using the "Longitude", "Latitude" and "Time zone" input fi elds.
When a town is selected, the geographic data of the selected town
are displayed. If data are entered directly which are different from
the town-related coordinates, the previous selection of the town is
cancelled.
Submenu Language
You can select the language of the menu texts from a list:
• German
• Spanish
• Dutch
• Polish
• English
• Italian
• Swedish
• French
• Portuguese
• Danish
Submenu Lighting
Switching the display background lighting on and off
This is switched off automatically if no button is pressed for 5
seconds. The lighting function is switched on at the factory.
Submenu SU/WI time
Su/Wi designates the automatic Summer/Winter time changeover.
The automatic changeover is activated at the factory; the timer
adjusts automatically.
In the menu, you can select between an automatic Summer / Winter
time changeover in accordance with country-specifi c rules or a
manual Summer time changeover for areas without defi ned rules
for the Summer time. Automatic Summer time changeover is not
available in these areas. Both changeover types can be deactivated
with resetting to the local standard time.
An activated Summer time is indicated in the function bar of the
display with "DST" (daylight saving time).
Note
If the automatic Summer time changeover cannot be selected,
a possibly necessary manual Summer time setting must
always be made using the "Su/Wi time" menu in order to
prevent unwanted switching time offsets of the Astro function
(closing and opening too soon).
Submenu Channel settings
Individual or local adjustment of the Astro switching times with
the option of offsetting the opening and/or closing time by up to a
maximum of ± 120 minutes.
The following settings apply to each channel.
Possible running time to the intermediate position: from 0 to 360
seconds, running time to the ventilation position: roller shutters 0 to
120 seconds, Venetian blinds 0 to 180 seconds.
In addition, you can program intermediate/ventilation/tilting
positions. You can also program on the receiver.
Explanation of functions
Explanation of functions

Ⓒ elero GmbH 22 | EN Ⓒ elero GmbH EN | 23
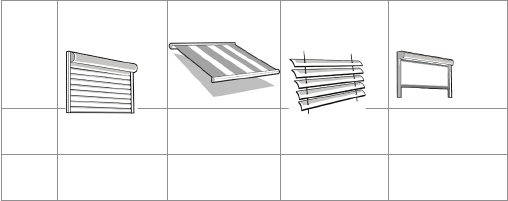
Product selection
After selection of a channel, a product-specifi c designation of
individual functions and a maximum running time can be assigned
to the channel. Product-specifi c basic characteristics of Venetian
blind products as compared with other product groups are
recognised and confi gured automatically.
Application Available setting
Roller shutter Intermediate position and ventilation position
Awning Intermediate position and cloth tensioning
position
Interior shading Intermediate position 1 or intermediate position 2
Venetian blinds Intermediate position and turning position
Intermediate position or intermediate position 1 (in seconds)
The transmitter can store a run time for the intermediate position for
each channel. A common run time for the intermediate position can
be set for unidirectional channels.
After selection of a channel, a running time for the start from
an intermediate position from the top end position can be set
in 1 second steps using the joystick (up/down) or using the UP/
DOWNbuttons.
Approach of the intermediate position (according to the preset
running time): short double press of the DOWNbutton.
The intermediate position run time is set at 0 (---) at the factory.
Ventilation, tilting, fabric tautening position, intermediate
position 2 (in tenths of seconds)
The transmitter can store a running time for this position for each
channel. A common run time can be set for unidirectional channels.
After selection of a channel, a running time for the approach of a
ventilation position (roller shutter) or tilting position (Venetian blind)
from the bottom end position can be set in 0.1 second steps using
the joystick (up/down) or using the UP/DOWNbuttons.
Approach of the ventilation or tilting position (according to the preset
running time): short double press of the UPbutton.
The ventilation position running time is set to 0 (---) at the factory.
Program position ↓ (DOWN)
After selection of a channel, the way an automatic closing command
is carried out (if the timed switching function for the channel is
activated) can be selected. You can set a common program position
for unidirectional channels.
End position Roller shutter, awning, Venetian blind or interi-
or shading moves to the bottom end position
Intermediate position
/ intermediate posi-
tion 1
Roller shutter, awning or Venetian blind moves
to the programmed position or a taught-in
runtime
Interim position 2 /
ventilation / turning /
cloth tensioning
position
Roller shutter, awning, Venetian blind or inte-
rior shading moves to the bottom end position
and then to the programmed position
Program position ↑ (UP)
After selection of a channel, the way an automatic opening
command is carried out (if the timed switching function for the
channel is activated) can be selected. You can set a common
program position for unidirectional channels.
End position Roller shutter, interior shading, Venetian
blind or awning moves to the top end position
(factory setting)
Interim position 2 /
ventilation / turning /
cloth tensioning
position
Roller shutter, awning, Venetian blind or interior
shading moves to the programmed position or
travels for the programmed running time
Explanation of functions
Explanation of functions
Ⓒ elero GmbH 24 | EN Ⓒ elero GmbH EN | 25
Priority
Once you have selected a channel, you can set an activated
priority, which means that automatic time switching commands from
the hand-held transmitter channel are given priority in all receivers
and accepted even the MANUAL operating mode of receivers.
Automatic switching commands are prioritised in the factory
settings.
The activated prioritisation of timed switching commands is
indicated in the function bar of the display by a "P".
In all unidirectional channels only a common setting of the priority is
possible.
Shading
A time-controlled down command switches off the automatic
shading system (privacy protection). A time-controlled open
command switches on the automatic shading system again.
Requirements: The setting for shading is on "Automatic ON".
The shading setting is set to “Automatic OFF” at the factory.
The activated shading function is indicated in the function bar of the
display by an "S".
In all unidirectional channels only a common setting of the
automatic shading function is possible.
Astro offset
Individual or local adjustment of the Astro switching times with
the option of offsetting the opening and/or closing time by up to a
maximum of ± 120 minutes.
FUNCTION menu
Submenu Factory settings
Resets all settings except the receiver assignments linked to
channels to the factory settings. All the initial operation steps must
then be carried out.
During the initial commissioning, the following must be set using the
automatic menu guidance:
"Language setting" -> "Town selection" -> "Date/time".
Submenu expert
The Expert menu is usually not released. It can be released by
pushing the following key combination in the dialogue of the menu
"Version" for 3 seconds:
fi rst <Menu key left> + then <Menu key right>.
The menu "Experts" is called and can be reached through the menu
"Function" until the display switches off (2 minutes without key
operation).
All On/Off
According to the factory settings, the central channel is available:
"All on".
If this is not desired or does not seem sensible (e.g. for mixed
operation with roller shutters and awnings), this function can be
switched off with "All off".
When selecting the setting "All off", the control and setting options
of the central channel are deactivated.
Info On/Off
Activation or deactivation function for the cyclic request of the
individual channels when starting during a movement in the group
or the central channel. Depending on the individual channels in the
group or the central channel, deactivation can clearly reduce the
radio traffi c when sending in the group. In case of deactivation, the
position display is updated by the internal runtime of the transmitter.
Total reset
Note:
• All data and taught-in receivers re deleted!
• Internal memory is reformatted.
• Date/time is reset to 01.01.2015, 06:00 hours.
Explanation of functions
Explanation of functions
Ⓒ elero GmbH 26 | EN Ⓒ elero GmbH EN | 27
SRV
Service information.
Submenu version
Indication of the current fi rmware version.
Programming the transmitter
Requirement
The receiver is installed. Check whether the channel has been
deleted or is in the correct mode according to the status display.
Stand in front of the curtain to be programmed while programming.
1. Where electrical receivers have already been installed, switch
the circuit breaker off and on again after a few seconds.
The receiver is now in programming mode for about 5 minutes.
2. Press the programming button P on the rear of the device briefl y
(approximately 1 second) until the status display lights up briefl y.
The curtain moves up and down for approximately two minutes,
showing that the receiver is in programming mode.
3. Press the UP button as soon as the curtain starts moving in
upwards direction (within 1 second at the most). The status
indicator is lit briefl y. The curtain stops briefl y, starts moving
again and then moves downwards.
4. Press the DOWN button as soon as the curtain starts moving in
downwards direction (within 1 second at the most). The status
indicator is lit briefl y. The curtain stops. The transmitter channel
has been programmed.
Note
Programming will have to be repeated if the curtain does not
stop.
A bidirectional programming process in the handheld
transmitter can be cancelled by pressing the STOP button for
6 seconds.
Programming additional transmitters
Note
Multiple receivers connected to the same supply are all
simultaneously ready for programming for approximately 5
minutes after connection to the mains and signals this by a
brief run downwards.
If the P button is now pressed on the transmitter, all receivers
start the programming mode simultaneously (ascents/
descents). An offset is created between the receivers by
randomly different pauses between the ascents/descents. The
longer programming is delayed, the greater the offset will be.
You can stop the short opening and closing movements by
briefl y pressing the STOP button on a transmitter which has
already been programmed. The programming mode in the
receiver is interrupted.
The transmitter can now be assigned without having to
disconnect individual receivers. If the curtain moves in the
wrong direction, delete the transmitter and program it again (→
see Deleting transmitters)..
To program additional transmitters to one receiver:
1. Press the UP, DOWN and the programming button P (back of
device) simultaneously (for 3 sec.) on a transmitter, which has
already been programmed to the receiver. The status indicator is
lit briefl y. The receiver is now ready for programming and briefl y
moves down.
2. Press the programming button P on the transmitter to be
programmed until the status display lights briefl y. The receiver is
now in programming mode (movements up and down).
3. Press the UP button as soon as the curtain starts moving in
upwards direction (within 1 second at the most). The status
indicator is lit briefl y. The curtain stops briefl y, travels further,
stops and then travels in the downwards direction.
Explanation of functions
Explanation of functions
Ⓒ elero GmbH 28 | EN Ⓒ elero GmbH EN | 29
4. Press the DOWN button as soon as the curtain starts moving in
downwards direction (within 1 second at the most). The status
indicator is lit briefl y. The curtain stops. The transmitter channel
has been programmed.
If more than 10 bidirectional receivers are being programmed in one
channel at the same time, the transmitter channel in programming
mode switches to group mode. Group mode is indicated by fast
fl ashing with pauses.
Programming in group mode is completed after a 2-minute pause or
pressing the STOP button for 6 seconds.
Note
A jogging mode for Venetian blinds for quickly reaching
receivers which are further away is not possible in a
bidirectional transmitter channel with more than 10
programmed receivers.
Synchronized programming mode
For programming one transmitter to multiple receivers at the same
time.
1. Press the DOWN and programming P (rear of the device)
buttons simultaneously (for 3 seconds) on a transmitter that has
already been programmed to the receivers. The status display
fl ashes. The receivers are now in programming mode.
2. For bidirectional operation only: press the programming button
P on the transmitter to be programmed until the status display
lights up briefl y. The receivers are now in programming mode
(ascents/descents).
3. Press the UP button as soon as the curtain starts moving in
upwards direction (within 1 second at the most). The status
indicator is lit briefl y. The curtains stop briefl y, start moving
again, stop and then move downwards.
4. Press the DOWN button as soon as the curtain starts moving in
downwards direction (within 1 second at the most). The status
indicator is lit briefl y. The curtains stop moving. The transmitter
channel has been programmed.
Stopping programming mode (bidirectional) in
the transmitter
Press the STOP button and hold for at least 6 seconds until the
status display lights up orange.
Approaching limit positions of
roller shutter / awning / Venetian blind
Requirement
The transmitter/transmitter channel has been programmed.
The end positions of the drive are set.
Approaching the lower end position (roller shutter/awning)
Press the DOWN button briefl y. The curtain descends to the lower
end position/the awning extends fully.
Approaching the lower end position (blind)
Press the DOWN button until the status display lights briefl y. The
curtain approaches the lower end position.
Press the DOWN button only briefl y (jog mode on JA, pulse mode
for Combio Pulse), the curtain starts up briefl y and stops again.
Approaching the upper end position (roller shutter / awning)
Press the UP button briefl y. The curtain approaches the upper end
position/the awning retracts.
Approaching the upper end position (blind)
Press the UP button until the status display lights briefl y. The curtain
approaches the upper end position.
Explanation of functions
Explanation of functions
Ⓒ elero GmbH 30 | EN Ⓒ elero GmbH EN | 31
Press the UP button only briefl y (jog mode on JA, pulse mode for
Combio Pulse), the curtain starts briefl y and stops again.
Intermediate positions of the curtains
Roller
shutter
Awning Venetian
blind
Interior
shading
Pos▼ Interim
position
Interim
position
Interim
position
Interim
position 1
Pos▲ Ventilation
position
-- /fabric
tensioning
Turning
position
Interim
position 2
Programming intermediate positions in the receiver
Requirement
The transmitter/transmitter channel has been programmed. The
end positions of the drive are set. The shutters are in the top end
position.
1. Move the curtain to the required position with the DOWN button.
Keep pressing the DOWN button.
2. Also press the STOP button. The curtain stops. The status
indicator is lit briefl y.
The intermediate position is now programmed.
Programming the ventilation/tilting position in the receiver
Requirement
The transmitter/transmitter channel has been programmed. The
end positions of the drive are set. The curtain is in the bottom end
position.
• Move the curtain in the UP direction using the UP button until the
ventilation slots open, or the slats have turned. Keep pressing
the UP button during operation. Also press the STOP button.
The curtain stops. The status indicator is lit briefl y.
The ventilation/tilting position is programmed.
Moving to intermediate positions
Requirement
The transmitter/transmitter channel has been programmed. The
curtain is in the top end position.
1. Press the DOWN button briefl y twice. The status indicator is lit
briefl y.
2. The shutters will move to the registered intermediate position.
In the case of Venetian blinds, the slats turn automatically after
reaching the intermediate position if a turning position has been
programmed. If no intermediate position is programmed, the
curtain travels to the lower end position (not if Combio Pulse is
in use).
Moving to ventilation / turning position
Requirement
The transmitter/transmitter channel has been programmed. The
curtain is in the bottom end position.
1. Press the UP button twice briefl y. The status indicator is lit
briefl y.
2. The shutters will move to the registered ventilation / turning
position. If no ventilation/turning position is programmed, the
curtain travels to the upper end position (not if Combio Pulse is
in use).
Explanation of functions
Explanation of functions
Ⓒ elero GmbH 32 | EN Ⓒ elero GmbH EN | 33
Operation of the transmitter using
Combio JA Pulse
A Combio 867/868/915 JA Pulse can be used for the precise
adjustment of the slats for Venetian blind drives.
The preset pulse time of Combio Pulse is cycled by pressing the UP
or DOWN button.
The pulse time can be changed by the user. Keep the <STOP> and
<UP> buttons on a programmed transmitter pressed for 6 seconds
for this. The drive starts to move in small pulses. As soon as the
curtain has travelled the required distance, release the UP button,
then release the STOP button. The new pulse time is saved. The
new pulse time corresponds to the sum of all pulse times during
the programming of the pulse time. The Combio JA Pulse ends the
programming of the pulse time after 30 pulses.
Deleting positions/deleting transmitters
Deleting the intermediate position from the receiver
1. Press both the <STOP> button and the <DOWN> button.
2. Hold this button combination for approximately three seconds.
The status indicator is lit briefl y.
Deleting the ventilation/tilting position in the receiver
1. Press both the <STOP> button and additionally the <DOWN>
button.
2. Hold this button combination for approximately three seconds.
The status indicator is lit briefl y.
Deleting a transmitter channel in the receiver
1. Press both the <STOP> button and additionally the
<Programming button P> (back of the device).
2. Keep this button combination pressed for approximately 6
seconds until the status display lights orange briefl y and then
lights red. In unidirectional radio operation, the status display
lights for 6 seconds: fi rst green briefl y twice and then red.
The channel in the transmitter is also deleted.
Deleting all transmitters from the receiver
1. Press both the <STOP> button + the <programming button P>
(on the back of the device) + the <UP> button + the <DOWN>
button.
2. Hold this button combination for approximately 6 seconds.
The status display lights orange/green briefl y twice, followed by
red (bidirectional).
The channel in the transmitter is also deleted.
In unidirectional radio operation, the status display lights for 6
seconds: fi rst green briefl y twice and then red.
Expert settings
DIP switch 2 on the rear of the device, beneath the cover:
switch up: Off (bidirectional and unidirectional operation possible,
preset), switch down: On (only bidirectional operation possible). DIP
switch 1: OEM setting.
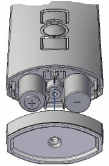
Replacing the battery
Batteries can be removed easily by the end user according to the
battery directive 2013/56/EU.
Replace batteries only with batteries of identical type.
• Screw open the underside of the unit and open the lid.
• Remove the fl at batteries.
• Insert 2 new batteries of the same type LR06, AA, with 1.5 Volt
rated voltage each in the correct position.
Use of of accumulator cells is excluded.
• Attach the lid again and connect it to the
device by the screw.
Do not dispose of fl at batteries in the household
waste!
Explanation of functions
Replacing the battery

Ⓒ elero GmbH 34 | EN Ⓒ elero GmbH EN | 35
EC declaration of conformity
elero GmbH hereby declares that the TempoTel 2 complies with
the basic prerequisites and the other relevant provisions of the EC
directives. The complete declaration of conformity can be found in
the download area of our website.
Certifi cation FCC / IC
US: Addendum to the manual
FCC / IC approval
This device (TempoTel 2) complies with part 15 of the FCC Rules
and RSS-210. Operation is subject to the following two conditions:
(1) This device may not cause harmful interference, and
(2) this device must accept any interference received, including
interference that may cause undesired operation.
Changes or modifi cations not expressly approved by the
manufacturer could void the user‘s authority to operate the
equipment.
CA: Addendum au manuel
Homologation FCC / IC
Le présent appareil (TempoTel 2) est conforme aux FCC part 15
et CNR-210 d‘Industrie Canada applicables aux appareils radio
exempts de licence. L‘exploitation est autorisée aux deux conditions
suivantes :
(1) l‘appareil ne doit pas produire de brouillage, et
(2) l‘utilisateur de l‘appareil doit accepter tout brouillage
radioélectrique subi, même si le brouillage est susceptible d‘en
compromettre le fonctionnement.
Cleaning
Clean the unit with a damp cloth. Do not use any cleaning agents or
solvents. This may attack the plastic.
Towns for the selection
EUROPE
Trondheim, Oslo, Oestersund, Stockholm, Helsinki, Moscow,
Kobenhaven, Glasgow, London, Manchester, Amsterdam, Bruxelles,
Hamburg, Kassel, Berlin, Köln, Dresden, Frankfurt, Nürnberg,
Stuttgart, München, Warzawa, Krakow, Praha, Kiev, Wien, Linz,
Innsbruck, Graz, Budapest, Basel, Zürich, Bern, Geneve, Lille,
Paris, Brest, Lyon, Toulouse, Marseille, Venezia, Milano, Firenze,
Roma, Napoli, Zagreb, Ljubljana, Bucaresti, Istanbul, Ankara, Izmir,
Athens, La Coruna, Madrid, Malaga, Las Palmas, Lisboa.
NORTH AMERICA
Vancouver, Montreal, New York, San Francisco, Denver, Atlanta,
San Diego, Dallas, Miami, Mexico City.
SOUTH AMERICA
Medelin, Lima, Santiago DC, Sao Paulo, Buenos Aires.
AFRICA
Casblanca, Tunis, Cairo, Cape Town.
ASIA
Beijing, Shanghai, Hong Kong, Manila, Singapore, Mumbai, New
Delhi, Tehran.
AUSTRALIA / NEW ZEALAND
Perth, Sydney, Brisbane, Christchurch.
Cleaning
EC declaration of conformity

Ⓒ elero GmbH 36 | EN Ⓒ elero GmbH EN | 37
Troubleshooting
Fault Cause Remedy
Drive does not run;
status display does
not light up
1. Batteries are ex-
hausted
2. Batteries are incor-
rectly installed
1. Insert new batteries
2. Insert batteries
correctly
Drive does not run;
status display lights
up red or fl ashes
orange
Unidirectional:
Status display lights
green
1. The receiver is
outside radio range.
2. Receiver not operat-
ing or faulty
3. Receiver not yet
programmed
1. Reduce distance to
the receiver
2. Switch on or re-
place receiver
3. Program receiver
Drive operates in the
wrong direction
Directions are incor-
rectly allocated
Delete transmitter and
reprogram
Desired drive does
not run
Incorrect group or
channel selected
Select correct group
or channel
End positions are
approached inaccu-
rately
End positions not
yet set
Have the end
positions set by a
specialist in accord-
ance with the product
instructions
The hand-held trans-
mitter does not carry
out the set switching
commands
1. The date and time
are not set
2. "MANUAL" operat-
ing mode is set
3. The timed switching
functions for specifi c
channels are not
activated
1. Setting the date
and time
2. Set “AUTO” operat-
ing mode
3. Activate the timed
switching function
for the channel
Fault Cause Remedy
The hand-held
transmitter does not
carry out the set
switching commands
accurately
Holiday function is
switched on
Switch holiday func-
tion off
The Astro program
switches inaccu-
rately
1. Date set incorrectly
2. Holiday function is
switched on
3. Astro offset is set
1. Set correct date
2. Switch holiday
function off
3. Adjust Astro offset
There is no timed
switching function for
automatic switching
commands after the
batteries have been
replaced
Power supply inter-
rupted for too long
Setting the date and
time
Repair
If you have any questions, please refer to your specialised
company.
Please always state the following information:
• Item number and item designation on the nameplate
• Error type
• Unusual events preceding fault
• Accompanying conditions
• Own suspicion
Troubleshooting
Repair

Ⓒ elero GmbH 38 | EN Ⓒ elero GmbH EN | 39
Manufacturer's address
elero GmbH
Antriebstechnik
Linsenhofer Straße 65
72660 Beuren
Deutschland / Germany
Tel: +49 7025 13-01
Fax: +49 7025 13-212
info@elero.de
www.elero.com
Please visit our website if
you require a contact outside
Germany.
Disposal /
notes on environmental protection
From implementation of the European directives 2002/96/EC and
2006/66/EC in national law, the following applies:
Electrical and electronic devices as well as batteries must not be
disposed of in the household waste. The consumer is
required by law to return electrical and electronic devices
as well as batteries to the public collection points provided
for this or the point of sales at the end of their service lives.
Details on this are provided for by the respective national law.
The icon on the product, the operating instructions or the packaging
refers to these provisions. Reuse, recycling or other forms
of use of old devices or batteries make an important
contribution to protect our environment.
Manufacturer's address
Contents

www.elero.com