elero Antriebstechnik 2871X09X Low power transceiver for screen market User Manual MultiTecTouch 868 GA 182032001 EN 0715 indd
elero GmbH Antriebstechnik Low power transceiver for screen market MultiTecTouch 868 GA 182032001 EN 0715 indd
User Manual
182032001_EN_0715
Operating instructions
Keep the operating instructions in a safe place!
MultiTec Touch-868 /-915
287150001 | 287160001 | 287170001

2 | EN Ⓒ elero GmbH Ⓒ elero GmbH EN | 3
Contents
1 General 7
1.1 Notes on the Operating Instructions 7
1.2 Standards and Directives 7
1.3 Intended use 8
1.4 Foreseeable misuse 8
1.5 Warranty and liability 9
1.6 Customer service of the manufacturer 9
2 Safety 10
2.1 General safety instructions 10
2.2 Safety principles 10
2.3 General operational regulations 11
2.4 Requirements for the personnel 12
2.5 Safety instructions for technical condition 12
2.6 Safety instructions for operation 13
3 Product description 13
3.1 Power supply and commissioning 15
3.2 Operation 16
3.3 Operating Principle 17
3.4 Bidirectional Radio System and Routing 17
3.5 Menu Guidance 18
3.6 Settings→Channels→Channel→
Administration 27
3.7 Settings→Channels→Channel→
Programs 29
3.8 Settings→Channels→Channel→
Program channel 30
3.9 Settings→Channels→Channel→
Conguration 31
Translation from the original German version.
All other documents in different languages are translations of the original
version.
All rights reserved in the event of registration of patents, working models or
design patents.
4 | EN Ⓒ elero GmbH Ⓒ elero GmbH EN | 5
3.10 Settings→Channels→Channel→
Delete channel 33
3.11 Settings→Channels→Channel→
Activate programming mode 33
3.12 Settings→Centralchannel 34
3.13 Settings→Productinfo 37
4 First programming of the transmitter
in a channel 39
4.1 Program further transmitters into a channel. 41
4.2 Stopping programming mode (bidirectional)
in the transmitter 42
4.3 Approaching limit positions of roller
shutter / awning / Venetian blind 43
4.4 Operation of the MultiTec Touch-868 /-915 with Com-
bio JA Pulse 45
4.5 Moving to intermediate position / ventilation
position / turning position 46
4.6 Delete transmitter channel in the receiver or
Delete all transmitters in the receiver 47
5 Specications 47
6 Cleaning and maintaining the device 48
7 Certication 49
7.1 EC Declaration of Conformity 49
7.2 CerticationFCC/IC 49
8 Troubleshooting 50
9 Repair 51
10 Manufacturer's address 51
11 Disposal / notes on environmental protection 52
1 General
1.1 Notes on the Operating Instructions
The content structure is based on the radio wall transmitter
MultiTec Touch-868 /-915 (hereinafter referred to as
"Device").
The manufacturer reserves the right to make changes to the
SpecicationsstatedintheseOperatingInstructionsatany
time. These may, in individual cases, be different from the
respective device version, however the functional informa-
tionwillnotundergosignicantchangesorbecomeinvalid.
ThecurrentversionoftheSpecicationsmayberequested
from the manufacturer at any time. No claims may be as-
serted against the manufacturer as a result of the preceding
sentence. Deviations from text or picture statements are
possible and depend on the technical development, fea-
tures, and accessories of the device. Deviating information
on special versions will be explained by the manufacturer
in the sales documentation. Other information shall remain
unaffected by these provisions.
1.2 Standards and Directives
During the design process, the basic health and safety re-
quirements of the applicable laws, Standards and Directives
werecompliedwith.Thesafetyisconrmedbythedeclara-
tion of conformity (see Chapter 7, Declaration of Conform-
ity). All safety information in these Operating Instructions
refer to the laws and regulations currently applicable in
Germany. All instructions in the Operating Instructions shall
be observed without limitation and at any time. Beside the
safety instructions contained in these Operating Instruc-
tions, the provisions for accident prevention, environmental
protection and occupational safety, which are applicable for
6 | EN Ⓒ elero GmbH Ⓒ elero GmbH EN | 7
the operating site, must be observed. Provisions and Stand-
ards for the safety rating can be found in the EC Declaration
of Conformity
1.3 Intended use
The device is intended to be used in a domestic distribu-
tion environment (to control electrically driven shutters,
sunblinds, sunshades, roller blinds, electrical lighting and
heating equipment). It is a multi-channel radio wall transmit-
ter.Furthereldsofapplicationhavetobearrangedwith
the manufacturer, elero GmbH Antriebstechnik (see Chap-
ter 10, Manufacturer's Address).
The operator will be solely responsible for damages result-
ing from improper use of the device. The manufacturer can-
not be held liable for personal or material damages caused
by misuse or procedural errors, and by improper operation
and commissioning.
Onlyifusedaccordingtothespecicationsoftheseoperat-
ing instructions the safe and proper use and safe operation
of the device are guaranteed.
1.4 Foreseeable misuse
A use which deviates from the intended use stated by the
manufacturer, elero GmbH Antriebstechnik (for address,
see Chapter 10, Manufacturer's Address), is deemed fore-
seeable misuse.
1.5 Warranty and liability
Principally, the General Terms and Conditions of the manu-
facturer, elero GmbH Antriebstechnik (see Chapter 10,
Manufacturer's Address for address), apply. The terms and
conditions are part of the sales documents and handed over
to the operator upon delivery. Liability claims for personal or
material damages are excluded when they can be attributed
to one or more of the following causes:
Customer has opened the device (seal is broken)
Unintended use of the device
Improper installation, commissioning, or operation of the
device
Structuralmodicationstothedevicewithoutthewritten
consent of the manufacturer
Operation of the device with improperly installed con-
nections, defective safety devices or improperly installed
safeguards
Non-observance of the safety provisions and instructions
of these Operating Instructions
Exceeding of the technical data indicated
1.6 Customer service of the manufacturer
The device should only be repaired by the manufacturer
in case of a failure. The address for sending to customer
service, see chapter 10, Manufacturer's Address.

8 | EN Ⓒ elero GmbH Ⓒ elero GmbH EN | 9
If you have not purchased the device directly from elero,
please contact the supplier of the device.
When requesting customer service, keep the serial number
at hand. It is located on the rating plate on the rear of the
device.
2 Safety
2.1 General safety instructions
The Operating Instructions contain all safety instructions
which must be observed in order to prevent dangers inher-
ent to handling the device in connection with the drives and
components to be controlled in the individual life phases. A
safe use of the device can only be ensured when all given
safety instructions are observed.
2.2 Safety principles
The device is designed according to state of the art and
recognized safety standards and is safe to operate. Dur-
ing the design process of the device, the basic health and
safety requirements of the applicable laws, Standards and
Directives were complied with. The safety of the device is
conrmedbythedeclarationofincorporation.
Any information relating to safety are based on the currently
valid regulations of the European Union. In other countries,
it must be ensured by the operator that the applicable laws
and state regulations are complied with.
In addition to the safety instructions in this operating
manual, the general regulations for accident prevention and
environmental protection must be observed and adhered to.
Thedeviceistobeusedonlyinatechnicallyawlessstate
as well as in accordance with the requirements, conscious-
ness of risk and in compliance with the operating instruc-
tions. The device is designed for use as described in chap-
ter "Intended Use". In case of improper use, threats to life
and limb of the user or third parties or damage to the device
or other property may occur. Accidents or near accidents
when using the device, that have resulted or could have
resulted in personal injury and / or damage to the environ-
ment, shall be reported to the manufacturers directly and
immediately.
All safety precautions listed in the operating instructions and
on the device are to be observed. In addition to these safety
instructions, the operator shall ensure that all national and
international regulations in force in the country of use, as
well as other binding regulations for occupational safety, ac-
cident prevention and environmental protection are met. All
works on the device must be carried out by trained, safety
technically trained and authorized personnel.
2.3 General operational regulations
The operator is obliged to use the device only in a
proper and safe condition. He must ensure that in addi-
tion to the safety instructions in the operating manual,
the general safety and accident prevention regulations,
the requirements of DIN VDE 0100, and the rules of the
environmental protection of the country of use are re-
spected and adhered to.
The operator is responsible for ensuring that all work is
carried out with the device by trained, safety instructed
and authorized personnel.
10 | EN Ⓒ elero GmbH Ⓒ elero GmbH EN | 11
The operator of the device or the personnel authorized
by him is ultimately responsible for accident-free opera-
tion.
2.4 Requirements for the personnel
Any person who is assigned to work with the device
must have read and understood the entire manual be-
fore performing the relevant work. This is true even if the
person has already worked with such a device or has
been trained for it.
All work at the device must be carried out by trained,
safety technically trained and authorized personnel.
Before starting any activities, the staff must be made
familiar with the dangers when handling the device.
All persons must only perform work according to their
qualications.Theresponsibilitiesoftherespectivestaff
mustbeclearlyspecied.
Any personnel who have been assigned to work with the
device must not have a physical disability, the attention
and judgement must not be temporarily or permanently
restricted (e.g. due to fatigue).
The handling of the device and all assembly, disassem-
bly and cleaning work by minors or persons who are
impairedbyalcohol,drugsormedicationinuence,is
not permitted.
2.5 Safety instructions for technical condition
The operator is required to operate the device in a
proper and safe condition. The technical condition must
comply with the statutory requirements at all times.
If danger to persons or changes are recognized in op-
erating performance, the device must be immediately
taken out of service and reported to the operator of the
system.
Nochangestothedevice,additionsormodications
should be performed without prior approval of the manu-
facturer.
2.6 Safety instructions for operation
The user of the device is required to satisfy himself of
the safe and proper condition of the device prior to the
rstuse.
That is also necessary at regular time intervals during
theoperationofthedevicewhichcanbespeciedbythe
operator. The operator is responsible for performance
before commencement of operation.
3 Product description
The MultiTec Touch-868 /-915 is an easy to handle multi-
channel radio wall transmitter.
The device permits comfortable, wireless controlling of
elero receivers in roller shutter, Venetian blind and sun
protection facilities. Control of bidirectional receivers such
as the elero Combio LI ET/MT, Combio HE and Unio-868
as well as connected devices is possible as well (electrical
light, electrical heating).
12 | EN Ⓒ elero GmbH Ⓒ elero GmbH EN | 13
Data communication takes place bidirectionally only (com-
patible with the elero ProLine 2 product range).
The environment for intended use is the residential and
business area, as well as small industry.
The main functions result from the setting options for
20 individual channels for bidirectional communication
between transmitters and receiver(s)
5 group channels (combination of taught-in individual
channels to one group channel, up to 20)
1 central channel for shared connection to all 20 indi-
vidual channels
Selection of the individual channels, group channels or
the central channel with display function
Information on executed commands or feedback by
display symbols
Menu-guided function settings with plain text displays,
channel and product management with editing options.
Comprehensive functions based on the integrated timer,
including random program, consideration of daylight sav-
ings time, switching times according to seasonal sunrise
and sunset (astro function).
Do not use any pointy objects, to avoid scratching of the
touch screen.
Observe that the touch screen does not get into contact
with water. Moisture or contact with water may cause mal-
functions of the touch screen.
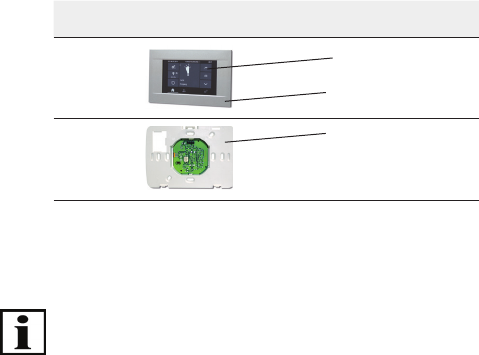
3.1 Power supply and commissioning
Setupofthedevice(gureofthereverse/holdingframe)
Mounting of the wall holding frame
Device declaration
(Figure display, holding frame)
Ddisplay
USB-connection
(covered under frame)
Mains unit
(integrated into the
holding frame)
Fig. 1 Device views
Warning:Dangertolifefromelectricshockorre!
Have mounting performed by an electrician only!
Have the mains unit in a suitable concealed wall socket
supplied with 230 Volt (if possible deep design, switching/
junction box) connected to the outer conductor L (phase)
and neutral conductor N by an authorised electrician.
Securing the holding frame with the two enclosed dowels
and screws. Observe live lines when drilling the holes.
To separate the operating unit from the holding frame,
use a matching screwdriver to carefully push the upper
middle latching tab of the operating unit down and to
release the operating unit from the wall vertically.
The DIP switches on the reverse of the PCB have no func-
tion but must be put in the "Off" position.
14 | EN Ⓒ elero GmbH Ⓒ elero GmbH EN | 15
The battery contained in the operating unit of the device
serves as a buffer for interruption of the power supply and
ensures maintenance of the clock function. The typical life
span of the batteries is approx. 5 years.
The battery can be removed easily by the end user accord-
ing to the battery directive 2013/56/EU.
For battery change, replace the battery by a new battery of
the same type (CR 2032 Lithium button cell 3 Volt, 20 mm
Ø, 3,2 mm height) and insert it in the correct position.
Donotdisposeofatbatteriesinthehouseholdwaste.
When the power supply is interrupted, no function of the
operating unit is available and no switching commands are
performed.
Toteachinreceiversorforrstconrmation,anexternal
power supply (5 volt direct current, 500 mA) can be con-
nected to the mini USB socket below the display alterna-
tively by USB charging socket.
3.2 Operation
The device is activated by connection to a working power
supply (via the enclosed mains unit 230 V ~ or USB 5 V =).
The display lights up and the home screen appears.
At initial installation select one of the 14 languages from
the menu guidance (English, German, Spanish, French,
Italian, Portuguese, Dutch, Swedish, Danish, Polish, Hun-
garian, Czech, Slovenian, Turkish).
3.3 Operating Principle
The text shown in the display represents a condition.
Text in connection with icons or symbols (each in a touch
eld)representsrequestsforaction.
Make your decision.
Select the planned action by tapping: Touch a menu/an
optionwithyourngeroncetoselectorstartthemenuor
the option.
The symbol → stands for the next brief push of the menu
itemasaspecicoperatingsequence.
In the further course of these instructions, only icons the
meaning of which may not be intuitively clear are explained
and described.
3.4 Bidirectional Radio System and Routing
A bidirectional radio system transmits radio signals to a
radio receiver and enables feedback from the radio receiver
to the transmitter. The radio signal can be sent directly to
the target receiver. If this is not possible, the radio signal will
be routed via other bidirectional participants until it reaches
the target receiver. The target receiver carries out the com-
mandandsendsaconrmationbacktothetransmitter.The
prerequisite for bidirectional radio hence is the radio trans-
mitting capability as well as the radio reception capability of
all participating components.
16 | EN Ⓒ elero GmbH Ⓒ elero GmbH EN | 17
3.5 Menu Guidance
Sensible use of the device requires that at least one chan-
nelistaughtin.Thedescriptionthereforestartswithconr-
mation of the device as a prerequisite for standard use.
The device is ready for operation with one of the three fol-
lowing displays in the menu bar.
Display Symbols
Tapping:
Channel overview (home screen) is selected
Tapping:
Group management is selected
Tapping:
Settings is selected
An active condition is signalled by a light background.
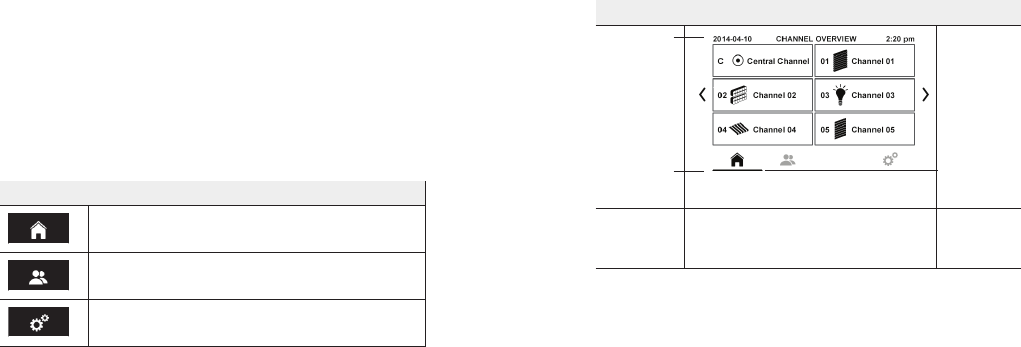
3.5.1 Channel Overview (Home Screen)
Status line: Channel overview
Inthemenubar,tapthersttoucheld"House":Display
of the central channel (visibility can be switched off in the
settings) and the active or activated channels in other touch
elds(numberofthechannel,nameofthechannel,symbol
of the channel). All (20) individual channels are automati-
cally assigned to the central channel.
Channel overview
Status bar
Menu bar
① Channel Overview (Home Screen)
First menu
button active
Special features here:
• Central channel activated
• Project assignment takes place.
Fig. 2 Channel overview, main screen to control a channel
18 | EN Ⓒ elero GmbH Ⓒ elero GmbH EN | 19
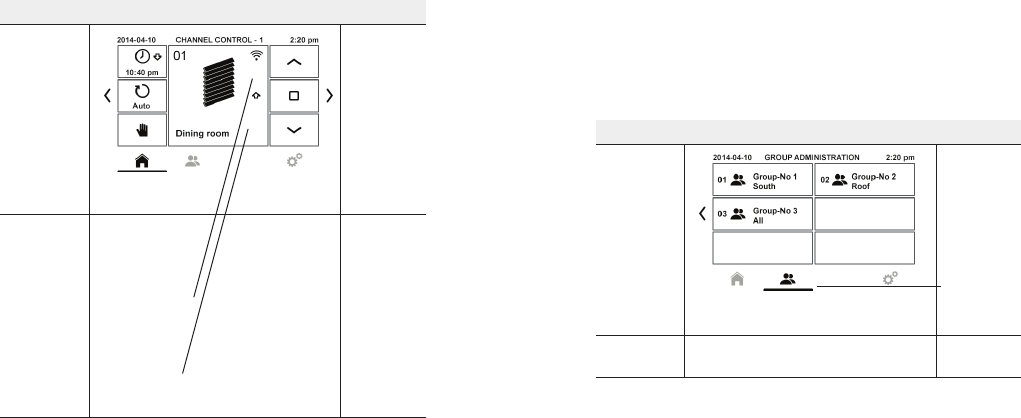
Channel control channel 1 (example)
Channel overview
Left:
Settings
Timer
Auto /
manual
< Switching
back previ-
ous channel
① Channel controller oftherstchannel
Right:
UP▲
STOP □
DOWN▼
> Switching
on to the
next channel
Centre:
Channel number and channel name (edit-
able), symbol for receiver (here: Venetian
blind,
Update after waiting time or
new menu call),
Meaning of the sending status display:
• white: Send
• green Positive feedback
• red Negative feedback
Running direction/position display:
(Update after waiting time or
new menu call)
Fig. 3 Channel control channel 1
3.5.2 Group management
Status line: Group management
A group is understood to mean the control of several re-
ceivers (channels) at the same time. The selected group is
controlled by a single travel command.
Inthemenubar,tapthetoucheld"GroupSymbol":Dis-
playthedenedgroupsinfurthertouchelds(numberof
the group, consistent group symbol, name of the group).
For 5 groups that can be selected, all individual channels
(20) can be assigned in theory. A group is only sensible
when it has at least 2 individual channels assigned.
Group management
② Group management
individual group window
second
menu button
active
Special features here:
•2groupsdened
Fig. 4 Group management
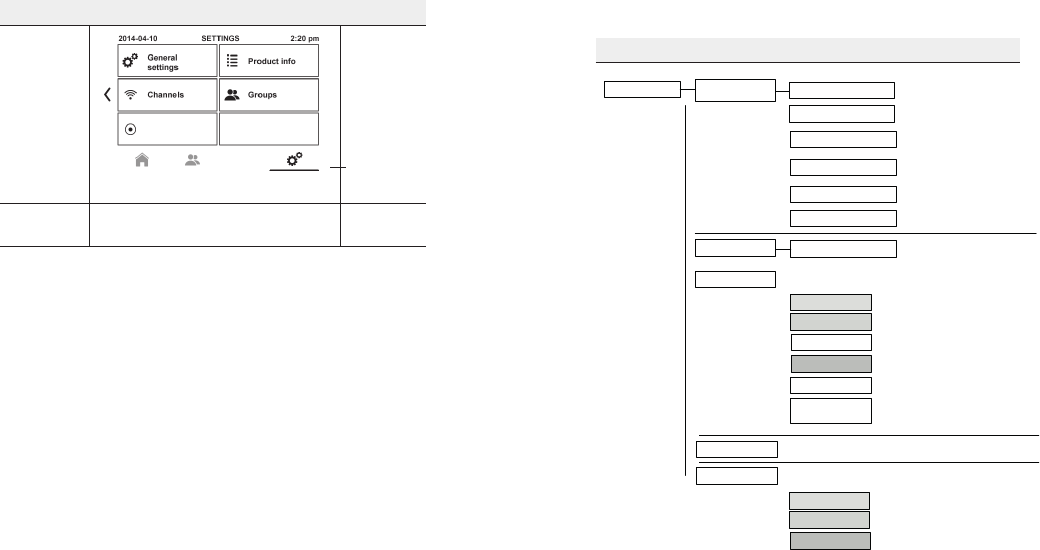
3.5.3 Settings
Status line: Settings
Inthemainmenutoucheld,tap"Symbolgears"atthe
lower right: Status display General settings, Channels,
Central channel, Product information, Groups in other touch
eldswithconsistentlyprexedsymbol.
20 | EN Ⓒ elero GmbH Ⓒ elero GmbH EN | 21
Settings
③ Settings
Third menu
button active
Special features here:
• none
Fig. 5 Settings
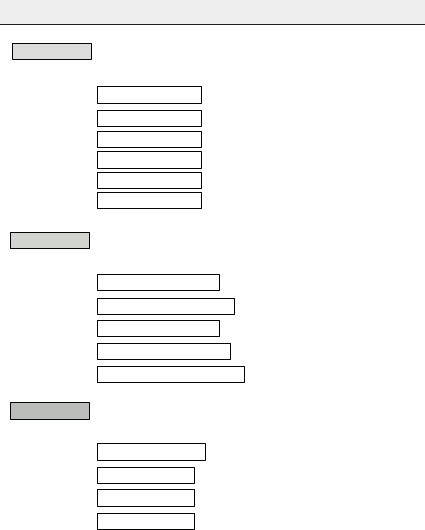
3.5.4 Menu Structure Settings
General Settings
6HWWLQJV *HQHUDO
VHWWLQJV
0HQXVWUXFWXUH6HWWLQJV
'LVSOD\EULJKWQHVV
'DWH7LPH 6HWGDWHWLPH
+ROLGD\PRGHDFWLYH
/DQJXDJH
$VWUR
)DFWRU\VHWWLQJV
6HWEULJKWQHVV
6LPXODWLRQKRXVHZLWKUHVLGHQWV
6HOHFWODQJXDJH
$VWURSDUDPHWHUV
&KDQQHOV FKDQQHOQRWR &KDQQHORYHUYLHZ
&HQWUDOFKDQQHO &KDQQHOJURXSVHWWLQJ=
&RQILJXUDWLRQ &KDQJHFRQILJXUDWLRQ
&KDQQHO1R
3URGXFWLQIRUPDWLRQ 3URGXFWLQIRUPDWLRQ
*URXSV 6HOHFWJURXSDGGJURXS
UHVHWDOOJURXSV
6HOHFWSURJUDPPH 3URJUDPFKDQQHO
3URJUDPPHV 6HOHFWSURJUDPPH
&KDQQHO1R
$GPLQLVWUDWLRQ &KDQJHDGPLQLVWUDWLRQGDWD
&KDQQHO1R
'HOHWHFKDQQHO'HOHWHFKDQQHO
5HDGLQHVVIRU
SURJUDPPLQJ
3URJUDPWUDQVPLWWHU
3URJUDPPLQJDV\QFKURQRXV
3URJUDPPLQJV\QFKURQRXV
&RQILJXUDWLRQ &KDQJHNRQILJXUDWLRQ
*URXS1R
3URJUDPPHV 6HOHFWSURJUDPPH
*URXS1R
$GPLQLVWUDWLRQ &KDQJHDGPLQLVWUDWLRQGDWD
*URXS1R
%DVLFVHWWLQJV
&KDQQHOFRQWURO
*URXSVHWWLQJV
Fig. 6 Menu structure general settings
22 | EN Ⓒ elero GmbH Ⓒ elero GmbH EN | 23
Settingsforspecicchannels
0HQXVWUXFWXUH$GPLQLVWUDWLRQ3URJUDPPHV6HWWLQJV
3URJUDPPHSRVLWLRQGRZQ
3URJUDPPHSRVLWLRQXS
3ULRULW\FORFN
6KDGLQJFORFN
&RQILJXUDWLRQ
3URJUDPPHV
6ZLWFKLQJWLPHVRII
$VWURWLPHVVZLWFKLQJSURJUDPPH
$VWURRIIVHW
,QGLYLGXDOVZLWFKLQJSURJUDPPH
$VWURHYHQLQJVZLWFKLQJSURJUDPPH
&KDQJHGLVSOD\WH[W
$GGJURXS
&KDQJHOLVWSRVLWLRQ
&KDQJHOLVWSRVLWLRQ
3URGXFWVHOHFWLRQ
$GPLQLVWUDWLRQ
&KDQJHGLVSOD\WH[W
&KDQQHO1R=*URXS1R
$GGJURXS*URXS1R
&KDQJHOLVWSRVLWLRQ&KDQQHO1R
&KDQJHDGPLQLVWUDWRUGDWD&KDQQHO1R
*URXS1R=
&KDQJHSURGXFW&KDQQHO1R
6HOHFWSURJUDP
&KDQQHOQU=*URXS1R
6HOHFWSURJUDP
&KDQQHOQU=*URXS1R
6HWDVWURRIIVHW
&KDQQHOQU=*URXS1R
6ZLWFKLQJWLPHV
&KDQQHOQU=*URXS1R
$VWURHYHQLQJ
&KDQQHOQU=*URXS1R
6HOHFWSURJUDPPHSRVLWLRQ'2:1
&KDQQHOQU=*URXS1R
6HOHFWSURJUDPPH83
&KDQQHOQU=*URXS1R
&KDQJHFRQILJXUDWLRQ
&KDQQHOQU=*URXS1R
&KDQJHFRQILJXUDWLRQ
&KDQQHOQU=*URXS1R
6WDWXVGLVSOD\GHSHQGLQJRQSUHVHOHFWLRQFKDQQHOFHQWUDOFKDQQHORUJURXS
&KDQJHDGPLQLVWUDWRUGDWD&KDQQHO1R
&KDQJHDGPLQLVWUDWRUGDWH=
&KDQJHDGPLQLVWUDWRUGDWH*URXS1R
6WDWXVGLVSOD\GHSHQGLQJRQSUHVHOHFWLRQFKDQQHOFHQWUDOFKDQQHORUJURXS
6HOHFWSURJUDP&KDQQHO1R
6HOHFWSURJUDP=
6HOHFWSURJUDP*URXS1R
6WDWXVGLVSOD\GHSHQGLQJRQSUHVHOHFWLRQFKDQQHOFHQWUDOFKDQQHORUJURXS
&KDQJHFRQILJXUDWLRQ&KDQQHO1R
&KDQJHFRQILJXUDWLRQ=
&KDQJHFRQILJXUDWLRQ*URXS1R
(GLWFKDQQHOV &KDQQHORYHUYLHZ*URXS1R
Fig. 7 Menu structure channel-related settings
3.5.5 Menustructure→Generalsettings
Status line: Basic settings
Date/Time
Status line: Set date/time
Deactivated time change Intended for countries that do not
have any seasonal time change (daylight savings time).
Automatic time change Setting summer time (and winter
time) on the correct date of the year.
The offset from the astro time (deviation from the position of
the sun) remains consistent (astro offset).
Manual time change Setting a time deviating from the
"normal time". The offset from the astro time may add up
(depending on the relationship to the zero meridian) to the
astro offset.
Display brightness
Select by wiping on the lighted bar.
Holiday mode active
The holiday function simulates an occupied house while
you are on holiday. When this function is active (light touch
eld),alltheprogrammedswitchingtimesaredelayedby0
to 30 minutes at random.
Language
Status line: Select language
24 | EN Ⓒ elero GmbH Ⓒ elero GmbH EN | 25
At initial installation - or later - select one of the 14 lan-
guages for the menu text display from the menu guidance
(English, German, Spanish, French, Italian, Portuguese,
Dutch, Swedish, Danish, Polish, Hungarian, Czech, Slove-
nian, Turkish).
Astro
Status line: Astro parameters
Selection Europe (continent), longitude/latitude, town
Adjustment of the astro switching times by geographic data
(selection from 58 cities in the world) or individually by en-
tering a combination of longitude and latitude in connection
with or without coordinated world time (UTC).
Factory settings
Resetting all settings except for the channel-bound receipt-
ed assignments. List assignments of taught-in receivers are
also lost.
3.5.6 Settings→Channels
Status line: Channel overview
Display and selection of one of the 20 available channels
Further settings possible (Administration, Programs, Pro-
gramchannel,Conguration,Deletechannel,Activate
programming mode)
Status line: Channel/Group settings
channel number
3.5.7 Settings→Centralchannel
Status line: Channel/Group settings central channel
The central channel controls all present individual channels
at the same time. This means a combination of all (up to 20)
conguredindividualchannels.
Further settings possible (Administration, Programs, Visibil-
ity(not)active),Conguration,Deletechannel)
3.5.8 Settings→Productinfo
Status line: Display product info
3.5.9 Settings→Groups
Status line: Select group
Display the 5 available groups, out of which one group can
be selected.
Further settings possible (add group (5 times);
Reset all groups.
Status line: Change administration data.
Terminate with safety prompt.
Note: The channel settings are retained.
3.6 Settings →Channels →Channel →
Administration
Status line: Change administration data - channel number
26 | EN Ⓒ elero GmbH Ⓒ elero GmbH EN | 27
3.6.1 Change display text
Status line: Change display text - channel number
(Designation of the channel):
Editor with switchable layout (alphanumeric)
3.6.2 Add group
Status line: Add group - channel number
Channels can be assigned to 5 different groups (logical
combination of channels).
3.6.3 Change list position
Status line: Change list position - channel number
Placement (sorting) of the programmed channels in a list.
Terminate with button "Save".
3.6.4 Reset channel data
Status line: Change administration data - channel number
Data of a single channel are reset. The assignment to the
programmed receiver is retained. Terminate with safety
prompt.
3.6.5 Product selection
Status line: Change product - channel number
Selection and assignment of a suitable symbol out of 10
symbols depending on application (roller shutter, interior
shading, Venetian blind, awning, light, heating, switch, val-
ance, curtain, lamellar curtain).
For bidirectional receivers from the elero ProLine 2 fam-
ily, the logically right symbol (roller shutter, Venetian blind,
interior shading, awning) is assigned automatically.
3.7 Settings →Channels →Channel →
Programs
Status line: Select program - channel number
The activated program is displayed brightly backlit.
3.7.1 Switching times off
Switching times off:
Timed switching commands are not executed.
3.7.2 Astro times switching program
Status line: Astro times - channel number
Controlsthecalendar-related(day-specic)upanddown
according to Astro function in accordance with the sunrise
and sunset times. Programmable lock times prevent up and
down movement occurring too soon.
3.7.3 Astro offset
Status line:
Set astro offset - channel number
For individual adjustment of the astro switching times by
selecting an offset for the time of opening and/or an offset
for the time of closing by up to 120 minutes.
Note: Display with bright backlighting with activated astro
offset only.
28 | EN Ⓒ elero GmbH Ⓒ elero GmbH EN | 29
3.7.4 Individual switching program
Status line: Switching times - channel number
Calendar-relatedly(day-specic)denableswitchingtimes
for opening and closing times.
3.7.5 Astro evening switching program
Status line: Astro evening - channel number
Controlsthecalendar-related(day-specic)upanddown
movement according to Astro function based on the time
of sunset. The adjustable locking time prevents too early
closing (offset of the closing time to a later time displayed
symbolically).
3.8 Settings →Channels →Channel →
Program channel
Status line: Programming the transmitter
Classic function as for an elero ProLine 2-hand/wall trans-
mitter
Operatingelements(touchelds)UP, STOP, DOWN, P)
and transmission symbol (coloured during programming).
Channel change possible by browsing forward (arrow to the
right) or backward (arrow to the left).
Prerequisite: The receiver is installed. Stand in front of the
curtain to be programmed while programming.
1. For receivers already installed electrically, interrupt the
supply voltage by switching off and on again. The receiv-
er is now in programming mode for about 5 minutes.
2. Push the touch panel P; the transmission control indica-
tor lights up green. The curtain moves up and down for
2 minutes, signalling that the receiver is in programming
mode.
3. Press the UP button (arrow up) as soon as the curtain
starts moving in the upwards direction (within 1 second at
themost).Thecurtainstopsbriey,startsmovingagain
and then moves downwards.
4. Press the DOWN button (arrow down) as soon as the
curtain starts moving in the downwards direction (within 1
second at the most). The curtain stops. The transmission
indicator display goes out. The channel is programmed
from the transmitter.
Programming will have to be repeated if the curtain does
not stop. Programming in the wall transmitter (signalled
by orange background) can be terminated by pushing the
toucheldCancelorbypushingtheSTOPbuttonfor6sec-
onds (square symbol).
3.9 Settings →Channels →Channel →
Conguration
Status line: Change conguration - channel number
3.9.1 Program position Down
Status line: Select program position down - channel number
30 | EN Ⓒ elero GmbH Ⓒ elero GmbH EN | 31
Valid for time-controlled travel commands: Select a target
run to the lower end position or the intermediate position or
ventilation position (differently sensible depending on appli-
cation roller shutter, Venetian blind or awning).
The currently activated selection is displayed brightly back-
lit.
3.9.2 Program position Up
Status line: Select program position up - channel number
Valid for time-controlled travel commands: Select a target
run to the upper end position or the intermediate position or
ventilation position (differently sensible depending on appli-
cation roller shutter, Venetian blind or awning).
The currently activated selection is displayed brightly back-
lit.
3.9.3 Priority clock
Status line: Change conguration - channel number
Priority automatic commands On or Off
Factory settings Priority off
The activated selection is displayed brightly backlit.
When the priority is activated, which means that automatic
time switching commands from the hand-held transmitter
channel are given priority in all receivers and accepted even
the manual operating mode of receivers.
3.9.4 Shading Clock
Status line: Change conguration - channel number
Shading Clock On or Off
Factory settings Shading off
The activated selection is displayed brightly backlit.
With the function Shading Clock activated: A time-controlled
down command switches off the automatic shading sys-
tem (privacy protection). A time-controlled open command
switches on the automatic shading system again.
3.10 Settings →Channels →Channel →
Delete channel
Status line: Delete transmitter - channel number
3.10.1 Delete all
Delete all channels. All channels in the transmitter are
deleted. Terminate with safety prompt.
3.10.2 Delete channel
Deleting a single channel. Selected channel is deleted.
Terminate with safety prompt.
3.11 Settings →Channels →Channel →
Activate programming mode
Status line: Programming the transmitter
3.11.1 Asynchronous programming
Multiple receivers connected to the same supply are all
simultaneously ready for programming for approximately 5
minutes after connection to the mains.
32 | EN Ⓒ elero GmbH Ⓒ elero GmbH EN | 33
If the P button is now pressed on the transmitter, all receiv-
ers start the programming mode simultaneously (indicated
by travelling up or down). An offset is created between the
receivers by randomly different pauses between the open-
ing and closing movements. The longer programming is
delayed, the greater the offset will be.
You can stop the short opening and closing movements by
brieypressingtheSTOPbuttononatransmitterwhichhas
already been programmed. The programming mode in the
receiver is interrupted.
The transmitter can now be assigned without having to
disconnect individual receivers. If the curtain moves in the
wrong direction, delete the transmitter and program it again.
3.11.2 Synchronous programming
For programming one transmitter to multiple receivers at the
same time.
Travelling up and travelling down of the receivers starting
synchronously. Concurrent programming on several facili-
ties possible
3.12 Settings →Central channel
Status line: Channel/Group settings - central channel
Submenus as for a single channel
3.12.1 Settings→Centralchannel→Administration
Status line: Change administration data of central channel
Change display text
Editor with switchable layout (alphanumeric)
Reset channel data
Data of the central channel are deleted. The assignment to
the receiver is retained.
3.12.2 Settings→Centralchannel→Programs
Status line: Select program - central channel
As for a single channel (Settings →Channels →Channel
→Programs):
Switching times off:
Timed switching commands are not executed.
Astro times switching program:
Controlsthecalendar-related(day-specic)upanddown
according to Astro function in accordance with the sunrise
and sunset times. Programmable lock times prevent up and
down movement occurring too soon.
Astro offset:
For individual adjustment of the astro switching times by
selecting an offset for the time of opening and/or an offset
for the time of closing by up to 120 minutes.
Individual switching program:
Calendar-relatedly(day-specic)denableswitchingtimes
for opening and closing times.
Astro evening switching program:
Controlsthecalendar-related(day-specic)upanddown
movement according to Astro function based on the time
of sunset. The programmable lock time prevents too early
downward movement.
34 | EN Ⓒ elero GmbH Ⓒ elero GmbH EN | 35
3.12.3 Settings→Centralchannel→
Visibility (not) active
Active visibility permits selection of the central channel in
the channel overview of the home screen. Activated visibility
is displayed brightly backlit.
3.12.4 Settings→Centralchannel→Conguration
Program position Down:
Valid for time-controlled travel commands: Select a target
run to the lower end position or the intermediate position or
ventilation position (differently sensible depending on appli-
cation roller shutter, Venetian blind or awning).
Program position Up
Valid for time-controlled travel commands: Select a target
run to the upper end position or the intermediate position or
ventilation position (differently sensible depending on appli-
cation roller shutter, Venetian blind or awning).
Priority clock:
Priority automatic commands On or Off
Whenthepriorityisactivated,itcanbespeciedinthe
central channel that automatic time switching commands
from the wall transmitter channel are given priority in all
receivers and accepted by the receivers even in manual
operating mode.
Shading Clock
With the function Shading Clock activated: A time-controlled
down command switches off the automatic shading sys-
tem (privacy protection). A time-controlled open command
switches on the automatic shading system again.
3.12.5 Settings→Centralchannel→Deletechannel
Status line: Deletion of transmitter
Central channel All channels in the transmitter are deleted.
Terminate with safety prompt.
3.13 Settings→Productinfo
Status line: Display product info
Display of version information
3.13.1 Settings→Groups→Group
Status line: Channel/Group settings - group number
A group is understood to mean the control of several receiv-
ers (channels) at the same time. The selected group is con-
trolled together by a single travel command. All 20 channels
(transmitter) can be used for the group control.
Any number of receivers can be programmed and con-
trolled in each channel.
The further submenus are accordingly structured in the
same manner as for a single channel.
3.13.2 Settings→Groups→Group→Administration
Status line: Change administration data - group number
36 | EN Ⓒ elero GmbH Ⓒ elero GmbH EN | 37
Change display text:
Editor with switchable layout (alphanumeric)
Add channels:
Selection of a single channel adds the channel to the group.
Several selections in sequence are sensible. Channels
added to a group appear brightly backlit in the display (ac-
tive).
3.13.3 Settings→Groups→Group→Programs
Status line: Select program - group number
Switching times off:
Timed switching commands are not executed.
Astro times switching program:
Controlsthecalendar-related(day-specic)upanddown
according to Astro function in accordance with the sunrise
and sunset times. Programmable lock times prevent up and
down movement occurring too soon.
Astro offset:
For individual adjustment of the astro switching times by
selecting an offset for the time of opening and/or an offset
for the time of closing by up to 120 minutes.
Individual switching program:
Calendar-relatedly(day-specic)denableswitchingtimes
for opening and closing times.
Astro evening switching program:
Controlsthecalendar-related(day-specic)upanddown
movement according to Astro function based on the time
of sunset. The programmable lock time prevents too early
downward movement.
3.13.4 Settings→Groups→Group→Conguration
Status line: Change conguration - group no.
Program position Down:
Valid for time-controlled travel commands: Select a target
run to the lower end position or the intermediate position or
ventilation position (differently sensible depending on appli-
cation roller shutter, Venetian blind or awning).
Program position Up:
Valid for time-controlled travel commands: Select a target
run to the upper end position or the intermediate position or
ventilation position (differently sensible depending on appli-
cation roller shutter, Venetian blind or awning).
Priority Clock:
Priority automatic commands On or Off
Shading Clock:
With the function Shading Clock activated: A time-controlled
down command switches off the automatic shading sys-
tem (privacy protection). A time-controlled open command
switches on the automatic shading system again.
4 First programming of the transmitter
in a channel
Prerequisite:
The bidirectional receiver is installed. Check whether the
respective channel is deleted or in the correct mode accord-
ing to the status display.
38 | EN Ⓒ elero GmbH Ⓒ elero GmbH EN | 39
1. Where electrical receivers have already been installed,
interrupt the power supply and switch it on again after a
few seconds. The receiver is now in programming mode
for about 5 minutes.
2. Push the function button P in the menu Teach trans-
mitter until the transmission status display is lit green.
The curtain moves up and down for approximately two
minutes, showing that the receiver is in programming
mode.
Visualisation binding orange
3. Press the UP button as soon as the curtain starts moving
in the upwards direction (within 1 second at the most).
Thetransmissionstatusindicatorislitbriey.Thecurtain
stops, starts moving again and then moves DOWN.
4. Press the DOWN button as soon as the curtain starts
moving in the downwards direction (within 1 second at
themost).Thetransmissionstatusindicatorislitbriey.
The curtain stops. The transmitter channel has been
programmed.
Important:
Programming will have to be repeated if the curtain does
not stop. Programming in the wall transmitter (signalled
by orange background) can be terminated by pushing the
toucheldCancelorbypushingtheSTOPbuttonfor6sec-
onds (square symbol).
4.1 Program further transmitters into a channel.
Multiple receivers connected to the same supply are all
simultaneously ready for programming for approximately 5
minutes after connection to the mains.
If the P button on the MultiTec Touch-868 /-915 is now
pressed, all receivers start the programming mode simul-
taneously (travelling up or down). An offset is created be-
tween the receivers by randomly different pauses between
the ascents/descents. The longer programming is delayed,
the greater the offset will be.
You can stop the short opening and closing movements by
brieypressingtheSTOPbuttononatransmitterwhichhas
already been programmed. The programming mode in the
receiver is interrupted.
The transmitter can now be assigned without having to
disconnect individual receivers. If the curtain moves in the
wrong direction, delete the transmitter and program it in the
receiveragain(→seeDeletingtransmitters).
To program additional transmitters to one receiver:
1. Press the UP, DOWN and the programming button P
(back of device) simultaneously (for 3 sec.) on a transmit-
ter, which has already been programmed to the receiver.
Thestatusindicatorislitbriey.Thereceiverisnow
readyforprogrammingandbrieymovesdown.
2. Press the programming button P on the transmitter to
beprogrammeduntilthestatusdisplaylightsbriey.The
receiver is now in programming mode (movements up
and down).
40 | EN Ⓒ elero GmbH Ⓒ elero GmbH EN | 41
3. Press the UP button as soon as the curtain starts moving
in the upwards direction (within 1 second at the most).
Thestatusindicatorislitbriey.Thecurtainstopsbriey,
starts moving again and then moves downwards.
4. Press the DOWN button as soon as the curtain starts
moving in the downwards direction (within 1 second at
themost).Thestatusindicatorislitbriey.Thecurtain
stops. The transmitter channel has been programmed.
If more than 10 bidirectional receivers are being pro-
grammed in one channel at the same time, the transmitter
channel in programming mode switches to group mode.
The group mode is visualised by the display "10+" to the
right of the green transmission signal.
Programming in group mode is competed after a pause of
2 minutes. Programming in the wall transmitter (signalled
by orange background) can be terminated by pushing the
toucheldCancelorbypushingtheSTOPbuttonfor6sec-
onds (square symbol).
Note
A jogging mode for Venetian blinds for quickly reaching
receivers which are further away is not possible in a bidirec-
tional transmitter channel with more than 10 programmed
receivers.
4.2 Stopping programming mode (bidirectional)
in the transmitter
Press the STOP button and hold for at least 6 seconds until
the status display lights up orange.
4.3 Approaching limit positions of roller
shutter / awning / Venetian blind
Requirement
The transmitter/transmitter channel has been programmed.
The end positions of the drive are set.
Approaching the lower end position (roller shutter/awn-
ing)
Push the DOWN button. The curtain descends to the lower
end position/the awning extends fully.
Approaching the lower end position (blind)
Push the DOWN button. The curtain approaches the lower
end position.
Push the DOWN buttononlybriey(jogmodeatYES,
impulse mode at Combio Pulse). The curtain starts and
stops again.
Approaching the upper end position (roller shutter /
awning)
Push the UP button. The curtain approaches the upper end
position/the awning retracts.
Approaching the upper end position (blind)
Push the UP button. The curtain approaches the upper end
position.
Push the UP buttononlybriey(jogmodeatYES,impulse
mode at Combio Pulse). The curtain starts and stops again.
42 | EN Ⓒ elero GmbH Ⓒ elero GmbH EN | 43
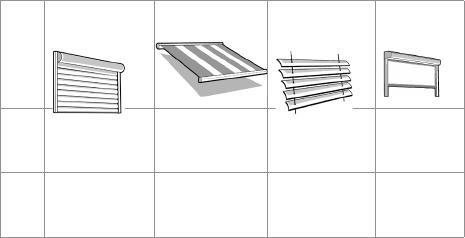
Intermediate positions of the curtains
Roller
shutter
Awning Venetian
blind
Interior
shading
Pos
▼
Intermediate
position
Intermediate
position
Intermediate
position
Intermedi-
ate posi-
tion 1
Pos
▲
Ventilation
position
-- /Cloth
tension
Turning posi-
tion
Intermedi-
ate posi-
tion 2
Moving to intermediate positions
Moving to ventilation / turning position
Requirement
The transmitter/transmitter channel has been pro-
grammed. The curtain is in the bottom end position.
1. Tap the middle of the screen in the channel view.
2. In the dialogue window "Channel scenes channel
number", 4 different interim positions can be moved to
by tapping them - sensibly according to the application
roller shutter, awning, Venetian blind or interior shad-
ing:
Intermed. position,
ventilation position,
intermed. position + ventilation position,
close + ventilation position
3. The shutters will move to the selected, registered ventila-
tion / turning position.
If no ventilation/turning position is programmed, the curtain
travels to the upper end position (not if Combio Pulse is in
use).
Requirement
In order to be able to use the ventilation position and the
intermed. position, they must be programmed via a differ-
ent transmitter from the elero ProLine 2 product family (e.g.
TempoTel 2 or MultiTel 2). On this, compare the respective
transmitter instruction.
The travelling movement is visualised by additional symbols
in the display.
4.4 Operation of the MultiTec Touch-868 /-915
with Combio JA Pulse
A Combio 867/868/915 JA Pulse can be used for the pre-
cise adjustment of the slats for Venetian blind drives.
The pre-set pulse time of Combio Pulse is cycled by press-
ing the UP or DOWNtouchelds.
Deleting positions/deleting transmitters
Setting and deleting ventilation and intermediate positions is
not possible via the MultiTec Touch-868. This is done via a
separate programmed hand-held transmitter from the elero
ProLine 2-product family.

44 | EN Ⓒ elero GmbH Ⓒ elero GmbH EN | 45
Deleting individual transmitter channel in the receiver
1. Pushtoucheldconguration.
2. Pushtoucheldchannels.
3. Selecttoucheldofthedesiredchannel.
4. Pushtouchelddeletechannel.
The channel in the transmitter is now deleted.
4.5 Moving to intermediate position / ventilation
position / turning position
Requirements:
The intermediate position and ventilation position for the
application roller shutter or the turning position for the ap-
plication Venetian blind must have been set up with another
transmitter than the MultiTech Touch-868 /-915.
The transmitter has been programmed and the intermediate
position (roller shutter) or turning position (Venetian blind) of
the driver is set. The curtain is in the upper end position.
Push the DOWN button in the upper end position twice
briey.
The curtain will move to the registered intermediate posi-
tion. In the case of Venetian blinds, the slats turn automati-
cally after reaching the intermediate position if a turning
position has been programmed. If no intermediate position
is programmed, the curtain travels to the lower end position
(not if elero Combio Pulse is in use).
Push the UPbuttoninthelowerendpositiontwicebriey.
The curtain will move to the registered ventilation / turning
position. If no ventilation/turning position is programmed,
the curtain travels to the upper end position (not if elero
Combio Pulse is in use).
4.6 Delete transmitter channel in the receiver or
Delete all transmitters in the receiver
In the menu Channel/group settings, select the function
Delete channel.
Select the function button to delete the selected chan-
nel Delete (only the selected channel is deleted in the
receiver) or function button to delete all transmitters in
the receiver Delete channelandconrmtherespective
deletion process.
5 Specications
All information in this chapter refers to an ambient tempera-
ture of 20 °C (± 5 °C).
SpecicationsMultiTecTouch-868/-915
Mains connection 230 V AC
Power supply via
Mini-USB (socket)
5 V DC,
max. 0.5 A
Power supply / standby 0.5 W (typical)
Battery type CR 2032
Protection type IP20
Permitted
ambient temperature [°C]
0 to 45
Radio frequency [MHz] 868 | 915

46 | EN Ⓒ elero GmbH Ⓒ elero GmbH EN | 47
SpecicationsMultiTecTouch-868/-915
Weight (incl. battery) [g] 200
Scope of supply Mains unit with wall holder
Operating instructions
Mounting bag with
2 screws and dowels
Conformity
Fig. 8 SpecicationsMultiTecTouch-868/-915
6 Cleaning and maintaining the device
Clean the device surface only with a soft, clean, and dry
cloth.
Do not use any cleaning agents and solvents.
Keep the device dry.
Do not use the device in dusty or dirty environments.
Do not try to open the device other than described in the
operating instructions.
Unauthorised changes may damage the device and
violate the provisions applicable to radio devices.
Do not drop the device, do not expose it to impacts or
shock and do not shake it. Rough handling may damage
the electronic circuits and mechanical parts in the device.
Keepthedeviceawayfrommagnetsormagneticelds.
7 Certication
7.1 EC Declaration of Conformity
elero GmbH hereby declares that the MultiTec Touch-868/
-915 complies with the basic prerequisites and the other
relevant provisions of the EC directives. The complete
declaration of conformity can be found in the download area
of our website.
7.2 CerticationFCC/IC
7.2.1 US: Addendum to the manual
FCC / IC approval
This device (MultiTec Touch-915) complies with part 15 of
the FCC Rules and RSS-210. Operation is subject to the
following two conditions:
(1) This device may not cause harmful interference, and
(2) this device must accept any interference received, inclu-
ding interference that may cause undesired operation.
Changesormodicationsnotexpresslyapprovedbythe
manufacturer could void the user‘s authority to operate the
equipment.

48 | EN Ⓒ elero GmbH Ⓒ elero GmbH EN | 49
7.2.2 CA: Addendum au manuel
Homologation FCC / IC
Le présent appareil (MultiTec Touch-915) est conforme aux
FCC part 15 et CNR-210 d‘Industrie Canada applicables
aux appareils radio exempts de licence. L‘exploitation est
autorisée aux deux conditions suivantes :
(1) l‘appareil ne doit pas produire de brouillage, et
(2) l‘utilisateur de l‘appareil doit accepter tout brouillage
radioélectrique subi, même si le brouillage est susceptible
d‘en compromettre le fonctionnement.
8 Troubleshooting
Fault Cause Remedy
Drive does not run 1. Receiver outside of
radio range
2. Receiver not oper-
ating or faulty
3. Receiver not yet
programmed
1. Reduce distance to
the receiver
2. Switch on or replace
receiver
3. Program receiver
Desired drive does
not run
Incorrect group or
channel selected
Select correct group or
channel
End positions are ap-
proached inaccurately
End positions not
yet set
Have the end positions
set by a specialist in
accordance with the
product instructions
Drive operates in the
wrong direction
Directions are incor-
rectly allocated
Delete transmitter
and program it again
Fig. 9 Troubleshooting in the MultiTec Touch-868 /-915
9 Repair
If you have any questions, please refer to your specialised
company.
Please always state the following information:
Item number and item designation on the
nameplate
Error type
Previous and
unusual events
Surrounding circumstances
Own assumption
10 Manufacturer's address
elero GmbH
Antriebstechnik
Linsenhofer Str. 65
72660 Beuren
Germany
Phone: +49 7025 13-01
Fax: +49 7025 13-212
info@elero.de
www.elero.com
Should you require a point of contact for outside of Ger-
many, please visit our website.

50 | EN Ⓒ elero GmbH Ⓒ elero GmbH EN | 51
11 Disposal /
notes on environmental protection
Since implementation of the European directives 2002/96/
EC and 2006/66/EC in national law, the following applies:
Electrical and electronic devices as well as batteries must
not be disposed of in the household waste. The consumer
is required by law to return electrical and electronic devices
as well as batteries to the public collection points provided
for this or the point of sales at the end of their service lives.
Details on this are provided for by the respective national
law.
The icon on the product, the operating instructions or the
packaging refers to these provisions. Reuse, recycling
or other forms of use of old devices or batteries make an
important contribution to protect our environment.

52 | EN Ⓒ elero GmbH