iGenio MOONI Mooni Bluetooth Remote Shutter User Manual Mooni Instructions CF ENG ESP copy
iGenio Ltd. Mooni Bluetooth Remote Shutter Mooni Instructions CF ENG ESP copy
iGenio >
User Manual

INSTRUCTIONS
Bluetooth
®
Remote Shutter
INSTRUCCIONES
Disparador a
Distancia Bluetooth
®
OFFICIAL PRODUCT

THANK YOU
Thank you for purchasing our
product.
Mooni® has been specifically
designed to make taking Selfies
much easier. Never again will you
have to struggle to hold your
cellphone at arm’s length and press
the camera shutter whilst struggling
to keep your phone still.
Just Bluetooth® pair your Mooni® with
your compatible iOS 5.0+ or Android
4.3+ cellphone, hold your phone in
one hand, pose for your Selfie and
press the button on your Mooni® with
the other. Simple!
Mooni® is manufactured with fully
certified Bluetooth® 3.0 technology
which guarantees you instant pairing
as well as reliable and secure
connections every time.
GRACIAS
Gracias por adquirir nuestro produc-
to.
El Mooni® ha sido específicamente
diseñado para que hacerse selfis sea
mucho más fácil. Nunca más tendrá
que esforzarse en sostener su móvil
con el brazo estirado y pulsar el
disparador de la cámara mientras
trata de mantener inmóvil el teléfono.
Simplemente utilice Bluetooth® para
emparejar el Mooni® con un móvil
compatible con iOS 5.0+ o Android
4.3+, sostenga el teléfono con una
mano, pose para su selfi y pulse el
botón del Mooni® con la otra.
¡Sencillo!
Mooni® está fabricado con tecnología
plenamente certificada para
Bluetooth® 3.0 que le garantiza un
emparejamiento instantáneo, así
como conexiones fiables y seguras
en cada ocasión.

Step 1
ACTIVATE BLUETOOTH® ON YOUR
DEVICE
Prepare your Mooni® for pairing by
activating the Bluetooth® function on
your compatible cellphone or other
device.
Settings
Bluetooth
DEVICES
Bluetooth
Paso 1
ACTIVE EL BLUETOOTH® EN SU
MÓVIL
Prepare su Mooni® para el empareja-
miento activando la función
Bluetooth® en su teléfono o dispositi-
vo compatible.
Ajustes
Bluetooth
DISPOSITIVOS
Bluetooth

Step 2
SWITCH ON & ACTIVATE
BLUETOOTH
®
PAIRING MODE
The button in the center of your
Mooni
®
functions both as an ON/OFF
switch and a shutter release. To
switch on, hold down until the red
LED light appears. Wait a few
seconds until the LED flashes red
and blue alternately.
Mooni
®
is now in “pairing mode”.
Paso 2
ENCIENDA Y ACTIVE EL MODO DE
EMPAREJAMIENTO BLUETOOTH
®
El botón ubicado en el centro del
Mooni
®
actúa como interruptor de
ENCENDIDO/APAGADO y como
disparador. Para encender, mantén-
galo pulsado hasta que se ilumine el
piloto led rojo. Espere unos
segundos hasta que el led parpadee
alternativamente en rojo y azul.
El Mooni
®
se encuentra ahora en
“modo de emparejamiento”.
MODO DE EMPAREJAMIENTO
Los ledes rojo y azul parpadean
alternativamente.
ENCENDER
Mantenga pulsado
hasta que aparezca
el piloto rojo.
PAIRING MODE
Red and blue LEDs
flash alternately.
SWITCH ON
Press and hold until
Red light appears.

Step 3
CONNECT & PAIR
Mooni® will now appear in the
Bluetooth® device list. Connect it
with your cellphone in accordance
your model’s pairing instructions.
Normally, this requires you to simply
click on the device name.
When successfully paired, the LED
light will flash red intermittently every
3 seconds.
Settings
Bluetooth
Mooni Connected
MY DEVICES
Bluetooth
Red LED flashes intermittently
PAIRING SUCCESSFUL
Paso 3
CONECTE Y EMPAREJE
El Mooni® aparecerá ahora en la lista
de dispositivos Bluetooth®. Conécte-
lo a su móvil de acuerdo con las
instrucciones de emparejamiento de
su modelo. Normalmente, basta con
seleccionar el nombre del dispositi-
vo.
Una vez emparejado con éxito, el
piloto led parpadeará en rojo de
forma intermitente cada tres
segundos.
Ajustes
Bluetooth
Mooni Conectado
MIS DISPOSITIVOS
Bluetooth
El led rojo parpadea intermitentemente.
EMPAREJAMIENTO CORRECTO
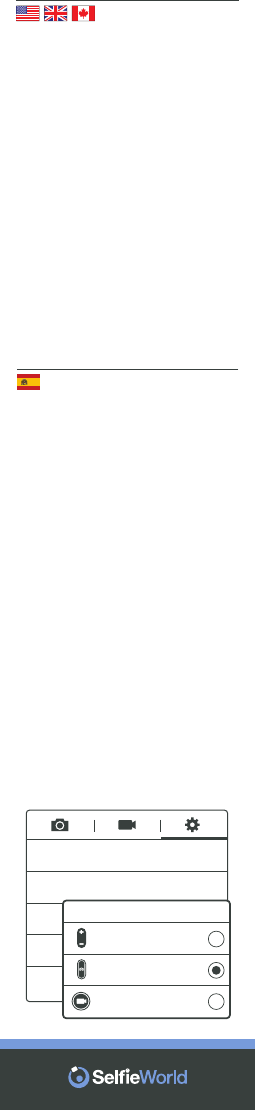
• Open Camera application
• Click 'gear' icon for Settings
• Click option 'Volume Key'
• Click 'The Camera Key'
*Note that screenshots and setting may
vary according to make, model and
Android version of cellphone.
*Tenga en cuenta que las capturas de
pantalla podrían variar.
GPS tag
Volume key
Timer
White balance
The camera
key
O
Auto
0
O
Volume key
The zoom key
The camera key
The record key
Step 4
IMPORTANT STEP FOR ANDROID USERS
Android users need to check their
camera settings are configured correctly
otherwise the Selfie stick button might
operate your camera's zoom function
and not the shutter.
Follow the steps below to ensure that
your "Volume Key" is set to operate the
"Camera Key".
• Abra la aplicación Cámara
• Toque el icono del engranaje para los
Ajustes
• Toque la opción “Tecla de volumen”
• Toque la opción “La tecla de cámara”
Paso 4
PASO IMPORTANTE PARA USUARIOS DE
ANDROID
Los usuarios de Android necesitan
comprobar que los ajustes de su
cámara se encuentren correctamente
configurados, o de lo contrario el botón
del paloselfi podría accionar la función
de zoom de la cámara en lugar del
disparador.
Siga los pasos indicados a continuación
para asegurarse de que la “Tecla de
volumen” esté configurada para actuar
como “La tecla de cámara”.

Step 5
OPEN CAMERA APPLICATION &
TAKE SELFIE
Open your cellphone’s camera
application, pose for your Selfie by
holding your cellphone in your
preferred hand.
Hold Mooni® in the other and press
the center button to remotely activate
the camera shutter.
Paso 5
ABRA LA APLICACIÓN DE LA
CÁMARA Y HÁGASE UN SELFI
Abra la aplicación de la cámara en su
móvil y pose para el selfi sosteniendo
el teléfono con la mano que desee.
Sostenga el Mooni® con la otra y
pulse el botón central para accionar
a distancia el disparador de la
cámara.

Step 6
SWITCHING OFF & RE-PAIRING
Mooni® will automatically switch itself
off when you deactivate the
Bluetooth® function on your
cellphone or device. Alternatively,
hold down the center button for 3
seconds. The LED will flash quickly
for a second before switching off.
Mooni® will automatically re-pair with
your Bluetooth® device assuming its
Bluetooth® function is already
activated and Mooni® is switched on.
You do not need to enter your
Bluetooth® settings again.
Settings
Bluetooth
Bluetooth
SWITCHING OFF
Press and hold for
3 Seconds.
Ajustes
Bluetooth
Bluetooth
APAGAR
Mantenga pulsado
durante tres segundos
Paso 6
APAGADO Y REEMPAREJAMIENTO
El Mooni® se apagará automática-
mente cuando desactive la función
Bluetooth® en su móvil o dispositivo.
Si lo desea, puede apagarlo
manteniendo pulsado el botón
central durante tres segundos. El led
parpadeará rápidamente durante un
segundo antes de apagarse.
El Mooni® se reemparejará automáti-
camente con su dispositivo
Bluetooth® siempre y cuando la
función Bluetooth® esté ya activada
en él y el Mooni® se encuentre
encendido. No necesita volver a
acceder a los ajustes de Bluetooth®.

FIX YOUR MOONI
®
TO YOUR
KEYRING
Mooni
®
has been designed with
maximum convenience and portabili-
ty in mind.
Simply carry it on your keyring for the
perfect Selfie opportunity anytime.
COLOQUE EL MOONI
®
EN SU
LLAVERO
El Mooni
®
ha sido diseñado pensan-
do en la máxima comodidad y
portabilidad.
No tiene más que llevarlo en su
llavero para poder disfrutar de la
oportunidad perfecta para un selfi en
cualquier momento.

REPLACING THE BATTERY
Mooni® comes supplied with a
long-life lithium-ion battery. To
replace, hold Mooni® with rear facing
you and gently rotate the cover
counter-clockwise (anti-clockwise).
The cover will loosen exposing the
battery. Remove it and replace with
new battery. Replace cover and
rotate clockwise to tighten.
SUSTITUCIÓN DE LA BATERÍA
El Mooni® viene provisto de una
batería de ion de litio de larga
duración. Para reemplazarla,
sostenga el Mooni® con su parte
posterior hacia usted y gire la
cubierta con cuidado en sentido
antihorario (contrario a las agujas del
reloj).
Esta se liberará y dejará a la vista la
batería.
Extráigala y sustitúyala por la nueva
batería. Vuelva a colocar la cubierta y
gírela en sentido horario para
apretarla.

GET MORE USE OUT OF YOUR
MOONI®
Mooni® isn’t only compatible with
cellphones. Use it on any iOS 5.0+
or Android 4.3+ device with
Bluetooth® and a camera application.
SÁQUELE MÁS PARTIDO A SU
MOONI®
El Mooni® no es solo compatible con
teléfonos móviles. Utilícelo con
cualquier dispositivo iOS 5.0+ o
Android 4.3+ que disponga de
Bluetooth® y una aplicación de
cámara.

TROUBLESHOOTING
This product has been extensively
tested with all major cellphone
brands and models. Due to different
implementations of Android by some
of the lesser well known cellphone
manufacturers, we cannot guarantee
100% compatibility with all
cellphones. In the event of technical
problems, however, please consult
the following troubleshooting guide:
PREREQUISITES FOR YOUR
CELLPHONE / TABLET
Please ensure your device is
updated to at least iOS 5.0 or
Android 4.3. Ideally, please update
to the latest version.
Note that Mooni® is not compatible
with Windows® phones.
TROUBLESHOOTING THE BATTERY
Hold down the button for a few
seconds and wait for LED to flash.
If the LED does not flash red/blue,
please replace with a spare CR2032
battery (supplied) and try again.
TROUBLESHOOTING BLUETOOTH®
Open Bluetooth® settings and
switch on.
Then switch on Mooni® and wait
until it appears in your device list.
Select Mooni® to pair with your
device.
If this doesn't happen, temporarily
remove any other Bluetooth® devices
you have (you can reconnect them
later) listed and/or reboot your
cellphone. For Android users, check
your volume key is configured to
operate the shutter in accordance
with Step 4 above.
•
•
•
•
•
•

TROUBLESHOOTING TAKING
PHOTOS
Open your device's native camera
app
Press button to take a photo
If Mooni® does not remotely operate
your camera, check the LED is only
flashing red indicating successful
pairing. If not, follow
TROUBLESHOOTING BLUETOOTH®
above. If so, download the "Camera
360" app by PinGuo Inc. from your
app store. Note that although Mooni®
may work with other 3rd party
camera apps, we do not
recommend or support them.
CONTACT TECHNICAL SUPPORT IN
THE FIRST INSTANCE
In the event that none of the above
works, please contact our technical
support team by emailing
support@igenio.co.uk quoting your
original order number. We kindly
request you do not leave negative
reviews without contacting our
support team first.
All products are covered by our
Lifetime Manufacturer's Warranty
and we are fully committed to your
100% satisfaction. We will do our
very best to assist you.
•
•

FCC STATEMENT
This device complies with Part 15 of
the FCC Rules. Operation is subject
to the following two conditions:
1 This device may not cause harmful
interference, and
2 This device must accept any
interference received, including
interference that may cause
undesired operation.
Warning: Changes or modifications not
expressly approved by the party
responsible for compliance could void
the user's authority to operate the
equipment.
NOTE: This equipment has been tested
and found to comply with the limits for a
Class B digital device, pursuant to Part
15 of the FCC Rules. These limits are
designed to provide reasonable
protection against harmful interference
in a residential installation.
This equipment generates uses and can
radiate radio frequency energy and, if
not installed and used in accordance
with the instructions, may cause harmful
interference to radio communications.
However, there is no guarantee that
interference will not occur in a particular
installation. If this equipment does
cause harmful interference to radio or
television reception, which can be
determined by turning the equipment off
and on, the user is encouraged to try to
correct the interference by one or more
of the following measures:
•
•
•
•
Reorient or relocate the receiving
antenna
Increase the separation between the
equipment and receiver
Connect the equipment into an outlet
on a circuit different from that to which
the receiver is connected
Consult the dealer or an experienced
radio/TV technician for help
RF WARNING STATEMENT
This equipment complies with FCC
radiation exposure limits set forth for an
uncontrolled environment. This device
has been evaluated to meet general RF
exposure requirement. This device can
be used in portable exposure condition
without restriction.

Please contact us at
support@igenio.co.uk
prior to returning any items.
We may require you to return the
faulty product for inspection or ask
you for photographs of the product
fault. We will require your proof of
purchase.
This does not affect your statutory
rights.
• accidental damage;
• normal wear and tear;
• general product misuse;
• damage caused through usage not
in accordance with the usage
instructions;
• damage caused by modifications
made by unauthorized 3rd parties.
LIFETIME WARRANTY
Mooni® comes with a Lifetime
Warranty against manufacturing
defects.
If a defect is found, we will be happy
to repair or replace your product. A
defect is defined as any fault in the
product’s materials or workmanship,
which is present at the time of
purchase.
The following conditions are not
classified as defects and are not
covered by the Manufacturer’s
Warranty:

Antes de retornar ningún artículo le
rogamos se ponga en contacto con
nosotros en
customerservice@igenio.co.uk
Es posible que le pidamos devolver el
producto defectuoso para su
inspección o realizar fotografías del
fallo. Deberá presentarnos su prueba
de compra.
Esto no afecta a sus derechos como
consumidor.
• daños accidentales;
• desgaste por uso normal;
• incorrecta utilización general del
producto;
• daños provocados por una
utilización no conforme con las
instrucciones de uso;
• daños provocados por modifica
ciones efectuadas por terceros no
autoriza dos.
GARANTÍA DE POR VIDA
Mooni® se proporciona con garantía
de por vida frente a defectos de
fabricación.
En caso de encontrar un defecto,
estaremos encantados de reparar o
sustituir su producto. Como defecto
se entiende cualquier fallo presente
en el momento de la compra en los
materiales del producto o en la mano
de obra.
Die folgenden Bedingungen werden
nicht als Defekte eingestuft und fallen
nicht unter die Herstellergarantie:

ESPECIFICACIONES DEL PRODUCTO
• Producto: disparador a distancia
por Bluetooth
®
Mooni
®
• Versión de Bluetooth: 3.0
• Juego de chips: Airoha 52014
• Frecuencia:
2,4 GHz - 2,4835 GHz
• Compatibilidad:
Android 4.3+ e iOS 5.0+
• Distancia de funcionamiento: 10m
• Tipo de batería: ion de litio
• Modelo y cantidad: 1 x CR2032
PRODUCT SPECIFICATION
• Product: Mooni®
Bluetooth® Remote Shutter
• Bluetooth® Version: 3.0
• Chipset: Airoha 52014
• Frequency: 2.4GHz - 2.4835GHz
• Compatibility:
Android 4.3+ and iOS 5.0+
• Working Distance: 10m
• Battery Type: Lithium-Ion
• Model & Quantity: CR2032 * 1

The Selfie World brand and logo is owned by iGenio Ltd,
A company registered in the UK.
Learn More About
Mooni
®
at
http://Selfie.World
For all product-related or technical
enquiries, please contact us at
support@igenio.co.uk
Mooni®
brand, logo & trademark
is owned by iGenio Ltd, registered
in the UK.
Conozca más sobre
Mooni
®
en
http://Selfie.World
Para cualquier consulta técnica o
relacionada con el producto, póngase en
contacto con nosotros en
support@igenio.co.uk
La marca, el logo y el nombre comercial
Mooni® son propiedad de iGenio Ltd.,
una empresa registrada en el Reino Unido.
Follow Us For Great Discounts
& The Latest Promotions
instagram.com/goselfieworld
facebook.com/goselfieworld
twitter.com/goselfieworld
Follow Us For Great Discounts
& The Latest Promotions
instagram.com/goselfieworld
facebook.com/goselfieworld
twitter.com/goselfieworld