iLuv Creative Technology AUDCLICK Wi-Fi&Bluetooth; Speaker User Manual Audclick QSG 072516
iLuv Creative Technology Wi-Fi&Bluetooth; Speaker Audclick QSG 072516
User Manual
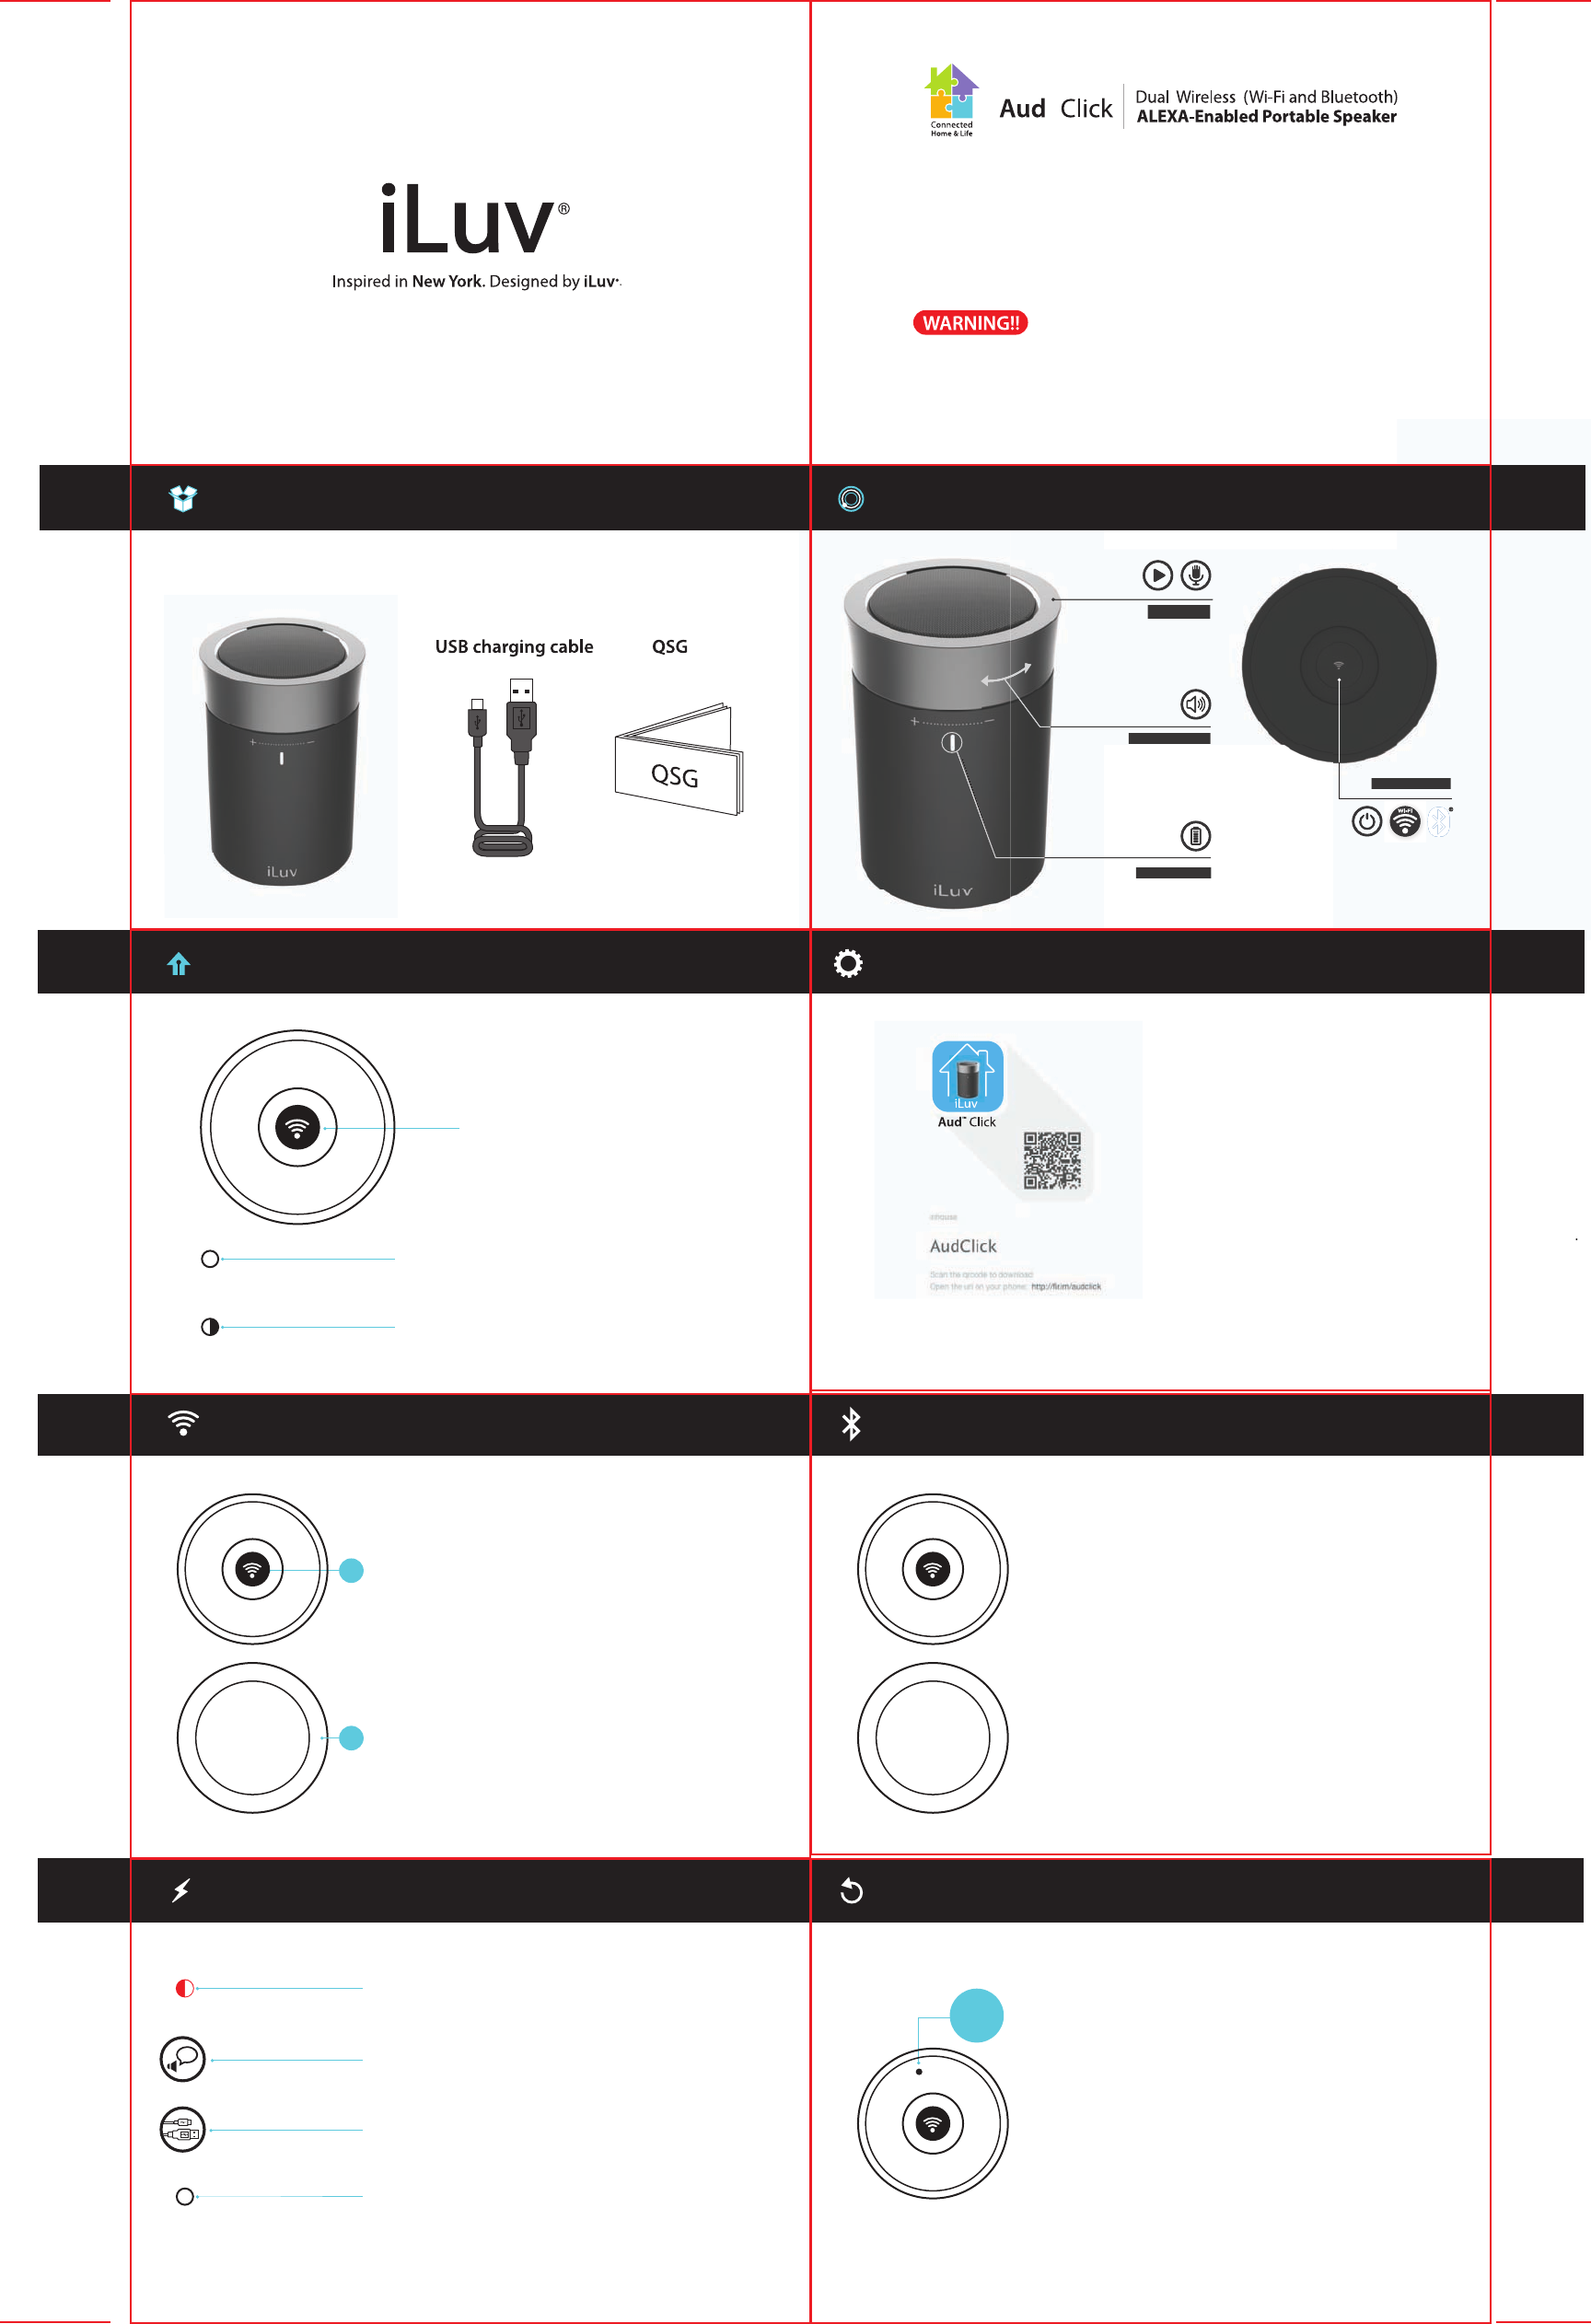
Bottom button
Top button
LED indicator
Volume control
THE AUD CLICK IS DESIGNED FOR HOME USE WI-FI CONNECTIVITY AND
WILL NOT FUNCTION PROPERLY WITHIN AN OFFICE ENVIRONMENT
WHERE WI-FI PROTECTIVE FIREWALLS ARE OPERATING.
Quick Start Guide
Bottom button
Top button
LED indicator
Volume control
1
2
Press the top
button to
play/pause music
Turn clockwise to
raise volume.
Turn counter clockwise
to lower volume.
1. If battery is low, the LED indicator will ash red.
Voice promptwill tell you that battery is low and
it is time to charge the Aud Click.
2. Using the included USB charging cable,
connect one side to your PC or smartphone's USB port
(DC 5V, 1A output) and the other side to the Aud Click.
3. While charging, LED indicator will remain red until fully
charged. Once fully charged, LED will turn o.
Noted : We recommend you keep charging the unit if you set alarms
to prevent battery low and missed alarm.
WHAT’S INCLUDED CONTROLS
Aud Click Main Unit
SETTING UP
WIFI OPERATION BLUETOOTH PAIRING (MANUALLY)
BATTERY CHARGING RESET THE UNIT
POWERING UP
1. Power on the unit. Unit should be under WiFi mode
and white LED will stay on.
2. Press and hold the top ring for 2 seconds, until you can hear
prompting tone and white LED is ashing. Then, you can
command Aud Click to operate by pressing top button
and using voice command.
Below is some example:
• Play Music - Click and Say “Play music on iTunes Radio”
• Weather - Click and Say "What's the weather in New York?"
• Spelling - Click and Say "How do you spell Apple?"
1. Download the Aud Click APP
to your smartphone (available in the apple
or android app stores)
2. Follow the procedure on the app
to setup Aud Click
3. On the app, go to Amazon and input
your Amazon account info to set up Alexa.
After set up, Aud Click can run by itself without APP.
White LED
WiFi is connected
Flashing white LED
WiFi is not connected
Flasinhg Red Indicator
Time to charge
Voice Prompt
“Battery is low”
USB charging cable
DC 5V, 1A output
White LED
Fully charged
1. Power on the unit, and double click the top ring.
LED indicator will change to blue indicating that
the Aud Click is in Bluetooth mode.
2. Press the WPS button, located at the bottom of the unit once.
Aud Click will go into Bluetooth pairing mode and LED indicator
will ash blue.
3. On your smartphone or tablet turn on Bluetooth and then select
"iLuv AudClick". Once Bluetooth is connected,
Blue LED will stop ashing and stay on.
4. Press the top ring to play/pause music.
Turn the silver ring clockwise to raise the volume,
and counter-clockwise to lower the volume.
5. Double click the top ring to switch back to WiFi mode.
1. If the unit behaves abnormally, just use a paper clip or
similar shaped tool to press the reset button which is located
at the bottom of the unit.
2. After reset is done, you need to set it up it
from the beginning again.
RESET
To power on, press and hold the
WPS (WiFi protected setup) button,
located at the bottom of the unit
for 2 seconds. Once on, wait a few
seconds for unit to start up and Aud
Click will default into WiFi mode.
LED will ash white until
connected. Once WiFi is success-
fully set up, LED will not ash but
will light up white.
Remark: USB only charging function
THE DISPOSAL OF ELECTRICAL AND ELECTRONIC EQUIPMENT WASTE PRODUCTS ON THE P
ART OF FINAL USERS IN THE EUROPEAN UNION
This symbol on the product or on the container indicates that this product cannot be eliminated with the
general waste.The user is responsible for eliminating this kind of waste by throwing them away at a
“recycling point” specifically for electrical and electronic waste.Selective collection and electrical
equipment recycling contribute to preserve natural resources and warrant waste recycling to protect
environment and health.In order to receive further information about electrical and electronic waste
collecting and recyling,contact your Local Council,the service of household waste or the establishment
where the product was acquired.

FCC Statement:
This device complies with part 15 of the FCC Rules. Operation is subject to the following
two conditions: (1) This device may not cause harmful interference, and (2) this device
must accept any interference received, including interference that may cause undesired
operation.
This equipment has been tested and found to comply with the limits for a Class B digital
device, pursuant to part 15 of the FCC Rules. These limits are designed to provide
reasonable protection against harmful interference in a residential installation. This
equipment generates, uses and can radiate radio frequency energy and, if not installed
and used in accordance with the instructions, may cause harmful interference to radio
communications. However, there is no guarantee that interference will not occur in a
particular installation. If this equipment does cause harmful interference to radio or
television reception, which can be determined by turning the equipment off and on, the
user is encouraged to try to correct the interference by one or more of the following
measures:
—Reorient or relocate the receiving antenna.
—Increase the separation between the equipment and receiver.
—Connect the equipment into an outlet on a circuit different from that to which the
receiver is connected.
—Consult the dealer or an experienced radio/TV technician for help.
Caution: Any changes or modifications not expressly approved by the party responsible
for compliance could void the user's authority to operate the equipment.
This equipment complies with FCC radiation exposure limits set forth for an uncontrolled
environment.
This transmitter must not be co-located or operating in conjunction with any other antenna or
transmitter.

Use the This product in the environment with the temperature between -10oC and 50oC.
For the following equipment:
Is in compliance with the essential requirements and other relevant provisions of Directive 1999/5/EC,
The equipment was passed. The test was performed according to the following European standards:
ETSI EN 300 328 v1.9.1 (2015-02); ETSI EN 301 489-1 V1.9.2: 2011-09; ETSI EN 301 489-17 V2.2.1: 2012-09;
EN 62479:2010