About BMPRO
With over 50 years' experience in power solutions combined with manufacturing and design facilities in Melbourne, Australia, BMPRO are the leading experts in RV power and control management. Inspired by the great outdoors, BMPRO has created a range of rugged, smart, and reliable products to power your adventures. Their range of battery, power, and RV management and control systems provides peace of mind, allowing users to relax in even the most far-flung destinations, knowing they have control over their power needs. To learn more about the BMPRO range of products, please visit their website teambmpro.com.
Safety Precautions
Please read the Safety Precautions before installing or using the OdysseyControl and OdysseyLink. Observe all precautions without fail. Failure to do so may result in personal damage or serious injury, potentially causing loss of life.
- ⚠️ Do not drop or vigorously shake the product, its accessories, or batteries, as this may cause damage, failure, fire, or explosion.
- Stay away from magnetic equipment. Radiation may erase information stored on this product, causing it to become inoperative.
- Please note that your battery can only reach top performance after being fully charged and discharged two or three times.
- Keep this product and your battery dry and do not expose it to water or water vapour. Do not use near water bodies like pools or ponds. Do not operate with wet hands, as contact with water can cause short-circuiting, corrosion, or electric shock.
- Do not use in environments that are excessively hot, cold, dusty, or humid, or where exposed to magnetic fields or long periods of sunshine, as this may cause the product or battery to fail, catch fire, or explode.
Product specifications are subject to change and improvement without notice.
About the OdysseyControl
The OdysseyControl is a sleek, in-built, app-driven battery monitor and control console that operates with BMPRO's BatteryPlus35 via the OdysseyLink. The Odyssey system offers users a new level of comfort and knowledge about their caravan's battery and power consumption, including:
- Full visibility and control of the caravan's battery system (status, power consumption, available charge sources).
- Monitoring of clean and dirty water tanks and caravan temperature.
- Control of caravan features, including lights, slide-out, and water pumps.
Note: Sensors are compatible only with OdysseyLink103.
What's Included
Included with this product are:
- OdysseyControl
- OdysseyLink
- OdysseyControl Owner's Manual
Description of Parts
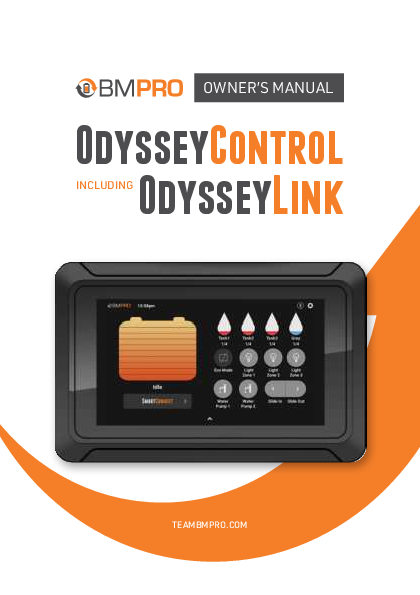
OdysseyControl App Interface
The OdysseyControl displays various information and controls via its app interface. Key elements include:
- 1. Pairing Status: Indicates Bluetooth pairing status between OdysseyControl and OdysseyLink. A connected status is shown with a specific icon, while disconnected status is indicated differently. Be aware that when disconnected, displayed information may be incorrect.
- 2. Settings Menu: Access to the OdysseyControl settings and functions.
- 3. Tanks: Monitor water levels for up to four water tanks. Tank properties like name and source (clean/dirty) are configurable in the Settings Menu. A 'Clean' tank indicator turns red when almost empty. A 'Dirty' tank indicator turns red when full and needing emptying.
- 4. Eco Mode: Powers off all caravan loads connected to the BatteryPlus35 load terminal block, except for terminal 1. Battery charging is not affected. This mode is useful for saving remaining battery power when charging is limited. When charging, Eco Mode dedicates all available charging current to the battery.
- 5. Light Zones: Control lights in three dedicated zones. Lights can be renamed via the Settings Menu.
- 6. Water Pumps: Turn water pumps on and off.
- 7. Slide Outs: Engage the caravan's slide-out mechanism by pressing the button; release to stop. As a safety feature, slide-outs cannot be operated from the OdysseyControl if the BatteryPlus35 is connected to an AUX source (e.g., while driving). Operation is available when the towing vehicle is parked.
- 8. Battery Status: Displays the battery's power capacity and usage. Statuses include 'CHARGING' (indicated by a lightning symbol ⚡), 'DISCHARGING' (shows time remaining before full discharge), and 'IDLE' (no current flow).
- 9. Swipe Up: Access more information on caravan battery and power consumption.
Battery and Power Consumption Display:
- 10. Battery Amps: Charging/discharging current of the battery.
- 11. Battery Volts: Voltage of the battery.
- 12. Input Source: Power sources used for charging and powering loads (e.g., Solar ☀️, AUX, MAINS).
- 13. Loads: Current supplied by the BatteryPlus35 to power all connected loads.
- 14. Temperature: Indicates the caravan's internal temperature. A wired temperature sensor can be connected to the OdysseyLink.
- 15. SmartConnect: Access the SmartConnect sensor screen.
OdysseyLink
The OdysseyLink is a key component for the Odyssey system.
- 1. Pairing Button: Press this button to enable Bluetooth pairing between the OdysseyLink and the OdysseyControl.
- 2. LED Status Indicator: Indicates the operational/pairing status. The LED blinks green when the OdysseyLink is ready to pair.
- 3. Serial Number: Required when pairing the OdysseyLink to the OdysseyControl.
Using the Odyssey
Pairing the OdysseyLink
Follow these instructions to pair the OdysseyLink to the OdysseyControl:
- Ensure the OdysseyLink is connected to the BatteryPlus35 and that the BatteryPlus35 is powered on.
- Press the Pairing Button on the OdysseyLink. The LED Status Indicator will flash green, giving you 30 seconds to complete the pairing.
- Launch the Odyssey App and press 'Scan' when prompted.
- The Odyssey App will search for nearby OdysseyLink devices. A pop-up window will list available devices.
- Select the device corresponding to the last six digits of the OdysseyLink's serial number.
If successful, the Pairing Status icon on the Odyssey App will confirm that the OdysseyControl and OdysseyLink are connected.
Configuring a New Battery
When replacing your caravan battery, ensure it is correctly configured with the OdysseyControl. Proper configuration ensures the BatteryPlus35 selects optimal charging parameters and the software accurately estimates battery usage, including capacity and time remaining.
To configure a new battery:
- Power down the BatteryPlus35.
- Replace the battery.
- Repower the BatteryPlus35 via the OdysseyControl.
- Click on the Settings Menu icon ⚙️.
- Scroll down to the Battery Capacity field.
- Enter your battery's capacity in Ampere-hours (default is 100Ah).
- If you have a BatteryPlus35-HA model, select the appropriate Battery Type: Lead Acid or LiFePO4 (default is Lead Acid).
- Return to the Odyssey App home screen.
Controlling Loads with the OdysseyControl
Controlling loads is simple, activated by a button press. A light grey icon indicates a load is on, while dark grey indicates it is off. The following scenarios describe situations where a load may be unusable:
Low Battery Voltage
If the caravan's battery voltage drops to low levels, the BatteryPlus35 will automatically enter ECO Mode, stopping power to all caravan loads connected to the BatteryPlus35 load terminal block (except terminal 1). In ECO Mode, load control from the OdysseyControl is disabled, though battery capacity and consumption can still be monitored. If the voltage drops further, the BatteryPlus35 enters Storage Mode, disconnecting power to the OdysseyLink and disabling Bluetooth communication. Battery capacity and consumption monitoring will cease. This is to conserve remaining battery power until it can be recharged.
User Enabled ECO Mode
Control of caravan loads from the OdysseyControl is unavailable if ECO Mode is enabled via the Odyssey App. To regain control, turn ECO Mode off.
User Enabled Storage Mode
Control of caravan loads from the OdysseyControl is unavailable if the Remote Switch connected to the BatteryPlus35 is activated to enter Storage Mode. To regain control, switch the Remote Switch off.
Customise View
The 'Customise View' option within the Settings menu allows you to modify the appearance of the Odyssey App based on your RV accessories. You can use this feature to disable functions not present on your RV, such as slides or specific water tanks.
Pairing and Using Sensors
Pairing SmartSense Propane Sensor
- To access the sensors page, press the "SENSOR" button at the top right corner of the OdysseyControl App home screen.
- A new page will appear with an "ADD" button. Pressing "Add" leads to a page displaying "Pair" and "Unpair" buttons.
- Pressing the "ADD" button allows selection between two different bottle sizes.
- After selecting the desired bottle size, press the "Pair" button.
- Press the "Sync" button on the gas sensor to start pairing.
If pairing is successful, the screen will indicate the tank level. If pairing is unsuccessful, a message will appear: "Pairing Failed: Cannot Detect Sensor". To unpair, press the red "UNPAIR" button under the corresponding tank.
Pairing SmartPressure Tire Pressure Sensor
- To pair the pressure sensor, press the "Pair" button at the location where you intend to install the pressure sensor.
- After pressing "Pair", install the pressure sensor on the selected tire.
- If pairing is successful, the tire icon will change to white, and the tire's pressure and temperature will be displayed.
- If pairing is unsuccessful, a notification message "Pairing Failed: Cannot Detect Sensor" will appear, with options to "Try again" or "Cancel".
- To unpair the SmartPressure sensor, press the "Unpair" button below the SmartPressure tile, then press the red "Unpair" button to complete the process.
Pairing SmartTemp Temperature Sensor
To pair the temperature sensor, press the "ADD" button.
- A list will appear to select the temperature sensor location (e.g., Fridge, Freezer).
- Turn on the temperature sensor by pressing and holding its power button for 3 seconds.
- Press the pair button to start pairing.
After successful pairing, temperature sensors will be listed, and temperatures will be indicated. If pairing is unsuccessful, a message "Pairing Failed: Cannot Detect Sensor" will appear. To unpair the SmartTemp sensor, press the "Unpair" button below the SmartPressure tile, then press the red "Unpair" button to complete the process.
Servicing
Do not attempt to service, dismantle, modify, or repair the OdysseyControl or OdysseyLink yourself, as this will void your warranty. For servicing requirements, please consult your BMPRO dealer or visit teambmpro.com for assistance.
FAQs and Troubleshooting
For further assistance with troubleshooting your OdysseyControl or OdysseyLink, contact the customer service team online at teambmpro.com/technical-support or call (03) 9763 0962.
OdysseyControl Connectivity
Does the OdysseyControl connect to Wi-Fi?
Yes, the OdysseyControl can connect to your local Wi-Fi network:
- Tap the Main screen icon ⚙️ to return to the OdysseyControl main screen.
- From the main screen, tap on the Settings icon ⚙️.
- Select 'Network & Internet', then 'Wi-Fi', and choose your network to connect.
How do I update the Odyssey App on my OdysseyControl?
The OdysseyControl is set up for automatic Odyssey App updates. Ensure you are:
- Connected to the internet.
- Logged into your Google account.
The Odyssey App will update automatically when a new release is available.
How do I create a Google account?
If you do not have a Google account, create one by clicking the Google Play icon on the OdysseyControl main screen and following the prompts. For more help, consult the online guide.
The screen on my OdysseyControl froze?
To reset your OdysseyControl, insert a paper clip into the reset pin hole located on the top of the unit.
Load Control Troubleshooting
I think one of my loads is not receiving power?
The load may be faulty, causing its electronic load fuse to activate and turn the load off. If this is the case, the LED Status Indicator on the BatteryPlus35 will flash solid red. Please disconnect the faulty load from the BatteryPlus35.
None of my loads appear to be powered and I can't use the OdysseyControl to power the loads on again?
In this situation, the OdysseyControl will display a pop-up message to help diagnose why loads are not powered. Common causes include:
- Eco Mode is Switched On: This message appears if the battery button on the OdysseyControl was selected. The battery icon will be light grey. Press the battery button again to restore power and control of loads.
- Low Voltage Mode is Switched On: This message appears if the BatteryPlus35 has entered the first stage of low voltage disconnect (ECO Mode). All icons will be dark grey. The Pairing Status Icon will indicate pairing status. Connect the BatteryPlus35 to a power source and begin battery charging.
- No Bluetooth Connection: All icons will be dark grey. The Pairing Status Icon will indicate that the OdysseyControl is not paired to the OdysseyLink. This message may appear if:
- The switch connected to the BatteryPlus35 Remote Switch input is activated (deactivate the switch).
- The BatteryPlus35 has entered the second stage of low voltage disconnect (Storage Mode). Connect the BatteryPlus35 to a power source and begin battery charging.
Pairing Issues
I've paired the OdysseyControl to the OdysseyLink, but the Pairing Status Icon shows they are not connected?
Check the following:
- Ensure Bluetooth on the OdysseyControl is turned on.
- Ensure the switch on the BatteryPlus35 Remote Switch input is not activated.
- Ensure the BatteryPlus35 is not in Storage Mode, as this turns power to the OdysseyLink off, preventing communication.
If the BatteryPlus35 is in Storage Mode, the operational LED status indicator on the BatteryPlus35 will emit a single yellow flash. Connect the BatteryPlus35 to a power source and begin battery charging. When sufficiently charged, communication between the OdysseyLink and OdysseyControl will automatically reestablish.
I've fitted a battery to the BatteryPlus35, but it's not detected in the OdysseyControl?
Check the following:
- Battery connections are tight and not loose or corroded.
- Battery polarity is correct: red lead-positive, black lead-negative.
- The dealership-fitted in-line fuse with the caravan battery is fitted and not blown. The correct value is 40A.
Appendices: Specifications
OdysseyControl Specifications
| Input Voltage: | 5V DC |
| Input Current: | 3A |
| Charger Input Voltage: | 12V |
| Communication/Charger Cable: | USB-to-microUSB |
| Weight: | 0.5 kg |
OdysseyLink Specifications
| Input Voltage: | 8-15V DC |
| Battery Drain: | < 21mA |
| Ambient Temperature: | 0-50°C |
| Cable Length: | 0.5m |
Warranty Terms and Conditions
Registering your BMPRO product is an important step to ensure you receive all entitled benefits. Please visit www.teambmpro.com to complete the online registration form.
- BMPRO goods come with guarantees that cannot be excluded under Australian Consumer Law. You are entitled to a replacement or refund for major failure and compensation for any reasonably foreseeable loss or damage. Goods must be repaired or replaced if they fail to be of acceptable quality and the failure does not amount to a major failure. These benefits are in addition to your other rights and remedies under law (the Australian Consumer Law).
- BMPRO warrants products against defects for two years from the original date of purchase. Proof of purchase is required for warranty claims.
How to Protect Your Rights Under This Warranty:
- The OdysseyControl and OdysseyLink are designed for installation by a suitably qualified installer. Inspect the product for visible manufacturing defects before installation. BMPRO accepts no responsibility beyond consumer guarantee obligations for incorrectly installed products.
- This warranty does not cover product failures or defects caused by, or associated with: failure to install or maintain correctly, unsuitable physical or operating environment, accident, acts of God, hazard, misuse, unauthorized repair, modification, alteration, natural disaster, corrosive environment, insect or vermin infestation, and failure to comply with additional instructions.
- BMPRO may seek reimbursement for costs incurred if a product is found to be in proper working order or damaged due to warranty exclusions listed in point 4.
- To enquire or make a claim under this warranty, follow these steps:
- A. Prior to returning a BMPRO product, email service@teambmpro.com to obtain a Return Material Authorisation (RMA) number.
- B. Package and send the product to: BMPRO Warranty Department, 19 Henderson Road, Knoxfield, VIC 3180. Mark RMA details on the packaging.
- C. Include a copy of the proof of purchase, a detailed description of the fault, and your contact details (phone number and return address).
- BMPRO will not be liable for any costs, charges, or expenses incurred in returning a product to initiate a warranty claim.


