Contents
- 1. User Manual Warrenty
- 2. User Guide
User Guide
Connect Ooma Telo to your integrated router
Using the Ethernet cable a provided, connect the
TO INTERNET port to any available Ethernet port
on your integrated modem/router.
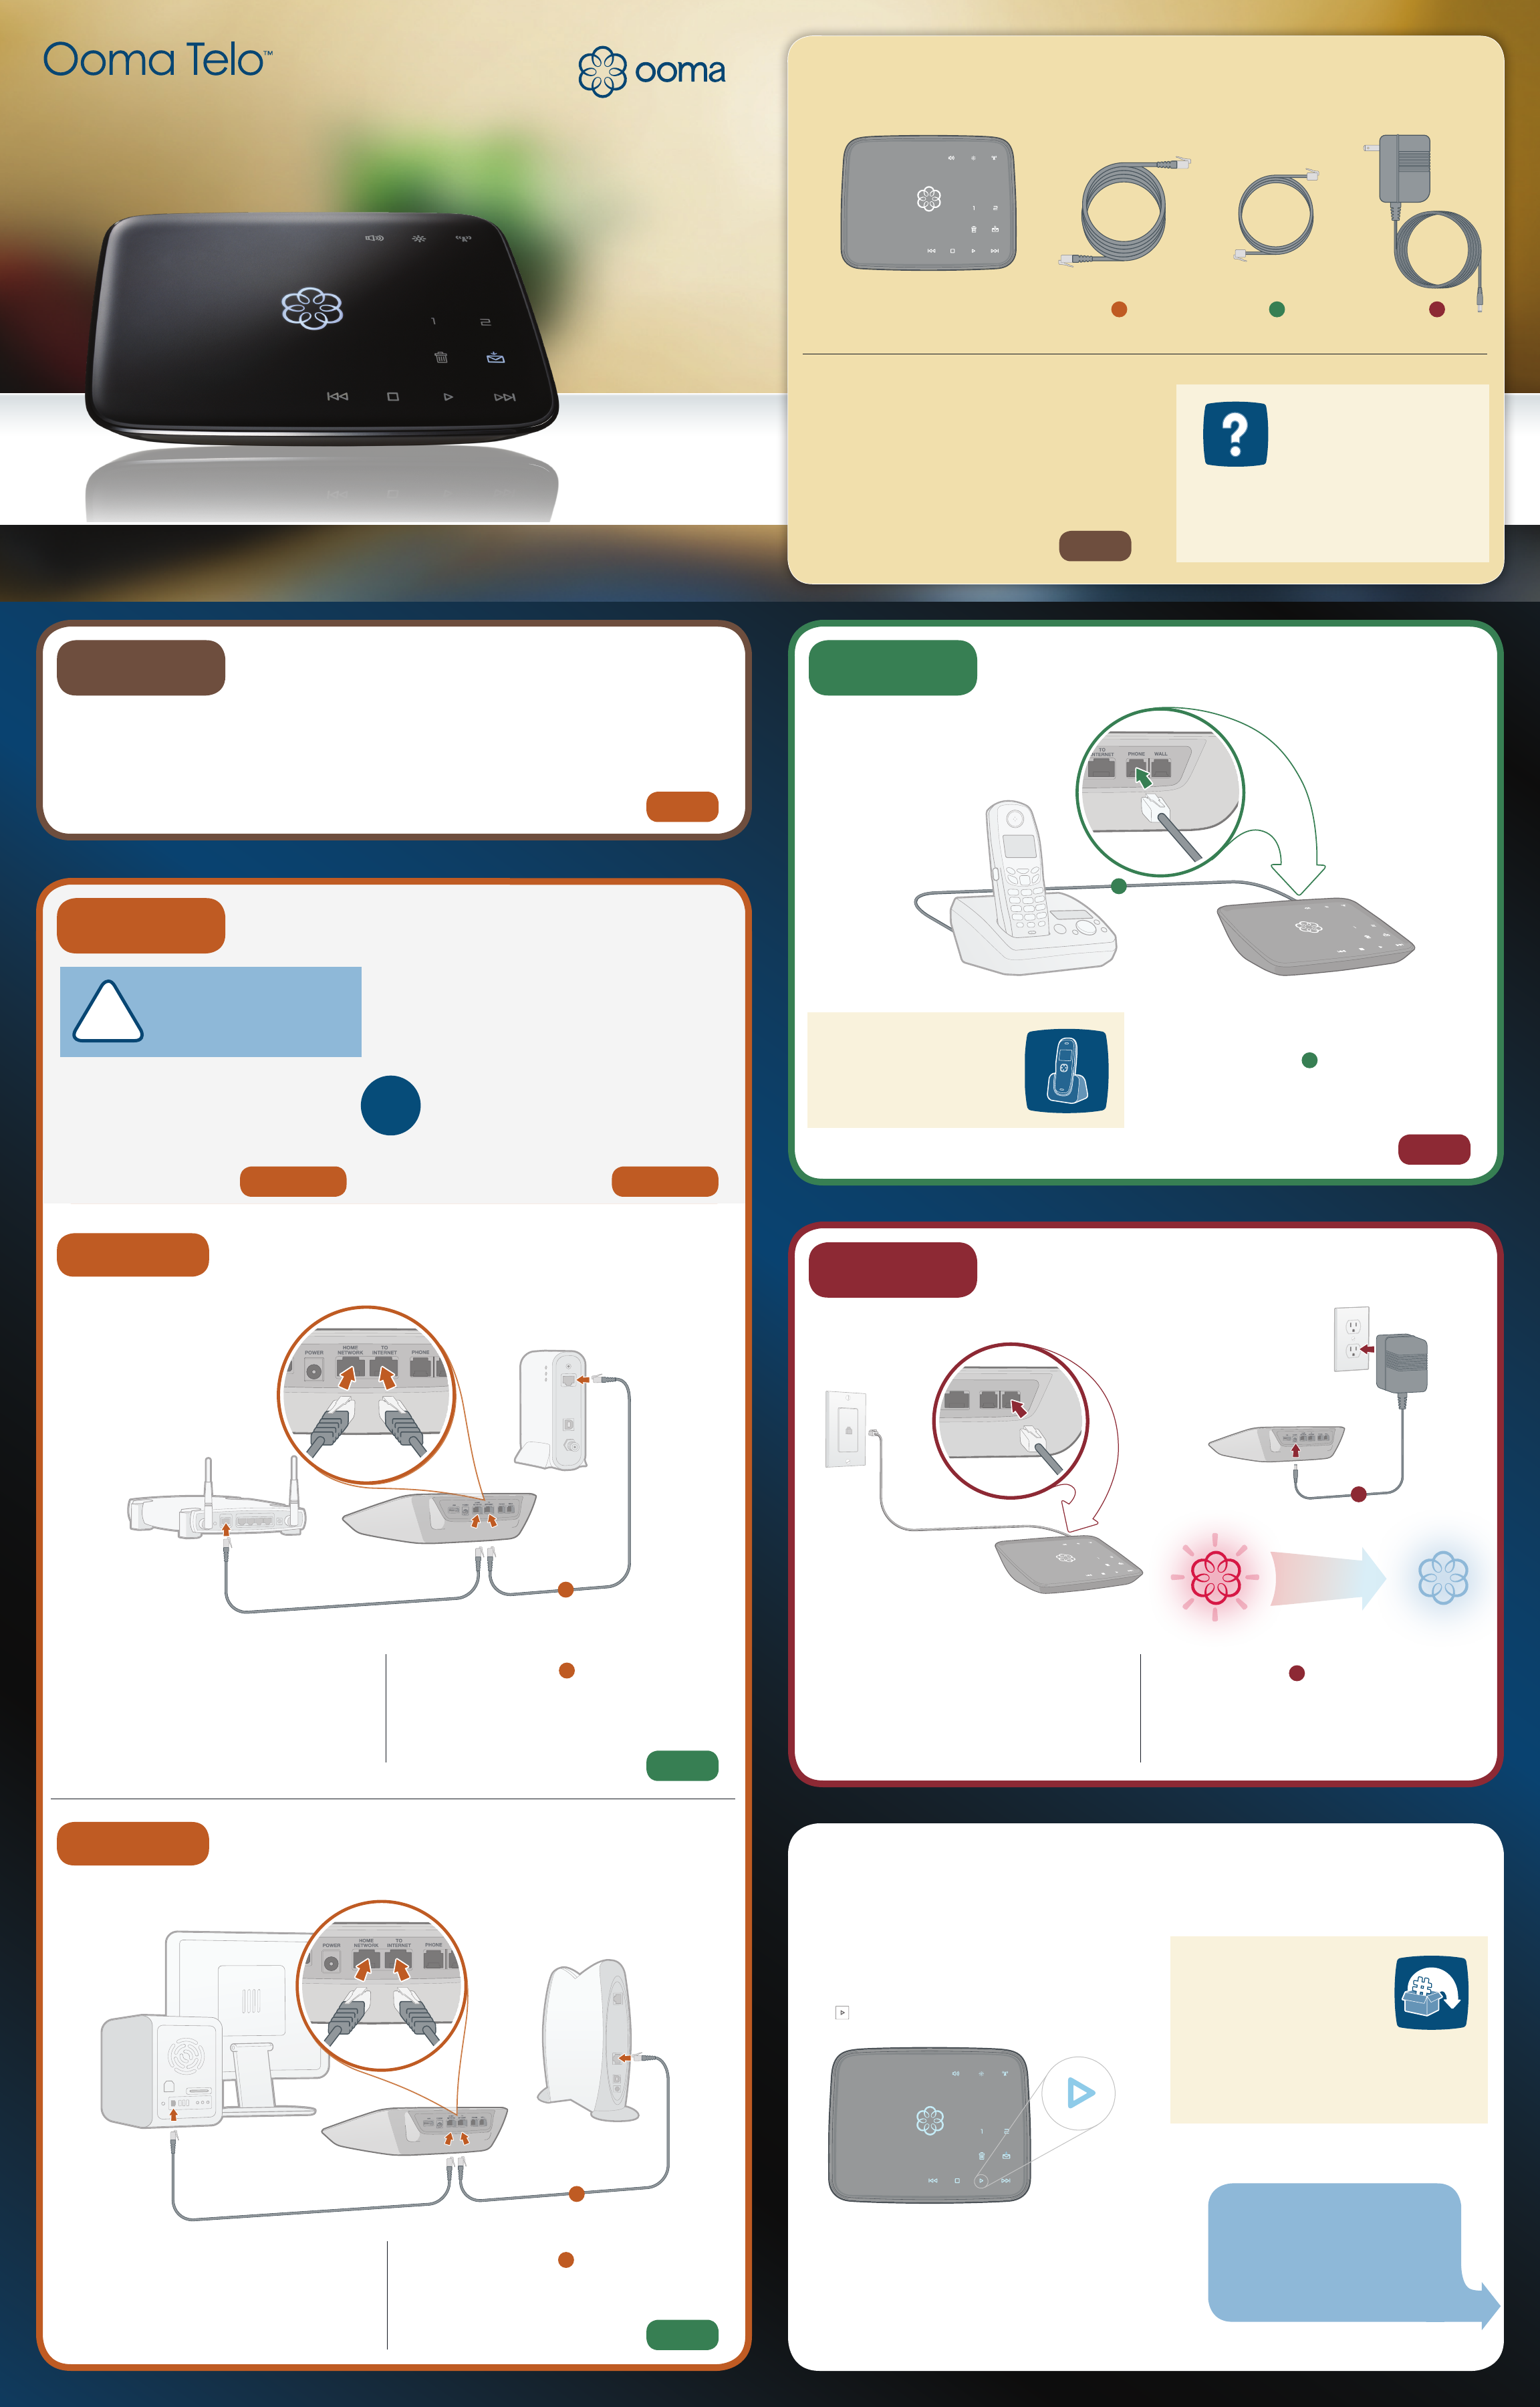
Connect your computer to Ooma Telo (optional)
If your computer is connected directly to your router,
disconnect the end plugged into the router and plug
it into the HOME NETWORK port. This allows Ooma
to prioritize your phone calls.
In-Service
Not In-Service
Transfer your number
In most cases, you can port your
existing phone number to Ooma for
a nominal fee. If you plan to do so,
it’s important to know the process
typically takes 3-4 weeks and you
must maintain your existing phone
service until the port completes.
To learn more, visit:
www.ooma.com/port
TM
Quick Start Guide
Ooma Telo™ Package Contents
Connect Ooma Telo to your router
Unplug the Ethernet cable from your modem and
plug it into the HOME NETWORK port. The other
end of this cable should be connected to the “WAN”
or “Internet” port on your router.
Plug your phone into Ooma Telo
Using the phone cable b provided, connect your
corded phone or cordless phone base station to the
PHONE port of Ooma Telo.
Connect Ooma Telo to your landline
(required only with landline option)
If during activation you selected to use Ooma with
your landline, you MUST connect the WALL port to
your phone jack. If your DSL and phone service are
on the same incoming line, you must connect the
WALL port to your phone jack through a DSL lter.
Connect Ooma Telo to your modem
Using the Ethernet cable a provided, connect the
TO INTERNET port of Ooma Telo to the Ethernet port
on your modem.
Power up
Plug the AC adapter c provided into the POWER
port, then turn on your modem and router. The Ooma
logo will start to blink red as it boots up. Within 60
seconds, the Ooma logo should turn blue. To conrm
Ooma is working, pick up the phone and listen for the
signature Ooma dialtone.
E
ORK
TO
INTERNET WALL
PHONE
Connect Between Your Modem and Router
(Recommended)
Getting Started
Installing Ooma™ is easy – most users are up and calling
in less than 15 minutes. This guide will step you through
the setup of Ooma Telo as well as the basics of using the
Ooma service.
Congratulations, You’re Done! What’s Next?
Place your rst phone call
Use the phone connected to Ooma Telo and dial just
like you always have.
Setup your voicemail
Pick up the phone connected to Ooma Telo and press
the key. Follow the voice prompts.
Check out My Ooma
Get the most out of your Ooma system by visiting:
http://my.ooma.com
You’ll be able to check your voicemail and call logs,
congure your preferences, update your 911 address
and more!
b
c
a
a
See completed
setup on backside
Connect Behind Your Integrated Modem/Router
Go to Step 3
Go to Step 4
Go to Step 3
Phone Jack
Power Outlet
Corded or
Cordless Phone
Router
Modem
Computer
Integrated Modem/Router
Option A: Separate modem and router:
Installing the Ooma Telo betwen your modem
and router will result in the best voice quality.
This setup allows Ooma to prioritize your phone
calls over other network trafc.
Go To Option 2A Go To Option 2B
Go to Step 1
abc
Ooma Telo AC Adapter
Ethernet Cable Phone Cable
Telo™
!Turn Off Network Devices
Before continuing, we recommend that
you turn off your modem and router.
Begin by activating your Ooma Telo device online. Open a web browser to: http://www.ooma.com/activate
Select your phone number, register your 911 address and create your My Ooma account. At the end of the activation
process, we recommend that you download a copy of the User Guide in case you need to refer to it during the
installation process: www.ooma.com/userguide
Identify whether you have a standalone router (modem and
router are two separate devices) or an integrated modem/
router (modem and router are combined into one device).
Then select from the following two options:
Activate Online
Option B: Integrated modem/router:
Installing the Ooma Telo behind your integrated
modem/router will be very straightforward, but be
aware that other network trafc can disrupt the
quality of your phone calls.
Step 1
Step 2
OR
700-0108-100
Connect Your Network
Option 2A
Option 2B
Ooma HD Handset
Did you know you can also use
Ooma Telo with up to six wireless
Ooma HD handsets? To learn more,
check out the Ooma Usage Guide
section on the back of this guide.
Have a Question or Need
Assistance?
Here is where you can look for help:
Frequently asked questions: www.ooma.com/faq
Online knowledgebase: www.ooma.com/support
User manuals: www.ooma.com/userguide
Community forum: forums.ooma.com
Live customer support: 1-888-711-OOMA (6662)
Go to Step 2
Connect Your Phone
Step 3
Finish Installation
Step 4
Basic Operation
Making and receiving calls
To place a call, pick up a phone connected to the
Ooma Telo and dial the phone number.
To answer a call, pick-up the phone when it rings.
Call-waiting
Switch to a second incoming call by pressing the
Flash key on your telephone handset. The current
call will be automatically put on hold.
Blocking Caller-ID
Disable your caller-ID on outgoing calls by dialing
*67 before you dial out. Visit my.ooma.com to
disable caller-ID for all calls.
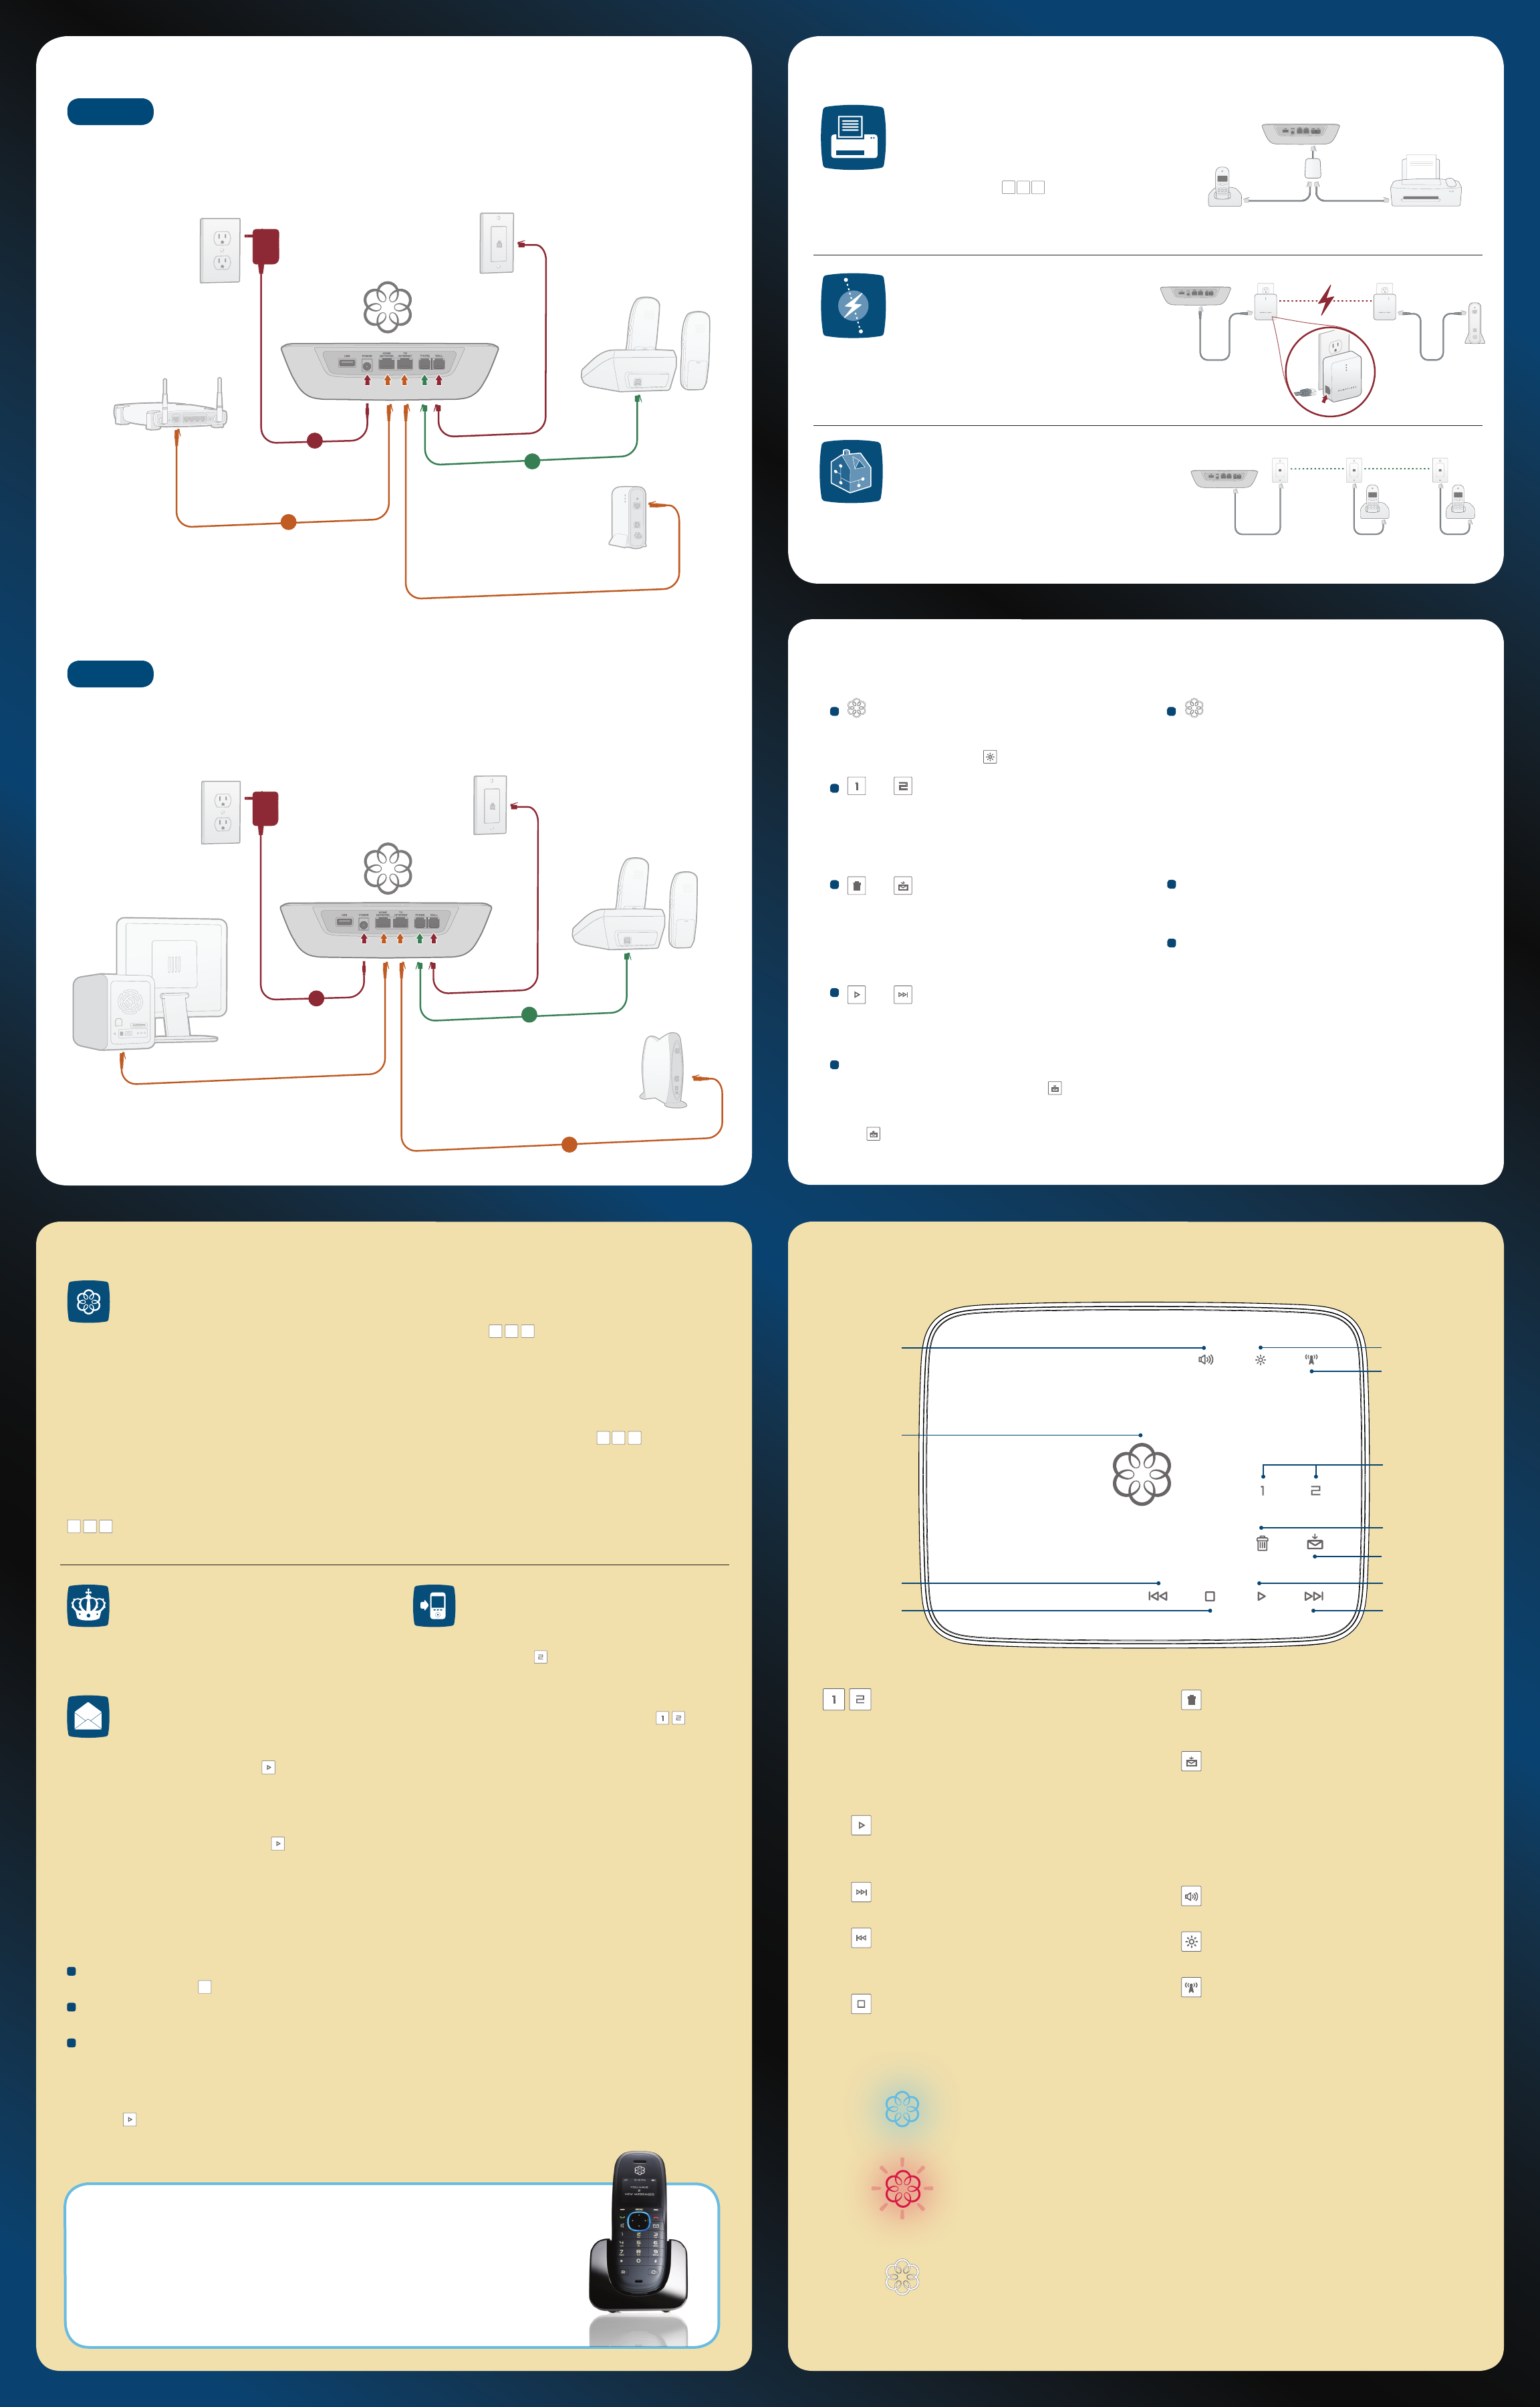
Completed Setup Diagrams Advanced Setup Options
Line 1 & Line 2 Key
A solid light shows your active call.
Press the current line to put the call on hold.
Press the other line to switch to the other call.
Press both at the same time to create a 3-way
conference call.
Play Key
Press to hear your voicemail messages.
Key will blink when there are new messages.
Forward Key
Press to skip to the next message.
Reverse Key
Press to replay current message.
Press twice to skip to the previous message.
Stop Key
Press to stop playing messages.
Trash Key
Press to delete the current message during
playback.
Send-to-Voicemail Key
Press to save the current message during
playback.
Press to transfer an active call to voicemail.
Press-and-hold for three seconds to turn
Do not Disturb on or off (a solid light indicates
that all calls are sent directly to voicemail).
Volume Adjustment Key
Press to adjust the volume level.
Brightness Adjustment Key
Press to adjust the brightness level.
Page Key
Press to locate your Ooma HD handset.
Press-and-hold for three seconds to register a
new Ooma HD handset.
Quick Reference
Solid Blue Ooma Logo
Indicates your Ooma service is working. You will hear Ooma dialtone and
all Ooma services are operational.
Blinking Red Ooma Logo
Indicates your Ooma service is not working. All services are unavailable.
You will not hear any dialtone and will be unable to make or receive calls.
If you’re using Ooma with a landline, you will hear regular dialtone and can
make and receive calls using your landline. Calling charges may apply.
White Ooma Logo
Indicates Ooma device is not powered or that the brightness is turned
down (check the brightness level). If there is no power, you will not hear
any dialtone and will be unable to use your phone.
Reverse
Stop Forward
Play
Trash
Send-to-Voicemail
Ooma Logo
Brightness
Adjustment
Line 1 and Line 2
Page
Troubleshooting
or keys do not light up
Check that the device is properly powered and that
the brightness is set at a viewable level. To adjust the
brightness level, press the key.
and are solidly lit up
The Ooma Telo is unable to register with the Ooma
network. Verify that your Internet connection is working by
connecting a computer to the HOME NETWORK port and
browsing to a website such as: www.ooma.com
and are solidly lit up
The Ooma Telo cannot get a network connection. Review
the completed setup diagram and check that your network
cables are plugged in correctly. The TO INTERNET port
should show a green light. Reboot any network devices,
such as modems and routers.
and are solidly lit up
A phone line is not detected. Check that the WALL port
is plugged into a working phone jack. Applies only if you
selected the option to use Ooma with a landline backup.
Incoming calls do not ring your phone
When Do not Disturb is turned on, the key will be solid
and all incoming calls will go directly to voicemail without
ringing your phones. To turn off the feature, press-and-hold
the key for three seconds.
is blinking red
Check if your high-speed Internet connection is working by
browsing to www.ooma.com from a computer. Make sure
all network cables are plugged in snugly and that the TO
INTERNET port shows a green light. Reboot the Ooma Telo
device and any other network devices, such as modems
and routers, by pulling out the power and plugging it back
in. Wait a few minutes for everything to boot up.
Note: If you are using Ooma with a landline backup, check
that the WALL port is plugged into a working phone jack.
You don’t hear Ooma dialtone
If the Ooma logo is blue but you don’t hear dialtone, check
that your phone is correctly plugged into the PHONE port.
Voice sounds stuttery or constantly breaks up
Voice quality is dependent on the consistency of your
Internet connection. For best results, Ooma recommends
that Ooma Telo be connected between the modem and
router as shown in Completed Setup Diagrams Option A.
This allows your phone calls to be intelligently prioritized
over other network trafc.
You can optimize how ooma prioritizes your network trafc
by opening your web browser to http://setup.ooma.com.
Note that this page can only be accessed from a computer
connected directly to or behind the HOME NETWORK
port of the Ooma Telo.
Connecting a fax machine
A standard phone splitter can be used to connect a
phone and fax machine to the PHONE port of the
Ooma Telo.
When placing fax calls, you must dial *99 prior to dialing the
destination fax number. Successful faxing mainly depends on the
quality of your Internet connection.
To learn more, visit: www.ooma.com/fax
Relocating your Ooma Telo
If you want to place your Ooma Telo in a more
convenient location, you can use HomePlug
(powerline) adapters.
These devices can extend your broadband connection to any room
using your electrical wiring. With HomePlug, you’ll be able to connect
Ooma Telo anywhere in your home where you have a power outlet.
To learn more, visit: www.ooma.com/homeplug
Distributing dialtone to all phone jacks
You can use Ooma Telo to distribute dialtone to
all phone jacks in your home, allowing you to use
multiple phones with Ooma.
This advanced setup requires disconnecting your home phone wiring
from your telephone company before connecting it to Ooma Telo.
To learn more, visit: www.ooma.com/homedistribution
Ooma Usage Guide
Corded or
Cordless Phone
Power Outlet
Modem
Router
a
b
c
Advanced Features
Making two calls at once
Simply press the line key or Flash key on your
handset and you’ll get a new Ooma dialtone.
Three-way conferencing
With calls on both lines, you can press the keys
simultaneously to bridge both lines together.
Call forwarding and Multi-Ring
Afraid to miss a call? Setup your Ooma system to
forward calls to your cell phone. Choose to forward
all calls, only when your Internet is down, or ring your
home phone and cell phone at the same time. Set this
up anytime at my.ooma.com.
Blocking telemarketers
Blacklists have been designed to help you lter
out telemarketers and other unwanted callers. Visit
my.ooma.com to start your personal blacklist.
Choosing a virtual number
Your Ooma system supports multiple phone numbers.
Add numbers from any calling area for a home ofce
or to make it easy for friends and family in another
state to reach you. Get started at my.ooma.com.
Screening your calls
Listen in as your callers leave their voicemail. The
message will be played through the speaker. Answer
the phone if you decide you want to take the call.
And much more
Check out other Ooma Premier features at:
www.ooma.com/premier
Volume
Adjustment
Phone Jack
(optional)
Phone
Ooma Telo
Ooma Telo
Ooma Telo
Phone
Splitter
HomePlug HomePlug
Phone
Phone Fax
Ooma Telo connected between your modem and router
Option A
Option B Ooma Telo connected behind your integrated modem/router
Corded or
Cordless Phone
Power Outlet
Computer
a
b
c
Phone Jack
(optional)
Integrated
Modem/Router
Modem
Ooma HD Handset
With the Ooma HD handset, you’ll unlock the full power of Ooma Telo and enjoy:
• Clear, interference-free conversations using DECT 6.0 digital technology
• Twice the sound clarity with Ooma HD Voice when calling friends and family using Ooma Telo
• Additional features only available on the handset such as the Instant Second Line™
• Convenient access to other enhanced features right in your hand, including voicemail, call
screening, ringtones, and more!
To learn more, visit: www.ooma.com/handset
© 2009 Ooma, Inc. Patent pending. All rights reserved. Reproduction in whole or in part without written permission is prohibited. Ooma, the Ooma logo, Ooma Telo, Ooma Premier, Instant Second Line, Broadband Answering
Machine, the sound of the Ooma dialtone, and all other Ooma company, product and service names and slogans are trademarks of Ooma, Inc. All other product, service or brand names are the property of their respective owners.
Ooma Premier™
The features described below are bundled as part of
Ooma Premier™. Your system comes with a free trial.
To learn more, visit: www.ooma.com/premier.
Enhanced Voicemail
Setting up
Pick up your phone and press the key on the
Ooma Telo. The system will walk you through setting
up your PIN and recording a personal greeting.
Playing messages at home
When you have new messages, the key will blink.
Press the key to listen to your voicemail through the
speaker. You can also listen to messages through
your phone. Simply dial your own phone number and
follow the voice prompts.
Checking voicemail remotely
There are three ways to check voicemail remotely:
1 Phone: Dial your Ooma number. When the call rolls
to voicemail, press the * key and enter your PIN.
2 Online: Listen to and manage your voicemail on the
web at my.ooma.com.
3 Email: Forward your voicemail as a MP3 le to your
email or mobile phone. Set this up at my.ooma.com.
Changing voicemail greetings
Pick up the phone connected to Ooma Telo and
press the key. From the main menu, select option
2: “Change your settings”. Then select option 2:
“Change your personal greeting”.
911 emergency calling
When you dial 91 1 , your address will auto-
matically be transmitted to rst responders (as long
as your community is enabled for enhanced 911).
For your safety, always keep your current address
up-to-date at my.ooma.com.
International and other calling services
To place an international call, dial 011 followed
by the country code and phone number. Your
prepaid balance will be announced before the call
completes.
Note: To make international calls and access other
premium services such as 411, you must charge-up
your prepaid account at my.ooma.com.