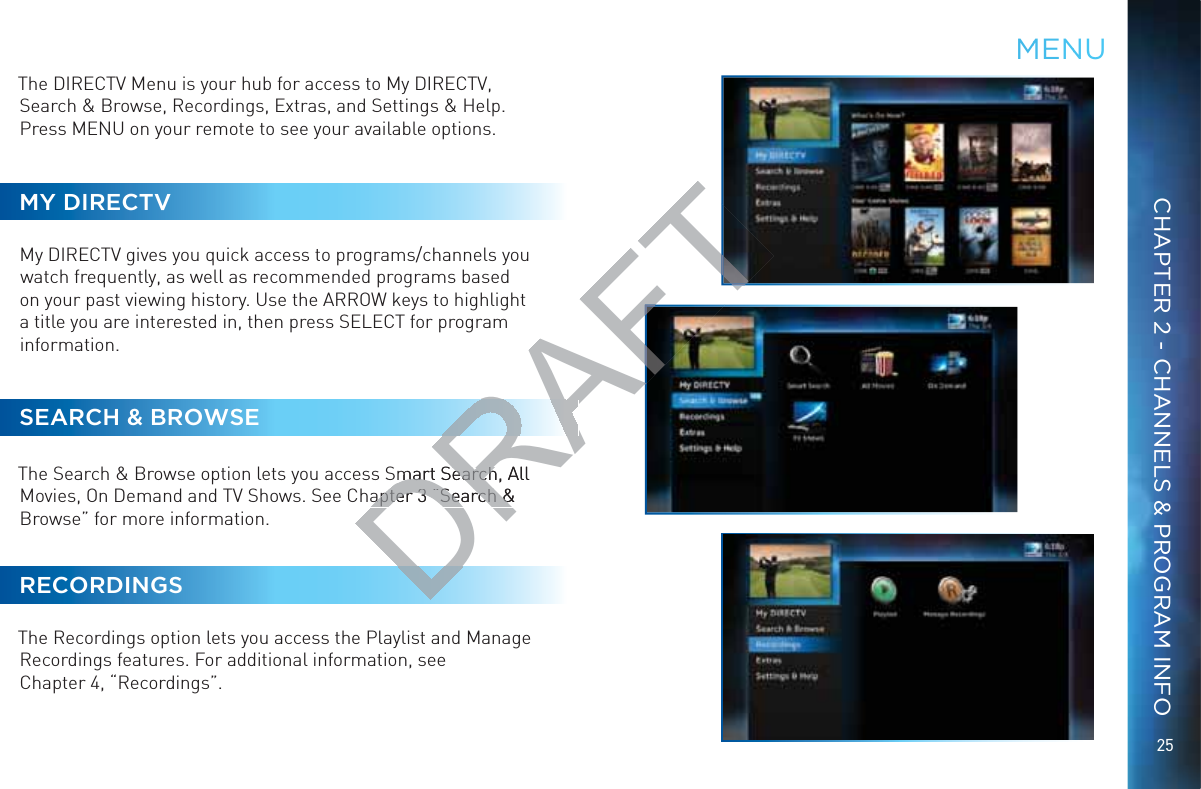
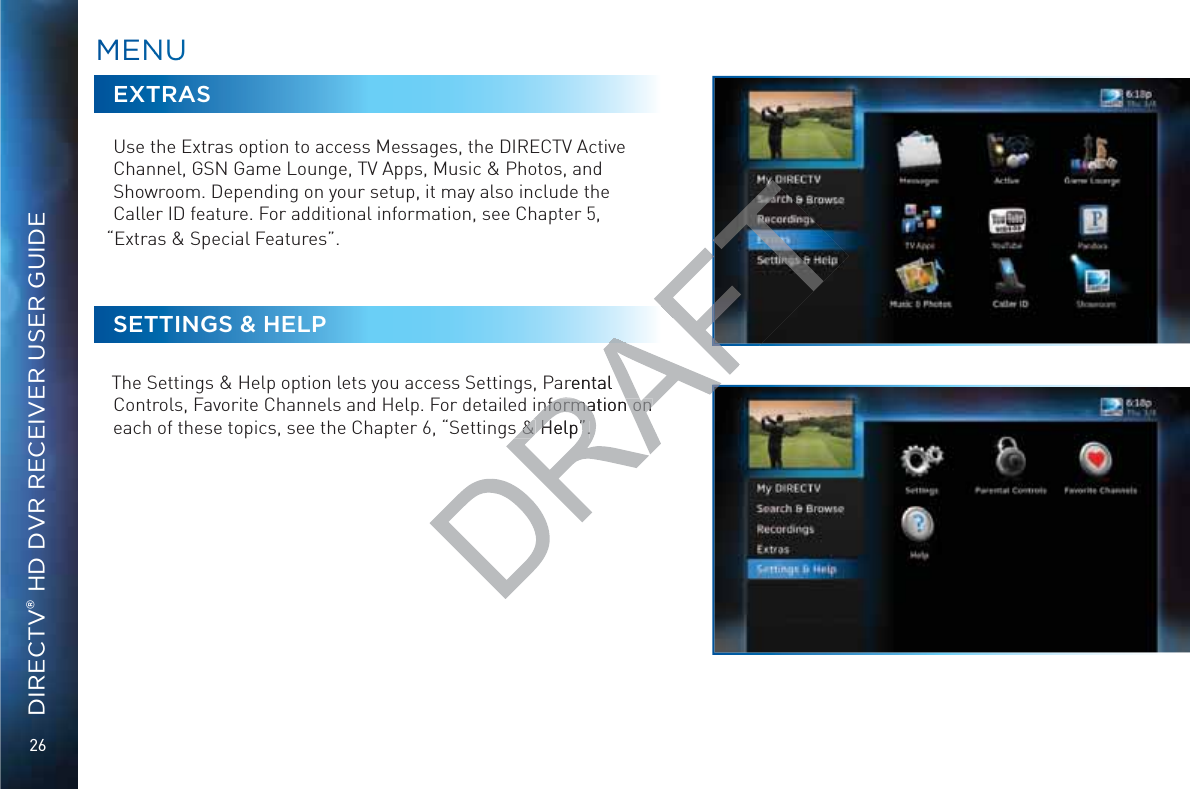
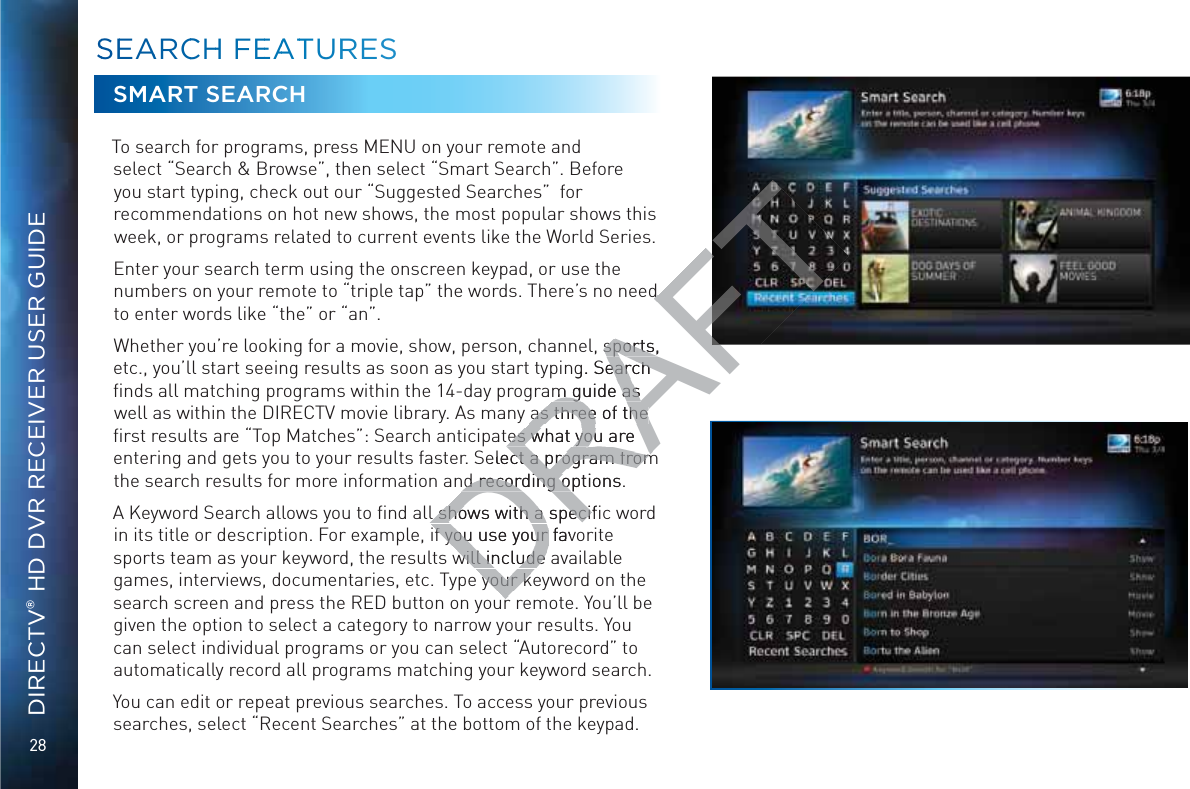
ARRIS C41 Satellite Home Media Center Client Receiver with integrated RF4CE Wireless Remote User Manual

Pace Americas Satellite Home Media Center Client Receiver with integrated RF4CE Wireless Remote

manual pt 3

DIRECTV® HD DVR RECEIVERSHD D
When you see the ENERGY STAR label on your set-top box, it means that your set-top box is ENERGY STAR qualified, giving you the benefit of saving energy and helping our environment.However, ENERGY STAR labeled HD DVR set-top boxes qualify for ENERGY STAR only when configured with the DIRECTV Whole-Home DVR service.  All other ENERGY STAR labeled set-top boxes, when used in conjunction with a DIRECTV subscription, meet ENERGY STAR criteria without requiring the consumer to take any additional steps.DRAFTRGY STAR RGY STARenefienefi
3Welcome! Now that you’re plugged in, it’s time to start enjoying access to over 285 channels of TV programming, satellite music and a great selection of the biggest box office movies from DIRECTV CINEMA™. We’ll take you step by step through everything from pushing the POWER button to searching for and finding your favorite programs. This user guide applies to the DIRECTV® HD DVR and the Genie™ (Adv Whole-Home) HD DVR and clients. Because this user guide was designed to accommodate several models, your receiver and its user interface may vary slightly from what is shown here.Online Mannuals and Other Resoourcces  To view the most up-to-date manuals for DIRECTV Receivers and other equipment, please visit www.directv.com/manuals or go to www.directv.com and search for keyword “manuals”.  You can also visit www.directv.com to manage your account, and find information about DIRECTV service, programming packages, special promotions, and much more.Gettting CCoonnectteddIf a professional installed your DIRECTV® DVR and Clients, you are ready to start watching TV. If your equipment was not professionally installed or you just added a surround sound system or other devices equipment, please see Appendix 1, “Setup and Activation”.IMPORTANT:   You must subscribe to HD Access or DIRECTV Advanced Receiver Service (ARS) to view the HD channels included in your programming package. DIRECTV hardware and programming and HD fees available separately. For information and pricing regarding programming and HD Access or ARS, please visit directv.com.WWEELLCCOOMMEE TOO THHEE DIRREECCTV FAMMILLY!DRAFTce mce md other equipment, pd other equipment, pt, and find informatiot, and find informand Clients, you are rClients, you are rsurround sound systesurround sound TVTV
4DIRECTV® HD DVR RECEIVER USER GUIDEWWellccomme too the DDIREECCTTV Faammilyy!  ..................................................3Safeetty & Caarre  ...................................................................................6Prodducct Infooormattion  .......................................................................8CCHHAPPTEERR 1:: UUSINNGG YYOUUR REMMMOOTE CCOONTTROLLL Yoour Remottee Conntroll  ....................................................................10Thee PPrrogressss Bar  .........................................................................Livee Buuffer  ......................................................................................CCHHAPPTEERR 22 -- CHHAANNNELLS & PRROOGRAAMM INNFO Prograam Guuide  ..............................................................................16Chaannneel Baannner & TVV OOptioons  .....................................................21MMennuu  ................................................................................................25CCHHAPPTEERR 33: SEAARRCCH & BROOWWWSSE Seaarrchh Feattures  ...........................................................................28AAll MMMovvies, OOn Deemanndd, andd Payy Per VVView  ................................30TVV SShhoows annd Geenie™™ RRecommmeends ............................................36CCHHAPPTEERR 44: RECCOORRDINNGS RReccoordding aa Singgle Shhoow  .............................................................40RReccoordding aa Series  .......................................................................42WWattcchiing annnd Deeletinngg Yourr RReccordeddd Showwws  ..........................42 ............................................................................................44MMannaage Recccordinngs  ......................................................................48RReccoordding ffrrom YYour CCoomputter, Phonnne or iPadd  ......................52CCHHAPPTEERR 55 -- EXXTRAAS && SPEECCIIAAL FEEAATUURES Extrraas  .............................................................................................56Speeccial Feaatturess  ...........................................................................63DIREECTTV® WWWholee-Hommee DVVR Service  .........................................66Gennie™™ (Addvv Whole-HHoome) HHD DDVR  ............................................71DIREECTTV™ MMMobilee Apps  ................................................................73DRAFT10........1313............1414FOO............................................ ...................................................... .....................................g aa Sg a rdding aa Serierrdinng aWattcchiing annnd DeeletinWatch and DPlayyllisstPlaylist.................MMannaage RecccorManaRReccoorddingRecorrdCC
5CCHHAPPTEERR 66 -- SEETTTINGSS & HHEELLPP Setttinggs  ..........................................................................................76Parrenttal Coonntrolls  .........................................................................85Faavoritte Chaannels  ........................................................................90HHelp  .................................................................................................91CCHHAPPTEERR 77 -- GEENNIEE™ HD DVVRR Gennie ((Adv WWWholee-Hoommme) HHDD DVVR  ...............................................Speeccial Feaatturess  ...........................................................................Bacckk PPanel EExammple  .....................................................................CCHHAPPTEERR 88 -- TRROOUBLESHOOOOTTING && FAQQS Trrouubleshoooting Tipss  ..................................................................102Freqqueently AAskedd Quueesstions  ......................................................105CCHHAPPTEERR 99 -- WAARRRRANTTY AANNDD OTHHEER IINFO Limmitted 90--DDay WWarrraannty  ..........................................................122DIREECTTV Prrootecttion PPPlaan  ...........................................................126FCCC Cuustommmer Innformmmaation  .......................................................128TERRMMSS ANDDD CONNDITTIOONS OOFF USSE OFF SOFTTTWAARRE  .........................................................................................129AAPPPENDDIICEESSAApppeenddix 1:: Setuup anndd Activvaation  ..............................................140AApppeenddix 2:: Connnectioonns too TTV && Equiipmennnt  .........................141AApppeenddix 3:: Receeiverr Front aand Back Paneells  .........................151AApppeenddix 4:: Howw to NNeettworrk Youur DVRR  ....................................155AApppeenddix 5:: Abouut Hiigghh-Definnition  ............................................162Inndeexx  ..............................................................................................168Icconn Reefereennce  .............................................................................174DRAFT.............................94.......................................99988...............................................99AQQSAQSS0--DDay W0-DaTV Prrootecttion TVV ProteCC Cuustommmer InnformmmaC CCuomer InffoTERRMMSS ANDDD CONNDTERMS AAND CODD(TTERRRMS)(TERMMS...........AAPPPENDAPPPENNDAAA
6DIRECTV® HD DVR RECEIVER USER GUIDESSAAFFETTTYY & CCAAAREEYour DIRECTV® Receiver has been designed and manufactured to stringent quality and safety standards. You should, however, be aware of the following important precautions for safe and optimal use of the equipment. Meaning of symbols printed on the rear panel of the product: This symbol indicates that dangerous voltage with a risk of electric shock is present within this unit.This symbol indicates that there are important operating and maintenance instructions in the literature accompanying this unit. Impportannt Safety Insstructioons1. Read these instructions.2. Keep these instructions.3. Heed all warnings.4. Follow all instructions.5. Do not use this apparatus near water.6. Clean only with dry cloth.7. Do not block any ventilation openings. Install in accordance with the manufacturer’s instructions.8. Do not install near any heat sources such as radiators, heat registers, stoves or other apparatus (including amplifiers) that produce heat.9. Use only the power supply (power cord) that came with your DIRECTV receiver.  Failure to use the authorized power supply (power cord) may cause electric shock, fire, bodily injury and/or property damage.  If the power supply (power cord) becomes damaged or needs to be replaced, please contact DIRECTV Customer Service to obtain an authorized replacement. 10. Do not defeat the safety purpose of the polarized or grounding-type plug. A polarized plug has two blades with one wider than the other. A grounding type plug has two blades and a third grounding prong. The wide blade or the third prong are provided for your safety. If the provided plug does not fit into your outlet, consult an electrician for replacement of the obsolete outlet.11. Protect the power cord from being walked on or pinched particularly at plugs, convenience receptacles and the point where they  exit the apparatus.12. Use only attachments/accessories specified by the manufacturer.13. Use only with the cart, stand, tripod, bracket or table specified by the manufacturer, or sold with the apparatus. When a cart is used, use caution when moving the cart/apparatus combination to avoid injury from tip-over.14. Unplug this apparatus during lightning storms or when unused for long periods of time.15. Refer all servicing to qualified service personnel. Servicing is required when the apparatus has been damaged in any way, such as power-supply cord or plug is damaged, liquid has been spilled or objects have fallen into the apparatus, the apparatus has been exposed to rain or moisture, does not operate normally, or has been dropped.DRAFTtructions in the tructionsce with the manufacturer’sce with the manufacturers, heat registers, stoves or at registers, stoves or DRed or grounding-type ed or grounding-ty blade or the th blade or the thdpadpaUse only the power supply (power cord) that came wiiver.  Failure to use the authorized power supply (power cord) may cause electric shock,DRwith your DIRECTV receivewith your DIRECTpppyp yord) becomes damaged or needs to be replaced, please contact DIRECTV Customer Service toyp ppypfire, bodily injury and/or property damage.  If the pDRyye power supply (power corde power supply (power yjy pp yobtain an authorized replacement.
7SSAAFETYYY & CCARRECAUTION: Avoid moisture to reduce the risk of fire or electric shock. The DIRECTV® Receiver should not be used near water (for example, kitchen sink, bathtub, pool, damp basement). Also, never spill liquid on the receiver. Do not place vases or other vessels containing liquid on top of it.WARNING: To reduce the risk of fire or electric shock, do not expose this product to rain or moisture. The apparatus shall not be exposed to dripping or splashing and no objects filled with liquids, such as vases, shall be placed on the apparatus.WARNING: Use only the power supply (power cord) that came with your DIRECTV receiver.  Failure to use the authorized power supply (power cord) may cause electric shock, fire, bodily injury and/or property damage.  If the power supply (power cord) becomes damaged or needs to be replaced, please contact DIRECTV Customer Service to obtain an authorized replacement.IMPORTANT: Be sure not to place your DIRECTV® Receiver near anything WET or HOT!If this product is rated at 240VAC, a suitable attachment plug should be used.TIP: We highly recommend plugging the DIRECTV® Receiver into a surge protector to prevent damage from fluctuations in your power supply. CAUTION: To reduce the risk of electric shock, do not remove cover (or back).No user-serviceable parts inside. Refer servicing to qualified service personnel.CAUTIONRISK OF ELECTRIC SHOCK DO NOT OPEN!:chjgZegdeZgkZci^aVi^dc¸i]ZkZcihadihdci]Z9>G:8IK® Receiver must be left uncovered to allow proper airflow to the unit. Blocking the airflow to the unit could impair performance or damage your receiver and other components.9dcdihiVX`ZaZXigdc^XXdbedcZcihdgdi]ZgdW_ZXihdcided[i]Z9>G:8IK® Receiver. Also, do not stack the receiver on top of a “hot component” such as an audio power amplifier.EgdiZXindjgXdbedcZcih[gdbedlZghjg\ZhWnXdccZXi^c\Vaai]ZXdbedcZcihWZ[dgZeaj\\^c\VcnedlZgXdgYh^cidi]ZlVaaoutlet. Use of a surge protector is also recommended.9dc¼idkZgadVYedlZgdjiaZihdgZmiZch^dcXdgYh!l]^X]XVcgZhjai^ci]Zg^h`d[ÃgZdgh]dX`#>i¼hVahd^bedgiVciidjhZdcani]Ztype of power source indicated on the marking label or in this manual.6kd^YVjY^d]jbdg^ciZg[ZgZcXZWn^chZgi^c\Vaacable plugs firmly into their jacks. Also, place Audio/Video (A/V) cables to the sides of the TV back panel rather than down the middle once connected. Try not to coil any twin-lead cables and keep them away from A/V cables as much as possible.CZkZg^chZgidW_ZXihd[Vcn`^cY^cidVcndeZc^c\h^ci]Z9>G:8IK® Receiver (other than the DIRECTV® Access Card as detailed in this manual).EaVXZ^idcVÄVi!]VgYhjg[VXZ¸YdcdideZgViZi]Z9>G:8IK® Receiver on a carpet or other padded surface.6alVnhjceaj\ndjg9>G:8IK® Receiver before moving it.6alVnhjceaj\i]Z9>G:8IK® Receiver, TV and other equipment before you connect or disconnect any cables.I]ZdcanlVnidY^hXdccZXii]Z9>G:8IK® Receiver from the power supply is to remove the power cord. The DIRECTV® Receiver unit must therefore be installed next to the power point which must be easily accessible.86JI>DC/:aZXig^XH]dX`¸cZkZgViiZbeiidY^hVhhZbWaZi]Z9>G:8IK® Receiver yourself; always take it to a qualified service person when repair is required. Opening or removing covers may expose dangerous voltage or other risks. Incorrect reassembly can cause shock when receiver is subsequently used. Attempted self-repair may also void your warranty. Changes or modifications not expressly approved by the party responsible for compliance (by the warranty or by the manufacturer) could void the user’s authority to operate the equipment.9dcdiYgdendjg9>G:8IK® Receiver and always move it with care.=VkZndjg9>G:8IK® Receiver professionally serviced (do not attempt to service it yourself).6cnX]Vc\ZhdgbdY^ÃXVi^dch^cXdchigjXi^dcd[i]^hYZk^XZl]^X]VgZcdiZmegZhhanVeegdkZYWni]ZeVgingZhedch^WaZ[dgcompliance could void the user’s authority to operate the equipment.>[ndjbdkZndjg9>G:8IK® Receiver between locations at different temperatures, allow it to reach room temperature before you apply power to it.9dcdie^X`jedgdi]Zgl^hZbdkZndjg9>G:8IK® Receiver while it is connected to the AC power supply. If you want to move your set-top box, first disconnect it, then wait at least 30 seconds before continuing.86JI>DC/IdgZYjXZi]Zg^h`d[ÃgZ!jhZdcanCd#'+6L<dgWZiiZgiZaZXdbbjc^XVi^dcha^cZXdgY#86JI>DC/GZeaVXZremote control batteries with same or equivalent type. There is danger of explosion if batteries are incorrectly replaced.;dgndjg^c[dgbVi^dc/I]Z^YZci^ÃXVi^dchi^X`ZgXVcWZadXViZYWZ]^cYi]ZhbVaaYddgdci]Zfront panel of your receiver.I]ZiZaZXdbbjc^XVi^dcnetwork voltage used is the category number 3.Note to Satellite Dish Installer: This reminder is provided to call your attention to articles 810 and 820 of the 2005 National Electrical Code. Refer to article 810, in particular 810-1 and 810-15, for required grounding of the metal structure of the dish antenna. Refer also to the 810-2 which, by reference to article 820, requires that the satellite dish coaxial cable shield be connected to the grounding system of the building as close to the point of cable entry as practical.gZhjgZhjhis manuahis mplugs firmly intoplugs firle once connected. Te once connc\h^ci]Z9>G:8IKc\h^ci]Z9>G:8IK®® Recei ReeZgViZi]Z9>G:8IKZgViZi]Z9>G:® Recer before moving it.e movingver, TV and other equipmenver, TV and other eG:8IK:8IK®® Receiver from the Receiver from tinstalled next to the powered next to the powercZkZgViiZbeiidY^hVhhZbZbeiidY^hVhhZbr is required. Opening or rer is required. Openinhock when receiver is subshock when receiver isxpressly approved by the pxpressly approved by thehority to operate the equipmty to operate the equipmjg9>G:8IKg9>G:8IK®® Receiver and Receiver and>G:8IK>G:8IK®® Receiver professi Receiver p\ZhdgbdY^ÃXVi^dch^cXdc\ZhdgbdY^ÃXVi^dch^cXce could void the user’s ace could void the user’s akZndjg9>G:8IKkZndjg9>G:8IK®® Reer to it.er to idgdi]Zgldgdi]Zglst disst dis
8DIRECTV® HD DVR RECEIVER USER GUIDEKeep your receipt to obtain warranty parts and service and for proof of acquisition. Attach it here and record the serial and model numbers in case you need them. *These numbers are typically located behind the card door on the front panel of your receiver.Model No. *Serial No.Acquisition DateDealer/Address/PhoneAccess Card *Receiver ID *PPRROODDUUCCCT INNFFORRMAATTIONNDRAFTTTFTFTAFAFRA
9CHAPTER 1 - USING YOUR REMOTE CONTROLCCHHAPPTEERR 1: USINGG YOUUR RREEMMOOTE CCONNTROLLYoourr Remmmote Controol  .........................................................10TTurningg Your Equippmmentt OOn aand Offf  .......................................10NNaavigattion annd Desttination Buttonsss  ......................................11SShhortCuut Butttonss  ......................................................................11DDVVR Conntrol Buttons  .................................................................12Thhe Proggrress Barr  .............................................................. 13Livve Bufffeer  ..........................................................................14DRAFT
10DIRECTV® HD DVR RECEIVER USER GUIDEMode SwitchYYOOUURR REEMOOOTTE CCONNTTROOLL These two buttons turn your TV and DIRECTV® Receiver on or off together. If your DIRECTV® System was installed professionally, your remote has already been programmed to operate your TV. If you need to reprogram the remote for a new TV or other audio-visual equipment, press MENU, select “Settings & Help”, “Settings”, then “Remote Control”. Follow the step by step instructions.Use the POWER (PWR) button and Mode Switch to turn a single component on or off (for example a DVD player or surround sound system). Simply slide the mode switch to the position that matches the component you want to control and then use the POWER button to turn it off or on. The mode switch must always be in the left-most position to control your DIRECTV® Receiver. If the mode switch is in a position that has not been programmed, or if you press a button that is not supported by that particular piece of equipment, an onscreen message will pop up to alert you. NOTE:  Each time you press a button, a green light at the top of the remote flashes. If the light flashes several times for just one press, it means the batteries (size AA) are getting low and need to be replaced.hTURNING YOUR EQUIPMENT ON AND OFFDRAFTThese two butTheseon or off ton or ofprofessiprofessito opeopenewEach tEachremote flareme press, it meanspress, it mneed to be replaced.need to be repla
11CHAPTER 1 - USING YOUR REMOTE CONTROLNAVIGATION AND DESTINATION BUTTONSThe buttons in the middle of the remote are navigation and destination keys. Press the GUIDE button to go to the program guide screen. Press the ACTIVE button to go to the DIRECTV Interactive™ channel. The LIST button takes you to the Playlist screen. Press EXIT to get out of any menu screen and return to live TV. Use the ARROW buttons and SELECT button to navigate though the guide or any menu screen. Press BACK to move back to the previous screen. The MENU button takes you to the main menu where you go to access all of the features available in your system.  Press INFO on any show to see information about that show. SHORTCUT BUTTONSYou can move through all of the DIRECTV user screens using only the direction ARROW buttons and the SELECT button as appropriate. However, the RED, GREEN, YELLOW and BLUE buttons on the remote are special shortcuts that change function depending on which menu screen you are looking at. As you use the system, look in the bottom-left of particular screens for hints that tell you which color button to use for a particular shortcut. You’ll see several examples in this chapter.YOOURR RREEMOOTE COONTTROOLDRAFTACACscreen. screend SELECT bnd SELhe previous screenhe previous she features available he features availaw. w. ugh all of the DIRECTall of the DIRECTdirection ARROW buttdirection ARROWpropriate. However, tpropriate. However, d BLUE buttons ond BLUE buttonchange functchange funcare lookare lookefteft
12DIRECTV® HD DVR RECEIVER USER GUIDEYYOOUURR REEMOOOTTE CCONNTTROOLLDVR CONTROL BUTTONSThese are the DVR control buttons (Rewind, Fast Forward, etc.). They can also be used along with the mode switch to control a DVD player or other auxiliary equipment.PLAY / SLOW MOTIONRRECORDStarts the recorded video or paused live TV currently on screen. Hold this button down for slow motion.One press allows you to record programs in the Guide and live TV. Press twice to record a series.IIPAUSE / FRAME BY FRAME STOPFreezes the action of any live or prerecorded television program. While paused, press FFWD or REW to move forward or backward frame by frame.While watching recorded TV, pressing this stops playback, displays the recorded program info screen, and inserts live TV in the top right.FFWD / JUMP TO TICKMARK REPLAY  / JUMP TO BEGINNING OF PROGRAMFast-forwards recorded or live-stored video. Press up to four times to fast-forward at increasing speeds. Press ADVANCE while fast-forwarding to go to the next 15-minute tickmark. Pressing PLAY returns to normal play.Jumps the program you’re watching backwards 6 seconds and starts playing from that point. Holding down REPLAY jumps to the beginning of the program.REW / JUMP TO TICKMARK ADVANCE / JUMP TO END OF PROGRAMRewinds recorded or live-stored video. Press up to four times to rewind at increasing speeds. Press REPLAY while rewinding to go to the previous 15-minute tickmark. Pressing play returns to normal play.Jumps ahead in recorded or live-stored video by 30 seconds. Press multiple times to skip multiples of 30 seconds. Hold down to continue to the end of the program.DRAFTTsed live TV sed livbutton down buttoof any live or any live or evision program. While program. While s FFWD or REW to moves FFWD or REW to movebackward frame by frambackward frame JUMP TO UMP TTICKMARKCKMARKst-forwards recorded ost-forwards revideo. Press up to four video. Press up to foforward at increasinforward at increasinADVANCE while fADVANCE whihe next 15-mihe next 15-mY returnY return
13CHAPTER 1 - USING YOUR REMOTE CONTROLTTHHE PPRROOGRESS BAARWhen you use the DVR control buttons, this indicator bar appears at the bottom of the screen to show where you are in the program and how far you can go forward or back. For live programs, the progress bar is green and the time shown is the time of day.The current time shows where you are in the program you are viewing.The left end of the green bar shows how far back in time you can go.The right end of the green bar shows how far ahead you can go.If you press the RECORD button during a live show, the progress bar turns orange and the orange record icon appears next to the title of the show.DRAFTRARAFhow, the progress the progress n appears next to the n appears next tD
14DIRECTV® HD DVR RECEIVER USER GUIDELLIIVEE BBBUFFFEERRYour DVR saves programs to the hard drive instantly and continuously, while you watch. This “live buffer” lets you pause, rewind fast forward or instant replay (jump back 6 seconds). If you start watching a program late, even if it is not set to record, you can back up to the beginning (up to 90 minutes) using REW, as long as you haven’t changed channels since the program started. Simply press PLAY during a show to display the progress bar and see how far back in time you can go. NOTE: You cannot fast forward during live TV until you pause or rewind a program.Progress BarDRAFTPrPr
15CHAPTER 2 - CHANNELS & PROGRAM INFOCCHHAPPTEERR 2 -- CHHAANNELS & PRROGRAAMM INNFOPPrroggramm Guidde  ................................................................... 16PPrrogrammm Infoo  .............................................................................16LLoocal Chhanneels  .........................................................................17HHDD and SSD Channneells  ................................................................17UUnnsubssccribedd Channels  ...........................................................1733DD Channnels  ..............................................................................18IIntteracttive Chhannneels  .................................................................18FFillteringgg the Guidee  ....................................................................19GGuuide OOpptions  ............................................................................19MMini Guide  .................................................................................CChhannnel BBannner &&& TTV OOpptionns  ........................................MMeessaggees  ..................................................................................IInffo  .............................................................................................LLast 4  .........................................................................................FFavoritee Channnelss  .....................................................................22CCloosed CCaptiooningg  .....................................................................22AAuudio/VVideo OOptioonnss  ..................................................................23PPaarentaall Controlss  ......................................................................23PPiccture in Piccturee  ......................................................................24AAddv Whoole-Home HHD DVVRR  ........................................................24MMeennu  ..................................................................................25MMyy DIREEECTV  ..............................................................................25SSeearch && Broowsee  ......................................................................25RReecordiinngs  ................................................................................25EExtras  ........................................................................................26SSeettingss & Heelp  .........................................................................26DRAFT99...200................21.............................21......................................21221..............................22222.....................................................22...................................... .......................2...........................................................................................
16DIRECTV® HD DVR RECEIVER USER GUIDEPPRROOGGRRAAAM GGUUIDEPress the GUIDE button to display the onscreen program guide, with up to 14 days of programming information. Navigate in the guide as follows: Use the ARROW buttons to move one cell at a time up/down/left/right; use the CHAN/PAGE button to scroll up or down by page; type in a channel number to go directly there. Look for color-button hints at the bottom of the screen for shortcuts: Use the GREEN button to move ahead in time 12 hours; use the RED button to come back 12 hours. PROGRAM INFOPress INFO on any program to see its associated program info screen. The Info screen displays the description for a program. Additionally, it allows you to watch or record the program, view a list of other showings or episodes, and more. Rotten Tomatoes™ fresh tomato and rotten tomato icons represent critics’ scores. Flixster uses upright popcorn and spilled popcorn icons to represent audience scores. A rating of better than 60% awards either the fresh tomato or upright popcorn.“Cast & Crew” displays actors, directors, producers, etc. that worked on the program. Select a person’s name for a list of their other programs. “You Might Like” displays shows similar to the current program. “Parental Info” shows info from Common Sense Media, a non-profit, independent organization that provides ratings and reviews for TV shows and movies, so you can decide what is okay for your kids to watch, based on program descriptions, details on a program’s language, violence and sexual content, and age-appropriate indicator.DRAFTinfo nfo ogram. m. ram, e. Rotten e. Rottenns represent ns represent and spilled d spilled es. A rating of better es. A rating of to or upright popcornto or upright popcors, producers, etc. ts,s, p proroduducecersrs, , ees name for a ss n namame e fofor r aaays shoayays s shshoo
17CHAPTER 2 - CHANNELS & PROGRAM INFOPRROOGGRAM GUIDDEUnsubscribed ChannelHDChannelLOCAL CHANNELSYour DIRECTV-provided local channels can be found in the guide from channel numbers 2 through 69. HD AND SD CHANNELSDIRECTV has a tremendous offering of HD channels and they are spread throughout the guide. To find them, look for HD after the program title in the guide. If you want to see only the HD version of a channel in the guide go to Chapter 6, “Settings:Display:Preferences”, for instructions on how  to make that setting.UNSUBSCRIBED CHANNELS  Channels in the guide that are not part of your subscription package are shown grayed out. You can customize your guide to hide these channels. See Chapter 6, “Settings & Help: Favorite Channels” for details.DRAFTUnsubscribed UnsubscribedChannelannHDHDChannellnelDispspyour subscription your subscription ustomize your guidustomize your guidgs & gs &Help: p: FaF
18DIRECTV® HD DVR RECEIVER USER GUIDEPPRROOGGRRAAAM GGUUIDE3D CHANNELS3D channels are in the 100s series in the Guide, starting on channel 103.  For a list of 3D programs, press GUIDE, press the YELLOW button and then select  “Sort programs by category”.  Select “3D” and a list of 3D programs will display. INTERACTIVE CHANNELSInteractive allow you to interact with what you see on screen. When accessing these channels, you will have to wait a few seconds for the software to download.  Press the ACTIVE button on your remote to get weather, horoscopes, lottery results, games and more. The channel is ready to interact when the yellow highlight box appears.   To exit an interactive channel, press GUIDE and pick the channel you want to move to, or, you can type in the new channel number while in the interactive channel.  Other interactive channels, such as News Mix and Sports Mix, let customers with a qualifying programming package see up to eight of the hottest channels on one screen. These channels are sprinkled among your regular channels; see the program guide. Move the yellow highlight box using the direction arrows on your remote to hear the audio associated with each channel.  If you want to see one of the channels full-screen, move the yellow highlight box over it and press SELECT.NOTE:   There is no separate 3D fee, but DIRECTV 3D programming is broadcast in HD and requires HD Access, HD receiver (HR44, HR34, HR21, H21 or later) compatible 3D HDTV and 3D glasses.  CHOICE™ package or higher required for ESPN 3D.  For more information, visit directv.com/3D.DRAFTw weather, weathee. The channel e. The channel ght box appears.ht box appears.UIDE and pick the UIDE and picu can type in the newu can type in the neactive channel.active channel.News Mix andNews Mix angrammgrammnnackagackainformatioinfo
19CHAPTER 2 - CHANNELS & PROGRAM INFOPRROOGGRAM GUIDDEFILTERING THE GUIDEThere may be times when you want to temporarily trim down the channels that are shown in the guide, filtering them according to the type of program you are looking for. For example, you may want to see just sports or movies or news. In that case, press GUIDE twice to display the guide filter.Simply use the arrow keys to highlight the category you want and press SELECT. The guide will now show only the channels that match that category. Look for the label in the bottom right of the guide to see how it is being filtered.NOTE:  Since the filtering is temporary, it only lasts as long as  you keep the program guide up on the screen.GUIDE OPTIONSFrom the program guide, press the YELLOW button to display “Guide Options”.SSortt Proogggramms byy Caategooryy:  Select “Sort programs by category”, then select a category to see a list of shows in chronological order that match your sort criterion. JJummpp too aa Daatee && Timmme:  Select “Jump to a date & time” to quickly go to a future date and time in the guide.Look to the right tosee how theguide is beingfiltered.DRAFTong asgOW button to displOW button to d
20DIRECTV® HD DVR RECEIVER USER GUIDEPPRROOGGRRAAAM GGUUIDECChaanngee FFavoritees LList:  By default, your program guide displays all channels offered by DIRECTV, some of which may not be in your programming package.  “Change favorites list” allows you to toggle the channels displayed in your guide among the following:  “All Channels”, “Channels I Get” (channels you subscribe to) or a custom list of channels you have defined. The “Edit Settings” option allows you to modify the channels in your custom list. See Chapter 6, “Settings & Help: Favorite Channels” for details.PPayy Per VVieww:  Select “Pay Per View” then select a program type. The receiver will search for featured movies, sports or events that are available for “rent” on DIRECTV. Even more movies are available using All Movies and On Demand. (See Chapter 3.)MINI GUIDEIf you are watching a show and want a quick look at what’s on next, press the BLUE button to display a one-line mini program guide. You can use it for the current channel or you can type in a new channel number to see what’s on there. Look for the channel or time you want using the UP, DOWN, LEFT and RIGHT arrows. Press SELECT on the new show if you want to go to that channel.online mini-guideDRAFTeceiver ver are are available are available 3.)3.)ck look at wck look at w-line m-line m
21CHAPTER 2 - CHANNELS & PROGRAM INFOWhen you find a current show in the guide you want to watch, press SELECT and the receiver changes to that channel. The channel banner briefly displays at the top of the screen with program title, channel number, date, time and other information.Select “More Info” for detailed program information and other options. You can also press INFO to display the channel banner while watching a program.The channel banner also provides easy access to Messages, the last four channels you watched, Favorite Channels, Closed Captioning, Audio and Video options, and Parental Controls. Use the ARROW keys to highlight an option, then press SELECT. MESSAGESSelect “Messages”, to see your messages. DIRECTV sends messages to you for important news items or special promotions. When you have new mail, an “envelope” icon appears in the channel banner.INFOSelect “Info” to read a brief description of the program. For detailed program information and other options select “More Info”.CCCHAANNNEEL BBANNNNER && TTV OOOPTIONNSDRAFV sends V senecial promotions. cial promotions. appears in the appears in th
22DIRECTV® HD DVR RECEIVER USER GUIDELAST 4Select “Last 4” to see a list of previous channels you’ve watched (up to 4). When you select a channel from this list, the receiver will tune to that channel. This is an easy way to toggle among the channels you watch most often.FAVORITE CHANNELSSelect “Favorites” to update the program guide to show only the channels you want to see.  You have four options to choose from such as, “All Channels”, “Channels I Get”, “Custom 1” and “Custom 2”.  Channels I Get displays only the channels you subscribe to.  Custom 1 and 2 are self-created lists of your favorite channels. If one of your self-created lists is active, select the “Add...” or “Remove...” option to add or remove the current channel from that list. CLOSED CAPTIONINGSelect the “CC” option, then select either “DIRECTV Subtitles” or “Closed Captioning”. Both options display the same text so only one or the other can be “ON” at a time. The display format is the only difference so check out both to determine your preference.  Select OFF to turn the display of subtitles or closed captioning off.CCHAANNNNEEEL BBAAANNNERR && TVV OOPPTIOOONSDRAFToose se m 1”annels annelsd lists of your d lists of yts is active, select s is active, select emove the current e the current
23CHAPTER 2 - CHANNELS & PROGRAM INFOAUDIO/VIDEO OPTIONSSelect “Audio/Video” to change the resolution and format of your display and to change audio to an alternate language, when available. Select “Change Resolution & Format” to change the display settings; each press of SELECT toggles to the next available option. The current settings are shown in gray text.  You may also select a language from options listed. Not all programs have alternate languages.PARENTAL CONTROLSSelect “Parental” to quickly lock or unlock your receiver.  You can also customize your parental controls settings by selecting “Parental Controls”.  For more information on parental controls settings, see the “Parental Controls” section in Chapter 6.CCCHAANNNEEL BBANNNNER && TTV OOOPTIONNSDRAFTr.  You .  Youy selecting y selectinental controls ntal controls Chapter 6.apter 6.
24DIRECTV® HD DVR RECEIVER USER GUIDEPICTURE IN PICTUREWatch two programs, live or recorded, at the same time. While watching one program, press the INFO button on your remote. Select “PIP”. The program you’re currently watching moves into a smaller window on your screen. The larger video is the active program and can be controlled by your remote. To switch between programs, press the DOWN ARROW. To change the position of the smaller window, press INFO on your remote. Select “PIP” and choose a position from the  options provided.NOTE: The Picture in Picture feature is only available on the TV connected directly to an Advanced Whole-Home HD DVR (model HR34 and above).CCHAANNNNEEEL BBAAANNNERR && TVV OOPPTIOOONSDRAlable on the TV lable on thme HD DVR (model  HD DVR (model RAFTur
25CHAPTER 2 - CHANNELS & PROGRAM INFOThe DIRECTV Menu is your hub for access to My DIRECTV, Search & Browse, Recordings, Extras, and Settings & Help. Press MENU on your remote to see your available options.MY DIRECTVMy DIRECTV gives you quick access to programs/channels you watch frequently, as well as recommended programs based on your past viewing history. Use the ARROW keys to highlight a title you are interested in, then press SELECT for program information.SEARCH & BROWSEThe Search & Browse option lets you access Smart Search, All Movies, On Demand and TV Shows. See Chapter 3 “Search & Browse” for more information.RECORDINGSThe Recordings option lets you access the Playlist and Manage Recordings features. For additional information, see  Chapter 4, “Recordings”.MMENNUDRAFTSmart Search, mart SearchAll apter 3 “Search & apter 3 “Search &
26DIRECTV® HD DVR RECEIVER USER GUIDEEXTRASUse the Extras option to access Messages, the DIRECTV Active Channel, GSN Game Lounge, TV Apps, Music & Photos, and Showroom. Depending on your setup, it may also include the Caller ID feature. For additional information, see Chapter 5, “Extras & Special Features”.SETTINGS & HELPThe Settings & Help option lets you access Settings, Parental Controls, Favorite Channels and Help. For detailed information on each of these topics, see the Chapter 6, “Settings & Help”.MMENNUUrental nformation on nformation on s & s & Help”.Help”.
27CCHHAPPTEERR 3: SEAARRCCH & BROOWWWSEESeearrch FFeeaturres  ................................................................. 28SSmmart SSearchh  ............................................................................28YYouTubee Searrch  .........................................................................29AAll MMoviees, Onn Deemmand aand Pay PPPer VViieww  .....................30AAlll Moviees  ..................................................................................30OOnn Demmand  ...............................................................................31RReecordiinng Frrom ““AAll Movviees” or “Onn Demmmandd””  ....................32PPaay Perr View Eventss  ..................................................................35TVVV SShowsss andd Geniee™ RRecommmennnds  .............................3TTVV Showwws  ...................................................................................GGeenie RReecommmennddss  ..................................................................CHAPTER 3 - SEARCH & BROWSEDRAFT.33366......366.....................36
28DIRECTV® HD DVR RECEIVER USER GUIDESMART SEARCHTo search for programs, press MENU on your remote and select “Search & Browse”, then select “Smart Search”. Before you start typing, check out our “Suggested Searches”  for  recommendations on hot new shows, the most popular shows this week, or programs related to current events like the World Series.Enter your search term using the onscreen keypad, or use the numbers on your remote to “triple tap” the words. There’s no need to enter words like “the” or “an”. Whether you’re looking for a movie, show, person, channel, sports, etc., you’ll start seeing results as soon as you start typing. Search finds all matching programs within the 14-day program guide as well as within the DIRECTV movie library. As many as three of the first results are “Top Matches”: Search anticipates what you are entering and gets you to your results faster. Select a program from the search results for more information and recording options.A Keyword Search allows you to find all shows with a specific word in its title or description. For example, if you use your favorite sports team as your keyword, the results will include available games, interviews, documentaries, etc. Type your keyword on the search screen and press the RED button on your remote. You’ll be given the option to select a category to narrow your results. You can select individual programs or you can select “Autorecord” to automatically record all programs matching your keyword search.You can edit or repeat previous searches. To access your previous searches, select “Recent Searches” at the bottom of the keypad.SSEEAARCCHH FEEAATTURRESSDRAFTd d , sports, sports,g. Search earch m guide as m guide as as three of the as three of the tes what you are es what you Select a program fromct a program fromnd recording options.nd recording ol shows with a specifil shows with a specif you use your favf you use your will include awill include your kyour k
29YOUTUBE SEARCHIf your DIRECTV HD DVR is connected to the Internet, you can search for and watch YouTube content on your TV. (If you aren’t connected, learn how to get connected at directv.com/getconnected.)If you’re already connected, follow these simple steps:1.  Press MENU on your remote and select ”Search & Browse”, then select ”Smart Search”. 22.  Enter your search term using the onscreen keypad, or use the numbers on your remote to ”triple tap” the words. 33.  Search results appear on the right side of the screen. The YouTube search is displayed at the bottom of the results list. Select the item labeled ”YouTube”. 44.  A list of YouTube videos matching your search term will display. Play a video from this screen by highlighting a title and pressing SELECT. Otherwise, highlight the title and press INFO for a description of the video and other options.SSSEEARRCCHH FEEEATUUREESCHAPTER 3 - SEARCH & BROWSEDRAFTe the the creen. The creen. The the results list. he results list. r search term will r search term will y highlighting a y highlightinge title and e title and ns.ns.
30DIRECTV® HD DVR RECEIVER USER GUIDETo see what movies and On Demand content are available, press MENU, select “Search & Browse”, then select either:  “All Movies” (Channel 1100)  “On Demand” (Channel 1000)  “TV Shows” (Channel 1998)ALL MOVIES“All Movies” offers an easy, one-stop way to find ANY movie on DIRECTV, including broadcast channels, premium channels, latest releases, In Theaters, Pay Per View, and On Demand. This includes both free and premium movies.Press MENU, select “Search & Browse”, then select “All Movies”. The latest movies are also available in the program guide starting at channel 125.A few of the categories include:Just Added - New titles available every week.  What’s On Now? - Movies that you can either watch instantly or that will start in the next 30 minutes.In Theaters - Movies coming soon.  Read a description of the movie and schedule it to record as soon as it’s available.Select a category and browse the titles using the arrow keys on your remote or the Page Up/Down buttons.  Alternatively, you can search for a movie by typing in your search term using the number keys on your remote like a cell phone. AALLL MMOVVVIESS, ONN DDEEMAND AANNND PAYY PERR VIEEEWDRAFT,,nd. This This ct “All Movies”. ct “All Movies”. am guide am guide y week.  y wether watch inther watch i
31You can record or order movies from this screen. Any movie with a green Play icon is available to order and watch immediately. Select the movie, select the “Play” option, then follow the onscreen instructions.Within the first five minutes, you can still cancel your purchase. Press INFO, select “More Info”, then select “Cancel PPV”.NOTE: As long as your receiver is connected to a land-based phone line or the Internet, you can use your remote to order. Otherwise, order on directv.com. ON DEMANDIf your DIRECTV HD DVR is connected to the Internet, DIRECTV On Demand lets you enjoy hundreds of additional box office hits available for purchase as well as thousands of movies and TV shows that can be downloaded to your receiver at no extra charge. Browse the listings by category such as, Movies, Kids & Family, TV Series, etc. On Demand titles will download to your DIRECTV Receiver over the Internet.NOTE:  In order to download programs to your DIRECTV HD DVR over the Internet, you need DIRECTV Advanced Receiver Service and broadband Internet service with a connection speed of 750 Kbps or higher (DSL or cable).  Please refer to Appendix 4 for details regarding connecting your DIRECTV HD DVR to the Internet.ALLL MMOVIEES, ONN DEEMMAAND AANDD PAYYY PERR VIEEWCHAPTER 3 - SEARCH & BROWSEDRAFTet, DIRECTV et, DIRECTl box office box office ds of movies and ds of movies eceiver at no extra eceiver at no extrauch as, Movies, Kidsuch as, Movies, Kidswill will download to ydownload t
32DIRECTV® HD DVR RECEIVER USER GUIDEVIEWER’S TIP: You can also check out your favorite programmer’s home page for previews and missed episodes.  Simply add a “1” in front of the regular DIRECTV channel number.  For example, A&E is on channel 265.  The homepage is channel 1265.RECORDING FROM “ALL MOVIES”  OR “ON DEMAND”When your HD DVR is connected to the Internet, you can record from both “All Movies” and “On Demand”. If your HD DVR is not connected to the Internet you can still record from “All Movies”.When your receiver is NOT connected to the Internet:To record a program, highlight a title and press the orange REC (Record) button on your remote. For Pay Per View and On Demand programs, an orange “Q” next to the title indicates it’s been scheduled. (Regular broadcast programs, an orange “R” icon.) You can also record by highlighting the title, pressing SELECT, then selecting “Add to Queue”.All movie requests are stored in your Queue. To access the Queue, press MENU, select “Recordings”, then “Manage Recordings” and then select “Queue”. You can prioritize your Queue but movies may become available to watch in a different order.When a movie is available to watch, you will find it in your Playlist. AALLL MMOVVVIESS, ONN DDEEMAND AANNND PAYY PERR VIEEEWDRAFTord ords not not Movies”.s”.to the to the ress the orange REC ress the orangy Per View and On Dey Per View and On Dtle indicates it’s beetle indicates it’s bees, an orange “Rs, an orange “ssing SEssing SE
33Your receiver has a default limit of 5 movies that will move from the Queue to the Playlist. Watch or delete one of these movies to receive more. You can also change the default limit by pressing MENU on your remote and selecting “Recordings”, then “Manage Recordings”, “Queue”, then “Preferences”.To watch a movie, press the LIST button on your remote to access the Playlist. Highlight a title and press the PLAY button. A confirmation message with the price of the movie will display, asking if you‘re sure you want to watch the movie. To delete a movie from your Playlist, highlight the title and press the RED button on your remote. To keep a movie, highlight the title and press the BLUE button on your remote. This ensures the movie will not be deleted by the receiver as your disk drive fills up. Warning: Setting too many programs to “Keep” may fill up your disk and not allow new programs to be recorded.ALLL MMOVIEES, ONN DEEMMAAND AANDD PAYYY PERR VIEEWCHAPTER 3 - SEARCH & BROWSEDRAFTs the the e fills up. up.l up your l up yo
34DIRECTV® HD DVR RECEIVER USER GUIDEWhen your receiver IS connected to the Internet:You can record from both “All Movies” and “On Demand” menus. To record a program, highlight a title, then press the orange REC (Record) button.  An orange “R” icon next to the title indicates it’s scheduled to record/download.  All scheduled records/downloads (with the exception of “In Theaters” titles), as well as those that are ready to watch, are displayed in the Playlist. Press LIST to display the Playlist. Programs are downloaded in the order they were scheduled. If a movie is currently downloading, it appears at the top of your Playlist with a progress bar displaying the % complete. You can start watching the movie while it’s downloading after the download progress bar turns green.  Movies scheduled, but waiting to record/download, are labeled “Pending Download”.To watch a movie, highlight the title and press PLAY button on your remote. If it’s a pay title, a confirmation message with the price of the program will display, asking if you‘re sure you want to watch it. Delete or cancel a title from your Playlist by highlighting the title and pressing the RED button on your remote.AALLL MMOVVVIESS, ONN DDEEMAND AANNND PAYY PERR VIEEEWDRAFTogress gress e movie ovie r turns wnload, are wnload, as PLAY button on youAY button on youessage with the priceessage with there sure you want to wre sure you want to wst by highlighting tst by highlightiote.ote.
35All “In Theaters” titles are stored in your Queue. To access the Queue press MENU, select “Recordings”, then “Manage Recordings” and then select “Queue”. When a movie is available to watch, you will find it in your Playlist. Your receiver has a default limit of 5 movies that will move from the Queue to the Playlist. Watch or delete one of these movies to receive more. You can also change the default limit by pressing MENU on your remote and selecting “Recordings”, then “Manage Recordings”, “Queue”, then “Preferences”.PAY PER VIEW EVENTSSpecial events like UFC,  Boxing,  WWE and more are listed in the program guide starting around channel 117. (Actual channel number may vary depending on current offerings.)Ordering PPV events works the same way as ordering DIRECTV On Demand movies from the program guide.  See previous section for details. ALLL MMOVIEES, ONN DEEMMAAND AANDD PAYYY PERR VIEEWCHAPTER 3 - SEARCH & BROWSEDRAFT are listed in are listed in 7. (Actual channeltual channelerings.)erings.)y as ordering DIRECy as ordering DIRECe.  See previouse.  See previo
36DIRECTV® HD DVR RECEIVER USER GUIDETo discover the TV Shows screen, and see what’s available to watch now, press MENU, select “Search & Browse”, then select “TV Shows”.TV SHOWSTV Shows is your destination for all things TV. Go to TV Shows to find programs you can watch instantly, as well as to enjoy the benefits of DIRECTV’s Genie Recommends feature.NEW GENIE RECOMMENDS FEATUREAccessible via MyDIRECTV, and “TV Shows” in the “Search & Browse” screen, the Genie Recommends feature enhances your viewing experience by giving you full control over how, what and when you watch:  Suggests TV programs and makes sample shows available for you to watch now, based on your tastes and what’s popular  Lets you easily convert any show to series recording  Can start your favorite shows from the beginning, even if you tune in lateTo start using Genie Recommends, press MENU, and either access it via the MyDIRECTV screen, or select “Search & Browse”, then “TV Shows”, then “’Genie Settings”.TTVV SHHOWWWS AANDD GGEENIE™™ REECCOOMMMEENDSDRAFTearch & earch enhances enhances rol over how, l over how, sample showssample showsed on your tastes ased on your tastes aes recoes reco
37NOTE: TV Shows and the Genie Recommends feature are only available on the Genie (Adv Whole Home) HD DVR (model HR34, HR44 and above) and Genie Clients (model C31 and above).NOTE: The DIRECTV start-from-the beginning feature can only be used if the tuner was pre-set to your show’s channel, or someone else in a Genie-networked household was watching the show from the start.TVV SSHHOWWS AANND GENIE™™ RECCCOMMMENDSCHAPTER 3 - SEARCH & BROWSEDRAFT
38DIRECTV® HD DVR RECEIVER USER GUIDEDRAFT
39CCHHAPPTEERR 44: RECCOORRDINNGSRReecoordingg a Single SShoww  ......................................................40FFroom Livve TV  ............................................................................... 40FFroom thhee Guidde  ........................................................................... 40CChhanginng a Recorrd OOptioon  ..........................................................40SStooppingg an In-prooggress Recoording  .......................................... 41RReecoordingg a Serieess  ...............................................................42FFroom Livve TV  ............................................................................... 42FFroom thhee Guidde  ........................................................................... 42CChhanginng a Recorrd OOptioon  ..........................................................SStooppingg an In-Prrogress RRecoording  ..........................................WWaatcchingg and Deleetiing YYour Recorrded SShoowws  ..................Plaayylist  .....................................................................................PPlaaylist OOptions  ...........................................................................MMaanaginng My Playylisst  ..................................................................46MMaanage RRRecorrdinggs  ...............................................................48TTo Do Lisst ...................................................................................... 48SSeries MMManagger  ........................................................................... 49QQuueue  ............................................................................................49HHisstory  ........................................................................................... 50PPuurchasses  .................................................................................... 50MMaanual RRecorrdinggss  ..................................................................... 50RReecord DDefauults  ..........................................................................50RReecoordinng froom YYoour CCoomputerr, Phhoonee or iPPad ......52Frrom a Computeerr  ....................................................................52DIRECTTVV Moobile AAppps  ............................................................ 53CHAPTER 4 -  RECORDINGSDRAFT42...44422.......44422..........................43....................................44444...................................44455........................................................46.................................. ...........................................................................ompomTVV TV MoobileM
40DIRECTV® HD DVR RECEIVER USER GUIDEFROM LIVE TVTo record a show you are currently watching, simply press RECORD once. FROM THE GUIDEYou don’t have to be watching a show to record it. Simply find it in the program guide and press the RECORD button. The orange record icon appears to let you know your show is being recorded or is scheduled to record. NOTE: You can record two shows at the same time with your DIRECTV DVR if you have made the proper connections to your satellite dish.CHANGING A RECORD OPTIONSome live events and even a few TV shows run past their allotted time slot. Your DVR is very smart, but it sets up all recordings based on the start and stop times the broadcasters give us for the program guide.If you are watching while recording and you think your show RREECOORRDINNG AA SSINGGLEE SSHOWWDRAFTe  s being eing time with your me with your connections to your connections to your N
41might go into the next time slot, press INFO on the remote, then select “More Info” and “Recording” from the onscreen choices to see the recording options for that show. Once there you can change the stop time or any other option. To save your changes select “Save Changes”.If your show is set to record in the future, you can find it in the guide or To Do list, then press INFO to display the Info screen. To change a recording option for that one show, select “Episode Options” and choose whichever option or options you want to change. If you want to change a recording option for every show in the series, select “Series Options” and then choose the options you want to change.STOPPING AN IN-PROGRESS RECORDINGIf you press the RECORD button a second time on a single show (like a movie), an onscreen message will appear giving you the choice to “Keep Recording”, “Change Recording Options”, or “Stop Recording”.  This is an easy way to cancel a recording.REECCOORDING AA SINNNGLE SHOOWCHAPTER 4 -  RECORDINGSDRAFTDINGe on a single show on a single show pear giving you the pear giving you tcording Options”, or cording Options”, or ancel a recordingancel a record
42DIRECTV® HD DVR RECEIVER USER GUIDEFROM LIVE TVIf the show you are currently watching is a series and not a single event (like a movie), simply press the RECORD button twice to automatically record every episode of the series. The RECORD icon is now a repeated circle R to let you know that this is a series and not a single recording.FROM THE GUIDEAs mentioned previously, you don’t have to be watching a series to record it. Simply find it in the program guide and press the RECORD button twice to record all episodes of it.CHANGING A RECORD OPTIONIf you are currently watching a series show and need to extend the recording time or change any other recording option, press INFO on the remote, select “More Info” and then “Series Options” from the onscreen choices. If you see a series set to record in the future in the program guide or the To Do List, to change a record option, press INFO and select “Series Options”.STOPPING AN IN-PROGRESS RECORDINGIf you press the RECORD button a third time on a series, an onscreen message will appear giving you the choice to “Keep Recording”, “Change Recording Options”, or “Stop Recording”. RREECOORRDINNG AA SSERIESRREECOORRDINNG AA SSERIESDRAFTries riesthe e and need to extend and need to recording option, presrecording option, p” and then “Series O” and then “Series Oseries set to recseries set to ro List, to co List, to cOptioOptio
43To see your list of recorded shows, press LIST on the remote. Alternatively, you can press MENU and select “Recordings”, then “Playlist”. Use the arrow keys to highlight the desired show, press SELECT, then select “Play” (or “Resume” if you’ve already watched part of the show) to start the show. You can use any of the DVR control buttons (like PAUSE, FFWD, REW, etc.) while watching your recorded show. If you press STOP, the show will stop and an information screen with various options will appear. The last channel viewed in live TV will appear in the upper-left corner of the screen. To return to full-screen live TV, press EXIT or select “Done”.WWATTCHHING AANNDD DEELETTINNGG YOUURR REECORRDED SSHOWWSWWATTCHHING AANNDD DEELETTINNGG YOUURR REECORRDED SSHOWWSCHAPTER 4 -  RECORDINGSDRAFTT
44DIRECTV® HD DVR RECEIVER USER GUIDEPPLLAYYLLISTTThe Playlist screen displays all your recorded programs. To get to the Playlist screen directly, press LIST on the remote, or press MENU and select “Recordings”, then “Playlist”. Titles that you have not viewed yet are shown in bright, white letters, while titles that you have already viewed (partially or completely) are light grey.The time, date and channel of each recorded program is displayed to the right of the program title. Any icon identifying program status is displayed to the left of the program title (for example, a circle K for “Keep Until I Delete”). See the inside back cover for a list of all the icons.Highlighting a program title displays the program description, just as in the Guide. If you press SELECT or INFO on a program, an Info screen is displayed for the program that offers several actions including Play, Keep, Delete and others. Series programs are identified in the list with a folder icon. For example, if you record a weekly comedy series, the title for that series is shown with a folder icon. Press SELECT on the series title to see the recorded episodes for that series. The number of new (not viewed) programs and total programs for each series is displayed to the right of the series name; for example, “2 New/5 Total”. Press PLAY on a series to play all the episodes in the folder, in order from oldest to newest.PPLLAYYLLISTTRECDRAFTion, n, rogram, m,rs several s seveh a folder icon.a folder icon.y series, the title for series, the tress SELECT on the ress SELECT on tes for that series. Thees for that series. Thend total programnd total progrseries namseries nameries teries tT
45PLAYLIST OPTIONSFrom the Playlist screen, press the YELLOW button to display Playlist Options.MMarrkk PProograamms to DDeleeteeSelect “Mark programs to delete” if you want to delete two or more programs at once. SSorrtt Prrooggramss bby CCCateegoryySelect “Sort programs by category” and then select Movies, Sports, News, Kids, etc., to filter the playlist as desired. This option will help you find what you want faster, once you start to record a lot of programs. This is just a temporary filter for your list, so just press the left arrow or BACK to see your full Playlist again.CChaangee OOrdderr oof PPllaylissttSelect “Change order of Playlist” to pick how you want to arrange the order of your recorded shows. You can sort by date with the newest at the top (the factory default setting), the oldest at the top; or alphabetically with A at the top, or Z at the top.PLAYLLISTCHAPTER 4 -  RECORDINGSDRAFTThis u start u start y filter for y filter for see your full ee your full w you want tow you want tcan socan solt slt sT
46DIRECTV® HD DVR RECEIVER USER GUIDEPPLLAYYLLISTTOOpeen/CCloose AllSeries programs are grouped in folders in your Playlist. Select “Open/Close All” to open all of your folders so you can see each episode without having to select each series individually. You can also use this option to close them all.FFilteeer by PlayylisstIf you are set up on a Whole-Home DVR or Adv Whole-Home network, this option lets you select whether to see all available titles from all receivers, or just those on the “local” receiver.MANAGING MY PLAYLISTYour DVR has a lot of recording space but it is possible to fill up the hard drive if you record regularly.  A quick way to check how much space you have available is the Disk Space Bar.  DDiskk Sppaacce BBarrThe Disk Space bar is at the bottom of your Playlist.  It shows the approximate amount of space available on your disk at any given time. The Disk Space bar shows programs you have designated “Keep Until I Delete” in dark blue, programs subject to expiration or automatic deletion in light blue, and the remaining unused disk space that is available for recording in black.When your disk is full, the oldest shows (viewed or not) are automatically pushed out to make room for the new ones.  39% FreeFrFreeeeDRAFTsible to fill up sible to filway to check how ay to check how pace Bar. Bar. our Playlist.  It sour Playlist.  Iyour disk ayour disk
47PLAYLLISTIf you have a show that you don’t want pushed out, press the BLUE button to “Keep” it in your Playlist until you delete it.KKeeeppHighlight the show you want to keep and press the BLUE button on your remote. A blue, K icon will appear next to the program title indicating it will be kept until you delete it. You may be tempted to make all of your recordings “Keep Until I Delete”, but if your hard drive ever fills up, new recordings can’t take place.Another way to manage your Playlist is to delete recordings you no longer want.DDeleeteHighlight a single show or a series (indicated by a folder icon) and press the RED button to delete it.  If you delete a folder, all episodes of that series will be deleted.  Don’t worry about pressing the RED button accidentally.  You will always see a confirmation message before you delete anything.Note that HD programs take up more disk space than SD. Thus, you may want to record your favorite content in HD, while recording other shows in SD to optimize your use of the available recording capacity.CHAPTER 4 -  RECORDINGSDRAFTer icon) er icon)a folder, a folder, worry about orry about l always see a l always see nything.nything.k space than SD. k space than Scontent in HD,content in HDuse of thuse of thAFT
48DIRECTV® HD DVR RECEIVER USER GUIDEOnce you have scheduled recordings, you can find the status and history of those recordings by pressing MENU and selecting “Recordings”, then “Manage Recordings” to see the following options: To Do List, Series Manager, Queue, History, Purchases, Manual Record and Record Defaults. These features are described on the next few pages.TO DO LISTThe To Do List displays recordings your DVR is scheduled to make in the future. Icons next to the titles indicate whether the recording is a single event, part of a series, or an autorecord based on a person or keyword search. The list is ordered by time with the next recordings at the top and the furthest in the future at the bottom. You can use this screen to make sure your recordings are properly scheduled or to delete future scheduled recordings you no longer want to record. DIRECTV On DEMAND™ programs scheduled to download over the Internet are shown in the Playlist, not the To Do List.Deleting single shows is easy: Simply highlight the show you want to delete and press the RED button on the remote. A confirmation message will appear before you can delete the show. If you want to delete an entire series from the To Do List, select the show, select “Series Options”, then select “Cancel Series”.MMAANAGGGE RRECCOORRDINGSSDRAFTto to her the the record dered by dered byfurthest in the furthest in to make sure your make sure your ete future scheduled ete future sc DIRECTV On DEMAN DIRECTV On DEMthe Internet are shothe Internet are shoht theht the
49SERIES MANAGERThe Series Manager screen displays a prioritized list of all the series you’ve scheduled to record. If there is a series recording conflict and the receiver must choose which show to record, it uses this list to determine the priority. As you set up series recordings, the most recent series goes to the bottom of the list in last priority. You can change the order of the priority at any time by selecting “Series Manager”, selecting the show you want to move, moving the highlight to the right, then using the arrow keys to promote or demote the series.There are a couple of color key short cuts on this screen as well. Use the RED button to delete an entire series. Use the GREEN button to move a highlighted show to the top of the list in one press.You can also adjust the recording options used for a particular series from this screen. Select the series you want, then select “Series Options” and change the recording options as desired.QUEUEThe Queue screen displays titles that are in the queue waiting to be delivered to your hard drive. See Chapter 3, “All Movies, On Demand and Pay Per View: Ordering Programs” for details.MMAANAAGE RRRECORRDINNGSCHAPTER 4 -  RECORDINGSDRAFTwell. ll. REEN t in one t in onefor a particular a particular u want, then select u want, then seoptions as desired.options as desired
50DIRECTV® HD DVR RECEIVER USER GUIDEHISTORYProvides status information for every recording scheduled, whether they were completed, canceled or deleted. If you think something should have been recorded, but wasn’t, check here to look for an explanation.PURCHASESProvides status information for all Pay Per View programs that were bought and, if viewed, the date and time.MANUAL RECORDINGSTo set up a recording based on channel, time and date, select “Manual Record” and enter all of the options as you wish, including whether you want this to be a one-time or recurring recording (i.e. every Tuesday), channel, day and date, start time and duration. You can schedule a manual recording up to 14 days in advance.RECORD DEFAULTSThe Record Defaults screen lets you set the recording options you want the receiver to use every time it does a recording. The receiver’s default settings work best in the vast majority of cases, but you may want to change them to your personal preferences.MMAANAGGGE RRECCOORRDINGSSDRAFTt and date, select date, select ns as you wish, ns as you wish,one-time or recurrinone-time or recurr day and date, start day and date, startrecording up recording u
51  When recording a series, the Episode Type gives you the option to record first run only, repeats only, or both.   The Keep at Most option lets you decide how many episodes you want to keep: 1, 2, 3, 4, 5, 10 or All. If you select “All Episodes” for a show that appears many times in the guide, you may find it uses disk space rapidly.  The Keep Until option lets you keep a recording until you delete it or until the disk is full, in which case the DVR can delete it automatically if the disk fills up. A recording that is labeled “Keep Until I Delete” will never be deleted until you do it manually. If all of your recordings are labeled that way and the disk fills up, no new recordings will occur until you manually delete some of your “Keep Until I Delete” recordings.  The Start and Stop options let you adjust the times of your recordings to ensure you don’t miss a thing. Keep in mind that starting early and ending late on all of your recordings may create more recording conflicts than if you started and stopped on-time (according to the program guide schedule). If you find a particular series runs habitually late or early, it is better to adjust that series using the program’s Info screen rather than set the recording defaults, which would affect all of your DVR recordings. Press MENU, select “Manage Recordings”, then select “Series Manager”. Select the program you want to adjust, then select “Series Options”.MMAANAAGE RRRECORRDINNGSCHAPTER 4 -  RECORDINGSDRAFTur r elete” e” es of your es of youKeep in mindKeep in mindyour recordings r recordings an if you started and an if you starteogram guide schedulogram guide scheduabitually late or earabitually late orprogram’s Infprogram’s Iich wouich wouecec
52DIRECTV® HD DVR RECEIVER USER GUIDEHave you ever forgotten to set a recording and wish you could do it remotely from work or while on the go? You can with directv.com, and DIRECTV Mobile Apps.NOTE:  You must have an account on directv.com to use  remote scheduling.FROM A COMPUTERTo schedule a recording from your computer, go to directv.com/tvlistings to see an online version of the program guide. Select a show and click “Record”. If you have more than one DVR in your home, choose the DVR you want to record to and then click “Record to Receiver”.NOTE:   If you have a mix of HD and SD DVRs in your home, make sure not to pick an HD movie for your SD DVR. It will not record.RREECOORDDIINGG FROOMM YOUUR COOMMPPUTEERR, PHONEEE OR IPADDDRD DVRs in your homeD DVRs in your homeour SD DVR. It wour SD DVR. DRAFT.com/om/. Select ct e DVR in e DVR and then click and then click
53DIRECTV MOBILE APPSOur FREE Mobile Apps is available for the iPhone, Android™, Palm® Pre™, Palm® Pixi™, BlackBerry®, Windows® Phone 7 and the iPAD. Turn your smartphone or iPAD into the easiest, fastest, most convenient way to find any program and set your home DVR.Features:  Search for any television show up to 14 days in advance.  Browse programs by channel, or date & time.  Get program information instantly, including description, length and rating.  Record a single episode or an entire series.  Set start and end time extensions to your record requests.  Order DIRECTV CINEMA™ right on your iPAD or phone (available for iPhone, Android, Palm, BlackBerry and Windows Phone 7), no need to have your receiver connected to a phone line. Record to any DIRECTV DVR in your home. You can also go online to directv.com/mobileapps for more information. You can also learn all about DIRECTV Everywhere, the mobile app that brings the DIRECTV viewing Chapter 5, “Extras & Special Features: DIRECTV Mobile Apps”.RRECOORDINGG FROM YOOUURR CCOMPUUTEER, PHHONE OOR IPPADCHAPTER 4 -  RECORDINGSDRAFTd requests.d requestD or phone r phone ckBerry and ckBerry and ur receiver connectedur receiver conneTV DVR in your homTV DVR in your homeapps for moreapps for mo
54DIRECTV® HD DVR RECEIVER USER GUIDEDRAFT
55CCHHAPPTEERR 55 -- EXXTTRAAS && SPECCCIAAL FFEAATUURESSSExxtrras  ..................................................................................56MMeessagees  ........................................................................................ 56DDIRECTTVV Actiive Channell .............................................................56GGSSN Gaamme Loounggee  ......................................................................57MMuusic && Phottos  ...............................................................................58CCaaller IDDD  .......................................................................................... 60SShhowrooom  .......................................................................................61PPaandorraa ...........................................................................61YYouuTubee  ...........................................................................................62Sppeccial FFeeatures  ...............................................................DDIRECTTVV® DooubleePPlay™  .............................................................GGaameSeearch™™ .................................................................................QQuuickTuunne  .......................................................................................SScoreGuuide™™  ...................................................................................TTVV Appss  ............................................................................................ 65DDIREECTVV®® Whhole--HHoomee DDVRR Servvvice  ..............................66GGeeniie™ ((AAdv WWhoolee-Hommme) HHD DVVVR ................................71DDIREECTVV™™ Mobile AAppps  ....................................................73FFor Smaartphoone &&  iPad  .............................................................. 73DDIRECTTVV Everywhheerre™  ...............................................................74CHAPTER 5 -  EXTRAS & SPECIAL FEATURESDRAFT62662......633.....................63................................64.......................................66644.................................66655.......................................................65ee.............................. .........................................
56DIRECTV® HD DVR RECEIVER USER GUIDEUse the Extras option to access Messages, the DIRECTV Active™  channel, GSN Game Lounge, Music & Photos, Pandora and YouTube. Depending on your setup, it may also include the Caller ID feature.MESSAGESPress MENU, select “Extras” and then “Messages” to see your messages from DIRECTV. DIRECTV sends you messages about important news items or special promotions. DIRECTV ACTIVE CHANNELPress MENU, then select “Extras”, then “Active” to access the DIRECTV Active channel, or simply press the ACTIVE key on your remote. The DIRECTV Active Channel provides a variety of interactive services, including daily and extended weather forecasts, daily horoscopes, lottery results, the GSN Game Lounge, and a quick list of the most popular shows on DIRECTV at any given time. For local weather on demand, press ACTIVE and select the “Weather” option. The first time you use this feature, you will have to enter your local ZIP code. You can view up to five cities by EEXXTRAASSDRAFTn “Active” to access n “Active” to access s the ACTIVE kes the ACTIVE koo
57selecting the “My Cities” menu item and following the onscreen instructions. To exit the DIRECTV Active channel, just enter a channel number or press the CHAN UP/DOWN key.NOTE: Because it is an interactive channel, the DIRECTV Active screen may take a few moments to load. Please be patient.GSN GAME LOUNGEPress MENU, select “Extras”, then “Game Lounge”. The GSN Game Lounge service contains memory and skill games that you can play onscreen using only your remote. There are free as well as subscription-only games to play. If you become a top scoring player, you will see your name on the leader board.EEXTRRASCHAPTER 5 -  EXTRAS & SPECIAL FEATURESDRAFTThe The GSN GSNgames that games thaThere are free ere are free If you become a top If you becomethe leader board.the leader board.
58DIRECTV® HD DVR RECEIVER USER GUIDEMUSIC & PHOTOS“Music & Photos” is an optional item in the “Extras” menu, only shown when your DVR is connected to a home network. Compatible models include the DIRECTV HD DVR (models HR44, HR34 and HR20 or later) or DIRECTV Plus® DVR (model R22). Other models may support DIRECTV™ Media Share in the future.Your DIRECTV Receiver can be connected to your home network to show photos and play music and videos that you have saved on your personal computer. You must have at least one personal computer running a media server (e.g. TVersity, Windows Media Player, Intel Viiv) in your network for this service to work. For help on setting up “Music & Photos”, visit  directv.com/mediashare.Once your DVR is properly connected to the media server on your home network, press MENU and select “Extras” then “Music & Photos”.  The DIRECTV Media Share screen  will display.  Select “Music” to access music by Artist, Album, Song, Playlists and Channel. Your favorite music will play as you watch TV or view photos from your PC. Once the desired songs are selected, the song’s information will display on the Progress bar.EEXXTRAASSDRAFTal edia edia For r dia server on dia server o “Extras” then xtras” then are screenare screenArtist, ArtisAlbum, m, Sonmusic will plamusic will plnce thnce th
59  Select “Photos” to go to the Photos submenu. Select “Browse” to see several photos at once.  The DVR controls on your remote allow you to stop, play or skip through your music and photos. Press the GREEN button on your remote to toggle among music, photos and video control modes. Pressing the STOP button while in music control mode stops the music from playing and the audio from the current channel is then heard. Pressing the STOP button while in photo control mode stops the display of photos and displays the video from the current channel. EEXTRRASCHAPTER 5 -  EXTRAS & SPECIAL FEATURESDRAFT
60DIRECTV® HD DVR RECEIVER USER GUIDECALLER IDDepending on your phone company, the “Caller ID” option may be labeled in the format “Telco Caller ID” where “Telco” is your phone company’s name; or it may appear in the “Extras” option when you press MENU.To set up your receiver to display an onscreen notice whenever you receive a call, press MENU and select “Caller ID”,  then select “Turn on Notices”. This will toggle the option to now read “Turn off Notices”.Note: In some areas, you must press MENU, then select “Extras”, then select “Caller ID”, then “Turn on Notices” or “Turn off Notices”.NOTE:  You must subscribe to caller ID service through your phone company and your DIRECTV Receiver must be connected to the phone line.You can review your 25 most recent calls in the call log at any time. To see your call log, press MENU, select “Caller ID” then select “Call Log”. Highlight and select a name to delete that listing from your log.Note: In some areas, you must press MENU, then select “Extras”, then select “Caller ID”, then “Call Log”.EEXXTRAASSDRAFTor ce through your rough your ver must be connectever must be conhe he call call “C“C
61CHAPTER 5 -  EXTRAS & SPECIAL FEATURESSHOWROOMShowroom offers you DIRECTV content such as instructional videos, behind-the-scenes clips and video extras, information about DIRECTV sports subscriptions, special offers, trailers  and more.PANDORAPandora is personalized Internet radio designed to help you discover new music you’ll love, mixed in with music you already know. To use Pandora, your receiver must be connected to the Internet and you must have a Pandora account set up online. To access Pandora, press MENU on your remote. Select “Extras” then “Pandora”.You can listen to various stations and create, edit and personalize stations.To listen to Pandora while watching a program: While listening to Pandora, press EXIT on your remote and select “Yes, Play Pandora” to display video onscreen. Your remote buttons now control your music. To switch to video control, press ENTER on your remote to change programs.  To exit Pandora and go back to TV, press EXIT and select “No, Stop Pandora”.EEXTRRASDRAFTady y o the online. To online. ct “Extras” then ct “Extras” then edit and personalize edit and persgram: While listengram: While lisselect “Yes, Pselect “Yes, te buttote buttoessess
62DIRECTV® HD DVR RECEIVER USER GUIDEYOUTUBEWatch millions of Internet videos on your TV.If your DIRECTV HD DVR is connected to the Internet, you can search for and watch YouTube content on your TV. (If you aren’t connected, see Appendix 4.)If you’re already connected, follow these simple steps:11.  Press MENU on your remote and select “Extras”, then select “YouTube”.22.   Enter your search term using the onscreen keypad, or use the numbers on your remote to “triple tap” the words.33.  A list of YouTube videos matching your search term will display. Play a video from this screen by highlighting a title and pressing SELECT. Otherwise, highlight the title and press INFO for a description of the video and other options.EEXXTRAASSDRAFTuse use s.rm will rm wiighting a title ighting a t the title and the title and o and other options.other options.
63CHAPTER 5 -  EXTRAS & SPECIAL FEATURESYour DIRECTV HD DVR supports these special features that can be accessed without going through a menu.DIRECTV® DOUBLEPLAY™With DoublePlay, you can easily switch between two programs on at the same time without missing a minute of either. Your HD DVR stores up to 90 minutes of live TV on two channels. If you tune to a new channel (a third channel), the saved portion on the original channel is cleared. DoublePlay expires after two hours of non-use.11.  While watching one program, press the DOWN arrow on your remote. A message displays confirming  DoublePlay has started.22.   Press the DOWN arrow again and tune to the second pro-gram.33.  Now use the DOWN arrow to switch back and forth between the two programs.44.  You can pause, rewind, fast forward, slow-mo or instant replay both.NOTE:  You cannot fast forward during live TV until you pause or rewind a program.Watching Program 1Press DOWN button on remoteProgram 2Watching Program 2Program 1Program 2Program 2Program 1SSPECIAAAL FEAATURRESDRAFTn ePlay ePlaysecond proecond pro--k and forth between k and forth betww-mo or instanw-mo or instT
64DIRECTV® HD DVR RECEIVER USER GUIDEGAMESEARCH™Sports blackouts, a long-time source of frustration and confusion for sports fans, occur when a sporting event is not televised in a certain area. But thanks to DIRECTV’s cutting-edge technology, whenever you tune to a channel with a blacked-out game, GameSearch™ recognizes the blackout and immediately looks to see if the game is on another channel. If a broadcast of the game is found, GameSearch displays an onscreen message that gives you the option to tune to that channel. If it can’t find one, an onscreen message will let you know the game is not available.QUICKTUNEUse QuickTune to get to your 9 “must see” channels fast!  While watching live TV, press the UP arrow on your remote control.  A display with spots for 9 channels will appear on screen.  To fill the spots, press the GREEN button on your remote control.  The channel you are currently viewing will be added to the currently highlighted spot in the QuickTune display.  After you’ve made all your picks, press the UP arrow whenever you want to bring up the application.  Use the arrow keys to highlight the channel you want to watch and then press SELECT.SSPPECIIALL FEEAATUREESSDRAFTn hannels fast!  While nels fast!  While ur remote control.  Aur remote conppear on screen.  To fippear on screen.  Toyour your remote controcontroadded to the cadded to theAfter you’After you’wanwan
65CHAPTER 5 -  EXTRAS & SPECIAL FEATURESSCOREGUIDE™Interactive content, like scores, statistics and other information, is available on some of our special sports and entertainment channels. Look for an onscreen popup that lets you know when interactive content is available and follow the onscreen instructions to use the interactive features.TV APPSWith DIRECTV’s exciting FREE TV Apps, like Flickr®, ScoreGuide™, 5-Day Weather Forecast and Webcams, you can view your favorite pictures, get up to the minute scores, check your local weather, hZZa^kZ[ZZYhd[edejaVgkVXVi^dch^\]ihVcYbjX]bdgZ¸without missing a second of what you’re watching, all at the press of a button. To enjoy TV Apps, your DIRECTV HD DVR must be connected to the Internet.  See Appendix 4, “How to Network your HD DVR”, for instructions.    Press the Right Arrow button on your remote control to launch TV Apps. Select the DIRECTV App Store icon at the top of the TV Apps Dock and choose the apps you want. You can also go to the online DIRECTV App Store on your computer, at directv.com/tvapps.   Whenever you want to access your TV Apps, just press the Right Arrow button and select the App you want to use.SSPECIAAAL FEAATURRESDRAFTeGuide™, e™,our favorite our favorite cal weather, cal weatheX]bdgZ¸bdgZ¸hing, all at the press ing, all at the press V HD DVR must be V HD DVR must b4, “How to Network y4, “How to Network ote cote c
66DIRECTV® HD DVR RECEIVER USER GUIDEDDIRECCTVV®® WWHOLLEE-HHOMME DVVRR SSERVVICCEWith DIRECTV’s Whole-Home DVR service and the proper equipment, it’s like having a DVR in every room. Now even rooms with HD Non-DVR receivers can schedule and watch recorded programs. Start watching a recorded program in one room, stop it, then continue watching it in another room.1. Neetwwoorrk YYouur Reccceiveerss:When your HD DVR and HD Non-DVR receivers are networked, it allows them to share content. This is typically completed by an installer during your installation appointment. To learn more about upgrade and eligibility requirements, go to directv.com/wholehome. To get a quick understanding of how recorded content is shared by your household, skip to step 7. NOTE: To access DIRECTV® Whole-Home DVR service functionality, you need a DIRECTV HD DVR receiver (models HR34, HR24, HR20-HR23 with DECA), an additional Whole-Home-capable receiver (models H25, H24, HR24, HR34, HR44, H21 with DECA, H23 with DECA, R22 with DECA,HR20-HR23 with DECA) for each TV, a SWiM network, HD Access, DVR service and DIRECTV® Whole-Home DVR service. There is a limit of one remote viewing per DVR at a time. For Whole-Home DVR to function, your receivers should never have an Ethernet cable connected, unless it is connected to a DECA. H24, H25, HR24, HR34, and HR44 receivers should never have a DECA installed.   DRAFTrvice rviceeiver (models ver (models ditional Whole-ditional Who4, HR24, HR34, HR444, HR24, HR34, Hwith DECA,HR20-HR2with DECA,HR20-HR2D Access, DVR seD Access, DVR There is a lThere is a lhole-hole-
67DIIRECCTVV®® WWHOOLE-HHOME DVR SSERVVICECHAPTER 5 -  EXTRAS & SPECIAL FEATURES22. AAcctivvaate DDIRREECTTVV® WWhhole--HHomeee DVVRR SServvice:Once DIRECTV® Whole-Home DVR service is activated on your account, press the LIST button on your remote.  The message on the right will display, confirming the service has been enabled.  Select “Continue”.33. NNaammee Youur Loocattionss:You’ll be prompted to give each receiver a name.  We refer to this as “Location”.  We recommend using a name that you’ll easily associate with the room or it’s location, such as, “Living Room”. The name must be 14 characters or less.  You must be at the receiver to assign its name.  After you’ve assigned a Location Name, you can change it as follows:  Press MENU, select “Settings & Help”, then “Settings”, “Whole-Home” and then “Name Location”.   44. SSeet PPllaaylisst Shharinng OOpptioonnss (HDD DVR onnly):During initial setup, if the receiver is an HD DVR, you’ll be prompted to set the following Playlist sharing options:DRAFTge it ge it then thenation”.   tionHDD DVR onnly):HDVRonly):DVR, you’ll beDVR, you’ll boptions:options:
68DIRECTV® HD DVR RECEIVER USER GUIDEDDIRECCTVV®® WWHOLLEE-HHOMME DVVRR SSERVVICCEShare PlaylistAn HD DVR has the option to share its Playlist with other receivers. Let’s say you have an HD DVR in your Den, an HD DVR in your Master Bedroom, and an HD Non-DVR in your Kitchen. If you set Share Playlist to “No” in the Master Bedroom, the other rooms (Den and Kitchen) won’t be able to access the Master Bedroom’s Playlist.Allow DeletionAn HD DVR has the option to prevent another location from deleting programs that were recorded by that HD DVR. In our previous example, if the DVR in the Den is set to allow deletion “From this room only”, a person trying to delete a program (recorded in the Den) from the Master Bedroom or Kitchen would be prevented from doing so.You can change sharing options at any time. Press MENU, select “Settings & Help”, then “Settings”, “Whole-Home” and then “Share Playlist”.55. VVieww SSStatuus:To view the Whole-Home status for all your connected HD DVRs, press MENU, select “Settings & Help”, “Settings”, “Whole-Home” then “Status”. This screen indicates if DIRECTV® Whole-Home DVR service is authorized, as well as the Playlist sharing settings for all networked HD DVRs.DRAFTur r eletion on gram gramKitchen would Kitchen would  Press MENU, select Press MENU, select le-Home” and then le-Home” and th
69DIIRECCTVV®® WWHOOLE-HHOME DVR SSERVVICECHAPTER 5 -  EXTRAS & SPECIAL FEATURES66. RReecoorrdd Prroggraamss:If you’re in a room with an HD DVR, and you’ve authorized DIRECTV® Whole-Home DVR service, you’ll still record programs in the same way you did before.  If you’re in a room with an HD Non-DVR receiver, once you authorize DIRECTV® Whole-Home DVR service you’re able to request programs to record.  To record a show you’re currently watching or to record a highlighted program in the Guide, press the orange REC (record) button.  A message displays onscreen asking you to select the HD DVR you would like to record on; then select either “Record Once” to record the current episode, “Record Series” to record the entire series or “Do Nothing” to cancel your request.NOTE:  Pressing the REC button twice to record a series or pressing it three times to cancel the request does not work on Non-DVR receivers.You can also schedule a recording from a program’s Info screen.  To record a program you’re currently watching or to record a highlighted program in the Guide, press the INFO button and select either “Record Once” or “Record Series”.  If your recording (requested from a Non-DVR receiver) conflicts with other recordings already scheduled on the DVR, a message will display letting you know that your program cannot be recorded.TIP:  Adding a second HD DVR to your DIRECTV® System doubles your recording capacity. Don’t worry about having to remember which DVR you recorded your shows on. Whole-Home DVR service keeps things simple by giving you a single, unified playlist of all your recordings on any connected TV.Dm a program’sm a program’ntly watntly watresresDRAecord a series or rd a series or uest does not work uest does not DRAFTt t ecord ord o cancel el ple by ple becordings onecordi
70DIRECTV® HD DVR RECEIVER USER GUIDEDDIRECCTVV®® WWHOLLEE-HHOMME DVVRR SSERVVICCE  Recordings can be deleted from any connected receiver that has been set up to Allow Deletion. However, to check the status of scheduled recordings on the To Do List or to change the priority of a series you’ve scheduled to record, go to the HD DVR, press MENU and select  “Recordings”, then “Manage Recordings” for options. 77. WWWatcchh Recoordded Proggrramms:By networking your receivers, the recordings from all the HD DVRs in your household are combined into a “shared” Playlist.  The shared Playlist is accessible by all networked receivers, even if the receiver is not a DVR!  To access the Playlist, press the LIST button on the remote control, or press MENU, then select “Recordings”, then “Playlist”. Highlight a show and press SELECT to play. If you’ve already watched part of the show in another room, you can select “Resume” to pick up where you left off. You can use any of the DVR control buttons such as PAUSE, FFWD, ADVANCE, while watching your recorded show.You can limit access to programs with Parental Controls. See “Parental Controls” in Chapter 6 for details.  Your parental control settings restrict access to both recorded and live programs.  Parental controls must be set at each receiver.To delete a program from your Playlist, use the arrow keys to highlight the desired show and press the RED button. You’ll then be asked to confirm the deletion.NOTE: Only two locations can access a recorded program at the same time (the HD DVR on which the program was recorded and one other location).  If a third location tries to playback a recording, a message will display explaining that the program is not available.DRAFTss ss hen and press and press e show in e show iup where you left up where you left s such as PAUSE, uch as PAUSE, orded show.orded show.Parental Controls. SeParental Controls. Stails.  Your parentatails.  Your parecorded and livcorded and leach reeach reA
71RRRRRRecord     dierent shows at once with one DVR.  ddddddddddddddGenie HD DVRGGENIE™™ (AADV WWHOOLE-HOOME) HD DDVRCHAPTER 5 -  EXTRAS & SPECIAL FEATURESGenie (Adv Whole-Home) HD DVR is the most comprehensive, flexible and cost effective HD DVR experience from DIRECTV. The Genie HD DVR (HR44, HR34 and above), together with Genie clients or RVU-capable TVs, can serve your entire home, and allow you and your family to watch what you want, where you want, when you want. You can use your Genie HD DVR in three ways: 1. As a standalone HD DVR - connect it and get all the enhancements and superior receiver features of the HR44, HR34 and above.22. As an HD DVR in a Whole-Home DVR setup - Genie enhances your current Whole-Home setup. When connected to other HD receivers as the hub of your Whole-Home DVR experience, the Genie HD DVR allows you to stream recordings to four active rooms simultaneously (up to three clients).33. As a Genie server connected to Genie client and/or RVU devices - The DIRECTV Genie HD DVR can stream content and features to RVU (remote viewing) capable TVs, clients and other devices, giving you full HD DVR functionality in every room. For example, if your Genie HD DVR is connected to an HDTV in your Living Room, as well as to a client and HDTV in your Office, plus RVU TVs in the Bedroom and Kids’ Room, you don’t need a separate DIRECTV Receiver in each room: the client/s and/or RVU TVs let you watch, record and manage your shows directly, via the Genie (Adv Whole-Home) HD DVR.DRAFDRes es her HD HD ence, the he our active our actand/or RVU d/or RVU n stream content and stream contble TVs, clients and otble TVs, clients and onality in every roomonality in every roomcted to an HDTcted to an HDTV in youTV in youmyomyo
72DIRECTV® HD DVR RECEIVER USER GUIDEIn any configuration, your Genie HD DVR offers the following features in addition to those of a DIRECTV HD DVR:   Record up to 5 programs simultaneously   Store up to 200 hours of HD programming   Get full HD DVR functionaltiy in every room   Watch two shows at the same time with Picture In Picture (on the TV connected to the Genie HD DVR) NOTE:  For a complete list of compatible RVU devices, receivers, clients and required services, visit directv.com/Genie.GGEENIEE™ (ADDVV WHOLLE-HHOME)) HD DVVRRDRAFTivers, vers,
73CHAPTER 5 -  EXTRAS & SPECIAL FEATURESDIRECTV™ MOBILLE APPPSFOR SMARTPHONE & IPADNow your favorite shows, movies and sports are just a tap away,  using your smartphone (iPhone, Android, Blackberry, Palm Pre, Palm Pixi, Windows Phone 7) or iPAD. Experience all the amazing features of the DIRECTV™ Mobile Apps with an HD DVR that is connected to the Internet. Features:  Use your phone or iPad as a remote control: Play, pause, rewind, fast-forward, scroll through channels, and more, all with a tap.  Create your own Home screen: Get instant access to your favorite channels and sports. You control what’s on your screen by choosing the channels you want to see, the teams and sports you want to follow, even the modules you want to include.  Create your own sports roster: Browse games and get scores instantly across all sports. You choose the teams and sports you want to follow.  Search for any television show up to 14 days in advance.  Watch movie trailers and get detailed show info: See descriptions, upcoming showings, cast & crew, parental info, similar shows, and photos.  Channel-tune instantly with a tap.  Easily share your favorite shows and movies with your friends on Facebook and Twitter.Go to directv.com/mobileapps for more information.DRAFTyour n your n youre, the e, the e modules you modules you games and get games and get u choose the teams u choose the teamsays in advaays in advainfo:info:
74DIRECTV® HD DVR RECEIVER USER GUIDEDDIRECCTVV™™ MMOOBILLEE AAPPSSDIRECTV EVERYWHERE™Now watch DIRECTV movies and TV shows on your tablet device, mobile phone or your computer, whenever, wherever you want. All you need is a DIRECTV online account, and an internet connection.To learn more about DIRECTV Everywhere go to  http://www.directv.com/entertainment/NOTE:  Certain remote control functions require a standard DIRECTV remote. iPad remote control functionality requires a home Wi-Fi connection. The iPad App requires Internet access and directv.com login. Internet connections may vary. In rare instances, scheduled recordings may not be recognized. Only available on certain DVR receivers. Visit directv.com/apps for complete details.  iPad is a registered trademark of Apple, Inc.Use of the DIRECTV mobile apps are licensed under DIRECTV’s current End User License Agreement. Use of the DIRECTV mobile apps are also subject to DIRECTV’s privacy policy and other legal policies, including DIRECTV’s  Customer Agreement for users who are DIRECTV customers.DRAFTDard quires aquires aernet access ernet access y vary. In rare y vary. In rarrecognized. Only ognized. Only rectv.com/apps for rectv.com/apprademark of Apple, Inrademark of Apple,nsed under nsed under ementement. Us. UsECTVECTV
7575CCHHAPPTEERR 66 - SEETTIINGSS & HHEELLPPSeettings  ..............................................................................76IInffo & TTeest  .................................................................................76DDissplay  .......................................................................................76AAuudio  ..........................................................................................80NNeetworkk Setuup  ..........................................................................80RReemotee Conttrol  .........................................................................81SSatellitee  .....................................................................................82WWhhole-HHHomee  .............................................................................83PPoower SSavingg  .............................................................................83RReeset  .........................................................................................PPaareental Conttrolss  ..............................................................LLoock Noow ...................................................................................UUnnlock NNow  ...............................................................................RRaatingss Limitts  ...........................................................................AAddult Chhanneels ..........................................................................8CChhanneell Bloccks  .........................................................................88WWeeb Viddeeos  ................................................................................88SSppendinng Limmits  ........................................................................89VVieewingg Hourrs  ...........................................................................89Faavoorite CChannnelss  .............................................................90HHeelpp  ....................................................................................91CHAPTER 6 -  SETTINGS & HELPDRAFT8833...833.................85.............................86......................................88866...............................88877.....................................................88........................................ .......................8........................................................................................
76DIRECTV® HD DVR RECEIVER USER GUIDEPress MENU, select “Settings & Help”, then “Settings” to review or change your system settings. These include: audio options, video format, TV resolution, network setup, remote control setup and more. INFO & TESTSelect “Info & Test” to display the System Info & Test screen.  Select “Run System Test” to initiate a test of the tuners, receiver ID and phone line.  NOTE:  Running the System Test will interfere with live TV and any current recordings.Select “More System Info” to review your basic system information such as receiver model, receiver ID, access card number, software version, etc.… as well as, current receiver settings. This information can be useful during troubleshooting.DISPLAYSelect “Display” to access the following options:  “Preferences”, “Video”, “TV Ratio”, “TV Resolution”, “Captioning” or “Clock”. Before you get started, you may want to review Appendix 5, “About High-Definition”, which describes HD formats and resolutions. SSETTTINGSDRAFTe TV and any d any sic system informatioystem informatios card number, s card numberrent receiver settings.rent receiver settingsbleshooting.blesho
7777PPreffeereennccesThese are user interface display settings which include:Recording Tips:  Turn “On” or “Off” helpful tips that display onscreen whenever you schedule a recording.Guide HD Channels:  Choose whether you want the guide to show   HD channels and their duplicate SD channels or to hide the SD duplicates.Guide shows:  Select whether you want the first press of the GUIDE button to take you directly to the program guide or to go to the category filter first.Language:  Select your preferred onscreen text language.Scrolling Effects:  Turn scrolling effects ON or OFF. This affects the appearance of large text areas when they scroll.Banner Time:  Set the channel banner time to determine how quickly the banner disappears after moving to a new channel.NOTE:  To change your screen format and resolution temporarily, press INFO on your remote, select “Audio/ Video” from the Channel Banner and select “Change Resolution & Format”.VVideeeo Set your preference for the following screen options:  Native, Screen Format and Bar Color.Native: You can turn Native mode ON or OFF. When Native Mode is ON, your TV auto-changes to match the resolution of the SEETTINNGSCHAPTER 6 -  SETTINGS & HELPDRd resolution tempod resolution temVideo” from thVideo” from ton & Foron & ForDRAFTis affects is affects etermine how ermine how a new channel.a new chann
78DIRECTV® HD DVR RECEIVER USER GUIDEprogram coming into the receiver. For example, if Native mode is ON and a program is being broadcast in 480p, your High-Definition Receiver tells the TV to show it in that same format. If the next program changes to 1080i, the receiver tells the TV to change to that format. Native mode slows down the system’s response time to channel changes since the receiver and TV must adjust the picture resolution at every channel change. Because of this, the default setting is OFF.  When Native Mode is OFF, your receiver will display the program at the highest resolution set on the “TV Resolutions” screen. Screen Format:  When a program is broadcast in a format that does not exactly fit your TV screen, your receiver will automatically size the picture.  Screen Format options include Original Format, Pillar Box (Widescreen 16:9 HDTVs only), Letterbox (Standard 4:3 TVs only), Stretch and Crop.   If you’re watching a widescreen movie on a Standard 4:3 TV, you may want to choose “Letterbox” which places bars on the top and bottom of the screen. If your HDTV is 4:3 aspect ratio, you may want to “Crop” or cut off the content at the left and right side of the screen while preserving the proportion of the picture that remains. You can also “Stretch” the picture vertically or horizontally to fill up the screen.Bar Color:  Select the Bar Color option to set the color of the bars displayed when you view programming in Letterbox or Pillar Box modes.   TTV RRRatiioo  Set the aspect ratio that matches your TV.  Options are Standard 4:3 or Widescreen 16:9.SSETTTINGSDRAFTclude de nly), y.  .  dard 4:3 TV, youdard 4:3 TVbars on the top ars on the top :3 :3 aspect ratio, you aspect ratit at the left and right t at the left and rig proportion of the pi proportion of the pipicture verticalpicture vertichehe
7979TTV RRResooluutionssSelect the resolutions your TV can support so your receiver can pass the proper signal. To find the resolutions your TV supports, check the user’s guide that came with your TV. If you select a resolution your TV doesn’t support, the receiver will reset the resolution after a few seconds.CCappttionninngSelect “Captioning” to turn closed captioning ON or OFF, and to select the font style, size and color for the display of captions.CCloccckSelect “Clock” to set your time zone and whether you want the receiver to show Daylight Savings time or not.SEETTINNGSCHAPTER 6 -  SETTINGS & HELPwant theant t
80DIRECTV® HD DVR RECEIVER USER GUIDEAUDIOSelect “Audio” to make a persistent change to your audio settings.Audio options include: Language:   Select your preferred audio language, i.e. English, Spanish, Chinese, etc…Sound Effects:  Select the volume of sound effectsDolby® Digital:  Select whether you want Dolby Digital audio output ON or OFF, i.e. for a surround sound system. Not all TV programs deliver Dolby Digital 5.1 audio. Look for the Dolby Digital icon in the program description and Channel Banner.HD Channels include 5.1 surround sound when available from the programmer. Additional equipment is required and sold separately. “Dolby” and the double-D symbol are trademarks of Dolby Laboratories.NETWORK SETUPSelect “Network Setup” to set up and test the connection of your DVR to the Internet. See Appendix 4, “How to Network Your HD DVR” for details. SSETTTINGSDRAFTr the r the el Banner.anner.able from able fd and sold d and soldre trademarks of e trademarks of
8181REMOTE CONTROLSelect “Remote Control” to display the Remote Control setup screen. Then select from the Program Remote, IR/RF Setup, Receiver Mode and Advanced Setups options.When the MODE switch on your remote is in the left-most position, it controls your DIRECTV Receiver. However, you can also program the AV1, AV2 and TV positions to control other equipment such as your TV, DVD, VCR or Stereo.PProggrammm RemmooteeFollow the step-by-step instructions to set your remote to control your TV or other A/V equipment, such as a DVD player or surround sound system. For best results, it is helpful to know the model number and brand of your equipment.  To clear current AV1, AV2 and TV settings, select “Program Remote” and then “Reset Remote”.IR/RRRF SSeetuppCertain remote control models feature RF (radio frequency) capability. Refer to the model number printed on the top left corner of your DIRECTV Remote Control. A letter R at the end of the model number (which may be followed by other letters) indicates that the remote supports radio frequency. If no letters follows the number, the remote works in IR mode only.NOTE:  Not all DIRECTV Receivers are RF-capable.SEETTINNGSCHAPTER 6 -  SETTINGS & HELPDRAFTplayer yful to ful to ment.  To clear ment.  To cleam Remote” and Remote” and (radio frequenc(radio frequeon the toon the toRaRa
82DIRECTV® HD DVR RECEIVER USER GUIDETo change your remote method of transmission from Infrared (IR) signals to RF, select “Remote Control” and then “IR/RF Setup”. While IR transmission requires a clear line of sight to the front of the receiver, RF transmission lets you put your receiver inside a cabinet or behind solid doors and still be able to command it from up to 200 feet away.RRecceeiveerr MoodeeSelect “Receiver Mode” if you want to use one remote to command a second DIRECTV® Receiver.AAdvvaancceedd SeetuuppsUse this option to set up your remote to control 3 or more receivers in one room. SATELLITEThis option is used by installers when your system is initially set up; you should not have to use it. However, you can use this screen to view the satellite signal strength your receiver is getting or to repeat the satellite setup procedure.The “Antenna Setup” option can be used to display channels received via your off-air antenna in the Guide.  You must have an off-air (terrestrial) antenna connected to your HD DVR Receiver. Not all HD DVR’s have a built-in off-air tuner. SSETTTINGSDRAFTsystem is initially system is initwever, you can use wever, you can usestrength your receivstrength your receivrocedure.roceddisplay cdisplay cYoYo
8383WHOLE-HOMEIf you’re using DIRECTV® Whole-Home DVR Service or Genie™ (Adv Whole-Home) HD DVR and Clients, you can use the Whole-Home settings to set or change your Playlist Sharing preferences, or to create or change the names of each receiver or client location.  To learn more, read “DIRECTV® Whole-Home DVR Service” in Chapter 5 or “Genie HD DVR” in Chapter 7, respectively. POWER SAVINGSome DIRECTV Receivers are Energy Star certified, meaning they include features that reduce electrical consumption. The Power Saving option automatically puts these receivers into Standby mode when there is no activity on your remote for 4 hours. When the feature is ON, a message will display to warn you before the receiver goes into Standby mode.RESETThe Reset screen lets you restart the receiver, reset to factory defaults, or reset everything. “Restart Receiver” is the same function as pressing the red reset button behind the access card door on the front of the receiver. This option does not affect your settings and scheduled recordings.SEETTINNGSCHAPTER 6 -  SETTINGS & HELPDRAFTning tion. The tion. Theivers intoivers intoremote for 4 mote for 4 ll display to warn ll display to wmode.mode
84DIRECTV® HD DVR RECEIVER USER GUIDE“Reset Defaults” erases all of your personal preference items, such as parental controls, favorites, language and scheduled recordings, and restores the receiver configuration to how it was set at the factory.“Reset Everything” Completely erases everything from system memory and starts over like a new receiver.  WARNING:  All your recordings will be erased from the hard drive! NOTE:  If Parental Controls are locked, you must enter your password to reset the receiver.SSETTTINGSDRAFT
8585PPARRENTAAAL CONNTROOLSTo review or update your Parental Controls settings, press MENU, select “Settings & Help”, then “Parental Controls”. You can also access Parental Controls by pressing INFO, then selecting “Parental”, then “Parental Controls”.Parental Controls enable parents to place certain restrictions on just who’s watching what, and requires a passcode to view restricted programming. Whether it’s for mature content, spending amounts, or even the number of hours of TV watching allowed, you’re always able to keep limitations where you want them for the whole family. The system default is “unlocked” for all categories.CHAPTER 6 -  SETTINGS & HELPDRAFT
86DIRECTV® HD DVR RECEIVER USER GUIDELOCK NOWAfter setting the restrictions you want (see below for options), choose “Lock Now” from the left menu. You’ll be asked to create a passcode. This passcode will be your entry to unlocking and adjusting limitations in the future.UNLOCK NOWWhen parental controls are locked, a message appears if you try to tune to a restricted program explaining why the program is blocked. To temporarily unlock a particular program select “Unlock Now” and enter your passcode. Making multiple entries aimed at guessing the passcode is discouraged by a time delay; each invalid passcode entered lengthens the delay for subsequent entry by one second.For more unlock options, press MENU, select “Settings & Help” then select “Parental Controls”. Various options for removing restrictions temporarily or permanently will appear. Select one and enter your passcode. You can also unlock Parental Controls by pressing INFO while watching TV. Select “Parental” then “Unlock All” and enter your passcode. NOTE: If you have Parental Controls set and temporarily unlocked, turning the receiver off will turn parental  controls back on.PPARENTALL COONNTROOLSSDRAFTu u ogram am m select tiple entries tiple entries by a time delay; by a time dedelay for subsequent lay for subsequent select “Settings & select “Settings & HeHs options for removs options for removwill appear. Sewill appear. SckckParenParenareare
8787RATINGS LIMITSSet rating limits for Movies, TV and Other (unrated) shows.  From the left menu, select “Rating Limits” then select either “Movies”, “TV” or “Other”.MMovvviesSelect the button next to the overall ratings limit you wish to impose. Brief descriptions of the ratings appear for your guidance.TTV PPProggramssHighlight and select the TV ratings limit you desire.  In addition to allowing or blocking shows by TV rating (i.e. TV-MA), you can also set ratings limits for particular types of content such as Fantasy Violence (FV), Dialogue (D), Language (L), Sexual Content (S) and Violence (V).  A description of each content type displays when highlighted.OOthheer SShhowssHighlight and select the box to toggle the setting between “Allow No Rating” and “Block No Rating”.  If you choose “Block No Rating”, programming that has no rating, such as news and sports, will not display.PPARRENTAAAL CONNTROOLSCHAPTER 6 -  SETTINGS & HELPDRAFTddition ), you ), you ntent such ntent suche (L), Sexual L), Sexual each content type each contentbetbet
88DIRECTV® HD DVR RECEIVER USER GUIDEADULT CHANNELSHide adult channels in the program guide, Manage Recordings screens, and when channel surfing. Select “Adult Channels”, then highlight and select the box to toggle between “Hide Adult” and “Show Adult”.CHANNEL BLOCKSPrevent children from viewing pre-selected channels. Select “Channel Blocks”. Scroll down the channel list and select those you wish to block. You can also key in channel numbers or use “Block All” or “Allow All” to save time.WEB VIDEOSPrevent children from viewing video from the Internet. Select “Web Videos”, then highlight and select the box to toggle between “Block Web Videos” and “Allow Web Videos”.PPARENTALL COONNTROOLSSDRAFTlect ect those se bers or use bers or  Intern Interntt

Navigation menu