ASUSTeK Computer UGPZ5 Bluetooth Module User Manual 6 User s Manual 6
ASUSTeK Computer Inc Bluetooth Module 6 User s Manual 6
UserManual.wiki
>
ASUSTeK Computer
>
UGPZ5 User Manual
>
Users Manual 6 rev
Contents
1.
Users Manual 6 rev
2.
Users Manual 1
3.
Users Manual 2
4.
Users Manual 3
5.
Users Manual 4
6.
Users Manual 5
Users Manual 6 rev
Navigation menu
Upload a User Manual
Namespaces
Wiki Guide
HTML
PDF
Info
Views
User Manual
Discussion / Help
Navigation
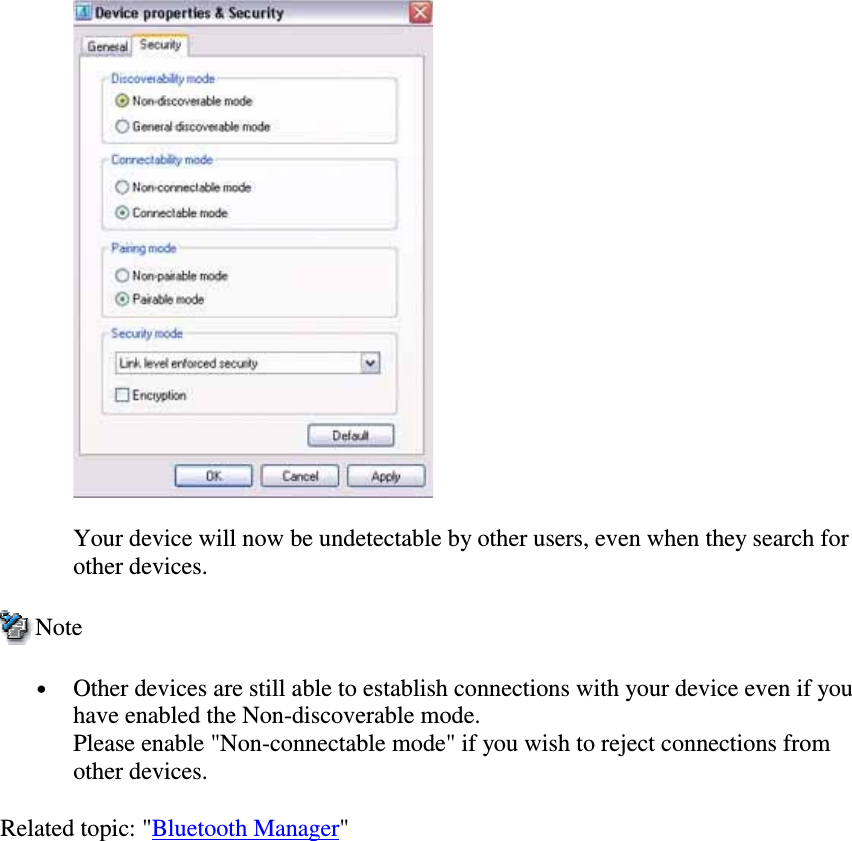
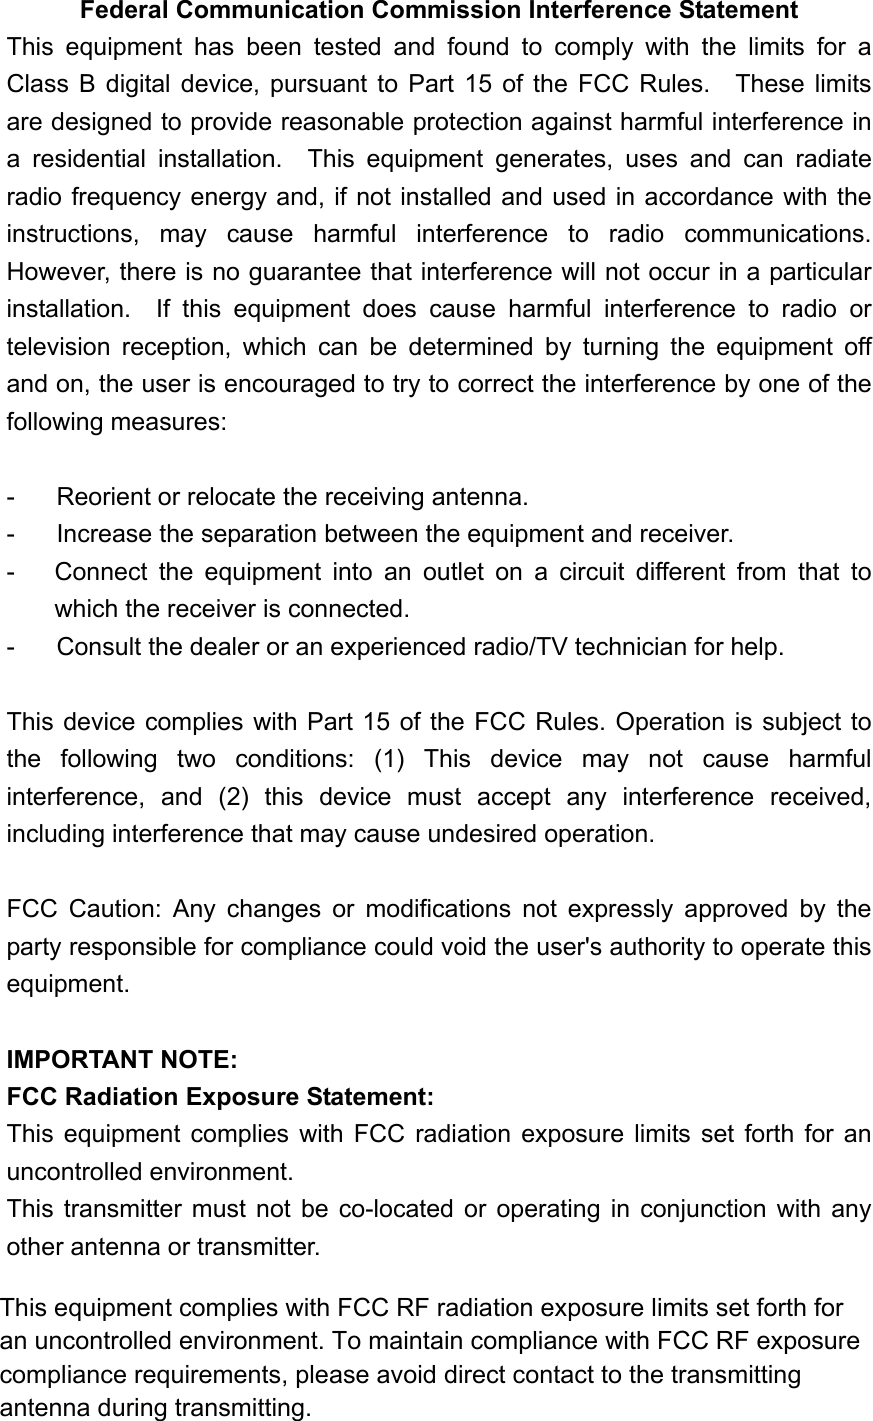
![Encrypting the content of your transmissionsSince Bluetooth communication is conducted wirelessly, there is always the possibilitythat a third party may be able to intercept your transmissions.You can use encryption to render the content indecipherable to anyone who manages tointercept it.Important• Encrypting your transmissions will still not guarantee complete security.Accordingly, please be aware that transmitting data is conducted with an elementof risk for the user.Procedure1. Right-clickontheBluetoothiconinthetasktray,andclickon[DeviceProperties & Security].The [Device Properties] window will appear.2. Select [Link Level Enforced Security] in [Security Mode] under the[Security] tab, put a check next to [Encryption], and then click on the [OK]button](https://usermanual.wiki/ASUSTeK-Computer/UGPZ5.Users-Manual-6-rev/User-Guide-507427-Page-2.png)
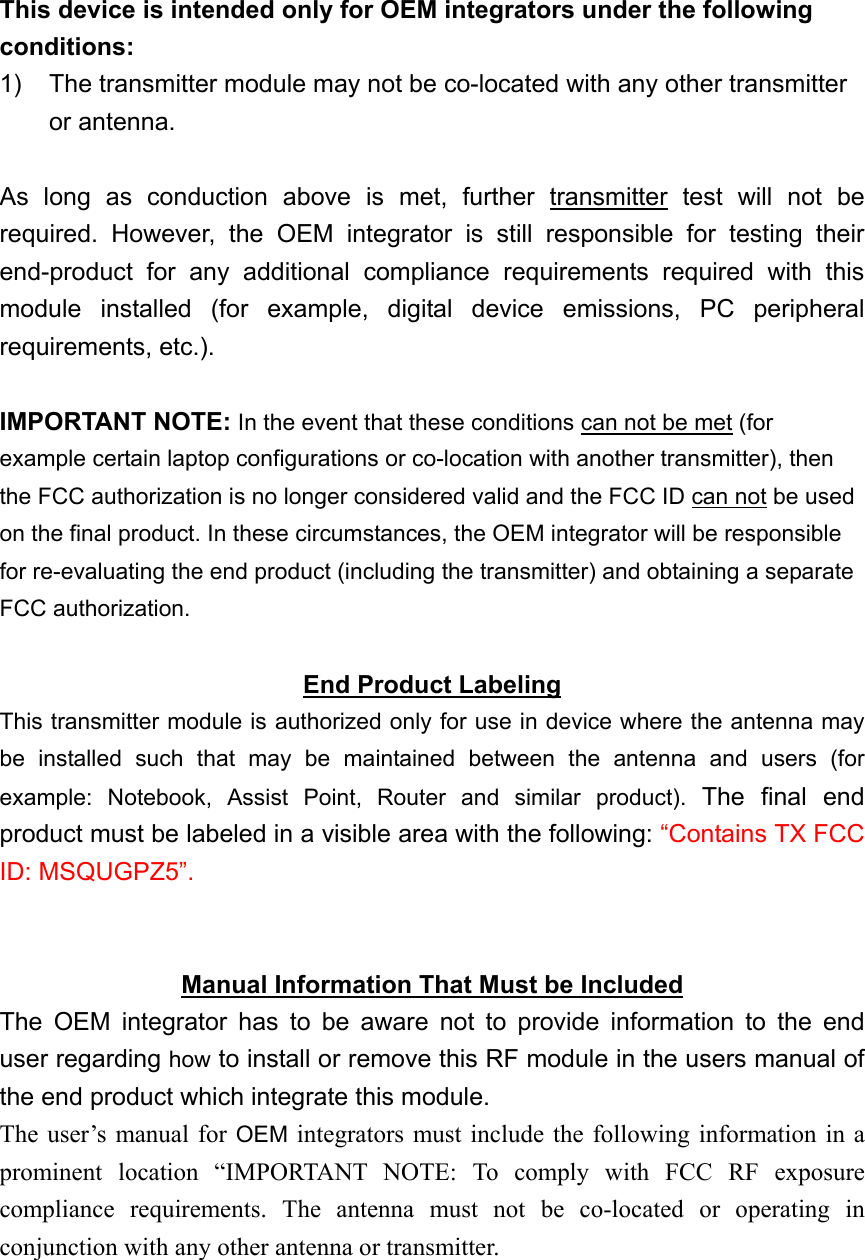
![Note• Once you have configured the security mode, a window will appear when youfirst make a connection to another device, prompting you to enter a Bluetoothpasskey (PIN code).Please click on the [OK] button after you have entered the passkey.• The window in which you enter the passkey will not appear once you haveconnected more than two times to the device.Related topic: "Bluetooth Manager"](https://usermanual.wiki/ASUSTeK-Computer/UGPZ5.Users-Manual-6-rev/User-Guide-507427-Page-3.png)
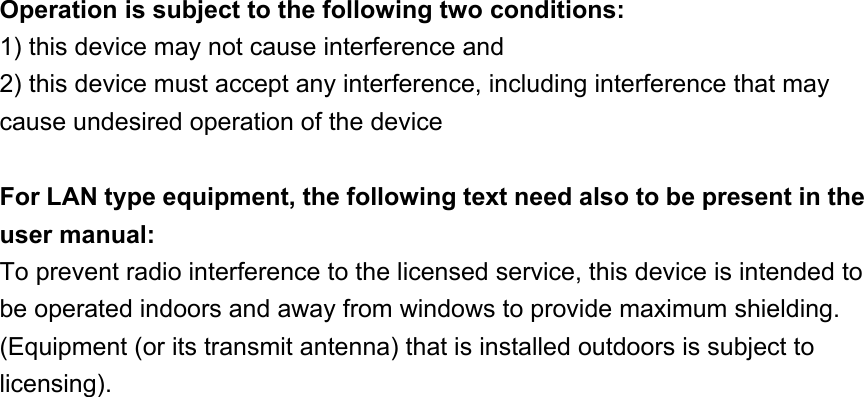
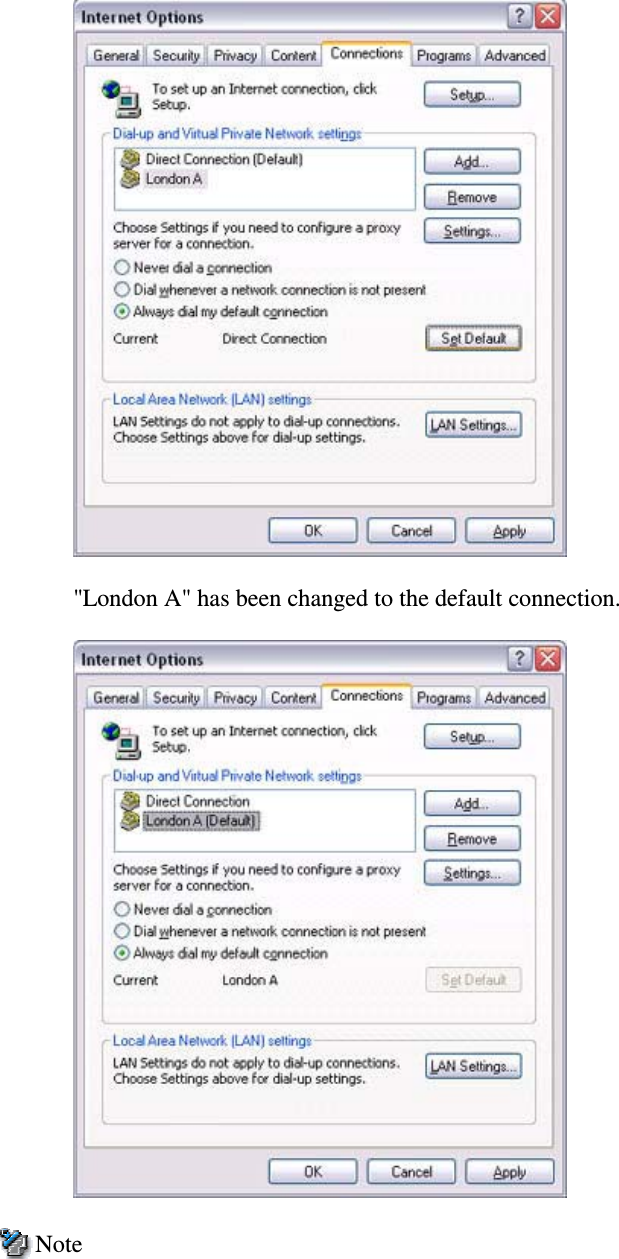
![Changing the default connectionThe "default connection" refers to the dial-up connection configured for use whenever aconnection is made to the Internet.If several connections have been registered, you can change the default connection byfollowing the procedure below.Procedure1. Start Internet Explorer2. Click on [Tools][Internet Options...]The [Internet Options] window will appear.3. Click on the [Connections] tab](https://usermanual.wiki/ASUSTeK-Computer/UGPZ5.Users-Manual-6-rev/User-Guide-507427-Page-4.png)
![In this window, "Direct Connection" is set as the default, and "Never dial aconnection" has been selected.Change the settings so that "London A" will always be dialled when you connectto the Internet.4. Select "Always dial my default connection"5. Clickon"LondonA",andthenclickonthe[SetDefault]button](https://usermanual.wiki/ASUSTeK-Computer/UGPZ5.Users-Manual-6-rev/User-Guide-507427-Page-5.png)
![• Alternatively, if you wish to connect to the Internet from a LAN in a company orother environment where a LAN can be accessed, select "Never dial a connection"if you have a dial-up configuration, but do not want dial-up to occurautomatically.• When connecting to the Internet via a LAN, you must enter the appropriate LANsettings under [LAN Settings...].](https://usermanual.wiki/ASUSTeK-Computer/UGPZ5.Users-Manual-6-rev/User-Guide-507427-Page-7.png)
![Manually creating a virtual Bluetooth COM portIn order for a PC to connect to and communicate with a Bluetooth device, the BluetoothUtility will create a gateway for data to be exchanged between the respective devices.This gateway is known as a "port" (or "virtual COM port").Since one virtual COM port will be allocated to each device, trouble-free communicationwill still be possible even if several devices are being used.When you use the Bluetooth Utility, a virtual COM port will be automatically created onset-up; however, virtual COM ports can be created manually if so needed.Note• Bluetooth Manager must be active in order for you to be able to use BluetoothLocal COM.Clients and serversWhen Bluetooth communications are performed, there will always be a "client/server"relationship between the various devices. A "client" is a device that sends certain requeststo another device, while a "server" is a device that provides a service on receipt of suchrequests from another device.For example, when a PC issues a print command to a wireless printer, the PC functions asthe client, while the printer functions as the server.When a PDA or other device attempts to receive files located on a PC by means of filetransfer protocol, the PC functions as the server, while the PDA functions as the client.Virtual Bluetooth COM ports can be created both for clients and servers.• Bluetooth virtual COM port for a clientVirtual COM port used when your device is the client, and requests are sent toanother device.• Bluetooth virtual COM port for a serverVirtual COM port used when your device is the server, and requests are receivedfrom another device.Creating a virtual COM portBluetooth virtual COM ports are created according to the procedure below.Procedure1. Click on the [Printers and Other Hardware] icon in the Control Panel](https://usermanual.wiki/ASUSTeK-Computer/UGPZ5.Users-Manual-6-rev/User-Guide-507427-Page-8.png)
![The [Printers and Other Hardware] window appears.2. Double-click on the [Bluetooth Local COM] iconThe main Bluetooth Local COM window will appear.Note](https://usermanual.wiki/ASUSTeK-Computer/UGPZ5.Users-Manual-6-rev/User-Guide-507427-Page-9.png)
![oEven when the Control Panel appears in Classic view, please simply clickon the [Bluetooth Local COM] icon.oNo such distinction between viewing formats exists in Windows 2000.3. Click on the [Add...] buttonThe [Bluetooth Local COM Wizard] window, from where you can create a virtual COM port, willappear.](https://usermanual.wiki/ASUSTeK-Computer/UGPZ5.Users-Manual-6-rev/User-Guide-507427-Page-10.png)
![Start from this window when creating Bluetooth virtual COM ports for either servers or clients.Creating a Bluetooth virtual COM port for a clientCreating a Bluetooth virtual COM port for a serverDeleting a virtual COM portPlease follow the procedure below to delete a virtual COM port when it is no longer needed.Note• You can only delete virtual COM ports created by the Bluetooth Local COM utility.1. Select the port you wish to delete from the [Bluetooth Local COM] window, and then clickon the [Delete] buttonA message will appear asking you to confirm that you wish to delete the port.](https://usermanual.wiki/ASUSTeK-Computer/UGPZ5.Users-Manual-6-rev/User-Guide-507427-Page-11.png)
![2. Click on the [Yes] buttonThe port will be deleted.3. Click on the [OK] button](https://usermanual.wiki/ASUSTeK-Computer/UGPZ5.Users-Manual-6-rev/User-Guide-507427-Page-12.png)
![Creating a Bluetooth virtual COM port for a clientProcedure1. From the [Bluetooth Local COM Wizard] window, select "Create aBluetooth virtual COM portforaclient",andthenclickonthe[Next]buttonThe [Bluetooth Local COM - Create COM Port for Client (1/1)] window willappear.2. Select [COM Port You Want to Create], and then click on the [Finish] button](https://usermanual.wiki/ASUSTeK-Computer/UGPZ5.Users-Manual-6-rev/User-Guide-507427-Page-13.png)
![The port you have created will now appear in the [Bluetooth Local COM]window.3. Click on the [OK] button](https://usermanual.wiki/ASUSTeK-Computer/UGPZ5.Users-Manual-6-rev/User-Guide-507427-Page-14.png)
![Creating a Bluetooth virtual COM port for a serverProcedure1. From the [Bluetooth Local COM Wizard] window, select "Create aBluetooth virtual COM port for a server", and then click on the [Next]buttonThe [Bluetooth Local COM - Create COM Port for Server (1/2)] window willappear.2. Select [COM Port You Want to Create], and then click on the [Finish] button](https://usermanual.wiki/ASUSTeK-Computer/UGPZ5.Users-Manual-6-rev/User-Guide-507427-Page-15.png)
![The [Bluetooth Local COM - Create COM Port for Server (2/2)] window willappear.3. Confirm the settings in [COM Port You Want to Create] and [ServiceProfiles], and then click on the [Finish] buttonThe port you have created will now appear in the [Bluetooth Local COM]window.](https://usermanual.wiki/ASUSTeK-Computer/UGPZ5.Users-Manual-6-rev/User-Guide-507427-Page-16.png)
![4. Click on the [OK] button](https://usermanual.wiki/ASUSTeK-Computer/UGPZ5.Users-Manual-6-rev/User-Guide-507427-Page-17.png)
![2. Double-click on the contact whose details you wish to send as a business cardThe details of the contact you selected will appear.3. Click on the [to Bluetooth] from the toolbarThe [Device List] window will appear.NoteoIf the [to Bluetooth] button does not appear on the toolbar, please refer toInstalling business card-sending functionality in Outlook as an Add-in"below and change the settings accordingly.](https://usermanual.wiki/ASUSTeK-Computer/UGPZ5.Users-Manual-6-rev/User-Guide-507427-Page-19.png)
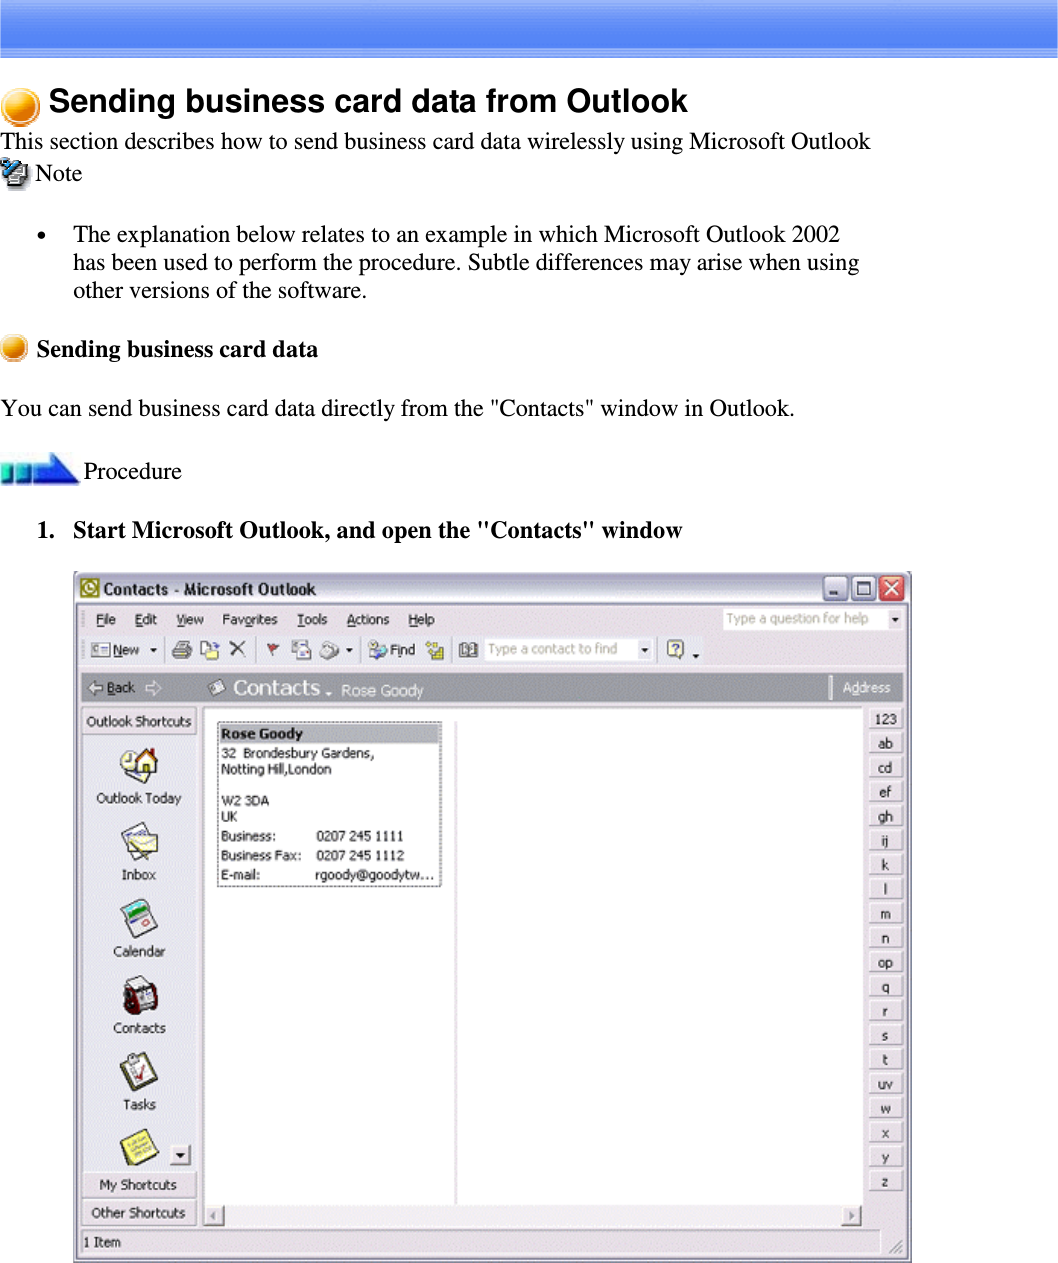
![4. Select the destination for the business card data, and then click on the [Send]buttonNoteoIf you cannot find the destination device in the list, please click on the[Searching for devices] button to discover it.The business card will be sent.If the business card has been sent successfully, the message below will appear.NoteoIf the transmission was unsuccessful, please attempt to send the data oncemore after having confirmed the operating conditions (power status,security settings, etc) of the destination device.Installing business card-sending functionality in Outlook as an Add-inYou can install one of the functions of the Bluetooth Utility in Outlook as an "Add-in",which will enable you to send business cards from the Outlook toolbar.Procedure1. Click on [Tools]-[Options...] in Outlook](https://usermanual.wiki/ASUSTeK-Computer/UGPZ5.Users-Manual-6-rev/User-Guide-507427-Page-20.png)
![The [Options] dialog box will appear.2. Select the [Other] tab, and then click on the [Advanced Options...] button inthe "General" field](https://usermanual.wiki/ASUSTeK-Computer/UGPZ5.Users-Manual-6-rev/User-Guide-507427-Page-21.png)
![The [Advanced Options] dialog box will appear3. Click on the [COM Add-Ins...] buttonThe [COM Add-Ins] dialog box will appear.](https://usermanual.wiki/ASUSTeK-Computer/UGPZ5.Users-Manual-6-rev/User-Guide-507427-Page-22.png)
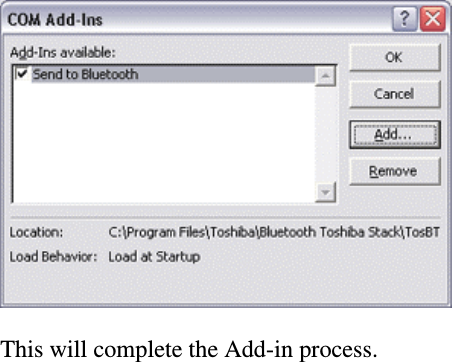
![4. Click on the [Add...] buttonThe [Add Add-In] dialog box will appear.5. Select "TosBTAddin.dll", and then click on the [OK] buttonNoteo"TosBTAddin.dll" can be found on the hard drive at the address below.C:\Program Files\Toshiba\Bluetooth Toshiba Stack6. Confirm that "Send to Bluetooth" has been added to the list and that a checkappears next to it, and then click on the [OK] button](https://usermanual.wiki/ASUSTeK-Computer/UGPZ5.Users-Manual-6-rev/User-Guide-507427-Page-23.png)
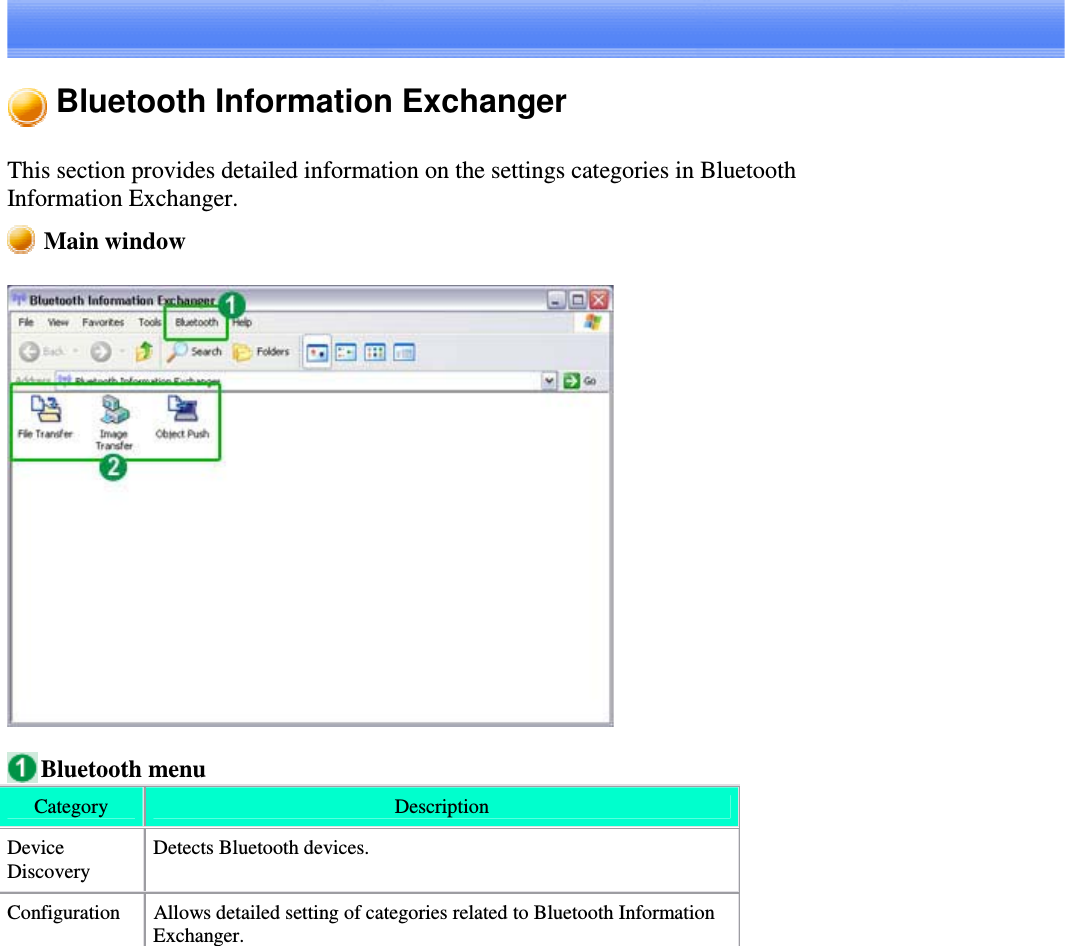
![Bluetooth SettingsThis section provides detailed information on the [Bluetooth Settings] window.Main windowMenu[Bluetooth] menuCategory DescriptionAdd NewConnectionOpens the [Add New Connection Wizard] window, and then searchesfor new devices.Connect Connects to selected device.Disconnect Disconnects from selected device.Details Displays detailed information about selected device.](https://usermanual.wiki/ASUSTeK-Computer/UGPZ5.Users-Manual-6-rev/User-Guide-507427-Page-25.png)
![Delete Deletes selected device.Createshortcut onDesktopCreates a shortcut icon for the selected device on the Desktop.Rename Changes the name of the device you have selected.Change Icon Changes the icon of the device you have selected.COM AutoConnectSettingsOpens the [COM Auto Connect Settings] window, and allows you toenable/disable Auto Connect.Displays the device connection name and port used. Check the box toenable Auto Connect, and remove the check to disable Auto Connect.You will need to connect manually to use a device in the latter case.AV playerselectionOpens [Select AV Payer] window, and allows you to select theapplication to be used when you want to play sound files or CDs](https://usermanual.wiki/ASUSTeK-Computer/UGPZ5.Users-Manual-6-rev/User-Guide-507427-Page-26.png)
![Exit Closes the [Bluetooth Settings] window.[View] menuCategory DescriptionLarge iconsSmall iconsListDetailsChanges the way icons are displayed on a device.[Help] menuCategory DescriptionHelp Opens the Bluetooth Utility User Guide.Version Displays the version information for Bluetooth Settings.](https://usermanual.wiki/ASUSTeK-Computer/UGPZ5.Users-Manual-6-rev/User-Guide-507427-Page-27.png)
![Device ListDisplays a list of devices that have been registered in [Bluetooth Settings].Function buttonsCategory DescriptionNewConnectionOpens [Add New Connection Wizard] window.Details... Shows details of selected device.Delete Deletes selected device.](https://usermanual.wiki/ASUSTeK-Computer/UGPZ5.Users-Manual-6-rev/User-Guide-507427-Page-28.png)
![Bluetooth ManagerThis section provides detailed information on the settings categories in BluetoothManager.Main menuCategory DescriptionBluetooth Settings Opens [Bluetooth Settings] window.Wireless FileTransferOpen the [Wireless File Transfer] window.Remote Camera Open the [Remote Camera] window.Add NewConnectionOpens the [Add New Connection Wizard] window.DeviceProperties&SecurityDisplays Bluetooth device information on your PC.[General] tabAllows you to confirm the name, address and other settingsdisplayed for other devices.](https://usermanual.wiki/ASUSTeK-Computer/UGPZ5.Users-Manual-6-rev/User-Guide-507427-Page-29.png)
![Note• [Device Name] is the only category able to bechanged. If you wish to change the name of adevice, enter the new name, and then click onthe [OK] or [Apply] button.• Click on the [Default] button to restore theinitial settings.[Security] tabSecurity-related (user) settings can be configured under this tab.](https://usermanual.wiki/ASUSTeK-Computer/UGPZ5.Users-Manual-6-rev/User-Guide-507427-Page-30.png)
![Note• Click on the [Default] button to restore theinitial settings.](https://usermanual.wiki/ASUSTeK-Computer/UGPZ5.Users-Manual-6-rev/User-Guide-507427-Page-31.png)
![Link LevelSecurityEnforced3)Requires Bluetoothpasskey (PIN code) to beentered on connectionwith another device.Encryption Encrypts data to betransmitted.1) Selecting Non-connectable mode will cause connectionrequests to be rejected from any device, including registered ones.Device detection will still be possible.2) Selecting Non-pairable mode will make it impossible to bondwith another device in a new connection relationship. Connectionwill be possible when a request has been received from aregistered device. Device detection will still be possible.3) Devices to which you have initially connected by entering aPIN code will not require you to do so for future connections.Connection will still be possible even if Link Level Security hasbeen selected.Power off Turns off Bluetooth(Turned off)Important• Communication using Bluetooth will be impossible onceit has been turned off. When you next wish to useBluetooth, please right-click on the Bluetooth icon in thetask tray, and then click on [Power ON].(Turnedon)Service Properties Ensures security against various kinds of access from remotedevices.Here you can enable or disable the following four typical servicesthat are accessed remotely.](https://usermanual.wiki/ASUSTeK-Computer/UGPZ5.Users-Manual-6-rev/User-Guide-507427-Page-32.png)
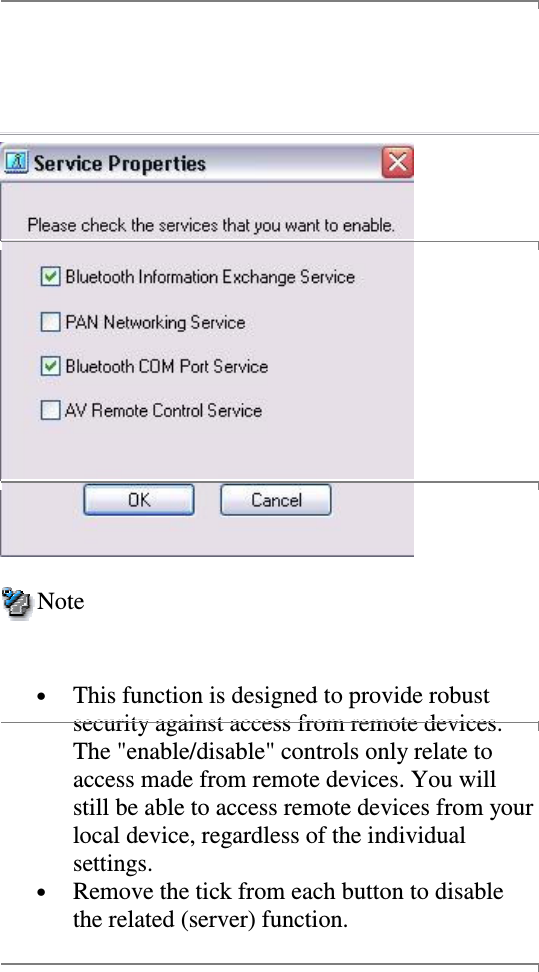
![device using the AV Remote ControlService.Help Displays the Bluetooth Utility User Guide.Exit Exits Bluetooth Manager.Important• When you exit Bluetooth Manager, Bluetoothcommunications will be disabled. When you next wish touse Bluetooth, please click on [Start][AllPrograms][Bluetooth][Bluetooth Settings] (inWindows 2000, click on[Start][Programs][Bluetooth][BluetoothSettings]).](https://usermanual.wiki/ASUSTeK-Computer/UGPZ5.Users-Manual-6-rev/User-Guide-507427-Page-34.png)
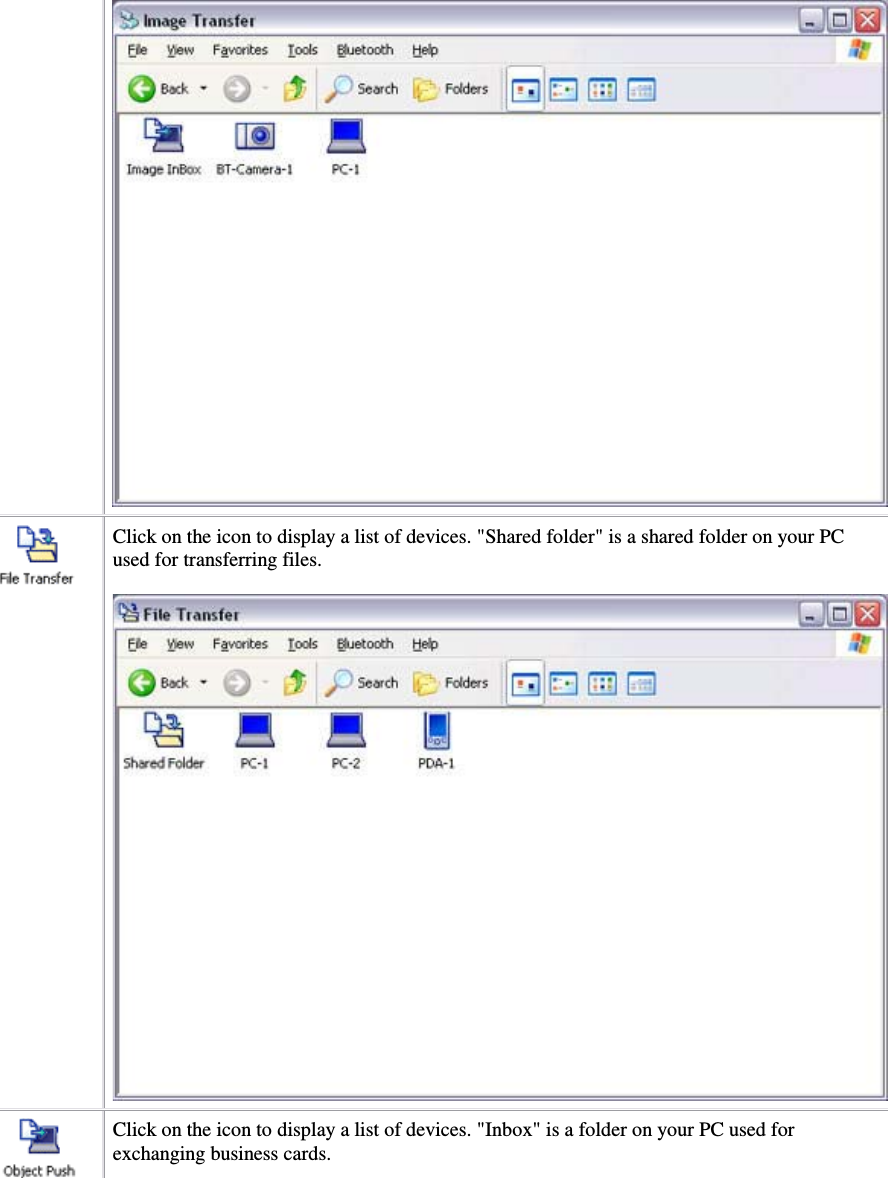
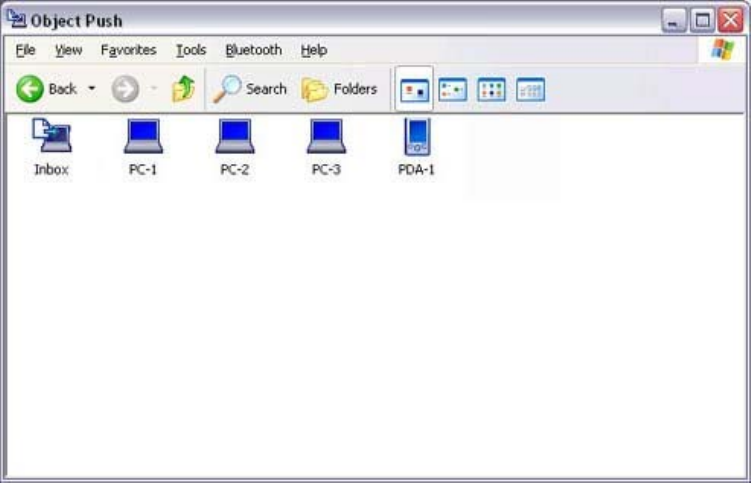
![-[General] tab-[Mode] tab-[Inbox/Business Card] tab-[Shared folder] tab-[Image box] tab-[Associate] tab-[Transfermode]tab-[Service security] tab-[Service class] tab-[Information] tab-[Version] tabHelp Displays Bluetooth Utility User Guide.Data exchange foldersThree folders are available for data exchange: "Image transfer", "File transfer" and"Object Push".Category DescriptionClick on the icon to display a list of devices. "Image box" is a folder on your PC used fortransferring images.](https://usermanual.wiki/ASUSTeK-Computer/UGPZ5.Users-Manual-6-rev/User-Guide-507427-Page-36.png)
![Bluetooth PropertiesThis section describes the settings categories for each of the tabs in the Propertieswindow.[General] tabCategory DescriptionDevice name Shows the name of your device (cannot be changed)Device type Shows the type of your device (cannot be changed)[Mode] tab](https://usermanual.wiki/ASUSTeK-Computer/UGPZ5.Users-Manual-6-rev/User-Guide-507427-Page-39.png)
![Category DescriptionDiscoverabilitymodeShows current discovery mode settings (cannot be changed)ConnectabilitymodeShows current connection mode settings (cannot be changed)Pairing mode Shows current pairing mode settings (cannot be changed)Security mode Shows current security mode settings (cannot be changed)[Inbox/Business Card] tab](https://usermanual.wiki/ASUSTeK-Computer/UGPZ5.Users-Manual-6-rev/User-Guide-507427-Page-40.png)
![Category DescriptionInbox Directory Sets the location on the hard drive of the "Inbox" folder (whereincoming business cards are saved).Click on the [Browse...] button to open the "Browse folders"window. Specify the directory where you would like the "Inbox" tobe located, and then click on the [OK] button.My Business Sets the location where you save your personal business cardbearing your name and other information.](https://usermanual.wiki/ASUSTeK-Computer/UGPZ5.Users-Manual-6-rev/User-Guide-507427-Page-41.png)
![Click on the [Browse...] button to open the "Browse folders"window. Specify the business card to be sent to a desired party, andthen click on the [OK] button.[Shared folder] tabCategory DescriptionShared Directory Sets the location on the hard drive of a shared folder used whenexchanging files with "File exchange".Click on the [Browse...] button to open the "Browse folders"window. Specify the directory where you wish the "Shared folder"to be located, and then click on the [OK] button.[Image box] tab](https://usermanual.wiki/ASUSTeK-Computer/UGPZ5.Users-Manual-6-rev/User-Guide-507427-Page-42.png)
![Category DescriptionImage InboxDirectorySets the location of the "Image Box" folder (where image data thathas been received is saved) on the hard drive.Click on the [Browse...] button to open the "Browse folders"window. Specify the directory where you wish the "Image Box" tobe located, and then click on the [OK] button.Preferred Format Converts images into a specified format for transmission.When no format has been specified, the image will be automaticallyconverted into the appropriate format of the destination device.-JPEG 160×120-JPEG 320×240-JPEG 640×480-JPEG 800×600-JPEG 1024×768[Associate] tab](https://usermanual.wiki/ASUSTeK-Computer/UGPZ5.Users-Manual-6-rev/User-Guide-507427-Page-43.png)
![Category DescriptionStart associatedapplicationSets whether to start an associated application automatically onreceipt of business card data (Microsoft Outlook, etc)."Enabled": Start associated application"Disabled": Do not start associated application[Transfer mode] tab](https://usermanual.wiki/ASUSTeK-Computer/UGPZ5.Users-Manual-6-rev/User-Guide-507427-Page-44.png)
![[Service security] tabCategory SpecificationObject push Sets business card exchange security level.Category DescriptionEnable When another device generates a request to send orreceive a business card, a message is displayed askingwhether you will allow the card to be sent or received.Note• Click on the [Browse...] button to specifywhere incoming cards are to be saved.](https://usermanual.wiki/ASUSTeK-Computer/UGPZ5.Users-Manual-6-rev/User-Guide-507427-Page-46.png)
![If you change this location, the location ofsaved cards under the [Inbox/Business Cards]tab will also be changed.Note• The security function will abort the cardexchange if you have not clicked the "Yes"button within a prescribed amount of time andwill display the message: "Failed to send(receive) card."Disable Send/receive cards without displaying any messages.File transfer Sets file transfer security level.Category DescriptionEnable When another device generates a request to send orreceive a file, a message is displayed asking whether youwill allow an FTP connection.](https://usermanual.wiki/ASUSTeK-Computer/UGPZ5.Users-Manual-6-rev/User-Guide-507427-Page-47.png)
![if you have not clicked the "OK" button within aprescribed amount of time and will display themessage: "Connecting with remote devicefailed."Disable Send/receive files without displaying any messages.Setpassword(OBEX)Selecting [Set password (OBEX authentication)] willenable you to set a password.When you have set a password, a window requesting thepassword for authentication will appear when file transferis attempted.File transfer will only proceed if your password has beenentered correctly.Show theother'spasswordentryscreenwhenconnectedThe "Show the other's password entry screen whenconnected" option becomes available when you select the"Set password (OBEX authentication)" option. If thisoption is enabled, a password-basis authentication screenappears when you receive a connection request fromother devices and you need to enter a password used to letthe other device perform the OBEX authenticationpassword checking. If this option is disabled, nopassward-basis authentication screen appears and thepassword that you set in "Set password (OBEXauthentication)" is automatically used.Note• You do not need to enable this option forconnection between Bluetooth Utilities.ImagetransferSets image transfer security level.Category Description](https://usermanual.wiki/ASUSTeK-Computer/UGPZ5.Users-Manual-6-rev/User-Guide-507427-Page-48.png)
![Note• Click on the [Browse...] button to specify whereincoming images are to be saved.If you change this location, you should alsosimilarly change the Image Box settings underthe [Image Box] tab.Disable Receive images without displaying any messages.[Service class] tab](https://usermanual.wiki/ASUSTeK-Computer/UGPZ5.Users-Manual-6-rev/User-Guide-507427-Page-49.png)
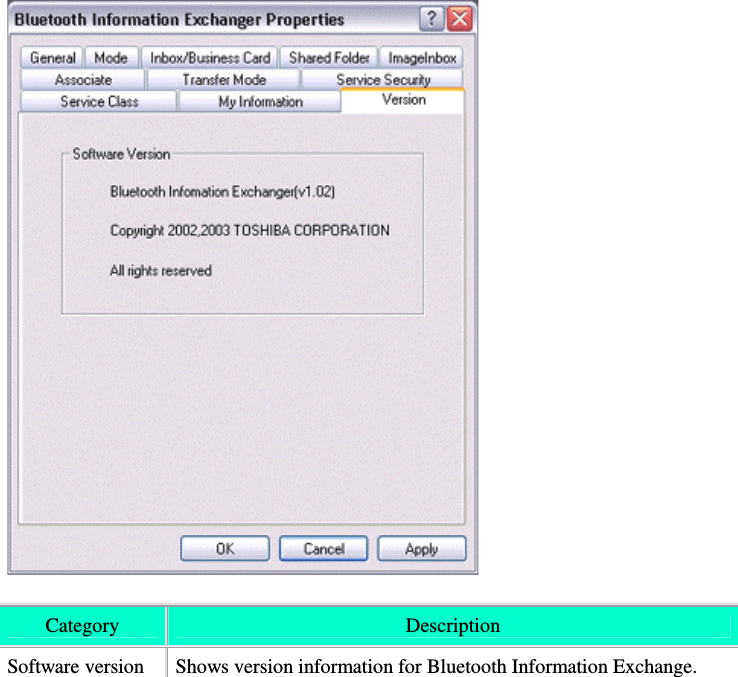
![Category DescriptionSelect enable ordisableSets whether to determine the service class when a device search isperformed."Enable": Determine service class"Disable": Do not determine service class[Information] tabCategory DescriptionDevice nameDevice addressHCI versionLMP versionShows information pertaining to your devices (cannot be changed)[Version] tab](https://usermanual.wiki/ASUSTeK-Computer/UGPZ5.Users-Manual-6-rev/User-Guide-507427-Page-50.png)
![Remote CameraThis section provides detailed information on the settings categories in Remote Camera.Main windowMenu[Bluetooth] menuCategory DescriptionDevice Search Searches for remote cameras.Properties [Filter for Search Devices]The program may discover devices other than digital cameras,depending on which profiles are supported by those devices](https://usermanual.wiki/ASUSTeK-Computer/UGPZ5.Users-Manual-6-rev/User-Guide-507427-Page-52.png)
![Adjusting the setting to "Loose filtering" will increase the likelihoodthat devices other than those intended will be detected.The further you slide the setting towards "Tight filtering", the stricterwill be the criteria determining device detection, and the lower thelikelihood will be that irrelevant devices will be included.Please adjust the filtration level according to the results of the search.[Multi Shot]Allows you to set the number of consecutive images captured by yourdigital camera in the dialog box below (between 2 and 16 inclusive).[Pixel Size]Images will be sent to your PC after having been automaticallyconverted to the size specified in the dialog box below, regardless ofthe size of the original image data.[Inbox settings]Opens the "Browse folders..." dialog box and allows you to select thefolder where you would like your captured images to be saved.](https://usermanual.wiki/ASUSTeK-Computer/UGPZ5.Users-Manual-6-rev/User-Guide-507427-Page-53.png)
![Exit Exits Remote Camera.[Help] menuCategory DescriptionImage monitorversioninformationDisplays version information for the image monitor.List of camerasA list of cameras that have been registered as remote cameras will be displayed.[Camera Search...] buttonClicking on this button will execute a search for remote cameras.Display imagesImages transferred to the PC from a remote camera will be displayed.[Explorer...] buttonClicking on this button will display the folders on the hard drive where images that havebeen transferred to the PC have been stored.](https://usermanual.wiki/ASUSTeK-Computer/UGPZ5.Users-Manual-6-rev/User-Guide-507427-Page-54.png)

![Camera imagesImages as seen through the lens of your remote camera will be displayed.Display magnificationThe size of the operating window display can be adjusted from 100% (1x) to 300% (3x).Important• Increasing the size of the operating window will impede its ability to display images, and willhave an adverse effect on other processes being performed by your PC. Please adjust themagnification as appropriate for your intended use.[Explorer...] buttonClicking on this button will display the folders on the hard drive where images that havebeen transferred to the PC have been stored.](https://usermanual.wiki/ASUSTeK-Computer/UGPZ5.Users-Manual-6-rev/User-Guide-507427-Page-56.png)
![Shutter button (consecutive images)Clicking this button will cause the camera to take the number of images specified in[Consecutive image settings] under the [Bluetooth] menu and then send those images toyour PC.Shutter button (single images)Clicking this button will cause the camera to take one picture and then send the image toyour PC.](https://usermanual.wiki/ASUSTeK-Computer/UGPZ5.Users-Manual-6-rev/User-Guide-507427-Page-57.png)
![Bluetooth Local COMThis section provides detailed information on the settings categories in Bluetooth LocalCOM.Main windowPortDisplays a list of configured ports.DescriptionDisplays the function of each port.Ports displayed as "Toshiba BT Port (COMxx)" are TOSHIBA Bluetooth virtual COMports.OwnerDisplays the application used to create those COM ports.The following information will appear for ports created by Bluetooth Local COM.COM port for client Local COM - ClientCOM port for server Local COM - Server [(name of service supplied by port)]](https://usermanual.wiki/ASUSTeK-Computer/UGPZ5.Users-Manual-6-rev/User-Guide-507427-Page-58.png)
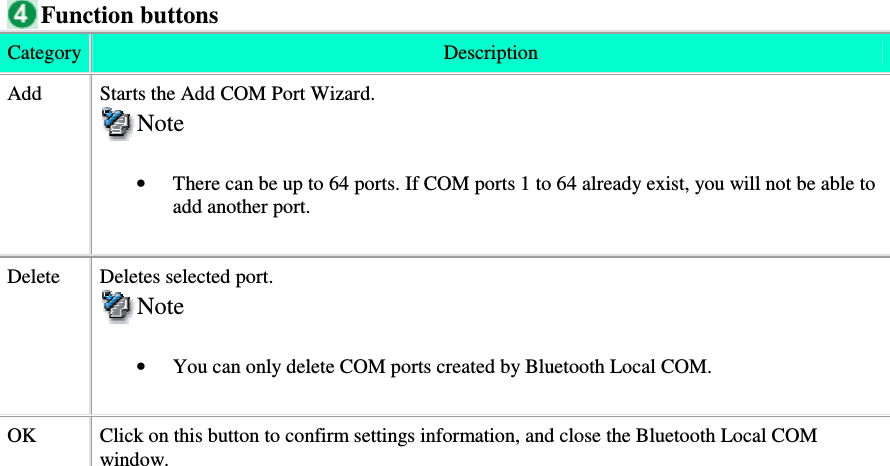
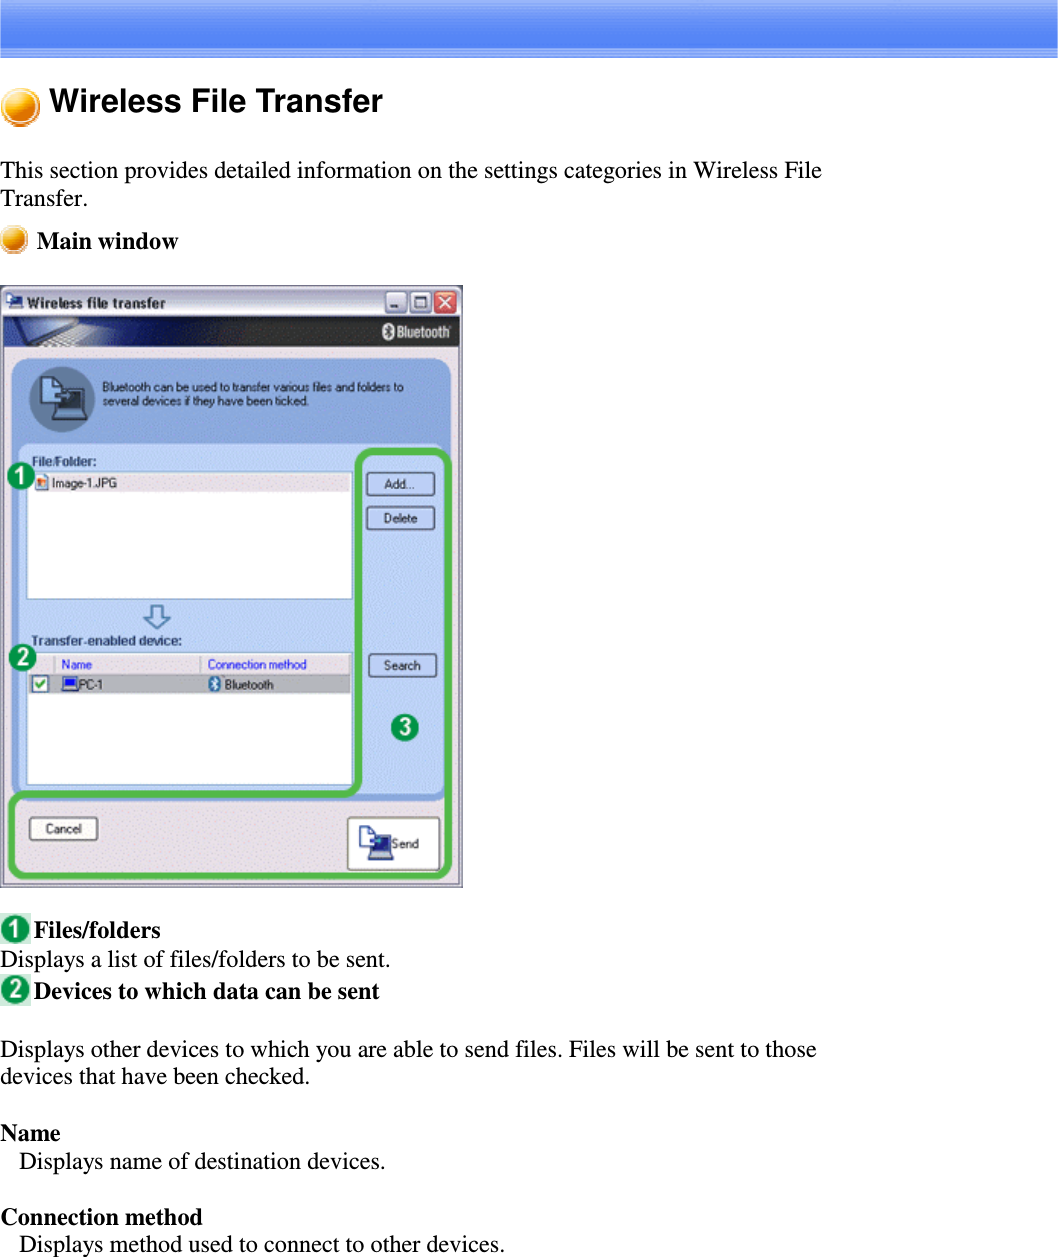
![Note• Ifadevicetowhichyouwouldliketosenddataisnotlisted,youcanclickonthe[Search] button to search for other devices.Function buttonsCategory DescriptionAdd Displays the window below, from where you can add files and/or folders youwould like to send.Delete By selecting a file from the list and clicking on the "Delete" button, you canremove that file (i.e., the file will not be sent).Search Searches for Bluetooth devices.Cancel Closes the "Wireless File Transfer" window.Send Sends a file.](https://usermanual.wiki/ASUSTeK-Computer/UGPZ5.Users-Manual-6-rev/User-Guide-507427-Page-61.png)
![General operation of the Bluetooth UtilityImportant• Please refer to "What you need to know about using Bluetooth"foranunderstanding of the basic concepts to be aware of when using Bluetooth.Bluetooth ManagerBluetooth icon does not appear in task tray• If the Bluetooth icon does not appear in the task tray, Bluetooth Manager will notbe active, which will prevent you from being able to use any of the functions ofthe Bluetooth Utility.Start the utilities as instructed below to enable Bluetooth Manager to startautomatically and allow all functions to be utilized.Bluetooth Settings(from Windows XP)[Start] > [All Programs] > [Bluetooth] > [Bluetooth Settings](from Windows 2000)[Start] > [Programs] > [Bluetooth] > [Bluetooth Settings]Remote Camera(from Windows XP)[Start] > [All Programs] > [Bluetooth] > [Remote Camera](from Windows 2000)[Start] > [Programs] > [Bluetooth] > [Remote Camera]Wireless File Transfer(from Windows XP)[Start] > [All Programs] > [Bluetooth] > [Wireless File Transfer](from Windows 2000)[Start] > [Programs] > [Bluetooth] > [Wireless File Transfer]Bluetooth SettingsClicking on the [New Connection] button brings up the message "Unable to prepare Bluetooth."• The wireless communication switch is turned off.Please switch it on.](https://usermanual.wiki/ASUSTeK-Computer/UGPZ5.Users-Manual-6-rev/User-Guide-507427-Page-63.png)
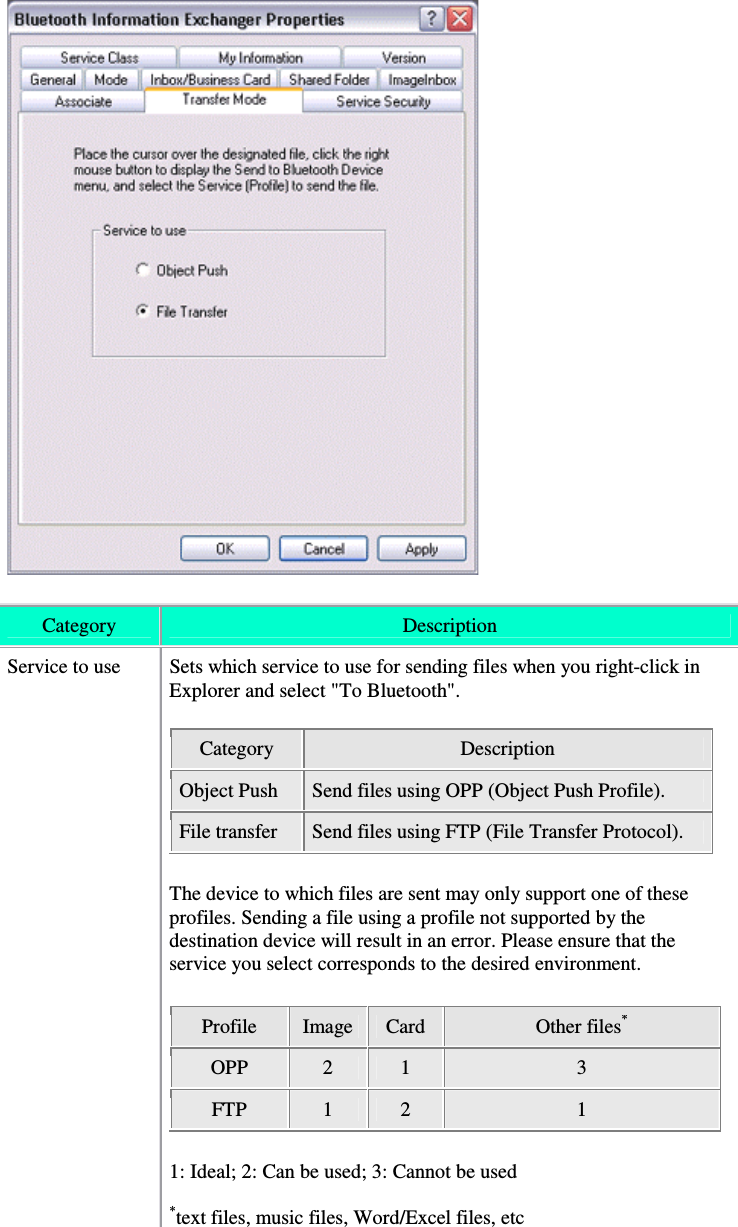
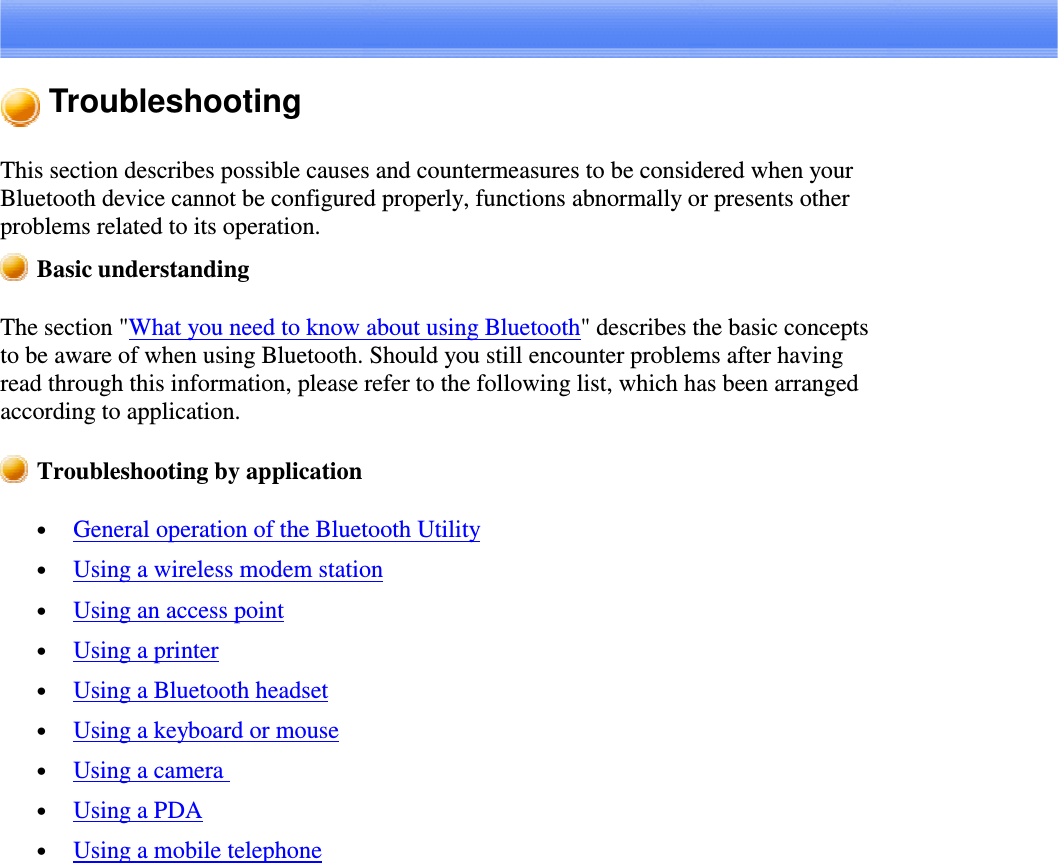
![Remote device(s) cannot be detected• The other device(s) may have been set to Non-discoverable mode.Please check the mode settings on the device.Services on a remote device are undiscoverable• The other device may be using a profile that is not supported by the BluetoothUtilityPlease check the profile being used on the other device.• The following profiles are compatible with Bluetooth Settings.DUN, FAX, LAP, SPP, HID, HCRP, FTP, OPP, HSP, PAN andBIPDevices running profiles other than those above will not be able to be registeredwith Bluetooth Settings.Bluetooth Information ExchangerAn error occurs when you try to send a file using the right-click menu.• Select and right-click on a file, and then you can choose either the FTP or OPPprofile to use when you click on [Send to Bluetooth Device].If neither profile is supported by the destination device, the file will not be able tobe sent from the right-click menu.The transmission will also fail if you use FTP to send a file to a device that onlysupports the OPP profile.Should this occur, please click on [Bluetooth][Profiles] under [BluetoothInformation Exchanger] to configure the Transfer mode.Cannot open shared folder on remote device using [File Transfer].• The other device may have a certain security level enforced (Non-connectablemode etc). Please confirm the security settings of the other device.Please enter the correct password if you are asked to enter one.Remote Camera• See "Using a camera"](https://usermanual.wiki/ASUSTeK-Computer/UGPZ5.Users-Manual-6-rev/User-Guide-507427-Page-64.png)

![Using a wireless modem stationImportant• Please refer to "What you need to know about using Bluetooth"foranunderstanding of the basic concepts to be aware of when using Bluetooth.Modem station cannot be detected• If the modem station is connected to and is being used by another device, themodem station will be undetectable even if you search for it.Cannot connect to modem station• If the modem station is connected to and is being used by another device, no otherdevice will be able to connect to the modem station.Bluetooth passkey entry failed• The Bluetooth passkey (PIN code) comprises a sequence of alphanumericcharacters, with the letters able to be rendered in upper and lower case.If [Caps Lock] is on, the Bluetooth passkey may not be able to be enteredcorrectly.Cannot connect to telephone line• Please ensure that the telephone cable is connected from the socket to the "LINE"terminal on the modem station.NoteoIf the telephone cable has come loose because it has not been fullyinserted into the socket, the resulting poor contact may prevent data frombeing transmitted accurately.oCommunication will be impossible if the interior of the cable has beenbroken. Please replace the cable with another one.• Please ensure that the two slide switches on the underside of the main unit havebeen set to the "NORMAL" and "MODEM" positions respectively.](https://usermanual.wiki/ASUSTeK-Computer/UGPZ5.Users-Manual-6-rev/User-Guide-507427-Page-66.png)
![Cannot connect to the Internet• The telephone number of the connection (i.e., the telephone number for the accesspoint of your Internet service provider) may not be correct. Please check thetelephone number.• The user ID and/or password for the provider with whom you have signed up mayhave been entered incorrectly. Please check the user ID and password.• The default connection may have been configured with different settings. Pleaseset the connection configured for mobile telephone use as the default connection.• When you place a call using a company switchboard or other exchange, thesystem may require you to enter a "0" before the telephone number itself. Pleasecheck the type of telephone line you are using.Cannot send or receive faxes• Once you have registered a wireless modem station as your fax server, you willneed to enter the fax settings from the [Printer and Faxes] window in the ControlPanel.Please refer to "Using a modem station for fax transmissions" for information onthe configuration procedure.• The telephone number of the fax destination may have been entered incorrectly.Please check the telephone number.• If the setting under COM Auto Connect Settings hasbeensetto"Off",aconnection will not automatically be established with the modem. Please connectto the modem manually.• When you place a call using a company switchboard or other exchange, thesystem may require you to enter a "0" before the telephone number itself. Pleasecheck the type of telephone line you are using.• The fax service may not have been enabled for sending (or receiving).Please check the settings by following the procedure below.1. Open [Printers and Faxes] from the Control Panel, right-click on the[Fax] icon, and then click on [Properties]](https://usermanual.wiki/ASUSTeK-Computer/UGPZ5.Users-Manual-6-rev/User-Guide-507427-Page-67.png)
![The [Fax properties] window will appear.2. Select the [Device] tab, right-click on the modem you wish to use, andthen click on [Properties]3. Select the [Send] tab, and then confirm that "Enable device to send"has been checked.](https://usermanual.wiki/ASUSTeK-Computer/UGPZ5.Users-Manual-6-rev/User-Guide-507427-Page-68.png)
![4. Select the [Receive] tab, and then confirm that "Enable device toreceive" has been checked (when you wish to receive faxes)](https://usermanual.wiki/ASUSTeK-Computer/UGPZ5.Users-Manual-6-rev/User-Guide-507427-Page-69.png)
![5. Click on the [OK] button](https://usermanual.wiki/ASUSTeK-Computer/UGPZ5.Users-Manual-6-rev/User-Guide-507427-Page-70.png)


![Cannot send or receive faxes• Once you have registered a mobile telephone as your fax server, you will need toenter the fax settings from the [Printer and Faxes] window in the Control Panel.Please refer to "Using a modem station for fax transmissions" for information onthe configuration procedure.• The telephone number of the fax destination may have been entered incorrectly.Please check the telephone number.• If the setting under COM Auto Connect Settings hasbeensetto"Off",aconnection will not automatically be established with the modem. Please connectto the mobile telephone manually.• The fax service may not have been enabled for sending (or receiving).Please check the settings by following the procedure below.1. Open [Printers and Faxes] from the Control Panel, right-click on the[Fax] icon, and then click on [Properties]The [Fax properties] window will appear.2. Select the [Device] tab, right-click on the modem you wish to use, andthen click on [Properties]](https://usermanual.wiki/ASUSTeK-Computer/UGPZ5.Users-Manual-6-rev/User-Guide-507427-Page-78.png)
![3. Select the [Send] tab, and then confirm that "Enable device to send"has been checked.](https://usermanual.wiki/ASUSTeK-Computer/UGPZ5.Users-Manual-6-rev/User-Guide-507427-Page-79.png)
![4. Select the [Receive] tab, and then confirm that "Enable device toreceive" has been checked when you wish to receive faxes)5. Click on the [OK] button](https://usermanual.wiki/ASUSTeK-Computer/UGPZ5.Users-Manual-6-rev/User-Guide-507427-Page-80.png)