ASUSTeK Computer UGPZ5 Bluetooth Module User Manual UserMan MSQUGPZ5
ASUSTeK Computer Inc Bluetooth Module UserMan MSQUGPZ5
UserManual.wiki
>
ASUSTeK Computer
>
UGPZ5 User Manual
>
Users Manual 5
Contents
1.
Users Manual 6 rev
2.
Users Manual 1
3.
Users Manual 2
4.
Users Manual 3
5.
Users Manual 4
6.
Users Manual 5
Users Manual 5
Navigation menu
Upload a User Manual
Namespaces
Wiki Guide
HTML
PDF
Info
Views
User Manual
Discussion / Help
Navigation
![Once the device search has been completed, the [Add New Connection Wizard(Select a Device)] screen will appear.4. Select the name of the headset device from the list, then click on the [Next]button5. Answering with the headsetIf the service has been properly detected, a screen will appear indicating that theheadset is being called, and a tone will accordingly sound in the headset.](https://usermanual.wiki/ASUSTeK-Computer/UGPZ5.Users-Manual-5/User-Guide-507449-Page-1.png)
![Please press the headset switch.ImportantoThe procedure for operating the headset may differ depending on themanufacturer and model.Please consult your user guide for a detailed description of how to operatethe unit.The [Add New Connection Wizard (Configuring (Connecting to Voice Circuit))]screen will appear, and device configuration will be performed.NoteoIf you are connecting to the headset for the first time, or if anotherBluetooth audio device has not yet been registered, the following [FoundNew Hardware Wizard] screen will appear, from which you can proceedto install the driver.If another audio device has already been registered (i.e., the driver hasbeen installed), you can proceed to Step 9 without having to install thedriver.6. Click on the [Next] button](https://usermanual.wiki/ASUSTeK-Computer/UGPZ5.Users-Manual-5/User-Guide-507449-Page-2.png)
![The [Install Hardware] screen will appear.7. Click on the [Continue Anyway] buttonThe following screen will appear automatically. You may disregard it and clickon the [Continue Anyway] button.The [Add New Connection Wizard (Completing the Found New HardwareWizard)] screen, which is the final screen of the installation wizard, will appear.8. Click on the [Finish] button](https://usermanual.wiki/ASUSTeK-Computer/UGPZ5.Users-Manual-5/User-Guide-507449-Page-3.png)
![Once driver installation is complete, the [Add New Connection Wizard (EnterConnection Name)] will appear.9. Confirm the information you have entered, and click on the [Next] buttonThe [Add New Connection Wizard (Completing the Add New ConnectionWizard)] screen will appear.10. Click on the [Finish] buttonThe configuration information will be registered, and an icon will be displayed in](https://usermanual.wiki/ASUSTeK-Computer/UGPZ5.Users-Manual-5/User-Guide-507449-Page-4.png)
![the [Bluetooth Settings] screen.Making a connection to the headsetYou can make a connection to the headset from an icon that has been registered in[Bluetooth Settings].Important• Before making a connection to the headset, please check that you have turned onthe headset's power, and that it has been enabled for a Bluetooth connection.Please ensure that the following audio-related applications have been closedbefore you connect the headset to your PC.oWindows Media Player, BeatJam, InterVideo WinDVD and othermusic/audio playback softwareoWindows Messenger and other e-conferencing softwareIf you wish to use these applications, please terminate the headset connectionbefore you launch them.Procedure1. Right-clickontheheadseticon,thenclickon[Connect].](https://usermanual.wiki/ASUSTeK-Computer/UGPZ5.Users-Manual-5/User-Guide-507449-Page-5.png)
![2. Answer with the headsetA screen will appear indicating that the headset is being called, and a tone willaccordingly sound in the headset.Please press the headset switch.If the connection has been properly established, the icon's appearance will changeto indicate a connected state.You may now launch conferencing and voice-recognition software and use theheadset.Disconnecting from the headsetPlease follow the steps below to disconnect from the headset.Procedure1. Right-click on the headset icon in the [Bluetooth Settings] screen, then clickon [Disconnect].](https://usermanual.wiki/ASUSTeK-Computer/UGPZ5.Users-Manual-5/User-Guide-507449-Page-6.png)
![A message will appear, requesting confirmation that you wish to disconnect.Click on the [Yes] button.The icon on the [Bluetooth Settings] screen will appear as shown below,indicating that the device has been disconnected.](https://usermanual.wiki/ASUSTeK-Computer/UGPZ5.Users-Manual-5/User-Guide-507449-Page-7.png)
![Synchronising information using ActiveSync [SPP]This section describes how to synchronize information on your PDA (calendars, contacts,inboxes etc) with your PC using Microsoft ActiveSync.When you connect via Bluetooth instead of with a standard cable, you will always be ableto synchronise your data without the hassle of having to connect the cable.Connecting using ActiveSyncEstablishing a partnership between ActiveSync and a PDAFinishing an ActiveSync connectionCancelling a partnershipImportant• Please use ActiveSync v.3.7 or higher. Also please establish a partnershipbetween the devices using a USB or infrared link before you connect viaBluetooth.• Please refer to the ActiveSync Help or other manuals for information on how touse the application.• Microsoft Outlook 2002 or another schedule management tool must also beinstalled on the PC.Connecting using ActiveSyncBoth the PC and PDA must be set up in order for a connection to be established.Preparing the PCProcedure1. On the PC, click on [Start][All Programs][Microsoft ActiveSync]The initial ActiveSync set-up window will appear.It is assumed in the explanation below that no ActiveSync connections have beenestablished with other devices.](https://usermanual.wiki/ASUSTeK-Computer/UGPZ5.Users-Manual-5/User-Guide-507449-Page-8.png)
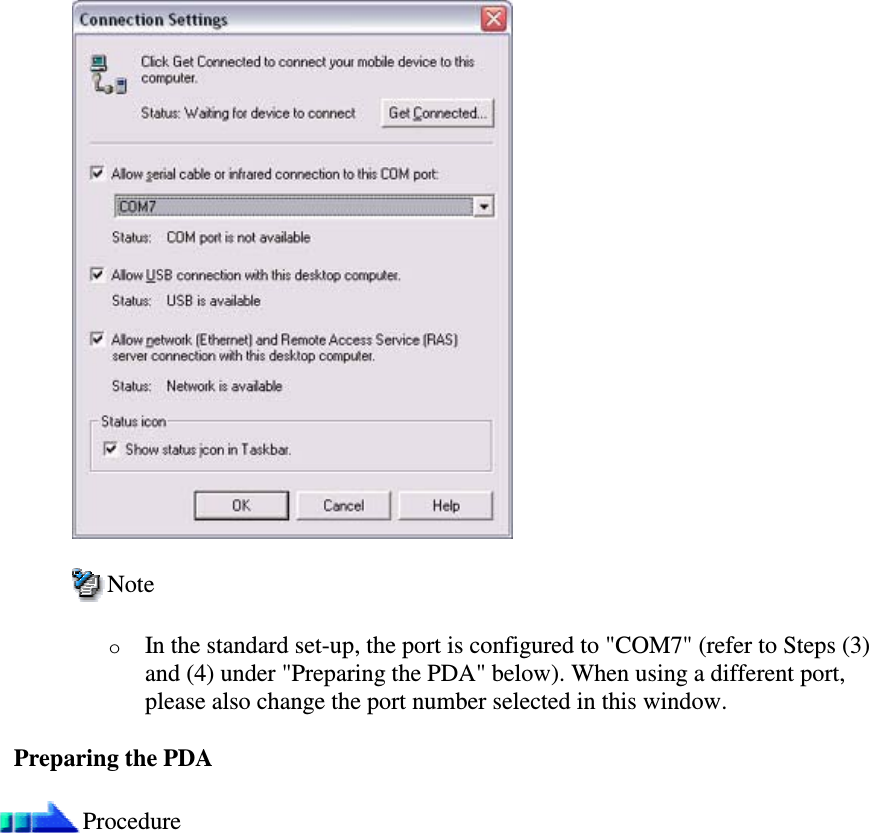
![2. Click [File][Connection Settings]The [Connection Settings] window will appear.3. Place a check next to [Allow serial cable or infrared connection to this COMport], and then select "COM7".](https://usermanual.wiki/ASUSTeK-Computer/UGPZ5.Users-Manual-5/User-Guide-507449-Page-9.png)
![1. Tap on the Bluetooth icon in the bottom right of the screenImportantoThe graphic above shows an example of a PDA operating window.The connection procedure may be different depending on themanufacturer or model of PDA you use. Please refer to the productinstruction manuals for further details.The [Bluetooth Settings] window will open.The message "Connection not registered" will appear if no Bluetooth device hasbeen registered.Please tap on [OK] to close the message.](https://usermanual.wiki/ASUSTeK-Computer/UGPZ5.Users-Manual-5/User-Guide-507449-Page-11.png)
![2. Double click on [Tools][Search for peripheral components]The application searches for nearby Bluetooth devices.3. Tap and hold on the destination PC icon, and then select [Update Services]A search for services will be carried out, and then a list of service names and theirconnection status will appear as list in the lower window.](https://usermanual.wiki/ASUSTeK-Computer/UGPZ5.Users-Manual-5/User-Guide-507449-Page-12.png)
![4. Tap and hold on "COM7" from the list of service names, and then select"Register ActiveSync".5. Tap [OK] in the confirmation message window](https://usermanual.wiki/ASUSTeK-Computer/UGPZ5.Users-Manual-5/User-Guide-507449-Page-13.png)
![An ActiveSync connection will be initiated.Establishing a partnership between ActiveSync and a PDAOnce a connection has been successfully established with a PDA, the procedure forestablishing a partnership with the PDA will be started by the ActiveSync application onthe PC.Performing this set-up procedure will enable data to be synchronised between your PCand PDA.Procedure1. In the [New Partnership (Set Up a Partnership)] window, select "Standardpartnership", and then click on the [Next] button](https://usermanual.wiki/ASUSTeK-Computer/UGPZ5.Users-Manual-5/User-Guide-507449-Page-14.png)
![The [New Partnership (Specify Data Synchronisation Method)] window willappear.2. Select "Synchronise with this PC", and then click on the [Next] buttonThe [New Partnership (Select Synchronisation Settings)] window will appear.3. Select the type of information to be synchronised between your PC and PDA,andthenclickonthe[Next]button](https://usermanual.wiki/ASUSTeK-Computer/UGPZ5.Users-Manual-5/User-Guide-507449-Page-15.png)
![The [New Partnership (Completing Setup)] window will appear.4. Click on the [Finish] buttonWhen you click on the [Finish] button, ActiveSync will begin to synchronise yourinformation.[Confirming changes]](https://usermanual.wiki/ASUSTeK-Computer/UGPZ5.Users-Manual-5/User-Guide-507449-Page-16.png)
![(Synchronisation process)[Synchronisation complete]While the ActiveSync connection is active, synchronisation will be performedwhenever information is changed on either the PC or the PDA.Once a partnership has been established, every time you start your PC (and PDA)thereafter, a Bluetooth connection will be opened and ActiveSync willsynchronise your information.Finishing an ActiveSync connection](https://usermanual.wiki/ASUSTeK-Computer/UGPZ5.Users-Manual-5/User-Guide-507449-Page-17.png)
![Follow the procedure below on your PDA if you want to end an ActiveSync connectionmanually.Procedure1. Tap and hold on "COM7" in the Bluetooth Settings window, and select[ActiveSync Release]Cancelling a partnershipFollow the procedure below from the ActiveSync window on the PC if you want tocancel the partnership between your PC and PDA.Procedure1. Click on [File]"Delete partnership"](https://usermanual.wiki/ASUSTeK-Computer/UGPZ5.Users-Manual-5/User-Guide-507449-Page-18.png)
![Click on the [Yes] button when the confirmation message appears.NoteoIf you wish to create another ActiveSync connection, you will have torepeat the above procedure to re-establish a partnership.](https://usermanual.wiki/ASUSTeK-Computer/UGPZ5.Users-Manual-5/User-Guide-507449-Page-19.png)
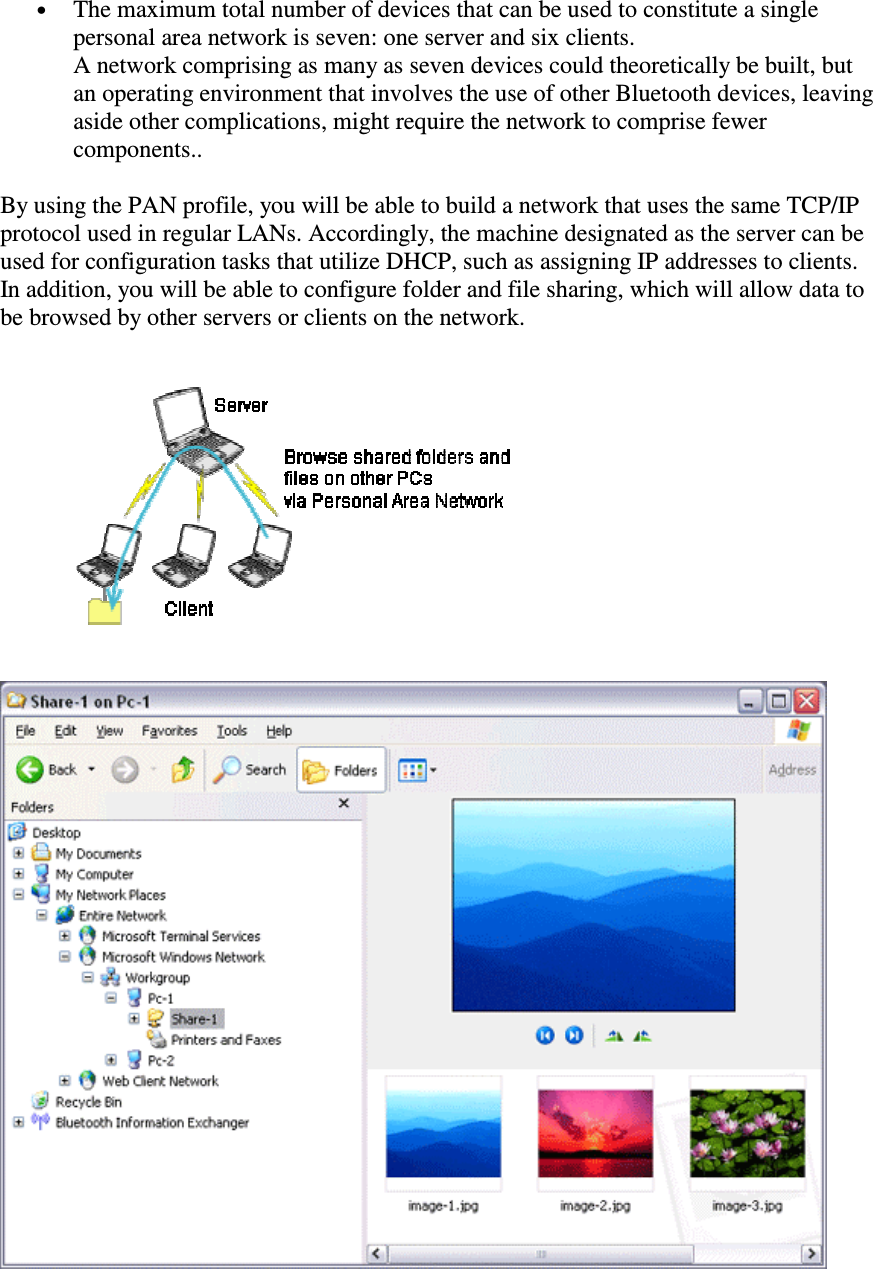
![Building a personal area network [PAN]You can use the PAN profile to build a network of Bluetooth-enabled devices.Operating as a serverOperating as a clientA personal area network comprises a client-server architecture. The device to which otherdevices connect is called the "server", and a device that connects to the server is called a"client."The client-server relationship is not necessarily a fixed one. The first of two devices toestablish a connection can be the server when one other device is present, and can be theclient in other instances.Note](https://usermanual.wiki/ASUSTeK-Computer/UGPZ5.Users-Manual-5/User-Guide-507449-Page-20.png)
![Important• Please refer to Windows Help for further information on TCP/IP, DHCP andconfigurations for sharing.Operating as a serverThe following icon will appear in the tasktray when the PAN server function has beenactivated.Should the icon not appear, please follow the procedure below to activate the PAN serverfunction.1. Right-clicktheBluetoothiconinthetask tray and make sure the Option [UsePAN Group Ad-hoc Network] is enabled.A message will appear asking you to confirm whether you wish to activate thePAN group ad-hoc network.2. Click the [Yes] buttonThe PAN server will be activated, and an icon will accordingly appear in thetasktray. Other devices that use the PAN profile will now be able to connect overthe network.Important• When using the device as the server, make sure that all user accounts have apassword set for the security reasons.By clicking on the icon, the [Bluetooth PAN Server] window will appear.In the graphic below, one client has established a connection.](https://usermanual.wiki/ASUSTeK-Computer/UGPZ5.Users-Manual-5/User-Guide-507449-Page-22.png)
![Note• When you try to connect to another server as a client, the task tray icon willdisappear, and your machine will not be able to function as a server in response toconnection requests originating from other devices.Operating as a clientConnecting to a server as a client is performed from the [Bluetooth Settings] window, asdescribed below.Procedure1. Right-clickontheBluetoothiconinthetasktray,andclickon[AddNewConnection]NoteoAlternatively, click on [Start][All Programs][Bluetooth][BluetoothSettings], and then on [New Connection] from the [Bluetooth Settings]window.2. Confirm that [Express Mode] has been selected, and then click on the [Next]button](https://usermanual.wiki/ASUSTeK-Computer/UGPZ5.Users-Manual-5/User-Guide-507449-Page-23.png)
![3. Click on the [Next] button in the advisory dialog boxThe [Add New Connection Wizard (Searching for Bluetooth devices)] windowwill appear.Once the program has finished searching for the devices, the [Add NewConnection Wizard (Device Selection)] window will appear.4. Select the name of the device designated as the server from [Device List], andthen click on the [Next] button](https://usermanual.wiki/ASUSTeK-Computer/UGPZ5.Users-Manual-5/User-Guide-507449-Page-24.png)
![The [Add New Connection Wizard (Searching for Services)] window will appear.The [Add New Connection Wizard (Confirm Connection Name)] window willappear.5. Click on the [Next] button](https://usermanual.wiki/ASUSTeK-Computer/UGPZ5.Users-Manual-5/User-Guide-507449-Page-25.png)
![The registered icon will appear in the [Bluetooth Settings] window.Connecting to a serverProcedure1. Right-clickontheiconinthe[BluetoothSettings]window,andthenclickon[Connect]](https://usermanual.wiki/ASUSTeK-Computer/UGPZ5.Users-Manual-5/User-Guide-507449-Page-26.png)
![Once you have connected, the icon will change to indicate that the device isconnected.Ending a connection to a serverProcedure1. Right-clickontheiconinthe[BluetoothSettings]window,andthenclickon[Disconnect]](https://usermanual.wiki/ASUSTeK-Computer/UGPZ5.Users-Manual-5/User-Guide-507449-Page-27.png)
![A message confirming whether you wish to disconnect will appear. Click on the[Yes] button.Once you have disconnected, the icon will change to indicate that the device isnot connected.](https://usermanual.wiki/ASUSTeK-Computer/UGPZ5.Users-Manual-5/User-Guide-507449-Page-28.png)
![Making a device undiscoverable to other usersFor security purposes, you may not wish your device to be detected by other Bluetoothusers. The procedure for accomplishing this is provided below.Procedure1. Right-clickontheBluetoothiconinthetasktray,andclickon[DeviceProperties & Security]The [Device Properties] window will appear.2. Select [Non-discoverable mode] in [Discoverability mode] under the[Security] tab, and then click on the [OK] button](https://usermanual.wiki/ASUSTeK-Computer/UGPZ5.Users-Manual-5/User-Guide-507449-Page-30.png)